

Page 1

Firefly 2 & 4
Channel Media
Player
Version 3.2
User Manual
Page 2

Trademarks
The Visual Circuits and Firefly logos are registered trademarks in the
United States and other countries. All other products, services or
company names mentioned herein are claimed as trademarks and trade
names by their respective companies.
© Visual Circuits, 1999-2003. All rights reserved.
No portion of this manual may be copied by any means without the prior
consent of Visual Circuits.
Visual Circuits Corporation
5155 East River Road, Suite 401
Minneapol is, MN 55 421 USA
http://www.visualcircuits.com
Visual Circuits Publication Number: 813-0050b
All specifications, notices and warnings are subject to change without
notice.
Page 3

Firefly Safety Requirements
IMPORTANT SAFETY INSTRUCTIONS:
The following safety instructions apply to Visual Circuits
Corporation Firefly:
1. Read and follow all warning notices and instructions marked on the
product or included in this manual. Opening or removing covers and/
or components may expose you to dangerous high voltage points or
other risks. Qualified personnel should perform all servicing.
2. The maximum ambient temperature for the Firefly is 114 degrees
Fahrenheit (45 degrees Celsius). Care should be given to allow
sufficient air circulation or space between units when Firefly is
installed in a closed or multi-unit rack assembly because the
operating ambient temperature of the rack environment must be
greater than room ambient temperature.
3. Slots and openings in the cabinet (chassis) are provided for
ventilation. To ensure reliable operation of the product and to protect
it from overheating, maintain a minimum of 1-inch (2.5-cm)
clearance on the top and sides.
4. Installation of the Firefly in a rack without sufficient airflow can be
unsafe.
5. If installed in a rack, the rack should safely support the combined
weight of all equipment it supports. A fully loaded Firefly weighs 12
pounds (4.6 kg).
6. The connections and equipment of the Firefly should be capable of
operating safely with the maximum power requirements of the
Firefly. In the event of a power overload, the supply circuits and
supply wiring should not become hazardous.
7. Models with AC power inputs are intended to be used with the threewire grounding type plug (a plug that has a grounding pin). This is a
safety feature. Equipment grounding is vital to ensure safe operation.
Do not defeat the purpose of grounding type plugs by modifying the
plug or using an adapter.
8. If a three-wire grounding type power source is not available, consult
a qualified electrician to determine another method of grounding the
equipment.
9. Install only in restricted areas in accordance with Articles 110-16,
100-17 and 110-18 of the National Electrical Code, ANSI/NFPA 70.
Page 4

10. Do not allow anything to rest on the power cord and do not locate the
product where persons will walk on or come in contact with the
power cord.
POWER AND GROUND REQ UIREMENTS:
Determine that the cumulative power requirements of the Firefly plus
other equipment in the rack do not overload the supply circuits and/or
wiring.
CAUTION
If using a power strip or similar supply, make
sure the power requirements of the chassis,
plus the cumulative power draw of any other
equipment in the rack, do not overload the
supply circuit.
WARNING
For safe operation, this equipment must be
properly grounded.
The chassis should be reliab ly earth grounded to
the rack equ ipment. This earth ground connection
must be maintained when supply connection is
other than direct connection to the branch circuit.
RACK MOUNTING AND VENTILATION REQUIREMENTS:
If you are rack-mounting the Firefly base unit:
1. Always stack the rack from the bottom up to ensure a stable and safe
rack.
2. The installation of the Firefly and other units within the rack should
not reduce the airflow within the rack. The maximum recommended
ambient temperature for the Firefly is 100.4 degrees Fahrenheit (38
degrees Celsius).
Page 5

3. Determine that the cumulative power requirements of the Firefly plus
the other equipment in the rack do not overload the rack supply
circuit and/or wiring.
4. When installing, consider the location of the Firefly(s) in relation to
other devices located in an adjacent rack. Ensure that the Firefly air
intake is not drawing directly upon heated air from another unit.
Rack Depth: The minimum rack depth required to install the Firefly
is 16 inches (41 cm). If cables are used, the rack should be EMI/RFI
shielded. Ensure that the cables used meet EMI/RFI requirements and
are shielded if exposed.
Side Rails: The Firefly has side rails provided for mounting. If
different rail mounts or sliding rails are used, consult the original
manufacturer of this equipment to confirm they meet the weight and
stress requirements in order to support the Firefly chassis.
User Manual Regulatory Documentation
CAUTION
The CD-ROM/DVD-ROM drive contains a laser
system and is a ‘Class 1 Laser Product’ under
a U.S. Department of Health and Human
Services (DHHS) Radiation Performance
standard, according to the Radiation Control
for Health and Safety Act of 1968.
Should a unit ever require maintenance, contact
an authorized repair location .
CAUTION
There is danger of explosion if the battery is
incorrectly replaced.
A lithium battery on the product provides backup
power for the device’s timekeeping capability. The
battery has an estim a te d life expectancy of ten
years. When the battery starts to weaken, the date
and time may become incorrect. If the battery f ails,
the unit must be sent back to Visual Circuits for
battery replacement.
Page 6

WARNING
An improperly grounded power supply can
result in electrical shock.
The AC power cord provided with y our system has
a grounded plug. Always use a grounded power
cord with a properly grounded wall outlet.
Class A Statement
FCC Part 15 (EN61000-3-2)
This equipment has been tested and found to comply with the limits for a
Class A digital device, pursuant to Part 15 (EN61000-3-2) of the FCC
Rules. These limits are designed to provide reasonable protection against
harmful interference when the equipment is operated in a commercial
environment. This equipment generates, uses, and can radiate radio
frequency energy and, if not installed and used in accordance with this
instruction manual, may cause harmful interference to radio
communications. Operation of this equipment in a residential area is
likely to cause harmful interference in which case the user will be
required to correct the interference at his or her own expense.
The Firefly complies with Part 15 (EN61000-3-2) of the FCC rules.
Operation is subject to the following two conditions:
1. This device may not cause harmful interference.
2. This device must accept any interference that may cause undesired
operation.
WARNING
Changes or modifications to this unit not
expressly approved by the party responsible
for compliance coul d void the user’s authority
to operate the equipment.
Industry Canada
Page 7

This Class A digital apparatus meets all requirements of the Canadian
Interference-Causing Equipment Regulations.
Cet appareil numerique de la classe A respecte toutes les exigences du
Regulement sur le materiel brouilleur du Canada.
EMC and Safety Directive Compliance
The CE mark is affixed to this Visual Circuits
Corporation product to confirm compliance with
the following European Community Directives:
Council Directive 89/336/EEC of 3 May 1989 on the approximation of
the laws of Member States relating to electromagnetic compatibility.
And
Council Directive 73/23/EEC of 19 February 1973 on the harmonization
of the laws of Member States relating to electrical equipment designed
for use within certain voltage limits:
Each amended by Council Directive 93/68/EEC of 22 July 1993 on the
harmonization of CE marking requirements.
Class A Warning (EN55024, EN55022)
In a domestic environment this product may cause radio interference in
which case the user may be required to take adequate measures.
WARNING
Failure to provide adequate surge protection
may cause damage to the Firefly.
Visual Circuits does not warranty damage caused
by electrical surges to the system. Surge
protection should be provided when connecting
any peripheral device and power to the system.
All specifications are subject to change without notice.
Page 8

Page 9

OVERVIEW
Welcome to Firefly . . . . . . . . . . . . . . . . . . . . . . . . . . . 1
Quick Start Guide. . . . . . . . . . . . . . . . . . . . . . . . . . . . 3
Encoding Requirements and Recommendations . 19
Remote Control. . . . . . . . . . . . . . . . . . . . . . . . . . . . . 23
Smart Card . . . . . . . . . . . . . . . . . . . . . . . . . . . . . . . 105
WEBVIEW . . . . . . . . . . . . . . . . . . . . . . . . . . . . . . . . . 113
Networking . . . . . . . . . . . . . . . . . . . . . . . . . . . . . . . 195
Updating Video Playback. . . . . . . . . . . . . . . . . . . . 199
Log File Reporting . . . . . . . . . . . . . . . . . . . . . . . . . 221
External Control Commands. . . . . . . . . . . . . . . . . 225
Front Panel Display . . . . . . . . . . . . . . . . . . . . . . . . 263
Troubleshooting. . . . . . . . . . . . . . . . . . . . . . . . . . . 269
Appendix. . . . . . . . . . . . . . . . . . . . . . . . . . . . . . . . . 281
Page 10

Contents
Page 11

CONTENTS
Welcome to Firefly . . . . . . . . . . . . . . . . . . . . . . . . . . . 1
Quick Start Guide. . . . . . . . . . . . . . . . . . . . . . . . . . . . 3
How to Plug & Play . . . . . . . . . . . . . . . . . . . . . . . . . . .3
How to Use the Remote Control . . . . . . . . . . . . . . . . . .9
Player Controls . . . . . . . . . . . . . . . . . . . . . . . . . . . .9
Menu Functions. . . . . . . . . . . . . . . . . . . . . . . . . . .11
How To Put Media On Firefly From a CD or DVD . .11
How to Automatically Copy Media From a CD or DVD
for Playback- “Drop and Go” . . . . . . . . . . . . . . . .13
Creating a Drop & Go CD/DVD. . . . . . . . . . . . . .13
Playing a Drop & Go CD/DVD . . . . . . . . . . . . . .13
How To Create a Basic Playlist . . . . . . . . . . . . . . . . .14
Using the Remote Control. . . . . . . . . . . . . . . . . . .14
Software Updating . . . . . . . . . . . . . . . . . . . . . . . . . . .17
Encoding Requirements and Recommendations . 19
Encoding Requirements . . . . . . . . . . . . . . . . . . . . . . .19
Encoding Recommendations. . . . . . . . . . . . . . . . . . . .20
Remote Control. . . . . . . . . . . . . . . . . . . . . . . . . . . . . 23
Remote Control Basics . . . . . . . . . . . . . . . . . . . . . . . .23
Activating the Remote Control . . . . . . . . . . . . . . . . . .23
Activating and Deactivating the Remote Control on
a Specific Firefly . . . . . . . . . . . . . . . . . . . . .23
i
Page 12

Contents
Globally Activating and Deactivating all Firefly’s . .
. . . . . . . . . . . . . . . . . . . . . . . . . . . . . . . . . . . . . . . .23
Player Controls . . . . . . . . . . . . . . . . . . . . . . . . . . . . . .24
Player Operation . . . . . . . . . . . . . . . . . . . . . . . . . .25
Play . . . . . . . . . . . . . . . . . . . . . . . . . . .26
Stop . . . . . . . . . . . . . . . . . . . . . . . . . . .26
Pause . . . . . . . . . . . . . . . . . . . . . . . . . .26
Scan Forward . . . . . . . . . . . . . . . . . . .26
Scan Reverse. . . . . . . . . . . . . . . . . . . .27
Skip Forward. . . . . . . . . . . . . . . . . . . .27
Skip Reverse . . . . . . . . . . . . . . . . . . . .28
Menu Options . . . . . . . . . . . . . . . . . . . . . . . . . . . . . . .29
Firefly Main Menu . . . . . . . . . . . . . . . . . . . . . . . .29
Exiting the Firefly Main Menu . . . . . . . . . . . . . . .30
Playlist Editor . . . . . . . . . . . . . . . . . . . . . . . . . . . .30
Adding Videos to a Playlist . . . . . . . .33
Removing Videos from a Playlist . . . .34
Moving Videos within a Playlist. . . . .34
Viewing Media Information . . . . . . . .35
Shuffling Video Playback on a Channel.
. . . . . . . . . . . . . . . . . . . . . . . . . . . . . . .36
Adding Graphic Overlays to Videos
within a Playlist. . . . . . . . . . . . . . . . . .38
Removing Graphic Overlays from a
Playlist. . . . . . . . . . . . . . . . . . . . . . . . .40
ii
Working with Graphic Overlays in a
Playlist. . . . . . . . . . . . . . . . . . . . . . . . .40
Creating an External A/V Playlist. . . .44
Page 13

Contents
Adding External A/V Events to a Playlist
. . . . . . . . . . . . . . . . . . . . . . . . . . . . . . .46
Removing External A/V Events from a
Playlist. . . . . . . . . . . . . . . . . . . . . . . . .47
Moving External A/V Events within a
Playlist. . . . . . . . . . . . . . . . . . . . . . . . .48
Editing External A/V Events within a
Playlist. . . . . . . . . . . . . . . . . . . . . . . . .48
Exiting the Playlist Editor. . . . . . . . . .51
Schedule Editor . . . . . . . . . . . . . . . . . . . . . . . . . . .52
To start creating a new schedule: . . . .53
To start editing an existing schedule: .54
To delete an existing schedule: . . . . . .54
Adding an Event to a Schedule. . . . . .57
Deleting an Event from a Schedule . .59
Editing an Event within a Schedule . .59
Assigning Dates for Video Playback .61
Exiting the Schedule Editor . . . . . . . .65
Playback Selector . . . . . . . . . . . . . . . . . . . . . . . . .65
Loading a Playlist or Schedule . . . . . .66
Media Maintenance . . . . . . . . . . . . . . . . . . . . . . . .67
Selecting Files to Copy or Delete . . . .69
Copying Selected Files . . . . . . . . . . . .70
Deleting Selected Files . . . . . . . . . . . .72
System Settings . . . . . . . . . . . . . . . . . . . . . . . . . . . . . .73
General Settings . . . . . . . . . . . . . . . . . . . . . . . . . .74
Site ID . . . . . . . . . . . . . . . . . . . . . . . . .75
Date/Time . . . . . . . . . . . . . . . . . . . . . .75
iii
Page 14

Contents
Time Zone. . . . . . . . . . . . . . . . . . . . . .75
IR Address . . . . . . . . . . . . . . . . . . . . .75
IR Timeout . . . . . . . . . . . . . . . . . . . . .75
Version . . . . . . . . . . . . . . . . . . . . . . . .75
Uptime. . . . . . . . . . . . . . . . . . . . . . . . .76
Play Test File (Menu Only Available Via
Front Panel Interface) . . . . . . . . . . . . .76
Video Settings . . . . . . . . . . . . . . . . . . . . . . . . . . . .76
Video Standard . . . . . . . . . . . . . . . . . .77
Channel 1, 2, 3, 4 Video Output . . . . .77
Audio Settings . . . . . . . . . . . . . . . . . . . . . . . . . . . .77
Volume . . . . . . . . . . . . . . . . . . . . . . . .77
Channel 1, 2, 3, 4 Audio . . . . . . . . . . .78
External A/V Settings . . . . . . . . . . . . . . . . . . . . . .79
Genlock . . . . . . . . . . . . . . . . . . . . . . . .79
Channel 1, 2, 3, 4 Audio/Video . . . . .79
Control Settings . . . . . . . . . . . . . . . . . . . . . . . . . .81
Accept TCP/IP . . . . . . . . . . . . . . . . . .81
Baud Rate . . . . . . . . . . . . . . . . . . . . . .82
Data Bits . . . . . . . . . . . . . . . . . . . . . . .82
Parity . . . . . . . . . . . . . . . . . . . . . . . . . .82
LCD Echo . . . . . . . . . . . . . . . . . . . . . .82
Network Settings . . . . . . . . . . . . . . . . . . . . . . . . . .83
Host Name . . . . . . . . . . . . . . . . . . . . .84
iv
Mode . . . . . . . . . . . . . . . . . . . . . . . . . .85
IP Address. . . . . . . . . . . . . . . . . . . . . .85
Netmask . . . . . . . . . . . . . . . . . . . . . . .86
Gateway . . . . . . . . . . . . . . . . . . . . . . .86
Page 15

Contents
Proxy Type . . . . . . . . . . . . . . . . . . . . .87
Proxy Address. . . . . . . . . . . . . . . . . . .87
Enable NTP (Network Time Protocol) . .
. . . . . . . . . . . . . . . . . . . . . . . . . . . . . . .87
NTP Server . . . . . . . . . . . . . . . . . . . . .87
Enable SNMP (Simple Network
Management Protocol) . . . . . . . . . . . .87
SNMP Network. . . . . . . . . . . . . . . . . .88
SNMP Netmask . . . . . . . . . . . . . . . . .88
Community . . . . . . . . . . . . . . . . . . . . .88
Security Name. . . . . . . . . . . . . . . . . . .88
Auth Passphrase . . . . . . . . . . . . . . . . .88
Priv Passphrase . . . . . . . . . . . . . . . . . .88
Logging Settings . . . . . . . . . . . . . . . . . . . . . . . . . .89
Run Log . . . . . . . . . . . . . . . . . . . . . . .89
Diagnostic Log . . . . . . . . . . . . . . . . . .89
Log Format . . . . . . . . . . . . . . . . . . . . .90
Log Default Playlist . . . . . . . . . . . . . .90
Max Log MBs . . . . . . . . . . . . . . . . . . .91
Upload Logs . . . . . . . . . . . . . . . . . . . .91
WebView Settings. . . . . . . . . . . . . . . . . . . . . . . . .92
WebView . . . . . . . . . . . . . . . . . . . . . .92
File Access . . . . . . . . . . . . . . . . . . . . .92
Username . . . . . . . . . . . . . . . . . . . . . .92
FTP Auto-Update Settings . . . . . . . . . . . . . . . . . .94
Password . . . . . . . . . . . . . . . . . . . . . . .93
FTP IP Address . . . . . . . . . . . . . . . . . .94
FTP Port . . . . . . . . . . . . . . . . . . . . . . .94
v
Page 16

Contents
Username . . . . . . . . . . . . . . . . . . . . . .94
Password . . . . . . . . . . . . . . . . . . . . . . .95
Directory . . . . . . . . . . . . . . . . . . . . . . .95
FTP Proxy Port . . . . . . . . . . . . . . . . . .95
Update Interval . . . . . . . . . . . . . . . . . .95
Fixed Update Interval . . . . . . . . . . . . .95
FTP Update Now . . . . . . . . . . . . . . . .95
HTTP Auto-Update Settings . . . . . . . . . . . . . . . . .96
HTTP Address . . . . . . . . . . . . . . . . . .96
HTTP Port. . . . . . . . . . . . . . . . . . . . . .96
HTTP Proxy Port . . . . . . . . . . . . . . . .96
HTTP Directory . . . . . . . . . . . . . . . . .97
Update Interval . . . . . . . . . . . . . . . . . .97
Fixed Update Interval . . . . . . . . . . . . .97
HTTP Update Now Button . . . . . . . . .97
Multicast . . . . . . . . . . . . . . . . . . . . . . . . . . . . . . . .98
Client Enable. . . . . . . . . . . . . . . . . . . .98
Channel . . . . . . . . . . . . . . . . . . . . . . . .98
Listen Address . . . . . . . . . . . . . . . . . .99
Listen Port. . . . . . . . . . . . . . . . . . . . . .99
Transfer Order. . . . . . . . . . . . . . . . . . .99
Reserves MBs . . . . . . . . . . . . . . . . . .100
Delete Channel . . . . . . . . . . . . . . . . .100
Smart Card Settings. . . . . . . . . . . . . . . . . . . . . . .100
Advanced Settings. . . . . . . . . . . . . . . . . . . . . . . .102
vi
Load Config . . . . . . . . . . . . . . . . . . .101
Save Config. . . . . . . . . . . . . . . . . . . .101
Eject Smart Card . . . . . . . . . . . . . . . .101
Page 17

Contents
Audio/Video Sync. . . . . . . . . . . . . . .102
Merge Playlists . . . . . . . . . . . . . . . . .102
Statistics . . . . . . . . . . . . . . . . . . . . . .103
Storage Settings (Menu Only Available Via Front
Panel Interface) . . . . . . . . . . . . . . . . . . . . .103
Usage. . . . . . . . . . . . . . . . . . . . . . . . .103
Copy From CD/DVD . . . . . . . . . . . .103
List Media . . . . . . . . . . . . . . . . . . . . .104
Delete Media. . . . . . . . . . . . . . . . . . .104
Delete Playlists/Schedules . . . . . . . .104
Smart Card . . . . . . . . . . . . . . . . . . . . . . . . . . . . . . . 105
Overview . . . . . . . . . . . . . . . . . . . . . . . . . . . . . . . . . .105
Licensing Features . . . . . . . . . . . . . . . . . . . . . . . . . .105
Saving and Loading System Setting Configurations 106
Using Your Visual Circuits Smart Card . . . . . . . . . .106
Inserting The Smart Card . . . . . . . . . . . . . . . . . .107
Saving A Firefly Configuration To The Smart Card.
. . . . . . . . . . . . . . . . . . . . . . . . . . . . . . . . . . . . . . .107
Using the Remote Control . . . . . . . .107
Using WebView . . . . . . . . . . . . . . . .108
Using the Front Panel . . . . . . . . . . . .108
Loading A Firefly Configuration From The Smart
Card . . . . . . . . . . . . . . . . . . . . . . . . . . . . . .108
Using the Remote Control . . . . . . . .109
Using WebView . . . . . . . . . . . . . . . .109
Using the Front Panel . . . . . . . . . . . .109
vii
Page 18

Contents
Ejecting the Smart Card . . . . . . . . . . . . . . . . . . .110
Using the Front Panel . . . . . . . . . . . .110
Using the Remote Control . . . . . . . .110
Using WebView . . . . . . . . . . . . . . . .111
WEBVIEW . . . . . . . . . . . . . . . . . . . . . . . . . . . . . . . . . 113
Accessing the WebView Interface . . . . . . . . . . . . . .113
Setup Procedures: . . . . . . . . . . . . . . . . . . . . . . . .113
Step 1: Connect to the Network . . . .113
Step 2: Determine the Address of the
Firefly . . . . . . . . . . . . . . . . . . . . . . . .114
Step 3: Establishing Communication
with the Firefly . . . . . . . . . . . . . . . . .115
Step 4: Enter Your User Name and
Password . . . . . . . . . . . . . . . . . . . . . .115
Using the WebView Interface. . . . . . . . . . . . . . . . . .116
Transferring Media . . . . . . . . . . . . . . . . . . . . . . .117
Webview Software Update . . . . . . . . . . . . . . . . .121
Reviewing, Previewing and Deleting Firefly Media.
. . . . . . . . . . . . . . . . . . . . . . . . . . . . . . . . . . . . . . .122
Reviewing Media and Storage Usage on
the Firefly . . . . . . . . . . . . . . . . . . . . .122
Previewing Videos and Graphic
Overlays on the Firefly . . . . . . . . . . .123
Deleting Media from the Firefly . . . .124
Using the Playlist Editor . . . . . . . . . . . . . . . . . . .126
viii
Creating a New Playlist . . . . . . . . . .127
Adding Videos to a Playlist . . . . . . .127
Page 19

Contents
Removing Videos from a Playlist . . .128
Moving Videos Within a Playlist . . .128
Shuffling Video Playback on a Channel.
. . . . . . . . . . . . . . . . . . . . . . . . . . . . . .129
Adding Graphic Overlays to a Playlist . .
. . . . . . . . . . . . . . . . . . . . . . . . . . . . . .129
Working With Graphic Overlays in a
Playlist. . . . . . . . . . . . . . . . . . . . . . . .131
Adding Scrolling Text to a Playlist. .134
Working With Scrolling Text in a
Playlist. . . . . . . . . . . . . . . . . . . . . . . .135
Transparency Level. . . . . . . . . . . . . .136
Creating an External A/V Playlist. . .137
Adding External A/V Events to a Playlist
. . . . . . . . . . . . . . . . . . . . . . . . . . . . . .139
Removing External A/V Events from a
Playlist. . . . . . . . . . . . . . . . . . . . . . . .140
Moving External A/V Events within a
Playlist. . . . . . . . . . . . . . . . . . . . . . . .141
Editing External Events within a Playlist
. . . . . . . . . . . . . . . . . . . . . . . . . . . . . .141
Saving a Playlist . . . . . . . . . . . . . . . .143
Playing a Playlist Quickly. . . . . . . . .144
Using the Schedule Editor. . . . . . . . . . . . . . . . . .144
Creating a New Schedule . . . . . . . . .145
Adding an Event to a Schedule. . . . .147
Deleting an Event from a Schedule .148
Editing an Event within a Schedule .149
ix
Page 20

Contents
Saving a Schedule . . . . . . . . . . . . . . .150
Additional Saving and Loading Methods
. . . . . . . . . . . . . . . . . . . . . . . . . . . . . .151
Assigning Dates for Video Playback 154
Exiting the Schedule Editor . . . . . . .158
Using the Player Control Panel . . . . . . . . . . . . . .158
Diagnostics . . . . . . . . . . . . . . . . . . . . . . . . . . . . .159
Diagnostics - General . . . . . . . . . . . .160
Diagnostics - Video. . . . . . . . . . . . . .162
Diagnostics - Playback . . . . . . . . . . .163
Diagnostics - Logging. . . . . . . . . . . .164
System Settings . . . . . . . . . . . . . . . . . . . . . . . . . .168
General Settings . . . . . . . . . . . . . . . . . . . . . . . . .168
Site ID . . . . . . . . . . . . . . . . . . . . . . . .169
Date/Time . . . . . . . . . . . . . . . . . . . . .169
Time Zone. . . . . . . . . . . . . . . . . . . . .169
Version . . . . . . . . . . . . . . . . . . . . . . .169
Uptime. . . . . . . . . . . . . . . . . . . . . . . .169
Video Settings . . . . . . . . . . . . . . . . . . . . . . . . . . .170
Video Standard . . . . . . . . . . . . . . . . .170
Channel 1, 2, 3, 4 Video Output . . .170
Audio Settings . . . . . . . . . . . . . . . . . . . . . . . . . . .171
Volume . . . . . . . . . . . . . . . . . . . . . . .171
Channel 1, 2, 3, 4 Audio . . . . . . . . . .171
. . . . . . . . . . . . . . . . . . . . . . . . . . . . . . . . . . . . . . .172
External A/V Settings . . . . . . . . . . . . . . . . . . . . .172
x
Genlock . . . . . . . . . . . . . . . . . . . . . . .172
Channel 1, 2, 3, 4 Audio/Video . . . .173
Page 21

Contents
Control Settings . . . . . . . . . . . . . . . . . . . . . . . . .174
Accept TCP/IP . . . . . . . . . . . . . . . . .174
Baud Rate . . . . . . . . . . . . . . . . . . . . .175
Data Bits . . . . . . . . . . . . . . . . . . . . . .175
Parity . . . . . . . . . . . . . . . . . . . . . . . . .175
Network Settings . . . . . . . . . . . . . . . . . . . . . . . . .176
Host Name . . . . . . . . . . . . . . . . . . . .176
Mode . . . . . . . . . . . . . . . . . . . . . . . . .176
IP Address. . . . . . . . . . . . . . . . . . . . .177
Netmask . . . . . . . . . . . . . . . . . . . . . .177
Gateway . . . . . . . . . . . . . . . . . . . . . .178
Proxy Type . . . . . . . . . . . . . . . . . . . .178
Proxy Address. . . . . . . . . . . . . . . . . .178
Enable NTP (Network Time Protocol) . .
. . . . . . . . . . . . . . . . . . . . . . . . . . . . . .178
NTP Server . . . . . . . . . . . . . . . . . . . .178
Enable SNMP (Simple Network
Management Protocol) . . . . . . . . . . .179
SNMP Network. . . . . . . . . . . . . . . . .179
SNMP Netmask . . . . . . . . . . . . . . . .179
Community . . . . . . . . . . . . . . . . . . . .179
Security Name. . . . . . . . . . . . . . . . . .179
Auth Passphrase . . . . . . . . . . . . . . . .179
Priv Passphrase . . . . . . . . . . . . . . . . .180
Logging Settings . . . . . . . . . . . . . . . . . . . . . . . . .180
Run Log . . . . . . . . . . . . . . . . . . . . . .180
Diagnostic Log . . . . . . . . . . . . . . . . .180
Log Format . . . . . . . . . . . . . . . . . . . .181
xi
Page 22

Contents
Log Default Playlist . . . . . . . . . . . . .181
Max Log MBs . . . . . . . . . . . . . . . . . .182
Upload Logs . . . . . . . . . . . . . . . . . . .182
WebView Settings. . . . . . . . . . . . . . . . . . . . . . . .183
WebView Enable . . . . . . . . . . . . . . .183
File Access . . . . . . . . . . . . . . . . . . . .183
Username . . . . . . . . . . . . . . . . . . . . .183
Password . . . . . . . . . . . . . . . . . . . . . .184
FTP Auto-Update Settings . . . . . . . . . . . . . . . . .185
Username . . . . . . . . . . . . . . . . . . . . .185
Password . . . . . . . . . . . . . . . . . . . . . .186
Directory . . . . . . . . . . . . . . . . . . . . . .186
FTP Proxy Port . . . . . . . . . . . . . . . . .186
Update Interval . . . . . . . . . . . . . . . . .186
Fixed Update Time . . . . . . . . . . . . . .186
FTP Update Now Button . . . . . . . . .186
HTTP Auto-Update Settings . . . . . . . . . . . . . . . .187
HTTP Address . . . . . . . . . . . . . . . . .187
HTTP Port. . . . . . . . . . . . . . . . . . . . .187
HTTP Proxy Port . . . . . . . . . . . . . . .187
HTTP Directory . . . . . . . . . . . . . . . .188
Update Interval . . . . . . . . . . . . . . . . .188
Fixed Update Interval . . . . . . . . . . . .188
HTTP Update Now Button . . . . . . . .188
Multicast Settings . . . . . . . . . . . . . . . . . . . . . . . .189
xii
Client Enable. . . . . . . . . . . . . . . . . . .189
Channel . . . . . . . . . . . . . . . . . . . . . . .189
Listen Address . . . . . . . . . . . . . . . . .190
Page 23

Contents
Listen Port. . . . . . . . . . . . . . . . . . . . .190
Transfer Order. . . . . . . . . . . . . . . . . .190
Reserves MBs . . . . . . . . . . . . . . . . . .191
Delete Channel . . . . . . . . . . . . . . . . .191
Smart Card Settings. . . . . . . . . . . . . . . . . . . . . . .192
Load Config . . . . . . . . . . . . . . . . . . .192
Save Config. . . . . . . . . . . . . . . . . . . .192
Eject Smart Card . . . . . . . . . . . . . . . .192
Advanced Settings. . . . . . . . . . . . . . . . . . . . . . . .193
Audio/Video Sync. . . . . . . . . . . . . . .193
Merge Playlists . . . . . . . . . . . . . . . . .193
Reset Stats. . . . . . . . . . . . . . . . . . . . .194
Networking . . . . . . . . . . . . . . . . . . . . . . . . . . . . . . . 195
Overview . . . . . . . . . . . . . . . . . . . . . . . . . . . . . . . . . .195
Getting Started . . . . . . . . . . . . . . . . . . . . . . . . . . . . .195
Media Messenger™ Software. . . . . . . . . . . . . . . . . .196
Product Features:. . . . . . . . . . . . . . . . . . . . . . . . .196
Benefits:. . . . . . . . . . . . . . . . . . . . . . . . . . . . . . . .196
Updating Video Playback. . . . . . . . . . . . . . . . . . . . 199
Automatic Updating . . . . . . . . . . . . . . . . . . . . . . . . .200
Media Update Disc Updating . . . . . . . . . . . . . . .200
Creating a Media Update Disc . . . . .200
Drop & Go Disc Updating. . . . . . . . . . . . . . . . . .202
Using a Media Update Disc . . . . . . .201
Firefly Storage Cleanup Routine . . .202
xiii
Page 24

Contents
Drop & Go Basics. . . . . . . . . . . . . . .202
Creating a Drop & Go Playback Disc. . .
. . . . . . . . . . . . . . . . . . . . . . . . . . . . . .203
Using a Drop & Go Playback Disc . .203
Firefly Storage Cleanup Routine . . .204
System Software Update Process . . .204
Content Update Processing . . . . . . . .205
Updating Routine Order . . . . . . . . . .206
Playlist Parsing Routine . . . . . . . . . .206
FTP U
PDATING . . . . . . . . . . . . . . . . . . . . . . . . . .207
FTP Server . . . . . . . . . . . . . . . . . . . .208
Player Management . . . . . . . . . . . . .208
Creating a Firefly FTP Update Account .
. . . . . . . . . . . . . . . . . . . . . . . . . . . . . .209
/ . . . . . . . . . . . . . . . . . . . . . . . . . . . . .209
/scripts . . . . . . . . . . . . . . . . . . . . . . . .209
/updates . . . . . . . . . . . . . . . . . . . . . . .209
FTP Update Process . . . . . . . . . . . . .210
FTP Updating Order . . . . . . . . . . . . .211
Playlist Parsing Routine . . . . . . . . . .211
System Update Check . . . . . . . . . . . .212
Firefly Storage Cleanup Routine . . .212
M
ULTICAST UPDATING . . . . . . . . . . . . . . . . . . . .212
Manual Updating. . . . . . . . . . . . . . . . . . . . . . . . . . . .216
WebView Updating. . . . . . . . . . . . . . . . . . . . . . .216
xiv
Overview. . . . . . . . . . . . . . . . . . . . . .213
Software Update Check . . . . . . . . . .215
System Settings for Multicasting . . .215
Page 25

Contents
Standard CD/DVD Updating. . . . . . . . . . . . . . . .217
Direct File Access Updating . . . . . . . . . . . . . . . .218
Log File Reporting . . . . . . . . . . . . . . . . . . . . . . . . . 221
Overview . . . . . . . . . . . . . . . . . . . . . . . . . . . . . . . . . .221
Run Logs . . . . . . . . . . . . . . . . . . . . . . . . . . . . . . . . . .222
Diagnostic Logs . . . . . . . . . . . . . . . . . . . . . . . . . . . .222
Log Format . . . . . . . . . . . . . . . . . . . . . . . . . . . . .223
Run Logs. . . . . . . . . . . . . . . . . . . . . .223
Diagnostic Logs . . . . . . . . . . . . . . . .223
DTDs (Document Type Definition) .223
Log Default Playlist. . . . . . . . . . . . . . . . . . . . . . .223
Maximum Log File Sizes . . . . . . . . . . . . . . . . . .224
Uploading Log Files . . . . . . . . . . . . . . . . . . . . . .224
External Control Commands. . . . . . . . . . . . . . . . . 225
Connecting via RS232 . . . . . . . . . . .225
Connecting via TCP/IP . . . . . . . . . . .225
Basic Hyper Terminal Setup . . . . . . . . . . . . . . . .226
VCC Control Commands: . . . . . . . . . . . . . . . . . . . . .227
Playlist Playback Commands . . . . . . . . . . . . . . .227
Playing Individual Files. . . . . . . . . . . . . . . . . . . .228
Using Serial Commands To Create Playlists . . .233
Firefly System Commands . . . . . . . . . . . . . . . . .234
Callback Commands . . . . . . . . . . . . . . . . . . . . . .234
Audio and Video Setting Changes . . . . . . . . . . .235
On-Screen Display . . . . . . . . . . . . . . . . . . . . . . .236
External A/V Switching . . . . . . . . . . . . . . . . . . .238
xv
Page 26

Contents
Networking Commands. . . . . . . . . . . . . . . . . . . .244
LDV Control Commands . . . . . . . . . . . . . . . . . . . . .247
Introduction . . . . . . . . . . . . . . . . . . . . . . . . . . . . .247
COM Port Settings . . . . . . . . . . . . . . . . . . . . . . .247
Getting Started: Understanding Command Language
. . . . . . . . . . . . . . . . . . . . . . . . . . . . . . . . . . . . . . .248
Error Codes . . . . . . . . . . . . . . . . . . . . . . . . . . . . .248
Command Syntax . . . . . . . . . . . . . . . . . . . . . . . .249
Address Arguments . . . . . . . . . . . . . . . . . . . . . . .249
Command Summary . . . . . . . . . . . . . . . . . . . . . .250
Playback Commands . . . . . . . . . . . . . . . . . . . . . .250
External Control Commands Quick Reference
Guide:. . . . . . . . . . . . . . . . . . . . . . . . . . . . .262
VCC Commands: . . . . . . . . . . . . . . .262
LDV Commands: . . . . . . . . . . . . . . .262
Front Panel Display . . . . . . . . . . . . . . . . . . . . . . . . 263
Introduction . . . . . . . . . . . . . . . . . . . . . . . . . . . . . . . .263
Navigating the Front Panel Display Menu System . .263
Changing System Settings. . . . . . . . . . . . . . . . . .265
Changing a Menu Option Choice . . .265
Changing a Menu Option Value . . . .267
Front Panel Display Menu Descriptions . . . . . . . . . .268
Troubleshooting. . . . . . . . . . . . . . . . . . . . . . . . . . . 269
General Issues . . . . . . . . . . . . . . . . . . . . . . . . . . . . . .269
Restoration Mode . . . . . . . . . . . . . . . . . . . . . . . .269
xvi
Page 27

Contents
No Power to Firefly (No LCD light or fan noise) . . .
. . . . . . . . . . . . . . . . . . . . . . . . . . . . . . . . . . . . . . .269
No Video Playback . . . . . . . . . . . . . . . . . . . . . . .270
Stuttering Files During Playback . . . . . . . . . . . .270
Picture Rolls or Other Video Problems Occur When
Using External Audio/Video Switching. . .272
"Latent Images" or "Flashing" During Playback.272
Some files in the playlist do not play . . . . . . . . .273
SMPTE time codes are not recognized properly.273
Test File Does Not Play Properly On All Channels .
. . . . . . . . . . . . . . . . . . . . . . . . . . . . . . . . . . . . . . .273
Test File Does Not Display On One Channel . . .274
File Copy Error Handling . . . . . . . . . . . . . . . . . .274
Filename Already Exists . . . . . . . . . . . . . . . . . . .274
Insufficient Disk Space . . . . . . . . . . . . . . . . . . . .274
CD/DVD Update Disc Fails . . . . . . . . . . . . . . . .274
Update Fails. . . . . . . . . . . . . . . . . . . . . . . . . . . . .275
The Remote Control is not doing anything . . . . .275
The Smart Card will not eject . . . . . . . . . . . . . . .275
Preventing Cabling and Connection Problems . . . . .276
LCD Error Messages. . . . . . . . . . . . . . . . . . . . . . . . .277
Bad FPL/FSC . . . . . . . . . . . . . . . . . . . . . . . . . . .277
Bad FTP Dir . . . . . . . . . . . . . . . . . . . . . . . . . . . .277
Bad IP Address . . . . . . . . . . . . . . . . . . . . . . . . . .277
Bad User/Pass . . . . . . . . . . . . . . . . . . . . . . . . . . .277
Cant List Media . . . . . . . . . . . . . . . . . . . . . . . . . .278
Cant List Scripts . . . . . . . . . . . . . . . . . . . . . . . . .278
Download Fail . . . . . . . . . . . . . . . . . . . . . . . . . . .278
xvii
Page 28

Contents
FTP Failed Networking Off . . . . . . . . . . . . . . . .278
Invalid FTP IP . . . . . . . . . . . . . . . . . . . . . . . . . . .278
Menu Disabled in Player Control Mode . . . . . . .278
Missing MPEG/Overlay . . . . . . . . . . . . . . . . . . .278
No Directory . . . . . . . . . . . . . . . . . . . . . . . . . . . .279
No IP Address . . . . . . . . . . . . . . . . . . . . . . . . . . .279
No Local FPL/FSC . . . . . . . . . . . . . . . . . . . . . . .279
No Valid TAR/FPL . . . . . . . . . . . . . . . . . . . . . . .279
Proxy Settings . . . . . . . . . . . . . . . . . . . . . . . . . . .279
Transfer Error . . . . . . . . . . . . . . . . . . . . . . . . . . .279
Returning Materials to Visual Circuits Corporation
(VAR/Distributor) . . . . . . . . . . . . . . . . . . . . . . . .280
Appendix. . . . . . . . . . . . . . . . . . . . . . . . . . . . . . . . . 281
Hardware Specifications . . . . . . . . . . . . . . . . . . . . . .281
Index 1
xviii
Page 29

WELCOME TO FIREFLY
Thank you for purchasing Firefly. Our design goal in the creation
of Firefly was to develop a media player for A/V professionals that
combines the ease and familiarity of an industrial DVD player with
the flexibility and control of a disk-based, multichannel MPEG-2
decoder. To reach this end, Firefly incorporates the best of both
types of players. From the world of DVD players you will find
familiarity in Firefly’s IR remote control interface, standard player
controls and the ease of “drop the disc in and hit play”. To these
functions we’ve added 1, 2 or 4-channel playback, an on-screen
graphical user interface, multichannel playlist creation, time/date
scheduling, graphic & text overlay capability, remote content
updating, network compatibility and a web-based “control and
monitor” interface. In addition, Firefly is upgradeable by
purchasing a pre-programmed Smart Card.
The result is a new-generation of commercial media players that fit
into a wide variety of stand alone or network attached applications,
from trade shows and exhibitions to retail merchandising,
education and training, corporation communications and digital
signage.
Firefly will continue to develop and evolve as a product, just as we
know that the demands of A/V contractors will continue to evolve.
Keep up with our latest product offerings by checking our all NEW
website at www.visualcircuits.com.
1
Page 30

Welcome to Firefly
2
Page 31

QUICK START GUIDE
This Quick Start Guide is intended to provide a brief overview of
the major features of the Firefly Media Player. Comprehensive
user and technical information can be found in the main body of
the Firefly User Manual.
How to Plug & Play
The Firefly comes loaded with sample videos that are useful as you
become familiar with Firefly’s features and for diagnostic
purposes. Video playback is typically controlled through a
“playlist” that defines which videos are played on which channels
and in what order. Only one playlist can be active at any time,
though any number of playlists can be stored on Firefly for later
use. Whenever Firefly is turned on, the playlist that was last used is
reloaded and playback begins automatically.
The default active playlist for a new Firefly is called “factory.fpl”,
which alternates between a spinning Visual Circuits logo and a
demonstration video. The fastest way to test Firefly is to simply
plug it in, connect the cables and turn it on.
1. Connect the power cable to the back of the Firefly and plug it
in to your power source.
2. Connect your video cables to the back of the Firefly following
the Firefly Video Connections Guide. on page 5.
Note that Firefly’s default factory setting plays composite and svideo NTSC and line-level audio on all channels. If your
application requires you to setup Firefly using a different video
standard and/or video output type, you will need to use the Front
Panel Display to change the system settings as needed. Consult the
section on Video Settings on page 76 within the main body of the
user manual for more information about changing these settings.
3
Page 32

Quick Start Guide
❏ For Composite monitors: Connect a BNC-ended
composite cable (not included) to the corresponding
Channel 1 composite connector on the back of the Firefly.
Connect additional video cables for Channels 2, 3 and 4 (if
desired).
❏ For S-Video monitors: Connect a BNC-ended Y s-video
cable (not included) to the corresponding Channel 1 chroma
(C) and luma (Y) connectors on the back of the Firefly.
Connect additional video cables for Channels 2, 3 and 4 (if
desired).
❏ For Component monitors: Connect BNC-ended
component cables (not included) to the corresponding Pr, Y
and Pb connectors on the back of the Firefly. Connect
additional video cables for Channels 2, 3 and 4 (if desired).
❏ For RGB monitors: Connect a a BNC-ended RGB cable
(not included) to the corresponding red (R), green (G) and
blue (B) connectors on the back of the Firefly. Connect
additional video cables for Channels 2, 3 and 4 (if desired).
NOTE
You can configure the Firefly video output type on an
independent, channel-by-channel basis. (Example:
CH1 & 2: Composite monitors; CH: 3: Component
monitor; CH4: RGB monitor). Configuring the video
output type(s) is f ound in Firefly System Settings: Video
menu, which is accessible using the remote cont rol,
front panel or WebView.
See Channel 1, 2, 3, 4 Video Output on page 77 in the
main body of the user manual for information on
selecting the video output type(s) using the remote
control.
4
Page 33

Quick Start Guide
5
Figure 1. Firefly Video Connections Guide.
Firefly Media Player Video Connections Guide
CH 1 CH 2 CH 3 CH 4
S-VIDEO
BLUE / Pb /
COMPOSITE
BLUE / Pb /
COMPOSITE
BLUE / Pb /
COMPOSITE
S-VIDEO
S-VIDEO
S-VIDEO
BLUE / Pb /
COMPOSITE
VIDEO IN
RED / Pr / C
GREEN / YRED / Pr / C
RED / Pr / C
RED / Pr / C
GREEN / Y GREEN / Y
GREEN / Y
Only one video output can be
used at a time on each channel
(composite or s-video or RGB).
Firefly's default factory setting plays composite
and s-video NTSC on all channels. If your
application requires you to setup Firefly
using a different video standard and/or vi deo
mode, you will need to use the Front Panel
Display to change the system settings as needed.
Page 34

Quick Start Guide
IMPORTANT
Only one video output, compo site or s-video or
RGB (sync on green), on each channel can be used
on Firefly at a time. Using more than one will cause
video playback to be dim with weak color.
3. Connect your audio cables to the back of the Firefly following
the Firefly Audio Connections Guide on page 7.
❏ To create an unbalanced audio connection on channel 1,
connect audio cables with stranded wire ends to terminal 1
(CH 1 LEFT +) and terminal 4 (CH 1 RIGHT +), as well as
to the designated ground terminals 3 & 6. Connect to the
other corresponding LEFT + and RIGHT + terminals and
ground terminals for Channels 2, 3 and 4 (if desired).
❏ To create a balanced audio connection on channel 1,
connect audio cables with stranded wire ends to the
corresponding output terminals as noted in the Firefly
Audio Connections Guide. Repeat for Channels 2, 3 and 4
(if desired).
❏ To create a S/PDIF digital audio connection on channel
1, connect a BNC-ended audio cable to CH 1 Digital Audio
as noted in the Firefly Audio Connections Guide. Connect
to the other corresponding Digital Audio connectors for
Channels 2, 3 and 4 (if desired).
6
Page 35

Quick Start Guide
7
Figure 2. Firefly Audio Connections Guide
For unbalanced audio,
connect to terminals 1 & 4
for each channel.
TERMINAL DESCRIPTION
1 CH 1 LEFT +
2 CH 1 LEFT -
3 CH 1 GROUND
4 CH 1 RIGHT +
5 CH 1 RIGHT -
6 CH 1 GROUND
TERMINAL DESCRIPTI ON
1 CH 4 LEFT +
2 CH 4 LEFT -
3 CH 4 GROUN D
4 CH 4 RIGHT +
5 CH 4 RIGHT -
6 CH 4 GROUN D
CHANNEL 1
TIME CODE
(Future Release)
Firefly Media Player Audio Connections Guide
S/PDIF
DIGITAL AUDIO
CH 1 CH 2 CH 3 CH 4
CHANNEL 2 CHANNEL 3 CHANNEL 4 AUDIO INPUT
TERMINAL DESCRIPTION
1 CH 2 LEFT +
2 CH 2 LEFT -
3 CH 2 GROUND
4 CH 2 RIGHT +
5 CH 2 RIGHT -
6 CH 2 GROUND
TERMINAL DESCRIPTION
1 CH 3 LEFT +
2 CH 3 LEFT -
3 CH 3 GROUND
4 CH 3 RIGHT +
5 CH 3 RIGHT -
6 CH 3 GROUND
TERMINAL DESCRIPTION
1 AUDIO IN LEFT
2 GROUND
3 AUDIO IN R IGHT
4 GROUND
5 UNUSED
6 UNUSED
Page 36

Quick Start Guide
4. Connect the video and audio cables from the back of the
Firefly to the video and audio inputs on the video monitor(s)
and audio components (if applicable). Note that Firefly’s
default factory setting plays composite and s-video NTSC and
line-level audio output on all channels.
5. Switch the power button on the back of Firefly to the ON
position. Firefly will run through a short series of selfdiagnostics upon startup before beginning automated playback.
8
Page 37

Quick Start Guide
How to Use the Remote Control
Player Controls
While Firefly is playing,
point the remote control at
the IR window on Firefly’s
front panel. Whenever you
press any of the Player
Control keys (located at the
bottom of the remote control)
the “Player Control Graphic
Overlay” will appear, by
default, over the output of
Firefly channel one. While in
player control mode, the
remote control affects only
the channel(s) highlighted by
the overlay. Pressing the
EXIT key on the remote
control will cause Firefly to
exit player control mode and
to return to playback mode.
You may move the overlay
from channel to channel by
pressing the Channel + and
Channel – keys or by
pressing the channel number
on the remote control while
it remains pointed at the
Firefly IR window.
Figure 3. Firefly IR Remote Control
9
Page 38
Quick Start Guide
While in player control mode, point the remote control at the
Firefly IR window on Firefly and use the following keys:
1 = channel 1
2 = channel 2
3 = channel 3
4 = channel 4
5 = all channels
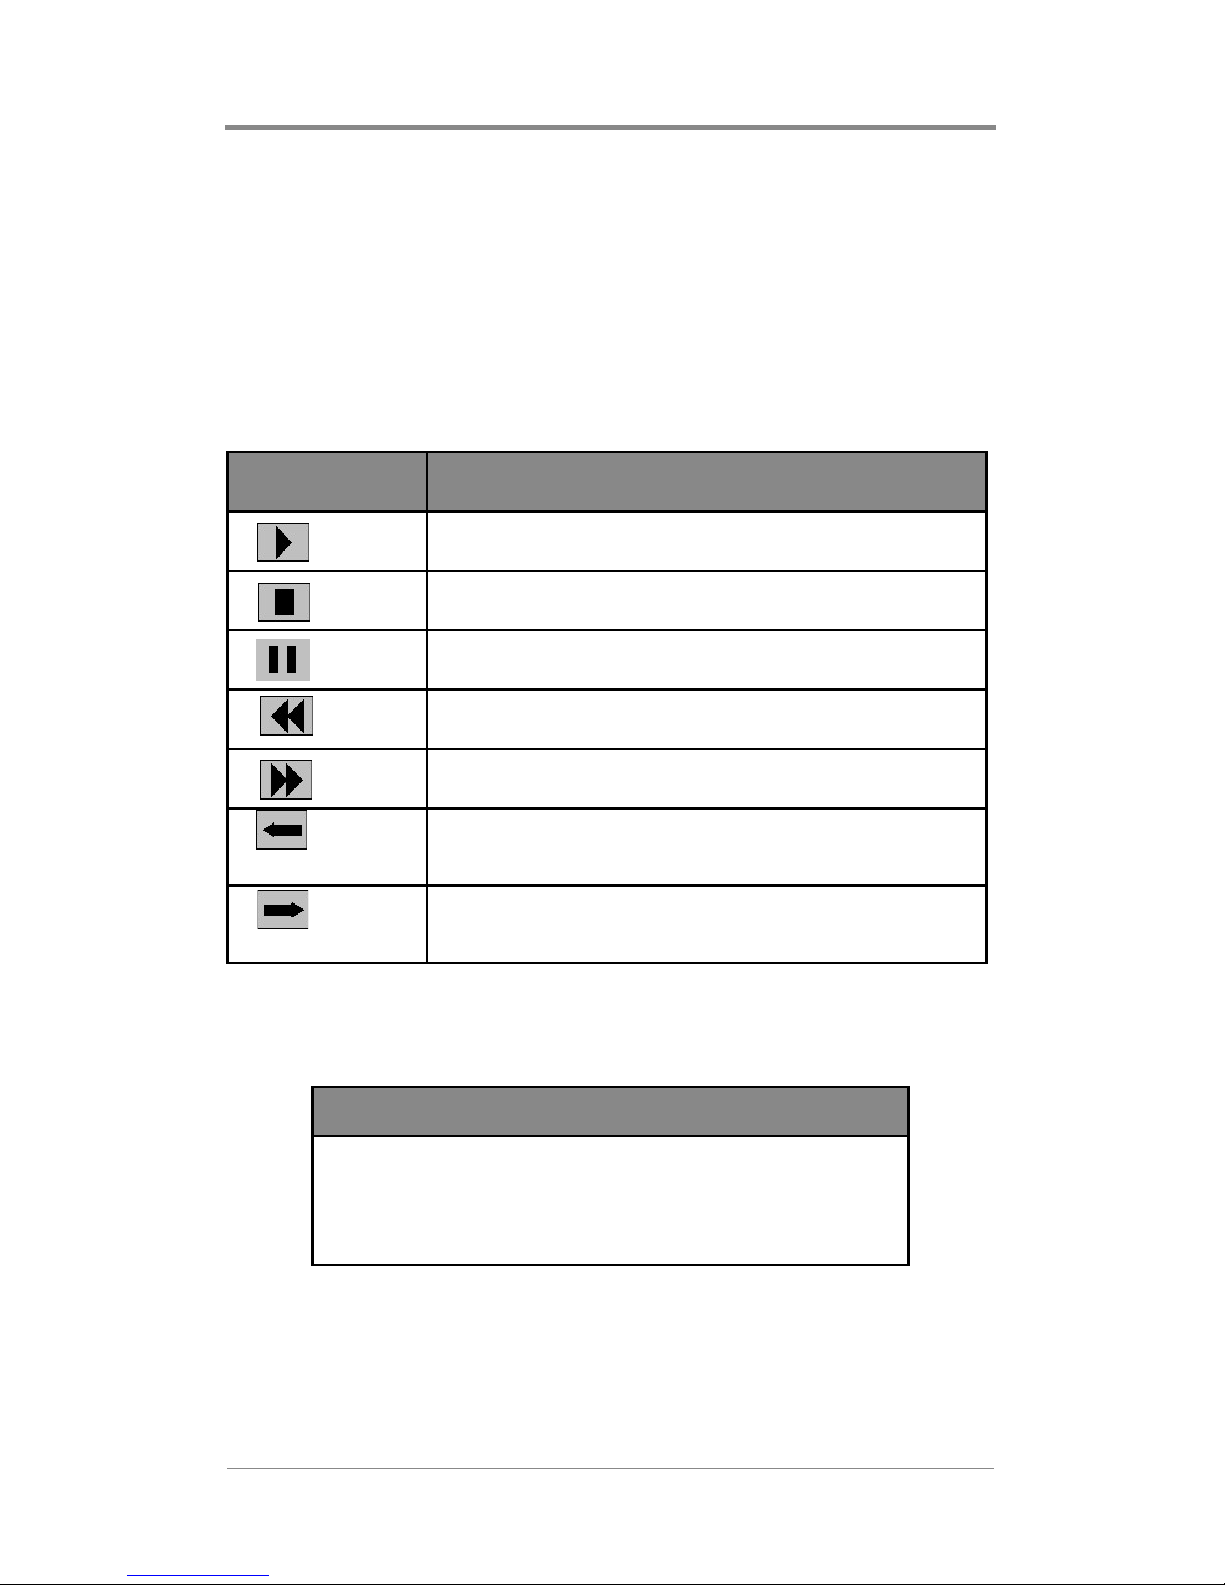
Symbol Description
Play
Stop
Pause
Scan Reverse
Scan Forward
On Menu
Navigation Keys
On Menu
Navigation Keys
Skip Reverse (Previous)
Skip Forward (Next)
Table 1. Firefly IR Remote Control Keys and Functions
NOTE
The Scan Rev erse and Scan F orward will not
operate when all channels are selected for
simultaneous control.
10
Page 39

Quick Start Guide
NOTE
Whenever the IR remote control is in use
(example: in player control mode), the front
panel display menu six-button interface will
not be available.
Menu Functions
Pressing the MENU/SELECT key on the remote control provides
access to the additional Firefly functions listed below. The menu
and sub-menus appear as full-screen graphic overlays on Firefly
video channel one. Please refer to the appropriate sections within
this user manual for instructions on each of the functions listed
below.
1. Playlist Editor
2. Schedule Editor
3. Playback Selector
4. Media Maintenance
5. System Settings (General, Video, Audio, External A/V,
Control, Network, WebView, FTP, Logging, Multicast, Smart
Card & Advanced)
6. Exit Menu
How To Put Media On Firefly From
a CD or DVD
1. Point the remote control at the IR window on Firefly and press
the MENU/SELECT key. This will force the Main Menu
options to appear as a full screen overlay on Firefly video
channel one.
11
Page 40

Quick Start Guide
2. Press 4 to enter “Media Maintenance”. The left side of the
display will show the list of media that currently reside on the
Firefly. The right side of the display will be blank.
3. Next place the CD or DVD into the Firefly. After the system
scans the disc (be patient, scanning can take 30 seconds or so),
the right side of the graphic display will show the list of media
available on the CD or DVD.
Copy Button
CD/DVD ROM
/monthly videos
january.mpg
february.mpg
march.mp2
april.mpg
/seasonal videos
spring.mp2
summer.mp2
/overlays
superfly.bmp
Size: 257M
Delete Button
CD/DVD
Media List
Firefly
Media List
Loaded Media
test.mpg
video1.mpg
video2.mp2
sample1.mpg
scarecrow.mpg
sample2.mp2
supersteaks.mp2
pony.bmp
chimp.bmp
Free: 21039M
Exit Button
X
Exit
Figure 4. Media Maintenance Screen
Within the CD/DVD list, the entries may be organized by
directories. These directories will be apparent because they will be
proceeded by a forward slash (example: “/seasonal videos”). Each
of the videos belonging to that particular directory will be listed
immediately after the directory name.
NOTE
Firefly does not pla y standard DVD movies. DVD
discs for Firefly are DVD-R discs used to transfer
media.
12
Page 41

Quick Start Guide
4. Use the menu navigation keys on the remote control to move
up and down through the media lists and left and right between
different portions of the graphic display. Note that the media
lists may contain file directories. If directories exist, you will
not need to open a directory folder to access the files within
(like in a Windows application). Instead, the media files will be
directly available immediately after each directory name.
5. Copy (<<) media from the CD to the Firefly or delete media
(X) from the Firefly by highlighting the appropriate on-screen
selection, first the media and then the action button, and
pressing the MENU/SELECT key on the remote control.
How to Automatically Copy Media
From a CD or DVD for Playback“Drop and Go”
The goal of “Drop and Go” is to allow you to place a CD or DVD
into the Firefly tray and have the system automatically copy the
media and then play it back on all four channels. No manual
playlist creation or file copying is required.
Creating a Drop & Go CD/DVD
1. Create four root-level directories on the Drop & Go CD/DVD,
named Channel1, Channel2, Channel3 and Channel4. The
directories must be on the root level and named as shown.
2. Place MPEG files into each directory as required. Files within
each Drop & Go directory are played in alphanumeric order.
Be sure to name files accordingly to match your desired
playback sequence.
Playing a Drop & Go CD/DVD
1. While Firefly is turned on and playing, open the CD/DVD tray.
13
Page 42

Quick Start Guide
2. Place the Drop & Go CD/DVD in the tray and close the tray.
3. Firefly will scan the CD/DVD and will automatically copy the
contents to its internal storage. Depending upon the amount of
content on the CD/DVD, this process may take several
minutes. During this time, the LCD on Firefly will display
“Drop And Go”.
4. Once the media transfer is complete, Firefly will automatically
play the contents within each directory on each channel in a
continuous loop and will eject the CD/DVD.
How To Create a Basic Playlist
Playing media on Firefly requires (a) that the MPEG videos
actually reside on the Firefly and (b) that a valid playlist, also
resides on the Firefly. The playlist can be created either directly on
the Firefly using its remote control or on a separate computer using
the WebView interface program (see Using the WebView Interface
on page 116).
Using the Remote Control
1. Point the remote control at Firefly’s IR window on the front
panel and press the MENU/SELECT key. A graphical interface
will appear on the output of Firefly video channel number one.
2. Use the navigation keys on the remote control to highlight
“Playlist Editor” and press the MENU/SELECT key on the
remote.
3. Move the highlight to “New Playlist” and press the MENU/
SELECT key. A dialog box will appear asking “Do you want to
create a new blank playlist?”. Press the MENU/SELECT key
to answer “Yes”.
4. Using the navigation and MENU/SELECT buttons on the
remote, create a name for the new playlist from the
alphanumeric screen.
14
Page 43

Quick Start Guide
CH 1 CH 2 CH 3 CH 4 Loaded Media
video1.mpg
New Playlist Name:
loop5_
a b c d e f g h i j
k l m n o p q r s t
u v w x y z 0 1 2 3
4 5 6 7 8 9 - _ [ ]
BACK DONE
video2.mpg
bikes.mp2
saturn.mpg
Clear
Save Cancel
Figure 5. New Playlist Name Entry Screen
Select a maximum of 14 characters as needed. If you wish to delete
a character, move the highlight down to BACK and press the
MENU/SELECT key. Continue pressing the MENU/SELECT key
to delete characters as needed. When you are finished, move the
highlight to DONE and press the MENU/SELECT key.
15
Page 44

Quick Start Guide
5. The graphical interface will now display separate tabs for each
of the four Firefly video output channels on the left side and
the list of available media on the right side.
Channel Tabs
Pla yli st
Channel
CH 1 CH 2 CH 3 CH 4 Loaded Media
cookie.m2p
demo6mb.m2p
Clear
[External AV]
cookie.m2p
demo6mb. m2p
logospin.m2p
memo . mpg
synctest.m2p
winter2. mpg
Save
Exit Options
Cancel
Figure 6. Playlist Editor Screen
a. Highlight the desired channel tab and press MENU/
SELECT on the remote to select that channel.
Media Window
Header
Avail able
Media
b. Use the navigation keys on the remote to move the highlight
to the right side of the display.
c. Use the navigation keys on the remote to highlight various
media. After each media file is highlighted, press the
MENU/SELECT or LEFT arrow key on the remote to add
that file, in order, to the playlist for the selected channel.
d. Continue this process until all channels (e.g., tabs) have
been populated with media, in the order in which they are to
be played.
16
Page 45

Quick Start Guide
6. When the playlist is complete, move the highlight to the Save
option on the screen. Press the MENU/SELECT key on the
remote. A dialog box will appear stating that the playlist is
saved and will give you the option to “Select it to play” or to
“Do not play it now”. Pressing the MENU/SELECT key on
“Select it to play” will select the newly created playlist to be
the active playlist (starting playback as soon as you exit).
Pressing the MENU/SELECT key while the highlight is on
“Do not play it now” will save the playlist for future use.
7. Press the EXIT key on the remote to exit and to begin
automatic playback of a previously selected playlist or the
newly created/selected playlist.
Software Updating
Visual Circuits is continuously looking for ways to improve and
expand its features and product performance. We have provided
you with a variety of simple methods in which to keep your Firefly
updated with the latest software for your application. Software
updates can be obtained from our website at
www.visualcircuits.com or contact a Visual Circuits representative
to obtain a CD/DVD or Smart Card media. Note that certain
optional upgrades may only be availble on CD/DVD or Smart Card
media.
Software updates and upgrades are processed with the following
Five methods.
1. CD/DVD ROM: Inserting a CD/DVD Updater Disc that
contains a .upd file extension will automatically upgrade &
restart the system. See System Software Update Process on
page 204
2. Multicast (optional) updating: An active update that finds a
.upd file will automatically update and restart the system. See
M
ULTICAST UPDATING on page 212
17
Page 46

Quick Start Guide
3. HTTP/FTP updating: An active update that finds a .upd file in
the /updates folder will automatically update & restart the
system. See Creating a Firefly FTP Update Account on
page 209
4. Smart Card: Typically used for “Feature Upgrades”. System
updates and current playlist restarts when card is inserted or
ejected. See Smart Card on page 105
5. Webview Firefly Update: Used to manually select the .upd file
from your PC through the Webview interface. System
automatically updates and restarts. See Webview Software
Update on page 121
18
Page 47

ENCODING REQUIREMENTS
AND RECOMMENDATIONS
In order to ensure proper playback on the Firefly, the MPEG
content must be encoded following a particular set of encoding
requirements. The Encoding Requirements, as well as the
Encoding Recommendations, listed below provide a brief set of
criteria to create MPEG files that will be compatible with the
Firefly playback system.
Encoding Requirements
1. Files must be program stream MPEG2 or system stream
MPEG1 of audio/video, or elementary stream MPEG2 or
MPEG1 of video only or audio only.
2. Use 4:2:0, not 4:2:2 encoding.
3. In MPEG-2, both audio and video fields should be encoded.
This is the normal default.
4. Audio only (Dolby Digital or MPEG Layer 2) files cannot be
mixed with files containing videos (MPEG, MPEG2 program
stream, video only).
5. Firefly – Standard IDE Hard Drive): The total bit rate of a
Firefly player must not exceed 40 mbps across four channels
(i.e. averaging 10 mbps per channel). Channels may be
encoded at different bit rates (up to 15 mbps on a given
channel) as long as 40 mbps is not exceeded across a single
hard drive (4-channel player).
6. The presentation time stamp (PTS) values contained in the
audio and video streams in a file must be continuous and
increasing. In particular, the PTS values should not reset to 0 at
any point in the file. The time between the first and last time
stamps in a file should reflect the actual duration of the file.
19
Page 48

Encoding Requirements and Recommendations
7. Files should be no less than 4 megabytes in size. If some of
your files are smaller than 4 megabytes, use an editor to
combine the files to create a single file at least 4 megabytes in
size.
8. Files should be no larger than 2 gigabytes in size.
Encoding Recommendations
1. Resolution: 720 X 480 or 704 X 480 in NTSC; 704 X 576 in
PAL.
2. Closed GOP (Group of Pictures) with an “I-frame” every 15
frames is recommended.
3. The recommended audio bit rate is 384kbps and a sampling
rate of 48khz. It is recommended to play back test files using
the original source tapes to confirm audio levels prior to
encoding an entire project. This will allow for calibration of
the encoding system to obtain a standard audio level.
4. Program stream files should have one end code (00 00 01 b9)
at the very end of the file. The Firefly can handle files without
end codes, but it is still a good idea to include one.
5. The bit rate can affect the size and transferability of the files.
The recommended bit rates for various types of video content
are as follows:
Bit Rate Video Content
4 mbps Good quality with low motion
6 mbps Good quality with typical motion
8 mbps Good quality with high motion
10 mbps High quality with demanding content
Table 2. Bit Rate Encoding Recommendations for Firefly
20
Page 49

Encoding Requirements and Recommendations
6. Although Firefly can transcode NTSC and PAL, it is
recommended to encode to the video standard (NTSC or PAL)
that you will be setting your Firefly to display.
7. When encoding files, annotate and store notes on the audio
levels of both the source tape and input settings of the encoder.
It will then be possible to verify audio levels of later encoding
sessions. It is desirable to maintain a baseline audio level
across all files of a presentation whether at single or multiple
locations. If no encoding notes or data is available from
previously encoded files, compare the files. When possible,
measure audio levels of the source tapes and of the encoded
files. At a minimum, listen to and compare files. Even if
encoding is done at the same production facility, variances
between sessions may occur. Once MPEGs are encoded, the
audio level of a file cannot be changed unless the file is reencoded or a new audio track is mixed.
8. MPEG files are constructed from intertwined (i.e. multiplexed)
audio and video streams. The length of video and audio stream
segments within MPEG files should be identical if possible.
Ending the audio segment at a .5 second interval (i.e., at an “Iframe”) will ensure identical stream lengths, providing smooth
and seamless looping playback.
9. When encoding SMPTE tracks it is recommended to encode
these tracks "hot"--at approximately +6db. This adjustment
can compensate for some SMPTE information that may be lost
during compression. Not all encoders will respond in the same
way. Sample testing should be done with all SMPTE tracks.
10. Standard color bars and audio test tones: MPEG files may be
encoded along with the content or source files for reference
and calibration. These encoded display test/tuning files should
be separate files--not headers or footers of the presentation.
21
Page 50

Encoding Requirements and Recommendations
11. To play back still images or computer-based graphics, we
recommend software encoders such as DVMPEG
(www.darvision.com). Yet, whenever possible, hardware-based
encoding systems are preferred.
NOTE
Multiplexing a blank audio track on all video only MPEG
files is highly recommended.
22
Page 51

REMOTE CONTROL
Remote Control Basics
Much like a TV or DVD remote control, the Firefly comes with its
own easy to use remote control. The remote control provides for a
wide variety of options.
Activating the Remote Control
In some situations there may be more than one Firefly in a given
installation and there will be a need to control these players
discretely even when they are all in range of a common remote
control. In these instances, it is necessary to be able to individually
activate and deactivate remote control response on each Firefly.
Activating and Deactivating the Remote
Control on a Specific Firefly
You can activate the Remote Control of any Firefly within range of
the remote by entering the IR Address of the desired Firefly and
pressing the CHAN+ key on the remote control. You can also
deactivate the remote control of any Firefly within range of the
remote by entering the IR address of the desired Firefly and
pressing the CHAN- key. For single digit addresses, you must type
the 0 in front of it (e.g. Type 01 and then press the CHAN+ key).
Globally Activating and Deactivating all
Firefly’s
To command ALL Firefly’s within range of the remote control to
begin responding, enter the address 00 followed by the CHAN+
key on the remote control.
23
Page 52

Remote Control
To command all Firefly’s within range of the IR remote to cease
responding, enter the address 00 followed by the CHAN- key on
the remote control.
Player Controls
You are able to access DVD-like controls for each channel of the
Firefly, essentially operating the Firefly like four conventional
DVD players. Functions such as the NEXT and PREVIOUS found
on DVD’s are available.
When you press either the RIGHT or LEFT player control keys on
the remote control, a white border, channel identifier and playback
status will be overlaid on the video. To change the border color,
press the UP arrow key. Figure 7 on page 25 illustrates the overlay.
This overlay will be continually maintained to represent the realtime conditions for that channel. The overlay will remain in place
for as long as player control is active on that channel.
The initial overlay will appear on channel one by default. To
change channels affected by the player controls, press the
corresponding channel number (5 = all channels) or the CHAN +
or - keys on the remote control.
NOTE
Whenever the IR remote control is in use
(example: in player control mode), Webview
& the front panel display menu six-button
interface will not function.
24
Page 53

Remote Control
TC: 00:03:28.12
CH 1
Figure 7. Player Control Display
Player Operation
Once a channel(s) has been selected for manual player control, the
keys on the lower portion of the remote control designated for
player control will be active. The following section describes the
function and operation of each player control key. They are very
similar to the player controls of a conventional DVD player.
NOTE
The Scan Forward and Scan Reverse keys only
operate when controlling one channel at a time. All
other player controls can be used when multiple
channels are selected.
25
Page 54

Remote Control
Play
Pressing the PLAY key will cause all selected channels to begin
playing from the current video file position. If one or more of the
selected channels are already playing at the time this command is
received, these channels will continue playing and will be
unaffected by the command.
Stop
Pressing the STOP key will cause all selected channels to cease
playback and return to the beginning of their playlist, remaining
that way until a further command is received. If one or more of the
selected channels is already stopped at the time this command is
received, these channels will remain stopped and will be
unaffected by the command. If a selected channel is paused or
scanning forward or backward at the time this command is
received, that operation will be interrupted. That channel will be
returned to the beginning of its playlist where it will remain until a
further command is received. Moreover, once stopped, the selected
channels will display a black screen.
Pause
If a channel is not presently paused and receives a pause command,
it will enter the pause mode. If a channel is already paused at the
time it receives a pause command, it will move forward a single
step. Press play to resume normal playback.
Scan Forward
The scan forward command will be triggered by the F.F. (>>) key
on the remote control and will sequentially advance the content
forward at a rapid rate. The status of the scan forward operation
will be displayed at the bottom of the screen via a status bar and a
time/frame indicator. The background will be composed of a still
image representing the exact place where the fast forward key was
first pressed. Therefore, the advancing or fast forwarded video will
26
Page 55

Remote Control
not be displayed. To resume normal playback, press the PLAY key
or the F.F. key again. To reverse or rewind the content, press the
REW key. Moreover, note that the fast forward function cannot go
past the start or end of the current file and that it only operates on
one channel at a time.
Scan Reverse
The scan reverse command will be triggered by the REW (<<) key
on the remote control and will sequentially move the content
backwards at a rapid rate. The status of the scan reverse operation
will be displayed at the bottom of the screen via a status bar and a
time/frame indicator. The background will be composed of a still
image representing the exact place where the rewind key was first
pressed. Therefore, the reversing or rewinding video will not be
displayed. To resume normal playback, press the PLAY key or the
REW key again. To advance or fast forward the content, press the
F.F. key. Moreover, note that the rewind function cannot go past
the start or end of the current file and that it only operates on one
channel at a time.
Skip Forward
The skip forward command will be initiated by pressing the
RIGHT arrow on the menu navigation keys section of the remote
control and is similar to the skip forward function of a DVD
player. When the skip forward command is received, selected
channels will be stepped forward to the next video in the playlist.
27
Page 56

Remote Control
Skip Reverse
The skip reverse command will be initiated by pressing the LEFT
arrow on the menu navigation keys section of the remote control
and is similar to the skip reverse function of a DVD player. When
the skip reverse command is received, selected channels will be
stepped back to the beginning of the video. As with CD and DVD
players, there will be a “double-click” window that allows you to
skip backward to the previous video by pressing skip reverse while
within the first few seconds of a video.
28
Page 57

Remote Control
Menu Options
The Firefly Main Menu is accessed by pressing the MENU/
SELECT key on the remote control while in either regular
playback, Drop & Go or Player Control mode. When the MENU
command is received, the menu will be displayed.
While in the menu options, the playback activity that was in
progress will be suspended. Channel 1 will display the Firefly
Main Menu.
Firefly Main Menu
The Firefly Main Menu includes six options:
1. Playlist Editor
2. Schedule Editor
3. Playback Selector
4. Media Maintenance
5. System Settings (General, Video, Audio, External Control,
Network, Logs, WebView, FTP, HTTP, Multicast, Smart Card
& Advanced)
6. Exit Menu
You can scroll through these options with the UP and DOWN
arrow keys on the menu navigation section of the remote control.
When you have highlighted the desired option, press the MENU/
SELECT key to select that option. You may also directly select
any menu option by pressing the associated number key on the
remote control.
29
Page 58

Remote Control
Exiting the Firefly Main Menu
You can exit the Firefly Main Menu and return to normal video
playback by scrolling to the “Exit Menu” option then pressing
MENU/SELECT. You can also exit by simply pressing the EXIT
key on the menu navigation section of the remote. Note that if
there is no content selected or scheduled to play, the screen will be
black.
Playlist Editor
Within the Playlist Editor, you will be able to arrange videos on the
Firefly into a playlist. A playlist is essentially a group of videos
arranged in a particular playback sequence. A playlist can be used
for immediate playback or saved on the Firefly for future playback.
In addition, within the Playlist Editor, you will be able to utilize
graphic overlays. A graphic overlay is a static image (.bmp, .jpg,
.gif, .tif, .tga or .png) placed over an associated video. You can
assign individual graphic overlays to specific videos within a
playlist or to all videos within a playlist if desired. The graphic
overlay feature provides an effective way to display a company
logo, sale sign or any other image over your regular video
playback.
Before going into the actual Playlist Editor, you will be routed to
the Playlist Chooser screen.
30
Page 59

Select a Playlist and
Press MENU to Edit
Remote Control
[New Playlist]
local1.fpl
local2.fpl
local3.fpl
local4.fpl
local5.fpl
Now Playing :
local1.fpl
Press 0
To Delete
Press EXIT
To Return
To Main Menu
Figure 8. Playlist Editor Chooser Screen
In this screen you will have the option to start creating a new
playlist, start editing an existing playlist or to delete an existing
playlist.
To start creating a new playlist:
❏ Use the UP and DOWN keys on the remote control to
highlight “New Playlist” and then press the MENU/
SELECT key. A dialog box will appear asking “Do you
want to create a new blank playlist?”. Press the MENU/
SELECT key to answer “Yes”.
❏ Use the menu navigation keys and MENU/SELECT key on
the remote to create a name for the new playlist from the
alphanumeric screen.
31
Page 60

Remote Control
CH 1 CH 2 CH 3 CH 4 Loaded Media
a b c d e f g h i j
k l m n o p q r s t
u v w x y z 0 1 2 3
4 5 6 7 8 9 - _ [ ]
BACK DONE
video1.mpg
New Playlist Name:
loop5_
video2.mpg
bikes.mp2
saturn.mpg
Clear
Save Cancel
Figure 9. New Playlist Name Entry Screen
Select a maximum of 14 characters as needed. If you wish to delete
a character, move the highlight down to BACK and press the
MENU/SELECT key. Continue pressing the MENU/SELECT key
to delete characters as needed. When you are finished, move the
highlight to DONE and press the MENU/SELECT key.
The graphical interface will now display the main Playlist Editor
screen comprised of separate tabs for each of the four Firefly video
output channels on the left side and the list of available media on
the right side.
To start editing an existing playlist:
❏ Use the UP and DOWN arrow keys on the remote control to
highlight the playlist you would like to edit and then press
the MENU/SELECT key.
The graphical interface will now display the main Playlist Editor
screen comprised of separate tabs for each of the four Firefly video
output channels on the left side and the list of available media on
the right side.
32
Page 61

Remote Control
To delete an existing playlist:
❏ Use the UP and DOWN arrow keys on the remote control to
highlight the playlist you would like to delete and then press
the 0 key on the remote.
The playlist will be deleted from the Firefly.
Channel Tabs
Playlist
Channel
CH 1 CH 2 CH 3 CH 4 Loaded Media
cookie.m2p
demo6mb.m2p
Cl ear
Save
Exit Options
Figure 10. Playlist Editor Screen
Adding Videos to a Playlist
[External AV]
cooki e.m2p
demo6mb.m2p
logospi n.m2p
memo .mp g
synctest.m2p
winter 2.mpg
Canc el
Media Window
Header
Availabl e
Med ia
1. The Channel 1 (CH1) tab should be highlighted as well as
selected. If it is not, you will need to press the RIGHT arrow
key until the “Ch1” tab is highlighted and then press the
MENU/SELECT key to select the playlist channel. You may
also press the number of the channel on the keypad of the
remote to highlight and select the channel at the same time.
33
Page 62

Remote Control
2. To browse for videos for “CH1”, press the RIGHT arrow key
until “Loaded Media” is highlighted. Then press the DOWN
arrow key to scroll through the list of Loaded Media. Once you
reach the last media file in the list, you can press the UP arrow
to scroll back up through the list. In instances where there is
more than one page of “Loaded Media”, you can use the FF
and REW keys to scroll up and down through the “Loaded
Media” by page.
3. To copy a video to “CH1”, highlight the desired video and
press the MENU/SELECT key or LEFT arrow key on the
remote. You will then see the name of the video appear at the
end of the list on the left side of the monitor in the Playlist
Channel. Repeat this step to copy additional videos to “CH1”.
4. Once you have completed copying videos to “CH1”, you can
move on to Channels 2, 3 and 4 to copy videos.
NOTE
While working in the Playlist Channel or the Loaded
Media list, pressing the EXIT key on the remote
control is a quick way to ju mp back up to the header
of the list.
Removing Videos from a Playlist
Pressing the right arrow key while the highlight is on a video in the
playlist channel for a channel tab (ex. “CH1”) will remove the
highlighted video from the playlist (not from the Firefly entirely).
Repeat this process to remove additional videos from the playlist.
Moving Videos within a Playlist
Frequently you may determine that you would like to change the
order of the videos to be played in a given playlist.
To move the location of a video within a playlist:
34
Page 63

Remote Control
1. Scroll through the Playlist Channel list using the UP and
DOWN arrow keys to put the highlight on the video file to be
moved.
2. When you have highlighted the desired video file, press the
MENU/SELECT key on the remote. The text for that video file
changes to green indicating that the video is selected. If you
accidently select the wrong media file, press the MENU/
SELECT key again while the highlight is on that media file to
de-select it.
3. Then, using the UP and DOWN arrow keys, move the
highlighted video to your desired location in the playlist.
4. Once in the proper location, press the MENU/SELECT key to
de-select the file. This will leave it in your desired “slot” within
the playlist.
5. Continue this process to move additional videos within a
playlist.
Viewing Media Information
Because the visible space in the Playlist Channel and Loaded
Media lists is limited, you may not be able to see the entire name
of a video or graphic overlay. The Media Information feature is
available to help you view basic information about media loaded
on the Firefly. This window will show up to 60 characters for the
name, file type description (if available), size of the media (in
bytes) and the date and time the media was transferred to the
Firefly.
You may obtain information about any video or graphic overlay
listed under the Playlist Channel and Loaded Media list by placing
the highlight on the media and then pressing the 0 button on the
remote control. After pressing the 0 button, the following window
will be displayed:
35
Page 64

Remote Control
CH 1 CH 2 CH 3 CH 4 Loaded Media
jackpots_first_birthday_celebrati
on_test123.mpg
MPEG system stream data
video1.mpg
video2.mpg
bikes.mp2
saturn.mpg
size: 10518424 bytes
date/time: 06/20/02 13:52
Clear
Save
Figure 11. Playlist Editor Media Information Window
Shuffling Video Playback on a Channel
Occasionally, you may want to vary the playback order of your
videos for a given playlist. The Shuffle playback feature within the
Playlist Editor allows you to do just that. By activating Shuffle
playback, videos within the playlist you are working with will be
played back in random order.
Cancel
In addition, keep in mind that Shuffle is set on a channel-bychannel basis. This means that if you would like the playlist’s
videos to have randomized playback on all 4 channels, you will
need to activate Shuffle for each individual channel. Alternatively,
if desired, you may shuffle the playback order for any other
combination of channels, while maintaining the regular playback
order for the others.
To turn on Shuffle playback for a playlist on a specific
channel:
36
Page 65

Remote Control
1. (From within the Playlist Editor main screen) Place the
highlight on the desired Channel number header (for example,
on “CH 1”).
2. Press the UP arrow on the remote control. You will notice that
[Shuffle] will appear on the bottom of the playlist channel
indicating that Shuffle playback has been activated for that
particular channel.
Media Window
Channel Tabs
Playlist
Channel
Shuffle
Playback
Enabled
CH 1 CH 2 CH 3 CH 4 Loaded Media
cookie .m2p
demo6mb.m2p
memo .mp g
winter2.mpg
monkey1.m2p
train31.m2p
carrie26.mpg
jungl e_dark.mpg
rainforest _rain.m2p
demo1a.m2p
[Shuff le]
[External AV]
cooki e.m2p
demo6mb.m2p
logospi n.m2p
memo .mp g
synctest.m2p
winter 2.mpg
monkey1.m2p
train31.m2p
carrie26.mpg
jungl e_dark. mpg
rainforest_rain.m2p
de mo1a . m2p
Header
Availabl e
Med ia
Cl ear
Save
Exit Opti ons
Canc el
Figure 12. Playlist Editor Screen With Shuffle Playback
Enabled
To turn off Shuffle playback for a playlist on a specific
channel.
1. Place the highlight on the desired Channel number header (for
example, on “CH1”).
2. Press the UP arrow on the remote control. You will notice that
[Shuffle] will disappear from the bottom of the playlist channel
indicating that Shuffle playback has been deactivated for that
particular channel.
37
Page 66

Remote Control
Adding Graphic Overlays to Videos within a Playlist
Using the graphic overlays feature in Firefly is a great way to add a
company logo, sale sign or any other image (.bmp, .jpg, .gif, .tif,
.tga or .png) on top of your video playback. Because the graphic
overlays are video file specific, you will be able to assign
individual graphic overlays to specific videos within a playlist, or
to all videos within a playlist if desired. Moreover, as described in
Working with Graphic Overlays in a Playlist on page 40, you will
have the option to customize the transparency level, key color, fade
in and out times and the position on the screen that the graphic
overlays will appear in.
The process for adding graphic overlay files to a playlist is
basically the same as the process of adding video files to a playlist.
The one significant difference, however, is that graphic overlays
are always linked to particular videos.
To add a graphic overlay to a video within a playlist, follow the
steps below:
1. (In the Playlist Editor main screen) The tab of the channel you
would like to start with should be highlighted as well as
selected. If it is not, you will need to press the RIGHT arrow
key until the channel tab is highlighted and then press the
MENU/SELECT key to select the playlist channel. You may
also press the number of the channel on the keypad of the
remote to highlight and select the channel at the same time.
2. To browse for graphic overlays for your desired channel, press
the RIGHT arrow key until “Loaded Media” is highlighted.
Then press the DOWN arrow key to scroll through the list of
Loaded Media. Once you reach the last media file in the list,
you can press the UP arrow to scroll back up through the list. In
instances where there is more than one page of “Loaded
Media”, you can use the FF and REW keys to scroll up and
down through the “Loaded Media” by page.
38
Page 67

Remote Control
3. To copy a graphic overlay to your desired channel, highlight
the desired graphic overlay file and press the MENU/SELECT
key or LEFT arrow key on the remote. When adding a graphic
overlay, it will always appear at the bottom of the Playlist
Channel.
4. Use the UP arrow key or EXIT key to move the highlight to the
“Loaded Media” header. Then use the LEFT arrow key to
move over to the Playlist Channel.
5. Scroll through the list using the UP and DOWN arrow keys to
put the highlight on the graphic overlay file to be assigned to a
video.
6. When you have highlighted the desired graphic overlay file,
press the MENU/SELECT key on the remote. The text for that
graphic overlay changes to a green indicating that the graphic
overlay is selected. If you accidently select the wrong file,
press the MENU/SELECT key again while the highlight is on
the correct one to de-select it.
7. Then, using the UP and DOWN arrow keys, move the
highlighted graphic overlay to your desired location in the
playlist. The graphic overlay must be positioned directly below
the video you wish to associate it with.
8. Once in the proper location, press the MENU/SELECT key to
de-select the file. This will leave it attached to your desired
video within the playlist.
9. Repeat steps 2 through 8 to copy and assign additional graphic
overlays to videos on your initial desired channel.
10. Once you are done copying and assigning graphic overlays to
videos within your initial channel, you can move on to the
other three channels, if desired.
39
Page 68

Remote Control
Removing Graphic Overlays from a Playlist
Pressing the right arrow key while the highlight is on the graphic
overlay within a playlist channel for a channel tab (ex. “CH1”) will
remove the highlighted selection from the playlist (not from the
Firefly entirely). Repeat this process to remove additional graphic
overlays from the playlist.
Working with Graphic Overlays in a Playlist
As previously noted, graphic overlays exist in a playlist as
attributes of specific video entries. The only image types that are
compatible with Firefly are .bmp, .jpg, .gif, .tif, .tga or .png.
Graphic Overlay Properties
Overlay Name:
Vertical:
Horizontal:
Key Color:
Key R:
Key G:
Key B:
Transparency %:
Fade In Seconds:
Fade Out Seconds:
VCCdemo.bmp
Top
Right
None
0
0
0
10
1
1
Exit
Figure 13. Graphic Overlay Properties Screen
40
Page 69

Remote Control
NOTE
While copying .jpg, .g if, .tif, .tga, .png or non 256color .bmp image files, Firefly con verts those files to a
standard 8-bit, 256-color bitmap format and reduces
the image sizes, if necessary, to the system
maximum of 720 x 480 for NTSC. This is necessary
to ensure that all image files used for graphic
overlays are consistent in appearance and
functionality. As a result, all image files listed under
“Loaded Media” will appear with “.bmp” as their
extension.
If you do not want your images to be converted by
Firefly, create them according to the parameters
outlined above before transferring.
To access the Graphic Overlay Properties screen, position the
highlight on the desired graphic overlay file in the playlist
channel and then press the MENU/SELECT key twice.
Within the Graphic Overlay Properties screen, you move from
field to field using the UP and DOWN arrows key on the remote.
Once within a field, you adjust the values using the LEFT and
RIGHT arrow keys or the number keys (for applicable fields where
a numerical value is required).
The process for altering the characteristics of a specific graphic
overlay is as follows:
1. If desired, select the vertical position on the screen where you
would like to have the graphic overlay located (top, center or
bottom).
2. If desired, select the horizontal position on the screen where
you would like to have the graphic overlay located (left, center
or right).
41
Page 70

Remote Control
3. If desired, adjust the key color. The key color property deals
with blocking out or cropping specified colors within the
graphic overlays. For example, if the image you are using is
your company logo (in color) and is placed on top of a white
rectangular background, you may only want to display the
company logo, instead of the logo on top of the white
background.
Within the key color property, there are three options: None,
Auto Key or RGB. You can choose None to not use the key
color option at all. You can choose Auto Key have the system
automatically “make transparent” the background color. The
system selects the color in the upper left most corner of the
image to determine which color to remove. In most instances,
Auto Key will be the easiest to use and most effective “make
transparent” method. Or you can choose to manually set the
RGB (Red, Green and Blue) key color level. The RGB option
requires you to know the specific RGB value of the color you
would like to “make transparent”.
NOTE
Use a solid background (one color) in your graphic
overlays for the Auto key feature to work properly.
NOTE
Entering your own RGB values for the key color feature
only works with 8 bit bitmap g raphics less than or equal to
720x480 resolution.
42
Page 71

Remote Control
4. If desired, select a level of transparency between 0 and 100%.
This value will adjust to what extent the graphic overlay covers
the video below. If you want the graphic overlay to blend in
with the video, you may select a higher transparency level.
Conversely, if you would like the graphic overlay to stand out,
you may select a lower or zero-value transparency level.
5. If desired, adjust the rate (in seconds) at which you would like
the graphic overlay to fade in on the screen.
6. If desired, adjust the rate (in seconds) at which you would like
the graphic overlay to fade out on the screen.
7. You may exit and return to the Playlist Editor by pressing the
MENU/SELECT key while the highlight is on “Exit” or by
simply pressing the EXIT key on the remote control. If for
some reason you are not satisfied with the changes you made,
go back into the Graphic Overlay Properties screen to make the
necessary changes or remove and reapply the graphic overlay
to begin again.
After you have adjusted the graphic overlay properties, the specific
graphic overlay you were just dealing with and all subsequent
graphic overlays you add to playlists will be set according to these
properties. This is, however, only until you adjust the properties for
another graphic overlay. At that point, the newly adjusted
properties will be applied to all subsequent graphic overlays.
NOTE
If your use of Firefly requires frequent changes to the
graphic overlay properties, you may want to use the
WebView interface (see Working With Graphic Overlays
in a Playlist on page 131) to be able to more effectively
manipulate these settings.
43
Page 72

Remote Control
Creating an External A/V Playlist
Using the external audio/video feature is a great way to insert
external programming and special events into your presentation
mix using the Firefly Media Player network. This feature allows
you to schedule live audio and video playback, such as a satellite
or cable television broadcast, or switch to local or national
programming in the event of breaking news or an emergency. The
“scheduling” of the external A/V events is accomplished by
inserting the external A/V event(s) into a playlist and then
scheduling the playlist using the schedule editor.
NOTE
External Audio/Video is an optional feature enabled
by a pre-programmed Smart Card.
If your Firefly does not have the External A/V f eature
(menu items are “grayed out”) and you would like to
purchase it, contact a Visual Circuits representative
at 1-800-250-5533.
NOTE
Genlock must be turned on in the Firefly system
settings for external audio/video switching to work
properly. See Genlock on page 79 for details on how
set this parameter.
If you do not genlock to the video input, the Firefly
system will turn this parameter on temporarily for the
duration of the playlist; however , note that this
temporary setting switch may cause picture roll to
occur at the beginning and/or end of the playlist.
44
Page 73

Remote Control
If you plan on having external audio and/or video playing for an
extended period of time, the easiest way to set this up is as follows:
1. Create a new playlist and name it something descriptive, such
as “External AV 1”.
2. (In the Playlist Editor main screen) The tab of the channel you
would like to start with should be highlighted as well as
selected. If it is not, you will need to press the RIGHT arrow
key until the channel tab is highlighted and then press the
MENU/SELECT key to select the playlist channel. You may
also press the number of the channel on the keypad of the
remote to highlight and select the channel at the same time.
3. Press the RIGHT arrow key until “Loaded Media” is
highlighted. Then press the DOWN arrow key to scroll down
to the listing [External AV].
4. To insert an external A/V event to your desired channel,
highlight the [External AV] listing and press the MENU/
SELECT key or LEFT arrow key on the remote. When adding
an external A/V event, it will always appear at the bottom of
the Playlist Channel.
Media Window
Channel Tabs
External A/V
Event
Playlist
Channel
CH 1 CH 2 CH 3 CH 4 Loaded Media
[Ext 00:00:30]
Cl ear
[External AV]
cooki e.m2p
demo6mb.m2p
logospi n.m2p
memo .mp g
synctest.m2p
winter 2.mpg
Save
Canc el
Header
External A/V
Event
Availabl e
Med ia
Figure 14. Playlist Editor Screen With External A/V Playlist
Exit Opti ons
45
Page 74

Remote Control
5. Repeat steps 1 through 3 to add additional external A/V events
to any of the other channels, if desired.
6. Save the playlist and exit the Playlist Editor.
7. Go into the Schedule Editor and schedule the “External AV 1”
playlist for your desired time slot, such as from 12:00 to 17:00
(see Schedule Editor on page 52 for details on scheduling).
Adding External A/V Events to a Playlist
If your application for utilizing the external audio/video feature
involves playing back regular internal videos with an occasional
insertion of external audio and/or video, you may want to add
external A/V events to an existing playlist.
The process for adding external A/V events to a playlist is similar
to the process of adding video files to a playlist.
To add an external A/V event to a playlist, follow the steps below:
1. (In the Playlist Editor main screen) The tab of the channel you
would like to start with should be highlighted as well as
selected. If it is not, you will need to press the RIGHT arrow
key until the channel tab is highlighted and then press the
MENU/SELECT key to select the playlist channel. You may
also press the number of the channel on the keypad of the
remote to highlight and select the channel at the same time.
2. Press the RIGHT arrow key until “Loaded Media” is
highlighted. Then press the DOWN arrow key to scroll down
to the listing [External AV].
46
Page 75

Remote Control
3. To insert an external A/V event to your desired channel,
highlight the [External AV] listing and press the MENU/
SELECT key or LEFT arrow key on the remote. When adding
an external A/V event, it will always appear at the bottom of
the Playlist Channel.
Media Window
Channel Tabs
Playlist
Channel
External A/V
Event
CH 1 CH 2 CH 3 CH 4 Loaded Media
cookie .m2p
demo6mb.m2p
memo .mp g
winter2.mpg
[Ext 00:00:30]
[External AV]
cooki e.m2p
demo6mb.m2p
logospi n.m2p
memo .mp g
synctest.m2p
winter 2.mpg
Header
External A/V
Event
Availabl e
Med ia
Cl ear
Save
Exit Opti ons
Canc el
Figure 15. Playlist Editor Screen With External A/V Event
4. Repeat steps 1 through 3 to add additional external A/V events
to the playlist on your initial channel or any of the other
channels, if desired.
See Moving External A/V Events within a Playlist on page 48 for
details on moving the external A/V event(s) to a different location
within the playlist.
See Editing External A/V Events within a Playlist on page 48 for
details on editing the audio, video and duration properties of
external A/V event(s).
Removing External A/V Events from a Playlist
Pressing the right arrow key while the highlight is on the external
A/V event within a playlist channel for a channel tab (ex. “CH1”)
will remove the highlighted selection from the playlist.
47
Page 76

Remote Control
Repeat this process to remove additional external A/V events from
the playlist.
Moving External A/V Events within a Playlist
You may determine that you would like to change the location of
an external A/V event within a given playlist.
To move the location of an external A/V event within a playlist:
1. Scroll through the Playlist Channel list using the UP and
DOWN arrow keys to put the highlight on the external A/V
event to be moved.
2. When you have highlighted the desired external A/V event,
press the MENU/SELECT key on the remote. The text for that
listing changes to green indicating that the external A/V event
is selected. If you accidently select the wrong listing, press the
MENU/SELECT key again while the highlight is on that
listing to de-select it.
3. Then, using the UP and DOWN arrow keys, move the
highlighted external A/V event to your desired location in the
playlist.
4. Once in the proper location, press the MENU/SELECT key to
de-select the listing. This will leave it in your desired “slot”
within the playlist.
5. Continue this process to move additional external A/V events
within a playlist, if desired.
Editing External A/V Events within a Playlist
The External A/V Event Properties screen is available for you to
view and/or set the basic properties of an external A/V event.
Within this screen, you will be able to set the external A/V event
duration, select or deselect external audio and select or deselect
external video.
48
Page 77
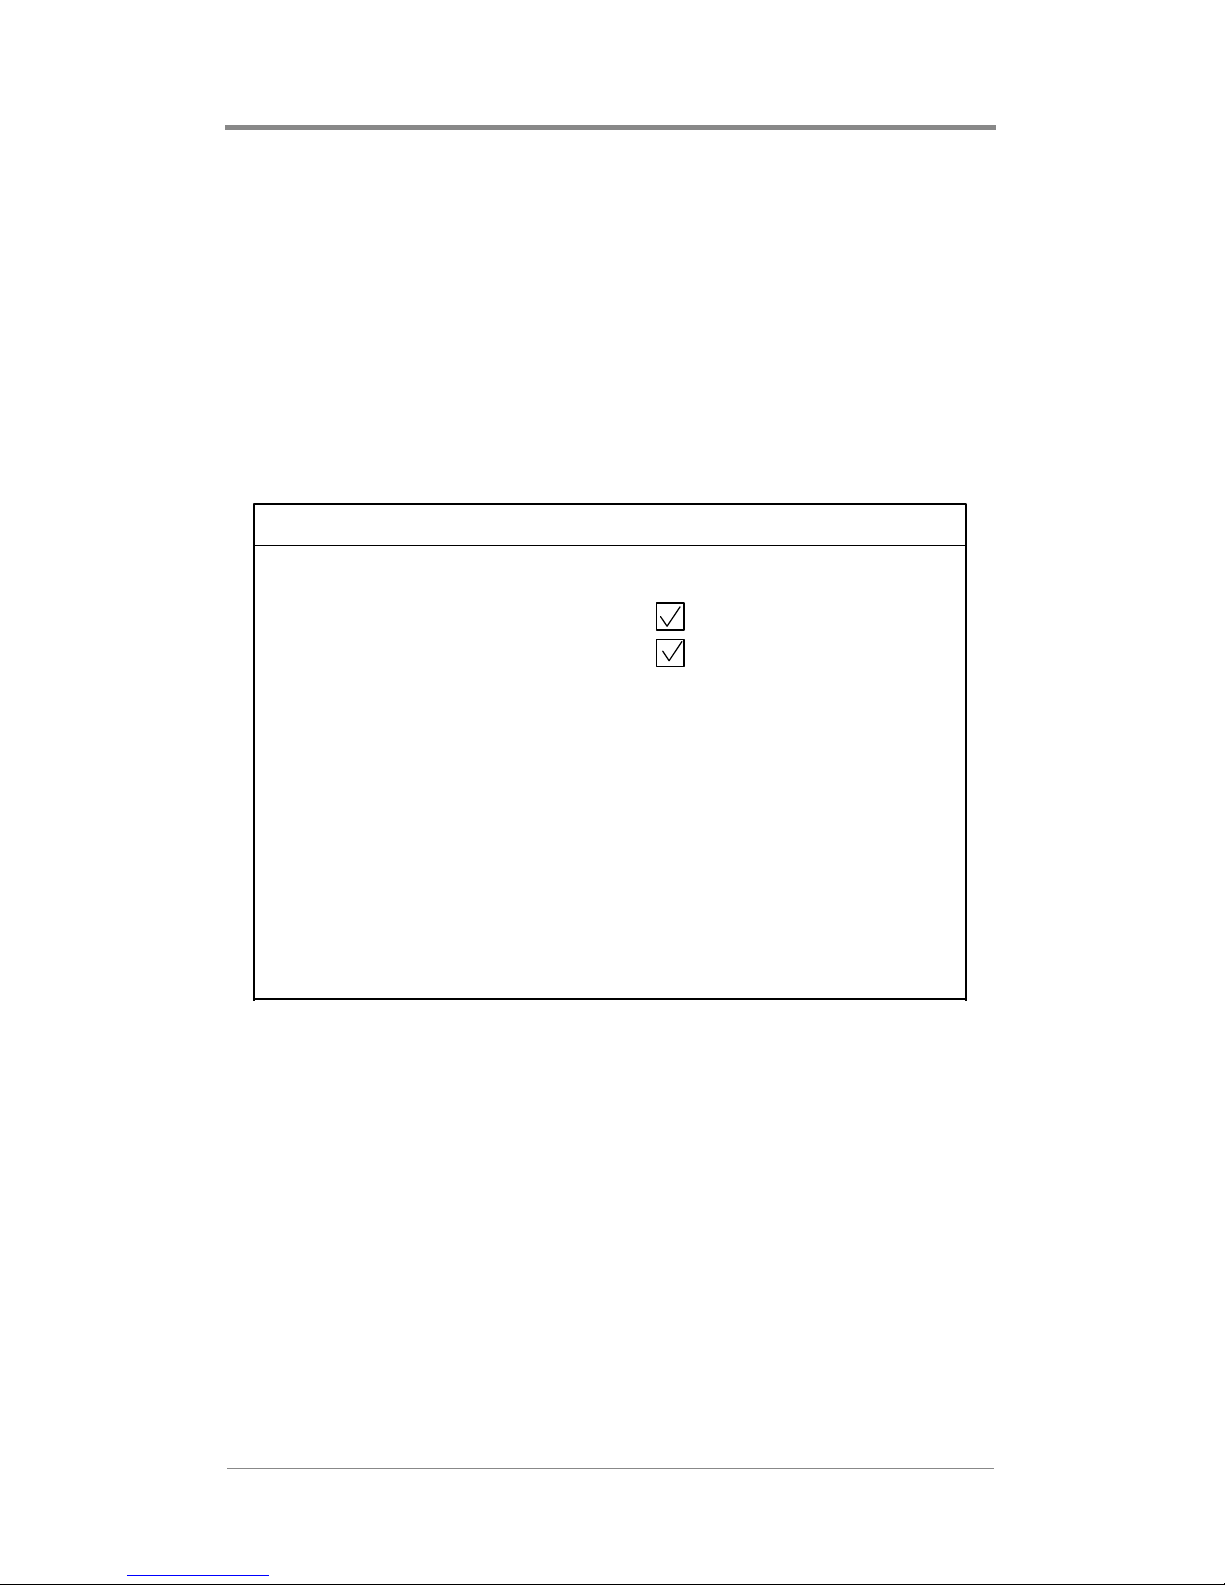
Remote Control
You may obtain information or set the basic properties of any
external A/V event listed under the Playlist Channel list by placing
the highlight on the “[Ext 00:00:30]” listing and then pressing the
MENU/SELECT key once on the remote control to select it and
then a second time to enter the External A/V Event Properties
screen.
After pressing the key sequence above, the following screen will
be displayed:
External A/V Event Properties
Duration:
External Audio:
External Video:
Exit
00:15:30
Figure 16. External A/V Event Properties Screen
49
Page 78

Remote Control
Duration:
Set the external A/V event duration by using the UP, DOWN,
LEFT and RIGHT arrow keys on the remote. Select the number of
hours, minutes and seconds (HH:MM:SS) for the external A/V
event to take place.
External Audio:
Turn this option on or off using the MENU/SELECT key on the
remote. A checked box indicates that audio for the external event is
selected and an unchecked box indicates that audio for the external
video is not selected.
External Video:
Turn this option on or off using the MENU/SELECT key on the
remote. A checked box indicates that video for the external event is
selected and an unchecked box indicates that video for the external
video is not selected.
50
Page 79

Remote Control
Exiting the Playlist Editor
At any point while working with the Playlist Editor you may exit
and return to the main menu by pressing the EXIT key. If you are
within the Playlist Selections list or Loaded Media list, you will
need to press EXIT twice. The first time you press the EXIT key
will bring you to the header of the list. When you press EXIT
again, a dialog box will appear as shown below:
CH 1 CH 2 CH 3 CH 4 Loaded Media
[External AV]
video2.mpg
Do You Really Want to Exit?
Continue Editing
bikes.mp2
saturn.mpg
Save Changes And Exit
Discard Changes And Exit
Clear
Save
Cancel
Figure 17. Exit Playlist Editor Dialog Box
❏ The “Continue Editing” option is highlighted as the default
answer when this dialog box appears. You may scroll
between the options with the UP and DOWN arrow keys on
the menu navigation section of the remote control. Once the
desired option is highlighted, press MENU/SELECT to
accept that selection.
❏ If you choose the “Save Changes & Exit” option, the edited
playlist is saved. You are then returned to the main menu.
❏ If you choose the “Discard Changes & Exit” option, all
changes made to the playlist during this editing session are
discarded. You are then returned to the main menu.
❏ If you choose the “Continue Editing” option, the dialog box
is cleared from the screen and you are returned to the editor.
51
Page 80

Remote Control
Schedule Editor
Within the Schedule Editor, you will be able to work with
playback schedules. A schedule is a group of one or more playlist
events. An event is composed of a single playlist with adjustable
playback properties. Beyond simple start and stop times, events
can be set to play on certain days of the week, interrupt other
events, play just once or at certain repeating intervals.
In addition, the Video Dates Editor (a feature within the Schedule
Editor), allows you to assign a specific start date, end date or both
a start and an end date for an individual video. This is especially
useful when you have time sensitive media that you cannot have
played before a certain date, after a certain date or outside a certain
date range.
Before going into the actual Schedule Editor, you will be routed to
the Schedule Chooser screen.
Select a Schedule and
Press MENU to Edit
[New Schedule]
sched1.fsc
sched4.fsc
sched7.fsc
sched8.fsc
sched9.fsc
Now Playing :
sched1.fsc
Press 0
To Delete
Press EXIT
To Return
To Main Menu
Figure 18. Schedule Editor Chooser Screen
52
Page 81

Remote Control
In this screen you will have the option to start creating a new
schedule, to start editing an existing schedule or to delete an
existing schedule.
To start creating a new schedule:
❏ Use the UP and DOWN arrow keys on the remote control to
highlight “New Schedule” and then press the MENU/
SELECT key. A dialog box will appear asking “Do you
want to create a new blank schedule?”. Press the MENU/
SELECT key to answer “Yes”.
❏ Use the menu navigation keys and MENU/SELECT key on
the remote to create a name for the new schedule from the
alphanumeric screen.
Schedule Editor
Playlist
local3 --Default-- x x x x x x x - - - - : - -
file4 09:56 09:57 x x x - - x - x x - - : - -
Start Stop
New Schedule Name:
SMTWTFS
sched5_
I O
file4 12:00 12:01 x x x - - x - x x - - : - -
a b c d e f g h i j
file4 05:00 05:01 x x x - - x - x x - - : - -
k l m n o p q r s t
u v w x y z 0 1 2 3
[Add Event] [Delete Event]
4 5 6 7 8 9 - _ [ ]
BACK DONE
Edit
Figure 19. New Schedule Name Entry Screen
Dates Help Save Cancel
Intvl
53
Page 82

Remote Control
Select a maximum of 14 characters as needed. If you wish to delete
a character, move the highlight down to BACK and press the
MENU/SELECT key. Continue pressing the MENU/SELECT key
to delete characters as needed. When you are finished, move the
highlight to DONE and press the MENU/SELECT key.
The graphical interface will now display the main Schedule Editor
screen.
To start editing an existing schedule:
❏ Use the UP and DOWN arrow keys on the remote control to
highlight the schedule you would like to edit and then press
the MENU/SELECT key.
The graphical interface will now display the Schedule Editor
screen.
To delete an existing schedule:
❏ Use the UP and DOWN arrow keys on the remote control to
highlight the schedule you would like to delete and then
press the 0 key on the remote.
The schedule will be deleted from the Firefly.
54
Page 83
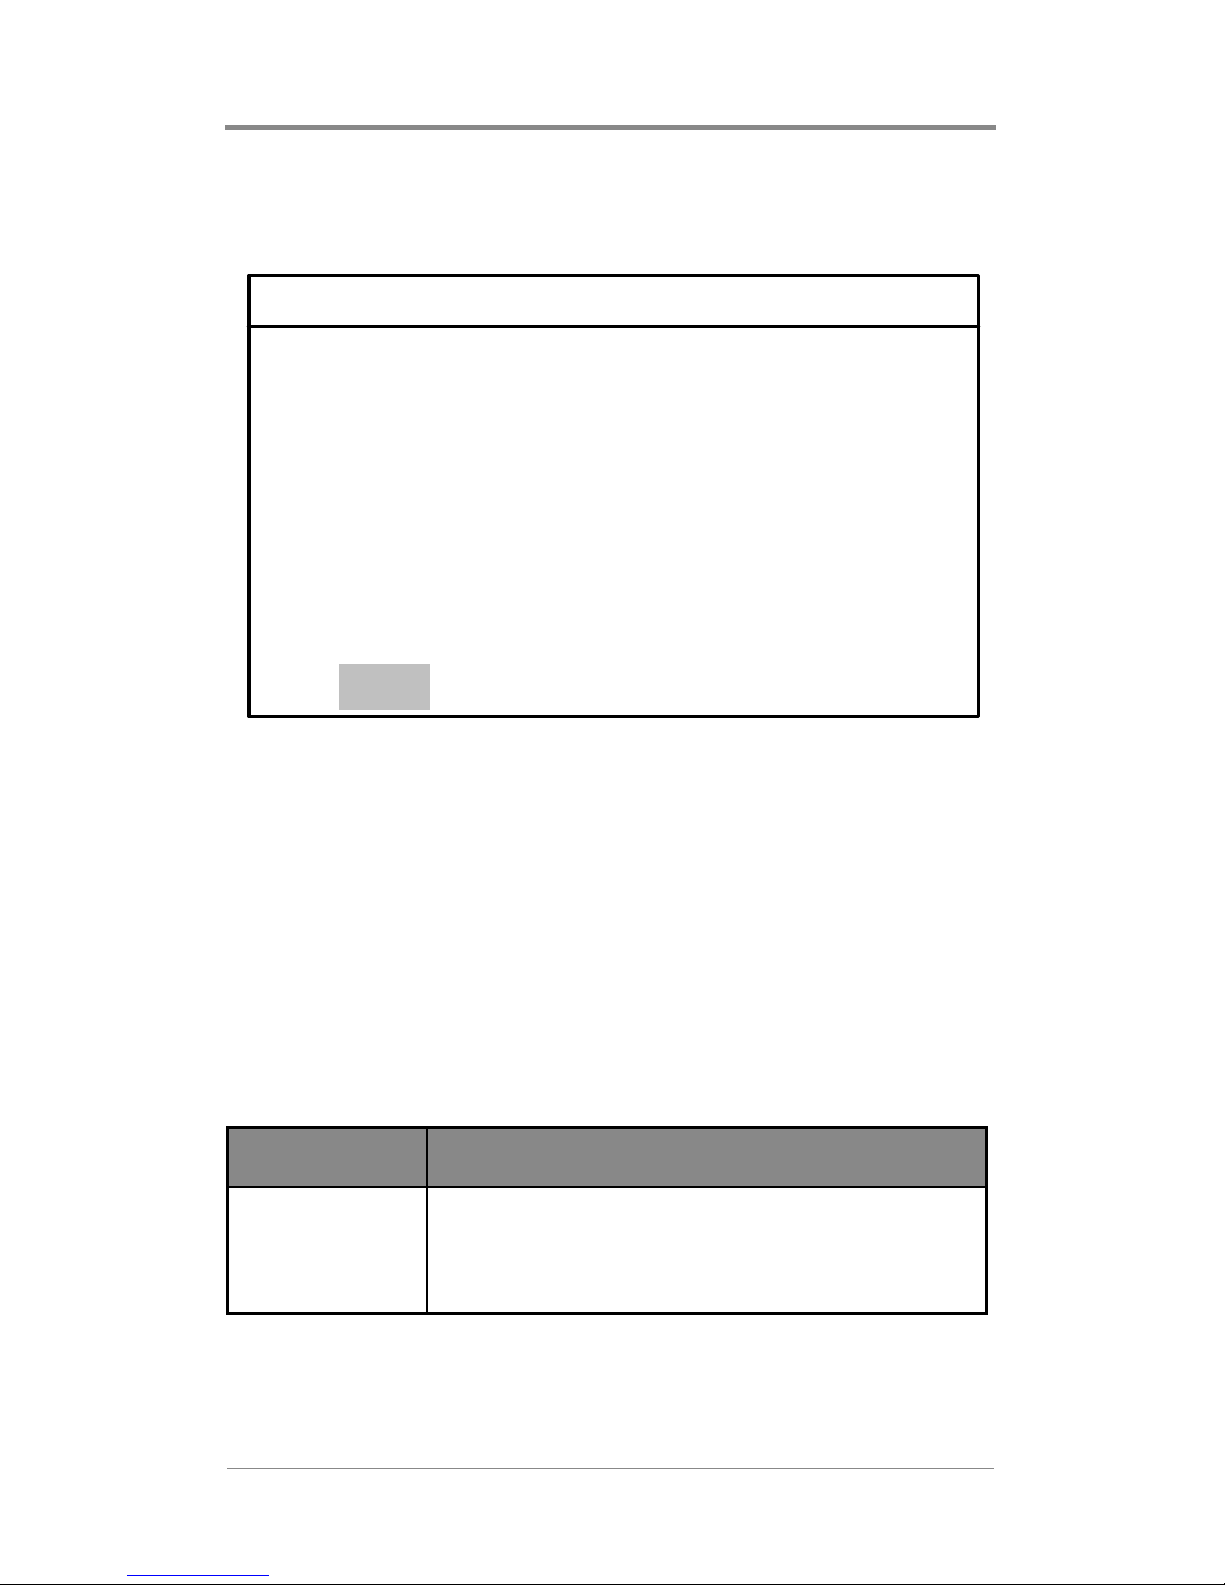
Schedule Editor
Remote Control
Playlist
local3 --Default-- x x x x x x x - - - - : - -
file4 08:00 12:00 x x x - - x - x x - - : - -
Start Stop
SMTWTFS
I O
Intvl
file5 12:00 17:30 x x x - - x - x x - - : - file6 17:30 22:00 x x x - - x - x x - - : - [Add Event] [Delete Event]
Edit
Figure 20. Schedule Editor Screen
Once you are in the Schedule Editor screen, you will have to
option to: add an event to a schedule, delete an event from a
schedule, or edit an event within a schedule. In addition, using the
Video Date Editor, you will be able to assign date rules to
individual videos if desired.
Dates Help Save Cancel
Each of the major tasks in the Schedule Editor involve adjusting
the event property fields. The following table provides basic
overviews and examples for each of the event property fields:
Property Description
Playlist Designates which playlist to play.
Example: “I’d like to have my product
demonstration playlist selected to play”.
55
Page 84

Remote Control
Property Description
Start Designates time to start playing playlist.
Example: “I’d like to have my playlist start
playing at 9:00”.
Stop Designates time to stop playing playlist.
Example: “I’d like to have my playlist stop
playing at 18:00”.
SMTWTFS Designates days of week to play playlist.
Example: “I’ d like to hav e my pla ylist pl ay only
on Thursdays, Fridays and Saturdays”.
I (Interrupt) Option to cut off video pla ying in pre vious
playlist instead of waiting for video to
finish playing.
Example: “I’d like to have the video in my
sales promotion playlist interrupt the video in
my product demonstration playlist”.
O (Play
Once)
Option to play playlist exactly once and
then return to previously scheduled
playlist.
Example: “I’d like to play my one hour
specials playlist just once during the business
day”.
Intvl
(Interval)
Option to repeat a “play once” event
periodically at a specified interval.
Example: “I’d like to play my one hour
specials playlist once every 2 hours
throughout the b usiness day”.
Table 3. Event Property Field Examples
56
Page 85

Remote Control
Adding an Event to a Schedule
To add an event to a schedule:
1. Using the LEFT and RIGHT arrow keys, position the highlight
on the “Edit” option at the bottom of the screen and then press
MENU/SELECT.
2. Using the menu navigation keys, position the highlight on the
“Add Event” option and then press MENU/SELECT.
3. Edit the event properties as described below.
a. Playlist: Press the MENU/SELECT key while the highlight
is on the playlist field. Then use the UP and DOWN arrow
keys to highlight your desired playlist and press the MENU/
SELECT key to select it. When done, press the RIGHT
arrow key to advance to the next field.
Schedule Editor
Playlist
local3 --Default-- x x x x x x x - - - - : - -
file4 08:00 12:00 x x x - - x - x x - - : - file5 12:00 15:30 x x x - - x - x x - - : - -
file6 15:30 22:00 x x x - - x - x x - - : - [Add Event] [Delete Event]
Start Stop
Playlist Select
file3.fpl
file4.fpl
file5.fpl
file6.fpl
SMTWTFS
I O
local9.fpl
Edit
Figure 21. Playlist Selector Window
Dates Help Save Cancel
Intvl
57
Page 86

Remote Control
b. Start: Use the number keys and RIGHT arrow key to set the
specific start time (24-hour clock) for the playlist. When
done, press the RIGHT arrow key to advance to the next
field.
c. Stop: Use the number keys and RIGHT arrow key to set the
specific stop time (24-hour clock) for the playlist. When
done, press the RIGHT arrow key to advance to the next
field.
d. SMTWTFS: Press the MENU/SELECT key to choose
which days of the week the playlist will play on. “x”
indicates the day is selected and “-” indicates the day is not
selected. When done, press the RIGHT arrow key to
advance to the next field.
e. I (Interrupt): Press the MENU/SELECT key to choose to
have the first video in a scheduled playlist start playing
precisely at its schedule time (interrupting or “cutting off”
the video playing in the previously scheduled playlist). This
is useful if you have a time sensitive playlist. “x” indicates
that “Interrupt” is selected, interrupting the previous video
and “-” indicates that “Interrupt” is not selected, allowing a
smooth transition to the first video in the next playlist.
When done, press the RIGHT arrow key to advance to the
next field.
f. O (Play Once): Press the MENU/SELECT key to choose to
have the playlist played back only once (regardless of its
time allotment). “x” indicates that “Play Once” is selected
and “-” indicates that “Play Once” is not selected. When
done, press the RIGHT arrow key to advance to the next
field.
g. Intvl (Interval): Press the MENU/SELECT key to choose
to have a “Play Once” event played back once at a
designated time interval. Use the number keys and RIGHT
arrow key to set the interval time.
4. Using the menu navigation keys on the remote, move the
highlight to “Save” at the bottom of the screen and press the
MENU/SELECT key.
58
Page 87

Remote Control
5. A dialog box will appear stating that the schedule is saved and
will give you the option to “Select it to play” or to “Do not play
it now”. Pressing the MENU/SELECT key on “Select it to
play” will select the newly created playlist to be the active
playlist (starting playback as soon as you exit). Pressing the
MENU/SELECT key while the highlight is on “Do not play it
now” will save the playlist for future use.
Deleting an Event from a Schedule
To delete an event from a schedule, use the following steps:
1. Using the LEFT and RIGHT arrow keys, position the highlight
on the “Edit” option at the bottom of the screen and then press
the MENU/SELECT key.
2. Using the menu navigation keys, position the highlight on
“Delete Event” and then press the MENU/SELECT key. The
highlight will now be in “delete mode”, highlighting all event
fields across a given event.
3. Using the UP and DOWN arrow keys, locate the event to be
deleted. Position the highlight on the event line and press the
MENU/SELECT key to delete it from the schedule.
4. Using the menu navigation keys on the remote control, move
the highlight to “Save” at the bottom of the screen and press
the MENU/SELECT key.
5. A dialog box will appear stating that the schedule is saved and
will give you the option to “Select it to play” or to “Do not play
it now”. Pressing the MENU/SELECT key on “Select it to
play” will select the newly created playlist to be the active
playlist (starting playback as soon as you exit). Pressing the
MENU/SELECT key while the highlight is on “Do not play it
now” will save the playlist for future use.
Editing an Event within a Schedule
To edit an event within a schedule, use the following steps:
59
Page 88

Remote Control
1. Using the LEFT and RIGHT arrow keys, position the highlight
on the “Edit” option at the bottom of the screen and then press
the MENU/SELECT key.
2. Using the UP and DOWN arrow keys, locate the event to be
edited.
3. Edit any or all of the event properties, if desired, as described
below.
a. Playlist: Press the MENU/SELECT key while the highlight
is on the playlist. Then use the UP and DOWN arrow keys
to highlight your desired playlist and press the MENU/
SELECT key to select it. When done, press the RIGHT
arrow key to advance to the next field.
b. Start: Use the number keys and RIGHT arrow key to set the
specific start time for the playlist. When done, press the
RIGHT arrow key to advance to the next field.
c. Stop: Use the number keys and RIGHT arrow key to set the
specific stop time for the playlist. When done, press the
RIGHT arrow key to advance to the next field.
d. SMTWTFS: Press the MENU/SELECT key to choose
which days of the week the playlist will play on. “x”
indicates the day is selected and “-” indicates the day is not
selected. When done, press the RIGHT arrow key to
advance to the next field.
e. I (Interrupt): Press the MENU/SELECT key to choose to
have the first video in a scheduled playlist start playing
precisely at its schedule time (interrupting or cutting off the
video playing in the previously scheduled playlist). This is
useful if you have a time sensitive playlist. “x” indicates that
60
Page 89

Remote Control
“Interrupt” is selected, interrupting the previous video and
“-” indicates that “Interrupt” is not selected, allowing the
video to finish playing before the new playlist begins
playing. When done, press the RIGHT arrow key to advance
to the next field.
f. O (Play Once): Press the MENU/SELECT key to choose to
have the playlist played back only once (regardless of its
time allotment). “x” indicates that “Play Once” is selected
and “-” indicates that “Play Once” is not selected. When
done, press the RIGHT arrow key to advance to the next
field.
g. Intvl (Interval): Press the MENU/SELECT key to choose
to have a “play once” event played back once at a
designated time interval. Use the number keys and RIGHT
arrow key to set the interval time.
4. Using the menu navigation keys on the remote control, move
the highlight to “Save” at the bottom of the screen and press
the MENU/SELECT key.
5. A dialog box will appear stating that the schedule is saved and
will give you the option to “Select it to play” or to “Do not play
it now”. Pressing the MENU/SELECT key on “Select it to
play” will select the newly created playlist to be the active
playlist (starting playback as soon as you exit). Pressing the
MENU/SELECT key while the highlight is on “Do not play it
now” will save the playlist for future use.
Assigning Dates for Video Playback
The Video Dates Editor allows you to designate the actual date(s) a
particular video is allowed to play. By selecting a start date, an end
date or both a start and an end date you can establish a “date rule”
for the playback of a particular video.
61
Page 90

Remote Control
Video Dates Editor
Video Name
Start Date
Stop Date
proddemo2.mpg 02/01/03 -- / -- / --
market31.mpg -- / -- / -- 05/31/03
janpromo.mpg 01/01/03 01/31/03
jackpot7.mpg 01/01/03 01/07/03
[Add] [Delete]
Figure 22. Video Dates Editor Screen
Depending on your application, you may have a need for using any
or all of the three previously mentioned date rules. The table below
provides some “real world” examples for using the Video Dates
Editor:
Start
Date
02/01/03 - -/- -/- - Start date with no stop date.
Stop
Date
62
Description
Example: “I want my product
demonstration video available to
playlists the day the product is
released, but no sooner than that”.
Page 91

Remote Control
Start
Date
- -/- -/- - 05/31/03 No start date with stop date.
01/01/03 01/31/03 Both start date and stop date.
Stop
Date
Description
Example: “I want my new marketing
campaign video available to playlists
from now until the end of the spring
months”.
Example: “I’ want my January
promotions video available to
playlists only during the month of
January”.
Table 4. Video Date Rule Examples
To add a date rule for a video, use the following steps:
1. (From the Schedule Editor main screen) Using the LEFT and
RIGHT arrow keys, position the highlight on the “Dates”
option at the bottom of the screen and then press the MENU/
SELECT key. The Video Dates Editor screen will be displayed.
2. Using the menu navigation keys, position the highlight on
“Add” and then press the MENU/SELECT key. The Video
Selector screen will appear.
3. Using the UP and DOWN arrow keys, position the highlight on
the video you would like to assign a date rule to and then press
MENU/SELECT.
4. If desired, use the number keys and RIGHT arrow key to set
the specific start date for the video. When done, press the
RIGHT arrow key to advance to the next field.
5. If desired, use the number keys and RIGHT arrow key to set
the specific stop date for the video.
6. Repeat steps 2 through 5 to add date rules to additional videos
if desired. When you are done, press the EXIT key to return to
the Schedule Editor main screen.
63
Page 92

Remote Control
To delete a date rule for a video, use the following steps:
1. (From the Schedule Editor main screen) Using the LEFT and
RIGHT arrow keys, position the highlight on the “Dates”
option at the bottom of the screen and then press the MENU/
SELECT key. The Video Dates Editor screen will be displayed.
2. Using the menu navigation keys, position the highlight on
“Delete” and then press the MENU/SELECT key.
3. Using the UP and DOWN arrow keys, position the highlight on
the video you would like to delete the date rule for and then
press MENU/SELECT.
4. Repeat steps 2 and 3 to delete date rules for additional videos if
desired. When you are done, press the EXIT key to return to
the Schedule Editor main screen.
To edit a date rule for a video, use the following steps:
1. (From the Schedule Editor main screen) Using the LEFT and
RIGHT arrow keys, position the highlight on the “Dates”
option at the bottom of the screen and then press the MENU/
SELECT key. The Video Dates Editor screen will be displayed.
2. Using the UP and DOWN arrow keys, position the highlight on
the video you would like to edit the date rule for.
3. If desired, use the number keys and RIGHT arrow key to set or
edit the specific start date for the video. When done, press the
RIGHT arrow key to advance to the next field.
4. If desired, use the number keys and RIGHT arrow key to set or
edit the specific stop date for the video.
5. Repeat steps 2 through 4 to edit date rules for additional videos
if desired. When you are done, press the EXIT key to return to
the Schedule Editor main screen.
64
Page 93

Remote Control
Exiting the Schedule Editor
At any point while you are working within the Schedule Editor you
may exit and return to the main menu by pressing the EXIT key on
the remote control. When the EXIT key is pressed, a dialog box
appears as shown below:
Schedule Editor
Playlist
local3 --Default-- x x x x x x x - - - - : - -
file4 08:00 12:00 x x x - - x - x x - - : - file5 12:00 15:30 x x x - - x - x x - - : - -
Do You Really Want to Quit?
file6 15:30 22:00 x x x - - x - x x - - : - -
Start Stop
Continue Editing
SMTWTFS
I O
[Add Event] [Delete Event]
Save Changes And Exit
Discard Changes And Exit
Edit
Figure 23. Exit Schedule Editor Dialog Box
Dates Help Save Cancel
Playback Selector
Intvl
The Playback Selector allows you to select a different playlist or
schedule to play back on the Firefly.
After selecting the Playback Selector from the Firefly main menu,
the following screen will be displayed:
65
Page 94

Remote Control
sched2.fsc
sched.fsc
local1.fpl
local2.fpl
local3.fpl
local4.fpl
Select a Schedule or Playlist
Press MENU to Load
Now Playing :
sched2.fsc
Press EXIT
To Return
To Main Menu
Figure 24. Playback Selector Screen
Loading a Playlist or Schedule
A list of playlists and schedules located on the Firefly will be listed
in the box located on the left.
Use the UP and DOWN arrow keys to highlight the desired playlist
or schedule and then press the MENU/SELECT key.
Once you have selected a playlist or schedule, you will be returned
to the Firefly main menu. Once you exit the main menu, the loaded
playlist will begin playing or the loaded schedule will begin
playing (when scheduled).
66
Page 95
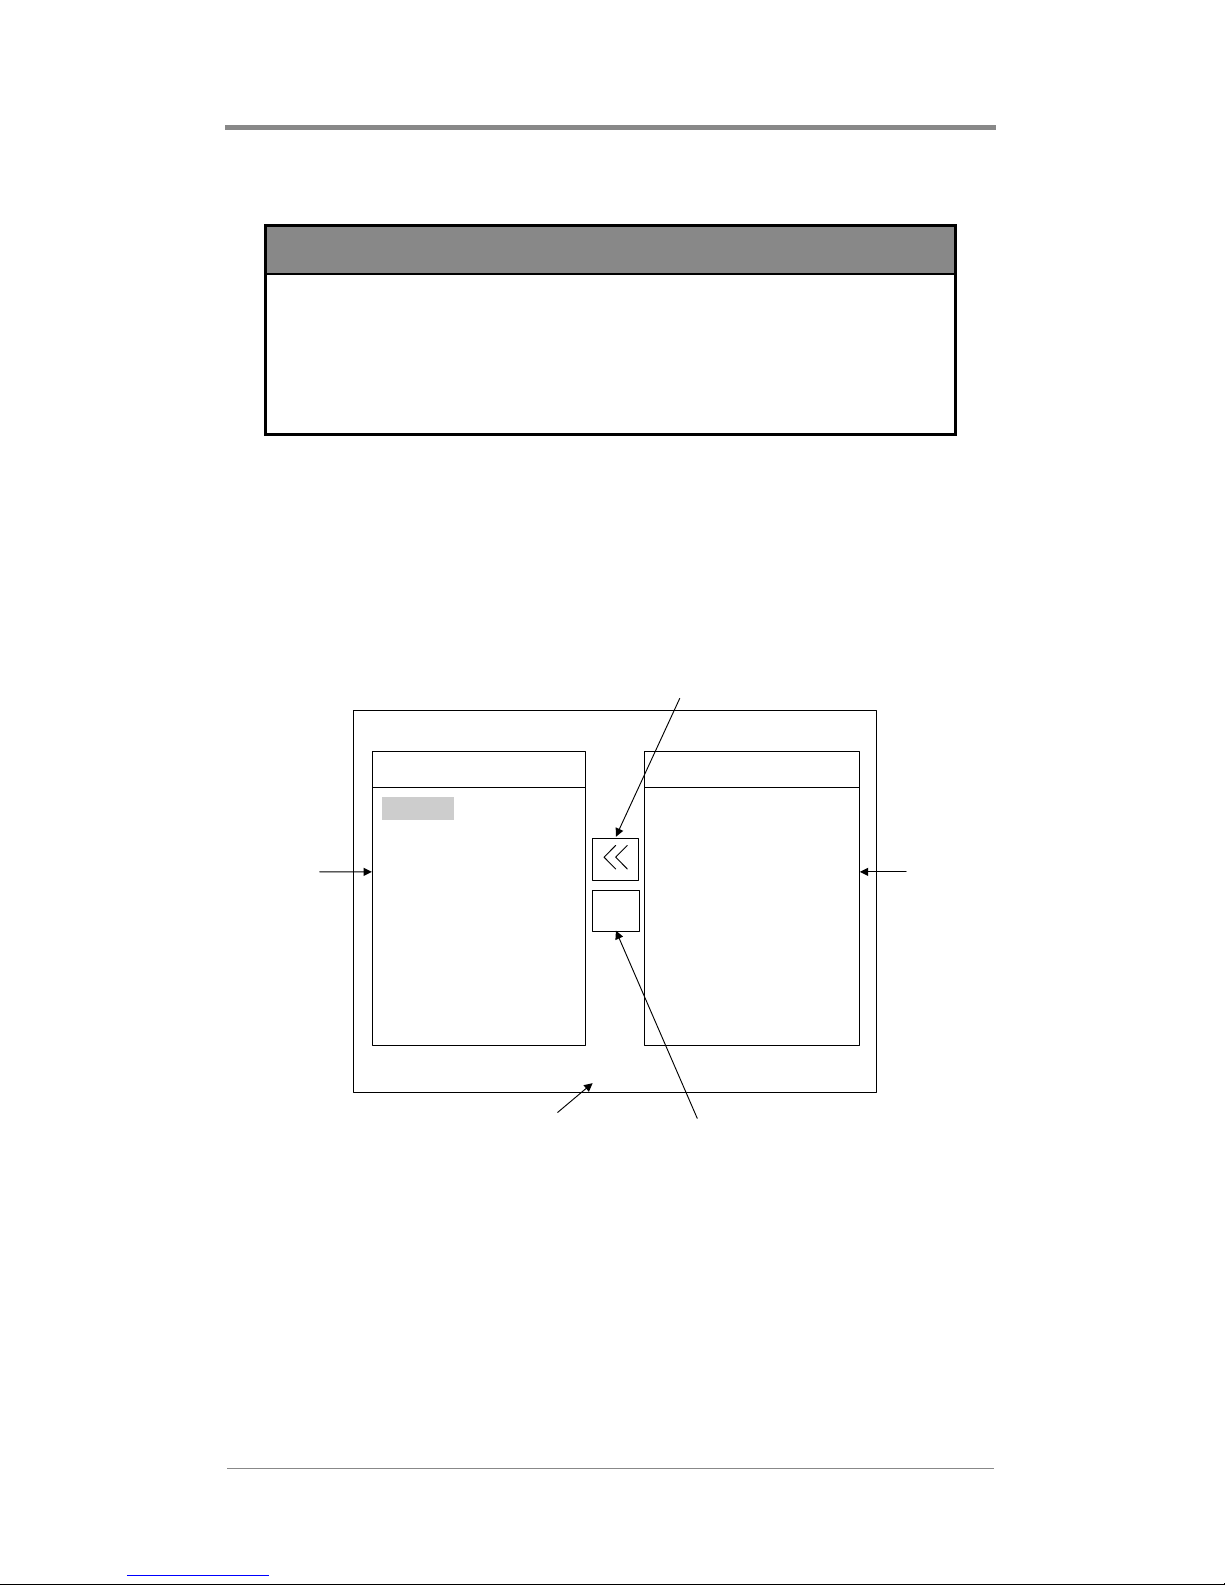
Remote Control
NOTE
Playlists and schedules can not be deleted in the
Playback Selector screen. The delete option will only
be available while in the Playlist Editor or Schedule
Editor screens.
Media Maintenance
The “Media Maintenance” screen enables you to manually copy
media from a CD or DVD to Firefly, and to delete unwanted
media. Upon selecting the “Media Maintenance” option from the
main menu, the following screen will be displayed:
Copy Button
CD/DVD ROM
/monthly videos
january.mpg
february.mpg
march.mp2
april.mpg
/seasonal videos
spring.mp2
summer.mp2
/overlays
superfly.bmp
Size: 257M
Delete Button
CD/DVD
Media List
Firefly
Media List
Loaded Media
test.mpg
video1.mpg
video2.mp2
sample1.mpg
scarecrow.mpg
sample2.mp2
supersteaks.mp2
pony.bmp
chimp.bmp
Free: 21039M
Exit Button
X
Exit
Figure 25. Media Maintenance Screen
You will be able to move between “Loaded Media”, “CD/DVD
ROM”, and the buttons on the screen using the LEFT and RIGHT
arrow keys on the menu navigation section of the remote control.
You can scroll within the media lists and buttons using the UP and
DOWN arrow keys on the remote control.
67
Page 96

Remote Control
Within the CD/DVD ROM list, the entries may be organized by
directories. These directories will be apparent because they will be
proceeded by a forward slash (example: “/seasonal videos”). Each
of the videos belonging to that particular directory will be listed
immediately after the directory name.
In cases where there is more than one page of media located on
either the “Loaded Media” or “CD/DVD ROM” windows, you can
use the F.F. (>>) key on the remote to scroll down by page or the
REW (<<) key to scroll up by page.
Because the visible space in the Loaded Media and CD/DVD
ROM lists is limited, you may not be able to see the entire name of
a video or graphic overlay. The Media Information feature is
available to help you view basic information about media loaded
on the Firefly or on a CD/DVD in the Firefly. This window will
show up to 60 characters for the name, in addition to the size of the
media (in bytes) and the date and time the media was transferred to
the Firefly.
You may obtain information about any video or graphic overlay
listed under the Loaded Media list or CD/DVD ROM list by
placing the highlight on the media and then pressing the 0 button
on the remote control. After pressing the 0 button, the following
window will be displayed:
68
Page 97

Remote Control
Loaded Media
jackpots.mpg
sears.mpg
bikes.mp2
saturn.mpg
newscipt1.glo
starwars2.mpg
oldscript.glo
sony.mp2
sixflags.mpg
supersteaks.mp2
Free: 21039M
MPEG system stream data
size: 10518424 bytes
date/time: 06/20/03 13:52
bellatlantic.mpg
hitachi.mpg
Test123.mpg
?
Exit
ebay.mp2
radioshack.mpg
chilis.mp2
mcdonalds.mp2
march2001.glo
CD/DVD ROM
Size: 257M
Figure 26. Media Maintenance Media Information Window
Selecting Files to Copy or Delete
To select a group of media files to copy or delete:
❏ Scroll through the CD/DVD media list to put the highlight
on the media file to be selected. Note that the media list
may contain file directories. If directories exist, you will not
need to open a directory folder to access the files within
(like in a Windows application). Instead, the media files
will be directly available immediately after each directory
name.
❏ When you have highlighted your desired media file, press
the MENU/SELECT key on the remote control. The text for
that media file changes to a green indicating that the media
file is selected.
69
Page 98

Remote Control
❏ Then continue to scroll through the list selecting other
media in the same fashion until all the media to be copied or
deleted are green.If you accidently select the wrong media
file, press the MENU/SELECT key again while the
highlight is on that media file to de-select it.
Copying Selected Files
Once a media file or group of media files have been selected from
the “CD/DVD ROM” window for copying to Firefly, you can copy
by moving the highlight to the COPY (<<) button and pressing the
MENU/SELECT key on the remote control. A dialog box will
appear asking for confirmation of the copy operation:
Loaded Media
levis.mpg
sears.mpg
bikes.mp2
saturn.mpg
newscipt1.glo
starwars2.mpg
oldscript.glo
sony.mp2
sixflags.mpg
supersteaks.mp2
Free: 21039M
You have chosen to copy
from CD/DVD to the system
bellatlantic.mpg
5 media files
Is this correct?
Do Not Copy
?
hitachi.mpg
ebay.mp2
radioshack.mpg
chilis.mp2
mcdonalds.mp2
march2001.glo
Yes Copy
Exit
CD/DVD ROM
Size: 257M
Figure 27. Copy Confirmation Dialog Box
The 5 represents the number of media files to be copied. The
highlight, by default, appears on the “Do Not Copy” option. You
can move between the two options using the UP and DOWN arrow
keys on the menu navigation section of the remote control. When
your desired choice is highlighted, press the MENU/SELECT key
on the remote control to confirm the selection.
70
Page 99

Remote Control
IMPORTANT
Firefly cannot read or copy consumer DVD movies.
Only non-encrypted MPEG videos stored on data
DVD's can be copied.
If the “Yes Copy” option is selected, the confirmation dialog box is
replaced with a copy progress dialog box as shown below:
Loaded Media
levis.mpg
sears.mpg
bikes.mp2
saturn.mpg
newscipt1.glo
starwars2.mpg
oldscript.glo
sony.mp2
sixflags.mpg
supersteaks.mp2
Media Copy in Progress
Now Copying 1 of 6:
bellatlantic.mpg
hitachi.mpg
ebay.mp2
radioshack.mpg
<media name>
Press EXIT to abort
?
chilis.mp2
mcdonalds.mp2
march2001.glo
Time Left: 1:32
13% Done
Exit
CD/DVD ROM
Size: 257MFree: 21039M
Figure 28. Copy Progress Dialog Box
The <media name> field is updated as media are copied. “Time
Left” and “% Done” allow you to see the progress of the file
currently being copied (not all of the files selected to copy) to the
Firefly.
71
Page 100

Remote Control
NOTE
While copying .jpg, .g if, .tif, .tga, .png or non 256color .bmp image files, Firefly con verts those files to a
standard 8-bit, 256-color bitmap format and reduces
the image sizes, if necessary, to the system
maximum of 720 x 480 for NTSC. This is necessary
to ensure that all image files used for graphic
overlays are consistent in appearance and
functionality. As a result, all image files listed under
“Loaded Media” will appear with “.bmp” as their
extension.
If you do not want your images to be converted by
Firefly, create them according to the parameters
outlined above before transferring.
At any time, you may abort the procedure by pressing the EXIT
key. After all media have been copied, you will be returned to the
“Media Maintenance” screen.
Deleting Selected Files
To delete media files from the Firefly, you will first need to select
them. Follow Selecting Files to Copy or Delete on page 69 to
select the files you wish to delete.
Once you have selected a media file or group of media files from
the “Loaded Media” window, you can delete them by moving the
highlight to the DELETE (X) button and pressing the MENU/
SELECT key on the remote control. A dialog box will appear
asking for confirmation of the delete operation:
72
 Loading...