


NAS-34
4 Bay Gigabit SATA NAS
User’s Guide
FCC Certifications
This Equipment has been tested and found to comply with the limits for a Class A digital device,
pursuant to part 15 of the FCC Rules. These limits are designed to provide reasonable protection
against harmful interference when the equipment is operated in a commercial environment. This
equipment generates, uses, and can radiate radio frequency energy and, if not installed and used in
accordance with the instruction manual, may cause harmful interference to radio communications.
Operation of this equipment in a residential area is likely to cause harmful interference in which
case the user will be required to correct the interference at his own expense.
This device complies with Part 15 of the FCC Rules. Operation is subject to the following two
conditions: (1) this device may not cause harmful interference, and (2) this device must accept any
interference received; including interference that may cause undesired operation.
CE Mark Warning
This equipment complies with the requirements relating to electromagnetic compatibility, EN 55022
Class A for ITE, the essential protection requirement of Council Directive 89/336/EEC on the
approximation of the laws of the Member States relating to electromagnetic compatibility.
Company has an on-going policy of upgrading its products and it may be possible that information
in this document is not up-to-date. Please check with your local distributors for the latest
information. No part of this document can be copied or reproduced in any form without written
consent from the company.
Trademarks:
All trade names and trademarks are the properties of their respective companies.
Copyright © 2007, All Rights Reserved.
1

Table of Contents
OVERVIEW............................ 4
Unpacking information ................................................................4
Introduction to the 4-Bay Desktop Gigabit SATA NAS ......................4
Key Features ...................................................................... 4
Front Panel ........................................................................ 5
Rear Panel ......................................................................... 6
INSTALLATION GUIDE........... 8
Hardware Installation ..................................................................8
Making Connection with the Device ............................................ 12
To access the folders in the device .......................................... 14
Software Installation .................................................................15
Installing the EZIP Backup .................................................... 15
EZ VIEW UTILITY.................17
Introduction............................................................................. 17
Getting Started .................................................................. 17
Connecting the device with EZ View ......................................... 30
MANAGEMENT GUIDE ..........32
Starting the Graphic User Interface (GUI) .....................................32
Using the Graphic User Interface (GUI) ........................................ 33
Understanding the GUI......................................................... 33
Management items list ......................................................... 34
Status ..................................................................................... 35
System....................................................................................36
Login .............................................................................. 36
Config............................................................................. 37
Reboot............................................................................ 38
Shutdown ........................................................................ 38
Firmware upgrade .............................................................. 38
HD Sleep ......................................................................... 39
Time............................................................................... 40
Network .................................................................................. 41
Hostname setup................................................................. 41
2

IP address setup ................................................................ 41
To enable DHCP client .....................................................................41
To configure the IP address for the device ..............................................42
Jumbo mode..................................................................................42
Alert ............................................................................... 43
DDNS ............................................................................. 45
Services .................................................................................. 46
FTP server ....................................................................... 47
UPnP AV ......................................................................... 48
iTunes ............................................................................ 49
P2P ............................................................................... 52
Printer............................................................................. 55
MySQL............................................................................ 58
Photo gallery..................................................................... 59
Account ..................................................................................67
User configuration .............................................................. 67
To add a new user...........................................................................67
To delete a user..............................................................................68
To configure a user..........................................................................69
Group configuration............................................................. 70
To add a new group .........................................................................71
To delete a group ............................................................................72
To configure a group ........................................................................72
Folder configuration ............................................................ 73
To add a new folder .........................................................................73
To delete a folder ............................................................................74
To configure a folder ........................................................................75
RAID....................................................................................... 78
USB/eSATA..............................................................................83
APPENDIX ...........................84
Using EZIP Backup to back up your files .....................................84
Trouble Shooting...................................................................... 86
PRODUCT SPECIFICATION ...88
3

Overview
Thank you for purchasing the product. Read this chapter to know about your
4-Bay Desktop Gigabit SATA NAS.
Unpacking information
Before getting started, please verify that your package includes the following items:
1. One 4-Bay Desktop Gigabit SATA NAS
(Hard Disk not Included)
2. One Power adapter and one AC power cable
3. One Quick Installation Guide
4. One Utility/ Manual CD
5. HD fastening screw x 16
6. One HD fastening key
Introduction to the 4-Bay Desktop Gigabit SATA NAS
Easily back-up your data and share them. This NAS allows 4 connected hard disks,
which boosts the capacity for your data sharing and backup needs. It uses the high-speed SATA
interface, providing users excellent data storage and sharing capability. The device also supports
RAID 0, RAID 1, RAID 5 and Linear modes for various HDD backup configurations.
The NAS embeds FTP server, Web Server and printer server. The FTP server allows
users to backup and share files with FTP client software. The Web server provides an easy way to
share files by web site. The NAS supports DDNS, which allows you to designate a easy-memorized
domain name to this device. The embedded printer server also brings you terrific convenience on
sharing your printer.
User-friendly and high compatibility, The NAS equips 2 USB 2.0 ports for your USB
storage devices and USB printer. You may also back-up files from your USB storage devices
conveniently by pressing the “Backup” button.
Hot swappable SATA tray module design, The NAS provides 2 HDD drawers, which give
you an extra hot-swappable function for immediate drive replacement and simplify maintenance.
Key Features
‧ Supports CIFS/SMB for Windows, MAC, Linux,
which allows remote users to retrieve files
easily using “My Neighborhood”
‧ Supports 50 sets of user name and password
‧ WEB-based User Interface (UI) for easy
configuration
‧ Up to 100 folders can be created via the web
configuration
‧ Supports 4 removable 3.5” SATA HDD up to
2TB
‧ Provides EZ View Utility for user-friendly setup
‧ Embeds FTP server for FTP clients to transfer
files conveniently
‧ Supports fixed IP & DHCP client network
environment setting
‧ Supports USB memory stick (pen drive), USB
Hard Disk
‧ Embeds BT (Bit Torrent) compatible P2P
software
4
‧ Embeds Web server for Web site construction ‧ Supports UPnP AV, iTunes server
‧ Supports firmware update over the Graphic
User Interface (GUI)
‧ Compatible with Windows 95 /98 /98SE /ME
/XP /2000 /NT4.0/Linux/ MAC OS /Vista
‧ Supports DDNS function
‧ Supports access management for 50 groups.
‧ Supports 32 concurrently connected users
‧ Provides Password security for management &
HD Access
‧
‧ Built-in Samba server
‧
‧ Supports hot-plug hard disk (RAID 1, 5)
‧ Built-in auto power recovery capability ‧ Complies with FCC, CE Class A certification
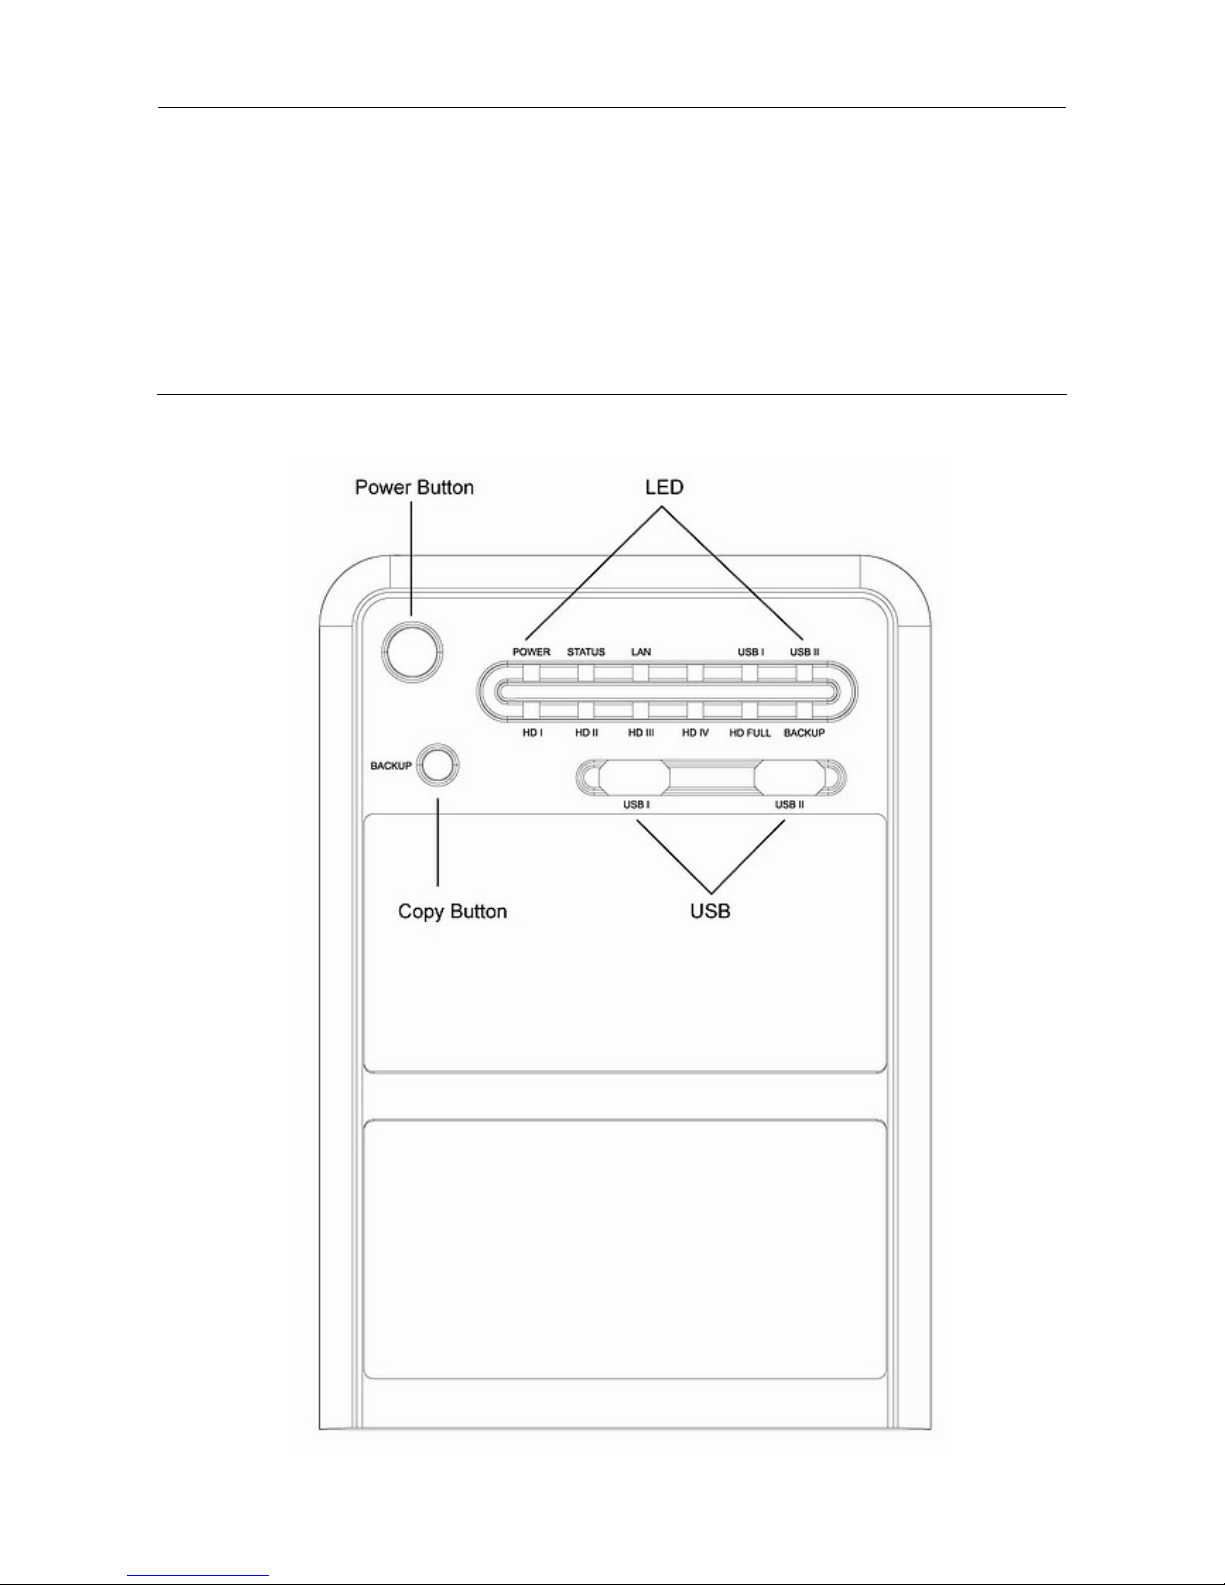
Front Panel
5

Power Button
To activate the device, press this Power button for two seconds after connecting the device to an
appropriate power outlet with the provided power cord.
To power off, press and hold the button for five seconds.
Backup Button
Press this button to copy files from USB port to the internal HD. A new folder will be created
automatically in the share directory. This new folder is named according to the time you press
this button.
Note: The Backup LED illuminates while data copying. Do not remove this device from USB port
before the Backup LED turns off.
LEDs Definition
LED Status
Steady Blue Power on
Power
Off Power off
Amber Device works normally
Status
Red Device encounters an error
Steady Green Valid Connection at 1000 Mbps
Blinking Green Data transmitting at 1000 Mbps
Steady Amber Valid Connection at 10/100 Mbps
LAN
Blinking Amber Data transmitting at 10/100 Mbps
Steady Green Valid connection on USB I port
USB I
Off Invalid connection on USBI port
Steady Green Valid connection on USB II port
USB II
Off Invalid connection on USBII port
Steady Green Valid connection on HD
Blinking Green HD working busily
HD I – HD IV
Off Valid connection on HD
Steady Red HD has run out of space
HD FULL
Off Space available on HDD
Steady Green Data copying from USB to internal HD
Backup
Off Data copying finished
USB Port
Connect this port with your USB Storage or printer devices.
Rear Panel
Reset to Default Button
Press and hold the Reset Default Button for four seconds to reset all configurations to factory
default settings.
Note:
y All configurations that are done by users will be removed from the device.
y The device also supports restoring factory default settings by software. To get instruction
restoring factory default parameters, see
System > Config > Reset to Factory Default on page
37.
LAN Port
Connect the port with RJ-45 cable to your switch or IP sharing router.
6
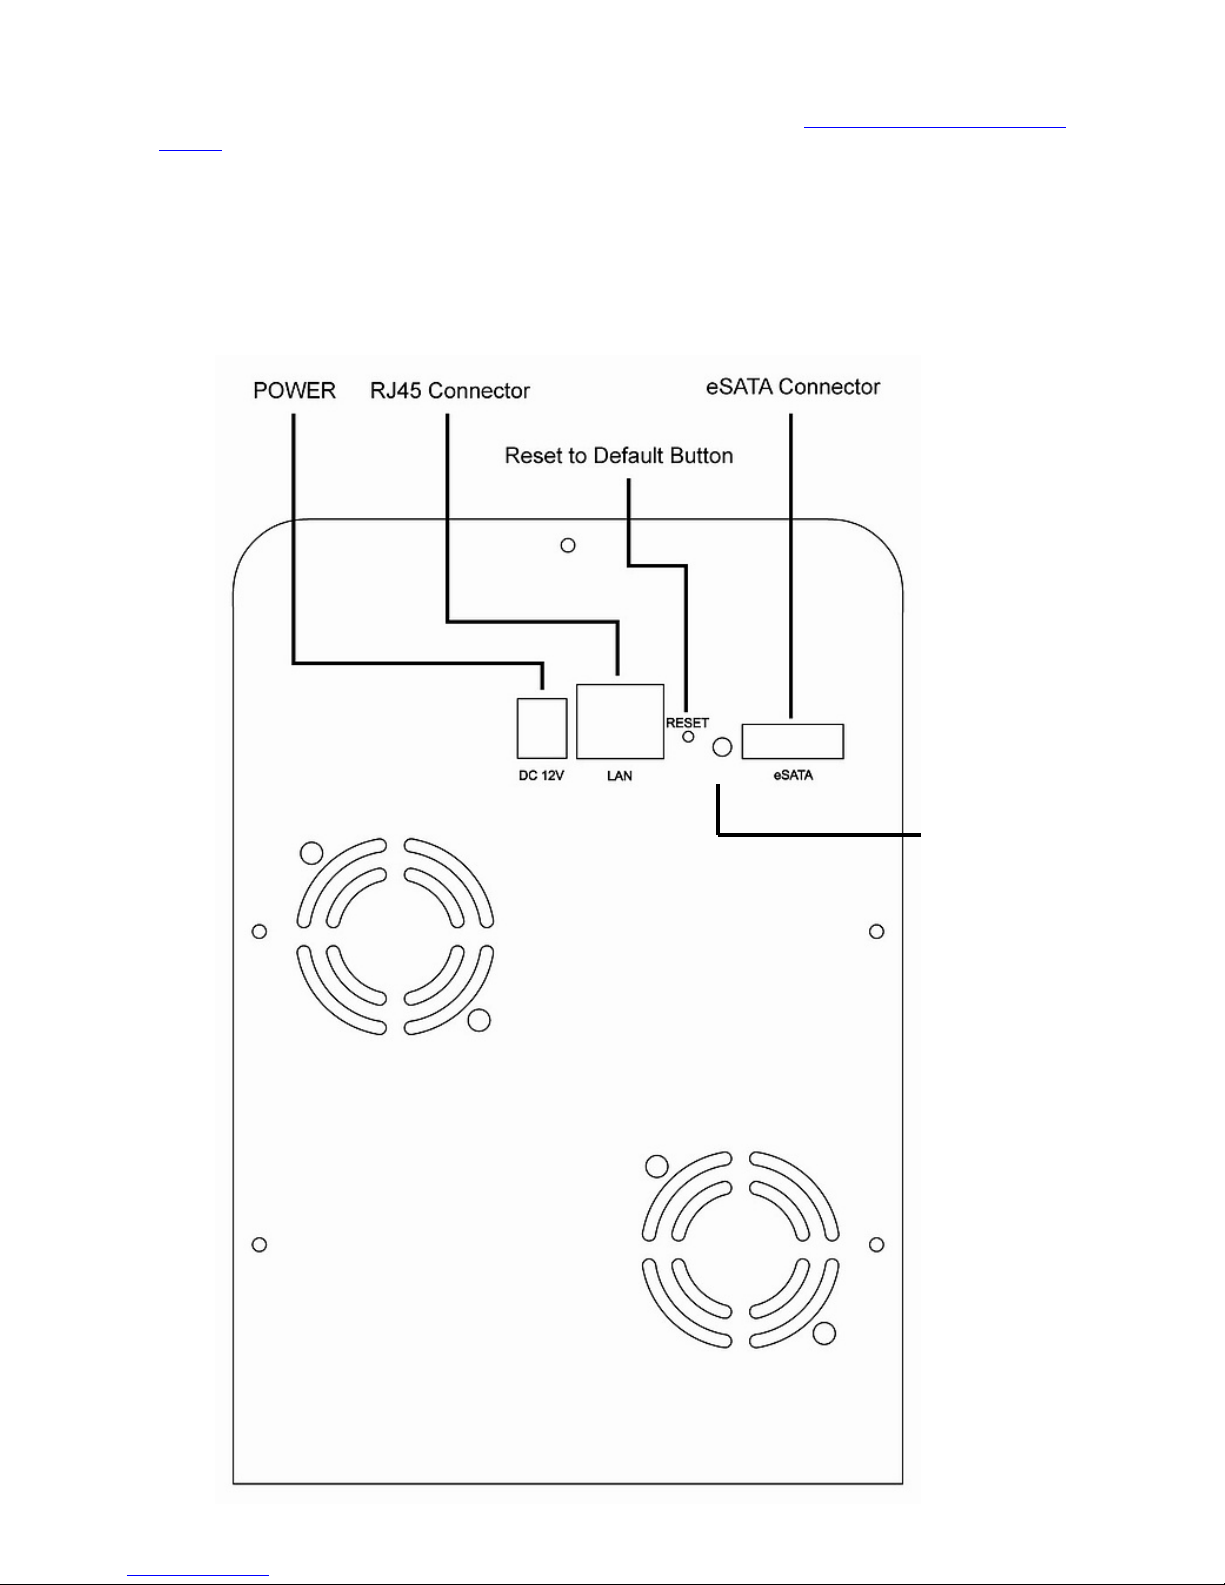
Note: To get instruction connecting the device to your LAN, refer to Making Connection with the
Device on page 12.
Power Adapter Socket
Connect the power supply cable to a power source.
eSATA Connector
Connect this port with your eSATA device.
eSATA LED
The LED stays light (green)/off means a valid/invalid connection on eSATA port.
eSATA LED
7

Installation Guide
Hardware Installation
Install a hard disk drive for the device
1. Use the key in the package to open the slot button.
2. Draw out the hard disk drawer from the device.
3. Take off the fixture from the drawer and prepare a SATA hard disk to install it on.
8
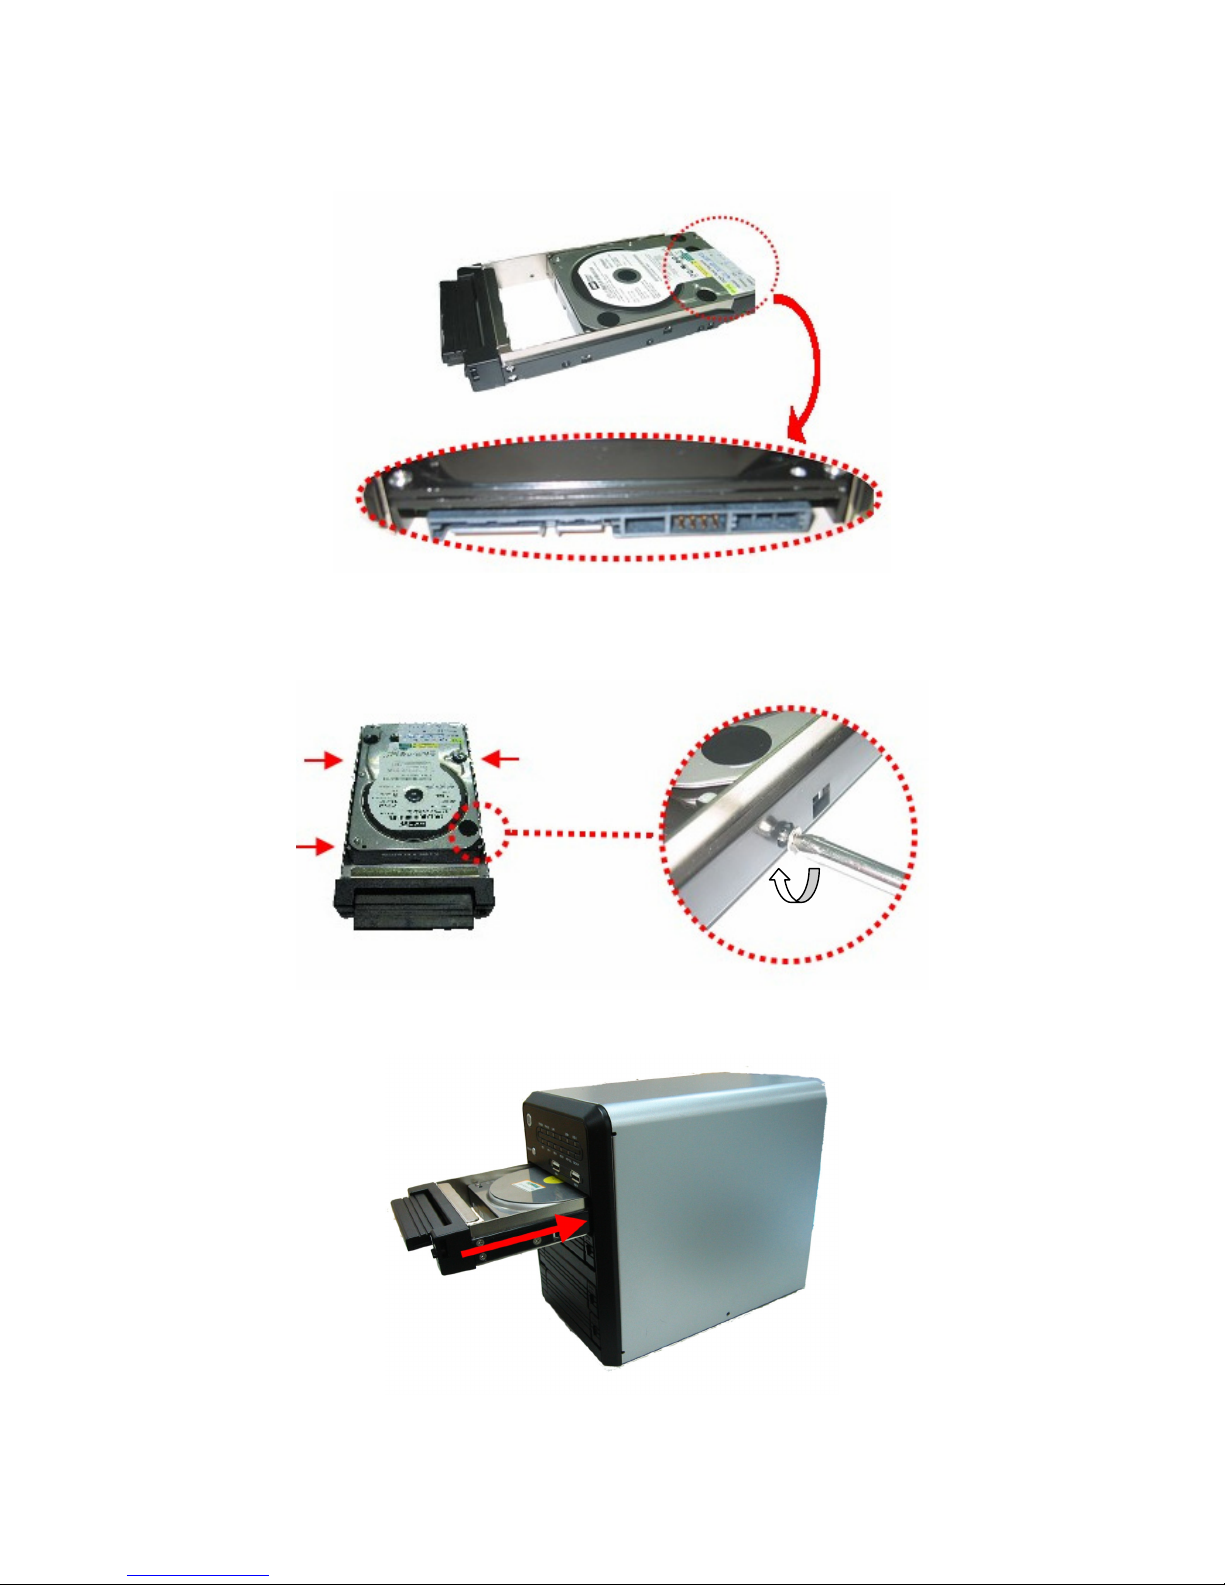
4. Place the SATA Hard Disk drive evenly on the hard disk drawer. The direction of the disk should
be like the one in the following pictures.
5. Screw your SATA hard disk on the drawer with the included screws in the package.
6. Slide the Hard Drive to connect to the device.
9

7. Close the cover and use the key to turn the button clockwise to fasten it.
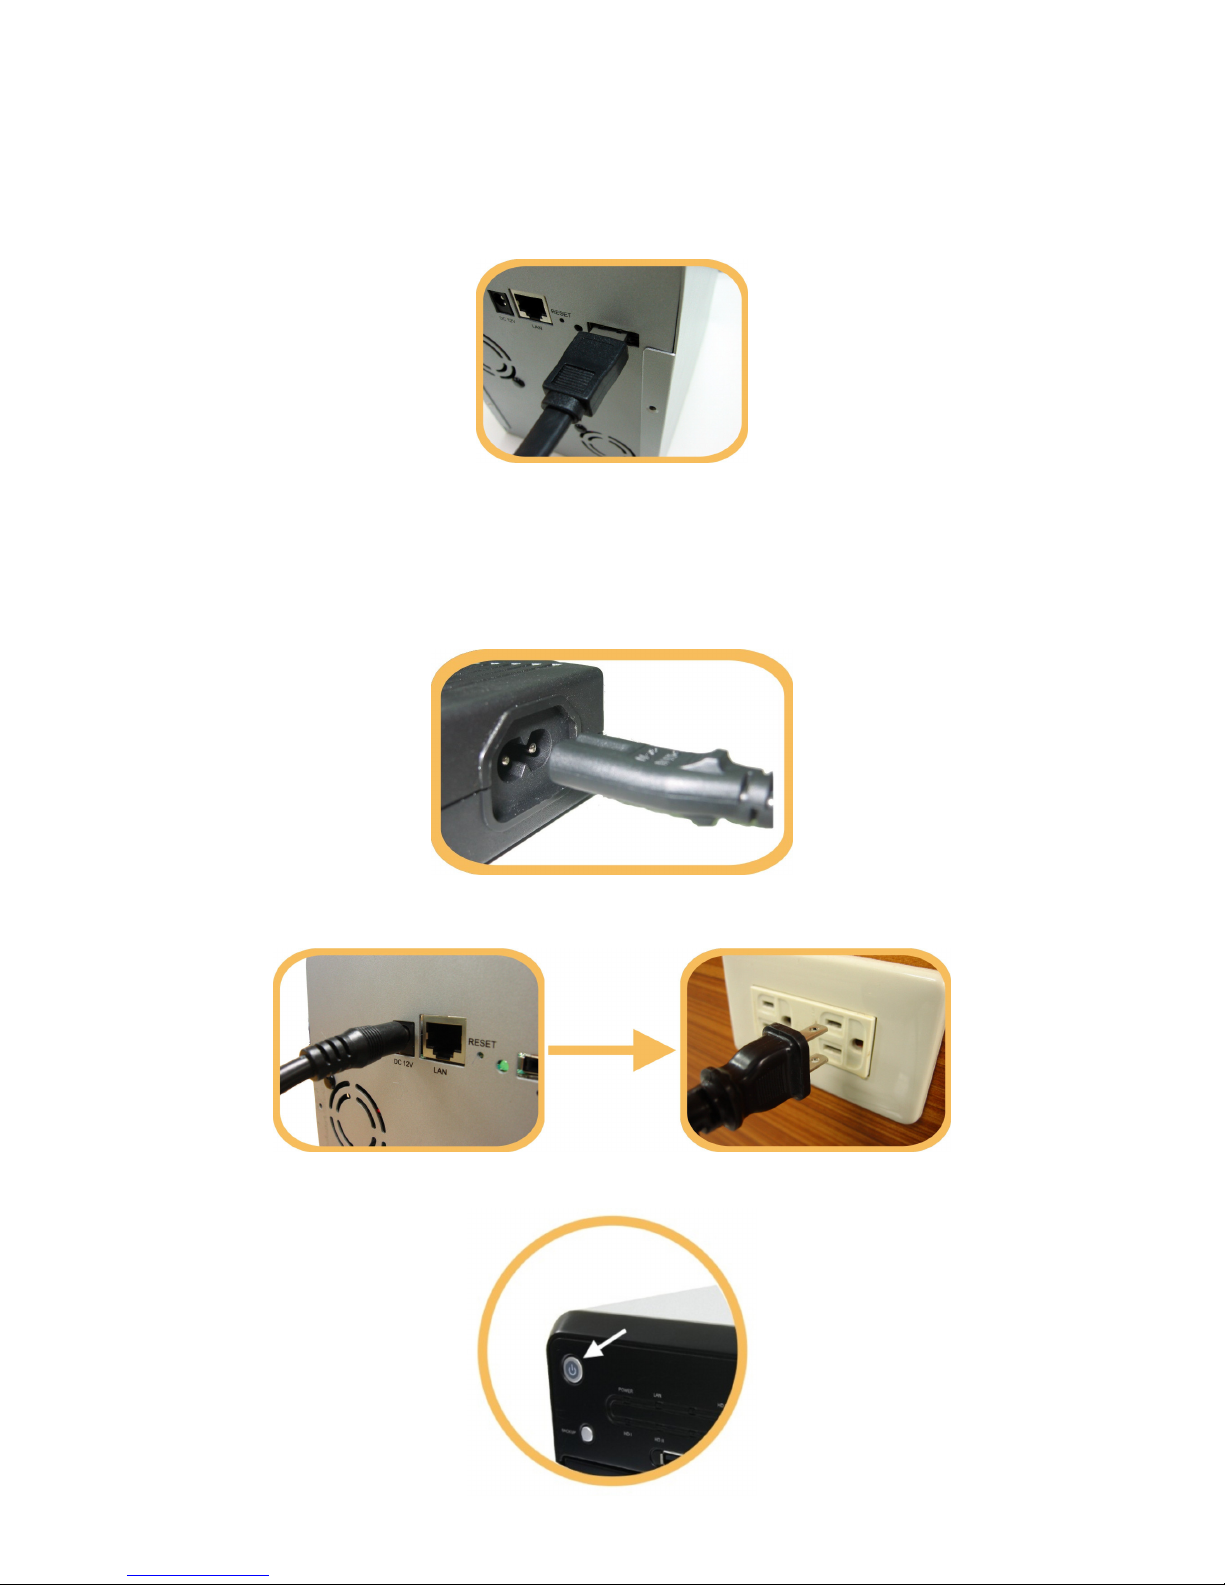
Connect this device to your Local Area Network (LAN)
1. Connect one end of an RJ-45 cable to the LAN port on the device.
2. Connect the other end of the cable to your IP sharing router or switch.
Connect your USB to this device
The device equips two USB ports that allow users to connect the device to a USB storage device.
1. Insert the USB Type A end of the cable to the device, the other end to your USB storage.
Note:
y The Type A end of the USB cable is usually the end that connects to your computer.
y If you are connecting an external HD to the USB ports on the device, we recommend users to
connect the power adapter of the external HD to supply efficient power for your external HD.
2. Insert the other end to your USB storage device.
10
Connect this NAS with eSATA device
This NAS equips one eSATA port that allows users to connect your NAS with eSATA device. Please
find the cable that came with your eSATA device. Insert one end of the cable to this NAS, the
other end to the eSATA device.
Note: You have to power on your eSATA device before powering on this NAS, or this NAS cannot
detect your eSATA device.
Power on the device
1. Connect the included power cord with the power adapter.
2. Connect the connector end to the device and the plug to an outlet.
3. Push the power button to power on.
11
Making Connection with the Device
In order to communicate with this NAS, you have to configure the IP address of your computer
to make it connectable with the device. Please do perform the following steps.
Note: The following TCP/IP configuration guide uses windows XP as the presumed operation
system.
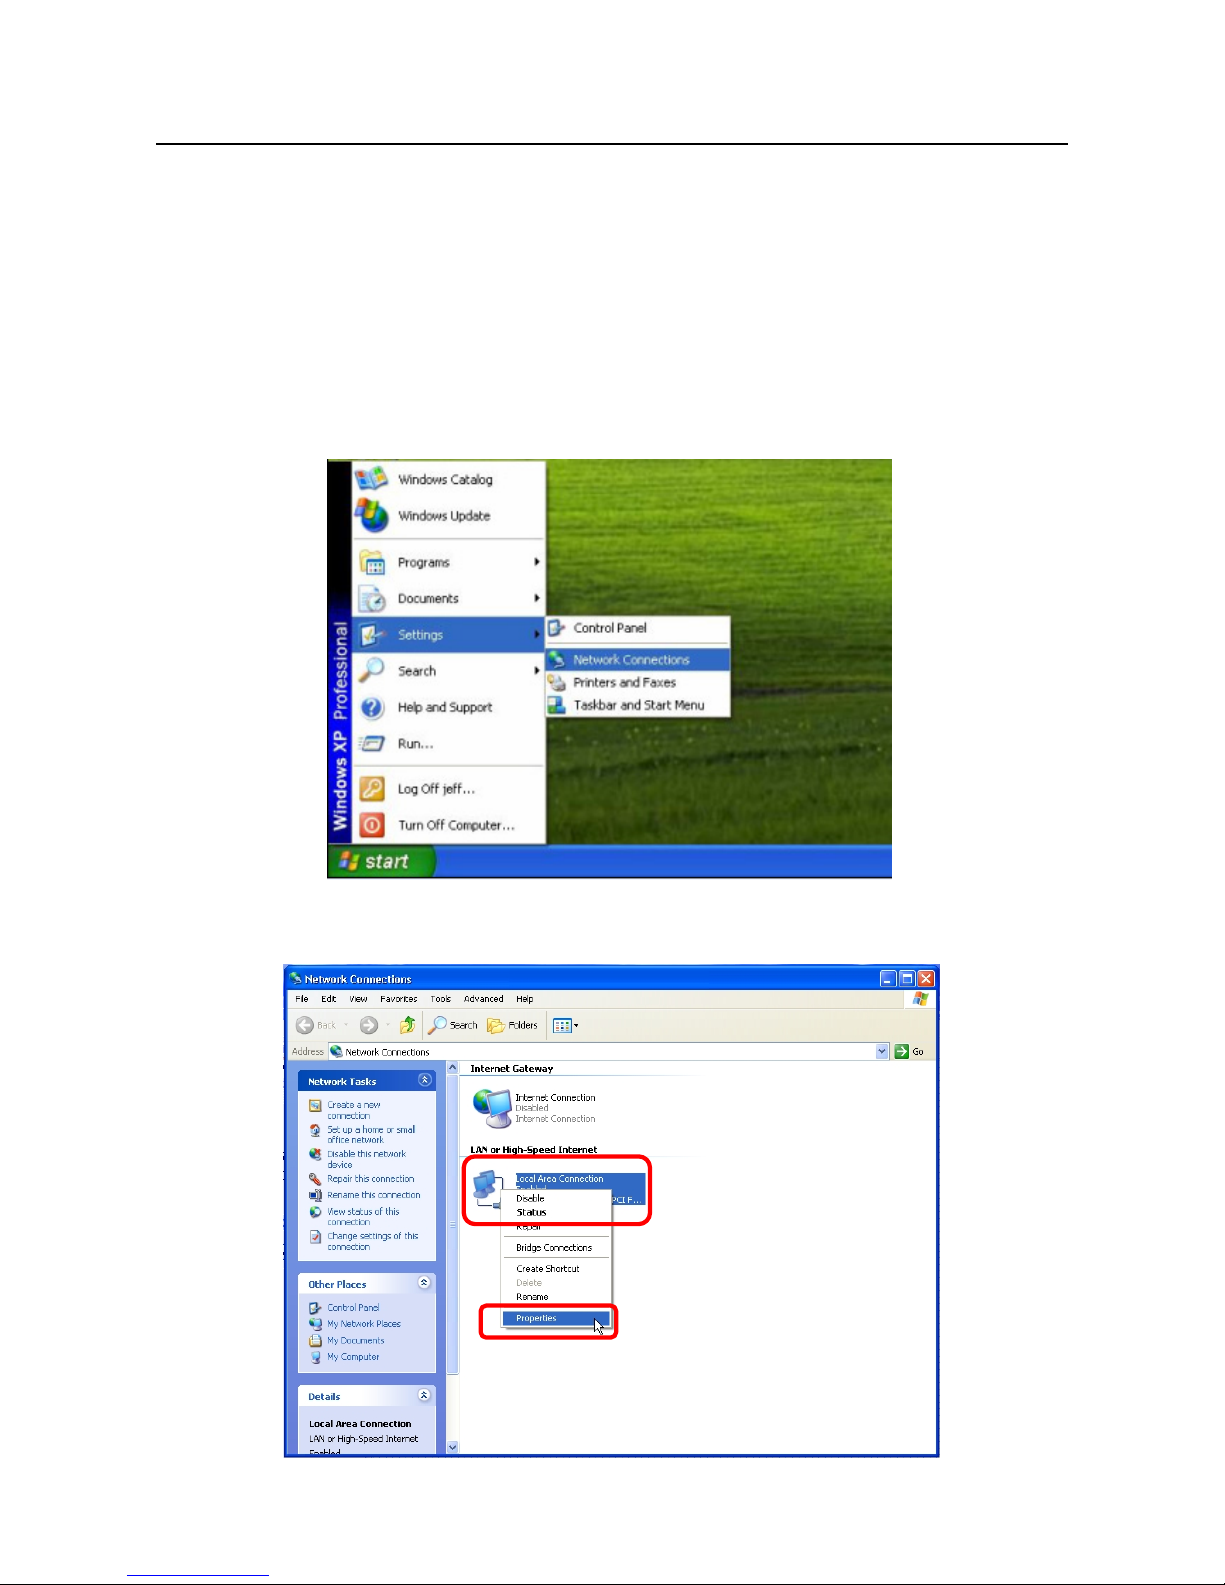
1. If you are in Classic Start menu view, click Start > Settings > Control Panel > Network
Connections. If you are in Start menu view, click Start > Control Panel > Network
Connections.
2. Right-click on Local Area Connection item and double-click on Properties.
12
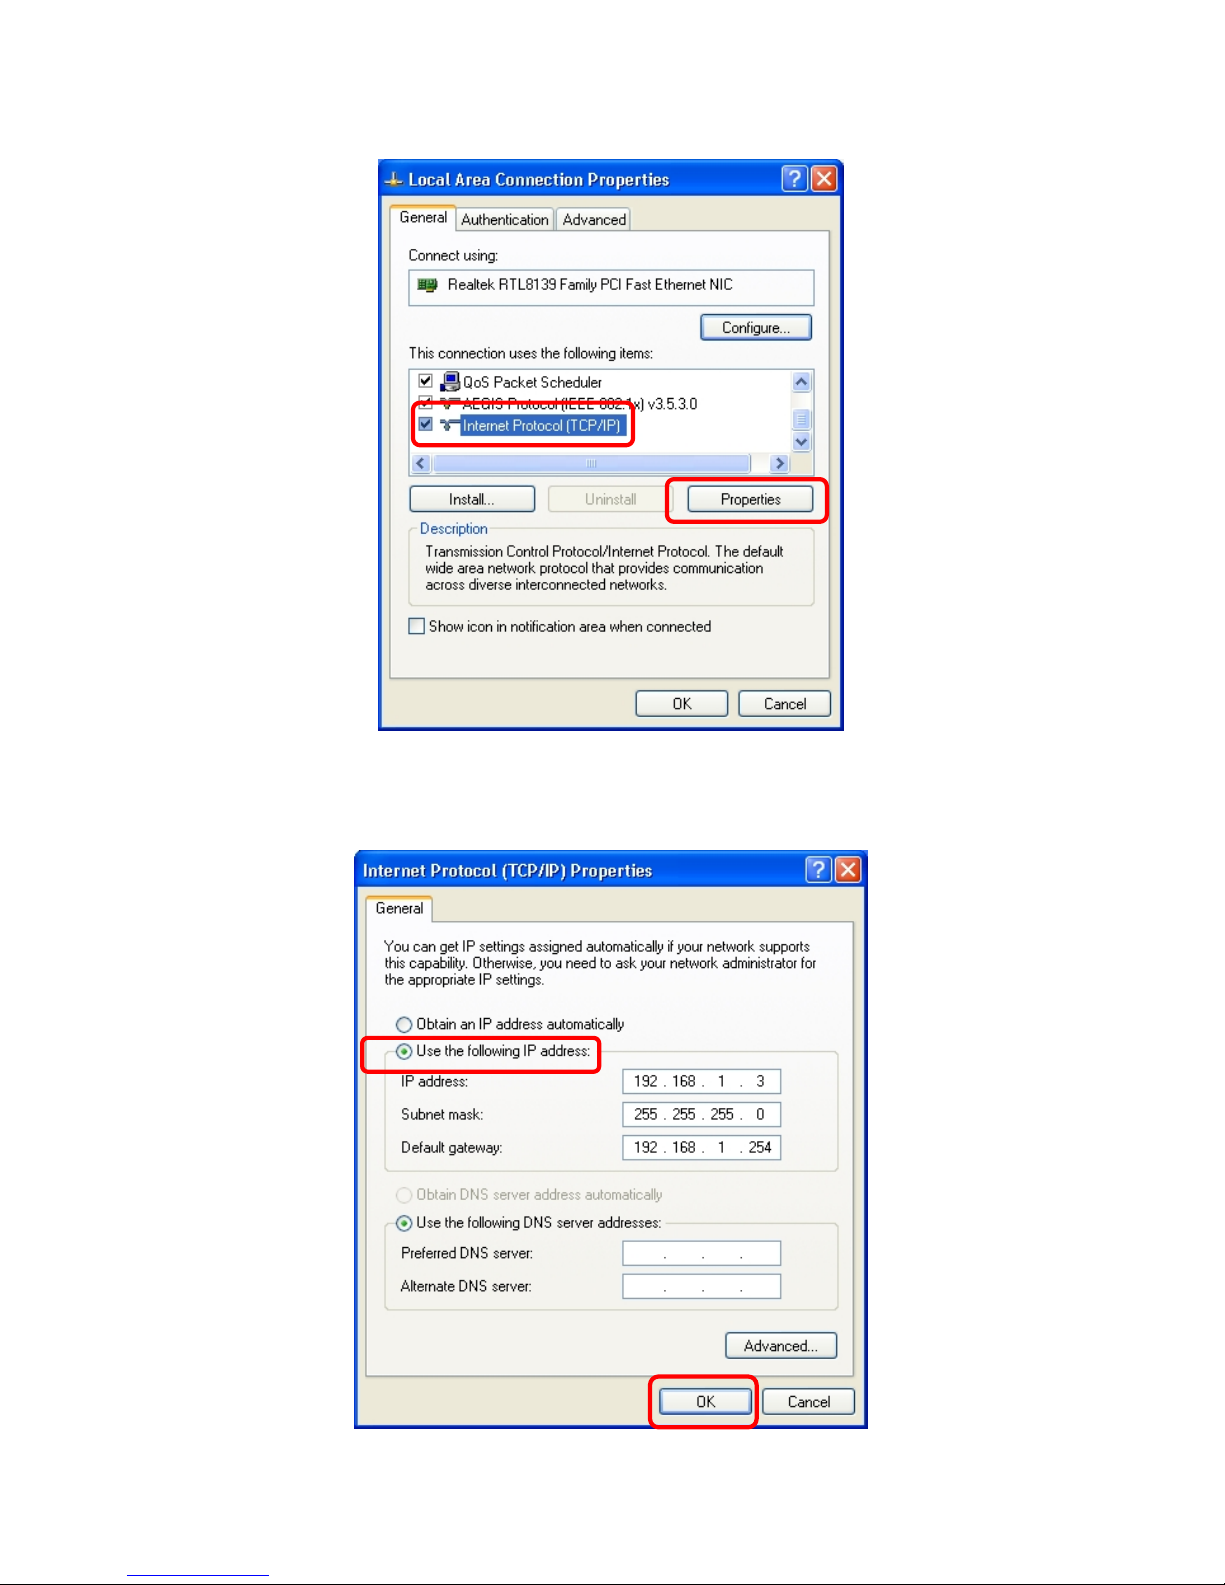
3. Choose Internet Protocol (TCP/IP) and click Properties.
4. Choose Use the following IP address to specify IP addresses manually. Please click the OK
button after your configuration.
13
Note:
1. The default network setting of the device:
IP address: 192.168.1.2
Subnet Mask: 255.255.255.0
DHCP Client: disable
2. Please DO NOT choose “192.168.1.2” as the IP address. The IP address “192.168.1.2” has
been set as the default IP for this device.
To access the folders in the device
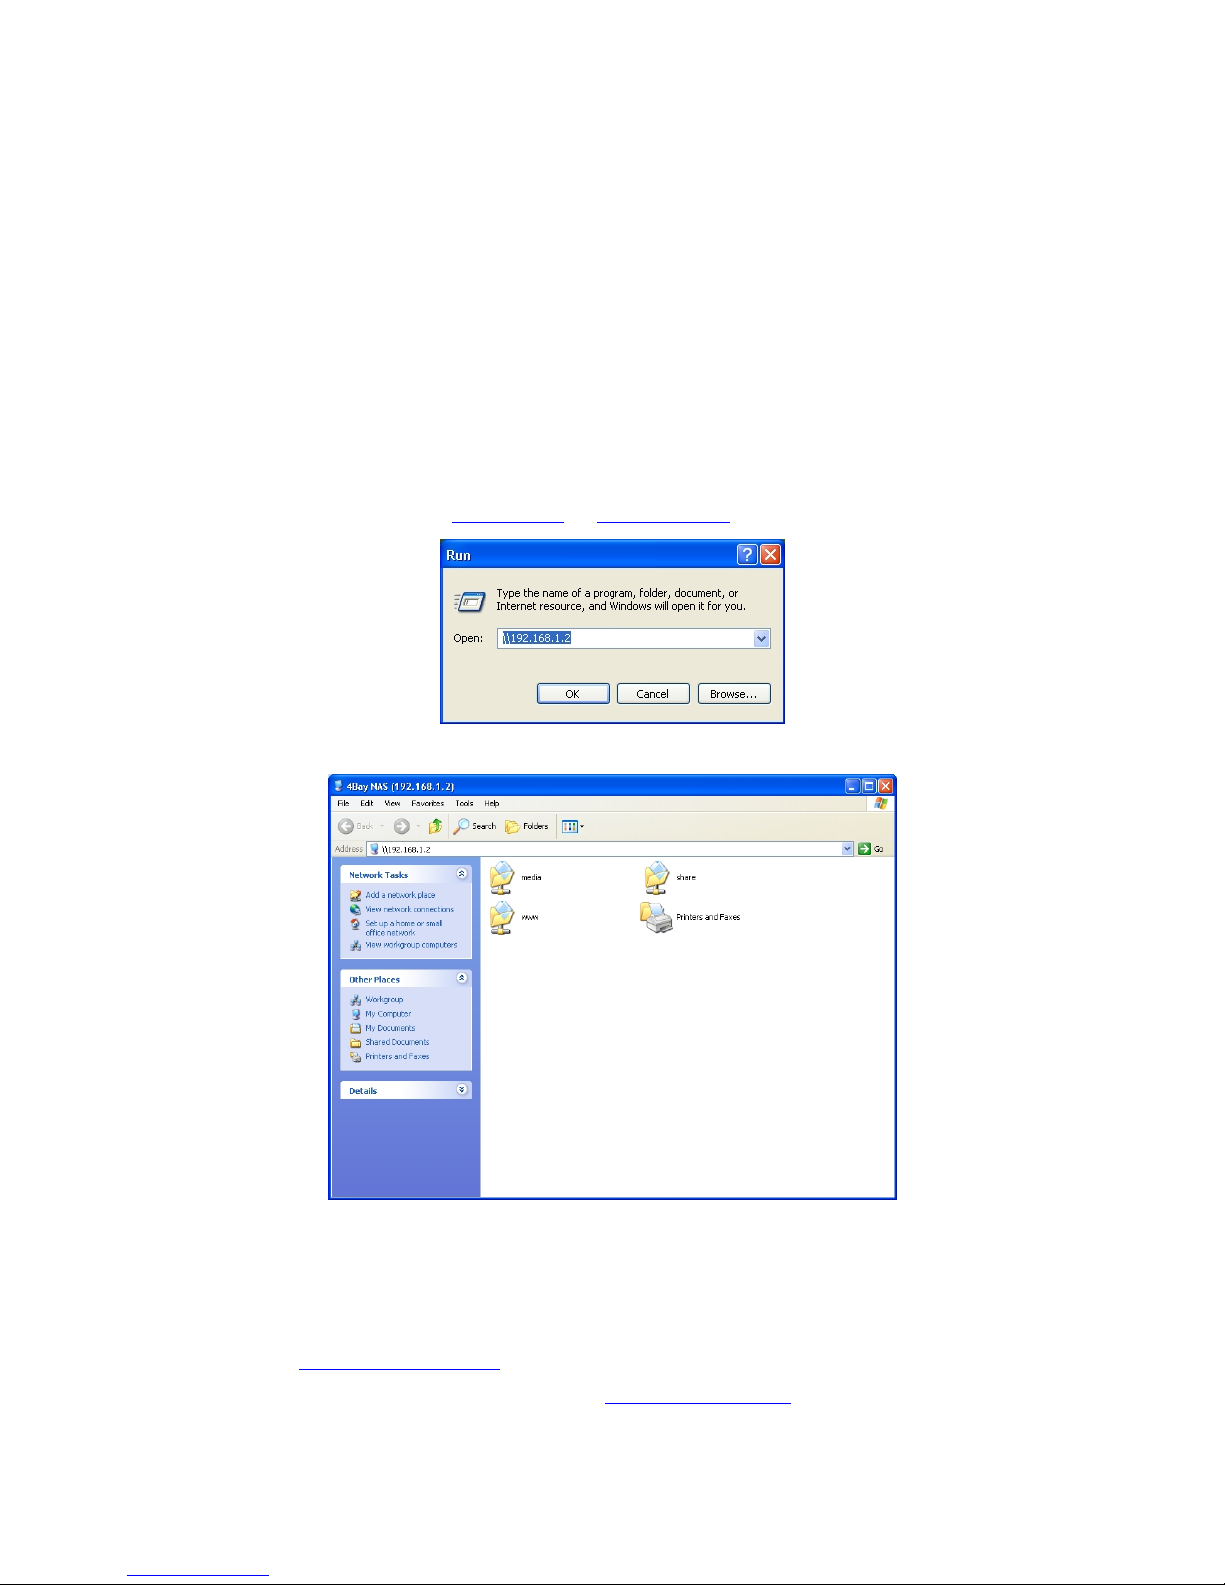
To open the folders connecting to the device:
1. Click Start > Run on your PC.
2. In the Run window, fill in
\\4Bay-NAS or \\192.168.1.2
3. Click OK to access the folder.
Note:
1. We provide one default username/ password as admin/admin.
2. As default, the Share folder is created automatically and it can be read/write by all users.
3. You can change the permission of users for access to each folder. To change their permission,
please see
To Configure a Folder on page 75.
4. To add or configure an account, please see
To Configure a User on page 69.
5. Users would like to use another set of username/ password after getting accessed to any
folder, please log off your operating system and log on again.
14

Software Installation
Installing the EZIP Backup
This EZIP Backup helps users to backup files on your computer to NAS. Please follow the
instructions below to install the software.
1. Insert the CD-Rom that came with this product to your CD-Rom drive. The main menu pops
up automatically. Click EZ Backup to start installation.
Note: If the auto-run program is not activated, please click on My Computer > your CD-Rom
Drive then click the autorun icon to start the main menu. Or, you can enter the EZIP Backup
folder and double click the icon to start installation.
2. The welcome window pops up. Click Next.
3. Fill your User Name and Company name in their respective blanks.
Select if you want this software to be used by anyone who uses this computer or yourself only.
Click Next to proceed.
15
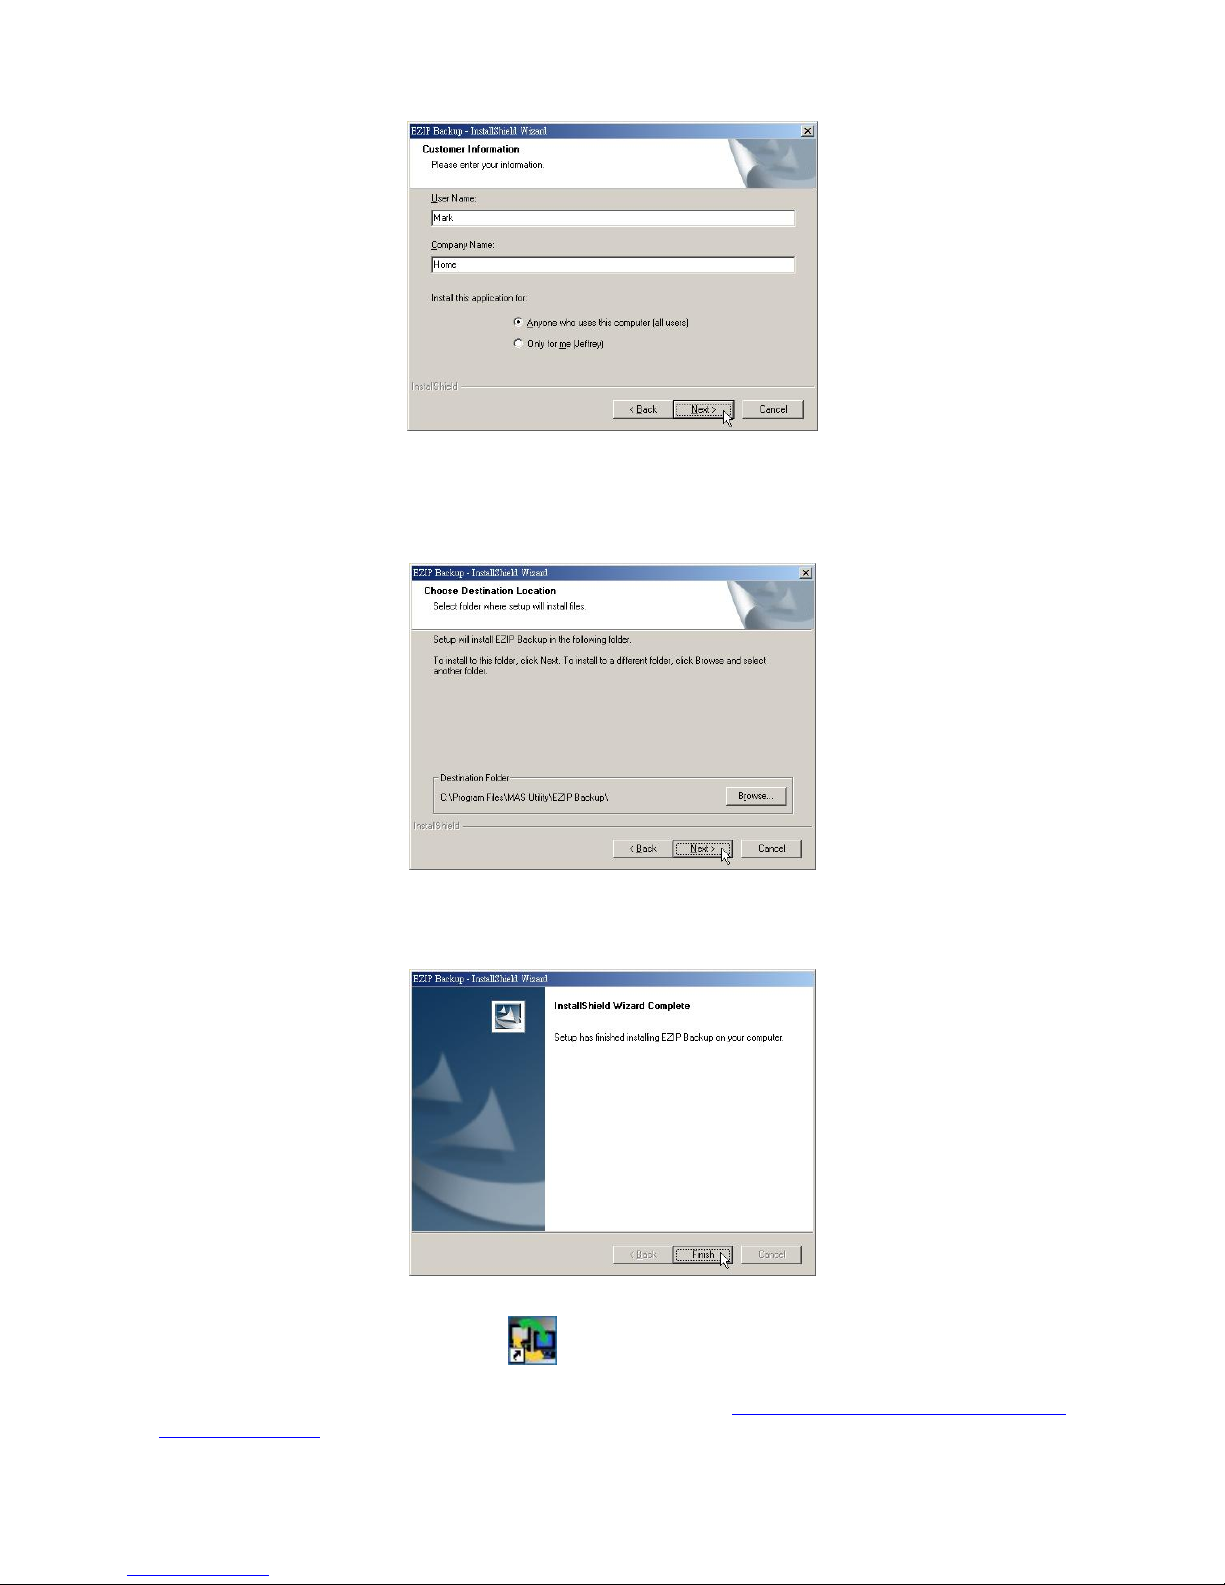
4. Choose the destination folder for this software and click Next to start installation. You may
click Browse to change the location.
5. Click Finish to complete the software installation.
6. After successful installation, the
shortcut shows on your windows desktop.
Note: For instructions using the software, please refer to
Appendix > Using EZIP Backup to
backup your files on page 84.
16

EZ View Utility
Read this chapter to understand the EZ View utility of the device and how to use
it.
Introduction
For users to launch the device more easily, we provided the convenient EZ View software. It is
user-friendly, easy to view and getting started. The following paragraphs are divided into two
parts: the first part introduces the EZ View utility, which gives you a general idea of EZ View
framework; the second part teaches you how to connect this device with EZ View to make a basic
configuration.
Getting Started
1. Insert the CD-Rom that came with this product to your CD-Rom drive. The main menu pops
up automatically. Click EZView to run EZ View utility.
Note: If the auto-run program is not activated, please click on My Computer > your CD-Rom
Drive then click the autorun icon to start the main menu. Or, you can enter the EZ View folder
and double click the
icon to run EZ View utility.
17

¡Main page - In main page, you can select Multimedia to scan
networks PVR on your LAN,
select Network to scan router or switch, select NAS to scan network storage device, or select
All to scan all of the network PVR, router or switch and NAS on your LAN. You can also click on
the icon to exit the program.
¡Device list page - After scanning, the page shows the connection status of the Multimedia
/Network/NAS on your LAN. You should notice that:
y Without a connected PVR / Router or AP / NAS, you cannot use Media and WEB buttons on
the EZ View.
y Even with a connected PVR / Router or AP / NAS, you cannot use Media button if the
Multimedia/Network/NAS has no hard disk in it.
You can also see the accessible information in System to know whether you can connect to the
device or not.
18
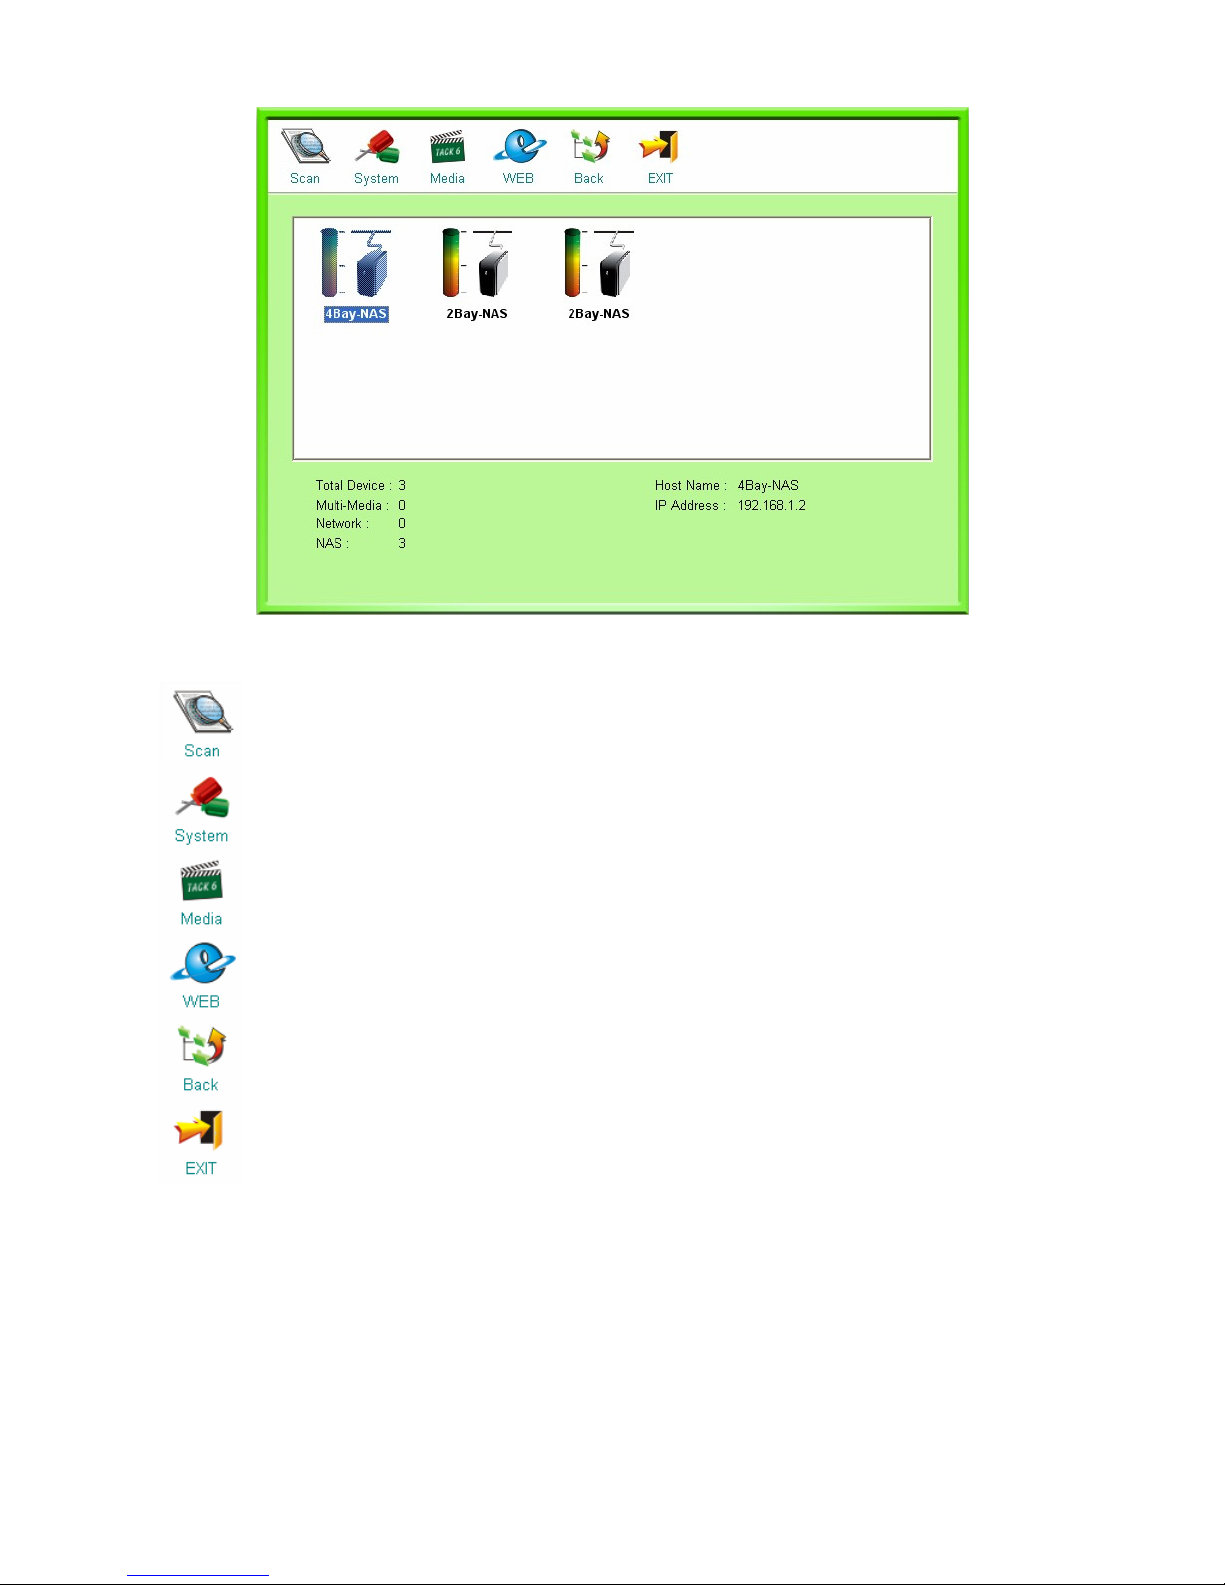
Buttons on EZ View device list page
Click this button to search for Multimedia/Network/NAS on your LAN again.
Click this button to see Multimedia/Network/NAS information, configure IP address,
user and folder, and upgrade firmware.
Browse/upload photos, music or video files to the folders in Multimedia/Network/NAS.
Open the WEB page of User Interface.
Go back to the previous page.
Exit the program.
19
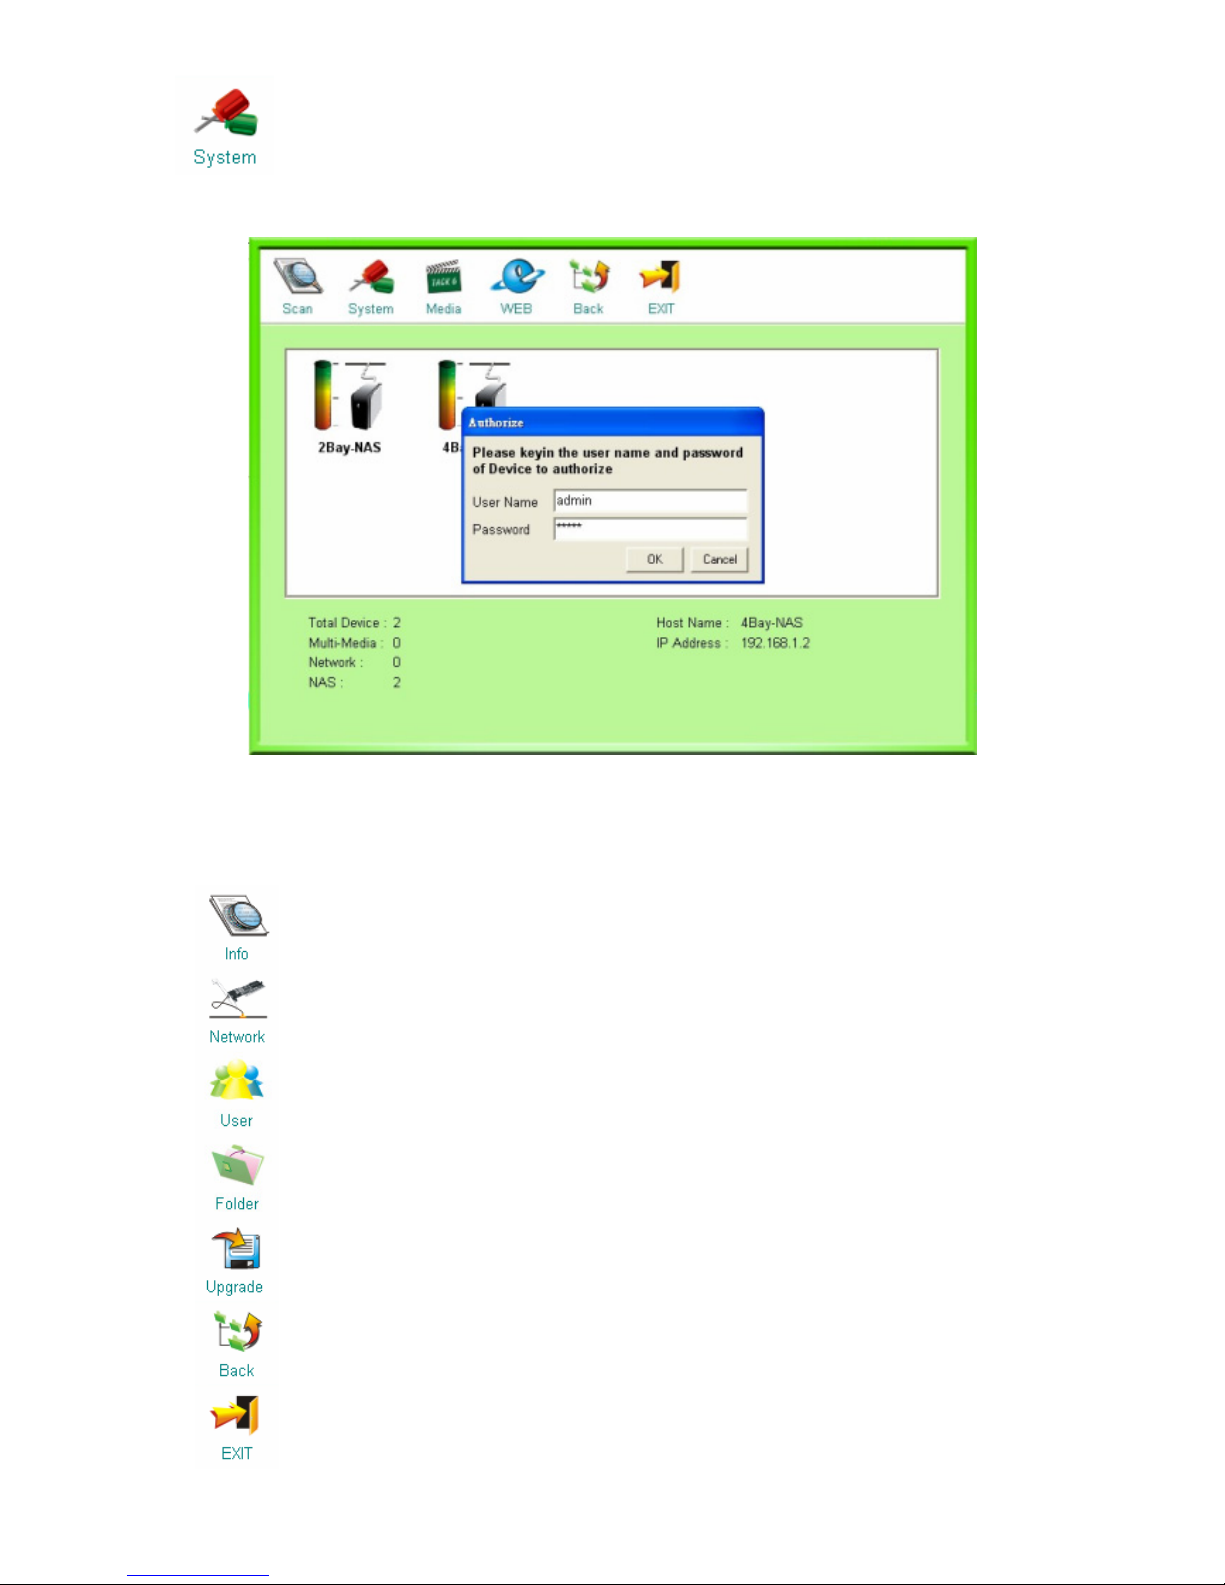
¡ System page – After clicking on System button, an authentication window pops up.
Fill in the user name and password to enter the Info page.
You may click on each button on this page to do different configurations.
Buttons on EZ View system page
1
Shows Multimedia/Network/NAS information including hostname, IP Address, HD
model name and capacity, etc.
2
Configure IP address, net mask, default gateway, hostname, workgroup and
description. After setting, please click on the mark on the bottom to save your
configurations.
3
Add a new user or delete an old one.
4
Add a new folder or delete an old one.
5
Upgrade firmware.
6
Go back to the previous page.
7
Exit the program.
20
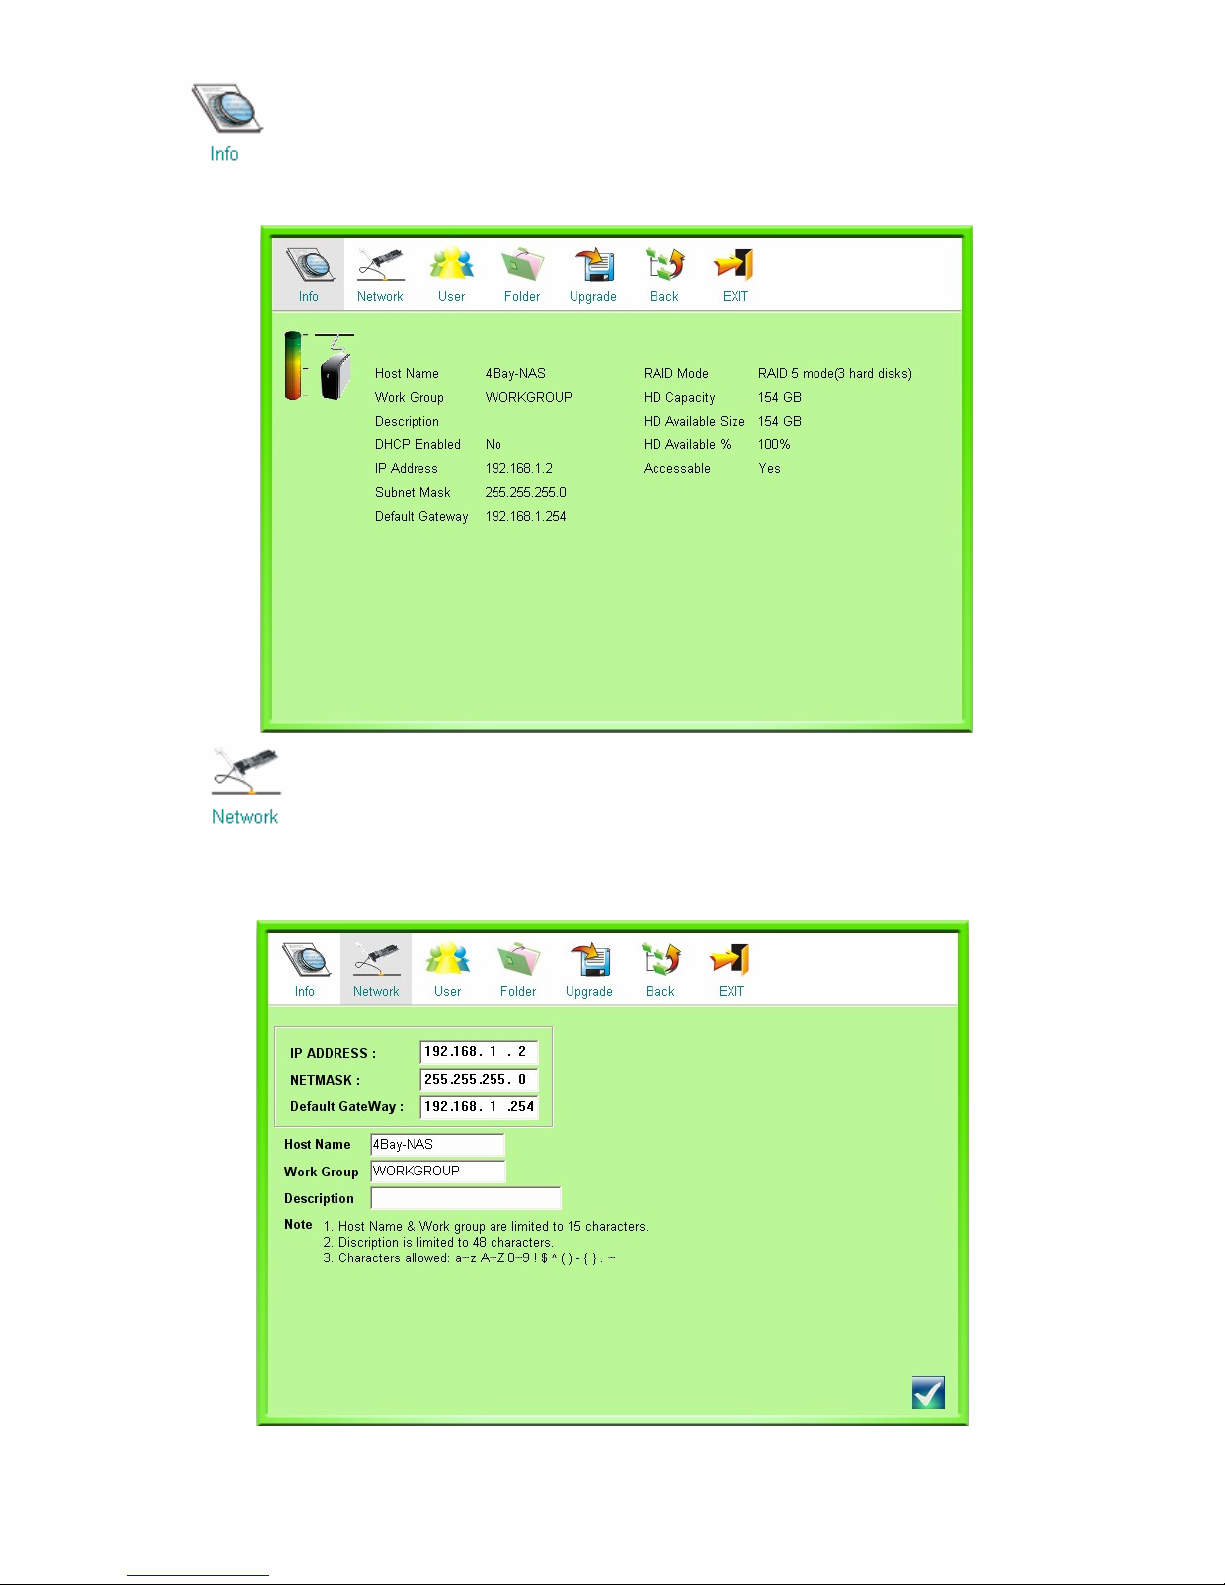
1. Info page – This page shows Multimedia/Network/NAS information including
hostname, IP Address, HD model name and capacity, etc.
2. Network page – You can configure IP address, net mask, default gateway,
hostname, workgroup and description in this page. After setting, please click on the check
mark on the bottom to save your configurations.
21
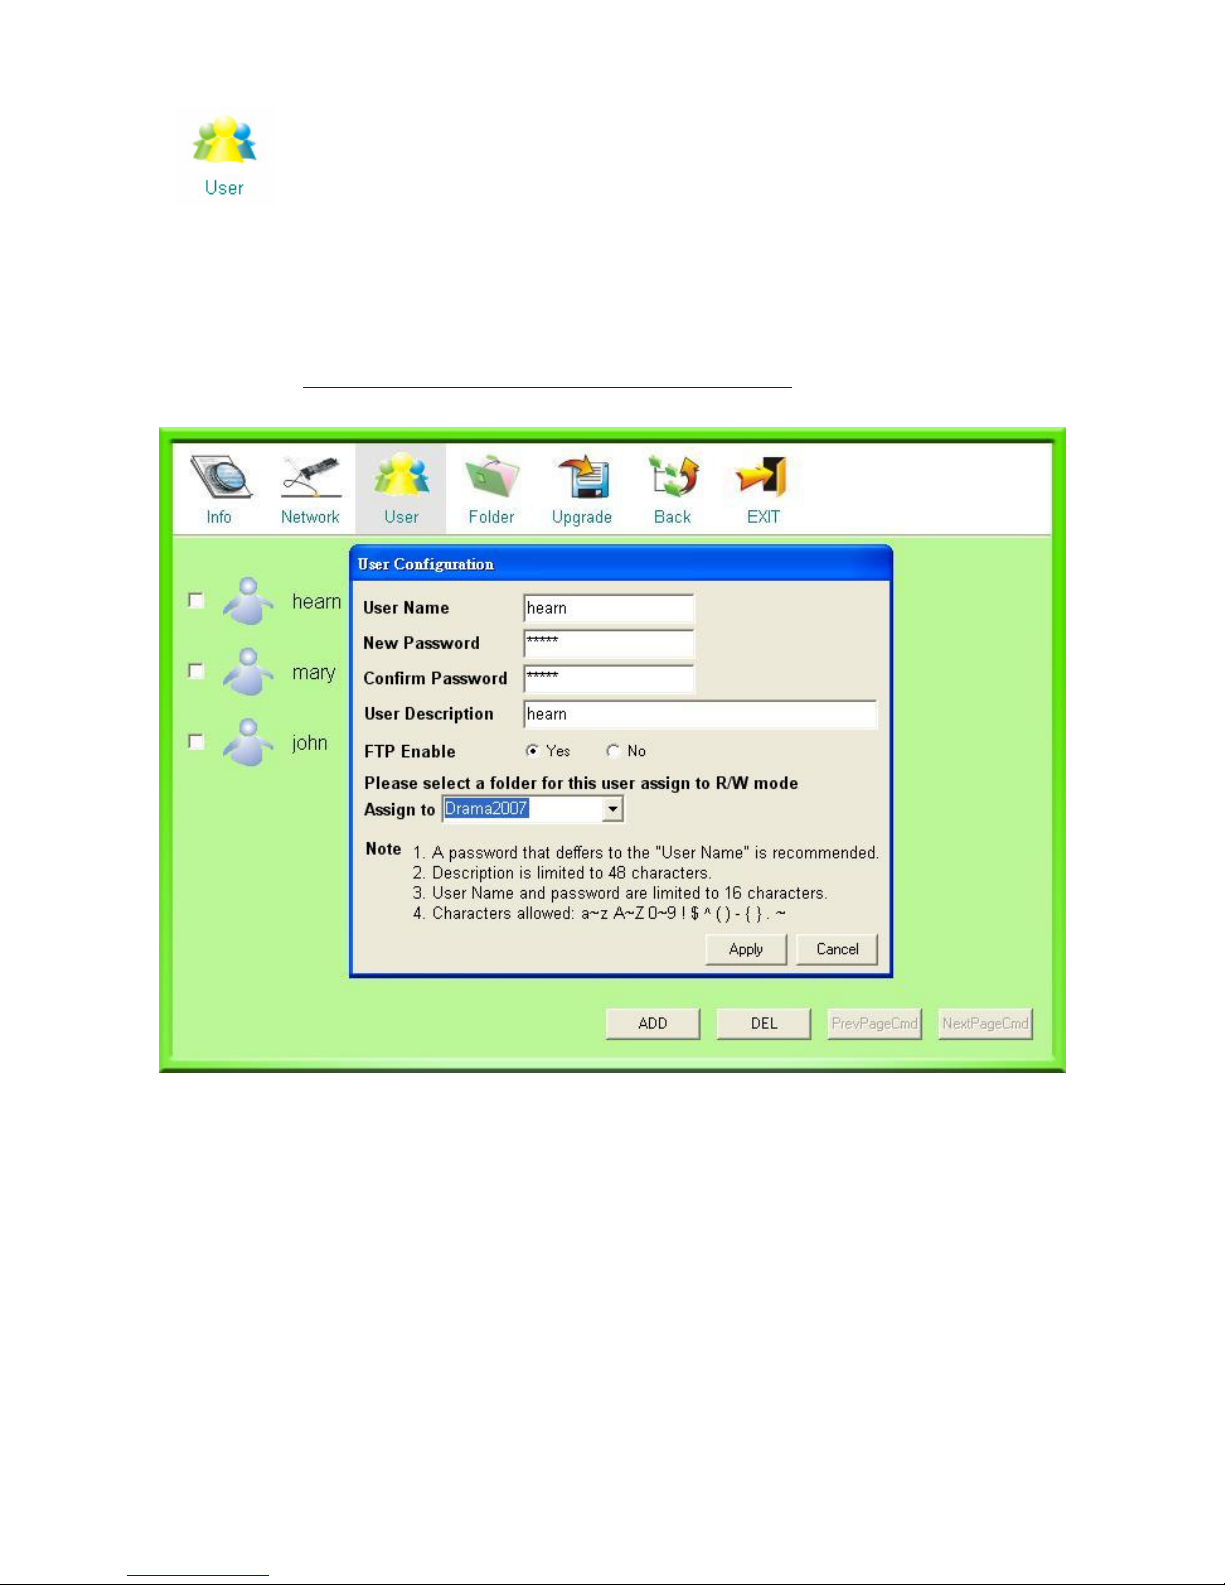
3. User page – You can add a new user or delete an old one on this page. After clicking
on the ADD button, the User Configuration window pops up. Fill in the blanks and click on
Apply to add a new user. To delete a user, click on the checkbox and then click on DEL
button.
Note: You can also add or delete users from the graphic user interface. For more information,
please refer to
Management Guide > Account > User configuration on page 67.
22
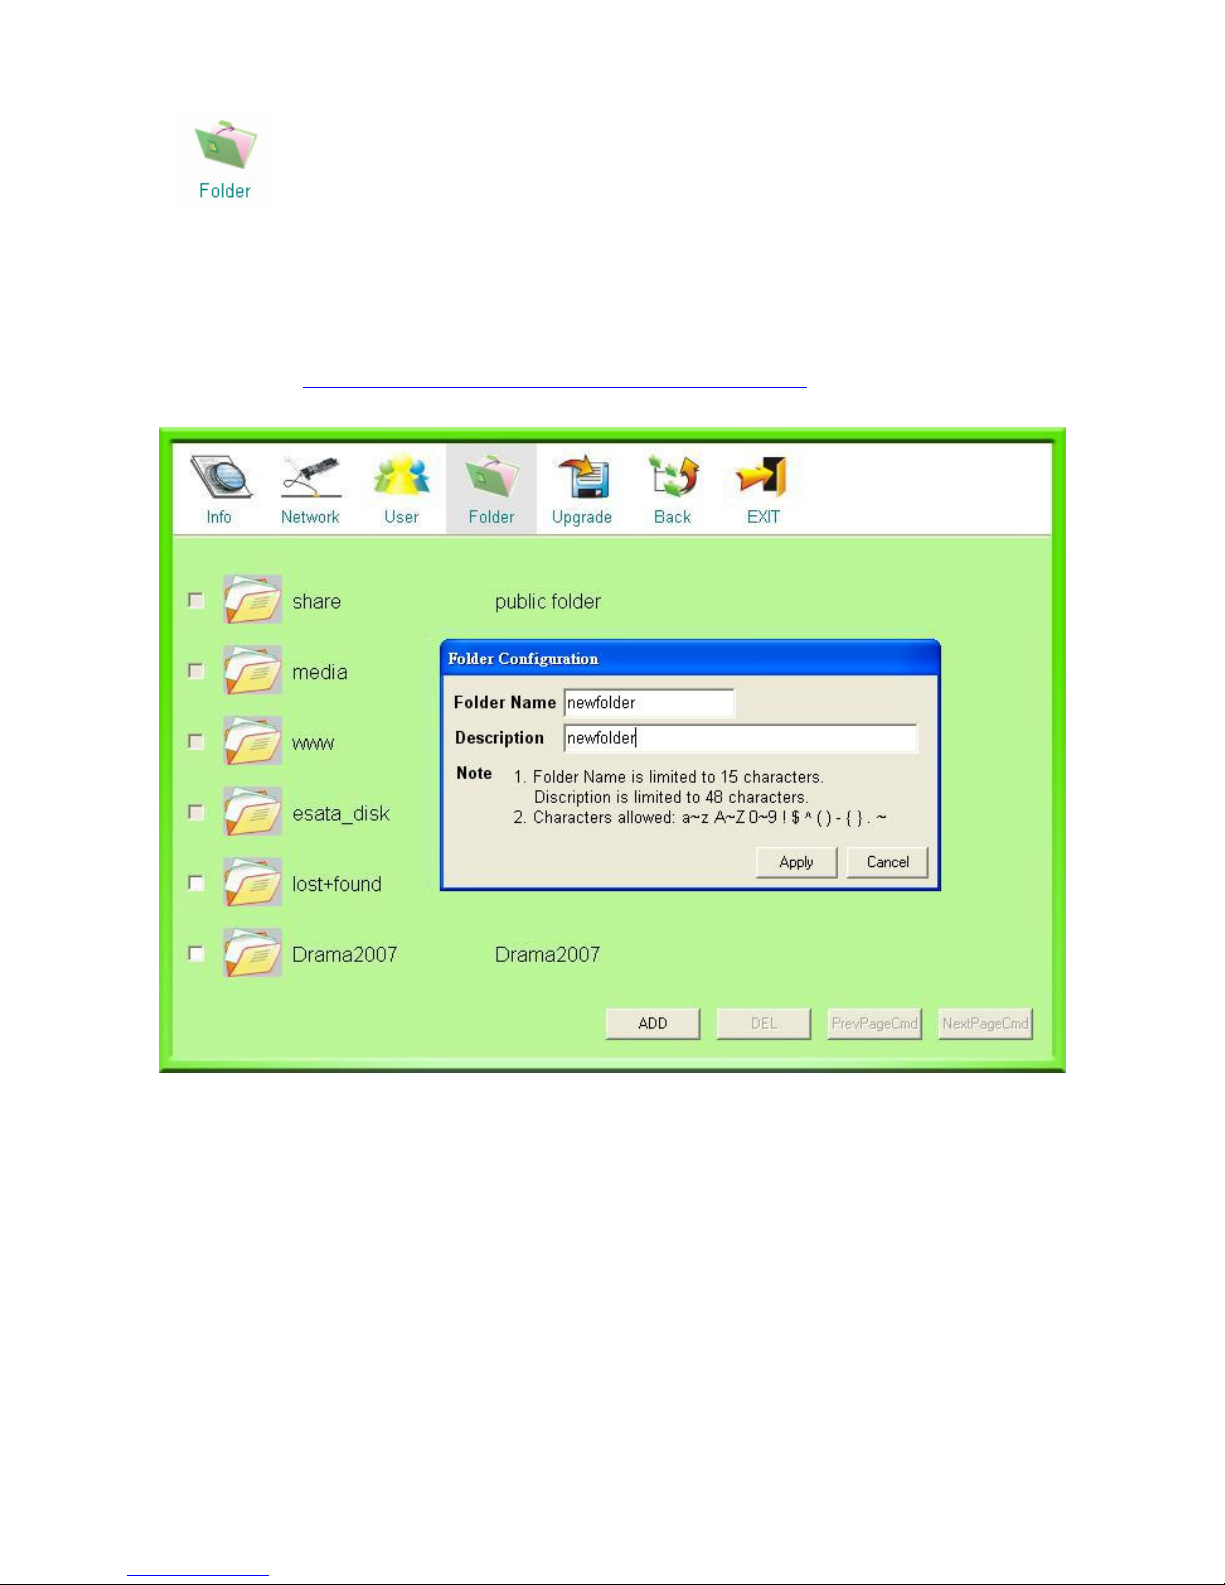
4. Folder page –You can add a new folder or delete an old one on this page. After
clicking on the ADD button, the Folder Configuration window pops up. Fill in the blanks
and click on Apply to add a new folder. To delete a folder, click on the checkbox and then click
on DEL button.
Note: You can also add or delete folders from the graphic user interface. For more information,
please refer to
Management Guide > Account > Folder configuration on page 73.
23
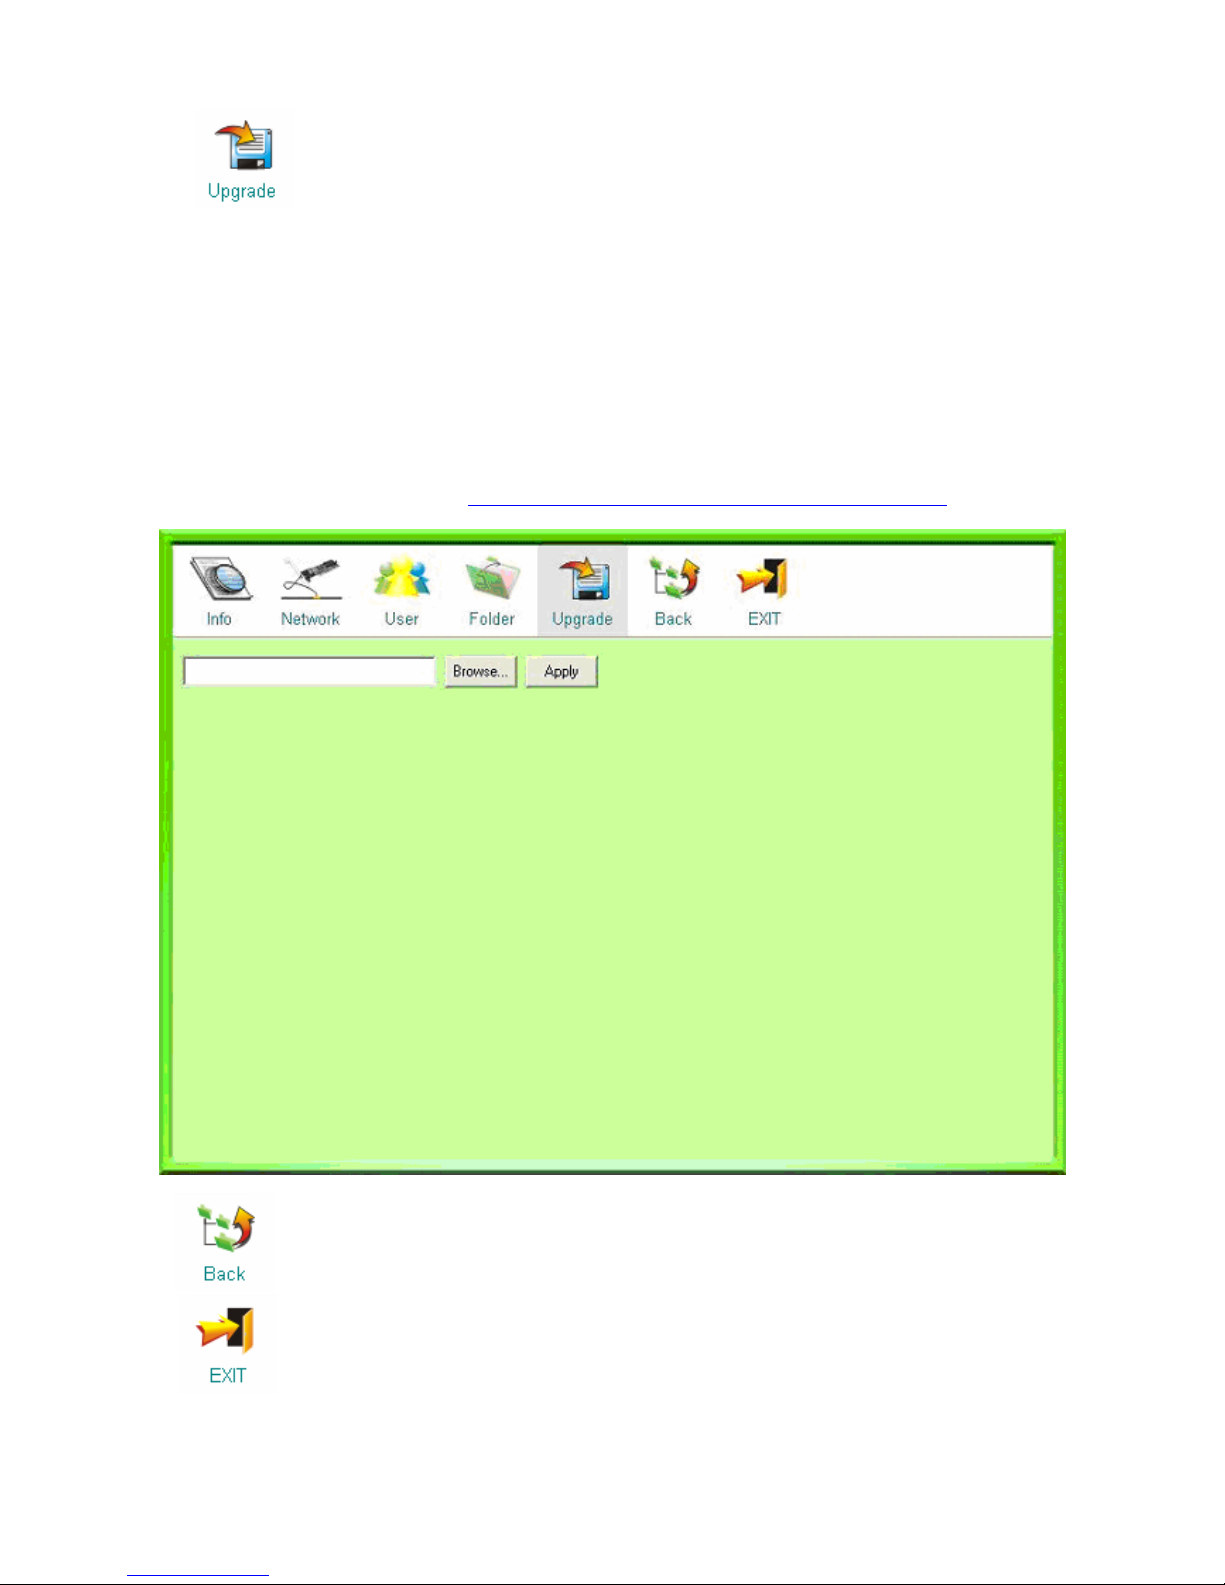
5. Upgrade page – You can upgrade the firmware for your device on this page.
Please follow the instructions below.
a. Insert the included CD and click the Browse button. (Note: The main menu may auto run.
Click EXIT to close it.)
b. Select your CD-Rom drive. Double click on the fwextension folder.
c. Select the ntx_fwext.tgz file and click Open to browse the file.
d. Click Apply to perform installation. It takes a few seconds to perform installing, please
wait upon installation.
Note: You can also upgrade the firmware from the WEB page of this device. For more
information, please refer to
Management Guide > System > Firmware upgrade on page 38.
6. Back button – Click on this button to go back to the main page.
7. Exit button – Click on this button to exit the program.
24
¡ Media page –
EZ View Utility supports most popular video, image, and audio formats:
Video: AVI, MPG, VOB, DAT, DIVX, MPEG
Image: JPG, JPEG, BMP
Audio: MP3, WMA, ASF
In this page, you may browse and upload multimedia files in the folders of
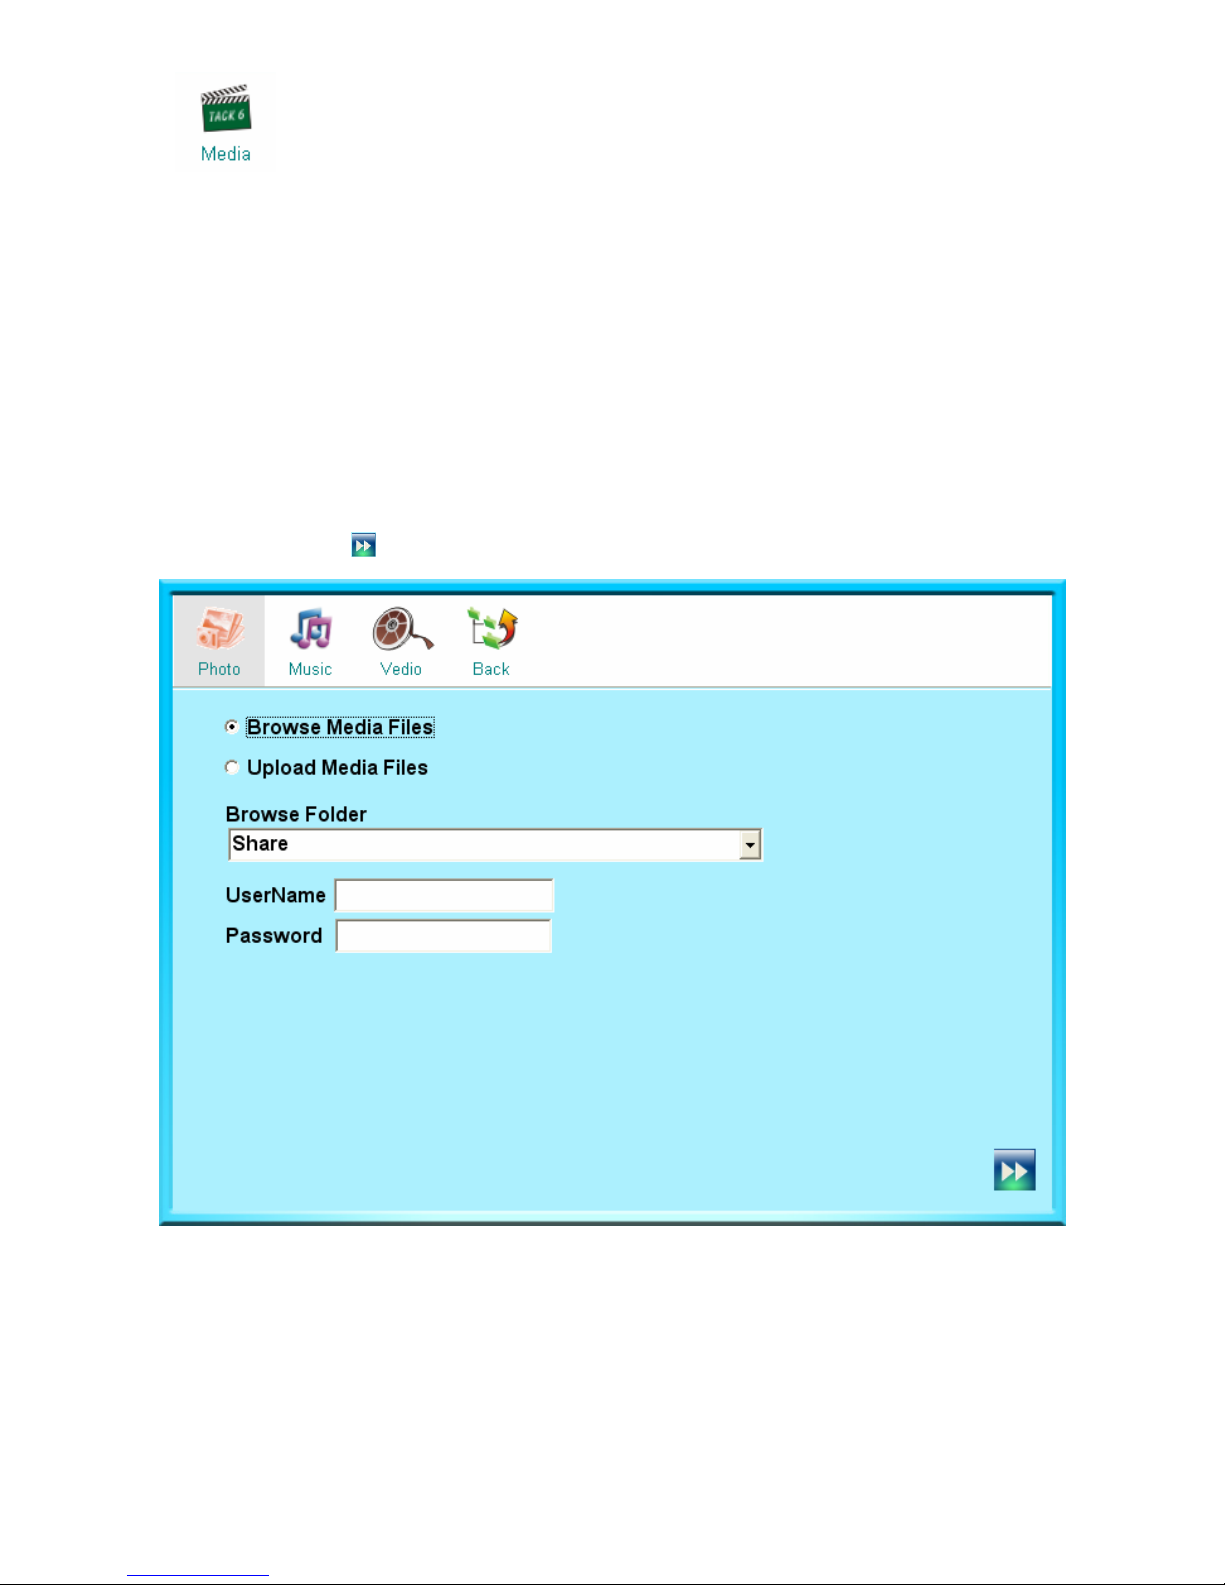
Multimedia/Network/NAS. Please refer to the following descriptions for more information.
Browse Files:
1. Select and click on Photo, Music, or Video buttons of your demand.
2. Select the folder you wish to browse from the Browse Folder drop-down list.
3. Enter the username and password to enter the folder with login authentication.
4. Click on the
button to execute.
25

Upload Files:
A. Upload multimedia files by EZ View utility
1. Select and click on Photo, Music, or Video buttons.
2. Click Browse button to browse the files or folders you wish to upload to the device.
3. Select the folder you wish to upload from the drop-down list.
4. Enter the username and password to login to the folder with authentication.
5. Click on the
button to execute.
26

B. Upload multimedia files to folders directly
1. Click Start > Run on your PC.
2. Fill in the IP address of the Multimedia/Network/NAS and then click OK to access the
folder.
3. Select the folder you wish to upload.
4. Enter the username and password to login to the folder with authentication.
5. Drag the files or folders to the folder directly. Please wait patiently when it is generating
thumbnails for images during uploading.
27

¡ Photo page – This page shows the thumbnails of the
available image files. Click on
each thumbnail to get detailed information including file name, width, height, planes, and
bits pixel of the photo, which shows on the bottom. Use
and buttons to browse
pages backwards and forwards.
Double click on the thumbnail to see a larger version of the photo. Use and buttons
to browse the previous file or the next one. Click on
to start auto play and to stop.
The
button brings you back to the thumbnail page.
28

¡ Music page - This page shows the list of the
available audio files. Use and
buttons to browse pages backwards and forwards. Double click on the list to play music. It uses
the default music-playing software of your PC to play the audio files.
¡ Video page - This page shows the list of the
available video files. Use and
buttons to browse pages backwards and forwards. Double click on the list to play video. It uses
the default video-playing software of your PC to play the video files.
29

Connecting the device with EZ View
1. In sert t he CD- Ro m that came w ith th is pro duct to your CD-Rom drive. On the auto-run main
menu, click on EZView. Or, in the EZ View folder, double click the icon. The window
pops up.
2. Select NAS on EZ View and it starts to scan NAS on your LAN.
3. After scanning, the menu shows the NAS on your LAN. You may click the button to
search for NAS on your LAN again.
Note: EZ View cannot detect the hard drive of this NAS if your hard drive is not formatted as EXT3
format. It shows no capacity on this window.
30

4. In device list page, click on System button, an authentication window pops up. Fill in the
user name and password to enter the Info page. The default user name and password is
admin/admin.
5. Click on Network button and fill in IP address for the NAS you wish to configure. Enter the
hostname, workgroup and description. On the bottom, click the check mark to execute your
setting.
6. After successful IP address setting, you may
‧Click the Media button to access the folders in the NAS or
‧Click the WEB button to open the GUI interface. In authentication window, fill in the
username and password.
Note: To get instructions using the GUI, please see Using the Graphic User Interface (GUI) in the
following chapter.
31

Management Guide
Read this chapter to understand the management interface of the device and
how to manage the device.
Starting the Graphic User Interface (GUI)
The Graphic User Interface (GUI) is the management interface of this device. Most parameters
and settings are configured over the GUI. There are two ways to access the GUI in the device:
from your web browser, or, from EZ View utility:
To access GUI from your web browser: Open your web browser and fill in
\\4Bay-NAS or
\\192.168.1.2 in the address bar and press ENTER.
To access GUI from EZ View utility:
Click on EZView on the auto-run main menu, or, double click the
icon in CD to start the
EZ View. The EZ View window pops up. Select your NAS and click the WEB button.
Fill in the username and password. Click OK to open the GUI interface.
Note:
y The default IP address of the device is 192.168.1.2.
y The default user name and password is admin/ admin. To change the password, please refer to
System-Login Configuration on page 36.
y The password is case sensitive and alphanumeric.
32

Using the Graphic User Interface (GUI)
This section provides an introduction to the GUI.
Understanding the GUI
The GUI is consisted of the following components,
1. Configuration categories: Located on the left side of each page. Lists the configuration
categories on this device. To get access to each category, click on the button that you are
going to configure.
2. Configuration items: Located on the right side of each page. Shows the items that can be
configured. You can click on the tabs that listed above to access to each sub-categories.
Note: For detail information about configuring each item, please refer to the management
instruction for each configuration category.
33

Management items list
The following table lists the information and items that you can configure with the GUI. For detail
instruction, please refer to the corresponding chapters.
Category Sub-category Information
Status Status Shows the status information of this device including Host
name, IP address, system up time, firmware version, HD
used percentage, RAID mode, current Samba users and FTP
users, and firmware extension loaded status.
System Login To change password.
Config To backup, reload or default configuration status.
Reboot To restart the system.
Shutdown To turn off the system.
Firmware Upgrade To upgrade firmware and firmware extension.
HD Sleep To set up the HD sleep mode with time regulation from 10
minutes to 4 hours.
Time To set up the system time zone, synchronize time and
assign a timeserver for the device.
Network Hostname To change the host name, work group name, and
description of the device.
IP address To configure the network settings for the device including IP
address, Subnet Mask, Gateway, DNS server, DHCP client
enable/ disable and Jumbo mode selecting.
Alert To configure sender and receiver addresses to receive alert
information from this device via MSN.
DDNS (Dynamic
Domain Name
Service)
To enable/ disable DDNS configuration.
Services FTP server (Files
Transfer Protocol)
Change FTP Port number, and enable/disable FTP
configuration and anonymous access.
UPnP AV (Universal
Plug and Play)
To enable/disable UPnP AV configuration.
iTunes To enable/disable iTunes configuration.
P2P (Peer-to-Peer) Change P2P properties including upload/download
limitation and enable/disable P2P configuration.
Printer To enable/disable printer configuration.
MySQL (Structured
Query Language)
To enable/disable MySQL database configuration.
Photo gallery To manage photo gallery.
Account User To add a new user, delete a user, setup user permission and
change user properties.
Group To make users in groups. Add users to groups or delete
users from groups.
Folder To add a new folder, delete a folder, change folder-access
authentication and set up folder properties.
RAID RAID setup To setup the HD RAID properties of Linear and RAID 0,1,5
modes.
USB/eSATA USB / eSATA setup To remove or format the USB / eSATA devices that
connected to the device and shows the USB / eSATA
information.
34

Status
The Status page shows the following information of the device. To open the Status page, click the
Status on the configuration categories list.
Items Information
Host name The identification of this device.
IP address The IP address of the device.
Up time The estimate time that you power the device on.
Version The firmware version of the device.
H.D. used (%) The usage percentage of HD (Total amount of HD).
RAID mode The RAID mode of HD.
Samba Users The number of members who is currently connected to the Samba server.
FTP Users The number of members who is currently connected to the FTP client.
Firmware
extensions loaded
Check if the extension firmware is installed.
Note: This page shows the device information only. To do more configurations for each item,
please refer to the instruction respectively in the corresponding chapters.
35

System
The System page allows users to:
1. Configure passwords.
2. Backup, reload and default configuration status.
3. Reboot and shutdown the device.
4. Upgrade firmware and load firmware extension.
5. Set up HD sleeping mode.
6. Synchronize system time.
To open the System page, click System on the configuration categories list.
Login
This page provides password configuration, which is used for getting access to the Graphic User
Interface.
To set up password:
1. Define a new password (limited to 20 characters) in the New password box.
2. Fill in the newly defined password (limited to 20 characters) in the Confirm password box.
3. Click Apply to execute.
Note:
y The default Administrator Name and password are admin/ admin.
y The password is case-sensitive and alphanumeric.
y To enforce the security, it is recommended to change password periodically.
36

Config
The Config page allows users to backup and download the configuration status of the device or
restore the factory default configuration.
․Backup the device configuration status:
1. Click the Download button.
2. The File Download dialogue window pops up, click Save.
3. Specify a folder to place the downloaded data and click Save.
4. Click Close to complete.
․Restore the device configuration status:
1. Please store the file that you backup to /share/ folder.
Note: To know how to backup the configuration status, see
Backup the Device Configuration
Status above.
2. Click Upload to execute.
3. The system restarts automatically to restore your later configuration.
Reset to factory default:
To restore the factory default configuration for the device, click the Default button to execute.
Note:
y All the user-defined configurations will be erased and replaced by factory default settings.
y We recommend users to backup the configuration status before restoring factory default. To
get more information for backup your configuration, see
Backup the Device Configuration
Status on the top of this page.
37

Reboot
The Reboot page allows users to reboot the system. To perform system rebooting, click Reboot.
Note: While rebooting the system, it may take several minutes. Please wait and ensure a safe
operating environment.
Shutdown
The Shutdown page allows users to shutdown the device. To turn off the device, click Shutdown
and wait the device to turn off automatically.
Note: Before turning off the device, please close all client applications that are running.
Firmware upgrade
The Firmware upgrade page allows users to upgrade the firmware and load the firmware
extension.
Firmware upgrade:
To upgrade the firmware, click Upgrade to perform firmware upgrade.
Note:
y To get new firmware of the device, please contact your distributor.
y Please put the firmware updated file into /share/fwupdate folder.
Firmware extension loaded:
To enable the FTP, UPnP, iTunes, P2P, MySQL and Photo gallery functions for the device, you
have to install the ntx_fwext.tgz file to the device before any configuration.
To install the file,
1. Insert the included CD and click the Browse button.
Note: The main menu may auto run. Click EXIT to close it.
38

2. Select your CD-Rom drive. Double click on the fwextension folder. Select the
ntx_fwext.tgz file and click Open to browse the file.
3. Click Apply to perform installation. It takes a few seconds to perform installing, please wait
upon installation.
Note:
Please put the ntx_fwext.tgz into /share/fwextension folder.
HD Sleep
The HD Sleep page provides function of HD sleep mode with time regulation from 10 minutes to
4 hours, which stops the device temporarily while there is no operating on the device for a certain
period of time. To enable HD Sleep, click on the drop list to specify a time and click Apply to
execute.
Note: The hard drive will shut down automatically if there are no clients connected.
39

Time
The Time page provides time synchronizing function. You can synchronize the system time by
applying the time on your computer to the device or by connecting to a timeserver on the
Internet.
To configure the device time,
1. Select the time zone that corresponds to your region from the Time Zone drop list.
2. To apply the time on your computer to the device, click on Time Sync button.
3. To synchronize the time from a timeserver, fill in a timeserver DNS address in the Time
Server box and click Apply to execute.
Note: the synchronized time will be applied by next reboot. To reboot the device, please see
Reboot.
40

Network
The Network page allows users to:
1. Configure general device information,
2. Configure the network setting for the device,
3. Configure MSN alert information.
To open the Network page, click Network on the configuration categories list.
Hostname setup
Items Information
Hostname (limited to 15 characters) Defines the user-defined device name.
Workgroup (limited to 15 characters) Defines the workgroup name for the device,
which is going to be shown on “Network
Neighborhood”.
Description (limited to 48 characters) Defines a note for the device.
IP address setup
To enable DHCP client
Select Enable to enact this device as a DHCP client or select Disable to disqualify.
41

To configure the IP address for the device
The IP Address Setting contains parameters of the device network setting. To modify, fill in each
blank and click Apply to execute.
Items Information
Jumbo frame To enable/disable jumbo frame.
DHCP client To enable/disable DHCP client.
IP address Specifies the device IP.
Subnet mask Defines the Subnet Mask.
Default gateway Defines the default gateway.
DNS server 1/2 Defines the DNS server.
Jumbo mode
The device supports Jumbo frame for obtaining a more efficient network. You may choose 4000,
7000 or 9000 as the size of a packet.
To enable Jumbo mode, choose a frame size from the drop-down list and click Set to execute.
42

Alert
The MSN (Messenger) Alert page allows you to have the device automatically send an instant
alert message if any of the following conditions or situations occurs:
y Drive Inserted y Drive Unplugged
y Building RAID mode start y Building RAID mode complete
y Building RAID mode fail y RAID mode change
y Insufficient RAID capacity
To enable function of MSN Alert of this device, you have to:
1. Install MSN messenger on your PC. (To download MSN messenger and apply MSN IDs and
passwords, please go to
http//:www.msn.com/).
2. Apply an MSN ID and password for the device.
3. Apply another MSN ID and password for yourself (If you already have one, please skip this
step).
4. Add contacts of each other on the MSN contact list.
To set up MSN Alert,
1. Fill in the MSN ID and password you get for this device in the relevant blanks. Fill in another
MSN ID for the receiver.
2. Click Apply to execute MSN Alert function.
43

3. Click Test to check whether you can receive a test message sent by the device via MSN. The
alert message received from the device appears similar to the illustration shown below:
Note:
y If you cannot receive any test message after clicking the Test button, you might have typed in
the wrong address or password, please retype them in the relevant boxes and test again. Please
ensure both of sender and receiver have been added on the MSN contact list of each other and
you are on the MSN line.
y The actual appearance of this message will vary depending on the type of MSN client software
that you are using on your computer system.
44

DDNS
To set up a server on the Internet and enable users to access it easily, a fixed and
easy-to–remember hostname is often required. DDNS (Dynamic Domain Name Server) service
allo ws an In terne t domai n name t o be as s igned to devices with a varying (dynamic) IP addresses.
When the user tries to connect this device via the hostname, DDNS will transfer the recorded IP
address to the NAS. To setup the DDNS service properties, please refer to the following
definitions and click Apply to execute your settings.
Items Information
DDNS enable To enable/ disable DDNS service. Click to mark or clear the check box.
Service provider The website that provides DDNS service. Please select noip / dyndns
from the drop list.
Domain name The hostname that you have applied for the device.
User name / Email DDNS login account. For DynDNS users please fill in your user name;
for No-IP users please fill in your Email address.
DDNS password The password of your DDNS service account.
Confirm password Retype the password to confirm.
Note: If you do not have an account of No-IP or DynDNS,
1. Please go to
http//:www.no-ip.com or http://www.dyndns.com and register a free account.
2. Log into No-IP / DynDNS Website and create a new hostname for the device.
3. After applying, please go back to the DDNS page of this device and complete the remaining
configuration.
45

Services
The Service page allows users to:
1. Configure FTP settings.
2. To enable or disable UPnP AV and iTunes configuration.
3. Configure P2P settings.
4. Configure printer settings.
5. Manage MySQL database and photo gallery.
6. Upload/download files with this device.
To open the Option page, click Service on the configuration categories list.
Note: Services may not be available if:
y HD is not installed. Please install HD and build RAID disk.
y HD is unable to use. Please build RAID disk.
y Firmware extensions are not installed.
To create RAID disk, please refer to RAID on page 78; to install firmware extensions, please refer
to System > Firmware Upgrade > Firmware extension loaded on page 38.
46

FTP server
The device embeds an FTP server (Files Transfer Protocol) that allows users to access this device
by FTP client. To setup the FTP server properties, please refer to the following definitions and click
Apply to execute your settings.
Items Information
FTP enable Select Enable or Disable to enact FTP server function or not.
FTP port The port number of the FTP server. Please fill in a number from
1 to 65535.
Anonymity Allow FTP clients to connect with the device without username/
password authentication.
Code page Select a code that fits your computer.
Note:
a. Please DO NOT use the number 80 and 8080 as the FTP port. As default, port 80 and
8080 are the Administration Port/Apache for the device.
b. FTP service may not be available if:
y HD is not installed. Please install HD and build RAID disk.
y HD is unable to use. Please build RAID disk.
y Firmware extensions are not installed.
To create RAID disk, please refer to
RAID on page 78; to install firmware extensions, please
refer to
Firmware Upgrade > Firmware extension loaded on page 38.
47

UPnP AV
The UPnP AV (Universal Plug and Play) service allows users to play multimedia files through UPnP
AV client software on UPnP AV server. To enable/disable UPnP AV server, please select
Enable/Disable in UPnP AV enable drop-down list and click Apply to execute. Click on
Rescan button to rescan the multimedia file in the media folder of this device, which will be
shown on the UPnP AV client software list later.
After enabling the UPnP,
‧Users of Windows XP will see a small computer icon showing in the notification area at the
lower-right corner of the screen automatically. Right-click the icon to access to the GUI
interface directly.
‧Users that have no icon shows on your screen, please click My Computer> My Network
Places> Show icons for networked UPnP devices to show UPnP devices. You will see the
4Bay NAS computer icon shows under Local Area Network. Double click on the icon to
confirm that your UPnP has executed normally.
Note: UPnP AV service may not be available if:
y HD is not installed. Please install HD and build RAID disk.
y HD is unable to use. Please build RAID disk.
y Firmware extensions are not installed.
To create RAID disk, please refer to
RAID on page 78; to install firmware extensions, please refer
to
Firmware Upgrade > Firmware extension loaded on page 38.
48

iTunes
The iTunes service allows users to play audio files through iTunes client software on iTunes server.
To enable/disable iTunes server, please select Enable/Disable in iTunes enable drop-down list
and click Apply to execute. Click on Rescan button to rescan the audio file in the media folder of
this device, which will be shown on the iTune client software list later.
Note: iTunes service may not be available if:
y HD is not installed. Please install HD and build RAID disk.
y HD is unable to use. Please build RAID disk.
y Firmware extensions are not installed.
To create RAID disk, please refer to
RAID on page 78; to install firmware extensions, please refer
to
Firmware Upgrade > Firmware extension loaded on page 38.
49

To Share Multimedia Files with UPnP AV and iTunes Clients
To share your multimedia files with other clients in this device, you have to put files into the media
folder first. Please perform the following steps:
1. Click Start>Run on your PC.
2. Enter the IP Address then click OK to access the folders.
3. Click on the media folder icon to open the folder.
50

4. Put multimedia files that you want to share here.
5. Open UPnP AV or iTunes to check your sharing.
Note: You can download the latest iTunes software from official Apple website
http://www.apple.com.
51

P2P
The device embeds P2P server (Peer-to-Peer), which supports BitTorrent downloading client to
download file automatically. Please setup the P2P configuration and click Apply to execute P2P
first, and then follow the process step by step to start downloading file from it.
Note:
y Number 0 equals to unlimited.
y The recommended upload and download speed are 10/0 KB per second.
Items Information
P2P enable Select Enable or Disable to enact P2P function or not.
Upload The maximum upload speed.
Download The maximum download speed.
Note:
a. If your NAS device is located behind firewall, please contact administrator to open port 6882
for BT user, or port 4662 (TCP) and port 4662+4(UDP) for emule user.
b. To check out download status, please go to http:// (your IP address): 4080
c. P2P service may not be available if:
y HD is not installed. Please install HD and build RAID disk.
y HD is unable to use. Please build RAID disk.
y Firmware extensions are not installed.
To create RAID disk, please refer to
RAID on page 78; to install firmware extensions, please refer
to
Firmware Upgrade > Firmware extension loaded on page 38.
52

How to start downloading files from P2P
To start downloading files from P2P,
1. Click Start>Run on your PC.
2. Enter the IP Address then click OK to access the folders.
3. Click share folder> p2p folder and you will see three sub-folders inside p2p folder.
4. Get a *.torrent file for downloading your demand file and place it under the torrents folder.
Put the seeds inside!!
53

5. The downloading starts automatically.
6. The completely downloaded
files with a folder will be saved in directories folder, the single
file will be saved in files folder.
Warning:
All users of this device are warned against illegal downloading of copyrighted materials. The P2P
embedded functionality is provided for downloading authorized files only. Downloading or
distributing of unauthorized materials may result in severe civil and criminal penalty. Users of this
device are subject to the restrictions of the copyright laws and should accept all the
consequences.
54

Printer
The printer page allows users to enable/disable printer configuration.
Procedures to setup the printer
Note: The device supports one connected USB printer only. Printer Connections on both the USB
ports may not led the printer functional.
1. Connect the USB cable of your printer to the device. Power on your printer.
2. Open the GUI and select System > Printer. Install the firmware extension file to the device.
Note: Printer service may not be available if:
y HD is not installed. Please install HD and build RAID disk.
y HD is unable to use. Please build RAID disk.
y Firmware extensions are not installed.
To create RAID disk, please refer to
RAID on page 78; to install firmware extensions, please refer
to
Firmware Upgrade > Firmware extension loaded on page 38.
3. Open the Printer page; you can see the information of your printer.
4. Select Enable in the drop-down list and click Apply.
Note: After finishing the four steps above, the printer server function is activated. To setup the
computers that are going to use the printer, please follow the instructions from step 5.
5. Click Start>Run on your PC. Enter the IP address then click OK to access the folder of this
device.
6. You can find a printer icon. Double click on this icon to proceed.
7. The system asks for installing the driver for the printer. Click Yes on the warning dialogue
windows to proceed.
55

8. Insert your CD that came with your printer. Click the Have Disk button.
9. Browse to the driver in your CD. Click Open to browse the driver.
Tip: The correct driver is usually the file with the product name in “*. Inf” format.
56

10. Click the OK button to start driver installation.
11. The printer is ready for use now.
57

MySQL
This device embeds MySQL (Structured Query Language) database management systems. Users
can make use of MySQL and combine with PHP (Hypertext Preprocessor, script language) to
design their own personal home page, photo album, guest book, forum, etc. Please select
Enable/Disable in MySQL enable and click Apply to execute. The clean button can be used to
clean all MySQL database.
Note:
i. After activating MySQL, please go to http:// (your IP address) /phpMyAdmin and do more
configurations.
ii. MySQL service may not be available if:
y HD is not installed. Please install HD and build RAID disk.
y HD is unable to use. Please build RAID disk.
y Firmware extensions are not installed.
To create RAID disk, please refer to
RAID on page 78; to install firmware extensions, please refer
to
Firmware Upgrade > Firmware extension loaded on page 38.
58

Photo gallery
The embedding Photo gallery database lets you organize and view your digital photo collection in
a gallery view. You can upload your favorite photos in the photo gallery to share with other
clients.
Click Init button to start the photo gallery database. The Clean button will replace the Init
button in this page after initializing the photo gallery. Use it to clean all Photo gallery database if
you need.
Note:
a. After activating Photo gallery, please go to http:// (your IP address) /cpg and do more
configurations. For more information, please refer to
http://coppermine-gallery.net/demo/cpg14x/docs/index.htm.
b. Photo gallery service may not be available if:
y HD is not installed. Please install HD and build RAID disk.
y HD is unable to use. Please build RAID disk.
y Firmware extensions are not installed.
To create RAID disk, please refer to
RAID on page 78; to install firmware extensions, please refer
to
Firmware Upgrade > Firmware extension loaded on page 38.
Procedures to setup the photo gallery
1. Before using photo galley, you have to enable MySQL function first. In the MySQL page, select
Enable from the drop-down list and then click Apply.
59

2. Click on the Init button to initialize the photo gallery.
3. In the Photo Gallery page, fill in Username and password, and then click on Let’s Go!
4. After completed installation, click on Let’s continue! to go on the proceed.
60

4. To change the language shows on the photo gallery, please follow the steps below:
c. On the top of the page, click on Admin mode.
d. Click on Config to do basic configurations.
e. Click on the Language & Charset settings.
f. In the Language drop-down list, select the language of your country.
61

5. To set up a new album:
a. On the top of the page, click on Albums.
b. Click on the New button to set up a new folder.
c. In the blank, fill in the album name.
d. Click on Apply modifications to apply.
e. Click CONTINUE to go on the procedure.
f. The album thumbnail shows on the page, click on the thumbnail to continue.
62

g. Click Upload file to upload files.
g. Click on Browse to select your files and then click on CONTINUE to upload.
63

For users who want to upload files from this device, please add a new folder and put the files in
\\192.168.1.2\www\cpg\albums and follow the steps below:
1. Click on the Batch add files button.
2. Click on the folder you wish to upload.
3. The page shows the files in the folder, click OK to start upload or click up one level to browse
for other files you wish to upload.
64

4. The page shows the thumbnail files in the folder. Click to mark the checkbox and select the
album you wish to upload to. After selection, please click on the Insert selected files button
to continue.
65

5. The page shows the upload result. Click on Edit files to do more configurations of the picture,
click on Album properties to do more configurations of the album, or click on Thumbnail
view to see the uploaded file in a thumbnail view.
6. This is the illustration of the Thumbnail view result.
66

Account
The Account page allows users to manage and configure users, groups, and folders.
To open the Account page, click Account on the configuration categories list.
User configuration
The User page allows users to:
y Add users
y Delete users
y Modify user properties
To add a new user
1. Click the Add button on the user list.
67

2. Define the user properties in the showing up Add user setting page.
Items Information
User name (limited to 16 characters) Specify a name for the newly added user.
New password (limited to 16 characters) Enter a username for the new user.
Confirm password (limited to 16 characters) Enter the new password again to confirm
the password.
User description (limited to 48 characters) Fill in a description as a note for the user.
FTP enable Select Yes to allow this user to access
the device with FTP client. Select No to
deny FTP access.
3. Click Apply to add the new user, click Reset to reload previous configuration.
Note: Only 50 sets of users can be applied.
To delete a user
1. Select the user that you wish to remove from the device. Mark the check box of the user.
2. Click the Delete button to remove the user.
68

To configure a user
1. Move the cursor onto the icon of the user that you wish to configure.
2. You can change the user’s properties by modifying the settings on each item.
Note: For more information about each item, see
To add a new user on page 67.
3. To change the user name, click the Change name button. The change username page shows
up. Fill in the new user name in the New user name box. Click Apply to execute.
69

Group configuration
The Group page allows users to:
y Add groups
y Delete groups
y Modify group properties
70

To add a new group
1. Click the Add button on the group list.
2. Configure the properties for this group in the showing up Add group setting page.
Items Information
Group name
(limited to 16 characters)
Enter a group name as the group ID.
Note: The first group name must start with an alphabet.
Group description
(limited to 48 characters)
Fill in description as a note for the group.
Authorized users Select group members by marking the check boxes.
3. Click Apply to add the new group or click Reset to reload previous configuration.
Note: Only 50 sets of groups can be applied.
71

To delete a group
1. Select the group that you wish to remove from the device. Mark the check box of the group.
2. Click Delete to remove the group.
To configure a group
1. Move the cursor onto the icon of the group that you wish to configure.
2. Modify the properties for the group. Click Apply to execute the modification or click Reset to
reload previous configuration.
Note: For more information about the items, please see
To add a new group on page 71.
72

Folder configuration
The Folder page allows users to:
y Add folders
y Delete folders
y Modify folder properties
Note: The share, media, and www folders are the system default folders. You are not allowed
to delete or configure them.
To add a new folder
1. Click the Add button on folder list.
73

2. Specify a folder name and description for the newly added folder in the showing up Add
folder setting page. Click Apply to enable.
Items Information
Folder Name (limited to 15 characters) The name for the folder.
Description (limited to 48 characters) A note for the folder.
Note:
y Both folder name and description are alphanumeric.
y Blank character is not allowed for folder name and description.
y Only 100 sets of folders can be applied.
To delete a folder
1. Mark the check box of the folder that you wish to delete.
2. Click Delete to delete the folder.
74

To configure a folder
Click on the folder that you are going to configure.
The folder configuration page shows up. This page allows users to:
‧Change folder name/ description.
‧Add or remove authorized users or groups for this folder.
‧Change folder-accessing authority level for users and groups.
75

To change the folder name/ folder description
1. Click on Change folder name or Change description icon. The Folder name/
description setting page shows up.
2. Fill in the new name or new description for the folder and click Apply.
Note: For more information about the items, please see
To add a new folder on page 73.
Configure folder-accessing authority level for users and groups
1. Configure the access-permission rules for all users by pre-defined levels. Select a level and
click Save to apply this authority for all users. The pre-defined levels use the following access
permission rules:
Pre-defined Levels Access Authority
Authentication-free
access
No authentication. Everyone is allowed to get access
to this folder without username and password.
No access for all users No access. No user is allowed to get access to this
folder.
Read-only access for
all users
All users are allowed to read in this folder. Modification
in this folder is not allowed.
Read/ Write access for
all users
All users are allowed to read and write this folder.
Current access
permission according
to following settings
The folder uses user-defined authority settings. The
access permissions in Group-Permission setting
and User-Permission setting will be applied to this
folder. Note: The default access permission are both
Read-only.
76

2. Configure the access-permission rules by groups and users:
Note: Before starting, you have to select Current access permission according to the
following settings first.
By group: Select an access-permission rule for this group and click Save to apply.
By user: Select an access authority for each user. Click Save to apply.
77

RAID
RAID (Redundant Array of Independent Disks) combines physical hard disks into a single logical
unit to target the aim of providing fault tolerance and improving performance. The RAID page
shows the Disk information and allows users to create different types of volumes. To open the
RAID page, click RAID on the configuration categories list.
78

Hard disks
The device supports hot swap. You don’t have to shutdown the system upon hard disk drive
removal or replacement while the system is running. In RAID 1 and RAID 5 mode
, you can
remove and replace “one” hard disk and simply click on the Recovery button to recover files into
HD again. However, hot-swap hard disk drive in other mode
will cause RAID stop and data loss.
Please rebuild RAID disk if you are in the situation.
Note: Hot-swap in Linear and RAID 0 mode should NOT be done unless you know exactly what
you are doing.
The Hard disks table shows the information of the Hard Disk:
Items Information
Disk The serial number of the slot.
Model The product name of HD.
Capacity The volume of HD.
Status and Check: There are some relevant probabilities between Status and Check information,
please refer to the following definitions:
Status Check Definitions
New HD Unformat An unformat new HD has been installed.
Ready Free HD is not in RAID array. You cannot use this HD to work.
Running HD is in RAID array.
Recovery Button HD is in RAID array under RAID 1 or RAID 5 Mode before.
But a motion of removing HD has caused this result. Click
this button to recover files into HD again.
RAID Broken RAID Fail The RAID mode is broken and failed. You cannot use this
HD to work.
No HD There is no hard disk installed.
Note: After clicking Recovery b utto n, it w ill c ost t ime t o rebu ild. The co st of time is in d irec t ra t io
to the HD capacity. Please wait patiently and do not remove HD while it is still running.
79

RAID disk
The RAID Disk table shows the status and information of the RAID Disk:
Items Information
Mode The RAID mode of the RAID Disk.
Disk Usage The used percentage of the RAID Disk.
Status The details of the RAID Disk. Click Report
or *Resyncing to see detailed RAID
information.
* You will see HD rebuilding information while during resyncing. Click on Report
or Resyncing in
Status table to show the following RAID information:
80

Create new RAID disk
You can combine hard disks to create different types of volumes, and find the data protection level
of your need. There are four modes for you to create a new RAID Disk:
Volume
Mode
Amount of
composed HD
Functionality
RAID 0 2~4 RAID 0 offers data striping without data redundancy. Select this mode
to maximize your disk capacity and access disk with much more faster
speed, but if one drive fails, all data in the array will be lost.
RAID 1 2 RAID 1 provides mirroring data over both disks. Select this mode to
assure data integrity, but the storing capacity is equal to a single drive.
Linear 2~4 Linear mode saves data on physical disks sequentially. Select this mode
to combine disks into one large disk but fail of data protection function.
RAID 5 3~4 RAID 5 includes a backup option. It uses parity mode of store redundant
data on space equal to the size of one disk for later data on recovery.
Therefore, the available storage capacity equals to a single drive.
81
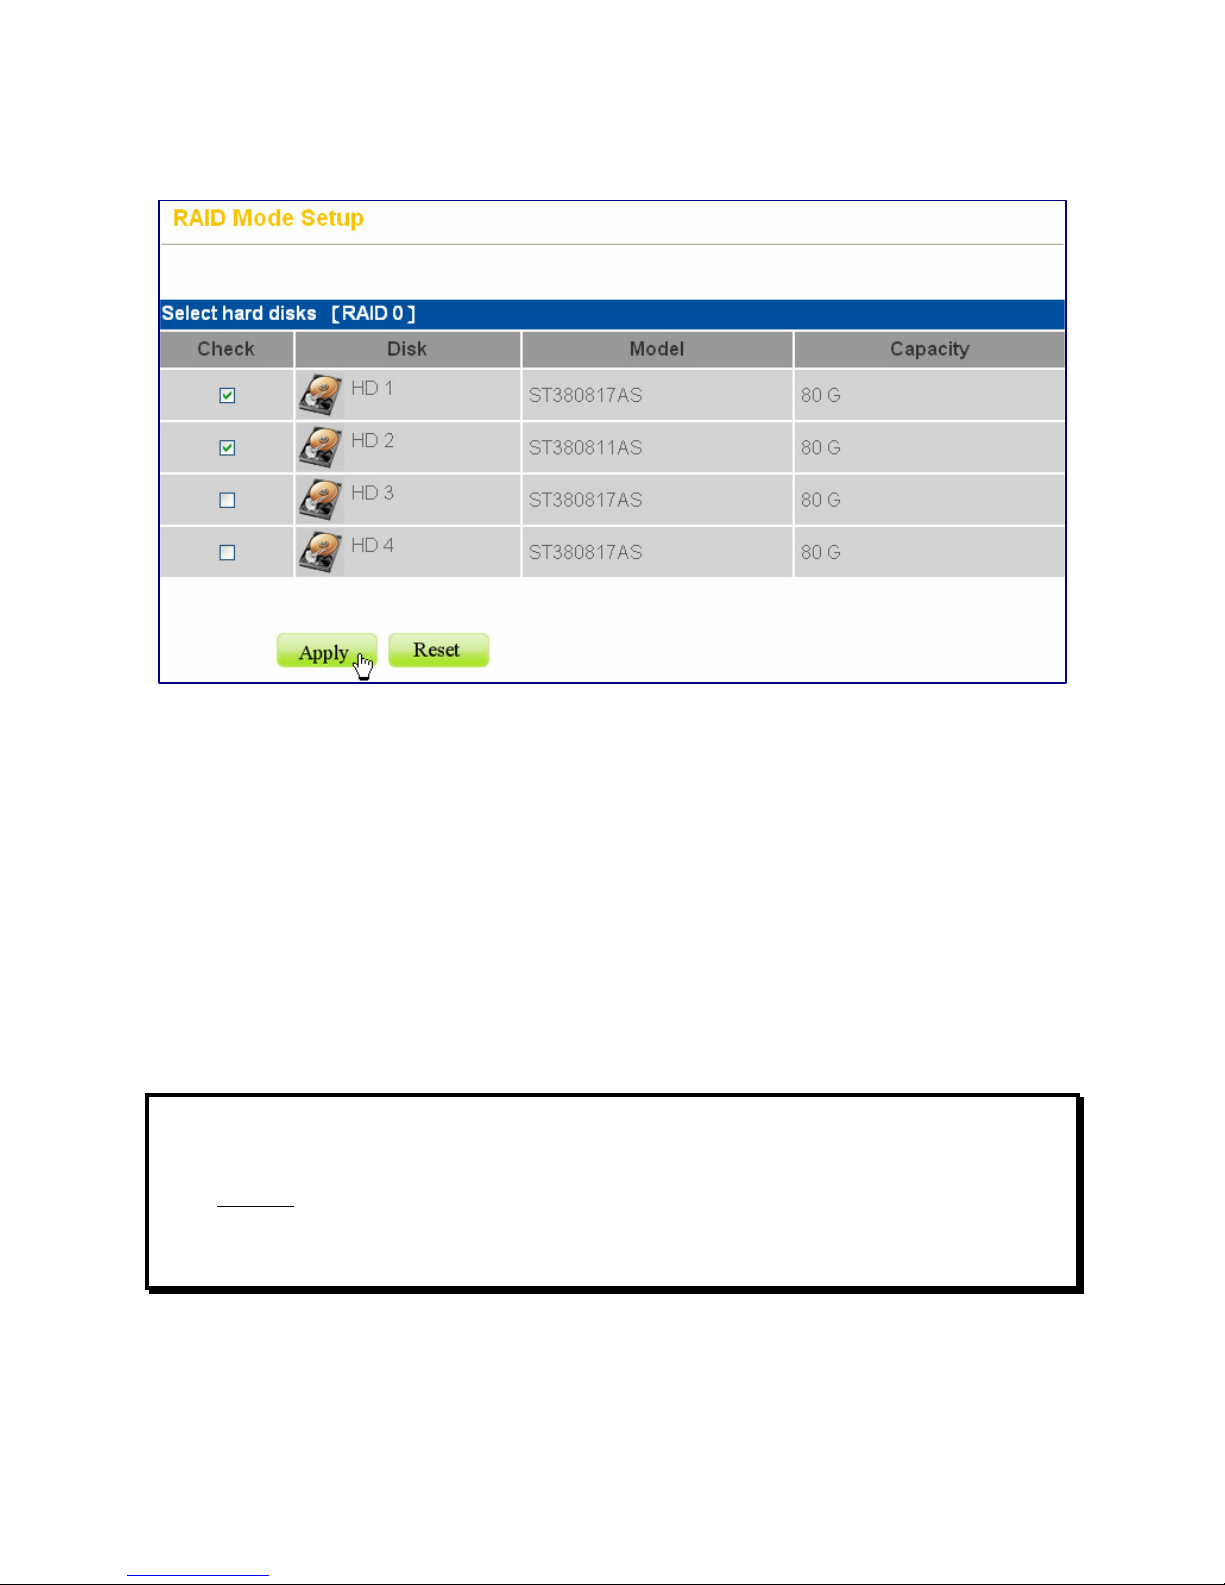
To change or create a RAID disk,
1. Click the types of mode you want to enter into the RAID Mode Setup page.
2. Select the disk that you wish to change or create.
3. Click Apply Change to build RAID.
Note:
y HD will be format after clicking Apply Change button and all contents will be erased!!
y After changing mode, the device will take some time to rebuild your system automatically. The
required time depends on the mode you select and the capacity of your hard disk drive. (ex. For
a 100G HDD, it may take 1 hour to rebuild in RAID 1 mode, but take about 5 minutes to rebuild
in RAID 0 mode) Please wait patiently and do not remove HD when it is still running. Please wait
patiently and do not remove HD when it is still running.
Warning:
Before changing or creating a RAID disk, please ensure that a hard disk drive has been installed
in the first bay of the device. The system cannot build RAID if you leave the first bay of the device
empty. Please insert the hard disk inside!!
82

USB/eSATA
The USB/eSATA page shows the information of the connected USB devices. To open the
USB/eSATA page, click USB/eSATA on the configuration categories list.
Items Information
Name The name of the connected USB/eSATA storage.
Description The partition order of the USB/eSATA storage device.
Note: The device recognizes the first four partitions of your USB storage only.
We recommend users not to format the USB storage for more than 4 partitions
Type The format type of the connected USB/eSATA storage device.
Size The volume of the connected USB/eSATA storage device.
Remove button Click this button to safely remove the connected device.
Note: Always disconnect your connected USB device by clicking the Remove
button. To remove your USB improperly may lead to data loss.
Format button Click this button to format the connected device in EXT3 or FAT32 file format.
After connecting the USB/eSATA storage to the device, you will see the USB/eSATA folder in
Account> Folder. You are not allowed to delete or configure them.
83

Appendix
Using EZIP Backup to back up your files
This program helps users to backup the files on you computer to your NAS. Those
backup files are going to be compressed as *.zip format on your NAS.
1. Double click the
shortcut on your desktop.
2. Click the
icon on system tray. The EZIP Backup window pops up. You may click the
button to close this program or click the button to minimize this window to
system tray.
3. Click PC Folder Select button. Browse a folder that you are going to backup and click OK.
The folder that you selected shows on the list.
84

4. Click the Change NAS button to select a NAS. Select a NAS in the NAS device drop list. Select
a destination folder for locating the back-upped files.
5. Fill in a user name and password for accessing this folder. Select the time that you are going
to execute backup. Click Setting Apply.
Note: You may also mark the Disable Schedule Backup checkbox to disable EZIP Backup to
backup your files by schedule.
6. Click the Apply button on the up-right corner of the window.
7. Click the
button to start backup.
To restore a back-upped file to your PC, select the file on the list and click
to
perform restoring.
85

Trouble Shooting
1. How to shut down the device properly?
Ans.
To shut down the System properly, press the Power button on the front panel for five seconds
until Status LED blinks red then go off.
2. The EZ View utility can’t configure My Network setting.
Ans.
Make sure that your RJ-45 cable is connected with the device and your PC/Switch.
Check if the LINK/ACT LED on the device illuminates.
Check the power of the device, your PC and Switch. Make sure that it’s on.
Check your PC’s IP address, make sure that it has a static IP or connects with a router
with DHCP server. For instruction about the IP setting, Please refer to the
Management
Guide > Network > IP Address Setup chapter on page 41.
Reboot the system with Web-based UI or press the Reset to Factory Default button to
restore the factory default setting and reboot.
3. The device can’t find my SATA interface HD
Ans.
The HD is unformatted. Please format it with our HD Format tool.
The partition format of HD is not EXT3, ex. NTFS. Please format it with the provided
Format tool.
The HD maybe broken. Please change another HD and try again.
4. I use the device as a Web/FTP server, but the users that outside the LAN can’t
access it.
Ans.
For WAN users to get access to the FTP or WEB server, you should link the device to a
router with appropriate configuration. Please make sure that:
1. The NAT functionality is enabled in your router.
2. In the port-mapping session, the “Internal Host IP” should be configured as the IP
address of this Device and the value of “Port” should be corresponded to the port
number of the WEB server or FTP server you configured.
(Ex, If the IP address of your device is 10.10.7.251, the port number of your FTP is
configured as 21 and the port for Web Server is as 8080, you should add or modify
a port mapping record, set the Internal Host IP address as 10.10.7.251, the Port as
21. then add or modify another port mapping record, set the Internal Host IP address
as 10.10.7.251 and the Port as 8080)
3. Before allowing the device to communicate with Internet, we strongly recommend
users to add a Firewall device to secure your network from being invading.
86

5. I can’t access this device.
Ans.
Check the LINK/ACT LED of Device illuminates.
Reboot the system with Web-based UI or press the Reset to Factory Default button to
restore the Factory default setting and reboot.
Maybe there are too many concurrently connected users. The system blocks the
incoming users after meeting the maximum allowed number.
6. I have accessed the HD, but I can’t access to the folders.
Ans.
Verify you have the correct username and password.
If you have accessed to any folder in the HD and would like to use another set of
username/ password for different authority, please log off your operation system and
log in again.
7. There are unrecognizable characters as the file name.
Ans.
Verify if the Unicode file is loaded to the device successfully. To get instruction loading
the file, please see
System > Firmware Upgrade > Firmware extension loaded on page
38.
8. I have followed the procedures to setup the printer and it just doesn’t work.
Ans.
Check if you power your printer on.
Verify that the cables are connected correctly
Make sure that you enactive the printer server functionality, you can refer to
Management Guide > Service > Printer on page 55 for more information.
You may select an incompatible printer driver. Click Start> Setup> Control Panel.
Double click the printer icon. Remove this printer and install a different driver and try
again.
The device supports one connected USB printer only. Printer Connections on both the
USB ports may led the printer functioned unsuccessfully.
9. I can’t add a new user.
Ans.
This device supports usernames with lower case only. Please check if you specify a new user
with a capital letter.
10. I can’t configure the default user “admin” in User Configuration.
Ans.
The password of the user admin can only be configured in the System> Login on page
25. Please note that you will have to login the GUI with this new Superuser password
after changing it.
The Superuser ID is also the administrator ID while you access folders in this device via
samba or ftp. The ID can access all folders in this device.
11. My eSATA cannot be detected.
Ans.
Verify that you connect the cable correctly between this product and your eSATA device.
Power off this product and your eSATA device. Power on your eSATA device first and
then power on this product. Please note that you should always turn on your eSATA
device first.
87

Product Specification
Standard
IEEE 802.3, IEEE 802.3u, IEEE 802.3ab
Support Protocol
TCP/IP, HTTP, SMB, FTP, DHCP, UPnP
File System
EXT3
Support concurrently connected Users
32 users
Interface
One 10/100/1000Mbps RJ-45 Ethernet port
2* USB 1.1/2.0 ports
One eSATA host connection port
One USB backup button
One Reset to Factory Default Button
One Power On/Off Switch Button
Connection speed
10/100/1000 Mbps
Support Hard Diskette
1* eSATA HDD up to 1TB
4* removable 3.5” SATA interface HDD up to 1TB for each bay
Diagnostic LEDs
Power (Blue)
Status (Amber, Red)
LAN (Green, Amber)
HDD I, HDD II, HDD III, HDD IV (Green)
USB I, USB II (Green)
HDD Full (Red)
Backup (Green)
eSATA (Green)
Dimensions
200(L) x 130(W) x 185(H) mm
Operating Temperature
Operating - 0~40℃; Storage - -10~65℃
Power Supply
DC 12V 6.7A External power adapter
Certification
FCC, CE, VCCI Class A
61VR-023400+207
88
 Loading...