

Page 1

Interior Features
Interior Equipment
Sunvisors
When you need a sunvisor, lower it for use
in front or swing it to the side.
Sunvisor
Side Extension Sunvisors
The visor extender extends the sunvisor's
range of sun shading.
To use, pull it out.
V anity Mirrors
To use the vanity mirror, lower the
sunvisor.
If your vehicle is equipped with a vanity
mirror light, it will illuminate when you
open the cover.
CAUTION
When moving the sunvisor, retract the
visor extender to its original position.
Otherwise, the visor extender could hit
the rearview mirror.
5–136
Mazda3_8CX9-EA-13F_Edition1.indb 136Mazda3_8CX9-EA-13F_Edition1.indb 136 2013/05/17 11:51:332013/05/17 11:51:33
Page 2
Interior Features
Interior Equipment
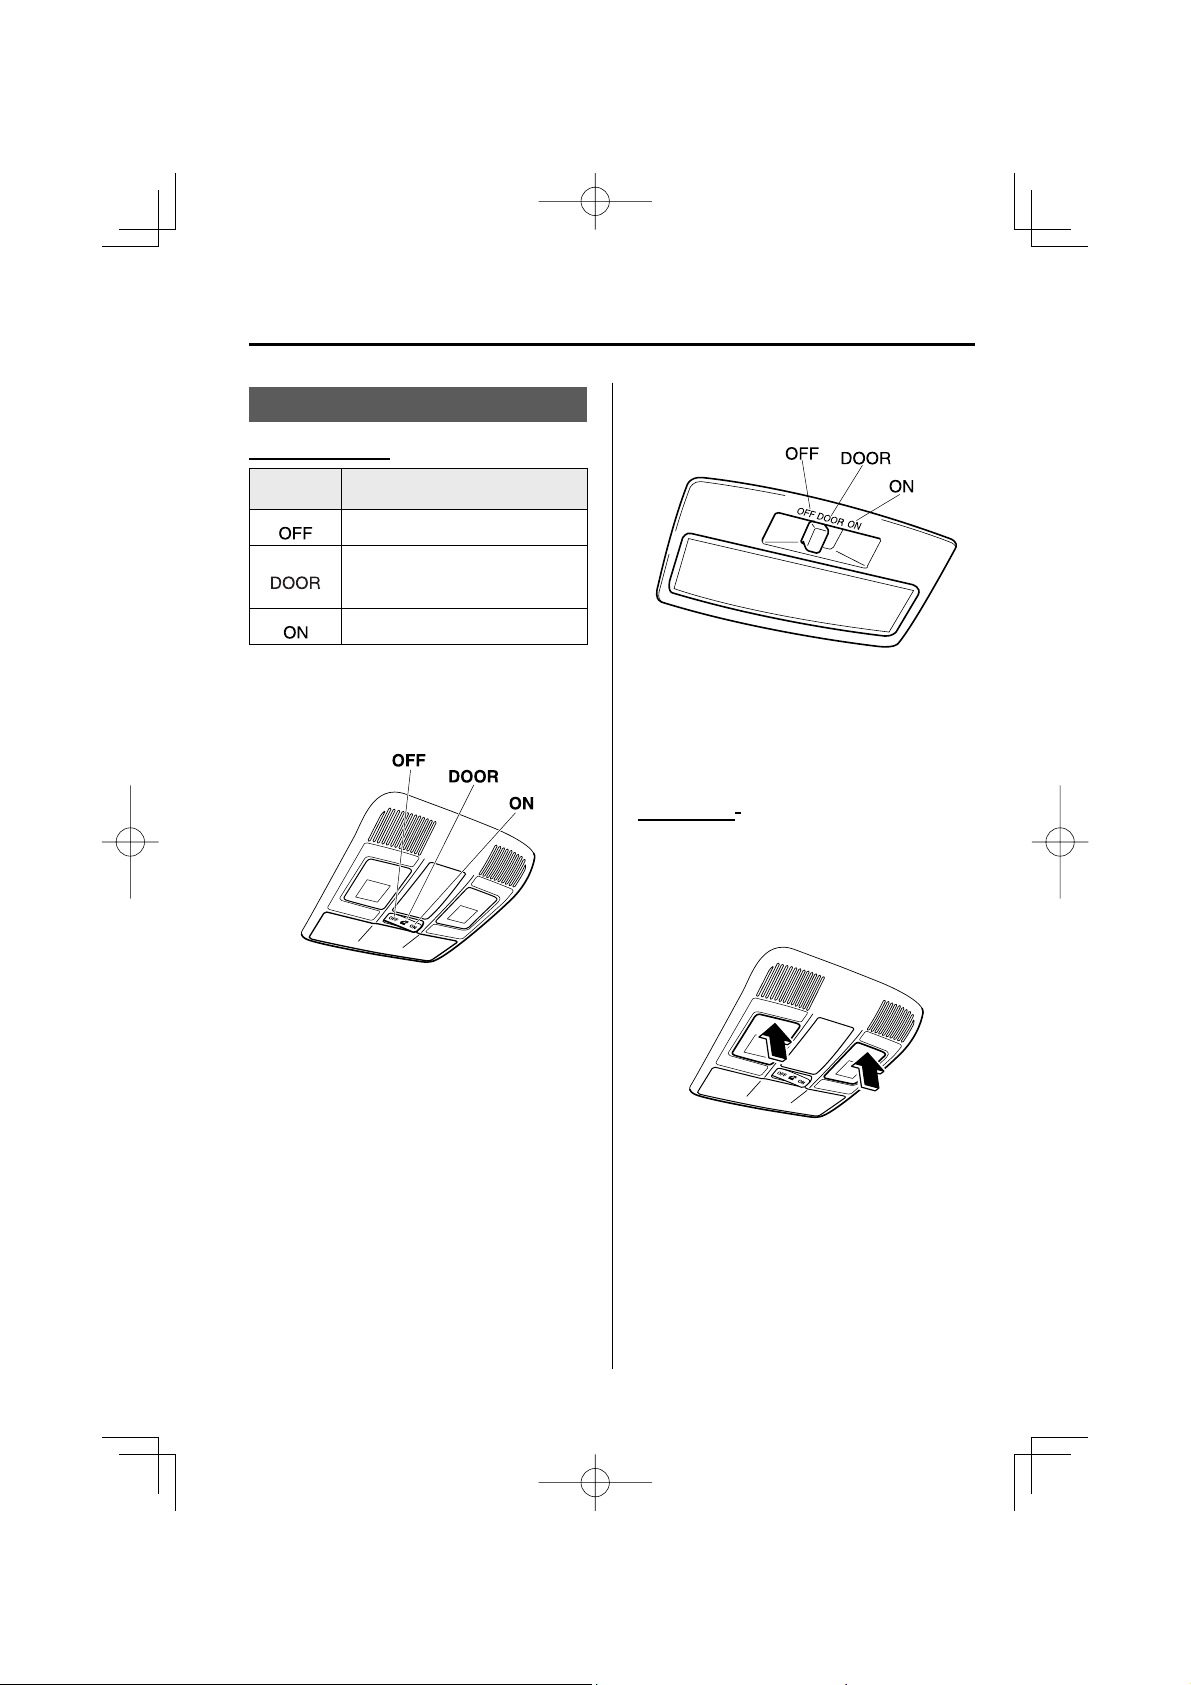
Interior Lights
Overhead Lights
Switch
Position
Light off
• Light is on when any door is open
• Light is on or off when the
illuminated entry system is on
Light on
With Map Lights
Overhead Lights
Without Map Lights
NOTE
(With map lights)
The map lights and rear overhead light
also turn on and off when the front
overhead light switch is operated.
Map Lights *
When the overhead light switch is in the
door or off position, press the lens to
illuminate the map lights, and then press
the lens again to turn them off.
NOTE
The map lights will not turn off even if the
lens is pressed in the following cases:
•
The overhead light switch is in the ON
position.
•
The overhead light switch is in the
door position with the door open.
•
The illuminated entry system is on.
*
Some models.
Mazda3_8CX9-EA-13F_Edition1.indb 137Mazda3_8CX9-EA-13F_Edition1.indb 137 2013/05/17 11:51:332013/05/17 11:51:33
5–137
Page 3

Interior Features
Interior Equipment
Luggage Compartment Lights (5–door)
Switch
Position
Luggage Compartment Light
Light off
Light on when the liftgate is open
Trunk Light (4–door)
The trunk light is on when the lid is open
and off when it's closed.
NOTE
To prevent the battery from being
discharged, do not leave the trunk open
for a long period when the engine is not
running.
Illuminated Entry System
When the illuminated entry system
operates, the overhead light (switch is in
the DOOR position) turn on for:
•
About 30 seconds after the driver's door
is unlocked and the ignition is switched
off.
• About 15 seconds after all doors are
closed and the ignition is switched off.
• About 5 seconds after all doors are
closed and the ignition is switched off
when the key is out of the vehicle.
• Illuminates for about 15 seconds when
the ignition is returned from ACC to
OFF.
The light also turns off when:
• The ignition is switched on and all doors
are closed.
• The driver's door is locked.
NOTE
•
Battery saver
If any door is left open with the
overhead light switch in the DOOR
position, or the liftgate/trunk lid is left
open, the overhead light or luggage
compartment light/trunk light turns
off after about 30 minutes to prevent
battery depletion.
•
The operation of the illuminated entry
system can be changed.
Refer to Personalization Features on
page
9-10 .
5–138
Mazda3_8CX9-EA-13F_Edition1.indb 138Mazda3_8CX9-EA-13F_Edition1.indb 138 2013/05/17 11:51:352013/05/17 11:51:35
Page 4
Interior Features
Interior Equipment
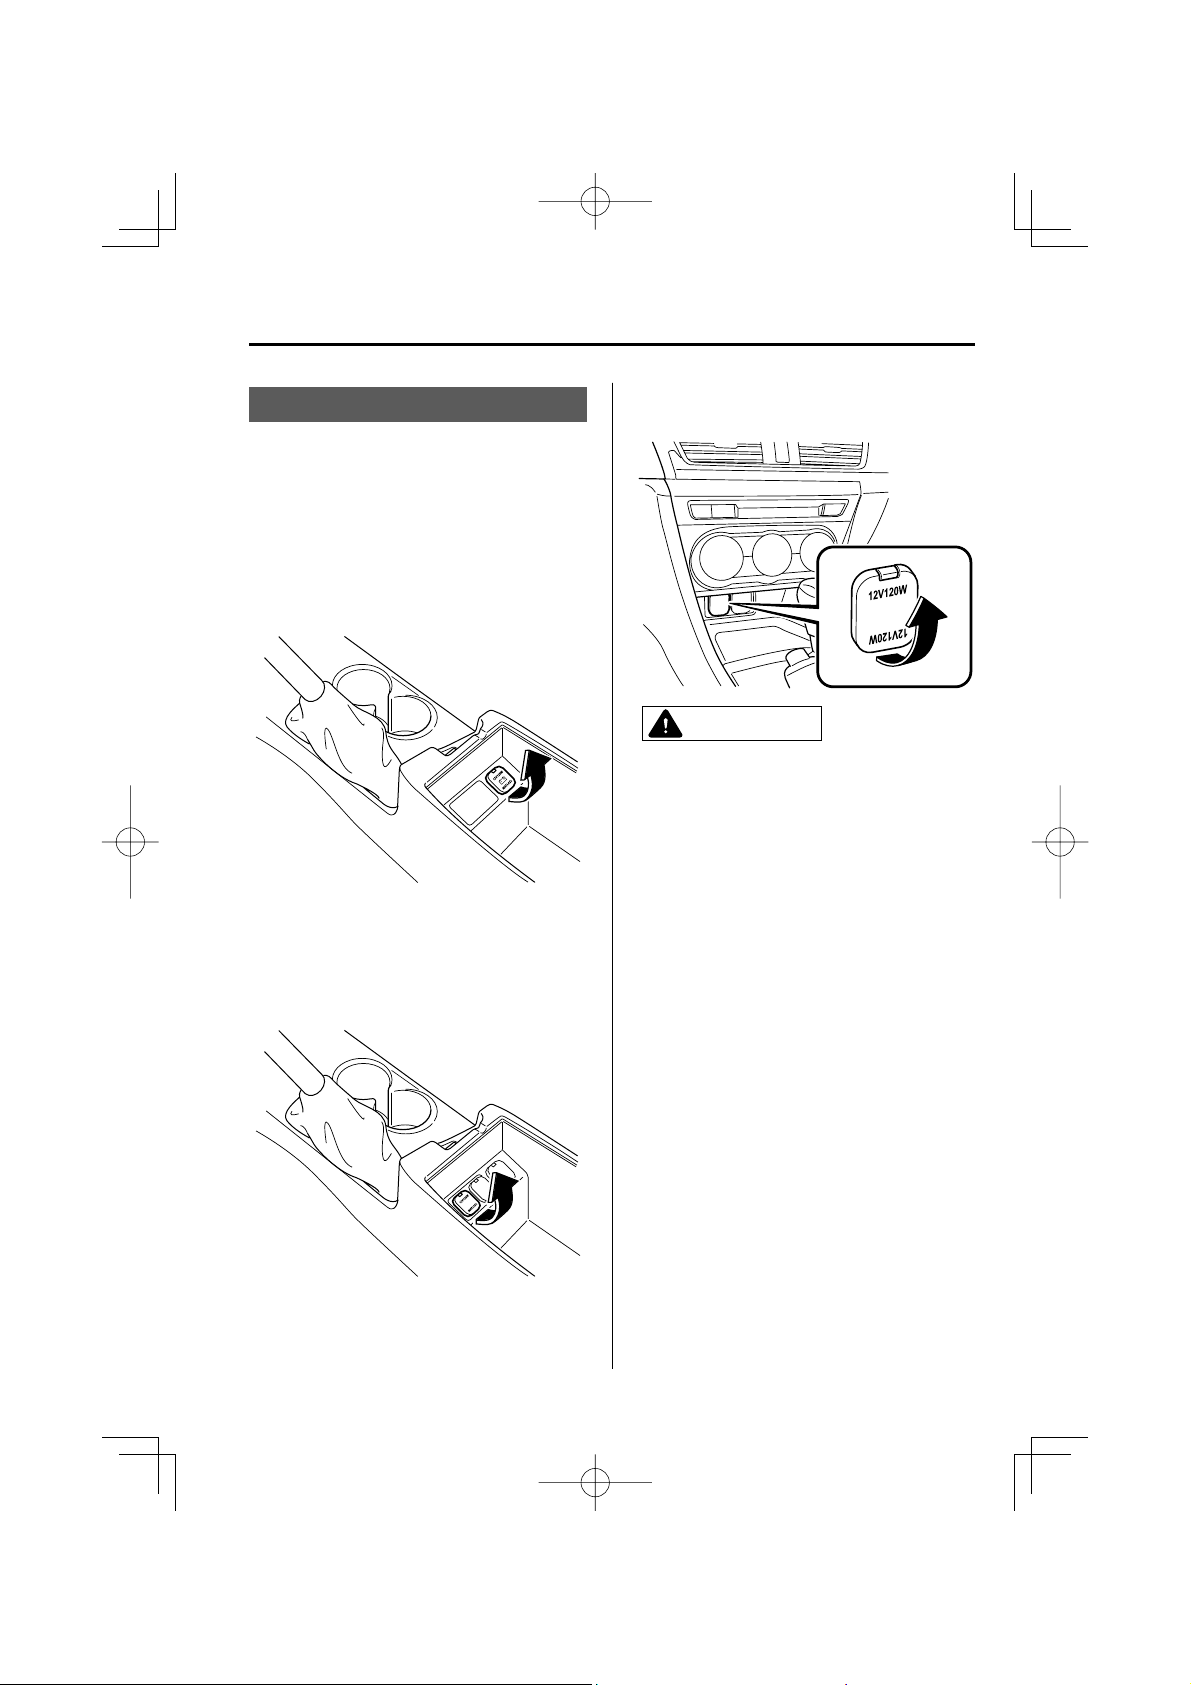
Accessory Sockets
Only use genuine Mazdaaccessories or the
equivalent requiring no greater than 120 W
(DC 12 V, 10 A).
Type A
The accessory sockets can be used
regardless of whether the ignition is on or
off.
*
Type B
The ignition must be switched to ACC or
ON.
With CD Player
Without CD Player
To prevent accessory socket damage or
electrical failure, pay attention to the
following:
CAUTION
Do not use accessories that require
more than 120 W (DC 12 V, 10 A).
Do not use accessories that are not
genuine Mazda accessories or the
equivalent.
Close the cover when the accessory
socket is not in use to prevent foreign
objects and liquids from getting into
the accessory socket.
Correctly insert the plug into the
accessory socket.
Do not insert the cigarette lighter into
the accessory socket.
Mazda3_8CX9-EA-13F_Edition1.indb 139Mazda3_8CX9-EA-13F_Edition1.indb 139 2013/05/17 11:51:352013/05/17 11:51:35
*
Some models.
5–139
Page 5
Interior Features
Interior Equipment
Noise may occur on the audio playback
depending on the device connected to
the accessory socket.
Depending on the device connected
to the accessory socket, the vehicle's
electrical system may be a ected,
which could cause the warning light to
illuminate. Disconnect the connected
device and make sure that the problem
is resolved. If the problem is resolved,
disconnect the device from the socket
and switch the ignition o . If the
problem is not resolved, consult an
Authorized Mazda Dealer.
NOTE
To prevent discharging of the battery, do
not use the socket for long periods with the
engine off or idling.
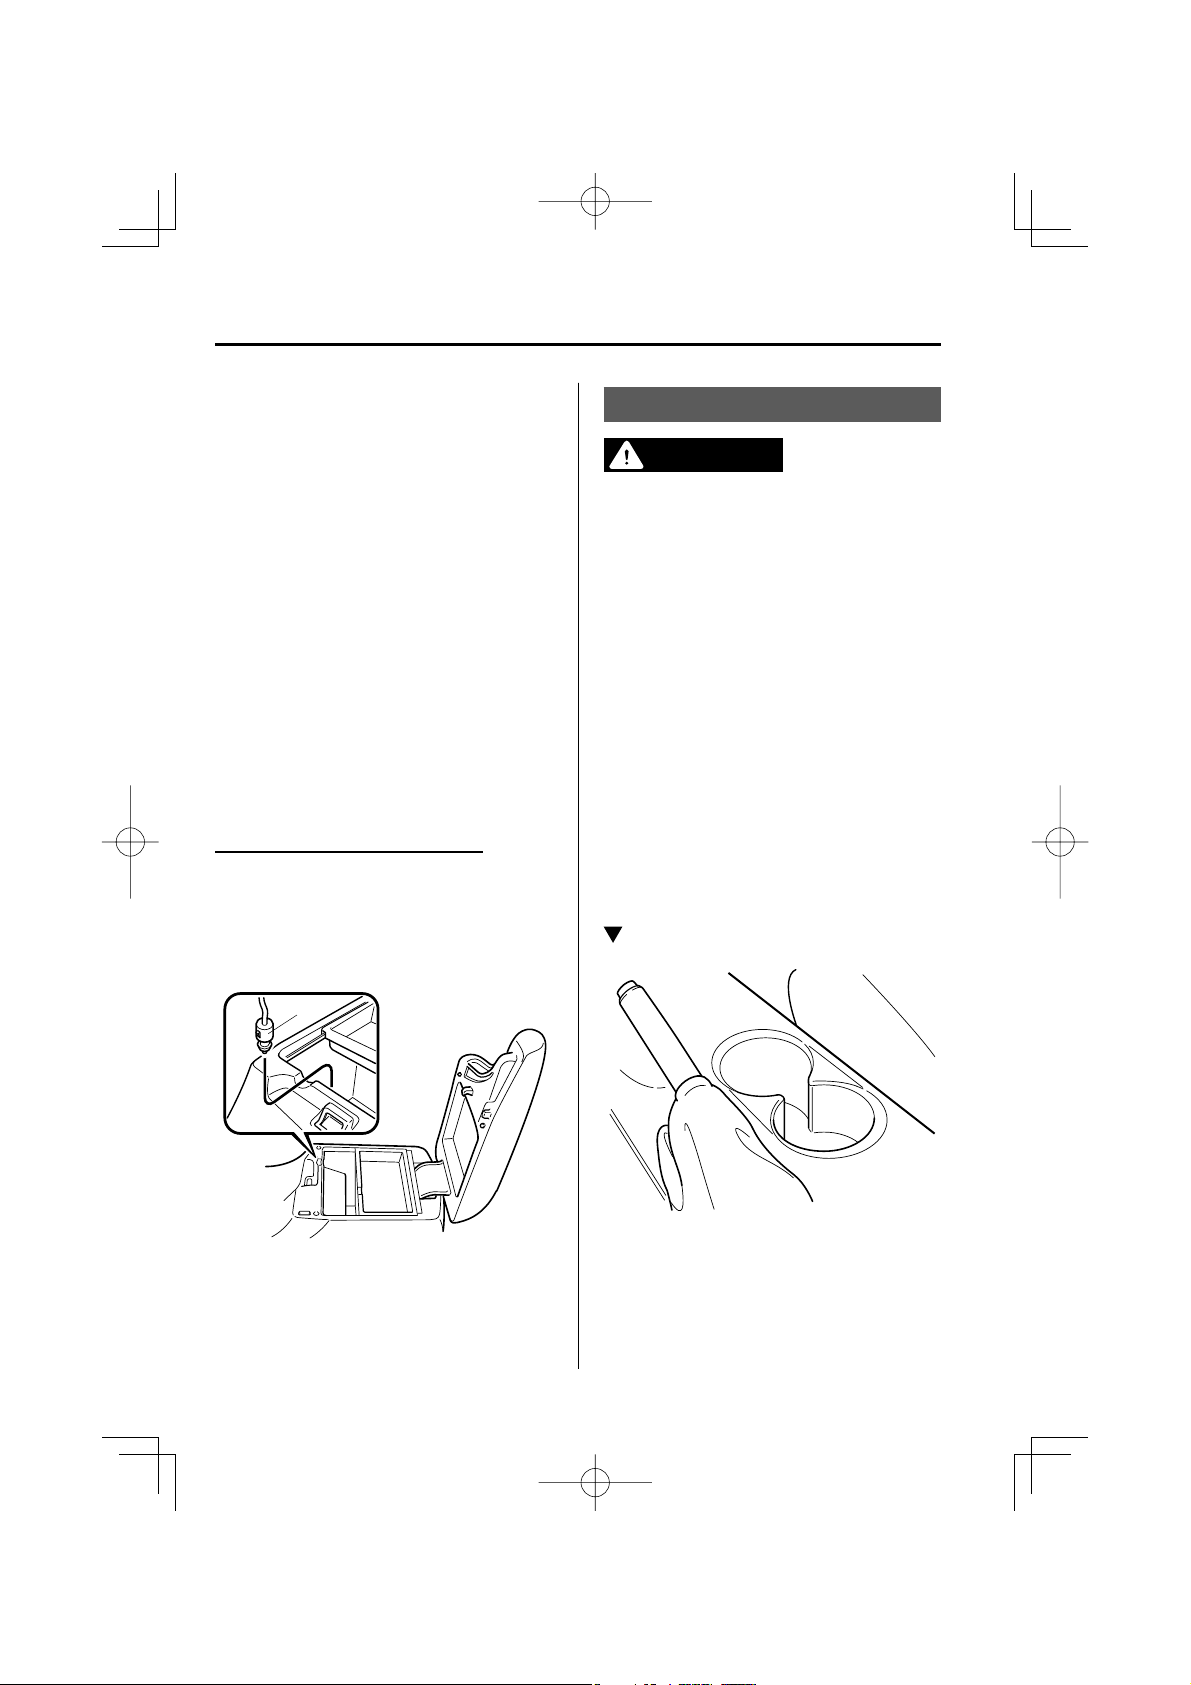
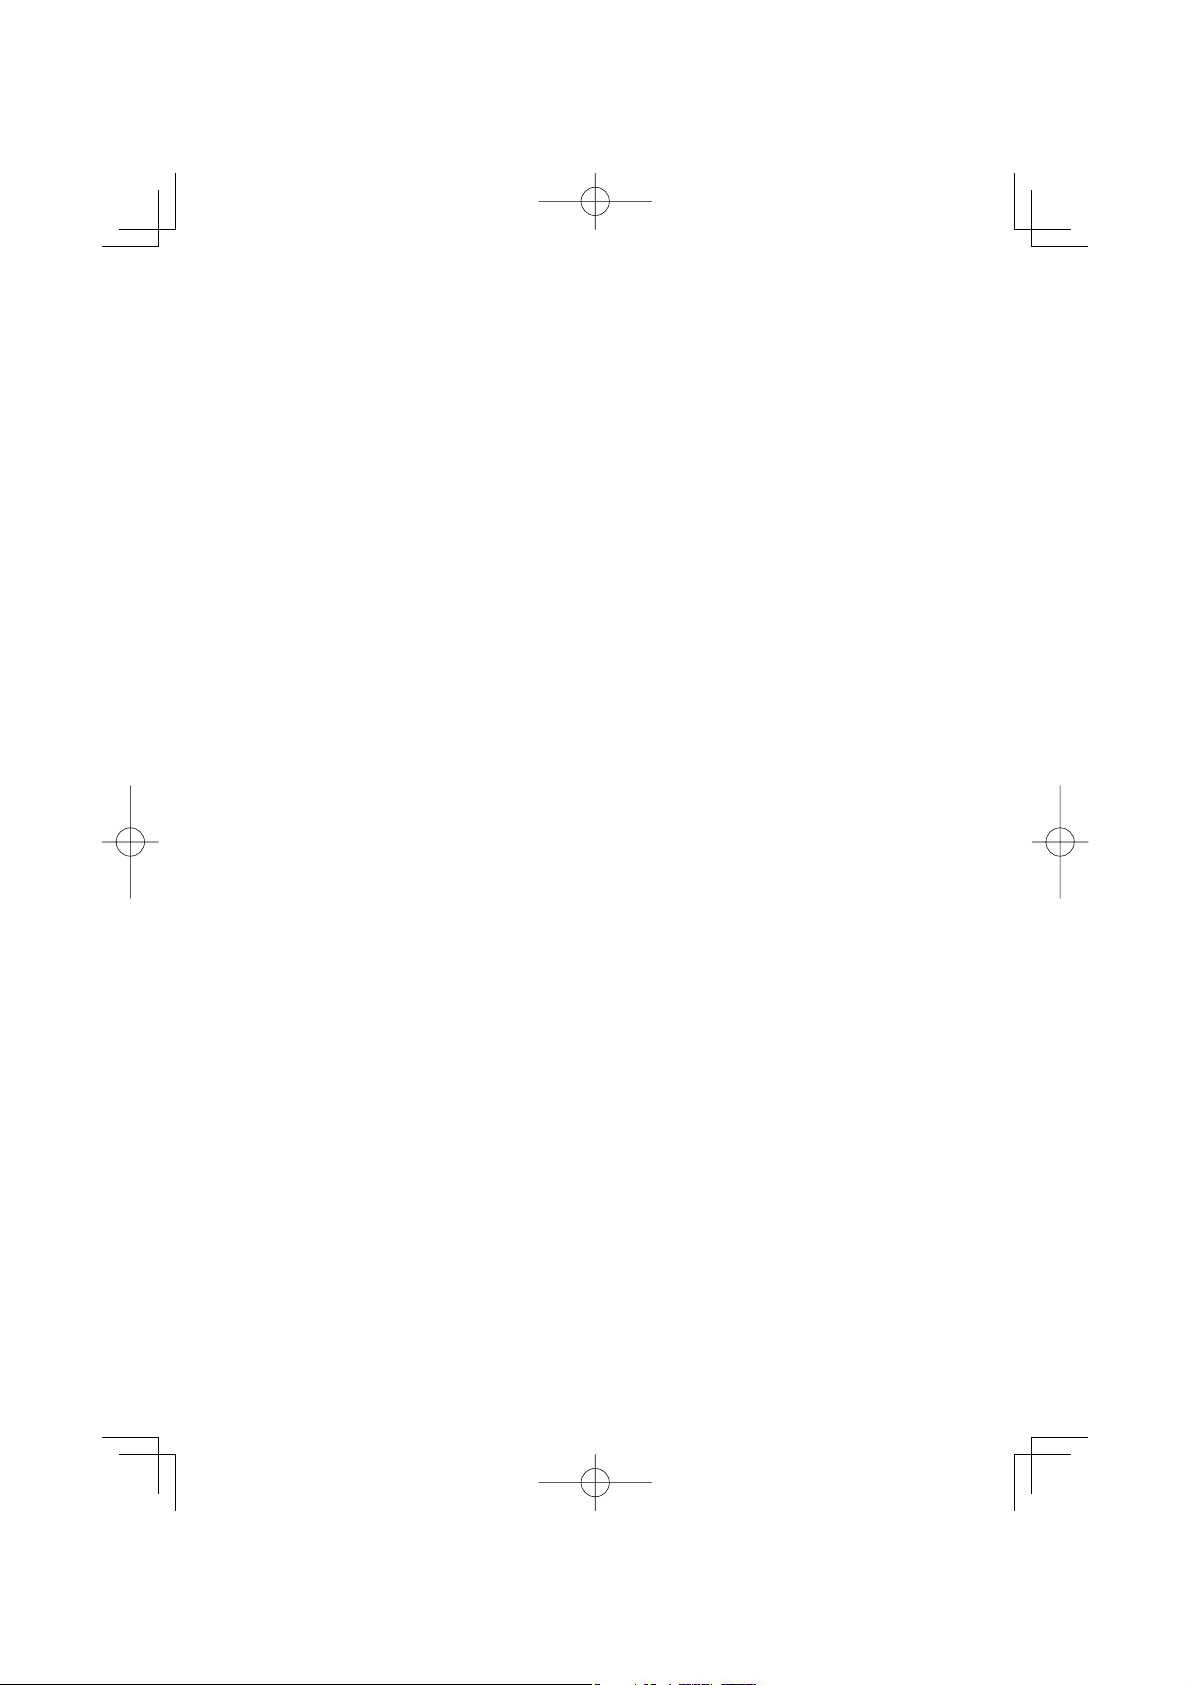
Connecting the accessory socket
1. Open the lid.
2. Pass the connection plug cord through
the cutout of the console and insert the
plug into the accessory socket.
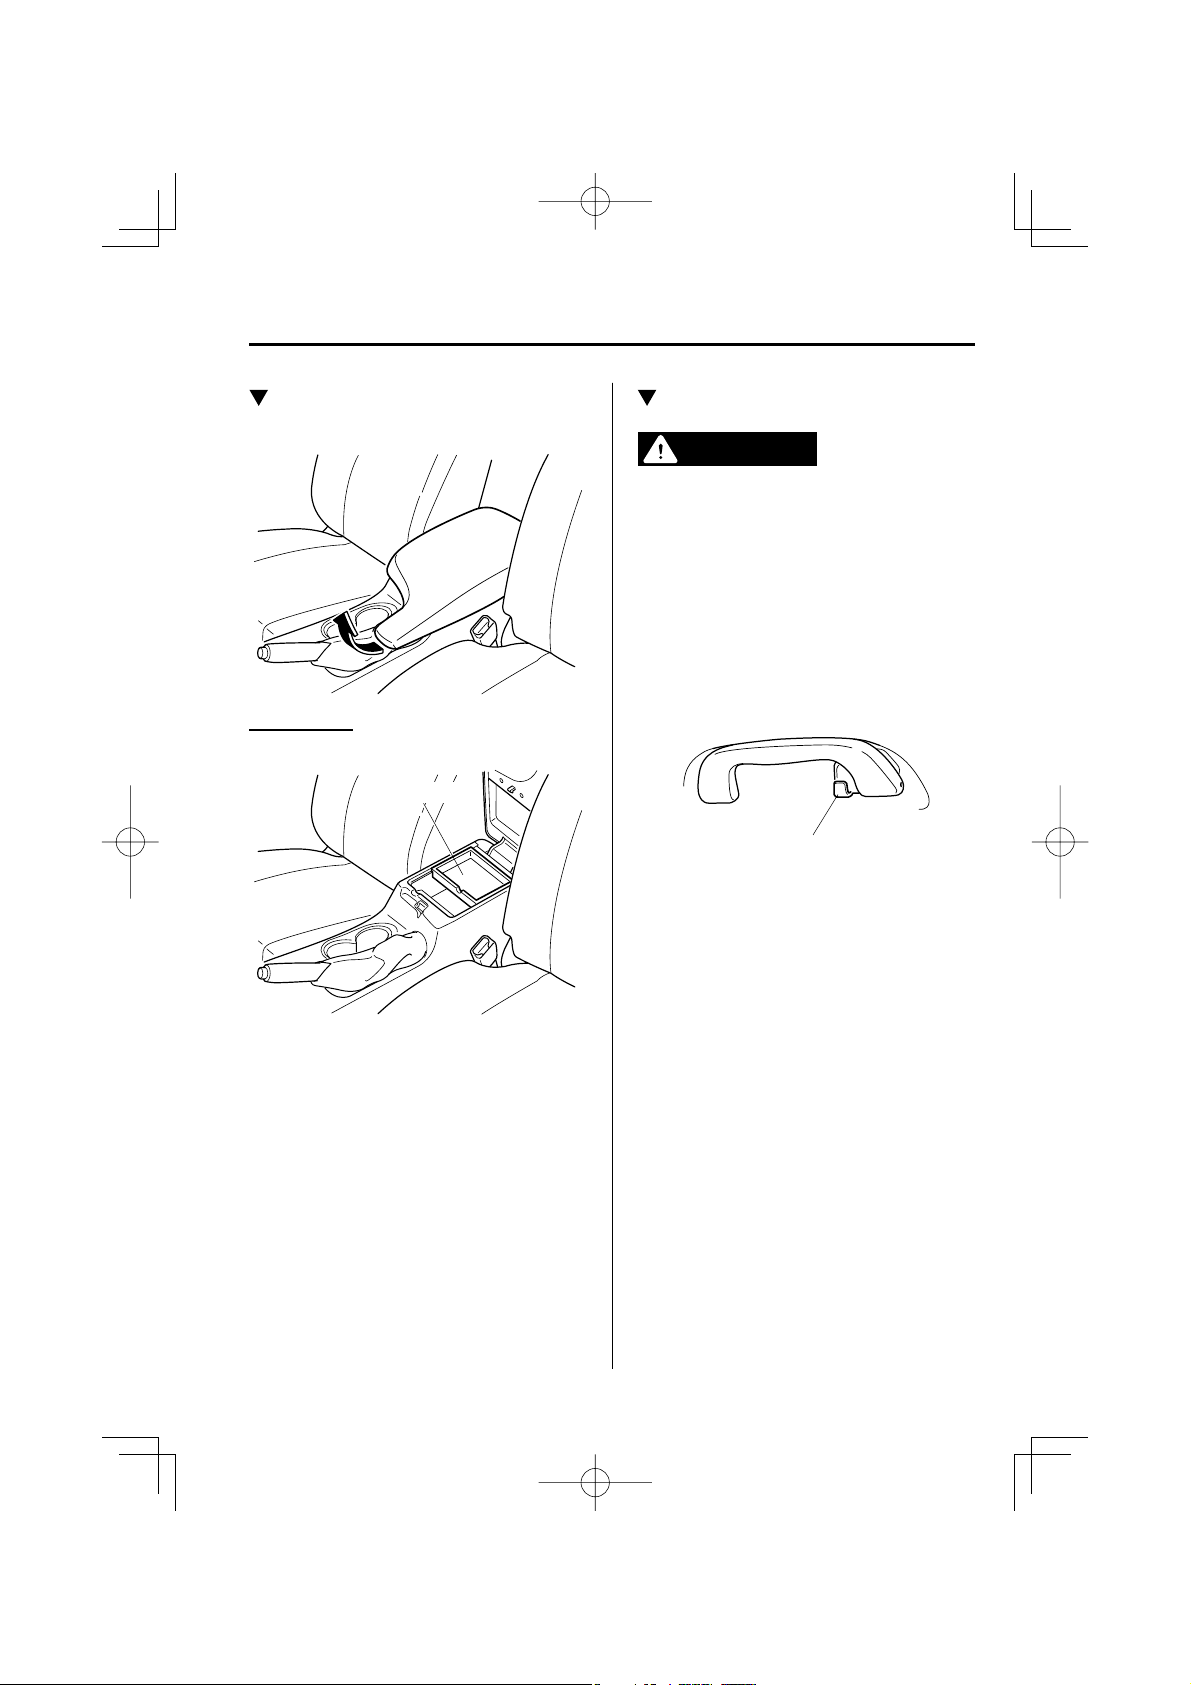
Cup Holder
WARNING
Never use a cup holder to hold hot
liquids while the vehicle is moving:
Using a cup holder to hold hot
liquids while the vehicle is moving is
dangerous. If the contents spill, you
could be scalded.
Do not put anything other than cups or
drink cans in cup holders:
Putting objects other than cups
or drink cans in a cup holder is
dangerous.
During sudden braking or
maneuvering, occupants could be
hit and injured, or objects could be
thrown around the vehicle, causing
interference with the driver and the
possibility of an accident. Only use a
cup holder for cups or drink cans.
Front
Plug
5–140
Mazda3_8CX9-EA-13F_Edition1.indb 140Mazda3_8CX9-EA-13F_Edition1.indb 140 2013/05/17 11:51:362013/05/17 11:51:36
Page 6
Interior Features
Interior Equipment
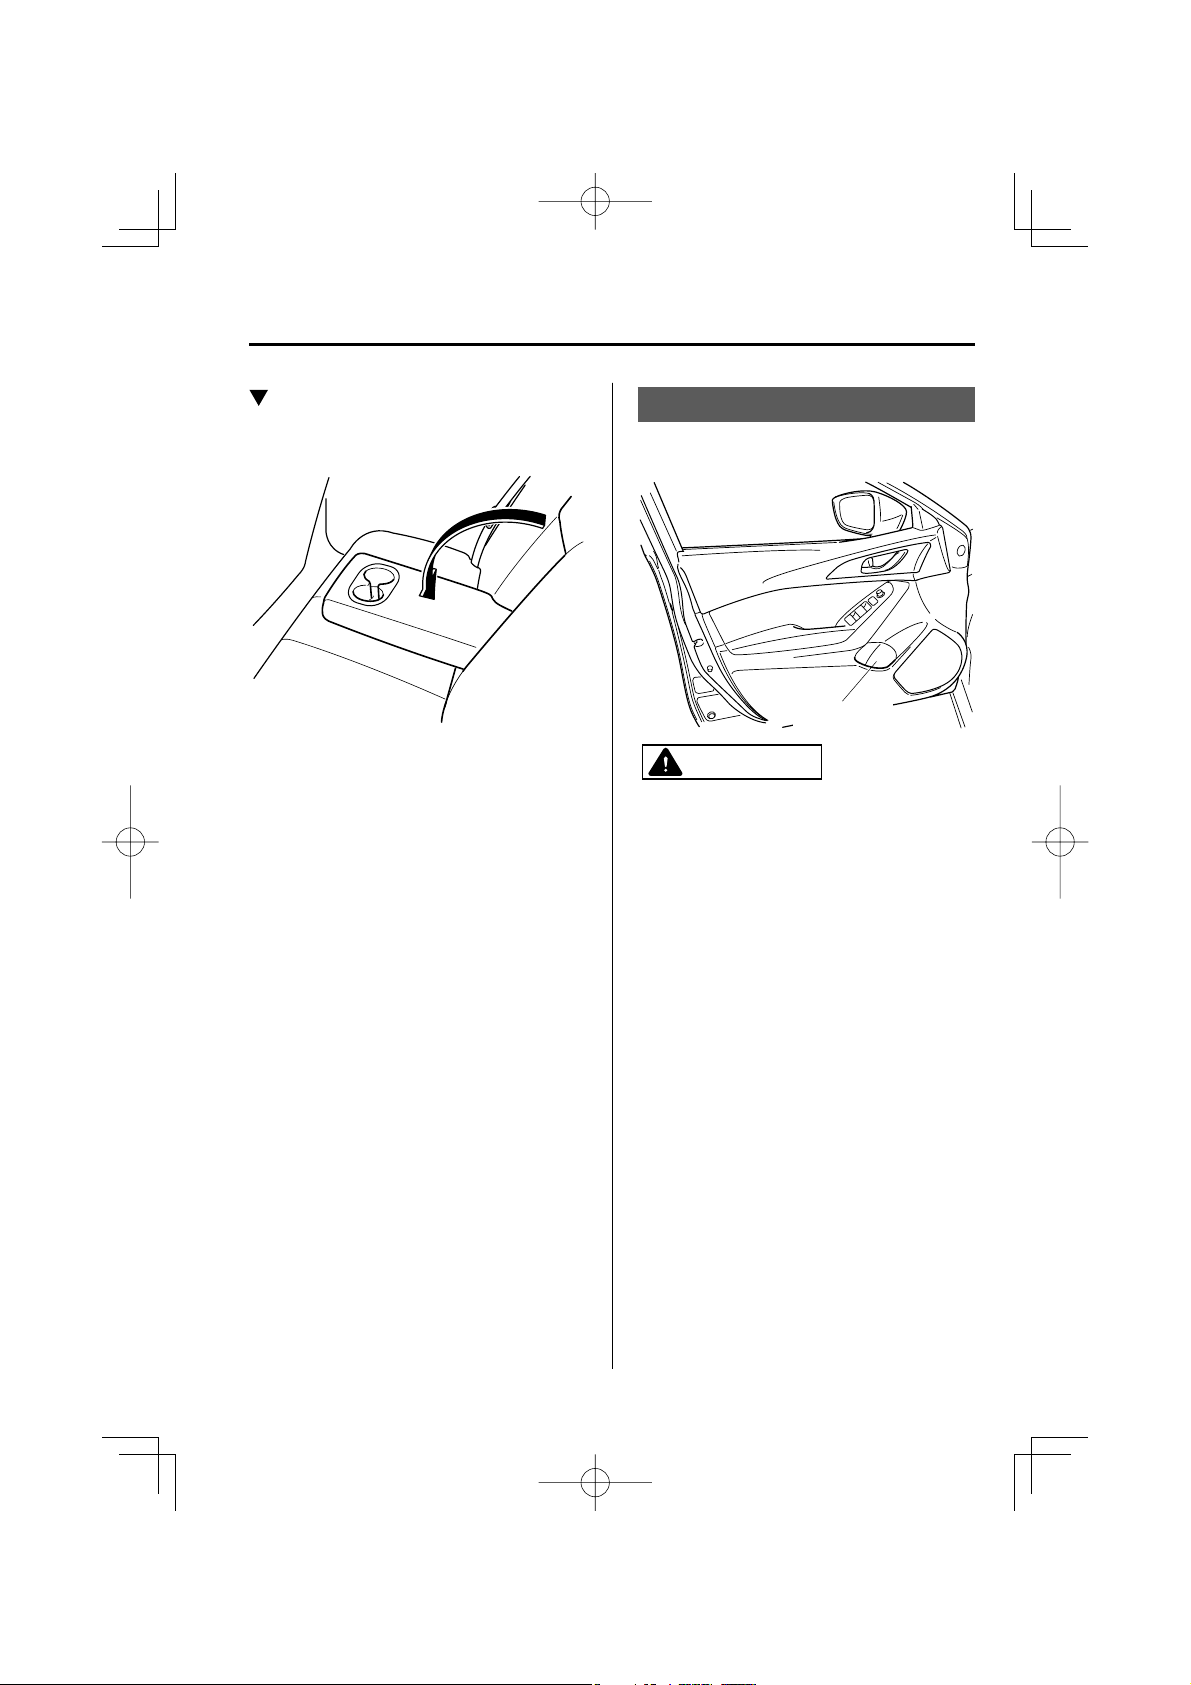
Rear *
The rear cup holder is on the rear center
armrest.
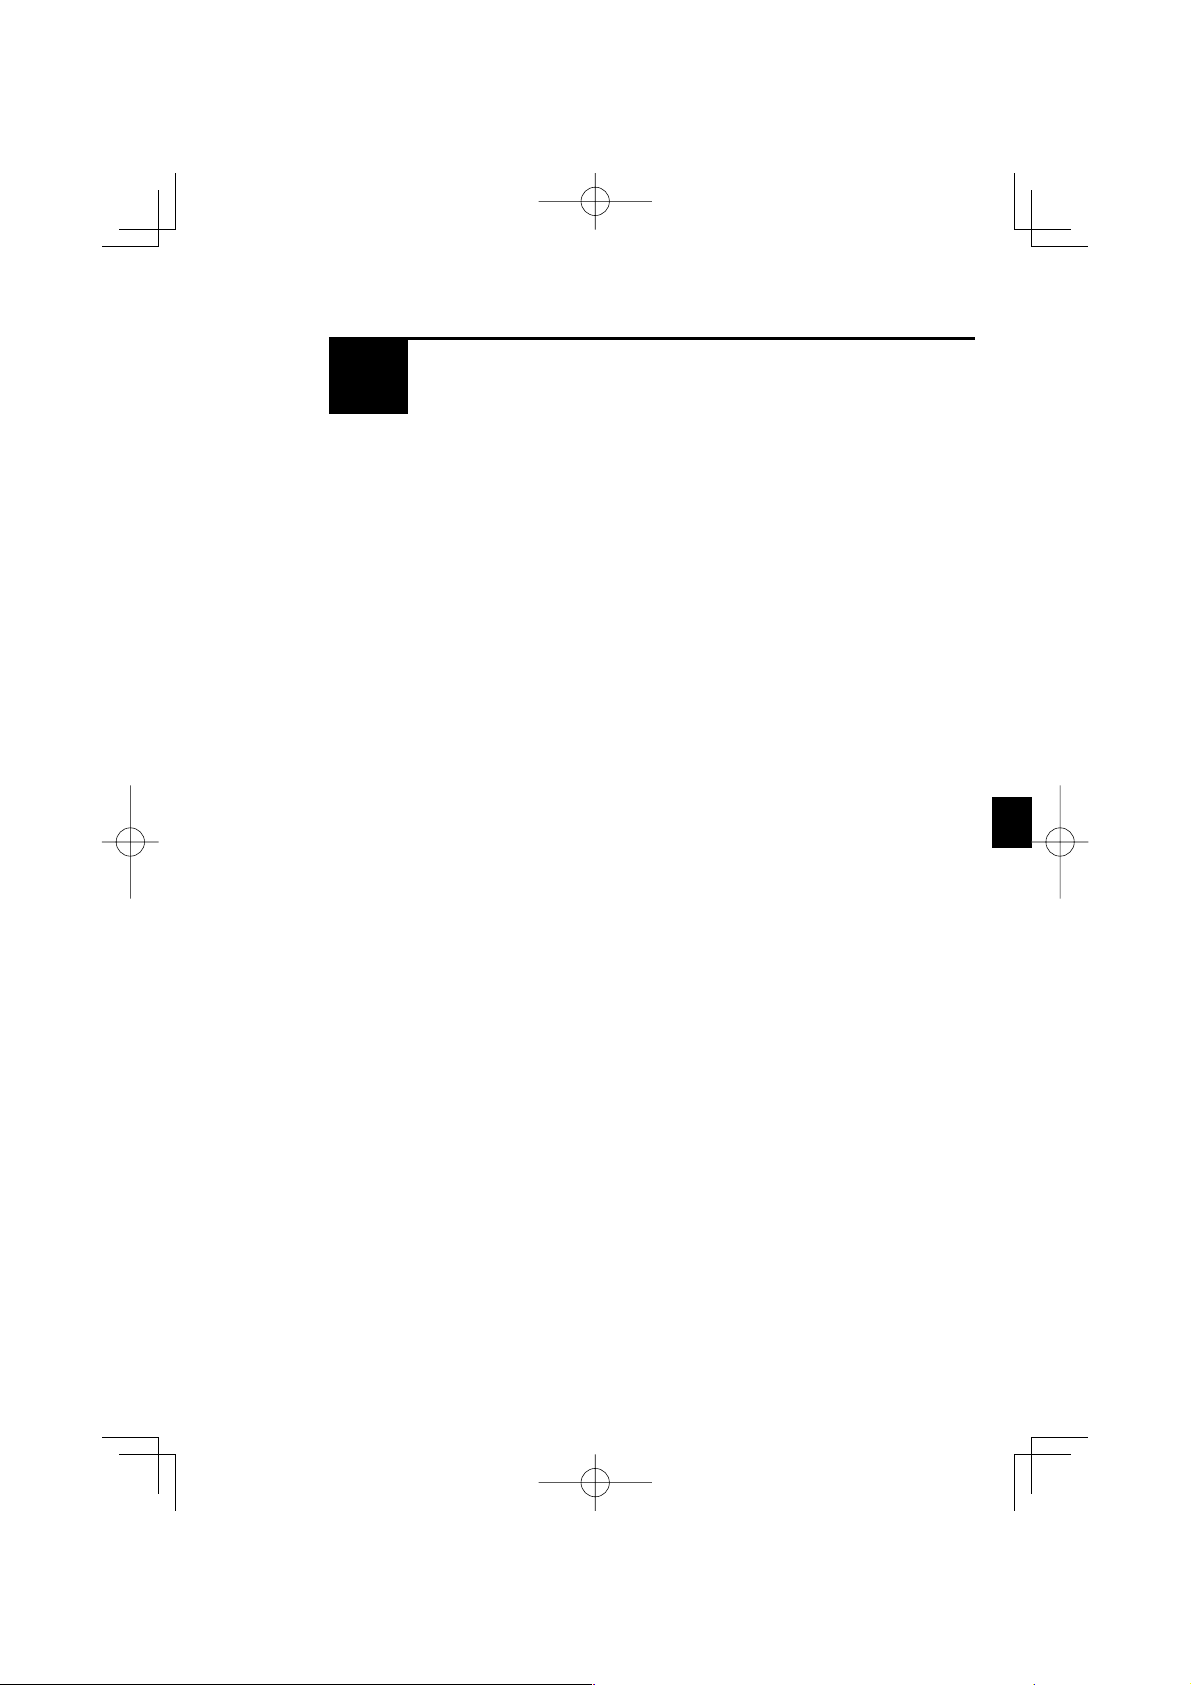
Bottle Holder
Bottle holders are on the inside of the
doors.
CAUTION
Do not use the bottle holders for
containers without caps. The contents
may spill when the door is opened or
closed.
Bottle holder
*
Some models.
Mazda3_8CX9-EA-13F_Edition1.indb 141Mazda3_8CX9-EA-13F_Edition1.indb 141 2013/05/17 11:51:372013/05/17 11:51:37
5–141
Page 7

Interior Features
Interior Equipment
Storage Compartments
WARNING
Keep storage boxes closed when
driving:
Driving with the storage boxes open is
dangerous. To reduce the possibility of
injury in an accident or a sudden stop,
keep the storage boxes closed when
driving.
Do not put articles in storage spaces
with no lid:
Putting articles in storage spaces with
no lid is dangerous as they could be
thrown around the cabin if the vehicle
is suddenly accelerated and cause
injury depending on how the article is
stored.
CAUTION
Do not leave lighters or eyeglasses
in the storage boxes while parked
under the sun. A lighter could explode
or the plastic material in eyeglasses
could deform and crack from high
temperature.
Overhead Console *
This console box is designed to store
eyeglasses or other accessories.
Push and release to open.
Glove Compartment
To open the glove compartment, pull the
latch toward you.
To close the glove compartment,
fi rmly press in the center of the glove
compartment lid.
*
5–142
Mazda3_8CX9-EA-13F_Edition1.indb 142Mazda3_8CX9-EA-13F_Edition1.indb 142 2013/05/17 11:51:372013/05/17 11:51:37
Some models.
Page 8
Interior Features
Interior Equipment
Center Console
To open, pull the release latch.
Storage tray
The storage tray can be removed.
Storage tray
Rear Coat Hooks
WARNING
Never hang heavy or sharp objects on
the assist grips and coat hooks:
Hanging heavy or sharp-ended objects
such as a coat hanger from the assist
grips or coat hooks is dangerous as
they can y o and hit an occupant
in the cabin if a curtain air bag was to
deploy, which could result in serious
injury or death.
Always hang clothes on the coat hooks
and the assist grips without hangers.
Coat hook
5–143
Mazda3_8CX9-EA-13F_Edition1.indb 143Mazda3_8CX9-EA-13F_Edition1.indb 143 2013/05/17 11:51:382013/05/17 11:51:38
Page 9
MEMO
5–144
Mazda3_8CX9-EA-13F_Edition1.indb 144Mazda3_8CX9-EA-13F_Edition1.indb 144 2013/05/17 11:51:382013/05/17 11:51:38
Page 10
6
Maintenance and Care
How to keep your Mazda in top condition.
Essential Information ........................................................................ 6-2
Introduction ................................................................................... 6-2
Scheduled Maintenance ..................................................................... 6-4
Scheduled Maintenance (U.S.A., Canada, and Puerto Rico) ........ 6-4
Maintenance Monitor .................................................................. 6-13
Owner Maintenance ......................................................................... 6-15
Owner Maintenance Precautions ................................................ 6-15
Hood ............................................................................................ 6-17
Engine Compartment Overview ................................................. 6-19
Engine Oil ................................................................................... 6-20
Engine Coolant ............................................................................ 6-21
Brake/Clutch Fluid ...................................................................... 6-23
Washer Fluid ............................................................................... 6-23
Body Lubrication ........................................................................ 6-24
Wiper Blades ............................................................................... 6-25
Battery ......................................................................................... 6-28
Battery Replacement ................................................................... 6-30
Tires............................................................................................. 6-32
Light Bulbs .................................................................................. 6-36
Fuses ........................................................................................... 6-49
Appearance Care.............................................................................. 6-54
Exterior Care ............................................................................... 6-54
Interior Care ................................................................................ 6-60
6–1
Mazda3_8CX9-EA-13F_Edition1.indb 1Mazda3_8CX9-EA-13F_Edition1.indb 1 2013/05/17 11:51:382013/05/17 11:51:38
Page 11
Maintenance and Care
Essential Information
Introduction
Be extremely careful and prevent injury to yourself and others or damage to your vehicle
when using this manual for inspection and maintenance.
If you are unsure about any procedure it describes, we strongly urge you to have a reliable
and qualifi ed service shop perform the work, preferably an Authorized Mazda Dealer.
Factory-trained Mazda technicians and genuine Mazda parts are best for your vehicle.
Without this expertise and the parts that have been designed and made especially for your
Mazda, inadequate, incomplete, and insuffi cient servicing may result in problems. This
could lead to vehicle damage or an accident and injuries.
For expert advice and quality service, consult an Authorized Mazda Dealer.
To continue warranty eligibility and to protect your investment, it is your responsibility to
properly maintain your vehicle according to factory recommended schedules outlined in this
manual. As part of this you must keep your maintenance records, receipts, repair orders and
any other documents as evidence this maintenance was performed. You must present these
documents, should any warranty coverage disagreement occur. Failure to do so can result in
your warranty being voided either in whole or in part.
This evidence may consist of the following:
• The Mazda Scheduled Maintenance Record, refer to the Warranty Booklet, must be
completely filled out showing mileage, repair order number, date for each service, and
signed by a qualified automotive service technician who service vehicles.
• Original copies of repair orders or other receipts that include the mileage and date the
vehicle was serviced. Each receipt should be signed by a qualified automotive service
technician.
• For self maintenance, a statement that you completed the maintenance yourself, displaying
mileage and the date the work was performed. Also, receipts for the replacement parts
(fluid, filters, etc.) indicating the date and mileage must accompany this statement.
NOTE
If you elect to perform maintenance yourself or have your vehicle serviced at a location
other than an Authorized Mazda Dealer, Mazda requires that all fl uids, parts and materials
must meet Mazda standards for durability and performance as described in this manual.
6–2
Mazda3_8CX9-EA-13F_Edition1.indb 2Mazda3_8CX9-EA-13F_Edition1.indb 2 2013/05/17 11:51:392013/05/17 11:51:39
Page 12
Maintenance and Care
Essential Information
Claims against the warranty resulting from lack of maintenance, as opposed to defective
materials or authorized Mazda workmanship, will not be honored.
Any auto repair shop using parts equivalent to your Mazda's original equipment may
perform maintenance. But we recommend that it always be done by an Authorized
Mazda Dealer using genuine Mazda parts.
Selecting “Maintenance Monitor” enables the system to notify you of your vehicle's
approaching inspection/servicing period (page 6-13 ).
6–3
Mazda3_8CX9-EA-13F_Edition1.indb 3Mazda3_8CX9-EA-13F_Edition1.indb 3 2013/05/17 11:51:392013/05/17 11:51:39
Page 13
Maintenance and Care
Scheduled Maintenance
Scheduled Maintenance (U.S.A., Canada, and
Puerto Rico)
Follow Schedule 1 if the vehicle is operated mainly where none of the following conditions
(severe driving conditions) apply.
•
Repeated short-distance driving
• Driving in dusty conditions
• Driving with extended use of brakes
• Driving in areas where salt or other corrosive materials are used
• Driving on rough or muddy roads
• Extended periods of idling or low-speed operation
• Driving for long periods in cold temperatures or extremely humid climates
• Driving in extremely hot conditions
• Driving in mountainous conditions continually
If any do apply, follow Schedule 2. (Puerto Rico residents follow Schedule 2.)
Vehicles using Engine Oil Flexible Maintenance
Engine Oil Flexible Maintenance is available for U.S.A. and Puerto Rico residents whose
vehicle is operated mainly where none of the following conditions apply:
•
Extended periods of idling or low-speed operation such as police car, taxi or driving
school car
• Driving in dusty conditions
If any do apply, follow Schedule 2 with engine oil fi xed maintenance.
Once engine oil fl exible maintenance is selected, the vehicle calculates the remaining oil
life based on engine operating conditions. The vehicle lets you know when an oil change
is due by illuminating the wrench mark in the instrument cluster. Change the oil as soon as
possible within the next 500 km (250 miles) or 15 days. Refer page 6-13 for the details.
Mazda Genuine 0W-20 Oil and Castrol
®
0W-20 Oil are required to achieve optimum
performance.
NOTE
• Please ensure that the Flexible Oil Maintenance Setting is reset after each Oil and Filter
replacement.
• For maintenance guidelines beyond the miles/months listed, follow the maintenance
intervals provided in the Scheduled Maintenance Tables.
6–4
Mazda3_8CX9-EA-13F_Edition1.indb 4Mazda3_8CX9-EA-13F_Edition1.indb 4 2013/05/17 11:51:392013/05/17 11:51:39
Page 14
Maintenance and Care
Scheduled Maintenance
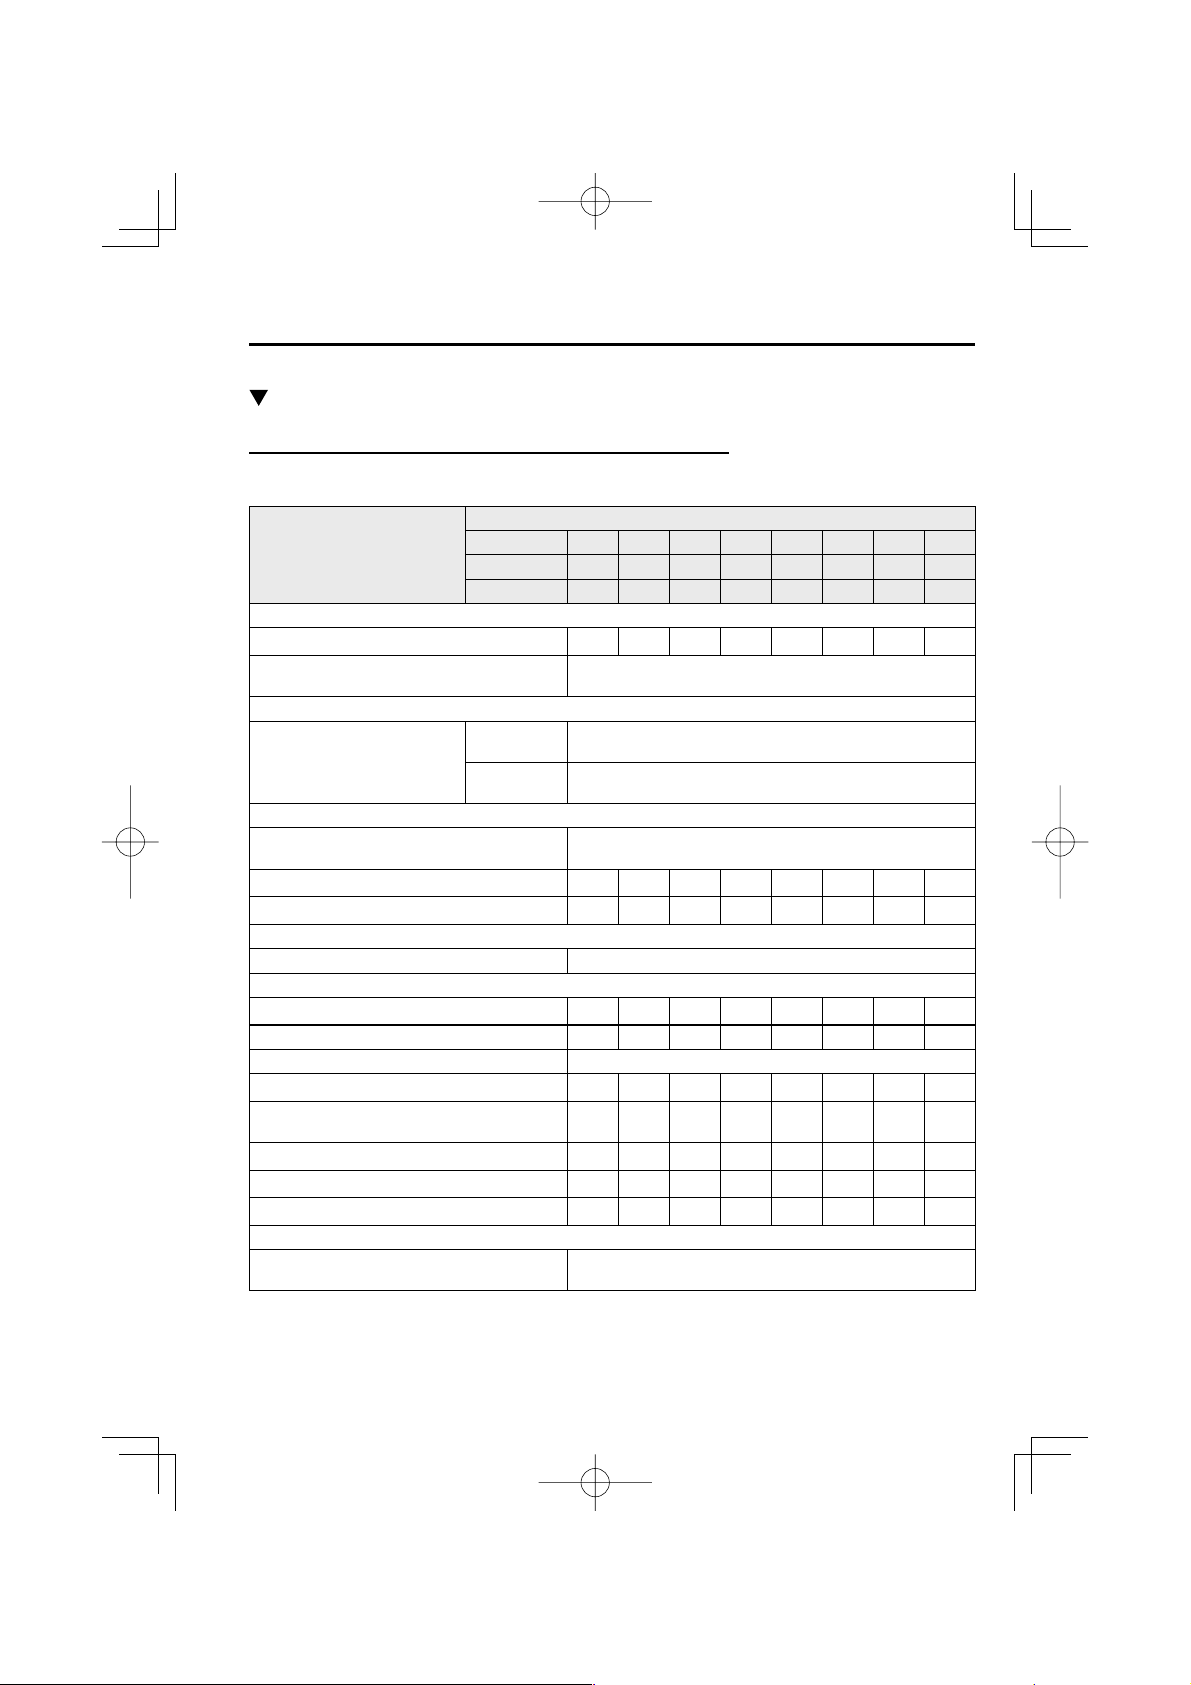
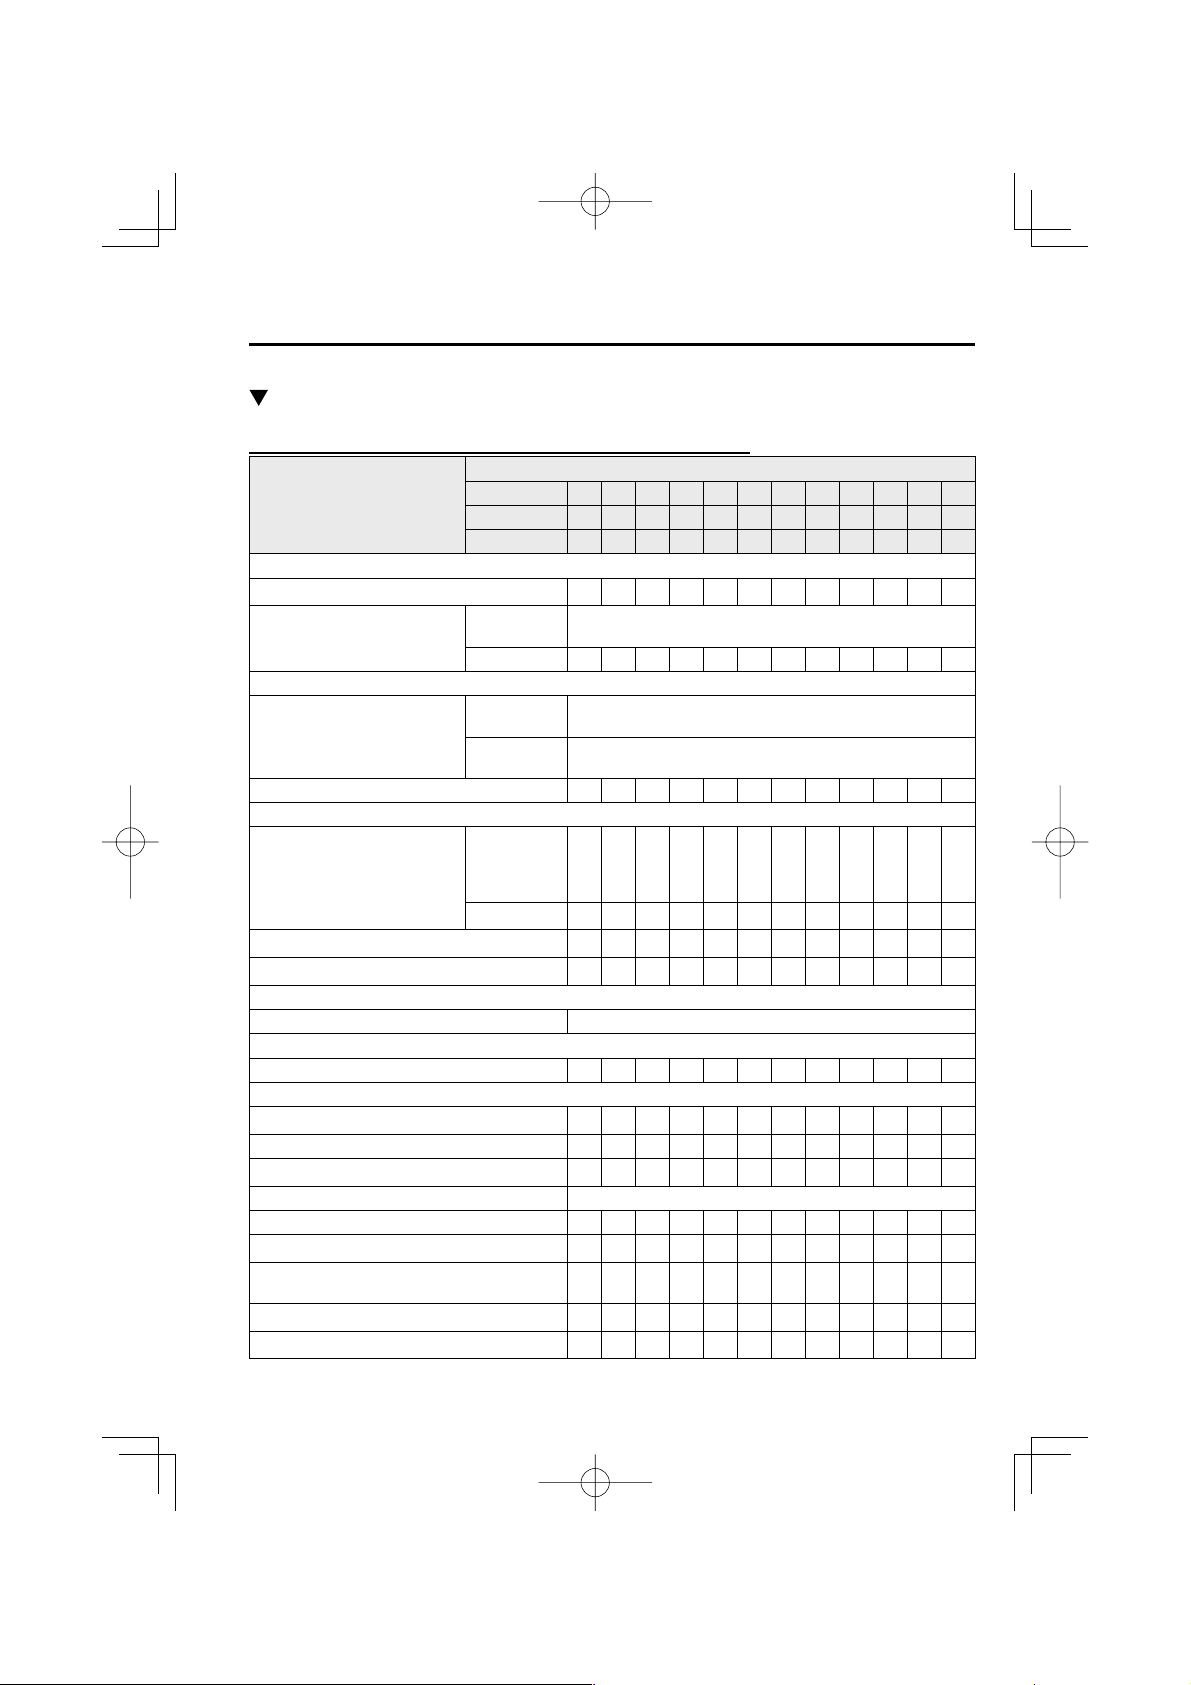
Schedule 1
U.S.A. residents - Engine oil fl exible maintenance interval
Use when the maintenance monitor for “Oil Change” is set to “Flexible”. For details, see
maintenance monitor. (page 6-13 )
Number of months or kilometers (miles), whichever comes fi rst.
Maintenance Interval
ENGINE
Drive belts I I
*1
Engine oil & fi lter
COOLING SYSTEM
Engine coolant
FUEL SYSTEM
Air fi lter
Fuel lines and hoses
Hoses and tubes for emission
IGNITION SYSTEM
Spark plugs Replace every 120,000 km (75,000 miles).
CHASSIS and BODY
Brake lines, hoses and connections I I I I
Disc brakes I I I I I I I I
Tire (Rotation) Rotate every 8,000 km (5,000 miles).
Steering operation and linkages I I I I
Front and rear suspension, ball joints and wheel
bearing axial play
Driveshaft dust boots I I I I
Bolts and nuts on chassis and body T T T T
Exhaust system and heat shields I I
AIR CONDITIONER SYSTEM
Cabin air fi lter
*3
I I I I
Months 12 24 36 48 60 72 84 96
×1000 km 16 32 48 64 80 96 112 128
×1000 miles 10 20 30 40 50 60 70 80
Replace when indicator is ON. (Max interval:12
months/16,000km (10,000 miles))
Replace at fi rst 192,000 km (120,000 miles) or 10 years; after
*2
FL22 type
Others
*3
I I
that, every 96,000 km (60,000 miles) or 5 years.
Replace at fi rst 96,000 km (60,000 miles) or 4 years; after that,
every 2 years.
Replace when any equivalent timing of replacing engine oil.
(Max interval:36 months/60,000km (37,500 miles))
I I I I
Replace when any equivalent timing of replacing engine oil.
(Max interval:24 months/48,000km (30,000 miles))
6–5
Mazda3_8CX9-EA-13F_Edition1.indb 5Mazda3_8CX9-EA-13F_Edition1.indb 5 2013/05/17 11:51:392013/05/17 11:51:39
Page 15
Maintenance and Care
Scheduled Maintenance
Chart symbols:
I: Inspect: Inspect and clean, repair, adjust, fi ll up, or replace if necessary.
T: Tighten
Remarks:
*1 The engine oil and fi lter must be changed at least once a year or within 16,000km(10,000 miles) since last
engine oil and fi lter change. The system must be reset whenever replacing the engine oil regardless of the
message/wrench mark display.
*2 Use FL22 type coolant in vehicles with the inscription “FL22” on the radiator cap itself or the surrounding area.
Use FL22 when replacing the coolant.
*3 According to state/provincial and federal regulations, failure to perform maintenance on these items will not
void your emissions warranties. However, Mazda recommends that all maintenance services be performed at the
recommended time or mileage/kilometer period to ensure long-term reliability.
6–6
Mazda3_8CX9-EA-13F_Edition1.indb 6Mazda3_8CX9-EA-13F_Edition1.indb 6 2013/05/17 11:51:402013/05/17 11:51:40
Page 16

Maintenance and Care
Scheduled Maintenance
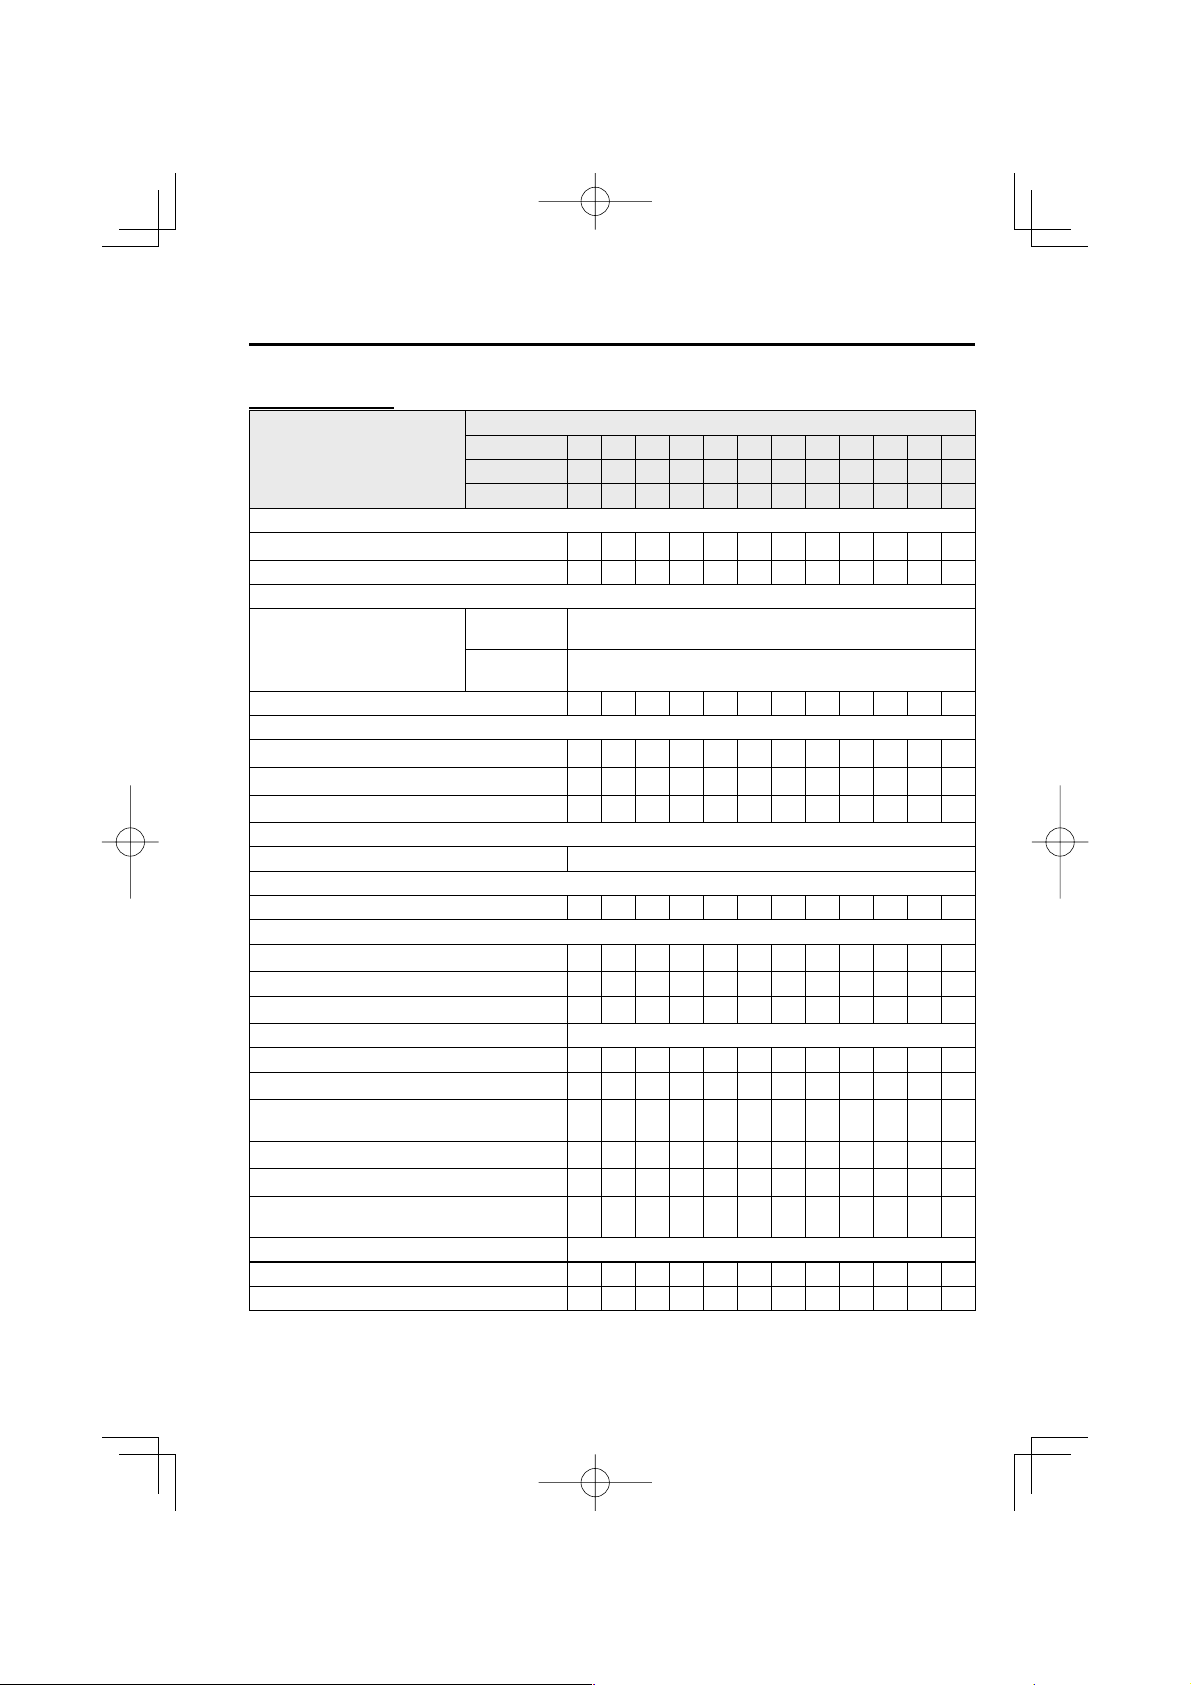
U.S.A. residents - Fixed maintenance interval
Use when the maintenance monitor for “Oil Change” is set to “Fixed”. For details, see
maintenance monitor. (page 6-13 )
Number of months or kilometers (miles), whichever comes fi rst.
Maintenance Interval
ENGINE
Drive belts I
Engine oil & fi lter R R R R R R R R
COOLING SYSTEM
Engine coolant
FUEL SYSTEM
Air fi lter R
*2
Fuel lines and hoses
Hoses and tubes for emission
IGNITION SYSTEM
Spark plugs Replace every 120,000 km (75,000 miles).
CHASSIS and BODY
Brake lines, hoses and connections I I
Disc brakes I I I I
Tire (Rotation)
Steering operation and linkages I I
Front and rear suspension, ball joints and wheel
bearing axial play
Driveshaft dust boots I I
Bolts and nuts on chassis and body T T
Exhaust system and heat shields Inspect every 72,000 km (45,000 miles) or 5 years.
All locks and hinges L L L L L L L L
AIR CONDITIONER SYSTEM
Cabin air fi lter R R
I I
*3
Rotate every 12,000 km (7,500 miles).
Months 6 12 18 24 30 36 42 48
×1000 km 12 24 36 48 60 72 84 96
×1000 miles 7.5 15 22.5 30 37.5 45 52.5 60
Replace at fi rst 192,000 km (120,000 miles) or 10 years; after
*1
FL22 type
Others
*2
I
that, every 96,000 km (60,000 miles) or 5 years.
Replace at fi rst 96,000 km (60,000 miles) or 4 years; after that,
every 2 years.
I I
Chart symbols:
I: Inspect: Inspect and clean, repair, adjust, fi ll up, or replace if necessary.
R: Replace
L: Lubricate
T: Tighten
6–7
Mazda3_8CX9-EA-13F_Edition1.indb 7Mazda3_8CX9-EA-13F_Edition1.indb 7 2013/05/17 11:51:402013/05/17 11:51:40
Page 17
Maintenance and Care
Scheduled Maintenance
Remarks:
*1 Use FL22 type coolant in vehicles with the inscription “FL22” on the radiator cap itself or the surrounding area.
Use FL22 when replacing the coolant.
*2 According to state/provincial and federal regulations, failure to perform maintenance on these items will not
void your emissions warranties. However, Mazda recommends that all maintenance services be performed at the
recommended time or mileage/kilometer period to ensure long-term reliability.
*3 To equalize tread wear for maintaining good performance in handling and braking, rotate the tires every 12,000
km (7,500 miles). However Mazda recommends to rotate every 8,000km (5,000 miles) to help increase tire life
and distribute wear more evenly.
6–8
Mazda3_8CX9-EA-13F_Edition1.indb 8Mazda3_8CX9-EA-13F_Edition1.indb 8 2013/05/17 11:51:402013/05/17 11:51:40
Page 18
Maintenance and Care
Scheduled Maintenance
Schedule 2
U.S.A. (severe driving conditions) and Puerto Rico residents
Number of months or kilometers (miles), whichever comes fi rst.
Maintenance Interval
ENGINE
Drive belts I
Engine oil & fi lter
COOLING SYSTEM
Engine coolant
Engine coolant level I I I I I I I I I I I I
FUEL SYSTEM
Air fi lter
*3
Fuel lines and hoses
I I
Hoses and tubes for emission
IGNITION SYSTEM
Spark plugs Replace every 120,000 km (75,000 miles).
ELECTRICAL SYSTEM
Function of all lights I I I I I I I I I I I I
CHASSIS and BODY
Brake lines, hoses and connections I I
Brake and clutch fl uid level I I I I I I I I I I I I
Disc brakes I I I I
Tire (Rotation) Rotate every 8,000 km (5,000 miles).
Tire infl ation pressure and tire wear I I I I I I I I I I I I
Steering operation and linkages I I
Front and rear suspension, ball joints and wheel
bearing axial play
Driveshaft dust boots I I
Bolts and nuts on chassis and body T T
Months 4 8 12 16 20 24 28 32 36 40 44 48
×1000 km 8 16 24 32 40 48 56 64 72 80 88 96
×1000 miles 5 10 15 20 25 30 35 40 45 50 55 60
Flexible
*1
Replace when indicator is ON. (Max interval:12
months/16,000km (10,000 miles))
Fixed R R R R R R R R R R R R
Replace at fi rst 192,000 km (120,000 miles) or 10 years; after
*2
FL22 type
Others
that, every 96,000 km (60,000 miles) or 5 years.
Replace at fi rst 96,000 km (60,000 miles) or 4 years; after that,
every 2 years.
U.S.A.
(severe
driving
R
conditions)
Puerto Rico R R
*3
I
I I
6–9
Mazda3_8CX9-EA-13F_Edition1.indb 9Mazda3_8CX9-EA-13F_Edition1.indb 9 2013/05/17 11:51:412013/05/17 11:51:41
Page 19

Maintenance and Care
Scheduled Maintenance
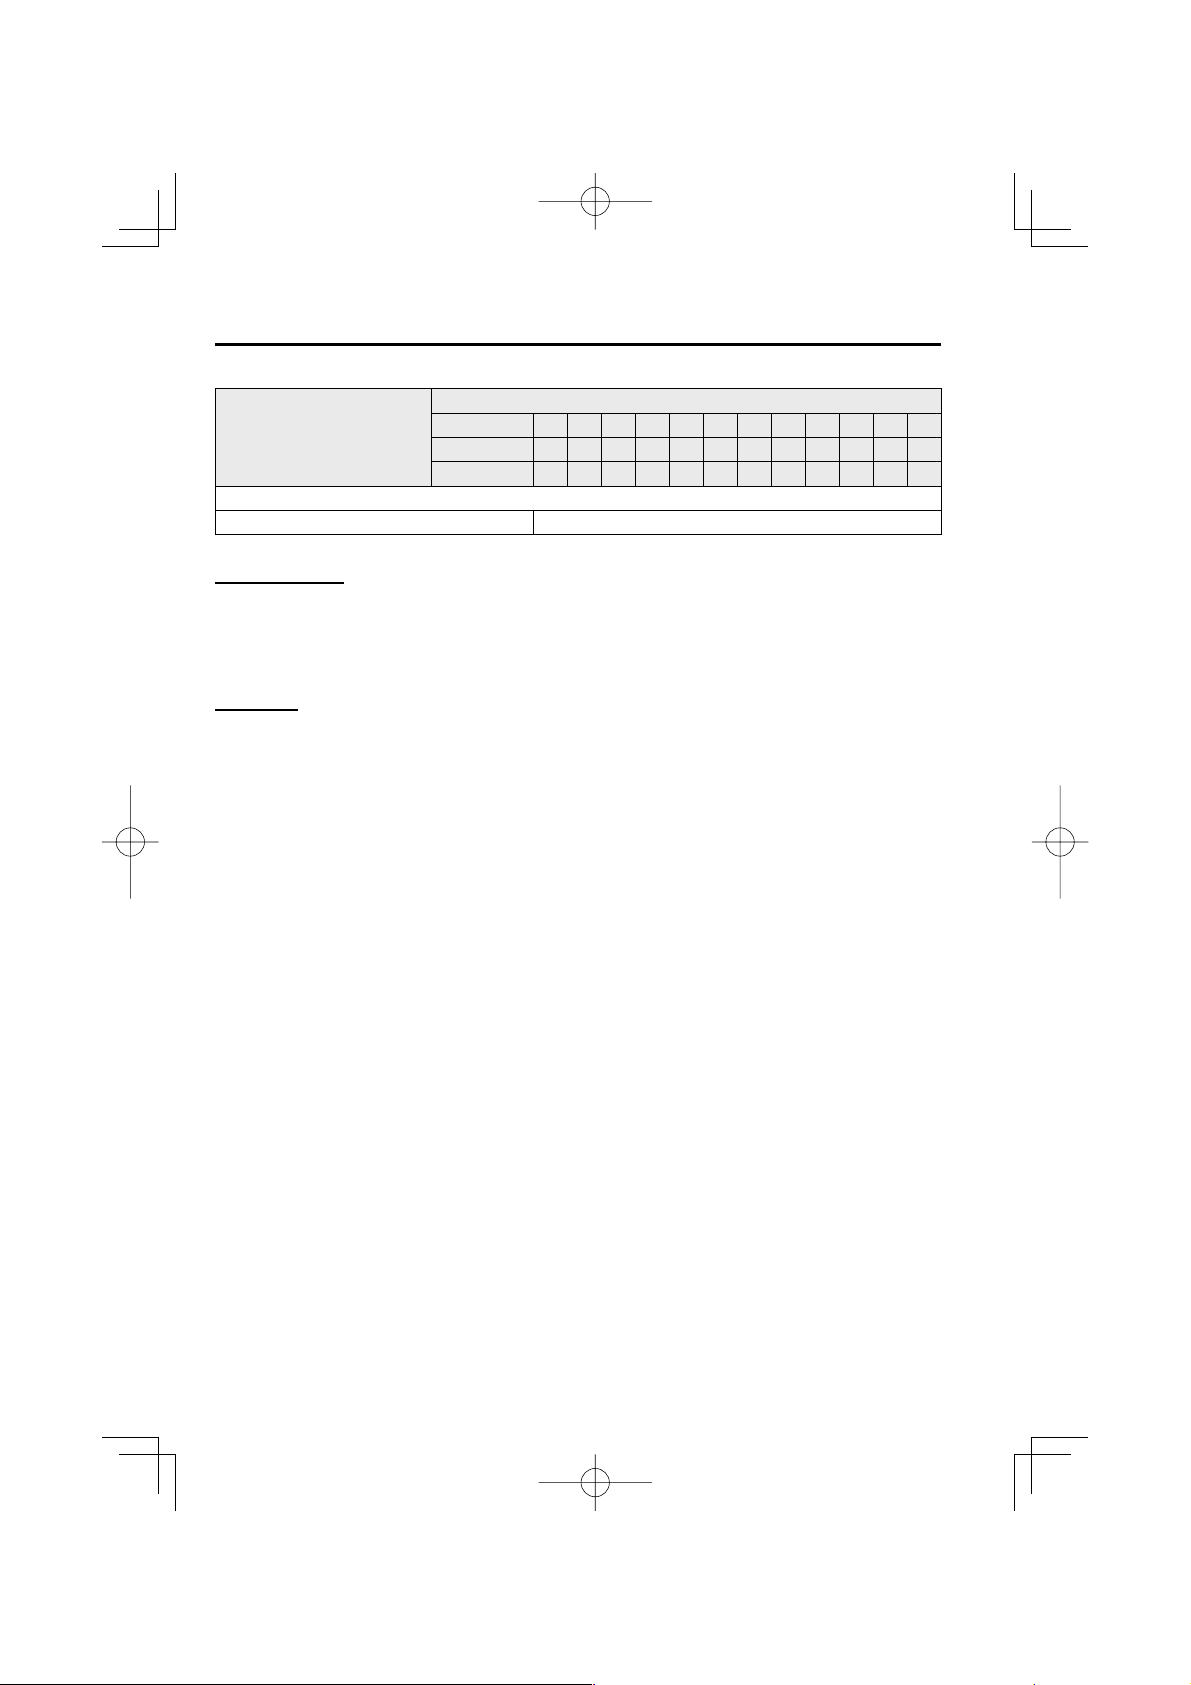
Number of months or kilometers (miles), whichever comes fi rst.
Maintenance Interval
Exhaust system and heat shields Inspect every 72,000 km (45,000 miles) or 5 years.
All locks and hinges L L L L L L L L L L L L
Washer fl uid level I I I I I I I I I I I I
AIR CONDITIONER SYSTEM
Cabin air fi lter Replace every 40,000 km (25,000 miles) or 2 years.
Chart symbols:
I: Inspect: Inspect and clean, repair, adjust, fi ll up, or replace if necessary.
R: Replace
L: Lubricate
T: Tighten
Remarks:
*1 Engine oil fl exible maintenance is available for U.S.A. and Puerto Rico residents whose vehicle is operated
mainly where none of the following conditions apply.
• Extended periods of idling or low-speed operation such as police car, taxi or driving school car
• Driving in dusty conditions
If any do apply, follow fi xed maintenance.
The engine oil and fi lter must be changed at least once a year or within 16,000km (10,000 miles) since last
engine oil and fi lter change. The system must be reset whenever replacing the engine oil regardless of the
message/wrench mark display.
*2 Use FL22 type coolant in vehicles with the inscription “FL22” on the radiator cap itself or the surrounding area.
Use FL22 when replacing the coolant.
*3 According to state/provincial and federal regulations, failure to perform maintenance on these items will not
void your emissions warranties. However, Mazda recommends that all maintenance services be performed at the
recommended time or mileage/kilometer period to ensure long-term reliability.
Months 4 8 12 16 20 24 28 32 36 40 44 48
×1000 km 8 16 24 32 40 48 56 64 72 80 88 96
×1000 miles 5 10 15 20 25 30 35 40 45 50 55 60
6–10
Mazda3_8CX9-EA-13F_Edition1.indb 10Mazda3_8CX9-EA-13F_Edition1.indb 10 2013/05/17 11:51:412013/05/17 11:51:41
Page 20
Maintenance and Care
Scheduled Maintenance
Canada residents
Number of months or kilometers (miles), whichever comes fi rst.
Maintenance Interval
ENGINE
Drive belts I
Engine oil & fi lter R R R R R R R R R R R R
COOLING SYSTEM
Engine coolant
Engine coolant level I I I I I I I I I I I I
FUEL SYSTEM
Air fi lter R
*2
Fuel lines and hoses
I I
Hoses and tubes for emission
IGNITION SYSTEM
Spark plugs Replace every 120,000 km (75,000 miles).
ELECTRICAL SYSTEM
Function of all lights I I I I I I I I I I I I
CHASSIS and BODY
Brake lines, hoses and connections I I
Brake and clutch fl uid level I I I I I I I I I I I I
Disc brakes I I I I
Tire (Rotation) Rotate every 8,000 km (5,000 miles).
Tire infl ation pressure and tire wear I I I I I I I I I I I I
Steering operation and linkages I I
Front and rear suspension, ball joints and wheel
bearing axial play
Driveshaft dust boots I I
Bolts and nuts on chassis and body T T
Body condition (for rust, corrosion and
perforation)
Exhaust system and heat shields Inspect every 72,000 km (45,000 miles) or 5 years.
All locks and hinges L L L L L L L L L L L L
Washer fl uid level I I I I I I I I I I I I
Months 4 8 12 16 20 24 28 32 36 40 44 48
×1000 km 8 16 24 32 40 48 56 64 72 80 88 96
×1000 miles 5 10 15 20 25 30 35 40 45 50 55 60
Replace at fi rst 192,000 km (120,000 miles) or 10 years; after
*1
FL22 type
Others
*2
I
that, every 96,000 km (60,000 miles) or 5 years.
Replace at fi rst 96,000 km (60,000 miles) or 4 years; after that,
every 2 years.
I I
I I I I
6–11
Mazda3_8CX9-EA-13F_Edition1.indb 11Mazda3_8CX9-EA-13F_Edition1.indb 11 2013/05/17 11:51:422013/05/17 11:51:42
Page 21
Maintenance and Care
Scheduled Maintenance
Number of months or kilometers (miles), whichever comes fi rst.
Maintenance Interval
AIR CONDITIONER SYSTEM
Cabin air fi lter Replace every 40,000 km (25,000 miles) or 2 years.
Chart symbols:
I: Inspect: Inspect and clean, repair, adjust, fi ll up, or replace if necessary.
R: Replace
L: Lubricate
T: Tighten
Remarks:
*1 Use FL22 type coolant in vehicles with the inscription “FL22” on the radiator cap itself or the surrounding area.
Use FL22 when replacing the coolant.
*2 According to state/provincial and federal regulations, failure to perform maintenance on these items will not
void your emissions warranties. However, Mazda recommends that all maintenance services be performed at the
recommended time or mileage/kilometer period to ensure long-term reliability.
Months 4 8 12 16 20 24 28 32 36 40 44 48
×1000 km 8 16 24 32 40 48 56 64 72 80 88 96
×1000 miles 5 10 15 20 25 30 35 40 45 50 55 60
6–12
Mazda3_8CX9-EA-13F_Edition1.indb 12Mazda3_8CX9-EA-13F_Edition1.indb 12 2013/05/17 11:51:422013/05/17 11:51:42
Page 22

Maintenance and Care
Scheduled Maintenance
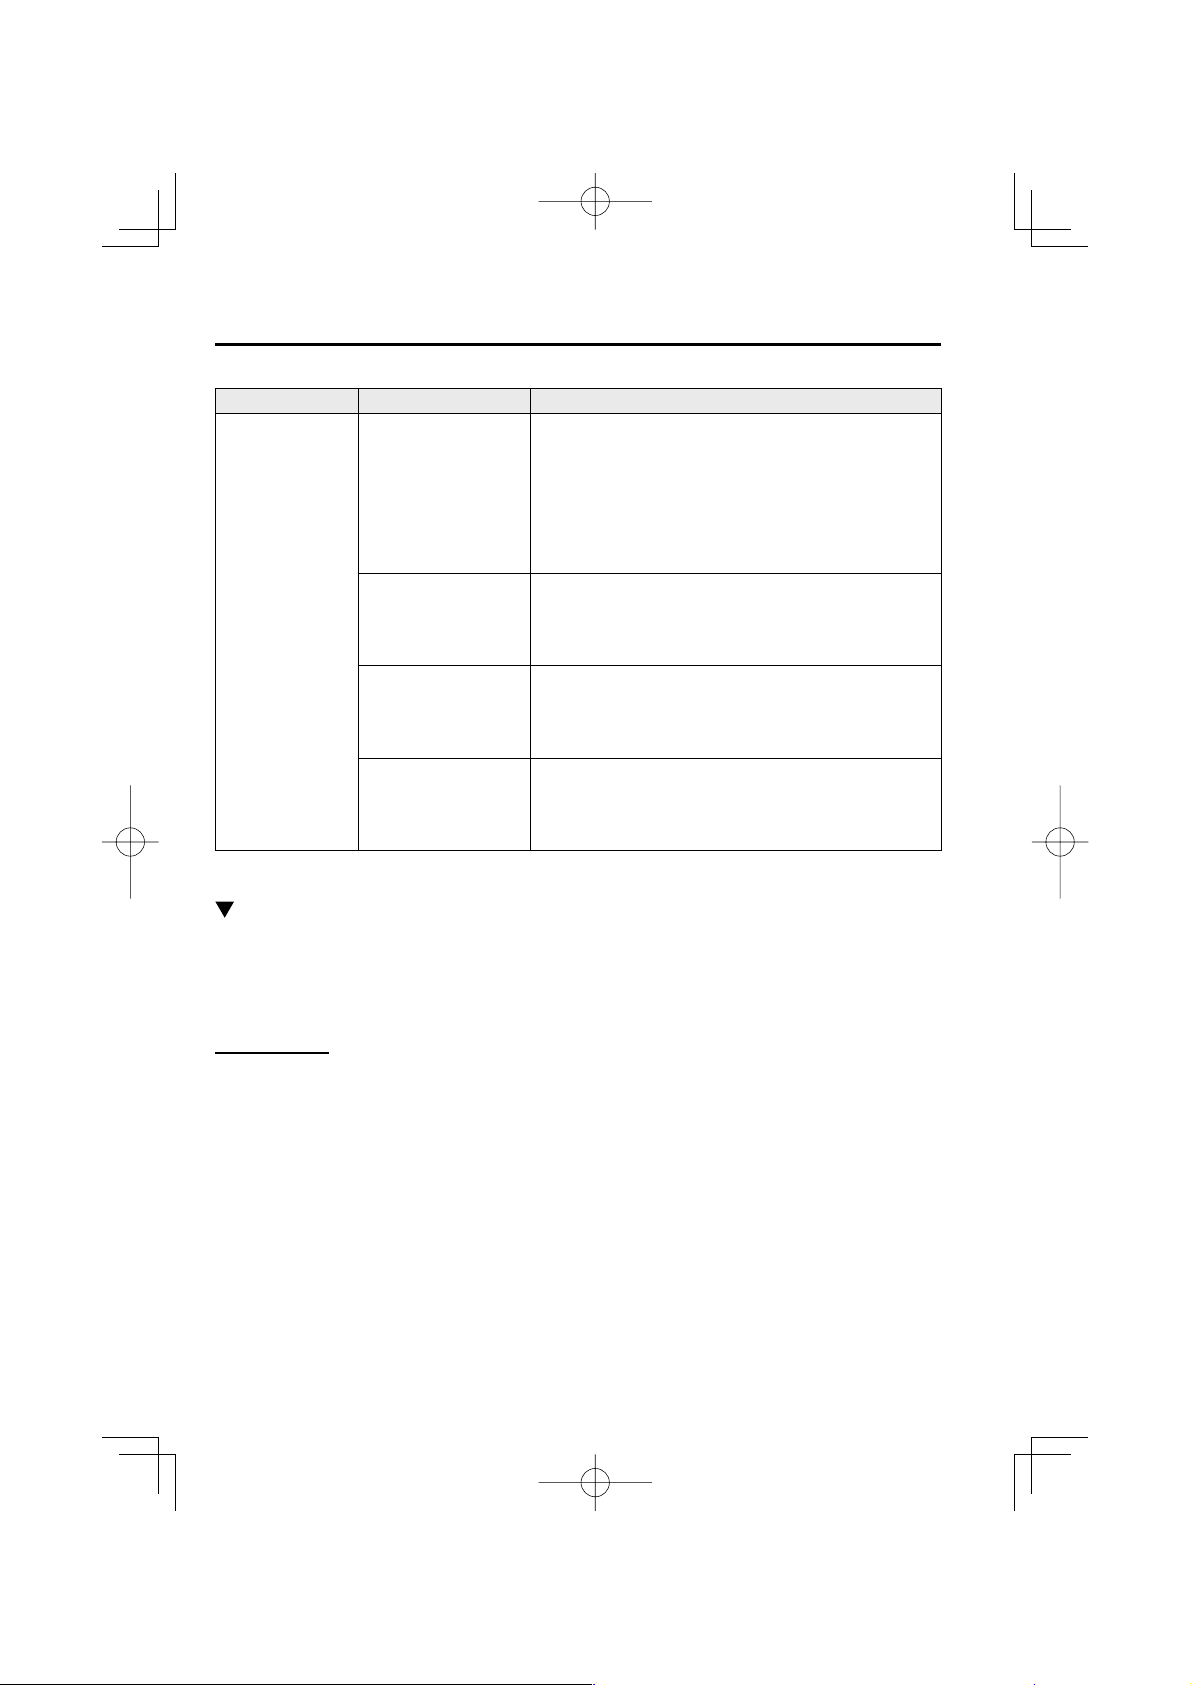
Maintenance Monitor
Maintenance Monitor (Vehicles with type B Audio)
1. Select the icon on the home screen to display the “Applications” screen.
2. Select the “Maintenance” to display the maintenance list screen.
3. Switch the tab and select the setting item you want to change.
You can customize settings in the setup display as follows:
Tab Item Explanation
Setting interval Notifi cation can be switched on/off.
Scheduled
Maintenance
Tire Rotation
Time (months) Displays the time or distance until maintenance is due.
Distance (mile or km)
Reset
Setting interval Notifi cation can be switched on/off.
Distance (mile or km)
Reset
Select this item to set the maintenance period.
“Scheduled Maintenance Due!” is displayed in red and the
wrench mark in the instrument cluster will be illuminated when
the remaining distance is less than 500 km (250 miles), or the
remaining number of days is less than 15 (whichever comes
fi rst).
Resets the time and distance to the initial values.
Once the system turns on, it needs to be reset whenever
carrying out maintenance.
Displays the distance until tire rotation is due.
Select this item to set the tire rotation distance.
“Tire Rotation Due!” is displayed in red and the wrench mark
in the instrument cluster will be illuminated when the remaining
distance is less than 500 km (250 miles).
Resets the remaining distance to the initial value.
Once the system turns on, it needs to be reset whenever rotating
the tires.
6–13
Mazda3_8CX9-EA-13F_Edition1.indb 13Mazda3_8CX9-EA-13F_Edition1.indb 13 2013/05/17 11:51:432013/05/17 11:51:43
Page 23
Maintenance and Care
Scheduled Maintenance
Tab Item Explanation
Oil replacement period can be selected from the fl exible setting
or fi xed setting, or it can be set to non-display.
The fl exible setting is available only in the United States and
Puerto Rico. Once engine oil fl exible maintenance is selected,
the vehicle calculates the remaining oil life based on the
engine operating conditions. The vehicle lets you know when
an oil change is due by illuminating the wrench mark in the
instrument cluster. Mazda Genuine 0W-20 oil and Castrol
0W-20 oil are required to achieve optimum performance.
Displays the distance until the oil replacement is due.
Select this item to set the oil replacement distance.
“Oil Change Due!” is displayed in red and the wrench mark in
the instrument cluster will be illuminated when the remaining
distance is less than 500 km (250 miles).
Displays the engine oil life until the oil replacement is due.
“Oil Change Due!” is displayed in red and the wrench mark in
the instrument cluster will be illuminated when remaining oil
life distance is less than 500 km (250 mile), or remaining days
are less than 15 (whichever comes fi rst).
In fl exible setting: Resets the remaining oil life to 100%.
In fi xed setting: Resets the remaining distance to the initial
value.
Once the Flexible Oil Maintenance Setting is selected, the
system must be reset whenever replacing the engine oil.
Oil Change
Setting interval
Distance (mile or km)
(Displays only in fi xed
setting)
Oil life (%)
(Displays only in fl exible
setting)
Reset
®
Maintenance Monitor (Vehicles without type B Audio)
“Oil Change” with a fl exible setting *1 is available. Consult your Authorized Mazda Dealer
when you want to change the setting
instrument cluster will be illuminated when remaining oil life becomes less than 500 km
(250 mile), or remaining days are less than 15 (whichever comes fi rst).
Reset method
Press and hold the TRIP button with the ignition switched off, then switch it on. Keep
pressing the TRIP button for more than 5 seconds. The master warning light will fl ash for a
few seconds when the reset is completed.
*1 The fl exible setting is available in the United States and Puerto Rico. Based on the
engine operating conditions, the onboard computer in your vehicle calculates the
remaining oil life. Mazda Genuine 0W-20 oil and Castrol
achieve optimum calculation performance.
*2 Once the Oil Maintenance Setting is selected, the system must be reset whenever
replacing the engine oil.
*2
. Once the system turns on, the wrench mark in the
®
0W-20 oil are required to
6–14
Mazda3_8CX9-EA-13F_Edition1.indb 14Mazda3_8CX9-EA-13F_Edition1.indb 14 2013/05/17 11:51:432013/05/17 11:51:43
Page 24
Maintenance and Care
Owner Maintenance
Owner Maintenance Precautions
The owner or a qualifi ed service technician should make these vehicle inspections at the
indicated intervals to ensure safe and dependable operation.
Bring any problem to the attention of an Authorized Mazda Dealer or qualifi ed service
technician as soon as possible.
When Refueling
• Brake and clutch fluid level (page 6-23 )
• Engine coolant level (page 6-21 )
• Engine oil level (page 6-20 )
• Washer fluid level (page 6-23 )
At Least Monthly
• Tire inflation pressures (page 6-32 )
At Least Twice a Year (For Example, Every Spring and Fall)
You can do the following scheduled maintenance items if you have some mechanical ability
and a few basic tools and if you closely follow the directions in this manual.
•
Engine coolant (page 6-21 )
• Engine oil (page 6-20 )
Improper or incomplete service may result in problems. This section gives instructions only
for items that are easy to perform.
As explained in the Introduction (page 6-2 ), several procedures can be done only by a
qualifi ed service technician with special tools.
Improper owner maintenance during the warranty period may affect warranty coverage.
Refer to Introduction (page 6-2 ) for owner's responsibility in protecting your investment.
For details, read the separate Mazda Warranty statement provided with the vehicle. If you
are unsure about any servicing or maintenance procedure, have it done by an Authorized
Mazda Dealer.
There are strict environmental laws regarding the disposal of waste oil and fl uids. Please
dispose of your waste properly and with due regard to the environment.
We recommend that you entrust the oil and fl uid changes of your vehicle to an Authorized
Mazda Dealer.
6–15
Mazda3_8CX9-EA-13F_Edition1.indb 15Mazda3_8CX9-EA-13F_Edition1.indb 15 2013/05/17 11:51:432013/05/17 11:51:43
Page 25

Maintenance and Care
Owner Maintenance
WARNING
Do not perform maintenance work if you lack su cient knowledge and experience
or the proper tools and equipment to do the work. Have maintenance work done by a
quali ed technician:
Performing maintenance work on a vehicle is dangerous if not done properly. You can be
seriously injured while performing some maintenance procedures.
If you must run the engine while working under the hood, make certain that you
remove all jewelry (especially rings, bracelets, watches, and necklaces) and all
neckties, scarves, and similar loose clothing before getting near the engine or cooling
fan which may turn on unexpectedly:
Working under the hood with the engine running is dangerous. It becomes even more
dangerous when you wear jewelry or loose clothing.
Either can become entangled in moving parts and result in injury.
Switch the ignition to o and make sure the fan is not running before attempting to
work near the cooling fan:
Working near the cooling fan when it is running is dangerous. The fan could continue
running inde nitely even if the engine has stopped and the engine compartment
temperature is high. You could be hit by the fan and seriously injured.
Do not leave items in the engine compartment:
After you have nished checking or doing servicing in the engine compartment, do not
forget and leave items such as tools or rags in the engine compartment.
Tools or other items left in the engine compartment could cause engine damage or a re
leading to an unexpected accident.
6–16
Mazda3_8CX9-EA-13F_Edition1.indb 16Mazda3_8CX9-EA-13F_Edition1.indb 16 2013/05/17 11:51:442013/05/17 11:51:44
Page 26
Maintenance and Care
Owner Maintenance
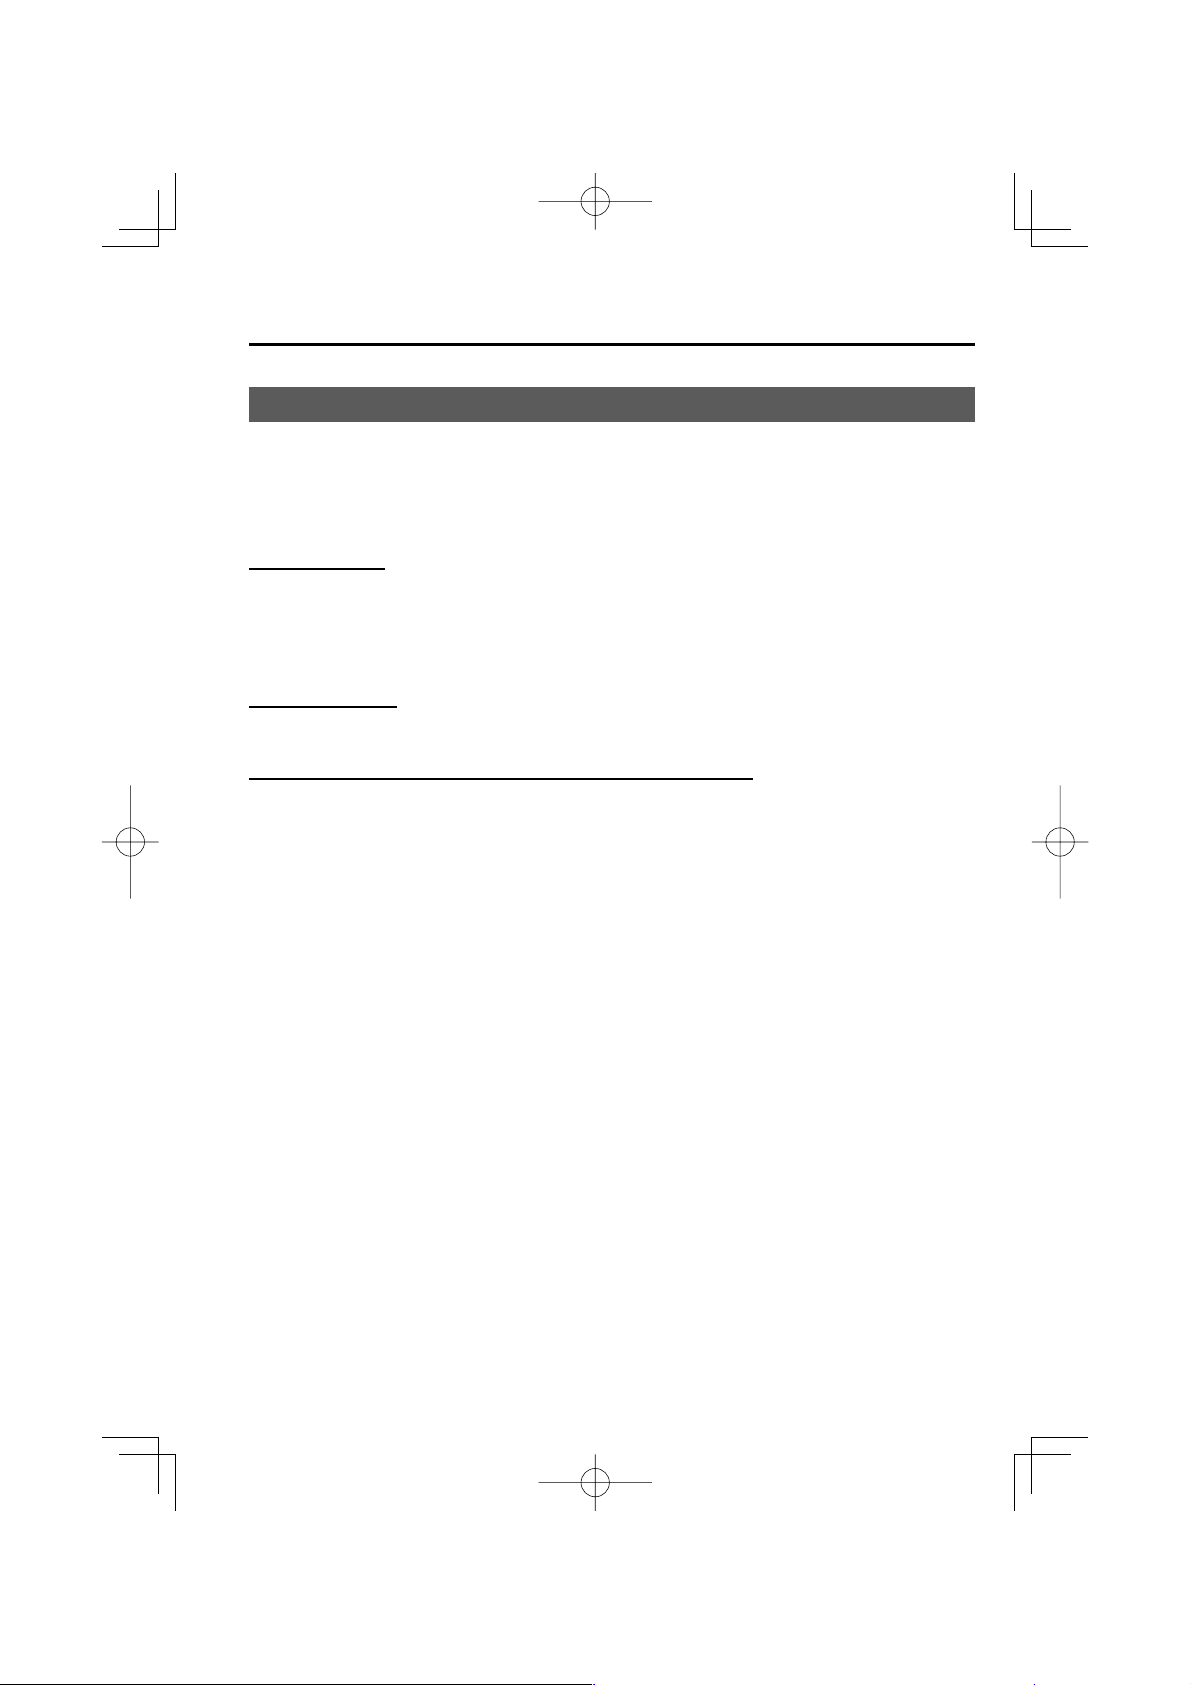
Hood
WARNING
Always check that the hood is closed
and securely locked:
A hood that is not closed and securely
locked is dangerous as it could y open
while the vehicle is moving and block
the driver's vision which could result in
a serious accident.
Opening the Hood
1. With the vehicle parked, pull the
release handle to unlock the hood.
2. Insert your hand into the hood opening,
slide the latch lever to the right, and lift
up the hood.
Release handle
NOTE
The lever is located a little to the left of
center when facing the vehicle.
3. Grasp the support rod in the padded
area and secure it in the support rod
hole indicated by the arrow to hold the
hood open.
Pad
Clip
Support rod
Clip
Lever
6–17
Mazda3_8CX9-EA-13F_Edition1.indb 17Mazda3_8CX9-EA-13F_Edition1.indb 17 2013/05/17 11:51:442013/05/17 11:51:44
Page 27
Maintenance and Care
Owner Maintenance
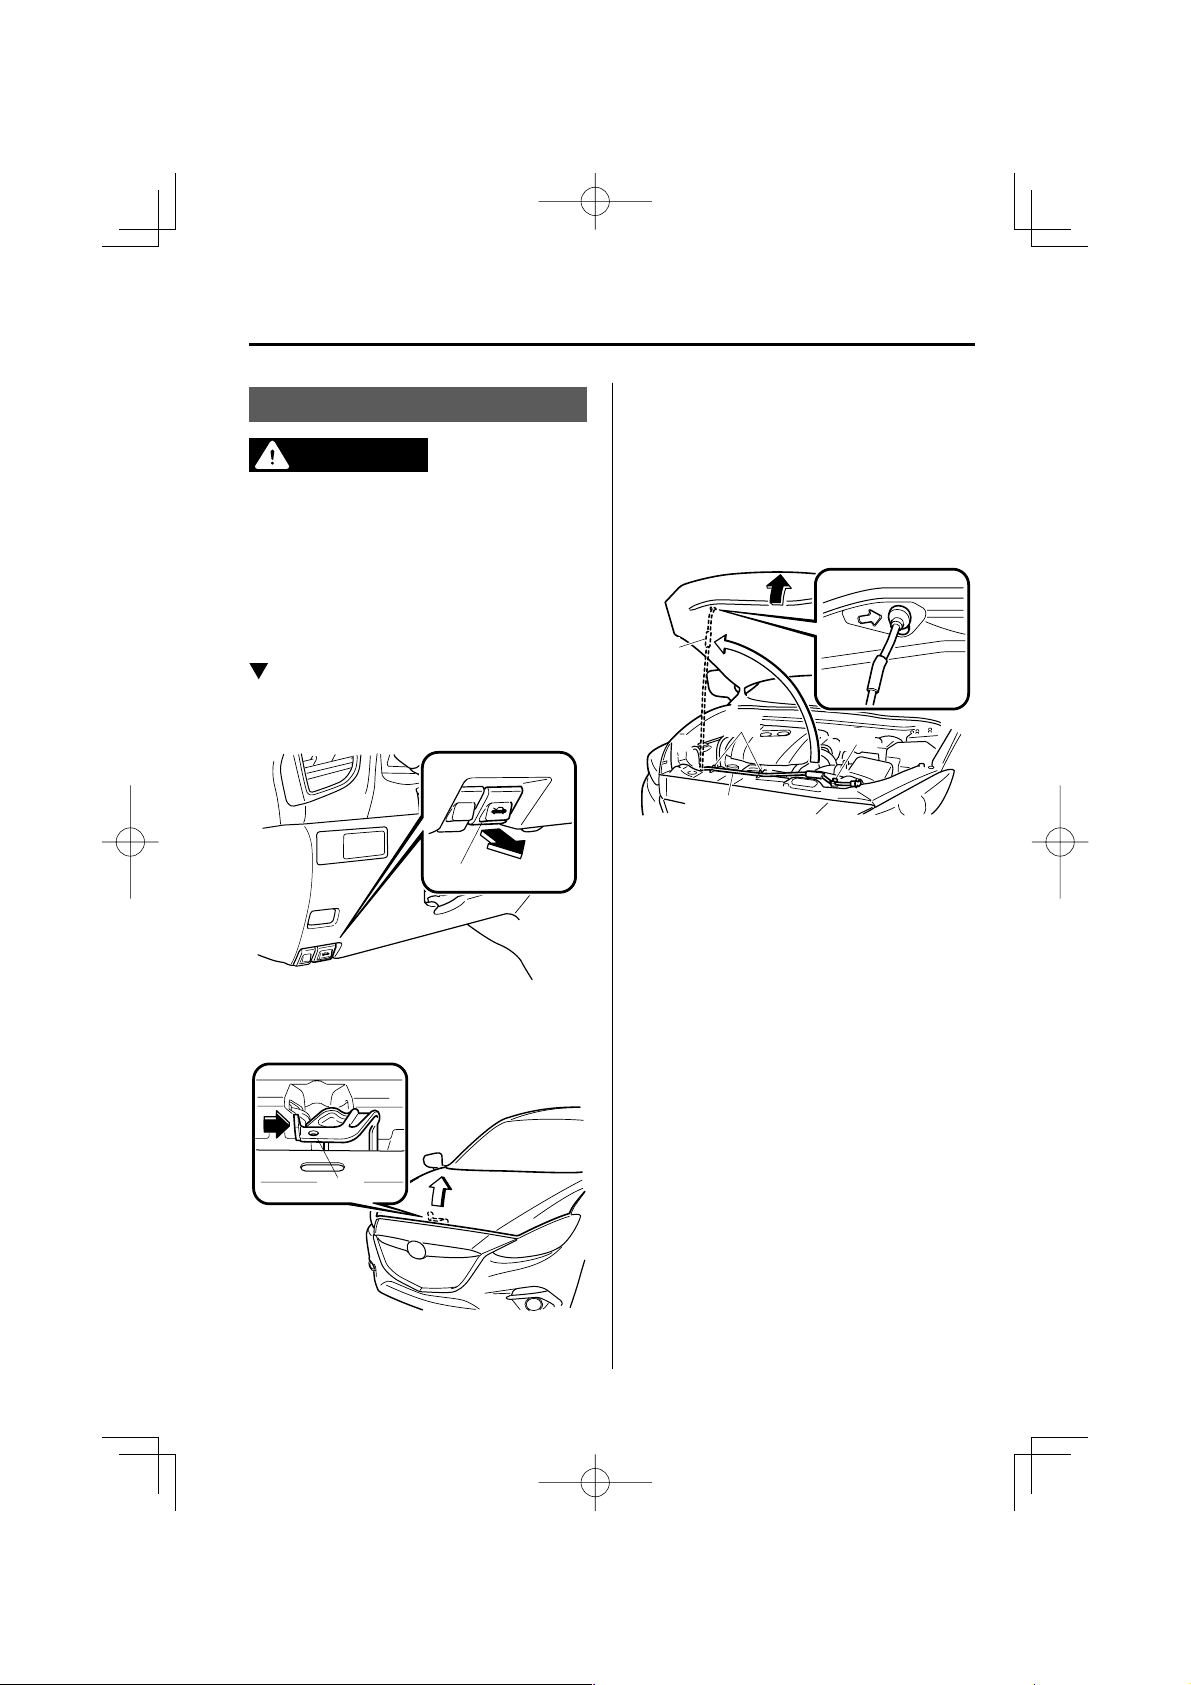
Closing the Hood
1. Check under the hood area to make
certain all fi ller caps are in place and all
loose items (e.g. tools, oil containers,
etc.) have been removed.
2. Lift the hood, grasp the padded area on
the support rod, and secure the support
rod in the clip. Verify that the support
rod is secured in the clip before closing
the hood.
Clip
ClipClip
3. Lower the hood slowly to a height of
about 20 cm (7.9 in) above its closed
position and then let it drop.
CAUTION
When closing the hood, do not push
it excessively such as by applying your
weight. Otherwise, the hood could be
deformed.
6–18
Mazda3_8CX9-EA-13F_Edition1.indb 18Mazda3_8CX9-EA-13F_Edition1.indb 18 2013/05/17 11:51:452013/05/17 11:51:45
Page 28
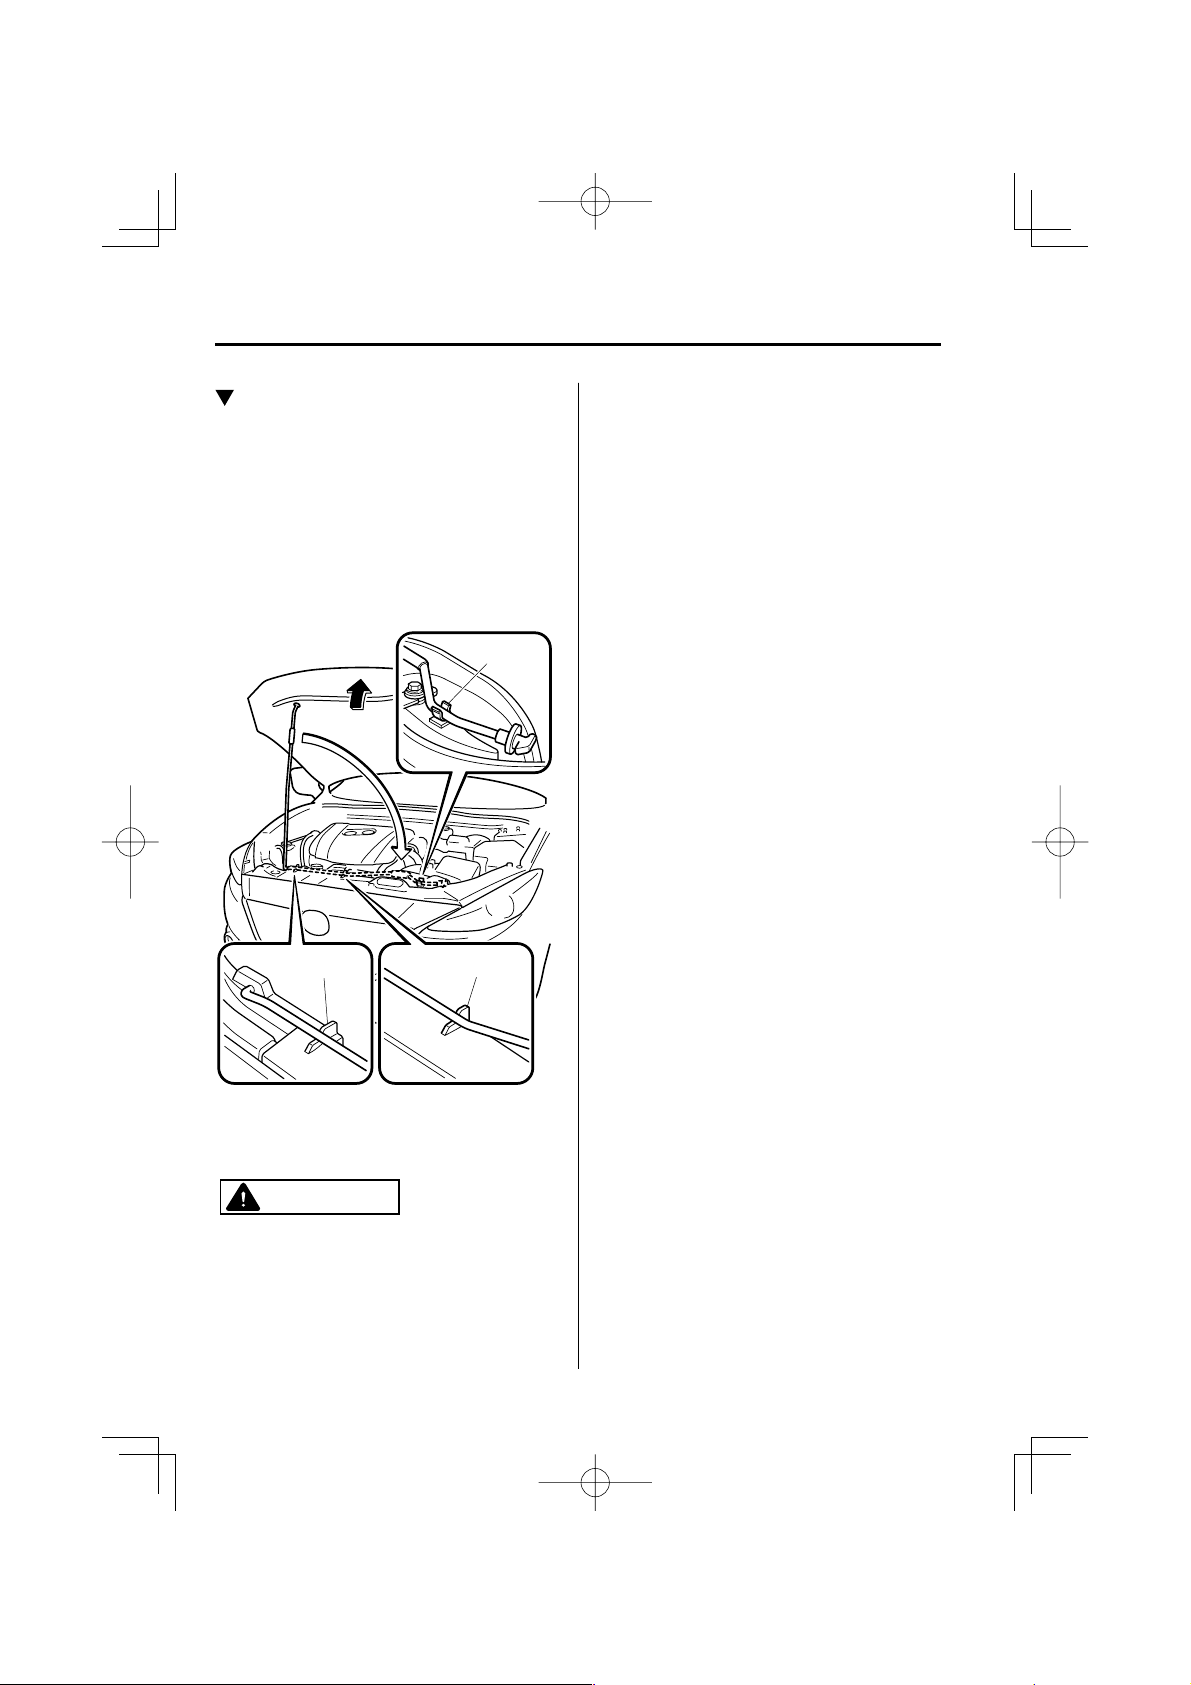
Owner Maintenance
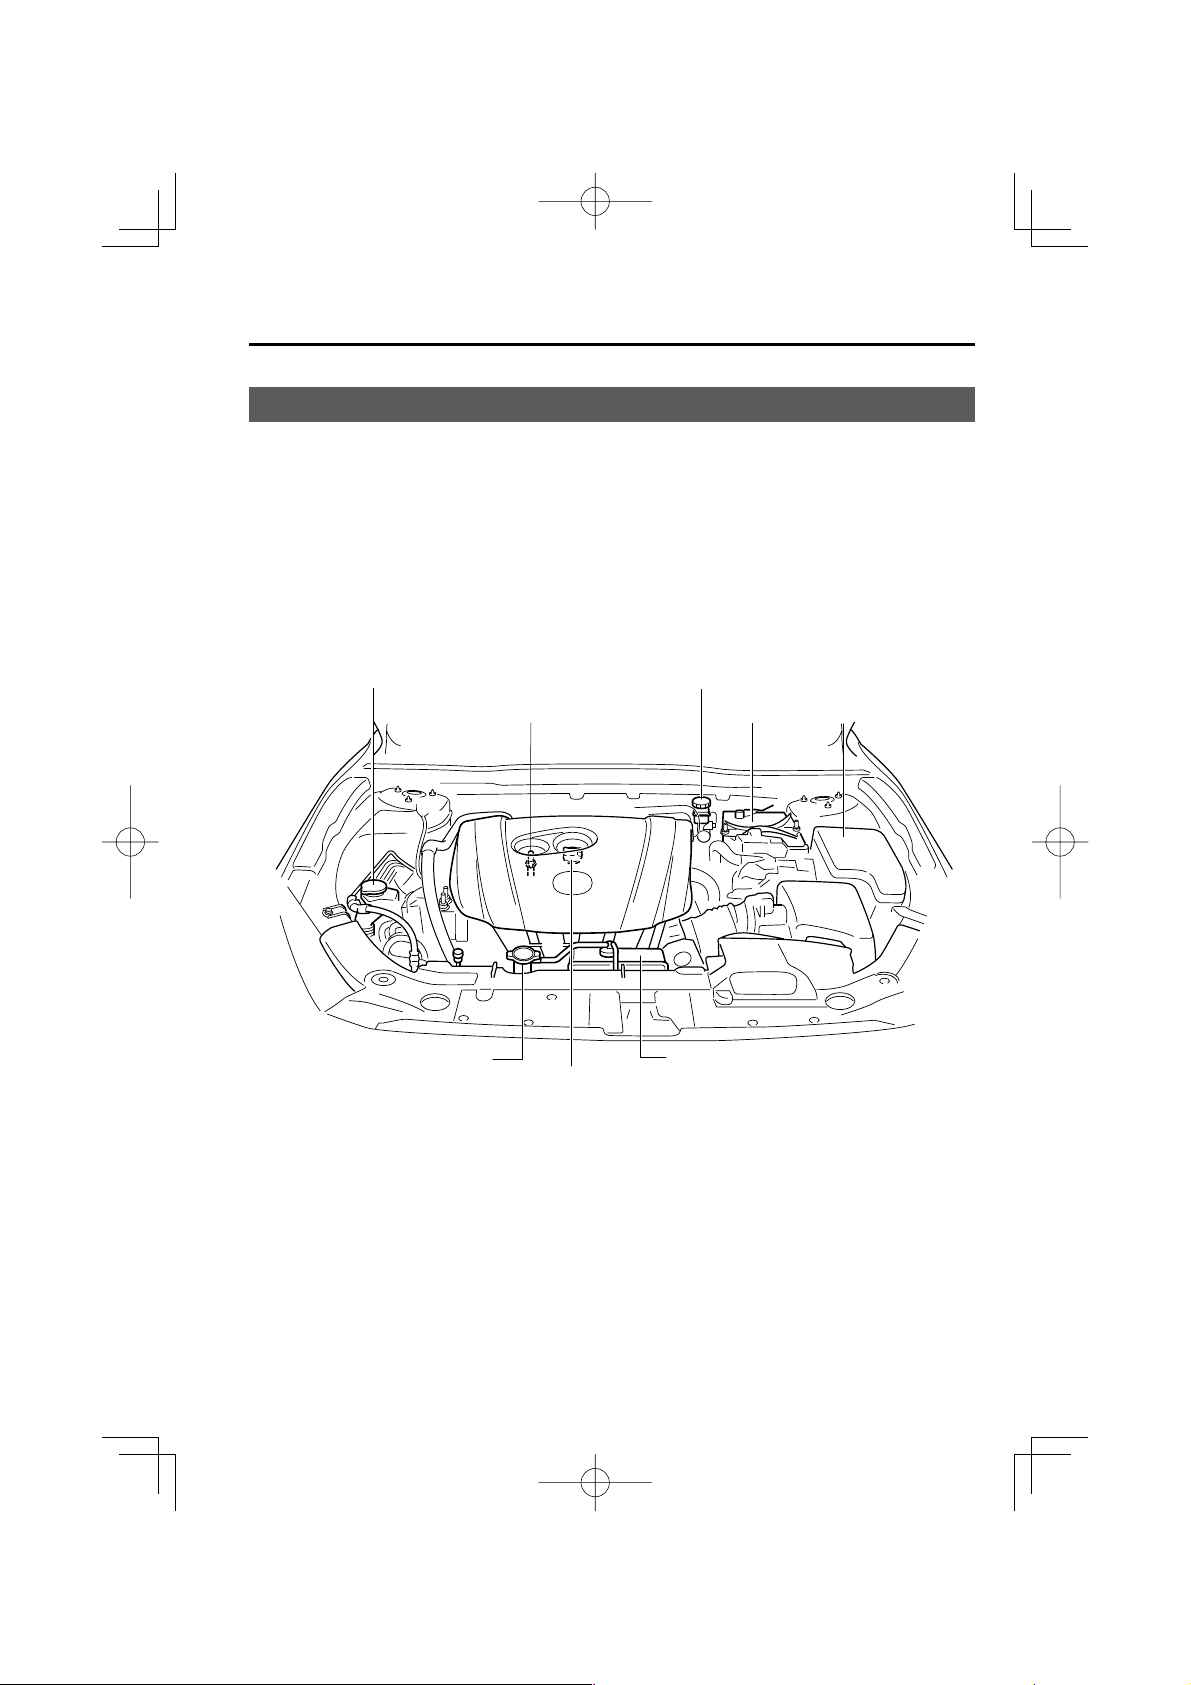
Engine Compartment Overview
Windshield washer fluid reservoir Brake/Clutch fluid reservoir
Maintenance and Care
Engine oil dipstick
Battery
Cooling system cap Engine coolant reservoir
Engine oil-filler cap
Fuse block
6–19
Mazda3_8CX9-EA-13F_Edition1.indb 19Mazda3_8CX9-EA-13F_Edition1.indb 19 2013/05/17 11:51:452013/05/17 11:51:45
Page 29
Maintenance and Care
Owner Maintenance
Engine Oil
NOTE
Changing the engine oil should be
performed by an Authorized Mazda
Dealer.
Refer to Introduction (page 6-2 ) for
owner's responsibility in protecting your
investment.
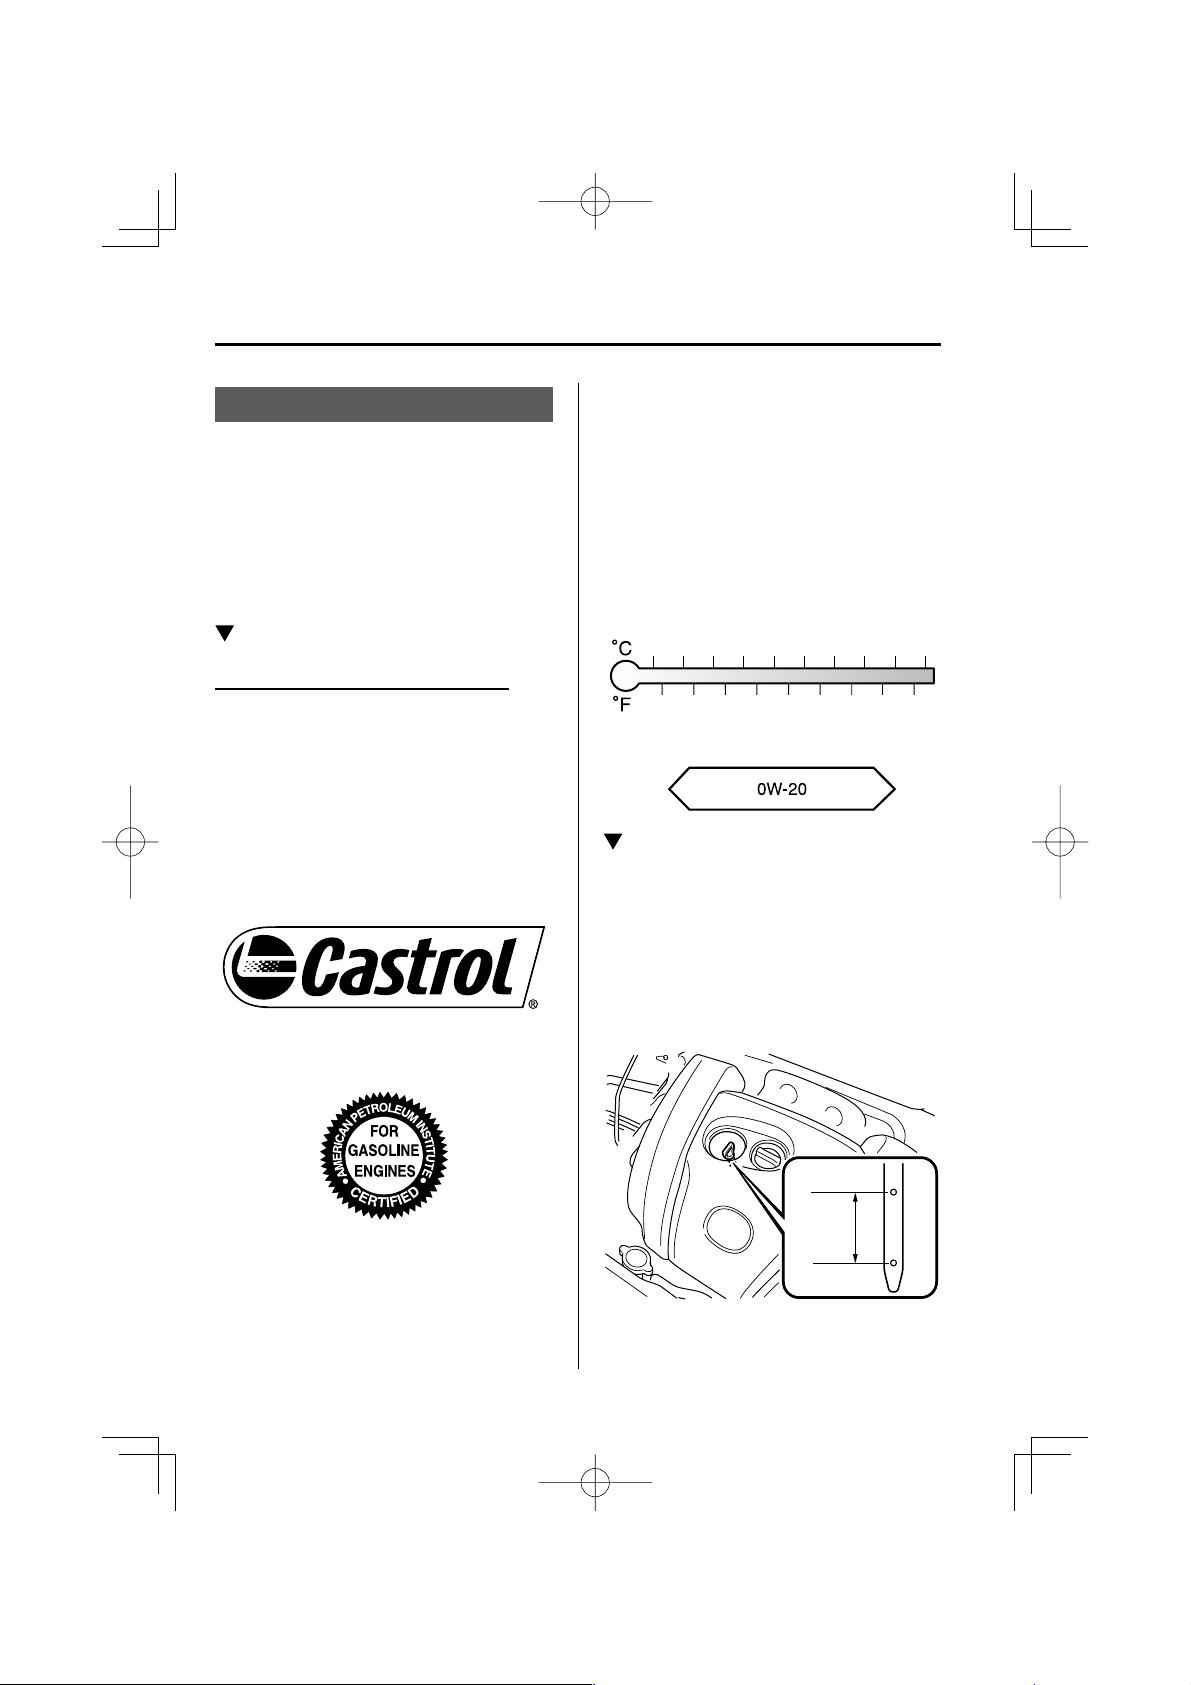
Recommended Oil
U.S.A., CANADA, and Puerto Rico
Use SAE 0W-20 engine oil.
Mazda Genuine Oil is used in your
Mazda vehicle. Mazda Genuine 0W-20
Oil is required to achieve optimum fuel
economy.
For maintenance service, Mazda
recommends Mazda Genuine Parts and
®
Castrol
(U.S.A. only).
Only use SAE 0W-20 oil “Certifi ed For
Gasoline Engines” by the American
Petroleum Institute (API).
Oil with this trademark symbol conforms
to the current engine and emission system
protection standards and fuel economy
requirements of the International Lubricant
Standardization and Approval Committee
(ILSAC), comprised of U.S. and Japanese
automobile manufacturers.
–40
–40 –20
–30
–20
0
–10
0
10
20
40
Inspecting Engine Oil Level
1. Be sure the vehicle is on a level
surface.
2. Warm up the engine to normal
operating temperature.
3. Turn it off and wait at least 5 minutes
for the oil to return to the oil pan.
4. Pull out the dipstick, wipe it clean, and
reinsert it fully.
20
30
80
60
100
5040
120
Full
(ILSAC)
OK
Low
6–20
Mazda3_8CX9-EA-13F_Edition1.indb 20Mazda3_8CX9-EA-13F_Edition1.indb 20 2013/05/17 11:51:452013/05/17 11:51:45
Page 30

Maintenance and Care
Owner Maintenance
5. Pull it out again and examine the level.
The level is normal if it is between
Low and Full.
If it is near or below Low, add enough
oil to bring the level to Full.
CAUTION
Do not add engine oil over Full. This
may cause engine damage.
6. Make sure the O-ring on the dipstick is
positioned properly before reinserting
the dipstick.
7. Reinsert the dipstick fully.
Engine Coolant
Inspecting Coolant Level
WARNING
Do not use a match or live ame in the
engine compartment. DO NOT ADD
COOLANT WHEN THE ENGINE IS HOT:
A hot engine is dangerous. If the
engine has been running, parts of the
engine compartment can become very
hot. You could be burned. Carefully
inspect the engine coolant in the
coolant reservoir, but do not open it.
Switch the ignition to o and make
sure the fan is not running before
attempting to work near the cooling
fan:
Working near the cooling fan when it
is running is dangerous. The fan could
continue running inde nitely even if
the engine has stopped and the engine
compartment temperature is high. You
could be hit by the fan and seriously
injured.
Do not remove either cooling
system cap when the engine and
radiator are hot:
When the engine and radiator are hot,
scalding coolant and steam may shoot
out under pressure and cause serious
injury.
NOTE
Changing the coolant should be done by
6–21
Mazda3_8CX9-EA-13F_Edition1.indb 21Mazda3_8CX9-EA-13F_Edition1.indb 21 2013/05/17 11:51:462013/05/17 11:51:46
Page 31

Maintenance and Care
Owner Maintenance
an Authorized Mazda Dealer.
Inspect the antifreeze protection and
coolant level in the coolant reservoir at
least once a year—at the beginning of the
winter season—and before traveling where
temperatures may drop below freezing.
Inspect the condition and connections of
all cooling system and heater hoses.
Replace any that are swollen or
deteriorated.
The coolant should be at full in the
radiator and between the F and L marks
on the coolant reservoir when the engine
is cool.
If it is at or near L, add enough coolant to
the coolant reservoir to provide freezing
and corrosion protection and to bring the
level to F.
Securely tighten the coolant reservoir tank
cap after adding coolant.
CAUTION
Radiator coolant will damage paint.
Rinse it o quickly if spilled.
Use only soft (demineralized) water
in the coolant mixture. Water that
contains minerals will cut down on the
coolant's e ectiveness.
Do not add only water. Always add a
proper coolant mixture.
The engine has aluminum parts and
must be protected by an ethyleneglycol-based coolant to prevent
corrosion and freezing.
DO NOT USE coolants Containing
Alcohol, methanol, Borate or Silicate.
These coolants could damage the
cooling system.
DO NOT MIX alcohol or methanol with
the coolant. This could damage the
cooling system.
Do not use a solution that contains
more than 60% antifreeze.
This would reduce e ectiveness.
NOTE
If the “FL22” mark is shown on or near
the cooling system cap, it is recommended
to use Mazda Genuine FL22 engine
coolant.
If the coolant reservoir is empty or new
coolant is required frequently, consult an
Authorized Mazda Dealer.
6–22
Mazda3_8CX9-EA-13F_Edition1.indb 22Mazda3_8CX9-EA-13F_Edition1.indb 22 2013/05/17 11:51:472013/05/17 11:51:47
Page 32

Maintenance and Care
Owner Maintenance
Brake/Clutch Fluid
Inspecting Brake/Clutch Fluid
Level
WARNING
If the brake/clutch uid level is low, have
the brakes inspected:
A low brake/clutch uid level is
dangerous.
A low level could indicate brake lining
wear or a brake system leak which
could cause the brakes to fail and lead
to an accident.
The brakes and clutch draw fl uid from the
same reservoir.
Inspect the fl uid level in the reservoir
regularly. It should be kept between the
MAX and MIN lines.
The level normally drops with
accumulated distance, a condition
associated with wear of brake and clutch
linings. If it is excessively low, have
the brake/clutch system inspected by an
Authorized Mazda Dealer.
Washer Fluid
Inspecting Washer Fluid Level
WARNING
Use only windshield washer uid or
plain water in the reservoir:
Using radiator antifreeze as washer
uid is dangerous. If sprayed on the
windshield, it will dirty the windshield,
a ect your visibility, and could result in
an accident.
Using Washer Fluid Without Anti-freeze
Protection in Cold Weather:
Operating your vehicle in temperatures
below 4 degrees C (40 degrees F)
using washer uid without anti-freeze
protection is dangerous as it could
cause impaired windshield vision and
result in an accident. In cold weather,
always use washer uid with antifreeze protection.
NOTE
State or local regulations may restrict the
use of volatile organic compounds (VOCs),
which are commonly used as anti-freeze
agents in washer fl uid. A washer fl uid with
limited VOC content should be used only
if it provides adequate freeze resistance
for all regions and climates in which the
vehicle will be operated.
6–23
Mazda3_8CX9-EA-13F_Edition1.indb 23Mazda3_8CX9-EA-13F_Edition1.indb 23 2013/05/17 11:51:472013/05/17 11:51:47
Page 33

Maintenance and Care
Owner Maintenance
Inspect fl uid level in the washer fl uid
reservoir; add fl uid if necessary.
L
Use plain water if washer fl uid is
unavailable.
But use only washer fl uid in cold weather
to prevent it from freezing.
NOTE
Front and rear washer fl uid is supplied
from the same reservoir.
Body Lubrication
All moving points of the body, such as
door and hood hinges and locks, should
be lubricated each time the engine oil is
changed. Use a nonfreezing lubricant on
locks during cold weather.
Make sure the hood's secondary latch
keeps the hood from opening when the
primary latch is released.
6–24
Mazda3_8CX9-EA-13F_Edition1.indb 24Mazda3_8CX9-EA-13F_Edition1.indb 24 2013/05/17 11:51:482013/05/17 11:51:48
Page 34

Maintenance and Care
Owner Maintenance
Wiper Blades
CAUTION
Hot waxes applied by automatic car
washers have been known to a ect the
wiper's ability to clean windows.
To prevent damage to the wiper blades,
do not use gasoline, kerosene, paint
thinner, or other solvents on or near
them.
When the wiper lever is in the
AUTO position and the ignition is
switched ON, the wipers may move
automatically in the following cases:
If the windshield above the rain
sensor is touched.
If the windshield above the rain
sensor is wiped with a cloth.
If the windshield is struck with a hand
or other object.
If the rain sensor is struck with a hand
or other object from inside the vehicle.
Be careful not to pinch hands or ngers
as it may cause injury, or damage the
wipers. When washing or servicing your
Mazda, make sure the wiper lever is in
the OFF position.
Contamination of either the windshield or
the blades with foreign matter can reduce
wiper effectiveness. Common sources are
insects, tree sap, and hot wax treatments
used by some commercial car washes.
If the blades are not wiping properly,
clean the window and blades with a good
cleaner or mild detergent; then rinse
thoroughly with clean water. Repeat if
necessary.
Replacing Windshield Wiper
Blades
When the wipers no longer clean well, the
blades are probably worn or cracked.
Replace them.
CAUTION
To prevent damage to the wiper arms
and other components, do not try to
sweep the wiper arm by hand.
NOTE
To prevent damage to the wiper arm
blades when raising both the driver and
passenger side wiper arms, raise the
driver side wiper arm fi rst. Conversely,
when setting down the wiper arms, set the
passenger side wiper arm down fi rst.
1. Raise the wiper arm.
2. Open the clip and slide the blade
assembly in the direction of the arrow.
6–25
Mazda3_8CX9-EA-13F_Edition1.indb 25Mazda3_8CX9-EA-13F_Edition1.indb 25 2013/05/17 11:51:482013/05/17 11:51:48
Page 35

Maintenance and Care
Owner Maintenance
3. Tilt the blade assembly and remove it
from the arm.
CAUTION
To prevent damage to the windshield
let the wiper arm down easily, do not
let it slap down on the windshield.
4. Pull down the blade rubber and slide it
out of blade holder.
5. Remove the metal stiffeners from each
blade rubber and install them in the
new blade.
CAUTION
Do not bend or discard the sti eners.
You need to use them again.
If the metal sti eners are switched,
the blade's wiping e ciency could be
reduced.
So do not use the driver's side metal
sti eners on the passenger's side, or
vice versa.
Be sure to reinstall the metal sti eners
in the new blade rubber so that the
curve is the same as it was in the old
blade rubber.
6. Carefully insert the new blade rubber.
Then install the blade assembly in the
reverse order of removal.
Replacing Rear Window Wiper
Blade (5-Door)
When the wiper no longer cleans well, the
blade is probably worn or cracked.
Replace it.
CAUTION
To prevent damage to the wiper arm
and other components, do not move
the wiper by hand.
6–26
Mazda3_8CX9-EA-13F_Edition1.indb 26Mazda3_8CX9-EA-13F_Edition1.indb 26 2013/05/17 11:51:492013/05/17 11:51:49
Page 36

Maintenance and Care
Owner Maintenance
1. Remove the cover and raise the wiper
arm.
2. Firmly rotate the wiper blade to the
right until it unlocks, then remove the
blade.
CAUTION
To prevent damage to the rear window,
do not let the wiper arm fall on it.
3. Pull down the blade rubber and slide it
out of the blade holder.
4. Remove the metal stiffeners from the
blade rubber and install them in the
new blade.
CAUTION
Do not bend or discard the sti eners.
You need to use them again.
5. Carefully insert the new blade rubber.
Then install the blade assembly in the
reverse order of removal.
6–27
Mazda3_8CX9-EA-13F_Edition1.indb 27Mazda3_8CX9-EA-13F_Edition1.indb 27 2013/05/17 11:51:502013/05/17 11:51:50
Page 37

Maintenance and Care
Owner Maintenance
Battery
WARNING
Wash hands after handling the battery and related accessories:
Battery posts, terminals and related accessories contain lead and lead compounds,
chemicals known to the State of California to cause cancer and reproductive harm.
Read the following precautions carefully before using the battery or inspecting
to ensure safe and correct handling:
Always wear eye protection when working near the battery:
Working without eye protection is dangerous. Battery uid contains SULFURIC ACID
which could cause blindness if splashed into your eyes. Also, hydrogen gas produced
during normal battery operation, could ignite and cause the battery to explode.
Wear eye protection and protective gloves to prevent contact with battery uid:
Spilled battery uid is dangerous.
Battery uid contains SULFURIC ACID which could cause serious injuries if it gets in eyes,
or on the skin or clothing. If this happens, immediately ush your eyes with water for 15
minutes or wash your skin thoroughly and get medical attention.
Always keep batteries out of the reach of children:
Allowing children to play near batteries is dangerous. Battery uid could cause serious
injuries if it gets in the eyes or on the skin.
Keep ames and sparks away from open battery cells and do not allow metal
tools to contact the positive (
near a battery. Do not allow the positive (
) or negative ( ) terminal of the battery when working
) terminal to contact the vehicle body:
Flames and sparks near open battery cells are dangerous. Hydrogen gas, produced
during normal battery operation, could ignite and cause the battery to explode. An
exploding battery can cause serious burns and injuries. Keep all ames including
cigarettes and sparks away from open battery cells.
Keep all ames, including cigarettes, and sparks away from open battery cells:
Flames and sparks near open battery cells are dangerous. Hydrogen gas, produced
during normal battery operation, could ignite and cause the battery to explode. An
exploding battery can cause serious burns and injuries.
6–28
Mazda3_8CX9-EA-13F_Edition1.indb 28Mazda3_8CX9-EA-13F_Edition1.indb 28 2013/05/17 11:51:512013/05/17 11:51:51
Page 38

Maintenance and Care
Owner Maintenance
NOTE
Before performing battery maintenance, remove the battery cover by pulling the tab.
Tab
Battery Maintenance
To get the best service from a battery:
•
Keep it securely mounted.
• Keep the top clean and dry.
• Keep terminals and connections clean,
tight, and coated with petroleum jelly or
terminal grease.
• Rinse off spilled electrolyte immediately
with a solution of water and baking
soda.
•
If the vehicle will not be used for an
extended time, disconnect the battery
cables and charge the battery every six
weeks.
When replacing the battery, refer to the
specifi cation charts (page 9-4 ).
6–29
Mazda3_8CX9-EA-13F_Edition1.indb 29Mazda3_8CX9-EA-13F_Edition1.indb 29 2013/05/17 11:51:522013/05/17 11:51:52
Page 39

Maintenance and Care
Owner Maintenance
Battery Replacement
If the buttons on the transmitter are
inoperable and the operation indicator
light does not fl ash, the battery may be
dead.
Replace with a new battery before the
transmitter becomes unusable.
CAUTION
Make sure the battery is installed
correctly. Battery leakage could occur if
it is not installed correctly.
When replacing the battery, be careful
not to touch any of the internal circuitry
and electrical terminals, bend the
electrical terminals, or get dirt in the
transmitter as the transmitter could be
damaged.
There is the danger of explosion if the
battery is not correctly replaced.
Dispose of used batteries according to
the following instructions.
Insulate the plus and minus terminals
of the battery using cellophane or
equivalent tape.
Never disassemble.
Never throw the battery into re or
water.
Never deform or crush.
Replace only with the same type battery
(CR2025 or equivalent).
The following conditions indicate that the
battery power is low:
• The KEY indicator light (green) flashes
in the instrument cluster for about 30
seconds after the engine is turned off.
• The system does not operate and
the operation indicator light on the
transmitter does not flash when the
buttons are pressed.
• The system's operational range is
reduced.
Replacing the battery at an Authorized
Mazda Dealer is recommended to prevent
damage to the key. If replacing the battery
by yourself, follow the instruction below.
Replacing the key battery
1. Pull out the auxiliary key.
2. Insert a small, fl athead screwdriver
into the groove shown in the fi gure and
rotate the screwdriver to open the cover
slightly.
6–30
Mazda3_8CX9-EA-13F_Edition1.indb 30Mazda3_8CX9-EA-13F_Edition1.indb 30 2013/05/17 11:51:532013/05/17 11:51:53
Page 40

Maintenance and Care
Owner Maintenance
3. Insert the small, fl athead screwdriver
into the gap between the cover and
the transmitter, and then rotate the
screwdriver to detach the cover.
4. Remove the battery cap, then remove
the battery.
6. Close the cover.
7. Reinsert the auxiliary key.
CAUTION
Be careful not to allow the rubber ring
shown in the gure to be scratched or
damaged.
If the rubber ring detaches, reattach it
before inserting a new battery.
Rubber ring
5. Insert a new battery with the positive
pole facing up, and then cover the
battery with the battery cap.
6–31
Mazda3_8CX9-EA-13F_Edition1.indb 31Mazda3_8CX9-EA-13F_Edition1.indb 31 2013/05/17 11:51:532013/05/17 11:51:53
Page 41

Maintenance and Care
Owner Maintenance
Tires
For reasons of proper performance, safety,
and better fuel economy, always maintain
recommended tire infl ation pressures and
stay within the recommended load limits
and weight distribution.
WARNING
Using Di erent Tire Types:
Driving your vehicle with di erent
types of tires is dangerous. It could
cause poor handling and poor braking;
leading to loss of control.
Except for the limited use of the
temporary spare tire, use only the
same type tires (radial, bias-belted,
bias-type) on all four wheels.
Using Wrong-Sized Tires:
Using any other tire size than what is
speci ed for your Mazda (page 9-9 )
is dangerous. It could seriously a ect
ride, handling, ground clearance,
tire clearance, and speedometer
calibration. This could cause you to
have an accident. Use only tires that
are the correct size speci ed for your
Mazda.
Tire Infl ation Pressure
WARNING
Always in ate the tires to the correct
pressure:
Overin ation or underin ation of tires
is dangerous. Adverse handling or
unexpected tire failure could result in a
serious accident.
Refer to Tires on page 9-9
Use only a -genuine tire valve cap:
Use of a non-genuine part is
dangerous as the correct tire air
pressure cannot be maintained if the
tire valve becomes damaged. If the
vehicle is driven under this condition,
the tire air pressure will decrease which
could result in a serious accident. Do
not use any part for the tire valve cap
that is not a Mazda-genuine part.
Inspect all tire pressures monthly
(including the spare) when the tires are
cold. Maintain recommended pressures for
the best ride, handling, and minimum tire
wear.
Refer to the specifi cation charts
(page 9-9 ).
After adjusting the tire pressure,
initialization of the tire pressure
monitoring system is necessary to make
the system operates normally.
Refer to Tire Pressure Monitoring System
Initialization on page 4-90 .
NOTE
•
Always check tire pressure when tires
are cold.
•
Warm tires normally exceed
recommended pressures. Do not
release air from warm tires to adjust
the pressure.
•
Underinfl ation can cause reduced fuel
economy, uneven and accelerated tire
wear, and poor sealing of the tire bead,
which will deform the wheel and cause
separation of tire from rim.
•
Overinfl ation can produce a harsh
ride, uneven and accelerated tire wear,
and a greater possibility of damage
from road hazards.
Keep your tire pressure at the correct
levels. If one frequently needs infl ating,
have it inspected.
6–32
Mazda3_8CX9-EA-13F_Edition1.indb 32Mazda3_8CX9-EA-13F_Edition1.indb 32 2013/05/17 11:51:542013/05/17 11:51:54
Page 42

Maintenance and Care
Owner Maintenance
Tire Rotation
WARNING
Rotate tires periodically:
Irregular tire wear is dangerous. To
equalize tread wear for maintaining
good performance in handling and
braking, rotate the tires every 12,000
km (7,500 miles). However Mazda
recommends to rotate every 8,000km
(5,000 miles) to help increase tire life
and distribute wear more evenly.
During rotation, inspect them for correct
balance.
Forward
Do not include (TEMPORARY USE ONLY)
spare tire in rotation.
Also, inspect them for uneven wear and
damage. Abnormal wear is usually caused
by one or a combination of the following:
•
Incorrect tire pressure
• Improper wheel alignment
• Out-of-balance wheel
• Severe braking
After rotation, infl ate all tire pressures to
specifi cation (page 9-9 ) and inspect the lug
nuts for tightness.
After adjusting the tire pressure,
initialization of the tire pressure
monitoring system is necessary to make
the system operates normally.
Refer to Tire Pressure Monitoring System
Initialization on page 4-90
CAUTION
Rotate unidirectional tires and radial
tires that have an asymmetrical tread
pattern or studs only from front to rear,
not from side to side. Tire performance
will be reduced if rotated from side to
side.
Replacing a Tire
WARNING
Always use tires that are in good
condition:
Driving with worn tires is dangerous.
Reduced braking, steering, and
traction could result in an accident.
Replace all four tires at the same time:
Replacing just one tire is dangerous. It
could cause poor handling and poor
braking resulting in loss of vehicle
control. Mazda strongly recommends
that you replace all four tires at the
same time.
6–33
Mazda3_8CX9-EA-13F_Edition1.indb 33Mazda3_8CX9-EA-13F_Edition1.indb 33 2013/05/17 11:51:552013/05/17 11:51:55
Page 43

Maintenance and Care
Owner Maintenance
If a tire wears evenly, a wear indicator will
appear as a solid band across the tread.
Replace the tire when this happens.
Tread wear indicator
New tread
Worn tread
You should replace the tire before the band
crosses the entire tread.
After adjusting the tire pressure,
initialization of the tire pressure
monitoring system is necessary to make
the system operates normally.
Refer to Tire Pressure Monitoring System
Initialization on page 4-90 .
NOTE
Tires degrade over time, even when
they are not being used on the road. It
is recommended that tires generally be
replaced when they are 6 years or older.
Heat caused by hot climates or frequent
high loading conditions can accelerate
the aging process. You should replace the
spare tire when you replace the other road
tires due to the aging of the spare tire. The
period in which the tire was manufactured
(both week and year) is indicated by a
4-digit number.
Refer to Tire Labeling on page 8-21 .
T emporary Spare Tire
Inspect the temporary spare tire at least
monthly to make sure it is properly
infl ated and stored.
NOTE
The temporary spare tire condition
gradually deteriorates even if it has not
been used.
The temporary spare tire is easier to
handle because of its construction which
is lighter and smaller than a conventional
tire. This tire should be used only for an
emergency and only for a short distance.
Use the temporary spare tire only until the
conventional tire is repaired, which should
be as soon as possible.
Refer to Tires on page 9-9 .
CAUTION
Do not use your temporary spare tire
rim with a snow tire or a conventional
tire. Neither will properly t and could
damage both tire and rim.
The temporary spare tire has a tread life
of less than 5,000 km (3,000 miles). The
tread life may be shorter depending on
driving conditions.
The temporary spare tire is for limited
use, however, if the tread wear solidband indicator appears, replace the tire
with the same type of temporary spare
(page 6-35 ).
6–34
Mazda3_8CX9-EA-13F_Edition1.indb 34Mazda3_8CX9-EA-13F_Edition1.indb 34 2013/05/17 11:51:552013/05/17 11:51:55
Page 44

Maintenance and Care
Owner Maintenance
NOTE
Tires degrade over time, even when
they are not being used on the road. It
is recommended that tires generally be
replaced when they are 6 years or older.
Heat caused by hot climates or frequent
high loading conditions can accelerate
the aging process. You should replace the
spare tire when you replace the other road
tires due to the aging of the spare tire. The
period in which the tire was manufactured
(both week and year) is indicated by a
4-digit number.
Refer to Tire Labeling on page 8-21 .
Replacing a Wheel
WARNING
Always use wheels of the correct size on
your vehicle:
Using a wrong-sized wheel is
dangerous. Braking and handling
could be a ected, leading to loss of
control and an accident.
CAUTION
A wrong-sized wheel may adversely
a ect:
Tire t
Wheel and bearing life
Ground clearance
Snow-chain clearance
Speedometer calibration
Headlight aim
Bumper height
Tire Pressure Monitoring System
When replacing a wheel, make sure the
new one is the same as the original factory
wheel in diameter, rim width, and offset
(inset/outset).
Proper tire balancing provides the best
riding comfort and helps reduce tread
wear. Out-of-balance tires can cause
vibration and uneven wear, such as
cupping and fl at spots.
6–35
Mazda3_8CX9-EA-13F_Edition1.indb 35Mazda3_8CX9-EA-13F_Edition1.indb 35 2013/05/17 11:51:562013/05/17 11:51:56
Page 45

Maintenance and Care
Owner Maintenance
Light Bulbs
With Xenon Fusion Headlights
Side turn signal lights Side turn signal lights
Overhead lights (Front)/
Front map lights
Vanity mirror
lights
Front side-marker lights
Headlights (Low/High beam)
Fog lights
Daytime running lights/
Parking lights
Front turn signal lights
4-Door 5-Door
Overhead light (Rear)
Trunk light
With Halogen Headlights
Overhead lights (Front)/
Front map lights
Vanity mirror
lights
Front side-marker lights
Headlights (Low beam)
Fog lights
Headlights (High beam)/
Daytime running lights
Front turn signal lights
Overhead light (Rear)
Luggage
Brake lights (LED type)
Brake lights/Taillights/Rear
side-marker lights (Bulb type)
Taillights/Rear side-marker
lights (LED type)
Rear turn signal lights
Taillights (Trunk lid side)
Reverse lights
High-mount brake light
License plate lights
compartment light
Brake lights (LED type)
Brake lights/Taillights/Rear
side-marker lights (Bulb type)
Taillights/Rear side-marker
lights (LED type)
Rear turn signal lights
Taillights (Trunk lid side)
Reverse lights
High-mount brake light
License plate lights
Some models.
6–36
Mazda3_8CX9-EA-13F_Edition1.indb 36Mazda3_8CX9-EA-13F_Edition1.indb 36 2013/05/17 11:51:562013/05/17 11:51:56
Page 46

Maintenance and Care
Owner Maintenance
WARNING
Do not replace the xenon fusion bulbs
yourself:
Replacing the xenon fusion bulbs
yourself is dangerous. Because the
xenon fusion bulbs require high
voltage, you could receive an electric
shock if the bulbs are handled
incorrectly. Consult an Authorized
Mazda Dealer when the replacement is
necessary.
Never touch the glass portion of a
halogen bulb with your bare hands
and always wear eye protection when
handling or working around the bulbs:
When a halogen bulb breaks, it is
dangerous. These bulbs contain
pressurized gas. If one is broken, it will
explode and serious injuries could be
caused by the ying glass.
If the glass portion is touched with
bare hands, body oil could cause the
bulb to overheat and explode when lit.
Always keep halogen bulbs out of the
reach of children:
Playing with a halogen bulb is
dangerous. Serious injuries could be
caused by dropping a halogen bulb or
breaking it some other way.
NOTE
•
To replace the bulb, contact an
Authorized Mazda Dealer.
•
If the halogen bulb is accidentally
touched, it should be cleaned with
rubbing alcohol before being used.
•
Use the protective cover and carton for
the replacement bulb to dispose of the
old bulb promptly and out of the reach
of children.
Replacing Exterior Light Bulbs
Headlights (With xenon fusion
headlights)
Low/High beam bulbs
You cannot replace the low/high beam
bulbs by yourself. The bulbs must be
replaced at an Authorized Mazda Dealer.
Headlights (With halogen headlights)
Low-beam bulbs, High-beam bulbs/
Daytime running lights
1. If you are changing the right bulb, start
the engine, turn the steering wheel all
the way to the left, and turn off engine.
If you are changing the left bulb, turn
the steering wheel to the right, and turn
off engine.
2. Make sure the headlight switch is off.
3. Pull the center of each plastic retainer
and remove the retainers.
Removal
Installation
6–37
Mazda3_8CX9-EA-13F_Edition1.indb 37Mazda3_8CX9-EA-13F_Edition1.indb 37 2013/05/17 11:51:582013/05/17 11:51:58
Page 47

Maintenance and Care
Owner Maintenance
4. Turn the screw counterclockwise and
remove it, and then partially peel back
the mudguard.
5. Disconnect the connector from the unit
by pressing the tab on the connector
with your fi nger and pulling the
connector downward.
Low-beam bulbs
High-beam bulbs/Daytime running
lights
6. Turn the socket and bulb assembly
to remove it. Carefully remove the
bulb from its socket in the refl ector by
gently pulling it straight backward out
of the socket.
Low-beam bulbs
6–38
Mazda3_8CX9-EA-13F_Edition1.indb 38Mazda3_8CX9-EA-13F_Edition1.indb 38 2013/05/17 11:51:582013/05/17 11:51:58
Page 48

Maintenance and Care
Owner Maintenance
High-beam bulbs/Daytime running
lights
7. Install the new bulb in the reverse order
of the removal procedure.
Daytime running lights/Parking lights
(With xenon fusion headlights)
Due to the complexity and diffi culty of
the procedure, the LED bulbs must be
replaced by an Authorized Mazda Dealer.
NOTE
LED bulb replacement is not possible
because it is built into the unit. Replace
the unit.
Front turn signal lights, Parking lights/
Front side-marker lights (With halogen
headlights), Front side-marker lights
(With xenon fusion headlights)
1. If you are changing the right bulb, start
the engine, turn the steering wheel all
the way to the left, and turn off engine.
If you are changing the left bulb, turn
the steering wheel to the right, and turn
off engine.
2. Make sure the headlight switch is off.
3. Pull the center of each plastic retainer
and remove the retainers.
Removal
Installation
4. Turn the screw counterclockwise and
remove it, and then partially peel back
the mudguard.
5. Turn the socket and bulb assembly
counterclockwise and remove it.
6–39
Mazda3_8CX9-EA-13F_Edition1.indb 39Mazda3_8CX9-EA-13F_Edition1.indb 39 2013/05/17 11:51:592013/05/17 11:51:59
Page 49

Maintenance and Care
Owner Maintenance
6. Disconnect the bulb from the socket.
Front turn signal lights
Parking lights/Front side-marker
lights (With halogen headlights), Front
side-marker lights (With xenon fusion
headlights)
3. Pull the center of each plastic retainer
and remove the retainers.
Removal
Installation
4. Turn the screw counterclockwise and
remove it, and then partially peel back
the mudguard.
7. Install the new bulb in the reverse order
of the removal procedure.
Fog lights *
1. If you are changing the right bulb, start
the engine, turn the steering wheel all
the way to the left, and turn off engine.
If you are changing the left bulb, turn
the steering wheel to the right, and turn
off engine.
2. Make sure the fog light switch is off.
*
6–40
Mazda3_8CX9-EA-13F_Edition1.indb 40Mazda3_8CX9-EA-13F_Edition1.indb 40 2013/05/17 11:51:592013/05/17 11:51:59
Some models.
Page 50

Maintenance and Care
Owner Maintenance
5. Disconnect the connector from the unit
by pressing the tab on the connector
with your fi nger and pulling the
connector downward.
6. Turn the socket and bulb assembly
to remove it. Carefully remove the
bulb from its socket in the refl ector by
gently pulling it straight backward out
of the socket.
Side turn signal lights * , Brake lights
(LED type), Taillights/Rear side-marker
lights (LED type), Taillights (Trunk lid
side/Liftgate side), High-mount brake
light
Due to the complexity and diffi culty of
the procedure, the LED bulbs must be
replaced by an Authorized Mazda Dealer.
NOTE
LED bulb replacement is not possible
because it is built into the unit. Replace
the unit.
Rear turn signal lights, Brake lights/
Taillights/Rear side-marker lights (Bulb
type)
4–Door
1. Make sure the ignition is switched off,
and the headlight switch is off.
2. Pull the center of each plastic retainer
and remove the retainers.
3. Remove trunk end trim.
Removal
Installation
7. Install the new bulb in the reverse order
of the removal procedure.
4. Pull the center of each plastic retainer
and remove the retainers.
*
Some models.
Mazda3_8CX9-EA-13F_Edition1.indb 41Mazda3_8CX9-EA-13F_Edition1.indb 41 2013/05/17 11:52:002013/05/17 11:52:00
6–41
Page 51

Maintenance and Care
Owner Maintenance
5. Peel back the trunk side trim.
Removal
Installation
6. Turn the socket and bulb assembly
counterclockwise and remove it.
7. Disconnect the bulb from the socket.
Rear turn signal lights
Brake lights/Taillights/Rear side-
marker lights (Bulb type)
8. Install the new bulb in the reverse order
of the removal procedure.
5–Door
(Left side)
1. Make sure the ignition is switched off,
and the headlight switch is off.
2. Remove the cover.
3. Turn the socket and bulb assembly
counterclockwise and remove it.
6–42
Mazda3_8CX9-EA-13F_Edition1.indb 42Mazda3_8CX9-EA-13F_Edition1.indb 42 2013/05/17 11:52:002013/05/17 11:52:00
Page 52

Maintenance and Care
Owner Maintenance
4. Disconnect the bulb from the socket.
Rear turn signal lights
Brake lights/Taillights/Rear side-
marker lights (Bulb type)
(Right side)
1. Make sure the ignition is switched off,
and the headlight switch is off.
2. Turn the knob and remove the cover.
3. Turn the wing bolt and jack screw
counterclockwise.
5. Install the new bulb in the reverse order
of the removal procedure.
6–43
Mazda3_8CX9-EA-13F_Edition1.indb 43Mazda3_8CX9-EA-13F_Edition1.indb 43 2013/05/17 11:52:012013/05/17 11:52:01
Page 53

Maintenance and Care
Owner Maintenance
4. Remove the jack
5. Turn the socket and bulb assembly
counterclockwise and remove it.
6. Disconnect the bulb from the socket.
Rear turn signal lights
Brake lights/Taillights/Rear side-
marker lights (Bulb type)
7. Install the new bulb.
8. Insert the wing bolt into the jack with
the jack screw pointing to the down
and turn the wing bolt clockwise to
temporarily tighten it.
9. Turn the jack screw in the direction
shown in the fi gure.
10. Turn the wing bolt completely to secure
the jack.
NOTE
If the jack is not completely secured, it
could rattle while driving. Make sure the
jack screw is suffi ciently tightened.
11. Install the cover in the reverse order of
the removal procedure.
6–44
Mazda3_8CX9-EA-13F_Edition1.indb 44Mazda3_8CX9-EA-13F_Edition1.indb 44 2013/05/17 11:52:022013/05/17 11:52:02
Page 54

Maintenance and Care
Owner Maintenance
Reverse lights
4–Door
1. Make sure the ignition is switched off,
and the headlight switch is off.
2. Pull the center of each plastic retainer
and remove the retainers.
3. Peel back the trunk lid trim.
Removal
Installation
4. Disconnect the electrical connector
from the bulb by pressing the tab on the
connector with your fi nger and pulling
the connector.
6. Disconnect the bulb from the socket.
7. Install the new bulb in the reverse order
of the removal procedure.
5–Door
1. Make sure the ignition is switched off,
and the headlight switch is off.
2. Remove the cover.
5. Turn the socket and bulb assembly
counterclockwise and remove it.
6–45
Mazda3_8CX9-EA-13F_Edition1.indb 45Mazda3_8CX9-EA-13F_Edition1.indb 45 2013/05/17 11:52:022013/05/17 11:52:02
Page 55

Maintenance and Care
Owner Maintenance
3. Disconnect the electrical connector
from the bulb by pressing the tab on the
connector with your fi nger and pulling
the connector.
4. Turn the socket and bulb assembly
counterclockwise and remove it.
5. Disconnect the bulb from the socket.
3. Peel back the trunk lid trim.
4. Turn the socket and bulb assembly
counterclockwise and remove it.
5. Disconnect the bulb from the socket.
Removal
Installation
6. Install the new bulb in the reverse order
of the removal procedure.
6. Install the new bulb in the reverse order
of the removal procedure.
License plate lights
5–Door
1. Make sure the ignition is switched off,
and the headlight switch is off.
2. Wrap a fl athead screwdriver with a soft
cloth to prevent damage to the lens,
4–Door
1. Make sure the ignition is switched off,
and the headlight switch is off.
and then remove the lens by carefully
prying on the edge of the lens with a
fl athead screwdriver.
2. Pull the center of each plastic retainer
and remove the retainers.
6–46
Mazda3_8CX9-EA-13F_Edition1.indb 46Mazda3_8CX9-EA-13F_Edition1.indb 46 2013/05/17 11:52:032013/05/17 11:52:03
Page 56

Maintenance and Care
Owner Maintenance
3. Disconnect the bulb by pulling it out.
4. Install the new bulb in the reverse order
of the removal procedure.
Replacing Interior Light Bulbs
Overhead lights (Front)/Map lights * ,
Overhead lights (Front)
lights (Rear)
*
, Vanity mirror lights *
1. Wrap a small fl athead screwdriver
with a soft cloth to prevent damage to
the lens, and then remove the lens by
carefully prying on the edge of the lens
with the fl athead screwdriver.
*
, Overhead
2. Disconnect the bulb by pulling it out.
Overhead lights (Front)/Map lights
Overhead lights (Front)
*
*
Edge
*
Some models.
Mazda3_8CX9-EA-13F_Edition1.indb 47Mazda3_8CX9-EA-13F_Edition1.indb 47 2013/05/17 11:52:042013/05/17 11:52:04
6–47
Page 57

Maintenance and Care
Owner Maintenance
Overhead lights (Rear) *
Edge
Vanity mirror lights
*
3. Install the new bulb in the reverse order
of the removal procedure.
Trunk light (4–Door)
1. Press both sides of the lens cap to
remove it.
2. Disconnect the bulb by pulling it out.
3. Install the new bulb in the reverse order
of the removal procedure.
Luggage compartment light (5–Door)
1. Wrap a small fl athead screwdriver with
a soft cloth to prevent damage to the
lens and remove the lens by carefully
prying on the edge of the lens with the
fl athead screwdriver.
2. Disconnect the bulb by pulling it out.
3. Install the new bulb in the reverse order
of the removal procedure.
*
6–48
Mazda3_8CX9-EA-13F_Edition1.indb 48Mazda3_8CX9-EA-13F_Edition1.indb 48 2013/05/17 11:52:052013/05/17 11:52:05
Some models.
Page 58

Maintenance and Care
Owner Maintenance
Fuses
Your vehicle's electrical system is
protected by fuses.
If any lights, accessories, or controls do
not work, inspect the appropriate circuit
protector. If a fuse has blown, the inside
element will be melted.
If the same fuse blows again, avoid using
that system and consult an Authorized
Mazda Dealer as soon as possible.
Fuse Replacement
Replacing the fuses on the vehicle's left
side
If the electrical system does not work, fi rst
inspect the fuses on the vehicle's left side.
1. Make sure the ignition is switched off,
and other switches are off.
2. Open the fuse panel cover.
3. Pull the fuse straight out with the
fuse puller provided on the fuse block
located in the engine compartment.
4. Inspect the fuse and replace it if it is
blown.
Normal
Blown
5. Insert a new fuse of the same amperage
rating, and make sure it fi ts tightly. If
it does not fi t tightly, have an expert
install it. We recommend an Authorized
Mazda Dealer.
If you have no spare fuses, borrow one
of the same rating from a circuit not
essential to vehicle operation, such as
the AUDIO or OUTLET circuit.
CAUTION
Always replace a fuse with a genuine
Mazda fuse or equivalent of the same
rating. Otherwise you may damage
the electric system.
6–49
Mazda3_8CX9-EA-13F_Edition1.indb 49Mazda3_8CX9-EA-13F_Edition1.indb 49 2013/05/17 11:52:052013/05/17 11:52:05
Page 59

Maintenance and Care
Owner Maintenance
6. Reinstall the cover and make sure that
it is securely installed.
Replacing the fuses under the hood
If the headlights or other electrical
components do not work and the fuses
in the cabin are normal, inspect the fuse
block under the hood. If a fuse is blown, it
must be replaced. Follow these steps:
1. Make sure the ignition is switched off,
and other switches are off.
2. Remove the fuse block cover.
3. If any fuse but the MAIN fuse is
blown, replace it with a new one of the
same amperage rating .
WARNING
Do not replace the main fuse by
yourself. Have an Authorized Mazda
Dealer perform the replacement:
Replacing the fuse by yourself is
dangerous because the MAIN fuse
is a high current fuse. Incorrect
replacement could cause an electrical
shock or a short circuit resulting in a
r e .
4. Reinstall the cover and make sure that
it is securely installed.
Normal
Blown
6–50
Mazda3_8CX9-EA-13F_Edition1.indb 50Mazda3_8CX9-EA-13F_Edition1.indb 50 2013/05/17 11:52:062013/05/17 11:52:06
Page 60

Fuse Panel Description
Fuse block (Engine compartment)
Maintenance and Care
Owner Maintenance
DESCRIPTION
1 FOG 15 A
2 H/L HI 20 A
3 H/CLEAN 20 A —
4 STOP 10 A Brake lights
5 ROOM 15 A Overhead light
6
7 FUEL WARM — —
8 HAZARD 25 A Hazard warning fl ashers, Turn signal lights
9 ABS/DSCS 30 A ABS, Dynamic stability control system
10 METER2 — —
11 AUDIO2 7.5 A Audio system
12 BOSE 25 A Bose
13 AUDIO1 15 A Audio system
14 FUEL PUMP 15 A Fuel system
15 HID R DRL 15 A Headlight (RH)
16 AT PUMP — —
17 HORN 15 A Horn
18 TAIL 15 A
19 — — —
20 AT 15 A Transaxle control system
21 R.WIPER 15 A Rear window wiper
22 A/C 7.5 A Air conditioner
23 ENGINE3 15 A Engine control system
FUSE
RATING
*
Fog lights
Headlight high beam
7.5 A Engine control system
®
Sound System-equipped model *
Taillights, License plate lights, Parking lights, Front side-marker
lights
PROTECTED COMPONENT
*
*1
, Daytime running lights *
*
*
Some models.
6–51
Mazda3_8CX9-EA-13F_Edition1.indb 51Mazda3_8CX9-EA-13F_Edition1.indb 51 2013/05/17 11:52:062013/05/17 11:52:06
Page 61

Maintenance and Care
Owner Maintenance
DESCRIPTION
FUSE
RATING
PROTECTED COMPONENT
24 ENGINE2 15 A Engine control system
25 ENGINE1 15 A Engine control system
26 GLOW SIG — —
27 EVVT 20 A Engine control system
28 WIPER 20 A Front window wiper and washer
29 DCDC REG — —
30 — — —
31 ADD FAN DE — —
32 P.WINDOW1 30 A Power windows
33 H/L LOW R 15 A Headlight low beam (RH)
*1
34 H/L LOW L HID L 15 A Headlight (LH)
, Headlight low beam (LH) *2
35 METER1 10 A Instrument cluster
36 IG2 30 A For protection of various circuits
37 — — —
38 FAN DE — —
39 DCDC DE — —
40 SRS1 7.5 A Air bag
41 ENGINE. IG1 15 A Engine control system
42 C/U IG1 15 A For protection of various circuits
43 — — —
*1 With xenon fusion headlights
*2 With halogen headlights
*2
6–52
Mazda3_8CX9-EA-13F_Edition1.indb 52Mazda3_8CX9-EA-13F_Edition1.indb 52 2013/05/17 11:52:072013/05/17 11:52:07
Page 62

Fuse block (Left side)
Maintenance and Care
Owner Maintenance
DESCRIPTION
FUSE
RATING
1 P.SEAT D 30 A
Power seat
PROTECTED COMPONENT
*
2 D.LOCK 25 A Power door locks
3 P.WINDOW2 25 A Power windows
4 SEAT WARM 20 A
5 R.OUTLET3 15 A
6 SRS2/ESCL 15 A
7 SUNROOF 10 A
8 M.DEF 7.5 A
9 R.OUTLET1 15 A
Seat warmer
Accessory sockets
Seat weight sensor
Moonroof
Mirror defroster
Accessory sockets
*
*
*
*
*
*
10 MIRROR 7.5 A Power control mirror
11 F.OUTLET 15 A Accessory sockets
12 AT IND 7.5 A
AT shift indicator
*
13 — — —
14 — — —
15 — — —
*
Some models.
6–53
Mazda3_8CX9-EA-13F_Edition1.indb 53Mazda3_8CX9-EA-13F_Edition1.indb 53 2013/05/17 11:52:072013/05/17 11:52:07
Page 63

Maintenance and Care
Appearance Care
Exterior Care
The paintwork on your Mazda represents
the latest technical developments in
composition and methods of application.
Environmental hazards, however, can
harm the paint's protective properties, if
proper care is not taken.
Here are some examples of possible
damage, with tips on how to prevent them.
Etching Caused by Acid Rain or
Industrial Fallout
Occurrence
Industrial pollutants and vehicle emissions
drift into the air and mix with rain or dew
to form acids. These acids can settle on a
vehicle's fi nish. As the water evaporates,
the acid becomes concentrated and can
damage the fi nish.
And the longer the acid remains on the
surface, the greater the chance is for
damage.
Prevention
It is necessary to wash and wax your
vehicle to preserve its fi nish according to
the instructions in this section. These steps
should be taken immediately after you
suspect that acid rain has settled on your
vehicle's fi nish.
Damage Caused by Bird Dropping,
Insects, or Tree Sap
Occurrence
Bird droppings contain acids. If these
are not removed they can eat away the
clear and color base coat of the vehicle's
paintwork.
When insects stick to the paint surface and
decompose, corrosive compounds form.
These can erode the clear and color base
coat of the vehicle's paintwork if they are
not removed.
Tree sap will harden and adhere
permanently to the paint fi nish. If you
scratch the sap off while it is hard, some
vehicle paint could come off with it.
Prevention
It is necessary to have your Mazda washed
and waxed to preserve its fi nish according
to the instructions in this section. This
should be done as soon as possible.
Bird droppings can be removed with a soft
sponge and water. If you are traveling and
these are not available, a moistened tissue
may also take care of the problem. The
cleaned area should be waxed according to
the instructions in this section.
Insects and tree sap are best removed with
a soft sponge and water or a commercially
available chemical cleaner.
Another method is to cover the affected
area with dampened newspaper for one to
two hours. After removing the newspaper,
rinse off the loosened debris with water.
Water Marks
Occurrence
Rain, fog, dew, and even tap water can
contain harmful minerals such as salt and
lime. If moisture containing these minerals
settles on the vehicle and evaporates, the
minerals will concentrate and harden to
form white rings. The rings can damage
your vehicle's fi nish.
6–54
Mazda3_8CX9-EA-13F_Edition1.indb 54Mazda3_8CX9-EA-13F_Edition1.indb 54 2013/05/17 11:52:082013/05/17 11:52:08
Page 64

Maintenance and Care
Appearance Care
Prevention
It is necessary to wash and wax your
vehicle to preserve its fi nish according to
the instructions in this section. These steps
should be taken immediately after you fi nd
water marks on your vehicle's fi nish.
Paint Chipping
Occurrence
Paint chipping occurs when gravel thrown
in the air by another vehicle's tires hits
your vehicle.
How to avoid paint chipping
Keeping a safe distance between you and
the vehicle ahead reduces the chances
of having your paint chipped by fl ying
gravel.
NOTE
•
The paint chipping zone varies with
the speed of the vehicle. For example,
when traveling at 90 km/h (56 mph),
the paint chipping zone is 50 m (164
ft).
•
In low temperatures a vehicle's fi nish
hardens. This increases the chance of
paint chipping.
•
Chipped paint can lead to rust forming
on your Mazda. Before this happens,
repair the damage by using Mazda
touch-up paint according to the
instructions in this section. Failure to
repair the affected area could lead to
serious rusting and expensive repairs.
Follow all label and container directions
when using a chemical cleaner or polish.
Read all warnings and cautions.
Maintaining the Finish
Washing
CAUTION
When the wiper lever is in the
AUTO position and the ignition is
switched ON, the wipers may move
automatically in the following cases:
If the windshield above the rain
sensor is touched or wiped with a
cloth.
If the windshield is struck with a hand
or other object from either outside or
inside the vehicle.
Keep hands and scrapers clear of the
windshield when the wiper lever is in
the AUTO position and the ignition
is switched ON as ngers could be
pinched or the wipers and wiper
blades damaged when the wipers
activate automatically.
If you are going to clean the
windshield, be sure the wipers
are turned o completely—this is
particularly important when clearing
ice and snow—when it is most likely
that the engine is left running.
Do not spray water in the engine
compartment. Otherwise, it could result
in engine-starting problems or damage
to electrical parts.
6–55
Mazda3_8CX9-EA-13F_Edition1.indb 55Mazda3_8CX9-EA-13F_Edition1.indb 55 2013/05/17 11:52:082013/05/17 11:52:08
Page 65

Maintenance and Care
Appearance Care
To help protect the fi nish from rust
and deterioration, wash your Mazda
thoroughly and frequently, at least once a
month, with lukewarm or cold water.
If the vehicle is washed improperly, the
paint surface could be scratched. Here are
some examples of how scratching could
occur.
Scratches occur on the paint surface when:
The vehicle is washed without first
•
rinsing off dirt and other foreign matter.
• The vehicle is washed with a rough, dry,
or dirty cloth.
• The vehicle is washed at a car wash that
uses brushes that are dirty or too stiff.
• Cleansers or wax containing abrasives
are used.
NOTE
•
Mazda is not responsible for scratches
caused by automatic car washes or
improper washing.
•
Scratches are more noticeable on
vehicles with darker paint fi nishes.
To minimize scratches on the vehicle's
paint fi nish:
•
Rinse off any dirt or other foreign matter
using lukewarm or cold water before
washing.
• Use plenty of lukewarm or cold water
and a soft cloth when washing the
vehicle. Do not use a nylon cloth.
• Rub gently when washing or drying the
vehicle.
• Take your vehicle only to a car wash
that keeps its brushes well maintained.
• Do not use abrasive cleansers or wax
that contain abrasives.
CAUTION
Do not use steel wool, abrasive
cleaners, or strong detergents
containing highly alkaline or caustic
agents on chrome-plated or anodized
aluminum parts. This may damage the
protective coating; also, cleaners and
detergents may discolor or deteriorate
the paint.
Pay special attention to removing salt, dirt,
mud, and other foreign material from the
underside of the fenders, and make sure
the drain holes in the lower edges of the
doors and rocker panels are clean.
Insects, tar, tree sap, bird droppings,
industrial fallout, and similar deposits
can damage the fi nish if not removed
immediately. When prompt washing with
plain water is ineffective, use a mild soap
made for use on vehicles.
Thoroughly rinse off all soap with
lukewarm or cold water. Do not allow
soap to dry on the fi nish.
After washing the vehicle, dry it with a
clean chamois to prevent water spots from
forming.
6–56
Mazda3_8CX9-EA-13F_Edition1.indb 56Mazda3_8CX9-EA-13F_Edition1.indb 56 2013/05/17 11:52:082013/05/17 11:52:08
Page 66

Maintenance and Care
Appearance Care
WARNING
D r y o brakes that have become
wet by driving slowly, releasing the
accelerator pedal and lightly applying
the brakes several times until the brake
performance returns to normal:
Driving with wet brakes is dangerous.
Increased stopping distance or the
vehicle pulling to one side when
braking could result in a serious
accident. Light braking will indicate
whether the brakes have been a ected.
When using a high water pressure car
wash
High water temperature and high water
pressure car washers are available
depending on the type of car wash
machine. If the car washer nozzle is
put too close to the vehicle, the force of
the spray could damage or deform the
molding, affect the sealability of parts, and
allow water to penetrate the interior. Keep
a suffi cient space (30 cm or more) between
the nozzle and the vehicle. In addition,
do not spend too much time spraying
the same area of the vehicle, and be very
careful when spraying between gaps in
doors and around windows.
Waxing
Your vehicle needs to be waxed when
water no longer beads on the fi nish.
Always wash and dry the vehicle before
waxing it. In addition to the vehicle body,
wax the metal trim to maintain its luster.
1. Use wax which contains no abrasives.
Waxes containing abrasive will remove
paint and could damage bright metal
parts.
2. Use a good grade of natural wax for
metallic, mica, and solid colors.
3. When waxing, coat evenly with the
sponge supplied or a soft cloth.
4. Wipe off the wax with a soft cloth.
NOTE
A spot remover to remove oil, tar, and
similar materials will usually also take off
the wax. Rewax these areas even if the rest
of the vehicle does not need it.
Repairing Damage to the Finish
Deep scratches or chips on the fi nish
should be repaired promptly. Exposed
metal quickly rusts and can lead to major
repairs.
CAUTION
If your Mazda is damaged and needs
metal parts repaired or replaced,
make sure the body shop applies anticorrosion materials to all parts, both
repaired and new. This will prevent
them from rusting.
Bright-Metal Maintenance
• Use tar remover to remove road tar and
insects. Never do this with a knife or
similar tool.
• To prevent corrosion on brightmetal surfaces, apply wax or chrome
preservative and rub it to a high luster.
• During cold weather or in coastal areas,
cover bright-metal parts with a coating
of wax or preservative heavier than
usual. It would also help to coat them
with noncorrosive petroleum jelly or
some other protective compound.
6–57
Mazda3_8CX9-EA-13F_Edition1.indb 57Mazda3_8CX9-EA-13F_Edition1.indb 57 2013/05/17 11:52:082013/05/17 11:52:08
Page 67

Maintenance and Care
Appearance Care
CAUTION
Do not use steel wool, abrasive
cleaners, or strong detergents
containing highly alkaline or caustic
agents on chrome-plated or anodized
aluminum parts. This may result in
damage to the protective coating
and cause discoloration or paint
deterioration.
Underbody Maintenance
Road chemicals and salt used for ice and
snow removal and solvents used for dust
control may collect on the underbody. If
not removed, they will speed up rusting
and deterioration of such underbody parts
as fuel lines, frame, fl oor pan, and exhaust
system, even though these parts may be
coated with anti-corrosive material.
Thoroughly fl ush the underbody and wheel
housings with lukewarm or cold water at
the end of each winter. Try also to do this
every month.
Pay special attention to these areas
because they easily hide mud and dirt.
It will do more harm than good to wet
down the road grime without removing
it.
The lower edges of doors, rocker panels,
and frame members have drain holes that
should not be clogged. Water trapped there
will cause rusting.
WARNING
Dry o brakes that have become
wet by driving slowly, releasing the
accelerator pedal and lightly applying
the brakes several times until the brake
performance returns to normal:
Driving with wet brakes is dangerous.
Increased stopping distance or the
vehicle pulling to one side when
braking could result in a serious
accident. Light braking will indicate
whether the brakes have been a ected.
Aluminum Wheel Maintenance *
A protective coating is provided over the
aluminum wheels. Special care is needed
to protect this coating.
CAUTION
Do not use any detergent other than
mild detergent. Before using any
detergent, verify the ingredients.
Otherwise, the product could discolor
or stain the aluminum wheels.
*
6–58
Mazda3_8CX9-EA-13F_Edition1.indb 58Mazda3_8CX9-EA-13F_Edition1.indb 58 2013/05/17 11:52:092013/05/17 11:52:09
Some models.
Page 68

Maintenance and Care
Appearance Care
NOTE
•
Do not use a wire brush or any
abrasive cleaner, polishing compound,
or solvent on aluminum wheels. They
may damage the coating.
•
Always use a sponge or soft cloth to
clean the wheels.
Rinse the wheels thoroughly with
lukewarm or cold water. Also, be sure
to clean the wheels after driving on
dusty or salted roads to help prevent
corrosion.
•
Avoid washing your vehicle in an
automatic car wash that uses highspeed or hard brushes.
•
If your aluminum wheels lose luster,
wax the wheels.
Plastic Part Maintenance
•
When cleaning the plastic lenses of the
lights, do not use gasoline, kerosene,
rectified spirit, paint, thinner, highly
acidic detergents, or strongly alkaline
detergents. Otherwise, these chemical
agents can discolor or damage the
surfaces resulting in a significant loss
in functionality. If plastic parts become
inadvertently exposed to any of these
chemical agents, flush with water
immediately.
• If plastic parts such as the bumpers
become inadvertently exposed to
chemical agents or fluids such as
gasoline, oil, engine coolant, or battery
fluid, it could cause discoloration,
staining, or paint peeling. Wipe off any
such chemical agents or fluids using a
soft cloth immediately.
• High water temperature and high water
pressure car washers are available
depending on the type of high pressure
car washer device. If the car washer
nozzle is put too close to the vehicle or
aimed at one area for an extended period
of time, it could deform plastic parts or
damage the paint.
• Do not use wax containing compounds
(polish). Otherwise, it could result in
paint damage.
• In addition, do not use an electrical or
air tool to apply wax. Otherwise, the
frictional heat generated could result
in deformation of plastic parts or paint
damage.
6–59
Mazda3_8CX9-EA-13F_Edition1.indb 59Mazda3_8CX9-EA-13F_Edition1.indb 59 2013/05/17 11:52:092013/05/17 11:52:09
Page 69

Maintenance and Care
Appearance Care
Interior Care
WARNING
Do not spray water in the cabin:
Splashing water on electrical parts
such as the audio unit and switches
is dangerous as it could cause a
malfunction or a re.
Dashboard Precautions
Prevent caustic solutions such as perfume
and cosmetic oils from contacting the
dashboard. They will damage and discolor
the dashboard. If these solutions get on the
dashboard, wipe them off immediately.
CAUTION
Do not use glazing agents.
Glazing agents contain ingredients
which may cause discoloration,
wrinkling, cracks and peeling.
Instrument panel top (soft pad)
• Extremely soft material is used for the
soft pad surface. When cleaning, it is
recommended that you use a clean towel
dampened in a mild detergent to remove
soiling.
• If the soft pad surface is rubbed harshly,
it could result in the surface being
damaged leaving white scratch marks.
Leather *
Remove dust and sand fi rst using a
vacuum cleaner or other means, then wipe
dirt off using a soft cloth with a leather
cleaner or a soft cloth soaked in mild soap.
Wipe off the remaining cleaner or soap
using a cloth soaked in clean water and
wrung out well.
Remove moisture with a dry, soft cloth
and allow the leather to further dry in a
well-ventilated, shaded area. If the leather
gets wet such as from rain, also remove
moisture and dry it as soon as possible.
Cleaning the Upholstery and
Interior Trim
Vinyl
Remove dust and loose dirt from vinyl
with a whisk broom or vacuum cleaner.
Clean vinyl with a leather-and-vinyl
cleaner.
*
6–60
Mazda3_8CX9-EA-13F_Edition1.indb 60Mazda3_8CX9-EA-13F_Edition1.indb 60 2013/05/17 11:52:092013/05/17 11:52:09
Some models.
Page 70

Maintenance and Care
Appearance Care
NOTE
•
Because genuine leather is a natural
material, its surface is not uniform and
it may have natural scars, scratches,
and wrinkles.
•
To maintain the quality for as long
as possible, periodical maintenance,
about twice a year, is recommended.
•
Sand and dust on the seat surface may
damage the overcoat of the genuine
leather surfaces and accelerate wear.
•
Greasy soiling on genuine leather may
cause molding and stains.
•
Rubbing hard with a stiff brush or
cloth may cause damage.
•
Do not wipe the leather using alcohol,
chlorine bleach, or organic solvents
such as thinner, benzene, or gasoline.
Otherwise, it may cause discoloration
or stains.
•
If the seats get wet, promptly remove
moisture with a dry cloth. Remaining
moisture on the surface may cause
deterioration such as hardening and
shrinkage.
•
Exposure to direct sunlight for long
periods may cause deterioration and
shrinkage. When parking the car under
direct sunlight for long periods, shade
the interior using sunshades.
•
Do not leave vinyl products on the
seats for long periods as they may
affect the leather quality and coloring.
If the cabin temperature becomes hot,
the vinyl may deteriorate and adhere to
the genuine leather.
Fabric
Remove dust and loose dirt from fabric
with a whisk broom or vacuum cleaner.
Clean it with a mild soap solution good
for upholstery and carpets. Remove fresh
spots immediately with a fabric spot
cleaner.
To keep the fabric looking clean and fresh,
take care of it. Otherwise its color will be
affected, it can be stained easily, and its
fi re-resistance may be reduced.
CAUTION
Use only recommended cleaners
and procedures. Others may a ect
appearance and re-resistance.
Panel
When the panel needs to be cleaned, use a
soft cloth to wipe off dirt from the surface.
NOTE
Scratches or nicks on the panels resulting
from the use of a hard brush or cloth may
not be repairable.
Be particularly careful when cleaning the
following areas which are installed with
specially coated panels.
•
Piano black panel
•
Decoration panel
Maintenance of the Active Driving
Display (ADD)
The combiner and mirror surface have a
special coating. When cleaning, do not use
a hard or rough-surface cloth, or cleaning
detergent. Otherwise, the combiner and
mirror could be damaged and the surface
coating could be scratched. Use a fi ne,
soft cloth such as those used for cleaning
eyeglasses.
6–61
Mazda3_8CX9-EA-13F_Edition1.indb 61Mazda3_8CX9-EA-13F_Edition1.indb 61 2013/05/17 11:52:102013/05/17 11:52:10
Page 71

Maintenance and Care
Appearance Care
Cleaning the Lap/Shoulder Belt
Webbing
Clean the webbing with a mild soap
solution recommended for upholstery or
carpets. Follow instructions. Do not bleach
or dye the webbing; this may weaken it.
After cleaning the belts, thoroughly dry
the belt webbing and make sure there is no
remaining moisture before retracting them.
WARNING
Have an Authorized Mazda Dealer
replace damaged seat belts
immediately:
Using damaged seat belts is
dangerous. In a collision, damaged
belts cannot provide adequate
protection.
Cleaning the Window Interiors
If the windows become covered with an
oily, greasy, or waxy fi lm, clean them with
glass cleaner. Follow the directions on the
container.
Cleaning the Floor Mats
Rubber fl oor mats should be cleaned with
mild soap and water only.
WARNING
Do not use rubber cleaners, such as tire
cleaner or tire shine, when cleaning
rubber oor mats:
Cleaning the rubber oor mats with
rubber cleaning products makes the
oor mats slippery.
This may cause an accident when
depressing the accelerator, brake, or
clutch (Manual transaxle) pedal or
when getting in or out of the vehicle.
After removing the fl oor mats for cleaning,
always reinstall them securely.
Refer to Floor Mat on page 3-47 .
CAUTION
Do not scrape or scratch the inside of
the window glass. It could damage the
thermal laments and the antenna
lines.
When washing the inside of the window
glass, use a soft cloth dampened in
lukewarm water, gently wiping the
thermal laments and the antenna
lines.
Use of glass cleaning products could
damage the thermal laments and the
antenna lines.
6–62
Mazda3_8CX9-EA-13F_Edition1.indb 62Mazda3_8CX9-EA-13F_Edition1.indb 62 2013/05/17 11:52:102013/05/17 11:52:10
Page 72

7
If Trouble Arises
Helpful information on what to do if a problem arises with the vehicle.
Parking in an Emergency .................................................................. 7-2
Parking in an Emergency .............................................................. 7-2
Flat Tire............................................................................................... 7-3
Spare Tire and Tool Storage .......................................................... 7-3
Changing a Flat Tire ...................................................................... 7-6
Battery Runs Out ............................................................................. 7-15
Jump-Starting .............................................................................. 7-15
Emergency Starting ......................................................................... 7-18
Starting a Flooded Engine ........................................................... 7-18
Push-Starting ............................................................................... 7-18
Overheating ...................................................................................... 7-19
Overheating ................................................................................. 7-19
Emergency Towing ........................................................................... 7-21
Towing Description ..................................................................... 7-21
Tiedown Hooks ........................................................................... 7-22
Warning/Indicator Lights and Warning Sounds ........................... 7-24
If a Warning Light Turns On or Flashes...................................... 7-24
Warning Message Indicated on Display ...................................... 7-33
Warning Sound is Activated ........................................................ 7-35
When Liftgate/Trunk Lid Cannot be Opened ............................... 7-39
When Liftgate/Trunk Lid Cannot be Opened ............................. 7-39
Active Driving Display (ADD) Does Not Operate
If the Active Driving Display (ADD) Does Not Operate ........... 7-41
*
........................ 7-41
*
Some models.
7–1
Mazda3_8CX9-EA-13F_Edition1.indb 1Mazda3_8CX9-EA-13F_Edition1.indb 1 2013/05/17 11:52:112013/05/17 11:52:11
Page 73

If Trouble Arises
Parking in an Emergency
Parking in an Emergency
The hazard warning lights should always
be used when you stop on or near a
roadway in an emergency.
The hazard warning lights warn other
drivers that your vehicle is a traffi c hazard
and that they must take extreme caution
when near it.
Depress the hazard warning fl asher and
all the turn signals will fl ash. The hazard
warning indicator lights in the instrument
cluster fl ash simultaneously.
NOTE
•
The turn signals do not work when the
hazard warning lights are on.
•
Check local regulations about the use
of hazard warning lights while the
vehicle is being towed to verify that it
is not in violation of the law.
7–2
Mazda3_8CX9-EA-13F_Edition1.indb 2Mazda3_8CX9-EA-13F_Edition1.indb 2 2013/05/17 11:52:112013/05/17 11:52:11
Page 74

Spare Tire and Tool Storage
Spare tire and tools are stored in the locations illustrated in the diagram.
4-Door
Tiedown eyelet
Spare tire hold-down bolt
If Trouble Arises
Flat Tire
Jack lever
Lug wrench
5-Door
Tiedown eyelet
Lug wrench
Tool bag
Spare tire hold-down bolt
Jack
Flat tire belt
Spare tire
Flat tire belt
Jack
Jack lever
Spare tire
7–3
Mazda3_8CX9-EA-13F_Edition1.indb 3Mazda3_8CX9-EA-13F_Edition1.indb 3 2013/05/17 11:52:112013/05/17 11:52:11
Page 75

If Trouble Arises
Flat Tire
Jack
To remove the jack
1 . (4–Door)
Push the tabs and remove the cover.
(5–Door)
Turn the knob and remove the cover.
2. Turn the wing bolt and jack screw
counterclockwise.
To secure the jack
1. Insert the wing bolt into the jack with
the jack screw pointing to the down
and turn the wing bolt clockwise to
temporarily tighten it.
2. Turn the jack screw in the direction
shown in the fi gure.
3. Turn the wing bolt completely to secure
the jack.
NOTE
If the jack is not completely secured, it
could rattle while driving. Make sure the
jack screw is suffi ciently tightened.
7–4
Mazda3_8CX9-EA-13F_Edition1.indb 4Mazda3_8CX9-EA-13F_Edition1.indb 4 2013/05/17 11:52:122013/05/17 11:52:12
Page 76

If Trouble Arises
Flat Tire
Maintenance
•
Always keep the jack clean.
• Make sure the moving parts are kept
free from dirt or rust.
• Make sure the screw thread is
adequately lubricated.
Spare Tire
Your Mazda has a temporary spare tire.
The temporary spare tire is lighter and
smaller than a conventional tire, and is
designed only for emergency use and
should be used only for VERY short
periods. Temporary spare tires should
NEVER be used for long drives or
extended periods.
WARNING
Do not install the temporary spare tire
on the front wheels (driving wheels):
Driving with the temporary spare tire
on one of the front driving wheels is
dangerous. Handling will be a ected.
You could lose control of the vehicle,
especially on ice or snow bound roads,
and have an accident. Move a regular
tire to the front wheel and install the
temporary spare tire to the rear.
CAUTION
When using the temporary spare
tire, driving stability may decrease
compared to when using only the
conventional tire. Drive carefully.
To avoid damage to the temporary
spare tire or to the vehicle, observe the
following precautions:
Do not exceed 80 km/h (50 mph).
Avoid driving over obstacles. Also, do
not drive through an automatic car
wash. This tire's diameter is smaller
than a conventional tire, so the
ground clearance is reduced about 10
mm (0.4 in).
Do not use a tire chain on this tire
because it will not t properly.
Do not use your temporary spare
tire on any other vehicle, it has been
designed only for your Mazda.
Use only one temporary spare tire on
your vehicle at the same time.
To remove the spare tire
1. Lift the trunk mat.
Trunk mat
7–5
Mazda3_8CX9-EA-13F_Edition1.indb 5Mazda3_8CX9-EA-13F_Edition1.indb 5 2013/05/17 11:52:122013/05/17 11:52:12
Page 77

If Trouble Arises
Flat Tire
2. Turn the spare tire hold-down bolt
counterclockwise.
Spare tire hold-down bolt
To secure the spare tire
Store the spare tire in the reverse order
of removal. After storing, verify that the
spare tire is stored securely.
Changing a Flat Tire
NOTE
If the following occurs while driving, it
could indicate a fl at tire.
•
Steering becomes diffi cult.
•
The vehicle begins to vibrate
excessively.
•
The vehicle pulls in one direction.
If you have a fl at tire, drive slowly to a
level spot that is well off the road and out
of the way of traffi c to change the tire.
Stopping in traffi c or on the shoulder of a
busy road is dangerous.
WARNING
Be sure to follow the directions for
changing a tire:
Changing a tire is dangerous if not
done properly. The vehicle can slip o
the jack and seriously injure someone.
No person should place any portion
of their body under a vehicle that is
supported by a jack.
Never allow anyone inside a vehicle
supported by a jack:
Allowing someone to remain in
a vehicle supported by a jack is
dangerous. The occupant could cause
the vehicle to fall resulting in serious
injury.
7–6
Mazda3_8CX9-EA-13F_Edition1.indb 6Mazda3_8CX9-EA-13F_Edition1.indb 6 2013/05/17 11:52:132013/05/17 11:52:13
Page 78

If Trouble Arises
Flat Tire
NOTE
Make sure the jack is well lubricated
before using it.
1. Park on a level surface off the right-ofway and fi rmly set the parking brake.
2. Put a vehicle with an automatic
transaxle in Park (P), a manual
transaxle in Reverse (R) or 1, and turn
off the engine.
3. Turn on the hazard warning fl asher.
4. Have everyone get out of the vehicle
and away from the vehicle and traffi c.
5. Remove the jack, tool, and spare tire
(page 7-3 ).
6. Block the wheel diagonally opposite
the fl at tire. When blocking a wheel,
place a tire block both in front and
behind the tire.
Removing a Flat Tire
1. If your vehicle is equipped with a
wheel cover, pry off the wheel cover
with the beveled end of the jack lever.
NOTE
Force the end of the jack lever fi rmly
between wheel and cover, or removal will
be diffi cult.
2. Loosen the lug nuts by turning them
counterclockwise one turn each, but do
not remove any lug nuts until the tire
has been raised off the ground.
NOTE
When blocking a tire, use rocks or wood
blocks of suffi cient size if possible to hold
the tire in place.
3. Place the jack on the ground.
7–7
Mazda3_8CX9-EA-13F_Edition1.indb 7Mazda3_8CX9-EA-13F_Edition1.indb 7 2013/05/17 11:52:132013/05/17 11:52:13
Page 79

If Trouble Arises
Flat Tire
4. Turn the jack screw in the direction
shown in the fi gure and adjust the jack
head so that it is close to the jack-up
position.
Jack head
5. Place the jack under the jack-up
position closest to the tire being
changed with the jack head squarely
under the jack-up point.
6. Continue raising the jack head
gradually by rotating the screw with
your hand until the jack head is inserted
into the jack-up position.
Tire blocks
Jacking position
Jacking position
7–8
Mazda3_8CX9-EA-13F_Edition1.indb 8Mazda3_8CX9-EA-13F_Edition1.indb 8 2013/05/17 11:52:142013/05/17 11:52:14
Page 80

If Trouble Arises
Flat Tire
WARNING
Use only the front and rear jacking
positions recommended in this manual:
Attempting to jack the vehicle
in positions other than those
recommended in this manual is
dangerous. The vehicle could slip o
the jack and seriously injure or even kill
someone. Use only the front and rear
jacking positions recommended in this
manual.
Do not jack up the vehicle in a position
other than the designated jack-up
position or place any objects on or
under the jack:
Jacking up the vehicle in a position
other than the designated jack-up
position or placing objects on or
under the jack is dangerous as it could
deform the vehicle body or the vehicle
could fall o the jack resulting in an
accident.
Use only the jack provided with your :
Using a jack that is not designed for
your Mazda is dangerous. The vehicle
could slip o the jack and seriously
injure someone.
Never place objects under the jack:
Jacking the vehicle with an object
under the jack is dangerous. The jack
could slip and someone could be
seriously injured by the jack or the
falling vehicle.
7. Insert the jack lever and attach the lug
wrench to tire jack.
8. Turn the jack handle clockwise and
raise the vehicle high enough so that
the spare tire can be installed. Before
removing the lug nuts, make sure your
Mazda is fi rmly in position and that it
cannot slip or move.
7–9
Mazda3_8CX9-EA-13F_Edition1.indb 9Mazda3_8CX9-EA-13F_Edition1.indb 9 2013/05/17 11:52:142013/05/17 11:52:14
Page 81

If Trouble Arises
Flat Tire
WARNING
Do not jack up the vehicle higher than is
necessary:
Jacking up the vehicle higher than
is necessary is dangerous as it could
destabilize the vehicle resulting in an
accident.
Do not start the engine or shake the
vehicle while it is jacked up:
Starting the engine or shaking
the vehicle while it is jacked up is
dangerous as it could cause the vehicle
to fall o the jack resulting in an
accident.
Never go under the vehicle while it is
jacked up:
Going under the vehicle while it is
jacked up is dangerous as it could
result in death or serious injury if the
vehicle were to fall o the jack.
9. Remove the lug nuts by turning them
counterclockwise; then remove the
wheel and center cap.
Locking Lug Nuts
If your vehicle has Mazda optional
antitheft wheel lug nuts, one on each
wheel will lock the tires and you must use
a special key to unlock them. This key will
attach to the lug wrench and can be stored
with the spare tire. Register them with
the lock manufacturer by fi lling out the
card provided in the glove compartment
and mailing it in the accompanying
envelope. If you lose this key, consult an
Authorized Mazda Dealer or use the lock
manufacturer's order form, which is with
the registration card.
Special keyAntitheft lug nut
To remove an antitheft lug nut
1. Obtain the special key for the antitheft
lug nut.
2. Place the special key on top of the
antitheft lug nut, and be sure to hold
the key square to it. If you hold the key
at an angle, you may damage both key
and nut. Do not use a power impact
wrench.
3. Place the lug wrench on top of the key
and apply pressure. Turn the wrench
counterclockwise.
7–10
Mazda3_8CX9-EA-13F_Edition1.indb 10Mazda3_8CX9-EA-13F_Edition1.indb 10 2013/05/17 11:52:152013/05/17 11:52:15
Page 82

If Trouble Arises
Flat Tire
To install the antitheft lug nut
1. Place the special key on top of the nut,
and be sure to hold the key square to
it. If you hold the key at an angle, you
may damage both key and nut. Do not
use a power impact wrench.
2. Place the lug wrench on top of the
special key, apply pressure, and turn it
clockwise.
Nut tightening torque
N·m (kgf·m, ft·lbf)
108—147
(12—14, 80—108)
Mounting the Spare Tire
1. Remove dirt and grime from the
mounting surfaces of the wheel and
hub, including the hub bolts, with a
cloth.
WARNING
Make sure the mounting surfaces of
the wheel, hub and lug nuts are clean
before changing or replacing tires:
When changing or replacing a tire,
not removing dirt and grime from the
mounting surfaces of the wheel, hub
and hub bolts is dangerous. The lug
nuts could loosen while driving and
cause the tire to come o , resulting in
an accident.
2. Mount the spare tire.
3. Install the lug nuts with the beveled
edge inward; tighten them by hand.
WARNING
Do not apply oil or grease to lug nuts
and bolts and do not tighten the
lug nuts beyond the recommended
tightening torque:
Applying oil or grease to lug nuts and
bolts is dangerous. The lug nuts could
loosen while driving and cause the tire
to come o , resulting in an accident.
In addition, lug nuts and bolts could
be damaged if tightened more than
necessary.
7–11
Mazda3_8CX9-EA-13F_Edition1.indb 11Mazda3_8CX9-EA-13F_Edition1.indb 11 2013/05/17 11:52:152013/05/17 11:52:15
Page 83

If Trouble Arises
Flat Tire
4. Turn the lug wrench counterclockwise
and lower the vehicle. Use the lug
wrench to tighten the nuts in the order
shown.
If you are unsure of how tight the nuts
should be, have them inspected at an
Authorized Mazda Dealer.
Nut tightening torque
N·m (kgf·m, ft·lbf)
108—147
(12—14, 80—108)
WARNING
5. Open the trunk/luggage compartment
mat.
Trunk/Luggage compartment mat
6. Remove the belt for securing the fl at
tire.
7. Put the fl at tire into the trunk/luggage
compartment on the left and toward the
back.
Always securely and correctly tighten
the lug nuts:
Improperly or loosely tightened lug
nuts are dangerous. The wheel could
wobble or come o . This could result
in loss of vehicle control and cause a
serious accident.
Be sure to reinstall the same nuts you
removed or replace them with metric
nuts of the same con guration:
Because the wheel studs and lug nuts
on your Mazda have metric threads,
8. (Split-folding type seat)
Fold the rear seatback forward on the
right side of the rear seat.
9. (Split-folding type seat)
Unlock the rear seatback on the left
side and assure a clearance to pass the
belt.
(One-piece folding type seat)
Unlock the rear seatback and assure a
clearance to pass the belt.
using a non-metric nut is dangerous.
On a metric stud, it would not secure
the wheel and would damage the stud,
which could cause the wheel to slip o
and cause an accident.
7–12
Mazda3_8CX9-EA-13F_Edition1.indb 12Mazda3_8CX9-EA-13F_Edition1.indb 12 2013/05/17 11:52:162013/05/17 11:52:16
Page 84

If Trouble Arises
Flat Tire
10. Pass the belt through the rear seatback
as shown in the fi gure.
After passing the belt through, return
the rear seatback to the original
position.
(Split-folding type seat)
Belt
(One-piece folding type seat)
Belt
NOTE
Pass the belt underneath the seatbelts.
Seat belt
Belt
11. Pass the buckle through the wheel as
shown in the fi gure and secure it so that
the buckle does not contact the wheel.
(Aluminum wheel)
7–13
Mazda3_8CX9-EA-13F_Edition1.indb 13Mazda3_8CX9-EA-13F_Edition1.indb 13 2013/05/17 11:52:172013/05/17 11:52:17
Page 85

If Trouble Arises
Flat Tire
(Steel wheel)
12. Pass the belt through the buckle, then
pull the belt end to secure the fl at tire.
13. (Split-folding type seat)
Return the rear seatback on the right
side of the rear seatback to its original
position.
14. Remove the tire blocks and store the
tools and jack.
15. Check the infl ation pressure. Refer to
Tires on page 9-9 .
16. Have the fl at tire repaired or replaced
as soon as possible.
NOTE
Do not press the tire pressure monitoring
system set switch after installing the spare
tire. The switch is only to be pressed after
installing the repaired fl at tire or installing
a replacement tire (page 4-20 ).
WARNING
Do not drive with any tires that have
incorrect air pressure:
Driving on tires with incorrect air
pressure is dangerous. Tires with
incorrect pressure could a ect
handling and result in an accident.
When you check the regular tires' air
pressure, check the spare tire, too.
NOTE
To prevent the jack and tool from rattling,
store them properly.
7–14
Mazda3_8CX9-EA-13F_Edition1.indb 14Mazda3_8CX9-EA-13F_Edition1.indb 14 2013/05/17 11:52:182013/05/17 11:52:18
Page 86

If Trouble Arises
Battery Runs Out
Jump-Starting
Jump-starting is dangerous if done incorrectly. So follow the procedure carefully. If you
feel unsure about jump-starting, we strongly recommend that you have a competent service
technician do the work.
WARNING
Follow These Precautions Carefully:
To ensure safe and correct handling of the battery, read the following precautions
carefully before using the battery or inspecting it.
Do not allow the positive ( ) terminal to contact any other metal object that
could cause sparks:
Flames and sparks near open battery cells are dangerous. Hydrogen gas, produced
during normal battery operation, could ignite and cause the battery to explode. An
exploding battery can cause serious burns and injuries. When working near a battery, do
not allow metal tools to contact the positive (
Keep all ames, including cigarettes, and sparks away from open battery cells:
Flames and sparks near open battery cells are dangerous. Hydrogen gas, produced
during normal battery operation, could ignite and cause the battery to explode. An
exploding battery can cause serious burns and injuries.
Do not jump-start a frozen battery or one with a low uid level:
Jump-starting a frozen battery or one with a low uid level is dangerous. It may rupture
or explode, causing serious injury.
Connect the negative cable to a good ground point away from the battery:
Connecting the end of the second jumper cable to the negative (
discharged battery is dangerous.
A spark could cause the gas around the battery to explode and injure someone.
Route the jumper cables away from parts that will be moving:
Connecting a jumper cable near or to moving parts (cooling fans, belts) is dangerous. The
cable could get caught when the engine starts and cause serious injury.
) or negative ( ) terminal of the battery.
) terminal of the
7–15
Mazda3_8CX9-EA-13F_Edition1.indb 15Mazda3_8CX9-EA-13F_Edition1.indb 15 2013/05/17 11:52:182013/05/17 11:52:18
Page 87

If Trouble Arises
Battery Runs Out
CAUTION
Use only a 12 V booster system. You can damage a 12 V starter, ignition system, and other
electrical parts beyond repair with a 24 V power supply (two 12 V batteries in series or a
24 V motor generator set).
Connect cables in numerical order and disconnect in reverse order.
Jumper cables
Discharged battery
1. Remove the battery cover.
Booster battery
3. If the booster battery is in another
vehicle, do not allow both vehicles
to touch. Turn off the engine of the
vehicle with the booster battery and
all unnecessary electrical loads in both
vehicles.
2. Make sure the booster battery is 12
V and that its negative terminal is
grounded.
7–16
Mazda3_8CX9-EA-13F_Edition1.indb 16Mazda3_8CX9-EA-13F_Edition1.indb 16 2013/05/17 11:52:192013/05/17 11:52:19
Page 88

If Trouble Arises
Battery Runs Out
4. Connect the jumper cables in the exact
sequence as in the illustration.
• Connect one end of a cable to the
positive terminal on the discharged
battery (1).
• Attach the other end to the positive
terminal on the booster battery (2).
• Connect one end of the other cable to
the negative terminal of the booster
battery (3).
• Connect the other end to the ground
point indicated in the illustration away
from the discharged battery (4).
5. Start the engine of the booster vehicle
and run it a few minutes. Then start the
engine of the other vehicle.
6. The i-ELOOP indicator light may fl ash
after the engine is started. The indicator
light turns off when the engine is
running and the charging is completed.
Make sure the i-ELOOP indicator light
is turns off before driving.
NOTE
•
If the vehicle is driven with the
i-ELOOP indicator light fl ashing, a
beep sound is heard.
•
If the steering wheel is operated with
the i-ELOOP indicator light fl ashing, it
may feel heavier than normal, however,
this does not indicate a malfunction.
The steering operation will return to
normal when the i-ELOOP indicator
light turns off.
•
Do not remove the jumper cables
while the i-ELOOP indicator light is
fl ashing.
7. When fi nished, carefully disconnect the
cables in the reverse order described in
the illustration.
8. If the battery cover has been removed,
install it in the reverse order of
removal.
NOTE
Verify that the covers are securely
installed.
7–17
Mazda3_8CX9-EA-13F_Edition1.indb 17Mazda3_8CX9-EA-13F_Edition1.indb 17 2013/05/17 11:52:192013/05/17 11:52:19
Page 89

If Trouble Arises
Emergency Starting
Starting a Flooded Engine
If the engine fails to start, it may be
fl ooded (excessive fuel in the engine).
Follow this procedure:
1. If the engine does not start within
fi ve seconds on the fi rst try, wait ten
seconds and try again.
2. Make sure the parking brake is on.
3. Depress the accelerator all the way and
hold it there.
4. Depress the clutch pedal (Manual
transaxle) or the brake pedal
(Automatic transaxle), then press the
push button start. If the engine starts,
release the accelerator immediately
because the engine will suddenly rev
up.
5. If the engine fails to start, crank it
without depressing the accelerator.
If the engine still does not start using
the above procedure, have your vehicle
inspected by an Authorized Mazda Dealer.
Push-Starting
Do not push-start your Mazda.
WARNING
Never tow a vehicle to start it:
Towing a vehicle to start it is
dangerous. The vehicle being towed
could surge forward when its engine
starts, causing the two vehicles to
collide. The occupants could be injured.
CAUTION
Do not push-start a vehicle that has a
manual transaxle. It can damage the
emission control system.
NOTE
You cannot start a vehicle with an
automatic transaxle by pushing it.
7–18
Mazda3_8CX9-EA-13F_Edition1.indb 18Mazda3_8CX9-EA-13F_Edition1.indb 18 2013/05/17 11:52:202013/05/17 11:52:20
Page 90

If Trouble Arises
Overheating
Overheating
If the High engine coolant temperature
warning light illuminates, the vehicle loses
power, or you hear a loud knocking or
pinging noise, the engine is probably too
hot.
WARNING
Switch the ignition to o and make
sure the fan is not running before
attempting to work near the cooling
fan:
Working near the cooling fan when it
is running is dangerous. The fan could
continue running inde nitely even if
the engine has stopped and the engine
compartment temperature is high. You
could be hit by the fan and seriously
injured.
Do not remove either cooling
system cap when the engine and
radiator are hot:
When the engine and radiator are hot,
scalding coolant and steam may shoot
out under pressure and cause serious
injury.
Open the hood ONLY after steam is no
longer escaping from the engine:
Steam from an overheated engine is
dangerous. The escaping steam could
seriously burn you.
If the High engine coolant temperature
warning light illuminates:
1. Drive safely to the side of the road and
park off the right-of-way.
2. Put a vehicle with an automatic
transaxle in park (P), a manual
transaxle in neutral.
3. Apply the parking brake.
4. Turn off the air conditioner.
5. Check whether coolant or steam is
escaping from the engine compartment.
If steam is coming from the engine
compartment:
Do not go near the front of the vehicle.
Stop the engine.
Wait until the steam dissipates, then
open the hood and start the engine.
If neither coolant nor steam is
escaping:
Open the hood and idle the engine until
it cools.
CAUTION
If the cooling fan does not operate
while the engine is running, the engine
temperature will increase. Stop the
engine and call an Authorized Mazda
Dealer.
6. Make sure the cooling fan is operating,
then turn off the engine after the
temperature has decreased.
7. When cool, check the coolant level.
If it is low, look for coolant leaks from
the radiator and hoses.
7–19
Mazda3_8CX9-EA-13F_Edition1.indb 19Mazda3_8CX9-EA-13F_Edition1.indb 19 2013/05/17 11:52:202013/05/17 11:52:20
Page 91

If Trouble Arises
Overheating
If you fi nd a leak or other damage, or if
coolant is still leaking:
Stop the engine and call an Authorized
Mazda Dealer.
Cooling system cap
Coolant reservoir
Cooling fan
If you fi nd no problems, the engine is
cool, and no leaks are obvious:
Carefully add coolant as required
(page 6-21 ).
CAUTION
If the engine continues to overheat or
frequently overheats, have the cooling
system inspected. The engine could be
seriously damaged unless repairs are
made. Consult an Authorized Mazda
Dealer.
7–20
Mazda3_8CX9-EA-13F_Edition1.indb 20Mazda3_8CX9-EA-13F_Edition1.indb 20 2013/05/17 11:52:212013/05/17 11:52:21
Page 92

If Trouble Arises
Emergency Towing
Towing Description
We recommend that towing be done only
by an Authorized Mazda Dealer or a
commercial tow-truck service.
Proper lifting and towing are necessary
to prevent damage to the vehicle.
Government and local laws must be
followed.
A towed vehicle usually should have its
drive wheels (front wheels) off the ground.
If excessive damage or other conditions
prevent this, use wheel dollies.
Wheel dollies
When towing with the rear wheels on the
ground, release the parking brake.
CAUTION
Do not tow the vehicle pointed
backward with driving wheels on
the ground. This may cause internal
damage to the transaxle.
Do not tow with sling-type equipment.
This could damage your vehicle. Use
wheel-lift or atbed equipment.
7–21
Mazda3_8CX9-EA-13F_Edition1.indb 21Mazda3_8CX9-EA-13F_Edition1.indb 21 2013/05/17 11:52:212013/05/17 11:52:21
Page 93

If Trouble Arises
Emergency Towing
Tiedown Hooks
CAUTION
Do not use the front and rear tiedown
eyelets for towing the vehicle.
They have been designed only for
securing the vehicle to a transport
vessel during shipping.
Using the eyelets for any other purpose
could result in the vehicle being
damaged.
Tiedown Hooks
1. Remove the tiedown eyelet and the lug
wrench from the luggage compartment
(page 7-3 ).
2. Wrap a fl athead screwdriver or similar
tool with a soft cloth to prevent damage
to a painted bumper, and open the cap
located on the front or rear bumper.
Front
Rear
CAUTION
Do not use excessive force as it may
damage the cap or scratch the painted
bumper surface.
NOTE
Remove the cap completely and store it so
as not to lose it.
3. Securely install the tiedown eyelet
using the lug wrench.
Front
Lug wrench
Tiedown eyelet
7–22
Mazda3_8CX9-EA-13F_Edition1.indb 22Mazda3_8CX9-EA-13F_Edition1.indb 22 2013/05/17 11:52:222013/05/17 11:52:22
Page 94

Rear
If Trouble Arises
Emergency Towing
Lug wrench
Tiedown eyelet
4. Hook the tying rope to the tiedown
eyelet.
CAUTION
If the tiedown eyelet is not securely
tightened, it may loosen or disengage
from the bumper when tying the
vehicle. Make sure that the tiedown
eyelet is securely tightened to the
bumper.
7–23
Mazda3_8CX9-EA-13F_Edition1.indb 23Mazda3_8CX9-EA-13F_Edition1.indb 23 2013/05/17 11:52:222013/05/17 11:52:22
Page 95

If Trouble Arises
Warning/Indicator Lights and Warning Sounds
If a Warning Light Turns On or Flashes
If any warning light turns on/fl ashes, take appropriate action for each light. There is no
problem if the light turns off, however if the light does not turn off or turns on/fl ashes again,
consult an Authorized Mazda Dealer.
(Vehicles with type B Audio)
The warning contents can be verifi ed on the audio.
1. Select the (
2. Select the Warning Guidance.
Stop Vehicle in Safe Place Immediately
If any of the following warning lights turns on, the system may have a malfunction. Stop the
vehicle in a safe place immediately and contact an Authorized Mazda Dealer.
Signal Warning
Brake System Warning
Light
) icon on the home screen to display the Applications screen.
This warning has the following functions:
Parking brake warning/Warning light inspection
The light illuminates when the parking brake is applied with the ignition switched to
START or ON. It turns off when the parking brake is fully released.
Low brake fl uid level warning
If the brake warning light remains illuminated even though the parking brake is
released, the brake fl uid may be low or there could be a problem with the brake system.
Park the vehicle in a safe place immediately and contact an Authorized Mazda Dealer.
WARNING
Do not drive with the brake system warning light illuminated. Contact an
Authorized Mazda Dealer to have the brakes inspected as soon as possible:
Driving with the brake system warning light illuminated is dangerous. It indicates
that your brakes may not work at all or that they could completely fail at any
time. If this light remains illuminated, after checking that the parking brake is fully
released, have the brakes inspected immediately.
Electronic Brake Force
Distribution System
Warning
CAUTION
In addition, the e ectiveness of the braking may diminish so you may need to
depress the brake pedal more strongly than normal to stop the vehicle.
If the electronic brake force distribution control unit determines that some components
are operating incorrectly, the control unit may illuminate the brake system warning
light and the ABS warning light simultaneously. The problem is likely to be the
electronic brake force distribution system.
WARNING
Do not drive with both the ABS warning light and brake warning light illuminated.
Have the vehicle towed to an Authorized Mazda Dealer to have the brakes
inspected as soon as possible:
Driving when the brake system warning light and ABS warning light are
illuminated simultaneously is dangerous.
When both lights are illuminated, the rear wheels could lock more quickly in an
emergency stop than under normal circumstances.
7–24
Mazda3_8CX9-EA-13F_Edition1.indb 24Mazda3_8CX9-EA-13F_Edition1.indb 24 2013/05/17 11:52:232013/05/17 11:52:23
Page 96

Warning/Indicator Lights and Warning Sounds
Signal Warning
If the warning light illuminates while driving, it indicates a malfunction of the
alternator or of the charging system. Drive to the side of the road and park off the rightof-way. Consult an Authorized Mazda Dealer.
Charging System
Warning Light
Engine Oil Warning
Light
(Red)
High Engine Coolant
Temperature Warning
Light
CAUTION
Do not continue driving when the charging system warning light is illuminated
because the engine could stop unexpectedly.
This warning light indicates low engine oil pressure.
CAUTION
Do not run the engine if the oil pressure is low. Otherwise, it could result in extensive
engine damage.
If the light illuminates or the warning indication is displayed while driving:
1. Drive to the side of the road and park off the right-of-way on level ground.
2. Turn off the engine and wait 5 minutes for the oil to drain back into the oil pan.
3. Inspect the engine oil level (page 6-20 ). If it's low, add the appropriate amount of
engine oil while being careful not to overfi ll.
CAUTION
Do not run the engine if the oil level is low. Otherwise, it could result in extensive
engine damage.
4. Start the engine and check the warning light.
If the light remains illuminated even though the oil level is normal or after adding oil,
stop the engine immediately and have your vehicle towed to an Authorized Mazda
Dealer.
The light fl ashes when the engine coolant temperature is extremely high, and
illuminates when the engine coolant temperature increases further.
Handling Procedure
Flashing light
Drive slowly to reduce engine load until you can fi nd a safe place to stop the vehicle
and wait for the engine to cool down.
Illuminated light
This indicates the possibility of overheating. Park the vehicle in a safe place
immediately and stop the engine.
Refer to Overheating on page 7-19 .
CAUTION
Do not drive the vehicle with the high engine coolant temperature warning light
illuminated. Otherwise, it could result in damage to the engine.
If Trouble Arises
7–25
Mazda3_8CX9-EA-13F_Edition1.indb 25Mazda3_8CX9-EA-13F_Edition1.indb 25 2013/05/17 11:52:232013/05/17 11:52:23
Page 97

If Trouble Arises
Warning/Indicator Lights and Warning Sounds
Signal Warning
The light illuminates/fl ashes if the electric power steering has a malfunction.
If the light illuminates/fl ashes, stop the vehicle in a safe place and do not operate the
steering wheel. There is no problem if the light turns off after a while. Contact an
Authorized Mazda Dealer if the light illuminates/fl ashes continuously.
NOTE
Power Steering
Malfunction Indicator
Light
• If the indicator light illuminates, the power steering will not operate normally. If this
happens, the steering wheel can still be operated, however, the operation may feel
heavy compared to normal, or the steering wheel could vibrate when turning.
• Repeatedly jerking the steering wheel left and right while the vehicle is stopped or
moving extremely slowly will cause the power steering system to go into protective
mode which will make the steering feel heavy, but this does not indicate a problem. If
this occurs, park the vehicle safely and wait several minutes for the system to return
to normal.
7–26
Mazda3_8CX9-EA-13F_Edition1.indb 26Mazda3_8CX9-EA-13F_Edition1.indb 26 2013/05/17 11:52:242013/05/17 11:52:24
Page 98

If Trouble Arises
Warning/Indicator Lights and Warning Sounds
Contact Authorized Mazda Dealer and Have Vehicle Inspected
If any of the following warning lights turns on/fl ashes, the system may have a malfunction.
Contact an Authorized Mazda Dealer to have your vehicle inspected.
Signal Warning
• (Vehicles with type B Audio)
The light turns on when the system has a malfunction.
Operate the audio display and verify the content.
Refer to If a Warning Light Turns On or Flashes on page 7-24 .
Master Warning
Light
ABS Warning Light
Check Engine Light
• (Vehicles without type B Audio)
The light illuminates continuously if any one of the following occurs. Consult an
Authorized Mazda Dealer.
• There is a malfunction in the battery management system.
• There is a malfunction in the brake switch.
If the ABS warning light stays on while you're driving, the ABS control unit has detected a
system malfunction. If this occurs, your brakes will function normally as if the vehicle had
no ABS.
Should this happen, consult an Authorized Mazda Dealer as soon as possible.
NOTE
• When the engine is jump-started to charge the battery, uneven rpm occurs and the ABS
warning light may illuminate. If this occurs, it is the result of the weak battery and does
not indicate an ABS malfunction.
Recharge the battery.
• The brake assist system does not operate while the ABS warning light is illuminated.
If this light illuminates while driving, the vehicle may have a problem. It is important to
note the driving conditions when the light illuminated and consult an Authorized Mazda
Dealer.
The check engine light may illuminate in the following cases:
• The fuel tank level being very low or approaching empty.
• The engine's electrical system has a problem.
• The emission control system has a problem.
• The fuel-fi ller cap is missing or not tightened securely.
If the check engine light remains on, or it fl ashes continuously , do not drive at high speeds
and consult an Authorized Mazda Dealer as soon as possible.
The light/indication illuminates when the transaxle has a problem.
Automatic
Transaxle Warning
Air Bag/Front Seat
Belt Pretensioner
System Warning
Mazda3_8CX9-EA-13F_Edition1.indb 27Mazda3_8CX9-EA-13F_Edition1.indb 27 2013/05/17 11:52:242013/05/17 11:52:24
Light
Light
*
CAUTION
If the automatic transaxle warning light illuminates, the transaxle has an electrical
problem. Continuing to drive your Mazda in this condition could cause damage to your
transaxle. Consult an Authorized Mazda Dealer as soon as possible
A system malfunction is indicated if the warning light constantly fl ashes, constantly
illuminates or does not illuminate at all when the ignition is switched ON. If any of these
occur, consult an Authorized Mazda Dealer as soon as possible. The system may not operate
in an accident.
WARNING
Never tamper with the air bag/pretensioner systems and always have an Authorized
Mazda Dealer perform all servicing and repairs:
Self-servicing or tampering with the systems is dangerous. An air bag/pretensioner
could accidentally activate or become disabled causing serious injury or death.
.
*
Some models.
7–27
Page 99

If Trouble Arises
Warning/Indicator Lights and Warning Sounds
Signal Warning
If the tire pressure monitoring system has a malfunction, the tire pressure warning
light fl ashes for about 1 minute when the ignition is switched ON and then continues
illuminating. Have your vehicle checked by an Authorized Mazda Dealer as soon as
possible.
WARNING
Tire Pressure
Monitoring System
Warning Light
*
(Red)
(Illuminate)
KEY Warning Light
If the tire pressure monitoring system warning light illuminates or ashes, or the tire
pressure warning beep sound is heard, decrease vehicle speed immediately and avoid
sudden maneuvering and braking:
If the tire pressure monitoring system warning light illuminates or ashes, or the tire
pressure warning beep sound is heard, it is dangerous to drive the vehicle at high
speeds, or perform sudden maneuvering or braking. Vehicle drivability could worsen
and result in an accident.
To determine if you have a slow leak or a at, pull over to a safe position where you can
check the visual condition of the tire and determine if you have enough air to proceed
to a place where air may be added and the system monitored again by an Authorized
Mazda Dealer or a tire repair station.
Do not ignore the TPMS Warning Light:
Ignoring the TPMS warning light is dangerous, even if you know why it is illuminated.
Have the problem taken care of as soon as possible before it develops into a more
serious situation that could lead to tire failure and a dangerous accident.
If any malfunction occurs in the keyless entry system, it illuminates continuously.
CAUTION
If the key warning indicator light illuminates or the push button start indicator light
(amber) ashes, the engine may not start. If the engine cannot be started, try starting it
using the emergency operation for starting the engine, and have the vehicle inspected
at an Authorized Mazda Dealer as soon as possible.
Refer to Emergency Operation for Starting the Engine on page 4-8 .
The warning light fl ashes when the system has a malfunction. Have your vehicle inspected
at an Authorized Mazda Dealer. The LDWS does not operate when the warning light fl ashes.
CAUTION
(Amber)
(Flashes)
Lane Departure
Warning System
(LDWS) Warning
Light
*
If any of the following cases occurs, the system may have a malfunction. Have the
vehicle inspected at an Authorized Mazda Dealer.
The light ashes while the vehicle is being driven.
The light does not illuminate when the ignition is switched ON.
Always use tires for all wheels that are of the speci ed size, and the same manufacture,
brand, and tread pattern. In addition, do not use tires with signi cantly di erent wear
patterns on the same vehicle. If such improper tires are used, the LDWS may not operate
.
normally
When an emergency spare tire is used, the system may not operate normally.
When illuminated
The warning light illuminates if the area of the windshield in front of the forward sensing
(Amber)
High Beam Control
System (HBC)
Warning Light
*
7–28
Mazda3_8CX9-EA-13F_Edition1.indb 28Mazda3_8CX9-EA-13F_Edition1.indb 28 2013/05/17 11:52:252013/05/17 11:52:25
Some models.
camera (FSC) is fogged or obstructed.
When fl ashing
This light fl ashes if there is a malfunction in the high beam control system (HBC). Have
*
your vehicle inspected by an Authorized Mazda Dealer.
Page 100

Warning/Indicator Lights and Warning Sounds
T aking Action
Take the appropriate action and verify that the warning light turns off.
Signal Warning Action to be taken
The light turns on when the remaining fuel is
about 9 L (2.4 US gal, 2.0 Imp gal).
Low Fuel
Warning
Light
NOTE
The light illumination timing may vary because
fuel inside the fuel tank moves around according
to the driving conditions and the vehicle posture.
Add fuel.
If Trouble Arises
Check
Fuel Cap
Warning
Light
If the check fuel cap warning light illuminates
while driving, the fuel-fi ller cap may not be
installed properly.
Stop the engine and reinstall the fuel-fi ller cap.
Refer to Fuel-Filler Cap on page 3-31 .
7–29
Mazda3_8CX9-EA-13F_Edition1.indb 29Mazda3_8CX9-EA-13F_Edition1.indb 29 2013/05/17 11:52:252013/05/17 11:52:25
 Loading...