

Page 1
Features
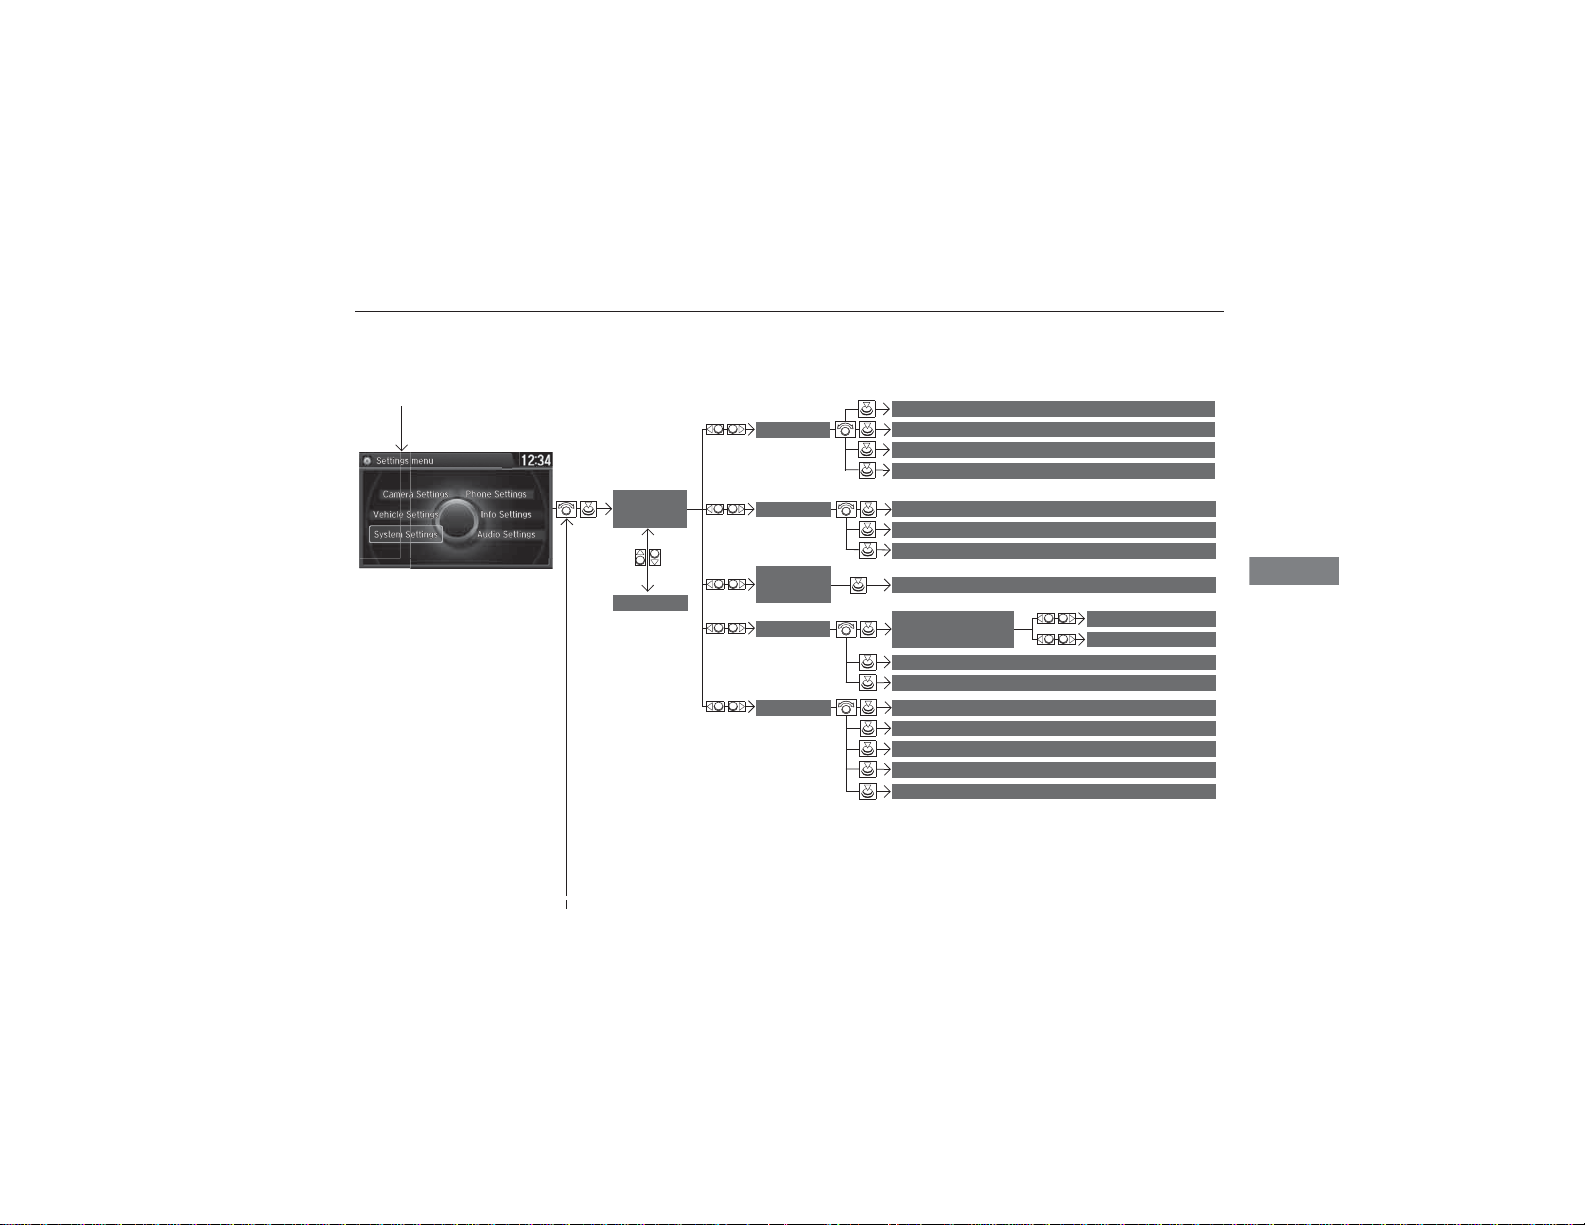
■ Customization flow
Press the SETTINGS button.
uuCustomized Features u
Display
Brightness
Contrast
Black Level
Sync Display Brightness
System
Settings
Default
Bluetooth
Voice
Recog
Clock
Clock/Wallpaper
Bluetooth Status
Bluetooth Device List
Edit Pairing Code
Voice Prompt
Type
Clock
Wallpaper
Clock Adjustment
Clock Format
LanguageOthers
Display Operation Restriction Tips
Background Color
Header Clock Display
Factory Data Reset
Continued
249
Page 2
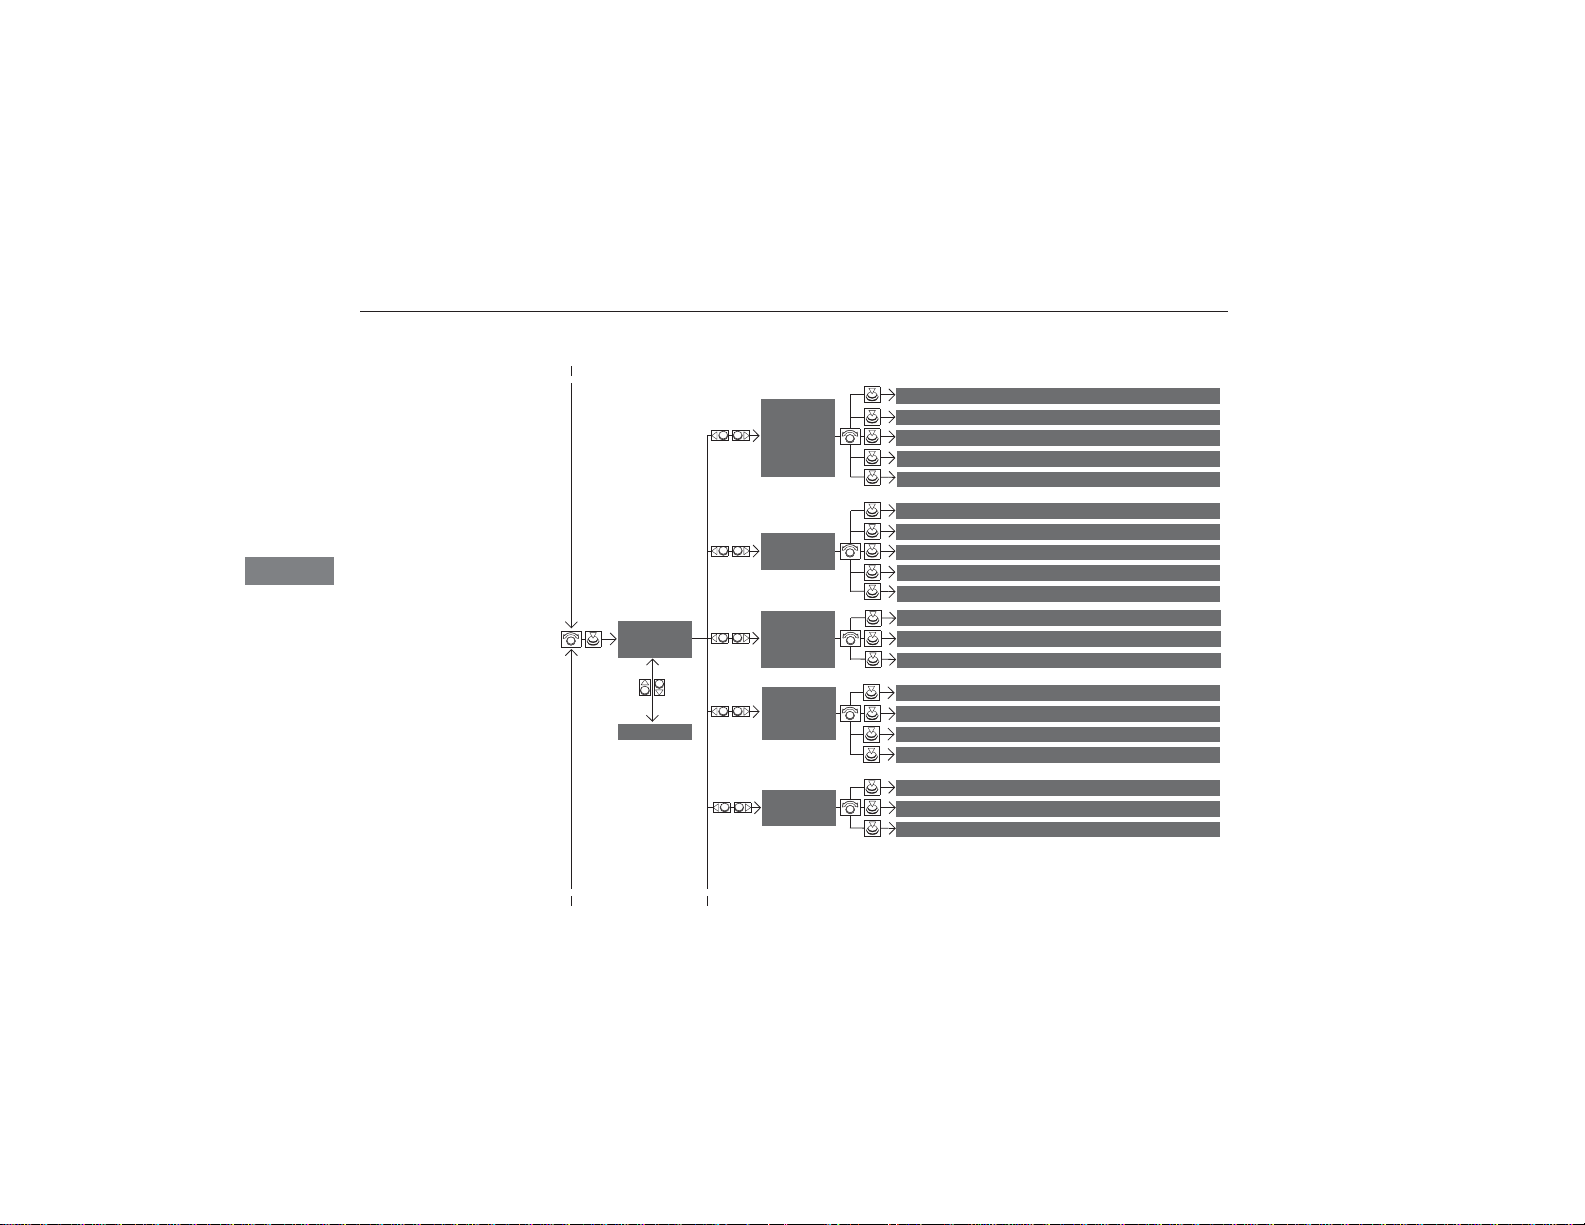
uuCustomized Features u
Features
Default
Memory Position Link
* Not available on all models
250
Vehicle
Settings
Driver
Assist
System
*
Setup
Meter
Setup
Driving
Position
Setup
Keyless
Access
Setup
Lighting
Setup
Forward Collision Warning Distance
ACC Pre-Running Car Detect Beep
ACC Display Speed Unit
Lane Keeping Assist Suspend Beep
Blind Spot Info
Language Selection
Adjust Outside Temp. Display
“Trip A” Reset Timing
“Trip B” Reset Timing
Turn by Turn Display
Steering Wheel Movement At Entry/Exit
Auto Seatbelt Tension
Door Unlock Mode
Keyless Access Light Flash
Keyless Access Beep
Remote Start System On/Off
Interior Light Dimming Time
Headlight Auto Off Timer
Auto Light Sensitivity
*
*
*
*
*
*
*
*
Page 3
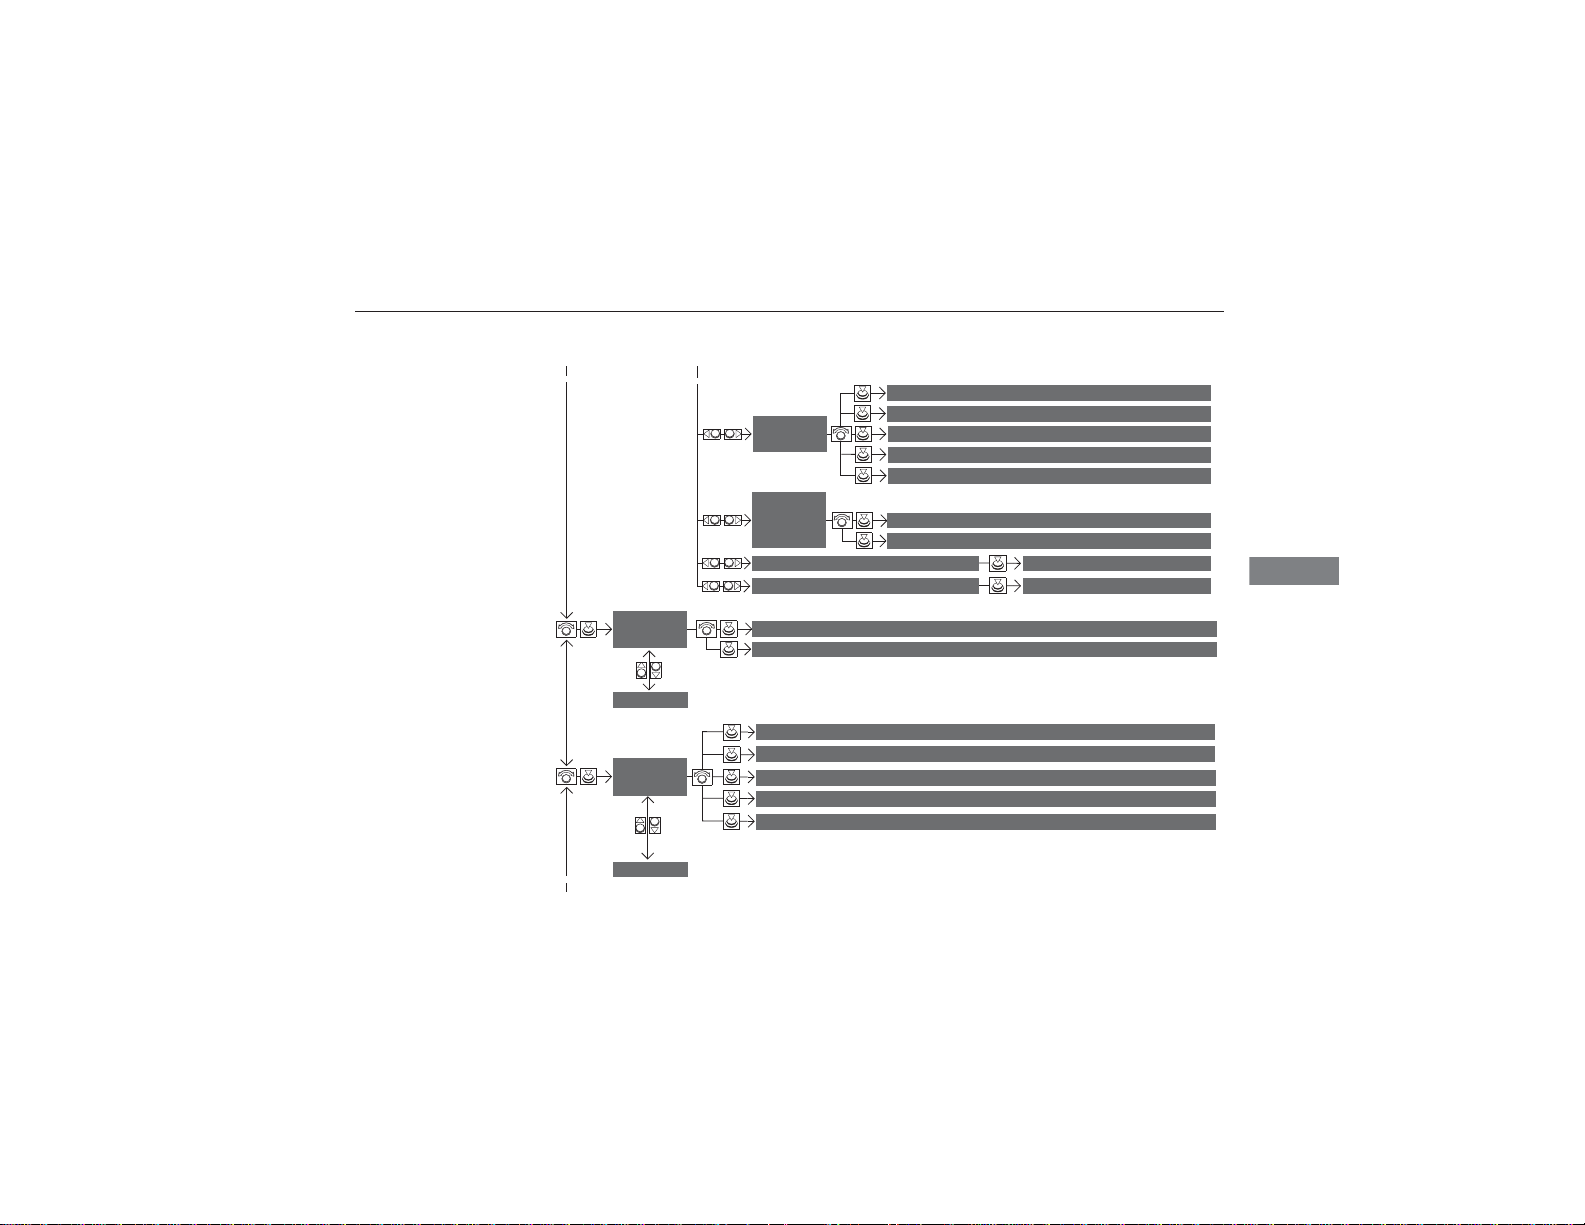
Features
Door
Setup
*1: May change depending on your currently selected source.
uuCustomized Features u
Auto Door Lock
Auto Door Unlock
Key And Remote Unlock Mode
Keyless Lock Answer Back
Security Relock Timer
Power
Tailgate
Setup
Camera
Settings
Power Tailgate Keyless Open Mode
Power Tailgate Open by Outer Handle
Preferred IDS ModeIDS Setup
Maintenance ResetMaintenance Info.
Fixed Guideline
Dynamic Guideline
Default
Sound
Audio
Settings
Source Select Popup
Cover Art
*1
Connect Bluetooth Audio Device
Bluetooth Device List
*1
*1
Default
Continued
251
Page 4
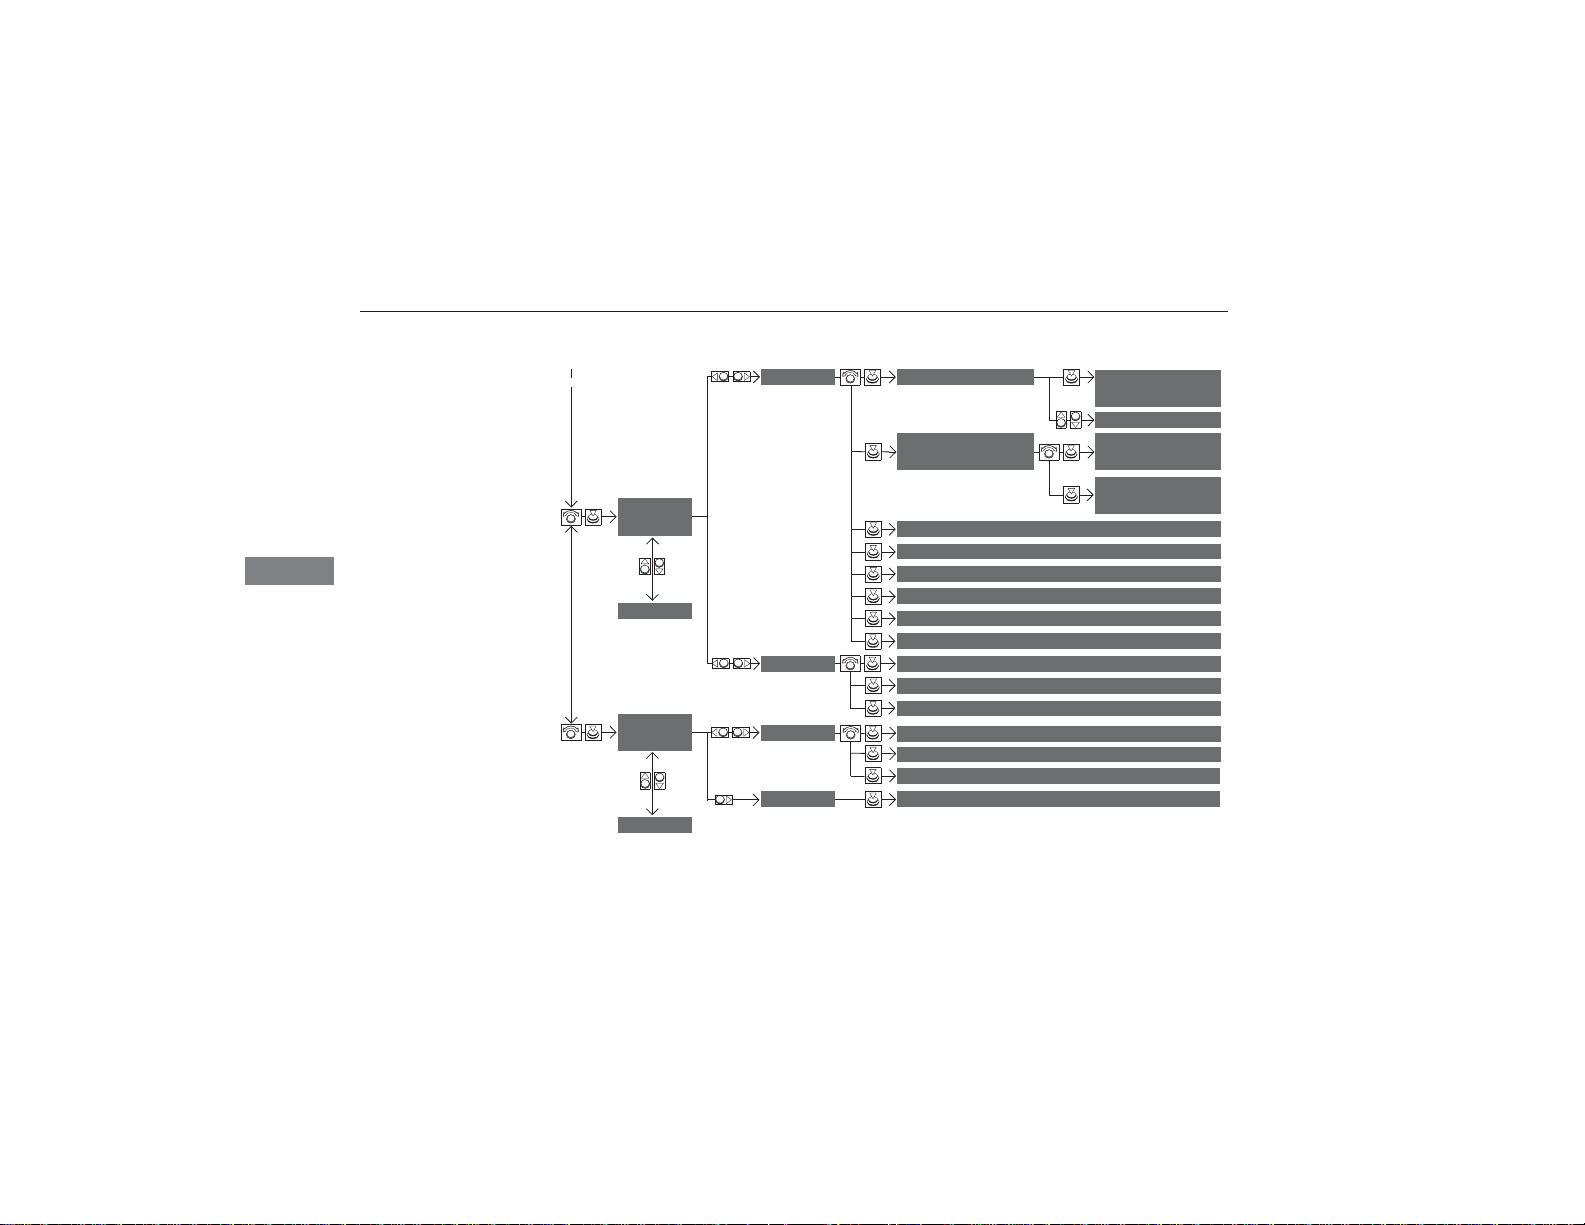
uuCustomized Features u
Features
Add Bluetooth
Device
Disconnect
Default
Phone
Connect phone
252
Phone
Settings
Info
Settings
Default
Bluetooth Device
List
Edit Bluetooth
Device
Add Bluetooth
Device
Edit Speed Dial
Auto Transfer
Auto Answer
Ring Tone
Automatic Phone Sync
Use Contact Photo
Text/Email
Clock
Enable Text/Email
Select Account
New Text/Email Alert
Clock/Wallpaper Type
Clock Adjustment
Others
Clock Format
Info Screen Preference
Page 5

Features
■ List of customizable options
Setup
Group
System
Settings
*1:Default Setting
Customizable Features Description Selectable Settings
Sync Display Brightness
Display
Brightness
Contrast
Black Level
Selects whether the display brightness
synchronizes with the instrument panel
brightness.
Changes the brightness of the audio/information
screen.
Changes the contrast of the audio/information
screen.
Changes the black level of the audio/information
screen.
uuCustomized Features u
On*1/Off
—
—
—
Continued
253
Page 6

uuCustomized Features u
Features
System
Settings
*1:Default Setting
254
Setup
Group
Customizable Features Description Selectable Settings
Bluetooth Status Turns the Bluetooth® on and off. On
Pairs a new phone to HFL, edits and deletes a
Bluetooth
Voice
Recog
Clock
Bluetooth Device List
Edit Pairing Code
paired phone, and creates a security PIN.
2 Phone Setup P. 274
Changes a pairing code.
2 To change the pairing code setting P. 276
Random/Fixed
Voice Prompt Turns the voice prompt on and off. Beginner*1/Expert
Clock Changes the clock display type.
Clock/
Wallpaper
Type
Wallpaper
Clock Adjustment
●
Changes the wallpaper type.
●
Imports an image file for a new wallpaper.
●
Deletes an imported wallpaper (default
wallpapers can be deleted).
2 Wallpaper Setup P. 213
Adjust Clock.
2 Clock P. 114
Analog/Digital*1/
Small Digital/Off
Blank/Galaxy*1/
Metallic
Clock Format Selects the digital clock display from 12H to 24H. 12H*1/24H
*1
/Off
—
*1
—
Page 7

uuCustomized Features u
Features
Setup
Group
System
Settings
*1:Default Setting
Customizable Features Description Selectable Settings
English*1/Français/
Español
On*1/Off
Blue*1/Amber/Red/
Green
Others
Language Changes the display language.
Display Operation
Restriction Tips
Alerts you when manual control of the system is
disabled to prevent distraction while driving.
Changes the background color of the audio/
Background Color
information screen and the On Demand MultiUse Display
TM
.
Header Clock Display Selects whether the clock display comes on. On*1/Off
Factory Data Reset
Default
Resets all the settings to their factory default.
2 Defaulting All the Settings P. 265
Cancels /Resets all customized items in the
System Settings group as default.
Default/OK
—
Continued
255
Page 8

uuCustomized Features u
Features
* Not available on all models
Vehicle
Settings
*1:Default Setting
256
Setup
Group
Customizable Features Description Selectable Settings
TM*
Long/Normal
Short/Off
On/Off
mph*1/km/h (U.S.)
mph/km/h
On/Off
Audible And Visual
Alert
Off
Driver
Assist
System
Setup
Forward Collision Warning
Distance
ACC Forward Vehicle
Detect Beep
*
*
ACC Display Speed Unit
*
Lane Keeping Assist
Suspend Beep
Blind Spot Info
*
*
Changes at which distance FCW* or CMBS
alerts, or turns FCW
*
on and off.
Causes the system to beep when the system
detects a vehicle, or when the vehicle goes out of
the ACC with LSF range.
Changes the speed unit for ACC with LSF on the
*
multi-information display (MID).
Cause the system to beep when the LKAS is
suspended.
Changes the setting for the blind spot
information.
*1
*1
*1
(Canada)
*1
*1
/Visual Alert/
/
Page 9

uuCustomized Features u
Features
* Not available on all models
Setup
Group
Vehicle
Settings
*1:Default Setting
Customizable Features Description Selectable Settings
Meter
Setup
Keyless
Access
Setup
Language Selection
Adjust Outside Temp.
Display
“Trip A” Reset Timing
“Trip B” Reset Timing
Turn by Turn Display
*
Door Unlock Mode
Keyless Access Light Flash
Keyless Access Beep
Remote Start System On/
*
Off
Changes the displayed language on the multiinformation display.
Adjust the temperature reading by a few
degrees.
Changes the setting of how to reset trip meter A, average
fuel economy A, average speed A, and elapsed time A.
Changes the setting of how to reset trip meter B, average
fuel economy B, average speed B, and elapsed time B.
Selects whether the turn-by-turn display comes
on during the route guidance.
Changes which doors unlock when you grab the
driver’s door handle.
Causes some exterior lights to flash when you
unlock/lock the doors.
Causes the beeper to sound when you unlock/
lock the doors.
Turns the remote engine start feature on and off. Enabled*1/Disabled
English
Español
-5°F
-3°C ~ ±0°C*1 ~ +3°C
(Canada)
With Refuel/IGN Off/
Manually Reset
With Refuel/IGN Off/
Manually Reset
On
Driver Door Only
All Doors
On
On
~
±0°F*1 ~
*1
/Off
*1
/Off
*1
/Off
*1
/Français/
+5°F
(U.S.)
*1
*1
*1
/
Continued
257
Page 10

uuCustomized Features u
Features
* Not available on all models
Vehicle
Settings
*1:Default Setting
258
Setup
Group
Customizable Features Description Selectable Settings
60seconds/
30seconds
15seconds
60seconds/
30seconds/
15seconds
Lighting
Setup
Interior Light Dimming
Time
Headlight Auto Off Timer
Changes the length of time the interior lights stay
on after you close the doors.
Changes the length of time the exterior lights
stay on after you close the driver’s door.
0seconds
Driving
Position
Setup
Auto Light Sensitivity
Memory Position Link
Steering Wheel Movement
At Entry/Exit
Auto Seatbelt Tension
*
Changes the timing for the headlights to come
on.
Turns the driving position memory system using a
remote transmitter on and off.
Moves the steering wheel fully up when you get
in/get out of the vehicle.
Turns the setting for the automatic seat belt epretensioner activation on and off.
Max/High/Mid
Low/Min
On
On
On
*1
/
*1
/
*1
/
*1
/Off
*1
/Off
*1
/Off
Page 11

uuCustomized Features u
Features
Setup
Group
Vehicle
Settings
*1:Default Setting
Customizable Features Description Selectable Settings
Auto Door Lock
Changes the setting for the automatic locking
feature.
With Vehicle
Speed
Off
All Doors When
Driver’s Door
Opens
When Shifted to
Park/All Doors When
Ignition Switched
Off/Off
Driver Door
Doors
On
90seconds/
60seconds/
30seconds
Door
Setup
Auto Door Unlock
Key And Remote Unlock
Mode
Keyless Lock Answer Back
Security Relock Timer
Changes the setting for when the doors unlock
automatically.
Sets up either the driver’s door or all doors to
unlock on the first push of the remote or built-in
key.
LOCK/UNLOCK- The exterior lights flash.
LOCK (2nd push)- The beeper sounds.
Changes the time it takes for the doors to relock
and the security system to set after you unlock
the vehicle without opening any door.
*1
/Shift from P/
*1
/All Doors
*1
/Off
*1
*1
/All
Continued
259
Page 12

uuCustomized Features u
Features
Vehicle
Settings
Camera
Settings
*1:Default Setting
260
Setup
Group
Customizable Features Description Selectable Settings
Power
Tailgate
Setup
IDS
Setup
Maintenance
Info.
Default
Guidelines
Default
Power Tailgate Keyless
Open Mode
Power Tailgate Open by
Outer Handle
Preferred IDS Mode
Maintenance Reset
Fixed Guideline
Dynamic Guideline
Changes the keyless setting for when the power
tailgate opens.
Selects whether to enable the power tailgate
open operation using the tailgate outer handle.
Changes the IDS mode setting for when you set
the power mode to ON.
Resets the engine oil life display when you have
performed the maintenance service.
Cancels/Resets all customized items in the
Vehicle Settings group as default.
Selects whether the fixed guidelines come on the
rear camera monitor.
Selects whether the dynamic guidelines come on
the rear camera monitor.
Cancels/Resets all customized items in the
Camera Settings group as default.
Anytime*1/When
Unlocked
Off (Manual Only)/
On (Power/
Manual)
Last Used
Normal/Sport
Default/OK
On*1/Off
On*1/Off
Default/OK
*1
*1
/Comfort/
—
Page 13

uuCustomized Features u
Features
CD (MP3/WMA/AAC), iPod®, USB, Pandora®*
or Aha
TM
mode
Bluetooth® Audio, Pandora®* or AhaTM mode
Bluetooth® Audio, Pandora®* or AhaTM mode
* Not available on all models
Setup
Group
Audio
Settings
*1:Default Setting
Customizable Features Description Selectable Settings
-6 ~ C*1 ~ +6 (Bass,
Treble and
Sound
Adjusts the settings of the audio speaker’s sound.
2 Adjusting the Sound P. 215
Subwoofer), -9 ~ C
+9 (Fader, Balance),
Off/Low/Mid
(SVC)
Selects whether the list of selectable audio
Source Select Popup
sources comes on when the AUDIO button is
On/Off
pressed.
Turns on and off the cover art display. On
Cover Art
Connects, disconnects or pairs a Bluetooth®
Connect Bluetooth Audio Device
Audio device to HFL.
Edits or deletes a Bluetooth® Audio device paired
Bluetooth Device List
Default
to HFL.
Cancels/Resets all customized items in the Audio
Settings group as default.
Default/OK
*1
/Off
*1
~
*1
/High
*1
—
—
Continued
261
Page 14

uuCustomized Features u
Features
Phone
Settings
*1:Default Setting
262
Setup
Group
Customizable Features Description Selectable Settings
Pairs a new phone to HFL, or connects or
Phone
Connect phone
Bluetooth Device List
Edit Speed Dial
disconnects a paired phone.
2 Phone Setup P. 274
Pairs a new phone to HFL, edits or deletes a
paired phone, or creates a security PIN.
2 Phone Setup P. 274
Edits, adds or deletes a speed dial entry.
2 Phone Setup P. 274
—
—
—
Page 15

uuCustomized Features u
Features
Setup
Group
Phone
Settings
*1:Default Setting
Customizable Features Description Selectable Settings
Sets calls to automatically transfer from your
phone to HFL when you enter the vehicle.
Sets whether to automatically answer an
incoming call after about four seconds.
Sets a phonebook data to be automatically
imported when a phone is paired to HFL.
Displays a caller’s picture on an incoming call
screen.
Turns the text message/E-mail function on and
off.
Selects whether a pop-up alert comes on the
screen when HFL receives a new text message/E-
On*1/Off
On/Off
Fixed/Mobile
Phone
On/Off
On*1/Off
On*1/Off
On/Off
Phone
Text/
Email
Auto Transfer
Auto Answer
Ring Tone Selects the ring tone.
Automatic Phone Sync
Use Contact Photo
Enable Text/Email
Select Account Selects a mail or text message account. —
New Text/Email Alert
mail.
Default
Cancels/Resets all customized items in the Phone
Settings group as default.
Default/OK
*1
*1
/Off
Continued
263
Page 16

uuCustomized Features u
Features
Info
Settings
*1:Default Setting
264
Setup
Group
Customizable Features Description Selectable Settings
Clock
Clock/
Wallpaper
Type
Clock
Wallpaper
See System Settings on P. 253 to P. 255.
Clock Adjustment
Clock Format
Selects either of the following to be displayed
when you press the INFO button.
Other Info Screen Preference
• Info Top: Some of the available menu items
pop up.
• Info Menu: All available menu items pop up.
Info Top/Info
Menu
• Off: The menu item you selected last time is
displayed.
Default
Cancels/Resets all customized items in the Info
Settings group as default.
Default/OK
*1
/Off
Page 17
Features
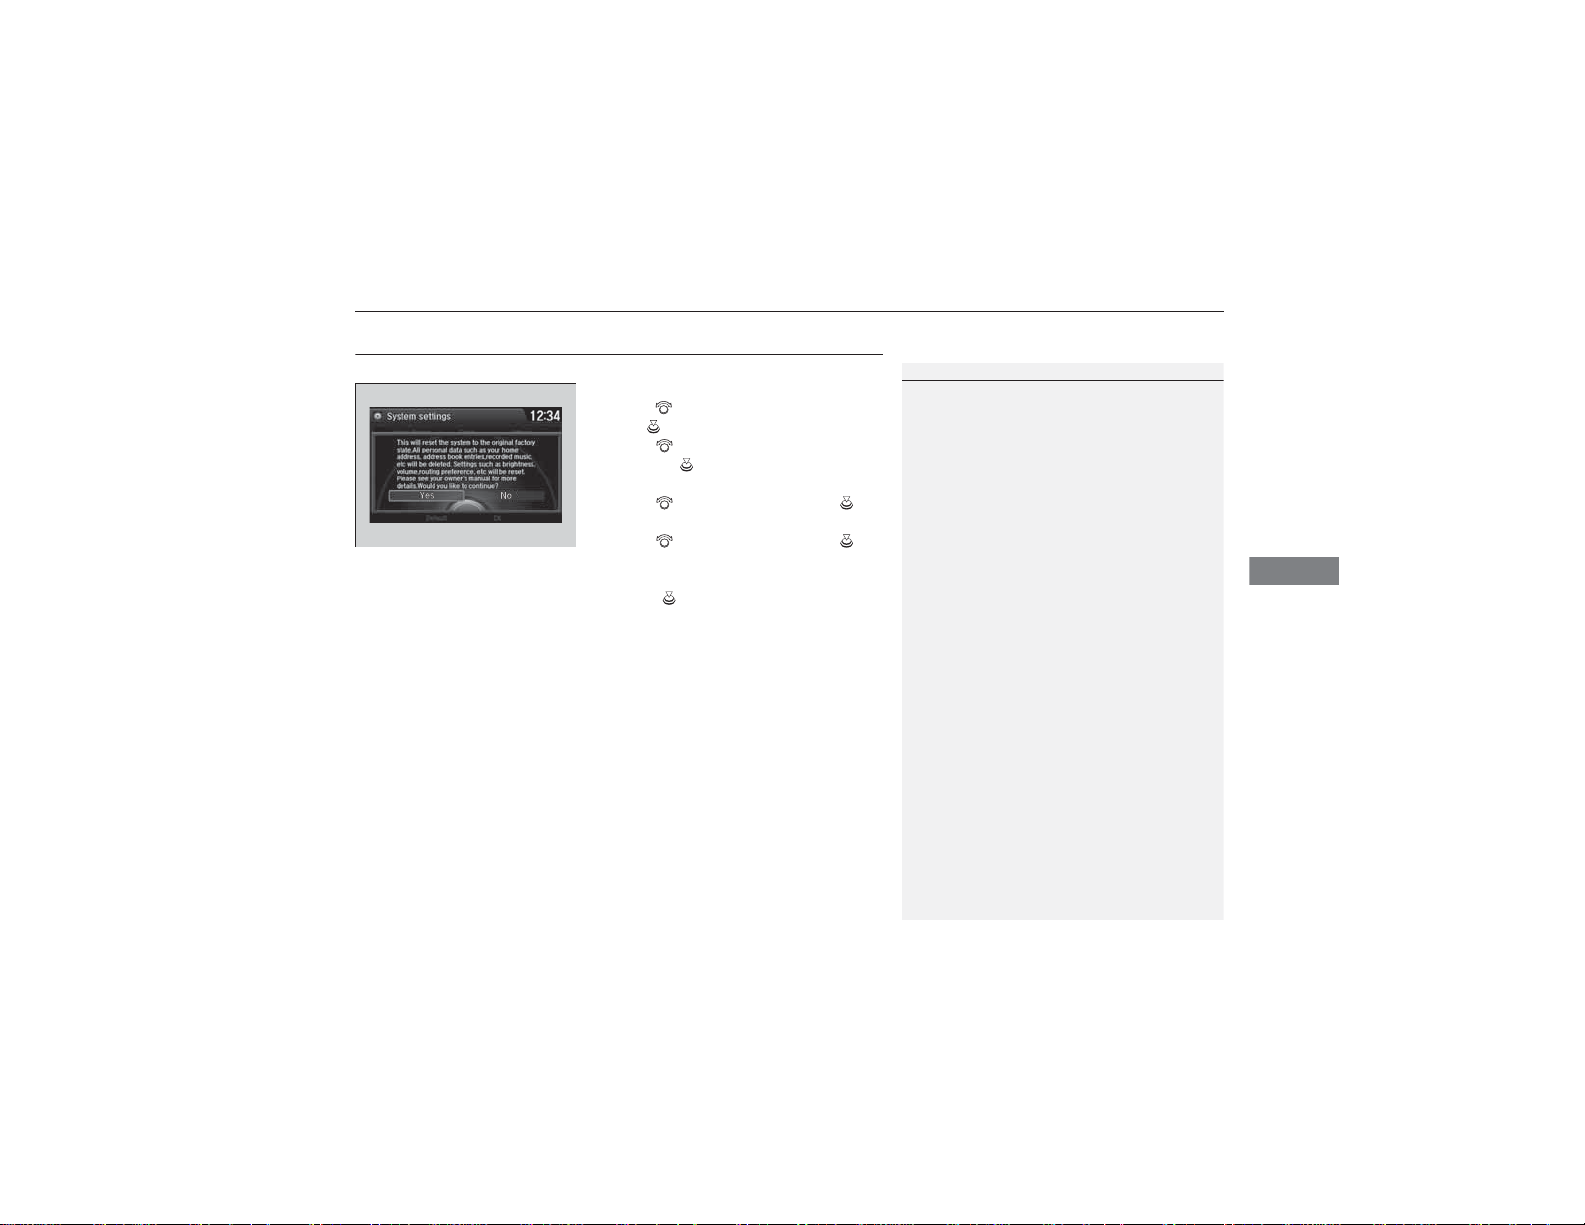
1Defaulting All the Settings
When you transfer the vehicle to a third party, reset
all settings to default and delete all personal data.
uuCustomized Features uDefaulting All the Settings
Defaulting All the Settings
You can reset all the menu and customized settings as the factory defaults.
1. Press the SETTINGS button.
2. Rotate to select System Settings, then
press .
3. Rotate to select Factory Data Reset,
then press .
u The pop-up menu appears on the screen.
4. Rotate to select Yes, then press .
u The confirmation message will appear.
5. Rotate to select Yes, then press
again to reset the settings.
u The confirmation message will appear.
Press to select OK.
265
Page 18
Features
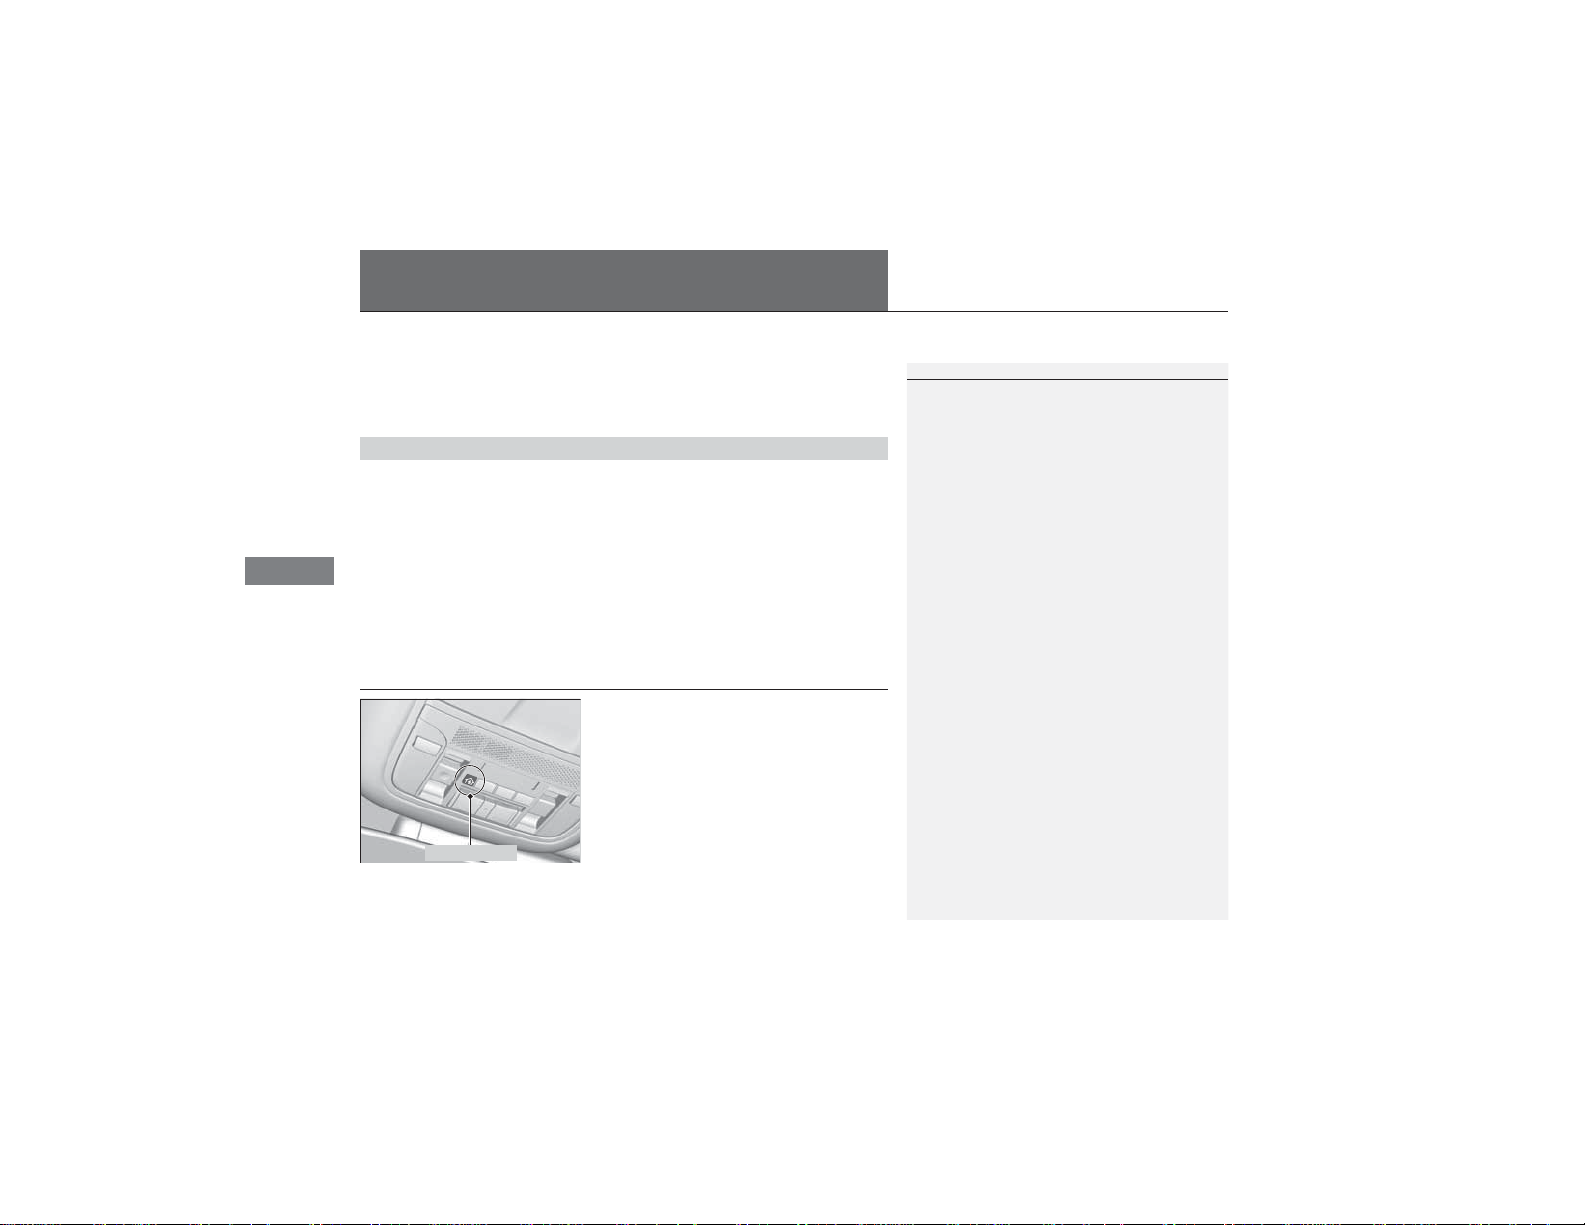
1HomeLink® Universal Transceiver
HomeLink® is a registered trademark of Johnson
Controls., Inc.
Before programming HomeLink to operate a garage
door opener, confirm that the opener has an external
entrapment protection system, such as an “electronic
eye,” or other safety and reverse stop features. If it
does not, HomeLink may not be able to operate it.
HomeLink® Universal Transceiver
The HomeLink® Universal Transceiver can be programmed to operate up to three
remote controlled devices around your home, such as garage doors, lighting, or
home security systems.
Important Safety Precautions
■
Refer to the safety information that comes with your garage door opener to test that
the safety features are functioning properly. If you do not have the safety
information, contact the manufacturer.
Before programming HomeLink, make sure that people and objects are out of the
way of the garage or gate to prevent potential injury or damage.
When programming a garage door opener, park just outside the garage door’s
path.
Training HomeLink
If you have not trained any of the buttons in
HomeLink before, you should erase any
previously learned codes. To do this:
• Press and hold the two outside buttons for
about 20 seconds, until the red indicator
blinks. Release the buttons, and proceed to
step 1.
Red Indicator
• If you are training the second or third
button, go directly to step 1.
266
Page 19
Features
Training a Button
1Training HomeLink
Retraining a Button
If you want to retrain a programmed button for a
new device, you do not have to erase all button
memory. You can replace the existing memory code
using this procedure:
1.
Press and hold the desired HomeLink button
until the HomeLink indicator begins to blink.
2.
Continue to hold the HomeLink button and
follow steps 1 - 3 under “Training a Button.”
Indicator remains on
for about 25 secs.
Standard transmitter
Indicator blinks rapidly for
2 secs, then remains on for
about 23 secs.
Rolling code transmitter
Erasing Codes
To erase all the codes, press and hold the two outside
buttons until the HomeLink indicator begins to blink
(about 10 to 20 secs). You should erase all codes
before selling the vehicle.
If you have any problems, see the device’s
instructions, visit www.homelink.com, or call
HomeLink at (800) 355-3515.
4.
a.
3.
2.
5.
a.
b.
1.
Position the remote transmitter you wish to link 1 to 3 inches (3 - 8 cm) from the
HomeLink button you want to program.
Press and hold the desired HomeLink button and the button on
the remote transmitter. Does the HomeLink indicator (LED)
blink after 10 secs?
Press and hold the
programmed HomeLink
button for about a sec.
Does the device (garage
door opener) work?
Press and hold the remote and the HomeLink
button at the same time. Then, while
continuing to hold the HomeLink button,
press and release the button on the remote
every 2 secs.
Does the LED blink within 20 secs?
Training
Complete
Press and hold the HomeLink button again.
Press and hold the HomeLink
button again.
The remote-controlled device
should operate.
Training Complete
The remote has a rolling code. Press the
“learn” button on the remote-controlled
device (e.g. garage door opener).
Within 30 secs, press and hold the
programmed HomeLink button for 2 secs.
HomeLink indicator blinks for 2 secs,
then remains on.
HomeLink LED
is on.
YES
NO
YES
YES
NO
NO
■
uuHomeLink® Universal Transceiver uTraining HomeLink
267
Page 20
Features
1Bluetooth® HandsFreeLink®
To use HFL, you need a Bluetooth-compatible cell
phone. For a list of compatible phones, pairing
procedures, and special feature capabilities:
• U.S.: Visit www.acura.com/handsfreelink, or call 1-
888-528-7876.
• Canada: Visit www.handsfreelink.ca, or call 1-888-
528-7876.
To use HFL, the Bluetooth setting must be On.
2 Customized Features P. 248
Voice control tips:
• Aim the vents away from the ceiling and close the
windows, as noise coming from them may interfere
with the microphone.
• Press and release the button when you want to
call a number using a stored voice tag, a
phonebook name, or a number. Speak clearly and
naturally after a beep.
• If the microphone picks up voices other than yours,
the command may be misinterpreted.
• To change the volume level, use the audio system’s
volume knob or the remote audio controls on the
steering wheel.
State or local laws may prohibit the operation of
handheld electronic devices while operating a
vehicle.
If you receive a call while using the audio system, the
system resumes its operation an after ending the call.
Models with navigation system
Models without navigation system
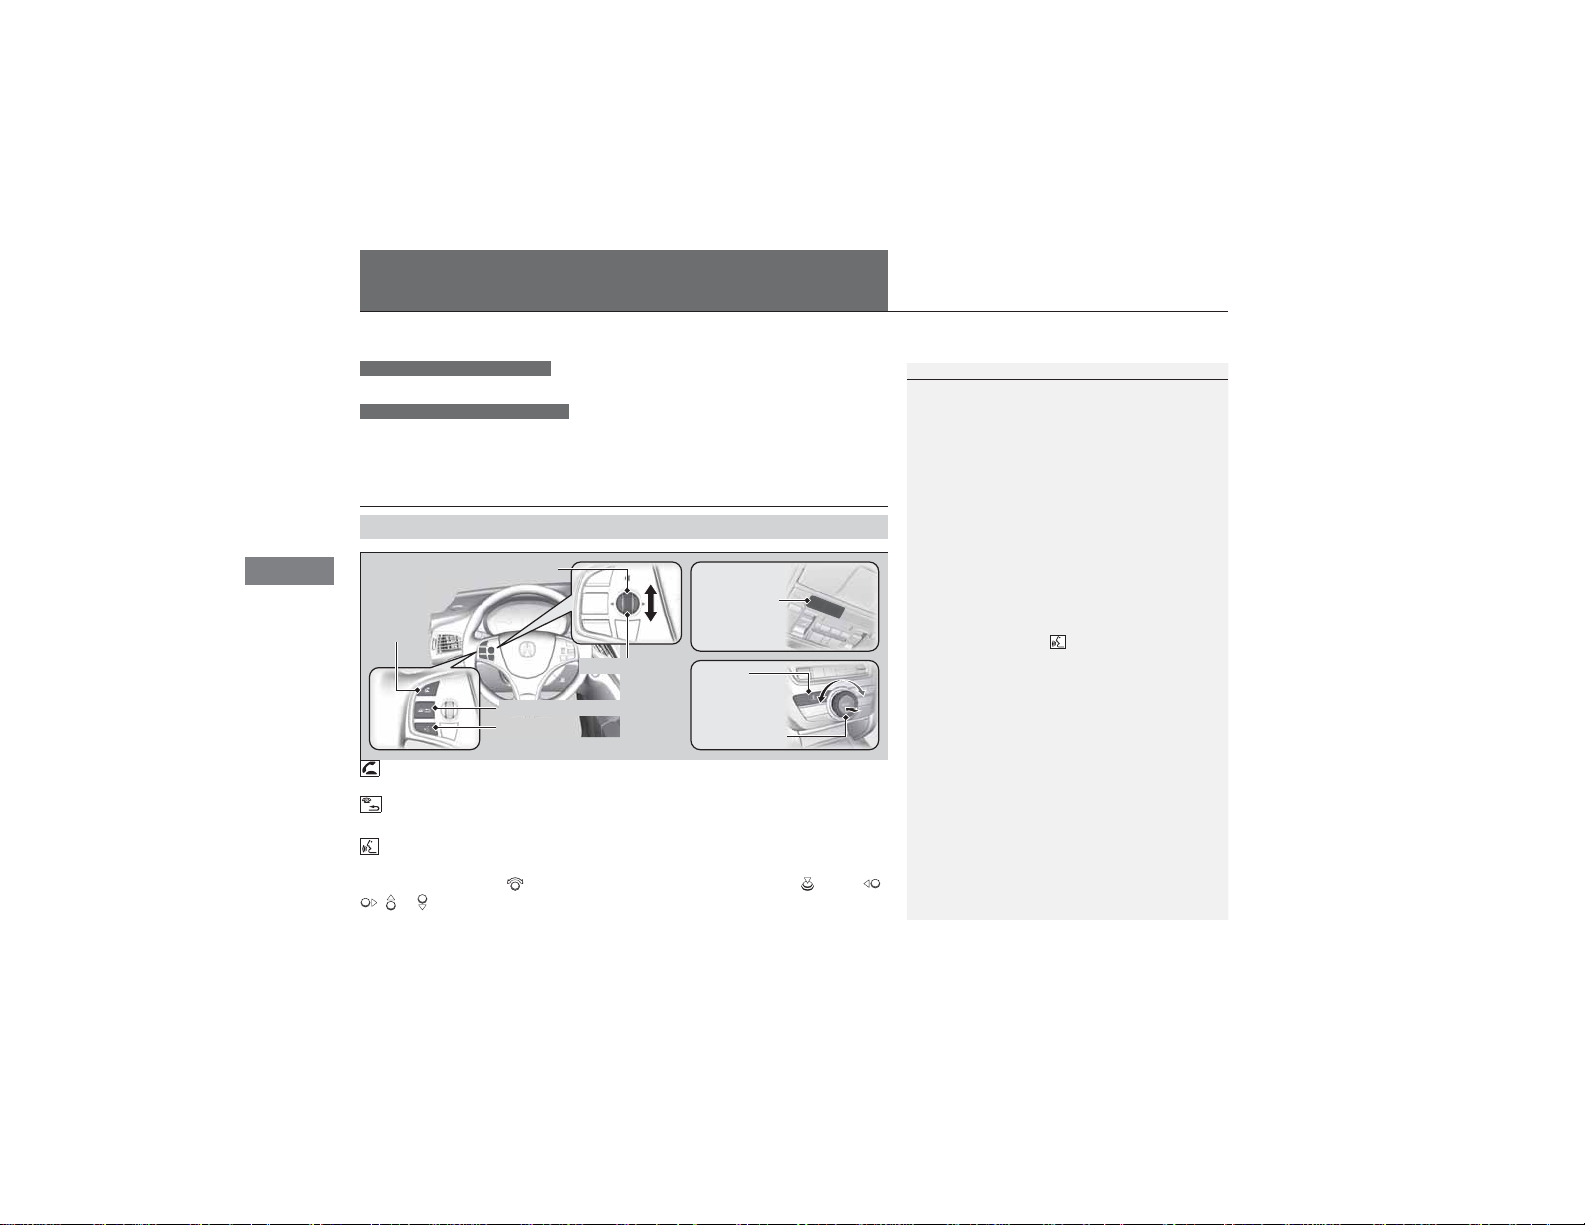
Talk Button
Volume up
Microphone
Hang-up/Back Button
Pick-up
Button
Volume down
Interface Dial
PHONE
Button
Bluetooth® HandsFreeLink®
See Navigation System Manual for how to operate Bluetooth® HandsFreeLink®.
Bluetooth® HandsFreeLink® (HFL) allows you to place and receive phone calls using
your vehicle’s audio system, without handling your cell phone.
Using HFL
HFL Buttons
■
(Pick-up) button: Press to go to the Speed Dial/Call History on the multi-
information display or to answer an incoming call.
(Hang-up/back) button: Press to end a call, to cancel a command or to clear
the phone information on the MID.
(Talk) button: Press to give HFL voice commands.
PHONE button: Press to go directly to the Phone screen.
Interface dial: Rotate to select an item on the screen, then press . Move ,
, or to select secondary menu.
268
Page 21
Features
HFL Status Display
1Bluetooth® HandsFreeLink®
Bluetooth® Wireless Technology
The Bluetooth® word mark and logos are registered
trademarks owned by Bluetooth SIG, Inc., and any
use of such marks by Honda Motors Co., Ltd., is
under license. Other trademarks and trade names are
those of their respective owners.
HFL Limitations
An incoming call on HFL will interrupt the audio
system when it is playing. It will resume when the call
is ended.
1HFL Status Display
The information that appears on the audio/
information screen varies between phone models.
You can change the system language to English,
French, or Spanish.
2 Customized Features P. 248
■
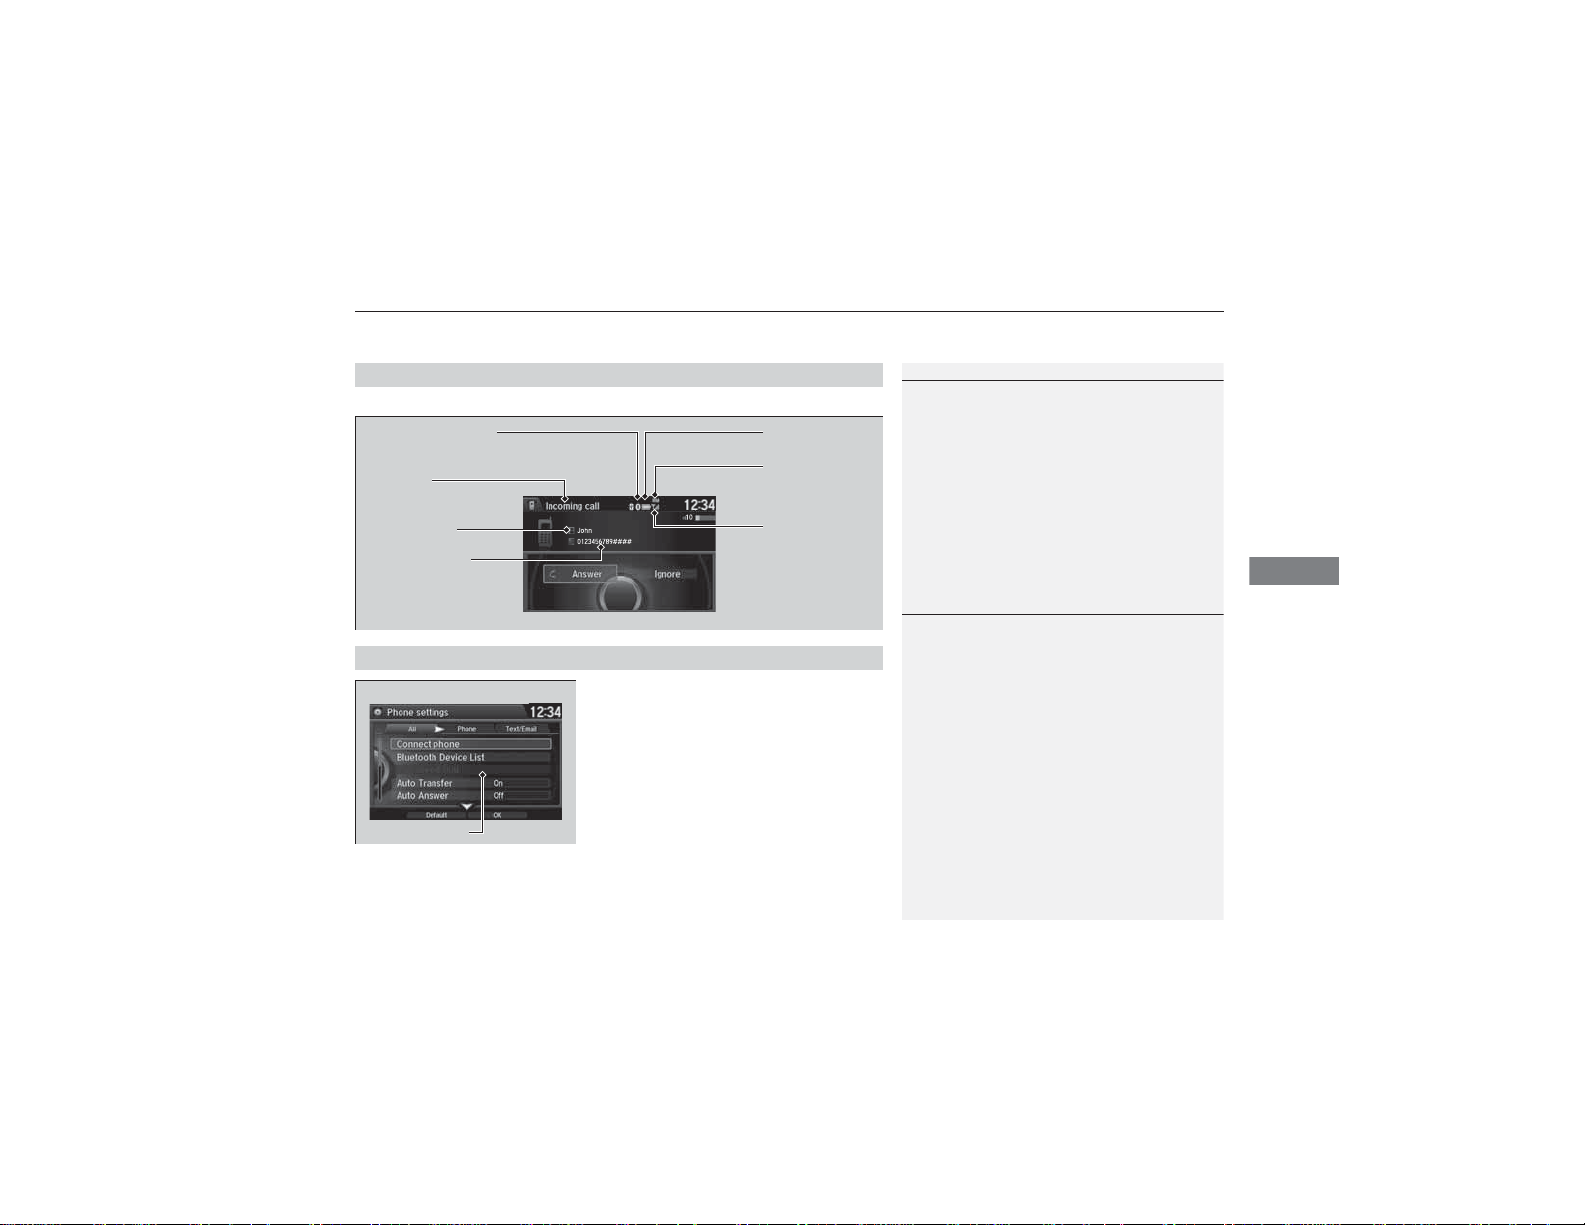
The audio/information screen notifies you when there is an incoming call.
Bluetooth® Indicator
Comes on when your
phone is connected to HFL.
HFL Mode
Battery Level
Status
Roam Status
uuBluetooth® HandsFreeLink®uUsing HFL
Caller’s Name
Caller’s Number
Limitations for Manual Operation
■
Certain manual functions are disabled or
inoperable while the vehicle is in motion.
You cannot select a grayed-out option until
the vehicle is stopped.
Only previously stored speed dial entries with
voice tags, phonebook names, or numbers
Disabled Option
can be called using voice commands while the
vehicle is in motion.
Signal Strength
2 Speed Dial P. 285
269
Page 22
uuBluetooth® HandsFreeLink®uHFL Menus
Features
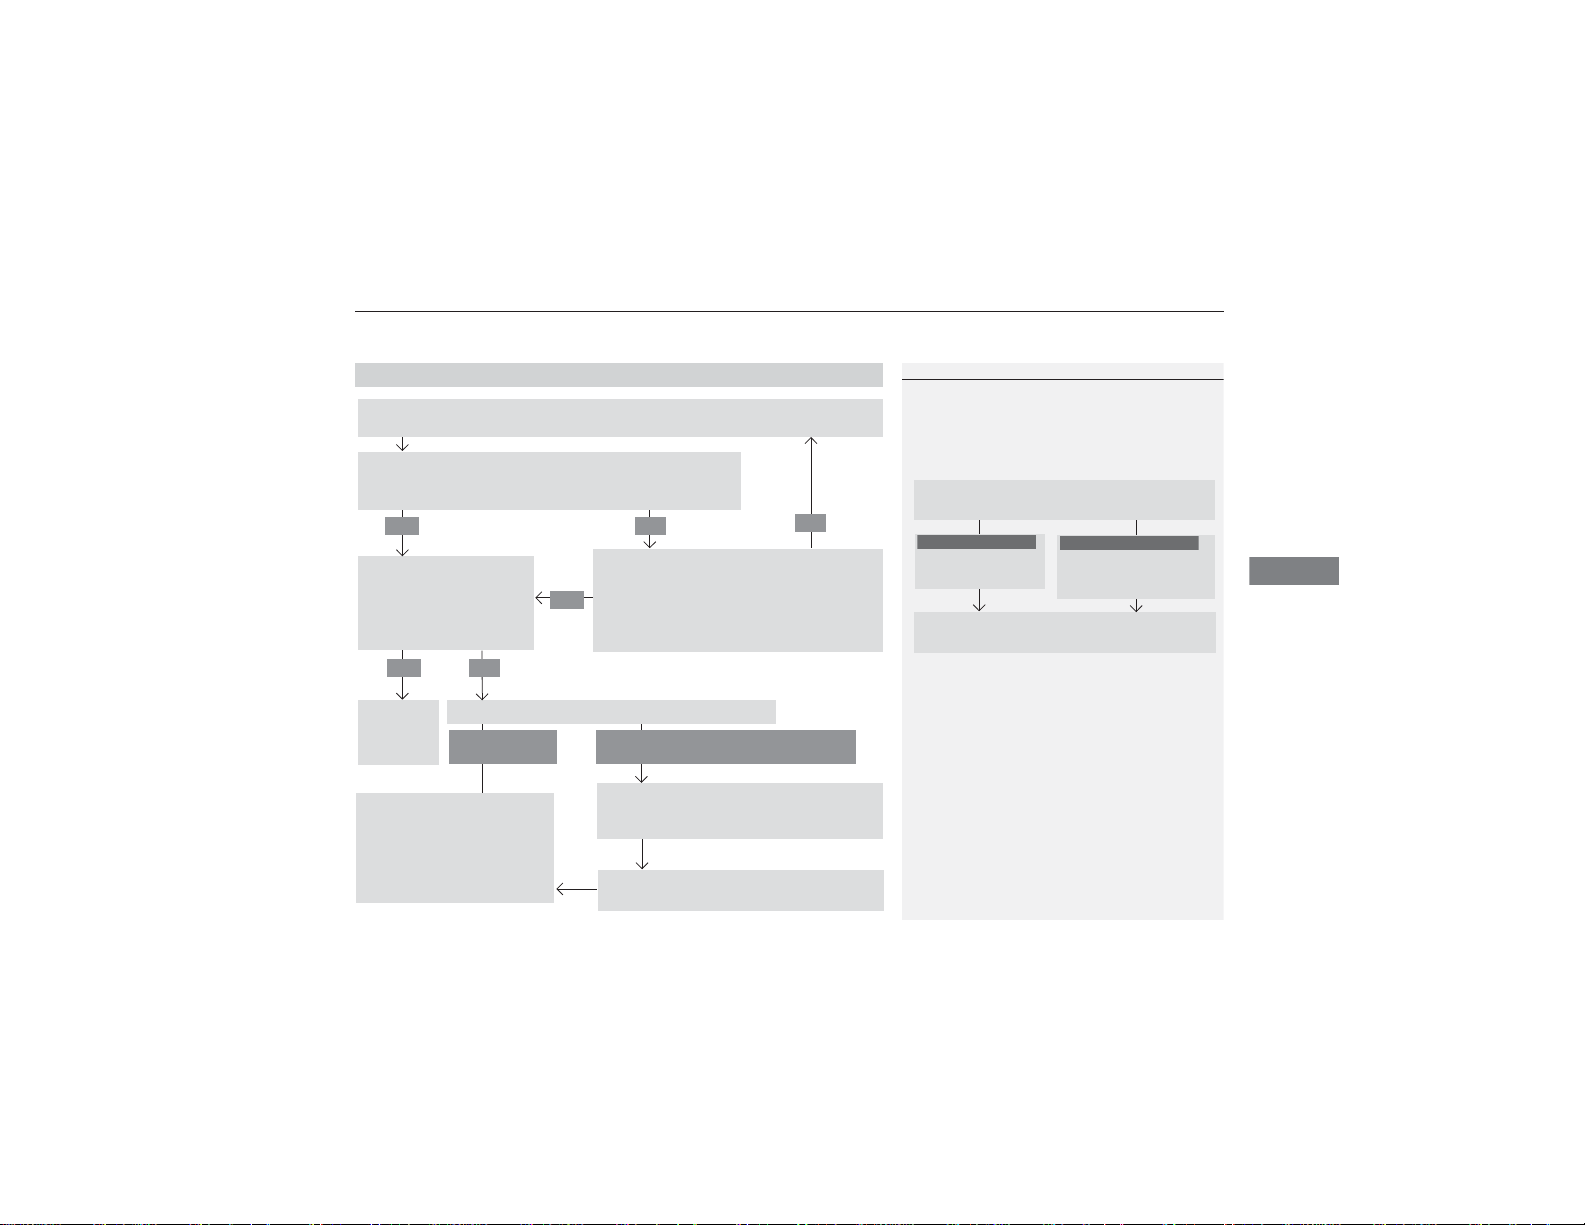
1HFL Menus
To use HFL, you must first pair your Bluetooth-
compatible cell phone to the system while the vehicle
is parked.
Some functions are limited while driving. A message
appears on the screen when the vehicle is moving
and the operation is canceled.
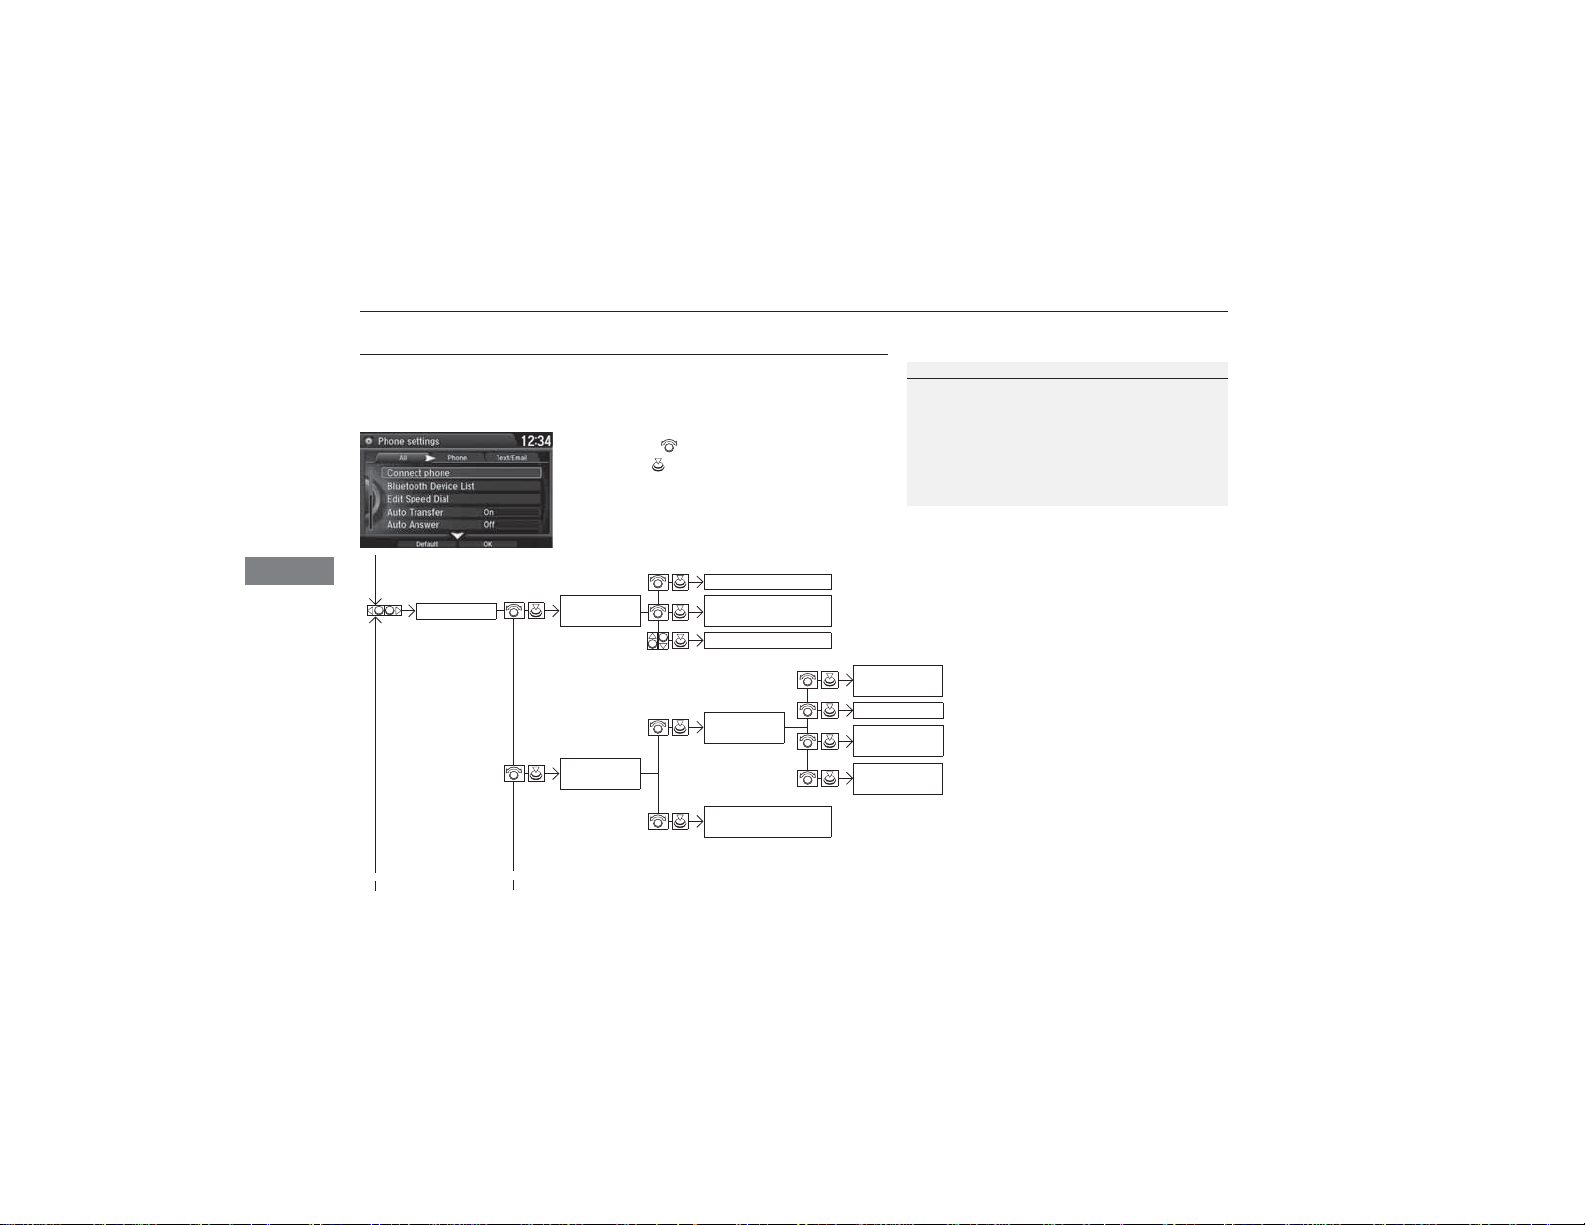
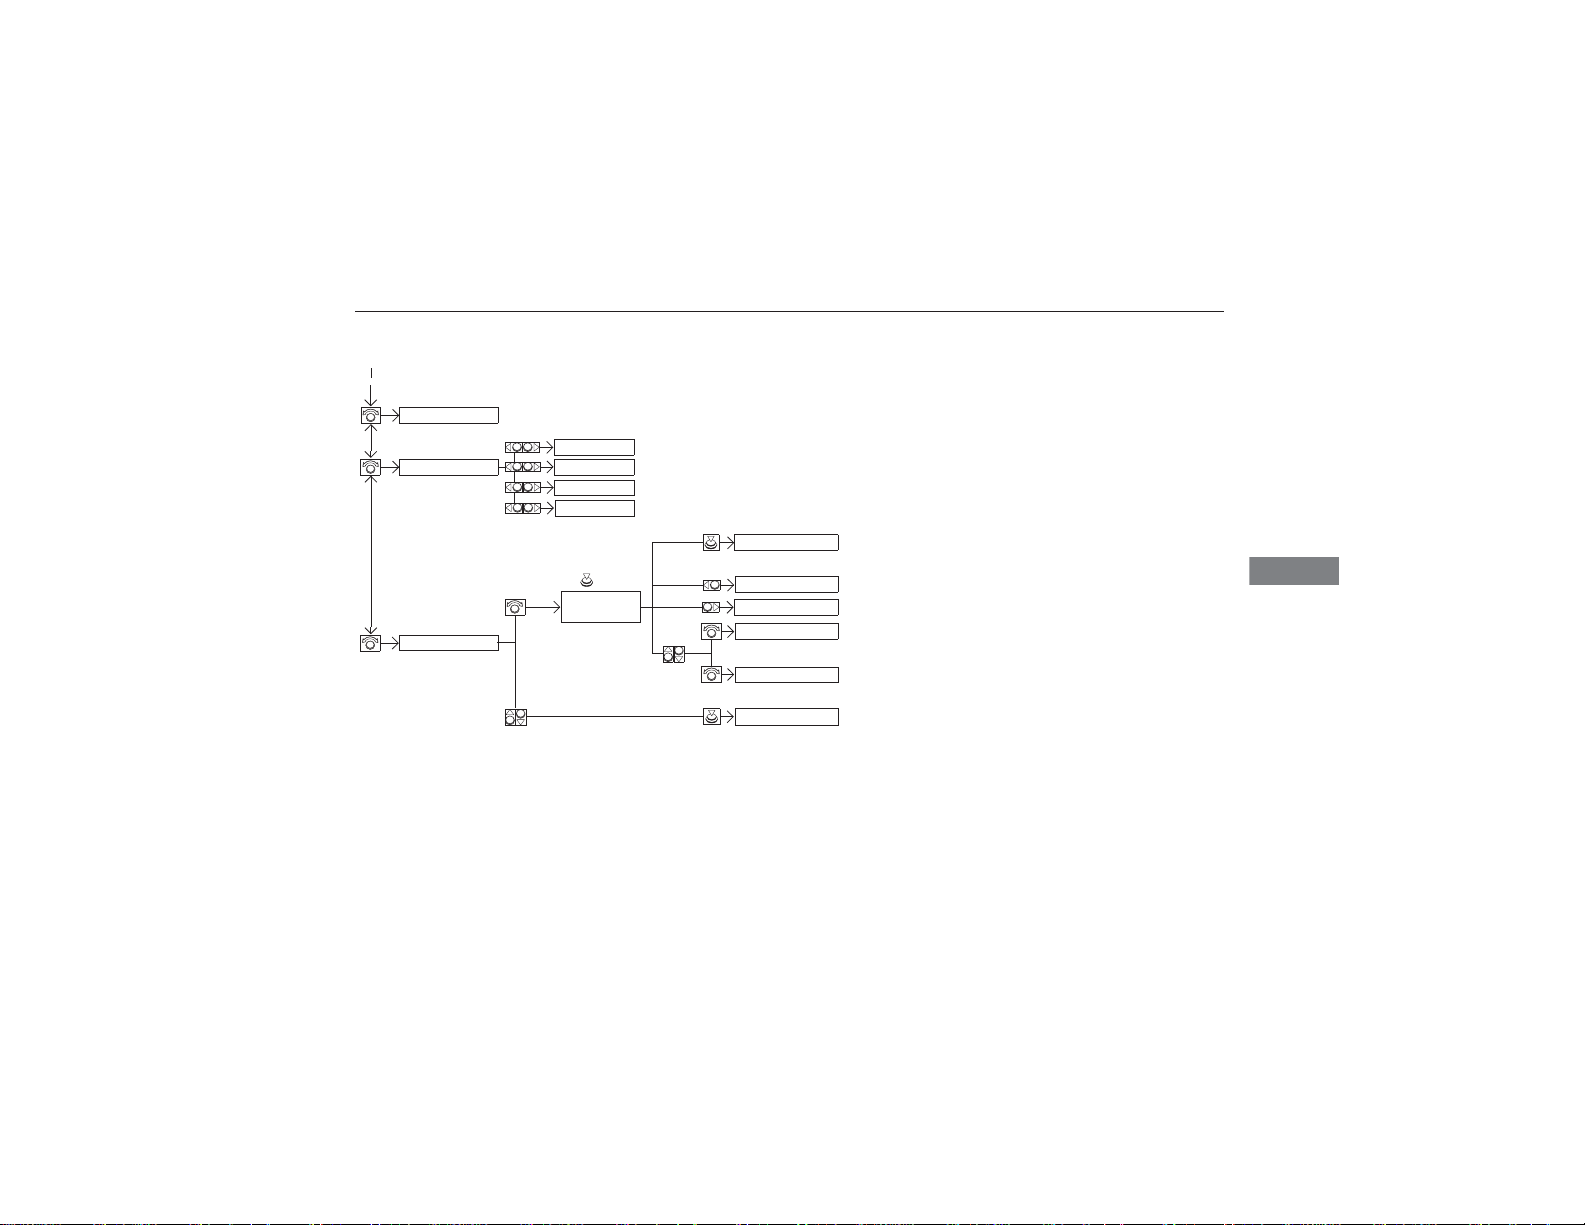
HFL Menus
The power mode must be in ACCESSORY or ON to use HFL.
■ Phone Settings screen
Phone
*1: Appears only when a phone is connected to HFL.
Connect
phone
Bluetooth
Device List
270
1. Press the SETTINGS button.
2. Rotate to select Phone Settings, then
press .
(Existing entry list)
Add Bluetooth
Device
Disconnect
(Existing
entry list)
Add Bluetooth
Device
Connect a phone to the system.
Pair a phone to the system.
Disconnect a paired phone from the system.
Edit Device
Replace This
Delete This
Pair a phone to the system.
Name
Edit PIN
Device
Device
Edit the user name of a paired phone.
Create a security PIN for a paired phone.
Replace a previously paired phone with a
new phone.
Delete a previously paired phone.
Page 23
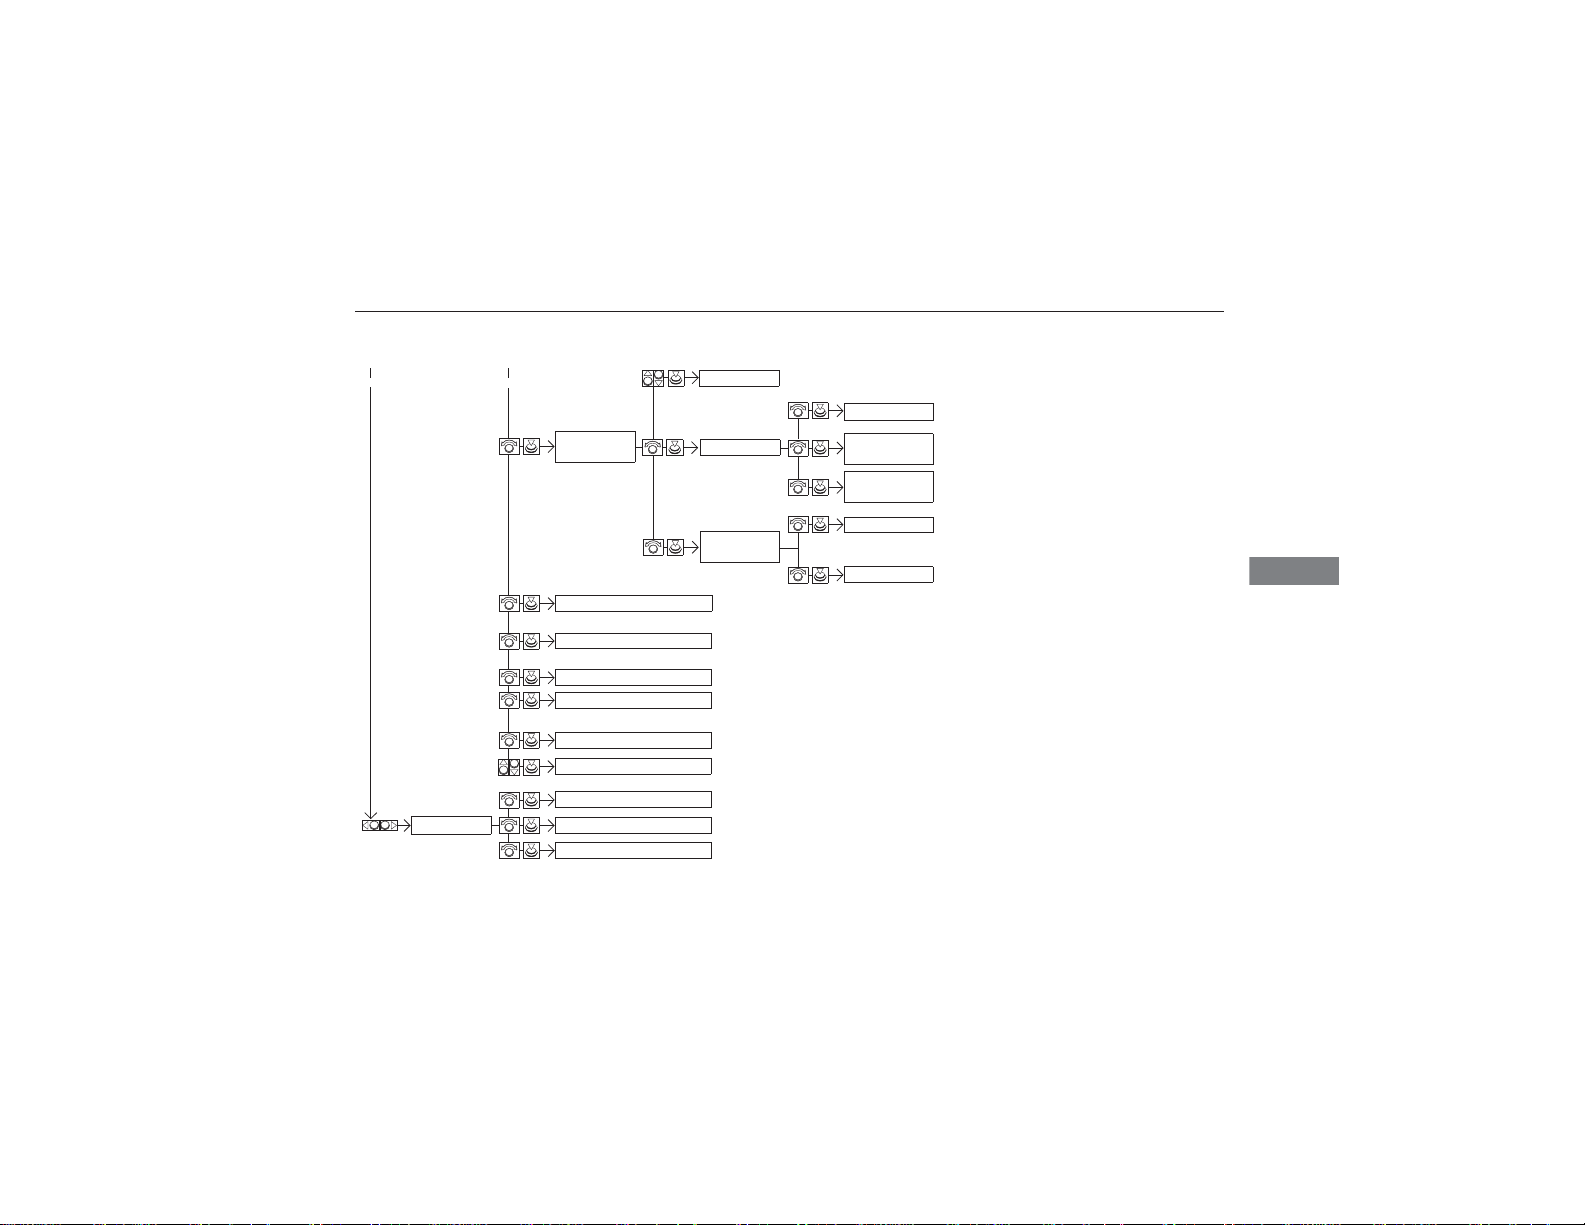
Features
Delete All
Delete all the previously stored speed dial numbers.
Select a phone number from the call
history to store as a speed dial number.
Select a phone number from the
phonebook to store as a speed dial number.
Enter a phone number to store as a speed
dial number.
(Existing
entry list)
Edit a previously stored speed dial number.
●
Change a number.
●
Create or delete a voice tag.
Delete a previously stored speed dial number.
Set calls to automatically transfer from your phone to HFL when you enter the
vehicle.
Auto Transfer
Auto Answer
Ring Tone
Set whether to automatically answer an incoming call after about four
seconds.
Select the ring tone.
Use Contact Photo
Set phonebook data to be automatically imported when a phone is paired to
HFL.
Display a caller’s picture on an incoming call screen.
Automatic Phone Sync
Enable Text/Email
Turn the text message/E-mail function on and off.
New Text/Email Alert
Select whether a pop-up alert comes on the screen when HFL receives a new
text message/E-mail.
Edit Speed
Dial
New Entry
Manual Input
Import from
Call History
Import from
Phonebook
Edit
Delete
uuBluetooth® HandsFreeLink®uHFL Menus
Default
Cancel/Reset all customized items in the Phone Settings group as default.
Text/Email
*1: Appears only when a phone is connected to HFL.
*1
Select Account
Select a mail or text message account.
Continued
271
Page 24
uuBluetooth® HandsFreeLink®uHFL Menus
Features
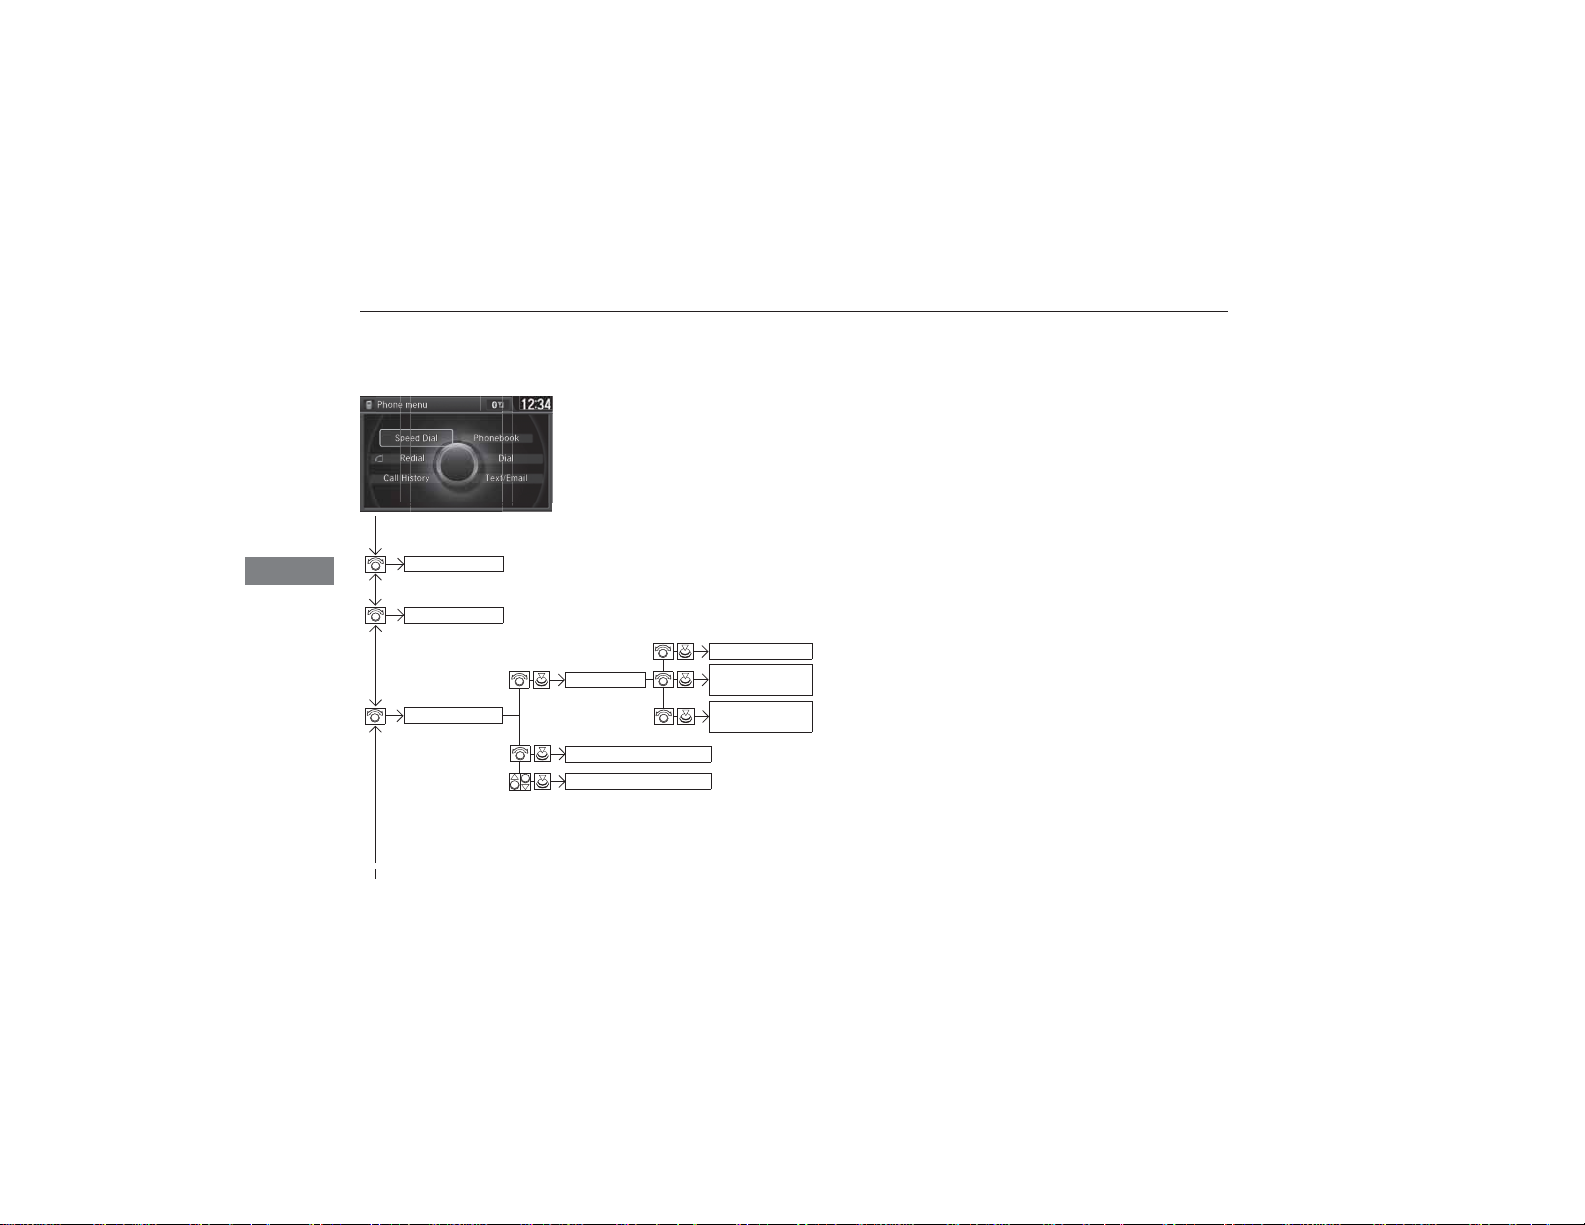
■ Phone screen
1. Press the PHONE button.
2. Press the MENU button to display the
*1
Dial
Enter a phone number to dial.
menu items.
Phonebook
Speed Dial
*1
Display the paired phone’s phonebook.
New Entry
*1
(Existing entry list)
More Speed Dials
*1: Appears only when a phone is connected to HFL.
272
Manual Input
Import from
Call History
Import from
Phonebook
Enter a phone number to store as a speed dial number.
Select a phone number from the call history to store as a
speed dial number.
Select a phone number from the phonebook to store as a
speed dial number.
Dial the selected number in the speed dial list.
Display another paired phone’s speed dial list.
Page 25
Features
Previous
Next
See the next message.
System reads received message aloud, or stop message
from being read.
Reply
Call
Reply to a received message using one of six fixed phrases.
Make a call to the sender.
*1
Redial
Call History
Text/Email
Redial the last number dialed in the phone’s history.
All
*1
Dialed
Received
Missed
Display the last 20 outgoing, incoming and missed calls.
Display the last 20 outgoing calls.
Display the last 20 incoming calls.
Display the last 20 missed calls.
(Read/Stop)
Select a message
and press .
Message is
read aloud.
*1
uuBluetooth® HandsFreeLink®uHFL Menus
See the previous message.
*1: Appears only when a phone is connected to HFL.
Select Account
Select a mail or text message account.
Continued
273
Page 26
Features
1Phone Setup
Your Bluetooth-compatible phone must be paired to
HFL before you can make and receive hands-free
calls.
Phone Pairing Tips:
• You cannot pair your phone while the vehicle is
moving.
• Up to six phones can be paired.
• Your phone’s battery may drain faster when it is
connected to HFL.
• If your phone is not ready for pairing or not found
by the system within three minutes, the system will
time out and returns to idle.
Once you have paired a phone, you can see it
displayed on the screen with one or two icons on the
right side.
These icons indicate the following:
: The phone can be used with HFL.
: The phone is compatible with Bluetooth® Audio.
When pairing is completed, an Automatic Phone
Sync prompt appears. Select On if you want your call
history and phonebook automatically imported to
HFL.
2 Changing the Automatic Phone Sync
setting P. 284
uuBluetooth® HandsFreeLink®uHFL Menus
Phone Setup
■
274
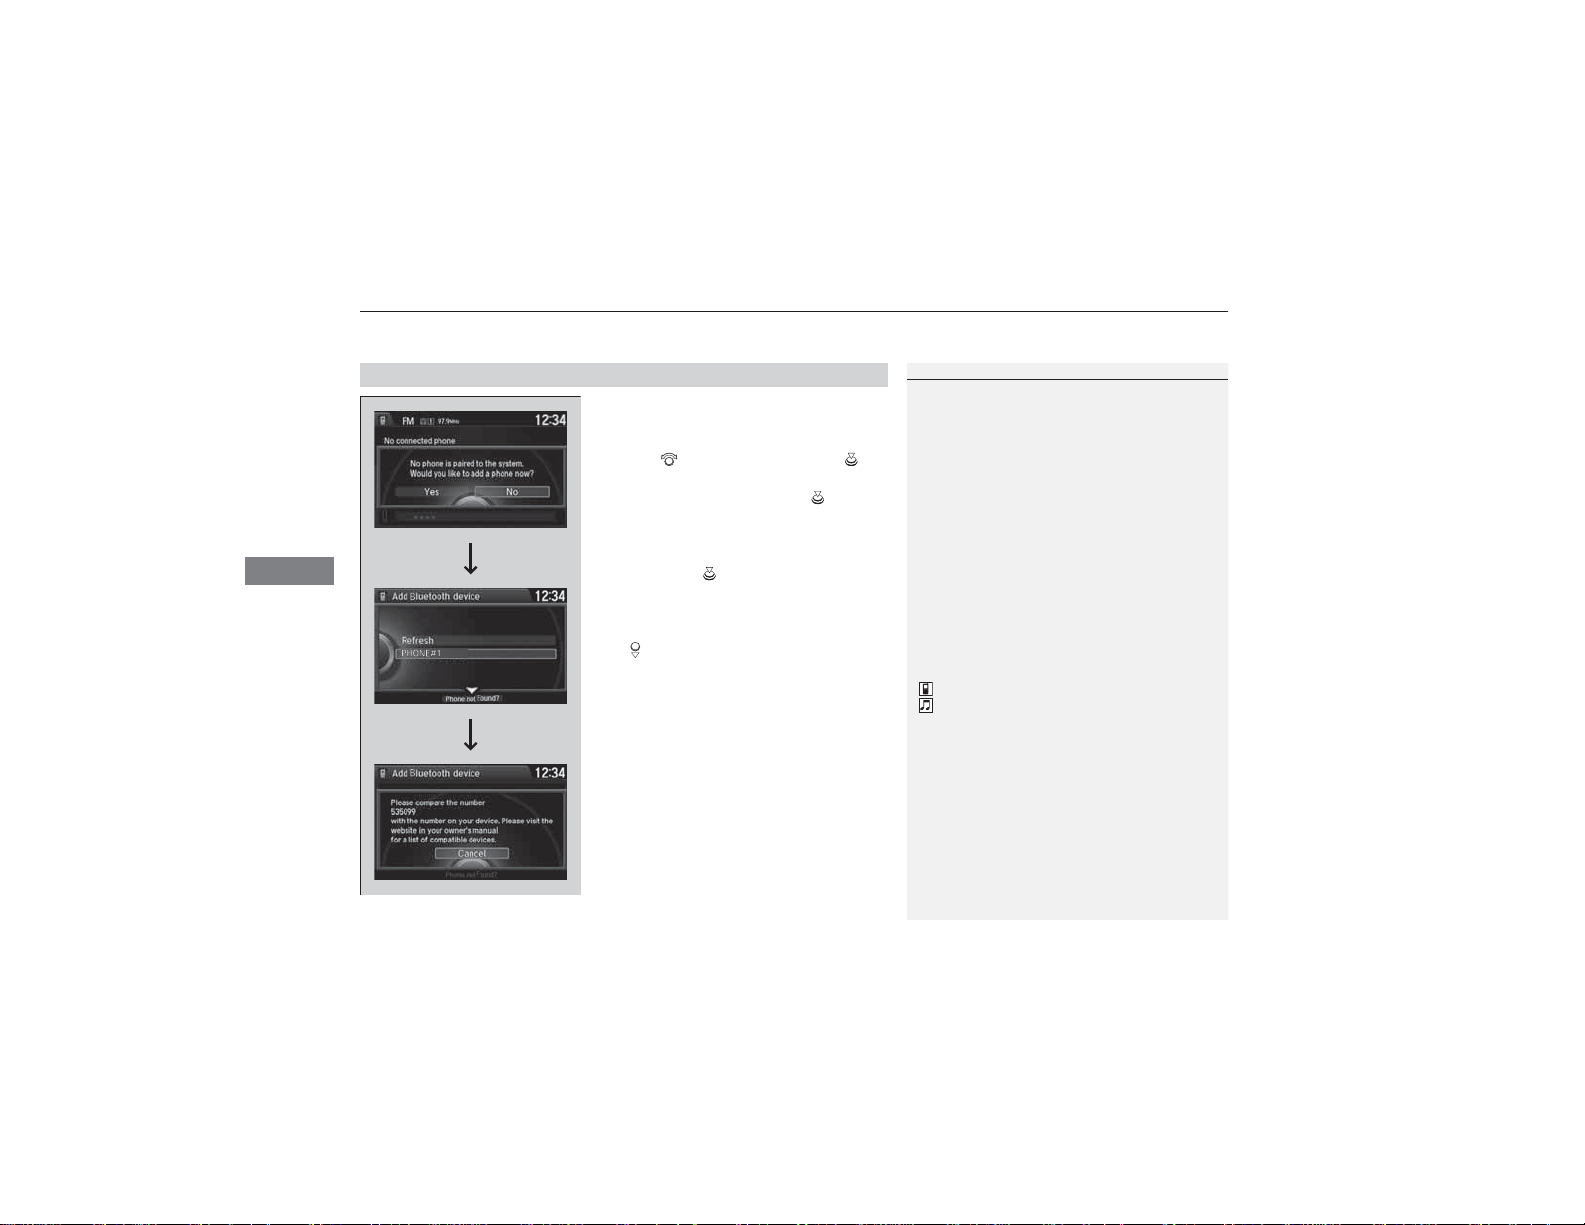
■ To pair a cell phone (when there is no
phone paired to the system)
1. Press the PHONE button.
2. Rotate to select Yes, then press .
3. Make sure your phone is search or
discoverable mode, then press .
u HFL automatically searches for a
Bluetooth device.
4. When your phone appears on the list, select
it by pressing .
u If your phone does not appear, you can
select Refresh to search again.
u If your phone still does not appear, move
to select Phone not Found? and
search for Bluetooth devices using your
phone. From your phone, select
HandsFreeLink.
5. HFL gives you a pairing code on the audio/
information screen.
u Confirm if the pairing code on the screen
and your phone match.
This may vary by phone.
6. You will receive a notification on the screen
if pairing is successful.
Page 27
Features
uuBluetooth® HandsFreeLink®uHFL Menus
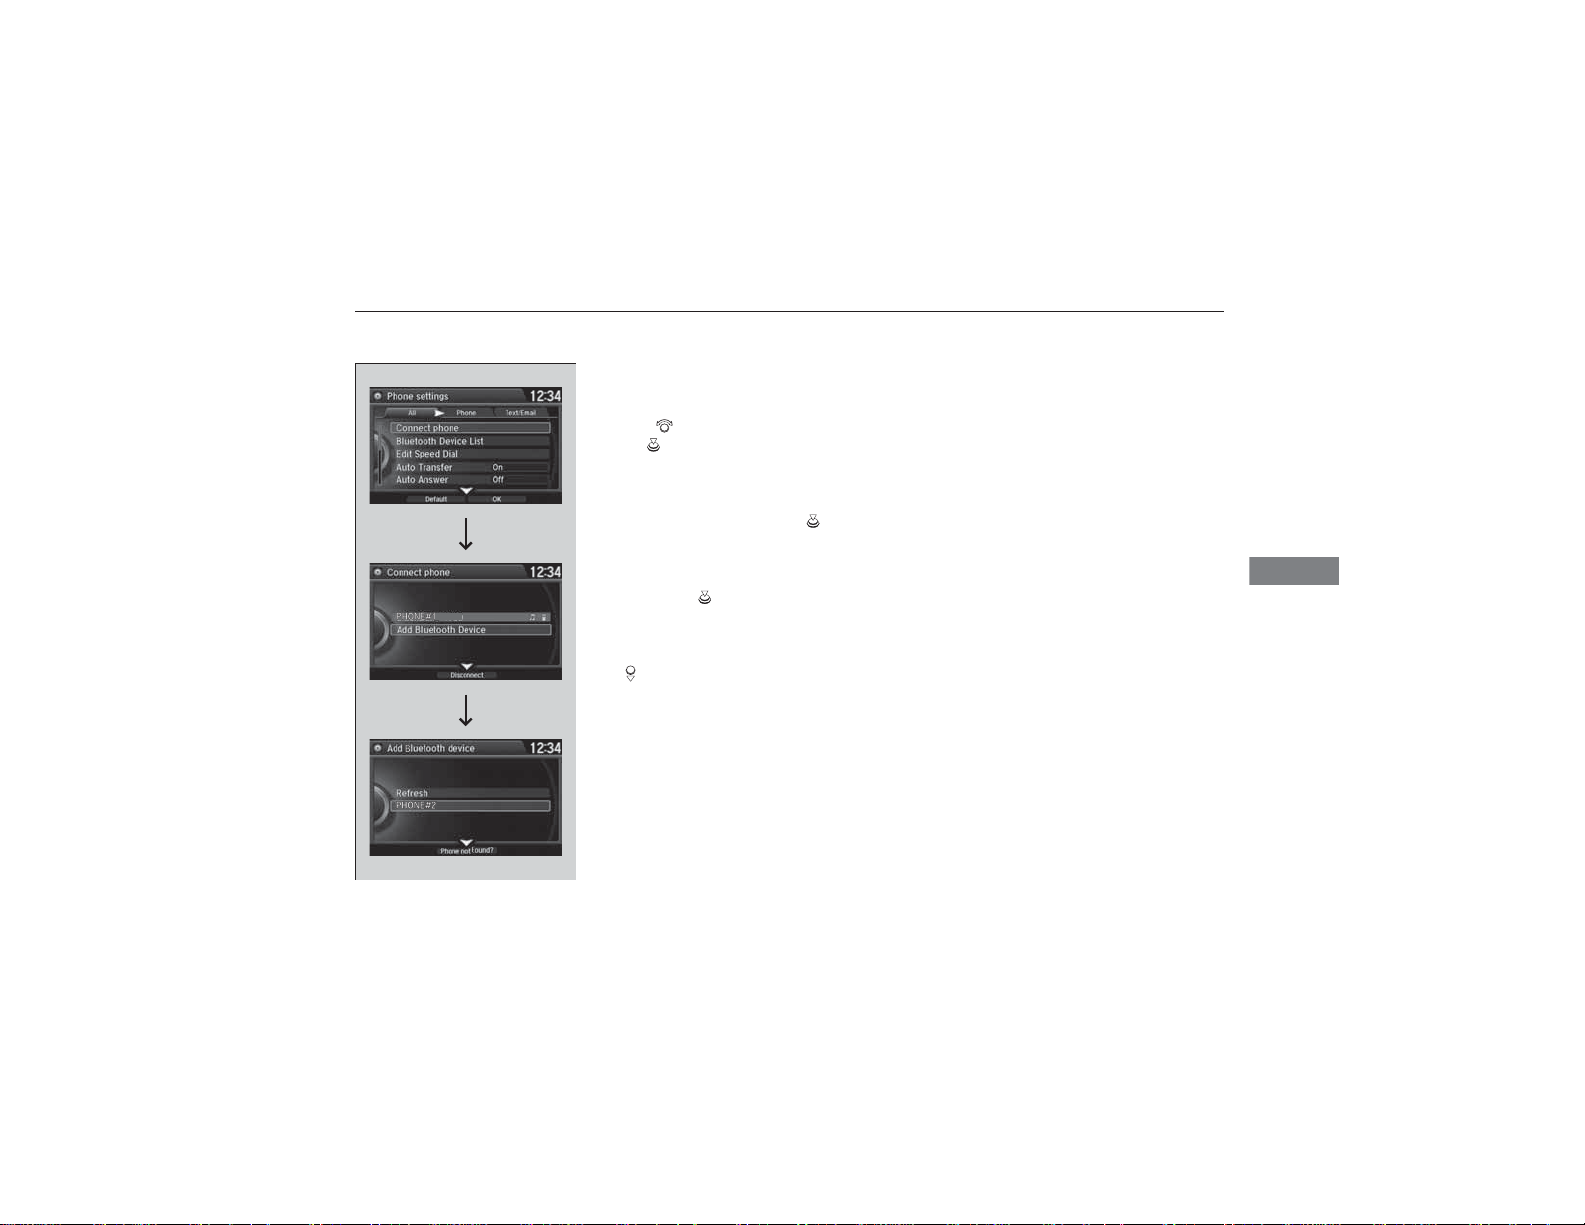
■ To pair a cell phone (when a phone has
already been paired to the system)
1. Press the SETTINGS button.
2. Rotate to select Phone Settings, then
press .
u Repeat the procedure to select Connect
phone, then Add Bluetooth Device.
3. Make sure your phone is in search or
discoverable mode, then press .
u HFL automatically searches for a
Bluetooth device.
4. When your phone appears on the list, select
it by pressing .
u If your phone does not appear, you can
select Refresh to search again.
u If your phone still does not appear, move
to select Phone not Found? and
search for Bluetooth devices using your
phone. From your phone, select
HandsFreeLink.
5. HFL gives you a pairing code on the audio/
information screen.
u Confirm if the pairing code on the screen
and your phone match.
This may vary by phone.
6. You will receive a notification on the screen
if pairing is successful.
Continued
275
Page 28
Features
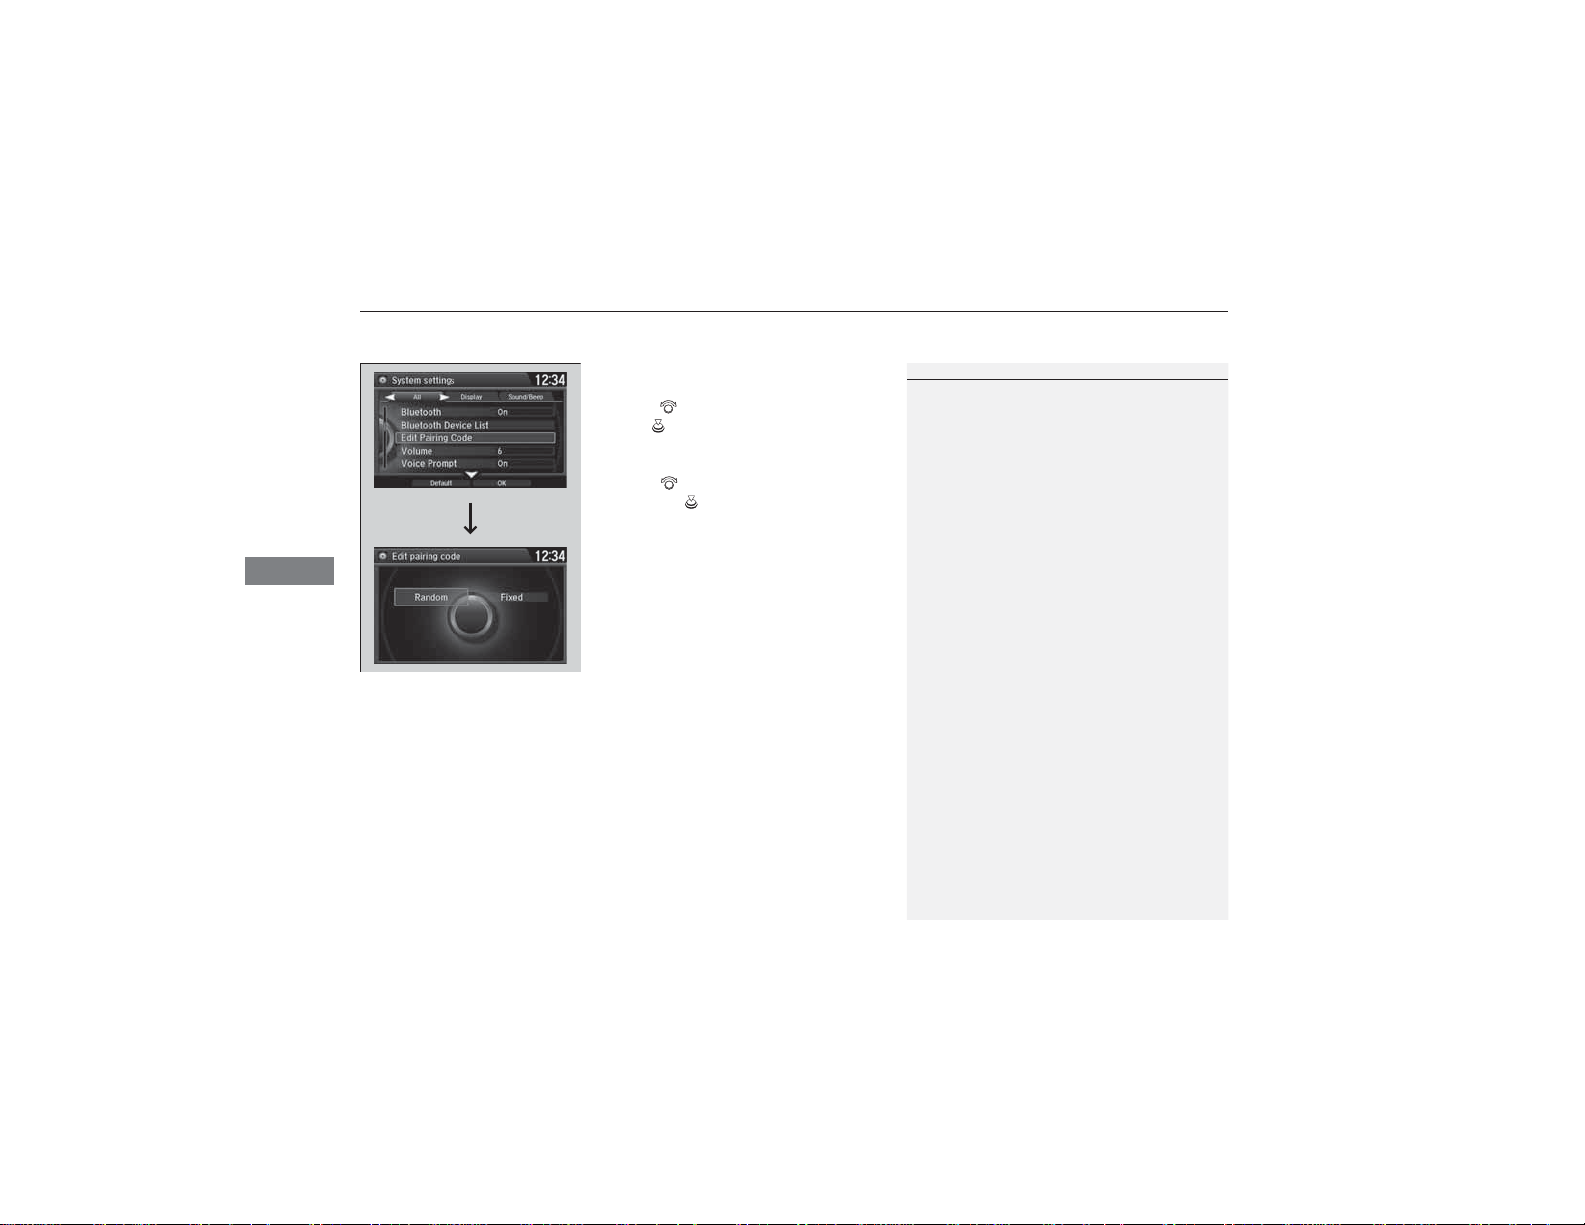
1To change the pairing code setting
The pairing code may be six or four digits depending
on your phone.
The default pairing code is 0000 until you change the
setting.
To create your own, select Fixed, and delete the
current code, then enter a new one.
For a randomly generated pairing code each time you
pair a phone, select Random.
uuBluetooth® HandsFreeLink®uHFL Menus
■ To change the pairing code setting
1. Press the SETTINGS button.
2. Rotate to select System Settings, then
press .
u Repeat the procedure to select Edit
Pairing Code.
3. Rotate to select Fixed or Random,
then press .
276
Page 29
Features
1To replace an already-paired phone with a new phone
The replaced phone will keep the same speed dial
entries, and security PIN information from the
previously paired phone.
uuBluetooth® HandsFreeLink®uHFL Menus
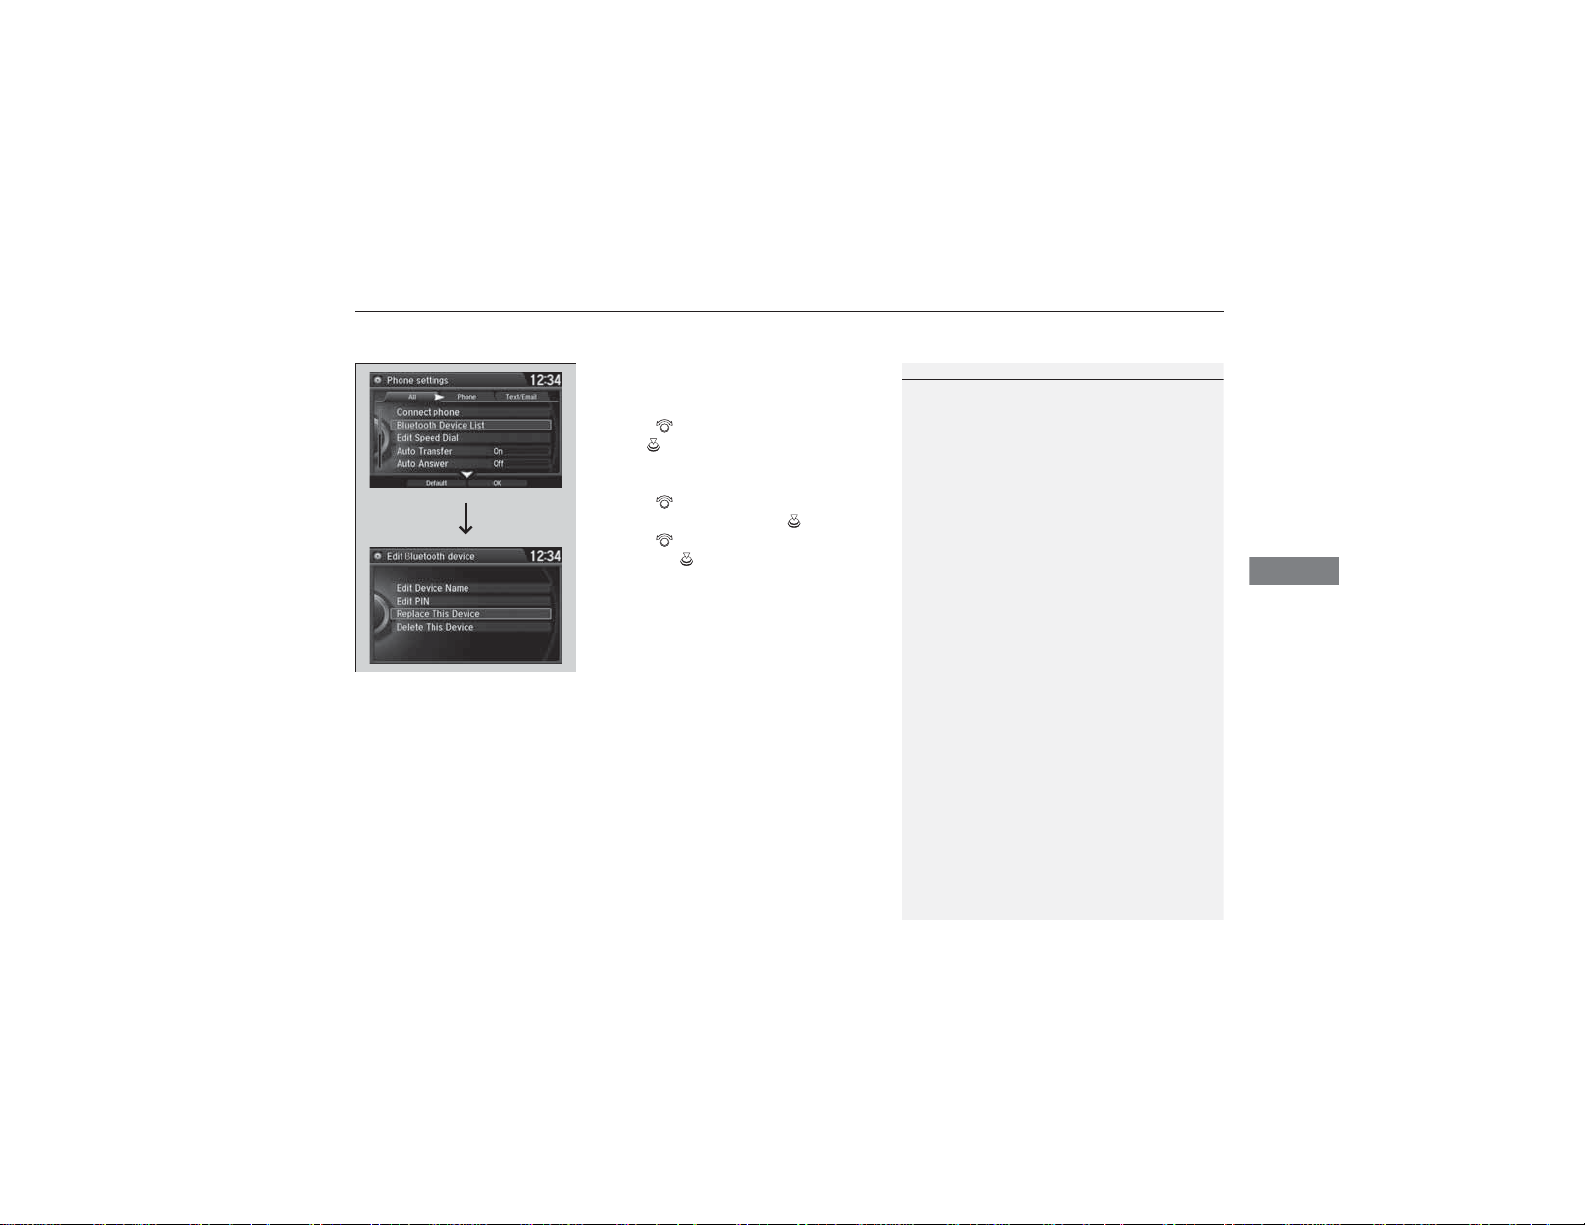
■ To replace an already-paired phone
with a new phone
1. Press the SETTINGS button.
2. Rotate to select Phone Settings, then
press .
u Repeat the procedure to select
Bluetooth Device List.
3. Rotate to select a paired phone you
want to replace, then press .
4. Rotate to select Replace This Device,
then press .
5. HFL enters the pairing process and searches
a new phone.
u Follow the prompts to pair a new phone.
6. You will receive a notification on the screen
if pairing is successful.
Continued
277
Page 30
Features
uuBluetooth® HandsFreeLink®uHFL Menus
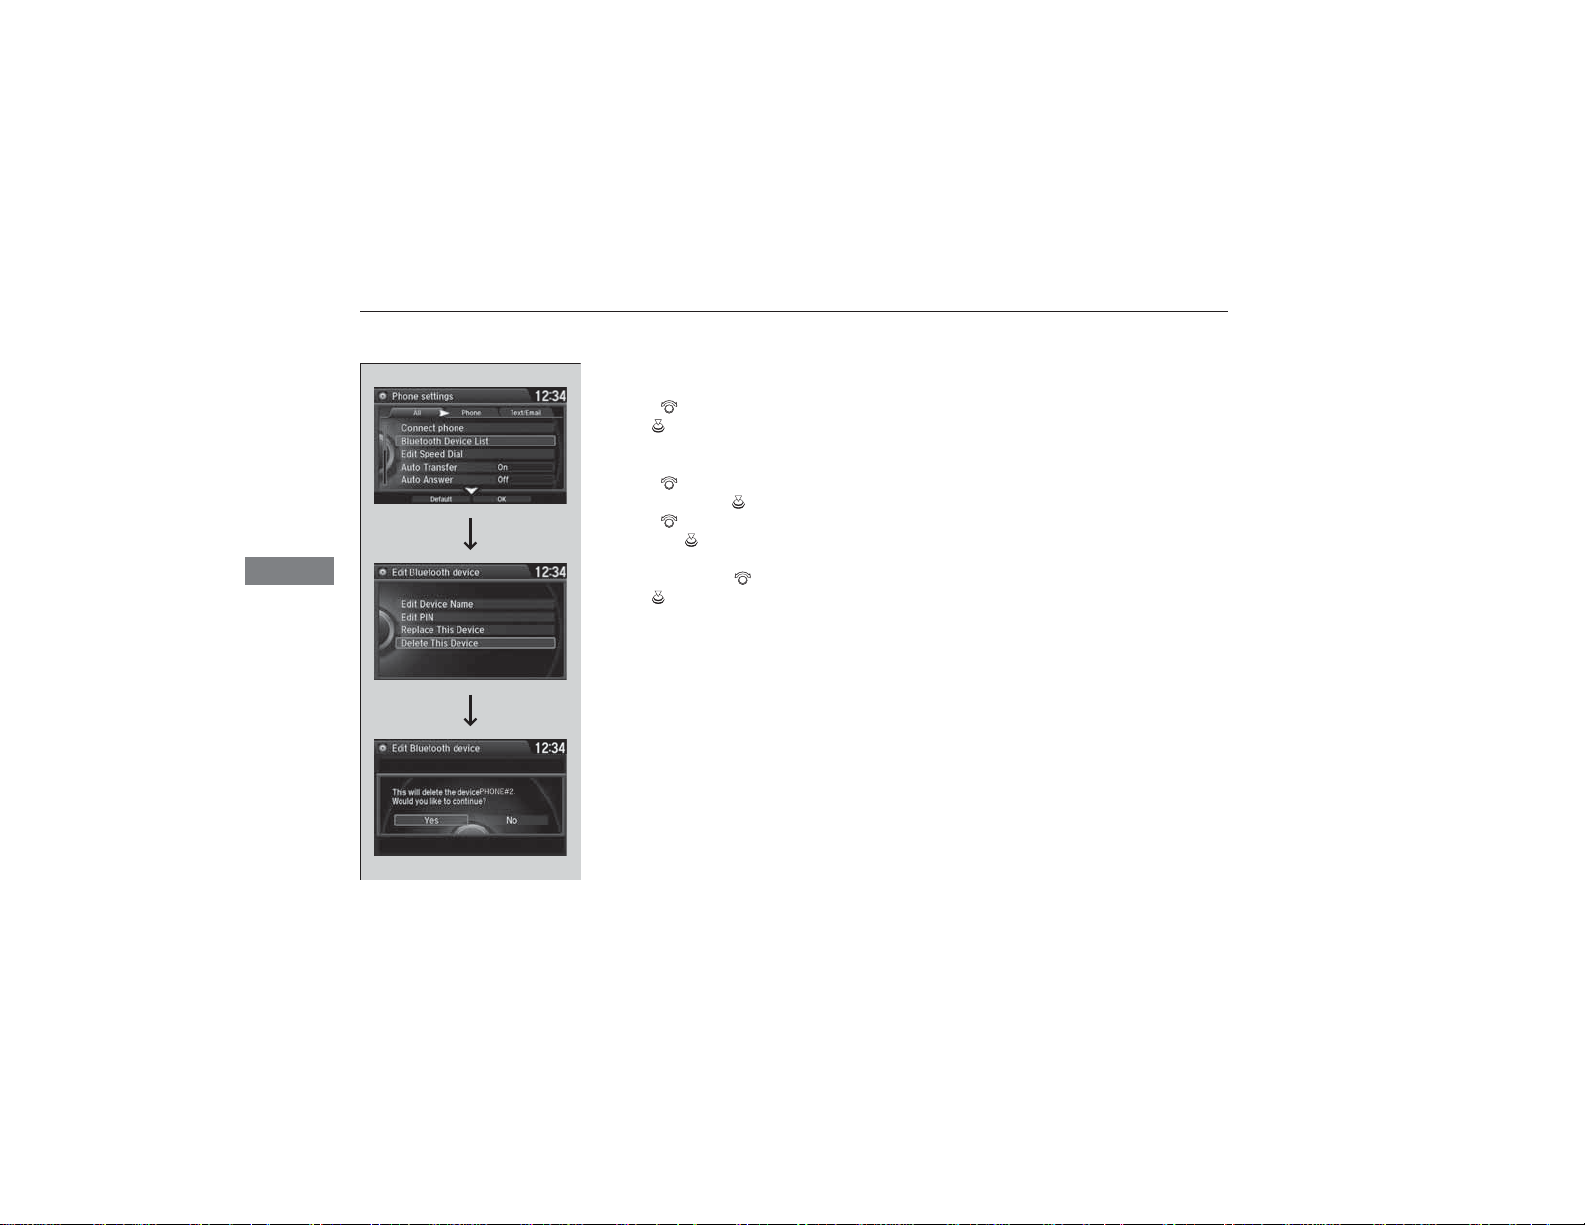
■ To delete a paired phone
1. Press the SETTINGS button.
2. Rotate to select Phone Settings, then
press .
u Repeat the procedure to select
Bluetooth Device List.
3. Rotate to select a phone you want to
delete, then press .
4. Rotate to select Delete This Device,
then press .
5. You will receive a confirmation message on
the screen. Rotate to select Yes, then
press .
6. You will receive a notification on the screen
if it is successful.
278
Page 31

Features
1To turn on or off the text/E-mail notice
On: A pop-up notification comes on every time you
receive a new text message.
Off: The message you receive is stored in the system
without notification.
To Set Up a Text Message/E-mail Options
■
■ To turn on or off the text/E-mail
function
1. Press the SETTINGS button.
2. Rotate to select Phone Settings, then
press .
u Repeat the procedure to select Enable
Text/Email.
u A pop-up menu appears on the screen.
3. Rotate to select On or Off, then press
.
■ To turn on or off the text/E-mail notice
1. Press the SETTINGS button.
2. Rotate to select Phone Settings, then
press .
u Repeat the procedure to select New
Text/Email Alert.
u A pop-up menu appears on the screen.
3. Rotate to select On or Off, then press
.
uuBluetooth® HandsFreeLink®uHFL Menus
Continued
279
Page 32

uuBluetooth® HandsFreeLink®uHFL Menus
Features
1To Create a Security PIN
If the phone is already security PIN protected, you
need to enter the current security PIN before clearing
the PIN or creating a new one.
Audio/information screen
On Demand Multi-Use Display
TM
Audio/information screen
On Demand Multi-Use Display
TM
To Create a Security PIN
■
You can protect each of the six cell phones with a security PIN.
1. Press the SETTINGS button.
2. Rotate to select Phone Settings, then
press .
u Repeat the procedure to select
Bluetooth Device List.
3. Rotate to select a phone you want to
add a security PIN to, then press .
4. Rotate to select Edit PIN, then press .
5. Enter a new four-digit number.
u
Rotate to select, then press .
Move to delete. Rotate to select
OK to enter the security PIN.
u
You can also enter a number using the
icons.
6. Re-enter the four-digit number.
u The screen returns to the screen in step
4.
280
Page 33

Features
Audio/information screen
On Demand Multi-Use Display
TM
Audio/information screen
On Demand Multi-Use Display
TM
Editing User Name
■
uuBluetooth® HandsFreeLink®uHFL Menus
Edit the user name of a paired phone as
follows:
1. Press the SETTINGS button.
2. Rotate to select Phone Settings, then
press .
u Repeat the procedure to select
Bluetooth Device List.
3. Rotate to select a phone you want to
edit, then press .
4. Rotate to select Edit Device Name,
then press .
5. Enter a new name of the phone.
u
Rotate to select, then press .
Move to delete. Rotate or move
to select OK then press to enter the
name.
u
You can also enter a name using the
icons.
Continued
281
Page 34

Features
uuBluetooth® HandsFreeLink®uHFL Menus
Automatic Transferring
■
If you get into the vehicle while you are on the phone, the call can be automatically
transferred to HFL.
Auto Answer
■
You can set HFL to automatically answer an incoming call in four seconds.
1. Press the SETTINGS button.
2. Rotate to select Phone Settings, then
press .
u Repeat the procedure to select Auto
Transfer.
3. Rotate to select On, then press .
1. Press the SETTINGS button.
2. Rotate to select Phone Settings, then
press .
u Repeat the procedure to select Auto
Answer.
3. Rotate to select On, then press .
282
Page 35

Features
1Ring Tone
Fixed: The fixed ring tone sounds from the speaker.
Mobile Phone: The ring tone stored in the
connected cell phone sounds from the speaker.
Off: No ring tones sound from the speaker.
1Use Contact Photo
This function may not be available on some phones.
Ring Tone
■
You can change the ring tone setting.
1. Press the SETTINGS button.
2. Rotate to select Phone Settings, then
press .
u Repeat the procedure to select Ring
Tone.
3. Rotate to select Fixed, Mobile Phone
or Off, then press .
Use Contact Photo
■
You can display a caller’s picture on an incoming call screen.
1. Press the SETTINGS button.
Phone settings
All Phone
Auto Transfer
Auto Answer
Ring Tone
Automatic Phone Sy
Use Contact Photo
Default
On
O
2. Rotate to select Phone Settings, then
press .
u Repeat the procedure to select Use
Contact Photo.
3. Rotate to select On or Off, then press
.
uuBluetooth® HandsFreeLink®uHFL Menus
Continued
283
Page 36

Features
1Automatic Import of Cellular Phonebook and Call History
When you select a person from the list in the cellular
phonebook, you can see up to three category icons.
The icons indicate what types of numbers are stored
for that name.
On some phones, it may not be possible to import the
category icons to HFL.
The phonebook is updated after every connection.
Call history is updated after every connection or call.
uuBluetooth® HandsFreeLink®uHFL Menus
Automatic Import of Cellular Phonebook and Call History
■
■ When Automatic Phone Sync is set to
On:
When your phone is paired, the contents of its
phonebook and call history are automatically
imported to HFL.
■ Changing the Automatic Phone Sync
setting
1. Press the SETTINGS button.
2. Rotate to select Phone Settings, then
press .
u Repeat the procedure to select
Automatic Phone Sync.
3. Rotate to select On or Off, then press
.
Pref
Home
Mobile
Work
Pager
Fax
Car
Other
Message
Voice
284
Page 37

Features
1Speed Dial
When a voice tag is stored, press the button to
call the number using the voice tag. Say “Call” and
the voice tag name.
Speed Dial
■
Up to 20 speed dial numbers can be stored per phone.
To store a speed dial number:
1. Press the PHONE button.
2. Press the MENU button.
3. Rotate to select Speed Dial, then press
.
u Repeat the procedure to select New
Entry.
4. Rotate to select a place to choose a
number from, then press .
From Import from Call History:
u Select a number from the call history.
From Manual Input:
u Input the number manually.
From Import from Phonebook:
u Select a number from the linked cell
phone’s imported phonebook.
5. When the speed dial is successfully stored
from Import from Call History or Import
from Phonebook, you are asked to create
a voice tag for the number. Rotate to
select Yes or No, then press .
6. Using the button, follow the prompts to
store a voice tag for the speed dial entry.
uuBluetooth® HandsFreeLink®uHFL Menus
Continued
285
Page 38

Features
1Speed Dial
Avoid using duplicate voice tags.
Avoid using “home” as a voice tag.
It is easier for HFL to recognize a longer name. For
example, use “John Smith” instead of “John.”
uuBluetooth® HandsFreeLink®uHFL Menus
■ To add a voice tag to a stored speed
dial number
1. Press the SETTINGS button.
2. Rotate to select Phone Settings, then
press .
u Repeat the procedure to select Edit
Speed Dial.
3. Select an existing speed dial entry.
u From the pop-up menu, rotate to
select Edit, then press .
4. Rotate to select Voice Tag, then press
.
u From the pop-up menu, rotate to
select Record, then press .
5. Using the button, follow the prompts to
complete the voice tag.
286
Page 39

Features
■ To delete a voice tag
1. Press the SETTINGS button.
2. Rotate to select Phone Settings, then
press .
u Repeat the procedure to select Edit
Speed Dial.
3. Select an existing speed dial entry.
u From the pop-up menu, rotate to
select Edit, then press .
4. Rotate to select Voice Tag, then press
.
u From the pop-up menu, rotate to
select Clear, then press .
5. You will receive a confirmation message on
the screen. Rotate to select Yes, then
press .
■ To delete a speed dial
1. Press the SETTINGS button.
2. Rotate to select Phone Settings, then
press .
u Repeat the procedure to select Edit
Speed Dial.
3. Select an existing speed dial entry.
u From the pop-up menu, rotate to
select Delete, then press .
4. You will receive a confirmation message on
the screen. Rotate to select Yes, then
press .
Continued
uuBluetooth® HandsFreeLink®uHFL Menus
287
Page 40

Features
1Making a Call
Any voice-tagged speed dial entry, phonebook name,
or number can be dialed by voice from most screens.
Press the button and say “Call” and the voice tag
name, “Call by name” and the phonebook name, or
“Call” and the phone number.
The maximum range between your phone and
vehicles is 30 feet (10 meters).
Once a call is connected, you can hear the voice of
the person you are calling through the audio
speakers.
uuBluetooth® HandsFreeLink®uHFL Menus
Making a Call
■
You can make calls by inputting any phone
number, or by using the imported
phonebook, call history, speed dial entries, or
redial.
288
Page 41

Features
1To make a call using the imported phonebook
This function is disabled while the vehicle is moving.
However, you can call a stored voice-tagged speed
dial number, phonebook name, or number using
voice commands.
2 Limitations for Manual Operation P. 269
2 Speed Dial P. 285
You can use the keyboard on the On Demand MultiUse Display
TM
for an alphabetical search.
■ To make a call using the imported
phonebook
1. Press the PHONE button.
2. Press the MENU button.
3. Rotate to select Phonebook, then
press .
4. The phonebook is stored alphabetically.
Move to Search.
u You can use the keyboard on the touch
screen for an alphabetical search.
5. Rotate to select a number, then press
.
u Dialing starts automatically.
Continued
uuBluetooth® HandsFreeLink®uHFL Menus
289
Page 42

uuBluetooth® HandsFreeLink®uHFL Menus
Features
1To make a call using a phone number
This function is disabled while the vehicle is moving.
However, you can call a stored voice-tagged speed
dial number, phonebook name, or number using
voice commands.
2 Limitations for Manual Operation P. 269
2 Speed Dial P. 285
You can use the keyboard on the On Demand MultiUse Display
TM
to input numbers.
Select numbers, then to start dialing.
■ To make a call using a phone number
1. Press the PHONE button.
2. Press the MENU button.
3. Rotate to select Dial, then press .
4. Rotate to select a number, then press
5. Rotate to select , then press .
■ To make a call using redial
1. Press the PHONE button.
2. Press the MENU button.
3. Rotate to select Redial, then press .
.
u Dialing starts automatically.
u Dialing starts automatically.
290
Page 43

Features
■ To make a call using the call history
1To make a call using the call history
The call history displays the last 20 dialed, received, or
missed calls.
(Appears only when a phone is connected to HFL.)
These icons next to the number indicate the
following:
: Dialed calls.
: Received calls.
: Missed calls.
The call history displays the last 12 dialed, received, or
missed calls.
Steering switches
Steering switches
Call history is stored by All, Dialed,
Received, and Missed.
1. Press the PHONE button.
2. Press the MENU button.
3. Rotate to select Call History, then
press .
4. Move or to select All, Dialed,
Received, and Missed.
5. Rotate to select a number, then press
.
u Dialing starts automatically.
uuBluetooth® HandsFreeLink®uHFL Menus
On MID
Mr.AAA
111AAA####
Mr.BBB
1. Press the button.
2. Shift the left selector wheel right to select
Call History.
3. Roll the left selector wheel to select a
number.
4. Push the left selector wheel or the
button.
u Dialing starts automatically.
Continued
291
Page 44

uuBluetooth® HandsFreeLink®uHFL Menus
Features
1To make a call using a speed dial entry
Move to select More Speed Dials to view another
paired phone’s speed dial list. You can make a call
from that list using the currently connected phone.
When a voice tag is stored, press the button to
call the number using the voice tag.
2 Speed Dial P. 285
Any voice-tagged speed dial entry, phonebook name
or number can be dialed by voice from any screen.
Press the button and follow the prompts.
The speed dial displays the 20 speed dial entries.
Steering switches
Steering switches
■ To make a call using a speed dial entry
1. Press the PHONE button.
2. Press the MENU button.
3. Rotate to select Speed Dial, then press
4. Rotate to select a number, then press
.
.
u Dialing starts automatically.
292
On MID
Mr.AAA
111AAA####
Mr.BBB
1. Press the button.
2. Shift the left selector wheel left to select
Speed Dial.
3. Roll the left selector wheel to select a
number.
4. Push the left selector wheel or the
button.
u Dialing starts automatically.
Page 45

Features
1Receiving a Call
Call Waiting
Press the button to put the current call on hold to
answer the incoming call.
Press the button again to return to the current
call.
Ignore the incoming call if you do not want to answer
it.
Press the button if you want to hang up the
current call.
You can select the icons on the On Demand MultiUse Display
TM
instead of the and buttons.
Receiving a Call
■
When there is an incoming call, an audible
notification sounds (if activated) and the
Incoming call screen appears.
Press the button to answer the call.
Press the button to decline or end the call.
Continued
uuBluetooth® HandsFreeLink®uHFL Menus
293
Page 46

Features
1Options During a Call
Touch Tones: Available on some phones.
You can select the icons on the On Demand MultiUse Display
TM
.
Mute Icon
uuBluetooth® HandsFreeLink®uHFL Menus
Options During a Call
■
The following options are available during a call.
Mute: Mute your voice.
Transfer: Transfer a call from HFL to your phone.
Touch Tones: Send numbers during a call. This is useful when you call a menu-
driven phone system.
The available options are shown on the Phone
screen.
Rotate to select one of the available
options, then press .
uThe mute icon appears when Mute is
selected. Select Mute again to turn it off.
294
Page 47

Features
1Receiving a Text Message/E-mail
The system does not display any received messages
while you are driving. You can only hear them read
aloud.
With some phones, you may be able to display up to
20 most recent text messages and E-mails.
State or local laws may limit your use of the HFL text
message/E-mail feature. Only use the text message/
E-mail feature when conditions allow you to do so
safely.
When you receive a text message or E-mail for the
first time since the phone is paired to HFL, you are
asked to turn the New Text/Email Alert setting to
On.
2 To turn on or off the text/E-mail notice
P. 279
Receiving a Text Message/E-mail
■
HFL can display newly received text messages and E-mails as well as 20 of the most
recently received messages on a linked cell phone. Each received message can be
read aloud and replied to using a fixed common phrase.
1. A pop-up appears and notifies you of a new
text message or E-mail.
2. Rotate to select Read to listen to the
message, then press .
u The text message or E-mail is displayed.
The system automatically starts reading
out the message.
3. To discontinue the message read-out, press
.
Continued
uuBluetooth® HandsFreeLink®uHFL Menus
295
Page 48

Features
1Selecting a Mail Account
You can also select a mail account from the folder list
screen or the message list screen.
Move to select Select Account, then press .
You can only receive notifications from one text
message or mail account at a time.
uuBluetooth® HandsFreeLink®uHFL Menus
Selecting a Mail Account
■
If a paired phone has text message or mail accounts, you can select one of them to
be active and receive notifications.
1. Press the SETTINGS button.
2. Rotate to select Phone Settings, then
press .
u Repeat the procedure to select Select
Account.
3. Rotate to select Text Messages or an
E-mail account you want, then press .
296
Page 49

Features
1Displaying Messages
The icon appears next to an unread message.
If you delete a message on the phone, the message is
also deleted in the system. If you send a message
from the system, the message goes to your phone’s
outbox.
To see the previous or next message, move or
on the text message screen.
Message List
Text Message
Displaying Messages
■
■ Displaying text messages
1. Press the PHONE button.
2. Press the MENU button.
3. Rotate to select Text/Email, then press
.
u Select account if necessary.
4. Rotate to select a message, then press
.
u The text message is displayed. The
system automatically starts reading the
message aloud.
Continued
uuBluetooth® HandsFreeLink®uHFL Menus
297
Page 50

Features
1Displaying E-mails
Received text messages and E-mails may appear in
the message list screen at the same time. In this case,
text messages are titled No subject.
Folder List
Message List
E-mail
uuBluetooth® HandsFreeLink®uHFL Menus
■ Displaying E-mails
1. Press the PHONE button.
2. Press the MENU button.
3. Rotate to select Text/Email, then press
.
4. Rotate to select a folder, then press .
5. Rotate to select a message, then press
.
u The E-mail is displayed. The system
automatically starts reading the message
aloud.
298
Page 51

Features
1Reply to a message
The available fixed reply messages are as follows:
• Talk to you later, I’m driving.
• I’m on my way.
• I’m running late.
• OK
• Yes
• No
You cannot add, edit, or delete reply messages.
uuBluetooth® HandsFreeLink®uHFL Menus
■ Read or stop reading a message
1. Go to the text message or E-mail screen.
u The system automatically starts reading
the message aloud.
2 Displaying Messages P. 297
2. Press to stop reading.
Press again to start reading the message
from the beginning.
■ Reply to a message
1. Go to the text message or E-mail screen.
u The system automatically starts reading
the message aloud.
2 Displaying Messages P. 297
2. Move and rotate to select Reply,
then press .
3. Rotate to select the reply message, then
press .
u The pop-up menu appears on the screen.
4. Select Send to send the message.
u Message Sent appears on the screen
when the reply message was successfully
sent.
Continued
299
Page 52

Features
uuBluetooth® HandsFreeLink®uHFL Menus
■ Making a call to a sender
1. Go to the text message screen.
John 0123456789####
Reply Call
2. Move and rotate to select Call, then
u The system automatically starts reading
the message aloud.
2 Displaying text messages P. 297
press .
300
Page 53

Features
1Compass
*
Compass operation can be affected under the
following conditions:
• Driving near power lines or stations
• Crossing a bridge
• Passing a large vehicle, or driving near a large
object that can cause a magnetic disturbance
• When accessories such as antennas and roof racks
are mounted by magnets
1Compass Calibration
Calibrate the compass in an open area.
While setting the compass, press the BACK button to
cancel the setting mode and return to the previous
screen.
* Not available on all models
Compass
*
When you set the power mode to ON, the compass self-calibrates, and the compass
display appears.
Compass Calibration
If the compass indicates the wrong direction, or the CAL indicator blinks, you need
to manually calibrate the system.
1. Set the power mode to ON.
2. On the top screen of any audio source,
press and hold for five seconds.
uThe display switches to the Compass
settings screen.
3. Rotate to select Calibration, then press
.
4. When the display changes to Calibration
Start, press .
5. Drive the vehicle slowly in two circles.
u The compass starts to show a direction
after the calibration. The CAL indicator
goes off.
301
Page 54

Features
2
3
4
5
6
7
8
9
10
11
12
13
14
15
1Compass Zone Selection
The zone selection is done to compensate the
variation between magnetic north and true north.
If the calibration starts while the audio system is in
use, the display returns to normal after the calibration
is completed.
uuCompass*uCompass Zone Selection
Compass Zone Selection
1. Set the power mode to ON.
2. On the top screen of any audio source,
press and hold for five seconds.
uThe display switches to the Compass
settings screen.
3. Rotate to select Zone Adjust, then
press .
uThe display shows the current zone
number the system is set to.
4. To change the zone, rotate to select the
zone number of your area (See Zone Map),
then press .
Zone Map
Guam Island: Zone 8
Puerto Rico: Zone 11
302
Page 55

Driving
* Not available on all models
This chapter discusses driving, refueling, and information on items such as accessories.
Before Driving
Driving Preparation ..........................304
Maximum Load Limit........................307
Towing a Trailer................................309
Off-Highway Driving Guidelines ..... 320
When Driving
Starting the Engine ..........................322
Precautions While Driving.................327
Automatic Transmission ...................328
Shifting............................................329
Integrated Dynamics System (IDS).....333
Cruise Control ................................. 334
Adaptive Cruise Control (ACC) with Low
Speed Follow (LSF)
*
......................... 337
Forward Collision Warning (FCW)
Lane Departure Warning (LDW)
Lane Keeping Assist System (LKAS)
VSA® (Vehicle Stability Assist), aka ESC
(Electronic Stability Control), System .. 358
Agile Handling Assist System............ 360
Blind Spot Information (BSI) System
Super Handling-All Wheel Drive
*
AWD®)
......................................... 363
Tire Pressure Monitoring System (TPMS)... 363
Tire Pressure Monitoring System (TPMS) -
Required Federal Explanation ......... 365
Braking
Brake System ................................... 367
*
*
..... 350
*
*
TM
(SH-
.. 346
.. 353
... 361
Anti-lock Brake System (ABS) ........... 369
Brake Assist System ......................... 370
Collision Mitigation Braking System
TM
(CMBS
Parking Your Vehicle
Multi-View Rear Camera
Refueling
Fuel Economy.................................... 385
Accessories and Modifications ........ 386
)*..................................... 371
When Stopped ................................ 377
Parking Sensor System
Fuel Information .............................. 383
How to Refuel ................................. 384
*
................... 378
TM
*
................ 382
303
Page 56

Driving
1Exterior Checks
NOTICE
When doors are frozen shut, use warm water around
the door edges to melt any ice. Do not try to force
them open, as this can damage the rubber trim
around the doors. When done, wipe dry to avoid
further freezing.
Do not pour warm water into the key cylinder.
You will be unable to insert key if the water freezes in
the hole.
Heat from the engine and exhaust can ignite
flammable materials left under the hood, causing a
fire. If you’ve parked your vehicle for an extended
period, inspect and remove any debris that may have
collected, such as dried grass and leaves that have
fallen or have been carried in for use as a nest by a
small animal.
Also check under the hood for leftover flammable
materials after you or someone else has performed
maintenance on your vehicle.
Before Driving
Driving Preparation
Check the following items before you start driving.
Exterior Checks
■
• Make sure there are no obstructions on the windows, door mirrors, exterior
lights, or other parts of the vehicle.
u Remove any frost, snow, or ice.
u Remove any snow on the roof, as this can slip down and obstruct your field of
vision while driving. If frozen solid, remove ice once it has softened.
u When removing ice from around the wheels, be sure not to damage the wheel
or wheel components.
• Make sure the hood is securely closed.
u If the hood opens while driving, your front view will be blocked.
• Make sure the tires are in good condition.
u Check air pressure, check for damage and excessive wear.
2 Checking and Maintaining Tires P. 417
• Make sure there are no people or objects behind or around the vehicle.
u There are blind spots from the inside.
304
Page 57

Driving
Interior Checks
1Interior Checks
The headlight aim is set by the factory, and does not
need to be adjusted. However, if you regularly carry
heavy items in the cargo area or tow a trailer, have
the aiming readjusted at a dealer or by a qualified
technician.
■
• Store or secure all items on board properly.
u Carrying too much cargo, or improperly storing it, can affect your vehicle’s
handling, stability, stopping distance, and tires, and make it unsafe.
2 Maximum Load Limit P. 307
• Do not pile items higher than the seat height.
u They can block your view and may be thrown forward in the event of sudden
braking.
• Do not place anything in the front seat footwells. Make sure to secure the floor
mat.
u An object or unsecured floor mat can interfere with your brake and accelerator
pedal operation while driving.
• If you have any animals on board, do not let them move around in the vehicle.
u They may interfere with driving and a crash could occur.
• Securely close and lock all doors and the tailgate.
2 Locking/Unlocking the Doors from the Inside P. 124
• Adjust your seating position properly.
u Adjust the head restraint, too.
2 Adjusting the Seats P. 161
2 Adjusting the Head Restraints P. 164
• Adjust the mirrors and steering wheel properly for your driving.
u Adjust them while sitting in the proper driving position.
2 Adjusting the Steering Wheel P. 157
2 Adjusting the Mirrors P. 158
uuBefore Driving uDriving Preparation
Continued
305
Page 58

uuBefore Driving uDriving Preparation
Driving
• Be sure items placed on the floor behind the front seats cannot roll under the
seats.
u They can interfere with the driver’s ability to operate the pedals, the operation
of the seats, or the operation of the sensors under the seats.
• Everyone in the vehicle must fasten their seat belt.
2 Fastening a Seat Belt P. 34
• Make sure that the indicators in the instrument panel come on when you start the
vehicle, and go off soon after.
u Always have a dealer check the vehicle if a problem is indicated.
2 Indicators P. 70
306
Page 59

Driving
1Maximum Load Limit
Gross Vehicle Weight Rating (GVWR):
The maximum allowable weight of the vehicle, all
occupants, all accessories, all cargo, and the tongue
load.
2 Specifications P. 480
Gross Axle Weight Rating (GAWR):
The maximum allowable weight of the vehicle axle.
2 Specifications P. 480
3
WARNING
Overloading or improper loading
can affect handling and stability
and cause a crash in which you
can be hurt or killed.
Follow all load limits and other
loading guidelines in this manual.
Label Example
Maximum Load Limit
The maximum load for your vehicle is 1,173 lbs (532 kg).
See Tire and Loading Information label attached to the driver’s doorjamb.
This figure includes the total weight of all occupants, cargo, and
accessories, and the tongue load if you are towing a trailer.
Steps for Determining Correct Load Limit -
(1) Locate the statement “The combined weight of occupants and
cargo should never exceed XXX kg or XXX lbs.” on your
vehicle’s placard.
(2) Determine the combined weight of the driver and passengers
that will be riding in your vehicle.
(3) Subtract the combined weight of the driver and passengers
from XXX kg or XXX lbs.
(4) The resulting figure equals the available amount of cargo and
luggage load capacity. For example, if the “XXX” amount
equals 1,400 lbs. and there will be five 150 lb. passengers in
your vehicle, the amount of available cargo and luggage load
capacity is 650 lbs.
(1,400 - 750 (5 x 150) = 650 lbs.)
Continued
uuBefore Driving uMaximum Load Limit
307
Page 60

uuBefore Driving uMaximum Load Limit
Driving
Load Limits Example
Example1
Max Load
1,173 lbs
(532 kg)
Passenger Weight
150 lbs x 2 = 300 lbs
(68 kg x 2 = 136 kg)
Cargo Weight
873 lbs
(396 kg)
Example2
Max Load
1,173 lbs
(532 kg)
Passenger Weight
150 lbs x 5 = 750 lbs
(68 kg x 5 = 340 kg)
Cargo Weight
423 lbs
(192 kg)
(5) Determine the combined weight of luggage and cargo being
loaded on the vehicle. That weight may not safely exceed the
available cargo and luggage load capacity calculated in step 4.
(6) If your vehicle will be towing a trailer, load from your trailer will
be transferred to your vehicle. Consult this manual to
determine how this reduces the available cargo and luggage
load capacity of your vehicle.
In addition, the total weight of the vehicle, all occupants,
accessories, cargo, and trailer tongue load must not exceed the
Gross Vehicle Weight Rating (GVWR) or the Gross Axle Weight
Rating (GAWR). Both are on a label on the driver’s doorjamb.
308
Page 61

Towing a Trailer
Towing Preparation
Towing Load Limits
■
Your vehicle can tow a trailer if you carefully observe the load limits, use the proper
equipment, and follow the towing guidelines. Check the load limits before driving.
Total Load
Number of
occupants
Each weight limit is calculated based on the following conditions:
• Occupants fill seats from the front of the vehicle to the back
• Each occupant weights 150 lbs (68 kg)
• Each occupant has 15 lbs (7 kg) of cargo in the cargo area
Any additional weight, cargo or accessories reduce the maximum trailer weight and
maximum tongue load.
4WD models with
ATF cooler
2 5,000 lbs (2,268 kg) 3,500 lbs (1,588 kg) 3,500 lbs (1,588 kg)
3 4,750 lbs (2,155 kg) 3,250 lbs (1,474 kg) 3,250 lbs (1,474 kg)
4 4,500 lbs (2,041 kg) 3,000 lbs (1,361 kg) 3,000 lbs (1,361 kg)
5 4,250 lbs (1,928 kg) 2,750 lbs (1,247 kg) 2,750 lbs (1,247 kg)
6 4,000 lbs (1,814 kg) 2,500 lbs (1,134 kg) 2,500 lbs (1,134 kg)
7 Towing not recommended
■ Total trailer weight
Do not exceed the maximum allowable
weight of the trailer, cargo, and everything in
or on it shown in the table.
Towing loads in excess of this can seriously
affect vehicle handling and performance and
can damage the engine and drivetrain.
4WD models
without ATF cooler
2WD models
1Towing Load Limits
3
WARNING
Exceeding any load limit or improperly
loading your vehicle and trailer can cause a
crash in which you can be seriously hurt or
killed.
Check the loading of your vehicle and
trailer carefully before starting to drive.
Check if all loads are within limits at a public scale.
If a public scale is not available, add the estimated
weight of your cargo load to the weight of your
trailer (as quoted by the manufacturer), and then
measure the tongue load with an ap propriate scale or
tongue gauge or estimate it based on cargo
distribution.
Refer to the trailer owner’s manual for additional
information.
Break-in Period
Avoid towing a trailer during your vehicle’s first 600
miles (1,000 km).
Never exceed the gross weight ratings.
Gross weight information
2 Vehicle Specifications P. 480
Driving
Continued
309
Page 62

uuTowing a Trailer uTowing Preparation
Tongue Load
Tongue Load
Number of
occupants
4WD models 2WD models
2 500 lbs (227 kg) 350 lbs (159 kg)
3 475 lbs (215 kg) 325 lbs (147 kg)
4 380 lbs (172 kg) 300 lbs (136 kg)
Driving
5 290 lbs (132 kg) 275 lbs (125 kg)
6 165 lbs (75 kg) 150 lbs (68 kg)
7 Towing not recommended
■ Tongue load
The weight of the tongue with a fully loaded
trailer on the hitch should be approximately:
Boat trailers: 5 – 15% of the total trailer
weight
Other trailers: 10 – 15% of total trailer weight
310
Page 63

Driving
■ To estimate the tongue load
Excessive tongue load reduces front tire traction and steering control. Too little
tongue load can make the trailer unstable and cause it to sway.
You can estimate the tongue load by measuring the trailer hitch height from the
ground in the following steps:
1. Park the vehicle on level ground.
2. Measure the distance between the ground and the bottom of the trailer hitch.
3. Connect the fully loaded trailer to the hitch.
4. Measure the distance between the ground and the bottom of the trailer hitch
again.
5. Subtract the second measurement from the first measurement, then refer to the
following table.
If the difference is 4WD models 2WD models
1 inches (2.5 cm) 150 lbs (68 kg)
1 1/2 inches (3.8 cm) 250 lbs (114 kg)
2 inches (5.1 cm) 350 lbs (159 kg)
2 3/8 inches (6.0 cm) 450 lbs (205 kg) —
2 5/8 inches (6.7 cm) 500 lbs (227 kg) —
If the difference becomes more than indicated in the table, distribute the load or
remove cargo as needed.
uuTowing a Trailer uTowing Preparation
Continued
311
Page 64

uuTowing a Trailer uTowing Preparation
Driving
1How to weigh the trailer loads using the public scale
Fully load the vehicle and trailer. An attendant who
watches the scale is needed as all occupants should
stay in the vehicle.
If a public scale is not available, add the estimated
weight of your cargo load to the weight of your
trailer (as quoted by the manufacturer), and then
measure the tongue load with an appropria te scale or
tongue gauge or estimate it based on cargo
distribution.
Weight limit for 2WD models 4WD models
Front gross axle
2,811 lbs
(1,275 kg)
2,910 lbs
(1,320 kg)
Gross vehicle
5,368 lbs
(2,435 kg)
5,677 lbs
(2,575 kg)
Rear gross axle
2,734 lbs
(1,240 kg)
2,965 lbs
(1,345 kg)
Gross combined
8,036 lbs
(3,645 kg)
9,833 lbs
(4,460 kg)
■ How to weigh the trailer loads using the public scale
Check each weight in the order indicated as shown.
Refer to the table on the right for each weight’s limit except for the tongue load.
2 Tongue load P. 310
1. Front gross axle weight.
4. Gross combined weight.
2. Gross vehicle weight.
3. Rear gross axle weight.
5. Hitched trailer weight.
6. Unhitched trailer weight.
• If you cannot weigh the rear axle, subtract 1 from 2.
• The maximum gross combined weight (4) decreases by 2% for every 1,000 feet
(305 meters) of elevation.
• To calculate the tongue load, subtract 5 from 6.
• Refer to the trailer owner’s manual for additional information.
312
Page 65

Driving
1Towing Equipment and Accessories
Make sure that all equipment is properly installed and
maintained, and that it meets federal, state, province/
territory, and local regulations.
Consult your trailer maker for proper installation and
setup of the equipment.
Improper installation and setup can affect the
handling, stability, and braking performance of your
vehicle.
Consult your trailer sales or rental agency if any other
items are recommended or required for your towing
situation.
The lighting and wiring of trailers can vary by type
and brand. If a connector is required, it should only
be installed by a qualified technician.
Trailer packages and products:
• Ball mount, hitch plug, hitch pin etc.
• Wiring harness kit
• Trailer hitch kit (jumper harness included)
2 Trailer brakes P. 314
• Automatic transmission cooler kit
2 Automatic transmission cooler P. 316
Are available at a dealer.
Towing Equipment and Accessories
■
Towing generally requires a variety of supplemental equipment.
To ensure the best quality, we recommend that you purchase Acura equipment
whenever possible.
Continued
uuTowing a Trailer uTowing Preparation
313
Page 66

Driving
1Trailer brakes
The 4-pin gray connector is located under the
instrument panel near the top of the parking brake
pedal.
Electric Brake
(Light Green) (20A)
Ground
(Brown)
Brake
(Green)
Stop
(Violet)
Trailer brake controller
connector’s terminals:
uuTowing a Trailer uTowing Preparation
■ Trailer brakes
Recommended for any trailer with a total weight of 1,000 lbs (450 kg) or more:
There are two common types of trailer brakes: surge and electric. Surge brakes are
common for boat trailers, since the brakes will get wet.
If you choose electric brakes, be sure they are electronically actuated. Do not
attempt to attach trailer brakes to your vehicle’s hydraulic system, as it will lower
braking effectiveness and create a potential hazard.
The 4-pin gray connector installed in your vehicle has all of the circuits required to
install most electric trailer brake controllers.
Have a qualified mechanic install your trailer
brake controller following the trailer brake
controller manufacturer’s instructions. Failure
to properly install the trailer brake controller
may increase the distance it takes for you to
stop your vehicle when towing a trailer.
314
Page 67

Driving
■ Trailer light
1Trailer light
The trailer lighting connector is located behind the
left side panel in the cargo area.
Even if you are planning to use the non-Acura trailer
lighting harness and converter, ask a dealer for the
correct connector and pins.
+B Trailer Charge
+B Trailer Hazard Light
+B Trailer Hazard Light
+B Trailer Back Light
Back Light
+B ELEC Brake
Right Turn Signal
Stop Light
Pins’ wiring color codes and their purposes:
+B Trailer Small
IG2 HAC
Left Turn Signal
Trailer lights and equipment must comply with federal, state, province/territory, and
local regulations. Check with your local trailer sales or rental agency for the
requirements in the area where you plan to tow.
uuTowing a Trailer uTowing Preparation
We recommend that you have a dealer install a Acura wiring harness and converter.
They are designed for your vehicle.
Continued
315
Page 68

Driving
4WD models
uuTowing a Trailer uTowing Preparation
■ Hitches
Read the trailer manufacturer’s instructions, and select the appropriate draw bar for
the height of the trailer you will be towing.
■ Weight distribution hitches
Your vehicle is designed to tow without the need for a load distributing hitch. If you
wish to use one, please consult your trailer maker for proper installation and set-up.
Improper set-up could degrade the handling, stability, and braking performance of
your vehicle.
■ Safety chains
Always use safety chains when you tow a trailer. Leave enough slack to allow the
trailer to turn corners easily, but do not allow the chains to drag on the ground.
■ Sway control
This device can be used if your trailer tends to sway. Your trailer maker can tell you
what kind of sway control you need and how to install it. Improper installation could
degrade the handling and stability of your vehicle.
■ Automatic transmission cooler
Install an additional ATF (automatic transmission fluid) cooler to help prevent the
transmission from overheating, and damaging. You can get the additional ATF
cooler at a dealer.
An additional ATF cooler is required to keep the transmission from overheating when
towing more than 3,500 lbs (1,588 kg). You can get the additional ATF cooler at a dealer.
■ Trailer mirrors
Many states, provinces and territories require special exterior mirrors when towing a
trailer. Install special mirrors whenever you cannot clearly see behind you, or if the
trailer creates a blind spot.
316
Page 69

uuTowing a Trailer uTrailer Stability Assist
Driving
1Trailer Stability Assist
*
Trailer stability assist is not a function that prevents
the vehicle and trailer from swaying. Avoid high
speeds, abrupt steering, improper trailer load, and
sudden braking to keep the trailer from swaying.
When swayed too severely, the system becomes
ineffective, and you may loose control of your
vehicle, causing the trailer to roll over or get
damaged.
2 Driving Safely with a Trailer P. 318
Trailer towing sway is caused by:
• Crosswinds
• Improper towbar down load
• Excessive Speed
The VSA® system indicator blinks during the trailer
stability assist operation.
2 VSA® Operation P. 358
* Not available on all models
*
Trailer Stability Assist
*
Helps to stabilize the vehicle and trailer when the trailer severely sways.
■ How trailer stability assist works
When the vehicle and trailer become unstable while driving, trailer stability assist
determines the cause. If the trailer oscillation is detected as the cause, and the
swaying increases, the system applies the brakes or controls engine output to reduce
vehicle speed.
Both the vehicle and trailer brake lights come on automatically if you brake to
reduce vehicle speed.
317
Page 70

uuTowing a Trailer uDriving Safely with a Trailer
Driving
1Driving Safely with a Trailer
Parking
In addition to the normal precautions, place wheel
chocks at each of the trailer’s tires.
1Towing Speeds and Gears
When towing a fixed-sided trailer (e.g., camper), do
not exceed 55 mph (88 km/h).
At higher speeds, the trailer may sway or affect
vehicle handling.
Driving Safely with a Trailer
Things You Need To Know Before Towing a Trailer
■
• Have the trailer properly serviced and keep it in good condition.
• Make sure that all the weights and load in the vehicle and trailer are within limits.
2 Towing Load Limits P. 309
• When towing more than 3,500 lbs (1,590 kg), use of gasoline with a pump
octane number of 91 or higher is recommended.
uTowing performance can be affected by high altitude, high temperature, or
steep uphill.
• Securely attach the hitch, safety chains, and other necessary parts to the trailer.
• Securely store all the items in and on the trailer so that they do not shift while
driving.
• Check if the lights and brakes on the trailer are working properly.
• Check the pressures of the trailer tires, including the spare.
Towing Speeds and Gears
■
• Drive slower than normal.
• Obey posted speed limits for vehicles with trailers.
• Use the
■
• Turn more slowly and with a wider turning arc than normal.
• Allow more time and distance for braking.
• Do not brake or turn suddenly.
(D position when towing a trailer on level roads.
Turning and Braking
318
Page 71

Driving
Driving in Hilly Terrain
■
• Monitor your temperature gauge. If it nears the red (Hot) mark, turn off the
climate control system and reduce speed. Pull to the side of the road safely to cool
down the engine if necessary.
• Shift to the
Retrieving a Boat
■
If the vehicle tires slip when retrieving a boat from the water, keep the transmission
in
(D and do not use the sequential shift mode in (S. This prevents damage to the
transmission.
(S position if the transmission shifts frequently.
Towing Your Vehicle
Your vehicle is not designed to be towed behind a motor home. If your vehicle needs
to be towed in an emergency, refer to the emergency towing information.
2 Emergency Towing P. 475
uuTowing a Trailer uTowing Your Vehicle
319
Page 72

Driving
1Off-Highway Driving Guidelines
Failure to operate your vehicle correctly might result
in a crash or a rollover.
2 Important Handling Information P. 28
2 Precautions While Driving P. 327
Spinning the tires can also damage the SH-AWD
system.
3
WARNING
Improperly operating this vehicle on or off
pavement can cause a crash or rollover in
which you and your passengers can be
seriously injured or killed.
• Follow all instructions and guidelines in
this owner’s manual.
• Keep your speed low, and don’t drive
faster than conditions permit.
Off-Highway Driving Guidelines
General Information
Your vehicle has been designed primarily for use on pavement, however, its higher
ground clearance allows you to occasionally travel on unpaved roads. It is not
designed for trail-blazing, or other challenging off-road activities.
If you decide to drive on unpaved roads, you will find that it requires somewhat
different driving skills and that your vehicle will handle somewhat differently than it
does on pavement. Pay attention to the precautions and tips in this section, and get
acquainted with your vehicle before leaving the pavement.
Important Safety Precautions
To avoid loss of control or rollover, be sure to follow all precautions and
recommendations:
• Be sure to store cargo properly and do not exceed your cargo load limits.
2 Maximum Load Limit P. 307
• Whenever you drive, make sure you and your passengers always wear seat belts.
• Keep your speed low, and never go faster than the conditions allow.
• It’s up to you to continually assess the situation and drive within the limits.
320
Page 73

Driving
uuOff-Highway Driving GuidelinesuAvoiding Trouble
Avoiding Trouble
• Check Out Your Vehicle before you leave the pavement and make sure that all
scheduled maintenance has been completed. Pay special attention to the
condition of the tires, and check the tire pressures.
• Remember the route you choose presents limits (too steep or bumpy), you have
limits (driving skill and comfort), and your vehicle has limits (traction, stability, and
power). Failing to recognize these limits will likely put you and your passengers in
a hazardous situation.
• Accelerating and Braking should be done slowly and gradually. Trying to start
or stop too fast can cause a loss of traction and you could lose control.
• Avoiding Obstacles and Debris in the road reduces the likelihood of a rollover
or damage to your suspension or other components.
• Driving on Slopes increases your risk of a rollover, particularly if you attempt to
drive across a slope that is too steep. Going straight up or down a slope is usually
the safest. If you can’t clearly see all conditions or obstacles on a slope, walk it
before you drive it. If there is any doubt whether you can safely pass, don’t try it.
Find another route. If you get stuck when climbing, do not try to turn around.
Back down slowly following the same route you took up the hill.
• Crossing a Stream - Avoid driving through deep water. If you encounter water
in your route (a small stream or large puddle, for example), evaluate it carefully
before going ahead. Make sure it is shallow, flowing slowly, and has firm ground
underneath. If you are not sure of the depth or the ground, turn around and find
another route. Driving through deep water can also damage your vehicle. The
water can get into the transmission and differential, diluting the lubricant and
causing an eventual failure. It can also wash the grease out of the wheel bearings.
• If You Get Stuck, carefully go in the direction that you think will get you
unstuck. Do not spin the tires as this will only make things worse and could
damage the transmission. If you are unable to free yourself, your vehicle will need
to be towed. Front and rear tow hooks are provided for this purpose.
321
Page 74

Driving
When Driving
1Starting the Engine
Keep your foot firmly on the brake pedal when
starting the engine.
The engine is harder to start in cold weather and in
thinner air found at altitudes above 8,000 feet (2,400
meters).
When starting the engine in cold weather, turn off all
electrical accessories such as the lights, climate control
system, and rear defogger in order to reduce battery drain.
If you live in a region where winter is extremely cold,
an engine block heater will improve starting and
warming of the engine. If temperatures consistently
below -22°F (-30°C) are expected, the coolant
mixture should be changed to a higher concentration
to prevent freezing. Consult a dealer for details.
If the exhaust system sounds abnormal or you can
smell exhaust gas inside the vehicle, have your vehicle
checked by a dealer. There may be a problem with
the engine or exhaust system.
Bring the keyless access remote close to the ENGINE
START/STOP button if the battery in the keyless
access remote is weak.
2 If the Keyless Access Remote Battery is
Weak P. 458
The engine may not start if the keyless access remote
is subjected to strong radio waves.
Do not hold the ENGINE START/STOP button to
start the engine.
If the engine does not start, wait at least 10 seconds
before trying again.
Brake Pedal
Starting the Engine
1. Make sure the parking brake is applied.
322
2. Check that the shift lever is in
(P, then
depress the brake pedal.
u Although it is possible to start the vehicle
in
(N, it is safer to start it in (P.
3. Press the ENGINE START/STOP button
without depressing the accelerator pedal.
The engine will crank until it starts.
Page 75

Driving
1Starting the Engine
The immobilizer system protects your vehicle from
theft.
If an improperly coded device is used, the engine’s
fuel system is disabled.
2 Immobilizer System P. 135
Stopping the Engine
■
You can turn the engine off when the vehicle is completely stopped.
1. Shift to
(P.
2. Press the ENGINE START/STOP button with your foot on the brake pedal.
uuWhen Driving uStarting the Engine
Continued
323
Page 76

uuWhen Driving uStarting the Engine
Driving
1Remote Engine Start with Vehicle Feedback
*
WARNING: Carbon monoxide gas is toxic and can
rapidly accumulate in closed or even partly enclosed
areas.
Breathing it can cause unconsciousness and even kill
you.
Never use the remote engine starter with the vehicle
parked in a garage or other areas with limited
ventilation.
Operate the remote in an open space from distances
up to 328 feet (100 meters) from the vehicle. If there
are buildings and obstacles between your vehicle and
the remote, the range will be reduced.
This distance may vary by external electrical
interference.
The engine may not start by the remote engine start
if:
• You have disabled a remote engine start setting
using the multi-information display (MID).
• The power mode is not in VEHICLE OFF (LOCK).
• The shift lever is in a position other than (P.
• The hood is open, or any door or the tailgate is
unlocked.
• You have already used the remote twice to start
the engine.
• Another registered keyless access remote is in the
vehicle.
• There is any antenna failure.
• Door is unlocked with the built-in key.
With the doors locked, Press the button,
then press and hold the button.
* Not available on all models
Remote Engine Start with Vehicle Feedback
■
*
You can remotely start the engine using the two-way keyless access remote from
distances up to 328 feet (100 meters) from the vehicle.
■ To start the engine
Go within the range,
and try again.
Amber LED: Blinks when any button is pressed.
Continues to blink
during a vehicle
self check until the
engine starts.
Green LED: Comes on while
the engine is running.
Red LED: Blinks when the
remote is out of the keyless
access system range.
The engine runs for up to 10 minutes without you starting the vehicle.
To extend the run time for another 10 minutes during the first run, press the
button, then press and hold the button.
uThe amber LED blinks, then the green LED comes back on if a 10-minute
extension request was transmitted successfully.
After pressing the (lock) button, wait for the green LED to blink. This indicates that
the all the doors and the tailgate are locked.
324
Page 77

Driving
■ To stop the engine
Press and hold the button
for one second.
1Remote Engine Start with Vehicle Feedback
*
• The engine oil pressure is low.
• The engine coolant temperature is extremely high.
• The telematics unit malfunctions.
• The security system alarm is not set.
Before starting the engine, make sure to check the
door lock status using the remote. When you press
the button, wait for the green LED to blink. If
the red LED turns on, the doors and tailgate did not
lock, and the engine does not start.
While the engine is running, the vehicle will
automatically precondition inside the vehicle.
When it is warm outside:
• The air conditioning is activated in recirculation
mode.
• The seat ventilation is activated
*
.
When it is cold outside:
• The defroster is activated at a moderately warm
temperature.
• The rear defogger and door mirror heaters are
activated.
• The seat and heated steering wheel are activated
*
.
2 Heated Steering Wheel
*
P. 181
2 Front Seat Heaters and Seat
Ventilation
*
P. 182, 183
* Not available on all models
Go within the range,
and try again.
uuWhen Driving uStarting the Engine
Amber LED: Blinks when any
button is pressed.
Red LED:
●
Comes on for one second to let you
know that the engine has stopped.
●
Blinks when the remote is out of
the keyless access system range.
The engine will not stop.
Continued
325
Page 78

uuWhen Driving uStarting the Engine
Driving
1Starting to Drive
The engine stops when the shift lever is moved out of
(P before the ENGINE START/STOP button is
pressed. Follow the step 1 when starting to drive.
When the engine was started using the two-way keyless
access remote
*
When the engine was started using the two-way keyless access remote
*
When the engine was started in any case
1Hill start assist system
Hill start assist may not prevent the vehicle from
rolling downhill on a very steep or slippery slope, and
will not operate on small inclines.
Hill start assist is not a replacement for the parking
brake.
* Not available on all models
Starting to Drive
■
1. Depress the brake pedal and press the ENGINE START/STOP button
simultaneously.
2. Keeping your right foot on the brake pedal, release the parking brake. Check that
the parking brake indicator has gone off.
2 Parking Brake P. 367
3. Put the shift lever in (D. Select (R when reversing.
4. Gradually release the brake pedal and gently depress the accelerator pedal to pull
away.
■ Hill start assist system
Hill start assist keeps the brake engaged briefly to help prevent the vehicle from
rolling on inclines as you move your foot from the brake pedal to the accelerator.
Move the shift lever to
then release the brake pedal.
The brakes remain engaged briefly as you release the brake pedal.
326
(D or (S when facing uphill, or (R when facing downhill,
Page 79

Driving
1Precautions While Driving
NOTICE
NOTICE
If you repeatedly turn the steering wheel at an
extremely low speed, or hold the steering wheel on
the full left or right position for a while, the system
heats up. The system goes into a protective mode,
and limits its performance. The steering wheel
becomes harder and harder to operate. Once the
system cools down, the EPS system is restored.
Repeated operation under these conditions can
eventually damage the system.
If the power mode is set to ACCESSORY or VEHICLE
OFF (LOCK) while driving, the engine will shut down
and all steering and brake power assist functions will
stop, making it difficult to control the vehicle.
Do not put the shift lever in
(N, as you will lose
engine braking (and acceleration) performance.
During the first 600 miles (1,000 km) of operation,
avoid sudden acceleration or full throttle operation so
as not to damage the engine or powertrain.
Avoid hard braking for the first 200 miles (300 km).
You should also follow this when the brake pads are
replaced.
Precautions While Driving
Driving Guidelines for Your Utility Vehicle
■
Utility vehicles have a significantly higher rollover rate than other types of vehicles.
To prevent rollovers or loss of control:
• Take corners at slower speeds than you would with a passenger vehicle.
• Avoid sharp turns and abrupt maneuvers whenever possible.
• Do not modify your vehicle in any way that you would raise the center of gravity.
• Do not carry heavy cargo on the roof.
In Rain
■
Avoid driving in deep water and on flooded roads. This can damage the engine,
driveline, or cause electrical component failure.
Other Precautions
■
If there is a strong impact with something under the vehicle, stop in a safe location.
Check the underside of the vehicle for damage or any fluid leaks.
uuWhen Driving uPrecautions While Driving
Do not operate the shift lever while pressing the
accelerator pedal. You could damage the
transmission.
327
Page 80

Driving
1Driving Guidelines for Your Utility Vehicle
Failure to operate your vehicle correctly might result
in a crash or a rollover.
2 Important Handling Information P. 28
2 Precautions While Driving P. 327
uuWhen Driving uAutomatic Transmission
Automatic Transmission
Creeping
■
The engine runs at a higher idle speed and creeping increases.
Keep the brake pedal firmly depressed when stopped.
Kickdown
■
Quickly depressing the accelerator pedal while driving uphill may cause the
transmission to drop to a lower gear, unexpectedly increasing vehicle speed. Depress
the accelerator pedal carefully, especially on slippery roads and curves.
328
Page 81

Shifting
Change the shift position in accordance with your driving needs.
■ Shift lever positions
Park
Used when parking or starting the
engine
Release Button
Reverse
Used when reversing
Neutral
Used when idling
uuWhen DrivinguShifting
1Shifting
You cannot change the power mode from ON to
VEHICLE OFF (LOCK) unless the shift lever is in
The vehicle may move forward very slightly even in
(N while the engine is cold.
Depress the brake pedal firmly and, when necessary,
apply the parking brake.
When shifting gears in extremely low temperatures
(-22°F/-30°C), there may be a short delay before the
shift indicated in the display. Always confirm you are
in the correct gear before driving.
(P.
Drive
Used:
●
For normal driving (gears change
between 1st and 6th automatically)
●
When temporarily driving in the
sequential mode
Drive (S)
Used for:
●
Automatically changing gears
between 1st and 5th (5th gear is
used only at high speed)
●
Driving in the sequential mode
Continued
Driving
329
Page 82

Driving
1Shift Lever Operation
NOTICE
When you change the shift lever from (D to (R and
vice versa, come to a complete stop and keep the
brake pedal depressed.
Operating the shift lever before the vehicle has come
to a complete standstill can damage the transmission.
Use the shift lever position indicator to check the
lever position before pulling away.
Whichever position the shift lever is in when driving,
a blinking transmission indicator indicates a
transmission problem.
Avoid sudden acceleration and have the transmission
checked by a dealer as soon as possible.
The fuel supply may be cut off if you drive at engine
speeds in or over the tachometer’s red zone (engine
speed limit). If this happens, you may experience a
slight jolt.
It may not be possible to operate the shift lever if the
brake pedal is applied while the shift lever release
button is held down.
Depress the brake pedal first.
Tachometer’s red zone
Shift Lever Position Indicator
Depress the brake pedal and press
the shift lever release button to shift.
Shift without pressing the shift lever
release button.
Press the shift lever release button
and shift.
M (Sequential Shift mode) Indicator/
Gear Position Indicator
uuWhen Driving uShifting
Shift Lever Operation
■
330
Page 83

Driving
Sequential Shift Mode
■
Use the paddle shifters to change between 1st and 6th gears without removing your
hands from the steering wheel. The transmission will switch to the sequential shift
mode.
■ When the shift lever is in (D:
The vehicle will go into the sequential shift mode momentarily, and the gear position
indicator will come on.
Once you start traveling at a constant speed, the sequential shift mode will
automatically switch off, and the gear position indicator will go off.
Hold the
(+ paddle shifter for two seconds to return to normal drive.
■ When the shift lever is in (S:
The vehicle will go into the sequential shift mode, and the M (sequential shift mode)
indicator and gear position indicator will come on. At speeds of 6 mph (10 km/h) or
less, the vehicle automatically shifts down into 1st gear. If you do not operate the
paddle shifters while in 1st gear, the transmission automatically shifts up to 2nd
gear.
You can only pull away in 1st or 2nd gear.
uuWhen DrivinguShifting
When switching out of the sequential shift mode, move the shift lever from
(D. When the sequential shift mode is canceled, the M indicator and gear position
indicator go off.
(S to
Continued
331
Page 84

uuWhen Driving uShifting
Driving
1Sequential Shift Mode Operation
Each paddle shift operation makes a single gear
change.
To change gears continuously, release the paddle
shifter before pulling it again for the next gear.
Recommended Shift Points
Use this table as a guideline for efficient fuel
economy and effective emission control.
The gear position indicator blinks when you cannot
shift up or down. It indicates that your vehicle speed
is not in its allowable gear shifting range.
Slightly accelerate to shift up and decelerate to shift
down while the indicator is blinking.
Shift Up Normal Acceleration
1st to 2nd 15 mph (24 km/h)
2nd to 3rd 25 mph (40 km/h)
3rd to 4th 40 mph (64 km/h)
4th to 5th 45 mph (72 km/h)
5th to 6th 50 mph (80 km/h)
■ Second gear lock mode
If you pull the
the gear position will be locked in 2nd gear. This makes it easier to pull away on
slippery surfaces such as snow covered roads.
(+ paddle shifter while stopped or driving at 6 mph (10 km/h) or less,
To cancel the 2nd gear lock mode, pull the
from
(S to (D.
Sequential Shift Mode Operation
■
Paddle Shifter (Shift down)
(- (+ Paddle Shifter (Shift up)
Downshifting when pulling
the
(- paddle shifter.
(Changes to a lower gear.)
332
(- paddle shifter, or move the shift lever
Upshifting when pulling
the (+ paddle shifter.
(Changes to a higher gear.)
Page 85

Driving
Normal
Balanced driving
performance for most
driving situations.
Sport
Enhances vehicle response
feel through decreased
steering assist, heightened
throttle response, increased
SH-AWD
*
torque bias, and
modified active sound
control.
Comfort
Maximizes driver comfort
through increased steering
assist.
IDS Button
* Not available on all models
Integrated Dynamics System (IDS)
Modifies the dynamic character of the vehicle. There are three IDS modes to select
from: Comfort, Normal, and Sport.
Press the IDS button to select a mode. The mode you have selected appears on the
MID.
You can customize the IDS mode default setting using the MID.
2 Customized Features P. 104
uuWhen DrivinguIntegrated Dynamics System (IDS)
333
Page 86

uuWhen Driving uCruise Control
Driving
1Cruise Control
It may not be possible to maintain a constant speed
when driving uphill or downhill.
When not using cruise control:
Turn off cruise control by pressing the CRUISE
button.
3
WARNING
Improper use of the cruise control can lead
to a crash.
Use the cruise control only when traveling
on open highways in good weather.
When to use
How to use
CRUISE MAIN is on in
the instrument panel.
Cruise control is ready to
use.
■Press the CRUISE button on
the steering wheel.
Cruise Control
Maintains a constant vehicle speed without having to keep your foot on the
accelerator. Use cruise control on freeways or open roads where you can travel at a
constant speed with little acceleration or deceleration.
■ Vehicle speed for cruise control:
Desired speed in a range above
roughly 25 mph (40 km/h) ~
■ Shift positions for cruise control:
In
(D or (S
334
Always keep sufficient distance
between you and the vehicle in
front of you.
Page 87

Driving
To Set the Vehicle Speed
RES/+/SET/− Switch
On when cruise control begins
Press down and release
On
■
Take your foot off the pedal and press the RES/+/SET/– switch down when you
reach the desired speed.
The moment you release the RES/+/SET/– switch, the set speed is fixed, and cruise
control begins. The CRUISE CONTROL indicator comes on.
uuWhen Driving uCruise Control
Continued
335
Page 88

uuWhen Driving uCruise Control
Driving
1To Adjust the Vehicle Speed
You can set the vehicle speed pressing the RES/+/
SET/– switch down on the steering wheel when
adjusting the speed with the accelerator and brake
pedals.
To decrease speed
To increase speed
1To Cancel
Resuming the prior set speed:
After cruise control has been canceled, you can still
resume the prior set speed by pressing the RES/+/
SET/– switch up while driving at a speed of at least
25 mph (40 km/h) or more.
You cannot set or resume in the following situations:
• When vehicle speed is less than 25 mph (40 km/h)
• When the CRUISE button is turned off
At vehicle speeds of 22 mph (35 km/h) or less, cruise
control is canceled automatically.
CRUISE Button
CANCEL Button
To Adjust the Vehicle Speed
■
Increase or decrease the vehicle speed using the RES/+/SET/– switch on the steering
wheel.
• Each time you press the switch up or down, the vehicle speed is increased or
decreased by about 1 mph or 1 km/h accordingly.
• If you keep the switch pressed up or down, the vehicle speed increases or
decreases until you release it. This speed is then set.
To Cancel
■
To cancel cruise control, do any of the
following:
• Press the CANCEL button.
• Press the CRUISE button.
• Depress the brake pedal.
The CRUISE CONTROL indicator goes off.
336
Page 89

uuWhen Driving uAdaptive Cruise Control (ACC) with Low Speed Follow (LSF)
Driving
1Adaptive Cruise Control (ACC) with Low Speed Follow (LSF)
*
Important Safety Reminder
As with any system, there are limits to ACC with LSF.
Inappropriate use of ACC with LSF can result in a serious
accident. Use the brake pedal whenever neces sary, and always
keep a safe distance between your vehicle and other vehicles.
The radar sensor for ACC with LSF is shared with the
collision mitigation braking system
TM
(CMBSTM).
2 Collision Mitigation Braking System
TM
(CMBS
TM
)* P. 371
3
WARNING
3
WARNING
■ Vehicle speed for ACC with LSF: A vehicle is
detected ahead within ACC with LSF range –
ACC with LSF operates at any vehicle speed.
No vehicle is detected within ACC with LSF
range – ACC with LSF operates at the speed of
25 mph (40km/h) or above.
■ Shift positions for ACC with LSF: In (D or (S.
The radar sensor is in the front grille.
■ Press the MAIN button on
the steering wheel.
ACC (green) is on in the
instrument panel.
ACC with LSF is ready to
use.
When to use
How to use
* Not available on all models
*
Adaptive Cruise Control (ACC) with Low Speed Follow (LSF)
Helps maintain a constant vehicle speed and a set following distance behind a
vehicle detected ahead of yours and, if the detected vehicle comes to a stop,
decelerates and stops your vehicle, without you having to keep your foot on the
brake or the accelerator.
Continued
*
Improper use of ACC with LSF can lead
to a crash.
Use ACC with LSF only when driving on
expressways or freeways and in good
weather conditions.
Exiting a vehicle that has been stopped
while the ACC with LSF system is
operating can result in the vehicle
moving without operator control.
A vehicle that moves without operator
control can cause a crash, resulting in
serious injury or death.
337
Page 90

Driving
1Adaptive Cruise Control (ACC) with Low Speed Follow (LSF)
*
When the MAIN button is pressed, ACC with LSF and
Lane Keeping Assist System (LKAS) are both turned on
or off.
Do not use ACC with LSF under these conditions:
• In poor visibility (e.g., bad weather, such as rain,
fog, and snow).
• When you must slow down and speed up
repeatedly.
• On winding roads.
• When you enter a toll gate, interchange, service
area, parking area, etc. In these areas, there is no
vehicle ahead of you, but ACC with LSF would still
try to accelerate to your set speed.
• On a slippery road (for example a road covered
with ice or snow).
• When a spare tire
*
is installed.
• When going down a steep hill where the engine
braking does not work sufficiently.
When not using ACC with LSF: Turn off adaptive
cruise by pressing the MAIN button. This also will
turn off the Lane Keeping Assist System (LKAS).
1To Set the Vehicle Speed
You can switch the displayed set speed
measurements on the MID between mph and km/h.
2 Customizable Features P. 107
On when ACC
with LSF begins
Press down and release
RES/+/SET/− Switch
* Not available on all models
uuWhen Driving uAdaptive Cruise Control (ACC) with Low Speed Follow (LSF)
To Set the Vehicle Speed
■
*
When driving at 25 mph (40 km/h) or above: Take your foot off the pedal and
press down the RES/+/SET/– switch when you reach the desired speed. The moment
you release the switch, the set speed is fixed, and ACC with LSF begins.
When driving at slower than 25 mph (40 km/h): You can set the vehicle speed
only when there is a vehicle detected ahead of you. If the vehicle is moving and the
brake pedal is not depressed, pressing the switch fixes the set speed to 25 mph (40
km/h) regardless of current vehicle speed. If the vehicle is stationary, you can set the
vehicle speed even with the brake pedal depressed.
Set Vehicle Distance
Set Vehicle Speed
When ACC with LSF starts operating, the
vehicle icon, distance bars and set speed
appear on the MID.
338
Page 91

uuWhen Driving uAdaptive Cruise Control (ACC) with Low Speed Follow (LSF)
Driving
1When in Operation
If the vehicle ahead of you slows down abruptly, or if
another vehicle cuts in front of you, the beeper
sounds and a message appears on the multiinformation display to alert you.
Depress the brake pedal, and keep an appropriate
distance from the vehicle ahead.
Even if the distance between your vehicle and the
vehicle ahead is short, ACC with LSF may start
accelerating your vehicle under the following
circumstances:
• The vehicle ahead of you is going at almost the
same speed as, or faster than, your vehicle.
• A vehicle that cuts in front of you is going faster
than your vehicle, gradually increasing the distance
between the vehicles.
If you do not want to hear a beep when the system
detects a vehicle, or when the vehicle goes out of the
ACC with LSF range, you can change the pre-running
detect car beep setting.
2 Customizable Features P. 107
Beep
A vehicle icon appears on the MID
When in Operation
■
■ There is a vehicle ahead
ACC with LSF monitors if a vehicle ahead of you enters the ACC with LSF range. If it
does, the ACC with LSF system maintains or decelerates your vehicle’s set speed in
order to keep the vehicle’s set following distance from the vehicle ahead.
2 To Set or Change Following Distance P. 342
ACC with LSF Range: 394 ft. (120 m)
*
When a vehicle whose speed is slower than
your set speed comes in front of you, your
vehicle starts to slow down.
Continued
339
Page 92

uuWhen Driving uAdaptive Cruise Control (ACC) with Low Speed Follow (LSF)
Driving
1When in Operation
Limitations
Use the brake pedal to maintain a safe distance with
other vehicles in the following cases. ACC with LSF
may not work properly when:
• A vehicle ahead of you is parked when your vehicle
is moving.
• Motorcycles or other small vehicles are ahead of
you.
• A vehicle cuts in front of you at a short distance.
ACC with LSF may momentarily apply brakes or
sound a beep if there is a vehicle, or even a building,
next to you if:
• You make a sudden turn or drive on a narrow road.
• You abruptly move the steering wheel.
• You are in an unusual position within your lane.
When your vehicle stops automatically because a
vehicle detected ahead of you has stopped, the
distance between the two vehicles will vary based on
the ACC with LSF distance setting, as follows:
Short: 11.5 ft (3.5 m)
Middle: 14.1 ft (4.3 m)
Long, Extra Long: 16.4 ft (5.0 m)
2 To Set or Change Following Distance P. 342
*
■ There is no vehicle ahead
When driving at 22 mph (35 km/h) or above:
Your vehicle maintains the set speed without
having to keep your foot on the brake or
accelerator pedal.
If there previously was a vehicle detected
ahead that kept your vehicle from travelling at
the set speed, ACC with LSF accelerates your
A vehicle icon with dotted-line
contour appears on the MID
vehicle to the set speed, and then maintains it.
When driving under 22 mph (35 km/h) and no
vehicle is detected ahead: ACC with LSF
automatically cancels. The beeper sounds once.
■ When you depress the accelerator pedal
You can temporarily increase the vehicle speed. In this case, there is no audible or
visual alert even if a vehicle is in the ACC with LSF range.
ACC with LSF stays on unless you cancel it. Once you release the accelerator pedal,
the system resumes the set speed.
■ A vehicle ahead is within ACC range and stops
Your vehicle also stops, automatically. The
Stopped message appears on the multiinformation display.
When the vehicle ahead of you starts again,
the vehicle icon on the MID blinks. If you press
the RES/+/SET/– switch up or down, or
depress the accelerator pedal, ACC with LSF
operates again within the prior set speed.
340
Page 93

Driving
1To Adjust the Vehicle Speed
If a vehicle detected ahead is going at a speed slower
than your increased set speed, ACC with LSF may not
accelerate your vehicle. This is to maintain the set
distance between your vehicle and the vehicle ahead.
To increase speed
To decrease speed
uuWhen Driving uAdaptive Cruise Control (ACC) with Low Speed Follow (LSF)
To Adjust the Vehicle Speed
■
Increase or decrease the vehicle speed using the RES/+/SET/– switch on the steering
wheel.
• Each time you press the switch up or down, the vehicle speed is increased or
decreased by about 1 mph or 1 km/h accordingly.
• If you keep the switch pressed up or down, the vehicle speed increases or
decreases by about 5 mph or 5 km/h accordingly.
*
Continued
341
Page 94

uuWhen Driving uAdaptive Cruise Control (ACC) with Low Speed Follow (LSF)
Driving
Distance Button
To Set or Change Following Distance
■
*
Press the (distance) button to change the
ACC with LSF following distance.
Each time you press the button, the following
distance (the distance behind a vehicle
detected ahead of you) setting cycles through
short, middle, long, and extra long following
distances.
The higher your selected set speed is, the longer the short, middle, long or extra long
following distance becomes. See the following examples for your reference.
Following Distance
50 mph (80 km/h) 65 mph (104 km/h)
When the Set Speed is:
342
Short
Middle
Long
Extra
Long
83 feet
25 meters
110 feet
33 meters
154 feet
47 meters
204 feet
62 meters
100 feet
31 meters
137 feet
42 meters
200 feet
61 meters
265 feet
81 meters
Page 95

Driving
1To Cancel
Resuming the prior set speed: After you have
canceled ACC with LSF, you can resume the prior set
speed while it is still displayed. Press the RES/+/SET/
– switch up when driving at a speed of at least 25
mph (40 km/h) or more.
Even if your vehicle speed has gone down to less than
25 mph (40 km/h), you can still resume the prior set
speed when ACC with LSF detects a vehicle ahead of
you.
You cannot set or resume in the following situations:
• When the vehicle speed is less than 25 mph
(40km/h) and there is no vehicle detected in front
of your vehicle
• When the MAIN button is turned off
CANCEL
Button
MAIN
Button
To Cancel
■
uuWhen Driving uAdaptive Cruise Control (ACC) with Low Speed Follow (LSF)
To cancel ACC with LSF, do any of the
following:
• Press the CANCEL button.
• Press the MAIN button.
uACC with LSF indicator goes off.
• Depress the brake pedal.
uWhen the LSF function has stopped the
vehicle, you cannot cancel ACC with LSF
by depressing the brake pedal.
Continued
*
343
Page 96

Driving
1Automatic cancellation
Even though ACC with LSF has been automatically
canceled, you can still resume the prior set speed.
Wait until the condition that caused ACC with LSF to
cancel improves, then press the RES/+/SET/– switch
down.
* Not available on all models
uuWhen Driving uAdaptive Cruise Control (ACC) with Low Speed Follow (LSF)
■ Automatic cancellation
The beeper sounds and a message appears on the MID when ACC with LSF is
automatically canceled. Any of these conditions may cause the ACC with LSF to
automatically cancel:
• Your vehicle speed slows to 22 mph (35 km/h) or below when a detected vehicle
goes out of the ACC with LSF range.
• Bad weather (rain, fog, snow, etc.)
• When the radar sensor in the front grille gets dirty.
• The vehicle ahead of you cannot be detected.
• An abnormal tire condition is detected, or the tires are skidding.
• Driving on a mountainous road, or driving off road for extended periods.
• Abrupt steering wheel movement.
• When the ABS, VSA® or CMBS
TM
is activated.
• When the VSA® indicator comes on.
• When the vehicle is stopped on a very steep slope.
• When you manually apply the parking brake.
• When the detected vehicle within the ACC with LSF range is too close to your
vehicle.
• The driver’s seat belt is unfastened when the vehicle is stationary.
• The vehicle stops for more than 10 minutes.
• The engine is turned off.
• When trailer stability assist is activated.
2 Trailer Stability Assist
*
P. 317
The ACC with LSF automatic cancellation can be also triggered by the following
causes.
344
*
Page 97

uuWhen Driving uAdaptive Cruise Control (ACC) with Low Speed Follow (LSF)
Driving
1To Switch ACC with LSF to Cruise Control
Always be aware which mode you are in. When you
are driving in Cruise mode, be more cautious about
keeping a safe distance from a vehicle ahead of you.
The current mode is displayed on the multiinformation display.
2 Switching the Display P. 98
To Switch ACC with LSF to Cruise Control
■
Press and hold the (distance) button for one second.
Cruise Mode Selected appears on the MID for two seconds, and then the mode
switches to Cruise.
To switch back to ACC with LSF, press and hold the button again for one second.
*
ACC with
LSF ON
Cruise
Control ON
Distance Button
345
Page 98

uuWhen Driving uForward Collision Warning (FCW)
Driving
1Forward Collision Warning (FCW)
*
Important Safety Reminder
FCW cannot detect all objects ahead and may not
detect a given object; accuracy of the system will vary
based on weather, speed and other factors. FCW
does not include a braking function. It is always your
responsibility to safely operate the vehicle and avoid
collisions.
You can change the Forward Collision Warning
Distance setting or turn the system on and off.
2 Customizable Features P. 107
The camera is shared with Lane Departure Warning
(LDW).
2 LDW Camera P. 351
* Not available on all models
*
Forward Collision Warning (FCW)
*
Alerts you when it detects the possibility of your vehicle colliding with the vehicle in
front of yours.
If the system determines a collision is possible, it gives both visual and audible alerts.
uTake appropriate action to prevent a collision (apply the brakes, change lanes,
etc.).
■ How the system works
The system may give warnings of potential collisions when your vehicle speed is
above 10 mph (15 km/h).
You can set Long, Normal or Short for when warnings start:
LONG
NORMAL
SHORT
Your Vehicle Vehicle Ahead
346
Page 99

uuWhen Driving uForward Collision Warning (FCW)
Driving
1Forward Collision Warning (FCW)
*
Never apply a film or attach any objects to the
windshield that could obstruct the FCW camera’s
field of vision.
Scratches, nicks, and other damage to the windshield
within the FCW camera’s field of vision can cause the
system to operate abnormally. If this occurs, we
recommend that you replace the windshield with a
genuine Acura replacement windshield. Making even
minor repairs within the camera’s field of vision or
installing an aftermarket replacement windshield
may also cause the system to operate abnormally.
After replacing the windshield, have a dealer
recalibrate the camera. Proper calibration of the FCW
camera is necessary for the system to operate
properly.
Beep
The camera is located
behind the rearview mirror.
The beeper sounds and the BRAKE message
appears in the MID until a possible collision is
avoided.
* Not available on all models
*
Continued
347
Page 100

Driving
1Automatic shutoff
To help reduce the likelihood that high interior
temperatures will cause the camera system to shut off,
when parking, find a shady area or face the front of the
vehicle away from the sun.
If you use a reflective sun shade, do not allow it to
cover the camera housing. Covering the camera can
concentrate heat on the camera.
If the Can Not Operate: Camera Too Hot message
appears:
• Use the climate control system to cool down the
interior and, if necessary, the defroster mode when
windows are fogged.
• Start driving the vehicle to lower the windshield
temperature, which cools down the area around
the FCW camera.
uuWhen Driving uForward Collision Warning (FCW)
*
■ Automatic shutoff
FCW may automatically shut itself off and the FCW indicator comes and stays on
when:
• The temperature inside the system is high.
• The windshield is blocked by dirt, mud, leaves, wet snow, etc.
Once the conditions that caused FCW to shut off improve or are addressed (e.g.,
cleaning), the system comes back on.
348
 Loading...