

Page 1

08/2001 en
AUDIO GUIDE
5500/6500
Page 2

Audio System
Audio System Keycode
RADIO KEYCODE
AFFIX RADIO KEYCODE/SERIAL NUMBER
LABEL HERE
DEALER STAMP
© Copyright in Great Britain, August 2001
Unit type fitted:
Model 5500
Model 6500
Page 3

This card will be extremely useful if your
Audio System is stolen.
Use the space provided to record the details of
your own vehicle's Keycode security number.
Then, detach the Keycode card and keep it in
your wallet or purse.
Leave the rest of this card at home with your
other vehicle documents.
Complete and detach this perforated card and
keep it in a safe place - but not in your vehicle.
Always lock your vehicle and hide valuable items
away from prying eyes.
If your vehicle is broken into, notify the police
immediately. Do not touch anything until you are
advised to do so.
Page 4

Contents
Useful information
System security 2
Radio reception 6
Care and maintenance 7
RDS and RDS-EON 9
Operating instructions
5500/6500 14
Page 5

3
System security
2
System security
KEYCODE SECURITY
If the battery is disconnected, or the radio is
removed from a vehicle, the audio unit will
not work.
The audio systems incorporate a unique
Keycode security number which must be
entered before the unit will operate again.
Recording the Keycode
When you take delivery of your vehicle, the
Keycode should be noted on the Keycode card
at the front of this Audio Guide. Detach the
card and keep it in a safe place, but not inside
your vehicle.
If you lose the Keycode, contact your dealer
and supply details of your audio unit along with
some proof of identity. Your dealer will then
obtain the correct code.
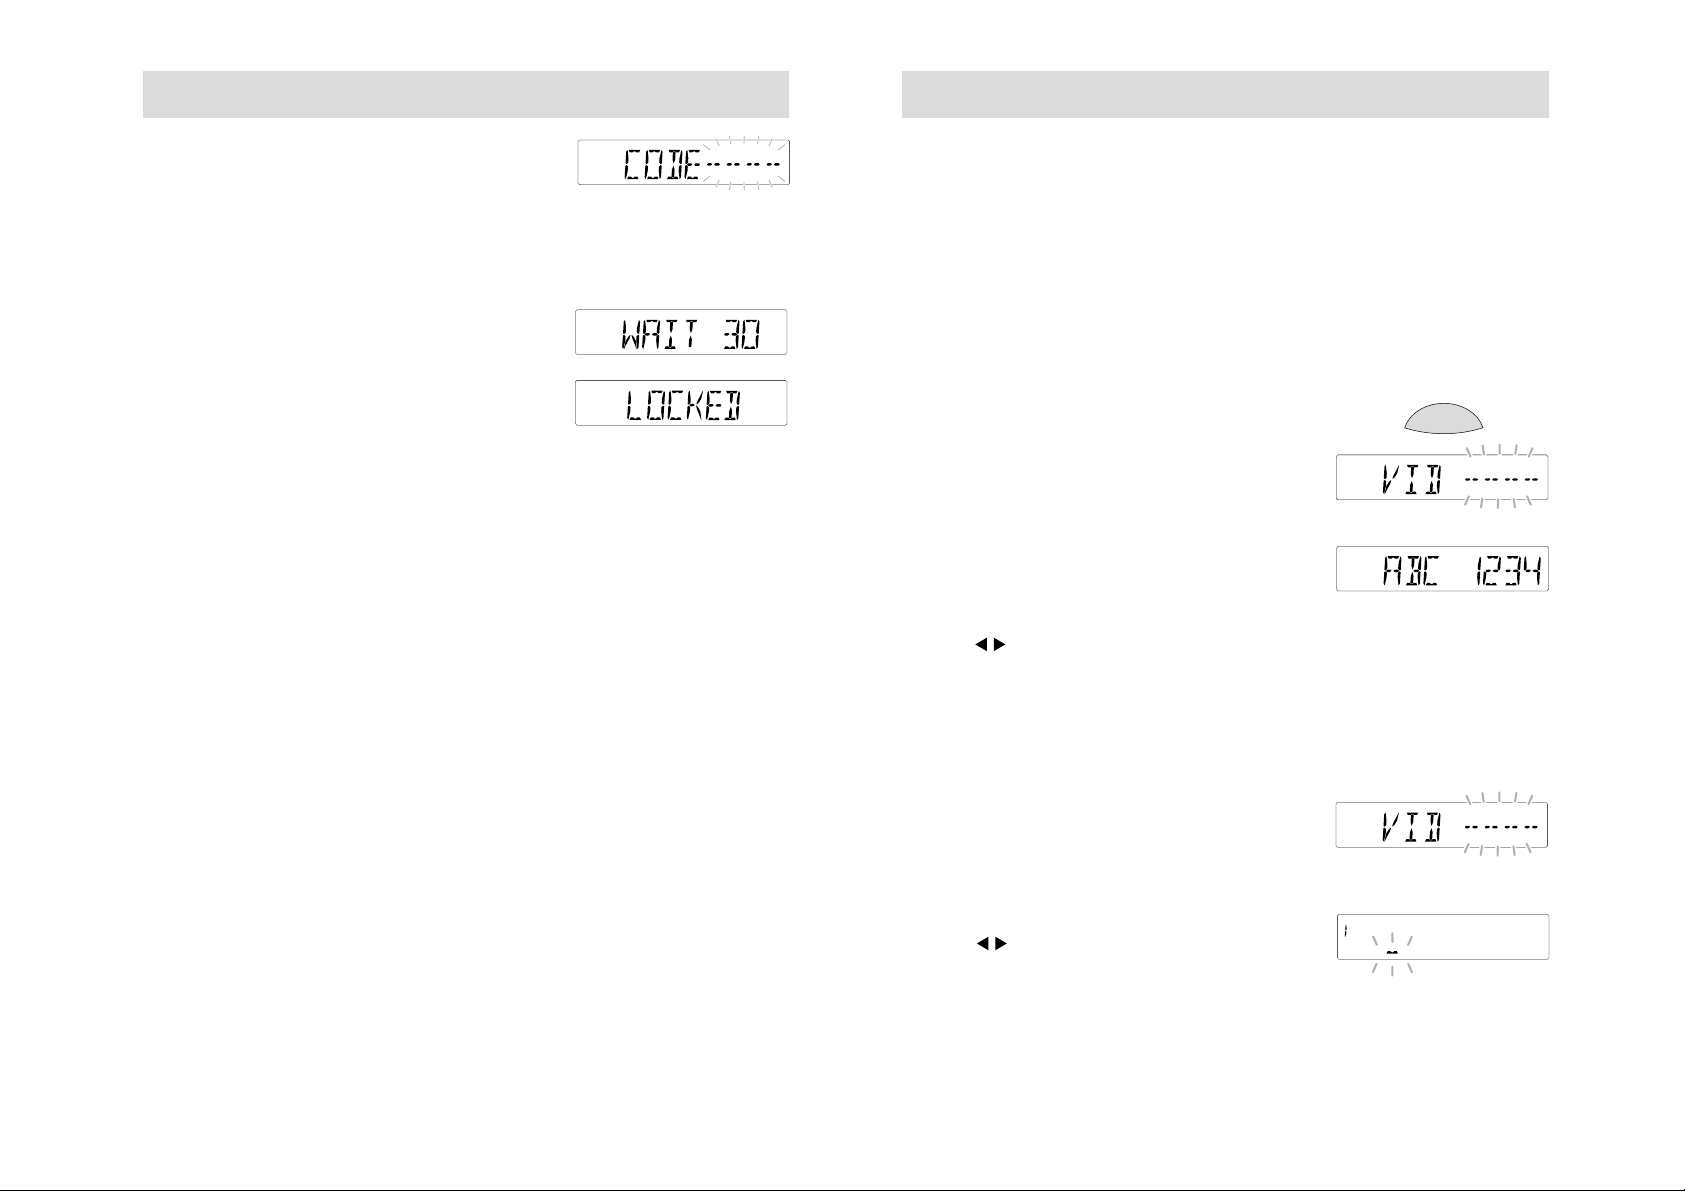
To enter a Keycode
If you switch on the audio unit and
'CODE - - - -' flashes in the display, you must
enter a Keycode before the unit is operational.
Use the station preset buttons to enter your
Keycode.
1. Press button 1 repeatedly until the correct
first digit of the Keycode is shown in the
display.
2. Then press preset buttons 2, 3 and 4 in the
same way for remaining digits, until the
complete correct Keycode is shown.
3. Press preset button 5 to enter the Keycode.
The audio unit will then operate.
KEYCODE SECURITY . . . . . . . . . . . . . . . . . . . . . . . . . . . . . . . . . 3
Recording the Keycode . . . . . . . . . . . . . . . . . . . . . . . . . . . . . . . . . 3
To enter a Keycode . . . . . . . . . . . . . . . . . . . . . . . . . . . . . . . . . . . . 3
If an incorrect number is entered . . . . . . . . . . . . . . . . . . . . . . . . . . 4
Keycode warning light . . . . . . . . . . . . . . . . . . . . . . . . . . . . . . . . . 4
VEHICLE IDENTIFICATION NUMBER (VID) . . . . . . . . . . . . . . . . . 5
To view/alter an existing code number . . . . . . . . . . . . . . . . . . . . . . 5
To enter a new code number . . . . . . . . . . . . . . . . . . . . . . . . . . . . . 5
Page 6
5
System security
4
VEHICLE IDENTIFICATION NUMBER (VID)
If an audio unit is stolen and then recovered,
it can be very difficult to trace the original owner.
Every vehicle has a unique Vehicle Identification
number. If this number has been entered, it
will help the police to match the audio unit
to its owner.
The number appears in the unit's display
whenever power is restored. For the location of
this number on your vehicle, please refer to
your Owner's Guide.
To view/alter an existing code number
Press and hold the MENU button for two
seconds, then press repeatedly until a display
like the one shown opposite appears. Then
enter your Keycode. (Refer to To enter a
Keycode page 3.)
The audio unit goes quiet and the display
shows a previously entered vehicle
identification number or, if a number has yet
to be entered, a flashing cursor is displayed.
Use the control to move across the display
and the volume control to change characters as
required. A total of 16 characters can be
displayed. When all the characters have been
selected, press MENU again to enter the
number. The unit then returns to normal
operation.
To enter a new code number
Press and hold the MENU button for two
seconds, then press repeatedly until a display
like the one shown opposite appears. Then
enter your Keycode. (Refer to To enter a
Keycode page 3.) A flashing cursor is displayed.
Use the control to move across the display,
and the volume control to select or change
characters as required. A total of 16 characters
can be displayed. When all the characters have
been selected, press MENU again to enter the
number. The unit then returns to normal
operation.
System security
If an incorrect number is entered
The audio units accept up to TEN Keycode
entry attempts. A numeral in the display
shows the number of attempts made.
If an incorrect number is entered, the
display reverts to 'CODE' and another
entry attempt may be made.
• If 'WAIT 30' appears, wait until the time
counts down to zero. When 'CODE' is
displayed again, try to enter the Keycode.
• If 'LOCKED' appears, the unit is
permanentlyinoperative. Contact your
local dealer for help and advice.
Keycode warning light
As an additional deterrent to would-be
thieves, this audio unit is fitted with a
keycode warning light.
This warning light will only flash, however
if both the ignition and the audio unit are
switched off.
MENU
•
Page 7

Care and maintenance
6 7
Radio reception
The following tips will help you gain the
best reception from your high quality
audio system.
To gain the best reception, always tune to the
strongest station signal available.
AM (MEDIUM/ LONG WAVE) RECEPTION
Under most conditions, strong MW and LW
signals provide stable sound quality and little
signal disturbance.
However, at night, atmospheric conditions
may sometimes lead to interference from
foreign stations.
FM RECEPTION
The FM waveband offers higher quality sound
reception, but signal strength can be subject to
interference caused by:
• The limited range of some transmitters.
• Reception distortion as signals reflect off
local buildings and other objects.
• Signal 'dead spots' where reception is
obstructed or restricted.
CASSETTES
The tape head in the cassette player needs to be
cleaned regularly. It only takes a few minutes and
perfect sound quality can be retained by using a
recommended 'wet' cleaning tape after every twenty
hours of playback.
It also pays to take good care of tape cassettes.
Direct sunlight or extreme temperatures, for
example, can distort a tape and may lead to trouble
when the cassette is inserted into a tape player.
The audio unit may also be damaged if 'foreign
bodies', unsuitable items like credit cards or coins,
are pushed inside the cassette aperture.
Finally, using a high quality tape cassette also helps
improve sound performance. Tapes to avoid include
those which are:
• Old and worn out.
• Spliced tapes.
• Cassettes with a total playback time of
over 100 minutes because thinner tape is
used in these and that increases the chance
of tangling.
• Cassettes which are damaged or have a
peeling label.
Page 8

Care and maintenance
CDs
For best possible sound quality, use CDs that
are clean and in good condition and only use
standard 12cm circular compact discs. It also
pays to take good care of them.
• Direct sunlight or extreme temperatures,
for example, can distort a CD and may
lead to trouble when it is inserted into the
audio unit.
• When not in use, CDs should be returned
to their original pack and stored in a
suitable container.
• Always hold a CD by its edge or centre and
avoid touching the underside surface (usually
the side with no printing on it). Fingerprints
and scratches will impair sound quality and
may even prevent CD playback.
• The audio unit may also be damaged if
'foreign bodies', unsuitable items like
credit cards or coins, are pushed inside the
CD aperture.
RDS and RDS-EON
RDS features . . . . . . . . . . . . . . . . . . . . . . . . . . . . . . . . . . . . . . . 10
Traffic information (TA) . . . . . . . . . . . . . . . . . . . . . . . . . . . . . . . . . 10
Alternative frequencies (AF) . . . . . . . . . . . . . . . . . . . . . . . . . . . . 10
Station name displays . . . . . . . . . . . . . . . . . . . . . . . . . . . . . . . . . 11
Clock and date displays . . . . . . . . . . . . . . . . . . . . . . . . . . . . . . . 11
Music/speech selection . . . . . . . . . . . . . . . . . . . . . . . . . . . . . . . . 11
Programme type (PTY) selection . . . . . . . . . . . . . . . . . . . . . . . . . 12
Traffic information . . . . . . . . . . . . . . . . . . . . . . . . . . . . . . . . . . . 13
Local or distant traffic announcements . . . . . . . . . . . . . . . . . . . . . 13
Station presets . . . . . . . . . . . . . . . . . . . . . . . . . . . . . . . . . . . . . 13
8
9
Page 9

10 11
RDS and RDS-EON
Audio units equipped with Radio Data System
(RDS) or Radio Data System - Enhanced Other
Network (RDS-EON) decoders pick up special
signals, transmitted on the FM waveband, when
tuned to some stations.
These provide additional features such as the
name of the radio station selected or traffic
information that automatically interrupts
normal broadcasts. However, certain features
may not be available from all radio stations.
RDS features
With the RDS function switched on, the
following features may be accessed.
(To select this feature, refer to page 22.)
Traffic Information (TA)
With this function selected, traffic information
broadcasts will automatically interrupt
normal radio, cassette or CD playback.
(To select this feature, refer to page 22.)
Alternative Frequencies (AF)
Some radio stations broadcast on different
frequencies in different parts of the country.
If a station's signal weakens the audio unit
retunes to a stronger alternative signal if
one exists.
During retuning, the audio unit checks a
programme identification (PI) code to ensure
that it is tuned to the same station and a
display like the one shown opposite appears.
(To select this feature, refer to page 24.)
RDS and RDS-EON
Station name displays
Audio units will display a selected radio
station's name, when the information is
broadcast using RDS.
Clock and date displays
Clock and date displays are also available
through RDS. These displays are
automatically updated and cannot be
manually changed or altered
When the unit is switched on, a series of
bars may appear until an RDS signal has
been received.
If an RDS signal has not been received, a
display like the one shown opposite appears.
(To select this feature, refer to page 25.)
Music/speech selection
With this feature activated and RDS on,
the audio unit automatically adjusts audio
settings to enhance speech clarity during
programme broadcasts.
(To select this feature, refer to page 25.)
Page 10

RDS and RDS-EON
Programme type (PTY) selection
Some FM stations transmit programme type
codes which the audio unit can use to locate
different stations transmitting programmes
of a certain type.
The following programme types may be
identified:
NEWS, AFFAIRS, INFO, SPORT, EDUCATE,
DRAMA, CULTURE, SCIENCE, VARIED, POP
M, ROCK M, EASY M, M. O. R. M, LIGHT M,
CLASSICS, OTHER M, WEATHER, FINANCE,
CHILDREN, SOCIAL, RELIGION, PHONE IN,
TRAVEL, LEISURE, JAZZ, COUNTRY, NATION
M, OLDIES, FOLK M, DOCUMENT, NONE.
Radio stations can also transmit emergency
information ALARM. However, this programme
type cannot be selected manually
(To select this function, refer to page 25.)
12
13
RDS and RDS-EON
In addition to the features described previously
this audio unit also provides the following
RDS-EON features:
Traffic information
RDS-EON connects certain radio stations so
that traffic information broadcast from one may
be received while listening to another. Stations
identified by ' TP ' will only receive traffic
announcements from other linked stations.
If, due to reception difficulties, traffic
information is not received, the audio unit
mutes and 'NO INFO' is displayed briefly
Local or distant traffic announcements
Because the number of traffic announcements
may become excessive in some areas, it is
possible to select local traffic information
('TA-LOCAL') or traffic information from
further away ('TA-DIST')
(To select this feature, refer to page 23.)
Station presets
When driving to another part of the country
some RDS-EON stations stored on preset
buttons are updated with the correct frequency
for that area.
Page 11

5500/6500
14 15
5500 . . . . . . . . . . . . . . . . . . . . . . . . . . . . . . . . . . . . . . . . . . . . . 17
6500 . . . . . . . . . . . . . . . . . . . . . . . . . . . . . . . . . . . . . . . . . . . . . 18
ON/OFF . . . . . . . . . . . . . . . . . . . . . . . . . . . . . . . . . . . . . . . . . . . 19
VOLUME CONTROL . . . . . . . . . . . . . . . . . . . . . . . . . . . . . . . . . 19
BASS/ TREBLE CONTROL . . . . . . . . . . . . . . . . . . . . . . . . . . . . 19
FADE/ BALANCE CONTROL . . . . . . . . . . . . . . . . . . . . . . . . . . . 19
Default audio settings . . . . . . . . . . . . . . . . . . . . . . . . . . . . . . . . . 19
SEEK TUNING CONTROL . . . . . . . . . . . . . . . . . . . . . . . . . . . . . 20
WAVEBAND SELECTOR . . . . . . . . . . . . . . . . . . . . . . . . . . . . . . 20
AUTOSTORE SELECTOR . . . . . . . . . . . . . . . . . . . . . . . . . . . . . 20
STATION PRESET BUTTONS . . . . . . . . . . . . . . . . . . . . . . . . . . . 21
STEREO INDICATOR . . . . . . . . . . . . . . . . . . . . . . . . . . . . . . . . . 21
DOLBY® NOISE REDUCTION CONTROL . . . . . . . . . . . . . . . . . 21
RDS BUTTON . . . . . . . . . . . . . . . . . . . . . . . . . . . . . . . . . . . . . . 22
MAIN RDS FEATURES
Traffic information . . . . . . . . . . . . . . . . . . . . . . . . . . . . . . . . . . . 22
To end a traffic announcement . . . . . . . . . . . . . . . . . . . . . . . . . . 23
Traffic volume levels . . . . . . . . . . . . . . . . . . . . . . . . . . . . . . . . . . 23
Local/distant traffic information . . . . . . . . . . . . . . . . . . . . . . . . 23
Alternative frequency (AF) tuning . . . . . . . . . . . . . . . . . . . . . . . 24
- AF AUTO . . . . . . . . . . . . . . . . . . . . . . . . . . . . . . . . . . . . . . . . 24
- AF MAN . . . . . . . . . . . . . . . . . . . . . . . . . . . . . . . . . . . . . . . . . 24
- AF OFF . . . . . . . . . . . . . . . . . . . . . . . . . . . . . . . . . . . . . . . . . . 24
Clock and date displays . . . . . . . . . . . . . . . . . . . . . . . . . . . . . . 25
Music/speech selector . . . . . . . . . . . . . . . . . . . . . . . . . . . . . . . 25
Programme type (PTY) selection . . . . . . . . . . . . . . . . . . . . . . . . 25
Selecting different programme types . . . . . . . . . . . . . . . . . . . . . . 25
Selecting similar programme types . . . . . . . . . . . . . . . . . . . . . . . 25
PTY selection during tape or CD playback . . . . . . . . . . . . . . . . 26
MENU BUTTON
Main features - radio . . . . . . . . . . . . . . . . . . . . . . . . . . . . . . . . . 27
Manual tuning . . . . . . . . . . . . . . . . . . . . . . . . . . . . . . . . . . . . . . . 27
Scan tuning . . . . . . . . . . . . . . . . . . . . . . . . . . . . . . . . . . . . . . . . 27
Preset scan tuning . . . . . . . . . . . . . . . . . . . . . . . . . . . . . . . . . . . 27
5500/6500
Loudness control . . . . . . . . . . . . . . . . . . . . . . . . . . . . . . . . . . . . . 28
Clock and date displays . . . . . . . . . . . . . . . . . . . . . . . . . . . . . . . 28
PTY selection . . . . . . . . . . . . . . . . . . . . . . . . . . . . . . . . . . . . . . . 28
Local/Distant traffic . . . . . . . . . . . . . . . . . . . . . . . . . . . . . . . . . . . 28
Music/Speech selection . . . . . . . . . . . . . . . . . . . . . . . . . . . . . . . . 28
Alternative frequencies . . . . . . . . . . . . . . . . . . . . . . . . . . . . . . . . . 28
Additional MENU features - radio, tape and CD
Vehicle Identification Number (VID) coding . . . . . . . . . . . . . . . . . . 29
Audio distortion reduction (CLIP) . . . . . . . . . . . . . . . . . . . . . . . . 29
TAPE PLAYBACK (5500 units only) . . . . . . . . . . . . . . . . . . . . . . 30
Automatic music search (AMS) . . . . . . . . . . . . . . . . . . . . . . . . . . 30
Fast forward/rewind . . . . . . . . . . . . . . . . . . . . . . . . . . . . . . . . . . 30
Auto reverse . . . . . . . . . . . . . . . . . . . . . . . . . . . . . . . . . . . . . . . . 31
Tape side selection . . . . . . . . . . . . . . . . . . . . . . . . . . . . . . . . . . . 31
To end tape playback . . . . . . . . . . . . . . . . . . . . . . . . . . . . . . . . . 31
To restart tape playback . . . . . . . . . . . . . . . . . . . . . . . . . . . . . . . 31
Tape eject . . . . . . . . . . . . . . . . . . . . . . . . . . . . . . . . . . . . . . . . . 31
MENU BUTTON
Main features - tape . . . . . . . . . . . . . . . . . . . . . . . . . . . . . . . . . 32
Clean tape function . . . . . . . . . . . . . . . . . . . . . . . . . . . . . . . . . . . 32
Loudness control . . . . . . . . . . . . . . . . . . . . . . . . . . . . . . . . . . . . 32
Clock and date displays . . . . . . . . . . . . . . . . . . . . . . . . . . . . . . . 32
PTY selection . . . . . . . . . . . . . . . . . . . . . . . . . . . . . . . . . . . . . . . 32
Additional MENU features - tape . . . . . . . . . . . . . . . . . . . . . . . . 32
CD PLAYBACK (6500 units only) . . . . . . . . . . . . . . . . . . . . . . . . 33
Track selection . . . . . . . . . . . . . . . . . . . . . . . . . . . . . . . . . . . . . 34
Repeat track playback (RPT) . . . . . . . . . . . . . . . . . . . . . . . . . . . 34
Fast forward/reverse . . . . . . . . . . . . . . . . . . . . . . . . . . . . . . . . . 34
To end CD playback . . . . . . . . . . . . . . . . . . . . . . . . . . . . . . . . . 34
CD eject . . . . . . . . . . . . . . . . . . . . . . . . . . . . . . . . . . . . . . . . . . 35
CD error codes . . . . . . . . . . . . . . . . . . . . . . . . . . . . . . . . . . . . . 35
Page 12

5500/6500
MENU BUTTON
Main features - CD
. . . . . . . . . . . . . . . . . . . . . . . . . . . . . . . . . . . 35
Track scanning . . . . . . . . . . . . . . . . . . . . . . . . . . . . . . . . . . . . . . 35
Random track playback (SHUFFLE)
. . . . . . . . . . . . . . . . . . . . . . 36
Track compression (COMP) . . . . . . . . . . . . . . . . . . . . . . . . . . . . . 36
Loudness control
. . . . . . . . . . . . . . . . . . . . . . . . . . . . . . . . . . . . . 36
Clock and date displays
. . . . . . . . . . . . . . . . . . . . . . . . . . . . . . . . 36
Programme type (PTY) selection . . . . . . . . . . . . . . . . . . . . . . . . . 36
Additional features - CD
Local/distant traffic information
. . . . . . . . . . . . . . . . . . . . . . . . . . 37
Vehicle Identification Number (VID) coding . . . . . . . . . . . . . . . . . . 37
Audio distortion reduction (CLIP)
. . . . . . . . . . . . . . . . . . . . . . . . . 37
16 17
5500/6500
5500
Bass/Treble control
Menu
Button
Keycode
warning light
Dolby®
Noise
Reduction
Tape
Aperture
Tape
Eject
Tape control
Loudness
Traffic
Information
Fade/
Balance
control
On/off and
volume
control
Station preset
buttons
Waveband/Autostore
selector
Radio
Data
System
(RDS)
button
Automatic tuning /AMS
/Fast forward and rewind
Page 13

5500/6500
6500
Fade/
Balance
control
Bass/Treble control
On/off and
volume
control
Station preset
buttons
Waveband/Autostore
selector
Menu button
Keycode
warning light
CD Eject
CD control
CD ApertureRadio
Data
System
(RDS)
button
Automatic tuning
/Track selection
Traffic
Information
5500/6500
ON/ OFF
Press for on/off. This button can also operate
the unit for up to one hour with the ignition
turned off. The radio automatically switches
off after one hour
VOLUME CONTROL
The display indicates the level selected.
See also Audio distortion reduction (CLIP)
page 29.
BASS/ TREBLE CONTROL
Press BASS/TREB once for bass or twice
for treble and use the volume control for
adjustment. The display indicates the
level selected.
FADE/ BALANCE CONTROL
Press FADE/BAL once for fade (front to rear)
or twice for balance (left to right) and use the
volume control for sound system adjustment.
The display indicates the level selected.
The fade function is applicable to vehicles with
front and rear speakers only
Default audio settings
Press and hold BASS/TREB for two seconds
until a display like the one shown opposite
appears. With the function switched on the
volume, bass, treble, fade and balance
settings all return to the manufacturer's
original preset levels.
18 19
AM/FM.T
MENU
T A
CD
Page 14

5500/6500
20 21
SEEK TUNING CONTROL
During radio reception, press
or
to locate
the next station down or up the waveband
selected.
WAVEBAND SELECTOR
• Press the AM/FM.T button repeatedly during
radio reception, to select AM (MW and LW),
FM (FM1 and FM2) or AutoStore (FM.T
LW.T or MW.T). The display indicates the
selection made.
• Press the AM/FM.T button during CD
playback to return to radio reception.
AUTOSTORE SELECTOR
AutoStore selects six strong station signals and
stores them on the preset buttons.
• Press and hold the AM/ FM.T button to
activate AutoStore.
• With an FM waveband selected, 'FMT' flashes
in the display while the unit searches through
the FM frequencies. The six strongest FM
station signals are then stored on the preset
buttons.
• If a LW or MW waveband is selected, 'LWT'
or 'MWT' flashes in the display while the unit
searches through the LW or MW frequencies.
The six strongest LW or MW station signals
are then stored on the preset buttons.
• The audio unit will mute whilst the waveband
is being searched and sound is restored when
the search is complete.
• Each time Autostore is activated, the unit will
store station frequencies from the waveband
last selected and also replaces stations
previously stored.
AM/FM.T
AM/FM.T
5500/6500
STATION PRESET BUTTONS
Select a waveband (FM or AM) and tune to the
station required. Press and hold one of the
preset buttons. The audio unit mutes for a few
seconds, then a bleep sounds and radio
reception is restored. This confirms the station
is now stored on that preset button. 36 preset
frequencies can be stored - six on each of the
AM bands (LW and MW, MW.T or LW.T) and
FM bands (FM1, FM2, FM.T).
STEREO INDICATOR
This shows whenever a stereo signal is
received. In poor signal conditions, the
indicator will flicker and then go out when
the signal is finally lost.
DOLBY® NOISE REDUCTION CONTROL
(5500 units only)
• Press during tape playback, to turn
this function on or off.
• With the function switched on, ' ' appears
in the display and background tape noise is
reduced.
Page 15

5500/6500
22 23
RDS BUTTON
Press to switch the RDS function on ('RDS-ON')
or off ('RDS-OFF'). (See also RDS and RDS-
EON, page 9.)
MAIN RDS FEATURES
• With RDS switched on the following features
may be accessed:
Traffic information
Press the TA button to switch this function on
or off. With the function switched on 'TA-L' or
'TA-D' appear in the display.
• 'TP' is displayed if a traffic station is selected.
• When it is broadcast, traffic information
automatically interrupts normal radio, tape
or CD playback and 'TRAFFIC' appears in
the display. Traffic interrupts at a preset
minimum level, unless a higher volume has
been previously selected for normal listening.
• If the unit is not tuned to a station
transmitting traffic information when TA
is pressed, it will search for one and display
'TP SEEK' while doing so. If nothing is
found, 'Not found' is displayed.
• If a traffic station signal weakens, 'TP' will
flash in the display. Press to find another
station. If this happens during radio, tape or
CD playback, or with the radio volume set to
zero, the unit will retune automatically to
another traffic station.
• If a non traffic station is selected or recalled
using a preset button, the audio unit will
remain on that station unless TA is turned
off, then on again.
T A
5500/6500
To end a traffic announcement
• When a traffic announcement ends, the audio
unit returns to normal sound operation.
• During a traffic announcement, press TA to
end the message, or press it at any other time
to switch off the feature.
Traffic volume levels
Press and hold the TA button until a display
like the one shown opposite appears. Use the
volume control to adjust traffic information
volume levels. The display shows the
level selected.
Local/distant traffic information
Press and hold the MENU button until the
display changes. Then press the MENU button
repeatedly until a display like the one shown
opposite appears. Use the button to
select either local ('TA-LOCAL') or distant
('TA-DIST') traffic announcements.
T A
MENU
Page 16

5500/6500
24 25
Alternative Frequency (AF) tuning
Press and hold the MENU button until the
display changes. Then press the MENU button
repeatedly until a display like the one shown
opposite appears. Use the button to switch
between 'AF AUTO' 'AF-MAN' and 'AF-OFF'.
AF-AUTO
With 'AF AUTO' selected, the unit automatically
mutes while it checks its list of alternative
frequencies and, if necessary, searches once
across the waveband for a genuine alternative
frequency.
Radio reception is restored when an alternative
frequency is found or, if one is not found, the
unit returns to the original stored frequency
and 'Not Found' is displayed.
This check may interrupt reception briefly and,
under certain reception conditions, you may
wish to select 'AF- OFF' or 'AF- MAN'
(see below).
AF-MAN
With 'AF- MAN' selected, if a station signal
weakens, press any preset button to start AF
tuning. The audio unit may mute while it
checks its list of alternative frequencies and
then retunes, as necessary, to a stronger signal.
If an alternative frequency is not found, the
original station frequency remains selected.
AF-OFF
With 'AF- OFF' selected, if a station signal
weakens, the original stored frequency
remains selected.
With the function switched off, 'AF- OFF' will
be displayed every time the unit is turned on.
5500/6500
Clock and date displays
Press the MENU button repeatedly until a
display like the one shown opposite appears.
Then use the button to alternate between
clock and date displays.
Music/speech selector
Press and hold the MENU button until the
display changes. Then press the MENU button
repeatedly until a display like the one shown
opposite appears. Then use the button to
switch this function on or off.
Programme type (PTY) selection
Press the MENU button repeatedly until 'PTY'
appears in the display. The programme type
(e.g. 'SPORT', 'POP M') currently selected is
also displayed.
Selecting different programme types
• While 'PTY' is displayed, use the volume
control to select another programme type.
Selecting similar programme types
• While 'PTY' is displayed, press the
button and the audio unit will search for
other stations broadcasting programmes with
the same PTY as you have selected.
Page 17

5500/6500
26 27
• While searching, the audio unit mutes, the
programme type is displayed and 'PTY'
flashes in the display.
• When a suitable programme is found, that
station's name and your selected programme
type will alternate in the display. Radio
reception is restored with the new station
and programme selected.
• If the new programme is not required, then
press while the display is still flashing
and the search will continue until another
matching programme is found.
• If a station transmitting a programme with
the same PTY cannot be found, 'Not Found'
is displayed and the audio unit will return to
your original station.
PTY selection during tape or CD playback
• If a PTY search is activated during CD
playback, your audio unit will restore radio
reception when it finds a station transmitting
the PTY selected.
If a station transmitting a programme with the
same PTY cannot be found, the audio unit will
continue to search.
• To cancel this search and retain tape or CD
playback, press the MENU button.
• To cancel this search, and restore radio
reception, press AM/FM.T
MENU
AM/FM.T
5500/6500
MENU BUTTON
Main features - radio
In addition to the RDS functions outlined, use
the MENU button to access other main menu
features, and the button for adjustment.
Manual tuning
Press the MENU button repeatedly until a
display like the one shown opposite appears.
Then use the button to make manual
tuning adjustments. The FM waveband allows
50kHz tuning steps, and the AM band 9kHz
steps.
Scan tuning
Press the MENU button repeatedly until a
display like the one shown opposite appears.
Then use the button to scan up or down
the waveband selected. Each time a station
frequency is found, 'Scn' flashes in the display
and a few seconds of radio reception can be
heard before the scan begins again. The display
briefly shows each frequency selected. Press
the button to end scan tuning and to listen
to the station selected.
Preset scan tuning
Press the MENU button repeatedly until a
display like the one shown opposite appears.
Then use the button to scan up or down
frequencies stored on the presets. 'Scn' flashes
in the display, together with the number of the
selected preset, and each stored station is
played for a few seconds in turn. Press any
preset or MENU again to continue listening to
the stored station selected. The display
confirms the preset selected.
MENU
Page 18

5500/6500
28 29
Loudness control
(6500 units only)
Press the MENU button repeatedly, until a
display like the one shown opposite appears.
Then use or to switch this function on
('LD-AUTO') or off ('LD-OFF').With this
function activated, the unit automatically
detects low volume audio output and raises
the level of bass frequencies.
5500 units only
Press the LD button to switch this function
on or off.
Clock and date displays
See page 25.
PTY selection
See page 25.
Local/Distant traffic
See page 23.
Music/speech selection
See page 25.
Alternative frequencies
See page 24.
5500/6500
Additional MENU features - radio, tape and CD
Vehicle Identification Number (VID) coding
Press and hold the MENU button until the
display changes. Then press the MENU button
repeatedly until a display like the one shown
opposite appears. To enter or alter a VID
coding, refer to System Security, page 5.
Audio distortion reduction (CLIP)
Press and hold the MENU button until the
display changes. Then press the MENU button
repeatedly until a display like the one shown
opposite appears. Then use the button to
turn this function on or off.
With the feature activated, the audio unit
automatically detects sound distortion and
reduces the unit's volume level until the
distortion has been eliminated. This means
that when the volume control is adjusted, with
the CLIP function switched on, there may not
be an increase in sound.
Page 19

30
31
5500/6500
TAPE PLAYBACK
(5500 units only)
Insert a tape and playback will automatically
start. 'TAPE A or TAPE B' appears in the
display to indicate which side of the tape is
playing.
Automatic Music Search (AMS)
• Press once to activate AMS and obtain the
start of the next track A display like the one
shown opposite appears.
• Press to end the search.
• Press once to obtain the beginnng of
previous tracks. A display like the one shown
opposite appears.
• Press to end a search.
Playback begins automatically when the
beginning of a track is reached.
Fast forward/rewind
• During normal tape playback, press
twice for fast forward.
• Press to end fast forward and restart the
tape.
• Press twice for fast rewind.
• Press to end fast rewind and restart
the tape.
During fast forward and rewind, radio reception
is automatically restored, with Automatic Music
Search function switched off.
5500/6500
Auto reverse
If the end of the tape is reached, auto reverse
operates with playback resuming at the start
of the tape's other side.
Tape side selection
During tape playback, press TAPE to change
the tape side being played.
To end tape playback
Press AM/FM.T to end tape playback and
restore radio reception.
To restart tape playback
During radio reception, press TAPE. If no tape
is inserted, 'NO TAPE' appears in the display.
Tape eject
Press to eject a tape and restore radio
reception.
AM/FM.T
Page 20

5500/6500
MENU BUTTON
Main features - tape
Use the MENU button to access main menu
features and the button for adjustment.
Clean tape function
For best quality tape playback, all tape
players need regular cleaning. This audio unit
will automatically warn you when cleaning
is required.
•
'TAPE' and 'CLEAN' alternate in the display
.
• Use a wet head cleaning tape and then press
to switch the function off.
• 'RESET' appears briefly in the display to
confirm the function is now off.
Loudness control
See page 28.
Clock and date displays
See page 25.
PTY selection
See page 25.
Additional MENU features- tape
See page 29.
32
33
5500/6500
CD PLAYBACK
(6500 units only)
6500 units are designed to play
commercially pressed 12cm audio
compact discs only. Due to technical
incompatibility, certain recordable and
re-recordable compact discs may not
function correctly.
Irregular shaped CDs and CDs with a
scratch protection film attached should not
be inserted into the CD player. Please
contact your dealer for further information.
CD playback starts and radio reception is
interrupted, when a CD is inserted into the
entry slot. If the audio unit is not switched on,
automatic 'wake up' operates and CD
playback begins.
'CD PLAY' appears in the display. Press CD to
start playback from a CD already in the audio
unit. If no disc is inserted, 'NO DISC' appears
in the display
The display indicates elapsed track time.
CD
MENU
Page 21

5500/6500
5500/6500
Track selection
Press to return to the start of the track being
played. If pressed within three seconds of the
start of a track, the previous track will be
selected. Press repeatedly to select previous
tracks.
Press to select the next track or press
repeatedly to access later tracks.
Repeat track playback (RPT)
Press and hold the CD button to switch this
function on. A display like the one shown
opposite appears.
With 'RPT ON' displayed, the current track will
play repeatedly. Press , or the CD button
again, to switch the function off.
Fast forward/reverse
Press and hold or to search backwards or
forwards across the tracks on the disc.
To end CD playback
Press the AM/FM.T button to restore radio
reception without ejecting the disc.
To reselect CD playback, press the CD button
and the CD will start from wherever playback
was last interrupted.
CD
AM/FM.T
CD
CD eject
• During CD playback, press to eject a CD.
• When ejected, the disc is held ready for
removal.
CD error codes
Codes may be shown in the audio unit display
that indicate errors with the CD unit.
These codes are as follows:
Display Description/rectification
E2E or E2D
E23, E24, E25,
E26, E27, E28,
Internal fault, see your Local Dealer
Clean the disc and try again. If error still shows,
see your Local Dealer
E29, E2B or E2C
CD HOT
Ambient temperature too hot - unit will not work
until it has cooled down.
E81, E84 or E85
There is an eject fault, see your Local Dealer
MENU BUTTON
Main features - CD
Use the MENU button to access main menu
features, and the button for adjustment.
MENU
34
Track scanning
Press the MENU repeatedly until a display like
the one shown opposite appears. Then use the
button to scan tracks on the CD. Each time
a track is found, a few seconds of track playback
will be heard before the scan continues. The
display shows briefly each track selected. Press
the button again to end the scan.
35
Page 22

37
5500/6500
Random track playback (SHUFFLE)
Press the MENU button repeatedly until a
display like the one shown opposite appears.
Then use the button to turn this function
on or off. With the function on, the elapsed time
indicator is briefly replaced by 'SHUF', and
tracks are played in an automatically selected
random sequence.
Track compression (COMP)
Press the MENU repeatedly until a display like
the one shown opposite appears. Then use the
button to turn this function on or off. With
the function on, quieter music is boosted and
louder music lowered to minimise repeated
volume adjustments.
Loudness control
See page 28.
Clock and date displays
See page 25.
Programme type (PTY) selection
See page 25.
5500/6500
Additional features - CD
Local/distant traffic information
See page 23.
Vehicle Identification Number (VID) coding
See page 5.
Audio distortion reduction (CLIP)
See page 29.
36
 Loading...