

VistaQuest VQ5218 User Manual
VQ5218
User’s Manual

1
1. Parts of the camera·······························································4
2. Preparing for using ·······························································5
3. Monitor Screen Display ·························································8
4. Using this digital camera·····················································10
Using the Self-timer and Burst snapshot ································12
Using the Flash ·······································································13
Using the Zoom Function ························································14
Recording video clip ·······························································15
Recording audio······································································16
5. Using the menu in record mode ············································16
Menu in capture mode ····························································17
Menu in video mode································································19
Setup menu ············································································20

2
6. Playback ···············································································22
Playback still image ································································22
Playing back movie clips ·························································23
Playing back audio files ··························································23
Other function in playback mode ············································24
Delete files ·············································································25
7. Making connections ······························································29
Connecting the Camera to a TV ···············································29
Connecting the Camera to a PC···············································30
8. Software Installation····························································31
Installing the Software ···························································31
9. Troubleshooting ···································································34
10. Technical Specifications······················································36

3
Thank you for purchasing this digital camera. Please read these operating
instructions carefully in order to use the digital camera correctly. Keep the
instructions in a safe place after reading so that you can refer to them later.
Precautions
Before using the camera, please ensure that you read and understand the
safety precautions described below.
• Do not try to open the case of the camera or attempt to modify this
camera in any way. Maintenance and repairs should be carried out only by
authorized service providers.
• Keep the camera away from water and other liquids. Do not use the
camera with wet hands. Never use the camera in the rain or snow. Moisture
creates the danger of electric shock.
• Use only the recommended power accessories. Use of power sources not
expressly recommended for this equipment may lead to overheating,
distortion of the equipment, fire, electrical shock or other hazards.
4
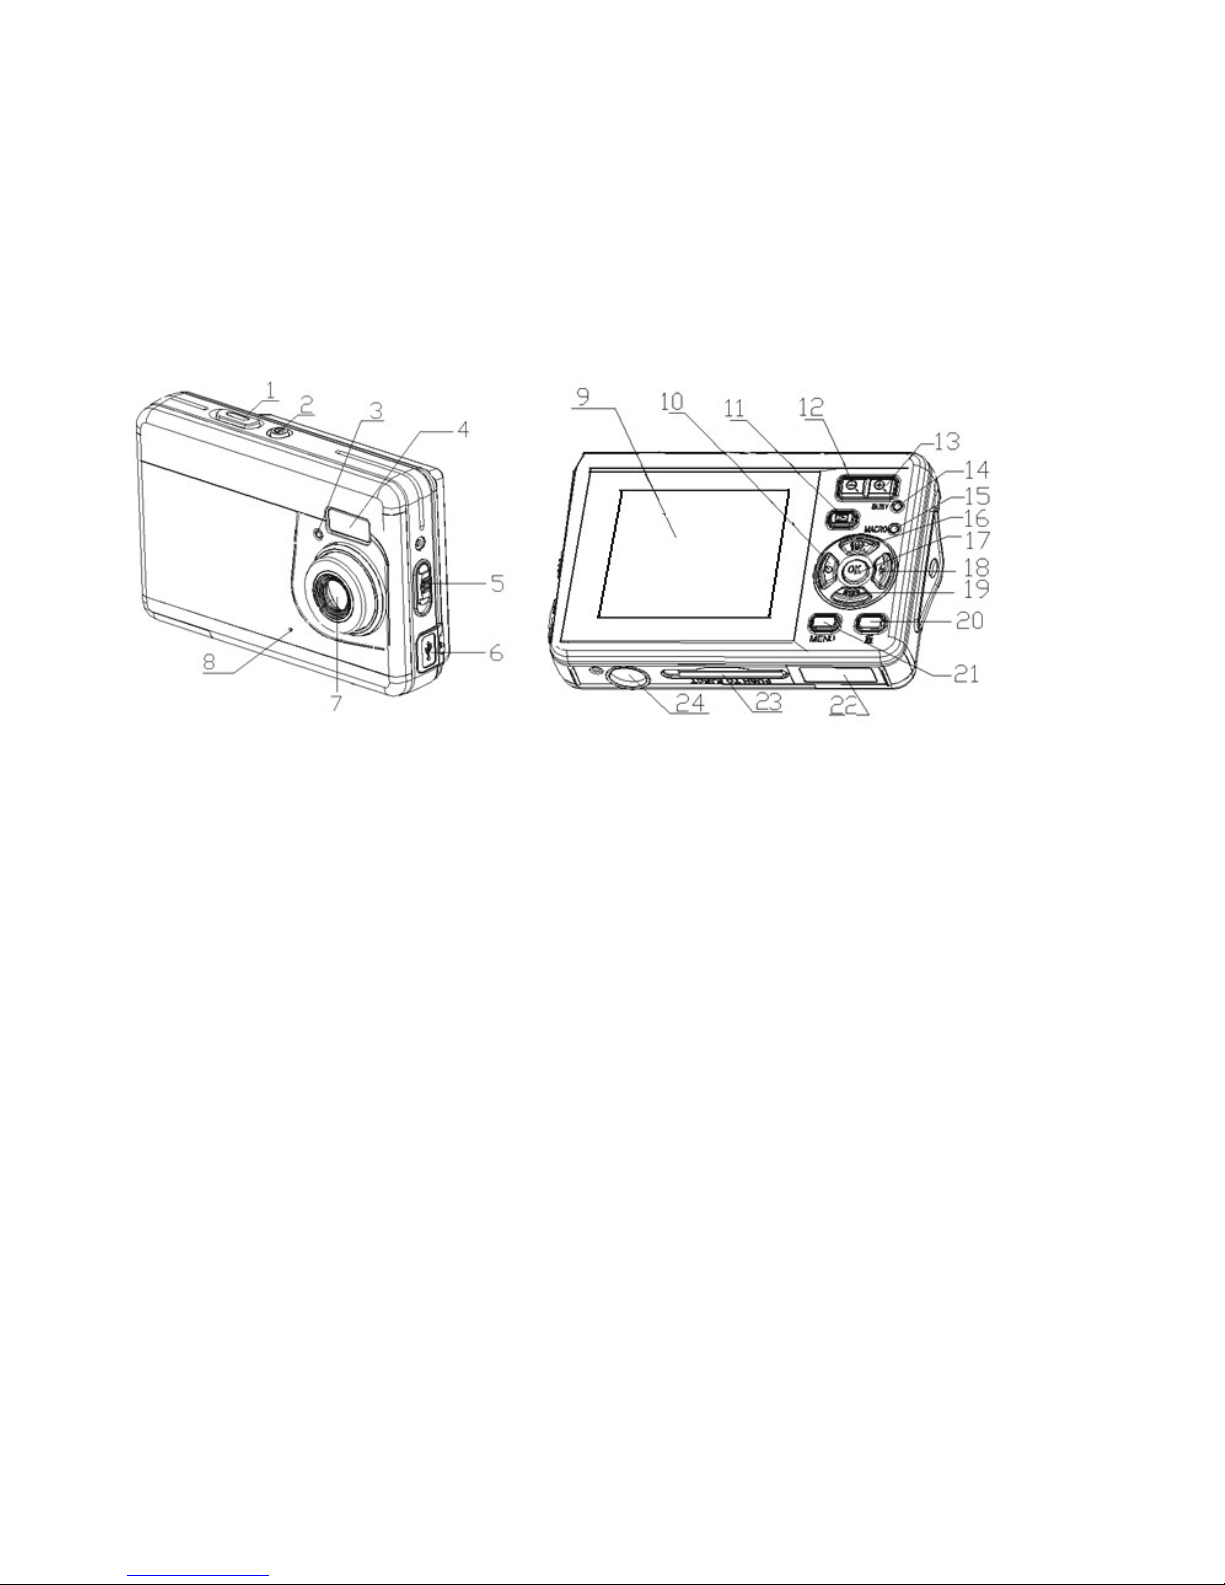
1. Parts of the camera
1: Shutter button
2: Power button
3: Self-timer indicator LED
4: Flash strobe
5: Macro button
6: USB jack
7: Lens
8: Microphone
9: TFT monitor screen
10: Left/self-timer button
11: Playback button
12: Zoom out button
13: Zoom in button
14: Busy light
15: Macro light
16: Up/Display button
17: Ok button
18: Right/Flash button
19: Down/Mode button
20: Delete Button
21: Menu button
22: Battery cover
23: SD card slot
24: Tripod socket

5
2. Preparing for using
Installing the battery
1. Open the camera battery door as illustrated.
2. Insert two AAA-size batteries with the positive (+) and negative (-)
poles matching the directions indicated on the battery cover.
3. Close the battery door.
Inserting the memory card
Turn off the camera before inserting or removing
the memory card. Be sure to orient the card
correctly when inserting it. Never try to force the
memory card into the slot when you feel
resistance. The memory card has a write protect
switch, which used to protect data from accidental

6
deletion. Therefore, whenever you want to record, format or delete files in
the SD card, disable the write protection beforehand.
1. Turn off the digital camera.
2. Insert the memory card as illustrated.
• Never insert any other object which is not a SD/MMC card into
the camera’s SD card slot. Doing so will cerate the risk of
damaging to the camera and the card.
• Never remove the SD card from the camera while the camera is
powered on. Doing so can cause failure to the picture recording
operation, and even damage the memory card.
Format the memory card
All data will be deleted including protected files. Be sure to download
important files to your computer before formatting.
1: Turn the power on, and set the camera to the Setup Menu.
2: Press the UP or DOWN button to select [Format] and then press the
RIGHT button or OK button to launch the submenu.
3: Press the UP or DOWN button to select the item [YES] and then press the
OK button to erase all data.

7
4: Press the MENU button to close the menu.
Setting the language
When using the camera for the first time after purchasing it, be sure to
choose a language and set the date & time before using the camera.
1: Turn the power on, and set the camera to the Setup Menu.
2: Press the UP or DOWN button to select [Language] then press the RIGHT
button or OK button to launch the submenu.
3: Press the UP or DOWN button to select the desired language and then
press the OK button to confirm the setting.
Setting the date and time
1: Turn the power on, and set the camera to the
Setup Menu.
2: Press the UP or DOWN button to select
[Date&Time] then press the RIGHT or OK
button to launch the submenu.
3: Press the UP or DOWN button to change the highlighted value. Press
the LEFT or RIGHT button to move the cursor between settings.
8
4: Press the OK button to confirm the setting.
5: Press the MENU button to close the menu.
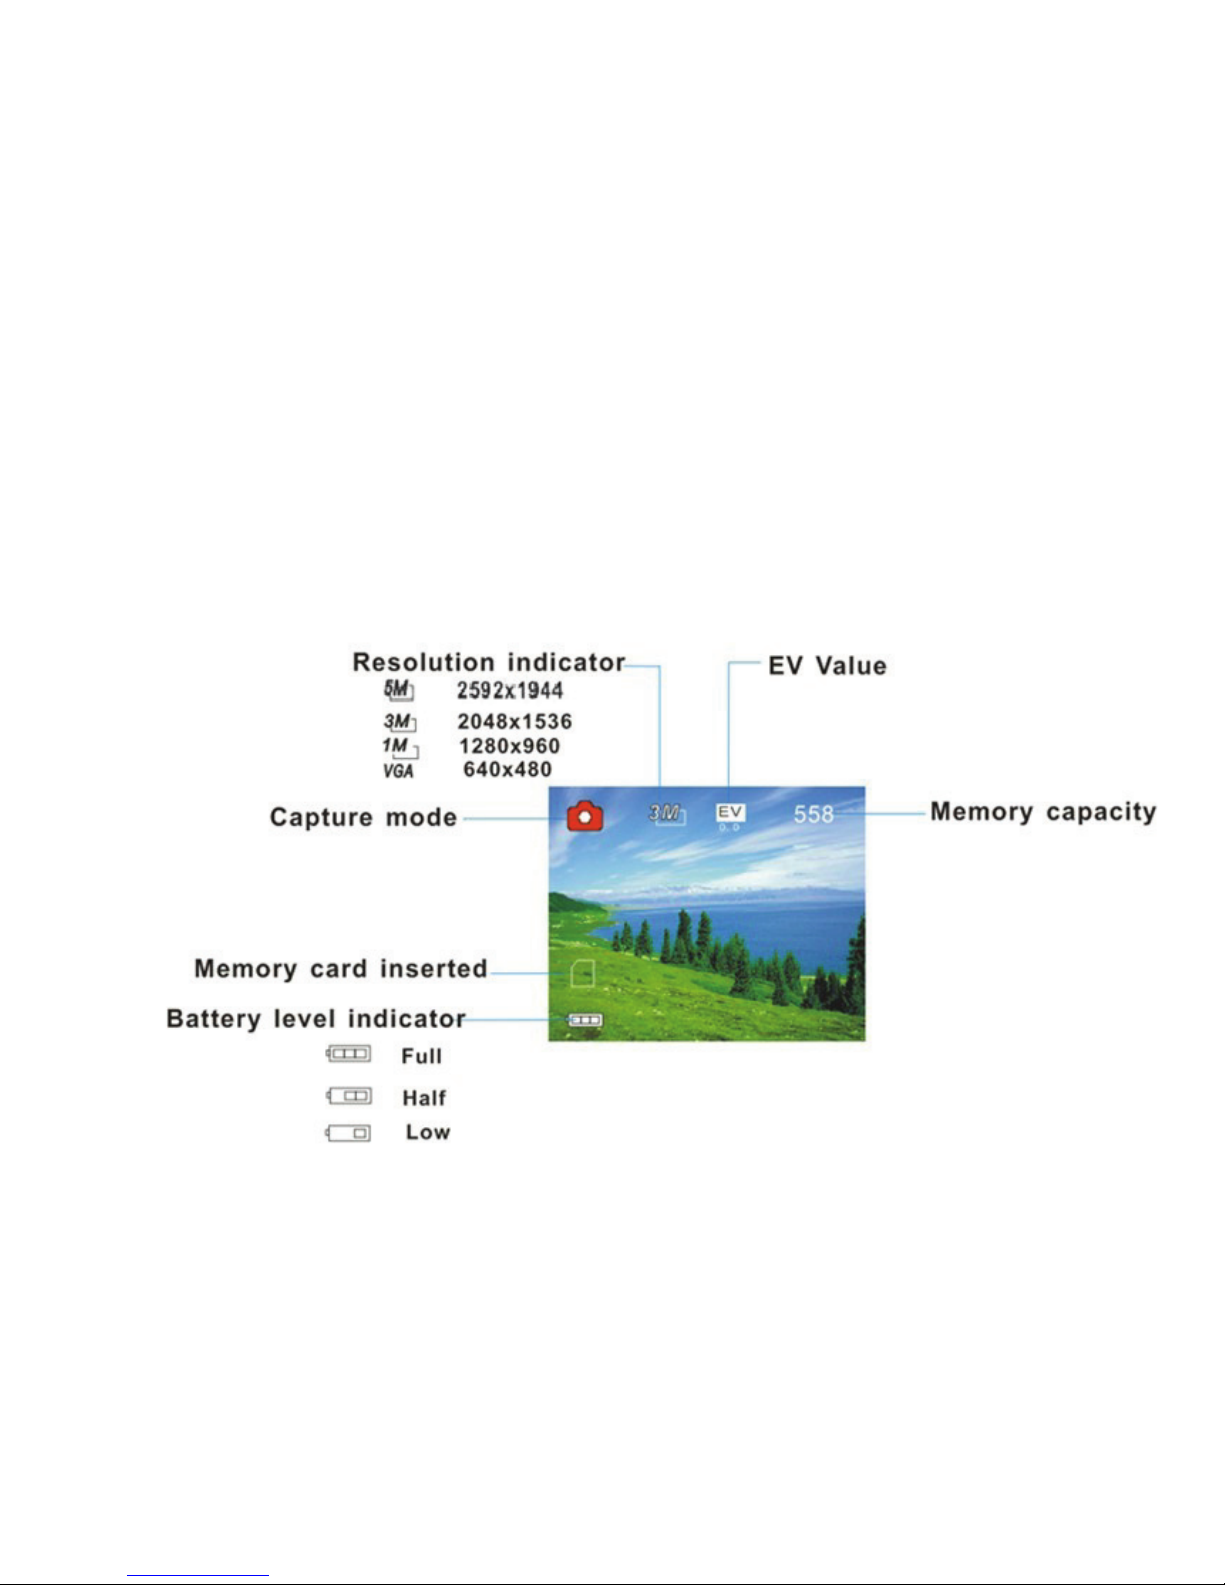
3. Monitor Screen Display
Capture mode
9
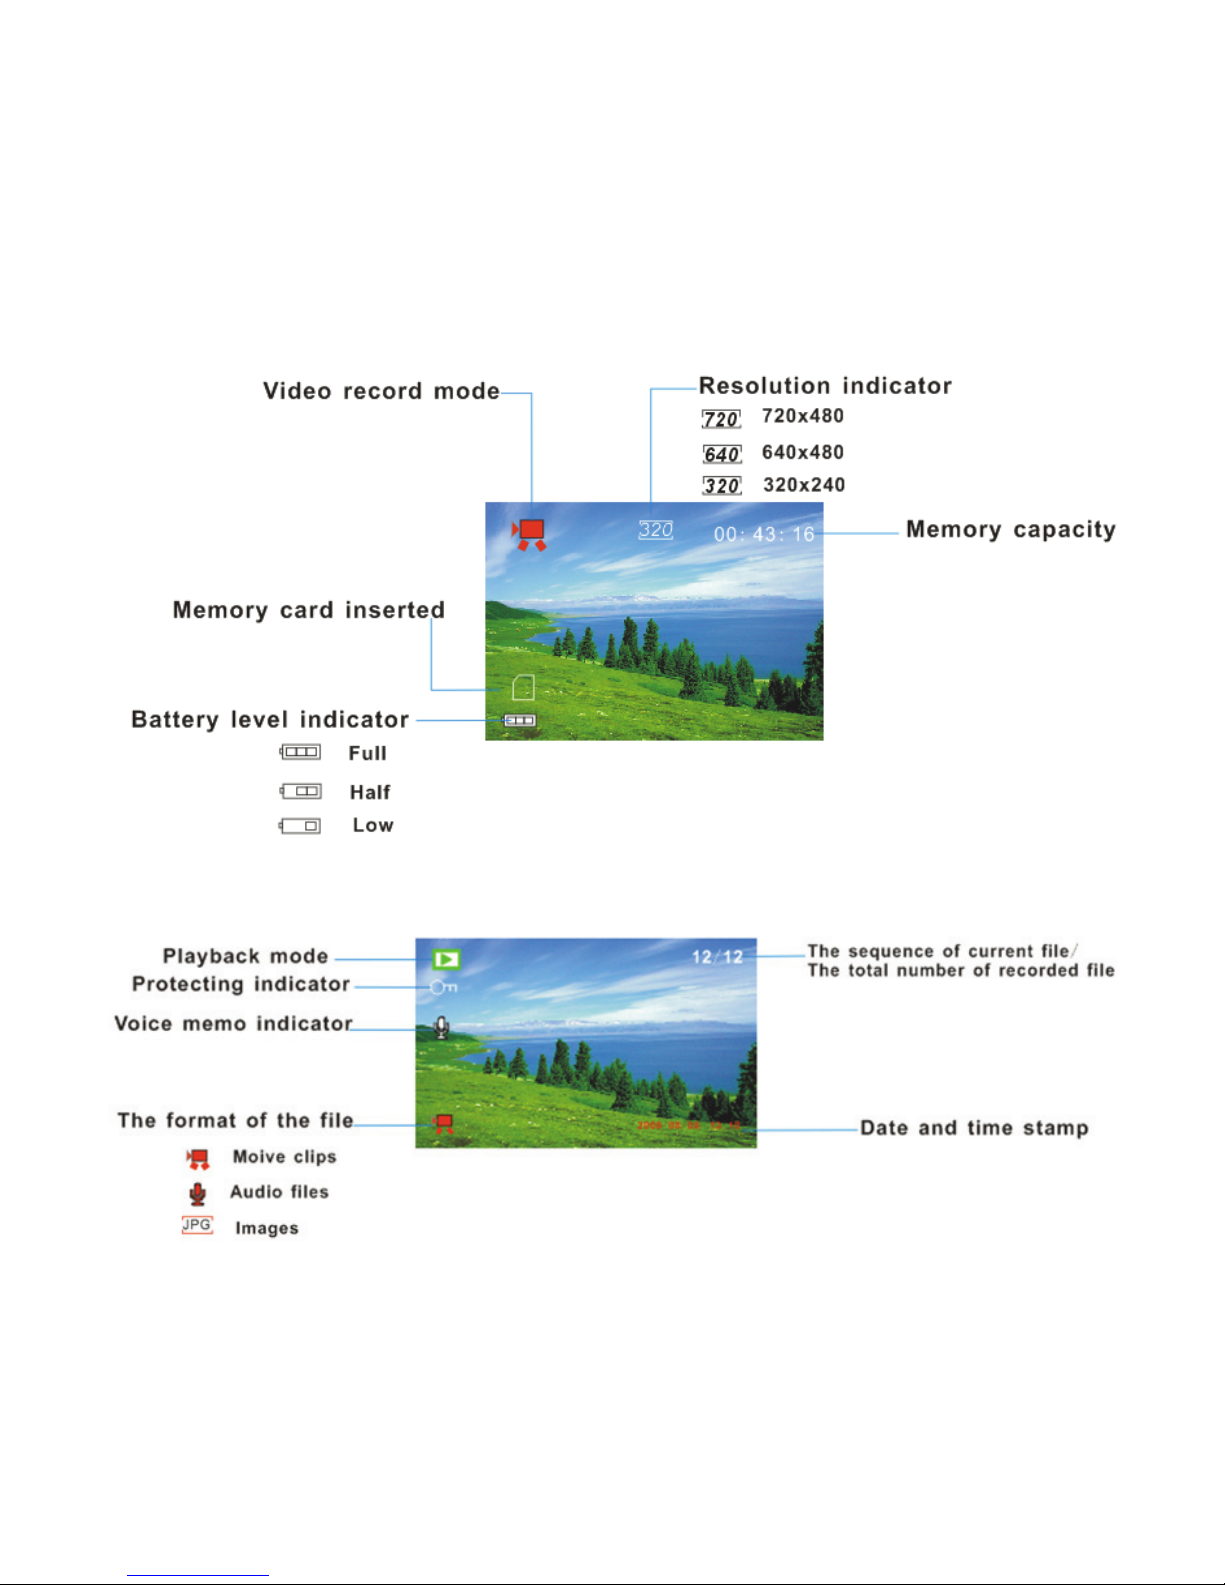
Video record mode
Playback mode

10
4. Using this digital camera
Turning the camera on and off
1. To turn on the camera, press the POWER button to turns on the
camera.
2. Press the POWER button again to turn the camera off.
• To save battery power, the camera automatically turns off a
period of time after the last control accessed. Press the POWER
button to power the camera back on. You can change the
power-off time by setting the function [Power Save] in the Setup
menu.
Change the record mode
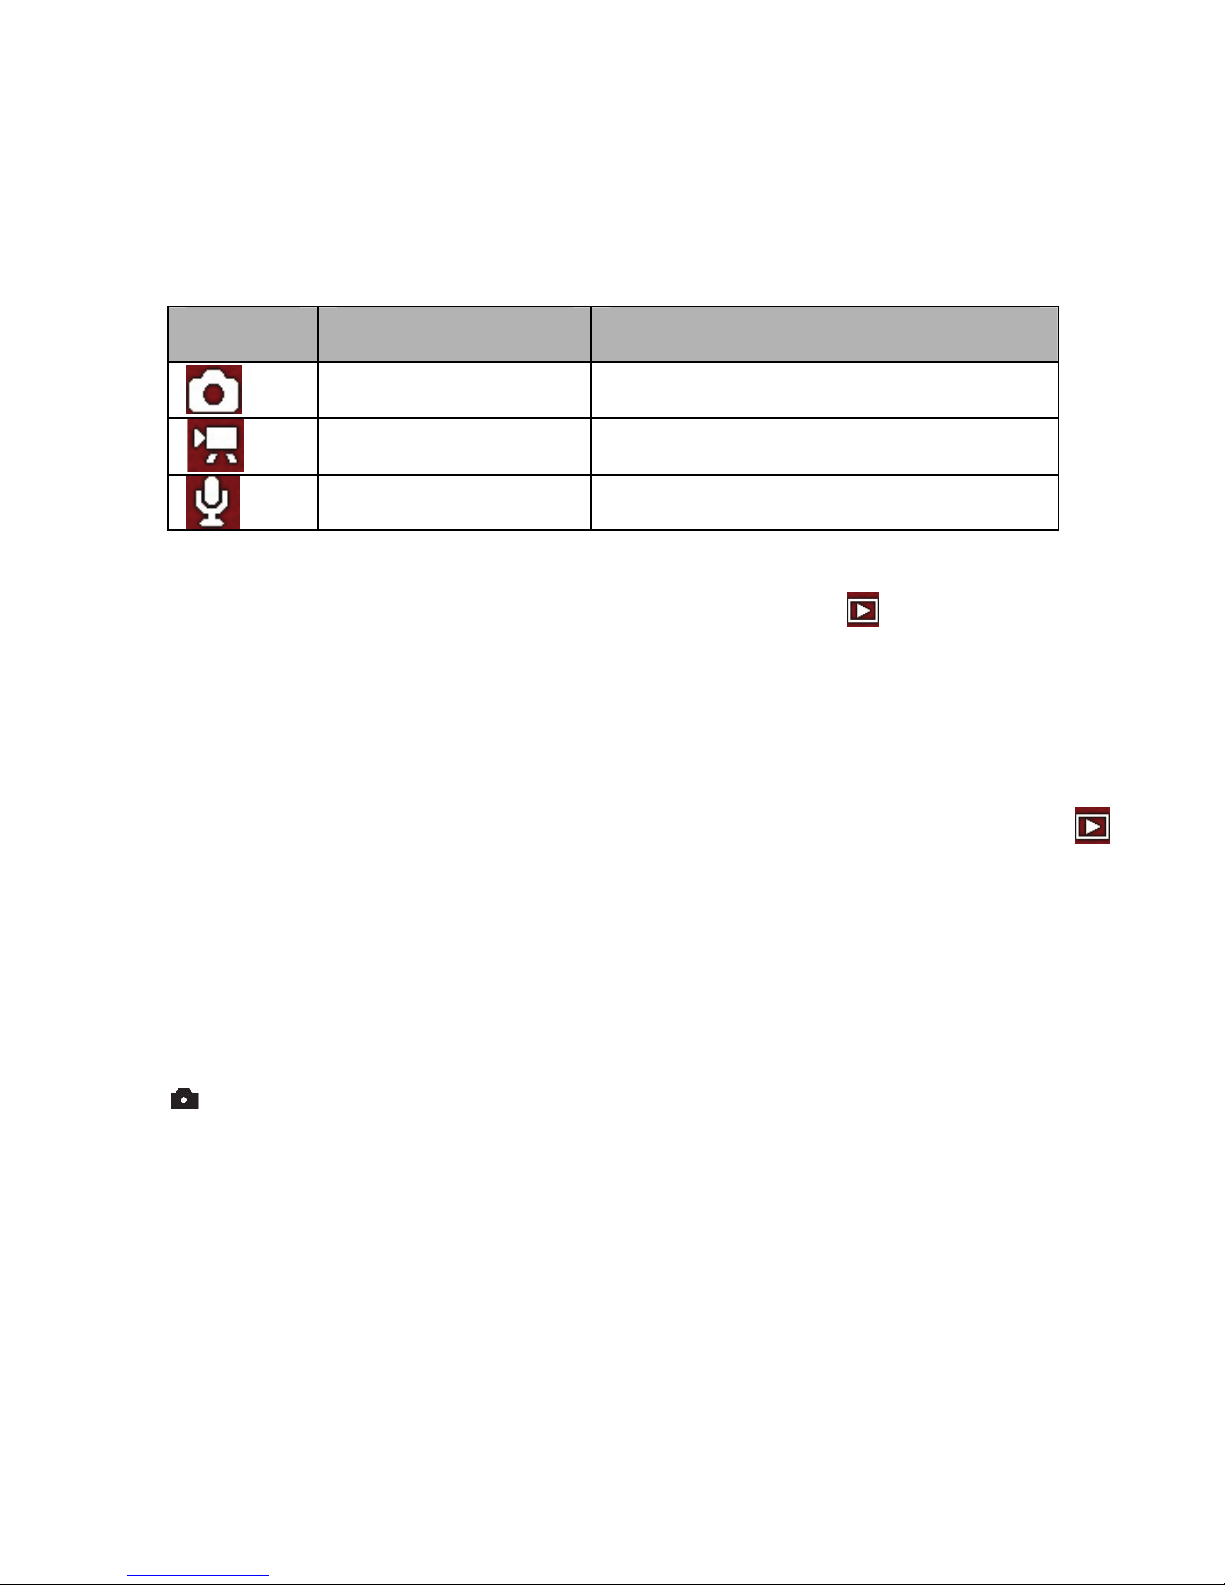
There are three record modes in this camera.
1: Press the POWER button to turn on the camera, and the camera get into
the default capture mode.
2: Press the MODE button to change the mode. Each time the MODE
button is pressed the mode icon is changed.
11
• When the digital camera is in playback mode
you must press
the PLAYBACK button to change it to record mode firstly then
you can use the MODE button to change mode.
• If you want to preview the record files you can press the
PLAYBACK button to set the digital camera to playback mode
.
Taking still images
1. Turn on the camera.
2. Press the MODE button to set the camera to capture mode, the icon
appears on the LCD screen.
3. Use the LCD screen to frame your subject.
4. Hold the camera steady and then press the SHUTTER button
completely down to take a picture.
Display Title Description
Capture mode For taking still photos.
Video mode For recording movie clips.
Audio mode For recording audio files.
 Loading...