

Vista Quantum E4000 Installation And User Manual
E4000 – Installation and User manual
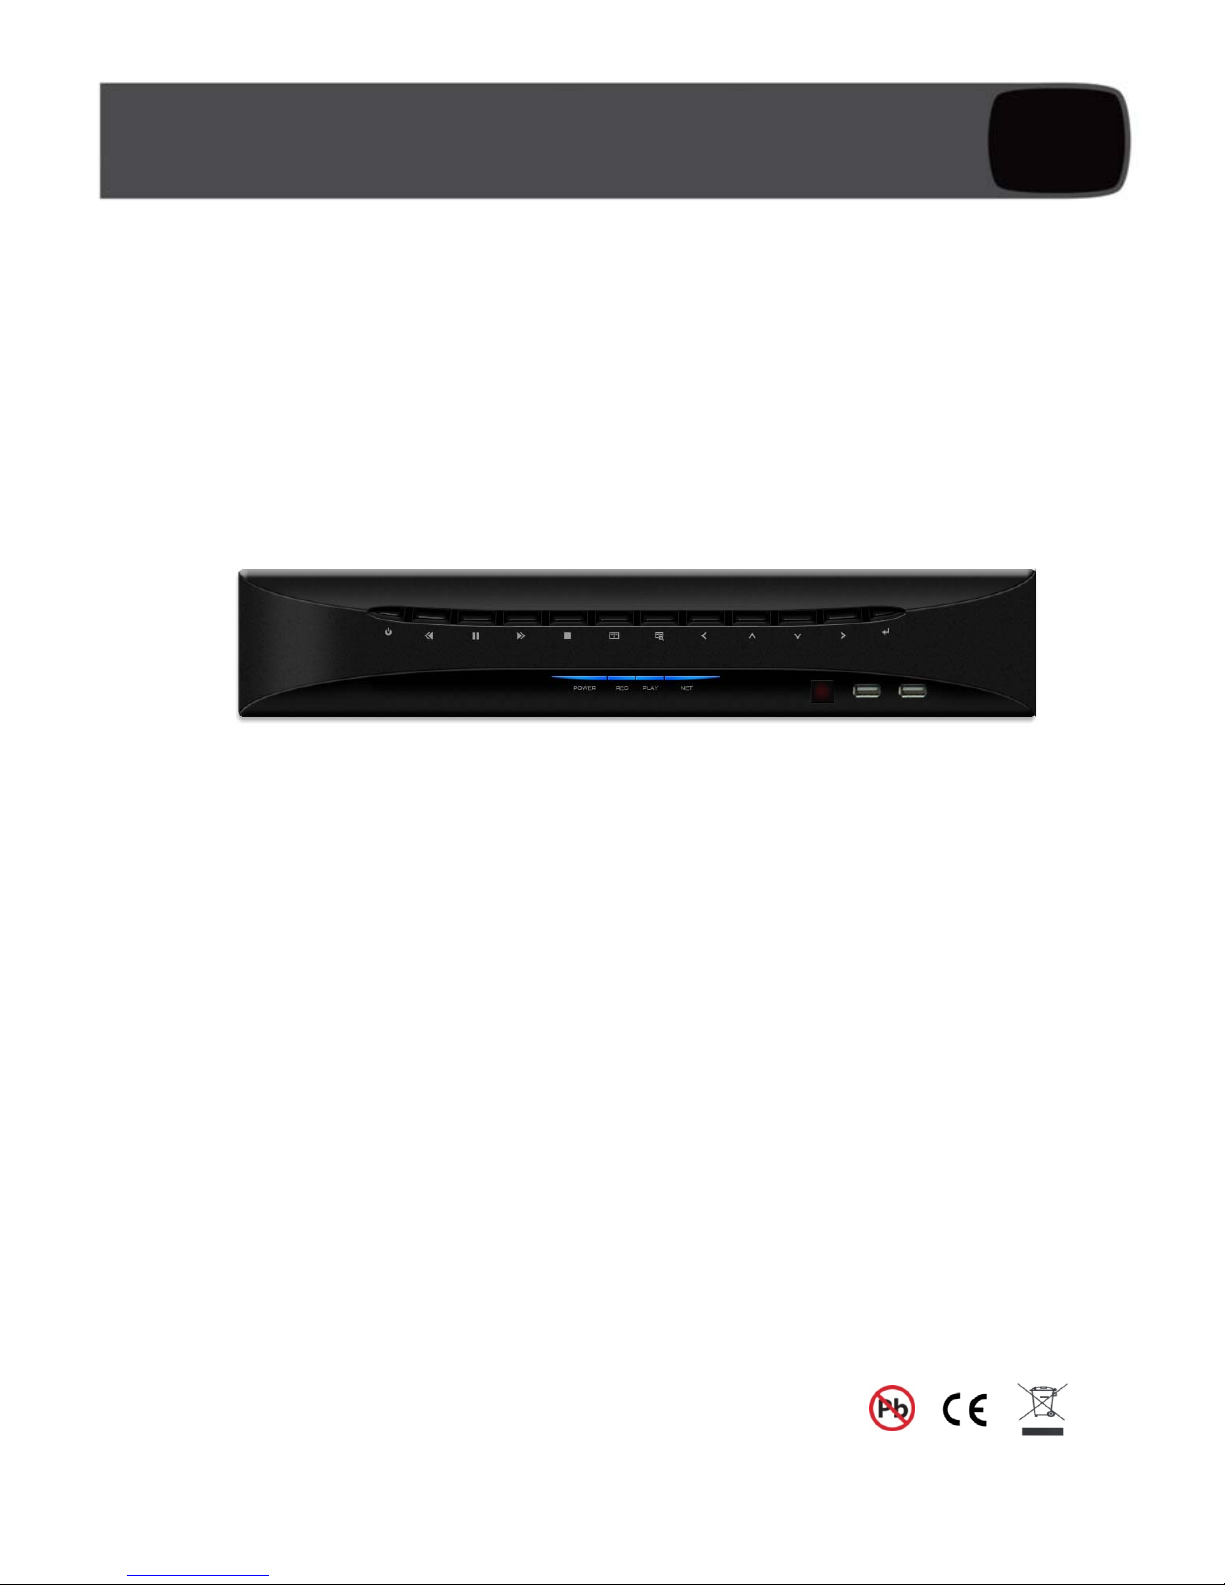
E4000
Digital Video Multiplexer/Recorder

2
E4000 installation and user manual
This page is intentionally left blank

3
E4000 installation and user manual
CE Information
The product must be installed according to the currently valid installation regulations
for EMC to guarantee the designed use and to prevent EMC problems.
The device supplied with this manual is according to the EC, EMC Directive,
89/336/EEC & LVD 73/23/EEC
Standard used for showing compliance with the essential requirements of the device:
EN 55022
EN 61000-3-2
EN 61000-3-3
EN 50130-4
EN 55024
LVD: EN60950-1

4
E4000 installation and user manual
Contents
SAFETY PRECAUTIONS ................................................................................................................................... 6
CONTENTS OF PACKING ................................................................................................................................. 7
FEA TURES ........................................................................................................................................................... 8
FRONT PANEL .................................................................................................................................................... 9
REAR PANEL CONNECT I ONS ........................................................................................................................ 11
SYSTEM CONNECTION DIAGRAM ............................................................................................................. 13
ALARM CONNECTIONS ................................................................................................................................. 14
REMOTE CONTROL ........................................................................................................................................ 15
OSD DESCRIPTION .......................................................................................................................................... 16
MENU TREE....................................................................................................................................................... 17
DEFAULT PASSWORDS ................................................................................................................................... 19
MENU NAVIGATION ........................................................................................................................................ 20
MENU SETTINGS ............................................................................................................................................. 22
1.
DISPLAY ........................................................................................................................................................ 22
[ Camera Setting ] .......................................................................................................................................... 22
[ Camera Covert ] .......................................................................................................................................... 22
[ Camera Name ] ........................................................................................................................................... 22
[ Spot Setting ] ............................................................................................................................................... 23
[ OSD Setting ] ............................................................................................................................................... 24
[ Live Setting ] ................................................................................................................................................ 25
2.
RECORDING .................................................................................................................................................. 26
[ Global ] ........................................................................................................................................................ 26
[ Frame ] ........................................................................................................................................................ 27
[ Event ] ......................................................................................................................................................... 28
[ Action ] ......................................................................................................................................................... 29
[ Schedule ] .................................................................................................................................................... 30
[ Holiday ] ....................................................................................................................................................... 31
[ Time ] ........................................................................................................................................................... 32
[ Duration ] ..................................................................................................................................................... 32
3.
SYSTEM ......................................................................................................................................................... 34
[ Basic ] .......................................................................................................................................................... 34
[ Disk ] ............................................................................................................................................................ 37
[ Account ] ...................................................................................................................................................... 38
[ Program Update ] ........................................................................................................................................ 40
[ Sensor ] ....................................................................................................................................................... 41
[ PTZ Setup ] ................................................................................................................................................. 41
[ PTZ Controller ] ........................................................................................................................................... 42
4.
NETWORK ..................................................................................................................................................... 47
[ DDNS ] ........................................................................................................................................................ 47
[ IP SET ] ....................................................................................................................................................... 48
[ NTP ] ........................................................................................................................................................... 48
[ LIVE ] ........................................................................................................................................................... 49
5.
EVENT ........................................................................................................................................................... 50
[ E-Mail Registration ] .................................................................................................................................... 50
[ SMTP Mode ] ............................................................................................................................................... 51
[ E-mail Out ] .................................................................................................................................................. 52
[ Beep Out ] ................................................................................................................................................... 52
[ Alarm Out ] ................................................................................................................................................... 53
SEARCH MENU ................................................................................................................................................. 54
1.
SEARCHING VIDEO FOOTAGE ....................................................................................................................... 54

5
E4000 installation and user manual
[ Date / Time Search ] .................................................................................................................................... 54
[ Event ] ......................................................................................................................................................... 54
[ Calendar Search ] ........................................................................................................................................ 55
2.
ARCHIVING EVIDENCE TO DVD/CD OR USB ............................................................................................... 57
3. LOG ............................................................................................................................................................... 59
CLIENT VIEWER SOFTWARE....................................................................................................................... 60
L
OGGING ON ..................................................................................................................................................... 61
E
XPLANATION OF SCREEN BUTTONS ............................................................................................................... 62
L
IVE MONITORING ............................................................................................................................................. 63
REMOTE SEARCH .............................................................................................................................................. 66
ARCHIVE ......................................................................................................................................................... 68
R
EMOTE LOG .................................................................................................................................................... 71
REMOTE SETUP: (MENU SETTINGS - SAME AS DVR) ...................................................................................... 72
1. Display ....................................................................................................................................................... 72
2. Recording .................................................................................................................................................. 75
3. System ....................................................................................................................................................... 79
4. Network ..................................................................................................................................................... 82
5. Event ......................................................................................................................................................... 83
L
OCAL SEARCH (VIEWING DOWNLOADED FOOTAGE) ........................................................................................ 85
Local Setup .................................................................................................................................................... 88
PAN,
TILT, ZOOM, FOCUS (REMOTE TELEMETRY CONTROL) .......................................................................... 90
PAN/TILT/ZOOM/FOCUS .............................................................................................................................. 90
PRESET/LEARN ............................................................................................................................................ 91
F
IRMWARE UPGRADE ........................................................................................................................................ 92
Quit (Exiting Client program) ......................................................................................................................... 92
APPENDIX 1 ....................................................................................................................................................... 93
A
LARM SENSOR INSTALLATION ......................................................................................................................... 93
APPENDIX 2 ....................................................................................................................................................... 96
D
YNAMIC IP (SUPPORTING DDNS SERVER) ................................................................................................... 96
APPENDIX 3 ....................................................................................................................................................... 98
Setup For DVR Port/ Web Server Port Using IP Sharing Router (Port Forwarding) ...................................... 98
APPENDIX 4 ....................................................................................................................................................... 99
S
PECIFICATION .................................................................................................................................................. 99

6
E4000 installation and user manual
Safety Precautions
Caution Before Use
Please read this manual before installing or using the Vista Quantum DVR.
Please keep this manual in a safe place, to allow for future reference
For the safety and proper use, The DVR is marked with various symbols. Please read these
to prevent injury of financial loss.
Installation Site
Ensure installation position is level, secure and adequately ventilated.
Avoid installing close to sources of humidity or water.

7
E4000 installation and user manual
Contents Of Packing
Mouse
Power Cable
User Manual
Remote Controller
Battery
AC Adaptor

8
E4000 installation and user manual
Features
● Convenience
- User-friendly GUI (Graphical User Interface)
- Easy-to-use menu structure
- Easy-to-use recorded data search (Time, Date, Motion, and Alarm)
- Easy-to control via Front Panel, IR remote control and USB 2.0 mouse.
● Stability
- Auto restart after power interruption
- DB structure offers data stabilisation and better storage utilisation
● Expandability
- Remote DVR’s can be controlled using the supplied software client viewer.
● Technology
- Embedded LINUX OS
- Maximum record rate 400fps(PAL)/ 480fps(NTSC)
- High-resolution & high-quality H.264 algorithm
- Uses watermarking & scrambling technologies,
- H.264 : 1 ~ 2 Kbytes per image with resolution 360x240
● Functionality
- Variable recording function (normal, alarm, motion, schedule, duration, Time Lapse,)
- RS485 Telemetry
- Full channel real-time monitoring
- Live monitoring, recording, playback, backup, remote access simultaneously
- Multi channel playback
- Variable events notification to e-mail, buzzer or PC Client system
9
E4000 installation and user manual
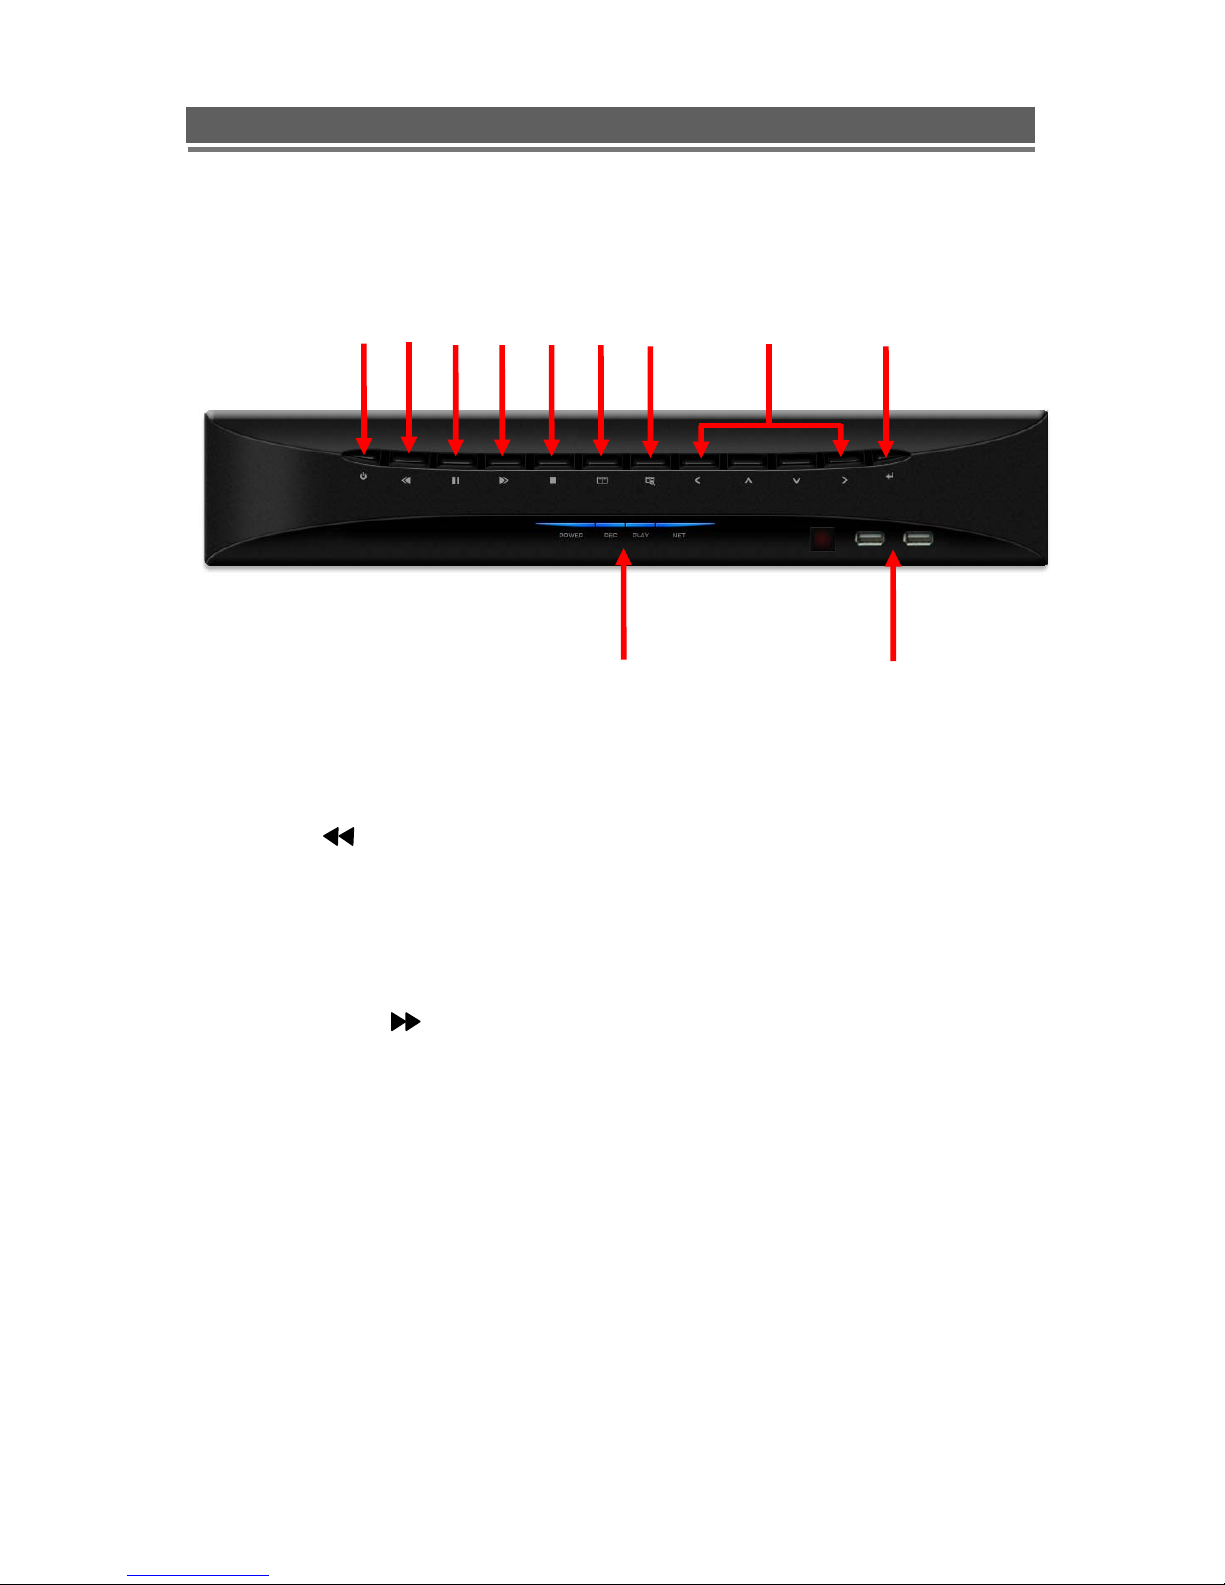
Front Panel
(1) POWER BUTTON
System Power On/Off
(2) REWIND ( )
Reverse play of recorded data
When in play mode press again to enter fast rewind mode.
(3) PAUSE ( ▌▌)
To freeze picture on playback mode and live mode.
(4) Forward PLAY ( )
Playback of the recorded data
When in play mode press again to enter fast forward mode.
(5) STOP (■)
To stop playback and go back to live mode.
(6) MENU
Displays the menu on the screen
(7) SEARCH
Entering search mode
(8) ARROW KEY
Moves the cursor while in menu mode
⑩ ⑪
① ② ③ ④ ⑤ ⑥ ⑦ ⑧ ⑨

10
E4000 installation and user manual
(9) SELECT
Menu selection
(10) LEDs
- POWER : System Power On/Off (When power is on, the light will be illuminated)
- REC : Recording status (When recording is on, the light will be illuminated)
- PLAY : Playback status (When playing is on, the light will be illuminated)
- NET : Network status (When network is connected, the light will flash)
(11) USB 2.0
USB 2.0 connector for mouse control & downloading to USB pens / drives (plus
upgrading firmware)
11
E4000 installation and user manual
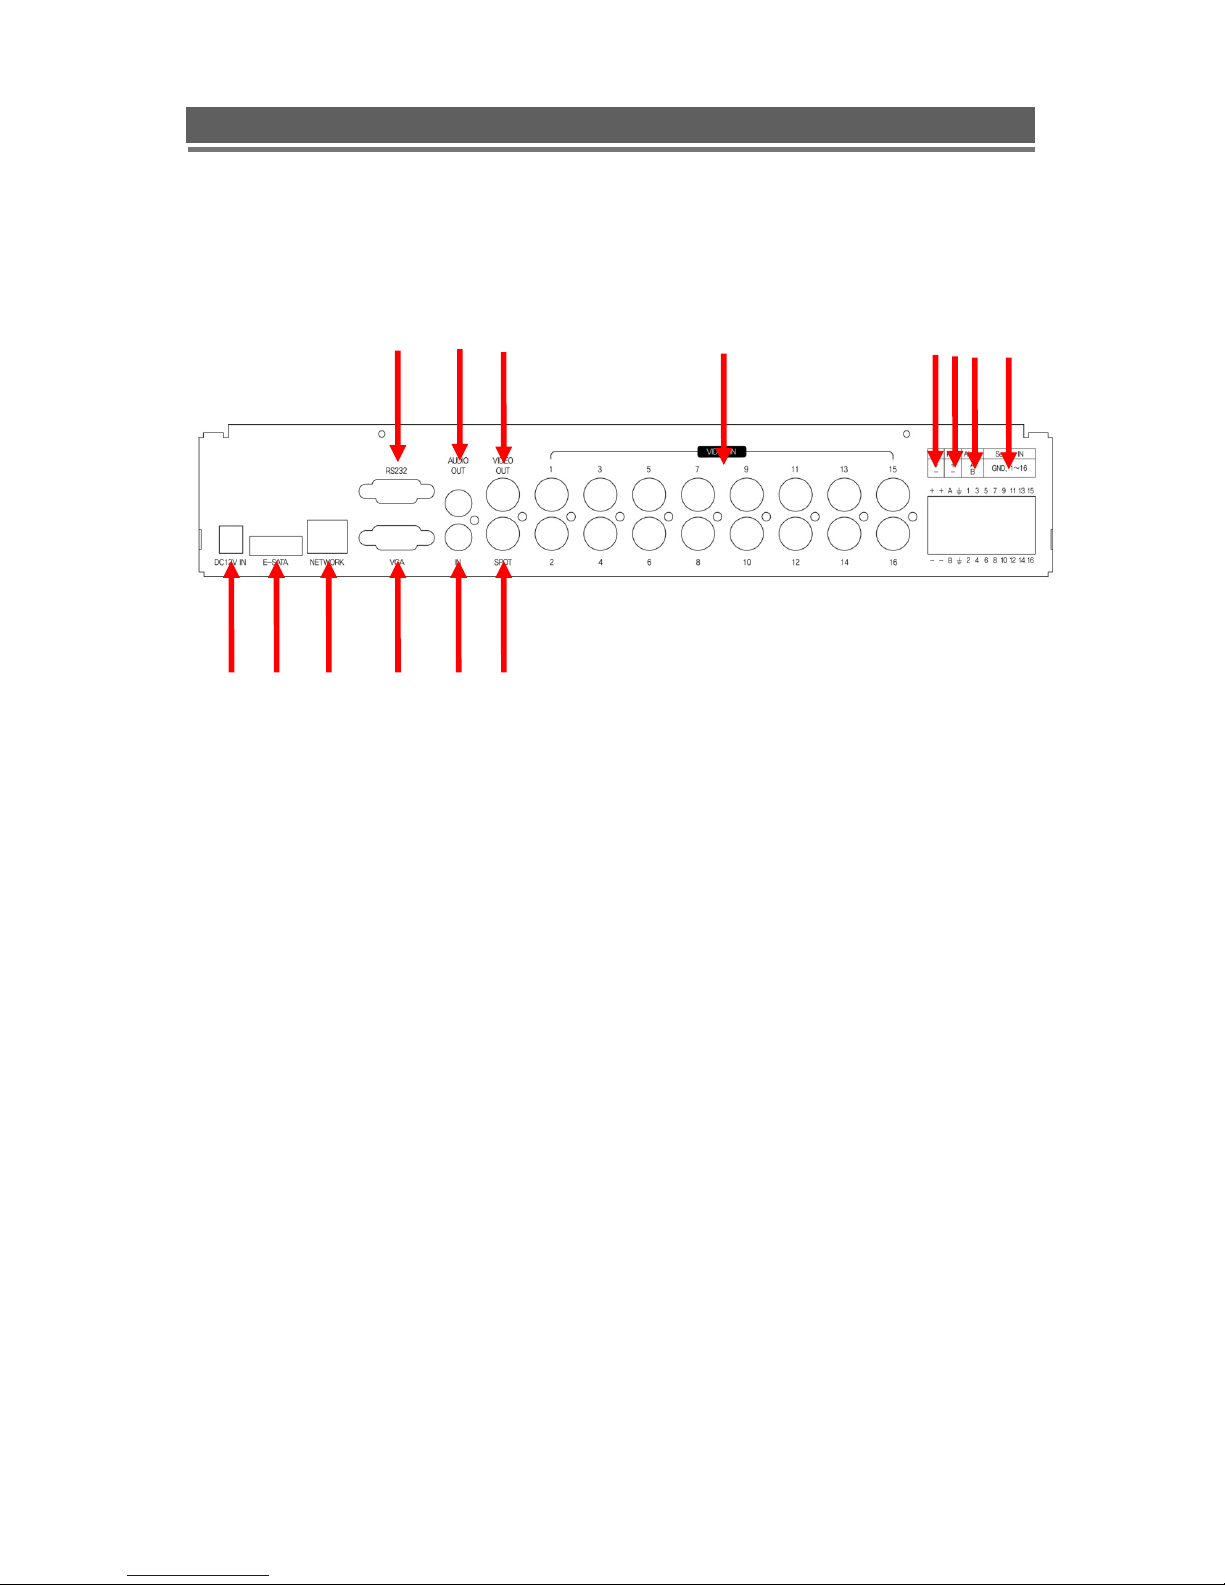
Rear Panel Connections
(1) RS232
Serial Communication
(2) AUDIO OUTPUT
Audio output
(3) COMPOSITE VIDEO OUT
Composite Video Output
(4) VIDEO IN
16 Camera inputs (1.0v p-p, 75Ω)
(5) PTZ CAMERA CONTROLLER
Serial Communication for Pan / Tilt Camera
(6) KEYBOARD CONTROLLER
Serial Communication for P/T/Z Control Keyboard
(7) ALARM OUT
Alarm output port
(8) SENSOR IN
16 Sensor input ports
(9) DC IN
⑨ ⑩ ⑪ ⑫ ⑬ ⑭
① ② ③ ④ ⑤⑥⑦⑧

12
E4000 installation and user manual
DC 12V 3.3A
(10) E-SATA PORT
Port for e-sata HDD
(11) Network Port (RJ-45)
Connecting to the Quantum DVR through Internet or LAN
(12) VGA VIDEO OUT
VGA Video Output
(13) AUDIO INPUT
Audio input through line
(14) SPOT OUT
Spot Video Output
13
E4000 installation and user manual
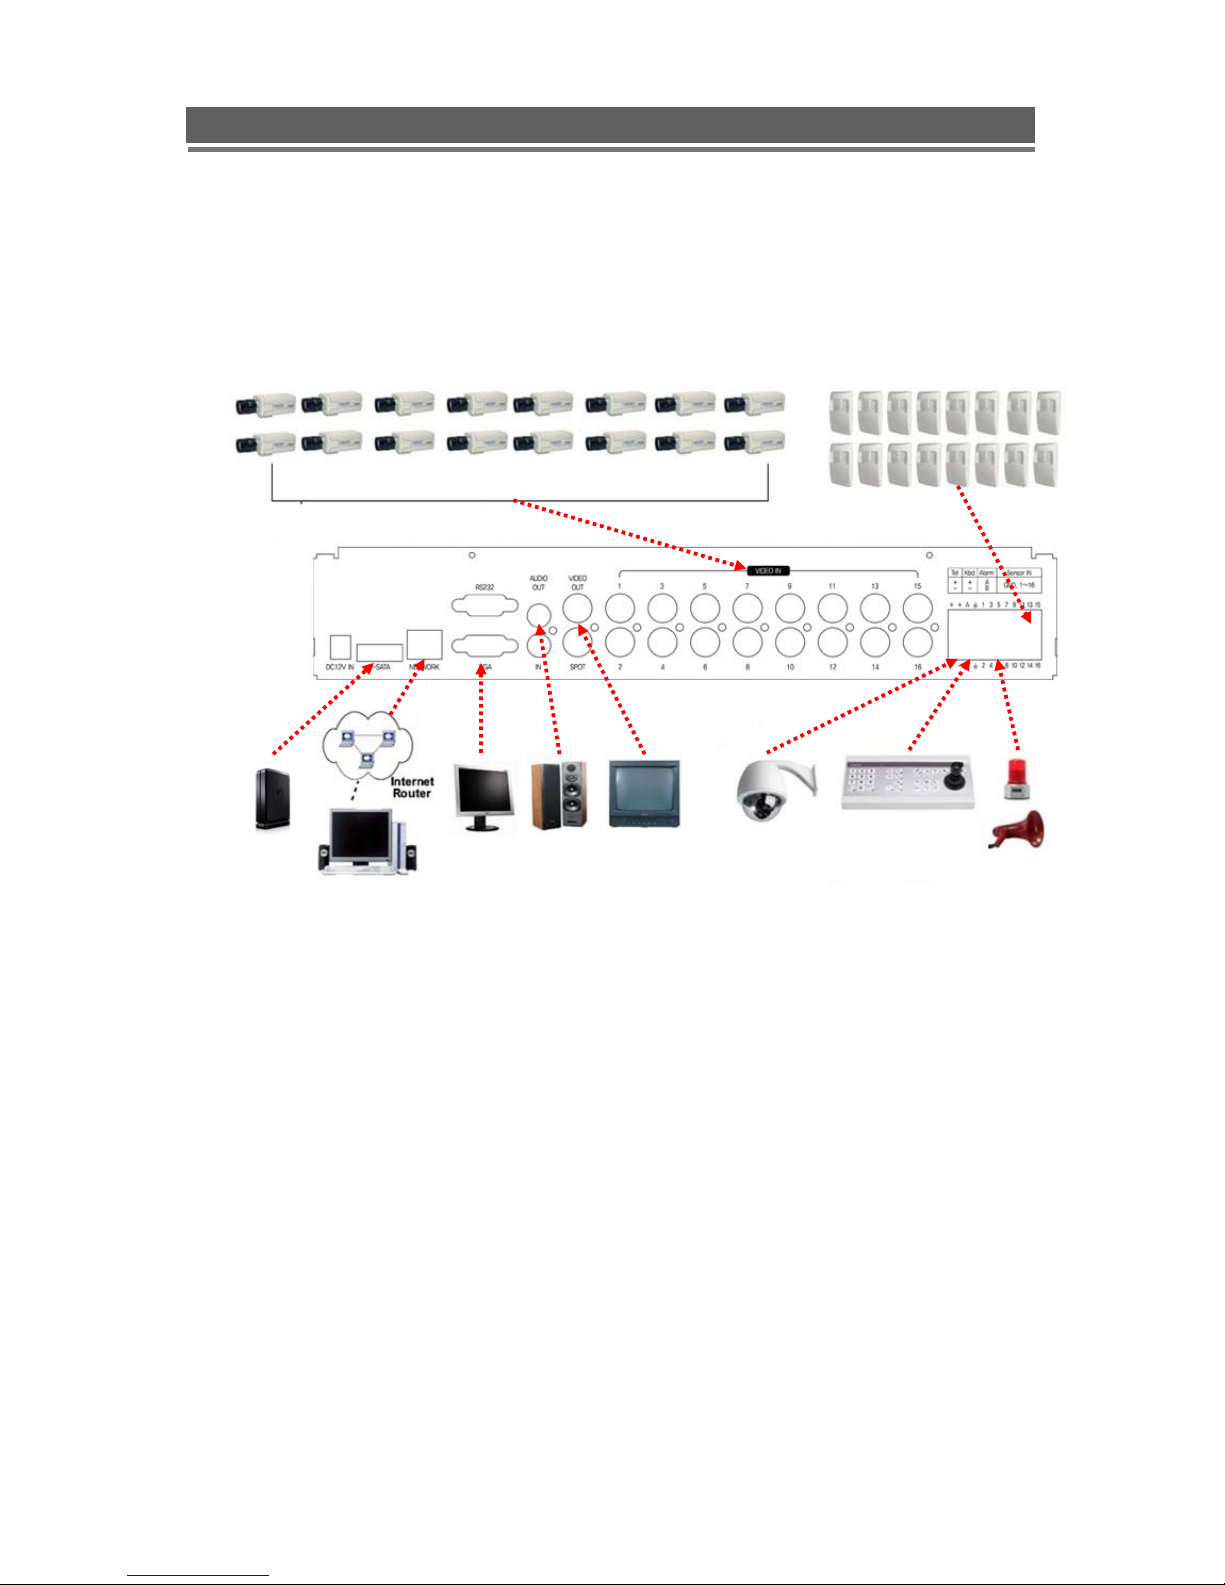
System Connection Diagram
Camera Sensor
e-sata
HDD
Siren
PC
Client
VGA
Monitor
Composite
Monitor
Keyboard
PTZ
Camera
14
E4000 installation and user manual
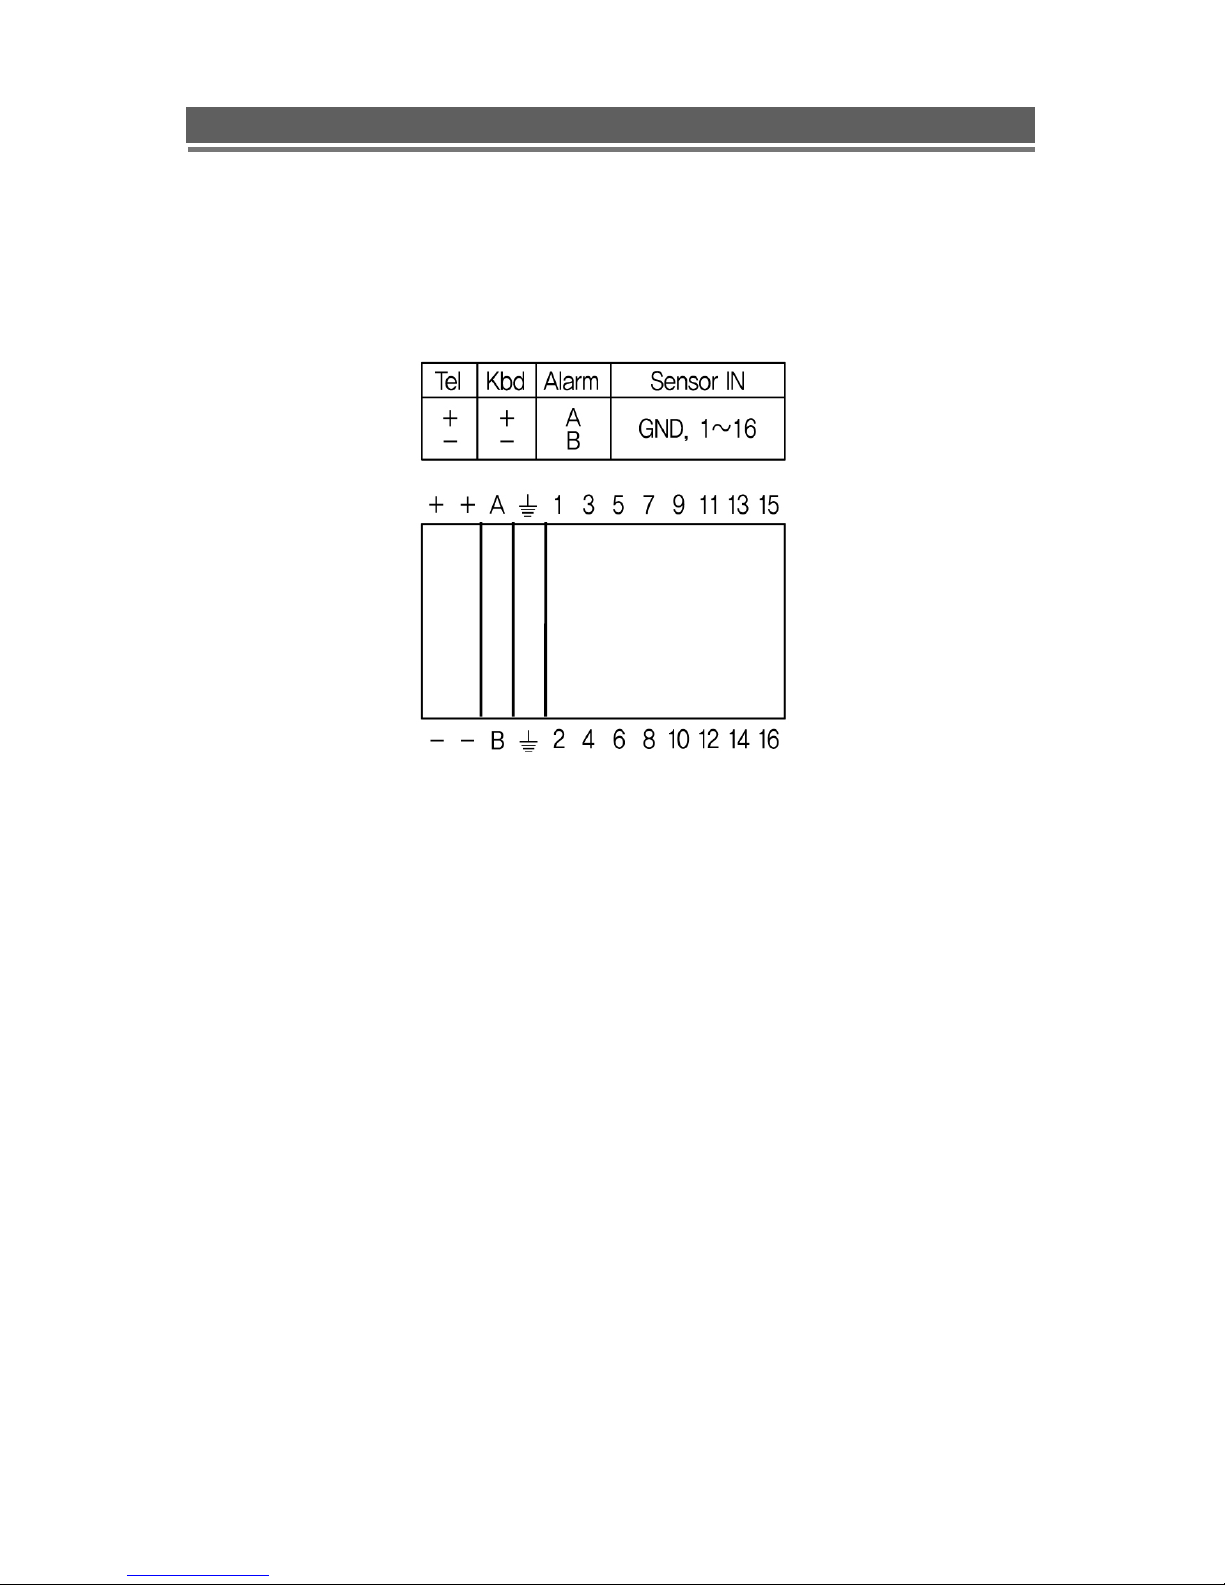
Alarm Connections
The Alarm connections are made via the push in connectors on the rear on the unit. There are 16
individual alarm inputs marked as Sensor In (1-16) and 2 Outputs marked as Alarm, plus 2 ground
connections. As shown below:

15
E4000 installation and user manual
Remote Control
1. Power: Power ON/OFF
2. REC: Start & Stop Recording
3. (1 to 9) Numbers and letters
4. P/T/Z: Entering PTZ menu directly
5. OSD: On Screen Display ON/OFF
6. SEQ: Sequence operation
7. LOG: Direct access Log list
8. INFO: Direct access system Info.
9. ID: Reserved.
10.MUTE: Audio Mute
11.AUDIO: Switches through Audio
channels
12. MENU: Entering system menu
13. SEARCH: Entering search
14. ARROW & SPLIT: Left, Right, Up and
Down. Also, Screen split options
15. VOL”+,-“ : Up, down volume
16. CH “+,-“ : Up, down channel(s)
17. ▶(▶) : Play(or fast forward)
18. (◀)◀: Reverse play
19.
II: Pause
20. ■: Stop playback
21. Cam: Changing PTZ icon
22. P/T: Pan &Tilt
23. Z/F: Zoom/ & Focus
24. DIS: Channel Division
16
E4000 installation and user manual
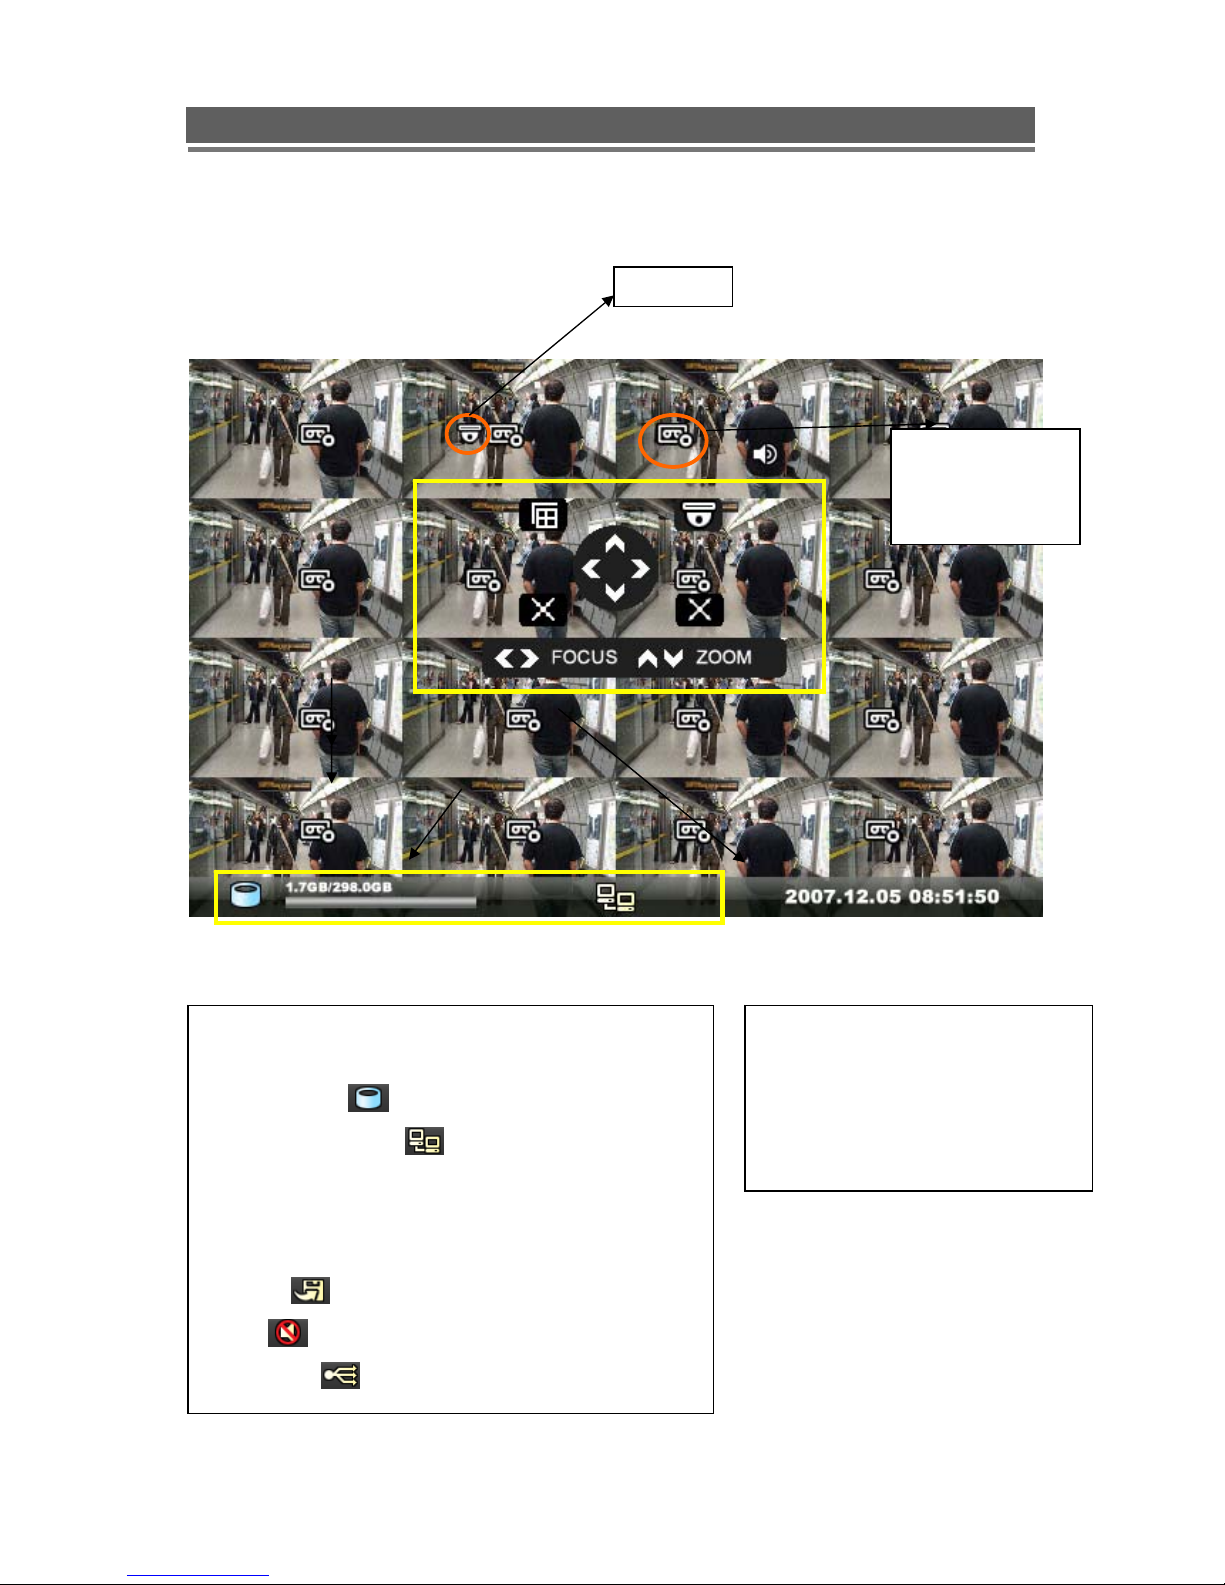
OSD Description
The Status Bar shows HDD capacity, Network
connection, Time, etc using by icons.
-HDD capacity : 1.7GB is used out of 298.0GB
-Network connection : It is shown that admin or
user is connected.
-Date/Time
*Others :
-Backup
-Mute
-USB Stick:
This screen shows PTZ control of
camera 2. The on screen arrows
will allow control of this camera.
Record Standby:
It is shown when
recording is not
activated.
PTZ icon
17
E4000 installation and user manual
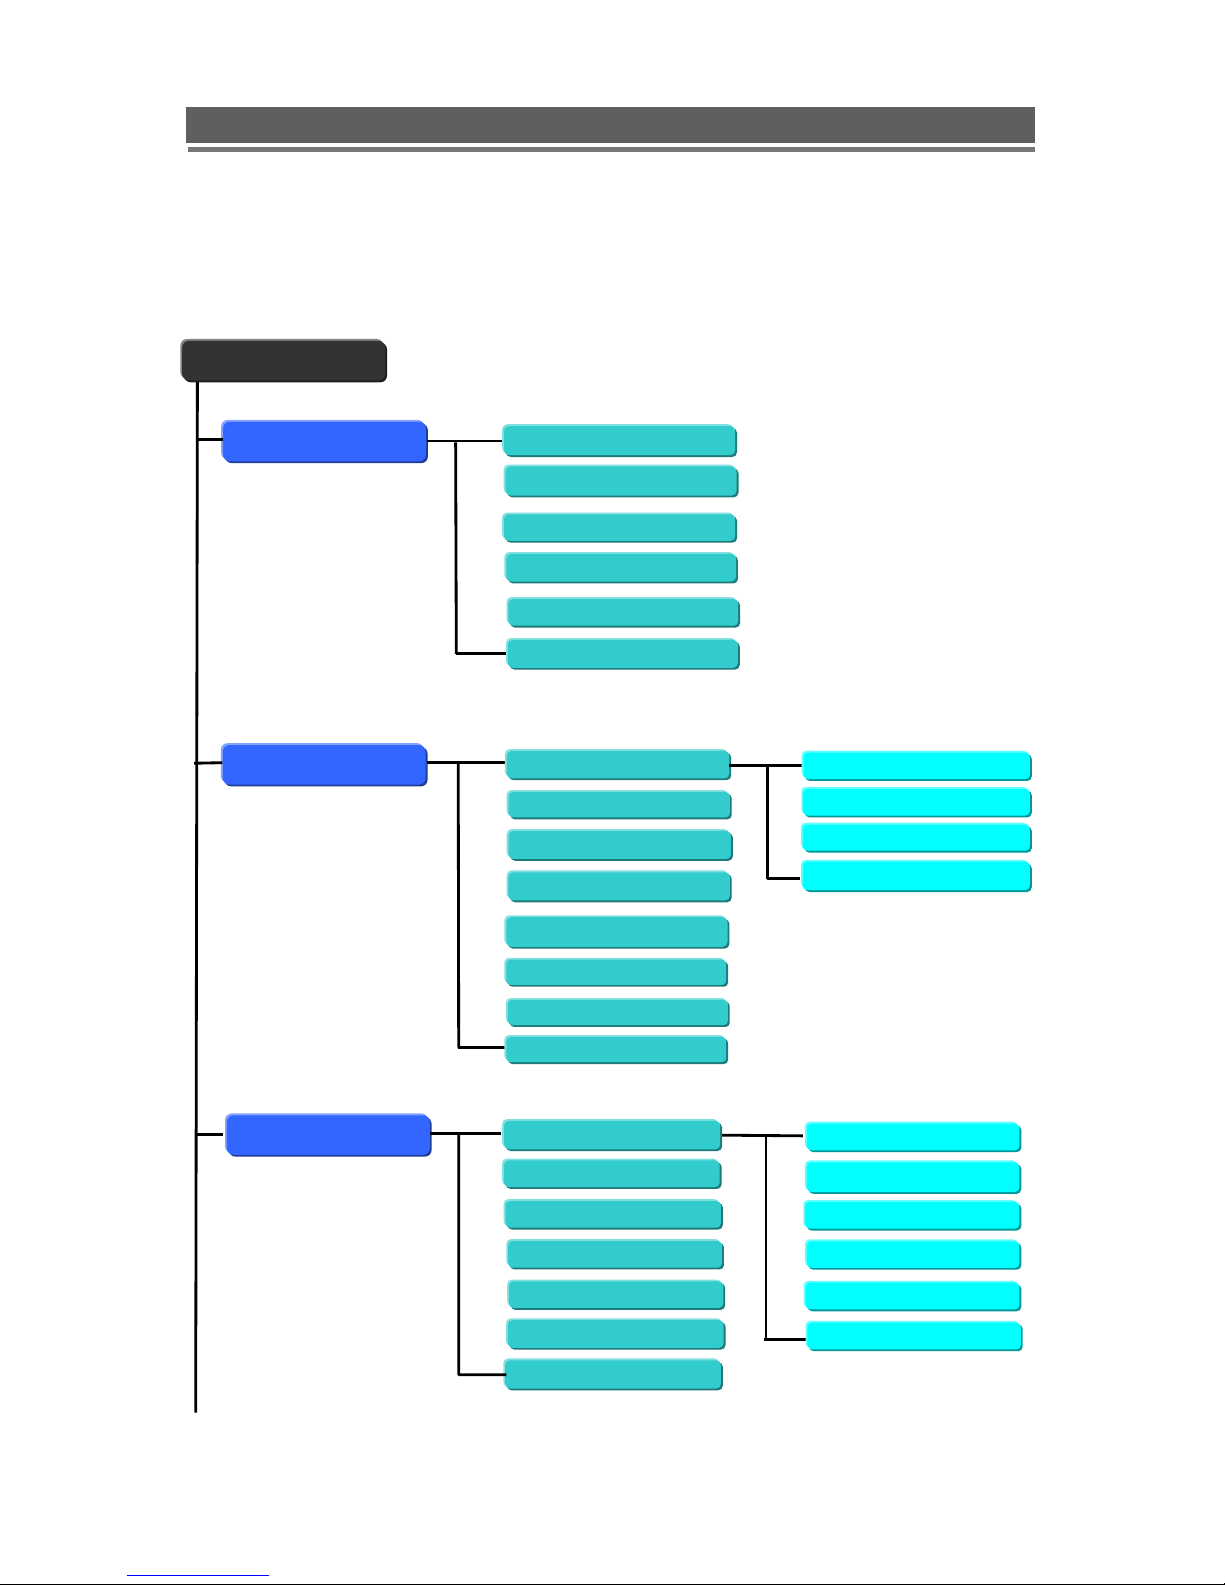
Menu Tree
Main Menu
Recording
Time
Duration
Global
Frame
Event
Action
Schedule
Holida
y
Display
Camera Covert
Camera Name
Spot Setting
Live Setting
OSD Setting
Camera Setting
Watermark
HDD Overwrite
A
udio
Pre-Alarm Duration
Video Type
Time/DST Set
System ID
Date Format
Auto Delete Mode
Language
System
Basic
Disk
Account
Program Update
Sensor
PTZ Controller
PTZ Setup

18
E4000 installation and user manual
Network
DDNS
E-Mail Registration
Event
DDNS
User ID
User Password
Domain
Dynamic IP
IP
Gate Way
Net Mask
DNS Server
DSL ID
DSL PW
DVR Port
Web Port
Live
NTP
IP SET
SMTP Mode
Search
Search
Archive
Log
Date/Time
Event
Calendar
All
Powe
r
Record
Operation
Client
Event
Archive
E-Mail Out
Beep Out
Alarm Out
19
E4000 installation and user manual
Default Passwords
Front Panel
A Password is required if you need to: Log on; enter the menus; down power; stop recording
or changing an IP setting.
Logging ON
Before the system can be used it is necessary to Log On as a user, he rights of each user
can be managed by an administrator level log on
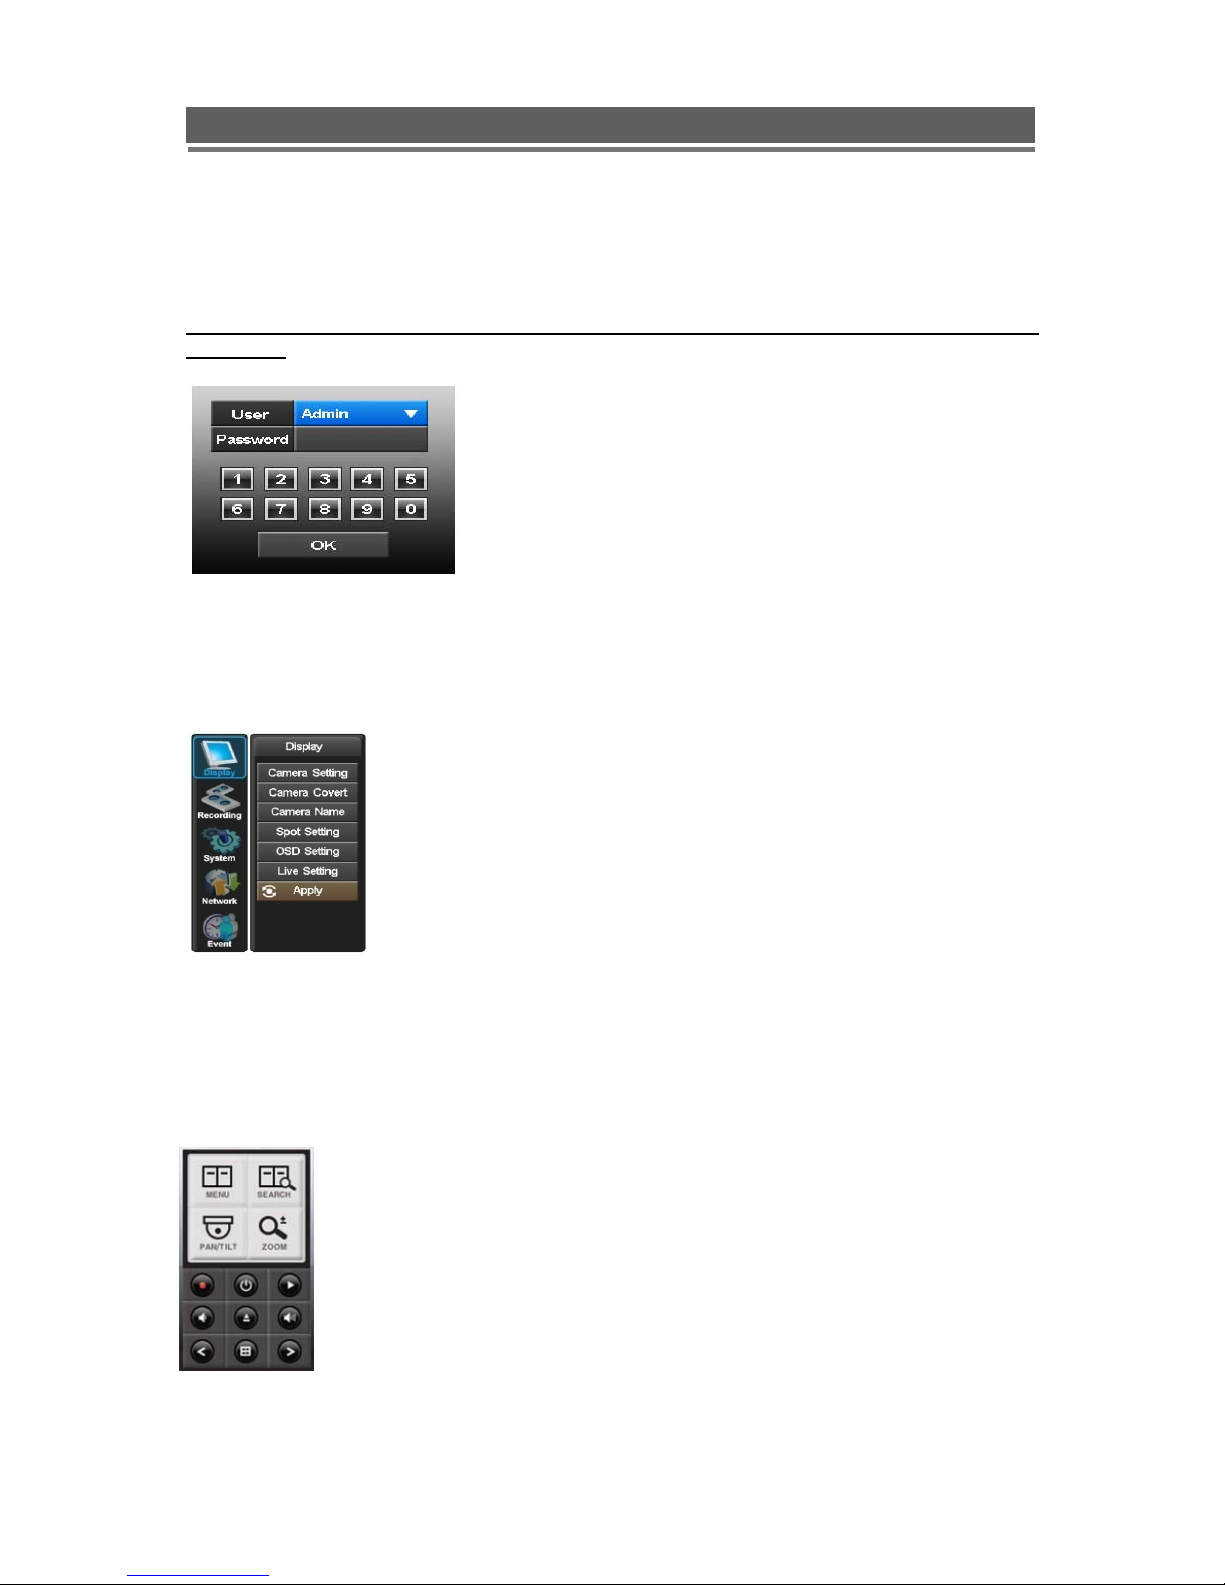
Press MENU on the front panel, or right click and select the MENU icon. The following box
will be displayed played asking for password.
The default Password is: 00000000 (8 zeros)
To select a different use press the Select key in the centre of the unit, use the up and down
arrows to choose, then press the Select key again to confirm. Then enter this users
password.
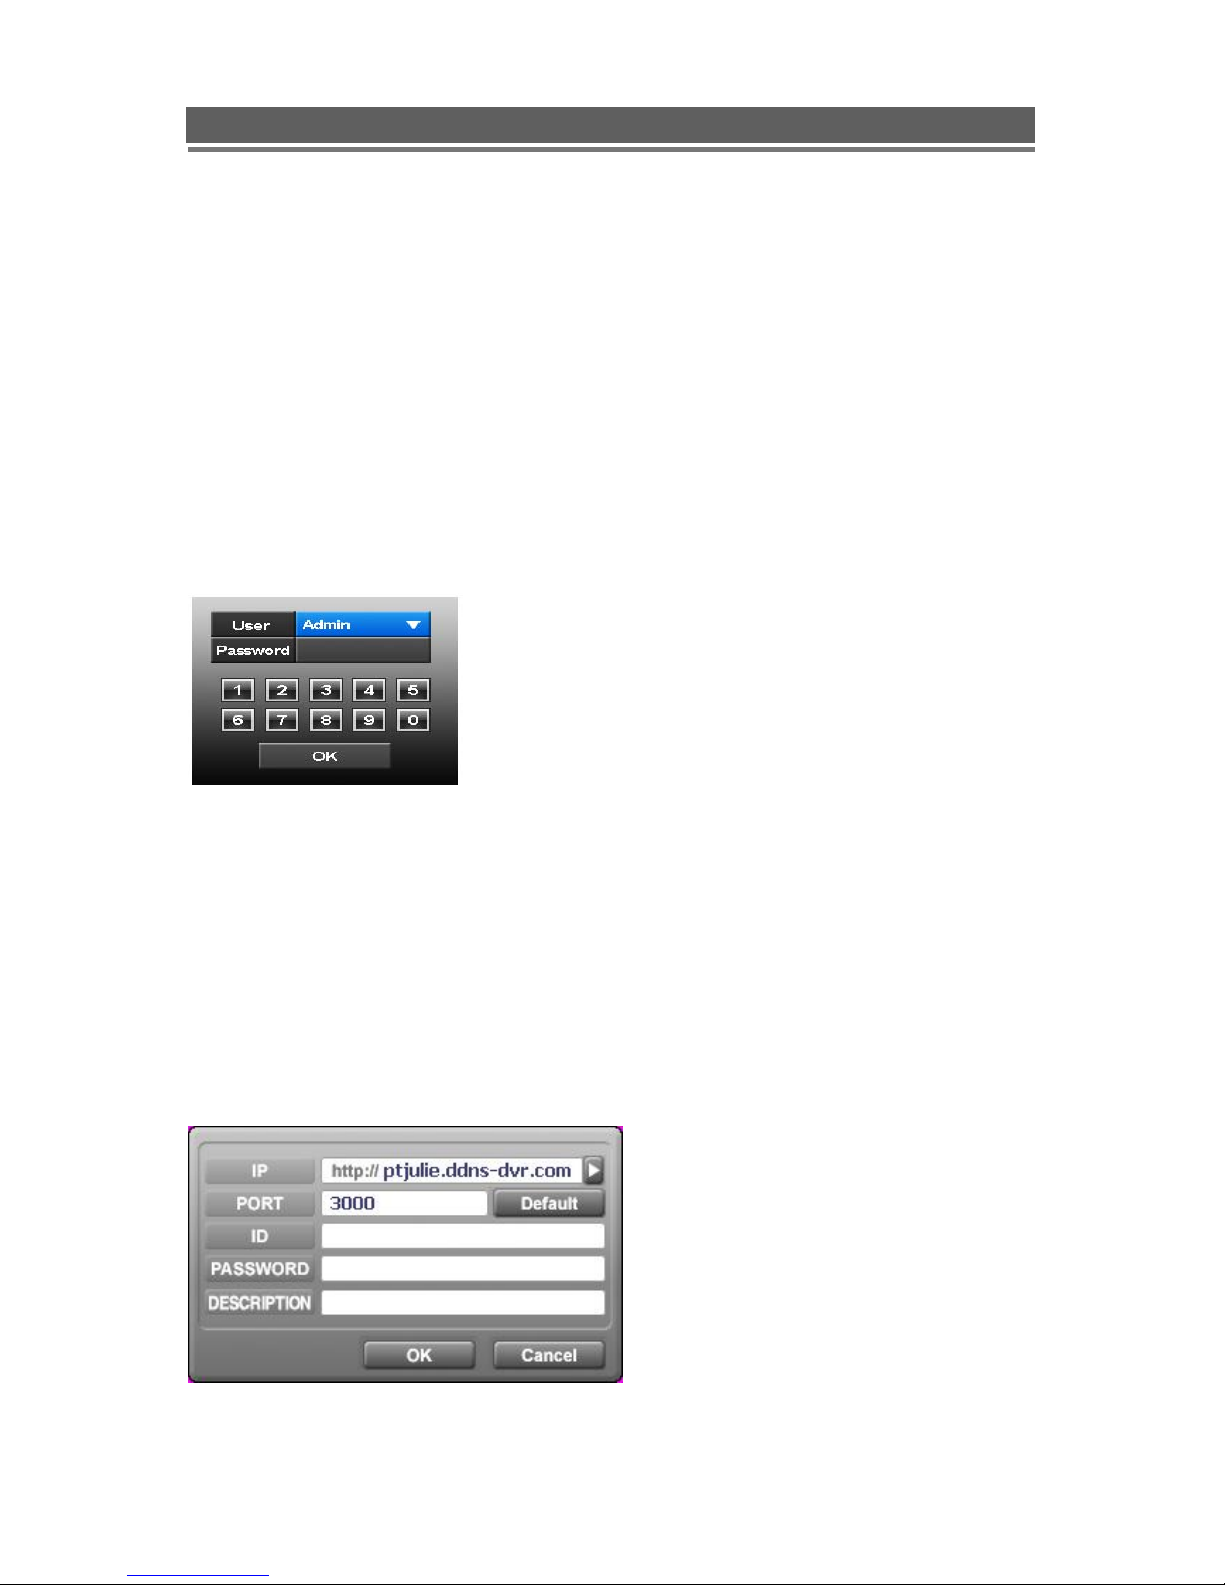
Viewer Software
When using the supplied Viewer software, the default logon details are:
User ID is “admin” (not case sensitive).
Password is “00000000” i.e. 8x Zero’s
(Admin ID cannot be changed, as this is the full administrator ID)
Click on arrow to view a quick connection
address book for the last 22 units that
the software has been connected to.
This uses the description to quickly identify
each unit.
20
E4000 installation and user manual
Menu Navigation
To enter the set-up menus, the user has to have the required access rights and be
logged on press the Menu button or right click with mouse on screen and select the menu
icon. The following screen will be displayed.
Front Panel or IR remote control
First select the user name by pressing select key and using the up and down key.
Next, enter the password (default password is 00000000 – 8 zeros). Use the down key, up
key and select key. The following menu page will be displayed.
All menus are navigated around using the left / Right / Up / Down and the Select button.
To step back out of the menus press MENU button
Mouse control
Left clicking the mouse brings up the following display, from this right click on the menu icon
to display the password box, use the mouse to select the user name and enter the password.
Note: This display is also used to select Search mode, Turn on the telemetry
mode.
21
E4000 installation and user manual
If Menu has been selected the following screen will be displayed.
Select Sub menus by clicking on the relevant title.
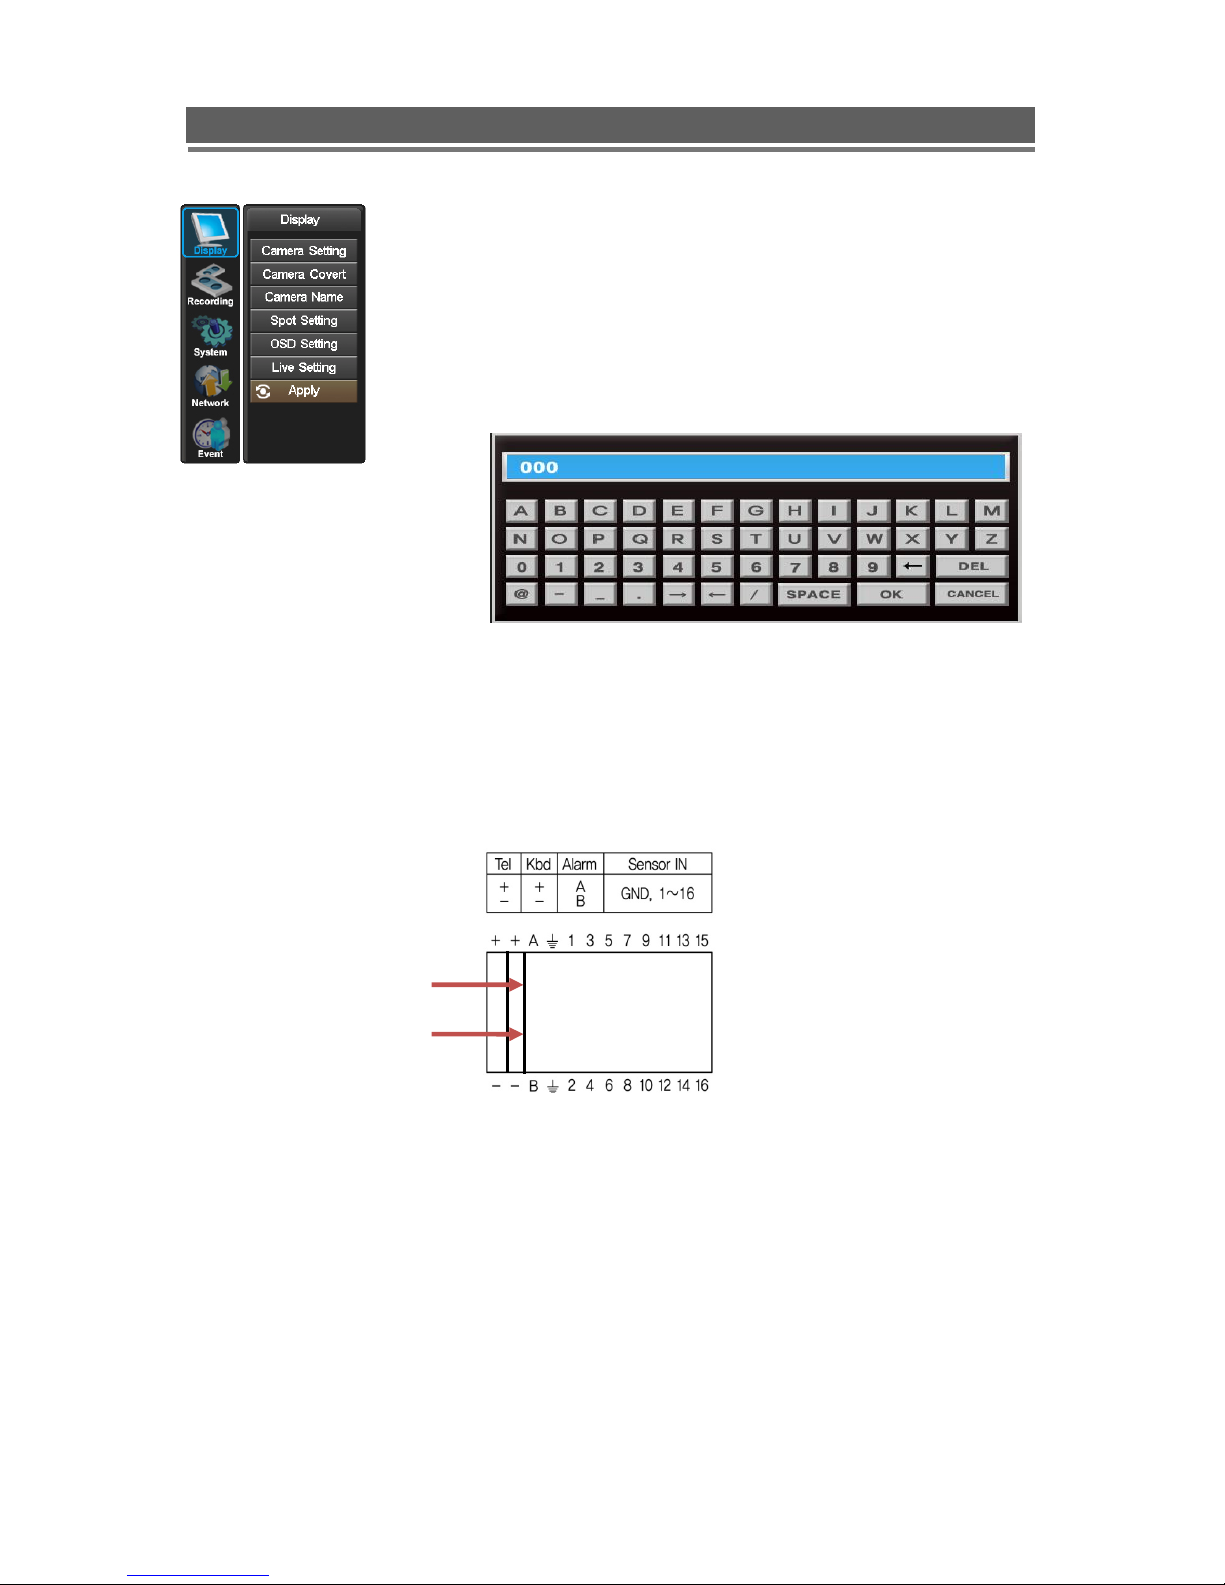
The method of altering the value of a segment within a menu page will
vary slightly depending on the page:
1. Clicking on a segment will toggle through available values
2. Click on icon at top of list will change all channel values
3. Click on the box and the following keyboard will be displayed:
Use the keyboard to fill in titles etc, followed by OK to enter the value.
Remote Keyboard
The remote keyboard is connected via the push in connector on the rear of the unit.
The 2 connectors are marked as Kbd (+) and Kbd(-), as shown below:
Kbd (+)
Kbd (-)

22
E4000 installation and user manual
Menu Settings
1. Display
[ Camera Setting ]
Brightness, Saturation, Contrast, Hue and default
The picture displayed from each camera can be individually adjusted to balance the multi
screen view.
Use UP() / DOWN() keys to select the cell to be altered, then press select to turn the box
green, then use the numeric keys to change the values.
Alternatively use the mouse to select the cell, the on screen keyboard will appear select the
value and click OK
[ Camera Covert ]
Cameras can be hidden from the viewer in live or play back mode.
Select the camera to be made covert using the up and down keys, then press select to turn
the camera green, toggle between on and off with the up and down buttons.
Alternatively use the mouse to select the camera and click between on and off.
In order to view covert cameras in Live or Playback, it needs to be turned off in the menus,
this is requires the necessary user rights.
[ Camera Name ]
Each camera can be titled using the alphanumeric buttons on the front panel or the mouse.
Each title can have up to 32 characters, if there are too many characters to display in 1 line,
it will be shown as _... For example, ‘FIRST MEETING ROOM’ -> ‘FIRST MEETIN…’
Use the Up and Down arrows to select the title to be altered, press the select key to turn the
title green. Use the left and right arrows to select the character position and use the Alphanumeric keys to select the character ( Similar to SMS on a mobile phone). When complete
press the select key to exit.
23
E4000 installation and user manual
Alternatively use the mouse to select the title to alter, the on screen keyboard will appear,
enter the title followed by the OK button.
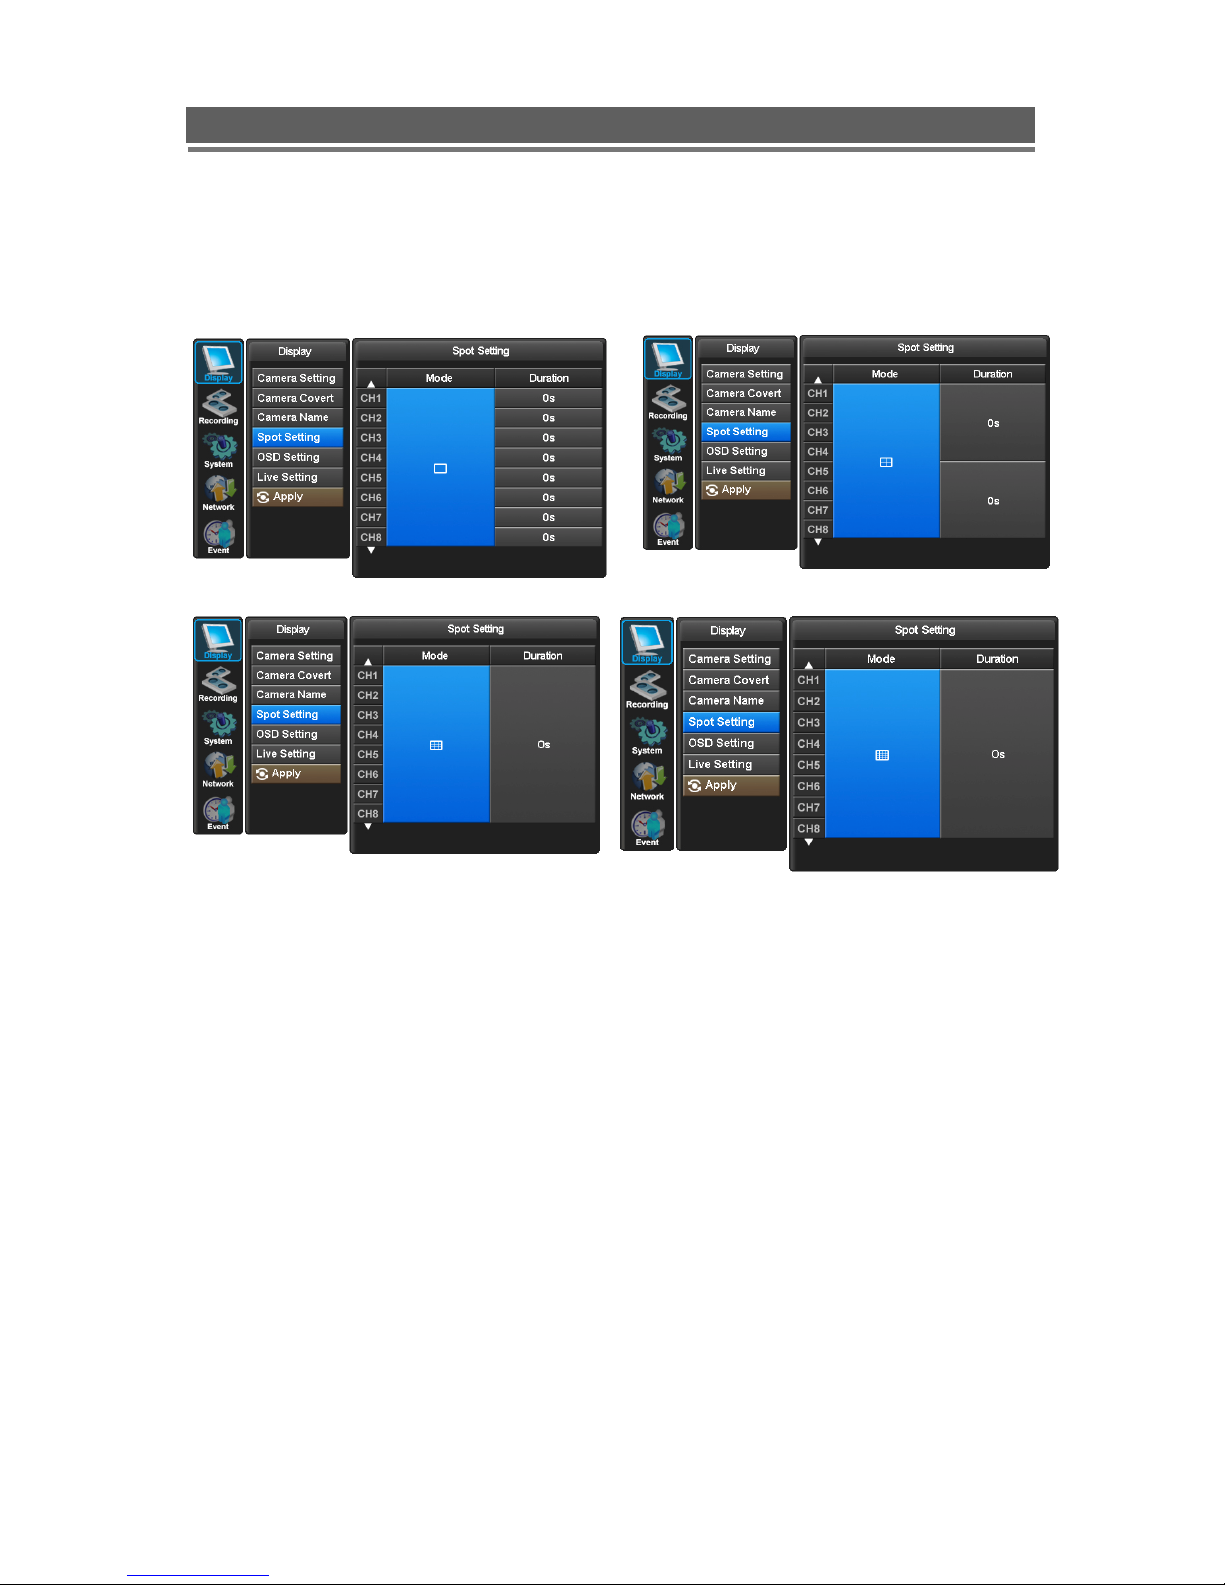
[ Spot Setting ]
<Single Screen> <Quad Screen>
<9 Channel Divisions> <16 Channel Divisions>
Spot output is used to configure the second monitor output. The Spot monitor can respond to
Alarms, Motion, Audio, or can be configured for full or multi-screen sequences.
Use the Select key to turn the Mode box from Blue to Green, use the up and down arrows to
select the mode between multi-screen options; Alarms, Motion or Audio.
Once the mode has been selected, you can select either a duration or On/Off option (Mode
dependant). Use the Select button to turn the box from blue to green then use the Up and
Down keys to alter value. Press select to turn back to blue.
Alternatively, use the mouse to select mode by repeatedly clicking in the Mode box. Then
select the duration or On/off for each channel.
24
E4000 installation and user manual
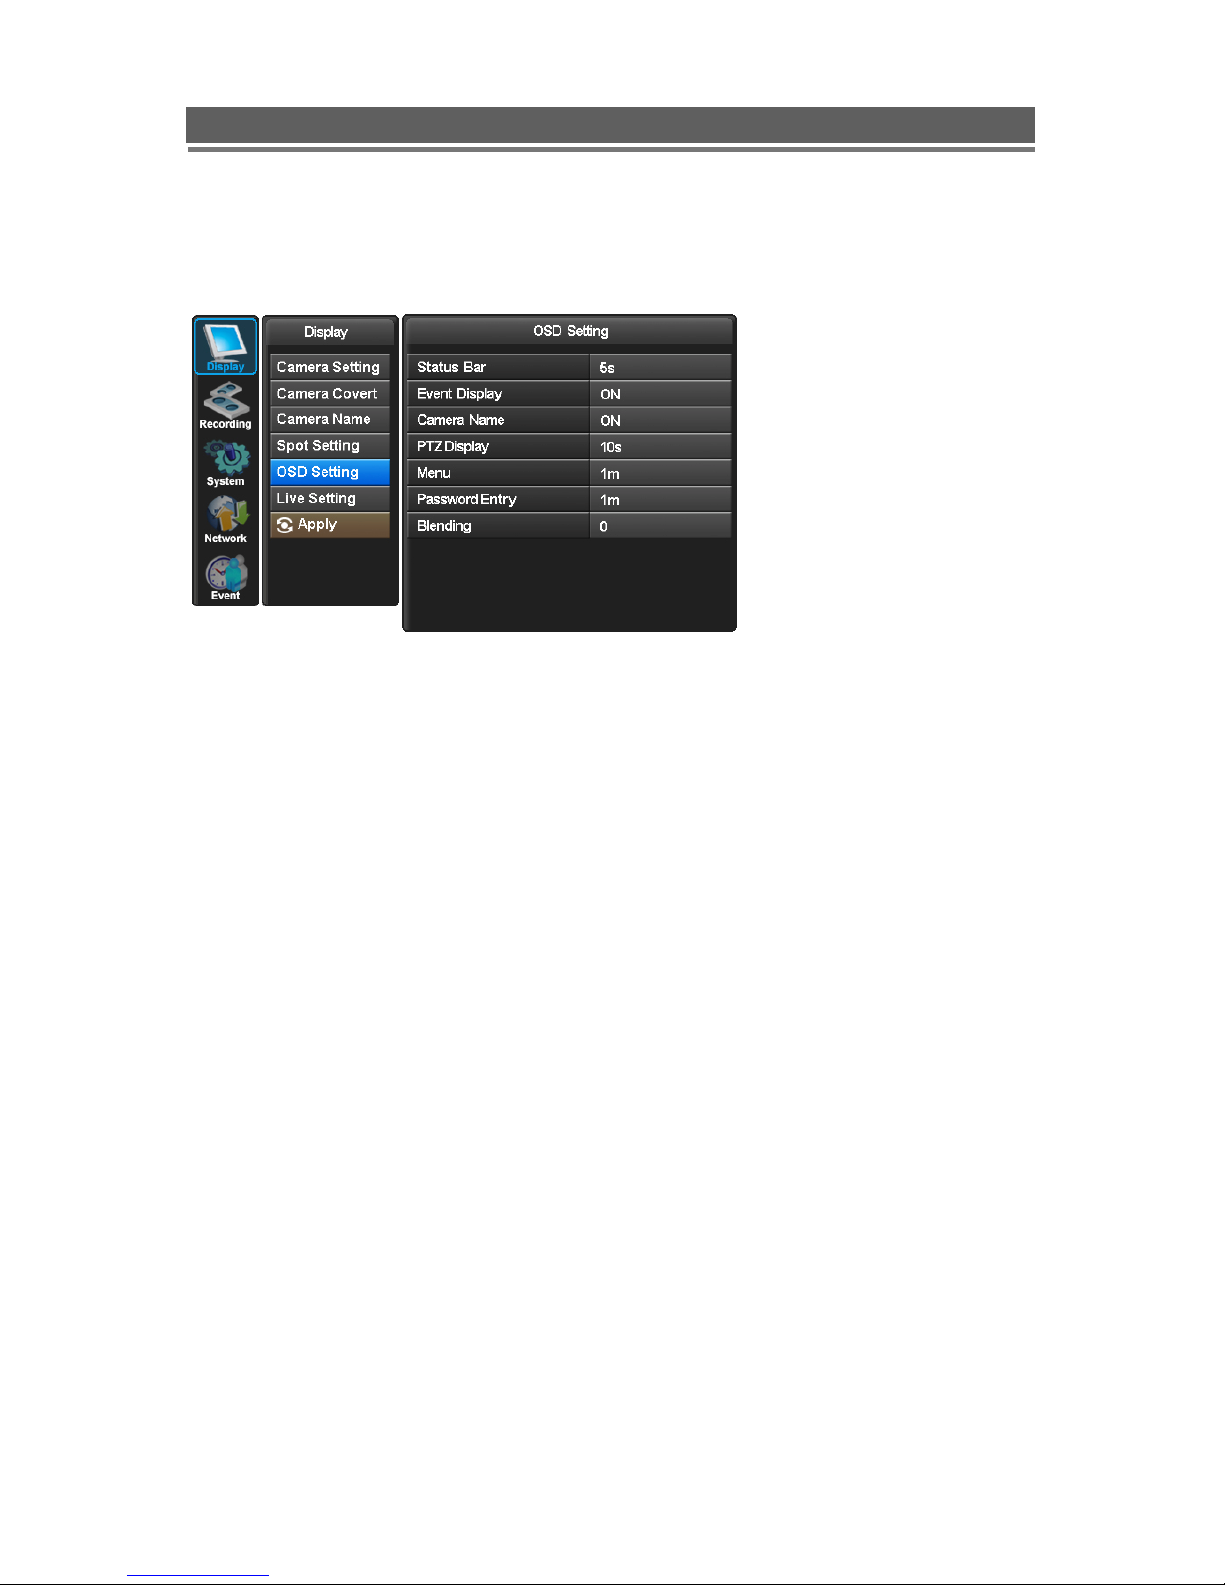
[ OSD Setting ]
Selecting how long the graphic information is displayed on the screen.
Status Bar
The display bar at the bottom of the screen can be set to be permanently on or to disappear
after a period of time.
Event Display
Icons such as recording mode, motion detection can be displays or not (On /Off)
Camera Names
The camera title can be displayed or not (On/Off)
PTZ display
When in telemetry mode the on screen telemetry display can be set to be Always on or to
disappear after a set period of inactivity 5 or 10 second or Off.
Menu
The menu display can be set to time out after either 1 or 5 minutes.
Password Entry
The password entry display can be set to time out after 1 or 5 minutes.
Blending
The opacity of the menus and Status bar can be set between 0 and 6, 0 is solid, 6 being very
opaque.

25
E4000 installation and user manual
[ Live Setting ]
The live settings are used to set up a sequence of either full screen camera images or multi
screen displays
Use the Up and Down arrows to select either: Full Screen, Quad or Nine way split
sequences. The display will change to allow individual sequence times to be set per channel
or split screen option. Use the select key to turn the cell green and then the Up and Down
keys to change the values.
Use the right button to move to “Start” press select, the main monitor out put will display this
sequence.
Alternatively use the mouse to select the sequence required then select the duration.
Click “Start” to turn the sequence on.
To interrupt the sequence, simply select any camera.
APPLY: In order to save any modified setting value, press “SEL” key when the
“APPLY” section is highlighted. This action can be carried out within each Sub
Menu.

26
E4000 installation and user manual
2. Recording
[ Global ]
Watermark
Generally this should be set to on, this allows the supplied software to verify the downloaded
information to ensure it has not been tampered with or changed.
HDD Overwrite
Generally this should be set to on to ensure that the DVR does not stop recording when the
hard drives are full.
Audio
Enable each audio channel for global recording.
Pre-Alarm Duration
This is the time for which the DVR will buffer recordings, to use as pre-alarm events, It can
be set to 0, 5, 10, 15 or 20 seconds
27
E4000 installation and user manual
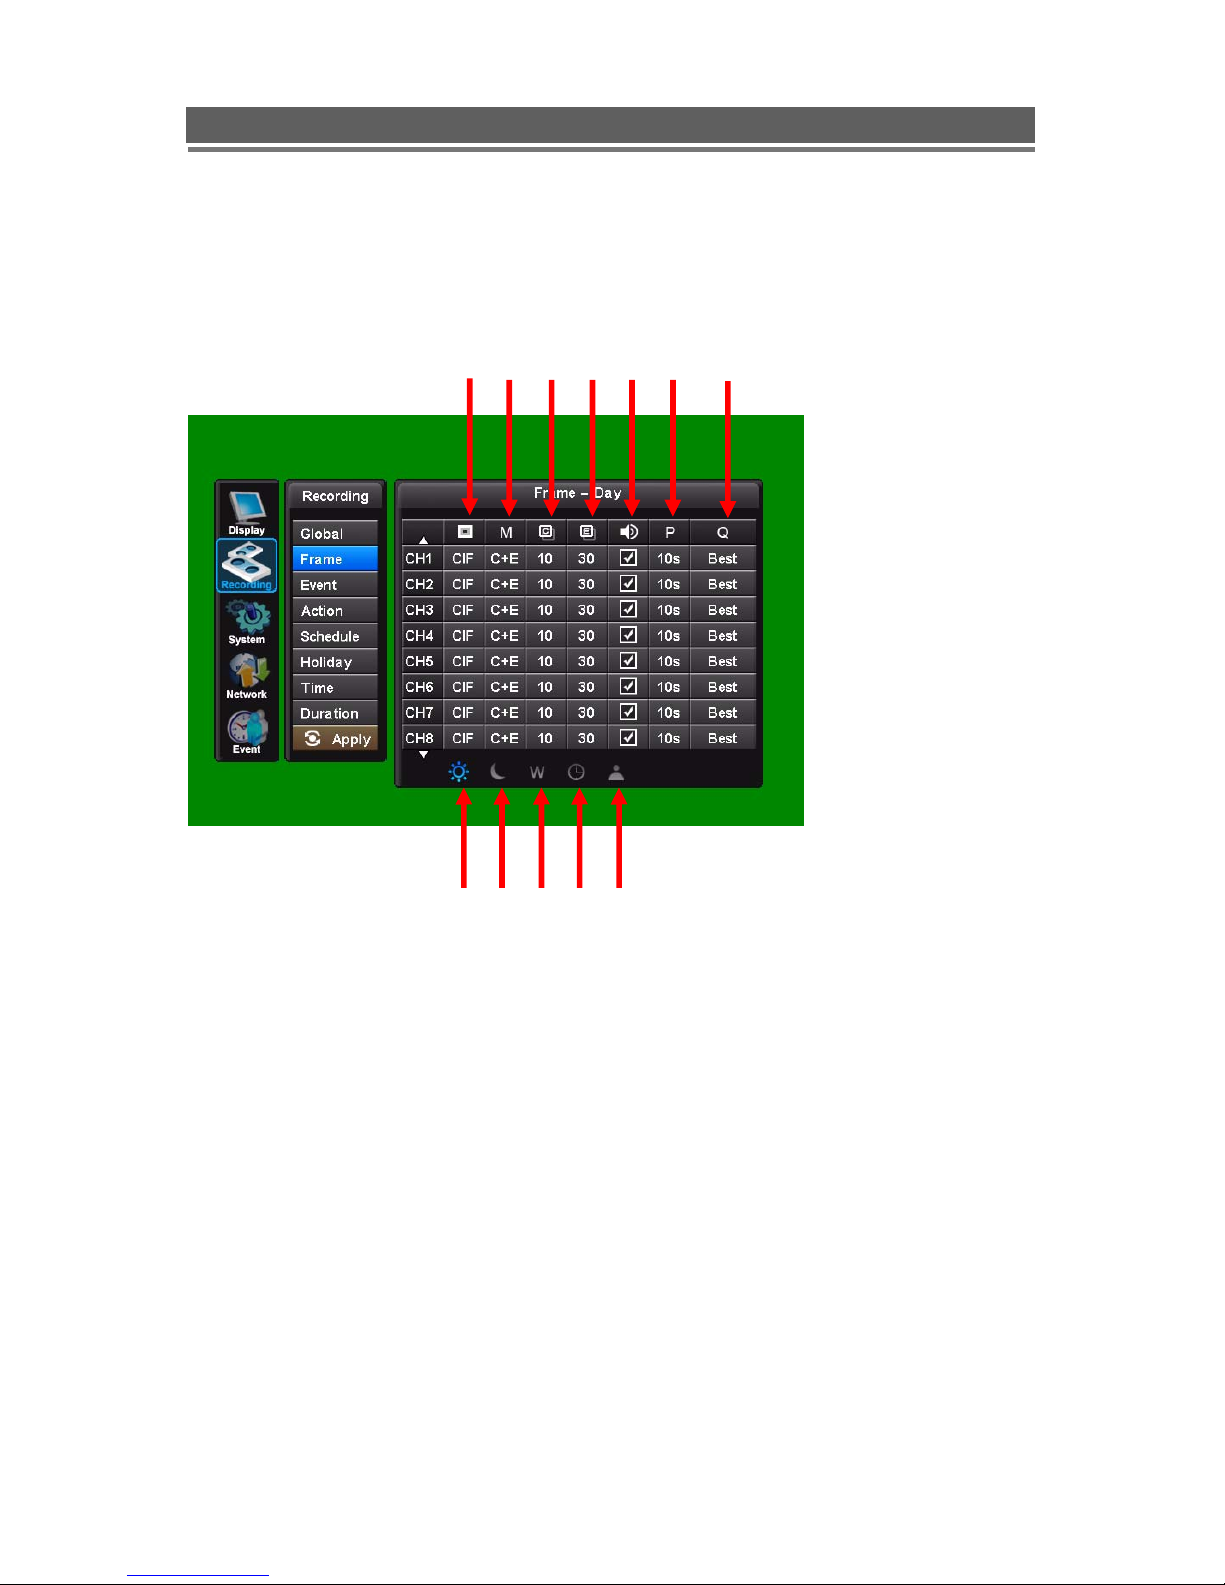
[ Frame ]
This configures the FPS for each schedule – Day/ Night/ Weekend & Holiday/ Time/ Instant
recording.
In Schedule Setup, users can define the recording schedule :
① Day
② Night
③ Weekend/Holiday
④ Time
⑤ Instant Recording
Configure the FPS for each schedule – Day / Night / Week(Holiday) / Time / Instant
⑥ Resolution
Each channel can be individually configured for record rate.
In CIF (360x288), 25 fps is available to each channel (total 400fps).
In 2CIF (720x288), 12.5 fps is available to each channel (Total 200fps).
In D1 (720x576), 6.25 fps is available to each channel (Total 100fps).
⑥ ⑦ ⑧ ⑨ ⑩ ⑪ ⑫
① ② ③ ④ ⑤
28
E4000 installation and user manual
⑦ Recording mode : [C] / [E] / [C+E] / [N/A]
C : Continuous , E : Event , C+E : Continuous + Event
⑧ Continuous Recording FPS
NTSC : 0~30fps , PAL : 0~25fps
⑨ Event Recording FPS
NTSC : 0~30fps , PAL : 0~25fps
⑩ Audio recording
Enable each audio channel for recording.
⑪ Post recording
10 ~ 99 sec
⑫ Quality
Best / Good / Standard
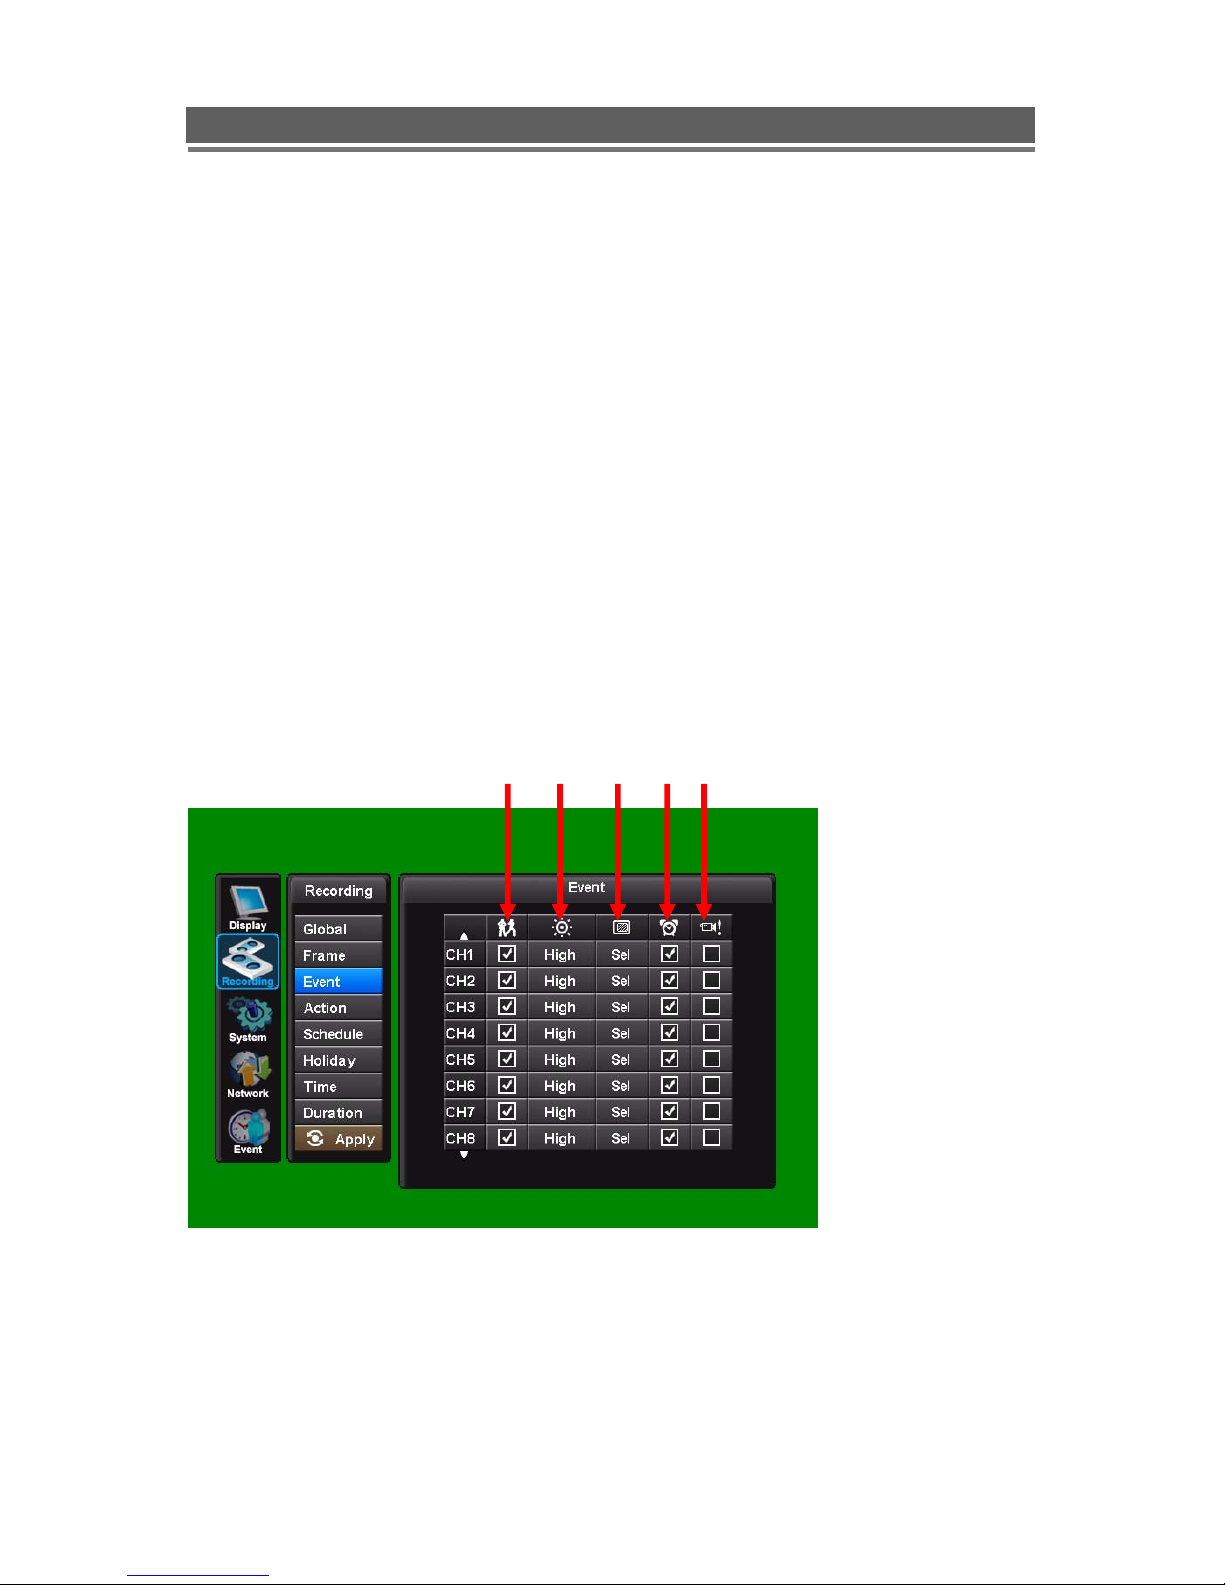
[ Event ]
When an event comes in the DVR records he image according to its settings(Frame menu)
and triggers an alarm(Action).
① Motion On/Off
Specify whether to use motion input or not.
② Motion Sensitivity
Low / Medium / High
① ② ③ ④ ⑤

29
E4000 installation and user manual
③ Motion Area
Define the motion detection area.
To setup the motion detection grid per channel select the “Sel” button
The detection area is divided into a grid of 11x9(PAL) / 11x8(NTSC) cells. Default is all cells
in active mode.
Use the Left/ right/ up/ down btton to move cursor and the Select key to toggle between
active and inactive.
The mouse can also be used to select cells and toggle them on and off.
Care must be taken in setting of the motion sensitivity. It is recommended that each level is
tested to find out which one suits that particular camera site.
The motion detection is not recommended for external cameras.
④ Alarm (Sensor)
There are 16 Alarm inputs on the rear of the unit.
Associate each sensor with the camera channels.
⑤ Video Loss
Select a channel to report video loss on.
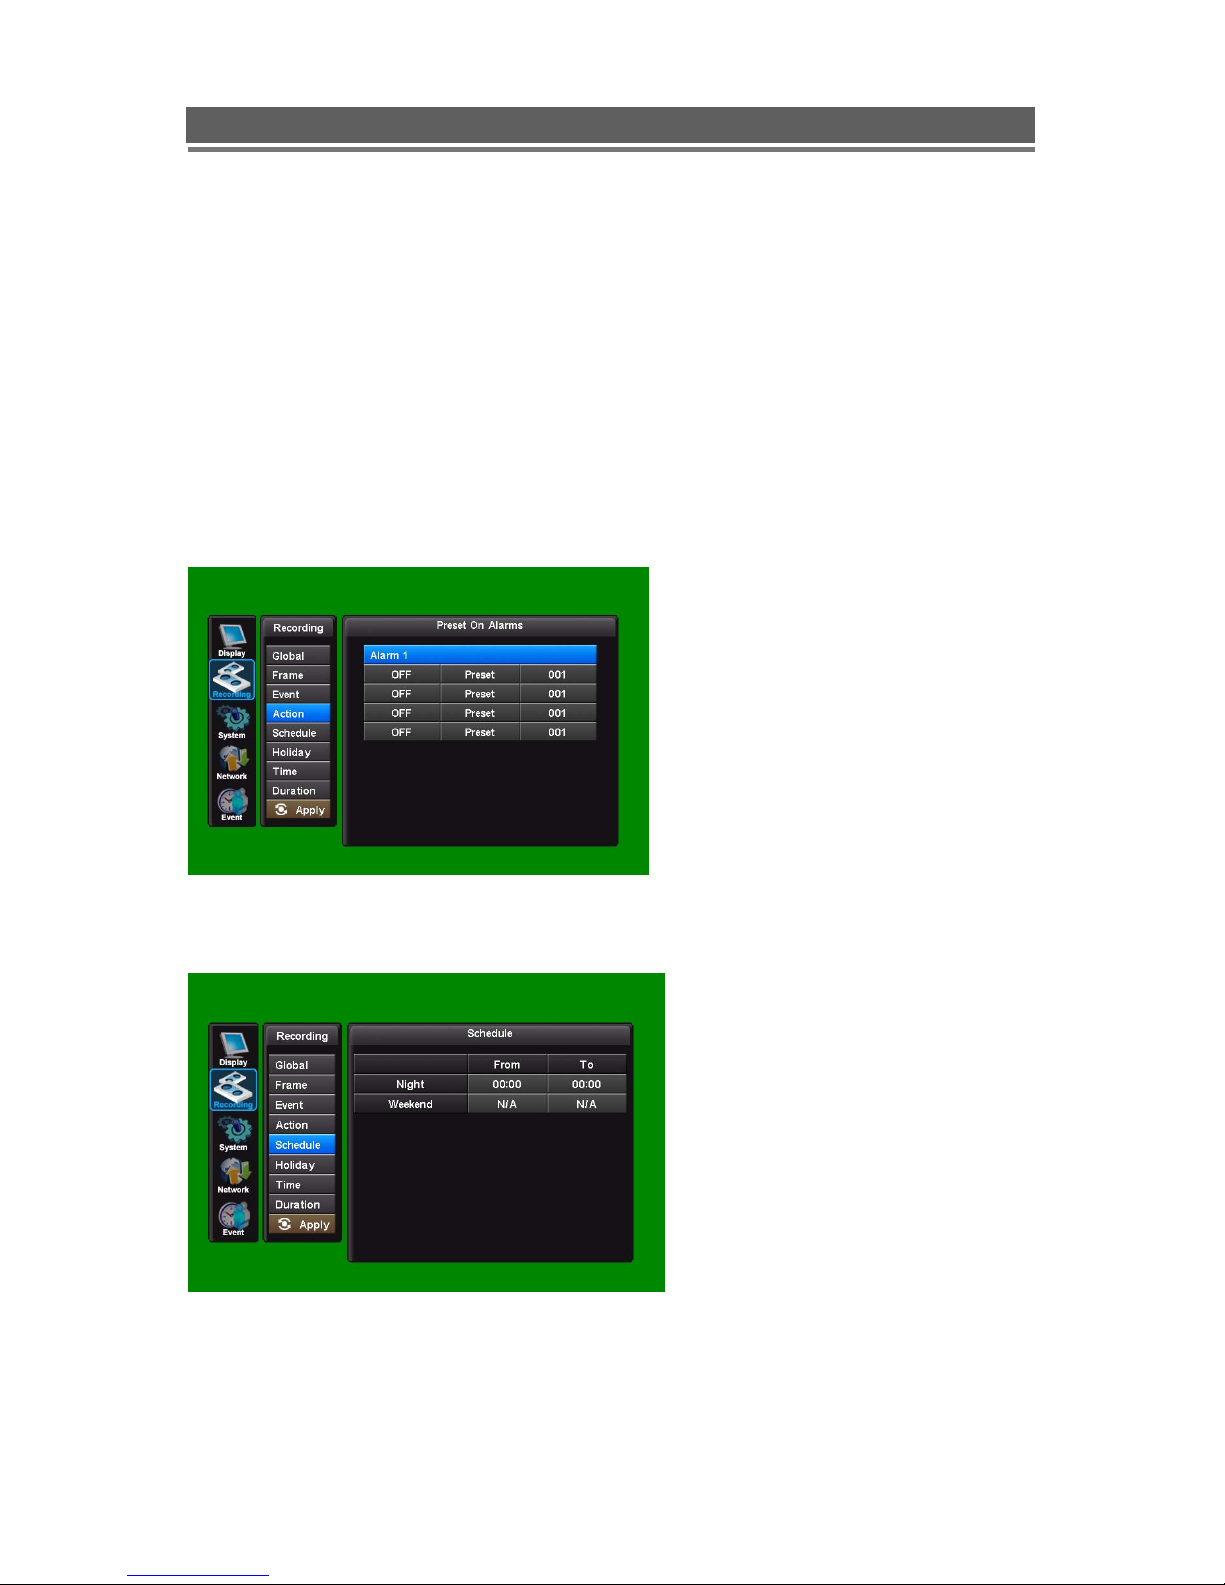
[ Action ]
① ② ③
30
E4000 installation and user manual
① Channel
▲ Channel 1~8 ▼ Channel 9~16
② Relay On/Off
Associate an alarm relay with a channel.
③ Preset on Alarm
Enable PTZ camera to move to a preset position when an event occurs.
See PTZ control for more information.
A single alarm input can be used to drive up to 4 PTZ cameras to preset positions or
Preset tours.
[ Schedule ]
① Night
Set night time.
Ex. If 18:00 to 6:00 is defined as night time, 6:00 to 18:00 is defined as daytime.
 Loading...