

Page 1

1
VIPER
Quick User Guide
Page 2

2
Please read this manual thoroughly before use and keep it handy for future reference.
Page 3

3
Contents
1. Overview ......................................................................................................................................... 1
1.1 DVR Description ........................................................................................................................ 1
1.2 DVR power up ........................................................................................................................... 1
1.2.1 Login ........................................................................................................................... 1
2. Live Screen Configuration 2
2.1 Icons in Live screen ................................................................................................................... 3
2.2 Live Launcher menu .................................................................................................................. 4
2.3 Quick menu ............................................................................................................................... 5
2.4 Camera selection ....................................................................................................................... 6
2.5 PTZ camera control .................................................................................................................... 7
3. Search/Playback 8
3.1 Search ...................................................................................................................................... 8
3.2 Playback ................................................................................................................................... 9
3.3 Backup ( Archive) .................................................................................................................... 10
Page 4
VIPER Quick userguide V1.0 1
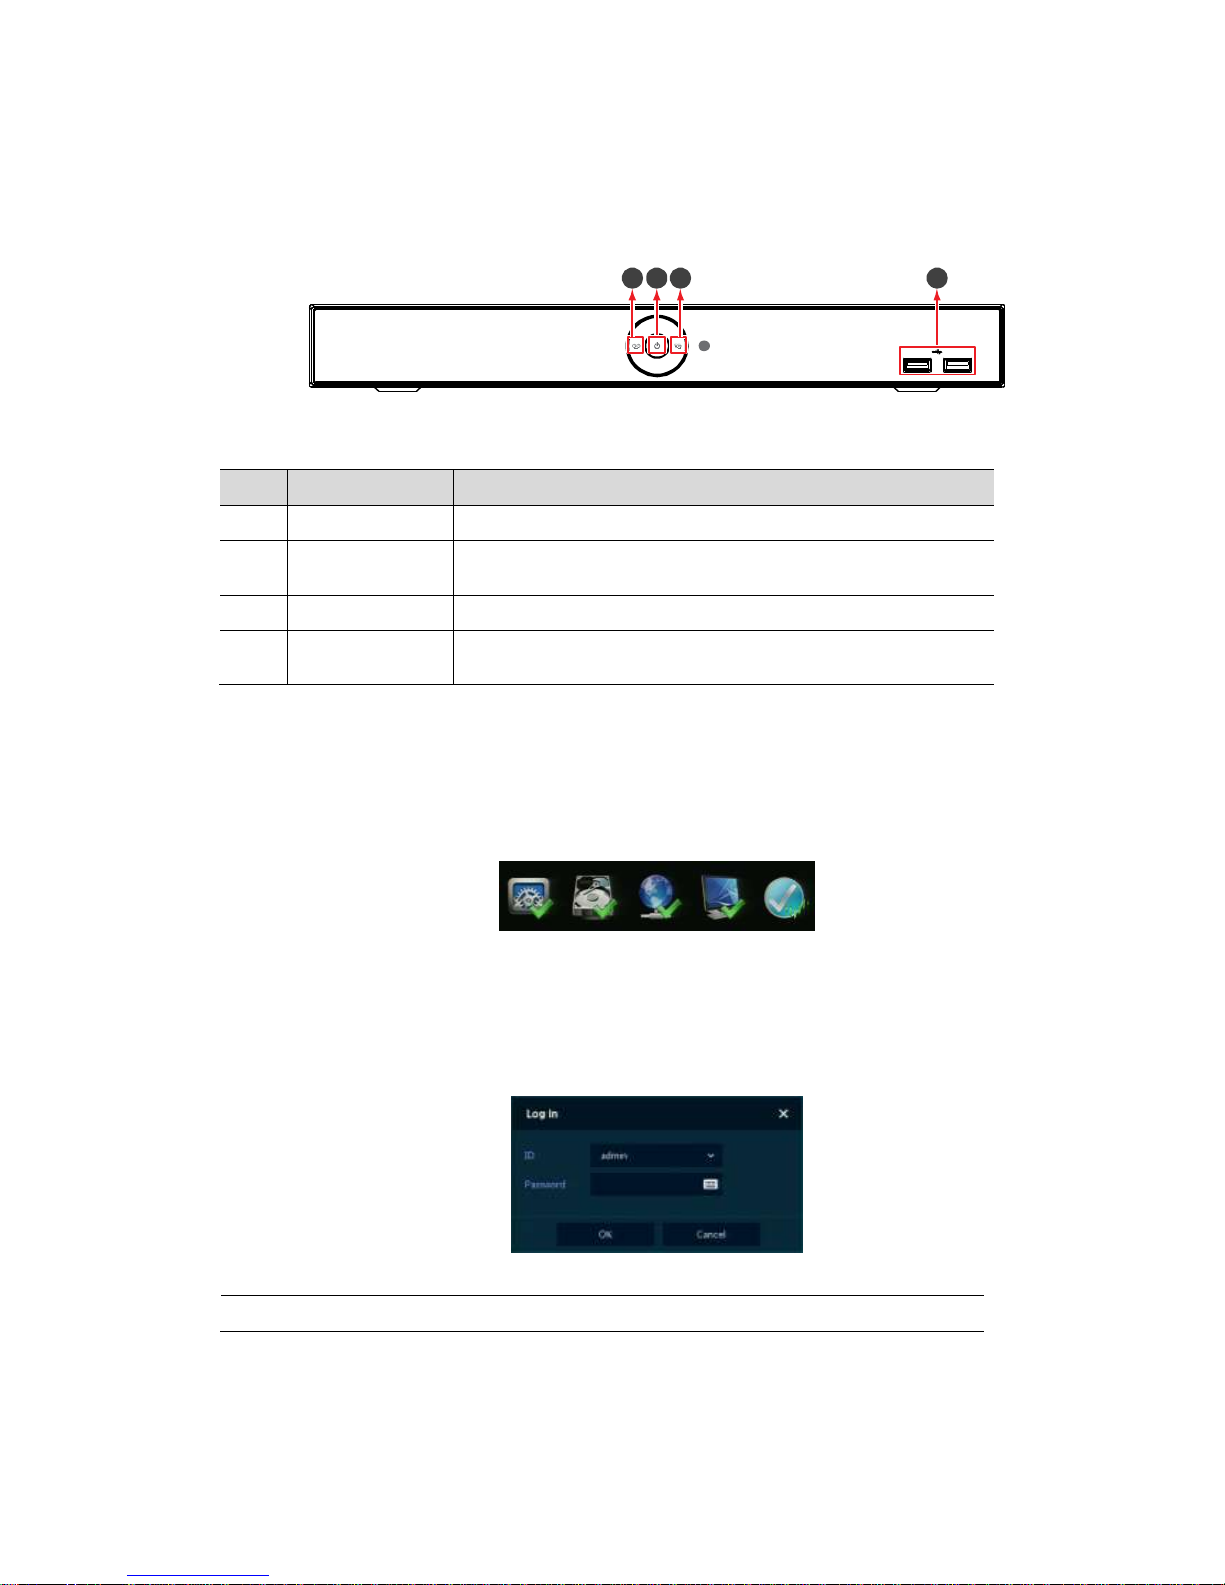
1. Overview
1.1 DVR Description
No.
Name
Function
1
Power status LED
Power indication ON/OFF
2
Recording status
LED
Status of recording
3
Network LED
Illuminated if Network connected
4
USB port
USB port is connected for USB mouse or firmware upgrade, and data
back-up.
1.2 DVR power up
When the NVR is powered up, it will take a couple of minutes to boot, the following icons will be displayed in
order as it goes through it’s booting cycle
When the boot up process is completed a buzzer will sound and the start up screen will be displayed.
1.2.1 Login
In Log in screen, enter the ID, Password and press OK.
Note
Default ID & Password is admin/admin
1 3 42
Page 5
VIPER Quick userguide V1.0 2
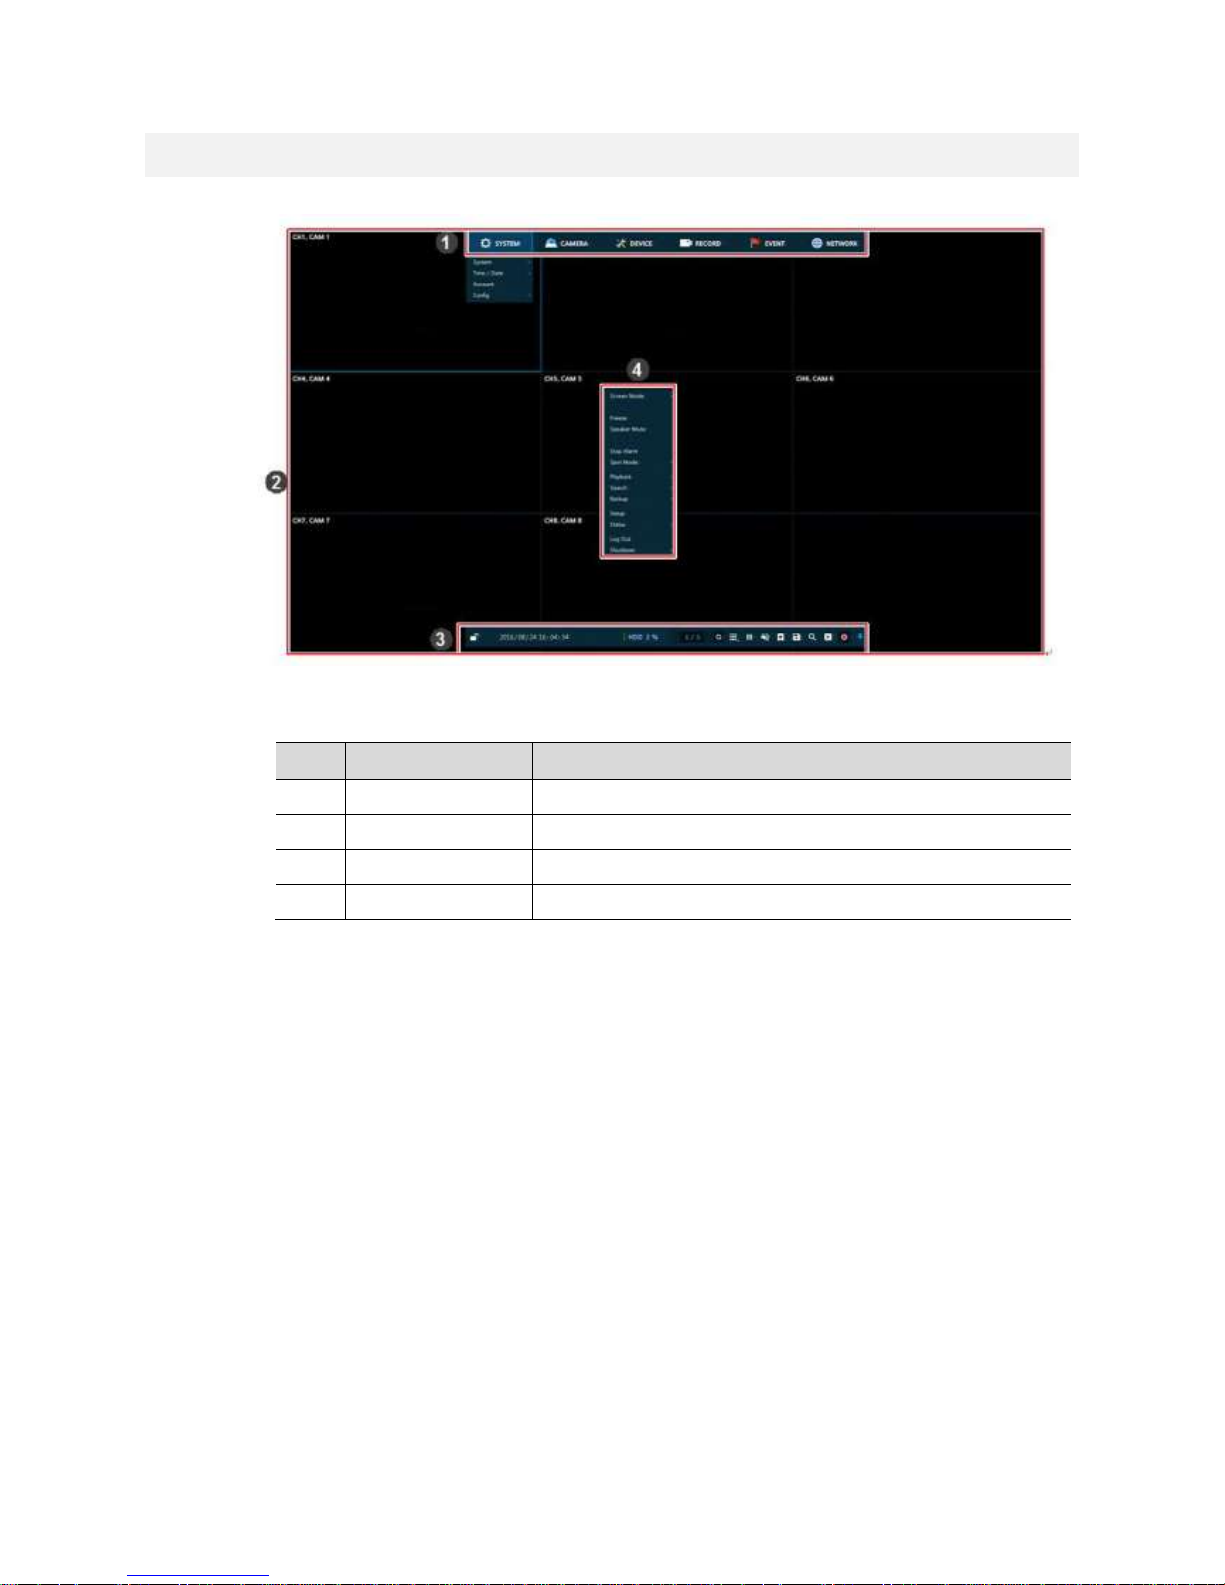
2. Live Screen Configuration
No.
Item
Description
1
Set up menu
Setting menu is located at the top of the screen (Admin only)
2
Live screen
Shows live video of connected cameras.
3
Launcher menu
Launcher menu is located at the bottom of the screen.
4
Quick menu
Clicking the right button of a mouse displays Quick menu.
Page 6
VIPER Quick userguide V1.0 3
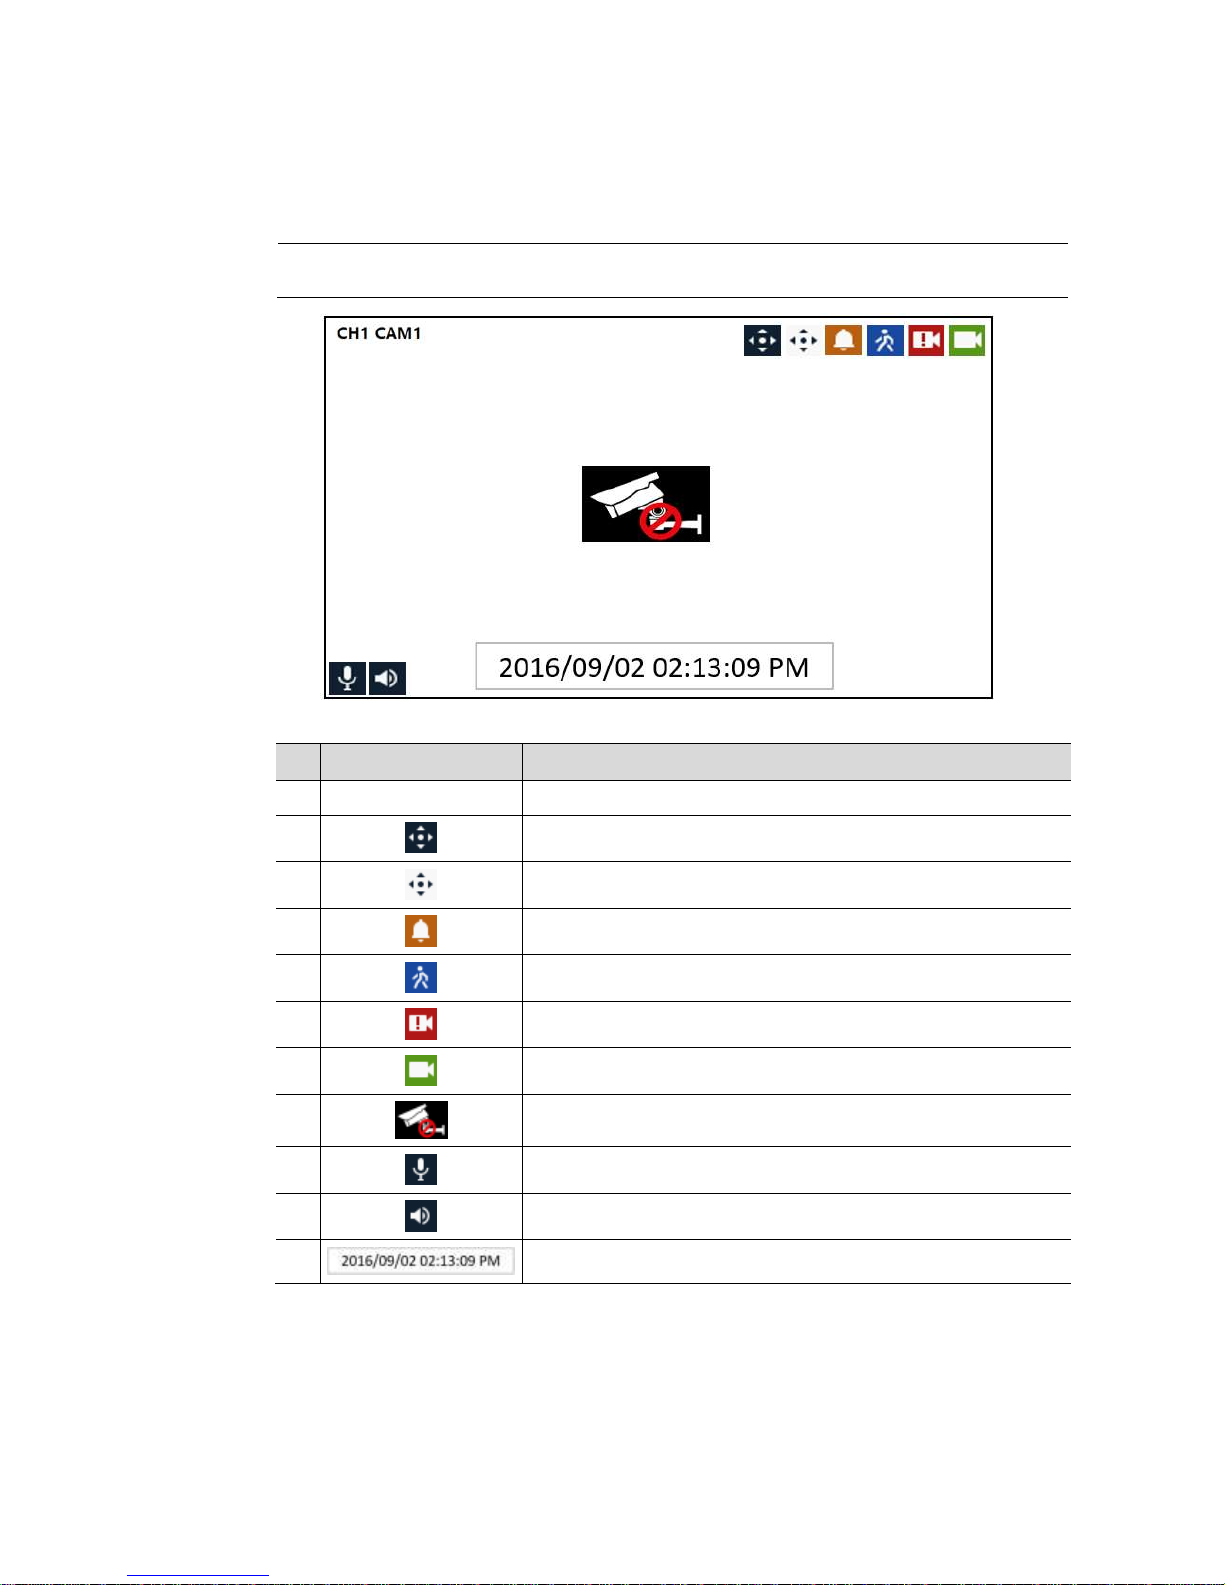
2.1 Icons in Live screen
Each icon in the live screen displays a present setting status or a function. UI screen consists of like below.
Note
Chosen live screen is marked as a blue frame; mouse-located live screen is marked
as yellow one.
No.
Icon
Description
1
CH1 CAM1
Channel numbers and camera titles
2 A camera with PTZ function
PTZ control function in process
Recording in alarm event mode
Recording in motion event mode
Recording in panic recording mode
Recording in consecutive recording mode
3 Video loss icon
4 Mic ON/OFF
Speaker ON/OFF
6
Displaying present time and date
Page 7
VIPER Quick userguide V1.0 4
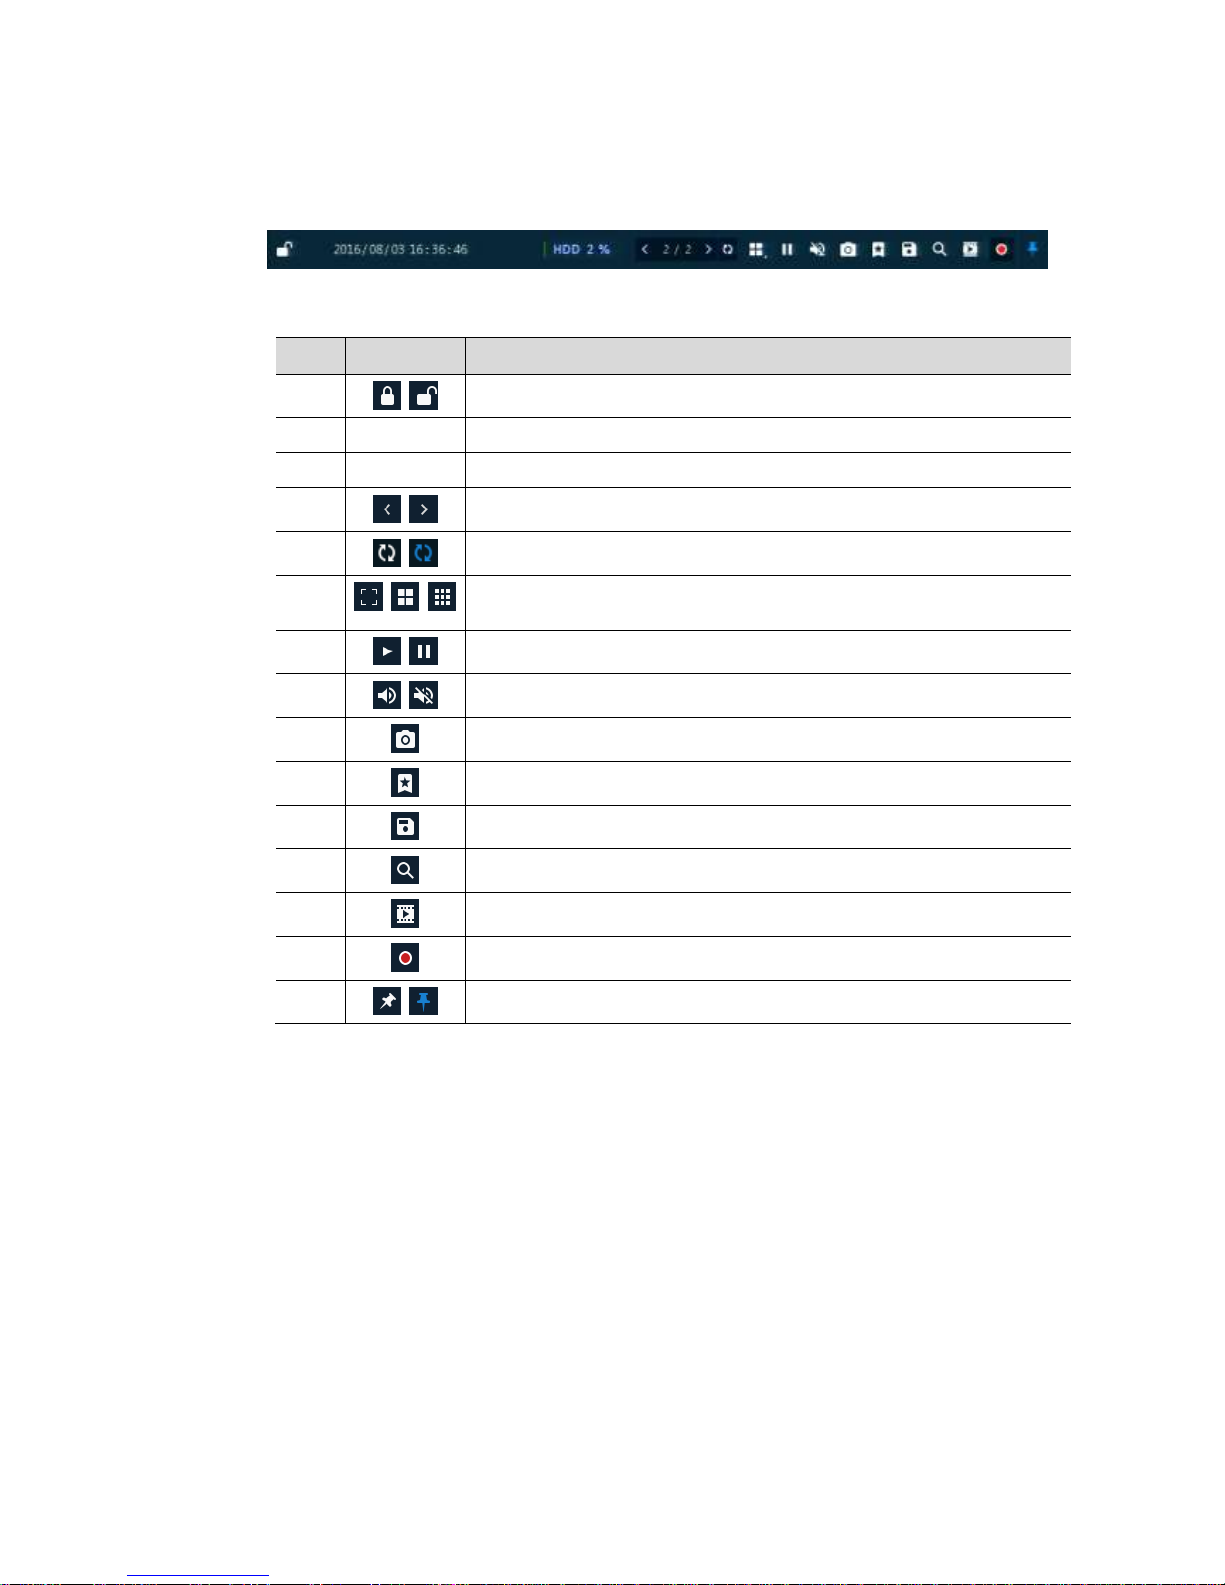
2.2 Live Launcher menu
This section describes Launcher menu in the bottom of the screen.
Figure 2-1 Launcher menu
Table 2-1 Launcher menu Item and Description
No.
Item
Description
1
Log in/out status and logged in ID
2
Date & Time
Displaying present date and time
3
HDD
Displaying HDD capacity in use
4
Moving to previous/next partition screen
5
Displaying live screen in order set (toggle)
6
Selecting partition mode to mark in live screen (single screen, 4-, 9-, and 16partition)
7
Stopping or replaying selected live screen images (toggle)
8
Audio on or mute chosen live screen(toggle)
9 Capturing channels users want
10
Bookmarking with date and time users want
11
Make a backup video of users want.
12
Searching recording data (time, event, and thumbnail).
13
Playing recorded data
14
Starting immediate recording of selected channel
15
Locking or releasing launcher menu (toggle)
Page 8

VIPER Quick userguide V1.0 5
2.3 Quick menu
This section depicts Quick menu when users click the right button of the mouse in live screen.
No.
Item
Description
1
Screen Mode
Selecting the partition mode of live screen (Full, 2X2, 3X3, and 4x4).
2
Zoom in
Magnifying selected live screen (Zoom out, 2 times, 4 times, and 8 times).
3
Freeze
Stopping or replaying selected live screen images (toggle)
4
Speaker
OUTPUT/Mute
Turning on/off a sound speaker
5
PTZ Control
Controlling PTZ Function
6
Stop Alarm
Stopping monitoring alarm output and event
7
Spot Mode
Set the output mode of a spot monitor (Auto, Full, and 4x4).
8
Playback
Playing selected live screen images (before 30 sec, 1 min, 5 min, 10 min,
30 min, 1-hour, Go to last play time, and Go to last record time)
9
Search
Searching recording data (time, event, thumbnail, and text).
10
Backup
Backup video users want.
11
Setup
Opening setting menu pop-up. For more information about setting menu,
see section “
0
Camera
selection
Individual cameras or multi screen modes can easily be
selected using the Mouse.
1. Selecting a single camera from a multi screen display
To select a single camera from any multi-screen view, simple
hover the mouse over the required camera and double click on
it’s image. This will display the selected camera in full screen
view.
To return to the same multi-screen view, double click on the full
screen image.
Page 9

VIPER Quick userguide V1.0 6
2. Automatic sequencing of cameras
To start an automatic sequence of camera images.”
12
Status
Opening a pop-up displays device system log, event, and recording status
(system log, event, and save)
13
Log in/Log out
Log in/Log out
14
Shutdown
Unplugging or restarting the device (shutdown, restart).
Page 10
VIPER Quick userguide V1.0 7
2.4 Camera selection
Individual cameras or multi screen modes can easily be selected using the Mouse.
1. Selecting a single camera from a multi screen display
To select a single camera from any multi-screen view, simple hover the mouse over the required camera and
double click on it’s image. This will display the selected camera in full screen view.
To return to the same multi-screen view, double click on the full screen image.
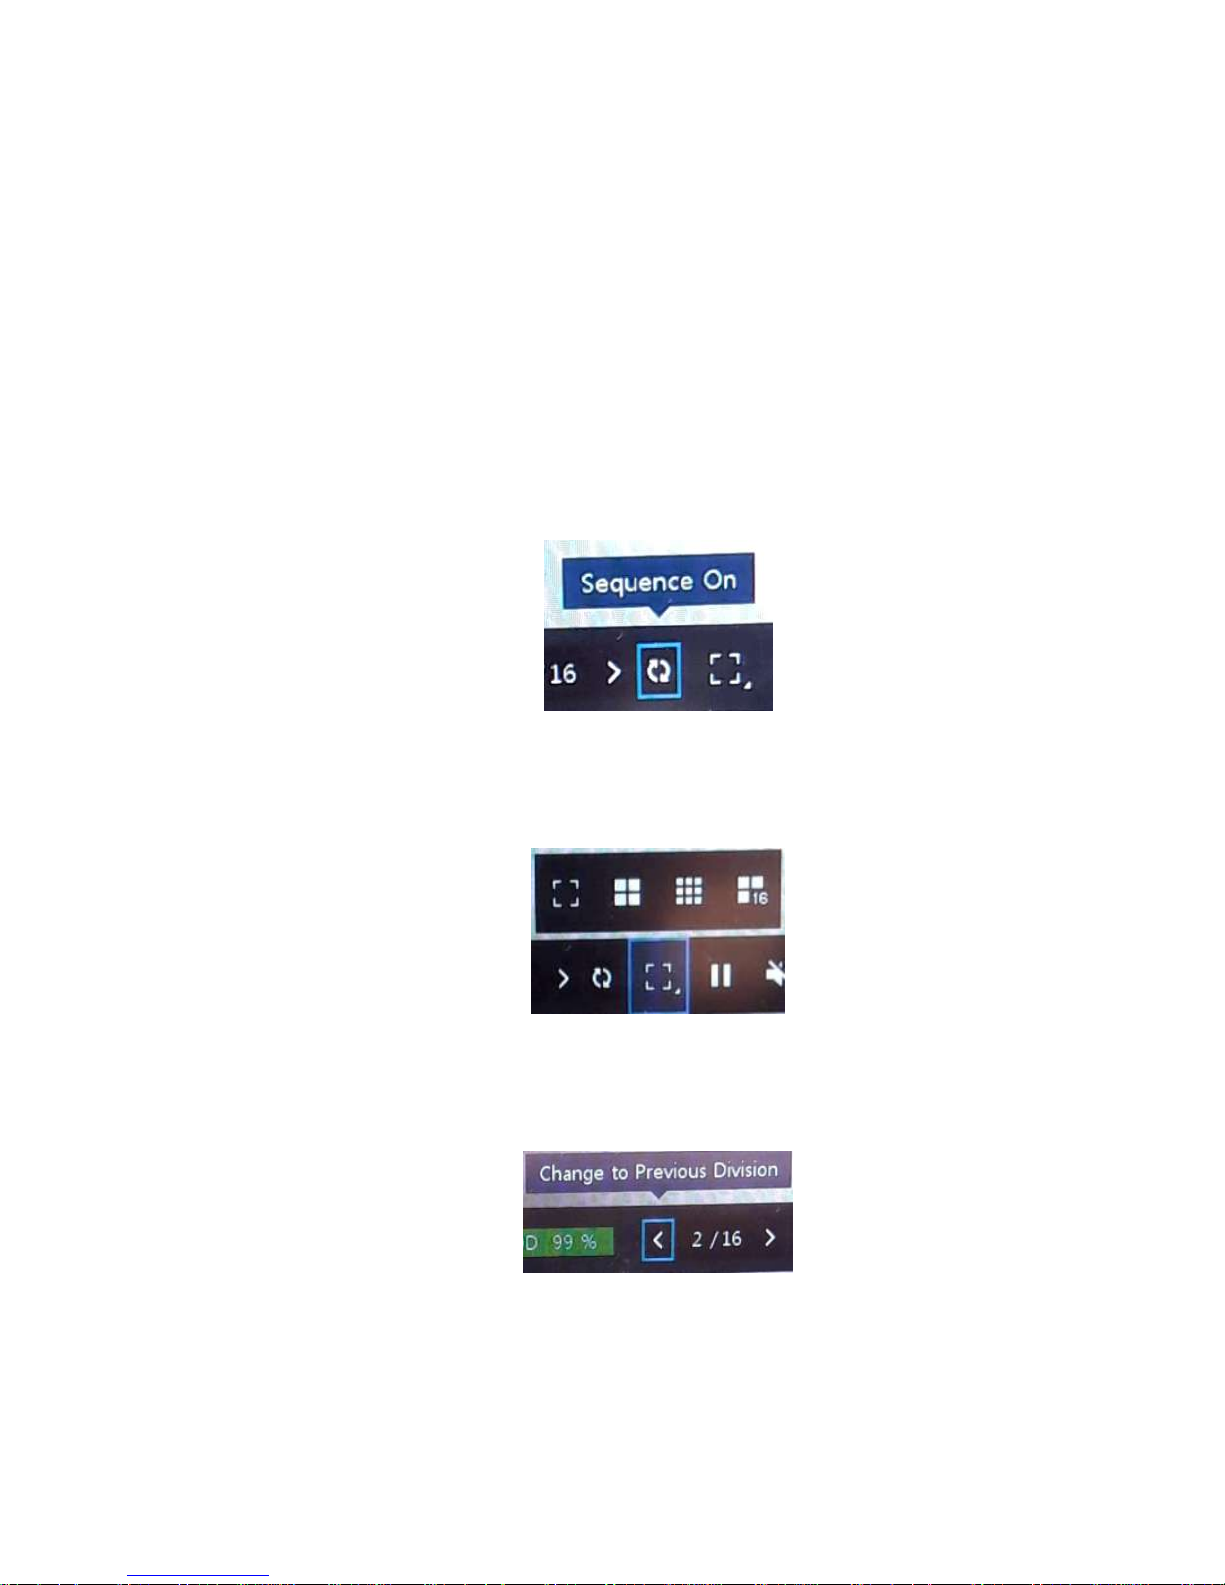
2. Automatic sequencing of cameras
To start an automatic sequence of camera images, select the sequence icon on the Launcher menu at the
bottom of the screen:
3. Selecting different multi-screen views
To select different multi-screen viewing options select the screen icon on the Launcher menu at the bottom of
the screen:
4. Manual stepping through cameras or multi screen views
To manually select different cameras or multi-screen views select the left or right arrows on the Launcher menu
at the bottom of the screen:
Page 11
VIPER Quick userguide V1.0 8
2.5 PTZ camera control
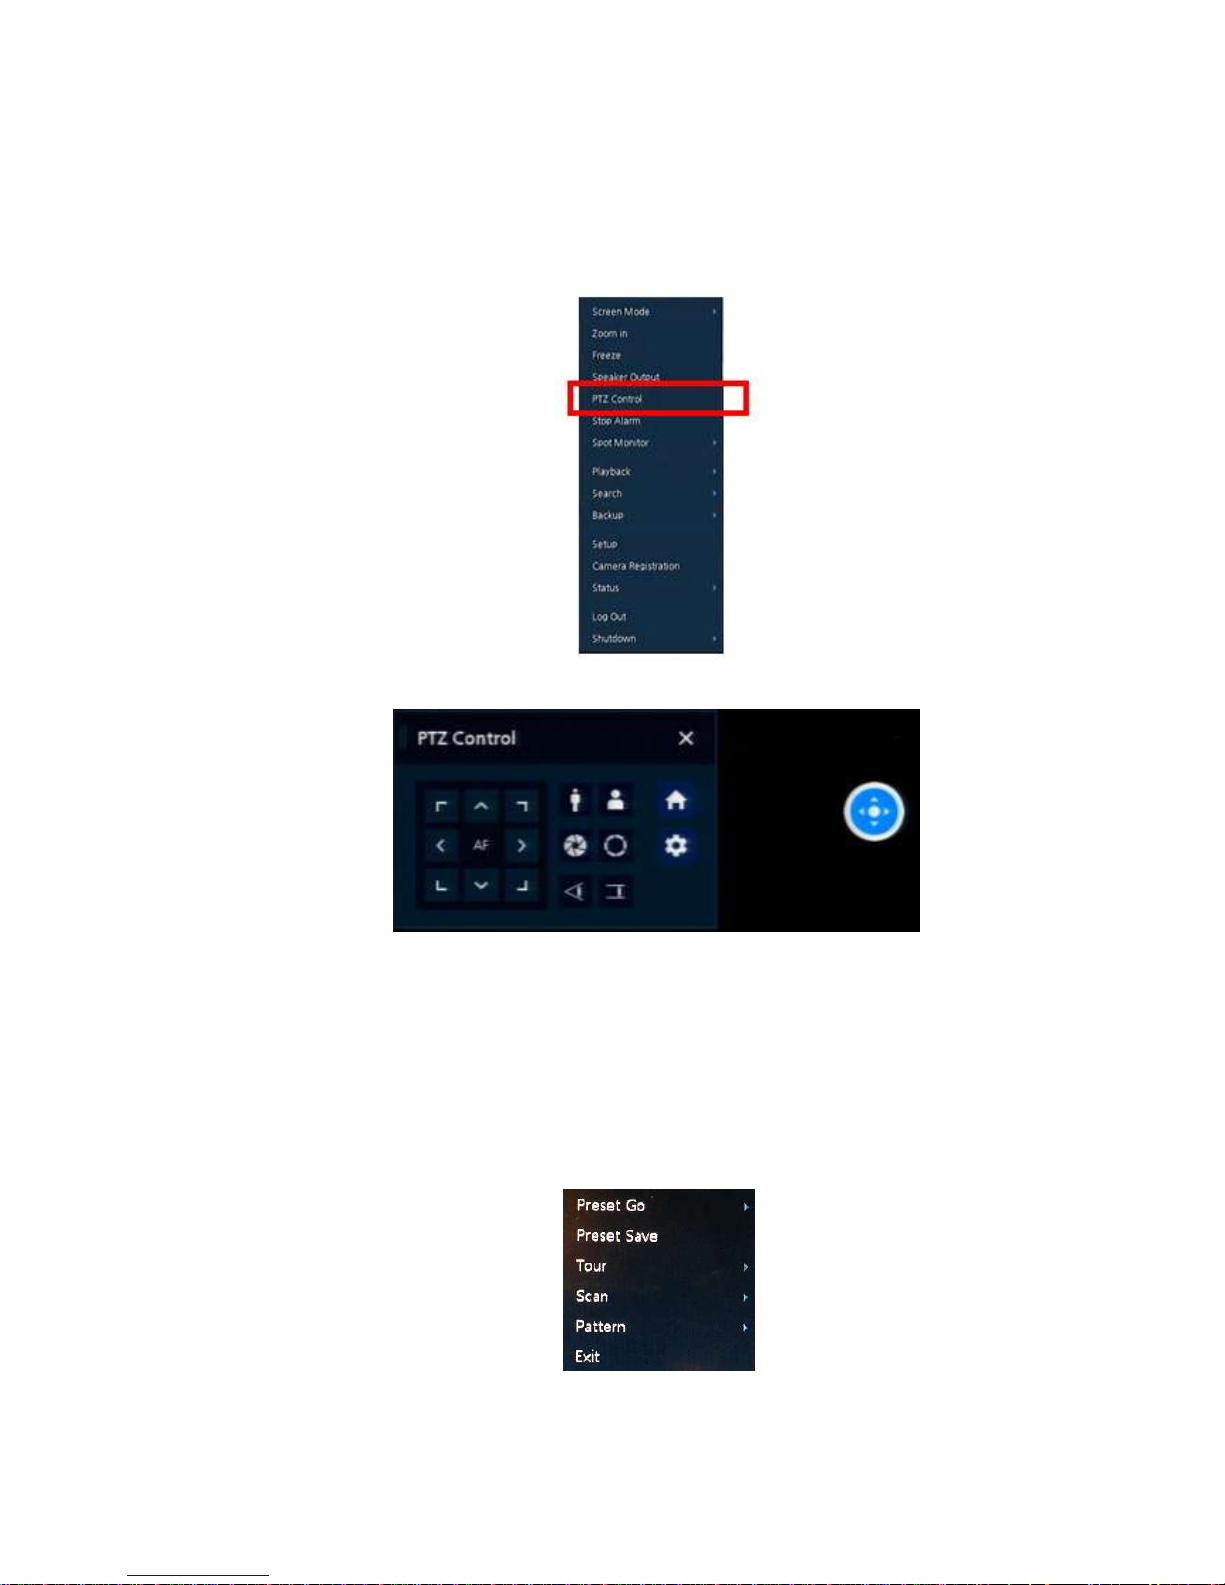
PTZ cameras cam be controlled when selected in full screen mode.
To access the PTZ OSD menu, first select the camera full screen, then right click anywhere on the screen to
display the Quick Menu:
Selecting the PTZ control option will diplsay a PTZ control panel and the PTZ icon in the center of the screen:
The camera can be moved by either:
1. Pressing and holding on an arrow.
or
2. Click on the screen and drag (the further from the icon the faster the speed)
Use the mouse scroll wheel to zoom in or out.
Presets / Tours etc
To select Preset positions or Tours right clicking anywhere on the screen will display the following menu:
Selecting any option will display drop down menu.
Page 12
VIPER Quick userguide V1.0 9
3. Search/Playback
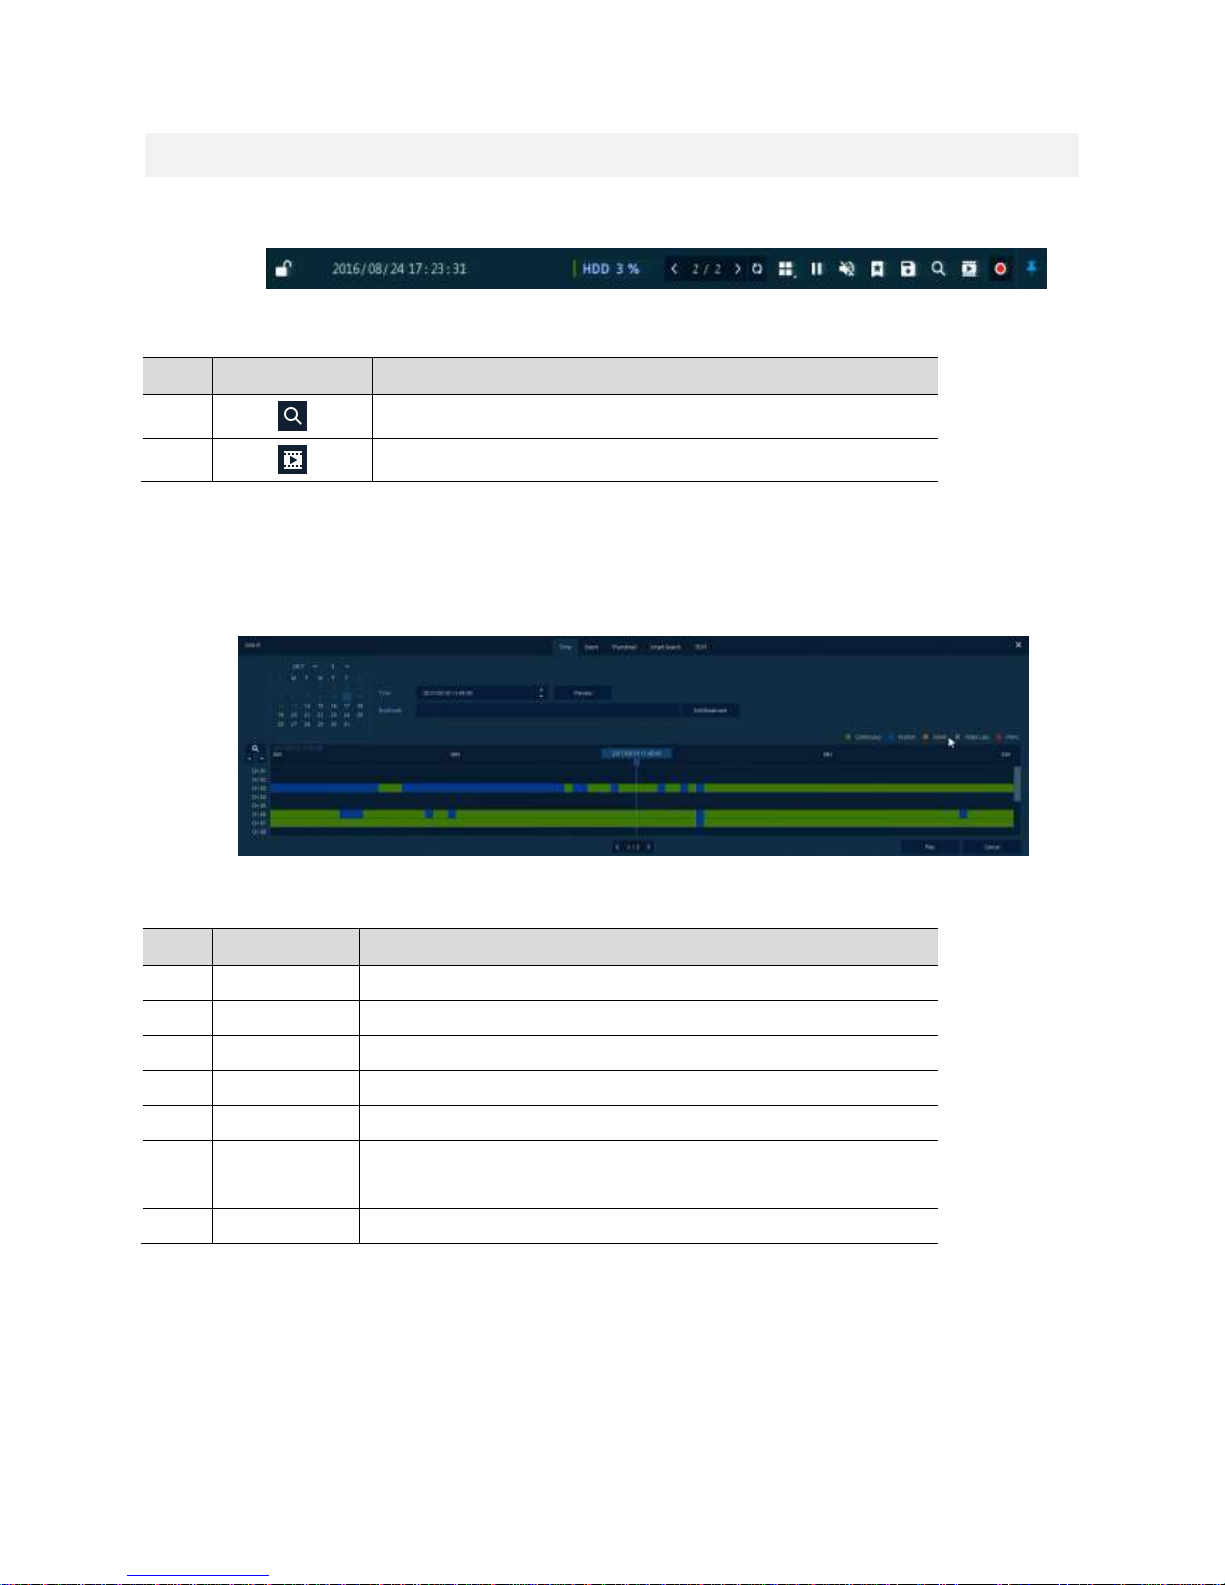
This chapter describes Live Launcher search and play menu located at the bottom of the screen.
Figure 3-1 Live Launcher Search, Play menu
Table 3-1 Item and Description of Live Launcher Search, Play menu
No.
Item
Description
1 Searching recording data (time, event, and thumbnail).
2 Playing recorded data – go direct to playback mode.
3.1 Search
This function allows searching of recorded data via various methods: Time, Event, Thumbnail, Smart Search
and Text.
Figure 3-2 Search: Time
Table 3-2 Search: Time Item and Description
No.
Item
Description
1
Calendar
Select the date to be searched
2
Time
Set the time to be viewed
3
Bookmark
Select any pre-defined bookmarks
4
Timeline
Displays the timelines across channels
5
Preview
Previewing video clips searched
6
Play
Playing video clips. For more information about Live bar, see section “0
Playback.”
7
Cancel
Exit the search screen
Note: For more detail on more advanced searching options please refer to the main manual
supplied on the CD.
Page 13
VIPER Quick userguide V1.0 10
3.2 Playback
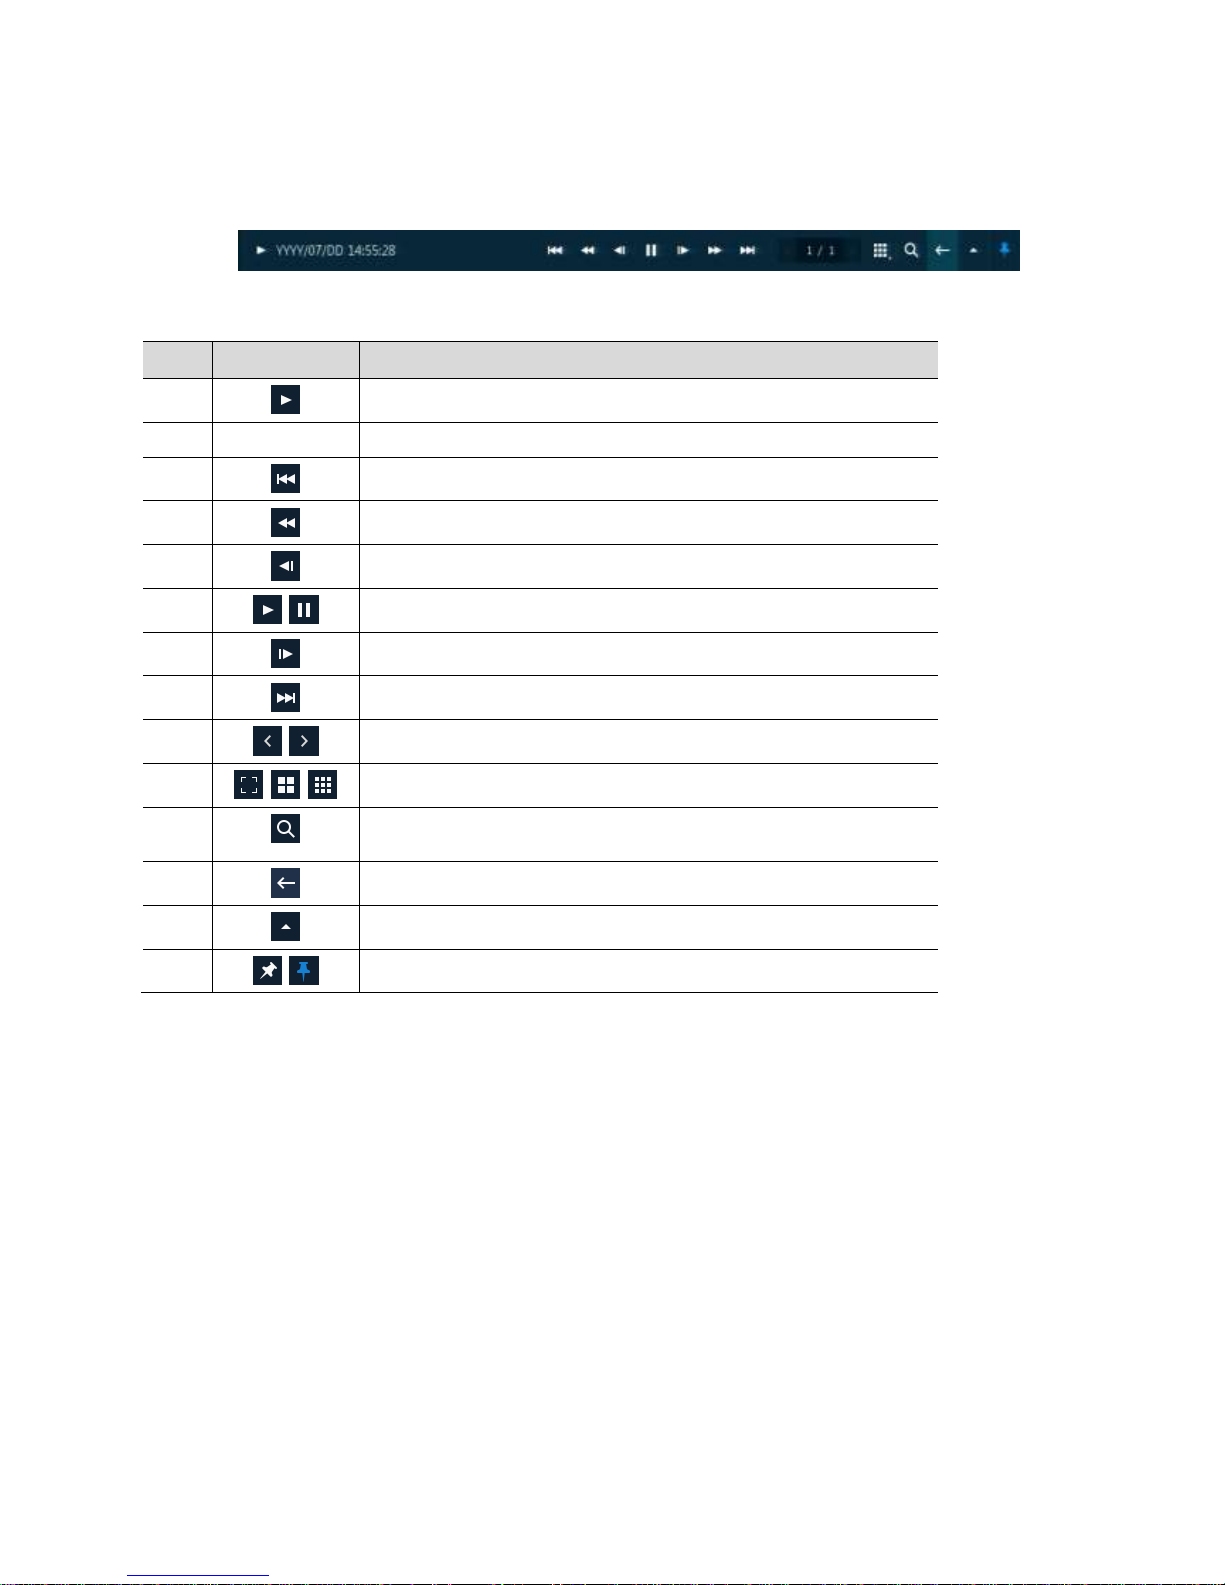
To play recorded data
Figure 3-3 Playback Launcher
Table 3-3 Playback Launcher Item and Description
No.
Item
Description
1 Play forward
2
Date and Time
Displaying date and time of video being played
3 Moving to the first section of the video
4 Playing the videos with multiplied speed in reverse (2~64x).
5 Playing the videos with lower speed in reverse (1/2~1/8x).
6
Play and Pause (toggle).
7 Play forward at slow speeds (1/2~1/8x).
8 Fast forward (2~64x).
9
Moving to previous/next channel or multi screen
10
Selecting the partition mode to mark in the screen
11
Searching the recorded data (time, event, and thumbnail). For more
information about search, see section “3.1 Search.”
12
Go to Live mode
13
Opening or closing the record timelines
14
Activating/deactivating automatic hidden function of Launcher menu
Page 14
VIPER Quick userguide V1.0 11
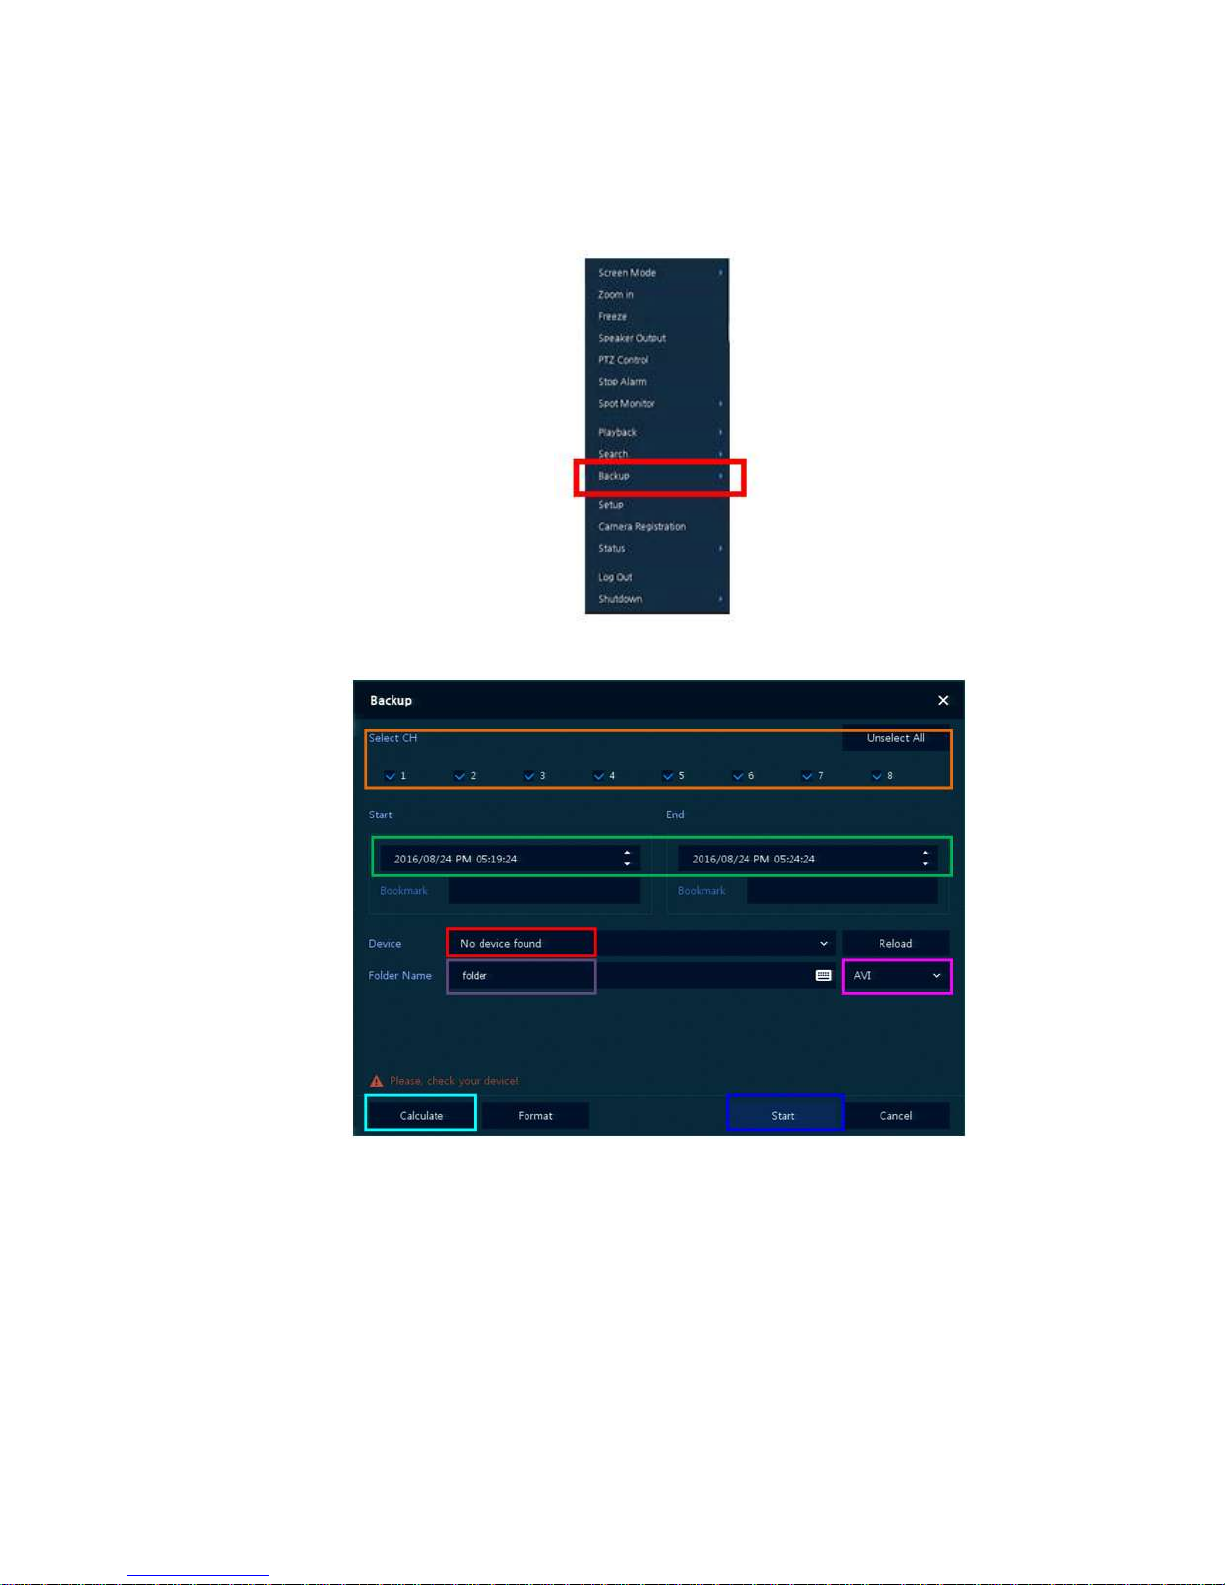
3.3 Backup ( Archive)
To back up information to A USB pen (or CD/DVD on HDAL model), right click on the screen to display the quick
menu. Select the BVACK up option:
This will display the following menu page:
1. Plug in a USB pen to the recorder, when it is discovered it will be displayed in the Device window
2. Select the required channels
3. Select the Start and Stop time
4. Give the download folder a logical name
5. Select “H4V” as back up format to download player software.
6. Click “calculate” to ensure the time period will fit on the pen
7. Click “Start”
Page 15

VIPER Quick userguide V1.0 12
 Loading...