

Page 1
USER OPERATING MANUAL
Colour Monitor
TV14
TV21
TV28
Please read this User Operating Manual before using your Colour Monitor
Page 2
2
Safety Pr
Safety Pr
ecautions
ecautions
!
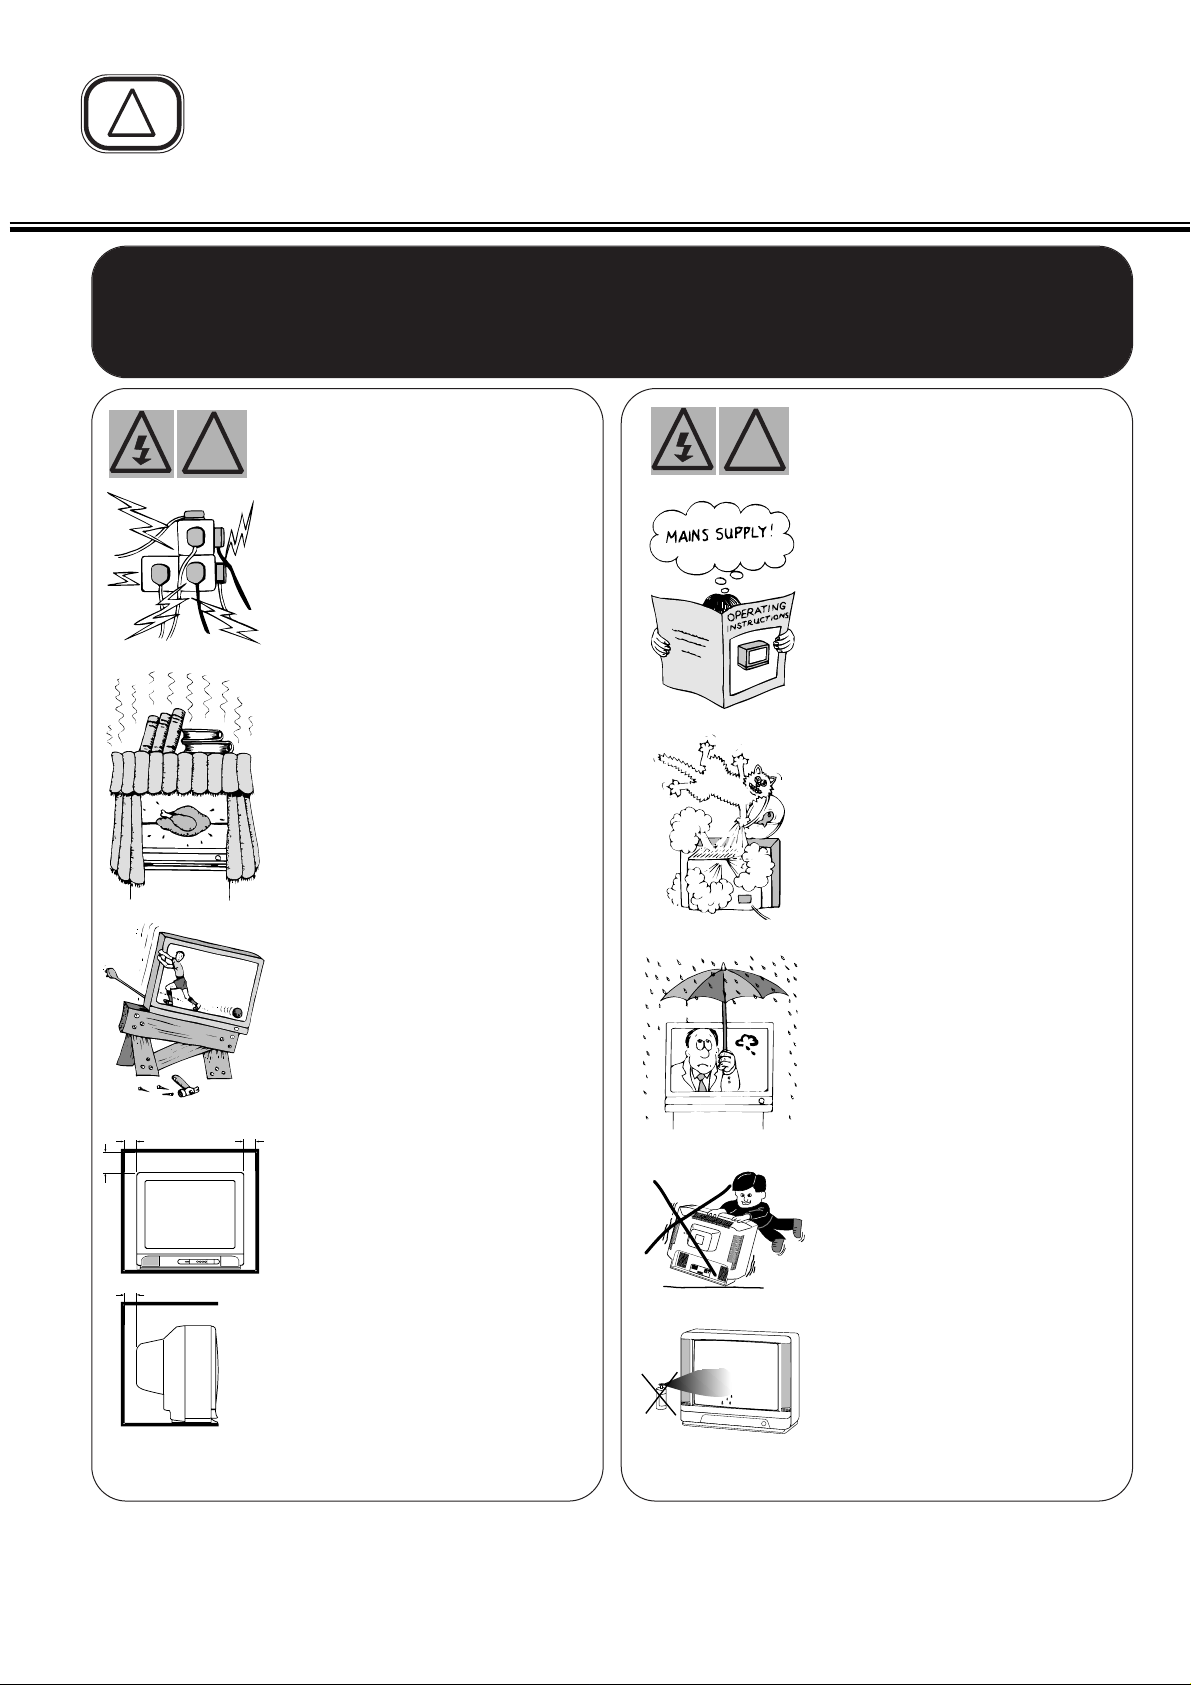
● Installation
● Use
MINIMUM DISTANCES
10cm
5cm
20cm
10cm
CAUTION: Please read and retain for your safety.
This colour monitor has been engineered and manufactured to assure your personal safety. But improper use can result in
potential electrical shock or fire hazards. In order not to defeat the safeguards incorporated in this receiver observe the
following basic rules for its installation, use and servicing.
INSTALLATION
Do not allow anything to rest on the
power cord.
Do not locate this colour monitor
where the cord will be damaged by
people walking on it.
Do not overload wall outlets and
extension cords as this can result in
fire or electric shock.
Slots and openings in the cabinet
and in the back or bottom are
provided for ventilation to ensure
reliable operation and to protect it
from overheating. These openings
must not be blocked or covered.
The opening should never be
covered with a cloth or other
material, and the bottom openings
should not be blocked by placing the
colour monitor on a bed, sofa, rug, or
other similar surface.
This colour monitor should never be
placed near or over a radiator or
heater. This colour monitor should
not be placed in a built-in installation
such as a bookcase unless proper
ventilation is provided
Do not place your colour monitor on
an unstable stand, shelf or table.
Serious injury to an individual, and
damage to the monitor may result if it
should fall. Your sales person can
recommend approved stands or shelf
and wall mounting instructions.
If the monitor is to be built into a
compartment or similarly enclosed,
the minimum distances must be
maintained.
Heat build-up can reduce the service
life of your monitor, and can also be
dangerous.
USE
This colour monitor should be
operated only from the type of
power source indicated on the
monitor or as indicated in the
Operating Instructions. If you are
not sure of the type of power
supply in your home, consult your
sales person or your local power
company.
Never add accessories that have
not been specifically designed for
this monitor.
Do not drop or push objects into
the monitor cabinet slots or
openings. Some internal parts
carry hazardous voltages and
contact may result in an electrical
shock hazard. Never spill liquids
of any kind on the colour monitor.
Do not expose the colour monitor
to rain or use near water.
For example, near a bathtub,
kitchen sink, in a wet basement,
etc. Before cleaning, unplug the
colour monitor from the wall
socket.
Never stand on, lean on or push
suddenly the monitor or its stand.
You should pay special attention
to children. Serious injury may
result if it should fall.
Do not apply liquid cleaners or
aerosol cleaners directly onto the
colour monitor. Use a damp cloth
for cleaning.
!
!
Page 3
3
Installa
Installa
tion
tion
Preparation-Mains Supply ●
Preparation-AV Connection ●
WARNING!
High voltages are used in the operation of this set.
Refer service to qualified service personnel.
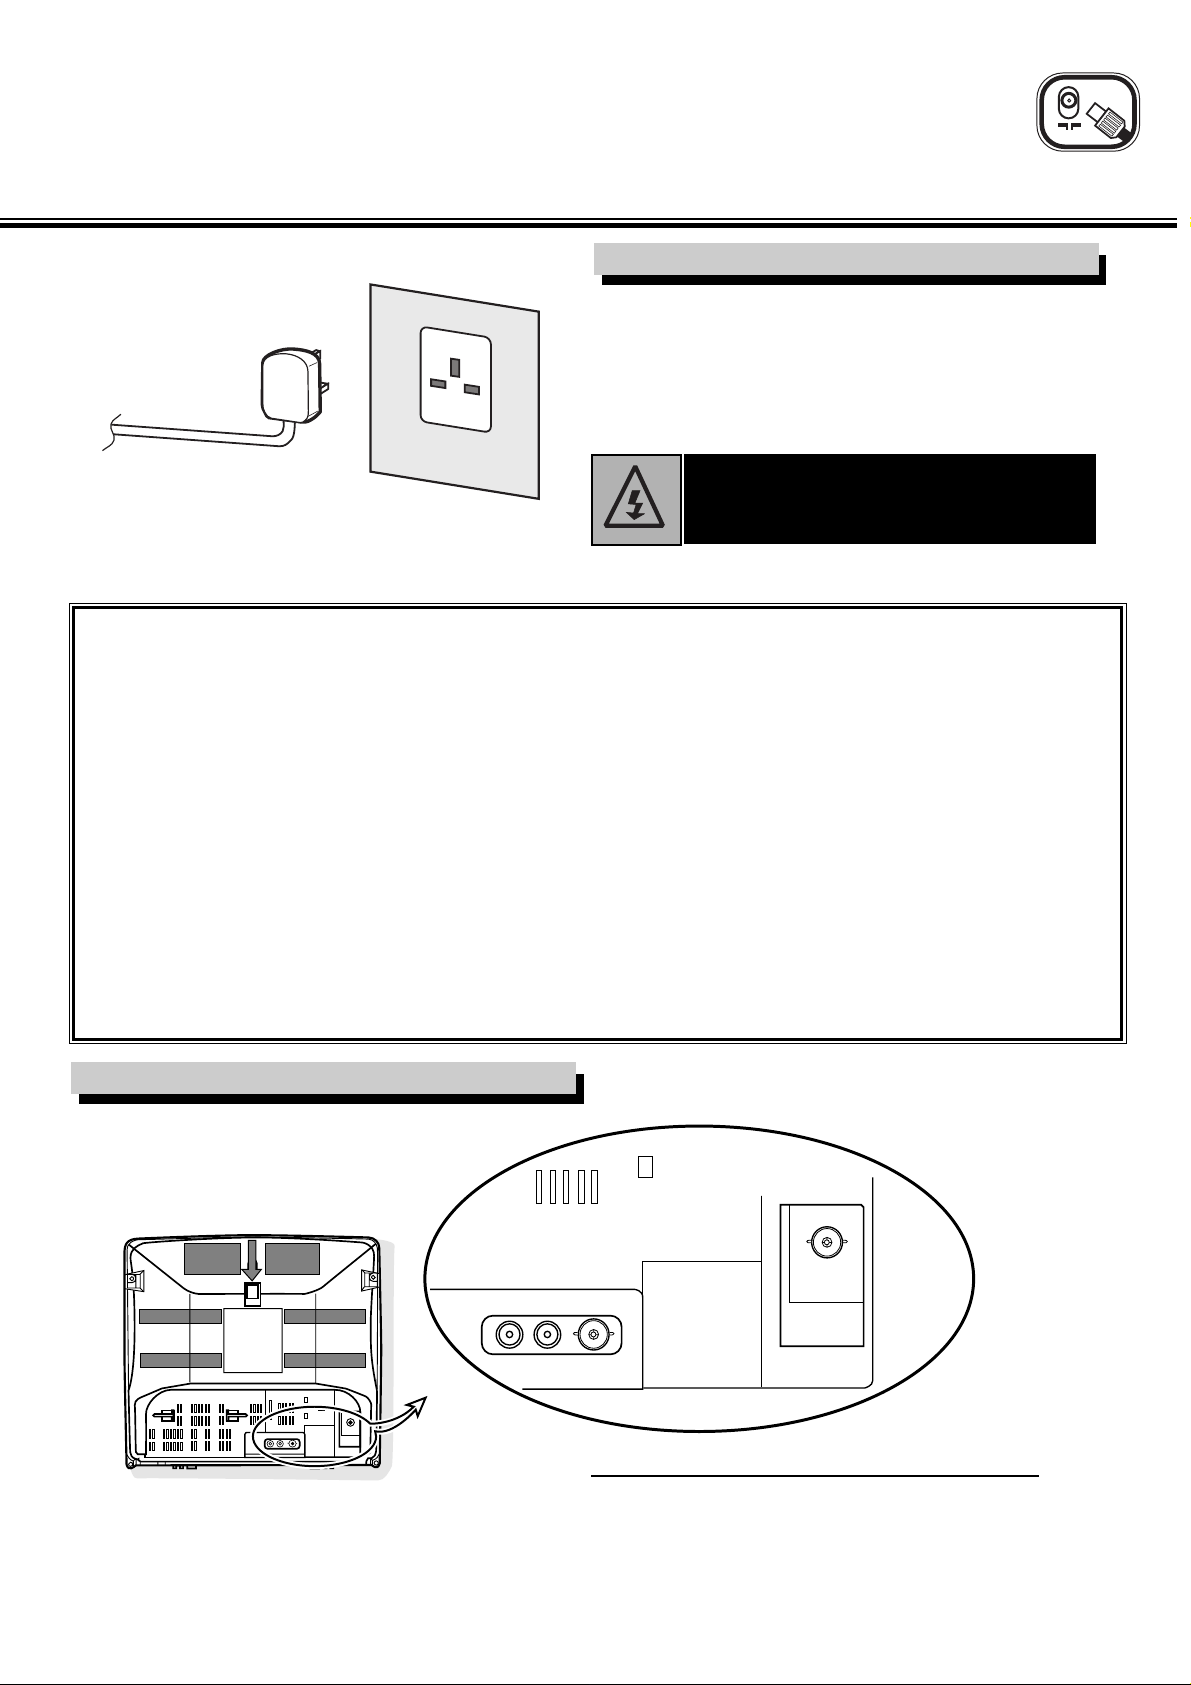
☞ Connect the power cord of the monitor to a wall outlet.
✐ The monitor is prepared for a mains voltage AC220~240V
50Hz. When the monitor is not to be used for an extended
period of time, it is advisable to disconnect the power cord
from the power outlet.
Mains Supply
AV Connection
AC Mains Outlet
Important:
This equipment is fitted with an approved non rewireable UK
mains plug.
To change a fuse in this type of plug proceed as follows:
1. Remove the fuse cover and fuse.
2. Fix a new fuse which should be a BS1362 5Amp A.S.T.A.
or BSI approved type.
3. Refit the fuse cover.
If the fitted plug is not suitable for your socket outlets, it
should be cut off and an appropriate plug fitted in its place. If
the mains plug contains a fuse, this should have a rating of
5Amp. If a plug without a fuse is used, the fuse at the
distribution board should not be greater than 5Amp.
Note: The severed plug must be destroyed to avoid a
possible shock hazard should it be inserted into a 13Amp
socket elsewhere.
The wires in this mains lead are coloured in accordance with
the following code:
Blue -------> Neutral
Brown ----> Live
1. The Blue wire must be connected to the terminal which is
marked with the letter “N” or coloured BLACK.
2. The Brown wire must be connected to the terminal with
the letter “L” or coloured RED.
3. Do not connect either wire to the earth terminal in the
plug which is marked with the letter “E” or by the earth
symbol or coloured GREEN or GREEN and YELLOW.
Before replacing the plug cover, make certain that the cord
grip is clamped over the sheath of the lead - not simply over
the wires.
Terminal Description
VIDEO IN BNC connector for video in.
VIDEO OUT BNC connector for video out.
AUDIO IN RCA connector for audio in.
AUDIO OUT RCA connector for audio out.
VIDEO IN
AUDIO OUT AUDIO IN VIDEO OUT
ANT.75
Page 4
4
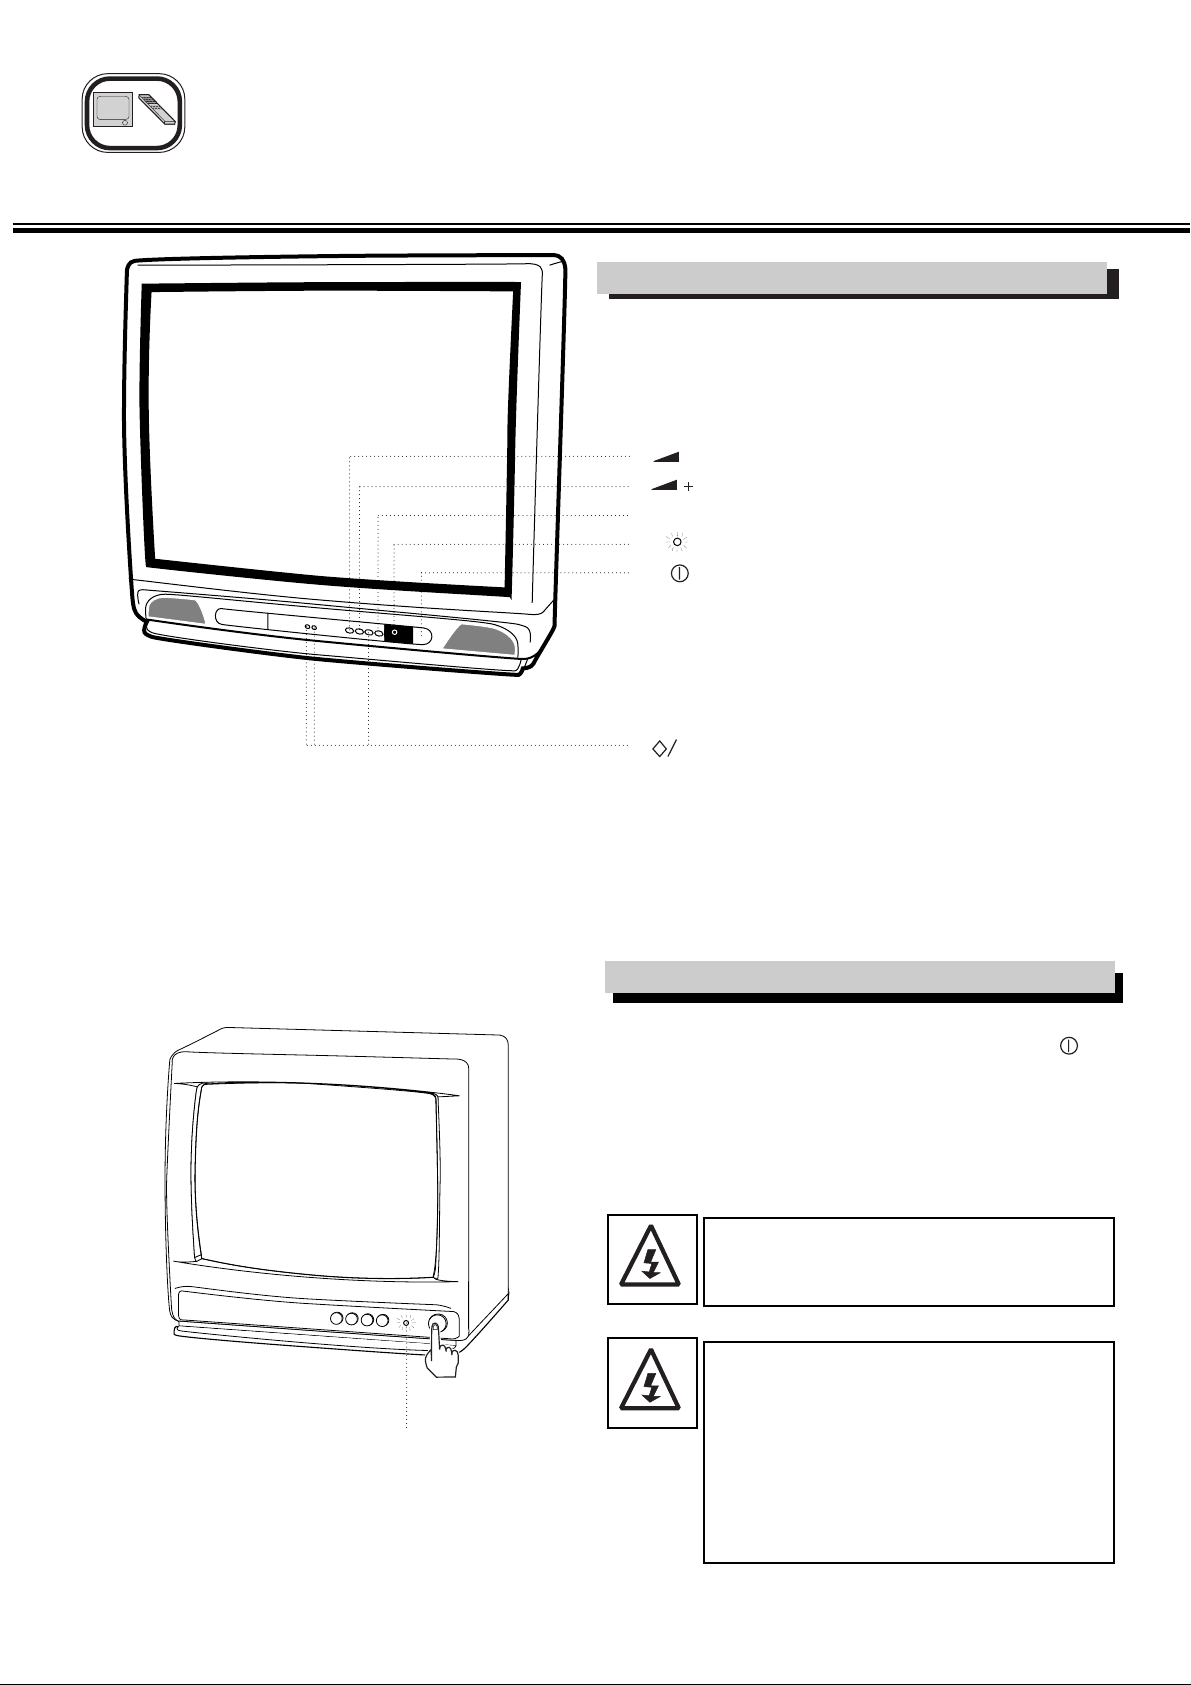
Switching On/Off
To turn the monitor on, press the Mains On/Off button .
✐
The power indicator illuminates red to show the power is on.
To switch the monitor off press the Mains On/Off button
again.
General Opera
General Opera
tion
tion
☞
● Monitor Controls
● Switching On/Off
Controls
Level down
Level up
P▲ Picture control
Power Indicator
Mains On/Off switch
F/M No operation
No operation
P▼ No operation
PT
-
Be sure to set the Mains On/Off button to the
Off position if a power failure occurs.
If you find the power indicator flashing, turn off
the monitor immediately. The flashing indicator is
a warning to show that the power protection
feature is operating. The fault may be cleared by
switching the monitor off and on again after the
indicator has completely dimmed (about 5
seconds). If the indicator flashes again switch off
the monitor and contact the service department.
Power Indicator
Page 5
General Opera
General Opera
tion
tion
Sound and Picture Controls ●
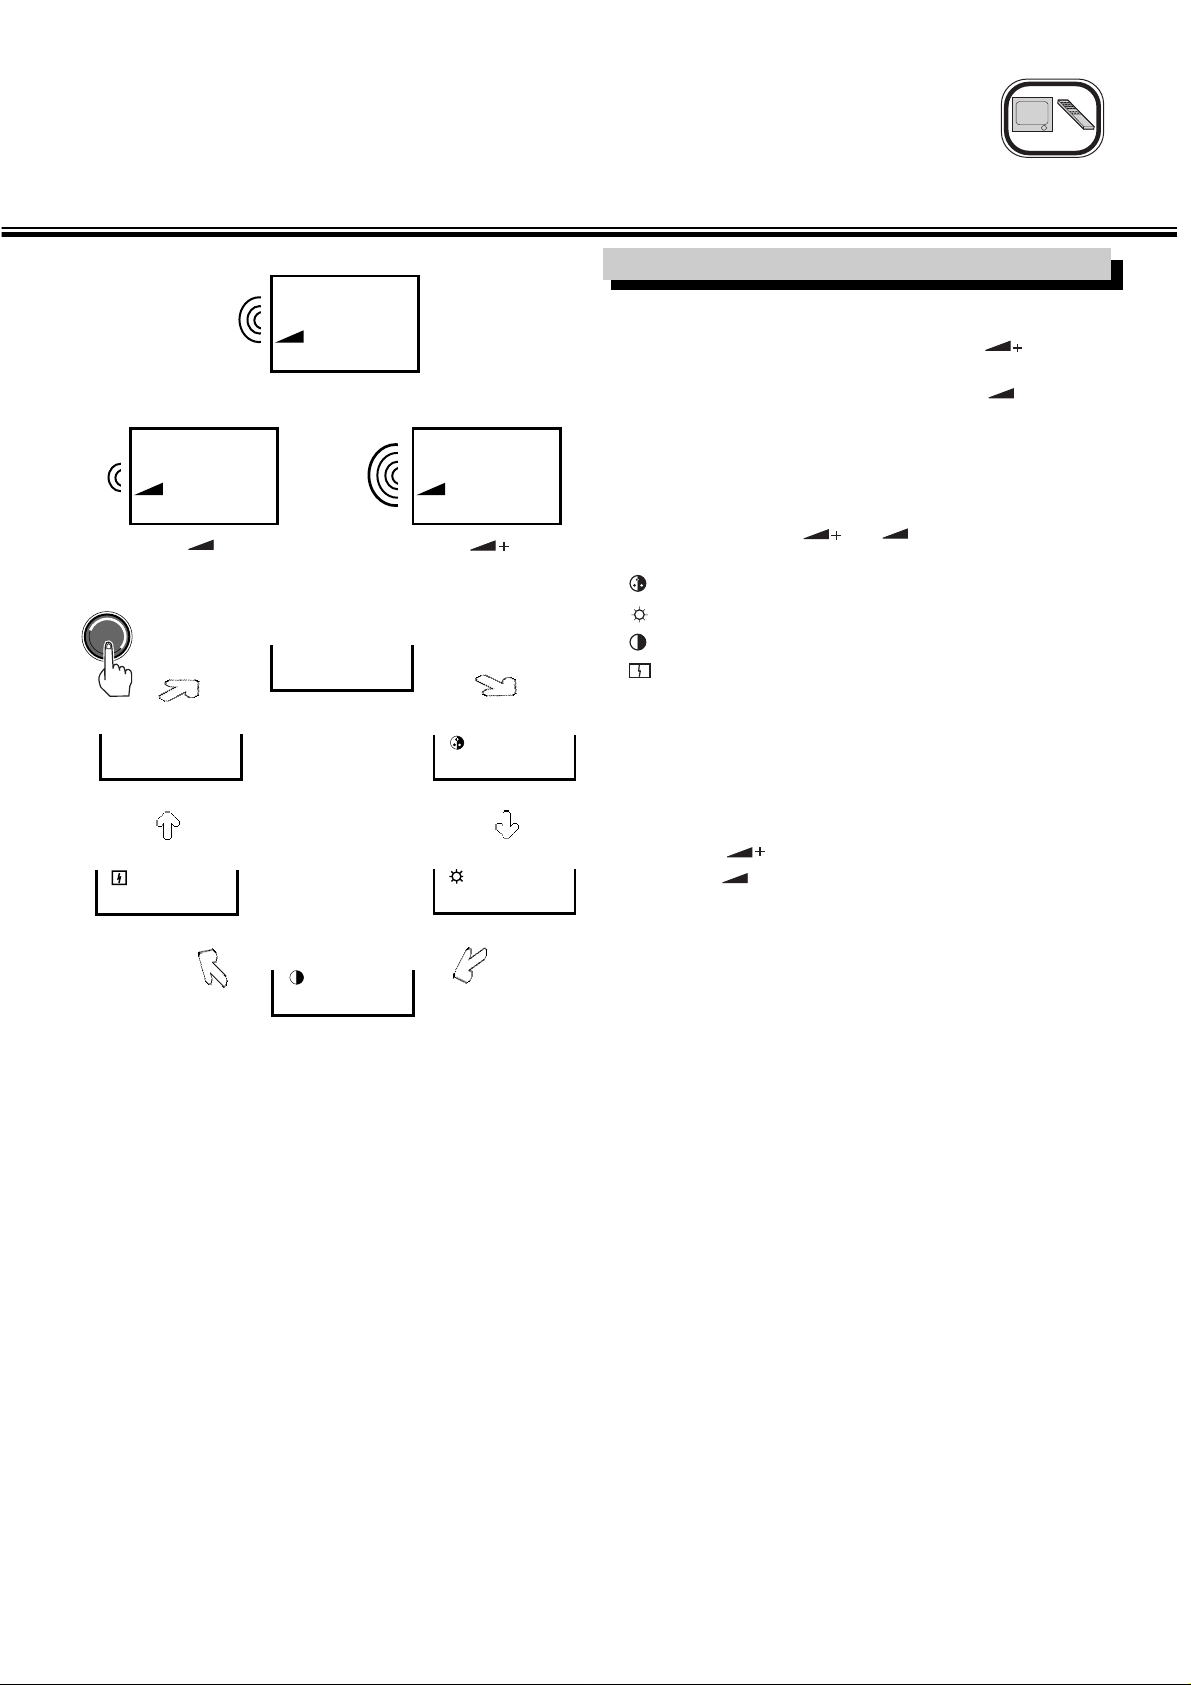
■ Sound Volume Control
To increase the sound volume level, press the button.
To decrease the sound volume level, press the button.
■ Selection & Adjustment of Controls
The following controls can be selected by using the P▲ button
and adjusted using the or button.
COLOUR : To adjust the picture colour.
BRIGHT : To adjust the picture brightness.
CONTRAST : To adjust the picture contrast.
SHARPNESS : To adjust the picture sharpness.
CHILD LOCK : To lock the monitor control buttons.
(see page 6)
1
Press the P▲ button repeatedly to select the control you
wish to adjust.
The control display changes as illustrated.
2
Press the button to increase the control level, or
press the button to decrease the control level.
All new values are automatically stored in the memory.
-
-
-
☞
COLOUR
IIIII------------
BRIGHT
IIIII------------
CONTRAST
IIIII------------
SHARPNESS
IIIII------------
CHILD LOCK
NO/YES
SOUND +10
II----------------
SOUND +30
IIIII|||||---------
SOUND +45
IIIII|||||||||||||--
-
▲
P
5
Sound and Picture Controls
Page 6
General Opera
General Opera
tion
tion
● Child Lock
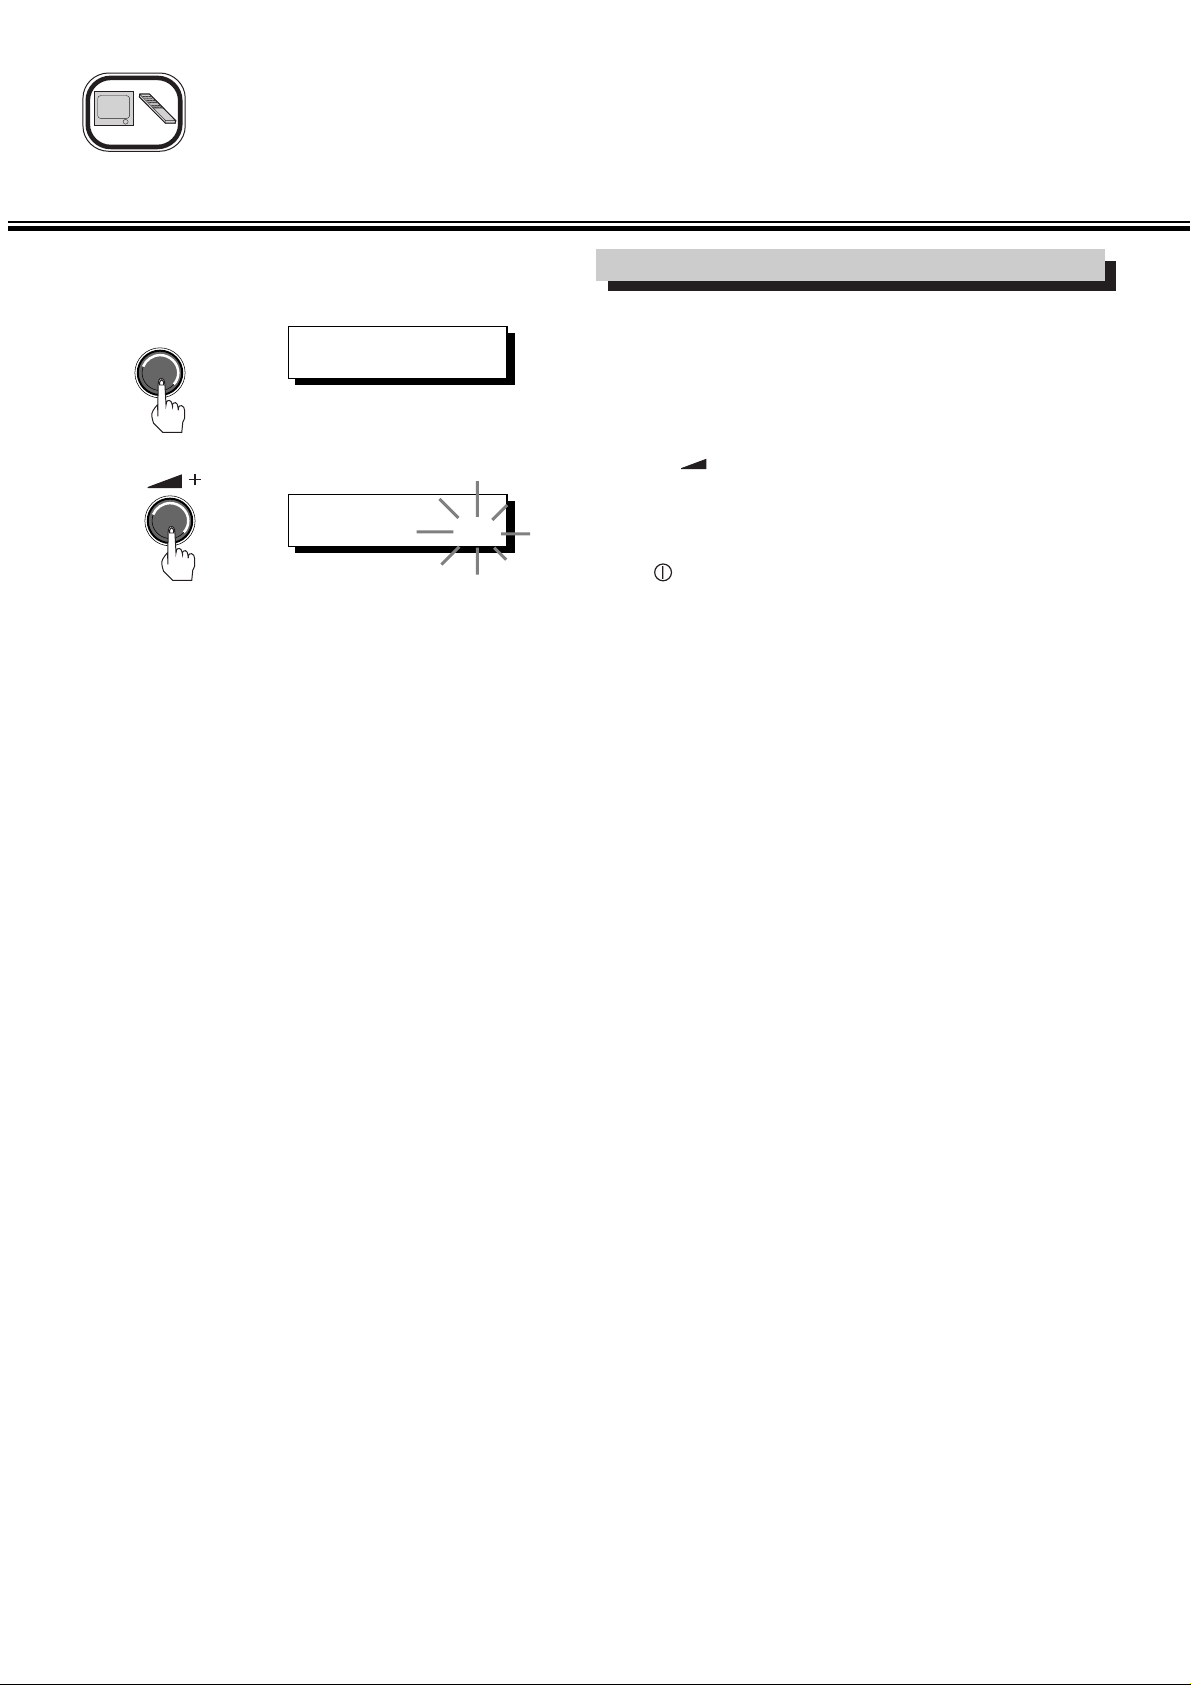
This monitor has a child lock function which renders the buttons
on the front of the monitor inoperative.
Setting the Child Lock Mode
Press the
P▲ button repeatedly until the word "CHILD LOCK”
appears on the screen.
Press the button until the word "YES" turns yellow, the
operation of the control button is now locked.
Note: The child lock function will be cancelled when the
Monitor is switched off by pressing the Mains ON/OFF
button.
CHILD LOCK
NO/YES
▲
P
CHILD LOCK
NO/YES
Child Lock
☞
6
Page 7

7
Common Specification
Power source AC 220~240V 50Hz
Scanning frequency 15.625KHz / 50Hz
Resolution 300 TVL (BNC)
Colour system PAL
Input terminals
Video IN BNC connector
Audio In RCA connector
Output terminals
Video OUT BNC connector
Audio OUT RCA connector
TV14 TV21 TV28
Sound output (watts) 1.5 2 3
Picture tube,Diagonal-cm (Deflection)
37, (90°) 55, (90°) 70, (110°)
(Visible picture diagonal) (cm) 34 51 66
Dimensions (W x H x D mm ) 370 x 335 x 391.5 521 x 465 x 481 628 x 567 x 469
Weight (kg) 9.0 19.0 30.4
Monitor Specification
Specif
Specif
ica
ica
tion
tion
Page 8

Part No. SKP10126 E7CV
Norbain House
Eskdale Road
Winnersh Triangle
Wokingham
Berkshire RG41 5TS
 Loading...