

Vista QNVR Installation And User Manual

Installation and User manual
QNVR
Quantum IP Network Video Recorder

2
QNVR Installation Manual V1.1
QNVR installation and user manual

3
QNVR Installation Manual V1.1
QNVR installation and user manual
CE Information
The product must be installed according to the currently valid installation regulat
ions for EMC to guarantee the designed use and to prevent EMC problems.
The device supplied with this manual meets the requirements of the following E
C Directives: EMC: 2004/108/EC, LVD : 2006/95/EC and RoHS: 2011/65/EU
Safety Precautions
1. Apparatus shall not be exposed to dripping or splashing and no objects filled with
liquids, such as vases, shall be placed on the apparatus.
2. WARNING – TO PREVENT FIRE OR SHOCK HAZARD DO NOT EXPOSE THE
SET TO RAIN OR MOISTURE.
3. "IMPORTANT SAFETY INSTRUCTIONS"
1) Read these instructions.
2) Keep these instructions.
3) Heed all warnings.
4) Follow all instructions.
5) Do not use this apparatus near water.
6) Clean only with a dry cloth.
7) Do not block any of the ventilation openings. Install in accordance with the
manufacturer's instructions.
8) Do not install near any heat sources such as radiators, heat registers, stoves,
or other apparatus (including amplifiers) that produce heat.
9) Do not defeat the safety purpose of the polarized or grounding type plug.
A polarized plug has two blades with one wider than the other. A grounding type
plug has two blades and a third grounding prong. The wide blade or the third
prong is provided for your safety. When the provided plug does not fit into your
outlet, consult an electrician for replacement of the obsolete outlet.
WARNING
This is a Class A product. In a domestic environment this product may cause
radio interference in which case the user may be required to take adequate
measures.
4
QNVR Installation Manual V1.1
QNVR installation and user manual
10) Protect the power cord from being walked on or pinched particularly at plugs,
convenience receptacles, and the point where they exit from the apparatus.
11) Only use the attachments/accessories specified by the manufacturer.
12) Use only with a cart, stand, tripod, bracket, or table specified
by the manufacturer, or sold with the apparatus. When a cart
is used, use caution when moving the cart/apparatus
combination to avoid injury from tip-over.
13) Unplug this apparatus during lightning storms or when unused for long periods
of time.
14) Refer all servicing to qualified service personnel. Servicing is required
when the apparatus has been damaged in any way, such as power supply cord
or plug is damaged, liquid has been spilled or objects have fallen into the
apparatus, the apparatus has been exposed to rain or moisture, does not
operate normally, or has been dropped.
15) the apparatus shall not be exposed to dripping or splashing and that no
objects filled with liquids, such as vases, shall be placed on the apparatus.
16) Shall be connected to a MAINS socket outlet with a protective earthing
connection.
17) the disconnect device shall remain readily operable.
18) The socket-outlet shall be installed near the equipment and shall be easily
accessible.
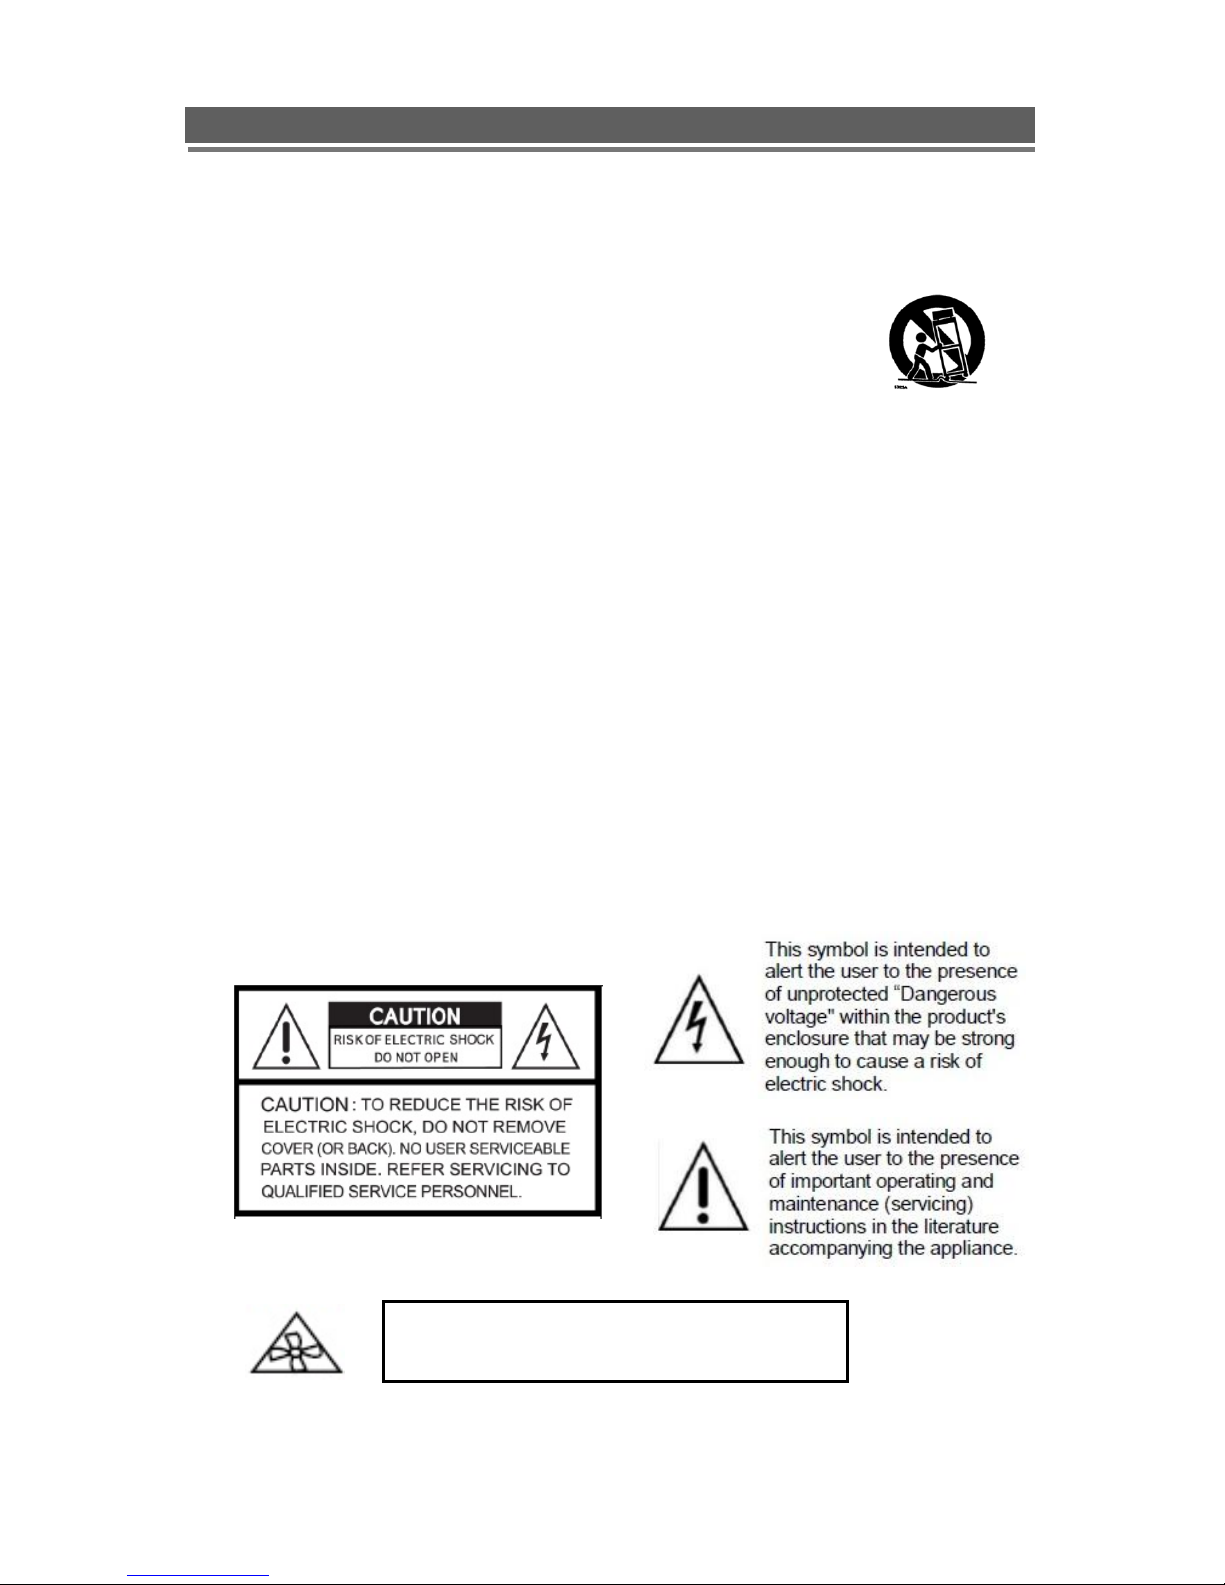
4. Explanation of Safety Related Symbols
WARNING
Hazardous moving parts
Keep away from moving fan blades

5
QNVR Installation Manual V1.1
QNVR installation and user manual
Contents
OVERVIEW ........................................................................................................................... 7
1. CONTENTS OF PACKING .................................................................................................... 7
2. FEATURES ....................................................................................................................... 8
INSTALLATION .................................................................................................................... 9
1. FRONT PANEL CONTROLS ................................................................................................. 9
2. REAR PANEL CONNECTORS .............................................................................................10
3. REMOTE CONTROL ..........................................................................................................13
4. CONNECTION GUIDE ........................................................................................................14
5. TURNING ON THE NVR ....................................................................................................16
OPERATION ........................................................................................................................17
1. NAVIGATION ....................................................................................................................17
1-1. Mouse Control ........................................................................................................................................ 17
1-2. Menu Navigation .................................................................................................................................... 17
2. SCREEN DISPLAYS ..........................................................................................................18
2-1. OSD Description ..................................................................................................................................... 18
2-2. Select Channel ....................................................................................................................................... 18
2-3. Digital Zoom ........................................................................................................................................... 19
3. PLAYBACK ......................................................................................................................20
3-1. OSD Description ..................................................................................................................................... 20
3-2. Playback Control .................................................................................................................................... 21
3-3. Playback Search .................................................................................................................................... 22
4. PTZ CONTROL VIA RS485 ...............................................................................................23
4-1. PTZ Control by mouse ............................................................................................................................ 23
4-2. PTZ Control by remote keyboard ........................................................................................................... 25
4-3. PTZ Control by remote controller ........................................................................................................... 25
4-4. PTZ Control by Client software ............................................................................................................... 25
SETUP MENU ......................................................................................................................26
1. DISPLAY .........................................................................................................................26
1-1. OSD Setting ........................................................................................................................................... 26
1-2. Live Setting ............................................................................................................................................. 28
1-3. Camera Covert ....................................................................................................................................... 28
1-4. Camera Name ........................................................................................................................................ 29
2. IP CAMERA SET UP, FOR LIVE VIEWING AND RECORDING.....................................................30
2.1 Camera Discovery and Connection ......................................................................................................... 31
2.2 Constant record setup ............................................................................................................................. 32
2.3 Event Boost record setup ........................................................................................................................ 32
2.4 Stream Switching record setup ................................................................................................................ 33
2-5. IP CAMERA menu overview ................................................................................................................... 34
2-6. Normal (Time Lapse) .............................................................................................................................. 35
2-7. Alarm ...................................................................................................................................................... 36
2-8. Motion ..................................................................................................................................................... 37
2-9. Schedule ................................................................................................................................................ 39
3. SYSTEM ..........................................................................................................................41
3-1. Basic ....................................................................................................................................................... 41
3-2. Disk ........................................................................................................................................................ 43
3-3. Account................................................................................................................................................... 44
3-4. Program Update ..................................................................................................................................... 45
3-5. PTZ Setup .............................................................................................................................................. 46
3-6. More ....................................................................................................................................................... 46
4. NETWORK .......................................................................................................................47
4-1. Basic ....................................................................................................................................................... 47

6
QNVR Installation Manual V1.1
QNVR installation and user manual
4-2. NTP ........................................................................................................................................................ 48
5. EVENT ............................................................................................................................48
5-1. E-Mail Registration ................................................................................................................................. 49
5-2. E-mail Out .............................................................................................................................................. 50
5-3. Beep Out ................................................................................................................................................ 50
5-4. Alarm Out ............................................................................................................................................... 51
SEARCH MENU ...................................................................................................................51
1. SEARCHING RECORDED DATA ..........................................................................................52
1-1. Date/Time Search................................................................................................................................... 52
1-2. Event Search .......................................................................................................................................... 52
1-3. Calendar Search .................................................................................................................................... 53
1-4. Bookmark Search ................................................................................................................................... 54
2. ARCHIVING EVIDENCE TO DVD/CD OR USB .....................................................................54
3. LOG ..............................................................................................................................56
CLIENT VIEWER SOFTWARE ............................................................................................58
1. CONNECTION ..................................................................................................................58
2. LOGGING ON ...................................................................................................................59
3. EXPLANATION OF SCREEN BUTTONS ................................................................................60
4. LIVE MONITORING ...........................................................................................................61
5. REMOTE SEARCH ............................................................................................................65
5-1. Search .................................................................................................................................................... 65
5-2. Archive.................................................................................................................................................... 67
5-3. Remote Log ............................................................................................................................................ 69
5-4. Information ............................................................................................................................................. 69
6. REMOTE SETUP (MENU SETTINGS - SAME AS DVR) ...........................................................71
6-1. Display .................................................................................................................................................... 71
7-2. IP Camera .............................................................................................................................................. 73
7-3. System ................................................................................................................................................... 75
7-4. Event ...................................................................................................................................................... 77
8. LOCAL SEARCH (VIEWING DOWNLOADED FOOTAGE) ...........................................................79
8-1. Search .................................................................................................................................................... 79
8-2. Log ......................................................................................................................................................... 81
8-3. Info ......................................................................................................................................................... 81
9. LOCAL SETUP .................................................................................................................82
9-1. Global ..................................................................................................................................................... 82
9-2. Opacity ................................................................................................................................................... 82
9-3. Audio Buffer ............................................................................................................................................ 83
9-4. Camera Name ........................................................................................................................................ 83
9-5. Deinterlace ............................................................................................................................................. 83
10. TELEMETRY CONTROL (PAN/TILT/ZOOM/FOCUS) .............................................................84
10-1. Pan / Tilt / Zoom / Focus ...................................................................................................................... 84
10-2. Preset / Learn ....................................................................................................................................... 85
11. SCREEN POSITION SAVE/LOAD .......................................................................................86
11-1. Screen Position Save ........................................................................................................................... 86
11-2. Screen Position Load ............................................................................................................................ 86
12. FIRMWARE UPGRADE ....................................................................................................87
APPENDIX 1 ........................................................................................................................88
DYNAMIC IP (SUPPORTING DDNS SERVER) .........................................................................88
APPENDIX 2 ........................................................................................................................90
SETUP FOR DVR PORT & WEB SERVER PORT USING IP SHARING ROUTER ...............................90
APPENDIX 3 ........................................................................................................................91
SPECIFICATION ...................................................................................................................91

7
QNVR Installation Manual V1.1
QNVR installation and user manual
Overview
1. Contents of Packing
Mouse
Power Cable
User Manual
Remote Controller
Battery
(AAA x2)
Installation
CD

8
QNVR Installation Manual V1.1
QNVR installation and user manual
2. Features
● Convenience
- User-friendly GUI (Graphical User Interface)
- Easy-to-use menu structure
- Easy-to-use recorded data search (Time, Date, Motion, and Alarm)
- Easy-to control via Front Panel, IR remote control and USB 2.0 mouse.
● Stability
- Auto restart after power interruption
- DB structure offers data stabilisation and better storage utilisation
● Expandability
- Remote NVR’s can be controlled using the supplied software client viewer.
● Technology
- Embedded LINUX OS
- Multi-Decoding (H.264/MPEG4/JPEG)
- High-resolution & high-quality H.264 algorithm
- Uses watermarking & scrambling technologies,
● Functionality
- Variable recording function (normal, alarm, motion, schedule)
- RS485 Telemetry
- Full channel real-time monitoring
- Live monitoring, recording, playback, backup, remote access simultaneously
- Multi channel playback
- Variable events notification to e-mail, buzzer or PC Client system
9
QNVR Installation Manual V1.1
QNVR installation and user manual
①②③④ ⑤ ⑥ ⑦ ⑧ ⑨
⑩⑪⑫ ⑬ ⑭ ⑮
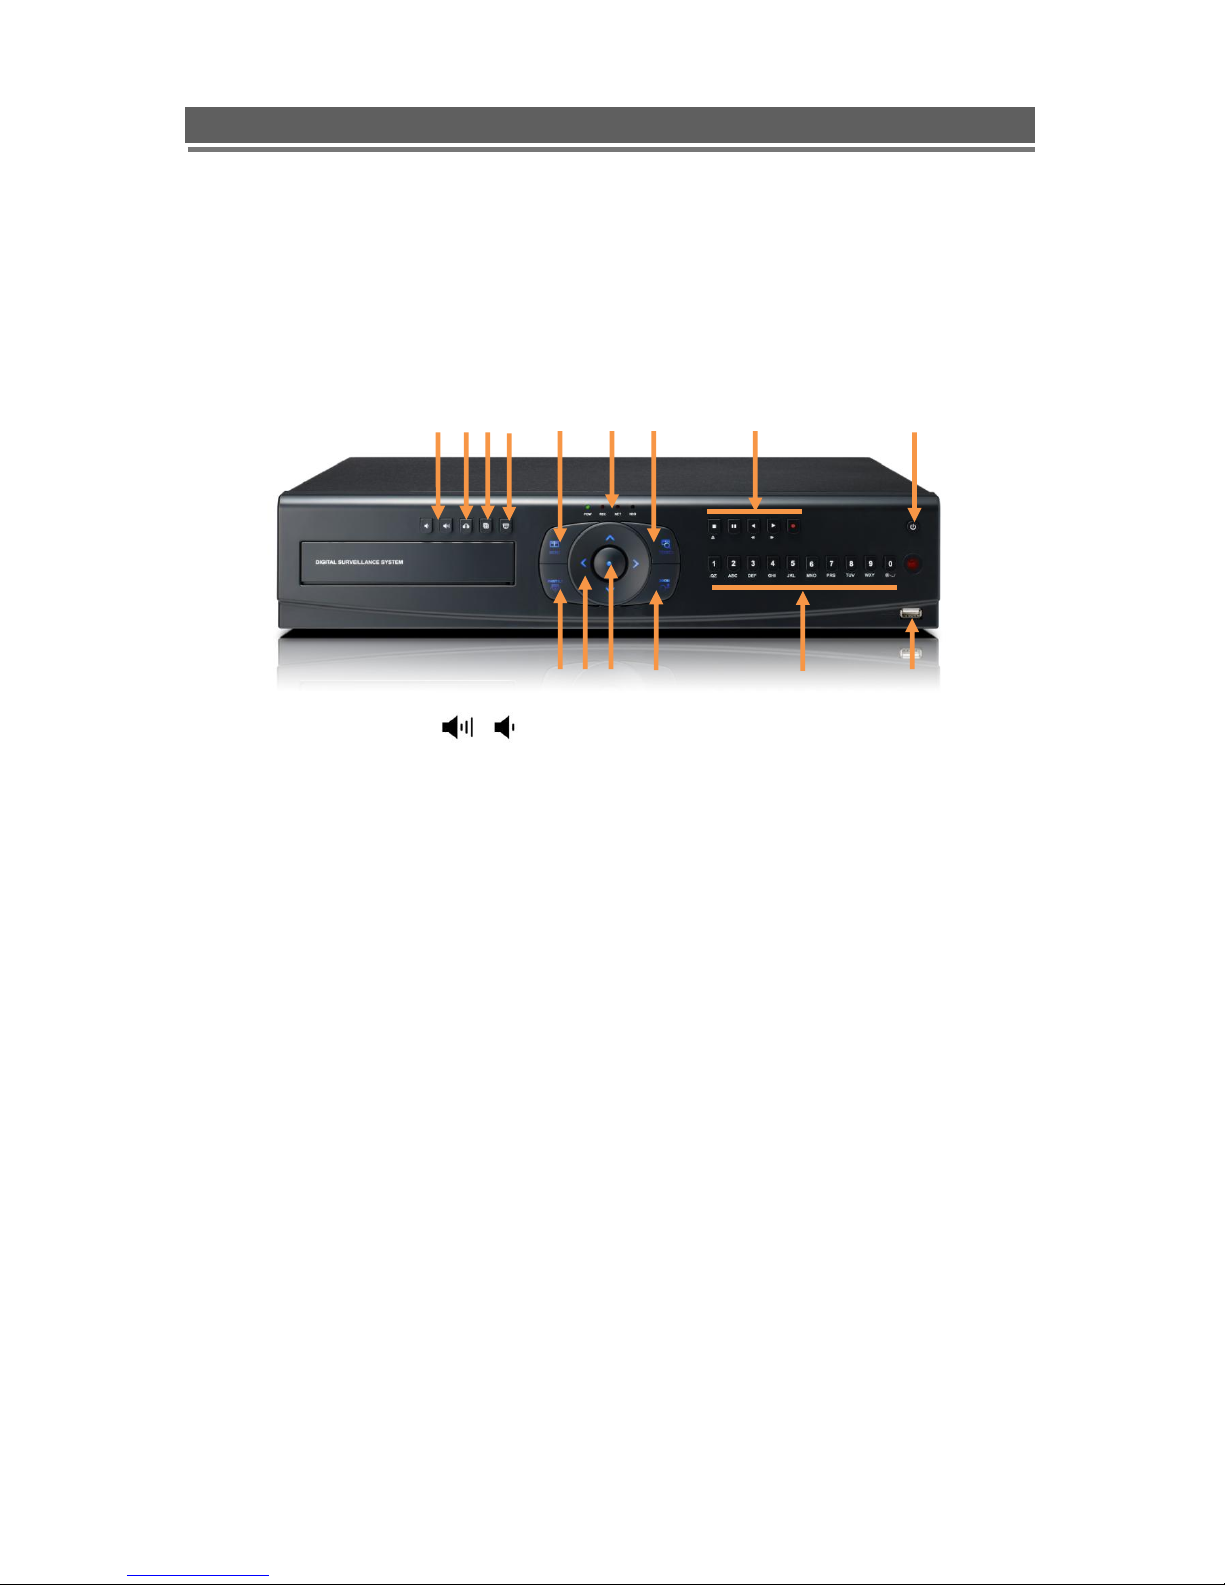
Installation
1. Front Panel Controls
① Volume Up & Down ( / )
To increase or decrease the volume.
② Audio Selection
Switches through audio channels
③ Multi-screen Display
Use the Multi-screen display button to select the display mode (single/4/9/16way).
④ PTZ Channel Selection
Used to select the PTZ channel on multi-screen.
⑤ Menu
Displays the menu on the screen
⑥ Indicator
- POWER: System Power On/Off (When power is on, the green light will be illuminated)
- REC: Recording status (When recording is on, the red light will flash)
- NET: Network status (When network is connected, the light will lash)
- HDD: HDD status (When the system is reading or writing to the HDD, the light will flash)
⑦ Search
Entering search mode
⑧ Stop / Eject (■)

10
QNVR Installation Manual V1.1
QNVR installation and user manual
To stop playback and go back to live mode. To eject DVD-RW
Pause ( ▌▌)
To freeze picture on playback mode and live mode.
Forward Play (▶)
Playback of the recorded data. When in play mode press again to enter fast forward mode.
When video is paused this allows frame forward.
Reverse Play / Rewind ()
Reverse play of recorded data. When in play mode press again to enter fast rewind mode.
When video is paused this allows frame forward
Rec (●)
It starts & stops manual recording, password protected.
⑨ Power
System Power On/Off (Password protected)
⑩ Pan / Tilt
To enable the pan & tilt of PTZ cameras, a “T” will appear in the task bar at the bottom of
the screen
⑪ Arrow Buttons
Moves the cursor while in menu mode
Pan and tilt in telemetry mode
Play forward / backwards in play mode
⑫ Select
Menu selection
⑬ Zoom
To control the zoom in & out of PTZ camera
⑭ Numeric & Character
Input for numbers & letters within the setup menus and searches
⑮ USB Port
USB connector for mouse control & downloading to USB memory.
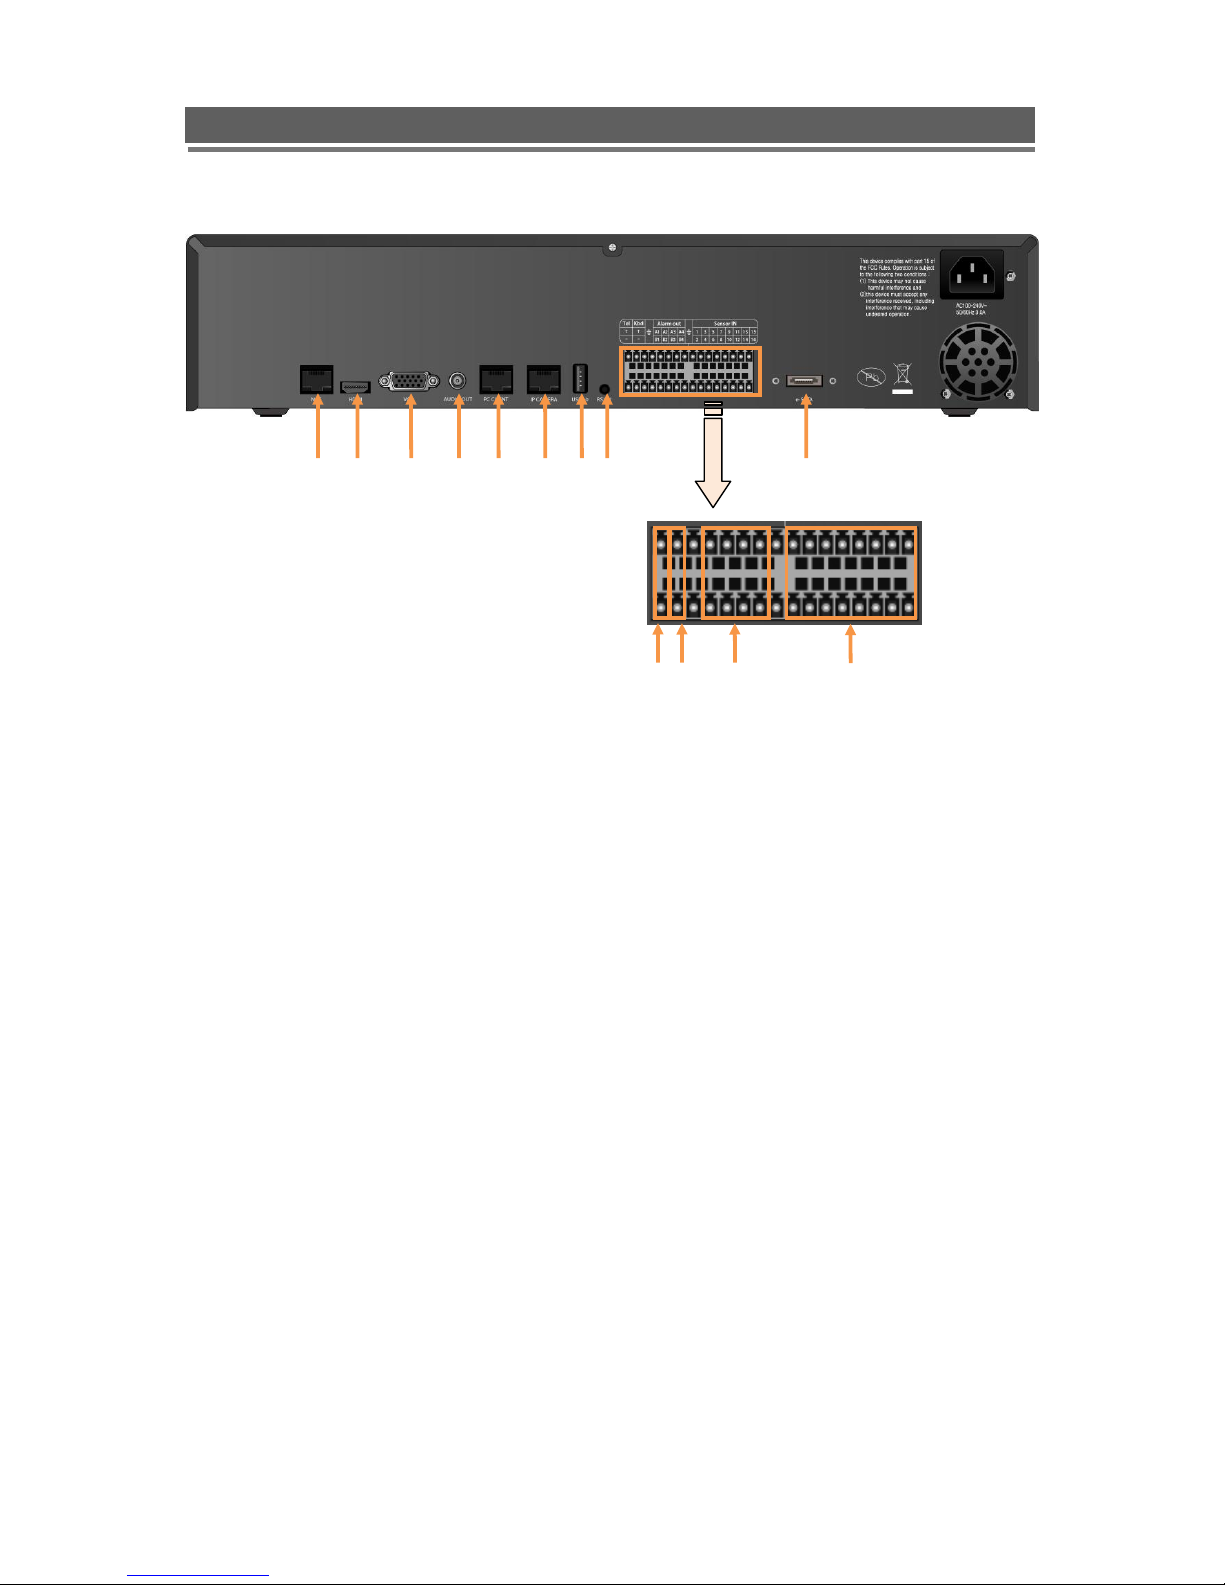
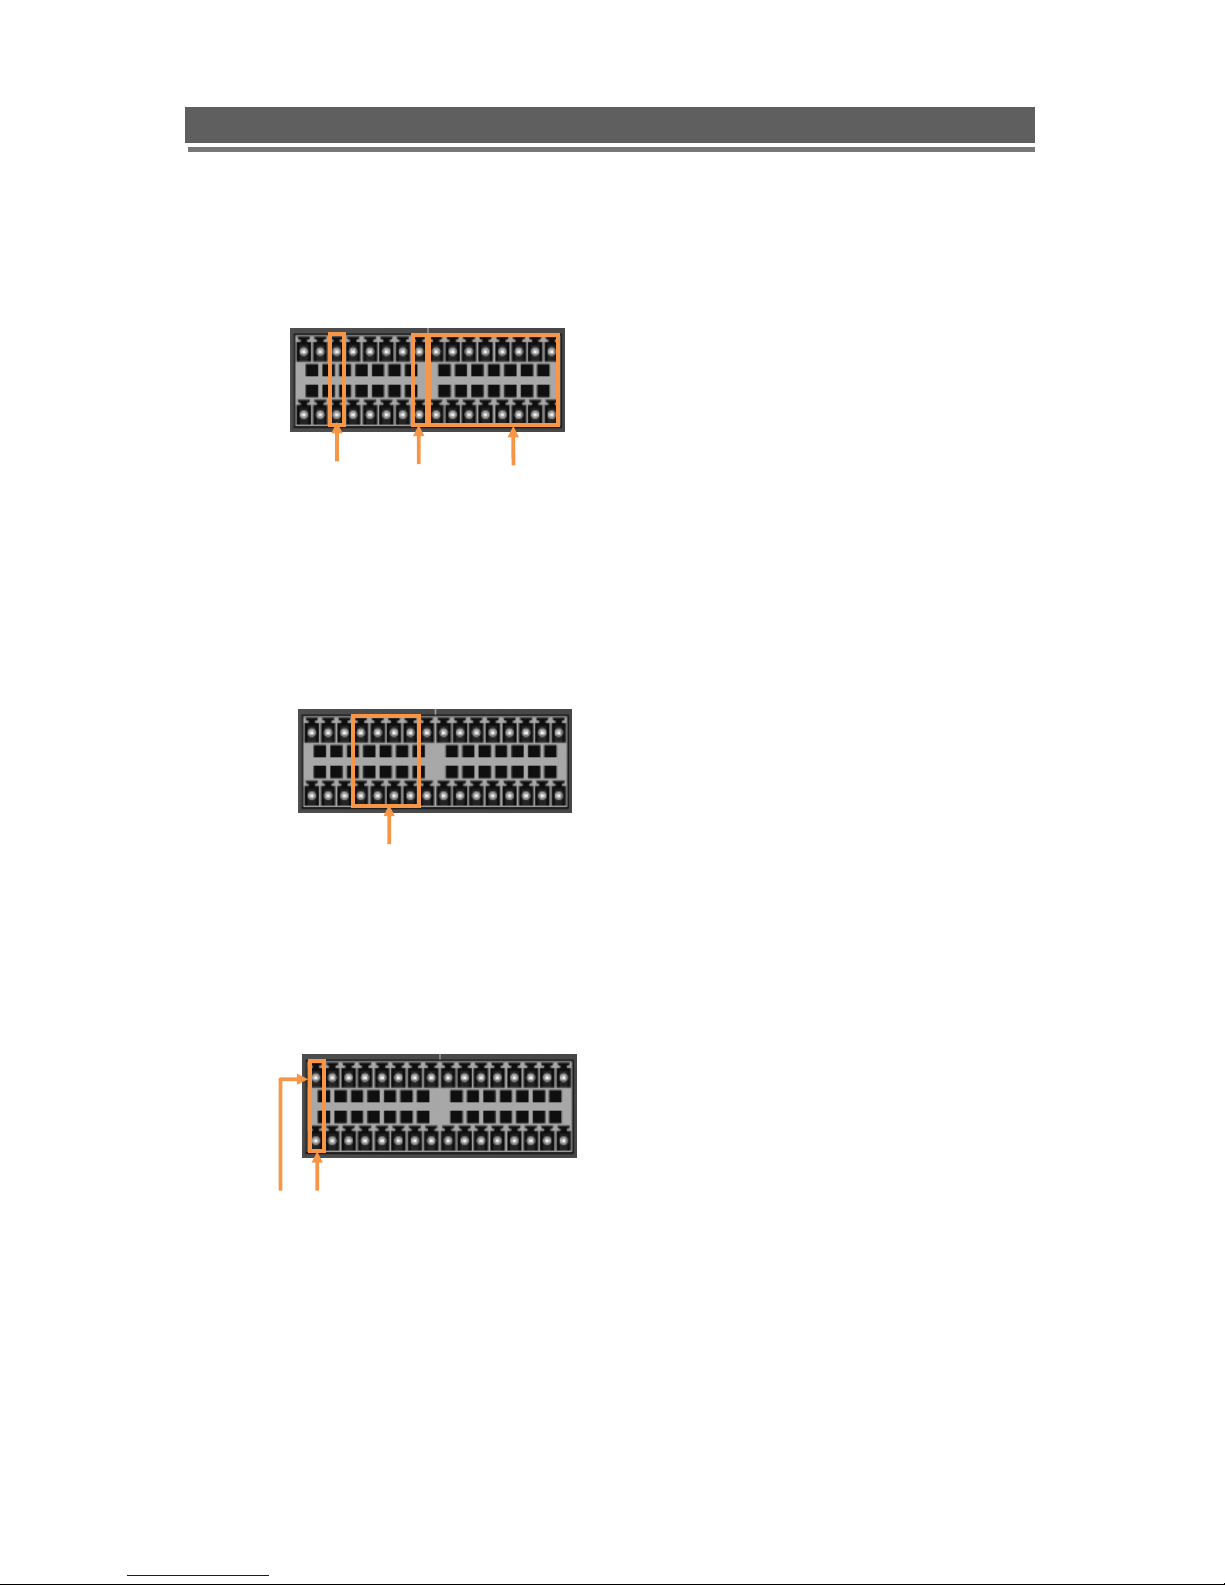
2. Rear Panel Connectors
⑭
11
QNVR Installation Manual V1.1
QNVR installation and user manual
① Network Port for NAS
Connecting to the network storage across a LAN
② HDMI Output
HDMI output port (1080p)
③ VGA Output
VGA video output for main monitor (1024x768 to 1920x1080)
④ Audio Output
Audio output
⑤ Network Port for PC Client
Connecting to the PC through Internet or LAN
⑥ Network Port for IP camera
Connecting to IP cameras on a LAN
⑦ USB Port
USB 2.0 port for mouse, USB storage
① ② ③ ④ ⑤ ⑥ ⑦ ⑧ ⑨ ⑩ ⑪
⑫
⑬

12
QNVR Installation Manual V1.1
QNVR installation and user manual
⑧ RS232 Port
Serial Communication (for service)
⑨ E-SATA Port
Port for e-SATA HDD
⑩ PTZ Camera Controller
Serial Communication for Pan / Tilt Camera
⑪ Keyboard Controller
Serial Communication for P/T/Z Control Keyboard
⑫ Alarm Output
Alarm(relay) output port
⑬ Sensor Input
16 Sensor input ports
⑭ AC Power Input
AC 100-240V 50/60Hz

13
QNVR Installation Manual V1.1
QNVR installation and user manual
3. Remote Control
① POWER : Power on/off
② P/T/Z : Entering PTZ Setup menu directly
③ REC : Start & Stop Recording
④ Numbers and letters (1 to 9)
⑤ INFO : Direct access system infomation
ID : Entering remocon ID set mode
MUTE : Audio Mute
AUDIO : Switches through Audio channels
⑥ MENU: Entering system menu
SEARCH: Entering search
ARROW : Left, Right, Up and Down
SEL : Select/Enter
⑦ VOL +/- : Up, down volume
⑧ CH +/- : Up, down channel
⑨ (◀)◀ : Reverse play
▶(▶) : Play (or fast forward)
I I : Pause
■ : Stop playback
⑩ OSD : On Screen Display ON/OFF
SEQ : Sequence operation
LOG : Direct access Log list
⑪ CAM : Changing PTZ icon
P/T : Pan &Tilt
Z/F : Zoom/ & Focus
DIS : Channel Division
⑩
①
②
③ ④ ⑤ ⑥ ⑧ ⑨ ⑦
⑪
14
QNVR Installation Manual V1.1
QNVR installation and user manual
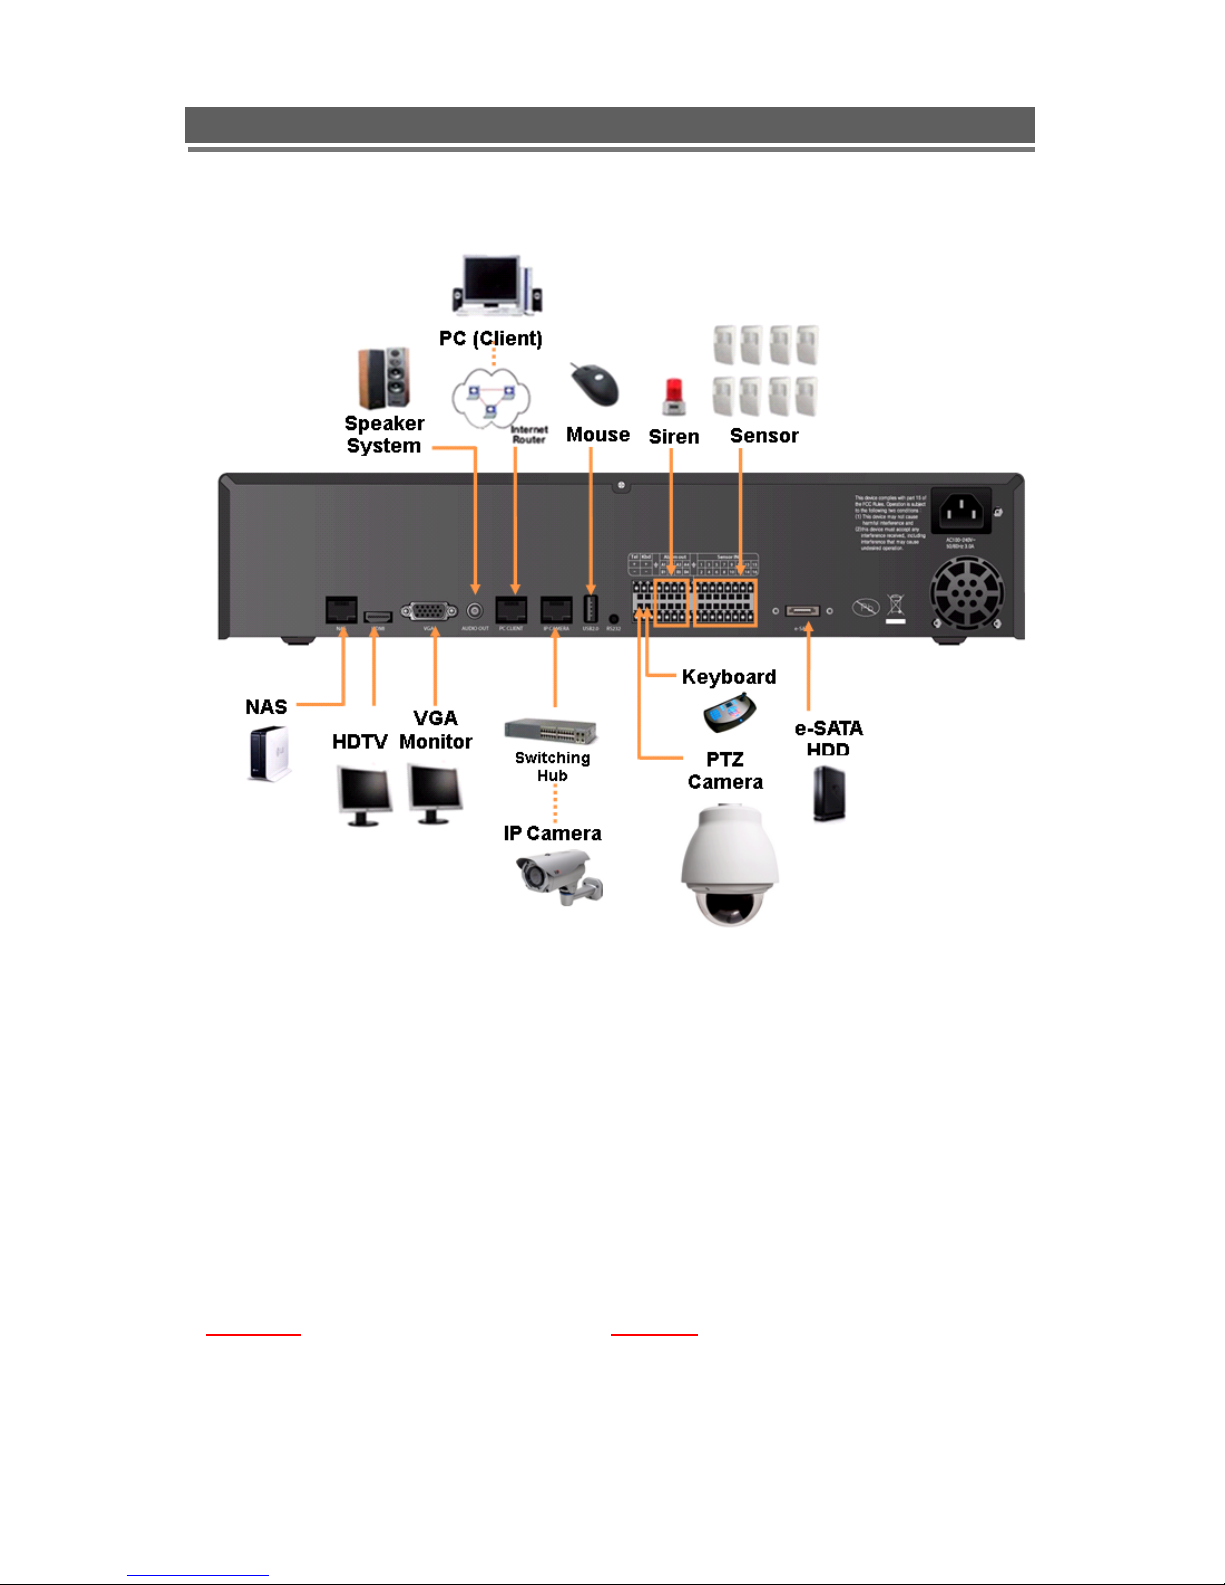
4. Connection Guide
Connecting the monitor
There are two available monitor outputs on NVR.
● HDMI output : Connect to the HDMI port of the HD monitor(HDTV).
● VGA output : Connect to the VGA port of the VGA monitor.
Connecting to a network
Use the Ethernet port to connect to remote PC, IP cameras and NAS via Ethernet network.
● Port for PC Client: Connect to the PC. (Default: 192.168.1.111)
● Port for IP Camera: Connect to IP camera network. (Default: 192.168.30.222)
● Port for NAS: Connect to the network storage. This can be share either of the above
sub-nets or be on a third independent sub-net (default 192.168.30.223).
Important: The PC port and IP camera port must not be on the same subnet.
Connecting audio
To listen to live or recorded audio, connect to an amplified speaker system.
15
QNVR Installation Manual V1.1
QNVR installation and user manual
● Audio output : Connect to the audio in of the audio AMP.
Connecting to a sensor input
There are 16 individual alarm inputs marked as Sensor In (1-16).
● Sensor inputs : Connect to (+) terminal of a sensor.
● Common GND : Connect to (–) terminals of sensors.
Connecting to a alarm output
The NVR can activate external devices such as buzzers or lights using the relay.
There are 4 relay outputs marked as Alarm out.
● A1/A2/A3/A4 : Connect to (+) terminal of buzzer or light.
● B1/B2/B3/B4 : Connect to (–) terminals of buzzer or light.
Connecting to a PTZ camera
This RS485 connector can be used to control Pan / Tilt / Zoom camera.
● Telemetry (+) : Connect to RS485 Rx(+) of PTZ camera.
● Telemetry (-) : Connect to RS485 Rx(-) of PTZ camera.
Connecting to a remote keyboard (VKBD4)
This RS485 connector is for a control keyboard.
Alarm
Common
Sensor
Common
(-)
(+)

16
QNVR Installation Manual V1.1
QNVR installation and user manual
● Keyboard (+) : Connect to RS485 Tx(+) of the keyboard.
● Keyboard (-) : Connect to RS485 Tx(-) of the keyboard.
Connecting to a mouse
● USB 2.0 : Connect to the mouse.
Connecting to a external HDD
To expand the HDD capacity, connect the external storage.
● e-SATA : Connect to the e-Sata HDD storage.
5. Turning on the NVR
1. Connect the power cable.
2. Connect camera cables.
3. Connect a network cable and a monitor cable.
4. Press the POWER button on the front panel and wait until the main screen is displayed on
the connected monitor; this process may take a couple of minutes.
(+)
(-)

17
QNVR Installation Manual V1.1
QNVR installation and user manual
Operation
1. Navigation
You can navigate the on screen menus using the front panel buttons, IR remote control or
mouse.
1-1. Mouse Control
Right clicking the mouse brings up the following popup menu.
① Setup Menu
② Search Menu
③ PAN/Tilt Menu
④ Focus/Zoom Menu
⑤ Power Button
⑥ Sequence Button
⑦ Playback Button
⑧ Eject Button
⑨ Volume Up/Down Button
⑩ Multi-screen Display Button
⑪ Channel Up/Down Button
1-2. Menu Navigation
To enter the Setup menu, the user has to have the required access rights and be logged on.
Press the Menu button or right click with mouse on screen and select the menu icon.
The following screen will be displayed asking for password.
① Select the user ID.
② Enter the password.
The default password is 00000000(8 zeros).
③ Press OK, the setup menu will be displayed
on screen.
All menus are navigated around using the Left/
Right/ Up/ Down and the Select button or mouse.
To step back out of the menus, press MENU button
or click the right button of the mouse.
① ② ③ ⑦ ⑨ ⑪ ⑤
⑧
⑩
①
③ ⑥ ⑨ ⑪ ②
④
18
QNVR Installation Manual V1.1
QNVR installation and user manual
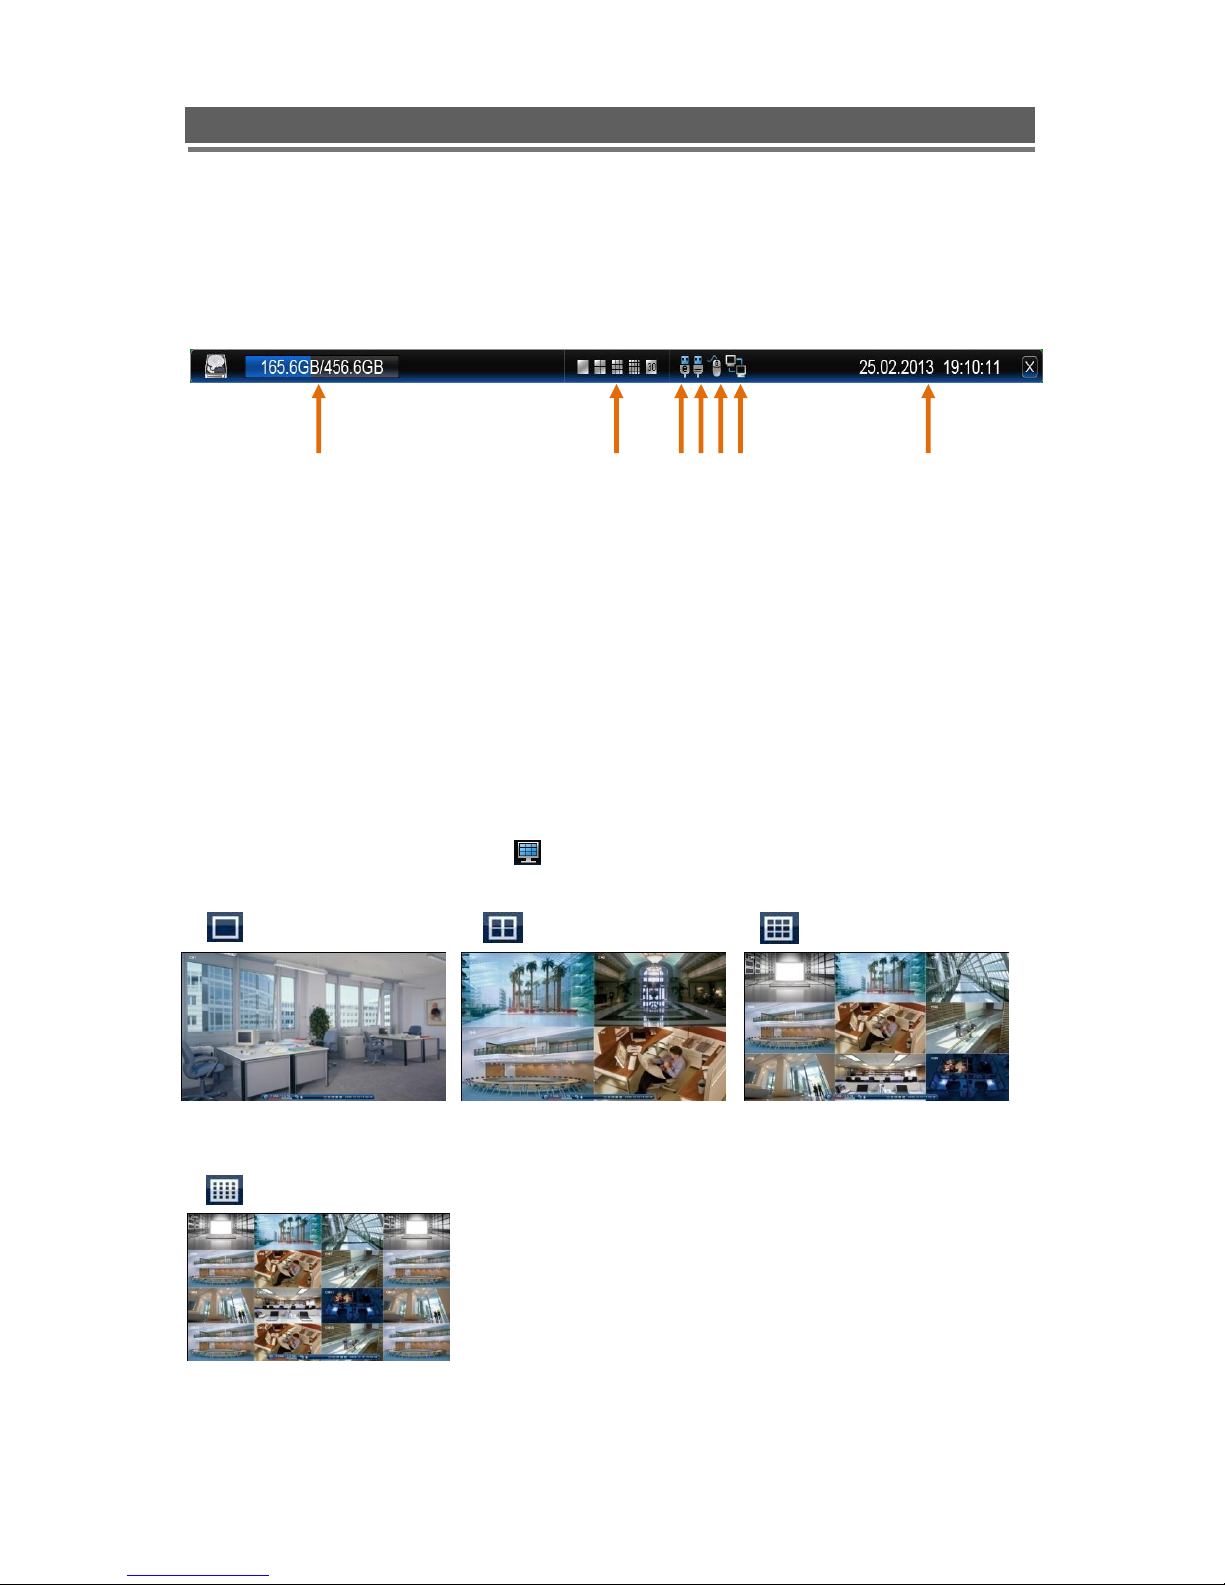
2. Screen Displays
2-1. OSD Description
The Status Bar on screen shows HDD capacity, network connection, current time, etc.
① HDD capacity: Used capacity / Duration
② Multi-screen Display icons : Single/ 4/ 9/ 16way
③ e-SATA connection
④ USB memory connection
⑤ Mouse connection
⑥ Network connection
⑦ Current Date/Time
2-2. Select Channel
Use the Multiscreen display button ( ) on the popup menu to select the display mode.
Single Channel 4 Channel 9 Channel
Live 1ch Live 4ch Live 9ch
16 Channel
Live 16ch
Also you can use the DIS button on the remote controller to change the display mode.
① ⑤ ⑦ ② ③ ⑥ ④

19
QNVR Installation Manual V1.1
QNVR installation and user manual
Display switches in the following order when the DIS button is pressed.
Single Channel 4 Channel 9 Channel 16 Channel Single Channel
2-3. Digital Zoom
When the system is in full-screen mode, drag your mouse in the screen to select a section
and then left click mouse to realize digital zoom.
You can right click mouse to exit.

20
QNVR Installation Manual V1.1
QNVR installation and user manual
3. Playback
Click the right button on the mouse, the popup menu will be displayed on screen.
To begin playback, press the Play button on the popup menu:
3-1. OSD Description
The Control Bar on screen shows Playback control buttons, Progress bar, Display mode
buttons, Playback time, etc.
① Previous/ Next time buttons ⑨ Reverse Slow Play button
② Time Bar ⑩ Slow Play button
③ Playback Speed Display ⑪ Replay button
④ Display mode buttons(1/4/9/16ch) ⑫ Add Bookmark button
⑤ Stop button ⑬ Search Bookmark button
⑥ Pause button ⑭ Quick Archive button
⑦ Reverse Play button ⑮ Playback Date & Time
⑧ Play button
④ ⑫ ⑬ ③ ⑮ ⑭ ① ① ② ⑩ ⑧ ⑥ ⑤ ⑦ ⑨
⑪

21
QNVR Installation Manual V1.1
QNVR installation and user manual
3-2. Playback Control
Playback
When the Play button(⑧) is pressed, the unit will play forward at the rate the data was
recorded. While in the play mode, the user may change the playback direction, playback
speed. To return to play forward operations, press the Play button(⑧).
Reverse Play
To begin reverse playback, press the Reverse Play button(⑦).
Pause
During playback, press the Pause button (⑥). This feature pauses all full screen and multiscreen images. When this button is pressed in the pause mode, the unit will play.
Single Frame Advance
During the pause mode, press the Play button (⑧) to view the frame directly after the frame
displayed on screen.
Single Frame Rewind
During the pause mode, press the Reverse Play button (⑦) to view the frame directly before
the frame displayed on screen.
Fast Forward
In playback mode, press the Play button(⑧) to switch between various fast play modes such
as x2, x4, x8, x16, x32 play.
Fast Backward
In reverse playback mode, press the Reverse Play button(⑦) to switch between various
reverse play modes such as x2, x4, x8, x16 reverse play.
Slow Playback
In playback mode, press the Slow Play button(⑩) to switch between various slow play
modes such as x1/2, x1/4, x1/8, x1/16, x1/32 slow play.
Slow Reverse Play
In playback mode, press the Reverse Slow Play button(⑨) to switch between various slow
play modes such as x1/2, x1/4, x1/8, x1/16, x1/32 reverse slow play.
Stop
To stop playback and return to the live mode, press the Stop button(⑧).

22
QNVR Installation Manual V1.1
QNVR installation and user manual
3-3. Playback Search
The user can search the recorded video during playback.
The recorded video is indicated by a colour bar on the time bar(②).
You can use the Previous/ Next time buttons(①) to view if there are more recorded data.
Click the mouse at the desired point of the colour bar, you can view the recorded data.
For more advanced search modes see “Search Menu” section page 48
23
QNVR Installation Manual V1.1
QNVR installation and user manual
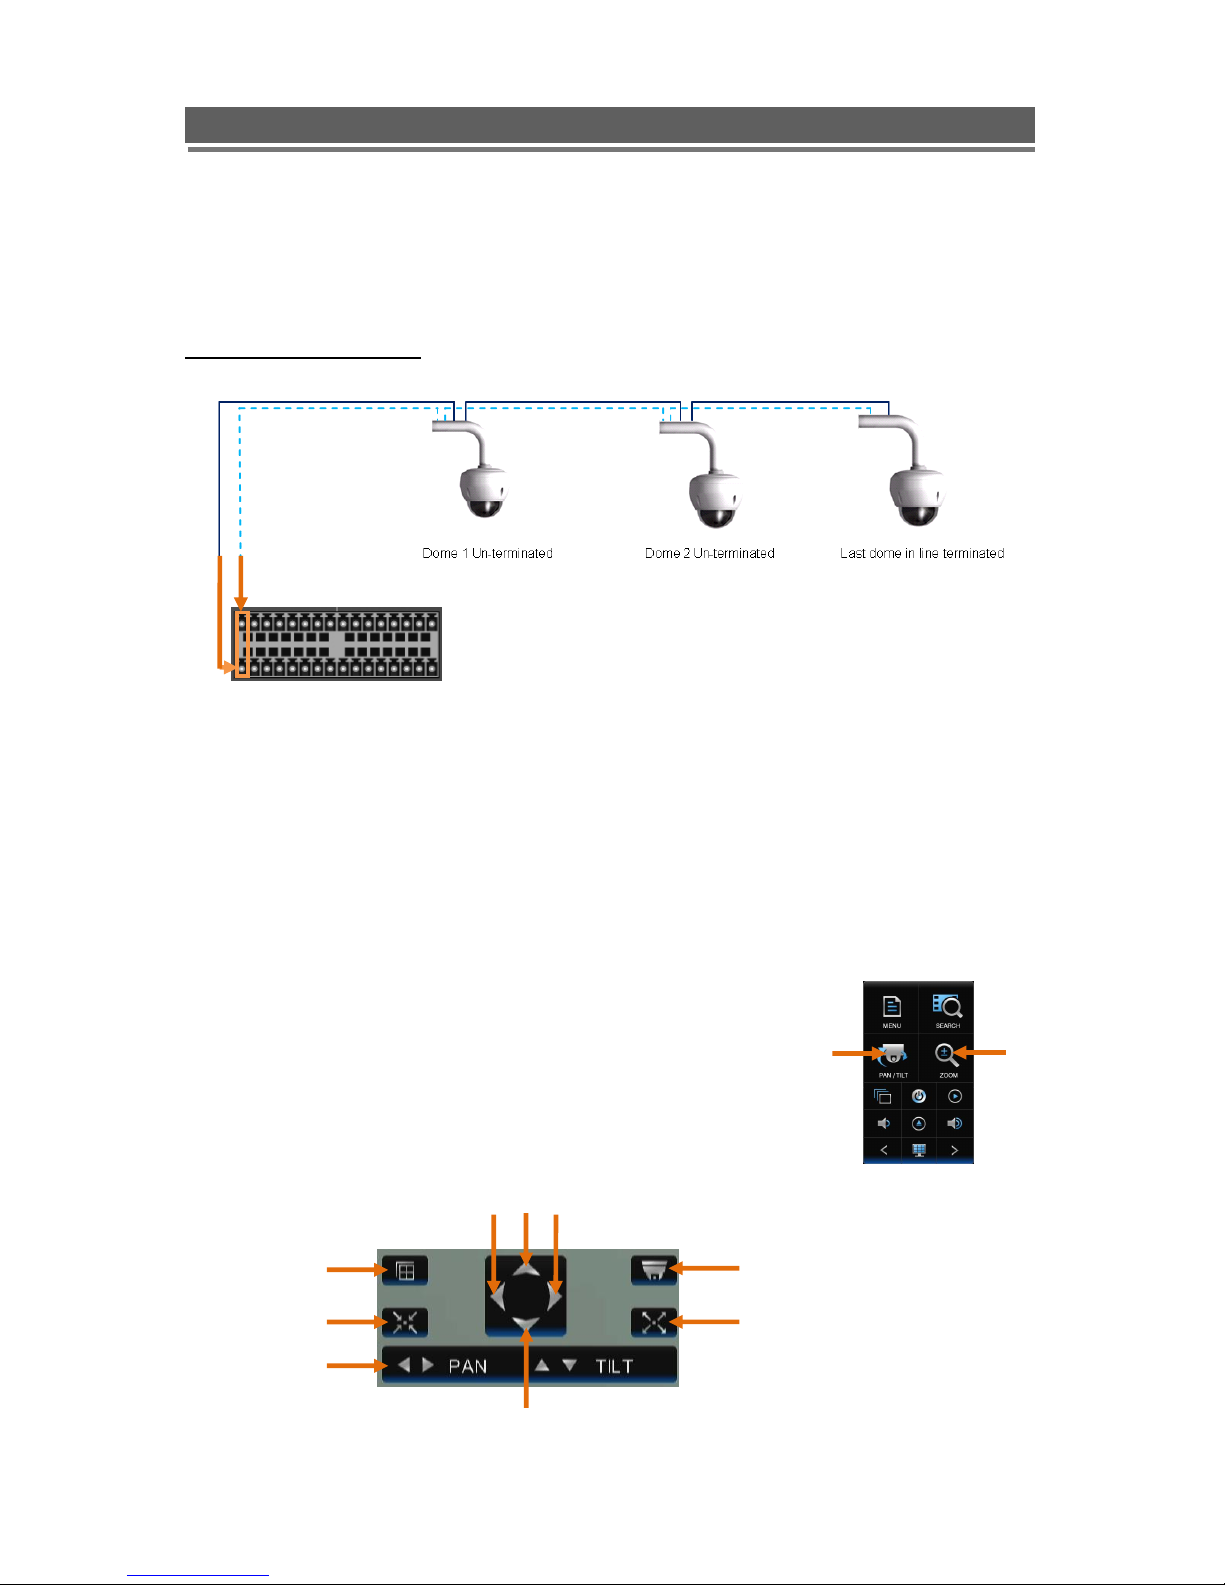
4. PTZ Control via RS485
The user can control PTZ cameras via RS485 communication.
The PTZ domes can be wired in a Daisy chain.
Daisy Chain configuration
The telemetry function of NVR can be controlled via 4 different methods:
1. Mouse
2. Remote keyboard
3. Remote controller
4. Software viewer
4-1. PTZ Control by mouse
1. Click the right button the mouse, the popup menu will appear.
2. To control Pan/Tilt, click the P/T icon(①).
To control Zoom/Focus, click the Z/F icon(②).
3. The PTZ menu will be displayed on screen.
The user can control PTZ cameras using PTZ menu.
② ① ⑧ ⑤ ③ ④ ① ② ⑥ ⑦ ⑨

24
QNVR Installation Manual V1.1
QNVR installation and user manual
① Multiscreen Display : Changing the display mode
② PTZ Camera Selection
③ Set Preset
④ Call Preset
⑤ PTZ Mode : The PTZ mode is toggled between Pan/Tilt and Zoom/Focus mode whenever
this button is pressed.
⑥ Pan Left / Focus Near
⑦ Pan Right / Focus Far
⑧ Tilt Up / Zoom In
⑨ Tilt Down / Zoom Out
[ Camera selection ]
The PTZ cameras can be controlled in either full screen or split screen mode.
If in split screen mode press the PTZ Camera Selection button(②), the PTZ camera icon
will step from one camera to the next on the split screen.
[ Pan and Tilt control ]
Press the PTZ Mode button(⑤) to enter the Pan/Tilt mode.
To move the dome use the arrows buttons;
Left(⑥) : Pan left, Right(⑦) : Pan right, Up(⑧) : Tilt up, Down(⑨) : Tilt down
[ Zoom and Focus control ]
Press the PTZ Mode button(⑤) to enter the Zoom/Focus mode.
To zoom or focus use the arrows buttons;
Left(⑥) : Focus near, Right(⑦) : Focus far, Up(⑧) : Zoom in, Down(⑨) : Zoom out
[ Preset positions ]
1. To store a preset position, move the camera to the required position.
2. Press the Set Preset button(③), the popup window will appear.
3. Enter the preset number to be stored then press OK.
[ Call Preset ]
1. To recall a preset position press the Call Preset button(④), the popup window will appear.
2. Enter the preset number you want then press OK.
25
QNVR Installation Manual V1.1
QNVR installation and user manual
4-2. PTZ Control by remote keyboard
1. Select Dome from the keyboard, ensure the keyboard is in Pan and Tilt mode.
2. Use the joystick to move the camera.
* For more detail, please refer to your keyboard manual.
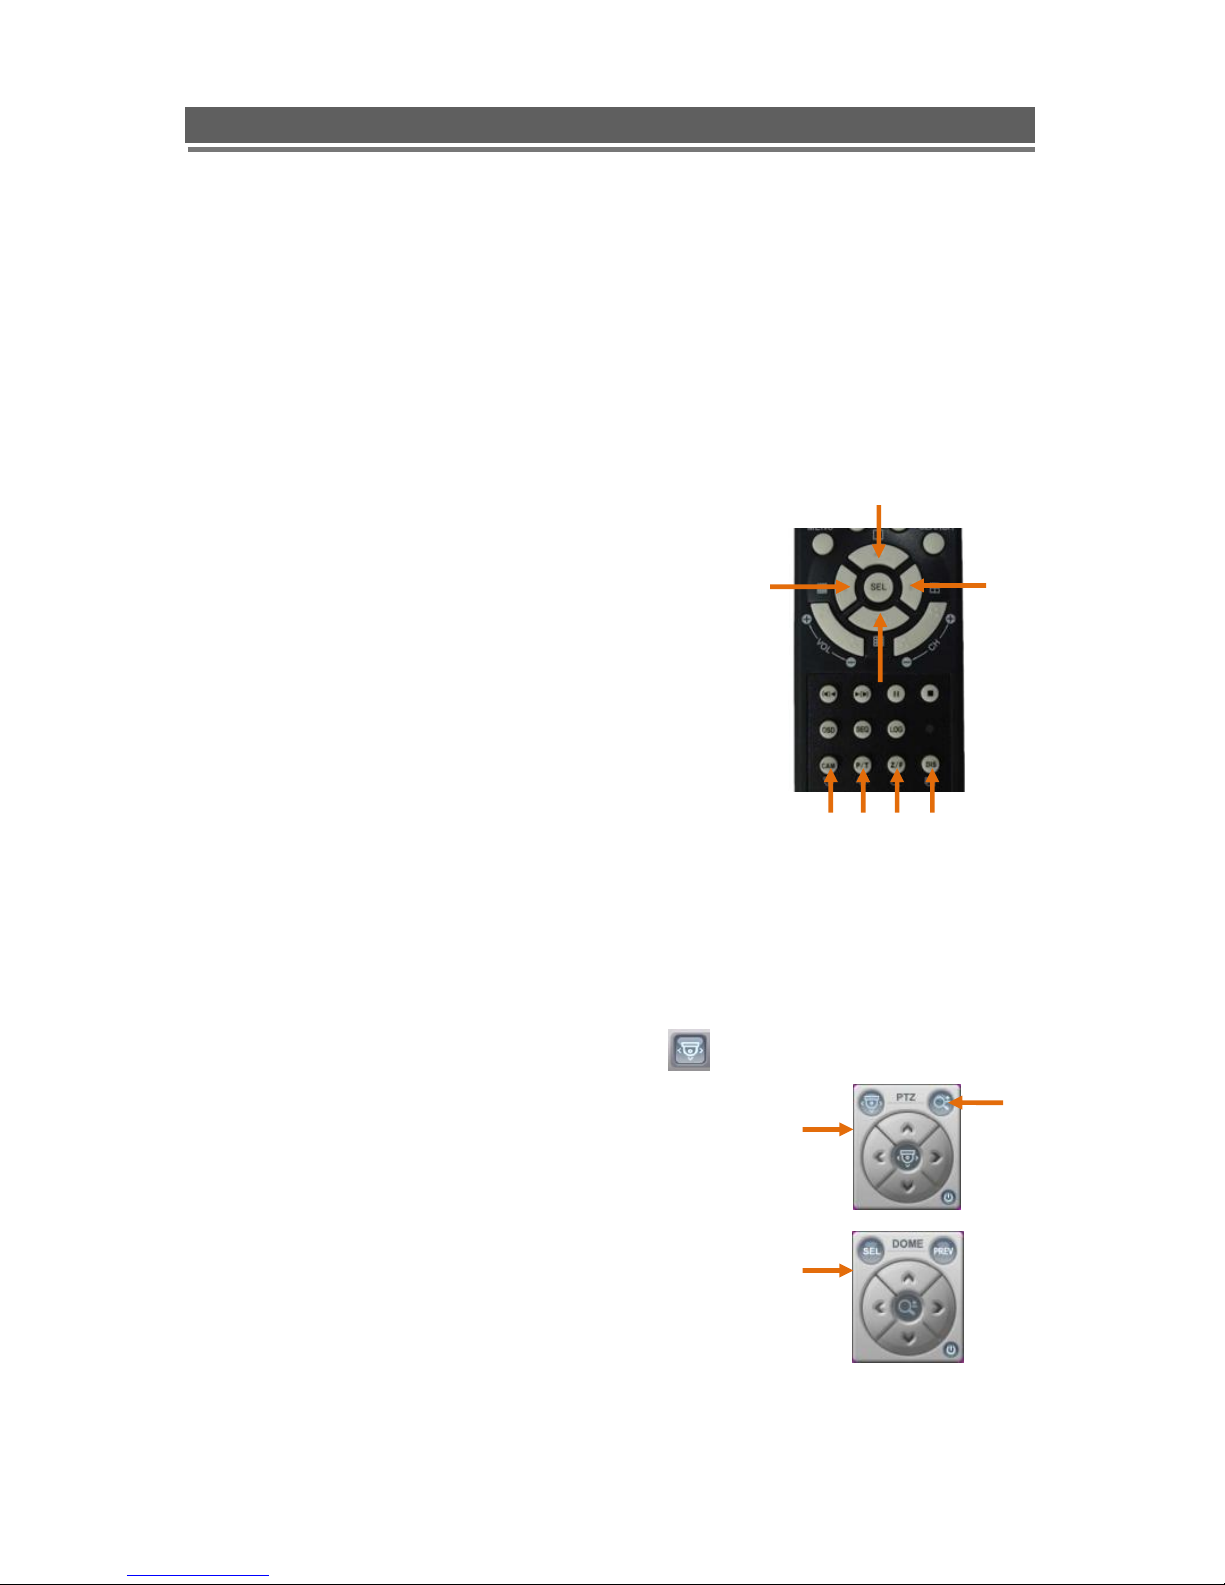
4-3. PTZ Control by remote controller
[ Camera selection ]
The PTZ cameras can be controlled in either full screen
or split screen mode. If in split screen mode press the
camera selection button(①), the PTZ camera icon will
step from one camera to the next on the split screen.
[ Pan and Tilt control ]
Press the P/T button(②) to enter the Pan/Tilt mode.
To move the dome use the arrows buttons;
Left(⑤) : Pan left, Right(⑥) : Pan right
Up(⑦) : Tilt up, Down(⑧) : Tilt down
[ Zoom and Focus control ]
Press the Z/F button(③) to enter the Zoom/Focus mode.
To zoom or focus use the arrows buttons;
Left(⑤) : Focus near, Right(⑥) : Focus far
Up(⑦) : Zoom in, Down(⑧) : Zoom out
4-4. PTZ Control by Client software
While Client software is running select the dome required.
1. Enter the Pan/Tilt mode by pressing the PTZ icon
at the top of the screen.
The Pan/Tilt control window(①) will appear.
2. To move the dome use the arrows buttons;
Left : Pan left, Right : Pan right
Up : Tilt up, Down : Tilt down
3. Press the Z/F mode button(②) on the control window
to change to the Zoom/Focus mode.
The Zoom/Focus control window(③) will appear.
4. To zoom or focus use the arrows buttons;
Left : Focus near, Right : Focus far
Up : Zoom in, Down : Zoom out
⑥ ⑤ ⑦ ⑧ ① ② ③
④ ② ①
③
26
QNVR Installation Manual V1.1
QNVR installation and user manual
Setup Menu
1. Display
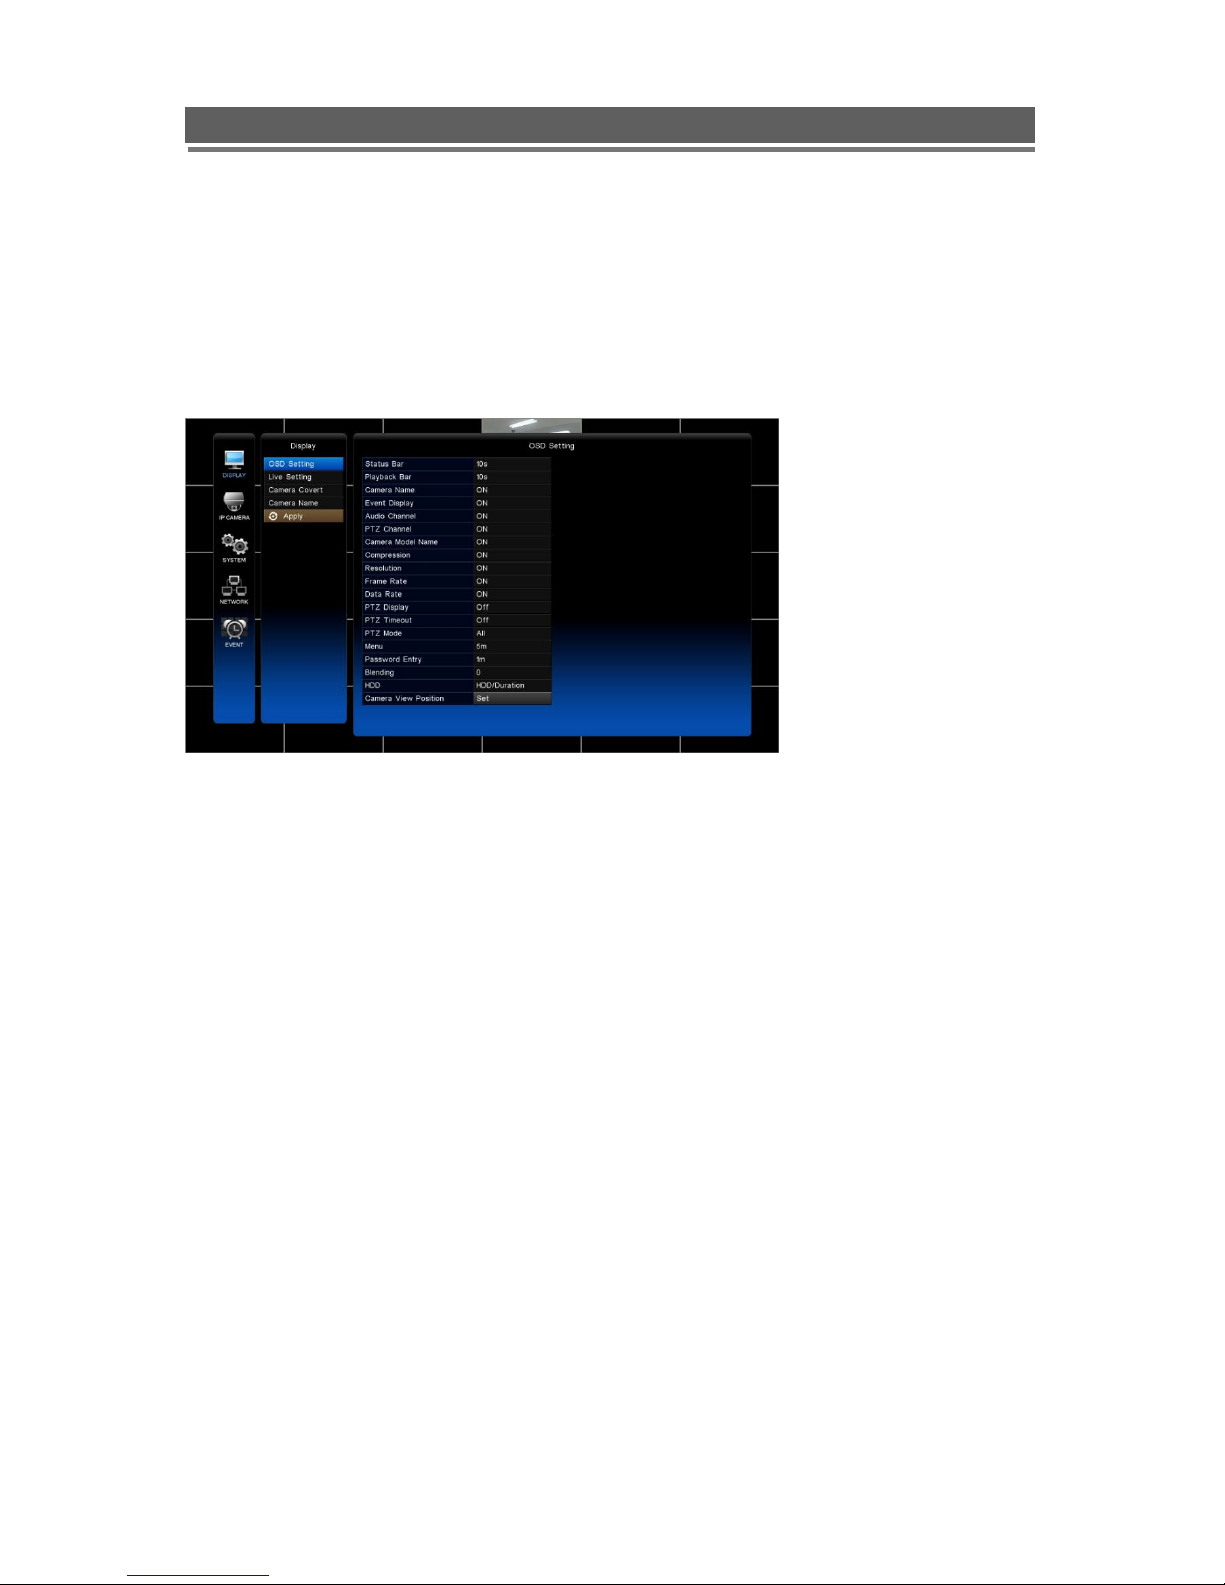
1-1. OSD Setting
On Screen Display Setting: Selecting whether the various information is shown on the screen
or not.
Status Bar
The display bar at the bottom of the screen can be set to be permanently on or to disappear
after a period of time.
Playback Bar
The control bar in the play mode can be set to be permanently on or to disappear after a
period of time.
Camera Name
The camera title can be displayed or not (On/Off)
Event Display
Icons such as recording mode, motion detection can be displays or not (On /Off)
Audio Channel
The channel with the audio can be displayed or not (On/Off)
PTZ Channel
The channel connected with the PTZ camera can be displayed or not (On/Off)
Camera Model Name
The model name of IP camera can be displayed or not (On/Off)
Compression
The type of video compression can be displayed or not (On/Off)
27
QNVR Installation Manual V1.1
QNVR installation and user manual
Resolution
The resolution of recording can be displayed or not (On/Off)
Frame Rate
The frame rate of image can be displayed or not (On/Off)
Data Rate
The data rate of image can be displayed or not (On/Off)
PTZ display
When in telemetry mode the on screen telemetry display can be set to be Always on or to
disappear after a set period of inactivity 5 or 10 second or Off.
PTZ Timeout
The PTZ operation can be set to time out after a period of time.
PTZ Mode
Control of PTZ devices can be limited to either local control, remote control over network or
both.
Menu
The menu display can be set to time out after either 1 or 5 minutes.
Password Entry
The password entry display can be set to time out after 1 or 5 minutes.
Blending
The opacity of the menus and Status bar can be set between 0 and 6, 0 is solid, 6 being very
opaque.
HDD
It allows you to see the free space of HDD or remaining recording time of HDD.
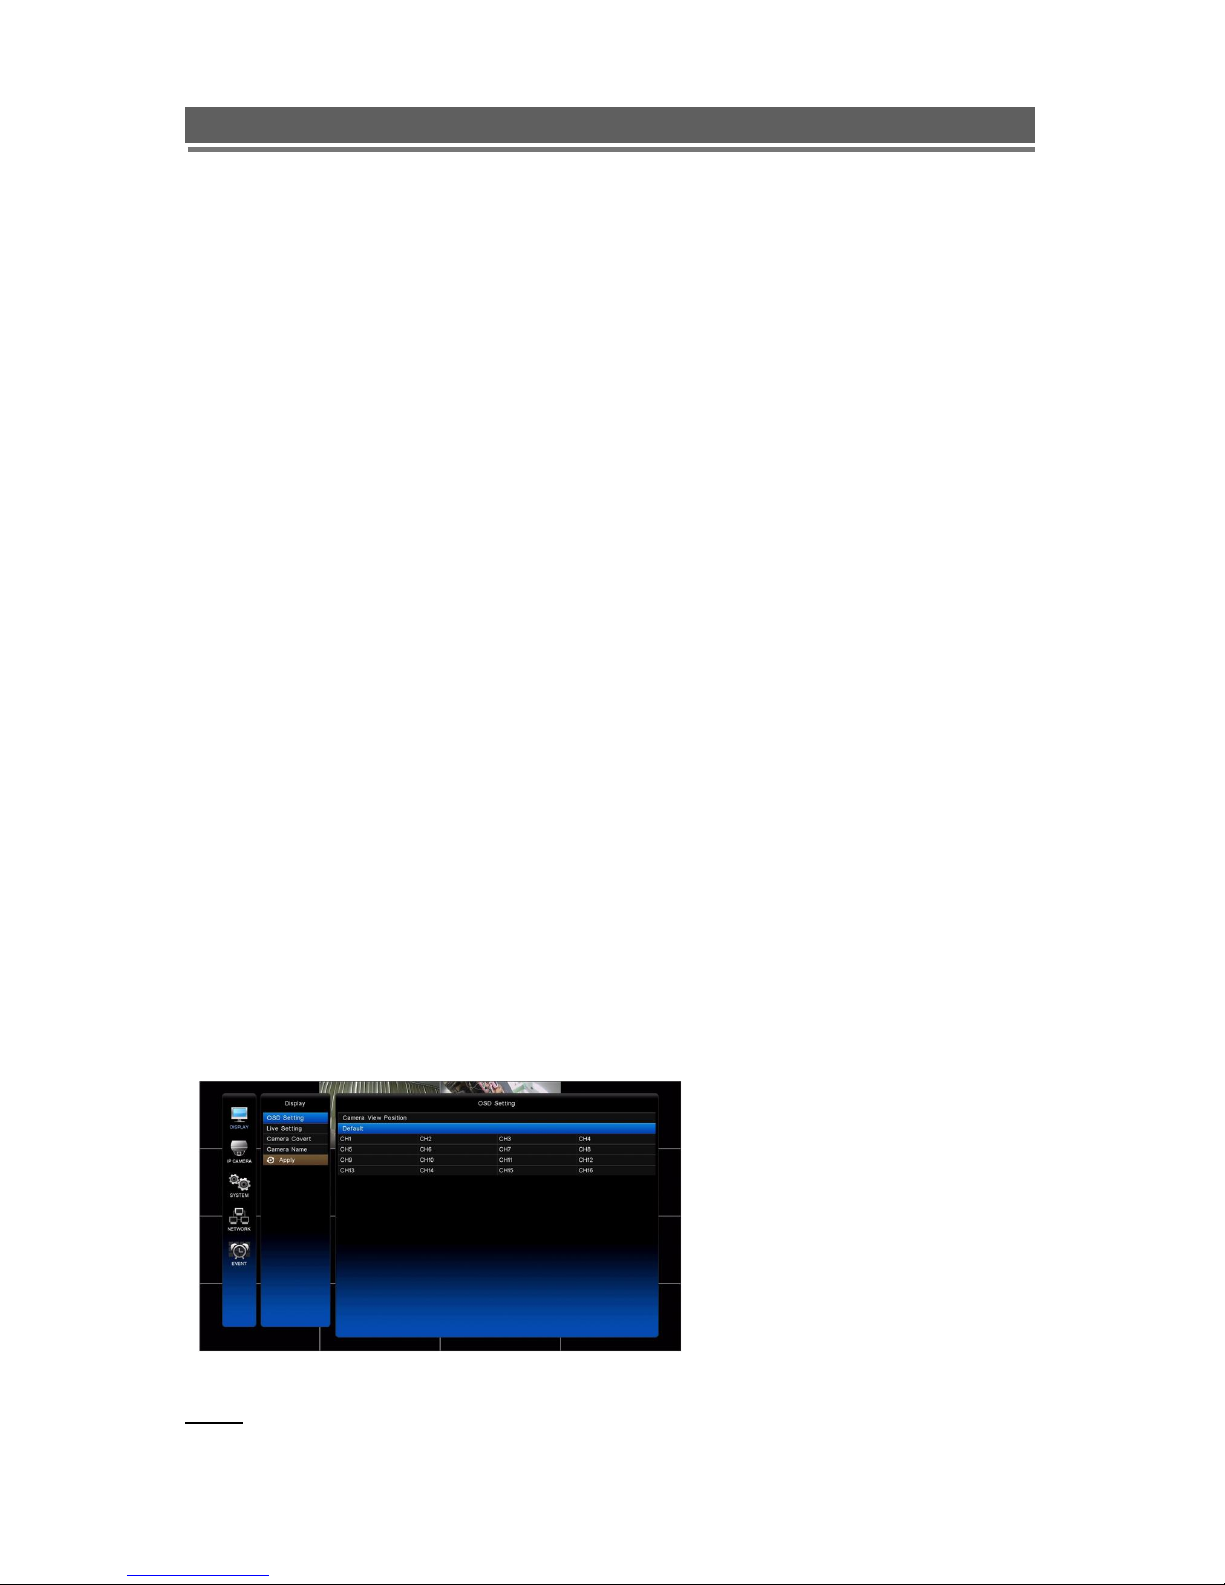
Camera View Position
It allows you to change the position of cameras for more efficient monitoring of your own
individual location.
NOTE : In order to save any modified setting value, press “SEL” key when “Apply”
section is highlighted. This action can be carried out within each Sub Menu.
28
QNVR Installation Manual V1.1
QNVR installation and user manual
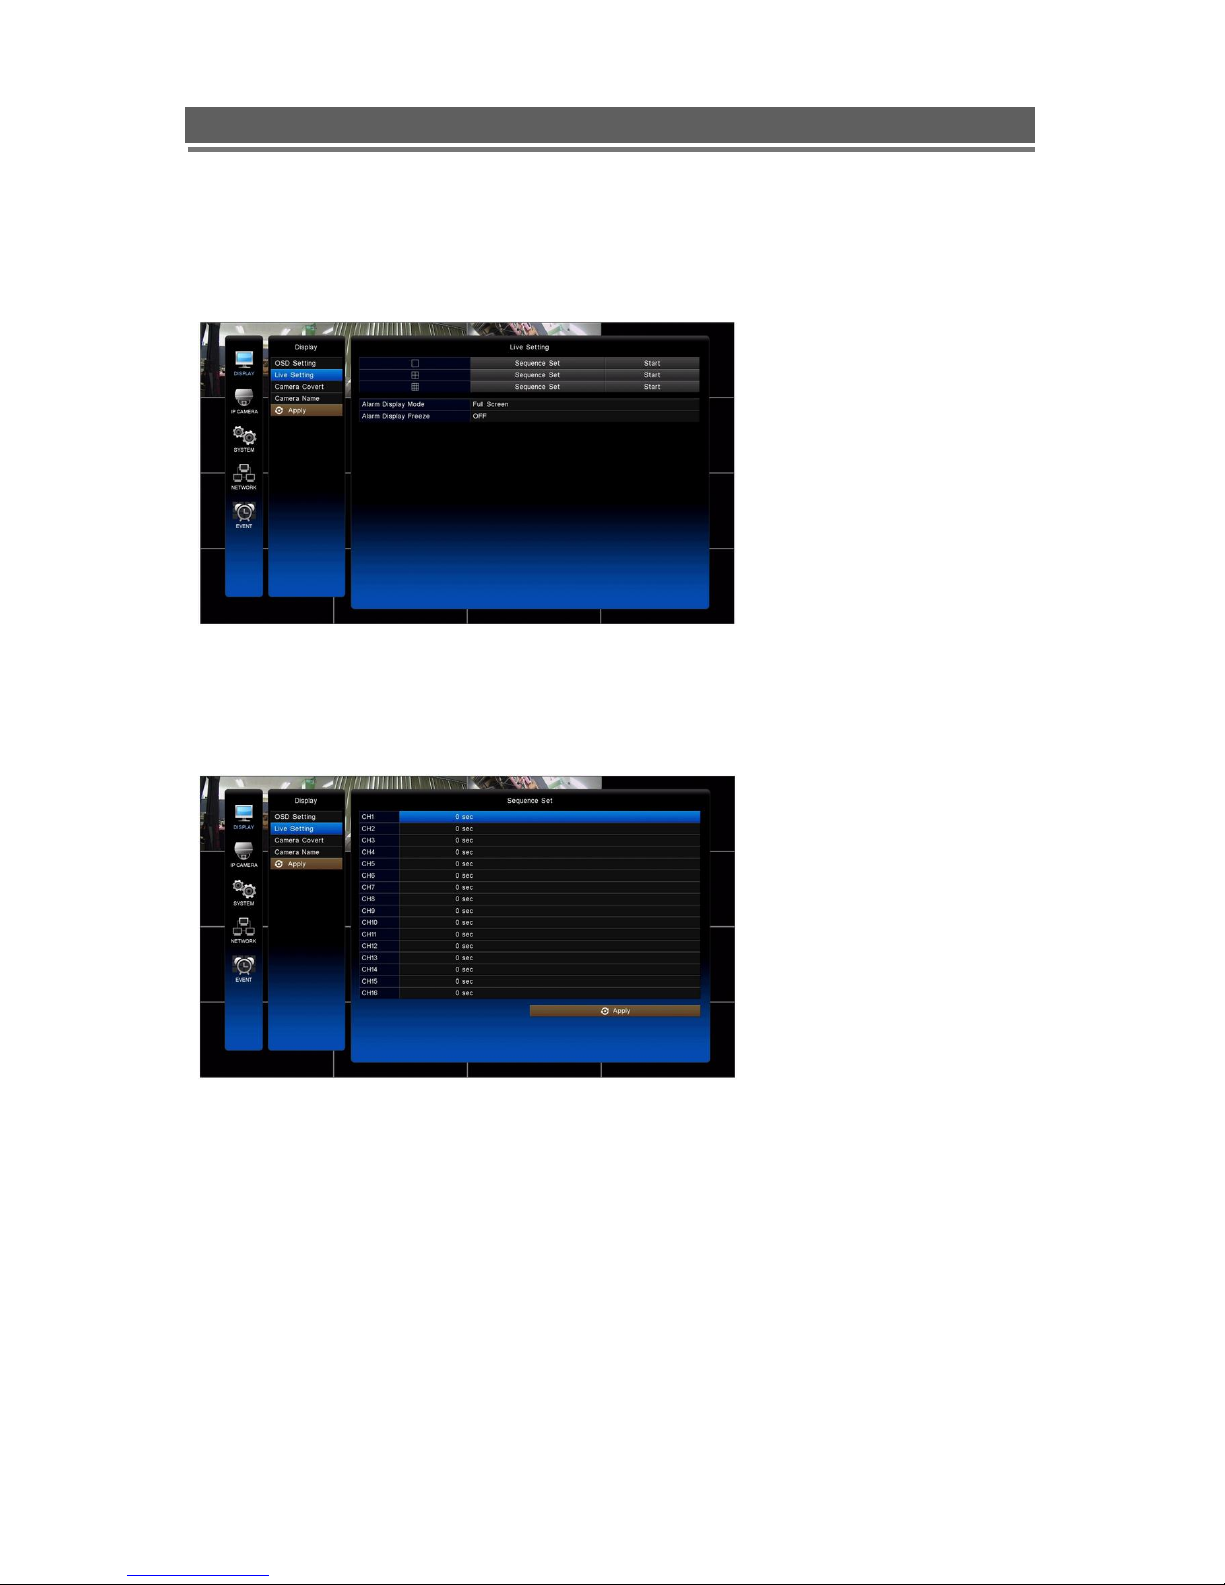
1-2. Live Setting
The live settings are used to set up a sequence of either full screen camera images or multi
screen displays
Sequence Set
Use the Up and Down arrows or the mouse roller wheel to select either: Full Screen, Quad, 9
or 16 way split sequences. The display will change to allow individual sequence times to be
set per channel or split screen option.
Use the select key to turn the cell green and then the Up and Down keys to change the
values. Use the right button to move to “Start” press select, the main monitor output will
display this sequence.
Alternatively use the mouse to select the sequence required then select the duration.
Click “Start” to turn the sequence on. To interrupt the sequence, simply select any camera.
Alarm Display Mode / Alarm Display Freeze
It allows you to select the way to show channels in which the alarm occurs.
1-3. Camera Covert
 Loading...