

ON
DAYSAV MAN AUTO RAND CLOCK
YEARDATE
MONTH
SKIP
EVENT
MO TU WE TH FR SA SU AM PM
OFF LOC DUSK DAWN
OK MODE PROG ON/OFF
ON
DAYSAV MAN AUTO RAND CLOCK
YEARDATE
MONTH
SKIP
EVENT
MO TU WE TH FR SA SU AMPM
OFF LOC DUSK DAWNON
DAYSAV MAN AUTO RAND CLOCK
YEARDATE
MONTH
SKIP
EVENT
MO TU WE TH FR SA SU AMPM
OFF LOC DUSK DAWN
ON
DAYSAV MAN AUTO RAND CLOCK
YEARDATE
MONTH
SKIP
EVENT
MO TU WE TH FR SA SU AM PM
OFF LOC DUSK DAWN
OK MODE PROG ON/OFF
ON
DAYSAV MAN AUTO RAND CLOCK
YEARDATE
MONTH
SKIP
EVENT
MO TU WE TH FR SA SU AM PM
OFF LOC DUSK DAWN
OK MODE PROG ON/OFF
DTC-200
ACCESSORIES
Installation and User Instructions
Ratings
Input: 102-132 VAC 60 Hz, 2.5W max.
•
Output: 15 Amp output, 1800W resistive and inductive,
•
500W tungsten, 1/3 HP
WARNING
Electrical shock hazard. Risk of injury or death. Always plug three-prong plug
•
into a properly grounded outlet. Never attempt to defeat this safety feature.
Risk of re. Do not use timer to control devices that could have dangerous
•
consequences due to inaccurate timing, such as sun lamps, sauna, heaters,
crock pots, etc.
NOTICE
Follow local electrical codes during use.
•
•
Dispose of used batteries promptly per local regulations.
1 – Activate the Batteries
The timer comes with two LR44 batteries installed.
Remove the pull tab to connect
1.
the installed batteries.
The display will initialize itself,
2.
then ash “12:00 AM” in the
CLOCK mode (Fig. 1).
NOTE: If display doesn’t light,
the batteries are dead. Replace the
batteries before using the digital
timer.
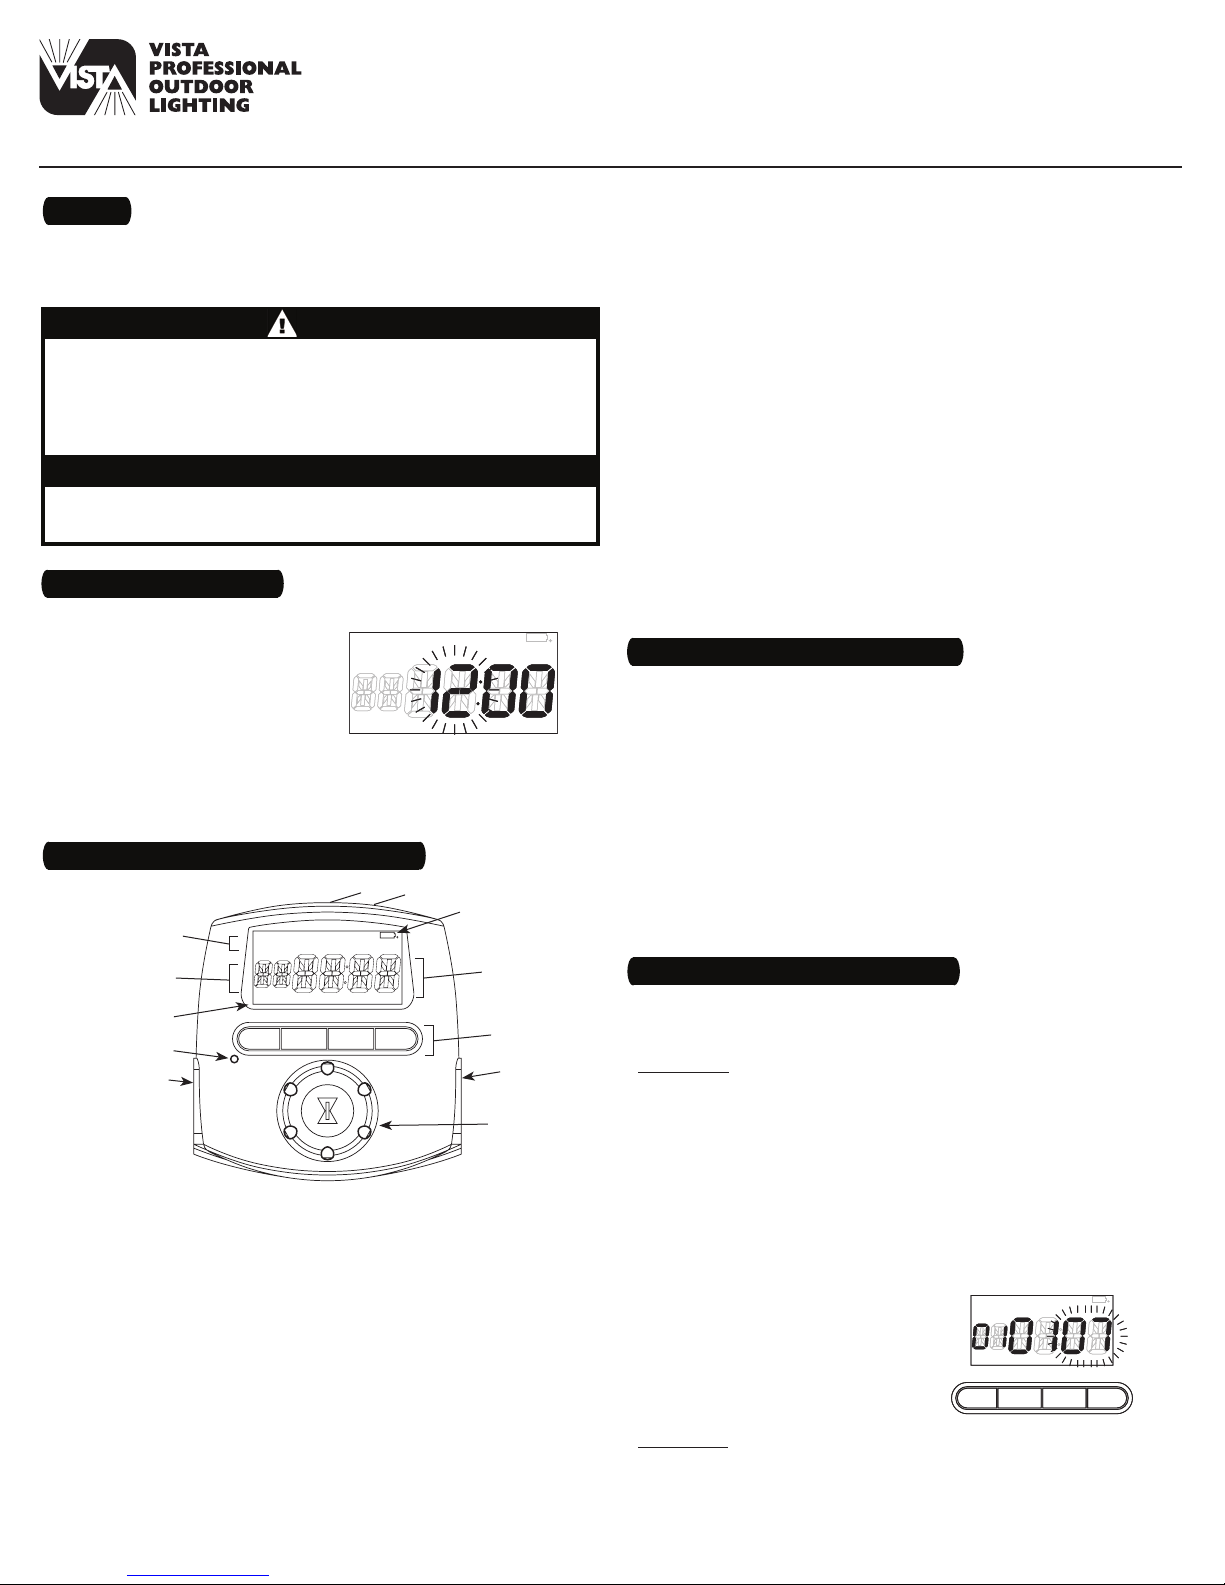
2 – Get Familiar with the Timer’s Features
11
1
2
10
Fig.
1
Digital Timer
Day Of Week (DOW) Display — events can be programmed for
8.
just one day of the week, all the days of the week, just weekdays
or just weekends
Event Display — the timer can be programmed for up to 28 total
9.
ON/OFF events per week
Mode Display — the timer can display several modes during
10.
setup and programming and three modes during operation:
MANual, AUTO and RANDom. MANual allows for manual operation
of the plugged-in devices, AUTO uses the timer’s exact settings
and RANDom uses the timer’s settings varied by random 5-minute
increments of ±30 minutes.
Output Status Indicator — this is the ON/OFF indicator. When the
11.
green li
ght is on it means that the lamp or appliance should be
on. If it is not on, the bulb may be burned out or the device may
be turned o at the lamp or appliance.
NOTE: You may set up and program the timer before you plug it
in. Be aware that while it is unplugged, the display will turn o to
conserve battery power if there is no pushbutton activity for a few
minutes. If this happens, simply push any button to turn the display
back on.
3 – Clear Any Existing Programming
It’s unlikely that your new digital timer has any existing
programming, but to make sure, use this procedure before setting
the time .
Locate the Reset button. It is the small, round hole adjacent to the
1.
keypad. You will need a pen or paper clip to press this button.
Press and hold the ON/OFF button.
2.
Press the Reset button for 3 seconds and release. The display will
3.
light up and then go blank.
Release the ON/OFF button.
4.
NOTE: Pressing the Reset button without holding down the ON/
OFF button will clear the time, but will not clear the non-volatile
(programming) memory.
9
8
7
5
1.
Battery Holder (back of unit) — two LR44 batteries keep time up
to three months without power
2.
Low Battery Indicator — programmed data is stored in nonvolatile memory, so it won’t be lost when batteries are removed
NOTE: Replace the batteries as soon as possible after the low
battery indicator appears.
3.
Time Of Day (TOD) Display — the timer will automatically adjust
for Daylight Saving Time (DST) and changing dawn and dusk
times for your location (Astronomic feature)
4.
Pushbuttons
5.
Two Timed, Grounded Outlets
6.
Selector Knob
7.
Reset Button
3
4 – Set the Time, Date and Location
NOTE: The following procedure must be completed entirely,
4
5
6
Fig.
2
including adjustments, in order for the Astronomic and automatic
Daylight Saving Time features to function properly.
Setting Time
1.
Ensure that the timer is in the CLOCK mode (Fig. 1). If it is not, press
the MODE button a few times (through MANual, AUTO and RANDom)
until CLOCK shows in the mode display area, then press OK.
2.
Turn the selector knob until the correct hour shows in the rst
two digits of the Time Of Day (TOD) display, along with the
correct AM and PM display. Note that the AM and PM displays will
alternate as the time passes through 12.
3.
Press the OK button to s
et the hour. The last two digits of the TOD
display (minute display) will begin to ash.
4.
Turn the selector knob until the
correct time in minutes shows.
5.
Press the OK button to set the
minutes. MONTH, DATE and YEAR
will show in the mode display area,
with the digits under YEAR ashing
(Fig. 3).
Fig.
Fig.
3
3
Setting Date
Turn the selector knob until the current year is displayed and
6.
press the OK button. The digits under MONTH will begin to ash.
Turn the selector knob until the current month is displayed and
7.
press the OK button. The digits under DATE will begin to ash.
ON
DAYSAV MAN AUTO RAND CLOCK
YEARDATE
MONTH
SKIP
EVENT
MO TU WE TH FR SA SU AM PM
OFF LOC DUSK DAWN
OK MODE PROG ON/OFF
ON
DAYSAV MAN AUTO RAND CLOCK
YEARDATE
MONTH
SKIP
EVENT
MO TU WE TH FR SA SU AM PM
OFF LOC DUSK DAWN
OK MODE PROG ON/OFF
ON
DAYSAV MAN AUTO RAND CLOCK
YEARDATE
MONTH
SKIP
EVENT
MO TU WE TH FR SA SU AM PM
OFF LOC DUSK DAWN
OK MODE PROG ON/OFF
ON
DAYSAV MAN AUTO RAND CLOCK
YEARDATE
MONTH
SKIP
EVENT
MO TU WE TH FR SA SU AM PM
OFF LOC DUSK DAWN
OK MODE PROG ON/OFF
ON
DAYSAV MAN AUTO RAND CLOCK
YEARDATE
MONTH
SKIP
EVENT
MO TU WE TH FR SA SU AM PM
OFF LOC DUSK DAWN
OK MODE PROG ON/OFF
ON
DAYSAV MAN AUTO RAND CLOCK
YEARDATE
MONTH
SKIP
EVENT
MO TU WE TH FR SA SU AM PM
OFF LOC DUSK DAWN
OK MODE PROG ON/OFF
ON
DAYSAV MAN AUTO RAND CLOCK
YEARDATE
MONTH
SKIP
EVENT
MO TU WE TH FR SA SU AM PM
OFF LOC DUSK DAWN
OK MODE PROG ON/OFF
ON
DAYSAV MAN AUTO RAND CLOCK
YEARDATE
MONTH
SKIP
EVENT
MO TU WE TH FR SA SU AM PM
OFF LOC DUSK DAWN
OK MODE PROG ON/OFF
ON
DAYSAV MAN AUTO RAND CLOCK
YEARDATE
MONTH
SKIP
EVENT
MO TU WE TH FR SA SU AM PM
OFF LOC DUSK DAWN
OK MODE PROG ON/OFF
ON
DAYSAV MAN AUTO RAND CLOCK
YEARDATE
MONTH
SKIP
EVENT
MO TU WE TH FR SA SU AM PM
OFF LOC DUSK DAWN
OK MODE PROG ON/OFF
4 – Set the Time, Date and Location (Continued)
ON
DAYSAV MAN AUTO RAND CLOCK
YEARDATE
MONTH
SKIP
EVENT
MO TU WE TH FR SA SU AM PM
OFF LOC DUSK DAWN
OK MODE PROG ON/OFF
ON
DAYSAV MAN AUTO RAND CLOCK
YEARDATE
MONTH
SKIP
EVENT
MO TU WE TH FR SA SU AM PM
OFF LOC DUSK DAWN
OK MODE PROG ON/OFF
ON
DAYSAV MAN AUTO RAND CLOCK
YEARDATE
MONTH
SKIP
EVENT
MO TU WE TH FR SA SU AM PM
OFF LOC DUSK DAWN
OK MODE PROG ON/OFF
ON
DAYSAV MAN AUTO RAND CLOCK
YEARDATE
MONTH
SKIP
EVENT
MO TU WE TH FR SA SU AM PM
OFF LOC DUSK DAWN
OK MODE PROG ON/OFF
ON
DAYSAV MAN AUTO RAND CLOCK
YEARDATE
MONTH
SKIP
EVENT
MO TU WE TH FR SA SU AM PM
OFF LOC DUSK DAWN
OK MODE PROG ON/OFF
ON
DAYSAV MAN AUTO RAND CLOCK
YEARDATE
MONTH
SKIP
EVENT
MO TU WE TH FR SA SU AM PM
OFF LOC DUSK DAWN
OK MODE PROG ON/OFF
ON
DAYSAV MAN AUTO RAND CLOCK
YEARDATE
MONTH
SKIP
EVENT
MO TU WE TH FR SA SU AM PM
OFF LOC DUSK DAWN
OK MODE PROG ON/OFF
8.
Turn the selector knob until the current date is displayed and
press the OK button. The timer will automatically determine and
display the day of the week.
NOTE: “00” indicates 2000.
Adjusting Daylight Saving Time
DAYSAV and AUTO will show in the mode
9.
display area (Fig. 4). The timer will
automatically adjust the clock for
Daylight Saving Time (DST) when set to
AUTO here. If you do not want the timer
to do this, turn the selector knob until
MANual shows.
After choosing AUTO or MANual, press the
10.
OK button. The timer’s starting date for
DST will show in the display in the form
of MONTH and week (Fig. 5).
The start and end dates for DST can
11.
change. The next four steps allow you to
change them for your location. If the timer’s settings for DST are
already correct, press the OK button right away, otherwise:
First, turn the selector knob to choose the correct month
a.
(01 through 12) for your DST starting date and press the OK
button.
Turn the selector knob again to change the week (01 = first,
b.
02 = second, 03 = third, 04 = fourth, 0L = Last) for your DST
starting date and press the OK button.
Then, turn the selector knob to choose the correct month for
c.
your DST ending date and press the OK button.
Turn the selector knob again to change the week for your DST
d.
ending date and press the OK button.
Setting Location
The timer will now display LOC, the
12.
default state and country (Alabama,
United States) (Fig. 6). The location
must be set in order for the Astronomic
feature to function.
First, turn the selector knob to choose
a.
your state and press the OK button.
Turn the selector knob again to change from the country to the
b.
section, if necessary. Your state may have from one to nine
sections to choose from (NE, NW, CTR, etc.).
Press the OK button to accept the location.
c.
The timer will now display LOC, “TZ”
13.
and the selected time zone for your
location (Fig. 7). If the timer’s selection
is correct, press the OK button right
away, otherwise turn the selector
knob until the correct time zone shows
in the display and then press the OK
button.
Adjusting Dawn and Dusk
The timer will now display DAWN and
14.
the calculated sunrise time for your
location (Fig. 8).
Ac
cept the calculated sunrise time or
turn the selector knob until the correct
time shows in the display, and then
press the OK button.
Fig.
Fig.
4
4
Fig.
Fig.
5
5
Fig.
Fig.
6
6
Fig.
Fig.
7
7
Fig.
Fig.
8
8
The timer will now display DUSK and the
15.
calculated sunset time for your location
(Fig. 9).
Accept the calculated sunset time or
turn the selector knob until the correct
time shows in the display, and then
press the OK button.
The timer will now jump to MANual mode.
16.
5 – Set Initial Pair of ON and OFF Events
You may program the digital timer for up to 28 events. A time setting
to turn on (at a specific time, DAWN or DUSK) is considered an ON
event. A time setting to turn off (at a specific time, DAWN or DUSK) is
considered an OFF event.
NOTE: You must view an event screen before programming.
Viewing an Event
1.
Ensure that the timer is in a normal operating mode by pressing
the MODE button, if necessary, until MANual, AUTO or RANDom
appears in the mode display area.
2.
Press the PROG button to view the
first event screen (Fig. 10). If all
programming has been cleared, the
timer will display SKIP above the event
display (“01”), indicating that the first
event is not programmed, and
“--:--” will replace the time display.
NOTE: From any event viewing screen (with no displays flashing),
you may:
-
Press OK to return to the normal operating mode without
making any change.
-
Turn the selector knob to view the next event screen.
-
Press PROG to set or change the event you are viewing. Event
number will flash.
Programming an ON Event
3.
Press PROG again. The SKIP display
(or ON or OFF, if the timer has been
programmed) will begin flashing
(Fig. 11).
4.
Turn the selector knob until the screen
displays the event setting you desire:
-
ON only — for turning on at a preset time
-
ON and DUSK — for turning on at sunset
-
ON and DAWN — for turning on at sunrise
NOTE: The settings with SKIP or OFF are used for disabling an
event or programming an OFF event.
5.
Press PROG to accept the event setting.
The Days Of Week (DOW) display will
begin to flash (Fig. 12).
6.
Turn the selector knob until the screen
displays the DOW setting you desire:
-
MO TU WE TH FR SA SU — for an event
that occurs every day
-
MO TU WE TH FR — for a weekday event
-
SA SU — for a weekend event
-
MO (or TU, or WE, etc.) — for a single day event
7.
Press PROG to accept the DOW setting. If you have chosen DAWN
or DUSK, skip to step 10. If you have chosen a preset time, the first
two digits of the Time Of Day (TOD) will begin to flash.
8.
Turn the selector knob until the desired hour is reached and press
PROG. The last two digits of the Time Of Day (TOD) will begin to
flash.
Fig.
9
Fig.
Fig.
10
10
Fig.
Fig.
11
11
Fig.
Fig.
12
12

ON
DAYSAV MAN AUTO RAND CLOCK
YEARDATE
MONTH
SKIP
EVENT
MO TU WE TH FR SA SU AM PM
OFF LOC DUSK DAWN
OK MODE PROG ON/OFF
ON
DAYSAV MAN AUTO RAND CLOCK
YEARDATE
MONTH
SKIP
EVENT
MO TU WE TH FR SA SU AM PM
OFF LOC DUSK DAWN
OK MODE PROG ON/OFF
ON
DAYSAV MAN AUTO RAND CLOCK
DATE
MONTH
SKIP
EVENT
MO TU WE TH FR SA SU AM PM
OFF LOC DUSK DAWN
OK MODE PROG ON/OFF
ON
DAYSAV MAN AUTO RAND CLOCK
DATE
MONTH
SKIP
EVENT
MO TU WE TH FR SA SU AM PM
OFF LOC DUSK DAWN
OK MODE PROG ON/OFF
ON
DAYSAV MAN AUTO RAND CLOCK
YEARDATE
MONTH
SKIP
EVENT
MO TU WE TH FR SA SU AM PM
OFF LOC DUSK DAWN
OK MODE PROG ON/OFF
ON
DAYSAV MAN AUTO RAND CLOCK
YEARDATE
MONTH
SKIP
EVENT
MO TU WE TH FR SA SU AM PM
OFF LOC DUSK DAWN
OK MODE PROG ON/OFF
ON
DAYSAV MAN AUTO RAND CLOCK
YEARDATE
MONTH
SKIP
EVENT
MO TU WE TH FR SA SU AM PM
OFF LOC DUSK DAWN
OK MODE PROG ON/OFF
ON
DAYSAV MAN AUTO RAND CLOCK
YEARDATE
MONTH
SKIP
EVENT
MO TU WE TH FR SA SU AM PM
OFF LOC DUSK DAWN
OK MODE PROG ON/OFF
9.
ON
DAYSAV MAN AUTO RAND CLOCK
YEARDATE
MONTH
SKIP
EVENT
MO TU WE TH FR SA SU AM PM
OFF LOC DUSK DAWN
OK MODE PROG ON/OFF
ON
DAYSAV MAN AUTO RAND CLOCK
YEARDATE
MONTH
SKIP
EVENT
MO TU WE TH FR SA SU AM PM
OFF LOC DUSK DAWN
OK MODE PROG ON/OFF
ON
DAYSAV MAN AUTO RAND CLOCK
YEARDATE
MONTH
SKIP
EVENT
MO TU WE TH FR SA SU AM PM
OFF LOC DUSK DAWN
OK MODE PROG ON/OFF
ON
DAYSAV MAN AUTO RAND CLOCK
YEARDATE
MONTH
SKIP
EVENT
MO TU WE TH FR SA SU AM PM
OFF LOC DUSK DAWN
OK MODE PROG ON/OFF
ON
DAYSAV MAN AUTO RAND CLOCK
YEARDATE
MONTH
SKIP
EVENT
MO TU WE TH FR SA SU AM PM
OFF LOC DUSK DAWN
OK MODE PROG ON/OFF
Turn the selector knob until the desired minutes are reached.
10.
Press PROG to accept the entire ON event setting.
NOTE: Do not press OK before pressing PROG this final time or the
timer will return to normal operating without accepting the new
setting.
11.
The timer will move on to view the next event screen and you
may continue programming or press OK to return to normal
operating.
Programming an OFF Event
12.
While viewing an event screen, press
PROG. The SKIP display (or ON or OFF, if
the timer has been programmed) will
begin flashing (Fig.13).
13.
Turn the selector knob until the screen
displays the event setting you desire:
-
OFF only — for turning off at a preset time
-
OFF and DUSK — for turning off at sunset
-
OFF and DAWN — for turning off at sunrise
NOTE: The settings with SKIP or ON are used for disabling an
event or programming an ON event.
14.
Press PROG to accept the event setting.
The Days Of Week (DOW) display will
begin to flash (Fig. 14).
15.
Turn the selector knob until the screen
displays the DOW setting you desire:
-
MO TU WE TH FR SA SU — for an event
that occurs every day
-
MO TU WE TH FR — for a weekday event
-
SA SU — for a weekend event
-
MO (or TU, or WE, etc.) — for a single day event
16.
Press PROG to accept the DOW setting. If you have chosen DAWN
or DUSK, skip to step 19. If you have chosen a preset time, the first
two digits of the Time Of Day (TOD) will begin to flash.
17.
Turn the selector knob until the desired hour is reached and press
PROG. The last two digits of the Time Of Day (TOD) will begin to
flash.
18.
Turn the selector knob until the desired minutes are reached.
19.
Press PROG to accept the entire OFF event setting.
NOTE: Do not press OK before pressing PROG this final time or the
timer will return to normal operating without accepting the new
setting.
20.
The timer will move on to view the next event screen and you
may continue programming or press OK to return to normal
operating.
6 – Select AUTO, RANDom or MANual Operation
Once set up, you have three choices for operating the digital timer.
The screen will display MANual, AUTO or RANDom and you may choose
between them by pressing the MODE button.
•
AUTO — uses the timer settings you have programmed.
•
RANDom — gives your home a “lived-in” look by varying your
settings by random 5-minute increments of ±30 minutes.
•
MANual — makes the switch into a standard ON/OFF switch
without timer settings. Press the ON/OFF button to operate
plugged-in devices.
NOTE: While in AUTO or RANDom and you may override the timer by
pressing the ON/OFF button.
•
If the timer has a device turned on, pressing the ON/OFF button will
turn it off and leave it off until the next ON event.
•
If the timer has a device turned off, pressing the ON/OFF button will
turn it on and leave it on until the next OFF event.
Fig.
Fig.
13
13
Fig.
Fig.
14
14
7 – Plug In Timer
To conserve battery power, as soon as setup and programming are
complete, plug the desired devices into the timer and plug the timer
into a properly grounded outlet.
About the Batteries
•
The battery voltage is continuously
monitored. If a low voltage is detected,
the low battery indicator will be displayed
(Fig. 15).
•
The timer requires two LR44 batteries to
keep time up to three months without
power.
•
Replace the batteries as soon as possible after the low battery
indicator appears.
•
Change the batteries within one minute of unplugging in order to
keep the time and date settings. Afterwards, if the display is wrong
or flashes “12:00 AM”, reset the time and date. All other settings
(your ON and OFF programming) remain in memory indefinitely
without battery or AC power.
•
While the batteries are removed, the timer will turn off the display
to conserve power.
•
Dispose of the used batteries promptly according to local
regulations. Keep batteries away from children.
Changing Program Times
Skipping an ON or OFF Event
Use these steps to disable an existing ON or OFF event that you no
longer want (for example, special settings from a vacation).
1.
Ensure that the timer is in a normal operating mode by pressing
the MODE button, if necessary, until MANual, AUTO or RANDom
appears in the mode display area.
2.
Press the PROG button to view the first
event screen (“01”).
3.
Turn the selector knob until the desired
event screen is displayed.
4.
Press PROG again. ON or OFF will be
flashing (Fig.16).
5.
Turn the selector knob until SKIP shows
in the display and “-- --” replaces the
time (Fig. 17), then press PROG to accept
the new setting.
6.
Continue to press PROG until the next
event is viewed.
7.
Continue programming or press OK to
return to normal operating.
Revising an ON or OFF Event
Use these steps to revise an existing ON or OFF event.
1.
Ensure that the timer is in a normal operating mode by pressing
the MODE button, if necessary, until MANual, AUTO or RANDom
appears in the mode display area.
2.
Press the PROG button to view the first
event screen (“01”).
3.
Turn the selector knob until the desired
event screen is displayed.
4.
Press PROG as many times as necessary
to display the setting you want to revise,
for example, DOW (Fig. 18).
5.
Turn the selector knob until you reach
the DOW setting you want (Fig. 19) and
press PROG to accept the new setting.
6.
Continue to press PROG until the next
event is viewed.
7.
Continue programming or press OK to
return to normal operating.
Fig.
15
Fig.
Fig.
16
16
Fig.
Fig.
17
17
Fig.
Fig.
18
18
Fig.
Fig.
19
19

Observed Problem Possible Cause What to Do
Digital timer does not switch on/o but
display looks normal.
Digital timer won’t enter AUTO or
RANDom mode when you press MODE.
Digital timer switches at incorrect times or
skips some of the programmed times.
The lights or controlled devices don’t
match the programmed on/o status
immediately after setting the time or
programming a schedule.
The load turns o immediately after
ned on.
tur
The digital timer operation is sluggish or
not switching on/o at all.
Timer shows ON but the light or other
controlled device is o.
being
Troubleshooting Guide
Digital timer is not set in AUTO, RANDom, or
MANual mode.
The time of day or timer settings have not
been set.
Programmed schedule(s) are incorrect.
Digital timer is in RANDom mode, which varies
switching times up to ±30 minutes (to give
your home a “lived-in
The Astronomic and exact switching times are
in conict. For example, you’ve set on to DUSK
and o at 8 pm, and due to seasonal changes,
DUSK has advanced to 8:30 pm.
NOTE: Your timer automatically skips any
conicting ON event as summer approaches
to prevent unwanted operation of lights or
other controlled devices. See “What to Do” if
you want to identify and remove conicting
settings.
Digital timer does not “catch up”
automatically to the programmed load state.
The status of the timer will remain as is until it
comes to the next programmed on/o time.
The timer is not functioning properly. If the problem persists, contact Intermatic
Though the low battery indicator is not being
displayed, the batteries are getting weak.
The light or controlled device itself may be
switched o or the light bulb may be burned
out.
” l
ook).
Press MODE to select the operational mode you
want to use.
Make sure the time of day and at least one
scheduled activity have been set.
Press PROG to review the settings and revise them
as necessary. See instructions.
If you don’t want to keep the timer in RANDom
mode, press MODE to change to AUTO mode.
Complete the steps for setting the Time and
1.
Date, then temporarily change the date to
June 21st.
Review the DAWN and DUSK settings by
2.
pushing the PROG button.
Make sure the s
3.
won’t interfere with these DAWN and DUSK
times. Make changes as necessary.
When nished, change the Date setting back
4.
to today’s date.
After programming your events or the time, then
returning to the AUTO mode, push the ON/OFF
button to change the load state if necessary.
Customer Service.
Replace the batteries.
Make sure the light or controlled device is
switched on and plugged in or replace the light
bulb.
pecic ON or OFF time settings
1625 Surveyor Ave • Simi Valley, CA • (805) 527-0987 • (800) 766-8478
FAX: (888) 670-8478 • email@vistapro.com • www.vistapro.com
DTC-200 8.09
 Loading...