

Page 1

www.vissonic.com
- 1 - VISSONIC ELECTRONICS LIMITED
CCLLEEAACCOONN
FFuullll DDiiggiittaall NNeettwwoorrkk DDSSPP CCoonnffeerreennccee ssyysstteemm
UUsseerr M
Maannuuaall
VV11..33..55 VVeerrssiioonn
VISSONIC ELECTRONICS LIMITED
Page 2
www.vissonic.com
- 2 - VISSONIC ELECTRONICS LIMITED
The meaning of symbols
■ Safety instructions
For your safe and correct use of equipments, we use a lot of symbols on the equipments and in the manuals,
demonstrating the risk of body hurt or possible damage to property for the user or others. Indications and their
meanings are as follow. Please make sure to correctly understand these instructions before reading the manual.
This is A level product, which may cause radio
interference in the living environment. In this case,
users may need to take the feasible measures to get
around the interference.
Remind users that the dangerous voltage without
insulation occurring within the equipment may cause
people suffer from shock
CE certification means that the product has reached
the directive safety requirements defined by the
European Union. Users can be assured about the use
of it
SGS certification means that the product has reached
the quality inspection standards proposed by the
world's largest SGS.
This product passed the ISO9001 international
quality certification (certification body: TUV
Rheinland, Germany).
Warning: in order to avoid electrical shock, do not
open the machine cover, nor is the useless part
allowed to be placed in the box. Please contact the
qualified service personnel.
■ General information instructions
It lists the factors leading to the unsuccessful
operation or set and the relevant information to pay
attention to
Page 3

www.vissonic.com
- 3 - VISSONIC ELECTRONICS LIMITED
Important note
Warning
In order to ensure the reliable performance of the
equipment and the safety of the user, please observe
the following matters during the process of
installation, use and maintenance:
The matters needing attention of installation
◆ Please do not use this product in the following
places: the place of dust, soot and electric
conductivity dust, corrosive gas, combustible gas; the
place exposed to high temperature, condensation,
wind and rain; the occasion of vibration and impact .
Electric shock, fire, wrong operation can lead to
damage and deterioration to the product, either;
◆In processing the screw holes and wiring, make
sure that metal scraps and wire head will not fall into
the shaft of controller, as it could cause a fire, fault,
or incorrect operation;
◆When the installation work is over, it should be
assured there is nothing on the ventilated face,
including packaging items like dust paper. Otherwise
this may cause a fire, fault, incorrect operation for the
cooling is not free;
◆Should avoid wiring and inserting cable plug in
charged state, otherwise it is easy to cause the shock,
or electrical damage;
◆The installation and wiring should be strong and
reliable, contact undesirable may lead to false action;
◆For a serious interference in applications, should
choose shield cable as the high frequency signal input
or output cable, so as to improve the anti-jamming
ability of the system.
Attention in the wiring
◆Only after cutting down all external power source,
can install, wiring operation begin, or it may cause
electric shock or equipment damage;
◆This product grounds by the grounding wires .To
avoid electric shocks, grounding wires and the earth
must be linked together. Before the
connection of input or output terminal, please make
sure this product is correctly grounded;
◆ Immediately remove all other things after the
wiring installation. Please cover the terminals of the
products cover before electrification so as to avoid
cause electric shock.
Matters needing attention during operation and
maintenance
◆Please do not touch terminals in a current state, or
it may cause a shock, incorrect operation;
◆Please do cleaning and terminal tighten work after
turning off the power supply. These operations can
lead to electric shock in a current state;
◆Please do the connection or dismantle work of the
communication signal cable , the expansion module
cable or control unit cable after turning off the power
supply, or it may cause damage to the equipment,
incorrect operation;
◆ Please do not dismantle the equipment, avoid
damaging the internal electrical component;
◆Should be sure to read the manual, fully confirm
the safety, only after that can do program changes,
commissioning, start and stop operation;
Matters needing attention in discarding product
◆Electrolytic explosion: the burning of electrolytic
capacitor on circuit boards may lead to explosion;
◆ Please collect and process according to the
classification, do not put into life garbage;
◆Please process it as industrial waste, or according
to the local environmental protection regulations.
Page 4

www.vissonic.com
4 VISSONIC ELECTRONICS LIMITED
Version
Version
Update
Date
1.3
2.2 Extension Main Unit
VIS-EXM 9
2.4 Connection Box 10
5.7 CONTROL 19
6.1.5 Camera Setup&Example
28
2017.1.18
1.3.1
6.1.2 Zone Setup 25
2017.2.6
1.3.2
5.3 Audio outputs 18
2017.2.7
1.3.3
6.1.5 Camera Setup&Example
28(Change the flow diagram)
2017.3.11
1.3.4
Add WIFI model, flush model
2017.6.21
1.3.5
6.3Configure the AP
7.5 Default setting
2017.6.27
VERSION:V1.3.5
Edit by Jackson Huang
Page 5

www.vissonic.com
5 VISSONIC ELECTRONICS LIMITED
Content
1 About this manual .......................................................................................................................... 6
Safety Instructions..................................................................................................................... 6
2 System Overview .................................................................................................................... 7
2.1 Full Digital Networked DSP Processor VIS-DCP2000 ...................................................... 8
2.2 Extension Main Unit VIS-EXM .......................................................................................... 9
2.3 2.4/5GHz Conference Access Point VIS-AP4C ................................................................ 10
2.4 Splitter Box VIS-CNB ...................................................................................................... 11
2.5 CLEACON Digital Networked Delegate/Chairman Unit-Table models .......................... 11
2.6 CLEACON Modular Flush-mounting models ............................................................... 17
3.System Design and Plan ............................................................................................................... 19
4. Installation ................................................................................................................................... 20
4.1 Install in the 19’rack ......................................................................................................... 20
4.2 Install in the AP ................................................................................................................. 20
4.3 Install in the Flush unit ...................................................................................................... 21
5. Connection .................................................................................................................................. 22
5.1 Power supply ..................................................................................................................... 22
5.2 Audio inputs ...................................................................................................................... 22
5.3 Audio outputs .................................................................................................................... 23
5.4 Audio Link ........................................................................................................................ 24
5.5 CU/DU .............................................................................................................................. 24
5.6 AP ...................................................................................................................................... 27
5.7 CONTROL ........................................................................................................................ 28
5.8 KEYBOARD .................................................................................................................... 29
5.9 ETHERNET ...................................................................................................................... 29
6. Configuration .............................................................................................................................. 29
6.1 Configuration on the VIS-DCP2000-W ............................................................................ 29
6.1.1 Setup DSP .............................................................................................................. 32
6.1.2 Zone Setup ............................................................................................................. 34
6.1.3 Delegate Setup ....................................................................................................... 36
6.1.4 Interpretation Setup ................................................................................................ 36
6.1.5 Camera Auto-tracking Setup & Application .......................................................... 37
6.1.6 Network Setup ........................................................................................................ 40
6.17 Configuration Setup ................................................................................................ 41
6.1.8 WIFI communication setup .................................................................................... 41
6.1.9 'Default' setting ................................................................................................. 42
6.2 Configuration on the contribution units ............................................................................ 42
6.2.1 Set the ID for the delegate/chairman unit ............................................................... 42
6.2.2 Set the unit type ...................................................................................................... 43
6.3 Configure the AP VIS-AP4C ............................................................................................ 44
7. Operation ..................................................................................................................................... 49
7.1 VIS-DCP2000 conference processor ................................................................................ 49
7.3 Simple interpreter desk VIS-DIC-T .................................................................................. 50
Page 6

www.vissonic.com
6 VISSONIC ELECTRONICS LIMITED
7.4 Chairman unit and delegate unit display and operation .................................................... 51
7.5 Default Setting On VIS-DCP2000-W, VIS-AP4C and VIS-WDC-T/VIS-WDD-T.......... 51
1 About this manual
This manual introduce about the conference system family, how to use and install it in the
common way and how to control it in commands. We insist you reading the SAFETY
INSTRUCTIONS and QUICK START before using it. In most of our user manual, we are
putting important note, instructions and hints in frames of different color, please pay attention to
those symbols.
Safety Instructions
Avoid plug in power connector with power on, otherwise will lead to electric shock, or cause
damage to the circuit
Installation and wiring must be solid and reliable, otherwise it may result in malfunction on
device.
Make sure the device has been well connected to the ground before using
Do not touch the terminals while power on, or may cause electric shock, malfunctions
Do not disassemble the equipment without permission, to avoid damage to the internal electrical
components and will void the warranty.
The user manual give the installers and operators the guide to install, configure and operate the
CLEACON system.
Date:5 September 2016
Copyright: VISSONIC Electronics Limited.
NOTE: Those information is the supplementary explanation to the contents, usage or glossary
CAUTION: Avoid improper operations to damage the product or third party devices
Page 7

www.vissonic.com
7 VISSONIC ELECTRONICS LIMITED
2 System Overview
The CLEACON system is based on the AUDIO-LINKTM audio distribution & processing
technology and WiFi 2.4G/5G Hz technology. The system is combined with wired CAT5 and
wireless units and can be used for voting and PC software control.
Figure 2.1 CLEACON system overview
The CLEACON system comprises:
✓ Full Digital Networked DSP Processor VIS-DCP2000
✓ Extension Main Unit VIS-EXM
✓ 2.4GHz/5GHz Conference Access Point VIS-AP4C
✓ Splitter Box VIS-CNB
✓ Digital Array Microphone with channels selector Chairman/Delegate Unit
VIS-ACC-T/VIS-ACD-T
✓ Digital Array Microphone Chairman/Delegate Unit VIS-DAC-T/VIS-DAD-T
✓ CAT5 Digital Discussion Chairman/Delegate Unit VIS-DCC-T/VIS-DCD-T
✓ CAT5 Digital Voting Chairman/Delegate Unit with Channel Selector
VIS-DVC-T/VIS-DVD-T
✓ CAT5 Dual Channels Chairman/Delegate Unit VIS-DSC-T/VIS-DSD-T
✓ CAT5 Digital Flush-mounting Discussion Chairman/Delegate Unit VIS-DCC-F/VIS-DCD-F
and VIS-DCC"-FS"/VIS-DCD"-FS"
✓ CAT5 Digital Flush-mounting 64 Channels Selector Unit VIS-CSU-F
✓ CAT5 Digital Conference System Flush-mounting Voting Unit VIS-DVU"-FS"1and
VIS-DVU"-FS"2
Page 8
www.vissonic.com
8 VISSONIC ELECTRONICS LIMITED
✓ Flush-mounting Speaker Unit VIS-SPK-F
✓ Flush-mounting Chairman/Delegate Unit with Voting and Channel Selector
VIS-FFC-F1/VIS-FFD-F1 and VIS-FFC-F2/VIS-FFD-F2
✓ Wireless Digital Discussion Chairman/Delegate Unit VIS-WDC-T/VIS-WDD-T
✓ Wireless Digital Voting Chairman/Delegate Unit VIS-WVC-T/VIS-WVD-T
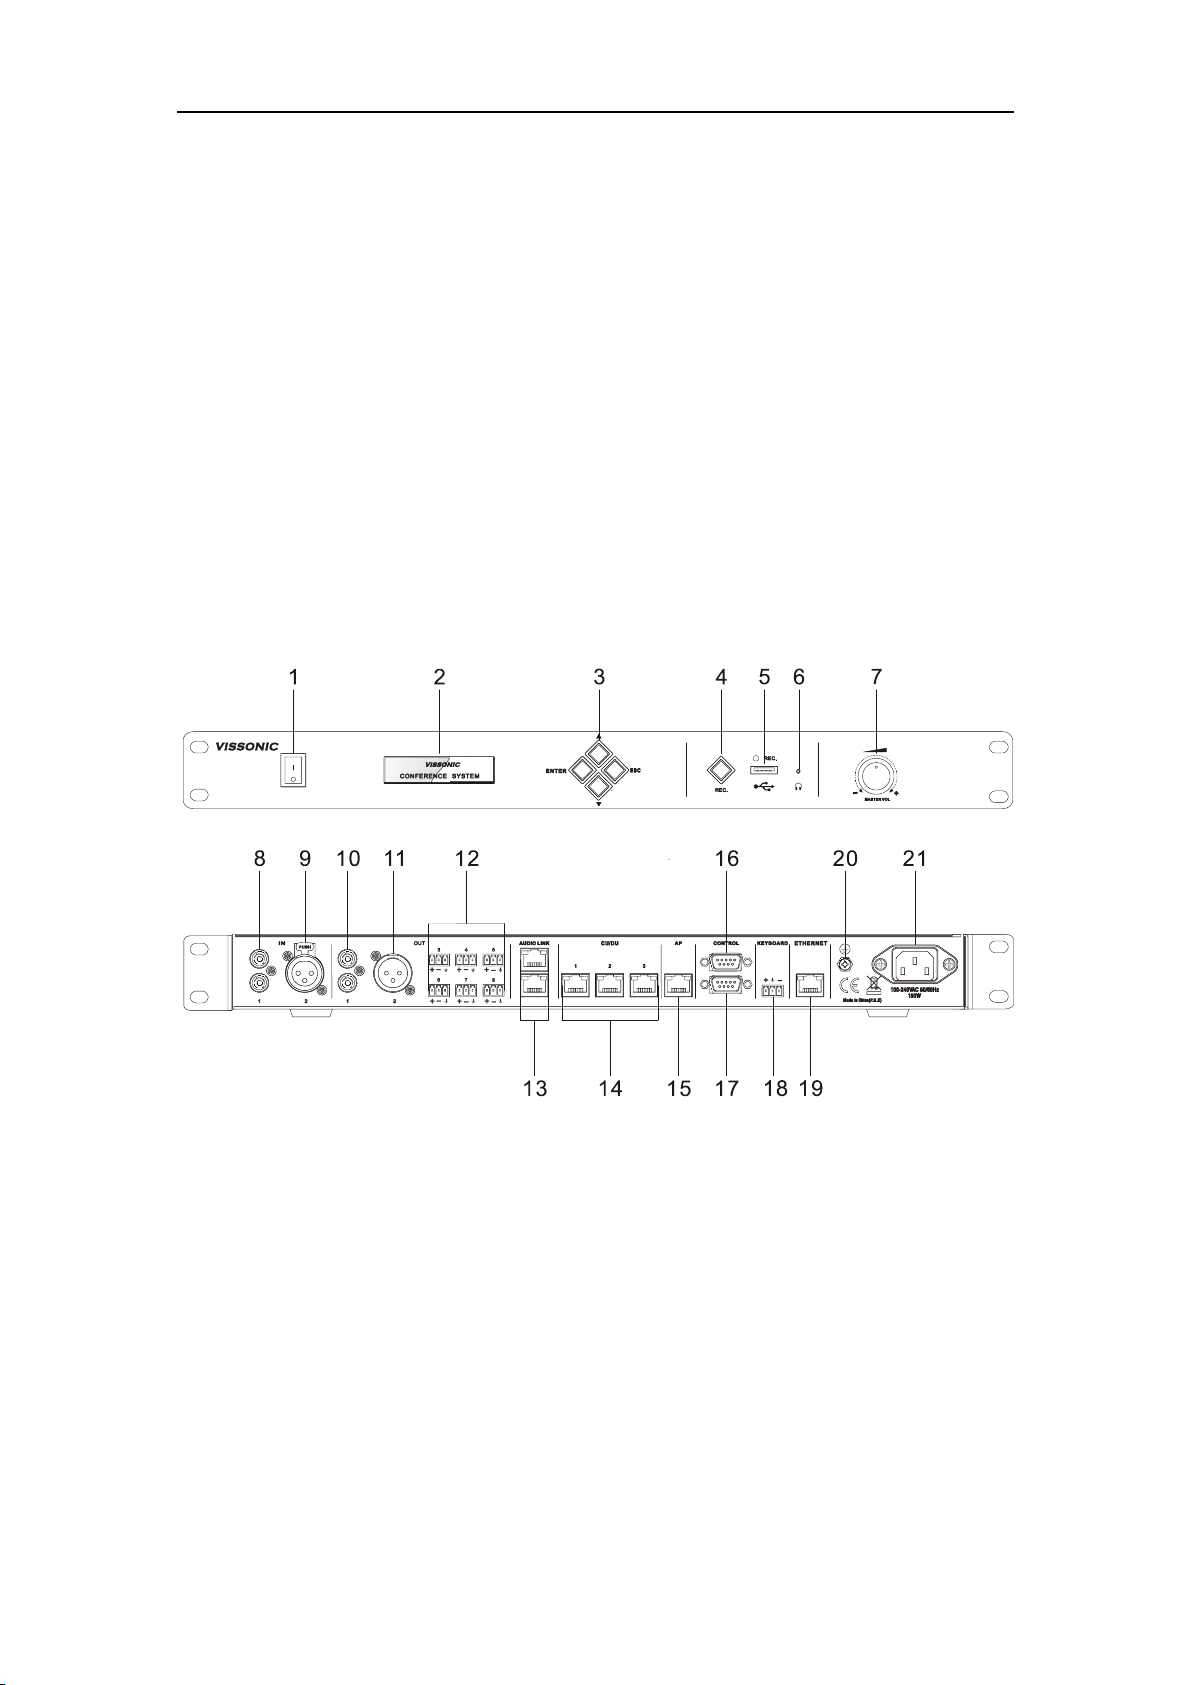
2.1 Full Digital Networked DSP Processor VIS-DCP2000
This processor control all the units in the chain, and supply power to all. You can configure it by
the button on front panel with screen information.
Figure 2.2 Front and rear view of VIS-DCP2000
On front panel, the processor unit contains:
1. Power Switch- Power on or off the processor unit
2. Display- Show the current status or the result of your operation, menu list etc.
3. Operate Buttons- 4-direction buttons for menu operation, confirm and exit
4. Audio Recording- Press to start/stop recording the audio of whole conference content
5. USB Slot- To insert USB disk (Up to 32G) for recording, with status light indicator which is
flashing during the recording.
6. Headphone Socket- Headphone connection
7. Knob- Control volume level of the system
On rear panel, the processor unit contains:
Page 9
www.vissonic.com
9 VISSONIC ELECTRONICS LIMITED
8. Audio Inputs(IN 1)- RCA audio input from external audio sources like MP3
9. Audio Inputs(IN 2)- XLR audio input from external audio sources like Microphone and
remote audio input
10. Audio Outputs(OUT 1)- RCA audio output to external audio devices like PA system,
loudspeakers etc and can be set as zone output.
11. Audio Outputs- XLR audio output to external audio devices like PA system, loudspeakers etc.
and can be set as zone output.
12. Audio Outputs(OUT3,OUT4,OUT5,OUT6,OUT7,OUT8)- Phoenix audio
output.OUT3,OUT4 can be set as zone output. OUT4 also can be set as echo cancellation
remote audio output. OUT5,OUT6,OUT7,OUT8 is corresponding to the interpretation CH 1,
CH2,CH3,CH4.
13. Audio Link-Extend to the next processor for conference room combination and audio
exchange.
14.CU/DU-Connect to the delegate unit, chairman unit and interpreter unit. The chain 1 and chain
2 or chain 2 and chain 3 can be the closed loop.
15.AP- connect to 2.4GHz/5GHz Professional Conference Access PointVIS-AP4C
16.Control-Female DP9 connector is used to connect with camera auto-tracking processor or
control system
17.Control-Male DP9 connector is used to connect with the camera chains.
18.Keyboard-Connect to the camera control keyboard
19.Enthernet-Connect to PC or switch for the software control
20.Ground screw-Connect the processor unit to the ground
21.Power inlet-Connect the processor unit to the main power supply with a power cable.
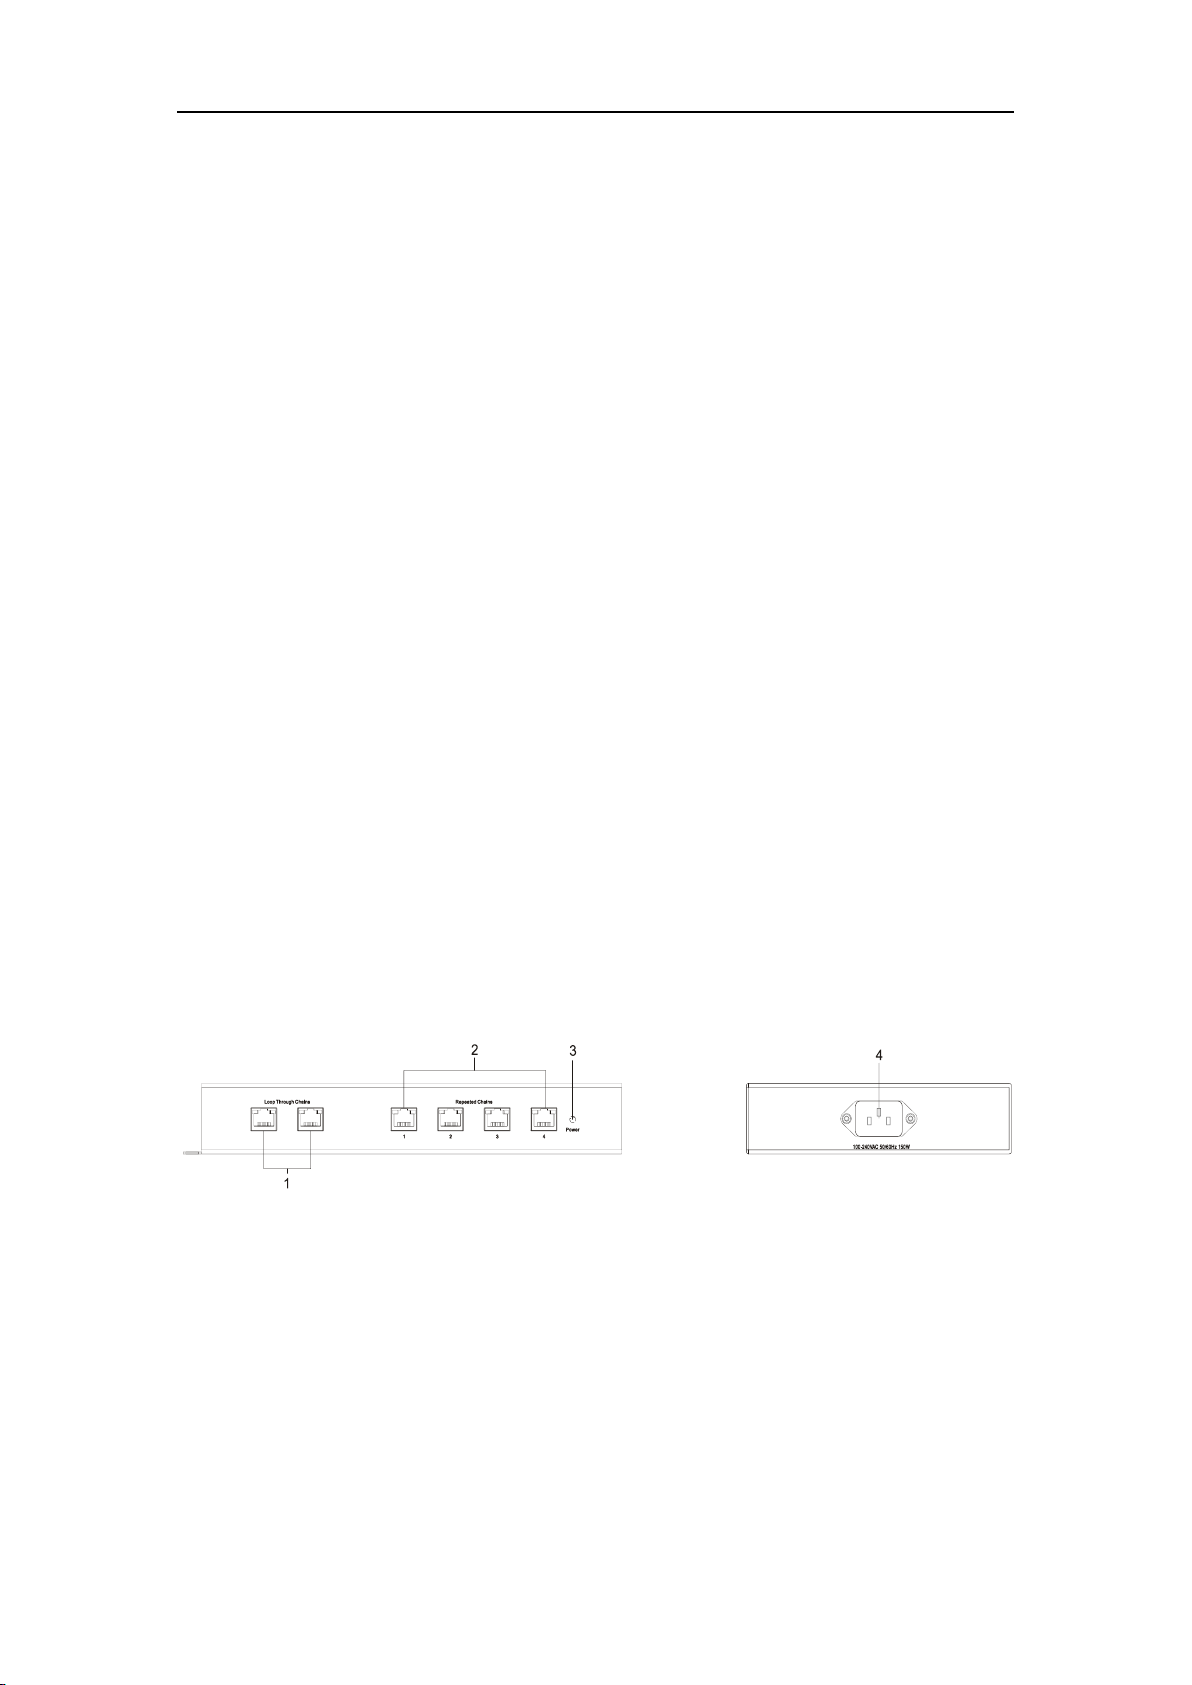
2.2 Extension Main Unit VIS-EXM
The extension main unit is used to extend the system to connect more delegate/chairman units.
Figure 2.3 Front and side view of VIS-EXM
1. Loop Through Chains-Connect with processor unit/last extension unit and next extension unit.
2. Repeated Chains-Provide 4 channels for delegate/chairman units.
3 Power indicator--Indicate status of the power inlet connection.
4.Power inlet-- Connect the extension unit with power cable.
Page 10
www.vissonic.com
10 VISSONIC ELECTRONICS LIMITED
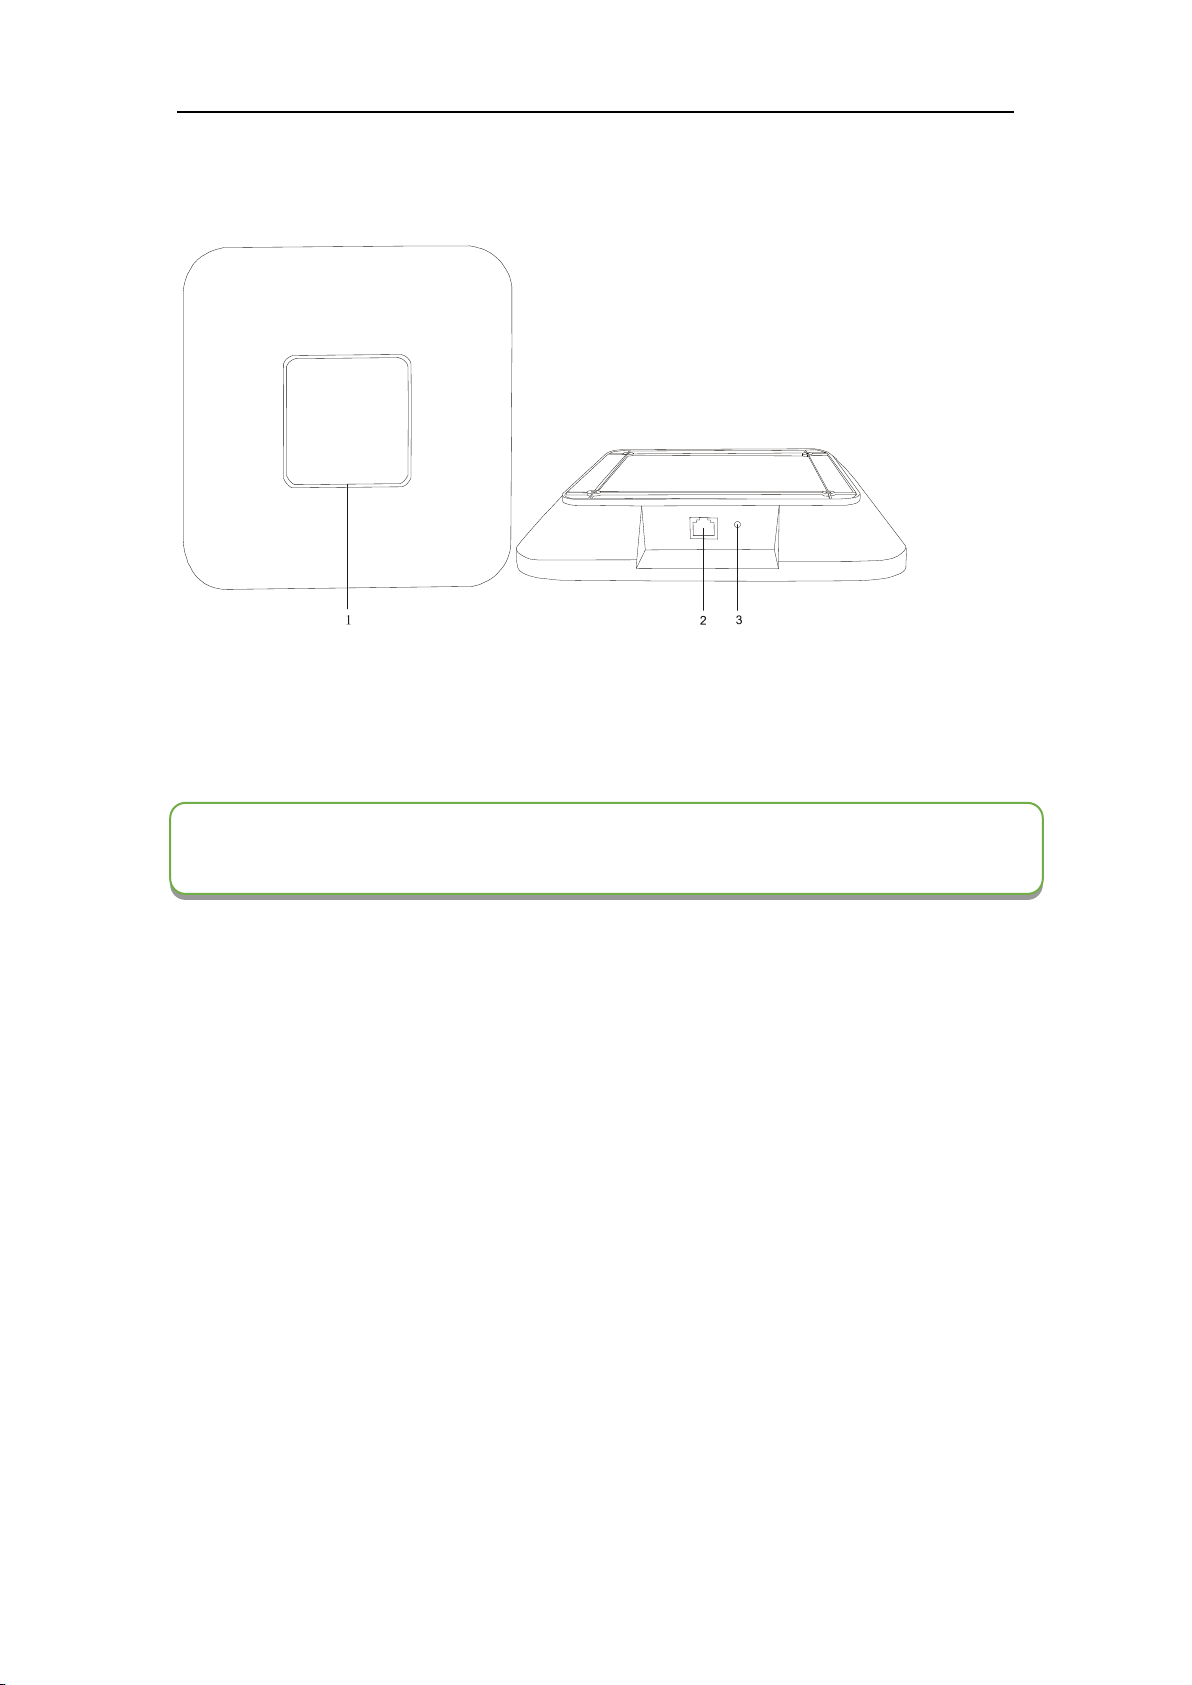
2.3 2.4/5GHz Conference Access Point VIS-AP4C
Figure 2.5 Top and front view of VIS-AP4C
1. Working signal indicator -- When the AP is connected with power, it will be static blue light.
When AP is communicating, the indicator is flashing.
2. Network port --connect to the AP port of processor unit or POE switch.
3.Reset button
NOTE: The switch do NOT recommend to other devices, only connected with the main unit
VIS-DCP2000 and max. 8 pieces of VIS-AP4C.
Page 11
www.vissonic.com
11 VISSONIC ELECTRONICS LIMITED
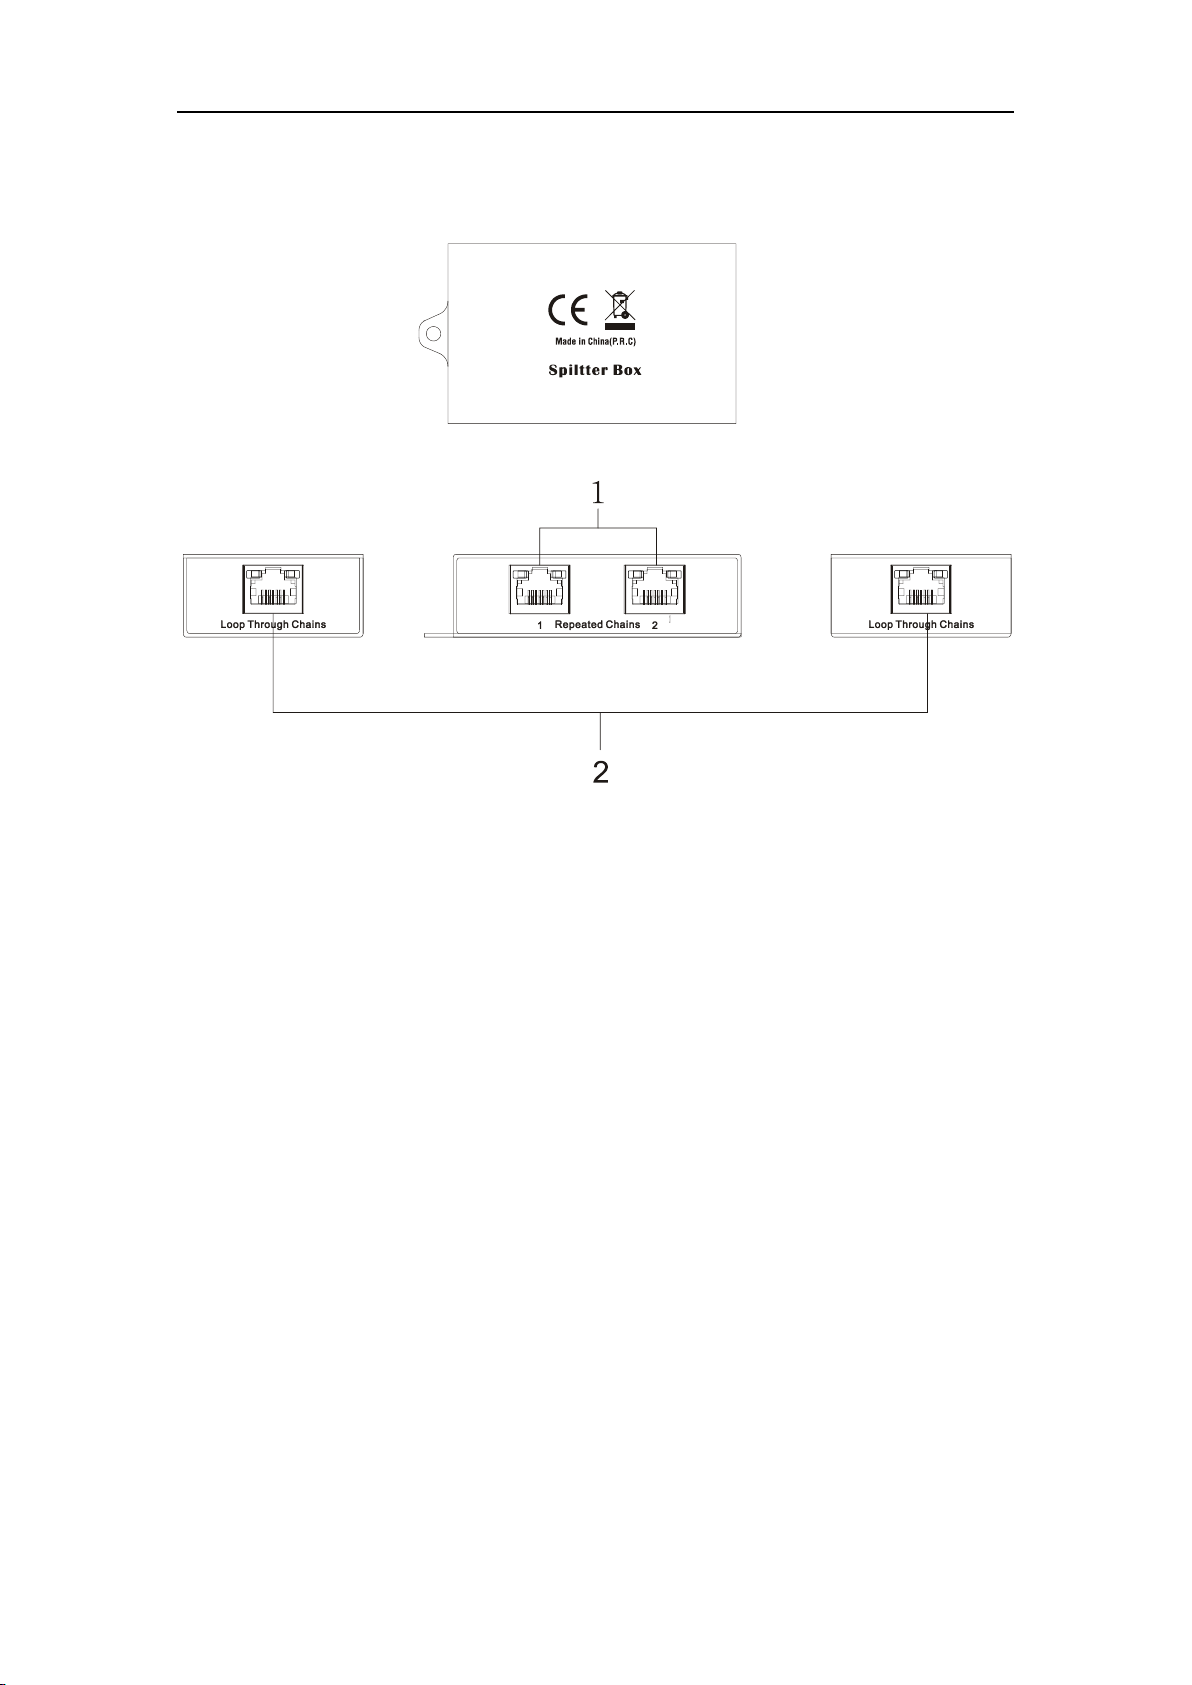
2.4 Splitter Box VIS-CNB
Figure 2.4 Front, rear and top view of VIS-CBN
1. Repeated Chains -- spilt two chains for delegate/chairman units
2. Loop Through Chains --connect to the processor unit, extension unit or loop to next connection
box
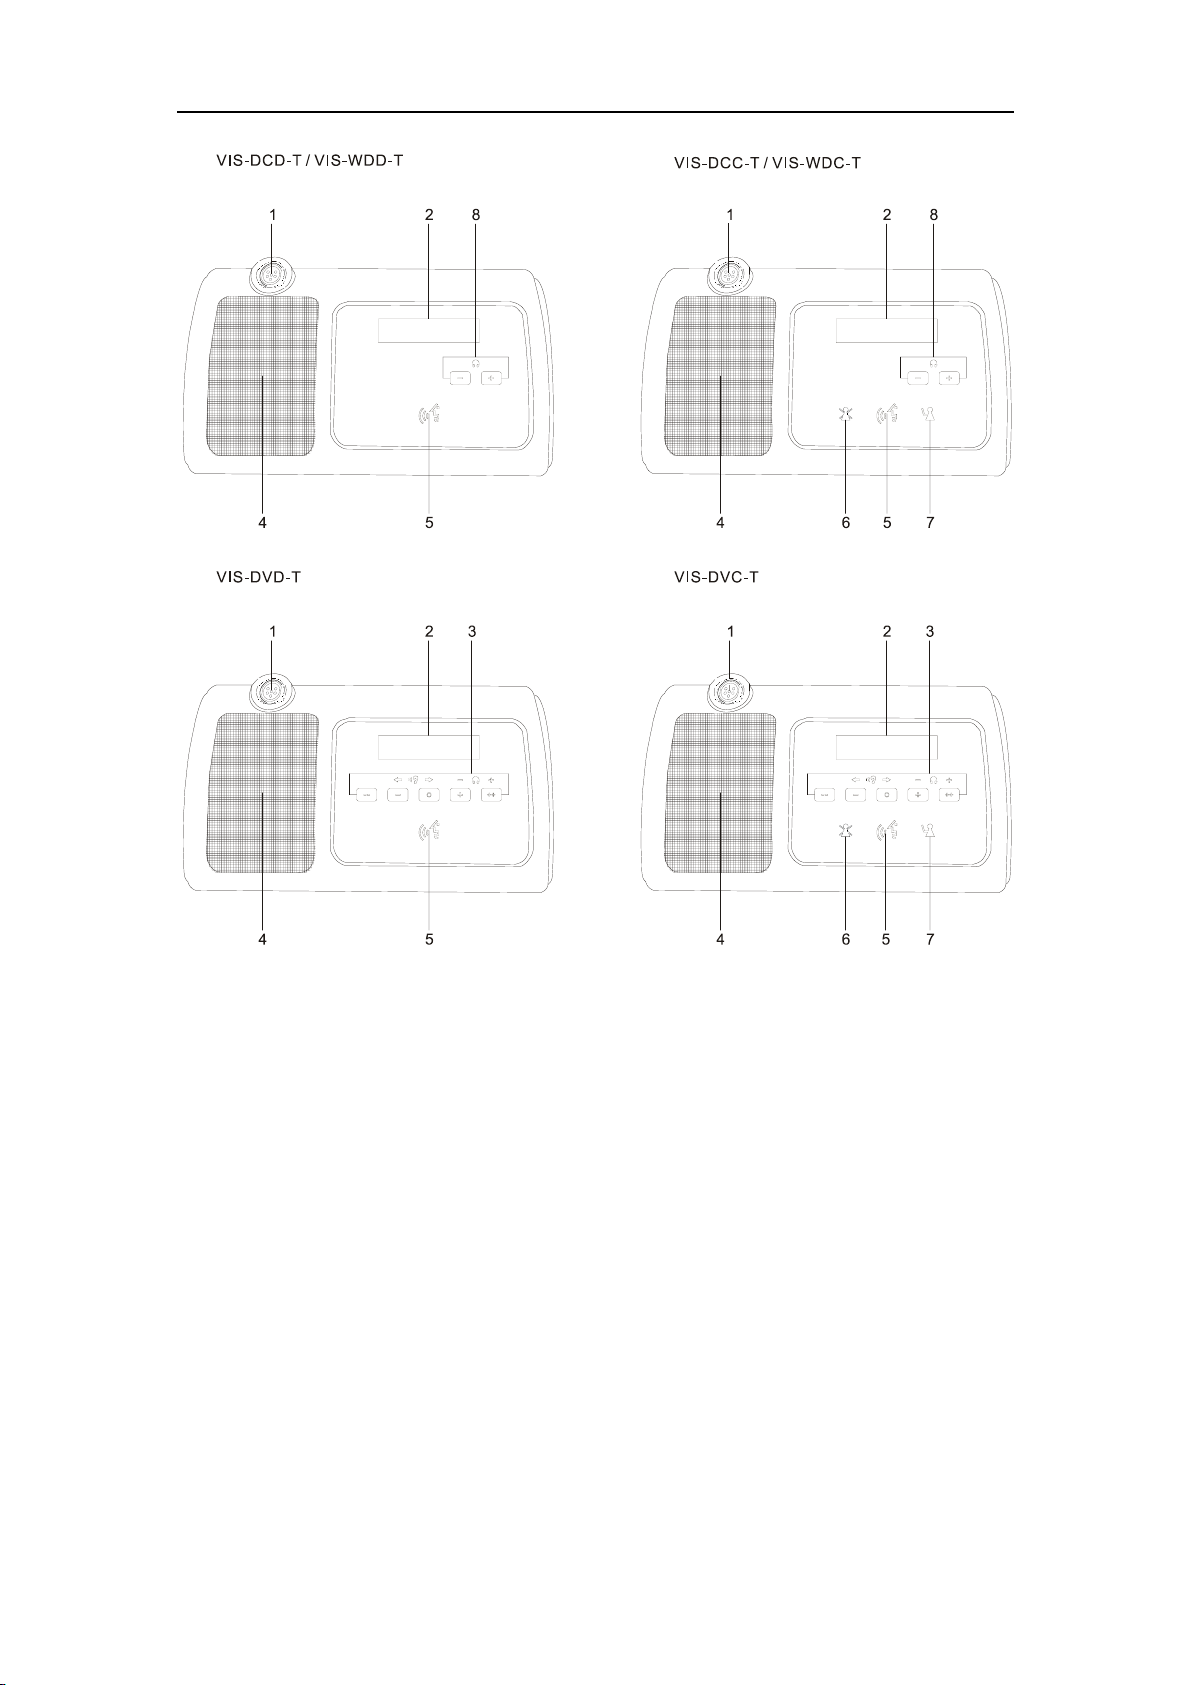
2.5 CLEACON Digital Networked Delegate/Chairman Unit-Table
models
With the discussion units(wired and wireless),the delegates can make contribution to a conference.
Page 12
www.vissonic.com
12 VISSONIC ELECTRONICS LIMITED
Figure 2.5 Top view of wired and wireless unit (1)
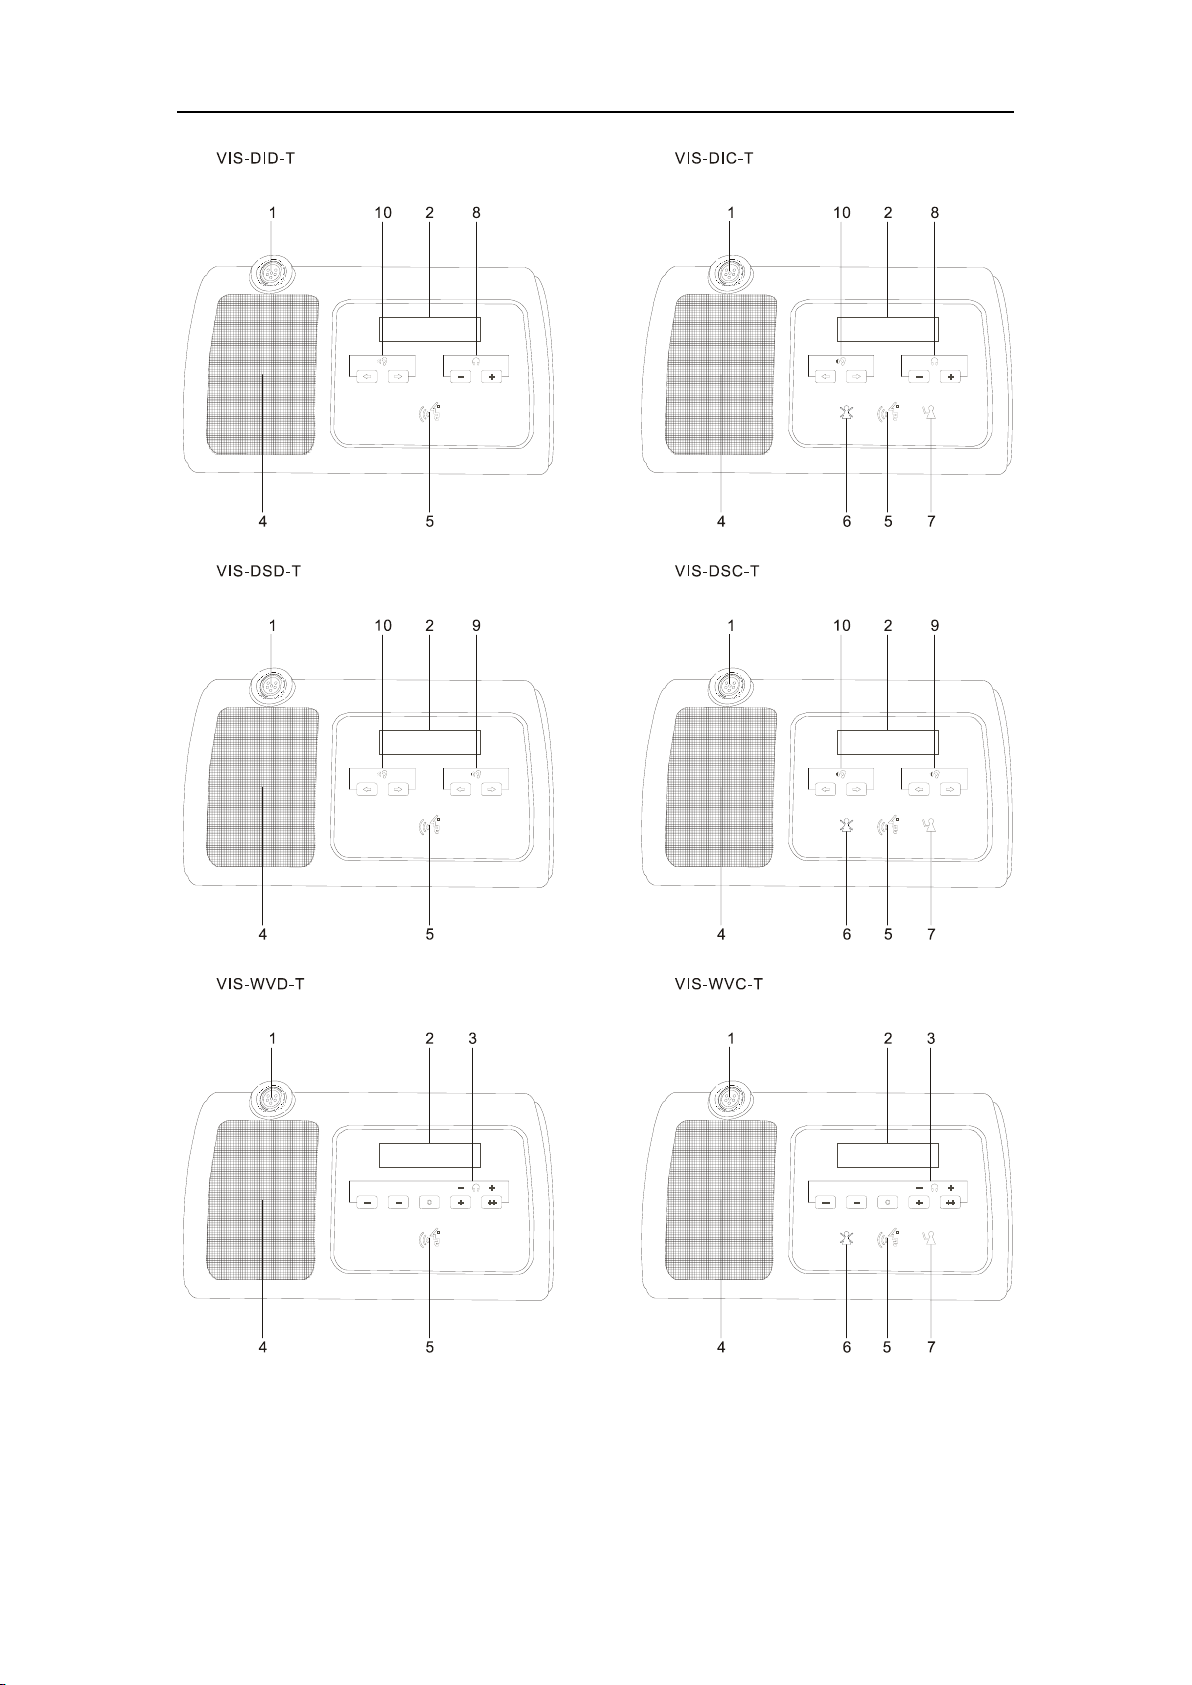
Page 13
www.vissonic.com
13 VISSONIC ELECTRONICS LIMITED
Figure 2.6 Top view of wired and wireless unit (2)
Page 14
www.vissonic.com
14 VISSONIC ELECTRONICS LIMITED
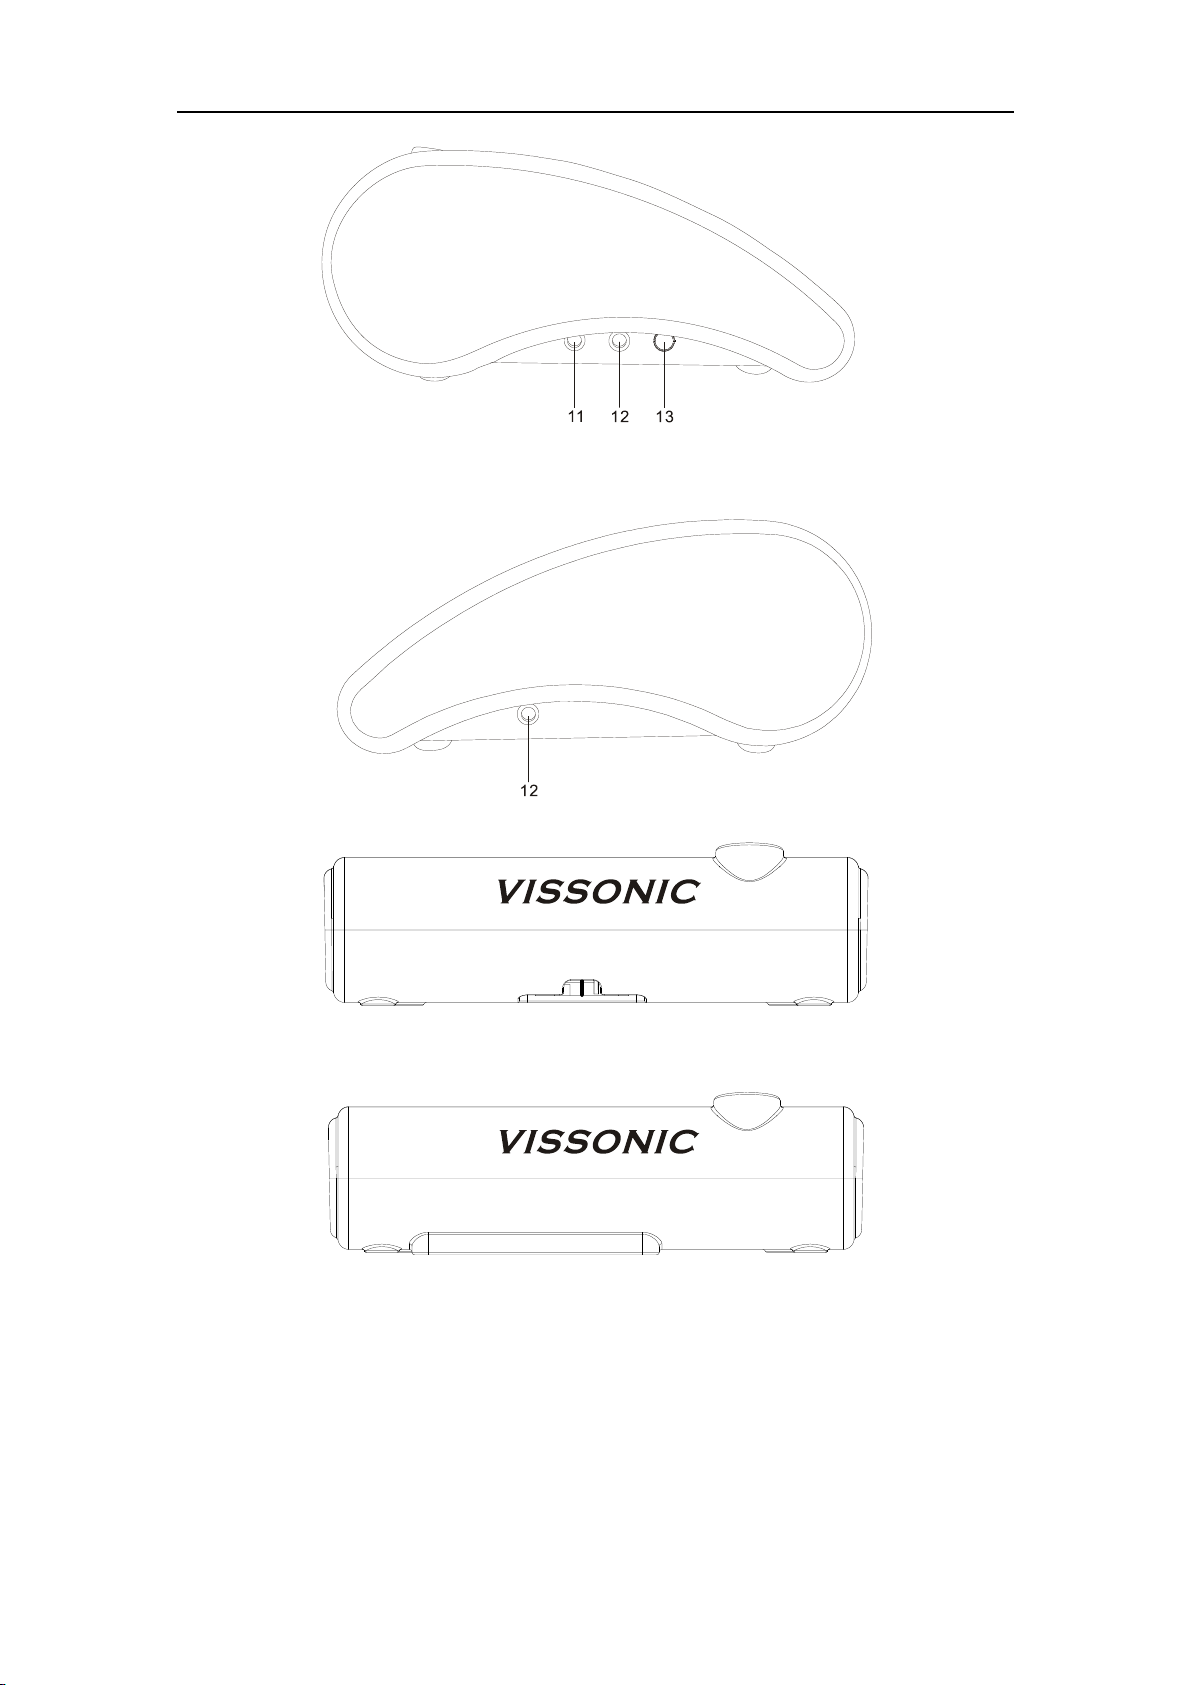
Figure 2.7 Side view of wired or wireless unit
Figure 2.8 Side view of wired unit
Figure 2.9 Side view of wireless unit
Page 15
www.vissonic.com
15 VISSONIC ELECTRONICS LIMITED
Figure 2.10 Bottom view of wired unit
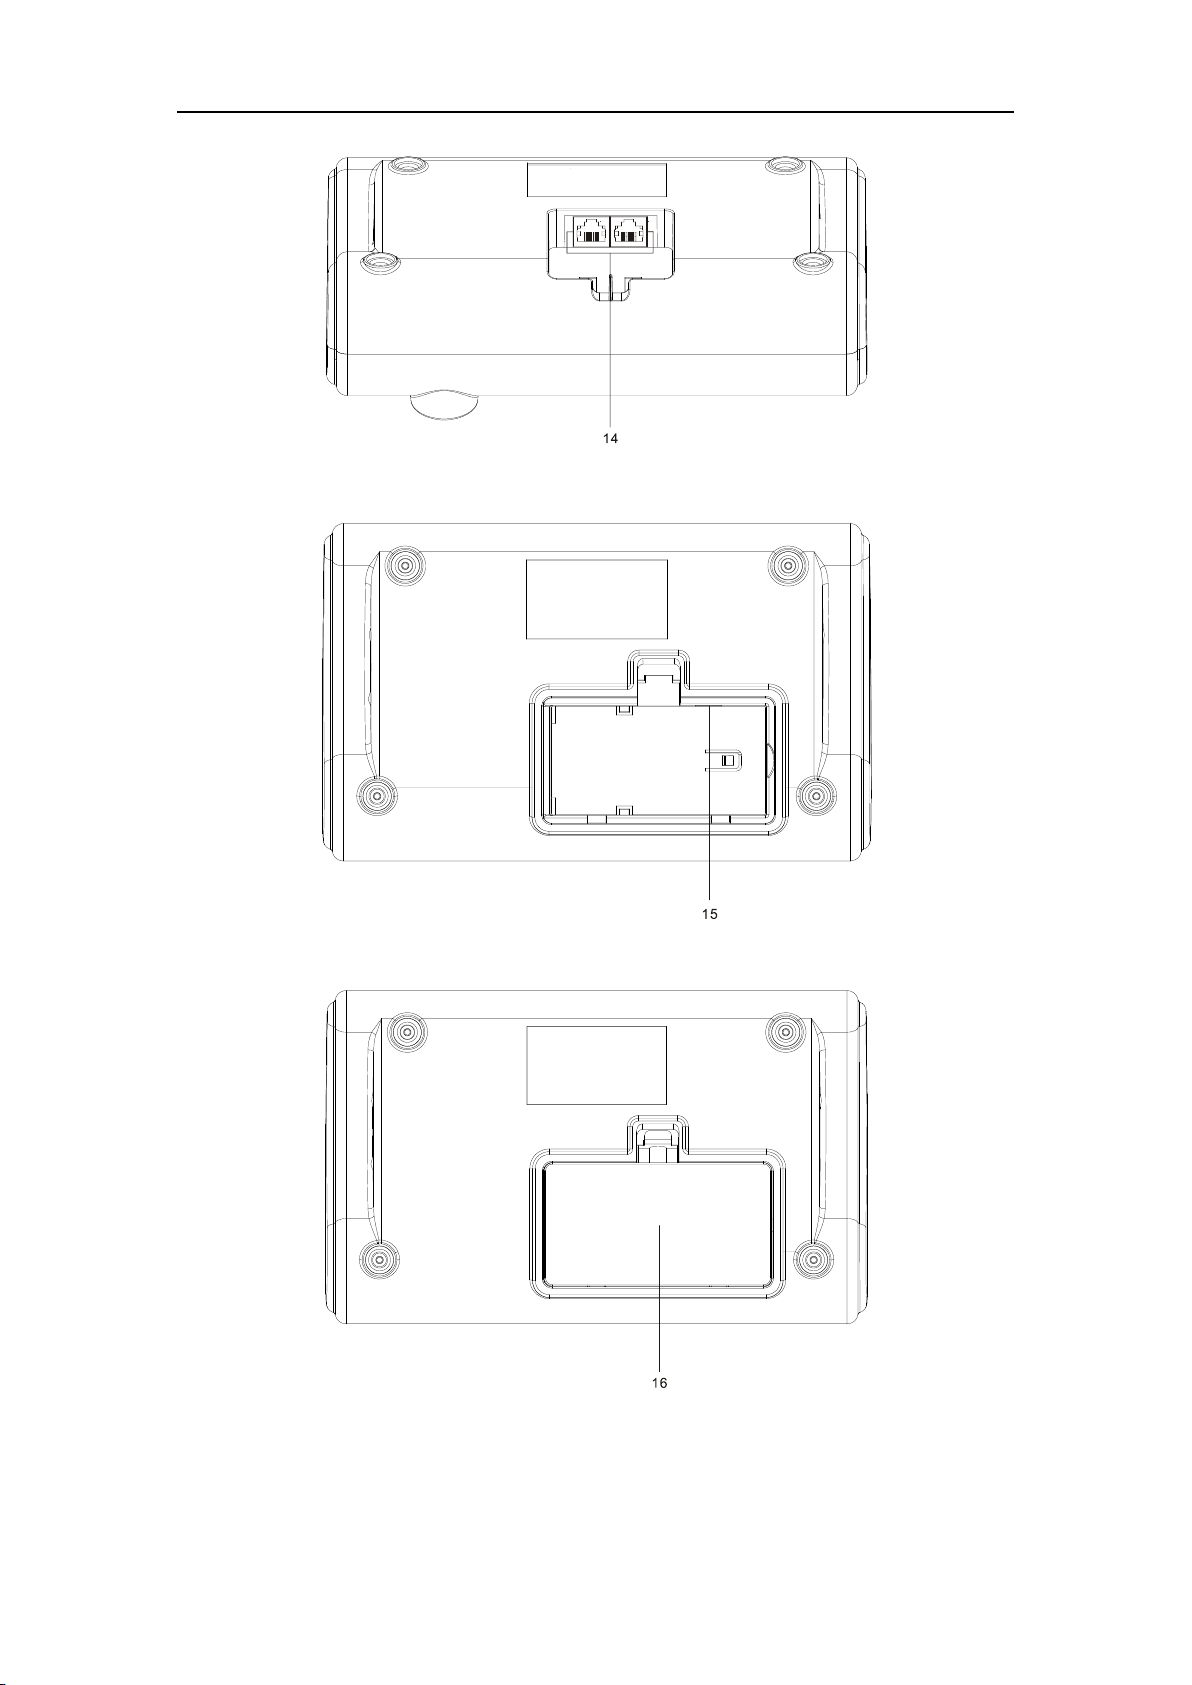
Figure 2.11 Bottom view of wireless unit (1)
Figure 2.12 Bottom view of wireless unit (2)
1.Microphone socket-Connects a pluggable gooseneck microphone(VIS-M600,VIS-M410 or
VIS-M330) to the discussion units.
Page 16

www.vissonic.com
16 VISSONIC ELECTRONICS LIMITED
2.OLED display-Display the MIC status, volume bar, interpretation channel, voting information,
speaking time, clock and date.
3.5 multi-function keys- Apply the voting, volume adjustment for headphones, channel selector
to select the channel that is sent to the headphone.
4.Loudspeaker-Gives the audio signal from the floor to the delegate,when the microphone is
enabled, the signal of the loudspeaker is muted.
5.Microphone button-Enables or disables the microphone. The microphone button has a
LED that shows the condition of the microphone.
6.Clear button-clear/deactivate all active delegate microphone or mute the system.
7.Approval button-Approve the applying microphone to be enabled under the apply mode and
work as mute while pressed clear button.
8.Volume button-Adjust the earphone volume.
9.Right channel selector-Selects the channel that is sent to the right headphones.
10.Left channels selector-Selects the channel that is sent to the left headphones.
11.Line-in socket-Connect the microphone, mobile phone or other audio source to imput the
audio from the contribution units.
12.Headphone socket-Headphone connection.
13.Power switch-Power switch for the wireless conference unit.
14.CU/DU socket-Makes a loop-through in the CEALCON system with the discussion unit.
15.Power supply socket - Connects a power supply adapter to the wireless discussion unit.
16.Battery pack compartment - Contains the battery pack (VIS-WBTY1) of the wireless
discussion unit.
Page 17

www.vissonic.com
17 VISSONIC ELECTRONICS LIMITED
2.6 CLEACON Modular Flush-mounting models
Figure 2.13 Top view of modular flush mounting units
Page 18

www.vissonic.com
18 VISSONIC ELECTRONICS LIMITED
Figure 2.13 Rear view of modular flush mounting units
1. Gooseneck microphone socket
2. 3.5mm earphone socket
3. Priority button on chairman unit,chairman can close all the MIC of delegate unit
4. Mic on/off button
5. Approval button
6. earphone for interpretation channel
7. Interpretation channel selecting button
8. Display for interpretation channel
9. Volume control button for interpretation
10 IC card sign-in indicator
11. IC card slot
12. key voting and multi function buttons
13. 2W high quality speaker
14. CU/DU port for connecting between model VIS-DCD-F,VIS-DDC-F,VIS-CSU-F and main
unit, extension unit, connection box etc.
15. Screw hole for installation
16.FS bus for connecting model "-FS" unit
17. SPK1 port to connect the VIS-SPK-F for working with current unit.
18. MIC port --connect to the model VIS-DCC-FS or VIS-DCD-FS and get the MIC input
from model VIS-DCC-FS or VIS-DCD-FS
19. SPK2 port to connect the VIS-SPK-F for working with the unit VIS-DCC-FS or
VIS-DCD-FS which connecting to the current unit.
20. Connect to the MIC port on the model VIS-DCC-F, VIS-DCD-F or VIS-CSU-F unit
21.3.5mm audio cable on VIS-SPK-F speaker unit connect to the SPK1 or SPK2 port on the
VIS-DCC-F, VIS-DCD-F or VIS-CSU-F unit
Page 19

www.vissonic.com
19 VISSONIC ELECTRONICS LIMITED
3.System Design and Plan
Before using our conference system, there are some basic points for you to plan/design a
conference room.
The processor control unit is powered by 110V~220V wide range power supply, while it has a
basic control capacity (with power relay devices it can load more devices). Here we list a basic
capacity of active units for one processor control unit.
Model
Extension
cable
(m)
VIS-DCP2000
VIS-EXM
Port
1
Port
2
Port
3
Max.
total
Port
1
Port
2
Port
3
Port
4
Max.
total
VIS-DCC-T
VIS-DCD-T
VIS-DIC-T
VIS-DID-T
VIS-DVC-T
VIS-DVD-T
VIS-DSC-T
VIS-DSD-T
0m
30
30
30
90
30
30
30
30
120
05m
30
30
30
90
30
30
30
30
120
10m
28
28
28
84
28
28
28
28
112
20m
24
24
24
72
24
24
24
24
96
50m
20
20
20
60
20
20
20
20
80
100m
10
10
10
30
10
10
10
10
40
The capacity is decided by:
1. Number of active units in the system
2. Length of extension cable from the first delegate unit to VIS-DCP2000, or the first unit to the
VIS-EXM
NOTE: Extension cable has direct effect on the control capacity. The longer and extension
cable you use, the less power is available to drive the devices connected in the system. You
must to choose the length of the extension cable exactly according to the practical situation.
Page 20

www.vissonic.com
20 VISSONIC ELECTRONICS LIMITED
4. Installation
4.1 Install in the 19’rack
The central unit can be installed in a standard 19-inch cabinet. The unit has standard accessories of a pair of
installation supports. See the following diagram for installation:
4.2 Install in the AP
The AP need to install in the same room as the MIC units. The AP can be wall-mounted or
ceiling installation
Page 21

www.vissonic.com
21 VISSONIC ELECTRONICS LIMITED
4.3 Install in the Flush unit
Installation steps:
1, open the desktop corresponding to the size;
2 install the embedded digital conference machine into the opened square hole of
desktop;
3, install the fixing plate on pressure riveting screw under the machine;
4, fix the fixing plate with butterfly nut;
5, making M5X35 the butterfly screws go through the fixing plate to lock with desktop, so
as to fix the equipment. As below:
Page 22

www.vissonic.com
22 VISSONIC ELECTRONICS LIMITED
5. Connection
5.1 Power supply
To connect the processor control unit to main power firmly
Figure 5.1
5.2 Audio inputs
The processor control unit provides RCA or XLR type audio input connector.
CAUTION: Main power supply should well grounded, otherwise it may cause fatal incident
Page 23

www.vissonic.com
23 VISSONIC ELECTRONICS LIMITED
Figure 5.2 Audio input connection
Pin
Type
Signal
Description
1
Cinch
Live
Signal in
2 Return
Shield/Ground
3
XLR
Xternal
Shield/Ground
4 Live
Positive
5 Return
Negative
5.3 Audio outputs
The processor control unit provides RCA , XLR or phoenix type audio output connector
Figure 5.3 Audio output connection
Pin
Type
Signal
Description
1
Cinch
Live
Signal in
2 Return
Shield/Ground
3
XLR
Xternal
Positive
4 Live
Shield/Ground
5 Return
Negative
6
Phoenix
+
Positive
7 -
Negative
8 G
Shield/Ground
Page 24

www.vissonic.com
24 VISSONIC ELECTRONICS LIMITED
5.4 Audio Link
Use audio link socket to connect between the conference processor and use the VISSONIC tested
CAT5E cable or better.
5.5 CU/DU
Use the CU/DU socket to connect to the chairman/delegate unit or extension main unit and use the
VISSONIC tested CAT5E cable or better.
There are three connection ways available for CLEACON conference system.
1. Hand-in-Hand-Loop-Network is an important feature for CLEACON conference system. You
can use this connection way to make the system more steady.
Page 25

www.vissonic.com
25 VISSONIC ELECTRONICS LIMITED
"Hand-in-Hand-Loop-Network" connection is only available between channel 1 and
channel 2,or channel 2 and channel 3,but not valid between channel 1 and channel 3.
2.Hand in Hand Connection
3.Hand in Hand Connection+ Hand-in-Hand-Loop connection
Page 26

www.vissonic.com
26 VISSONIC ELECTRONICS LIMITED
4.Connction box+ Hand-in-Hand-Loop connection
5.Extension Main Unit connection
Page 27

www.vissonic.com
27 VISSONIC ELECTRONICS LIMITED
5.6 AP
Use the AP socket to connect to the 2.4GHz/5GHz conference access point VIS-AP4C or
switch(connected with VIS-AP4C)and use the CAT5 cable or better.
NOTE: The switch do NOT recommend to other devices, only connected with the main
unit VIS-DCP2000 and max. 8 pieces of VIS-AP4C.
Page 28

www.vissonic.com
28 VISSONIC ELECTRONICS LIMITED
5.7 CONTROL
Full digital conference system can use a variety of control systems via RS-232 serial interface.
Upper COM connected to video switcher/matrix for camera tracking or connect to the central
controller
The default switching command is
Baud rate:9600bps,parity:8,Stop:1
Command
Description
1V1.
Switch the channel 1 to output
2V1.
Switch the channel 2to output
3V1.
Switch the channel 3 to output
4V1.
Switch the channel 4 to output
......
......
14V1.
Switch the channel 14 to output
15V1.
Switch the channel 15 to output
16V1.
Switch the channel 16 to output
If you need other commands is needed to tell us for update the firmware.
Bottom COM connected to cameras or HD camera auto tracking controller VIS-MSDI.
COM port pin is described as follows:
Pin
Signal
Description
1 - Null 2 TXD
sending data
3
RXD
Receiving data
4 - Null 5 GND
Signal ground
6 - Null
Page 29

www.vissonic.com
29 VISSONIC ELECTRONICS LIMITED
7 - Null 8 -
Null 9 -
Null
5.8 KEYBOARD
Use the KEYBOARD socket to connect to the Camera controller with CAT5 cable.
5.9 ETHERNET
Use the ETHERNET socket to connect to the PC and use CAT5 cable or better.
6. Configuration
6.1 Configuration on the VIS-DCP2000-W
Use the configuration menu of the processor unit to configure the processor and the system.
Main screen
U n i t : 0 0 0 1
M I C : O v e r r i d e / 1
The screen will display as above picture, including the information of total unit quantity '0001' to
'4000' , MIC mode 'Override, Voice, Open, Apply' and the maximum active number '1,2,4,6'.
Page 30

www.vissonic.com
30 VISSONIC ELECTRONICS LIMITED
Manu screen
M e n u
M I C M o d e
->
The menu operation buttons '△' ,'▽','ENTER' and 'ESC' is used to browse the menu and set the
parameter.
1. Press '△' ,'▽', 'ENTER' and 'ESC' to browse the menu(as the blue sign)
2.Browse to the green sign menu
3.Press '△' ,'▽' to adjust parameters and press the 'ENTER' to confirm the options.
The knob 'Master vol' is used to set the volume of master line out and the value directly display on
the LCD. You can reference the bellowing menu structure to set the parameters
Page 31

www.vissonic.com
31 VISSONIC ELECTRONICS LIMITED
Page 32

www.vissonic.com
32 VISSONIC ELECTRONICS LIMITED
For example, we want to set the active MIC as 3 and operate as bellowing,
1.From the main screen, press the button 'Enter' to get the menu screen as bellowing,
M e n u
M I C M o d e
->
2.Press the button '▽'
M e n u
A c t i v e M I C
->
3.Press the button 'ENTER'
A c t i v e M I C : 1
->1 2 4 6
4.Press the button '▽' to select the '6'
A c t i v e M I C : 1
->
1 2 4 6
5.Press button 'ENTER' to confirm the option and the setting is done.
A c t i v e M I C : 6
->
1 2 4 6
6. Press the button 'ESC' back to the main menu.
U n i t : 0 0 0 1
M I C : O v e r r i d e / 1
6.1.1 Setup DSP
Use the menu items in 'DSP' sub-menu to set to get the sound effect for the whole system.
Page 33

www.vissonic.com
33 VISSONIC ELECTRONICS LIMITED
Menu item
Parameter
Value
Description
Enable
---
On
Off
Turn on/off all DSP effect on. If the customers
required the original audio quality, ANC,AFC
should be off.
HP Filter
On
off
Switch on the high-pass filter(low-cut switch) to
cut low frequency elements from the audio when
needed
Switch off the high filter in order to get better
sound quality.
DSP1
ANC
AFC
AEC
0 to 15
On/Off
On/Off
1.When switch off the zone audio function(Select under the
menu 'Zone'->'Zone Setup'->'Enable'->'off'), DSP1 process
the OUT1,OUT2,OUT3,OUT4(output the same audio)
2.When switch on the zone audio function(Select under the
menu 'Zone'->'Zone Setup'->'Enable'->'on'),DSP1 process
the elect OUT1,OUT2,OUT3 or OUT4(Select under the
menu 'Zone'->'Zone Setup'->'DSP1')
ANC(Active noise control)noise reduction level 0 is no reduction and level 15
is the highest reduction.
AFC(Acoustic Feedback Cancellation) to prevent
or suppress audio feedback.
AEC(Acoustic Echo Cancellation),If the AEC is
on, the AEC is valid on the channel of the audio
input port 'IN 2'as remote sound input and audio
output port 'OUT4' as output to remote site.
DSP2
ANC
0 to 15
When switch on the zone audio function(Select under the
menu 'Zone'->'Zone Setup'->'Enable'->'on'), DSP2 process
the elect OUT1,OUT2,OUT3 or OUT4(Select under the
menu 'Zone'->'Zone Setup'->'DSP2')
ANC(Active noise control)noise reduction level 0 is no reduction and level 15
is the highest reduction.
DSP3
ANC
0 to 15
DSP3 reduce the noise on USB audio recording,
delegate speaker and delegate headphone.
ANC(Active noise control)noise reduction level 0 is no reduction and level 15
is the highest reduction.
Page 34

www.vissonic.com
34 VISSONIC ELECTRONICS LIMITED
6.1.2 Zone Setup
Use the menu items in 'Zone' sub-menu to set the sound volume for different zone.
The zone function is default value 'off'(menu 'Zone Setup'-> 'Enable'->'off') and the AEC under
DSP1 is default value 'off'(Reference menu 'DSP'->'DSP1'->'AEC' description). The audio output
'OUT1', OUT2', OUT3' and 'OUT4' is output of same audio.
If we need to use the zone function, switch on the zone function'(Menu 'Zone'-> 'Zone Setup'->
'Enable'->'on'),then we set the other sub-menus under 'Zone'.
Menu item
Parameter
Value
Description
Out 1
ID zone
Zone 1 Gain
Zone 2 Gain
Zone 3 Gain
Zone 4 Gain
X1(1~4000)
0 to -40dB
0 to -40dB
0 to -40dB
0 to -40dB
Out 1 is output the audio to the zone 1.
ID zone-set the ID range of MICs in the
same zone(zone 1),the the ID start from
1,here we set the number X1 on ID zone
and then the ID zone is 1 to X1.
Zone 1 Gain-The gain of MICs in Zone1 to
OUT1
Zone 2 Gain-The gain of MICs in Zone2 to
OUT1
Zone 3 Gain-The gain of MICs in Zone3 to
OUT1
Zone 4 Gain-The gain of MICs in Zone4 to
OUT1
OUT2
ID zone
Zone 1 Gain
Zone 2 Gain
Zone 3 Gain
Zone 4 Gain
X2 (X1+1 to
4000)
0 to -40dB
0 to -40dB
0 to -40dB
0 to -40dB
Out 2 is output the audio to the zone 2.
ID zone-set the ID range of MICs in the
same zone(zone 2),the default the ID start
from X1+1,here we set the number X2 on
ID zone and then the ID zone is X1+1 to X2
Zone 1 Gain-The gain of MICs in Zone1 to
OUT2
Zone 2 Gain-The gain of MICs in Zone2 to
OUT2
Zone 3 Gain-The gain of MICs in Zone3 to
OUT2
Zone 4 Gain-The gain of MICs in Zone4 to
OUT2
OUT3
ID zone
Zone 1 Gain
Zone 2 Gain
Zone 3 Gain
Zone 4 Gain
X3 (X2+1 to
4000)
0 to -40dB
0 to -40dB
0 to -40dB
0 to -40dB
Out 3 is output the audio to the zone 3.
ID zone-set the ID range of MICs in the
same zone(zone 3),the default the ID start
from X2+1,here we set the number X3 on
ID zone and then the ID zone is X2+1 to X3
Zone 1 Gain-The gain of MICs in Zone1 to
Page 35

www.vissonic.com
35 VISSONIC ELECTRONICS LIMITED
OUT3
Zone 2 Gain-The gain of MICs in Zone2 to
OUT3
Zone 3 Gain-The gain of MICs in Zone3 to
OUT3
Zone 4 Gain-The gain of MICs in Zone4 to
OUT3
OUT4
ID zone
Zone 1 Gain
Zone 2 Gain
Zone 3 Gain
Zone 4 Gain
X4 (X3+1 to
4000)
0 to -40dB
0 to -40dB
0 to -40dB
0 to -40dB
Out 4 is output the audio to the zone 4.
ID zone-set the ID range of MICs in the
same zone(zone 4),the default the ID start
from X3+1,here we set the number X4 on
ID zone and then the ID zone is X3+1 to X4
Zone 1 Gain-The gain of MICs in Zone1 to
OUT4
Zone 2 Gain-The gain of MICs in Zone2 to
OUT4
Zone 3 Gain-The gain of MICs in Zone3 to
OUT4
Zone 4 Gain-The gain of MICs in Zone4 to
OUT4
Zone Setup
Enable
DSP1
DSP2
On/off
Off,1,2,3,4
Off,1,2,3,4
Switch on/off zone audio function
When Zone function is valid, select the DSP1 to
process the OUT1,OUT2,OUT3,OUT4 or not
process. Don't repeat same output as DSP2.
When Zone function is valid, select the DSP2 to
process the OUT1,OUT2,OUT3,OUT4 or not
process. Don't repeat same output as DSP1
Remote Out
-
Off,1,2,3,4
It is valid when the zone function is on (Menu
'Zone'-> 'Zone Setup'-> 'Enable'->'on').
Select the IN2(Remote In) not to output to elect
output port(Multi options). For example, select the
value '1' and '4', audio output 'OUT1' and 'OUT4' is
not mixed the audio from IN2 to output.
Note: If DSP(menu DSP->Enable) is on and
AEC(menu DSP->DSP1->AEC) is on, OUT4 work
as the remote out with the AEC processing.
Application:
Application 1 :Change the sensitive of MICs. There are two MICs on the chairman desk, we need
to reduce the gain of MICs on the chairman desk. Just change the gain of zone where are MICs on
the chairman desk.
Page 36

www.vissonic.com
36 VISSONIC ELECTRONICS LIMITED
Application 2. Increase the sounding gain. There are only MICs on the rostrum, and then we
increase the output gain on the auditorium.
USB Recording Setup
Use the menu items in 'Recording' sub-menu to set the recording parameters.使用菜单
Menu item
Parameter
Value
Description
Set
Quality
ANC
32,64,96,128kbps
On/Off
Set the audio quality of MP3 for
USB recording
6.1.3 Delegate Setup
Use the menu items in 'Delegate Setup' sub-menu to set the delegate relative setting.
Menu item
Parameter
Value
Description
Unit Info.
Total Units
0000~4000
Show the quantity of delegates/chairman units that
connected to the system and help to check the system
fault.
Time
Enable
Hour
Minute
Second
Year
Month
Date
Day
On/Off
00 to 23
00 to 59
00 to 59
2016 to 2115
01 to 12
01 to 31
MON to SUN
Set the time display on the whole system, including
the OLED display in the delegate unit. If set the
'Enable' to off, the clock do not display on the
delegate unit.
Volume
-
0 to -40 dB, mute
Set the volume for the speakers and headphone on the
delegate units.
Speaker
-
On/Off
Turn on/off the speaker on the delegate units.(not
include the interpreter unit)
AGC enable
-
On/Off
ANC enable
-
On/Off
Reduce the noise for speaker and headphone on
delegates.(Note: Any noise reduction technology will
affect the audio quality, if customer pursue tone
quality, please set off the ANC )
Unit Type Set
-
Off, On, All
delegate
Reference to the 6.2.2
6.1.4 Interpretation Setup
Use the menu items in 'Interpretation' sub-menu to set the interpretation relative setting.
Menu item
Parameter
Value
Description
Max. channel
-
00 to 64
Limit the channel number according to the need
and reduce the operation on delegate units.
Channel
00
Chinese,English,...(10
Set each Channel to bind with a language.
Page 37

www.vissonic.com
37 VISSONIC ELECTRONICS LIMITED
01
...
64
4 languages)
Chinese,English,...(10
4 languages)
Chinese,
English,...(104
languages)
Auto floor
-
On/Off
On-The interpreter close the MIC on a channel, the
audio in this channel is switched to floor audio.
Off-The interpreter switch off the MIC and keep the
same audio output on the channel.
Channel lock
On/Off
On-The interpreter unit cannot be changed the
output channel.
Off-The interpreter unit can be changed the output
channel.
Booth setup
Max. booth
Start set
02 to 64
On/Off
Max. booth--set the booth quantity.
On--All interpreter units will show the booth
number for options. Press the MIC on interpreter
unit to select the booth no. The interpreter units in
the same booth should be the same.
Off--finish setting.
Note: The speakers of the interpreters will be off, if
turn on the MIC of interpreter in the same booth
6.1.5 Camera Auto-tracking Setup & Application
Use the menu items in 'Camera' sub-menu to set the Camera auto tracking relative setting.
Menu item
Parameter
Value
Description
Protocol
-
SAMSUNG,PELCO-D,V
ISCA,CUSTOM
Select the protocol according to the camera model,
The value 'CUSTOM' mean the processor connect
the camera tracking controller VIS-MSDI and
the preset information is saved on the camera
controller and don't need to set the sub-menu '
Camera map ' and 'Start Set'
Camera map
(Note: If you use
the cameras using
SAMSUNG or
PELCO-D protocol
need to set this
menu. Use VISCA
Camera select
Camera addr.
Video channel
001 to 016
Off,001to 255
Off,001 to 255
Camera select--select the camera to setup, there
totally support 16 cameras.
Camera addr.--set the camera address for the
camera selected on submenu 'Camera select'.(if
SAMSUNG,PELCO-D need to set the
address, VISCA is not need to set as Off)
Video channel--Bind the camera(which set on
Page 38

www.vissonic.com
38 VISSONIC ELECTRONICS LIMITED
protocol, no need to
set this menu)
submenu 'camera select') to the video channel
number of video switcher, .(There are no video
switcher connected to the main unit for camera
tracking by RS232, just set as Off.)
Note: To set next camera, we just repeat the same
steps:
'Camera Select->'Camera addr' ->'Video channel'
The main unit will record every times of setup for
each cameras.
Start Set
-
01 to 16
Select the camera no.1 to 16 to start the camera
tracking setting.
Step 1:Select "01" on main unit for no.1 camera
Step 2: Adjust the camera to point to the
microphone.
Step 3: Press ON and press Off the microphone that
camera are pointing to.
Step 4: Adjust the camera to point to the next
microphone.
Step 5: Press ON and press Off the microphone that
camera are shooting
Step 6:Repeat the step 2 to step 5 until you preset
all position for the camera '01'
Step 7: Select "02" on main unit for no.2 camera
Step 8: Repeat the step 2~step 6 to finish the
camera '02'. More camera are set as the same way.
Step 9:After setting the last microphone (on and off
the MIC),we can adjust the camera to give a full
view of the meeting and press 'ESC' to quit from
the menu of 'Start Set'. The preset of full view will
be active while there are no microphone on.
Note: When exit the camera setting, the system will
record the final camera position as the full view
preset, so we finish the setting of last MICs covered
by this camera, we need to adjust the camera to get
the full view preset and next to exit the setting of
the camera. (You can consider the chairman unit as
the full view preset.)
Example
here we need to set up 2 cameras with VISCA, SAMSUNG/ PELCO-D or CUSTOM protocol and
switch the video by a video switcher or camera auto-tracking controller VIS-MSDI
Step 1.Connect the main unit to the cameras or camera auto-tracking controller VIS-MSDI with
the bottom CONTROL port.
1. Use the VISCA protocol camera
Page 39

www.vissonic.com
39 VISSONIC ELECTRONICS LIMITED
2. Use the SAMSUNG/ PELCO-D protocol camera
3. Use the CUSTOM protocol camera (Set up the camera auto tracking by VIS-MSDI, please
reference its user manual)
Step 2. If we don't use the VIS-MSDI on Step 1,here we need a seamless video switcher
or HDMI camera switching recorder VIS-CRS02 to switching the video from cameras, we need
to connect the main unit to the video switcher or switching recorder VIS-CRS02 with the upper
CONTROL port.
1.RS232 control the seamless video switcher
2. RS232 control HDMI camera switcher and recorder VIS-CRS02.
Page 40

www.vissonic.com
40 VISSONIC ELECTRONICS LIMITED
Step 3 Set the camera information to the main unit by the front panel and adjust camera to shoot
the position by remote controller ,keyboard controller or CLEACON conference software as the
bellowing step flow.
6.1.6 Network Setup
Use the menu items in 'Network' sub-menu to set the IP address and MAC for processor unit.
Menu item
Parameter
Value
Description
IP
Option 1
Option 2
Option 3
Option 4
000 to 255
000 to 255
000 to 255
000 to 255
Set the static IP for the processor.
Default IP
address:192.168.10.100
Port:10166
Page 41

www.vissonic.com
41 VISSONIC ELECTRONICS LIMITED
Enter
Save/Exit
MAC
Option 1
Option 2
Option 3
Option 4
Option 5
Option 6
Enter
000 to 255
000 to 255
000 to 255
000 to 255
000 to 255
000 to 255
Save/Exit
Set the MAC address for the
processor. Note: The MAC need
to be different in the same local
area network.
6.17 Configuration Setup
Use the menu items in 'Configuration ' sub-menu to set the parameter for global system.
Menu item
Value
Description
Language
CN/EN
Change the language for main unit and delegate units (Note: We can
change the language according to your need by updated the firmware)
Delay time
10ms~30ms
The default setting is 15ms,other options are only for
test,
Save power
On/Off
Note: Not ready, plan for system power saving.
Download
Run/Host/Unit
The default setting is 'Run' to keep the system run faster. When
we need to update the firmware for the processor, we select
'Host' .When we need to update the firmware for the delegate
units, we select 'Unit' (Note: Don't change the default setting
'RUN', Only if you need to update the system.)
Scan Set
On/Off
Default is off, when scan set is on, the system will check the
ID of delegate units when boot up, if there are ID conflict,
those conflicting MICs will be flashing.
6.1.8 WIFI communication setup
Menu item
Value
Description
SSID
16 bits
16 bits SSID,Default setting is
WIFI_CONFERENCE
PASSWORD
9 bits
9 bits password for communication
between main unit to the delegate
unit, default password is
88888888
Start Set
On/Off
The default setting is OFF.
If set as "On", the main unit will send
the new SSID and PASSWORD to
the wireless delegate/chairman unit.
After all delegate/chairman unit is
received the new SSID and
PASSWORD, please set the 'START
Page 42

www.vissonic.com
42 VISSONIC ELECTRONICS LIMITED
SET 'menu as Off.
Please reboot the wireless
delegate/chairman unit and all
wireless unit is not able to connect to
the main unit after update the SSID
and PASSWORD. Please visit the
wireless AP VIS-AP4C by browser
on PC, set the same SSID and
PASSWORD on the VIS-AP4C.
After corrective setting, wireless unit
and main unit can communicate
again.
6.1.9 'Default' setting
For urgent situation or wrong setting on the parameters, the 'Default' setting can set the
main unit to the factory default setting.
6.2 Configuration on the contribution units
After connection all the units, we need to set the ID for every contribution units. If there are
installed all VIS-DIC-T, and need to set them as chairman unit, delegate unit, interpreter unit or
VIP, we need to set the unit type.
6.2.1 Set the ID for the delegate/chairman unit
The LCD display are working on the main screen.
Main screen
U n i t : 0 0 0 1
M I C : O v e r r i d e / 1
Press the button 'ESC' around 2 seconds on processor unit, the display will show the ID setting
interface.
S e t i n g I D . . .
Just press the MIC button on every delegate/chairman units one by one and set the ID for them.
Press the button ''ESC' around 2 seconds on the processor unit, the display exit from the 'Setting
Page 43

www.vissonic.com
43 VISSONIC ELECTRONICS LIMITED
ID...' interface and back to main screen. The setting is saved and finished.
6.2.2 Set the unit type
Enter the menu of 'Delegate Setup' and set on the sub-menu 'Unit Type Set'.
U n i t T y p e S e t
D e l e g a t e S e t u p :
VIS-DIC-T is default as the chairman unit and there are most of units are delegate units in a
conference system, so we need to set all units as 'All delegates'.
A l l d e l e g a t e s
T y p e : A l l d e l .
->
Set as the above screen, all the VIS-DIC-T are worked as the delegate units. Next set the as 'Type:
ON.'
On
T y p e : O n
->
We can check on the contribution units and the display on all units show the bellow screen.
Delegate
We press the MIC button on the unitand the display will shift cyclically as
Delegate-Chairman-interpreter-VIP.Let the them display as what you want to set as.
Interpreter
VIP
Chairman
Set on the processor unit to off the type setting as bellowing.
O f f
T y p e : O f f
->
Page 44

www.vissonic.com
44 VISSONIC ELECTRONICS LIMITED
6.3 Configure the AP VIS-AP4C
For example, we need to change the SSID as 'CLEACON-CS' and password as '99999999'.
Firstly,we need to set the SSID(Menu WiFi-->SSID) and Password (Menu
WiFi-->Password)on the main unit
Secondly, set the 'Start Set' (Menu WiFi-->Start set-->On)menu to send the data to all
wireless unit. All wireless unit will show SSID and Password updated successfully on the LED
display.
Thirdly,set the 'Start Set' (Menu WiFi-->Start set-->Off)menu to off. Now the wireless unit
show connection failure.
We need to change the SSID and Password on the AP to make the system work again.
Quick Connection(Conference system stop working)
Page 45

www.vissonic.com
45 VISSONIC ELECTRONICS LIMITED
Test and Installation Connection(Conference system is working)
Step 1 Connect the PC to the AP by LAN as one of above connection.
Step 2 Set the PC to the same IP range as the AP VIS-AP4C. The default IP address of AP is
192.168.2.1. For example, we set the PC as bellowing network properties
Page 46

www.vissonic.com
46 VISSONIC ELECTRONICS LIMITED
Step 3 We need to visit the AP by the browser and input the default IP 192.168.2.1 to get the
bellowing interface.
and select the interface language here.
Page 47

www.vissonic.com
47 VISSONIC ELECTRONICS LIMITED
Step 4 The default password is 'admin' and Login to get the status information.
Step 5 Change the SSID and Password as your setting on the main unit.
Input SSID-- CLEACON-CS, Password--99999999 as bellowing picture and click 'Modify' to
save the setting.
Page 48

www.vissonic.com
48 VISSONIC ELECTRONICS LIMITED
NOTE: The system support two SSID and password for 2.4G & 5.8G, we don't need the
second one and keep all the same SSID and Password here. Now the current version do not
allow to change the yellow part setting, or the system will not work.
The AP also support to configure the bandwidth, channel(including the 5.2G to
5.8G),transmit power etc.
The Default Channel is Auto, if the wireless system are working on the condition with a lot of
5G signal, It is need to set a fix channel according to the wireless condition.
NOTE: Don't select the radar channel. The system stop working under the radar channel.
Radar channel is channel 52,56,60,64,100,104,108,112,116,132,136,140/
Page 49

www.vissonic.com
49 VISSONIC ELECTRONICS LIMITED
7. Operation
7.1 VIS-DCP2000 conference processor
When you start the conference processor, the display will show 'Initializing...'.The display then
shows the main screen.
Main screen
U n i t : 0 0 0 1
M I C : O v e r r i d e / 1
The screen will display as above picture, including the information of total contribution units are
connected to the system '0001' to '4000' , MIC mode 'Override, Voice, Open, Apply' and the
maximum active number '1,2,4,6'.
MIC mode
On the main screen, press the button '▽' and directly enter the sub-menu of MIC mode to set the
microphone mode. When the conference processor is connected to the PC, you also can set the
microphone mode from the PC software.
Menu item
Value
Description
MIC mode
Override
Open
Voice
Apply
The microphone mode
of CLEACON
conference system
Mode
Description
Override
In the override mode, delegates can activate their
microphones with the microphone button on their
contribution device. When themaximum number of
delegates speak, the next delegate that activates his or
her microphone automatically deactivates the
microphone that
was activated for the longest time.
Open
In the open mode, delegates can enable their microphones with
the microphone button on their contribution units. When the
maximum number of delegates speaker, the next delegate that
enables his or her microphone is added to a request-to-speak list.
The microphone is not enable until another delegate disables his
or her microphone.
Voice
In the voice mode, the unit will be activated by the voice and no
Page 50

www.vissonic.com
50 VISSONIC ELECTRONICS LIMITED
need the press the MIC button.
Apply
In the apply mode, delegates can apply to enable their
microphones with the microphone button on their contribution
units and the green LED on MIC will be on. When the chairman
unit press the APROVAL button to enable the applying delegate
microphone according to the applying order. When the
maximum number of delegates speaker, the system allowing the
same maximum number of applying microphone on the waiting
list.
Active MIC
On the main screen, press the button '△' and directly enter the sub-menu of Active MIC mode
to set the active MIC number.
Menu item
Value
Description
Active MIC
1,2,4,6
Limited the max number of
active microphone.
Monitoring -Unit information
Menu item
Value
Description
UNIT
0000~4000
Show the quantity of delegates/chairman
units that connected to the system and
help to check the system fault.
7.3 Simple interpreter desk VIS-DIC-T
Refer to the 6.2.2 and set the unit VIS-DIC-T as the interpreter unit. Please check the display and
operation.
Screen
Description
Main screen,
'Interpreter unit'-Unit type
'Out:01 ENG' show the interpreter output
to channel number and language name.
Press the channel buttons to
change the output channel.
Volume bar to show the volume level to
speaker and headphone and press the
volume buttons to adjust it.
Page 51

www.vissonic.com
51 VISSONIC ELECTRONICS LIMITED
Press the MIC button to turn
on/off the microphone.
Show the `speaking time
Digital clock show the current
time.
Press the button and hold for
mute for cough, release the button to
unmute.
7.4 Chairman unit and delegate unit display and operation
Microphones
The colors of the LEDs of the microphone buttons, the LED ring of MICand display show the
condition of the microphone that connected to the discussion unit.
MIC button color
LED ring color
Display character
Condition
Red(on)
Red(on)
Mic on
Microphone enabled
White(off)
Green(on)
Applying to speak
Please wait...
Request to speak
7.5 Default Setting On VIS-DCP2000-W, VIS-AP4C and
VIS-WDC-T/VIS-WDD-T
Under the default setting on AP, main unit and delegate unit, the wireless conference system
can work together automatically. If necessary, we set the whole system to default setting by
following steps.
Step 1 Set the default setting on main unit VIS-DCP2000
Menu->Default->Enter(Default)
Step 2 Press the volume - and + button at the same time when the unit reboot enter the
bellowing interface.
Page 52

www.vissonic.com
52 VISSONIC ELECTRONICS LIMITED
Press '-' button to confirm and set it successfully.
Step 3 Set the default setting on the AP VIS-AP4C
 Loading...