

Page 1
QUICKSTART GUIDE
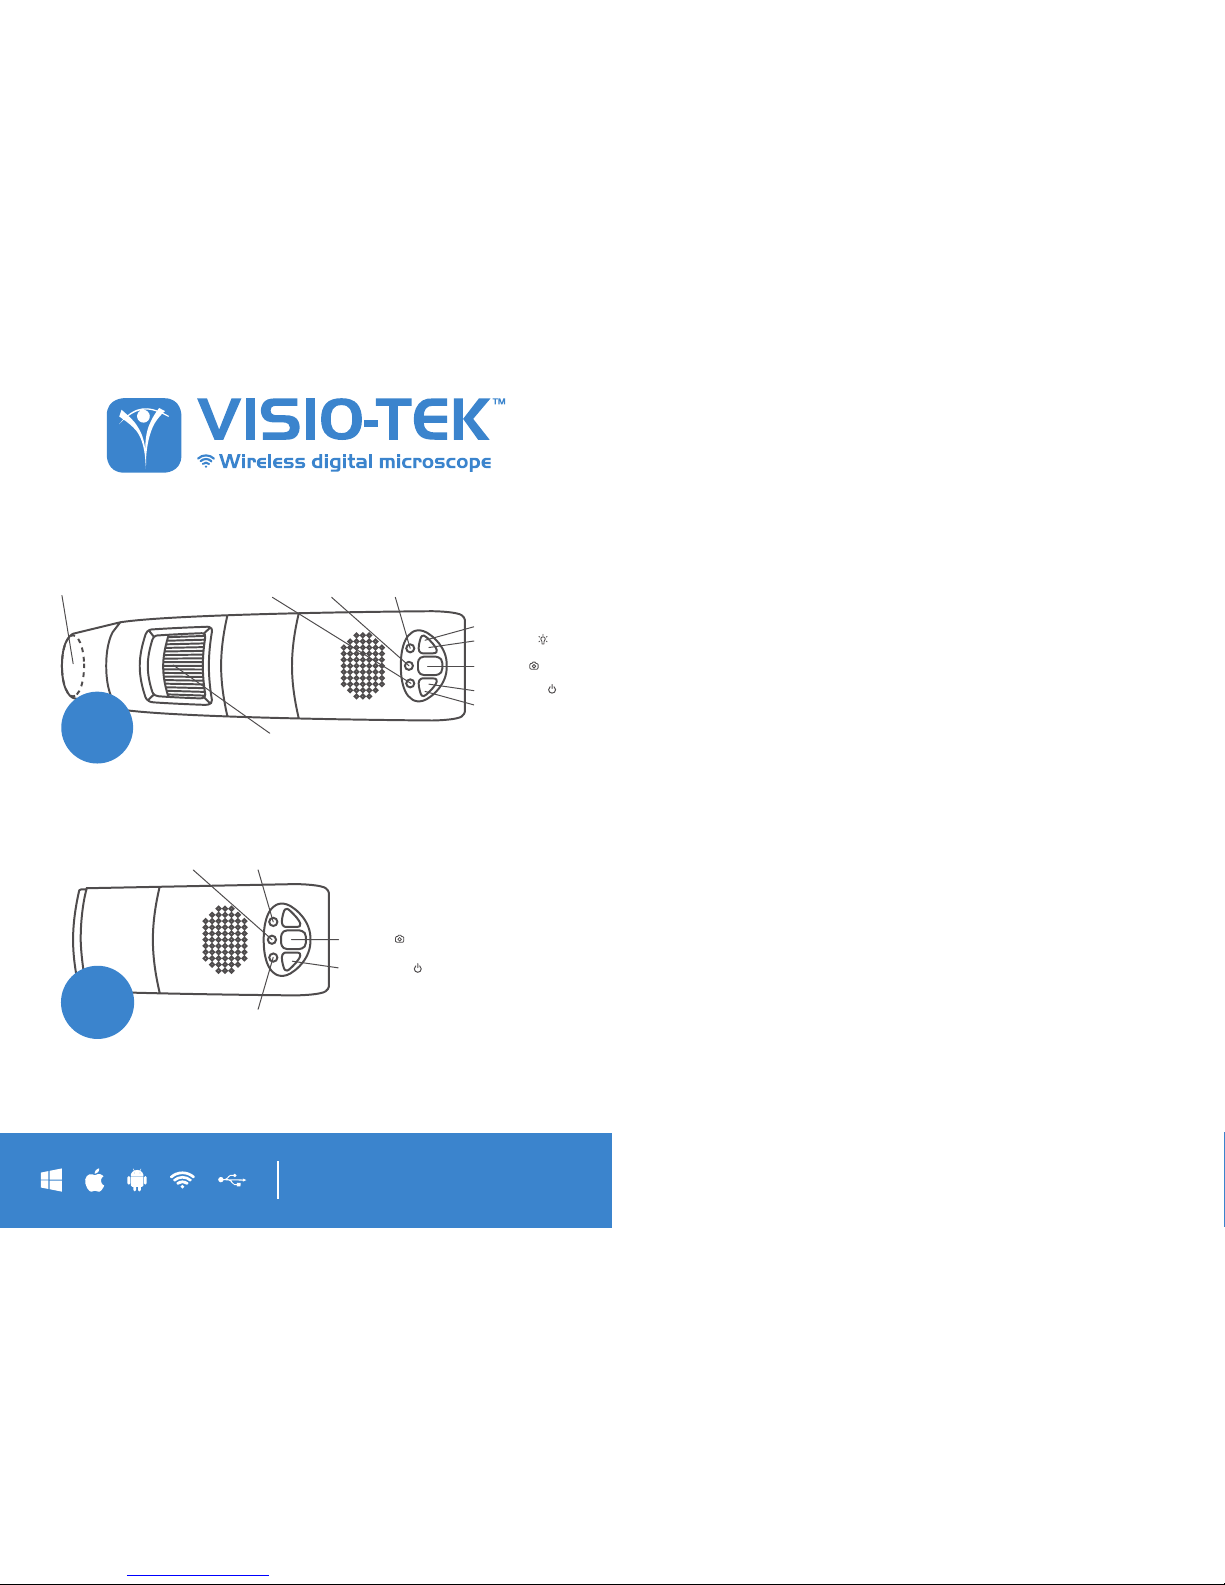
VISIOEYE
Battery
Indicator
Power
Indicator
Illumination &
Focus Cap
Focus & Magnification
Adjustement Wheel
Wi-Fi
Indicator
LED Regulator (-)
LED Regulator (+)
LED Switch ( )
Snapshot ( )
Power Button ( )
VISIO
Battery
Indicator
Wi-Fi
Indicator
Power
Indicator
Snapshot ( )
Power Button ( )
1. WI-FI CONNECTION
DOWNLOAD THE APP
For Apple products: install the app on your iPhone or iPad via the Apple App store. Simply
search for “Visio-tek” in the search box and you will see the App as the first result in the search.
For Android products: install the app on your Android device by searching for “Visio-tek” in
the Google Play store.
CONNECT YOUR DEVICE TO WI-FI
First turn your device on by holding the power button and wait for the green power indicator to
light up with a LED light. Wait approximately 20 seconds for the blue Wi-Fi indicator to light up.
A flashing blue light tells that the device has connected to Wi-Fi.
NETWORK CONNECTION
Check the Wi-Fi connection on your phone, tablet or PC and search for available networks.
Look for the connection that’s most similar to SSID “WiFi2SCOPE_xxxxxx” and tap it.
You will be prompted for a password. Enter “12345678” without the parenthesis, press ‘Ok’
and you will be connected.
NOTE: Entering password is only required the first time you connect your device.
VIEW THE PICTURES
Open your Visio-tek App. Within roughly 5 seconds you will be able to see the images on the
device screen.
To view the video stream, check that the Wi-Fi indicator is flashing and connect to the video
stream. This can then be broadcasted to other devices if you wish.
Note that frame rate of live video will decrease by increasing number of receiving devices
connected simultaneously.
2
Page 2
2. USING THE LED BUTTONS
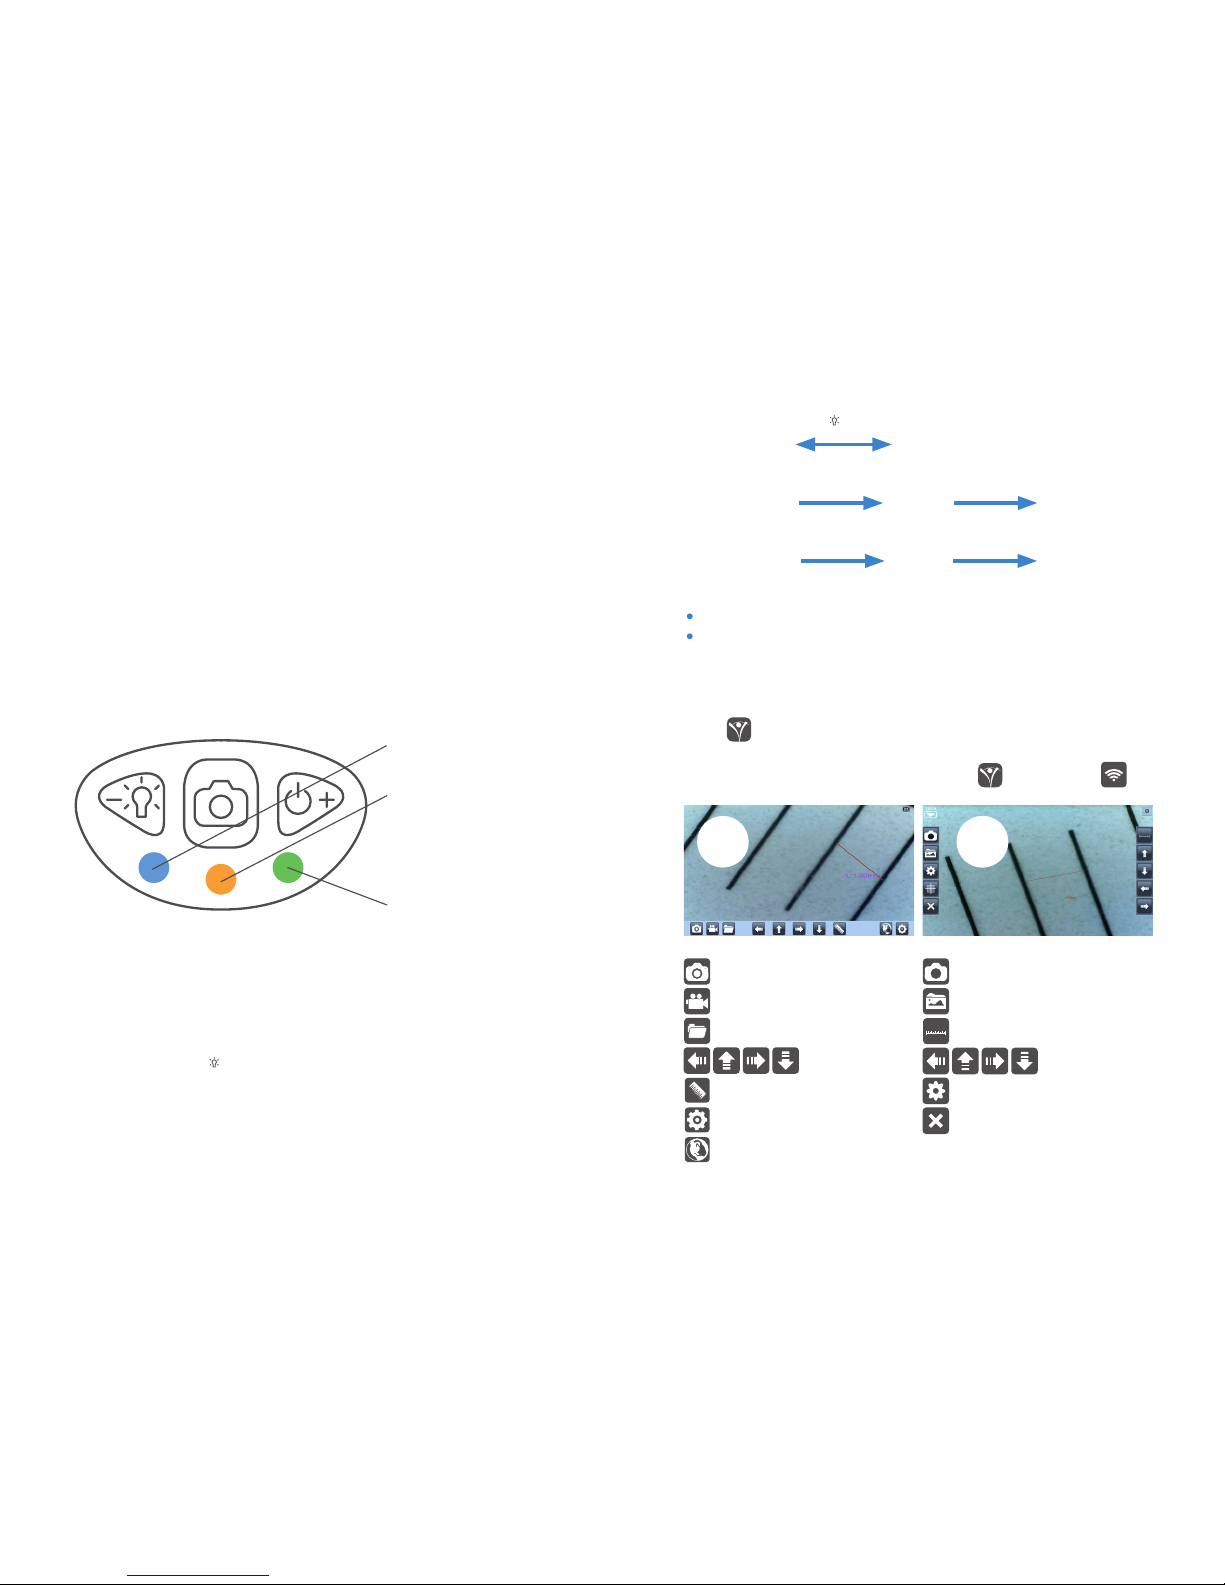
Power Indicator (green LED): The LED lights up when the microscope is in Wi-Fi mode or
when connected via Mini USB cable to the PC or power supply.
Wi-Fi Indicator (Blue LED): When Wi-Fi is transmitting correctly, the LED will flash. Continuous
illumination indicates no Wi-Fi transmission.
Wi-Fi: Hold the button for 2 seconds to activate the device Wireless Access Point (WAP)
USB: Switch off your Visio-tek microscope and connect to the USB port on your computer via
USB cable
Snapshot Button: Press the button to capture pictures directly from the microscope.
LED Regulator Button (+/-): Press + and - to increase or decrease the intensity of the light.
Wi-Fi working BLUE
Battery Status
In Charging ORANGE
Low Level RED
Power ON GREEN
SWITCHING LIGHT FUNCTIONS
Hold LED Switch Button ( ) for two seconds to switch from white light to IR light/UV light;
Press + and - to increase or decrease the intensity of the light. The UV LEDs or IR LEDs
are automatically activated when the intensity drops below the LEDs minimum levels.
iOS
Android
Capture Photo
Capture Video
Photos / Videos Folder
Calibration & Measurement
Resolution Settings
IP Address
Navigation Icons
3. THE APP ON APPLE & ANDROID DEVICES
Click on to run the Visio-tek app and view the live stream. If the image stream seems too
slow or goes to a black screen, restart the app and connect again.
On Android connected devices, run the app by clicking on and after click on
WHITE
LEDs
IR
LEDs
WHITE
LEDs
UV
LEDs
IR
LEDs
IR
LEDs
UV
LEDs
WHITE
LEDs
hold (-) 9 times
hold (-) 9 times
hold (-) 9 times
hold (-) 9 times
hold ( ) for 2 sec
or
UV
LEDs
after switching from IR to UV LEDs, if press + once, it will return to IR LEDs (low luminance status)
after switching from WHITE to UV LEDs, if press + once, it will return to WHITE LEDs (low luminance status)
Capture Photo
Photos / Videos Folder
Calibration & Measurement
Reset
Resolution Settings
Navigation Icons
3 4
Page 3
4. CALIBRATION ON SMARTPHONE & TABLET
To obtain accurate measurement data for each magnification, please calibrate before any
measurements. Use the enclosed calibration ruler. Bring the image into focus by turning the
“Focus & Magnification adjustment wheel”;
CALIBRATION ON iOS
Click the calibration icon to pop-up the screen;
Click “Calibration”
Calibration
:
A. Click to select a first point and refine the selection by clicking the arrows.
B. In the same way select a second point at a known distance;
C. Press any point on the screen.
D. Enter the actual value of lenght and press “OK”: a line of known length will appear.
CALIBRATION ON ANDROID
A. Click on the triangle button on the top-left of the screen and enter the scale value in the
“Magnification” box.
B. Use the enclosed calibration ruler as observed object. Click on
C. Click
calibrate
to start calibration.
D. Click to select a first point and refine the selection by clicking the arrows.
E. In the same way select a second point at a known distance.
F. Press any point on the screen, enter the actual value of lenght and press “OK”: a line of known
length will appear.
Now the calibration is completed. Click on the screen again, you can make measurements on
the live video using the same focus. If the new photo object is not in focus, please only adjust the
distance between the microscope and the object until the photo is clear.
For more information about Calibration go to Visio-tek official website www.visio-tek.net
and search the related video tutorial.
5. CONFIGURATION & INSTRUCTIONS FOR
VISIO-EYE
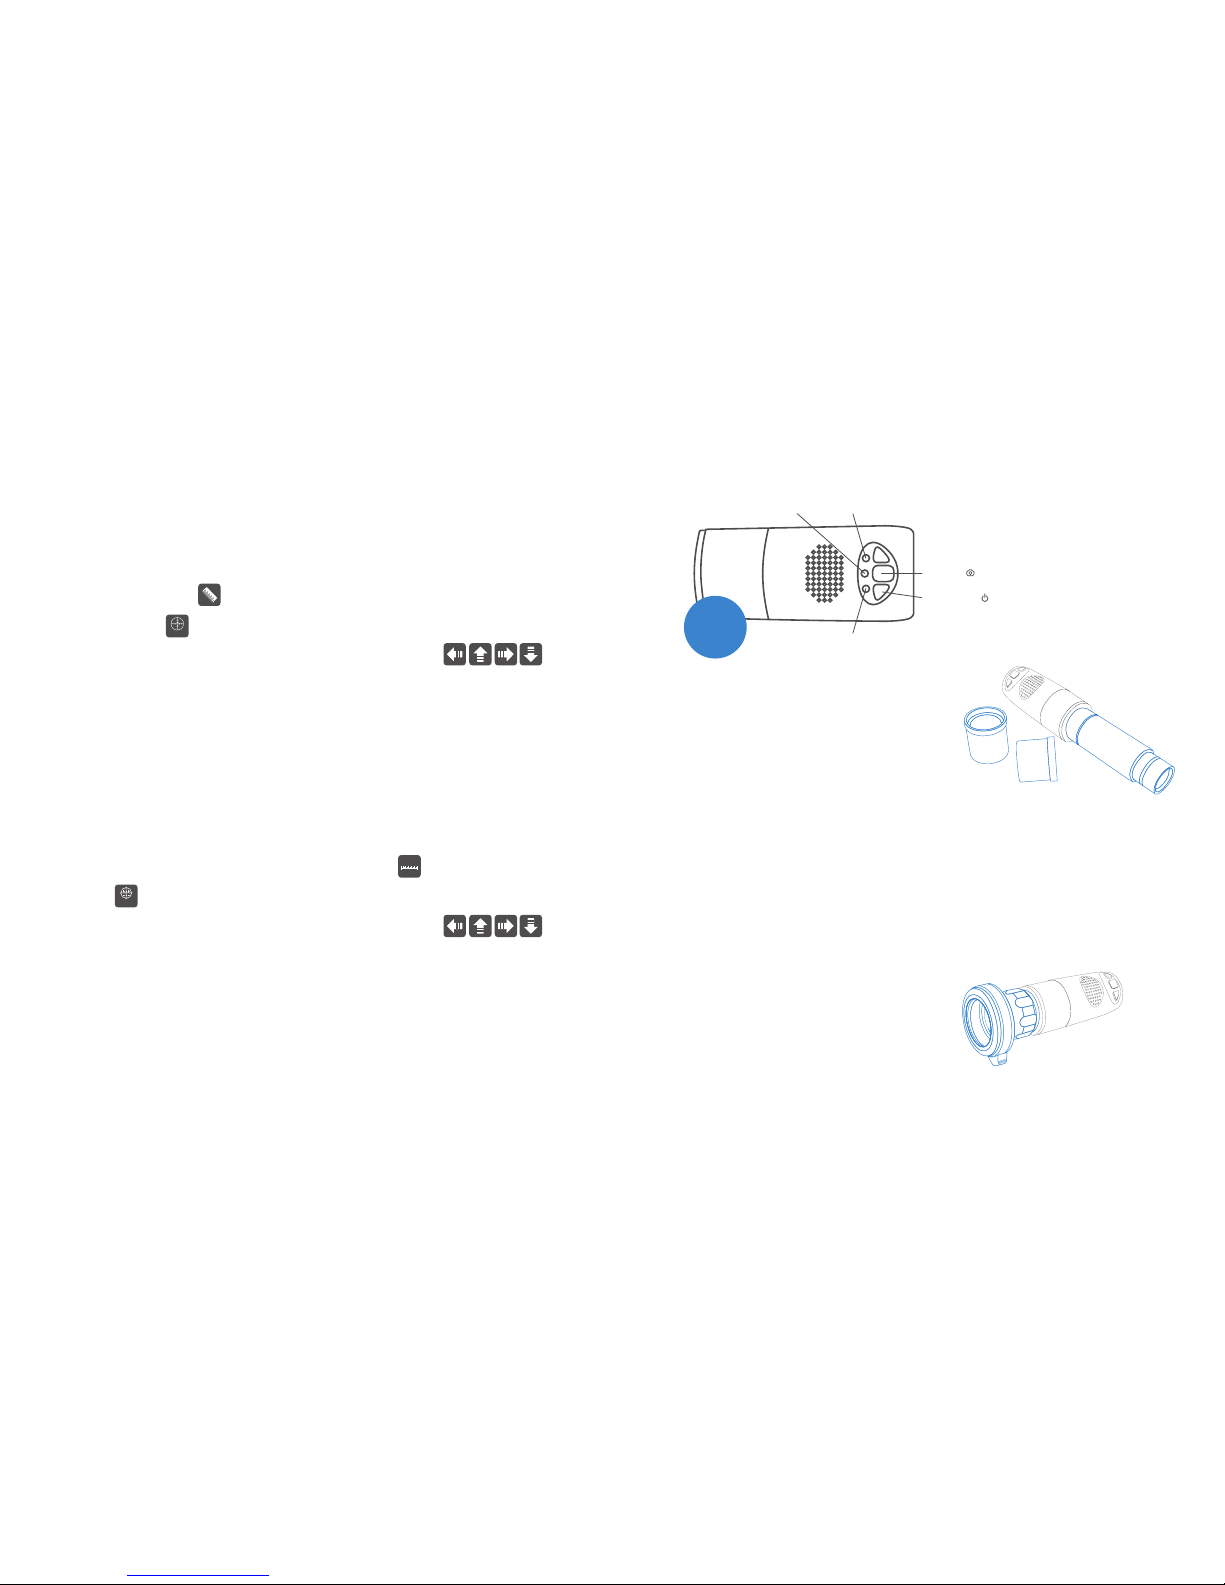
VISIOEYE
Battery
Indicator
Wi-Fi
Indicator
Power
Indicator
Snapshot ( )
Power Button ( )
FOR EYEPIECE MICROSCOPES
C- Mount thread microscope:
connect by screwing the VISIO-EYE to your Eyepiece Microscope.
Microscopes with 23 mm diameter eyepiece:
screw VISIO-EYE to VISIO-SCOPE lens and insert in the Eyepiece Microscope.
Microscopes with 30 mm diameter eyepiece:
screw VISIO-EYE to VISIO-SCOPE lens; enter the 30.0 adapter and insert in the Eyepiece
Microscope.
Microscopes with 30.5 mm diameter eyepiece:
screw VISIO-EYE to VISIO-SCOPE lens; enter the 30.5 adapter and insert in the Eyepiece
Microscope.
FOR OPTICAL ENDOSCOPES
Screw VISIO-EYE to VISIO C-coupler and holding the C-couplers’ flaps open, insert the
endoscope; rotate C-coupler’s zoom ring to focus. Depending on the microscope or endoscope’s
magnifying lenses, it may be necessary to tighten the VISIO-EYE-RING on your VISIO-EYE.
5 6
Page 4
MADE
IN PRC
6. F.A.Q
1. Q: There is no video display on the app after successful Wi-Fi connection.
What do I do?
A: If the Wi-Fi LED’s doesn’t light up, power off Wi-Fi microscope and close the App to restart
it. If the illumination LEDs light up, wait about 5 seconds to restart the App or power off Wi-Fi
microscope and close the App to restart it. If the problem persists, continue restarting the app.
2. Q: The Wi-Fi microscope video stops after changing the resolution to
1280 x 1024, but it works well at 640x480. Why is that?
A: Low battery, charge your microscope.
3. Q: The Wi-Fi microscope video stops working after a long time. What do I do?
A: Check if the battery is low or dead. Power off the Wi-Fi microscope and close the App to
restart it. Follow the procedures in the quickstart guide to restart the app.
4. Q: The Wi-Fi microscope video’s frame rate is slow. How do I fix it?
A1: Please wait for about 5 seconds and restart the app.
A2: Set the video resolution to 640x480 if the current resolution is 1280x1024.
A3: Check if there is low battery or there are other Wi-Fi networks around interfering with the
connection. If the problem persists, restart the app.
5. Q: Why does the video stop displaying after I change the resolution?
A: When changing the resolution, you must wait until the LED light is off and lights up again
before clicking for live video - it takes about 5 seconds. Also try to power off the Wi-Fi
microscope and close the app to restart it.
6. Q: Why does the device feel warm after the WiFi microscope has been working
for some time?
A: The power dissipation of the Wi-Fi microscope is about 2.5W. The highest internal temperature
of the device can reach about 60°C, so this could make feel a slight warmth to the user.
7. Q: How long can the Wi-Fi microscope work on a full battery charge?
A: It is about 2 hours at 640x480 resolution. So it’s suggested to switch the device off when not
being used. Full charging time is about 4 hours.
8. Q: Can I use the Wi-Fi setup or the wired setup via USB?
A: This is a possible option, refer to the complete user manual.
IMPORTANT INFO AND WARNINGS
1. PLEASE READ THE USER MANUAL BEFORE
USING THE PRODUCT
2. Do not expose this product to water or other
liquids. Immediately power down the product if
it comes into contact with water or other liquids.
Continued use of the product may result in fire or
an electrical shock.
3. If the lens is dirty, please use a lens brush or
soft cloth to wipe clean. Avoid touching it with your
fingers. Exercise care to avoid scratching the lens.
4. Close the Software, before removing the
microscope from the PC.
5. Multiple wireless sources placed too close each
other can cause interference and issues with
functionality. For example Wi-Fi, cordless phone,
Bluetooth etc.
Please keep the Wi-Fi microscope away from these
and other wireless sources during operation.
DISPOSAL
The crossed waste bin indicates that the product
must be collected separately from other waste at
the end of its useful life. It must be disposed of in
accordance with local WEEE regulations.
WARRANTY
The warranty of this product against any defects
due to materials or workmanship is valid for a
period of 1 year from the date of original purchase.
To take advantage of the guarantee, you must retain
your purchase invoice. The warranty is null and void
if the damage is resulting from carelessness or
misuse. Products considered to be defective should
be returned only to the dealer from which it was
purchased accompanied by the invoice.
For more information about our products go to the VISIO-TEK official website: www.visio-tek.net
7
 Loading...