


WiFi
Microscope User Manual
WiFi Microscope
User’s Manual
Welcome
Thank you for choosing WiFi Microscope!
The WiFi Microscope is an exciting and dual-usage digital microscope; it can be used either with a WiFi connection or with a
USB wired connection. The dual-usage microscope enables you to clearly study micro-objects, the WiFi connect not only gives
you freedom to move away from a laptop/PC, it also enables you to share your study with others connected to the WiFi. The
WiFi Microscope has a wide scope of applications, such as,
• Industrial Inspection
• Computer Parts inspection
• Telecom module inspection
• Scientific teaching tool
• Medical analysis
• School Research tool
• Insect dissection / examination
• Plant dissection / examination
• Skin examination
• Textile Inspection
• Collections / Coin/ Jewelry Inspection
• Printing Inspection
• And more…………..
Please read this manual carefully before using WiFi microscope!
Page 1 of 31

WiFi
Microscope User Manual
Contents
Welcome .......................................................................................................................................................................... 1
Contents .......................................................................................................................................................................... 2
Product Specifications ...................................................................................................................................................... 3
Safety Cautions................................................................................................................................................................. 4
Package Contents ............................................................................................................................................................. 5
How to Use ....................................................................................................................................................................... 6
User guide: Working at WiFi Mode ......................................................................................................................................... 7
Setting for Internet and Microscope’s WiFi Connection at the same time ..................................................................... 7
WiFi Security Setup ......................................................................................................................................................... 9
User guide: Working at Wired USB Mode ............................................................................................................................. 10
WiFi Micro App .............................................................................................................................................................. 10
WiFi Micro on iPad/iPhone ................................................................................................................................................... 10
Calibration and Measurement’s Guide .......................................................................................................................... 12
WiFi Micro on Android Tablet /Phone .................................................................................................................................. 13
Calibration and Measurement’s Guide .......................................................................................................................... 14
WiFi Micro on Windows Computer ...................................................................................................................................... 16
Video Processing ........................................................................................................................................................... 19
Photo Viewing, Measure and Calibration ..................................................................................................................... 22
WiFi Micro on Mac Computer ............................................................................................................................................... 23
Photo Measurement ..................................................................................................................................................... 27
Troubleshooting ............................................................................................................................................................. 30
Page 2 of 31

WiFi
Microscope User Manual
Product Specifications
u Operation system: Windows /Mac/IOS and Android
WiFi Spec:
u Photo and Video Resolution: 1.3MPiexe-- 1280x1024(MJPG),640x480(MJPG), 320x240
u Frame Rate:15fps@1280x1024,30fps@640x480, 320x240
u IEEE 802.11 b/g/n standards compliant
u Wireless Transmission Distance: up to 5m
u Transmit Power:
11n HT40 MCS7: +13 dBm
11b CCK: +18 dBm
11g OFDM: +15 dBm
u Data Rate:
802.11n: up to 150Mbps
802.11b: 1, 2, 5,5, 11Mbps
802.11g: 6, 9, 12, 18, 24, 36, 48, 54Mbps
u The Temperature: ≤60 °C (Celsius degree) with full speed running.
u Frequency Range: 2.400 ~ 2.4835GHz
u Power Consumption: Max 2.5W
u Frame Rate: 10fps~30fps
u Li-ion Battery: Continuous Working Time—Appx.2 Hours, Full Charging Time—Appx.2 Hours
u Battery Life: 500 cycles
Camera Spec:
u Camera Sensor: CMOS 1/4 ”
u Optical features:
Exposure: Auto
Gamma Correction: Auto
Numerical Aperture: Auto
White Balance: Auto
Black Reference: Auto
Flicker Avoidance: Auto
Defect Identification: Auto
Color Saturation: Auto
Microscope Spec:
u Adjustable Magnification: 5x~200x
u The Object Distance: 8~300mm
u Focus Range: 8mm ~ 300mm
u Light Source: 8pcs adjustable White LEDs
u Lens: High Definition Microscopy Lens
u Dimension: 36mm(Diameter) x 142mm(Length)
u Weight: 88g
Wired USB Spec:
u Photo and Video Resolution: 1.30Mpixel—1280x1024,640x480,320x240
u Frame Rate:15fps@1280x1024,30fps@640x480, 320x240
u PC interface: USB 2. 0
u MiniUSB Cable:1.2m
Page 3 of 31

WiFi
Microscope User Manual
Safety Cautions
1. Avoid touching the lens.
2. Protect the product from electrostatic damage.
3. Do not attempt to disassembly any part of this product.
4. Do not attempt to service this product yourself. Opening the covers may expose you to dangerous
voltage points or other risks.
5. Store and operate WiFi Microscope at Temp: -20 ~ 45°C, Humidity: 45% ~ 85%, storing and
operating outside these limits may reduce the life of the product.
6. Do not expose this product to water or other liquids. If water or other liquids enter the product,
immediately power off the product. Continued use of the product may result in fire or an
electrical shock.
7. Do not use any detergent or volatile solution, as this will damage the camera case, painted
surfaces and lens. To clean the product uses only a soft cleaning cloth.
8. Do not place this product near a heat source or expose direct flame, avoid the lens damaged by
high temperature or humidity
9. If the lens is dirty, please use a kens brush on soft cloth to wipe clean. Avoid touching it with your
fingers. Exercise care to avoid scratching the lens.
10. Need to read WiFi Microscope User’s Manual before using and storing it.
11. To avoid electric shock, remove all electricity source before removing PC.
Page 4 of 31
WiFi
Microscope User Manual
Package Contents
The WiFi Microscope package includes the following:
1. WiFi Microscope
2. Plastic Stand
3. Mini USB cable
4. Quickstart guide
5. Calibration ruler
6. Focus Caps (2 pcs)
Page 5 of 31
WiFi
Microscope User Manual
How to Use
Part Description
.
The Power “OFF/USB—WiFi” Switch
WiFi: WiFi Microscope works in WiFi mode when Power Switch is moved to “WiFi” side.
OFF/USB: Power-off WiFi Microscope when Power Switch is moved to “OFF/USB” side; also, USB microscope works if
connected to PC’s USB port via MiniUSB cable.
WiFi Indicator (Blue LED): Flashing light indicates data transmission; Constant light indicates no data transmission.
Power Indicator (Blue LED): Lights when power on WiFi or connected to PC via MiniUSB cable.
Battery Indicator (Blue LED or Red LED): Red LED lights when battery level low; Blue LED lights when battery charging full.
Charge Indicator (Red LED): Lights when the battery is being charged; turn off when the battery is fully charged.
Charging Instructions:
1. Connect the PC’s USB cable, it charges whether the power switch is on WiFi or OFF/USB. (We DO NOT recommend
charging WiFi Microscope while using)
Page 6 of 31
WiFi
Microscope User Manual
User guide: Working at WiFi Mode
1. Install WiFi Micro:
For iPad and iPhone:
Search “Visio-tec” in App Store to download and install it.
For Android’s Smart-Phone and Tablet:
Search “Visio-tec” in Google play Store to download and install it.
For Windows and Mac PC:
Install the app “Mac (Windows (WiFi software)\Win (WiFi software).exe” (for windows OS) or “Mac (WiFi software)\
Mac (WiFi software).dmg) from the www.visio-tec.net.
2. Slide the Power switch to the “WiFi”, and the power LED indicator will light, wait for ~20 seconds until the WiFi
indicator and the illumination LEDs light, then the WiFi signal will be transmitting correctly.
3. Check the wireless connection on your Phone/Tablet or PC and a list of available networks will appear. Select the SSID
“WiFi2SCOPE_xxxxxx” network from the list to connect; the network “WiFi2SCOPE_xxxxxx” requires a password: enter
the password “12345678” and click Ok.
4. Once connected, please wait for about 5 seconds to open the “WiFi Micro” application to see your images. If there is no
video display, please close and restart WiFi Micro app again. The WiFi indicator LED flashes and video stream signal
should be displayed in the app. Video streaming can be broadcasted to many devices, but the frame rate of live video will
decrease as the number of receiving devices increase.
Setting for Internet and Microscope’s WiFi Connection at the same time
To access the internet by WiFi connection at the same time the WiFi microscope is working, open an internet browser, input
http://10.10.1.1, and click “enter”. A pop-up window will require you to enter a username and password, please enter: admin
and admin, and then this window should appear:
Page 7 of 31
WiFi
Microscope User Manual
Click in the window to pop-up the below screen:
Select “Wireless AP Client Mode”, click to pop-up the below screen:
Click till your desired network SSID appears, and click it to pop-up the below screen:
Enter the password to click “Next” till the setting is Well Done. Now you can open WiFi Micro app to use WiFi microscope, and
at the same time, you can access the internet.
Page 8 of 31
WiFi
Microscope User Manual
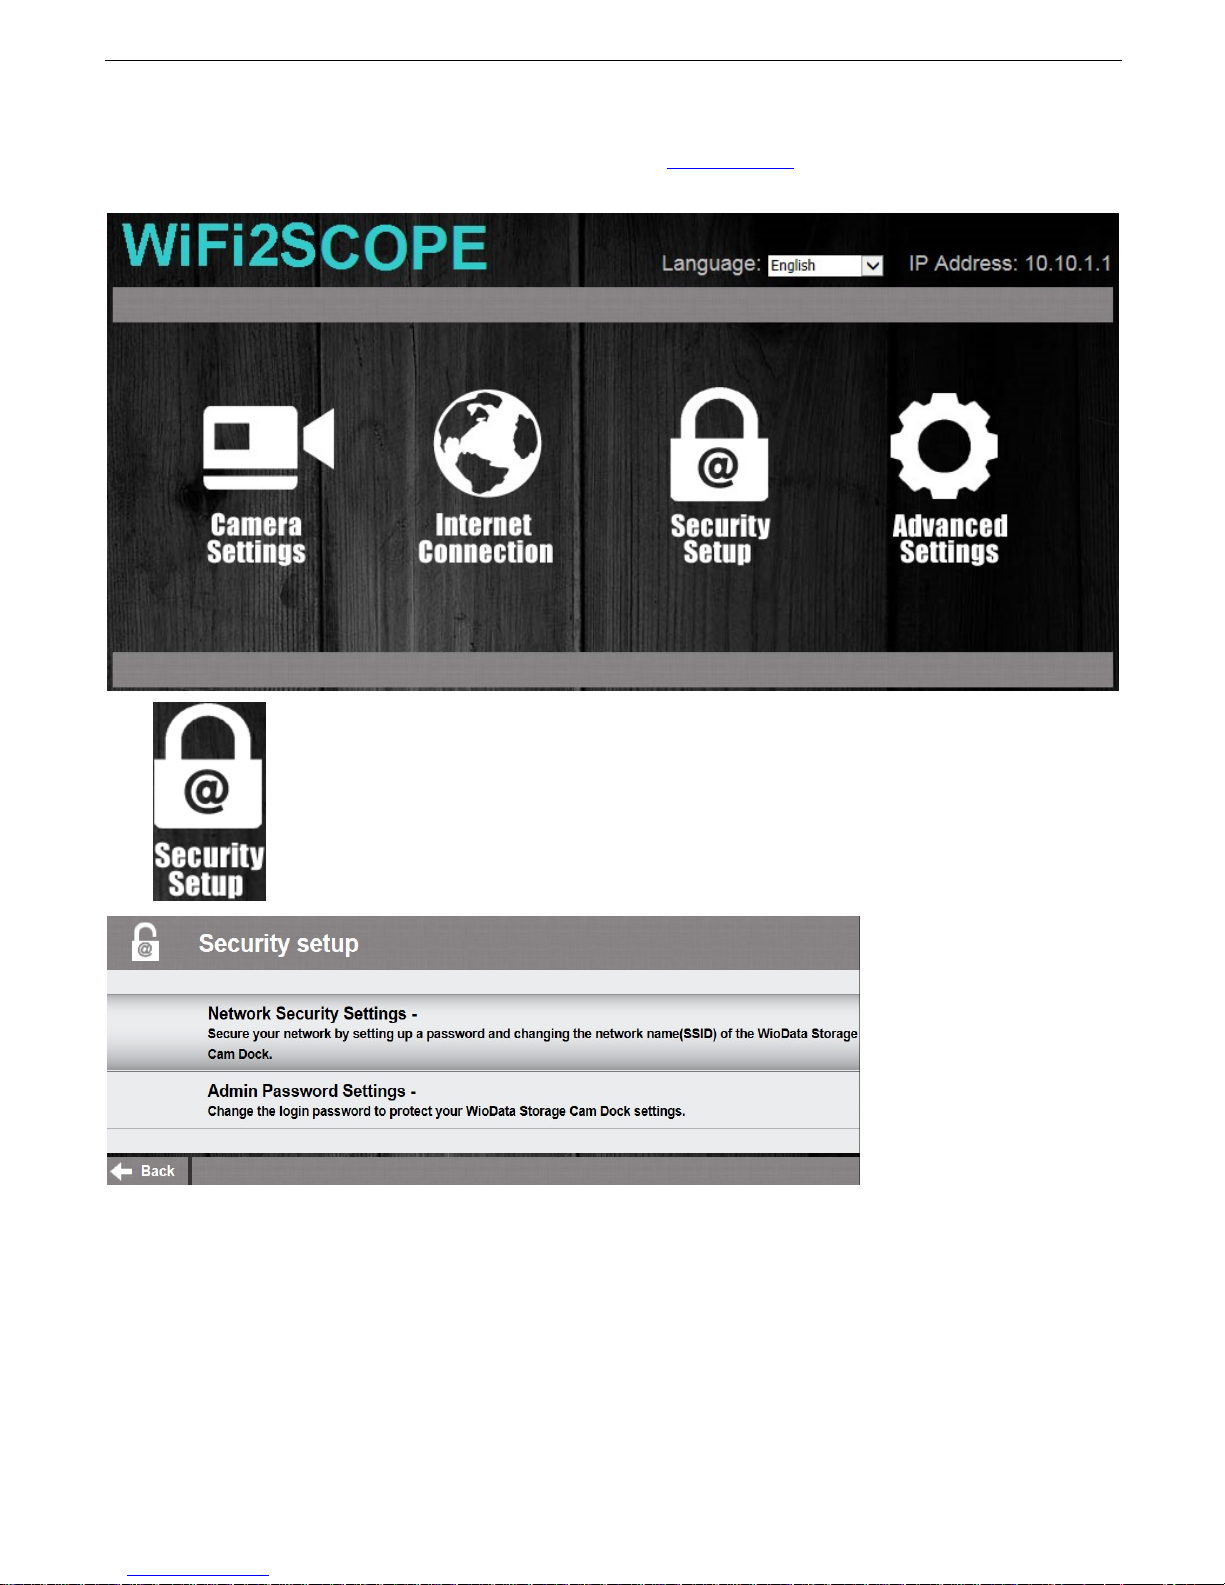
WiFi Security Setup
To change the WiFi access password, open an internet browser, input http://10.10.1.1, and click “enter”. A pop-up window will
require you to enter a username and password, please enter: admin and admin, and then this window should appear:
Click in the window to pop-up the below screen:
Click “Network Security Settings -” to pop-up this below screen:
,
Page 9 of 31
WiFi
Microscope User Manual
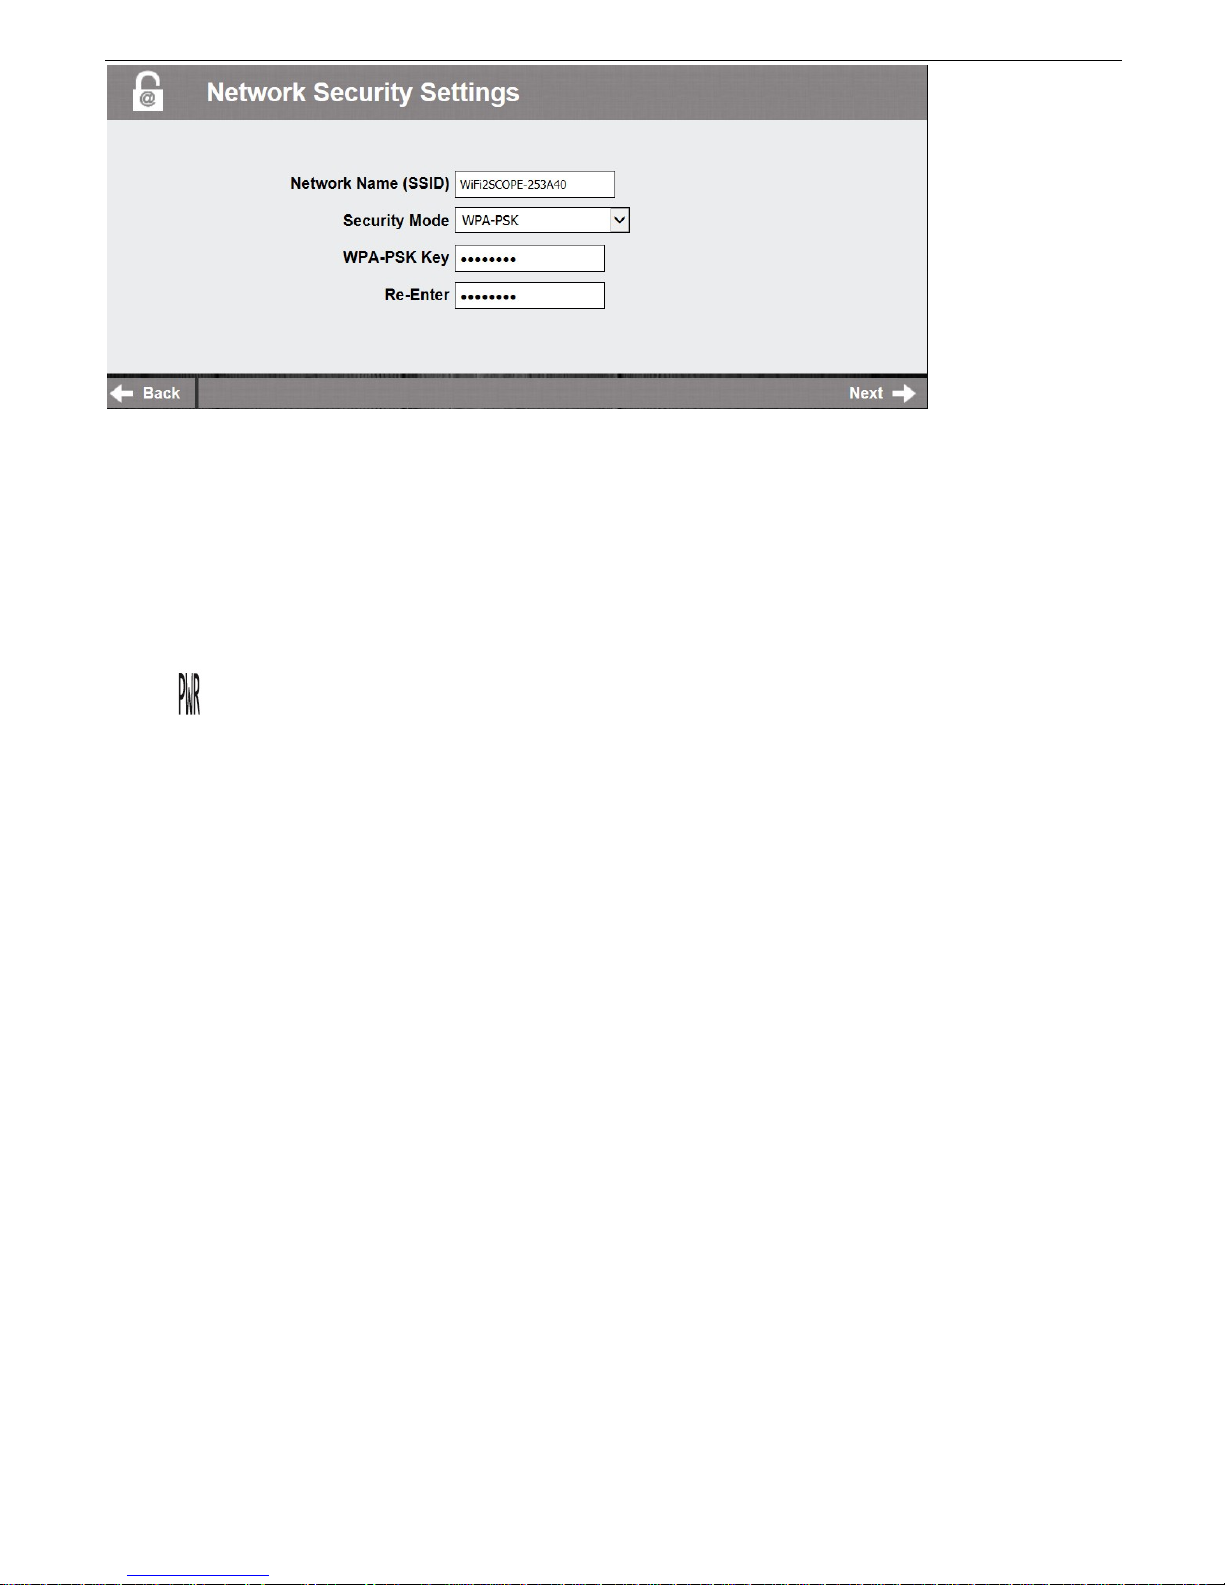
Enter your desired Network Name (SSID) and password in “WPA-PSK Key” and “Re-Enter”, and click “Next” until the setting is
done. Now you can re-connect the new SSID WiFi by entering the new password.
User guide: Working at Wired USB Mode
1. Install the application “Windows (USB software)\Win (USB software).exe (for windows OS) or Mac (USB
software)\Mac (USB software).dmg for Mac OS) from www.visio-tec.net.
2. Slide the Power switch to the “OFF/USB” side, and connect to PC’s USB port with USB cable; the power
LED indicator will light, as well as charge indicator LED (Battery is being charged)
3. Open the app to work with it. The illumination LED lights up as soon as the application software is running.
WiFi Micro App
Note: Before start Visio-tec app, please make sure the WiFi microscope has already connect to your display device by WiFi.
WiFi Micro on iPad/iPhone
Search “Visio-tec” in App Store to download and install it, click "Visio-tec icon to display video as below:
Warm-up Tips: If the live video is black or slow, please restart “Visio-tec” app again.
Page 10 of 31

WiFi
Microscope User Manual
: Capture photo or record video (You must set the pixel resolution to 640x480 when recording video).
: Album for Photos or videos.
, , , : Navigation icon—moving a dot left/up/down/right for calibration or measurement operation
: Measurement icon. : Calibration, : Line, :Angle, :3 dots for circle
: Switch between photo taking and video recording by clicking
: Setting: (When change any item of the Setting, you must wait until the illumination LED is off and lights up again – it will
take about 5 seconds).
Resolution setting and Default:
Page 11 of 31

WiFi
Microscope User Manual
: Enable the button snapshot.
: Add new album folder (Default is OFF)
Calibration and Measurement’s Guide
To obtain the accurate measurement data, please calibrate before measurement at every magnification. Use the enclosed
calibration ruler as the to-be-observed object. Bring photo into focus by turning the “Focus & Magnification adjustment
wheel”; Click to pop-up this below screen:
Click “ ” to back the live video, click two dots (moving the dot by clicking , , , ) which draw a your
desired line, then click on the live video to pop-up this screen:
Input the actual length of the line; click “ok” and on the live video to pup-up this below screen:
Page 12 of 31

WiFi
Microscope User Manual
Now the calibration is completed, you must click on screen to resume the live video, and you can make measurement features
accurately on the live video at this same focus. (Don’t subsequently adjust the “Focus & Magnification adjustment wheel”) If
the new photo object is not in focus, please only adjust the distance between the microscope and the object till the photo is
clear. This measurement data can be saved inside the taken photo.
W
iFi Micro on Android Tablet
/Phone
Search “Visio-tec” in Google play Store to download and install it, click "Visio-tec" icon to display video as below:
Warm-up Tips: If the live video is black or slow, please restart “Visio-t” app again.
Page 13 of 31

WiFi
Microscope User Manual
: Capture photo
: Album folder.
, , , : Navigation icon—moving a dot left/up/down/right for calibration or measurement operation
: Measurement icon. : Calibration, : Line, :Angle, :3 dots for circle
: Setting:(When change any item of the Setting, you must wait until the illumination LED is off and lights up again – it will
take about 5 seconds).
Resolution setting and Default:
: Enable the Button Snapshot.
: Enable to rename the photo for every capturing
: Default.
Calibration and Measurement’s Guide
To obtain the accurate measurement data, please calibrate before any measurement function at each magnification.
Use the enclosed calibration ruler as the to-be-observed object. Bring photo into focus by turning the “Focus & Magnification
adjustment wheel”; Click to pop-up this below screen:
Page 14 of 31

WiFi
Microscope User Manual
Click “ ” to back the live video, click two dots (moving the dot by clicking , , , ) which draw a your
desired line, then click on the live video to pop-up this screen:
Input the actual length of the line; click “ok” and on the live video to pup-up this below screen:
Page 15 of 31

WiFi
Microscope User Manual
Now the calibration is completed, click on screen again, you can make measurement features accurately on the live video at
this same focus. (Don’t subsequently adjust the “Focus & Magnification adjustment wheel”) If the new photo object is not in
focus, please only adjust the distance between the microscope and the object till the photo is clear. This measurement data can
be saved inside the taken photo.
WiFi Mic
Double-click Visio-tec icon after completing installation to pop-up the below screen:
ro on Windows Computer
Page 16 of 31

WiFi
Microscope User Manual
Click “Preview” icon and the WiFi Micro main screen will display video as below: (it waits about 5 seconds to display video; if
the live video is black or slow, please click “Preview” icon once again to try.)
Menu:
File
Select a photo or video, click “File” on menu bar or right-key to pup-up the drop-down menu for operation.
Open: Open the selected photo or video to be viewed.
Save As: Save the selected photo or video file as the desired folder and file format. (Or click ).
Delete: Delete the selected photo or video.
Delete All: Delete the all photos or videos in the photo or video folder.
E-Mail: Email the selected photos through your default email account. (Or click button).
Favorites: Open the folder which contains the captured photos and recorded videos.
Setting
Device Setting: Select “Video setting” to pop-up the window below for video parameter setting:
Page 17 of 31

WiFi
Microscope User Manual
When change any item of the Setting or enable the button snapshot, you must wait until the illumination LED is off and lights up
again before clicking OK - it takes about 5seconds.
Setting: click to pop-up the pen setting: (If the "Line width" is 2 or 3 Pixel, the "Pen Type" must be Solid-Line)
Snapshot Enable: Enable the button snapshot. The video will be stop, please Click “Preview” again.
Language: The language selection allows you to select the WiFi Micro interface language.
Capture
Take Picture: You can capture a photo by clicking the snapshot Button.
Take/Stop Video: In the active live video window, click on the button to record a video
Page 18 of 31

WiFi
Microscope User Manual
1. Frame rate: is the number of frames or photos that are projected or displayed per second. The number range is 1~30
2. Timer limit: is the time of video recording to avoid video file size exceeding the disk space. The number range is
1~99999
Take time-lapsed pictures: Press the time-lapsed button on the active preview window
Help
About: Software version.
Video Processing
Please click “Preview ” to resume the live video after finished operation of video processing below.
Horizontal Mirror
Vertical Mirror
Negative
Binary Segmentation
Monochrome display (Red)
Monochrome display (Green)
Monochrome display (Blue)
Page 19 of 31

WiFi
Microscope User Manual
Calibration on Video
It is strongly suggestion: To obtain the accurate measurement data, please calibrate before any measurement function at
each magnification.
Select a known measurement standard as the to-be-observed object, such as a ruler, to be used for calibration. Bring photo of
the selected ruler into focus by turning the “Focus & Magnification adjustment wheel”, determine the magnification by taking
a reading from the scale on the focus dial as below(The default magnification is 60):
Enter the scale value in the “Scale” box in the right-hand scale box of the screen as below:
In the live video window click on the calibration button , and then click and drag to 2mm length, a small window pop up ,
enter the actual length(The example is 2mm) to click “OK” Button..
The software will automatically calibrate the scale of magnification and will show the calibrated scale of magnification at the
right-hand box of calibration button as below:
Page 20 of 31

WiFi
Microscope User Manual
Now the calibration is completed, you can make measurement features accurately on taken photos or real-time video at this
focus point (Don’t subsequently adjust the “Focus & Magnification adjustment wheel”).If the new photo object is not in focus,
please only adjust the distance between the microscope and the object till the photo is clear, and then capture the photo to
measure it.
Line Measurement
This allows you to measure the linear distance between two points. Simply click and drag to the desired length, and click again
to finish.
Point to Line Measurement
This allows measurement of a line 90 degree from a certain line. Simply create a line to represent the base by clicking once to
start, drag, and then click again to set the endpoint. Branch off from the base line to start measuring the line that is 90 degree
from the base line and a final click to finish the measurement.
Continuous Line Measurement
This allows measurement of the distance between multiple connecting lines. Simply click and drag to form one section of
distance, click again to start another section. Continue until the total desired distance is measured. Double-click to finish.
Polygon Measurement
This allows measurement of a polygon. Simply click and drag to form the desired length, and click again to start the next
section, double-click to finish the polygon measurement.
Radius of Circle Measurement
This allows you to measure the circumference, area, and radius of a circle. Simply click and extend out to the desired radius.
Diameter of Circle Measurement
This allows you to measure the circumference, area, and radius of a circle. Simply click and extend out to the desired diameter.
Three Point Circle Measurement
This allows the measurement of the circumference, area, and radius of a circle. Simply click on any three points on the circle
you wish to measure.
Three Point Arc Measurement
This allows a measurement of an arc. Click on three consecutive points on an arc to measure.
Three Point Angle Measurement
This allows the measurement of an angle. Start at the pivot point and extend out to start measuring an angle.
Four Points Angle Measurement
This allows the measurement of an angle by selecting four points. Simply select two points from one line segment and another
two points from another line segment to complete the angle measurement.
Page 21 of 31

WiFi
Microscope User Manual
Photo Viewing, Measure and Calibration
You can double-click the selected Photo to measure and view it as below shown:
For measure, please enter the magnification if there is not number. The number is the scale value of roller at the baseline of
the captured photo.
Photo file name: yyyymmddhhmmss_nnnx_Nxxxx is combined by date, time, magnification and serial number. For example,
Still_2009-03-06_102949_060X_N0002 figures: Number is 0002, magnification is 60, date is Mar-06-2009, time is AM10:29:49.
The program will auto load the magnification when you measured it if you put the scale before you capture the photo.
: Open a photo for measure from a folder.
: Save as
: Print this photo.
: Select one target.
: Measure function items.
: Pen setting.
: Add text into photo.
: Delete the selected target.
: Move the selected target.
: Calibration.
Page 22 of 31

WiFi
Microscope User Manual
WiFi Micro on Mac Computer
If you attempt to install WiFi Micro in the OS X 10.8 or later version, the system will pop-up the message as below window:
You need to set your computer as below:
Click Apple icon to pop-up the below window:
Click “System Preference” to pop-up below window:
Page 23 of 31

WiFi
Microscope User Manual
Click “Security&Privacy” to pop-up the below window:
Click “Click the lock to make changes” to pop-up the below window:
Page 24 of 31

WiFi
Microscope User Manual
Input “Name” and “password” of your system, and click “Unlock” to pop-up the below window:
Select “Anywhere” to finish the setting. Now you can install “Visio-tec” app.
Double-click Visio-tec icon after completing installation to pop-up the below window:
Page 25 of 31

WiFi
Microscope User Manual
Click “Preview” icon and then the WiFi Micro main screen will display video as below: (it waits about 5 seconds to display
video; if the live video is blank or slow, please click “Preview” icon once again to try.).
: Preview (Connect the WiFi microscope and display video).
: Capture photo.
Page 26 of 31

WiFi
Microscope User Manual
: Photo folder: Open the folder which contains the captured photos.
: Setting (Show / Hide).
: Enable the Button Snapshot feature.
When change any item of the Setting or enable the button snapshot, you must wait until the illumination LED is off and lights up
again - it takes about 5seconds.
: “About”.
Photo Measurement
Click “Preview ” to resume the live video after finished operation of photo measurement.
Double-click one photo and then the measurement window will display as below:
Page 27 of 31

WiFi
Microscope User Manual
Calibration: To obtain the accurate measurement data, please calibrate before any
measurement function at each magnification.
(1) Select the standard ruler photo and double-click it and Click [Calibration] Button to pop-up the below window, then click
[YES].
(2) Input a desired exact knew value (2mm in this example) in [Actual Length] box of the below screen and then click [OK]
Button.
Page 28 of 31

WiFi
Microscope User Manual
(3) Finally, you must draw one line with the exact length 2mm to complete the calibration.
Now the calibration is completed, you can make measurement features accurately on photos which were taken at this focus
point afterward the calibration. (Don’t subsequently adjust the “Focus & Magnification adjustment wheel”) If the new photo
object is not in focus, please only adjust the distance between the microscope and the object till the photo is clear, and then
captures the photo to measure it.
Measurement Line: This allows you to measure the linear distance between two points. Simply click and drag
to the desired length, and click again to finish.
Page 29 of 31

WiFi
Microscope User Manual
Measurement rectangle: This allows you to measure the width, height, and area of a rectangle.
Measurement Radius Circle: This allows you to measure the circumference, area, and radius of a circle.
Simply click and extend out to the desired radius.
Measurement Diameter Circle: This allows you to measure the circumference, area, and radius of a circle.
Simply click and extend out to the desired diameter.
Measurement Three Points Circle: This allows the measurement of the circumference, area, and radius of a
circle. Simply click on any three points on the circle you wish to measure.
Measurement Three Points Angle: This allows the measurement of an angle. Start at the pivot point and
extend out to start measuring an angle.
Measurement Four Points Angle: This allows the measurement of an angle by selecting four points. Simply
select two points from one line segment and another two points from another line segment to complete the angle
measurement.
Undo: Undo the last action.
Delete: Delete all measurements.
Redo: Redo the previous action.
Save: Save the Measurement on photo.
Troubleshooting
❶. In WiFi microscope mode, there is no video display after changing the resolution to 1280 x 1024, but it works well at
640x480.
1. Low battery, please charge your microscope.
❷. WiFi microscope video stops after working for a long time:
1. Check if low battery or the battery is exhausted.
2. Power off WiFi microscope and close Visio-tec to restart it again.
❸. If the live video‘s frame rate of WiFi microscope is slow:
1. Click “Preview” icon again on “Visio-tec” app when using on Window PC or Mac PC. Close and restart Visio-tec app again
for smart-Phone or tablet.
2. Set the video resolution to 640 x 480 if the current resolution is 1280 x 1024.
3. Check if low battery or there are many other WiFi networks interference around.
4. Power off WiFi microscope and close Visio-tec to restart it again.
❹.There is no video display or slow video on “Visio-tec” application after successful WiFi connection:
1. If the illumination LEDs don’t light up, please power off WiFi microscope and close “Visio-tec” to restart it.
2. If the illumination LEDs light up, restart “Visio-tec” app when using on Smart-Phone or Tablet; Click “Preview” icon again
on “Visio-tec” app when using on Window PC or Mac PC. Or power off WiFi microscope and close “Visio-tec” to restart it.
❺. Why does the screen stop video displaying after changing the resolution?
When changing the resolution, you must wait until the illumination LED is off and lights up again before clicking OK - it takes about
5seconds.Please restart Visio-tec app.
Page 30 of 31

WiFi Microscope User Manual
❻. Why does the device feel rather warm after WiFi microscope has been working for some time?
The Power dissipation of WiFi microscope is about 2.5W, so the highest internal temperature of the device can reach about 60°C.
❼. Hong long can the WiFi microscope works for after the battery is full charging?
It is about 2 hours at 640x480 resolution. Full charging time is also about 2 hours.
Page 31 of 31
 Loading...