

Page 1

Rev 4
03/01/06
VisionTek THEATER™ 550 PRO
User Guide
1
Page 2

Copyright © 2004, ATI Technologies Inc. All rights reserved.
ATI and ATI product and product feature names are trademarks and/or registered trademarks of ATI Technologies Inc. All other company and/or product names are
trademarks and/or registered trademarks of their respective owners. Features, performance and specifications are subject to change without notice. Product may
not be exactly as shown in diagrams.
Copyright © 2005, VisionTek All rights reserved.
VisionTek and XTASY product and product feature names are trademarks and/or registered trademarks of VisionTek. All other company and/or product names are
trademarks and/or registered trademarks of their respective owners. Features, performance and specifications are subject to change without notice. Product may
not be exactly as shown in diagrams.
Reproduction of this manual, or parts thereof, in any form, without the express written permission of VisionTek is strictly prohibited.
Microsoft® is a registered trademark of Microsoft Corporation.
Windows® is a registered trademark of Microsoft Corporation.
Windows® XP Media Center Edition® is a registered trademark of Microsoft Corporation.
SnapStream® is a registered trademark of SnapStream Corporation.
Beyond Media® and Beyond TV® are registered trademarks of SnapStream Corporation.
Disclaimer
While every precaution has been taken in the preparation of this document, VisionTek and ATI Technologies Inc. assume no liability with respect to the operation or
use of ATI based hardware, software or other products and documentation described herein, for any act or omission of VisionTek and ATI concerning such products
or this documentation, for any interruption of service, loss or interruption of business, loss of anticipatory profits, or for punitive, incidental or consequential damages
in connection with the furnishing, performance, or use of the VisionTek or ATI hardware, software, or other products and documentation provided herein.
VisionTek and ATI Technologies Inc. reserves the right to make changes without further notice to a product or system described herein to improve reliability,
function or design. With respect to ATI based products which this document relates, VisionTek and ATI disclaim all express or implied warranties regarding such
products, including but not limited to, the implied warranties of merchantability, fitness for a particular purpose, and non-infringement.
Product Notices
Dolby* Laboratories, Inc.
Manufactured under license from Dolby Laboratories. Confidential Unpublished Works.
© 1992-1997 Dolby Laboratories, Inc. All rights reserved.
Macrovision
Apparatus Claims of U.S. Patent Nos. 4,631,603, 4,577,216, 4,819,098, and 4,907,093 licensed for limited viewing uses only.
This product incorporates copyright protection technology that is protected by method claims of certain U.S. patents and other intellectual property rights owned by
Macrovision Corporation and other rights owners. Use of this copyright protection technology must be authorized by Macrovision Corporation, and is intended for
home and other limited viewing uses only unless otherwise authorized by Macrovision Corporation. Reverse engineering or disassembly is prohibited.
2
Page 3

IMPORTANT SAFETY INSTRUCTIONS
• Read Instructions - All the safety and operating instructions should
be read before the product is operated.
• Retain Instructions - The safety and operating instructions should
be retained for future reference.
• Heed Warnings - All warnings on the product and the operating
instructions should be adhered to.
• Compatibility - This option card is for use only with IBM AT or
compatible UL Listed personal computers that have Installation
Instructions detailing user installation of card cage accessories.
• Grounding - For continued protection against risk of electric shock
and fire, this accessory should be installed only in products equipped
with a three-wire grounding plug, a plug having a third (grounding)
pin. This plug will only fit into a grounding-type power outlet. This is a
safety feature. If you are unable to insert the plug into the outlet,
contact your electrician to replace the obsolete outlet. Do not defeat
the safety purpose of the grounding-type plug.
• Secure Attachment - All card securement pins shall be completely
tightened as to provide continuous bonding between the option card
and the PC chassis.
• Outdoor Antenna Grounding - Since an outdoor antenna or cable
system is connected to the product, be sure that the antenna or
cable system is grounded so as to provide some protection against
voltage surges and built-up static charges. Article 810 of the National
Electrical Code, ANSI/NFPA 70, provides information with regard to
proper grounding of the mast and supporting structure, grounding of
the lead-in wire to the antenna discharge unit, size of grounding
conductors, location of antenna-discharge unit, connection of
grounding electrodes, and requirements for the grounding electrode.
• Lightning - For added protection for this product during a lightning
storm, or when it is left unattended and unused for long periods of
time, unplug it from the wall outlet, and disconnect the antenna or
cable system. This will prevent damage to the product due to
lightning and power-line surges.
• Power Lines - An outside antenna system should not be located in
the vicinity of overhead power lines or other light or power circuits, or
where it can fall into such power lines or circuits.
• Antenna Installation - When installing an outside antenna system,
extreme care should be taken to keep from touching such power
lines or circuits, as contact with them may be fatal.
• Note to CATV System Installer - This reminder is provided to call
the CATV systems installer’s attention to Section 820-40 of the NEC,
which provides guidelines for proper grounding and, in particular,
specifies that the cable ground shall be connected to the grounding
system of the building, as close to the point of cable entry as
practical.
3
Page 4

Table of Contents
Chapter 1
Getting Started -------------------------------------------------------------------------------------------------
System Requirements
Chapter 2
Installing Hardware -------------------------------------------------------------------------------------------
Quick Installation
Detailed Installation
Installing your THEATER™ 550 PRO-based TV tuner card in Windows XP Home,
Pro, and XP Media Center Edition
Connecting Display Devices
Chapter 3
Detailed Hardware Installation – Windows XP Media Center Edition version only--------------
Chapter 4
Installing Software Drivers and Setup - Windows XP Version Featuring SnapStream
“Subscriber Edition” software--------------------------------------------------------------------------------
Section A: Installing ATI TV Tuner Drivers (WDM drivers)
Section B: Installing SnapStream Beyond TV Software
Section C: Beyond TV Setup Wizard
Section D: Beyond TV Help
Section E: Installing SnapStream Beyond Media Software
Section F: Beyond Media Setup Wizard
Section G: Beyond Media Help
Chapter 5
Installing Software Drivers and Setup - Windows Media Center Edition version with remote
control------------------------------------------------------------------------------------------------------------
Software driver installation Theater 550 Pro XP Media Center Edition Version only
Setup Wizard for Windows® XP Media Center Edition® 2005
Using Windows® XP Media Center Edition® 2005
Chapter 6
Capturing Video-----------------------------------------------------------------------------------------------
Windows Movie Maker
Chapter 7
Reference -------------------------------------------------------------------------------------------------------
Troubleshooting
Getting Additional Resources
Product Registration
Customer Care/Support
Warranty Service
Compliance Information
4
Page 5

Important !!!!!!! This manual covers two different VisionTek Theater 550 Pro product solutions:
(1) The VisionTek XTASY Theater 550 Pro Media Center Edition version with
(2) VisionTek Theater 550 Pro Windows XP version without
remote control.
remote control
CHAPTER 1: Getting Started
Congratulations on your purchase of the VisionTek Theater 550 Pro TV Tuner card/PVR solution. Your VisionTek
THEATER™ 550 PRO TV tuner card is an advanced, analog TV tuner card that represents a vast improvement in
both video and audio quality over previous PC TV tuner products. The THEATER™ 550 PRO TV tuner card uses
hardware MPEG encoding and digital audio.
The THEATER™ 550 PRO TV tuner card provides the following features:
• NTSC analog video decoding with motion-adaptive 3D comb filtering (depending on region).
• Worldwide, analog, stereo audio decoding with digital output to the PC.
• FM radio.
• MPEG-1 Layer II, 2-channel audio encoding.
• High quality MPEG-2 video encoder.
• Hardware noise reduction.
Watch television on your computer! You can receive up to 125 cable television channels and 70 antenna channels in
smooth, full-motion video, and view them on the whole screen or in a window.
System Requirements
Hardware • Intel® Pentium® 4 or Celeron®, AMD Athlon® or
Sempron® (or compatible).
• Sound card and speakers.
• 128 MB of system memory; 256 MB or more is
recommended for best performance.
• Motherboard with a free 3.3V PCI slot.
• CD-ROM drive (for installation software).
• A DirectX 9 supported graphics card is recommended
for optimal display output quality.
• Cable TV signal or amplified antenna.
Internet connection to retrieve electronic programming
guide
Operating
System
Decoder • You must have an MPEG decoder (DVD or media
Monitor • High-resolution MultiSync or multi-frequency monitors
• Windows® XP Media Center Edition® 2005
• Windows® XP (Professional or Home, Service Pack 2)
player) already on your system in order to play back
MPEG video captured by the THEATER™ 550 PRObased TV tuner card.
or any other type of VGA monitor.
• Digital flat-panel (DFP) displays or digital CRT display.
5
Page 6

CHAPTER 2: Installing Hardware
This chapter will guide you through the physical installation of your THEATER™ 550 PRO-based TV tuner card.
Quick Installation
Experienced users and system administrators can follow these brief instructions for installing the THEATER™ 550
PRO-based TV tuner card in the shortest possible time.
To perform a quick installation
1 Uninstall the drivers and software for any previous TV Tuner products if you have not already done so.
2 Shut down and disconnect the power from your computer system.
3 Remove any previously installed TV Tuner product.
4 Install your new THEATER™ 550 PRO TV tuner card.
5 Reassemble and connect your computer system.
6 Install the THEATER™ 550 PRO-based TV tuner card drivers and configuration software from the VisionTek
Installation CD-ROM by doing one of the following:
• Run through the automatic
•
Start > Run > X:\SETUP.EXE (where X is the drive letter of your CD-ROM drive).
SETUP utility; or
7 Windows XP Media Center Edition version card – run setup wizard by pressing green button on remote control.
or
7 Windows XP Snapstream “Subscriber Edition” version card – install SnapStream software.
6
Page 7
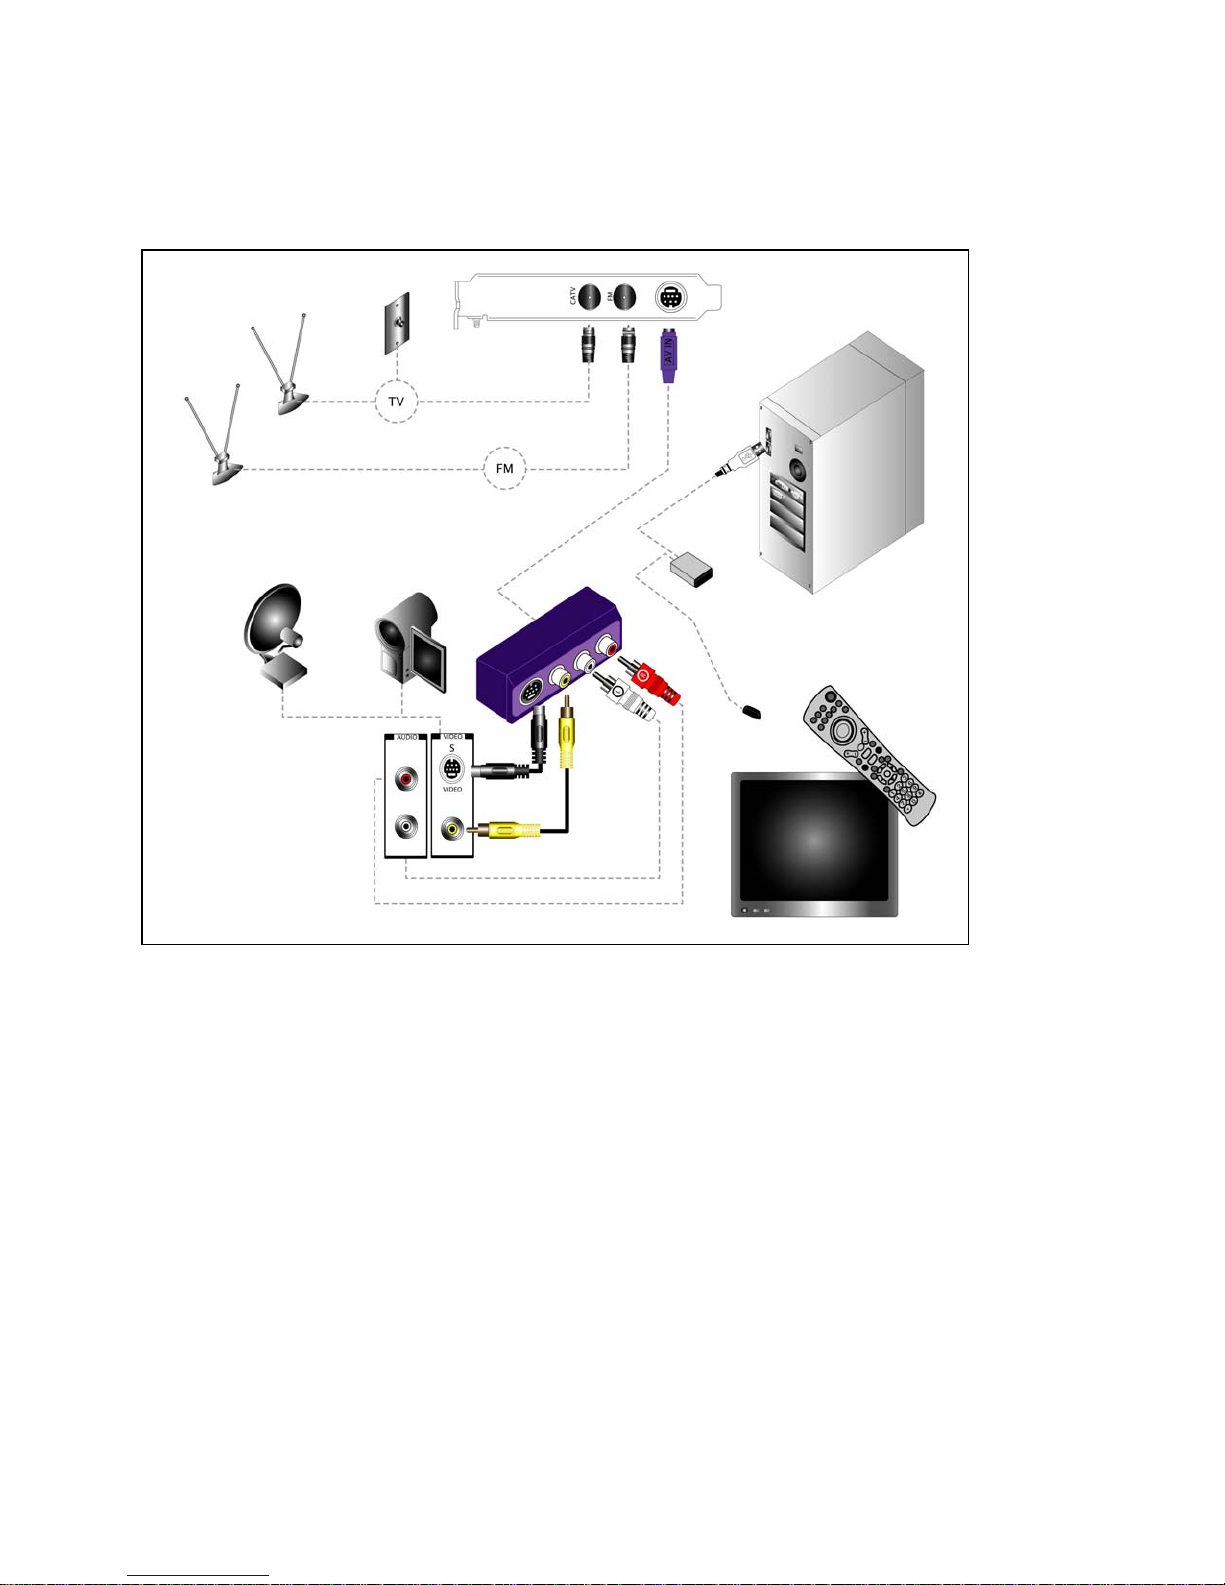
Quick install diagram of the Media Center Edition sku with remote control.
7
Page 8
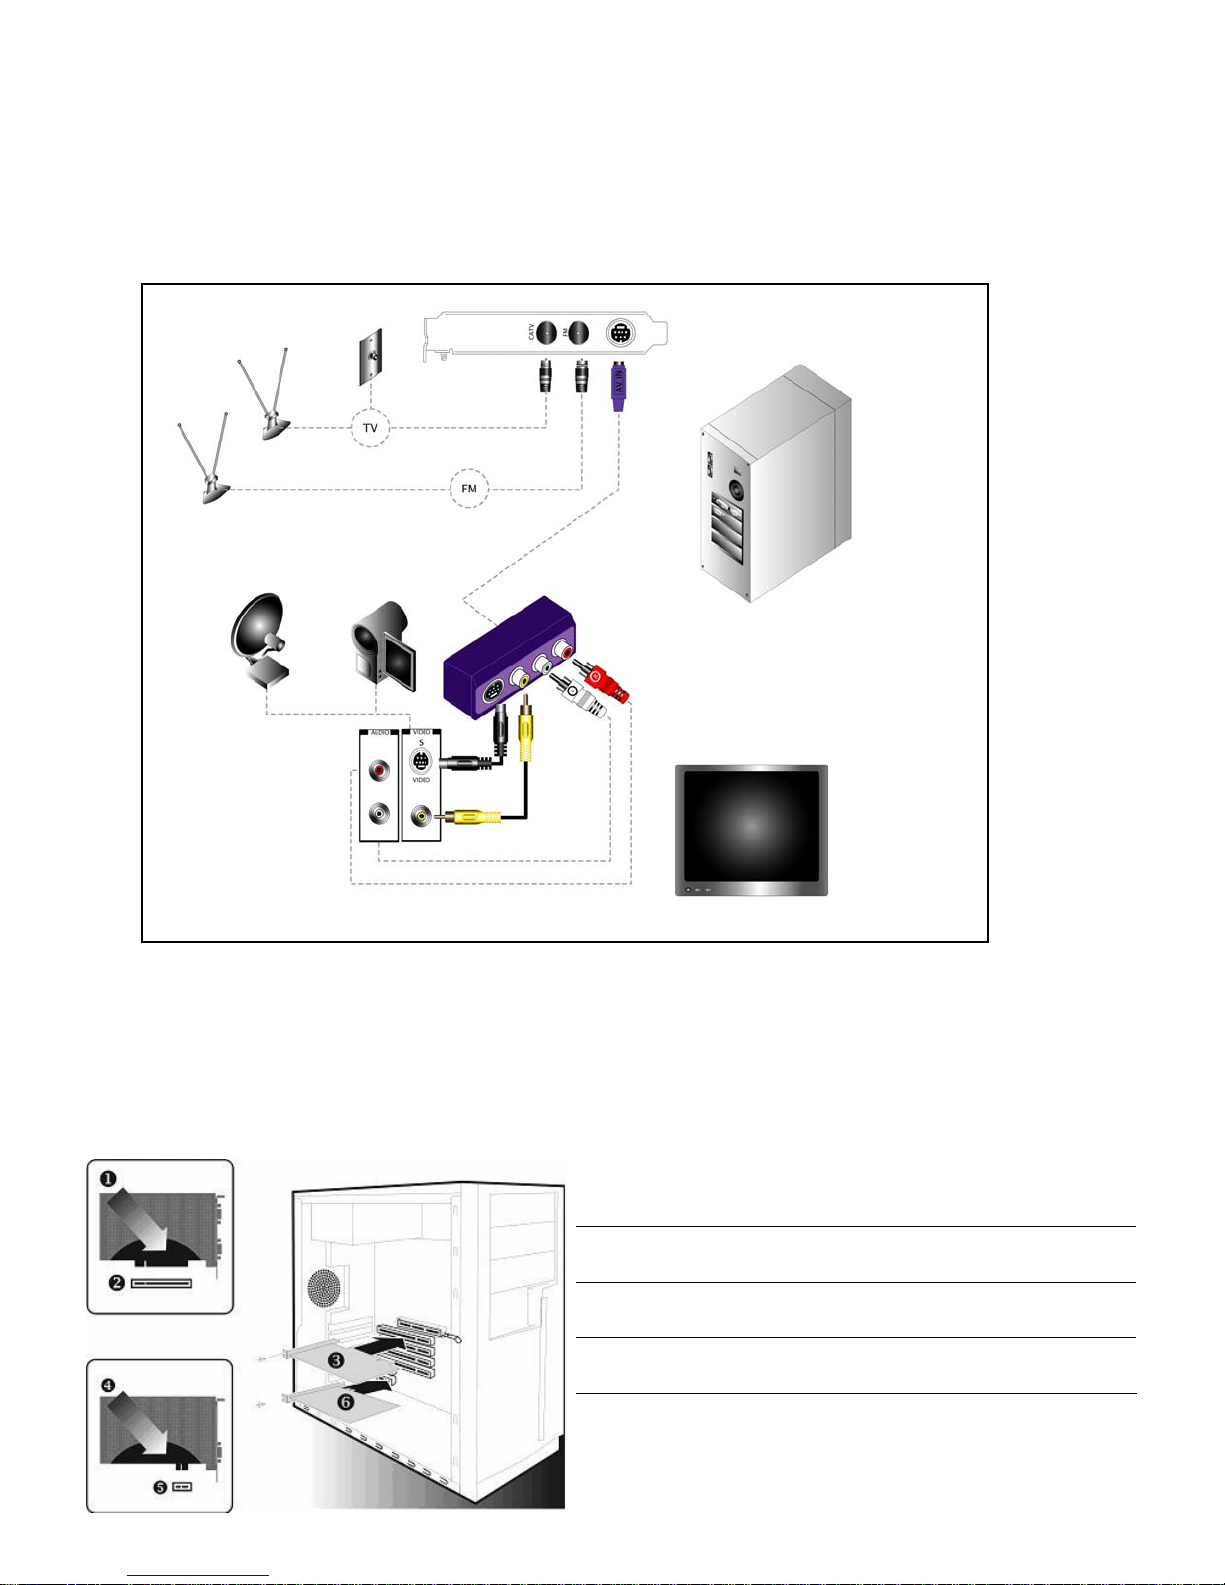
Quick install diagram of the Windows XP sku featuring SnapStream software.
Detailed Installation
The following instructions will take you step by step through the installation of your new THEATER™ 550 PRObased TV tuner card.
Installation Diagram
THEATER™ 550 PRO-based TV tuner card with PCI Connector
PCI Connection on Motherboard
Insertion Point for PCI Card
8
Page 9

Installing your THEATER™ 550 PRO-based TV tuner card in Windows XP Home,
Pro, and Media Center Edition
1 Turn off the computer, monitor, and other peripheral devices.
2 Disconnect all cables from the back of your computer with the exception of your power cord.
WARNING - Wait approximately 20 seconds after unplugging the
power cord before disconnecting a peripheral or removing a
component from the motherboard to avoid possible damage to the
motherboard.
3 Remove the computer cover. If necessary, consult your computer’s manual for help in removing the cover.
WARNING - Remember to discharge your body’s static electricity
by touching the power supply or the metal surface of the computer
chassis before touching the motherboard or components.
4 Locate an available PCI slot and, if necessary, remove the metal back-plate cover.
5 Align your THEATER™ 550 PRO TV tuner card with the appropriate slot, and then press it in firmly until the
card is fully seated.
6 Screw in or fasten the THEATER™ 550 PRO TV tuner card securely. Replace your computer cover.
7 Reconnect any cables you have disconnected, and then plug in the computer’s power cord.
8 Attach a TV antenna or cable cord to the TV connector on your THEATER™ 550 PRO TV tuner card.
9 Attach an FM antenna to the FM connector on your THEATER™ 550 PRO-based TV tuner card. If your cable
service provides an FM signal, you can use a splitter to connect the cable to the FM and TV connectors on your
card.
10 Plug the purple input dongle that came with your THEATER™ 550 PRO-based TV tuner card into the AV IN
connection.
11 Attach your S-video source and/or composite source to the proper input on the purple input dongle.
12 Turn on the monitor, and then your computer. If you have properly installed your card, operating system messages
will appear once the boot procedure is finished. Proceed with the installation of drivers and software.
Connecting Devices
THEATER™ 550 PRO-based TV tuner card Baseplate
1
2
3
Cable TV Coaxial Connection
FM Radio Coaxial Connection
AV IN Connection (to Purple Dongle)
9
Page 10

IF USING SNAPSTREAM SOFTWARE PLEASE SKIP TO
CHAPTER 4 FOR ASSISTANCE INSTALLING SOFTWARE
What is SnapStream Beyond TV?
SnapStream Beyond TV is a software program that allows you to view TV and record
TV on your PC. Think of it as an alternative to TiVo™ or Microsoft XP Media Center
Edition.
Important!!!!! Media Center Edition users:
If you purchased the VisionTek Xtasy Theater 550 Pro Media Center Edition
(w/remote control) and you have a digital cable box or satellite receiver we
recommend you use Media Center Edition for viewing and recording TV
programs. This is because the remote control that comes with the product may not
be able to interface with a digital cable box or satellite receiver when using
Snapstream Beyond TV. The remote control supplied with the product has limited
functionality with Snapstream programs.
What is Snapstream Beyond Media?
Beyond Media is a perfect addition to your Beyond TV home theater PC. Beyond Media
is a music player, and a photo browser--an all-in-one media player that will take your
entertainment PC to the next level.
10
Page 11

CHAPTER 3: Installing Hardware - Media Center Edition
y
version (with remote control)onl
Remote control receiver unit for Media Center Edition version
Instructions: Attach the USB cable (included with product) into USB receptacle on receiver unit. Next, insert the other
end of the USB cable into an available USB port on your computer.
----------------------------------------------------------------------------------------------------------------------------------------------
IR Blaster for Media Center Edition 2005 version
To have Media Center change channels on a set top box such as a cable box or satellite receiver, you have to connect
Media Center to the box or receiver by using the IR blaster. This will allow you to access channels beyond channel
125 if using digital cable or satellite.
Note: The IR blaster bundled with this product is currently not supported by Snapstream Beyond TV
software.
Instructions: Please insert the male end of the plug into the either one of the receptacles on the receiver unit (shown
above). We recommend placing the receptor end of the IR blaster on top of your cable or satellite receiver set top box.
11
Page 12

Diagram for remote control used on
XP Media Center Edition version.
Note: The Windows XP version featuring
SnapStream software does not come with
a remote control
Launch Windows XP Media Center
Edition by pressing the Green
Button with the Windows Flag
“MY” Buttons are shortcut
buttons to take you to the four
main areas within Media Center.
“More” Button provides additional
information in each format.
“CH/PG” +/- Button allows
movement up and down
channels
“Vol” +/- Button allows for
increases and decreases
volume levels
“Recorded TV” Button is
shortcut to Recorded TV
page.
“Guide” Button cycles
through the guide options
“DVD” Button invokes
the DVD menu
“Live TV” Button brings
live TV to the front on last
channel user watched.
Numeric Keypad allows for
direct input as needed.
12
Page 13

CHAPTER 4: Installing Software - Windows XP Version Featuring
SnapStream
“Subscriber Edition” software
Section A: Installing ATI TV Tuner Drivers (WDM drivers)
This chapter will guide you through the installation of the TV Tuner software drivers for your VisionTek XTASY
THEATER™ 550 PRO TV tuner card.
1 Insert the installation CD that came with the product. Windows XP autorun feature should automatically load the
installation menu shown above
or
1 From the Windows® Desktop, click My Computer > CD or DVD drive (VisionTek logo will be present)
2 Click Install VisionTek Theater 550 Pro drivers
3 Follow the onscreen instructions and reboot as prompted
Note: If video is not displayed, you may need to update your graphics card drivers
13
Page 14

Section B: Installing SnapStream Beyond TV Software
This chapter will guide you through the installation of your SnapStream software
1 Insert (or remove and reinsert) the installation CD that came with the product. Windows XP autorun feature
should automatically load the installation menu shown above
or
1 From the Windows® Desktop, click My Computer > CD or DVD drive (VisionTek logo will be present)
2 Click Install SnapStream Beyond TV software button.
14
Page 15

Section C - SnapStream Beyond TV Setup Wizard
• From the Windows® Start Menu, choose Programs > SnapStream > Beyond TV> Beyond TV Setup Wizard
15
Page 16

Section D - SnapStream Beyond TV Help
• From the Windows® Start Menu, choose Programs > SnapStream > Beyond TV > Beyond TV Help
16
Page 17

Section E: Installing SnapStream Beyond Media Software (optional)
This chapter will guide you through the installation of your SnapStream software
1 Insert (or remove and reinsert) the installation CD that came with the product. Windows XP autorun feature
should automatically load the installation menu shown above
or
1 From the Windows® Desktop, click My Computer > CD or DVD drive (VisionTek logo will be present)
2 Click Install Optional SnapStream Beyond Media software button.
17
Page 18

Section F – Beyond Media Setup Wizard
• From the Windows® Start Menu, choose Programs > SnapStream > Beyond Media > Beyond Media Setup
Wizard
18
Page 19

Section G - SnapStream Beyond Media Help
• From the Windows® Start Menu, choose Programs > SnapStream > Beyond Media > Beyond Media Help
19
Page 20

Chapter 5: Installing Software Drivers and Setup - Windows
Media Center Edition version with remote control
1 Insert the installation CD that came with the product. Windows XP autorun feature should automatically load the
installation menu shown above
or
1 From the Windows® Desktop, click My Computer > CD or DVD drive (VisionTek logo will be present)
2 Click Install ATI TV Tuner Drivers (WDM drivers)
3 Follow the onscreen instructions and reboot as prompted
Note: If video is not displayed, you may need to update your graphics card drivers
20
Page 21

Setup Wizard for Windows® XP Media Center Edition® 2005
After you’ve completed hardware setup and installed all of the software drivers you are now ready to proceed with
configuration.
1 Press the green button on the remote control and you will be brought through the Microsoft Media Center Edition
setup wizard.
Follow the instructions of the wizard.
2
Note: If video is not displayed, you may need to update your graphics card drivers.
Using Windows® XP Media Center Edition® 2005
To start TV from Windows® XP Media Center Edition® 2005
Note: You must have Windows® XP Media Center Edition® 2005 installed on your computer.
1 In the Windows® Start Menu, click Media Center.
or
1 From the Windows® Start Menu, choose Programs > Accessories > Media Center > Media Center.
2 Click the MY TV button, and then click Live TV.
Note: If video is not displayed, you may need to update your graphics card drivers.
For more help using TV Tuner cards and remote control devices in Media Center Edition
please refer to the documentation provided with your PC, or Media Center Edition software.
CHAPTER 6: Capturing Video
Disclaimer: This product incorporates copyright protection technology that is protected by method claims of certain U.S. patents and other intellectual property
rights owned by Macrovision Corporation and other rights owners. Use of this copyright protection technology must be authorized by Macrovision Corporation, and is
intended for home and other limited viewing uses only unless otherwise authorized by Macrovision Corporation. Reverse engineering or disassembly is prohibited.
21
Page 22

Windows Movie Maker
Applicable for Windows XP Home, XP Pro, XP Media Center Edition. Theater 550 Pro XP Edition with SnapStream
and Media Center Edition.
Reminder: For assistance configuring your hardware setup please refer to Chapter 2 –
“Installing your THEATER™ 550 PRO-based TV tuner card in Windows XP Home, Pro, and
Media Center Edition.”
From the Windows® Start button, click Programs > Accessories > Windows Movie Maker
1 Double-click Capture from video device
2 Highlight the ATI AVStream Analog Capture Device (as shown below)
3 Select Video Input Source (device that you are capturing from)
22
Page 23

23
Page 24

24
Page 25

25
Page 26

26
Page 27

CHAPTER 7: Reference
This chapter offers troubleshooting tips and provides customer-care, warranty, and compliance information.
Troubleshooting
The following troubleshooting tips may help if you experience problems. ATI’s documentation contains helpful
installation/configuration tips and other valuable feature information. Please contact VisionTek or ATI for more
advanced troubleshooting information.
Problem Possible Solution
Video is Unstable
or Only Black
and White
There is No Video
or Audio
Video Recording
Stops
Unexpectedly
• Check that you are using the correct broadcast
standard format.
• Check the quality of your incoming TV signal on
another receiver; bad reception may be the cause.
• Try connecting your tuner directly to the cable TV or
antenna source. Too many splitters in the cable will
degrade the signal.
• Ensure that your cable or antenna is connected.
• In the TV Video Settings page, ensure that the video
connector is set to the correct source.
• Check that the audio and video connectors are
securely plugged into the correct jacks.
• Check that your video card is securely seated in its
slot. Please refer to the user guide for the card
location.
• Video files are typically very large; ensure that you
have sufficient disk space.
• Ensure that you are recording to the correct hard disk
- check the Record on Drive setting in the Media
Center by clicking on My TV, then Settings, then
Recorder which takes you to the Recorder Storage
page.
• The maximum file size for the FAT32 file system is 4
Gigabytes.
• Disable screen savers while recording.
• Disable Power management while recording.
27
Page 28

Problem Possible Solution
Dropped Frames
During Video
Recording
Poor TV
Reception
Dropped frames during video recording indicates that
some part of the system is not fast enough to keep up
with the recording. Recording video is a very demanding
task for even the most powerful system. To achieve the
best results, you must dedicate the PC to recording, and
ensure that nothing else is active during recording.
• Defragment your hard drive.
• A large, dedicated disk is recommended if you plan to
do much video recording.
• Ensure that DMA is enabled for your hard drive, to
improve disk access speed and free up the system
CPU.
• Close all other running tasks, including those in the
System Tray — clock, popup reminders, virus
scanners, etc.
• Close and exit from any Task Scheduler.
• Do not log on to your network.
• Do not connect USB devices while recording.
• Do not open or close CD-ROM trays while recording.
• Do not move the mouse while recording.
• If you use an indoor antenna, you will get the best
results with an amplified model. Place it as far away
from the PC monitor as possible, to avoid
interference.
• Splitting the cable or antenna input can reduce the
signal quality. For the best reception, connect the
cable or antenna directly to your card.
Getting Additional Accessories
Additional accessories can be purchased from the following:
Remote Control for Snapstream: http://store.snapstream.com/firefly.html
IR Blaster for Snapstream: http://store.snapstream.com/usb-uirt.html
VisionTek.com Store: https://www.visiontek.com/store/catalog/
Product Registration
You may register your product with VisionTek by following the link below.
http://www.visiontek.com/registration.html
28
Page 29

Customer Support Options
If you require further assistance with your product, the following Customer Care options are available to you:
Service Access Additional Info
Online www.visiontek.com
www.ati.com
VisionTek
Telephone
US
ATI
Telephone
US & Canada
ATI
Telephone
US & Canada
Priority PayPer-Incident
Visiontek
1-866-VTEK-411
(1-866-883-5411)
1-905-882-2626 • 9:00AM - 7:00PM EST.
1-900-733-2843 • 9:00AM - 7:00PM EST.
• Always available.
• Complimentary.
• 8:00AM - 5:00PM CST.
Monday thru Friday.
Monday thru Friday.
• Complimentary for registered
users only
International and local toll
charges to Canada may apply.
Monday to Friday.
• $19.95 per incident (subject to
change without notice).
VisionTek tech Support and/or ATI Customer Care will work to resolve your issue and help you to get your product
up and running. If your issue is not resolved, our technicians will determine whether the difficulty you are
experiencing is the result of the product, whether your product contains a defect, and whether your product should be
returned to VisionTek for warranty service.
• ATI Customer Care is unable to assist with refunds, returns, or exchange specific inquiries. If resolving the
problem being experienced is critical to your decision to keep the product, it is your responsibility to ensure that
you know and are within the period of time your reseller will allow for refunds, returns or exchange.
• ATI is not responsible for any expense incurred accessing Customer Care. It is expected that customers will
review the expense associated with the available support options and will choose the method that best meets
their needs and budget.
• ATI Customer Care reserves the right to limit support options for products that are not registered or are at End
of Life.
29
Page 30

Warranty Service
Please contact your original point of sale or VisionTek for warranty service.
Compliance Information
FCC Compliance Information
This THEATER™ 550 PRO-based TV tuner card product complies with FCC
Rules part 15. Operation is subject to the following two conditions
• This device may not cause harmful interference, and
• This device must accept any interference received, including interference
that may cause undesired operation.
This equipment has been tested and found to comply with the limits for a Class B digital device, pursuant to Part 15 of the FCC Rules. These limits are designed to
provide reasonable protection against harmful interference in a residential installation. This equipment generates uses and can radiate radio frequency energy and,
if not installed and used in accordance with manufacturer's instructions, may cause harmful interference to radio communications. However, there is no guarantee
that interference will not occur in a particular installation. If this equipment does cause harmful interference to radio or television reception, which can be determined
by turning the equipment off and on, the user is encouraged to try to correct the interference by one or more of the following measures:
• Re-orient or relocate the receiving antenna.
• Increase the separation between the equipment and receiver.
• Connect the equipment to an outlet on a circuit different from that to which the receiver is connected.
• Consult the dealer or an experienced radio/TV technician for help.
The use of shielded cables for connection of the monitor to the graphics card is
required to ensure compliance with FCC regulations. Changes or modifications
to this unit not expressly approved by the party responsible for compliance could
void the user's authority to operate this equipment.
Industry Canada Compliance Statement
ICES-003 This Class B digital apparatus complies with Canadian ICES-003.
Cet appareil numérique de la Classe B est conforme à la norme NMB-003 du Canada.
For further compliance information:
ATI Research Inc.
4 Mount Royal Ave.
Marlborough, MA
01752-1976
USA
508-303-3900
CE Compliance Information
EMC Directive 89/336/EEC and amendments 91/263/EEC, 92/31/EEC and 93/68/EEC, Class B Digital Device EN 55022:2003/CISPR 22 Class B, Limits and
Methods of Measurement of Radio Interference Characteristics Information Technology Equipment.
30
Page 31

EN 55024:1998/CISPR 24:1997 +A1:2001 +A2:2003, Immunity of Information Technology Equipment (ITE), including EN 61000-4-2, EN 61000-4-3, EN 61000-4-4,
EN 61000-4-5, EN 61000-4-6
Low Voltage Directive for TV-Tuner-Equipped products 73/23/EEC - The Low Voltage Directive.
EN 60950: 1992+A1+A2+A3+A4 - Safety of Information Technology Equipment.
Informations de conformité de la CE
Directive EMC 89/336/CEE et amendements 92/31/CEE et 93/68/CEE, pour dispositif numérique de Classe B.
EN 55022:2003/CISPR 22:1997, - Classe B - Limites et méthodes de mesure des caractéristiques d'interférences radiophoniques, Matériel des technologies de
l'information.
EN 55024:1998/CISPR 24:1997 +A1:2001 +A2:2003, Norme sur l'immunité de matériel des technologies de l'information, et comprenant EN 61000-4-2, EN 61000-
4-3, EN 61000-4-4, EN 61000-4-5, EN 61000-4-6
Directive de Basse Tension pour produits équipés tuner TV.
73/23/CEE - Directive de basse tension.
EN 60950 : 1992+A1+A2+A3+A4 - Sécurité du matériel des technologies de l'information.
CE-Konformitätserklärung
MC Richtlinie 89/336/EEC und Änderungen 92/31/EWG und 93/68/EWG, Digitales Gerät der Klasse B.
EN 55022:2003/CISPR 22:1997, - Klasse B - Grenzwerte und Meßverfahren für Funkstörungen von Einrichtungen der Informationstechnik.
EN 55024:1998/CISPR 24:1997 +A1:2001 +A2:2003, Unempfindlichkeits-Standard für informationstechnische Ausrüstungen, einschliesslich EN 61000-4-2, EN
61000-4-3, EN 61000-4-4, EN 61000-4-5, EN 61000-4-6
Niederspannung Richtlinie für Produkte Enthalten Fernsehen tuner 73/23/EWG - Niederspannungsrichtlinie.
EN 60950: 1992+A1+A2+A3+A4 - Sicherheit für Einrichtungen der Informationstechnik.
31
 Loading...