

Page 1
www.visiontek.co.in
User’s Manual
GSM Commercial Modem 81GC
Congratulations !!! We thank you for purchasing the VISIONTEK GSM Comemrcial Modem 81GC.
This User's manual will help you in knowing all the features of the system including installation.
Operational and programming procedure in a step by step manner. Please keep this handy manual
handy for easy reference.
For Servicing and other details kindly look at the corporate address and email id at the backside of
the manual.
Introduction
1
2
Installation
3
Operation
Page 2
1
Introduction
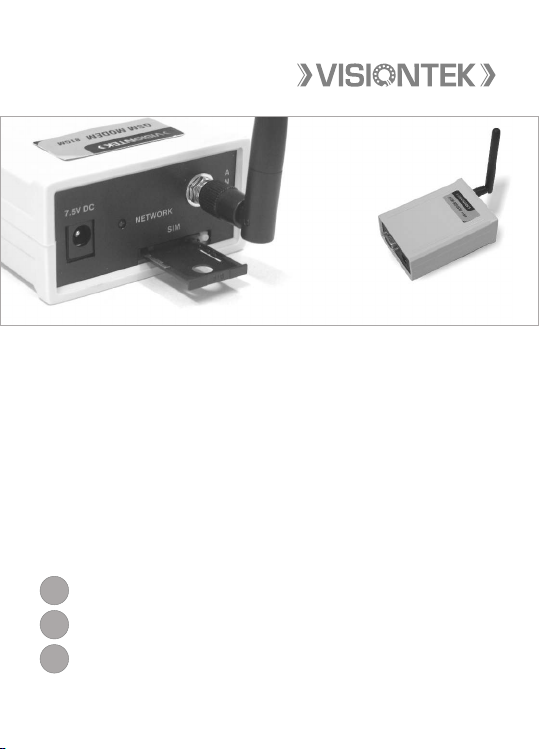
VISIONTEK GSM Commercial Modem 81GC is a highly flexible plug-n-play modem for easy
integration with RS-232 and audio* interface. It is equipped with features of circuit switched
data, SMS, Fax, Voice and GPRS (Class 10). VISIONTEK 81GC is a per fect solution to use with
SMS gateways, access internet while on the move and corporate communications (GPRS,
Data transfer & PC Fax even in remote location).
FEATURES
<
Dual/Tri* band 900/1800/1900 MHz GSM
<
Data, SMS (Text & PDU), Fax, Voice and GPRS (Class 10)
<
DC input voltage
<
Fully compliant with ETSI, GSM Phase 2+ specifications
<
Low power consumption
<
AT Commands
<
3V SIM Interface
<
RS-232 interface (9 PIN ‘D’ type female)
VISIONTEK GSM Commercial Modem 81GC package consists of the following:
81GC GSM modem – 1 No. 2dB rubber duct antenna – 1 No. Adpter. AC DC 7.5V1.5A-1No
RS-232 Cable - 1 No. User Manual – 1 No.
2
Installation
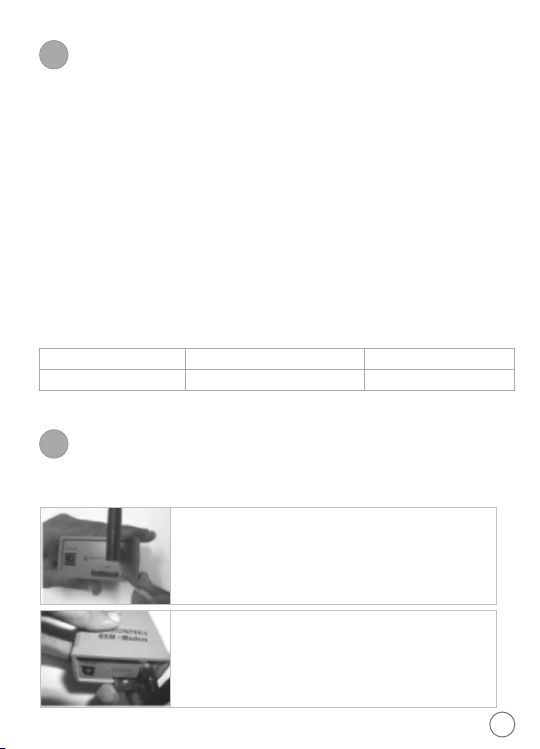
The installation of 81GC is very simple. Please follow the step by step procedure as shown
in the diagram.
Step:1
Press the Notch using small screw driver to the eject the SIM.
Step:2
Remove the SIM tray from the Modem.
1
Page 3

Step:3
Insert the SIM card in the tray as shown.
Step:4
Insert the SIM tray back along with the SIM card.
Step:5
Modem is ready for the operation.
NOTE : (1) SIM installed in the GSM Modem gets locked to the unit (PIN lock)
(2) The GSM Modem works with all SIM cards.
3
Operation
TO ESTABLISH A DATA CALL - PC SIDE SETTING:
NOTE : All the setting are for standard 9600bps Modem connected to COM1.
a) Select “START” ------> “Settings” --------> “Control Panel” -------> “Modems”
b) After double clicking on “Modems” Icon. If standard 9600 bps modem is already
selected, then Close the current screen.
c) If “Modem” is not selected in the list then Go to Control Panel “Add” bar and select a
modem from the list by selecting “Do not detect my modem, I will Select it from the list”
Click next and select “Standard Modem Types” in manufactures and “Standard 9600 bps”
in models and Click Next. Now select port COM1 or COM2 and click the “FINISH” to
complete settings.
d) Open Hyper Terminal Screen and check whether it is at the same speed of module Eg :
9600.
2
Page 4

If not click on Properties tool bar and set thefollowing by selecting “Configure” toolbar
asshown in figure and Click OK.
3
Page 5

e) Connect the 9 pin RS-232 cable or Modem cable from GSM Modems “Modem” side and
PC and click on “Disconnect” tool bar and Type any alphabet. Eg. 'A' through Keyboard,
the same should Apper on screen of Hyper Terminal.
f) Through Hyper Terminal dial to a GSM/PSTN modem or another GSM Modem connected
to another PC (Insert a SIM card which has a Data number).
Eg.: Data Number : ATD9849289751
g) “Connect 9600” is displayed on Hyper Terminal screen after connection is established
h) Transfer any data by typing through keyboard. It should appear on the other PC to which
we are dialing.
i) To disconnect the modem, click on “Disconnect” icon on toolbar and then type ATH. If
'OK' response is seen, then modem is Disconnected.
j) Instead of typing data through keyboard, any test file can also be transferred by
selecting “Send file” icon on toolbar and file can be selected by “Browsing”, protocol
should be Selected as 'Z modem' or 'IKX modem'.
4
Page 6

WARRANTY
VISIONTEK GSM Commercial Modem is warranted for a period of 12 months from the date of sale against
manufacturing defects. Antenna and Battery for 6 Months warranty. Linkwell Telesystems Pvt. Limited,
obligation under this warranty shall be limited to servicing or replacing the defective parts provided that
notice of such defects and satisfactory proof thereof is given to Linkwell Telesystems Pvt. Limited
The warranty does not cover any defect in the product caused by accident, misuse, mishandling,
negligence, alteration, modification or substitution of any of the components or parts or any attempt at
internal adjustments, any form of tampering by unauthorized/unskilled service personnel, loss of
components or accessories, natural calamities and over voltage of electricity.
Under no circumstance shall Linkwell Telesystems Pvt. Limited, be liable for any consequential or resulting
injury or for loss, damage or expenses directly or indirectly arising from the use of this product Linkwell
Telesystems Pvt. Limited will make every effort to carry out repairs/replacement under this warranty as
early as possible and it is expressly made clear that the company shall not be liable to do so within any
specified time or period.
The decision of Linkwell Telesystems Pvt. Limited as to the nature of the defect and applicability of this
warranty shall be final. Claims if any, to this warranty shall be only made before the courts having
jurisdiction in Secunderabad, Andhra Pradesh.
Product Pictures
High Gain Whip
Antenna
Linkwell Telesystems Pvt. Ltd.
1-11-252/1/A, Gowra Klassic, Begumpet, Hyderabad - 500 016. Andhra Pradesh, INDIA.
Ph. : +91-40-66388000 | Fax : +91-40-66388006, 27763838
BRANCHES: NOIDA - 0120-2549090, 2549095, 2541427, 2541437 | KOLKATTA - 033-22176549, 22169301 |
AHMEDABAD - 079-40062001, 40062002 | MUMBAI - 022-24916940, 24916942 | VIZAG - 0891-2550725,
2564752,2508088 | BANGALORE - 080-25598811, 25550729, 25591457 | CHENNAI - 044-24797950, 24797960 |
KERALA - 94471-37717
RS-232 Port
5
 Loading...