

Page 1
Solutions forSolutions for
visualvisual
®
CommunicationCommunication
www.visiontech.sewww.visiontech.se
®
Copyright © 2003, Visiontech AB
CDR: 25082003
Printed in Sweden
S/N: KXH720413c
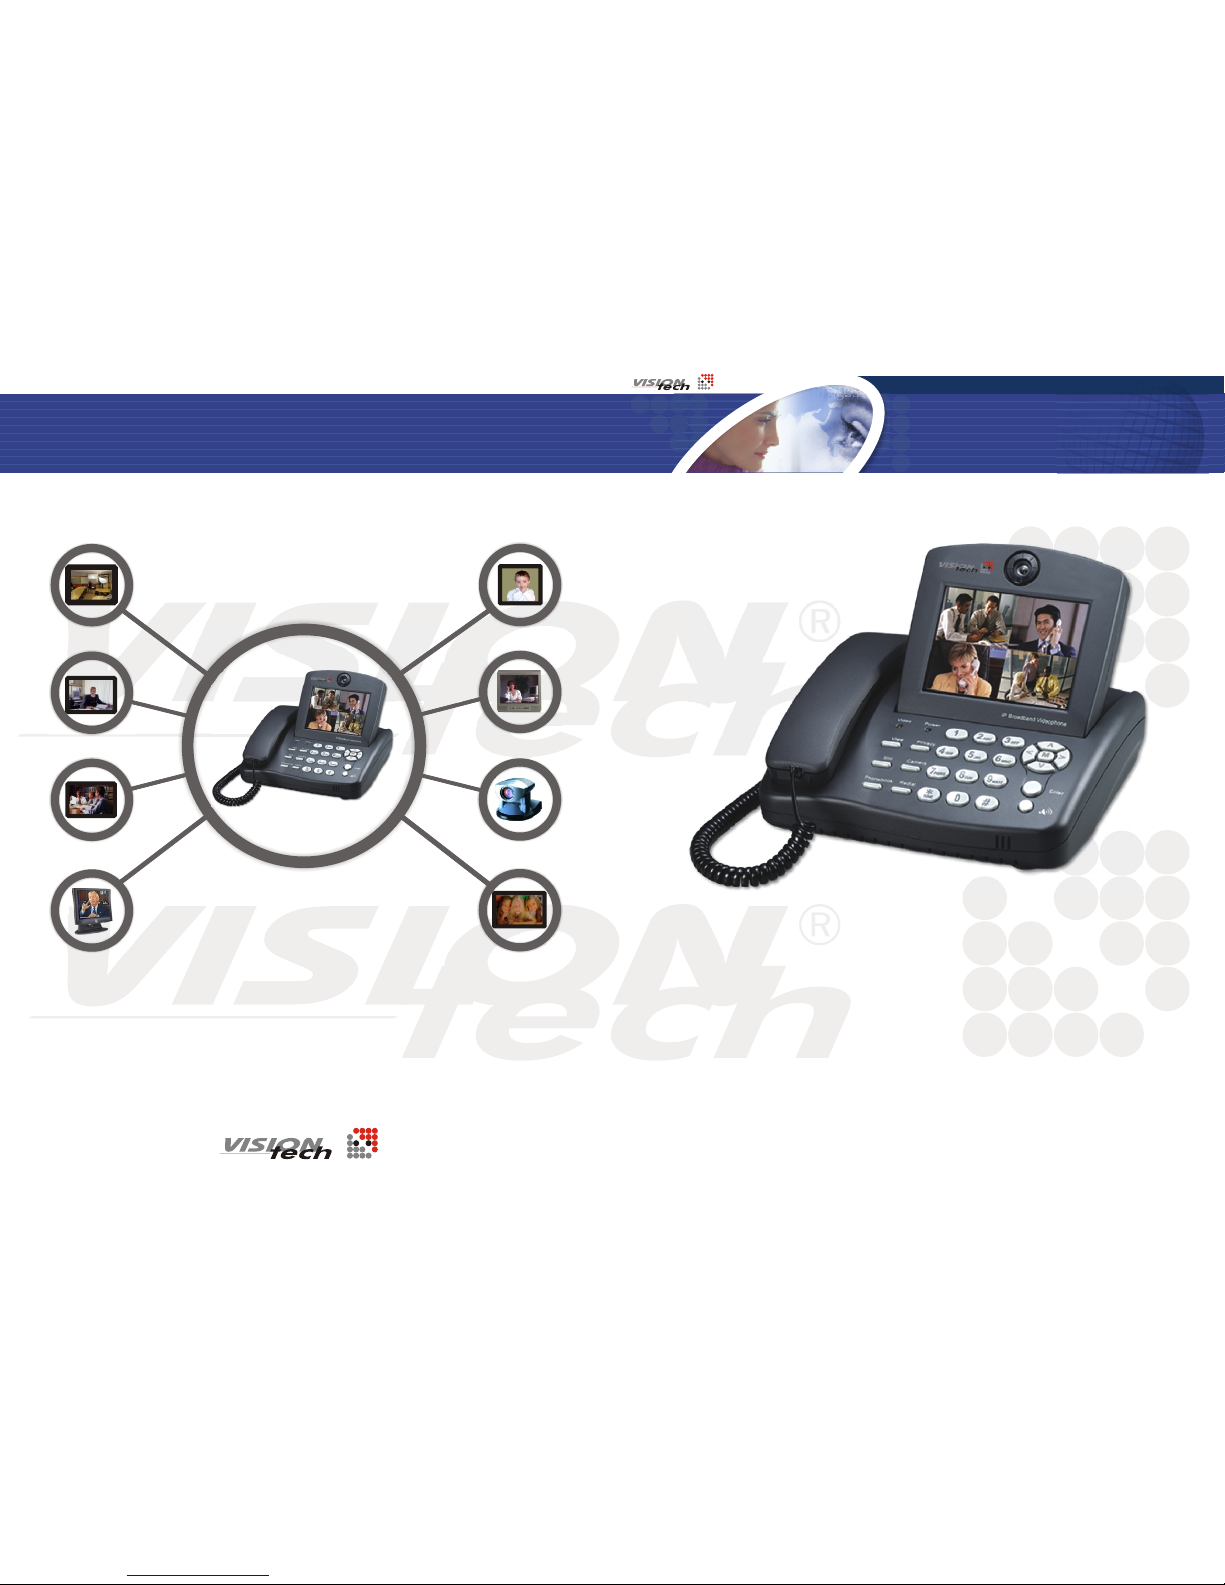
IP Broadband VideophoneIP Broadband Videophone
User ManualUser Manual
Page 2

IP Broadband VideophoneIP Broadband Videophone
User ManualUser Manual
This device complies with Part 15 of the FCC Rules. Operation is
subject to the following two conditions:
+ This device may not cause harmful interference.
+ This device must accept any interference received, including
interference that may cause undesired operation.
This equipment has been tested and found to comply with the limits
for a Class B digital device pursuant to Part 15 of FCC Rules. These
limits are designed to provide reasonable protection against harmful
interference in a residential installation. This equipment generates,
uses and can radiate radio frequency energy and, if not installed and
used in accordance with the instructions, may cause harmful
interference to radio communications. However, there is no
guarantee that interference will not occur in a particular installation.
If this equipment does cause harmful interference to radio or
television reception, which can be determined by turning the
equipment off and on, the user is encouraged to try to correct the
interference by one or more of the following measures:
+ Reorient or relocate the receiving antenna.
+ Increase the separation between the equipment and receiver.
+ Connect the equipment into an outlet on a circuit different from
that to which the receiver is connected.
+ Consult the dealer or an experienced radio/TV technician for help.
+ Shielded interface cables must be used in order to comply with
emission limits. Changes or modifications not expressly approved
by the party responsible for compliance could void the user's
authority to operate the equipment.
12 FCC Statement
56
|
Page 3

Version A, September 2003
http://www.visiontech.se
Copyright © 2003 Visiontech All rights reserved.
No part of this document may be copied or reproduced in any form or
by any means without the prior written consent of .
makes no warranties with respect to this documentation
and disclaims any implied warranties of merchantability, quality, or
fitness for any particular purpose. The information in this document is
subject to change without notice. reserves the right to
make revisions to this publication without obligation to notify any
person or entity of any such changes.
Trademarks or brand names mentioned herein are trademarks or
registered trademarks of their respective owners.
Visiontech
Visiontech
Visiontech
Visiontech warrants to the original purchaser of this product that it
shall be free of defects resulting from workmanship or components
for a period of one (1) year from the date of sale. Defects covered by
this Limited Warranty shall be corrected either by repair or, at
Visiontech's discretion by replacement. In the event of replacement,
the replacement unit will be warranted for the remainder of the
original one (1) year period or thirty (30) days, whichever is longer.
THERE ARE NO OTHER ORAL OR WRITTEN WARRANTIES, EXPRESSED
OR IMPLIED, INCLUDING BUT NOT LIMITED TO THOSE OF
MERCHANTABILITY OR FITNESS FOR A PARTICULAR PURPOSE.
This Limited Warranty is nontransferable and does not apply if the
product has been damaged by negligence, accident, abuse, misuse,
modification, misapplication, shipment to the Manufacturer or service
by someone other than the Visiontech Transportation charges to
Visiontech are not covered by this Limited Warranty. To be eligible for
warranty service, a defective product must be sent to and received
by Visiontech within fourteen (14) months of the date of sale and be
accompanied with proof of purchase. Visiontech does not warrant
that this product will meet your requirements; it is your sole
responsibility to determine the suitability of this product for your
purposes. Visiontech does not warrant the compatibility of this
product with your computer or related peripherals, software.
LEADTEK'S SOLE OBLIGATION AND LIABILITY UNDER THIS
WARRANTY IS LIMITED TO THE REPAIR OR REPLACEMENT OF A
DEFECTIVE PRODUCT. THE MANUFACTURER SHALL NOT, IN ANY
EVENT, BE LIABLE TO THE PURCHASER OR ANY THIRD PARTY FOR
ANY INCIDENTAL OR CONSEQUENTIAL DAMAGES OR LIABILITY IN
TORT RELATING TO THIS PRODUCT OR RESULTING FROM ITS USE
OR POSSESSION.
This limited warranty is governed by the laws of Sweden.
11 Limited Warranty
|
55
|
User Manual
IP Broadband Videophone
Page 4

In the event of not finding the solution to your problem, please
contact your local distributor. You may also contact our technical
support staff; E-mail to <[email protected]> with the following
information:
Product name:
It will be easier for our staff to answer your question if you know the
name of the product.
Detailed description of your problem:
Please describe in detail all the problems you encountered, including
the kind of software and hardware you are using, and the contents of
your system files.
10 Tech Support
Table of Contents
Getting Started
Overview
Feature highlights
What's in the package
Getting to Know Your VT640P
Front view
Rear view
Side view
Installation
Installing the unit
Using external devices (Optional)
System Setup
Common Settings
ADSL/Constant ADSL/Single, Public, & Fixed IP
When the IP is used exclusively by VT640P
When the IP is shared with other devices (with a DHCP server connected)
When the IP is shared with other devices (without a DHCP server connected)
ADSL/Constant ADSL/Multiple, Public, & Fixed IP
When VT640P uses one of the IPs (with a DHCP server connected)
When VT640P uses one of the IPs (without a DHCP server connected)
When one of the IPs is shared with other devices (with a DHCP server connected)
When one of the IPs is shared with other devices (without a DHCP server connected)
ADSL/Timing ADSL
When the ADSL is used exclusively by VT640P
When the ADSL is shared with other devices (with a DHCP server connected)
When the ADSL is shared with other devices (without a DHCP server connected)
Cable
When the IP is used exclusively by VT640P
When the IP is shared with other devices (with a DHCP server connected)
When the IP is shared with other devices (without a DHCP server connected)
LAN/No Firewall or NAT
With a DHCP server connected
Without a DHCP server connected
LAN/NAT
With a DHCP server connected
Without a DHCP server connected
54
|
|
User Manual
IP Broadband Videophone
1
1
2
3
6
6
7
9
10
12
13
14
15
16
17
18
19
20
21
22
23
24
25
26
27
28
6
I
A
A
Page 5

Plug power adapter in the power outlet in the wall. Plug the power cord in the unit.
Turn on the power switch.
Power Indicator OFF
Make sure the power indicator is ON. If auxiliary video input is used on TV,
Select the appropriate video input for TV.
No image is displayed on LCD screen
Be sure the RJ-45 wire is plugged into the "WAN" jack directly on the VT640P.
The unit is not responding when the "OK" button is pressed
Plug RJ-45 cable into "WAN" jack on the unit.
Plug RJ-45 cable from the Internet device into "WAN" jack on the unit.
Can not dial an IP address
Increase light on the image and reduce back lighting.
Video of local view is dark
Aim the VT640P at a strong white light source momentarily.
Increase the room light level.
Video in local view has a red cast
Hang up and call again. Make sure the remote video phone is compatible with H.323
standard. Ask the other party call you.
Video connection is not established correctly
Probable cause is bad connection (noisy line). Hang up and try again. This time, ask
the other party to call you.
Green or yellow blocks appear in the remote picture
Your VT640P is reliable and easy to use. If you encounter any problem while using this
product, please refer to the table below for possible solutions.
Other problems
LAN/Firewall with Packet Filter
With a DHCP server connected
Without a DHCP server connected
Working with a Gatekeeper
Making a Call
Before making a video call
Making a video call
Making Adjustments
Using OSD menus
Configuration
Password Checking
System Setup
Bandwidth Setup
Remote Update
Configuration Changed
Password
Change Password
Phonebook
Add
Search
InBox
OutBox
Restore factory settings
OSD Menu Tree
Trouble Shooting
Error messages in bootup sequence
Error messages in changing System Setup Settings
Other problems
Tech Support
Limited Warranty
FCC Statement
Table of Contents
|
|
User Manual
IP Broadband Videophone
53
29
30
31
33
34
35
36
36
37
39
40
41
42
42
43
43
44
47
48
49
50
51
52
53
54
55
56
Page 6

Overview
Visiontech VT640P is designed to avoid complicated installation. And
with the buttons on the keypad, you are able to access the userfriendly on screen display menu (OSD), easily control the functions
and make adjustments.
The VT640P has a built-in high quality CCD camera and an active
matrix liquid crystal display. Images are transmitted through the
Internet at up to 24 frames per second (fps) (@ CIF resolution).
While making a video call, you can enjoy the brilliant real-time color
images of yourself, your correspondents or both. If you do not want
your image to display on the caller or receiver's screen, VT640P's
private mode can do just that.
The VT640P is fully compliant with H.323 international standards for
video communication. It can be used with any video phone that are
compatible with this standard.
Feature highlights:
Broadband IP address video phone
Connect the other video phone by simply entering the IP
address/number (see NOTE)
Built-in high quality CCD camera with cover protection and focus
adjustment knob
High quality TFT LCD display
Friendly and easy operation through keypads
Phone book dialing function
2 A/V inputs & 1 A/V output for additional video/audio input and
video/audio output for large display
Up to 24 frames per second video display (@ CIF resolution)
Video selectable and picture image up to VHS quality
Echo-cancellation and no delay high quality audio
1 Getting Started
Note: To dial numbers, VT640P must work in conjunction with additional
accessories, such as the H.323 Gatekeeper.
DHCP is OFF.
Please assign the IP address.
PPPoE is ON.
Please assign the username.
Host Name is empty.
Please assign it.
When the user changes the settings in System Setup menu, VT640P will automatically
check if the configuration is set up correctly before leaving OSD menu. If any item is
not properly configured, an error message as well as the remedy will be displayed.
Please follow the instructions on the screen and refer to Chapter 4: System Setup
for correct settings.and Chapter 5: Working with a Gatekeeper
Error messages in changing
System Setup settings
DHCP is set to OFF but the IP address is not
assigned.
When VT640P does not use DHCP to get an IP,
you have to assign an IP for it. Please assign the
IP address.
PPPoE is set to ON but the username is not given.
The username is required when you use PPPoE.
Please assign the PPPoE username that you use to
login.
The Host Name is empty. VT640P can not work
without a Host Name.
Please input a Host Name for VT640P.
Gatekeeper is ON.
Please assign
the Gatekeeper IP.
Gatekeeper is set to ON but the Gatekeeper IP is
not assigned.
Please assign the Gatekeeper IP for the
Gatekeeper to work.
Gatekeeper is ON.
Please assign
the phone no. or alias.
Gatekeeper is set to ON but the phone no. or alias
is not assigned.
Please assign the phone no. or alias.
NAT is ON.
Please assign the NAT door.
NAT is set to ON but the NAT door is not assigned.
Please assign the NAT door so the NAT can work.
52
|
1
|
User Manual
IP Broadband Videophone
Page 7
Audio/Video Cable
Power Adapter
Handset Cable
Ethernet Cable
Power Cord
User's Manual
VT640P
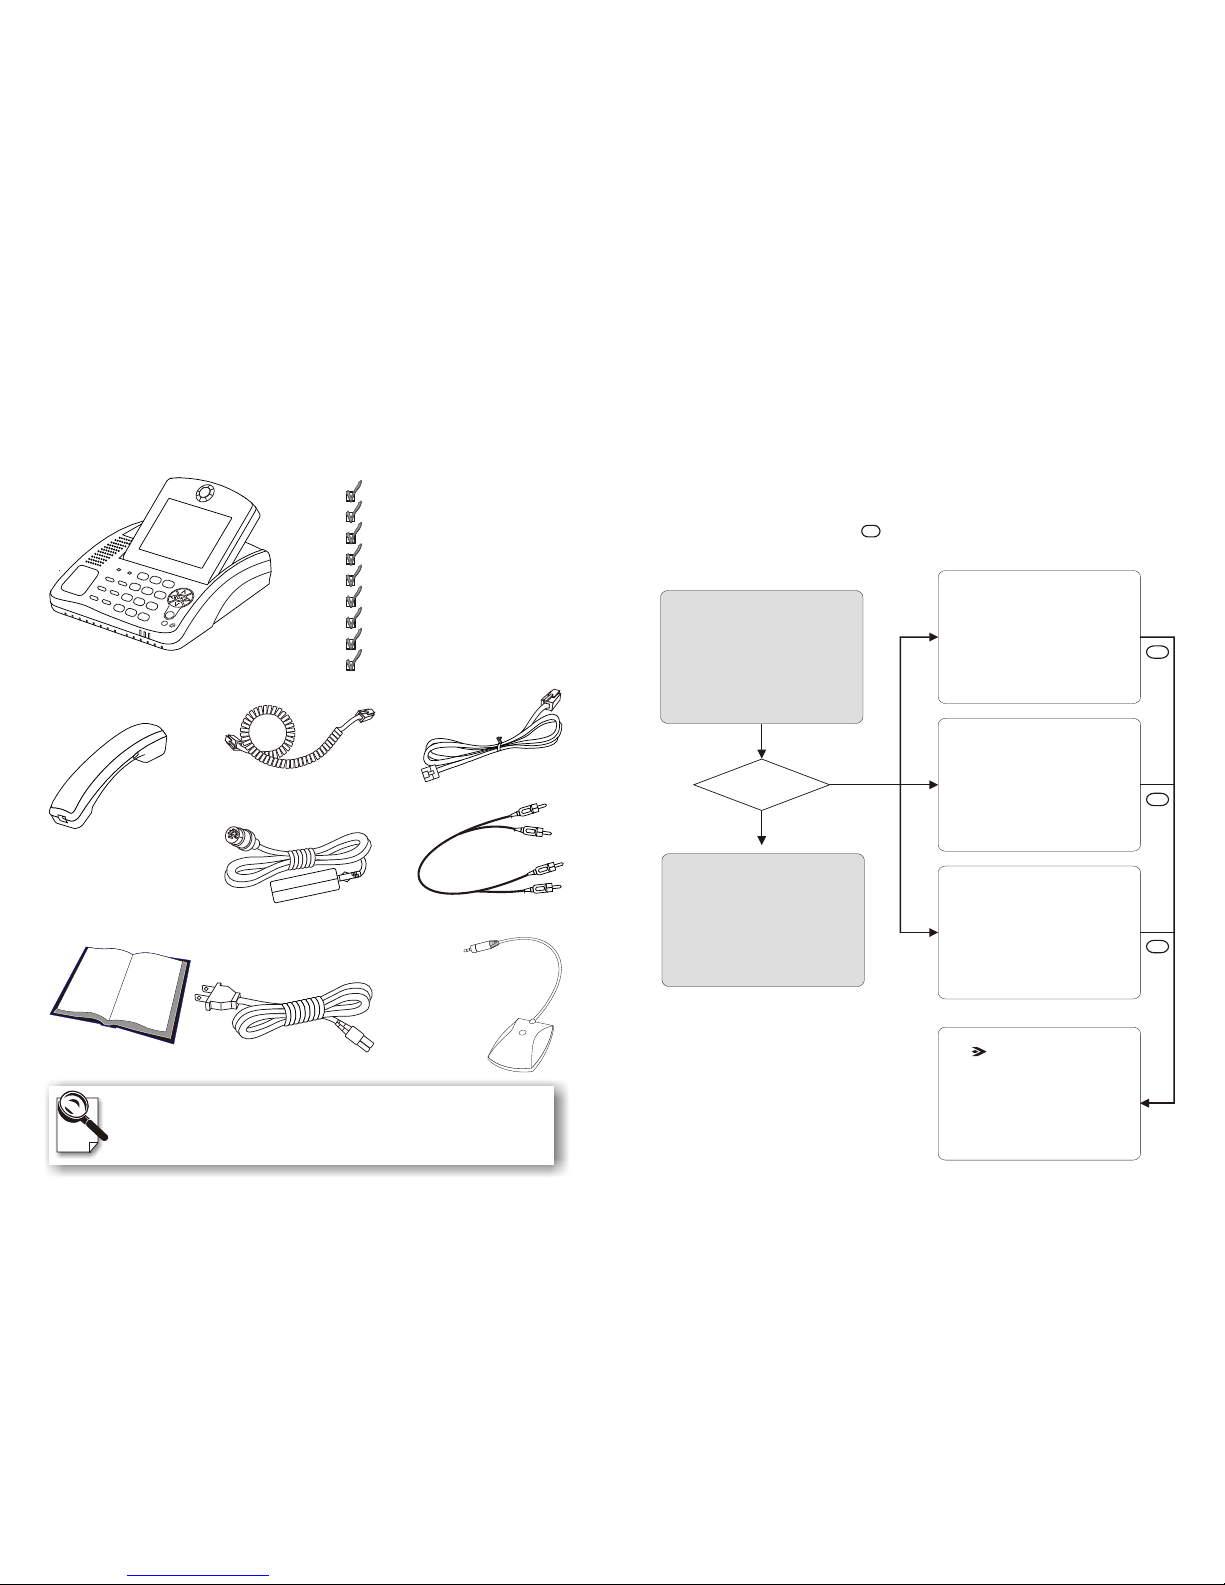
What's in the package?
Please unpack the product package with caution; inspect
the items closely. If you find any damaged item, please contact your
local distributor immediately. Also, please keep the box and packing
material for future use in the event of future shipments.
VT640P x1
Handset x1
User's Manual x1
Handset Cable x1
Power Adapter x1
Power Cord x1
Ethernet Cable (RJ-45) x1
Audio/Video Cable x1
Microphone x1
Handset
Microphone
9 Trouble Shooting
System power up
Error messages in bootup sequence
Cannot get IP address.
Please check the network
settings and connection.
Local View
Gatekeeper registration
timeout.
Please check the network
settings and connection.
Gatekeeper registration
failed (xxx),
Please check the network
settings.
Phonebook
Configuration
Password
In factory default setting, the local view will be displayed when VT640P is powered on.
If the system is not correctly set up, any of the three messages will appear on screen,
as shown below. Please press and refer to Chapter 4: System Setup and
to set up the system correctly.Chapter 5: Working with a Gatekeeper
OK
System
correctly set up
Yes
No
OK
OK
OK
2
|
|
User Manual
IP Broadband Videophone
51
Page 8
Phonebook
Configuration
Password
System Setup
Server Setup
Network Setup
Terminal Setup
Option
Bandwidth Setup
Remote Update
Search
Add
InBox
OutBox
8 OSD Menu Tree
Speed Dial
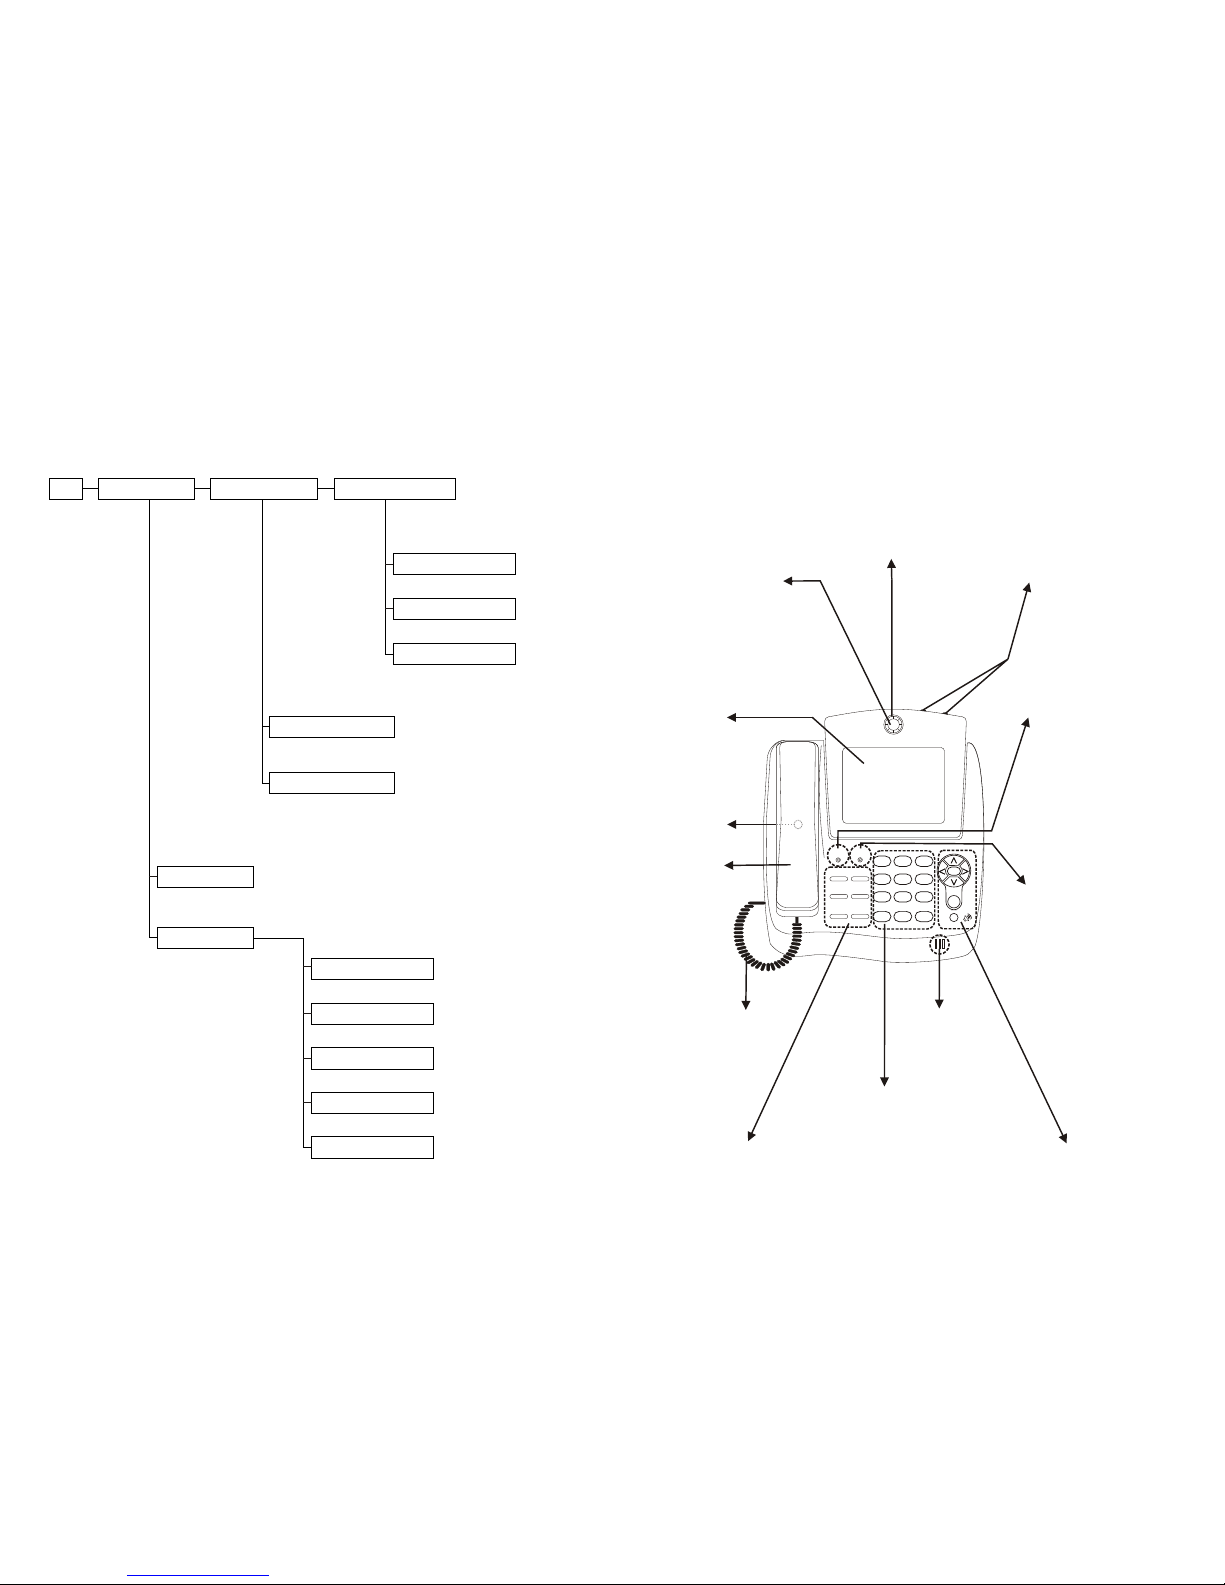
2 Getting to Know Your VT640P
Front view
Focus Adjusting Knob: on
outer ring of the camera.
Brightness and Hue:
These two knobs are
for adjusting the
brightness and hue of
the images on the LCD
screen.
LCD Screen:
shows the video
images of
callers.
CCD Camera:
The input source
of local video
image. This is a
mini built-in CCD
camera.
Keypad:
To enter the IP address or to input data
required for accessing the OSD menu.
Video Indicator:
Lights orange when
the main unit is in
video transmission.
When VT640P is in
audio mute, the video
indicator blinks.
Power Indicator:
Lights green when the
power is on. The light
blinks when the power
saving function is on.
The power saving
function activates
when the system is
inactive for five
minutes.
Handset Cable
Handset
Microphone
Cursor Panel: See next page.
1
2
3
4
5
6
7
8
9
0
#
*
Video Power
Clear
View
Privacy
Still Camera
Phonebook
Hot Keys: See next page.
Speaker
OK
Mute
Redial
OK
50
|
3
|
User Manual
IP Broadband Videophone
Page 9
Local view
********
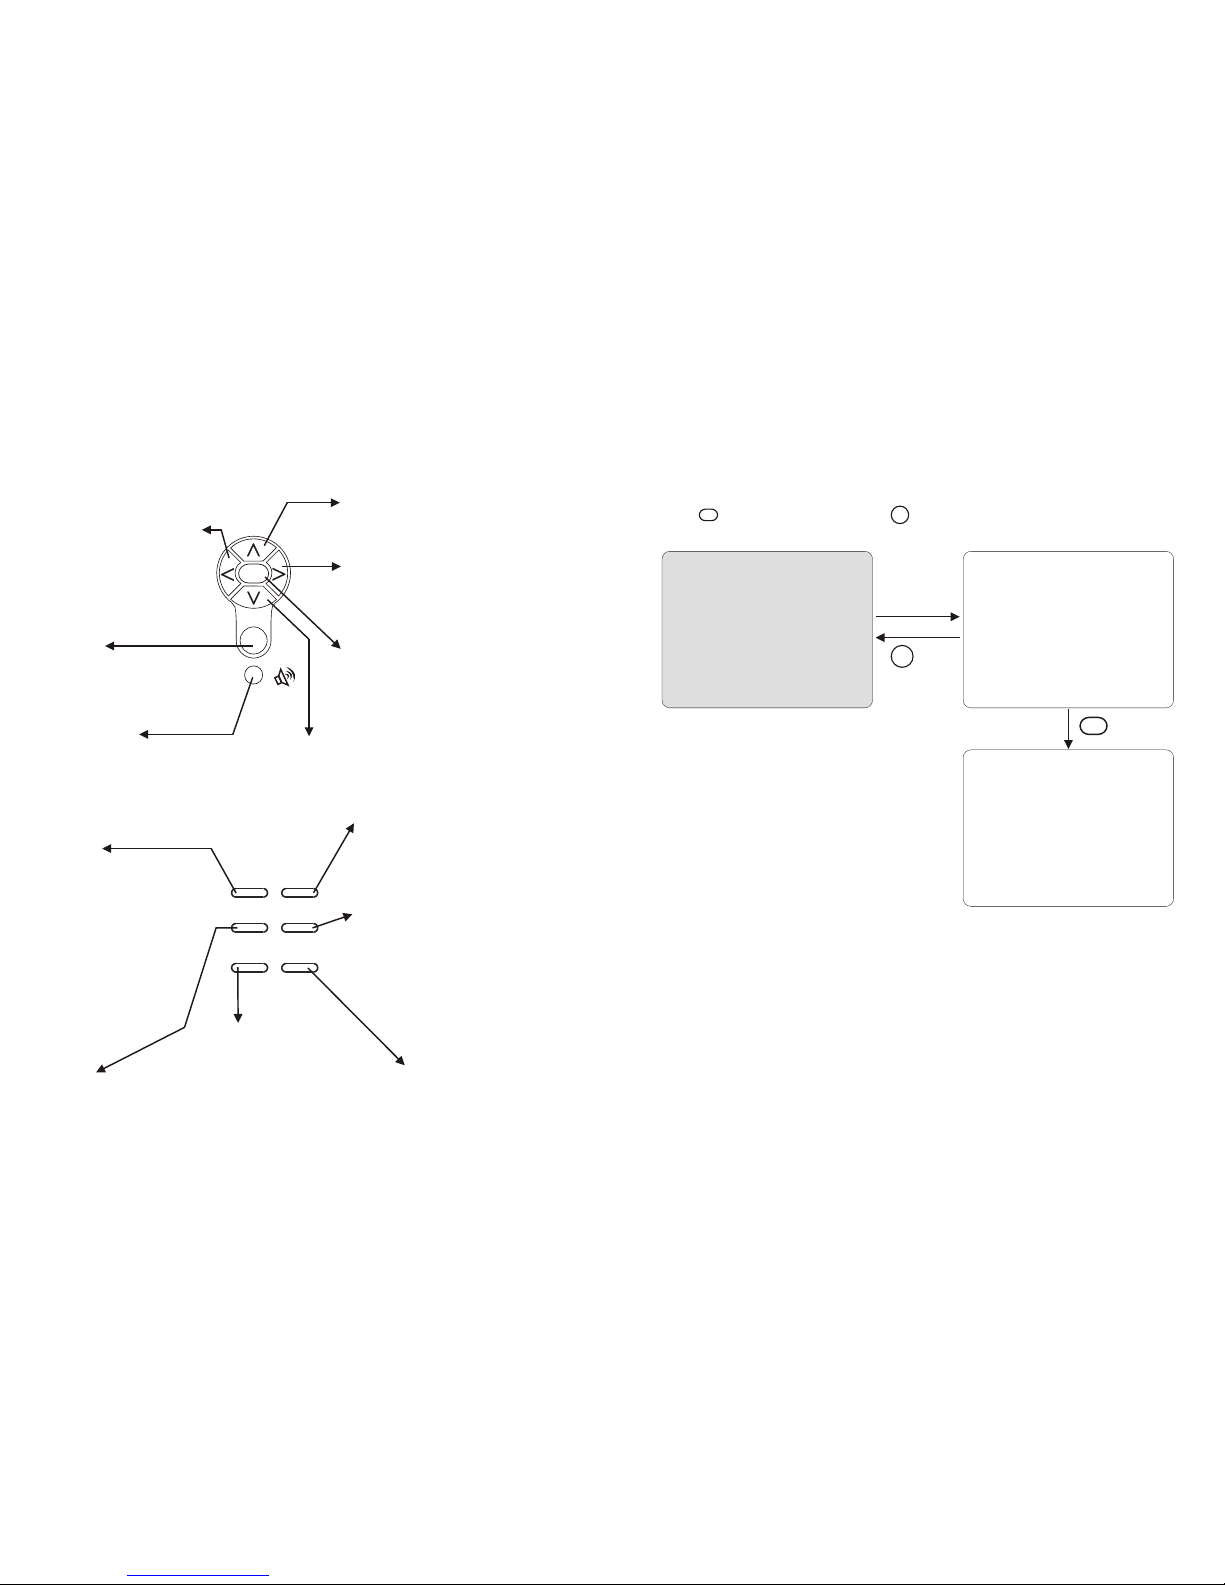
In local view screen, pressing "********" (eight asterisks) will bring out a dialog
window, asking if you want to restore all settings to factory default (see below).
Press to begin the process. Press to cancel.
Restore all settings
to factory default?
Yes <OK>
No <CLEAR>
Using OSD menus
Restore factory settings
Clear
Settings restored.
Please reboot.
OK
Clear
Factory default settings:
IP: 192.168.1.1
Phone No.: 1000
Subnet Mask: 255.255.255.0
Gateway: 192.168.1.254
DNS Server: 0.0.0.0
GateKeeper: 0.0.0.0
Update Server: 0.0.0.0
Host Name: VT640P
H.323 Alias: Visiontech
PPPoE username: <empty>
PPPoE password: <empty>
NAT door: 0.0.0.0
Auto Answer Rings: 4
Gatekeeper: OFF
PPPoE: OFF
NAT: OFF
Auto Answer: OFF
Ringer: HI
H.263: ON
Keep Alive: ON
Bandwidth: 256
Phonebook: <empty>
DHCP: OFF
OK
Front view (cont.'d)
Phonebook
Still
Camera
View
Privacy
Mute/Redial:
During a video call, this
button is used to mute
the audio so that you will
not be heard by the
other party on the phone;
when there is no
connection, to redial the
IP address/ number* last
dialed.
Hot Keys
View:
To select how local and
remote video is displayed
on the screen. The
options are: Remote, PIP
upper-left, PIP lower-left,
PIP upper- right, PIP
lower-right, Local. And it
switches in that
sequence.
Privacy:
Stop sending your image to the
other side so that you will not be
seen by the person you talk to.
Camera:
To switch between the built-in CCD
camera and external cameras
connected to VT640P.
Still:
To freeze the
video image of
yourself so that
the other party
can have a
clearer display.
Hands Free:
To dial the correspondent's IP
address without picking up the
handset.
Used with OSD menus;
to move the cursor left
or to go back to the
previous menu. During
a video call, used to
make the video sharper.
OK: Used with OSD menus; to pop
up the OSD menu, to enter the sub
menu, or to confirm the selection.
Cursor Panel
Used with OSD menus; to move the
cursor right or to enter the sub
menu.
During a video call, used to make
the video smoother.
Used with OSD menus; to move the
cursor up. During a call, to turn the
volume of the speakerphone up.
Used with OSD menus; to move the cursor down.
During a call, to turn the volume of the
speakerphone down.
Clear:
Used to backspace when you
input letters or numbers.
*Note: To dial phone numbers, VT640P must
work in conjunction with additional accessories,
such as the H.323 Gatekeeper.
Phonebook:
See page 43.
Clear
OK
Mute
Redial
4
|
49
|
User Manual
IP Broadband Videophone
Page 10
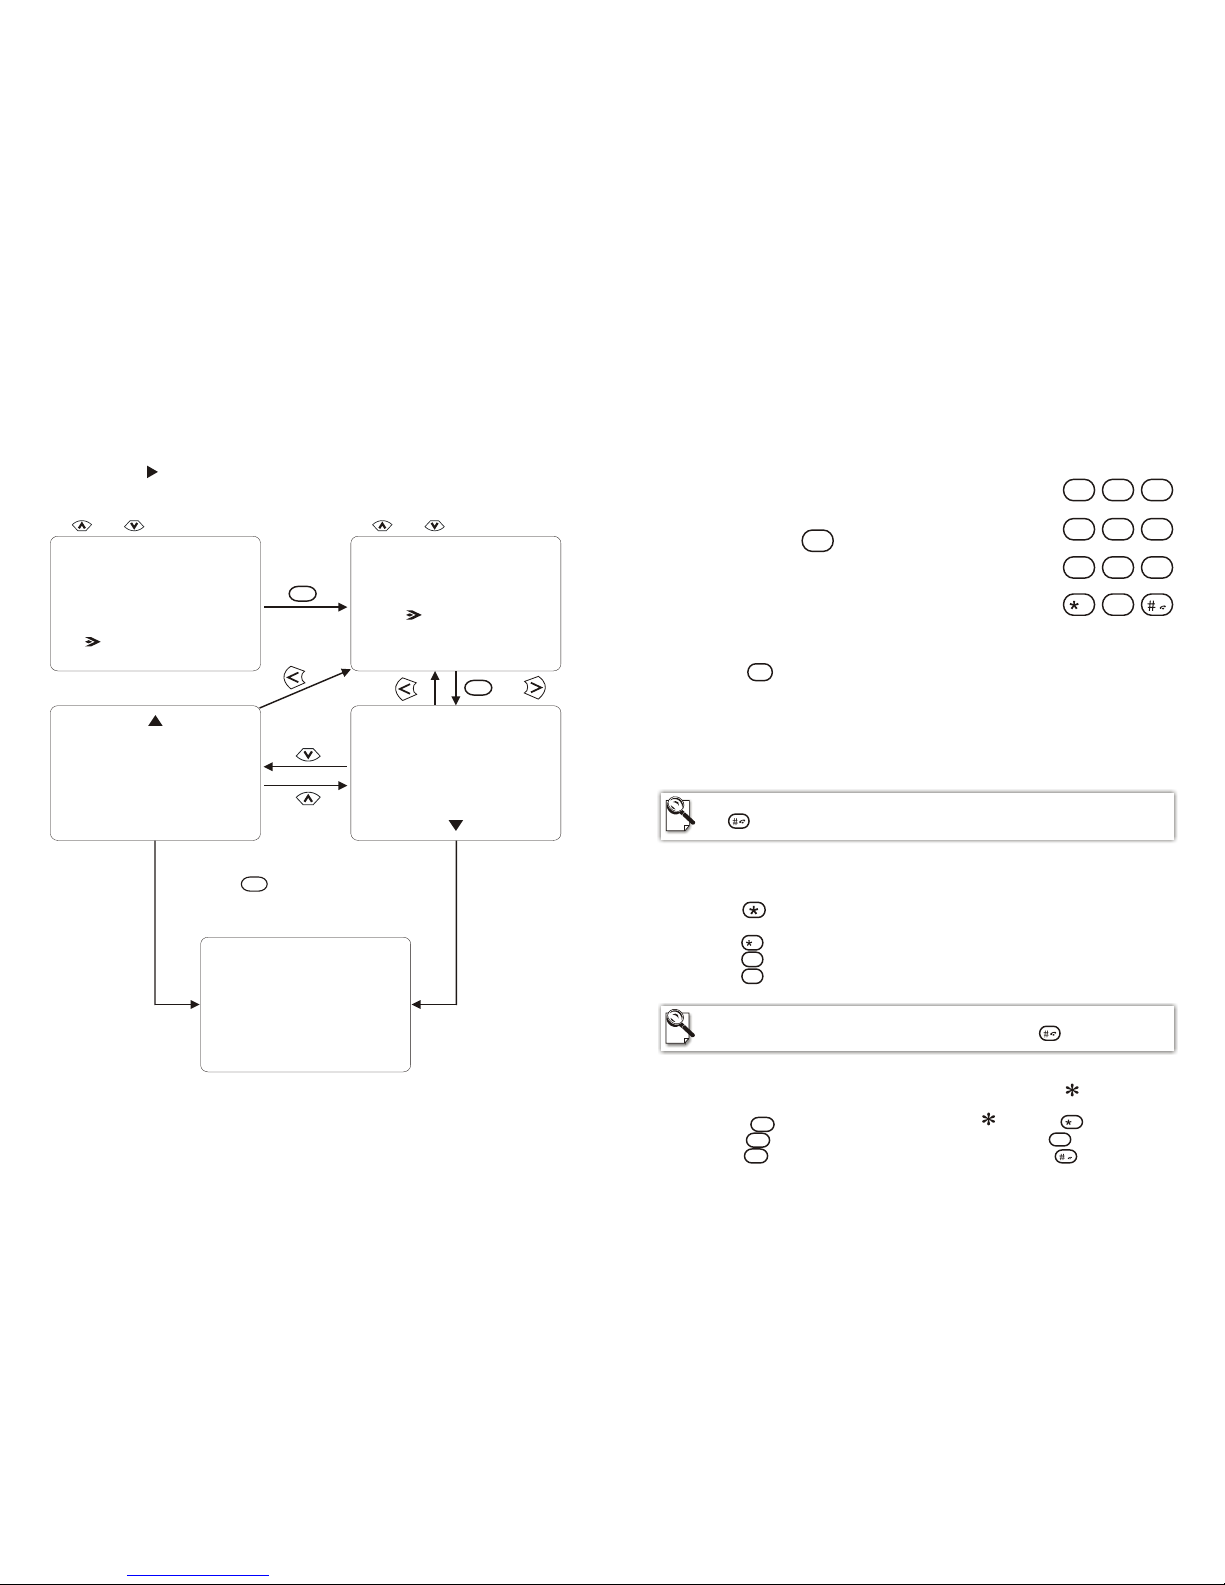
Using OSD menus
OutBox contains the numbers of the 10 last dialed calls.
Phonebook OutBox
Search
InBox
Phonebook
Configuration
Password
OutBox
or
OK
OK
and : Item selection and : Item selection
Dial out
*
By (IP / Phone no. / Alias)
Dialing to (Name) ...
If you can not dial out with VT640P, please hang up or press the speakerphone button
to return to local view, and try to dial again.
Dial out
*
¡¯
Select a desired item and then
press , or press a number
directly, to dial out.
OK
Add
Press to clear In/Out Box
****
0. 24586547 (00:02:15)
1. 35648755 (00:01:20)
2. Amy (00:32:47)
3. Tom (00:51:30)
4. 25478654 (00:01:38)
5. 25478654 (00:03:21)
6. Mary (00:01:16)
7. 12547869 (00:02:37)
8. Tom (00:08:18)
9. 52458745 (00:07:24)
Speed Dial
Inputting numbers
Pressing any key on the numeric keypad can input the
correspondent number.
For example, pressing will generate the number " 8 ".
Numeric Keypad
Front view (cont.'d)
8
TUV
2
ABC
1
@_-
3
DEF
5
JKL6MNO
4
GHI
9
WXYZ
8
TUV
7
PQRS
0
! ; $
. ,
Inputting letters
Every button on the numeric keypad has characters printed on it,
in addition to the numbers. Number keys from " 2 " to " 9 " have
English letters on them, so they can be used to input English letters. When inputting
data, pressing a key consecutively will generate the letters on it.
For example, has the number " 7 " and the alphabets " PQRS " on it.
Pressing this key once will generate the number " 7 ".
Pressing this key twice consecutively will generate the letter " P ".
Pressing this key three times consecutively will generate the letter " Q ".
Pressing this key four times consecutively will generate the letter " R ".
Pressing this key five times consecutively will generate the letter " S ".
Ant it will cycle in such order.
7
PQRS
Inputting punctuation marks
The keypad provides four punctuation marks:
" . " " , " " ! " and " ; ".
" . ": Press twice consecutively;
Press only once to generate " . " when inputting IP addresses.
" , ": Press three times consecutively.
" ! ": Press twice consecutively.
" ; ": Press three times consecutively.
. ,
. ,
0
! ; $
0
! ; $
Inputting special characters
The keypad also provides six special characters: " @ " " _ " " - " " " " $ " and " #
".
" @ ": Press twice consecutively; " ": Press once.
" _ ": Press three times consecutively. " $ ": Press 4 times.
" - ": Press four times consecutively. “ # ": Press once.
1
@_-
1
@_-
1
@_-
. ,
0
! ; $
Switching between upper case and lower case letters
Press once to switch between upper and lower case letters when inputting data.
Speed Dial
When the handset is picked up or the speaker button is pressed, pressing can enable speed dial.
48
|
5
|
User Manual
IP Broadband Videophone
Page 11
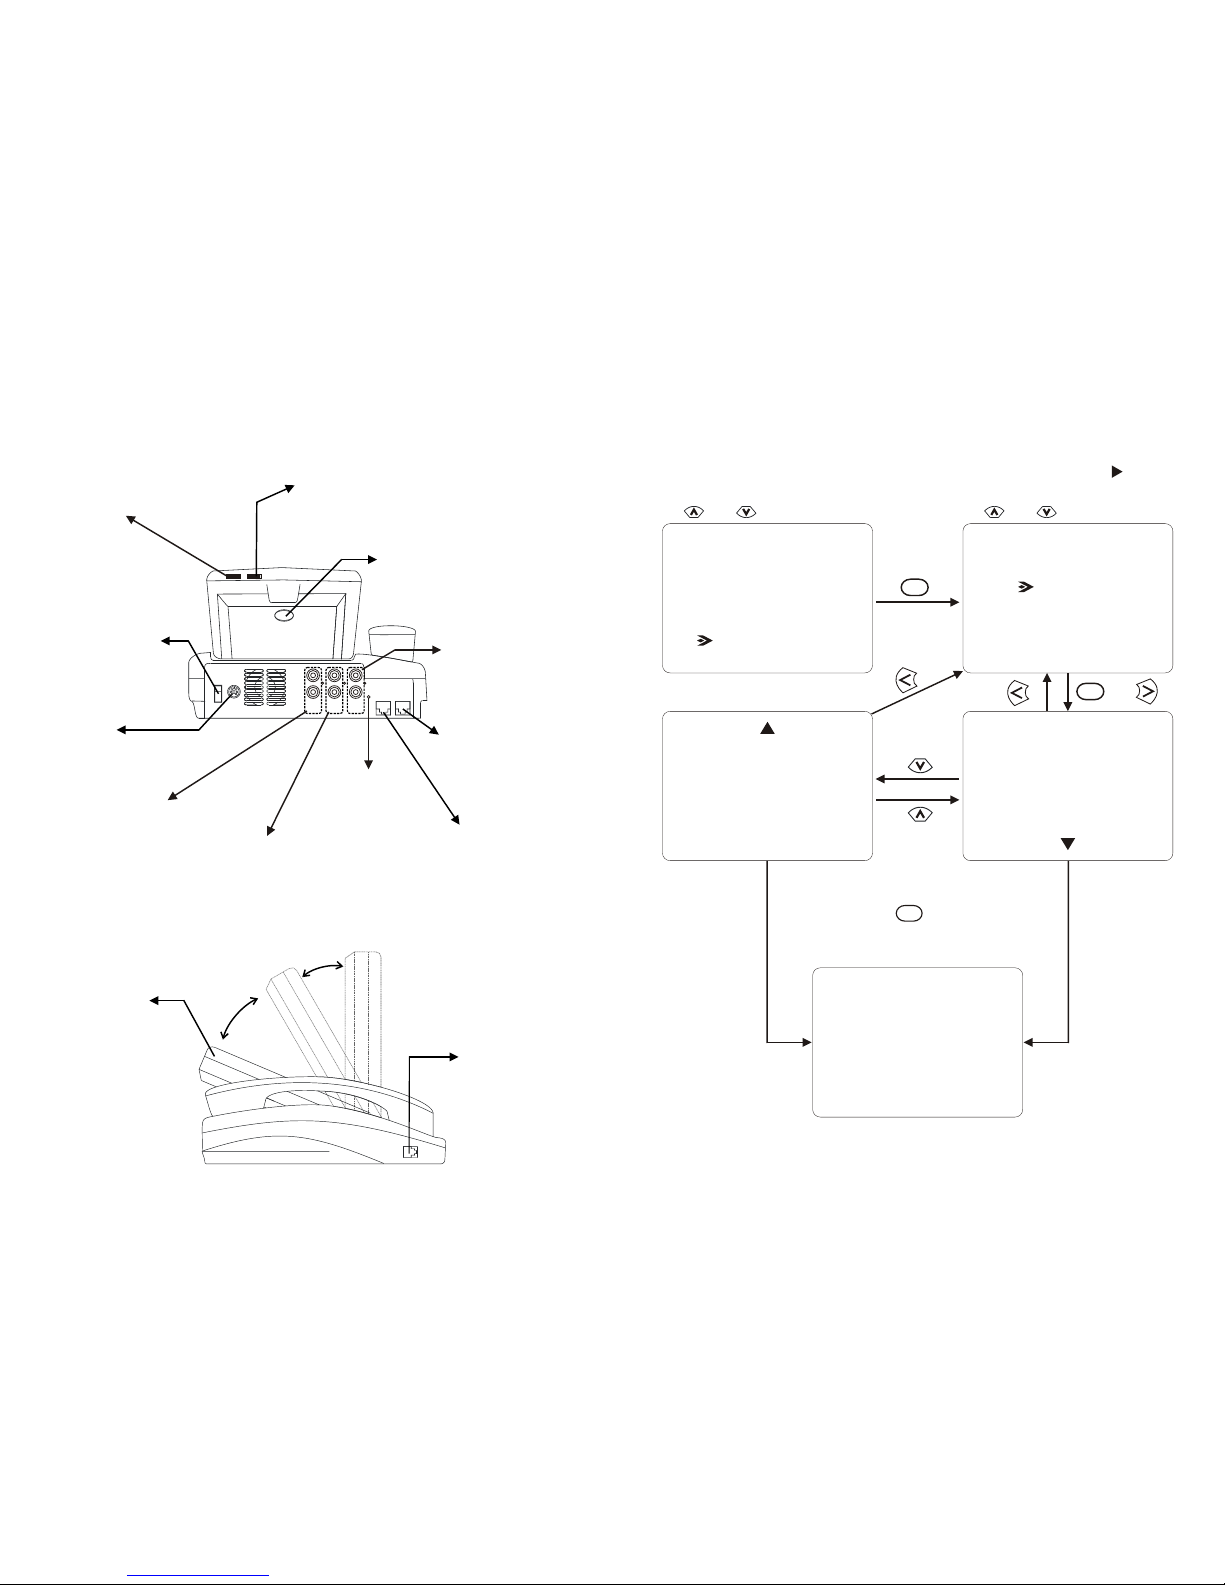
Using OSD menus
Phonebook InBox
InBox contains the numbers of the 10 last received calls.
Dial out
*
Phonebook
Configuration
Password
or
OK
OK
By (IP / Phone no. / Alias)
Dialing to (Name) ...
and : Item selection and : Item selection
If you can not dial out with VT640P, please hang up or press the speakerphone button
to return to local view, and try to dial again.
Dial out
*
¡¯
Select a desired item and then
press , or press a number
directly, to dial out.
OK
0. 24586547 (00:02:15)
1. 35648755 (00:01:20)
2. Amy (00:32:47)
3. Tom (00:51:30)
4. 25478654 (00:01:38)
5. 25478654 (00:03:21)
6. Mary (00:01:16)
7. 12547869 (00:02:37)
8. Tom (00:08:18)
9. 52458745 (00:07:24)
Search
InBox
OutBox
Add
Press to clear In/Out Box
****
Speed Dial
WAN
AUDIO
VIDEO
A/V
OUT
A/V
IN2
POWER
A/V
IN1
ON
OFF
DC IN
Brightness
For adjusting the brightness of LCD screen
Hue
For adjusting the hue of
LCD screen
DC IN
Connect to the DC
output of power
adapter
A/V OUT
Audio and Video output connector
A/V IN2
Audio and Video input connector 2
A/V IN1
Audio and Video
input connector 1
WAN
Ethernet connector
Lens Cover Holder
A holder for the plastic cover
plate of CCD lens
Rear view
Power Switch
For turning ON/OFF
the power
Side view
Handset Jack
Handset cable
connector
LCD Panel
The LCD panel can be
tilted up or down to
adjust the angle of the
shots taken of the
caller and obtain the
most comfortable
viewing position.
COM
COM
(reserved)
MIC
MIC
External microphone
connector (optional)
6
|
47
|
User Manual
IP Broadband Videophone
Page 12
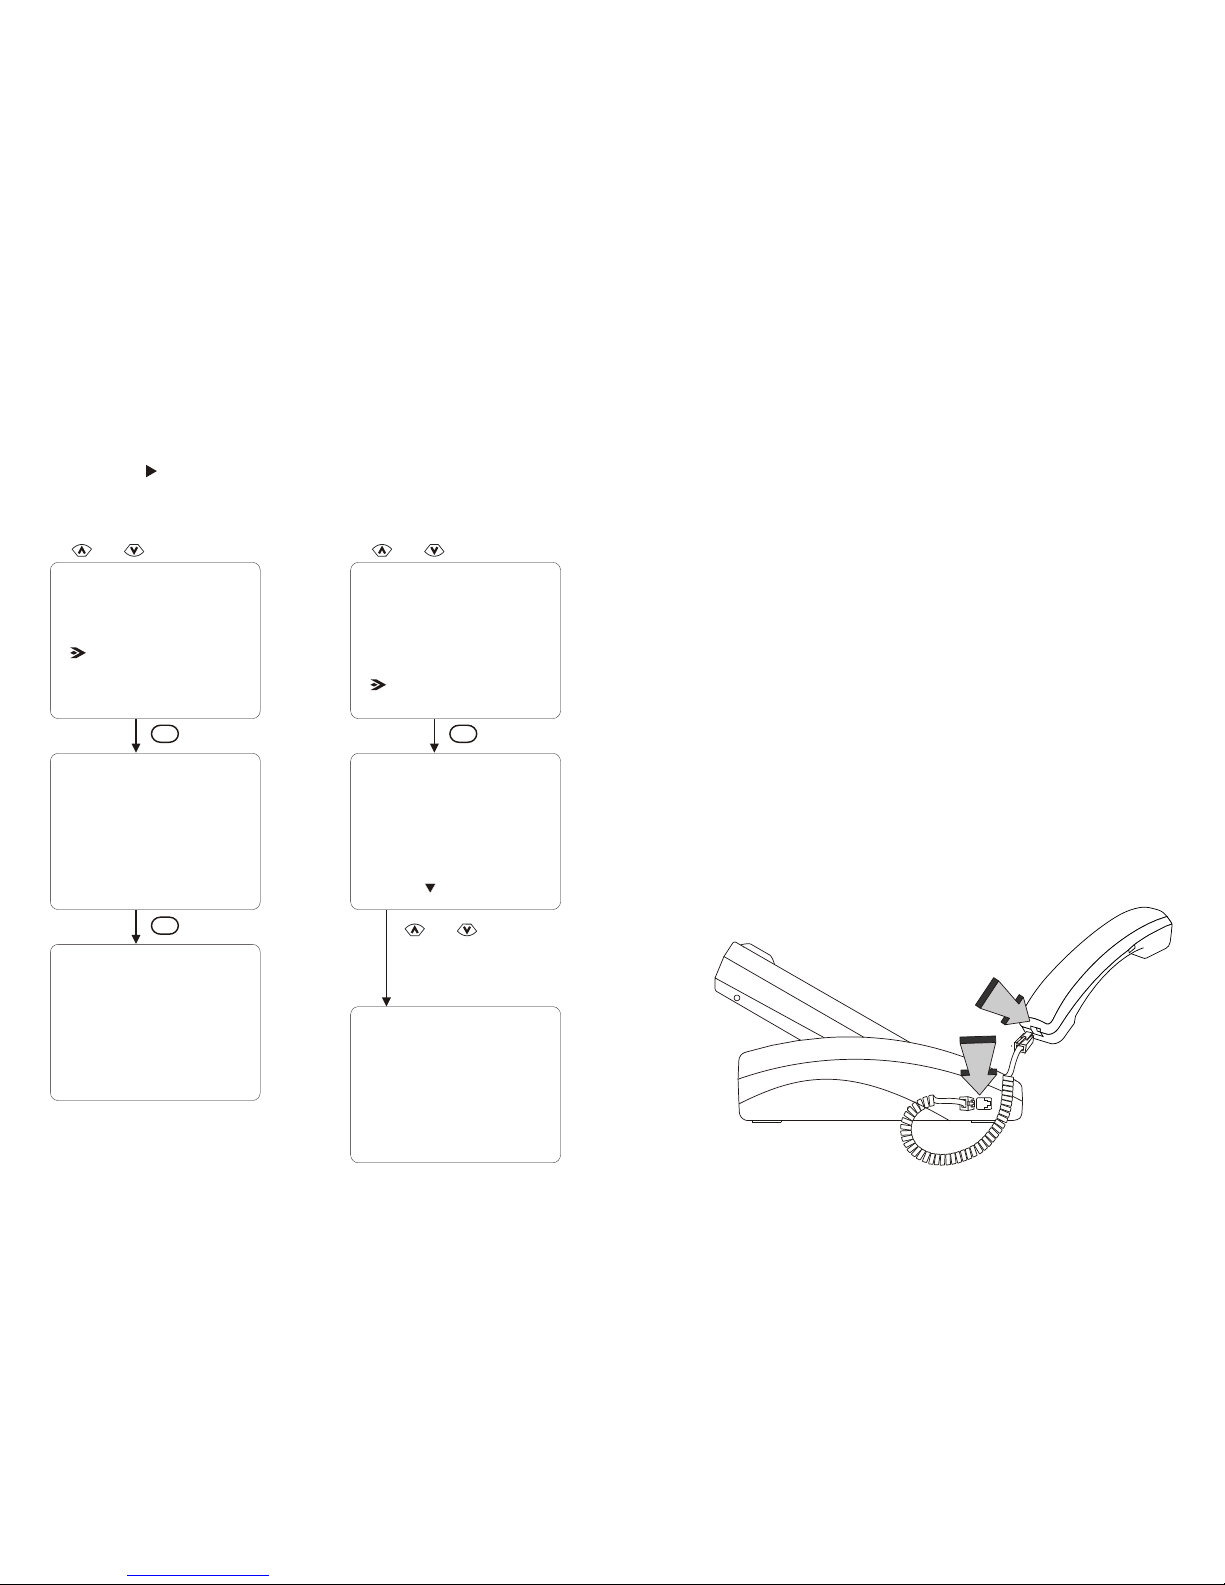
Delete This Record?
YES <OK>
NO <CLEAR>
Dial
Edit
Record deleted
Using OSD menus
Search for a number (cont'd)
Delete the phonebook record
Phonebook Search
Delete
OK
OK
and : Item selection
Add to Speed Dial
Record saved
OK
and : Item selection
Dial
Edit
Delete
Add to Speed Dial
0. (None)
1. (None)
2. (None)
3. (None)
4. (None)
Add the record to Speed Dial
and : Item selection
Press the item number (0-9) to
assign the record to the number.
3 Installation
Step 1 Pick a good spot
Prolonging the lifespan
Avoid storing or operating VT640P in abnormal conditions. High temperatures
or excessive humidity could cause the unit to malfunction and shorten its
useful lifespan.
Stability
Place your VT640P on top of a counter, desk, or table with the CCD camera
opening in front.
Lighting condition
Make sure the lighting is sufficient and does not shine directly into camera
lenses.
View of camera
Avoid using VT640P in a room with brightly painted walls or flamboyant
wallpaper. Soft and evenly painted background provides the best results.
Installing the unit
Step 2 Hook up the handset
Connect the handset and the VT640P main unit with handset cable.
Connect the handset cable.
46
|
7
|
User Manual
IP Broadband Videophone
Page 13
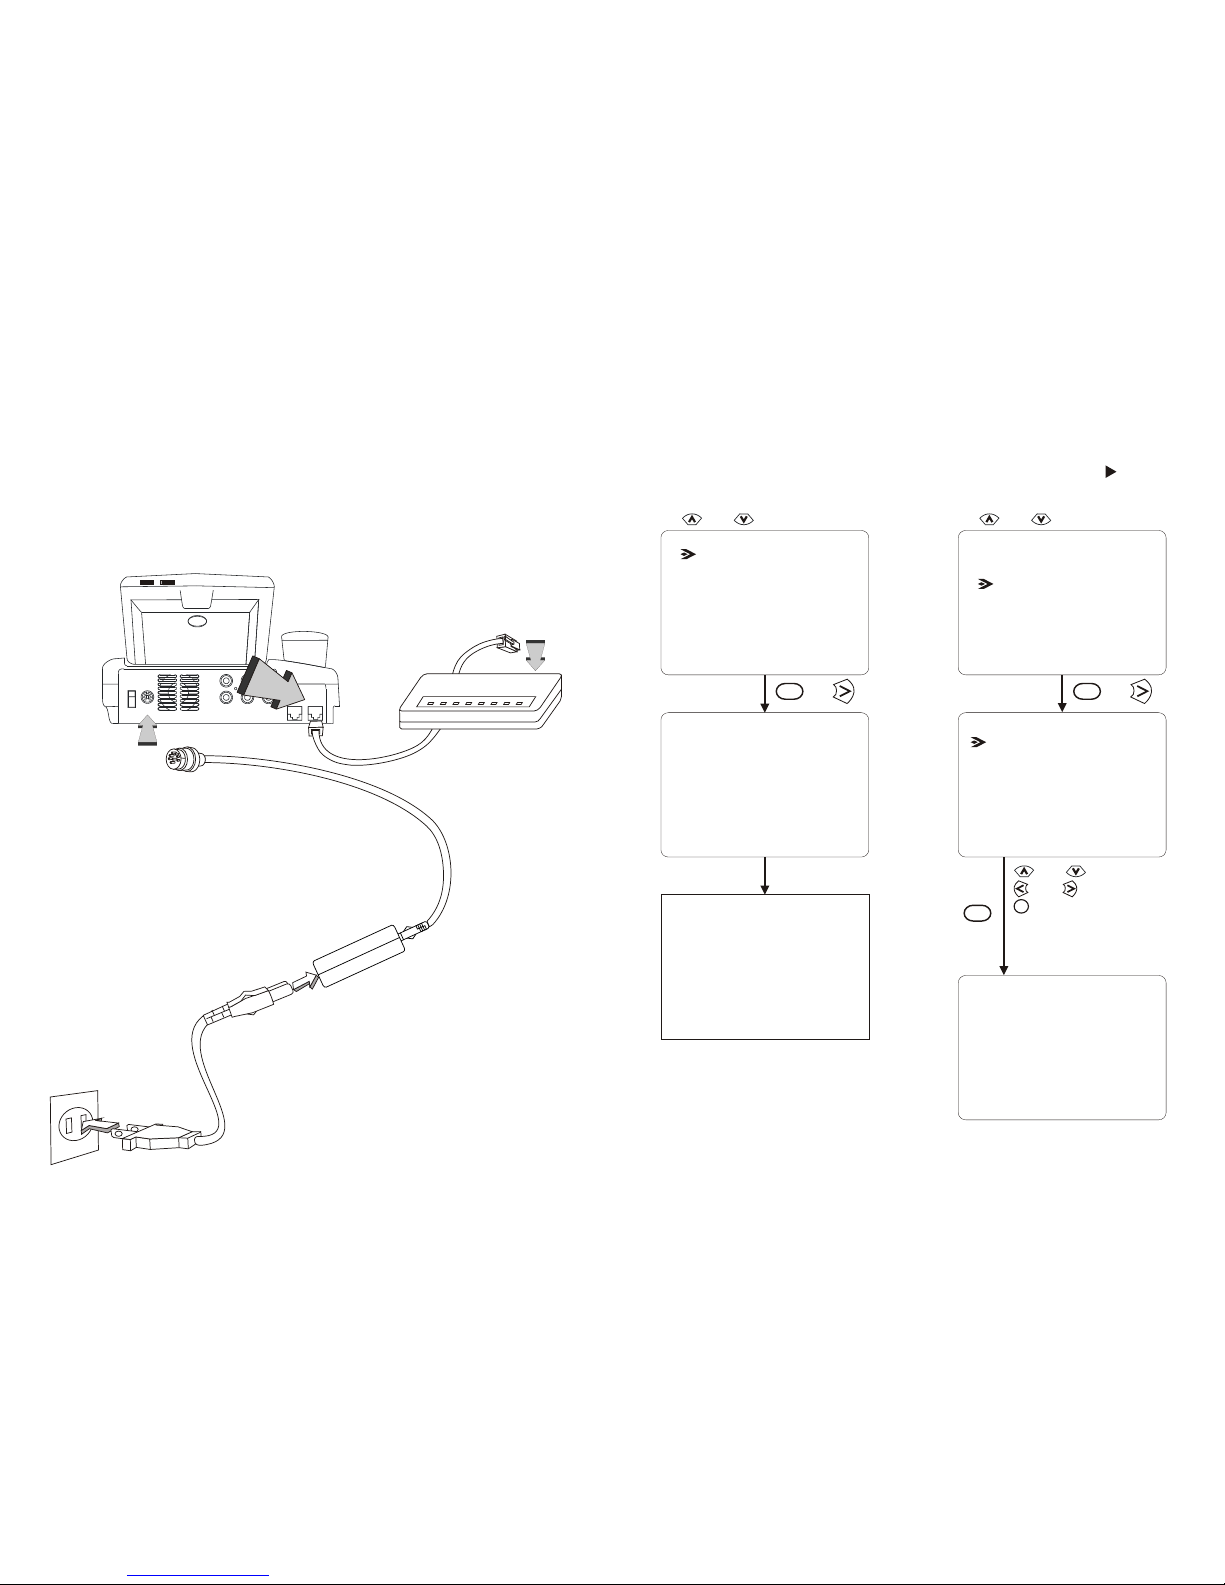
Dialing ...
192.168.3.1
Using OSD menus
Search for a number (cont'd)
Dial the searched number
Phonebook Search
and : Item selection
If you can not dial out with VT640P, please hang up or press the
speakerphone button to return to local view, and try to dial again.
Call progressing
Updating ...
Name: |Joe
Phone No. : 789
IP: 192.168.3.1
H.323 Alias: Joe
OK
and : Item selection
Edit the phonebook record
Dial
Edit
Delete
Add to Speed Dial
Dial
Edit
Delete
Add to Speed Dial
and : Item selection
Clear
: backspace
Numeric keypad: input numbers,
letters, punctuation marks, and
special characters.
and
: move cursor
or
OK
or
OK
Step 3 Connect the Ethernet cable
Plug one end of the Ethernet cable in the jack marked "WAN" on VT640P. Plug
the other end of the Ethernet cable in the RJ-45 jack of the Internet device
(hub, router, or ATU-R).
Connect the Ethernet cable
to the Internet device.
Installing the unit (Cont'd)
Step 4 Plug in for power
Connect the power cord between the wall outlet and
the power adapter. Plug the free end of the power
adapter into the power connector (DC IN)
on VT640P.
Connect the power adapter.
Connect the power cord and plug in.
AUDIO
VIDEO
A/V
OUT
A/V
IN2
POWER
A/V
IN1
ON
OFF
DC IN
COM WAN
8
|
45
|
User Manual
IP Broadband Videophone
Page 14
Using OSD menus
Phonebook Search
Search for a number
Dial
Edit
Delete
(Continued on next page)
or
OK
and : Item selection
Searching by Name:
Joe
Name: Joe
Phone No. : 789
IP: 192.168.3.1
H.323 Alias: Joe
OK
Add to Speed Dial
Clear
: backspace
Numeric keypad: input numbers, letters, punctuation
marks, and special characters.
and
: move cursor
Search
InBox
Add
OutBox
Speed Dial
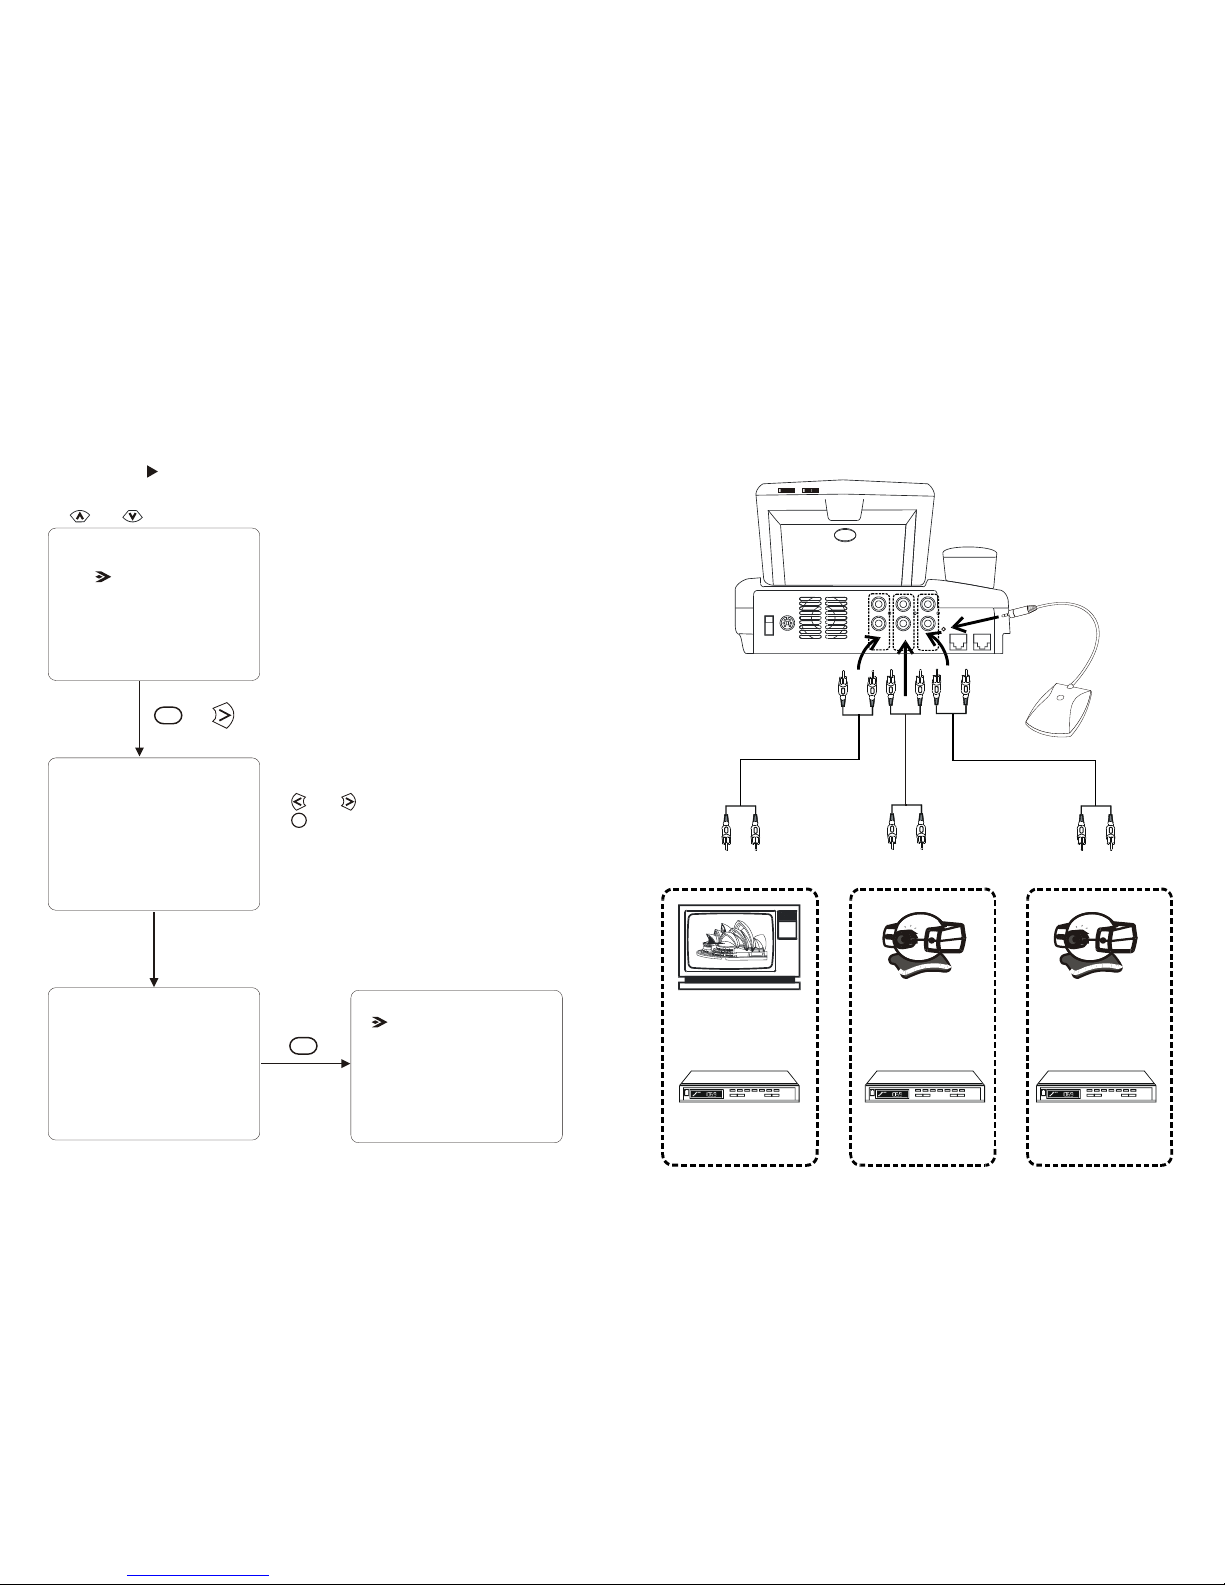
Using external devices (Optional)
VCR
(for recording)
VCR
(for playing)
A/V Output
OR
OR
CCD Camera
Television
VCR
(for playing)
OR
CCD Camera
WAN
AUDIO
VIDEO
A/V
OUT
A/V
IN2
POWER
A/V
IN1
ON
OFF
DC IN
COM
MIC
A/V Input 1
A/V Input 2
External
microphone
44
|
9
|
User Manual
IP Broadband Videophone
Page 15
Record Saved
Add This Record?
YES <OK>
NO <CLEAR>
Note:
You can enter the phonebook menu either
through the OSD menu or by pressing the
Phonebook button
If you enter the phonebook menu by
pressing the
at any time.
Phonebook button, VT640P
will return to local view when you leave the
phonebook menu.
Using OSD menus
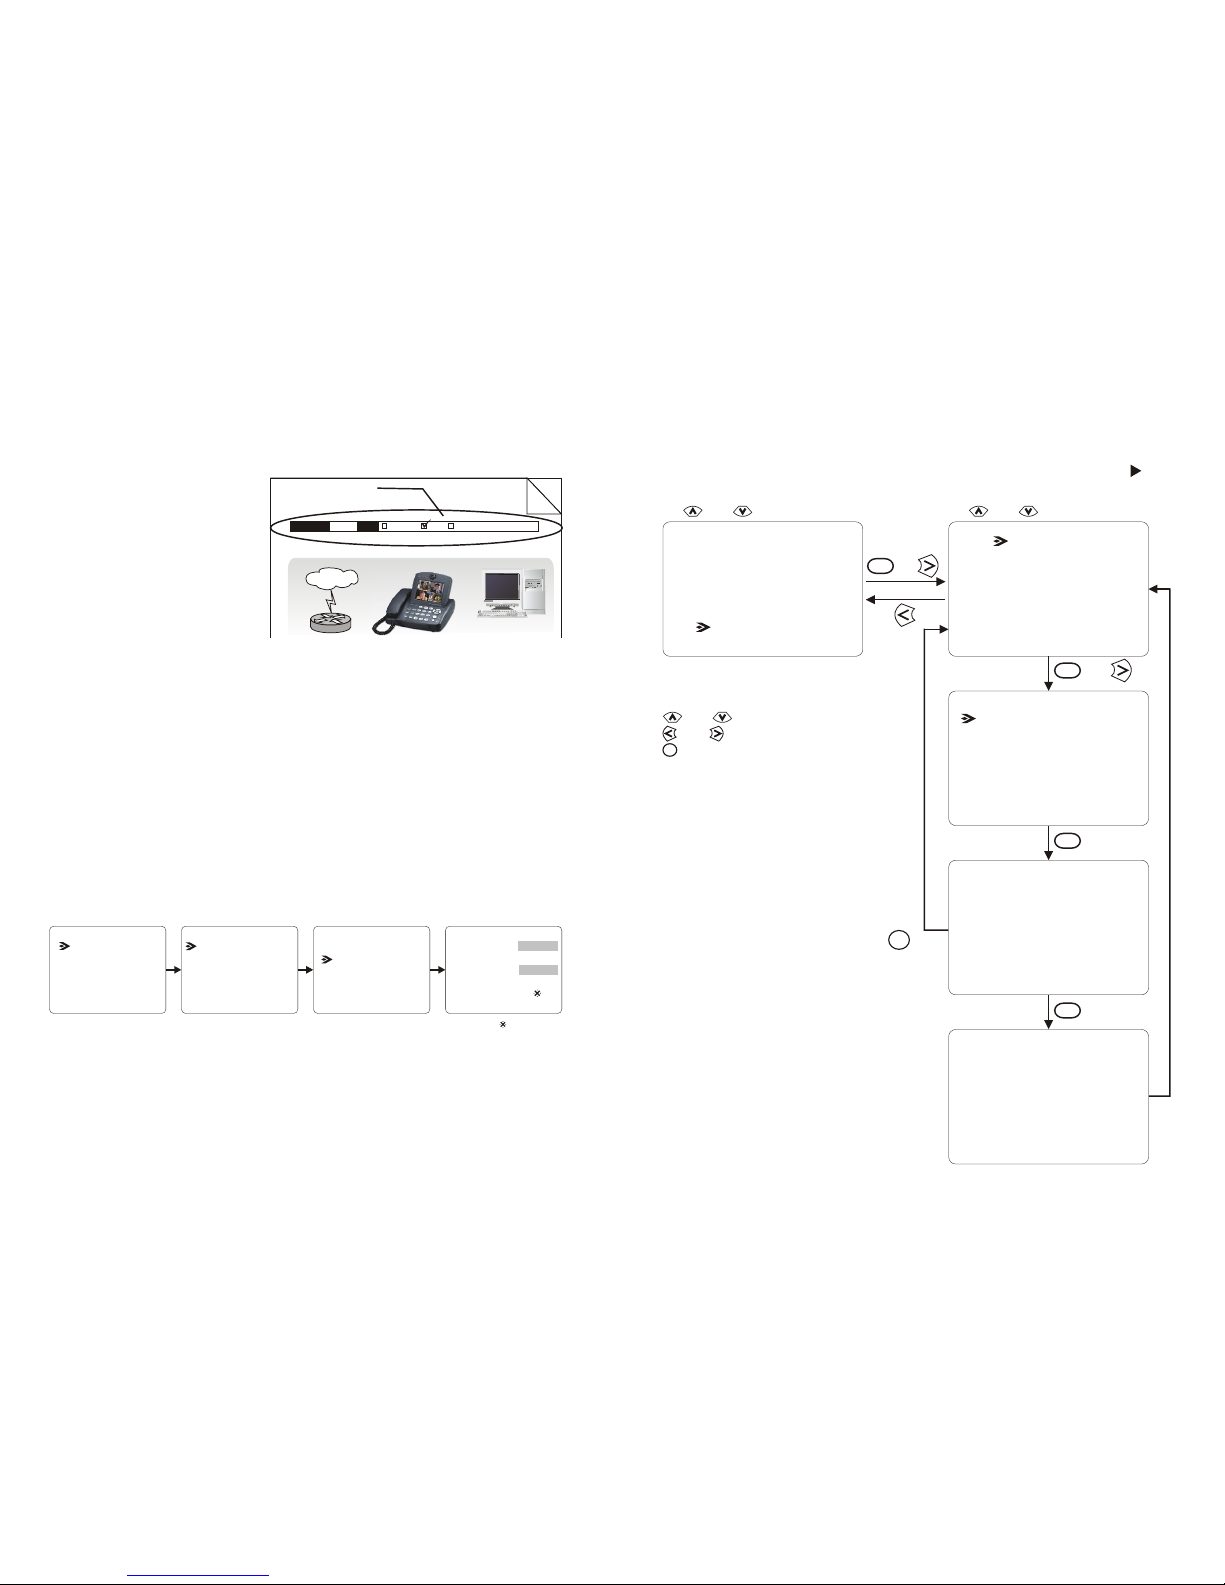
Phonebook Add
Adding to the phonebook
Phonebook
Configuration
Password
Search
InBox
Add
OutBox
Name: |
Phone No:
IP:
Alias:
or
Clear
or
OK
OK
OK
OK
and : Item selection and : Item selection
Speed Dial
and : Item selection
Clear
: backspace
Numeric keypad: input numbers, letters,
punctuation marks, and special characters.
and
: move cursor
4 System Setup
The System Setup section gives
instructions on how to set up your
VT640P system under some mostly
used interconnection types. There
is a condition bar on each page (as
shown in the figure), indicating
what type of connection the setup
guide on that page is for. Look for
the type of connection you use with
your VT640P to find the setup
instructions you need.
Connection LAN Type Firewall NAT Packet Filter
Without DHCP server connected
Internet
System Setup (Cont'd)
Condition Bar
Common Settings
The following settings need to be done by users with any type of connection.
Phonebook
Bandwidth Setup
Remote Update
System Setup
Server Setup
Network Setup
Terminal Setup
Option
Server Setup
Other than the settings that vary in different interconnections, there are some
common settings that should be done under any type of connection. Detailed
information is as follows:
Configuration
Password
(see p. 37)
: as default
Update Server:
Note : 1.DNS Server is used for applications in the future..
2.If the Internet service you use applies the gatekeeper, please refer to Chapter
5 for the complete settings of GateKeeper.
DNS Server: Note 1
GateKeeper: Note 2
10
|
43
|
User Manual
IP Broadband Videophone
Page 16
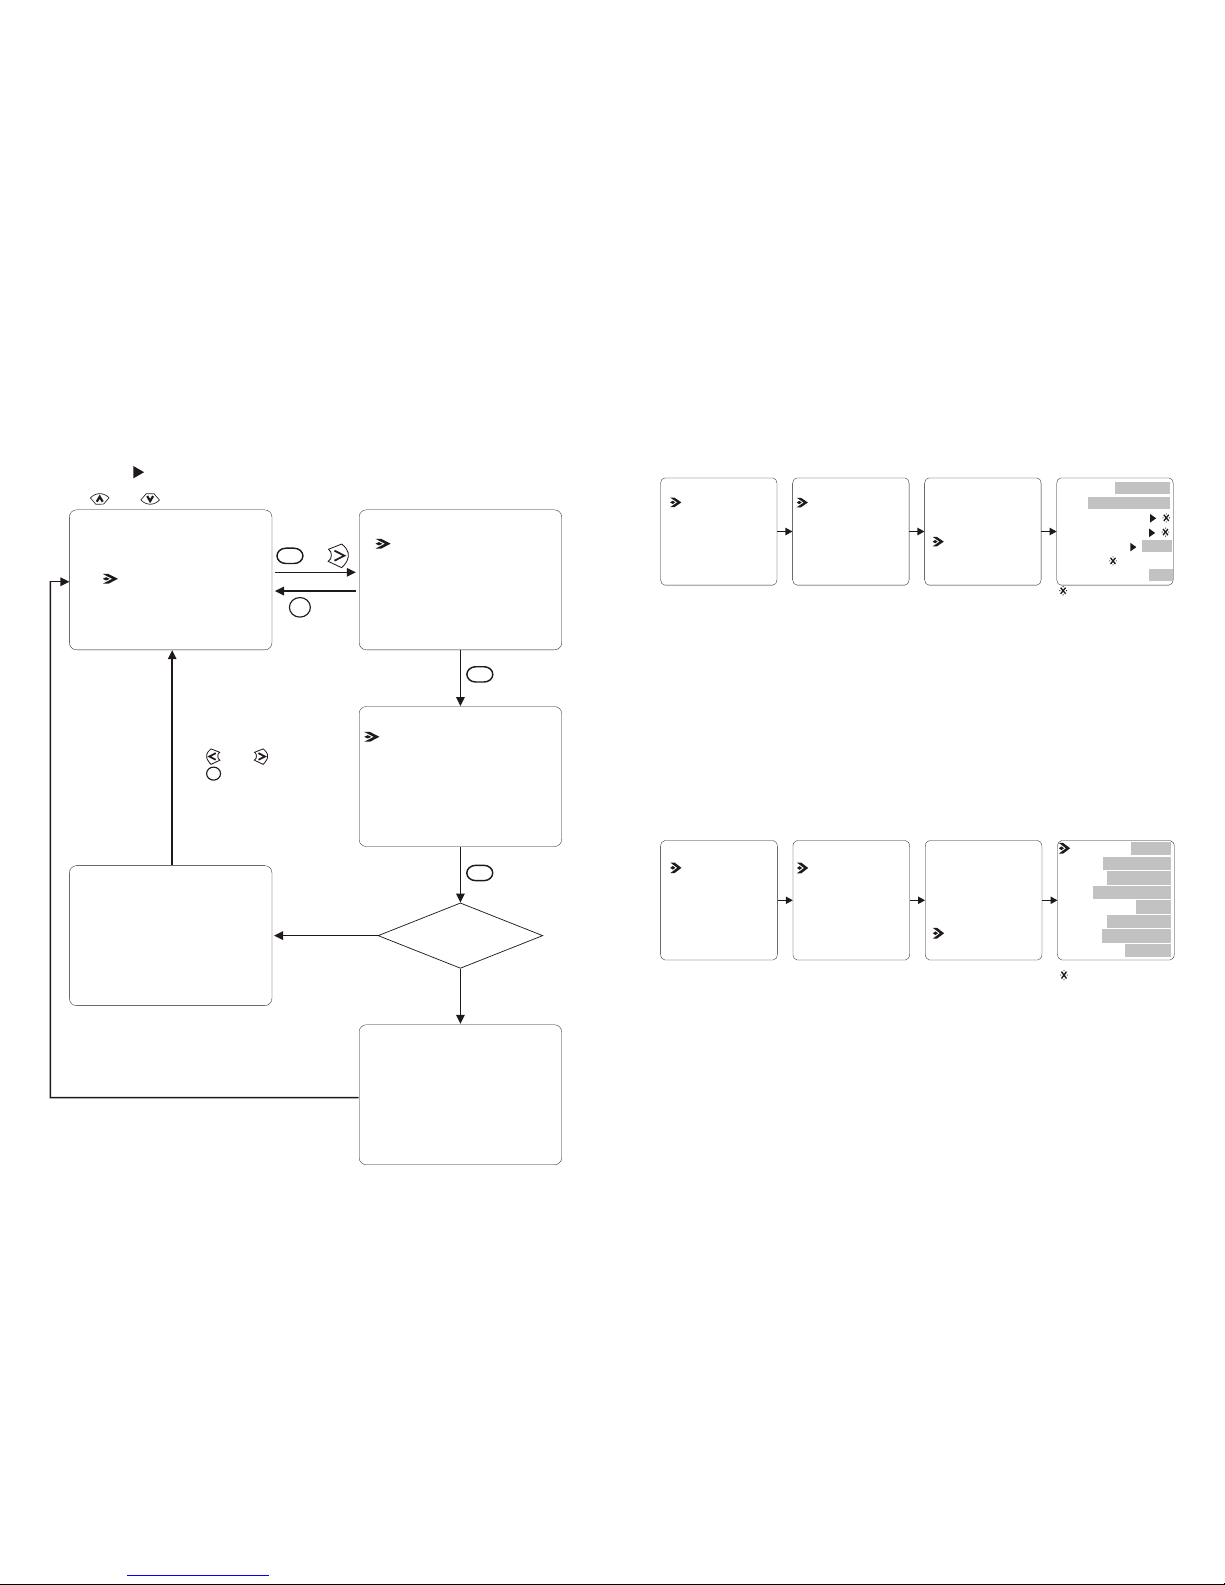
Password changed
change failed
Check inputs
Password
Change Password
Old password: |
Confirm:
Any key
Clear
: backspace
Numeric input: maximum
4 digits
and
: move cursor
Phonebook
Configuration
Password
Change Password?
YES <OK>
NO <CLEAR>
New password:
Invalid
Valid
Invalid input, Password
or
OK
Clear
OK
OK
and : Item selection
Note : 1.If the Internet service you use applies the gatekeeper, please refer to Chapter
5 for the complete settings of GateKeeper.
2.These settings must be set according to different environments. Please refer
to p. 12 to p. 32 for details.
3.You can let VT640P automatically pick up phones by setting Auto Answer to
ON.
4.You can set the volume of the ringer to HI or LO.
5.If two parties have a communication problem with the video protocol, setting
H.263 to OFF may solve the problem.
Server Setup
Network Setup
Terminal Setup
Option
Phonebook
Configuration
Password
Bandwidth Setup
Remote Update
System Setup
(see p. 38)
: as default
DHCP: Note 2
PPPoE: Note 2
NAT: Note 2
Option
H.263: Note 5
Keep Alive: Note 1
Server Setup
Network Setup
Terminal Setup
Option
Terminal Setup
Phonebook
Configuration
Password
Bandwidth Setup
Remote Update
System Setup
(see p. 38)
Alias: Note 1
PPPoE Username ( )
Host Name: Note 1
PPPoE Password ( )
Auto Answer Rings (0~9): Note 3
NAT Door:
: as default
Note : 1.
Host name and alias
may be assigned by your gatekeeper service provider.
2.If the Internet service you use applies the gatekeeper, please refer to Chapter
5 for the complete settings of GateKeeper.
3.
Host name and alias are for terminal identification. The default settings are
the same in all units. Therefore, you must change them.
You can set the number of rings before the system picks it up under the Auto
Answer mode. The default is 4.
GateKeeper: Note 1
Auto Answer: Note 3
Ringer: Note 4
GK Password ( ) Note 2
Using OSD menus
42
|
11
|
User Manual
IP Broadband Videophone
Page 17
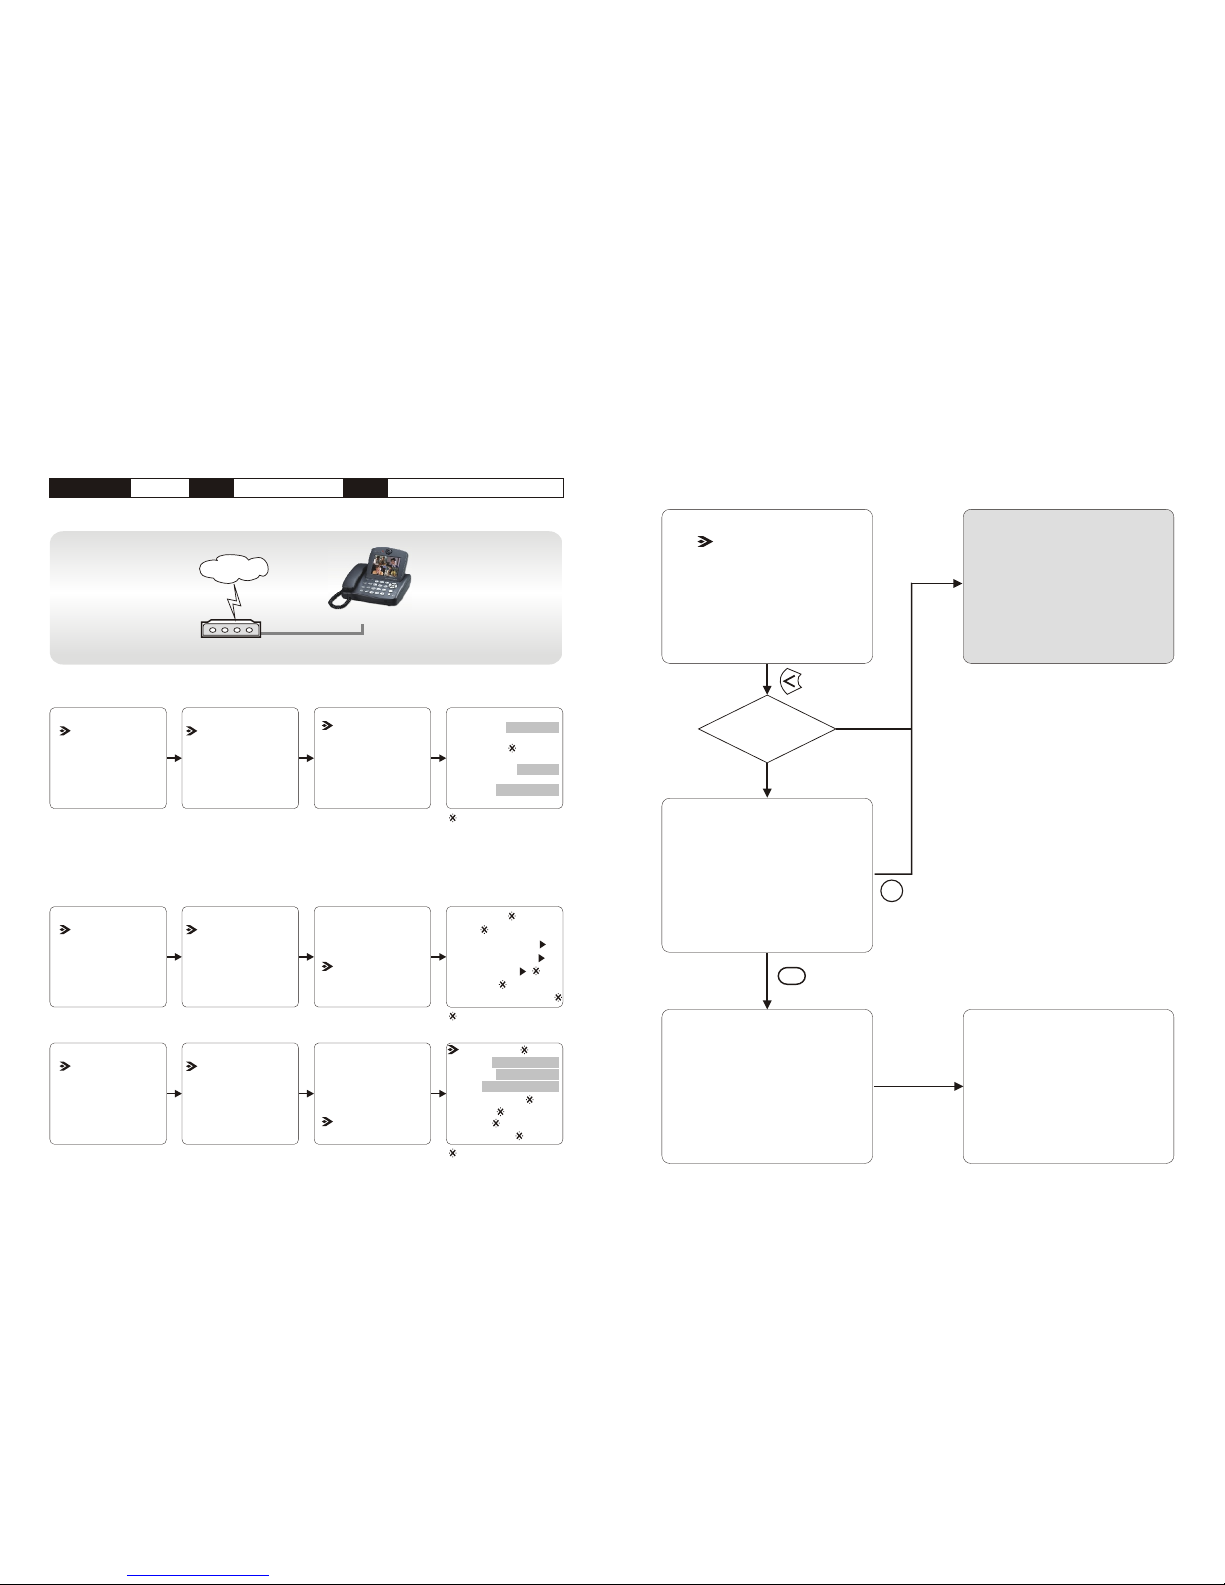
Please Wait
Saving ...
Save the setting
Yes <OK>
No <CLEAR>
Configuration
Password
Phonebook
Configuration
Configuration has
been changed?
No
Yes
Clear
Saving Complete
Please Reboot.
OK
Configuration Changed
Local view
Connection ADSL Type Constant ADSL IP Single, Public, & Fixed
When the IP is used exclusively by VT640P
Internet
ATU-R
VT640P System Setup
Server Setup
Network Setup
Terminal Setup
Option
IP Address: see note
Phone No. :
Subnet Mask: see note
Gateway: see note
(see p. 37)
VT640P
Server Setup
Network Setup
Terminal Setup
Option
Server Setup
Network Setup
Terminal Setup
Option
Phonebook
Configuration
Password
Bandwidth Setup
Remote Update
System Setup
Phonebook
Configuration
Password
Bandwidth Setup
Remote Update
System Setup
Phonebook
Configuration
Password
Bandwidth Setup
Remote Update
System Setup
(see p. 38)
(see p. 38)
: as default
: as default
: as default
Note : IP address, Subnet Mask and Gateway are assigned by your ISP, each consisted of 4 sets of
numbers with dots in between them. Check with your ISP for the information.
GateKeeper:
DHCP: OFF
PPPoE: OFF
NAT: OFF
Auto Answer:
Ringer:
H.263:
Keep Alive:
Alias:
PPPoE Username ( )
Host Name:
PPPoE Password ( )
Auto Answer Rings (0~9):
NAT Door:
GK Password ( )
System Setup (Cont'd)
Using OSD menus
12
|
41
|
User Manual
IP Broadband Videophone
Page 18
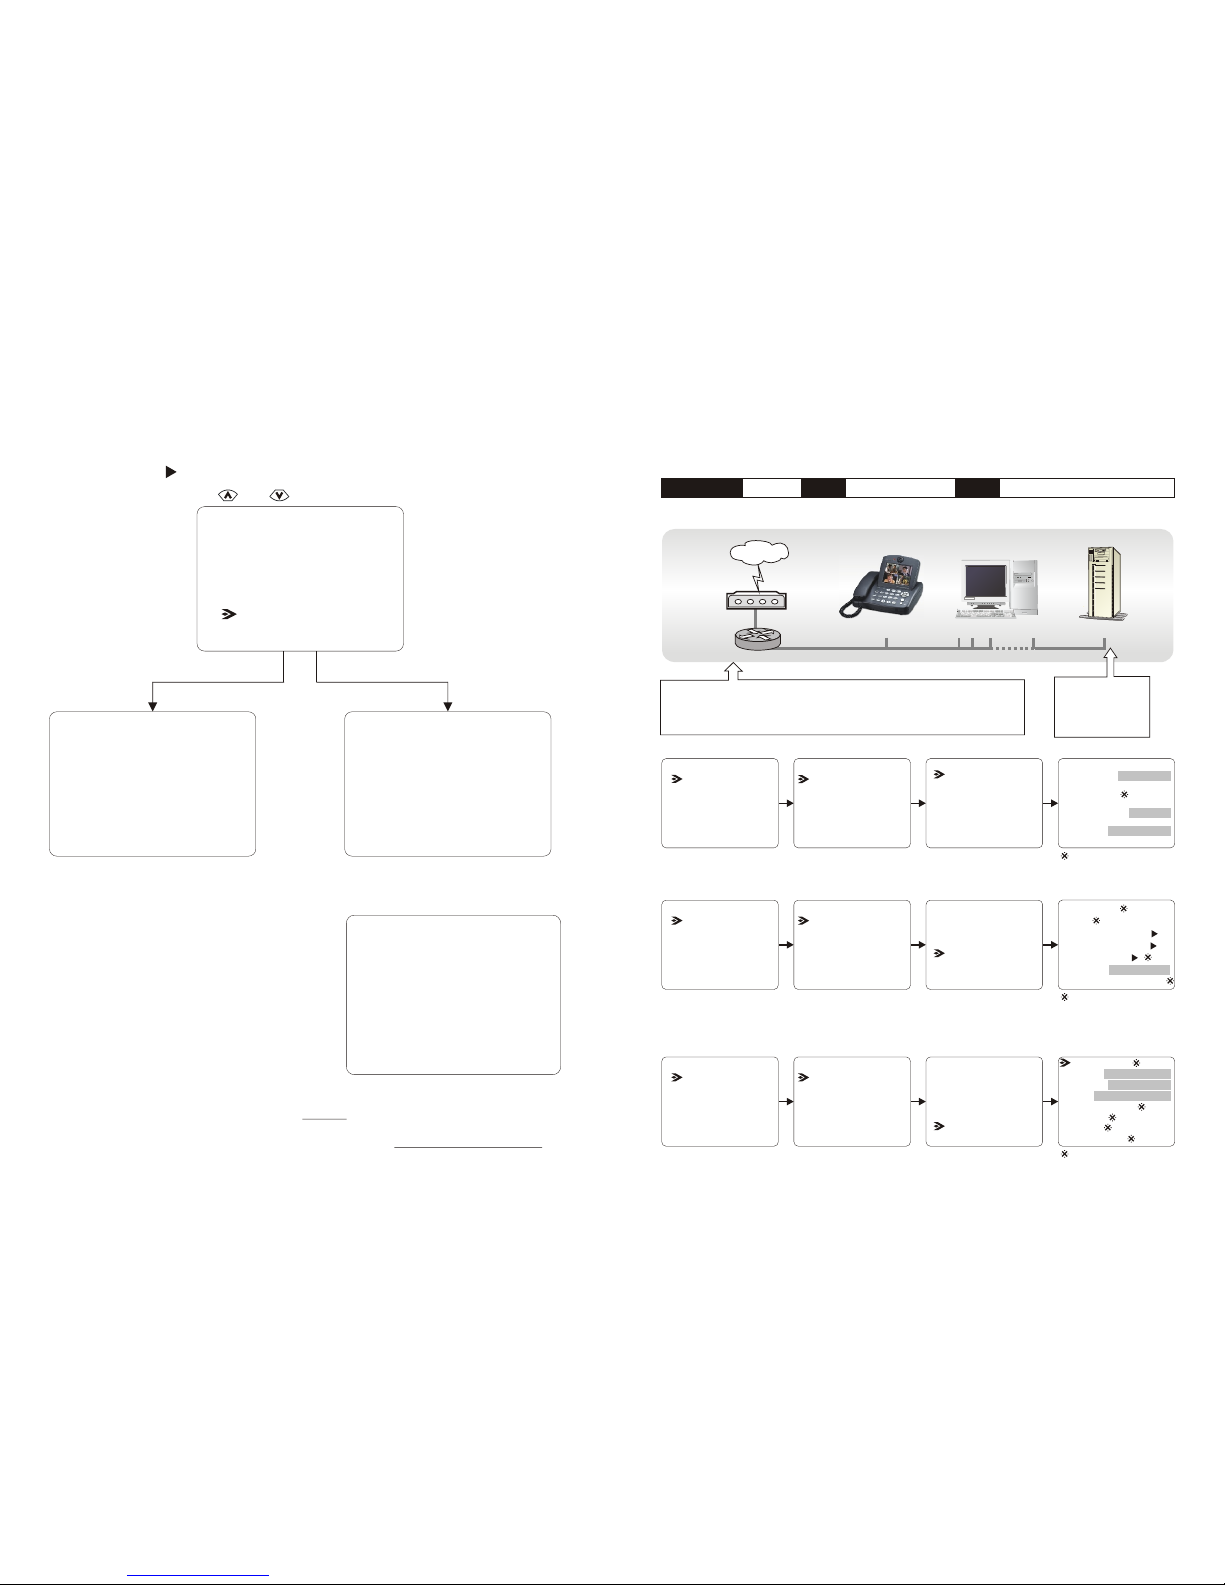
Configuration Remote Update
Remote Update Completed.
Please Reboot.
The updated software will be created to suit the ongoing development of the Internet
environment. Users who continue to use VT640P under the same connection do not
need to renew the software. If you do not know whether you should update the
software under certain circumstances, visit our website at http://www.visiontech.se for
information you need.
Note:
If the update fails, the screen as
shown to the right will be displayed.
Please reboot the VT640P manually.
Bandwidth Setup
Remote Update
System Setup
and : Item selection
When the update is finished, the screens as shown above will be displayed, and the
VT640P will automatically reboot.
Remote Update Failed.
Please Reboot.
LAN S/W Loading.
Wait.
Remote update main s/w only.
Remote update main
s/w and LAN s/w, or
remote update LAN
s/w only.
Connection ADSL Type Constant ADSL IP Single, Public, & Fixed
When the IP is shared with other devices (with a DHCP server connected)
Internet
ATU-R
Router
VT640P System Setup
IP Address: see note
Phone No. :
Subnet Mask: see note
Gateway: see note
(see p. 37)
(see p. 38)
(see p. 38)
Server Setup
Network Setup
Terminal Setup
Option
Note : IP, Subnet Mask and Gateway are assigned by your DHCP server.
This router has to be able to provide the NAT service and the following static
routes should be set : TCP port 1720-1729 and 7000-7009 and UDP port 8050-
8054. Or you can put VT640P into DMZ if your router supports this function.
The DHCP Server
must be able to
support dynamicfixed IP allocation.
Phonebook
Configuration
Password
Phonebook
Configuration
Password
Bandwidth Setup
Remote Update
System Setup
Bandwidth Setup
Remote Update
System Setup
Server Setup
Network Setup
Terminal Setup
Option
Server Setup
Network Setup
Terminal Setup
Option
Phonebook
Configuration
Password
Bandwidth Setup
Remote Update
System Setup
: as default
: as default
: as default
GateKeeper:
DHCP: ON
PPPoE: OFF
NAT: ON
Auto Answer:
Ringer:
H.263:
Keep Alive:
Note : The NAT door is the public IP of your router and this IP is assigned by your ISP.
Alias:
PPPoE Username ( )
Host Name:
PPPoE Password ( )
Auto Answer Rings (0~9):
NAT Door: see note
GK Password ( )
Using OSD menus
System Setup (Cont'd)
VT640P
General PC 1, 2, ...n
DHCP Server
40
|
13
|
User Manual
IP Broadband Videophone
Page 19
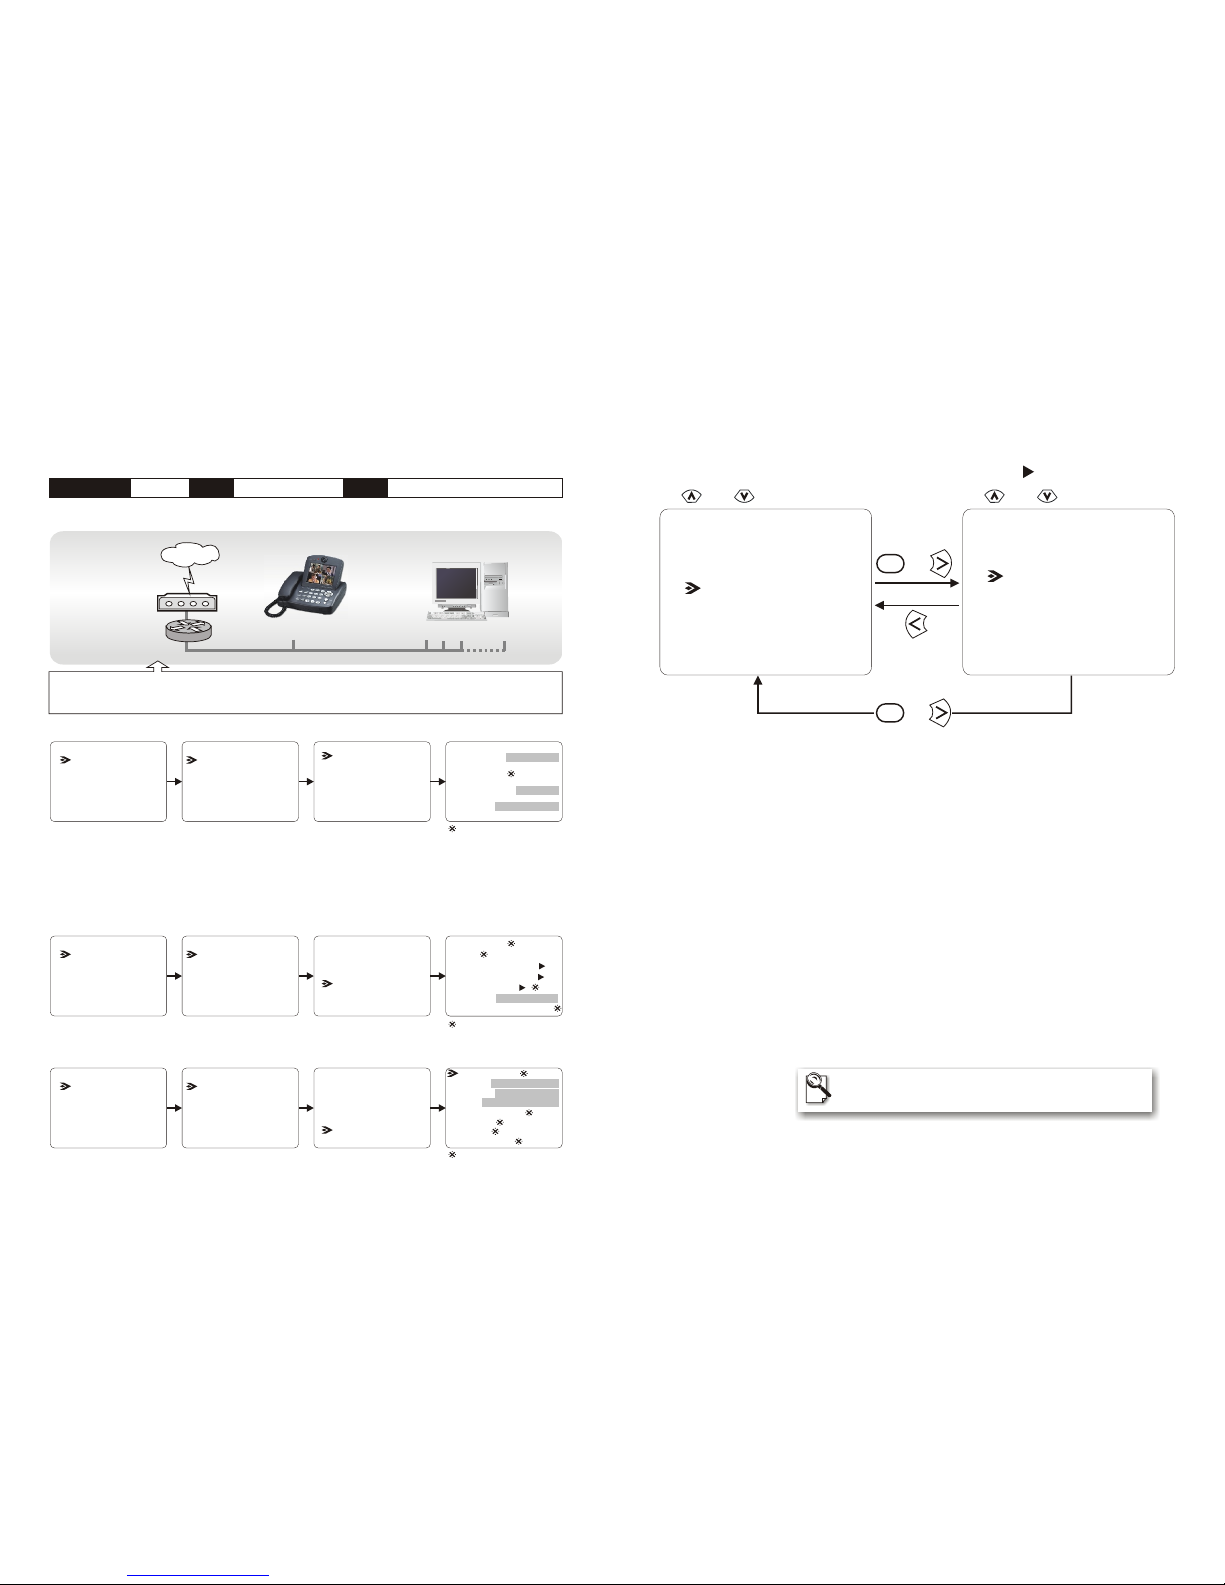
Bandwidth Setup
Remote Update
System Setup
1. 128
2. 256
Input Bandwidth:
3. 384
4. 512
5. 640
Set the video
bandwidth
Configuration Bandwidth Setup
and : Item selection
or
The Bandwidth Setup in VT640P divides the bandwidth into 5 levels: (in Kbps)
1. 128
2. 256
3. 384
4. 512
5. 638
Note that the bandwidth affects the quality of video transmission; a low bandwidth
setting that leaves too much bandwidth unused is a waste of connection resources, and
a high bandwidth setting that exceeds the bandwidth that is available will jam the
transmission and the video quality will be far lower than expected.
To choose the bandwidth that makes the most effective use of your connection, read
the following carefully.
For home users:
Set the bandwidth you wish to be used by the VT640P. It should not be more than the
bandwidth of your type of connection.
Note for ADSL users:
The upload and download rates of VT640P are the same. ADSL is a type of
connection whose download rate is not the same as the upload rate. ADSL users
are advised to set the lower rate of the two as the bandwidth to be used by VT640P.
For business users:
It is best to reserve a certain amount of bandwidth for videoconferencing on a LAN
connection for the VT640P users to set its bandwidth accordingly.
or
OK
OK
and : Item selection
If you use PPPoE to connect to Internet, please do not set the
bandwidth to higher than 384K.
Connection ADSL Type Constant ADSL IP Single, Public, & Fixed
When the IP is shared with other devices (without a DHCP server connected)
Note : You can assign your own IP, Subnet Mask and Gateway within your private segment. If the segment is
172.16.0.0-172.16.0.255, your settings should be:
IP : one chosen from the range between 172.16.0.1 to 172.16.0.254
Subnet mask : 255.255.255.0
Gateway : one chosen from the range between 172.16.0.1 to 172.16.0.254, usually 172.16.0.254,
and can't be the same as your IP address.
VT640P System Setup
IP Address: see note
Phone No. :
Subnet Mask: see note
Gateway: see note
(see p. 37)
(see p. 38)
(see p. 38)
Internet
ATU-R
Router
Phonebook
Configuration
Password
Phonebook
Configuration
Password
Phonebook
Configuration
Password
Bandwidth Setup
Remote Update
System Setup
Bandwidth Setup
Remote Update
System Setup
Bandwidth Setup
Remote Update
System Setup
Server Setup
Network Setup
Terminal Setup
Option
Server Setup
Network Setup
Terminal Setup
Option
Server Setup
Network Setup
Terminal Setup
Option
: as default
: as default
: as default
This router has to be able to provide the NAT service and the following static routes should be set : TCP port
1720-1729 and 7000-7009 and UDP port 8050-8054. Or you can put VT640P into DMZ if your router supports
this function.
GateKeeper:
DHCP: OFF
PPPoE: OFF
NAT: ON
Auto Answer:
Ringer:
H.263:
Keep Alive:
Note : The NAT door is the public IP of your router and this IP is assigned by your ISP.
Alias:
PPPoE Username ( )
Host Name:
PPPoE Password ( )
Auto Answer Rings (0~9):
NAT Door: see note
GK Password ( )
System Setup (Cont'd)
VT640P
General PC 1, 2, ...n
Using OSD menus
14
|
39
|
User Manual
IP Broadband Videophone
Page 20
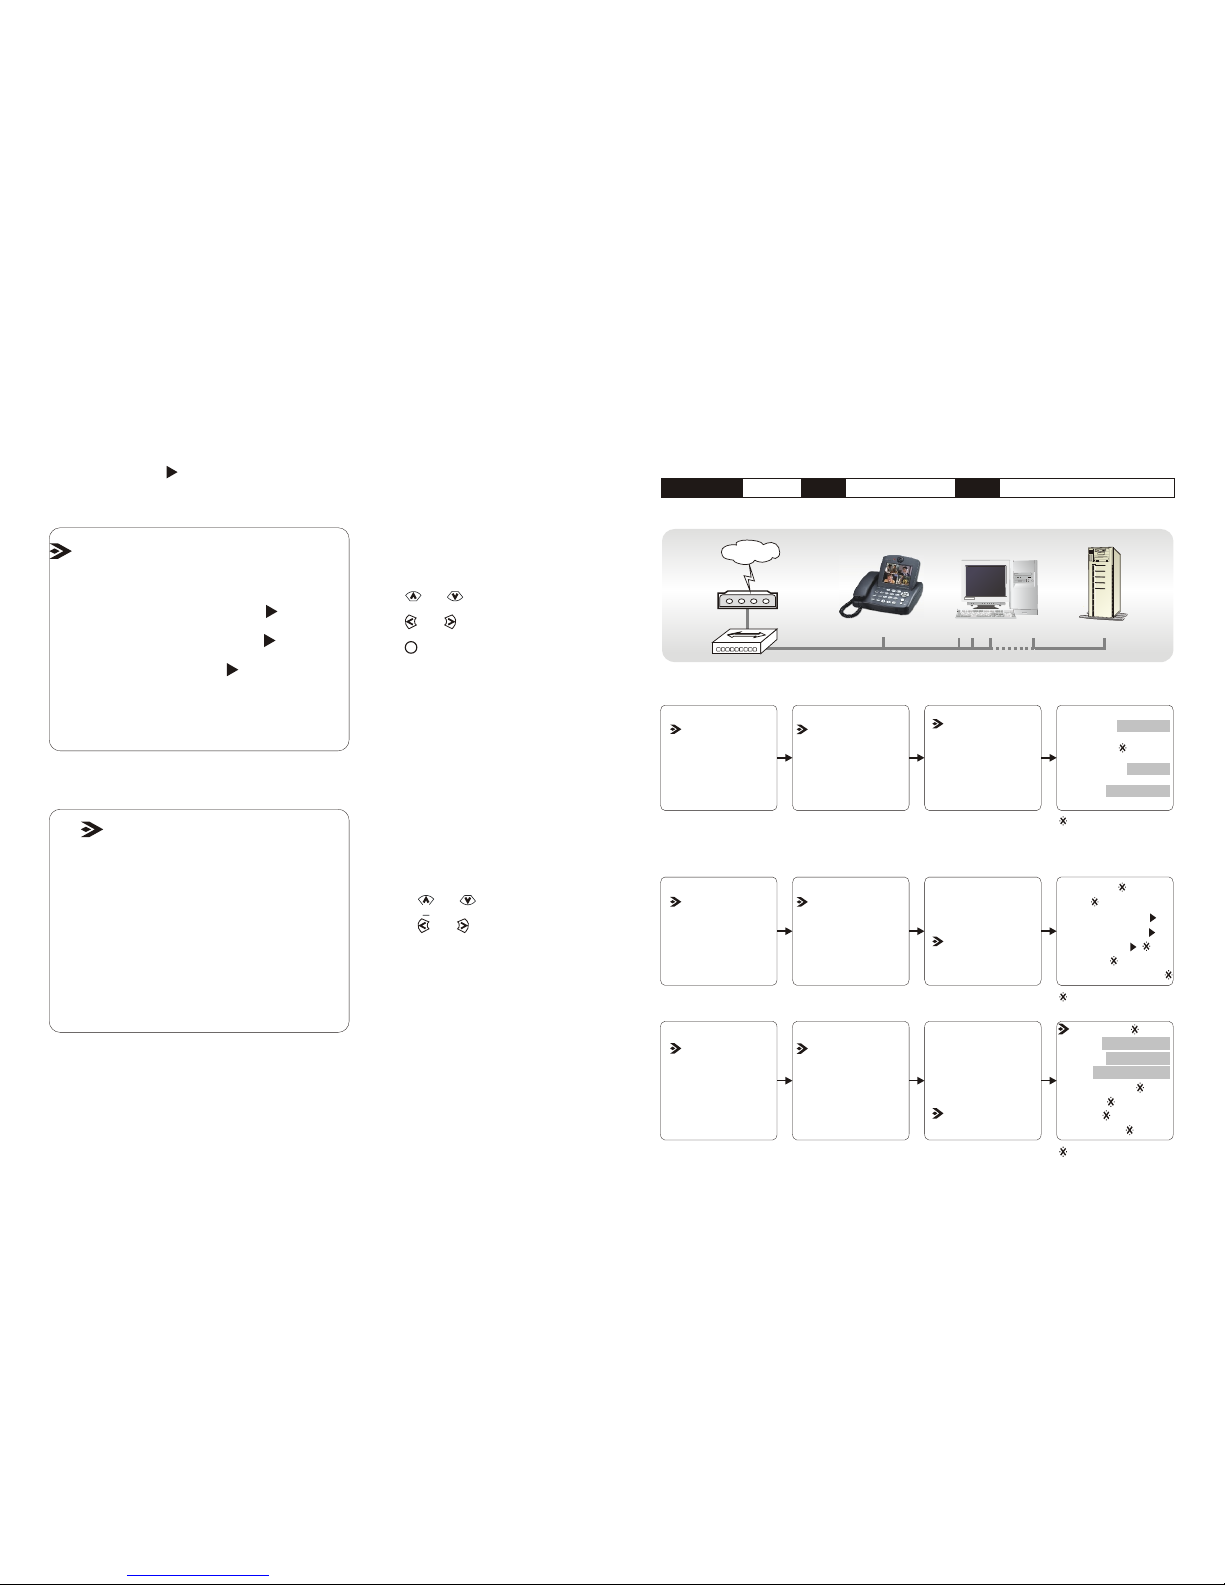
Configuration System Setup
Terminal Setup
Alias: Visiontech
PPPoE Username ( )
PPPoE Password ( )
NAT Door: 0.0.0.0
GK Password ( )
Host Name: |BVP8770
Auto Answer Rings(0~9): 4
Option
and : Item selection
and
: toggle options
(ON/OFF, HI/LO)
GateKeeper: OFF
Auto Answer: OFF
DHCP: OFF
PPPoE: OFF
NAT: OFF
Ringer: HI
H.263: ON
Keep Alive: ON
Note: You can change Phone Number only when DHCP is ON.
Phone Number is required when and its address must be
unique. If you are not familiar with them, please contact your service provider.
After changing any setting under System Setup, you need to restart VT640P (turn
the power off and then turn it on) so that the changes will take effect (see page 41).
GateKeeper is set to ON,
and : Item selection
Clear
: backspace
Numeric keypad: input
numbers, letters, punctuation
marks, and special characters.
and
: move cursor
Connection ADSL Type Constant ADSL IP Multiple, Public, & Fixed
When VT640P uses one of the IPs (with a DHCP server connected)
VT640P System Setup
IP Address: see note
Phone No. :
Subnet Mask: see note
Gateway: see note
(see p. 37)
(see p. 38)
(see p. 38)
Note : IP, Subnet Mask and Gateway are assigned by your DHCP server.
Internet
ATU-R
Hub
Phonebook
Configuration
Password
Phonebook
Configuration
Password
Phonebook
Configuration
Password
Bandwidth Setup
Remote Update
System Setup
Bandwidth Setup
Remote Update
System Setup
Bandwidth Setup
Remote Update
System Setup
Server Setup
Network Setup
Terminal Setup
Option
Server Setup
Network Setup
Terminal Setup
Option
Server Setup
Network Setup
Terminal Setup
Option
: as default
: as default
: as default
GateKeeper:
DHCP: ON
PPPoE: OFF
NAT: OFF
Auto Answer:
Ringer:
H.263:
Keep Alive:
Alias:
PPPoE Username ( )
Host Name:
PPPoE Password ( )
Auto Answer Rings (0~9):
NAT Door:
GK Password ( )
Using OSD menus
System Setup (Cont'd)
VT640P
General PC 1, 2, ...n
DHCP Server
38
|
15
|
User Manual
IP Broadband Videophone
Page 21
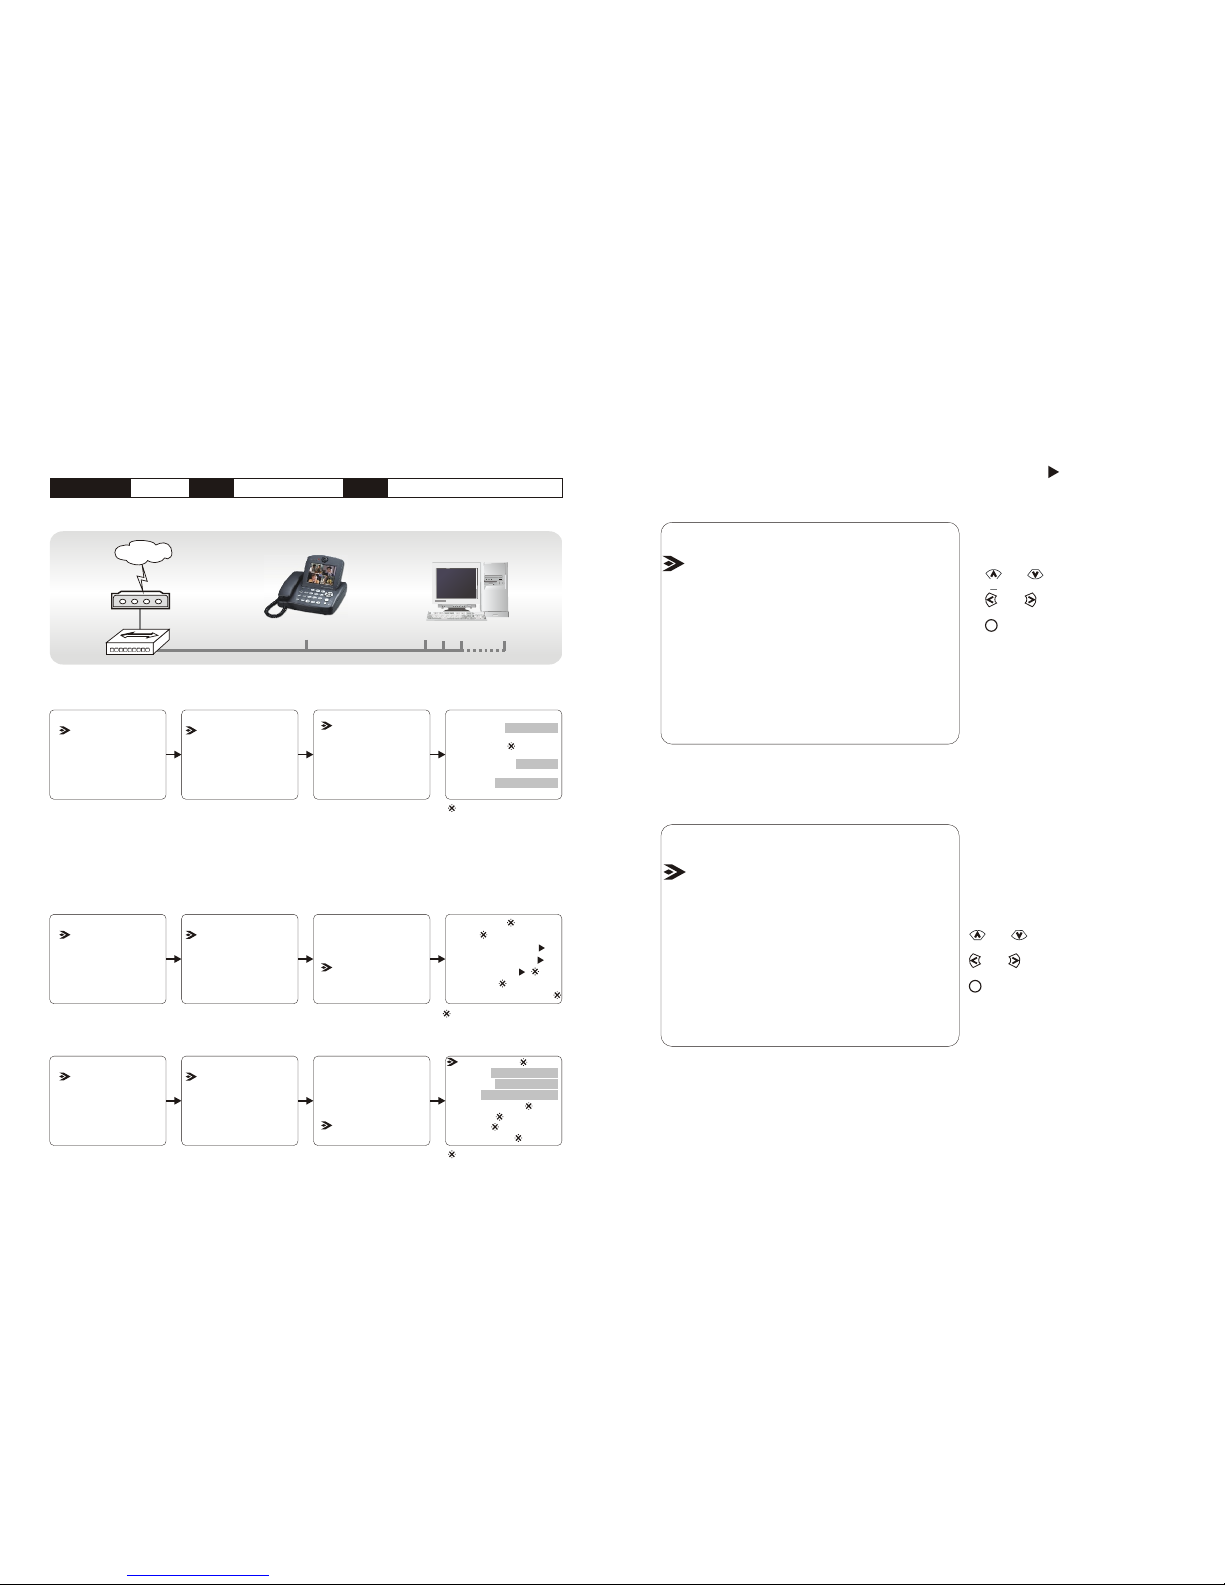
Configuration System Setup
Network Setup
IP Address: 192.168.1.1|
Phone No. : 123
Subnet Mask: 255.255.255.0
Gateway: 192.168.1.254
After changing any setting under System Setup, you need to restart
VT640P (turn the power off and then turn it on) so that the changes
will take effect (see page 41).
Server Setup
GateKeeper: 0.0.0.0
Update Server: 0.0.0.0
DNS Server: |0.0.0.0
and : Item selection
Clear
: backspace
Numeric keypad: input numbers and "."
and
: move cursor
and : Item selection
Clear
: backspace
Numeric keypad: input numbers and ".”
and
: move cursor
Connection ADSL Type Constant ADSL IP Multiple, Public, & Fixed
When VT640P uses one of the IPs (without a DHCP server connected)
VT640P System Setup
(see p. 38)
Internet
ATU-R
Hub
: as default
Note : IP address, Subnet Mask and Gateway are assigned by your ISP, each consisted of 4 sets of
numbers with dots in between them. Check with your ISP for the information.
(see p. 38)
Phonebook
Configuration
Password
Bandwidth Setup
Remote Update
System Setup
Server Setup
Network Setup
Terminal Setup
Option
: as default
GateKeeper:
DHCP: OFF
PPPoE: OFF
NAT: OFF
Auto Answer:
Ringer:
H.263:
Keep Alive:
Phonebook
Configuration
Password
Bandwidth Setup
Remote Update
System Setup
Server Setup
Network Setup
Terminal Setup
Option
IP Address: see note
Phone No. :
Subnet Mask: see note
Gateway: see note
(see p. 37)
Phonebook
Configuration
Password
Bandwidth Setup
Remote Update
System Setup
Server Setup
Network Setup
Terminal Setup
Option
: as default
Alias:
PPPoE Username ( )
Host Name:
PPPoE Password ( )
Auto Answer Rings (0~9):
NAT Door:
GK Password ( )
System Setup (Cont'd)
VT640P
General PC 1, 2, ...n
Using OSD menus
16
|
37
|
User Manual
IP Broadband Videophone
Page 22
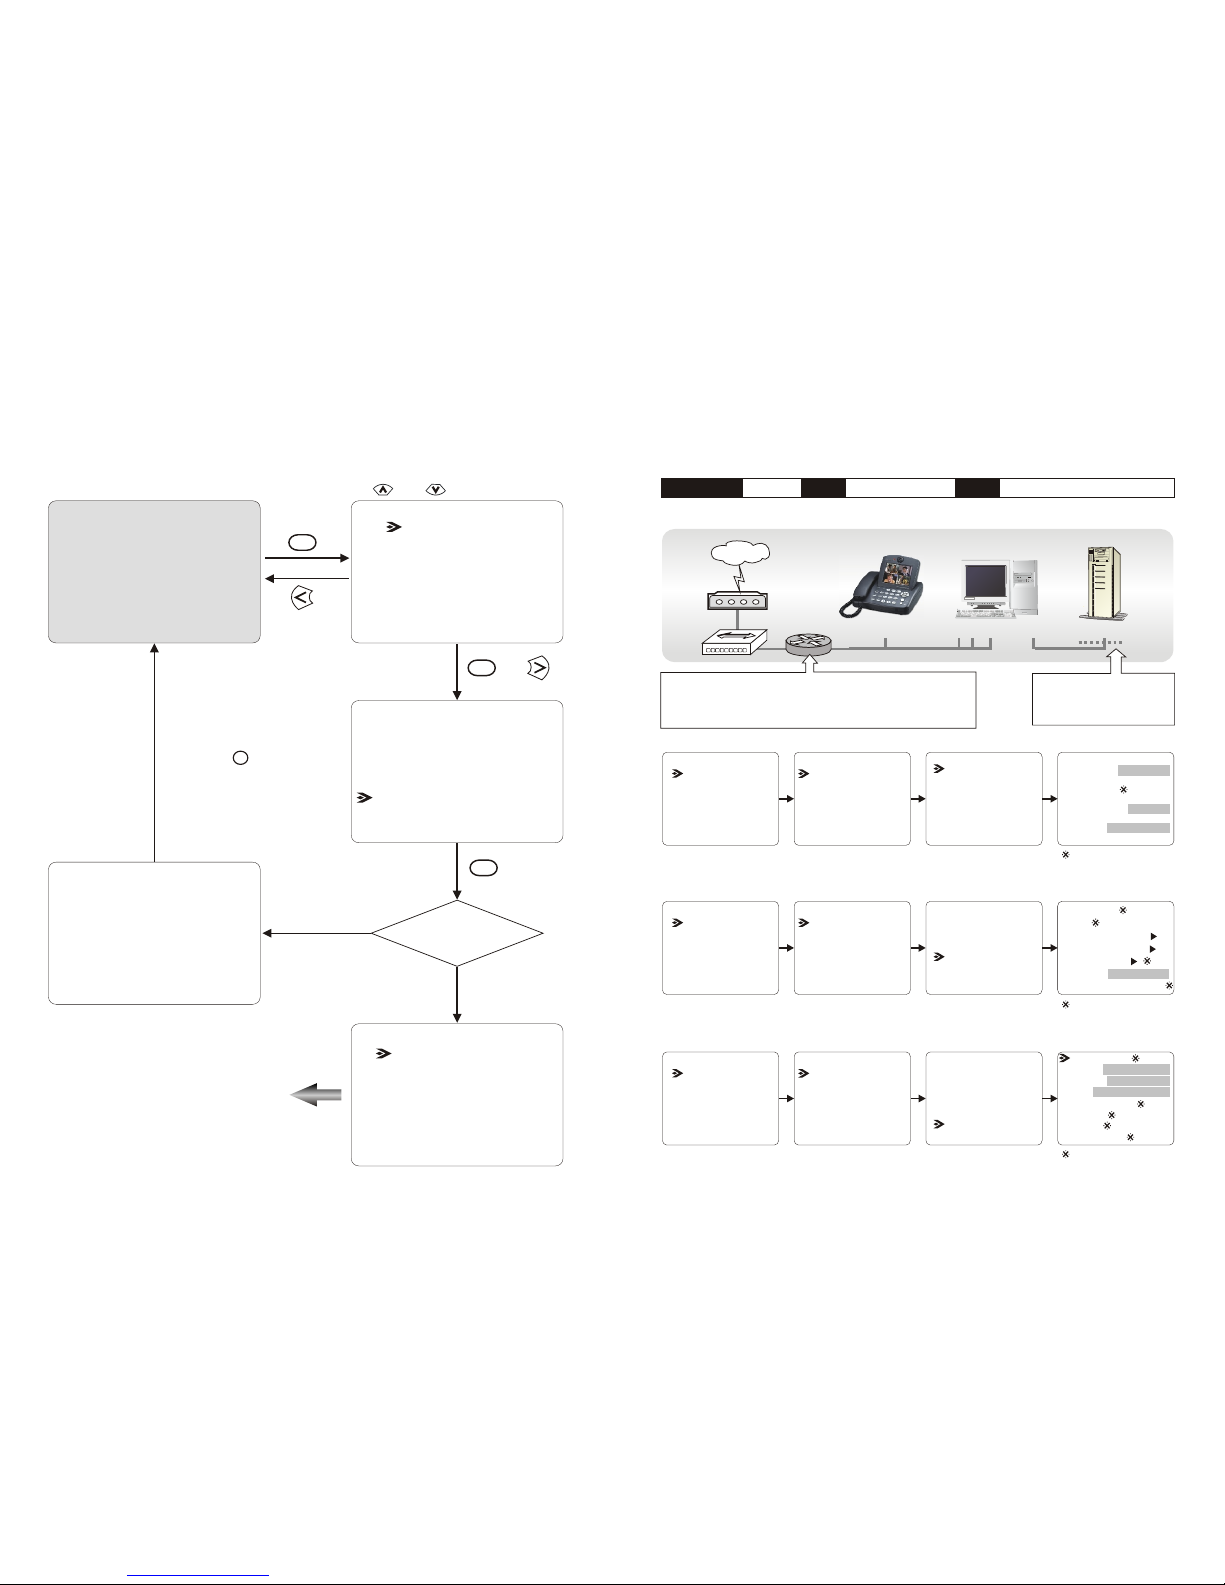
Bandwidth Setup
Remote Update
System Setup
Local view
incorrect Password
Password correct?
Yes
Password Checking
Phonebook
Configuration
Password
Please input password
|
No
or
Any key
and : Item selection
OK
OK
OK
Configuration
Clear
: backspace
Numeric input,
maximum 4 digits
(Continued on page 35 and 36
respectively, for instructions on
configuring different settings)
Connection ADSL Type Constant ADSL IP
When one of the IPs is shared with other devices (with DHCP server connected)
Multiple, Public, & Fixed
Router
VT640P System Setup
IP Address: see note
Phone No. :
Subnet Mask: see note
Gateway: see note
(see p. 37)
(see p. 38)
Note : IP, Subnet Mask and Gateway are assigned by your DHCP server.
Internet
ATU-R
Hub
This router has to be able to provide the NAT service and the
following static routes should be set : TCP port 1720-1729 and
7000-7009 and UDP port 8050-8054. Or you can put VT640P into
DMZ if your router supports this function.
The DHCP Server must be
able to support dynamic-fixed
IP allocation.
Phonebook
Configuration
Password
Phonebook
Configuration
Password
Phonebook
Configuration
Password
Bandwidth Setup
Remote Update
System Setup
Bandwidth Setup
Remote Update
System Setup
Bandwidth Setup
Remote Update
System Setup
Server Setup
Network Setup
Terminal Setup
Option
Server Setup
Network Setup
Terminal Setup
Option
Server Setup
Network Setup
Terminal Setup
Option
(see p. 38)
: as default
: as default
: as default
GateKeeper:
DHCP: ON
PPPoE: OFF
NAT: ON
Auto Answer:
Ringer:
H.263:
Keep Alive:
Note : The NAT door is the public IP of your router and this IP is assigned by your ISP.
Alias:
PPPoE Username ( )
Host Name:
PPPoE Password ( )
Auto Answer Rings (0~9):
NAT Door: see note
GK Password ( )
Using OSD menus
System Setup (Cont'd)
VT640P
General PC 1, 2, ...n
DHCP Server
36
|
17
|
User Manual
IP Broadband Videophone
Page 23
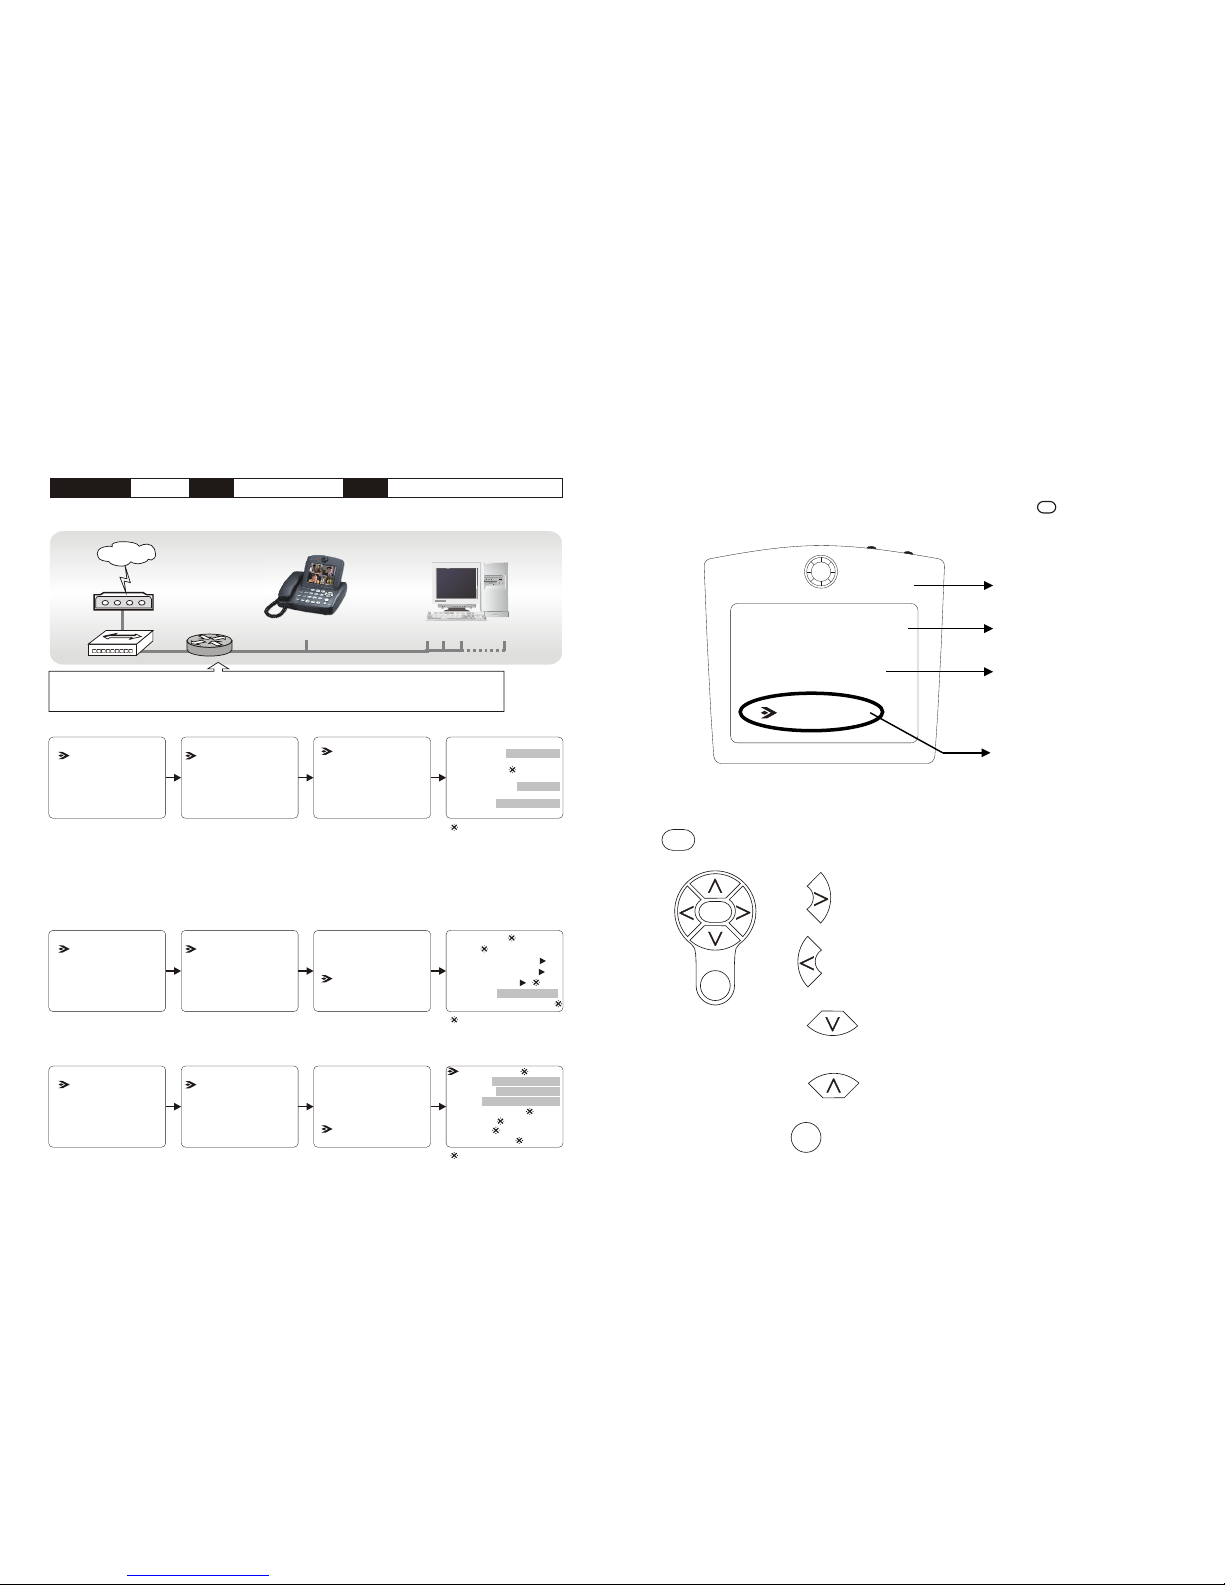
Using OSD menus
VT640P allows you to use the cursor panel on the keypad to control OSD (on-screendisplay) menus. The OSD menu is brought out by pressing the button on the
cursor panel of the keypad. The figure below shows you what an OSD menu looks like:
Clear
OSD menu
LCD Panel
Screen
Cursor Panel
Operating OSD menuscursor panel explained¡Ð
Highlighted item
Configuration
Phonebook
7 Making Adjustments
Clear
Password
OK
OK
OK
Brings up on-screen menu, enter the sub- menu, or confirm the selection made.
Moves the cursor right or enter the sub-menu.
Moves the cursor left or go back to the previous menu.
Moves the highlighted option down.
Moves the highlighted option up.
Serves as the backspace key when inputting data.
Connection ADSL Type Constant ADSL IP Multiple, Public, & Fixed
When one of the IPs is shared with other devices (without a DHCP server connected)
VT640P System Setup
IP Address: see note
Phone No. :
Subnet Mask: see note
Gateway: see note
(see p. 37)
(see p. 38)
Router
Internet
ATU-R
Hub
Phonebook
Configuration
Password
Phonebook
Configuration
Password
Phonebook
Configuration
Password
Bandwidth Setup
Remote Update
System Setup
Bandwidth Setup
Remote Update
System Setup
Bandwidth Setup
Remote Update
System Setup
Server Setup
Network Setup
Terminal Setup
Option
Server Setup
Network Setup
Terminal Setup
Option
Server Setup
Network Setup
Terminal Setup
Option
(see p. 38)
: as default
: as default
: as default
This router has to be able to provide the NAT service and the following static routes should be set :
TCP port 1720-1729 and 7000-7009 and UDP port 8050-8054. Or you can put VT640P into DMZ if
your router supports this function.
Note : You can assign your own IP, Subnet Mask and Gateway within your private segment. If the segment is
172.16.0.0-172.16.0.255, your settings should be:
IP : one chosen from the range between 172.16.0.1 to 172.16.0.254
Subnet mask : 255.255.255.0
Gateway : one chosen from the range between 172.16.0.1 to 172.16.0.254, usually 172.16.0.254,
and can't be the same as your IP address.
GateKeeper:
DHCP: OFF
PPPoE: OFF
NAT: ON
Auto Answer:
Ringer:
H.263:
Keep Alive:
Note : The NAT door is the public IP of your router and this IP is assigned by your ISP.
Alias:
PPPoE Username ( )
Host Name:
PPPoE Password ( )
Auto Answer Rings (0~9):
NAT Door: see note
GK Password ( )
System Setup (Cont'd)
VT640P
General PC 1, 2, ...n
18
|
35
|
User Manual
IP Broadband Videophone
Page 24
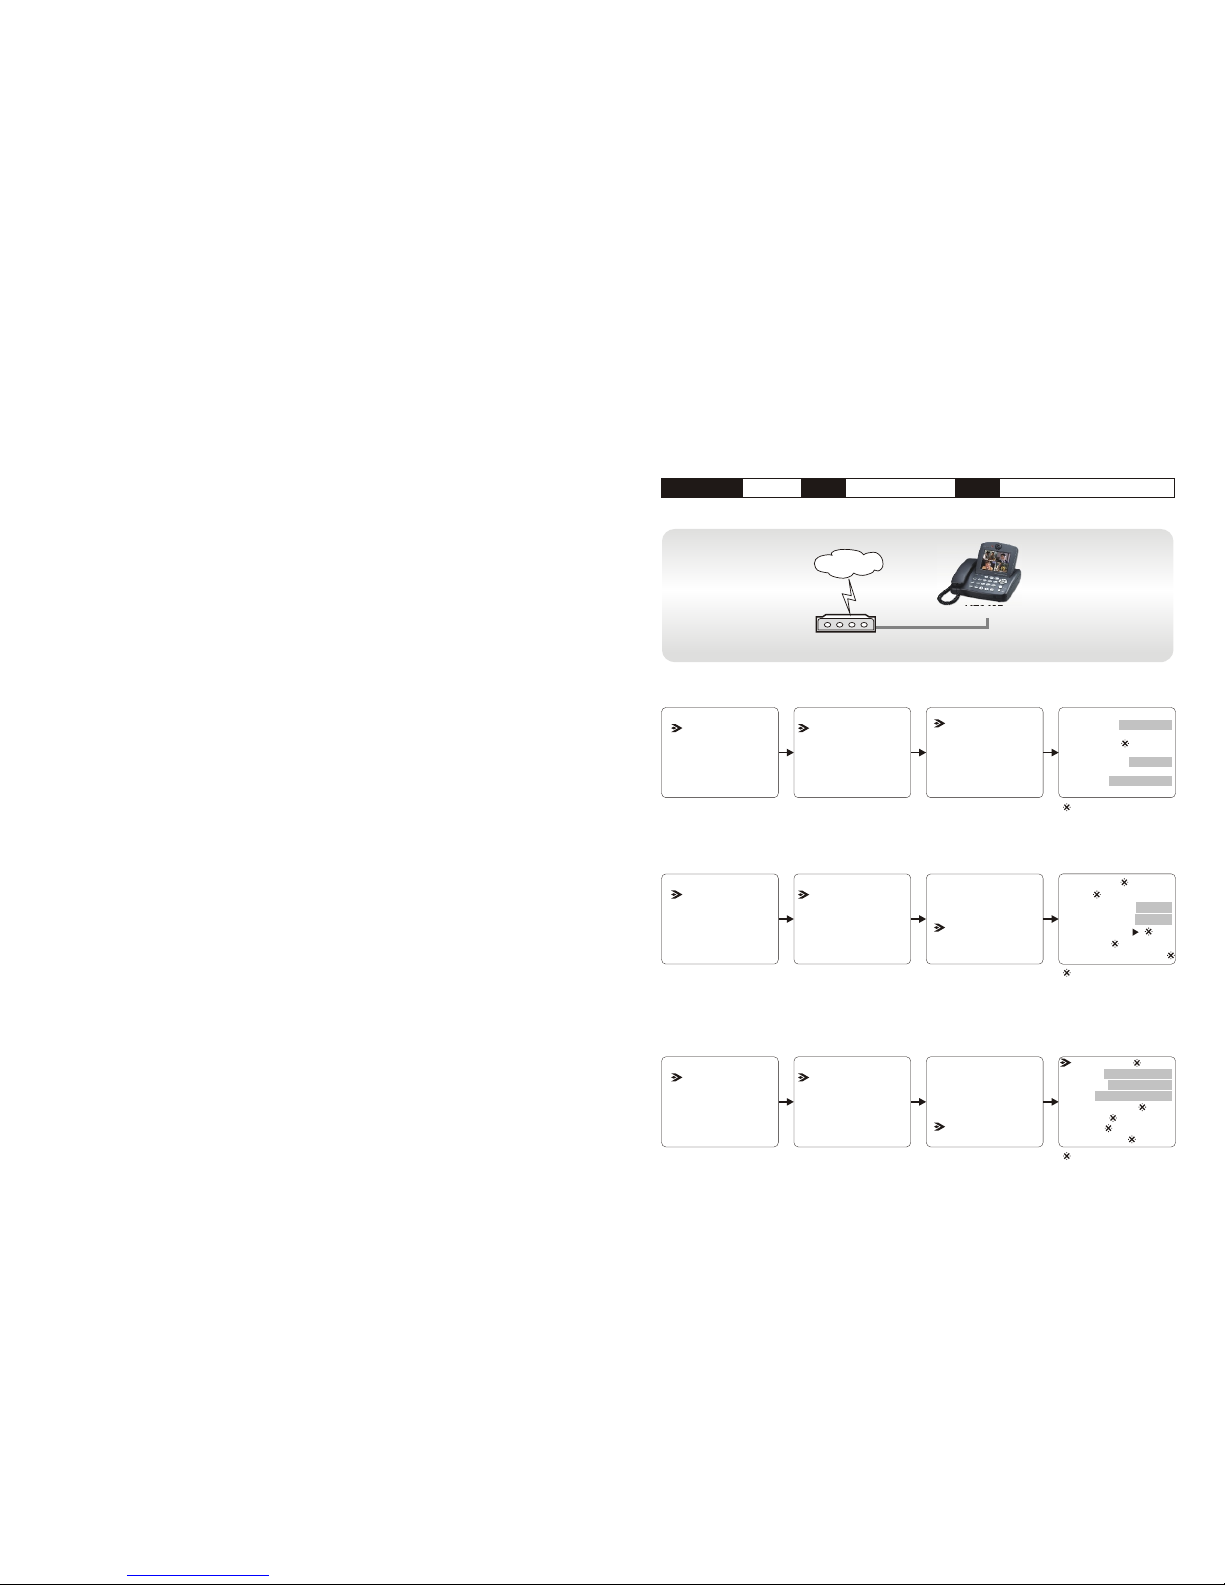
Step 1 Turn on the power of the unit. The LCD screen shows the local view, the
image of the caller.
Step 2 Pick up the handset. Enter the desired IP address/number * (See note). Use
the " " key to input the dots between the numbers. When a key is
pressed, the image on the LCD screen disappears and the numbers you
input are displayed.
Step 3 The other party answers the phone, and the video connection is established.
You will be able to see the person you are talking to.
Step 4 To end the connection, simply hang up the handset.
Step 5 If there is difficulty in making connection, please make sure that VT640P
has been properly installed. Please also check if the network settings are
correctly configured.
Power Saving Mode
The VT640P incorporates a power saving circuit to protect its internal components and
extend its service life.
If the VT640P is inactive for 5 minutes, the LCD screen automatically shuts down and
goes blank. The power indicator blinks.
The image returns to the screen when the handset is picked up or any key is pressed.
*Note: To dial numbers, VT640P must work in conjunction with additional
accessories, such as the H.323 Gatekeeper.
*
Making a video call
Connection ADSL Type Timing ADSL IP
When the ADSL is used exclusively by VT640P
VT640P System Setup
IP Address: see note
Phone No. :
Subnet Mask: see note
Gateway: see note
(see p. 37)
(see p. 38)
Note : IP, Subnet Mask and Gateway are assigned by PPPoE.
Internet
ATU-R
VT640P
Single, Public, & Dynamic
Phonebook
Configuration
Password
Phonebook
Configuration
Password
Phonebook
Configuration
Password
Bandwidth Setup
Remote Update
System Setup
Bandwidth Setup
Remote Update
System Setup
Bandwidth Setup
Remote Update
System Setup
Server Setup
Network Setup
Terminal Setup
Option
Server Setup
Network Setup
Terminal Setup
Option
Server Setup
Network Setup
Terminal Setup
Option
(see p. 38)
: as default
: as default
: as default
GateKeeper:
DHCP: OFF
PPPoE: ON
NAT: OFF
Auto Answer:
Ringer:
H.263:
Keep Alive:
PPPoE Password: see note
PPPoE Username: see note
Note : PPPoE Username and Password are assigned by your ISP.
Alias:
Host Name:
Auto Answer Rings (0~9):
NAT Door:
GK Password ( )
System Setup (Cont'd)
34
|
19
|
User Manual
IP Broadband Videophone
Page 25

Avoid having lights behind you that
might shine into the camera lens.
Keep a distance of 0.5 meters away
from VT640P.
6 Making a Call
Here are a few things you need to consider before making a video call.
Use the self-view image and focus knob to get the best
shot of yourself.
Adjust the hue and brightness of the screen for best
image.
0.5 m0.5 m
Before making a video call
Avoid having a lot of
movement in the
background and try
not to move around
excessively. Too much
movement tends to
slow down the frame
rate of the video
image, resulting in a
jerky picture.
1
2
3
4
5
6
7
Connection ADSL Type IP
When the ADSL is shared with other devices (with a DHCP server connected)
Timing ADSL
VT640P System Setup
IP Address: see note
Phone No. :
Subnet Mask: see note
Gateway: see note
(see p. 37)
(see p. 38)
Note : IP, Subnet Mask and Gateway are assigned by your DHCP server.
Internet
ATU-R
VT640P
Router
General PC 1, 2, ...n
DHCP Server
The DHCP Server
must be able to
support dynamicfixed IP allocation.
This router has to be able to provide the NAT service
and the following static routes should be set : TCP port
1720-1729 and 7000-7009 and UDP port 8050-8054.
Or you can put VT640P into DMZ if your router
supports this function.
Single, Public, & Dynamic
Phonebook
Configuration
Password
Phonebook
Configuration
Password
Phonebook
Configuration
Password
Bandwidth Setup
Remote Update
System Setup
Bandwidth Setup
Remote Update
System Setup
Bandwidth Setup
Remote Update
System Setup
Server Setup
Network Setup
Terminal Setup
Option
Server Setup
Network Setup
Terminal Setup
Option
Server Setup
Network Setup
Terminal Setup
Option
(see p. 38)
: as default
: as default
: as default
GateKeeper:
DHCP: ON
PPPoE: OFF
NAT: ON
Auto Answer:
Ringer:
H.263:
Keep Alive:
Note : The NAT door is the public IP of your router and is assigned by PPPoE.
Alias:
PPPoE Username ( )
Host Name:
PPPoE Password ( )
Auto Answer Rings (0~9):
NAT Door: see note
GK Password ( )
System Setup (Cont'd)
20
|
33
|
User Manual
IP Broadband Videophone
Make sure of the most appropriate
lighting source, preferably from the
front with the beam on your face.
Do not point the VT640P at a mirror
or bright light.
Page 26
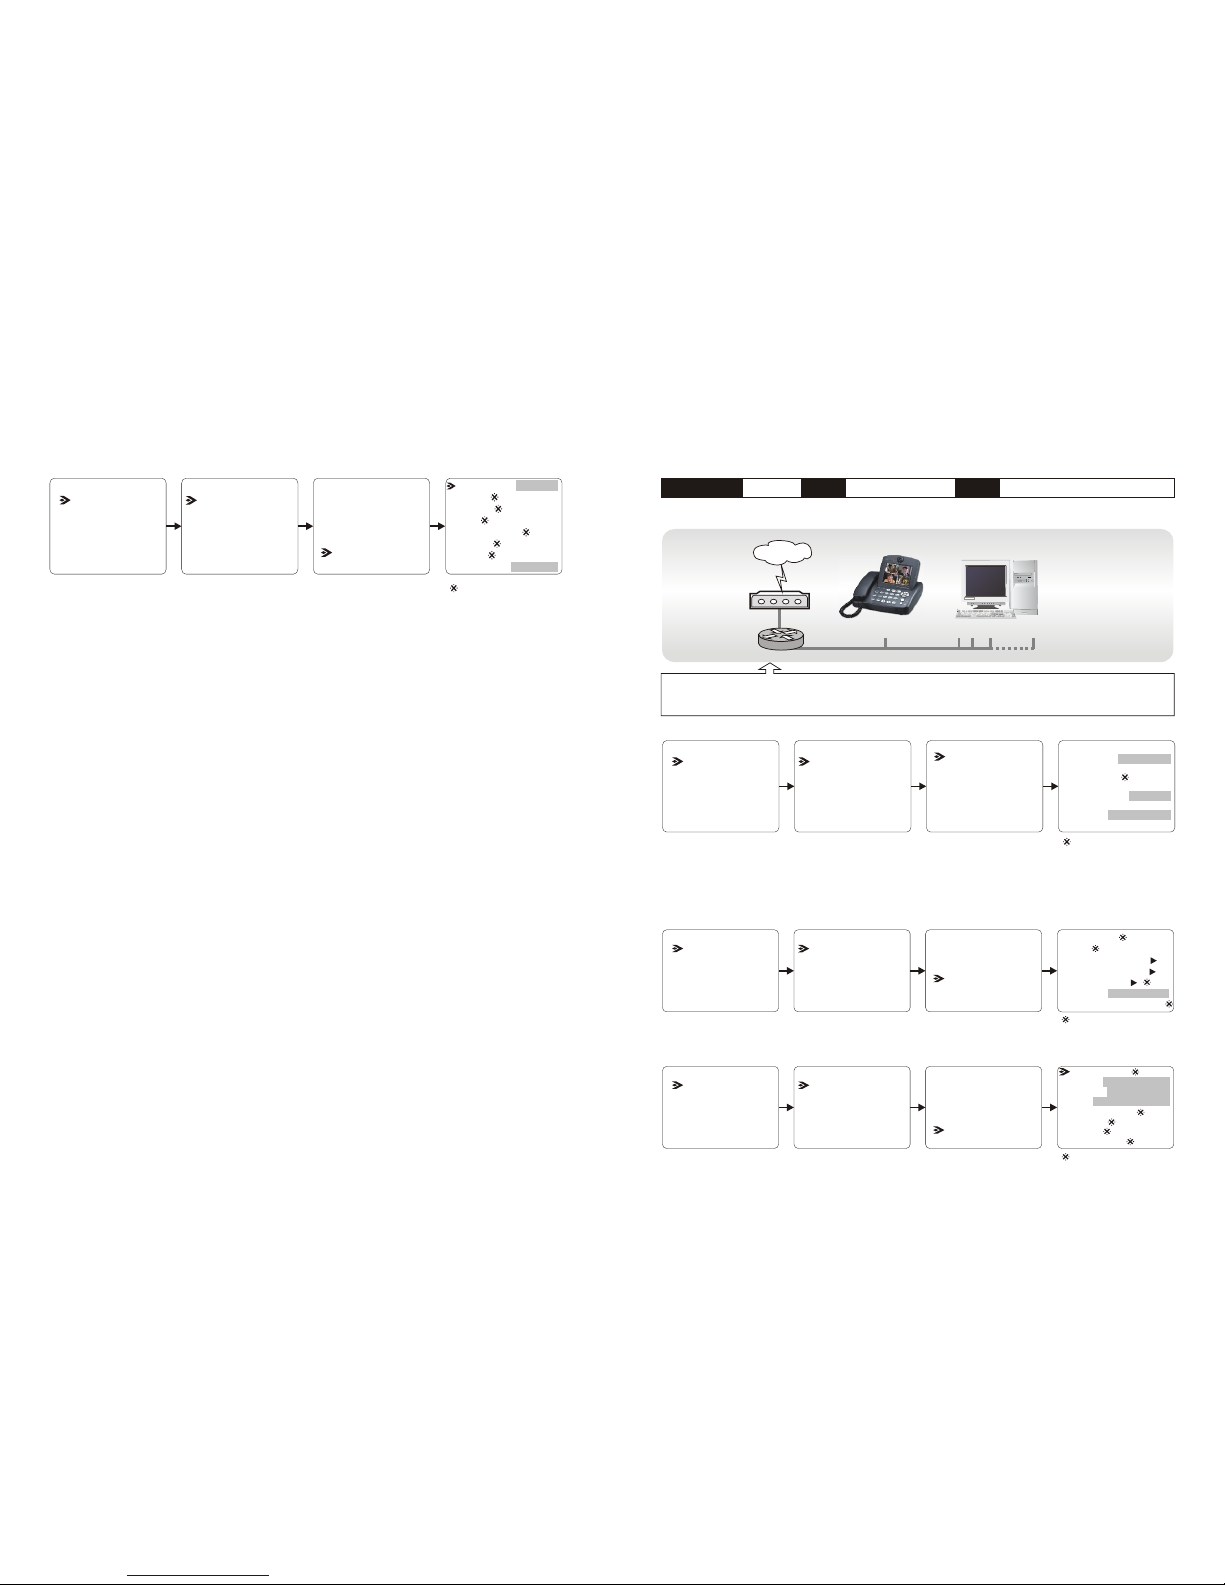
(see p. 38)
Option
After finishing these settings, you don't need the IP address of the other
party when making a call. Simply dial their phone number, and your call will
get through. However, the other party has to be registered with the
gatekeeper as well.
Server Setup
Network Setup
Terminal Setup
Option
Phonebook
Configuration
Password
Bandwidth Setup
Remote Update
System Setup
: as default
Note:
If your gatekeeper service provider periodically inquires for your VT640P's online
status, you can set Keep Alive to OFF; if it doesn't make such an inquiry and you
want to stay online for a long period of time, it is better to set Keep Alive to ON.
Consult your gatekeeper service provider if you don't know how to do Keep Alive
setting.
H.263:
Ringer:
Auto Answer:
NAT:
PPPoE:
DHCP:
GateKeeper: ON
Keep Alive: see note
Connection ADSL Typ e IP
When the ADSL is shared with other devices (without a DHCP server connected)
Timing ADSL
VT640P System Setup
IP Address: see note
Phone No. :
Subnet Mask: see note
Gateway: see note
(see p. 37)
(see p. 38)
Internet
ATU-R
Router
Single, Public, & Dynamic
Phonebook
Configuration
Password
Phonebook
Configuration
Password
Phonebook
Configuration
Password
Bandwidth Setup
Remote Update
System Setup
Bandwidth Setup
Remote Update
System Setup
Bandwidth Setup
Remote Update
System Setup
Server Setup
Network Setup
Terminal Setup
Option
Server Setup
Network Setup
Terminal Setup
Option
Server Setup
Network Setup
Terminal Setup
Option
(see p. 38)
: as default
: as default
This router has to be able to provide the NAT service and the following static routes should be set : TCP port
1720-1729 and 7000-7009 and UDP port 8050-8054. Or you can put VT640P into DMZ if your router supports
this function.
: as default
Note : You can assign your own IP, Subnet Mask and Gateway within your private segment. If the segment is
172.16.0.0-172.16.0.255, your settings should be:
IP : one chosen from the range between 172.16.0.1 to 172.16.0.254
Subnet mask : 255.255.255.0
Gateway : one chosen from the range between 172.16.0.1 to 172.16.0.254, usually 172.16.0.254,
and can't be the same as your IP address.
GateKeeper:
DHCP: OFF
PPPoE: OFF
NAT: ON
Auto Answer:
Ringer:
H.263:
Keep Alive:
Note : The NAT door is the public IP of your router and is assigned by PPPoE.
Alias:
PPPoE Username ( )
Host Name:
PPPoE Password ( )
Auto Answer Rings (0~9):
NAT Door: see note
GK Password ( )
System Setup (Cont'd)
VT640P
General PC 1, 2, ...n
32
|
21
|
User Manual
IP Broadband Videophone
Page 27
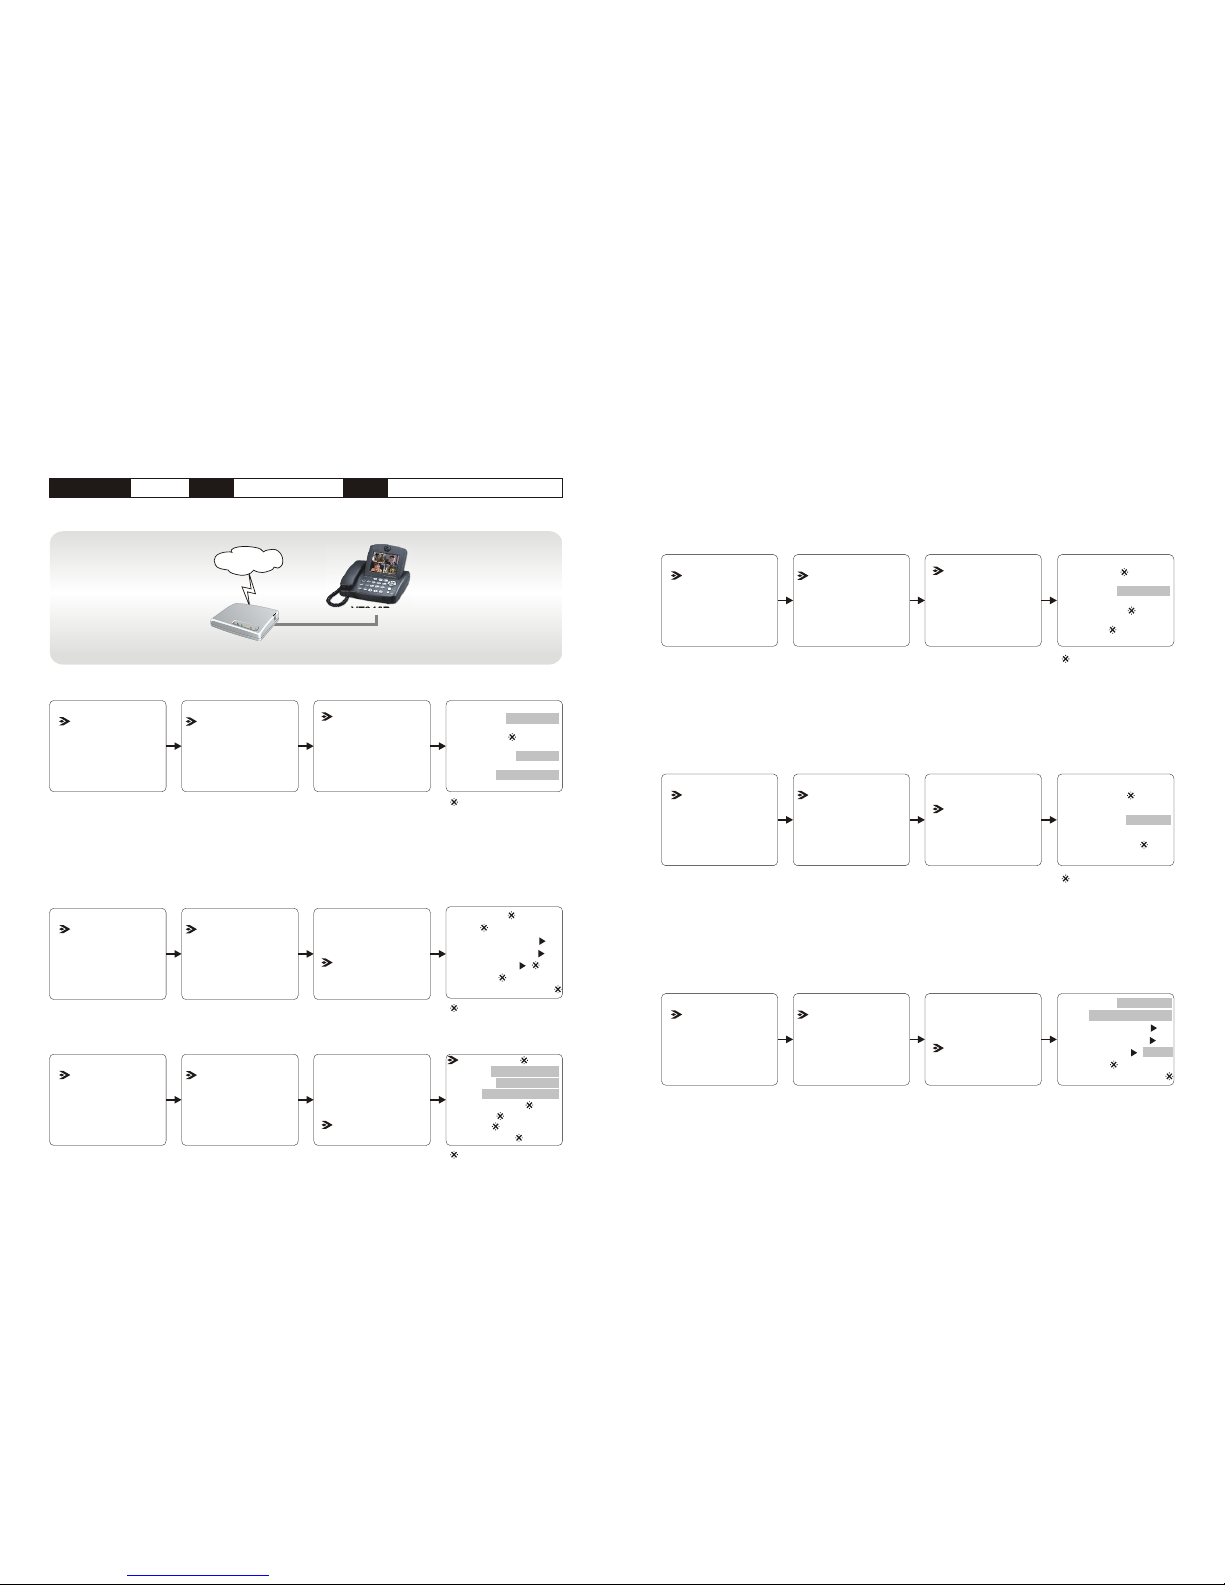
5 Working with a GateKeeper
If the Internet service you use applies the gatekeeper, it is important to be sure that
certain settings are done as instructed below.
(see p. 37)
(see p. 38)
Note : You need to get a phone number from your gatekeeper service provider.
Note :
1. Host name and alias may be assigned by your gatekeeper service provider.
2. GK Password is set according to your gatekeeper service provider's requirements.
Server Setup
Network Setup
Terminal Setup
Option
(see p. 37)
Server Setup
Network Setup
Terminal Setup
Note : You need to get the IP of the gatekeeper from your gatekeeper service provider.
Server Setup
Network Setup
Terminal Setup
Option
Server Setup
Network Setup
Terminal Setup
Option
Phonebook
Configuration
Password
Phonebook
Configuration
Password
Bandwidth Setup
Remote Update
System Setup
Bandwidth Setup
Remote Update
System Setup
Bandwidth Setup
Remote Update
System Setup
Phonebook
Configuration
Password
IP Address:
Phone No. : see note
Subnet Mask:
Gateway:
: as default
: as default
Alias: note 1
Host Name: note 1
Update Server:
DNS Server:
GateKeeper: see note
PPPoE Username ( )
PPPoE Password ( )
Auto Answer Rings (0~9):
NAT Door:
GK Password ( ) note 2
Connection Cable Type IP
When the IP is used exclusively by VT640P
Internet
VT640P
Cable modem
--
VT640P System Setup
IP Address: see note
Phone No. :
Subnet Mask: see note
Gateway: see note
(see p. 37)
(see p. 38)
Note : IP, Subnet Mask and Gateway are assigned by the DHCP server of your ISP.
Single, Public, & Dynamic
Phonebook
Configuration
Password
Phonebook
Configuration
Password
Phonebook
Configuration
Password
Bandwidth Setup
Remote Update
System Setup
Bandwidth Setup
Remote Update
System Setup
Bandwidth Setup
Remote Update
System Setup
Server Setup
Network Setup
Terminal Setup
Option
Server Setup
Network Setup
Terminal Setup
Option
Server Setup
Network Setup
Terminal Setup
Option
(see p. 38)
: as default
: as default
: as default
GateKeeper:
DHCP: ON
PPPoE: OFF
NAT: OFF
Auto Answer:
Ringer:
H.263:
Keep Alive:
Alias:
PPPoE Username ( )
Host Name:
PPPoE Password ( )
Auto Answer Rings (0~9):
NAT Door:
GK Password ( )
System Setup (Cont'd)
22
|
31
|
User Manual
IP Broadband Videophone
Page 28
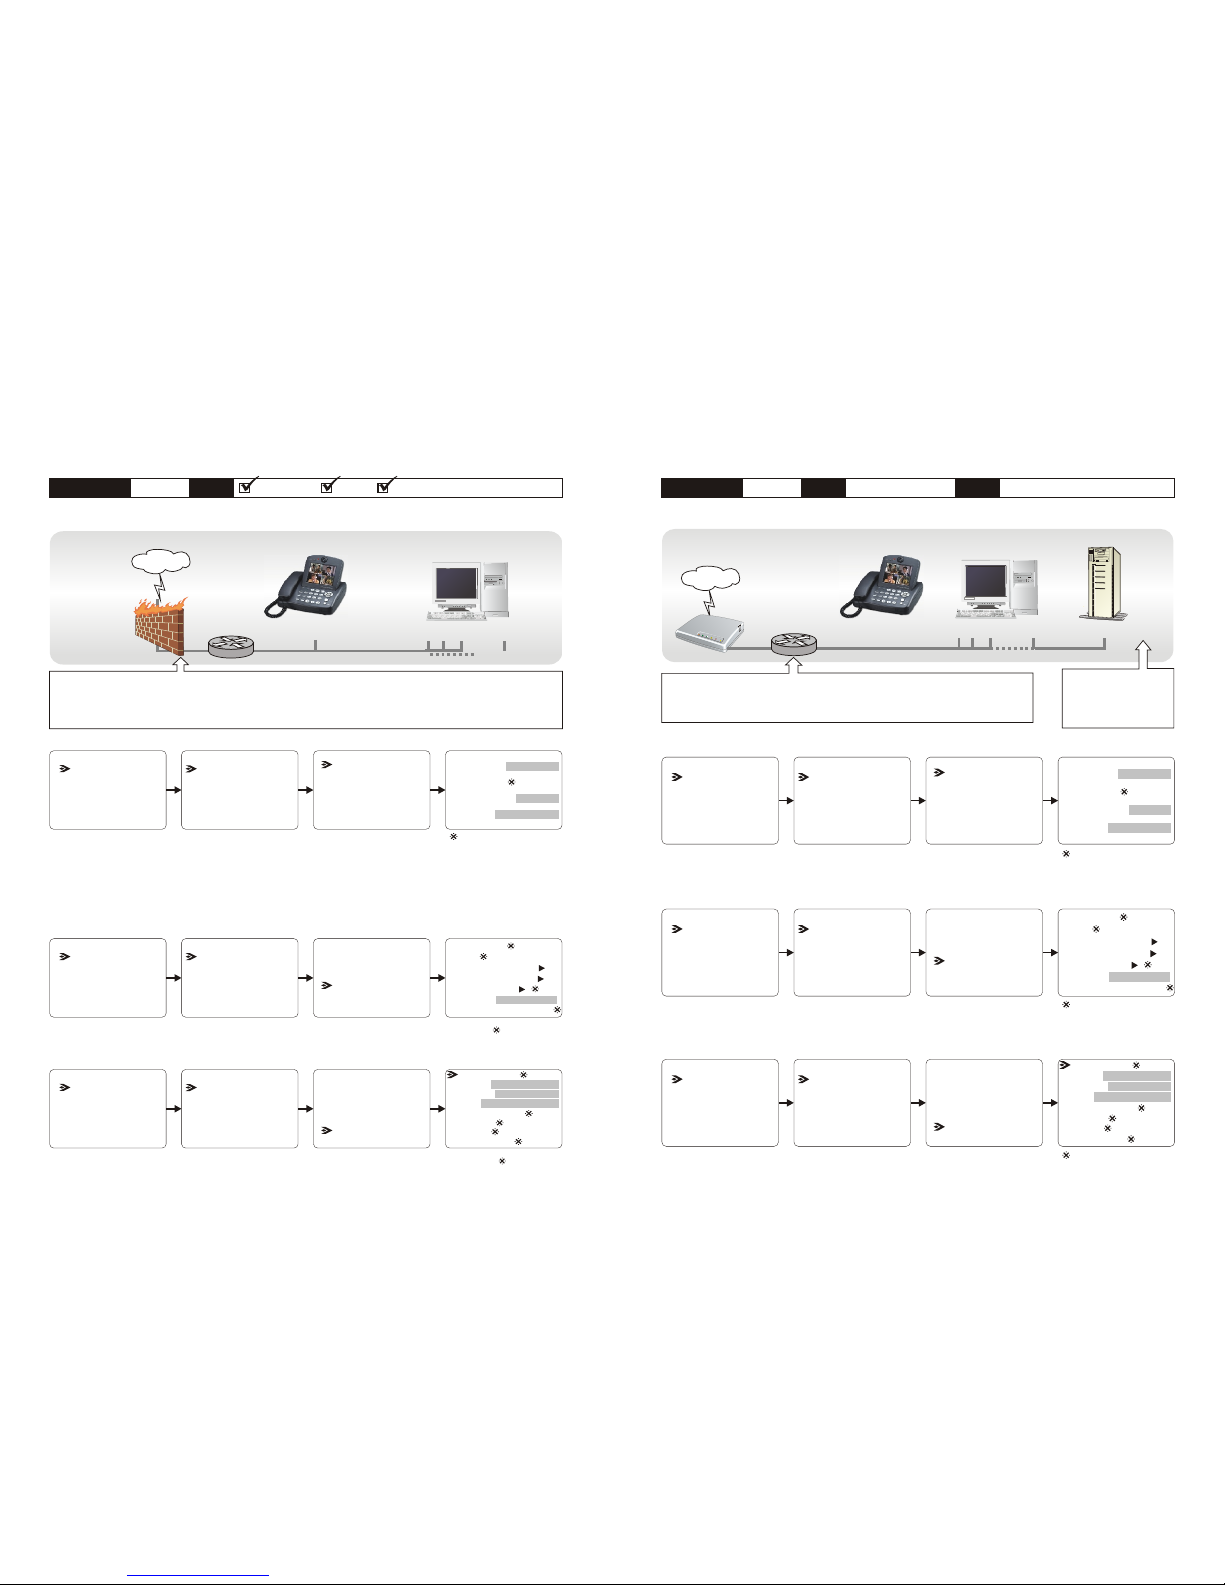
Connection LAN Type Firewall NAT Packet Filter
Without a DHCP server connected
VT640P System Setup
IP Address: see note
Phone No. :
Subnet Mask: see note
Gateway: see note
(see p. 37)
(see p. 38)
Server Setup
Network Setup
Terminal Setup
Option
Server Setup
Network Setup
Terminal Setup
Option
Server Setup
Network Setup
Terminal Setup
Option
Phonebook
Configuration
Password
Phonebook
Configuration
Password
Phonebook
Configuration
Password
Bandwidth Setup
Remote Update
System Setup
Bandwidth Setup
Remote Update
System Setup
Bandwidth Setup
Remote Update
System Setup
(see p. 38)
: as default
: as default
: as default
This firewall must be able to enable packets I/O for TCP port 1720-1729 and 7000-7009 and UDP port 8050-8054
(for VT640P exclusively).
It must also be able to provide the NAT service, and the following static routes should be set: TCP port 17201729 and 7000-7009 and UDP port 8050-8054. Or you can put VT640P into DMZ if your router supports this
function.
Note : You can assign your own IP, Subnet Mask and Gateway within your private segment. If the
segment is 172.16.0.0-172.16.0.255, your settings should be:
IP : one chosen from the range between 172.16.0.1 to 172.16.0.254
Subnet mask : 255.255.255.0
Gateway : one chosen from the range between 172.16.0.1 to 172.16.0.254,
usually 172.16.0.254, and can't be the same as your IP address.
GateKeeper:
DHCP: OFF
PPPoE: OFF
NAT: ON
Auto Answer:
Ringer:
H.263:
Keep Alive:
Note : The NAT door is the public IP of your firewall and this IP is assigned by your ISP.
Alias:
PPPoE Username ( )
Host Name:
PPPoE Password ( )
Auto Answer Rings (0~9):
NAT Door: see note
GK Password ( )
Connection Cable Type IP--
When the IP is shared with other devices (with a DHCP server connected)
Internet
Cable modem
VT640P System Setup
IP Address: see note
Phone No. :
Subnet Mask: see note
Gateway: see note
(see p. 37)
(see p. 38)
Note : IP, Subnet Mask and Gateway are assigned by your DHCP server.
The DHCP Server must
be able to support
dynamic-fixed IP
allocation.
This router has to be able to provide the NAT service and the following static
routes should be set : TCP port 1720-1729 and 7000-7009 and UDP port 8050-
8054. Or you can put VT640P into DMZ if your router supports this function.
Single, Public, & Dynamic
Phonebook
Configuration
Password
Phonebook
Configuration
Password
Phonebook
Configuration
Password
Bandwidth Setup
Remote Update
System Setup
Bandwidth Setup
Remote Update
System Setup
Bandwidth Setup
Remote Update
System Setup
Server Setup
Network Setup
Terminal Setup
Option
Server Setup
Network Setup
Terminal Setup
Option
Server Setup
Network Setup
Terminal Setup
Option
(see p. 38)
: as default
: as default
: as default
GateKeeper:
DHCP: ON
PPPoE: OFF
NAT: ON
Auto Answer:
Ringer:
H.263:
Keep Alive:
Note : The NAT door is the public IP of your router and is assigned by the DHCP server of your ISP.
Alias:
PPPoE Username ( )
Host Name:
PPPoE Password ( )
Auto Answer Rings (0~9):
NAT Door: see note
GK Password ( )
System Setup (Cont'd)
System Setup (Cont'd)
Internet
Router
Firewall
VT640P
General PC 1, 2, ...n
VT640P
General PC 1, 2, ...n
DHCP Server
Router
30
|
23
|
User Manual
IP Broadband Videophone
Page 29
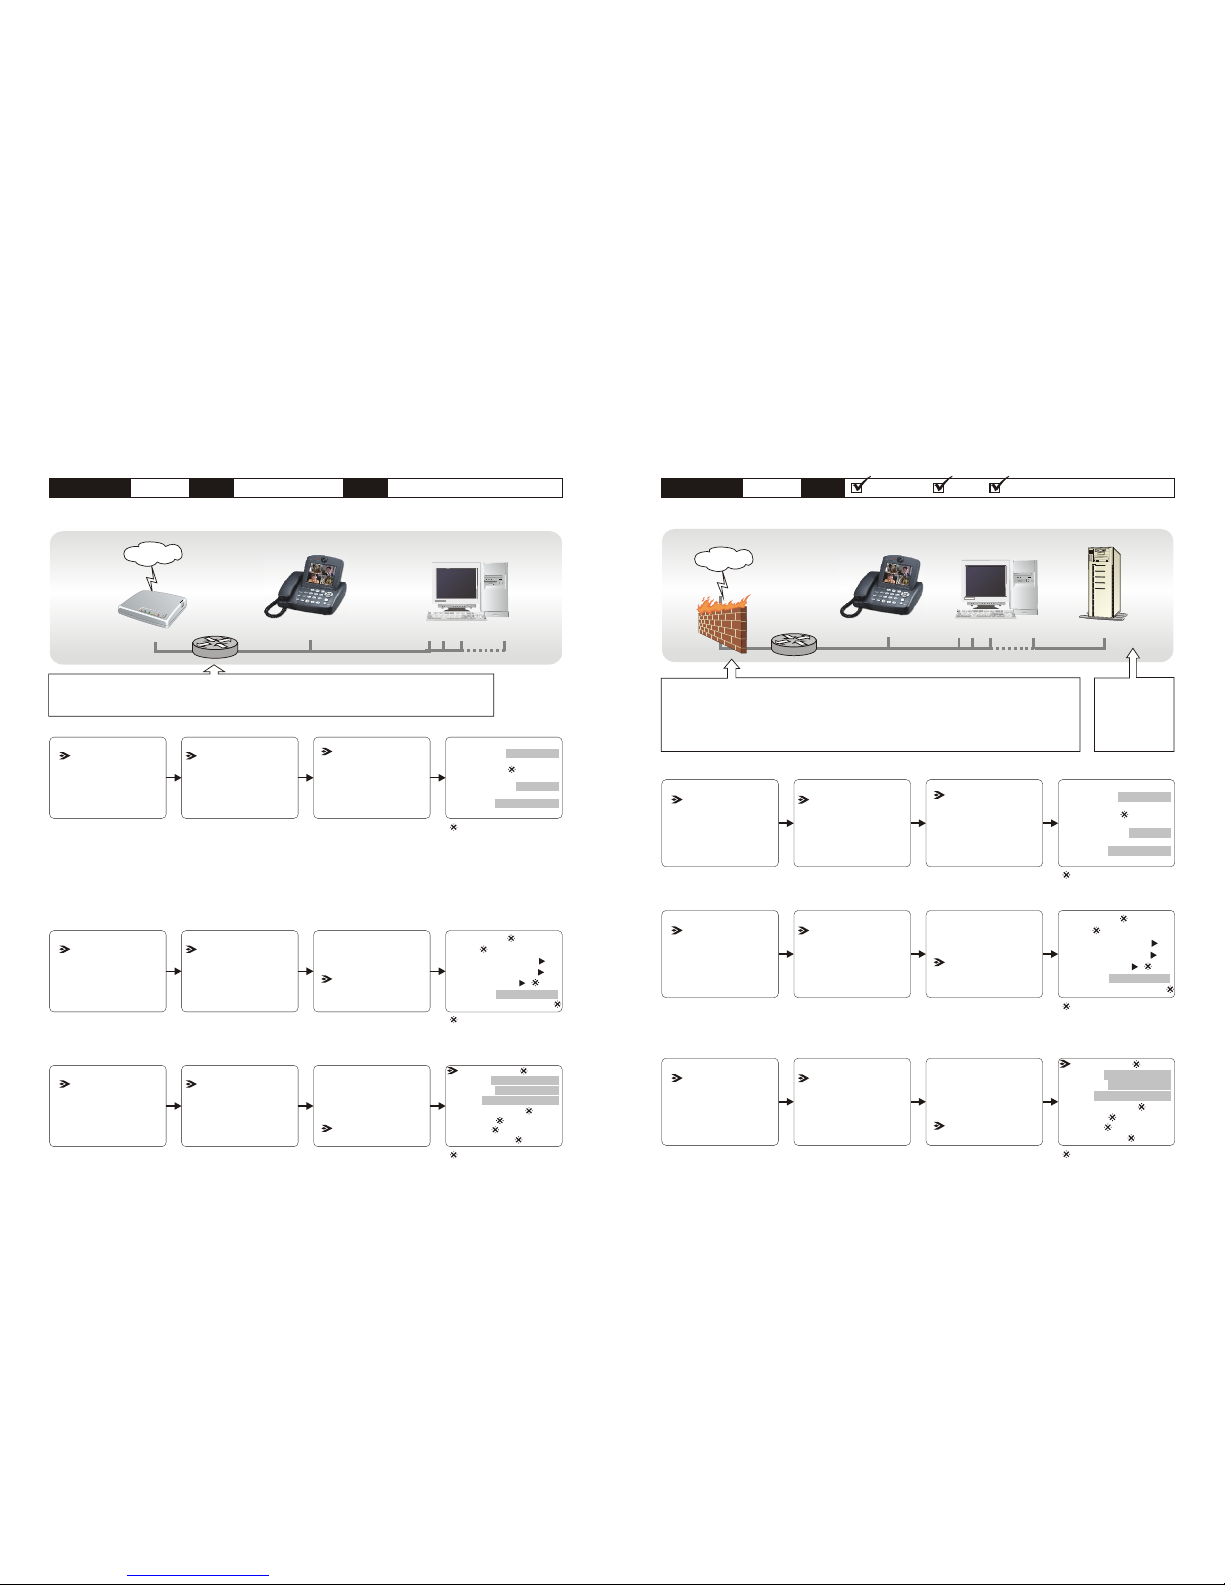
Connection LAN Type Firewall NAT Packet Filter
VT640P System Setup
IP Address: see note
Phone No. :
Subnet Mask: see note
Gateway: see note
(see p. 37)
(see p. 38)
Note : IP, Subnet Mask and Gateway are assigned by your DHCP server.
The DHCP
Server must be
able to support
dynamic-fixed
IP allocation.
This firewall must be able to enable packets I/O for TCP port 1720-1729 and 7000-7009
and UDP port 8050-8054 (for VT640P exclusively).
It must also be able to provide the NAT service, and the following static routes should be
set: TCP port 1720-1729 and 7000-7009 and UDP port 8050-8054. Or you can put VT640P
into DMZ if your router supports this function.
Server Setup
Network Setup
Terminal Setup
Option
Server Setup
Network Setup
Terminal Setup
Option
Server Setup
Network Setup
Terminal Setup
Option
Phonebook
Configuration
Password
Phonebook
Configuration
Password
Phonebook
Configuration
Password
Bandwidth Setup
Remote Update
System Setup
Bandwidth Setup
Remote Update
System Setup
Bandwidth Setup
Remote Update
System Setup
(see p. 38)
: as default
: as default
: as default
GateKeeper:
DHCP: ON
PPPoE: OFF
NAT: ON
Auto Answer:
Ringer:
H.263:
Keep Alive:
Note : The NAT door is the public IP of your firewall and is assigned by your ISP.
Alias:
PPPoE Username ( )
Host Name:
PPPoE Password ( )
Auto Answer Rings (0~9):
NAT Door: see note
GK Password ( )
When the IP is shared with other devices (without a DHCP server connected)
Connection Cable Type IP--
VT640P System Setup
IP Address: see note
Phone No. :
Subnet Mask: see note
Gateway: see note
(see p. 37)
(see p. 38)
Internet
Cable modem
Router
Server Setup
Network Setup
Terminal Setup
Option
Server Setup
Network Setup
Terminal Setup
Option
Server Setup
Network Setup
Terminal Setup
Option
Phonebook
Configuration
Password
Phonebook
Configuration
Password
Phonebook
Configuration
Password
Bandwidth Setup
Remote Update
System Setup
Bandwidth Setup
Remote Update
System Setup
Bandwidth Setup
Remote Update
System Setup
(see p. 38)
: as default
: as default
: as default
This router has to be able to provide the NAT service and the following static routes should be set :
TCP port 1720-1729 and 7000-7009 and UDP port 8050-8054. Or you can put VT640P into DMZ if
your router supports this function.
Single, Public, & Dynamic
Note : You can assign your own IP, Subnet Mask and Gateway within your private segment. If the
segment is 172.16.0.0-172.16.0.255, your settings should be:
IP : one chosen from the range between 172.16.0.1 to 172.16.0.254
Subnet mask : 255.255.255.0
Gateway : one chosen from the range between 172.16.0.1 to 172.16.0.254,
usually 172.16.0.254, and can't be the same as your IP address.
GateKeeper:
DHCP: OFF
PPPoE: OFF
NAT: ON
Auto Answer:
Ringer:
H.263:
Keep Alive:
Note : The NAT door is the public IP of your router and is assigned by the DHCP server of your ISP.
Alias:
PPPoE Username ( )
Host Name:
PPPoE Password ( )
Auto Answer Rings (0~9):
NAT Door: see note
GK Password ( )
System Setup (Cont'd)
System Setup (Cont'd)
VT640P
General PC 1, 2, ...n
VT640P
General PC 1, 2, ...n
DHCP Server
Internet
Router
Firewall
With a DHCP server connected
24
|
29
|
User Manual
IP Broadband Videophone
Page 30
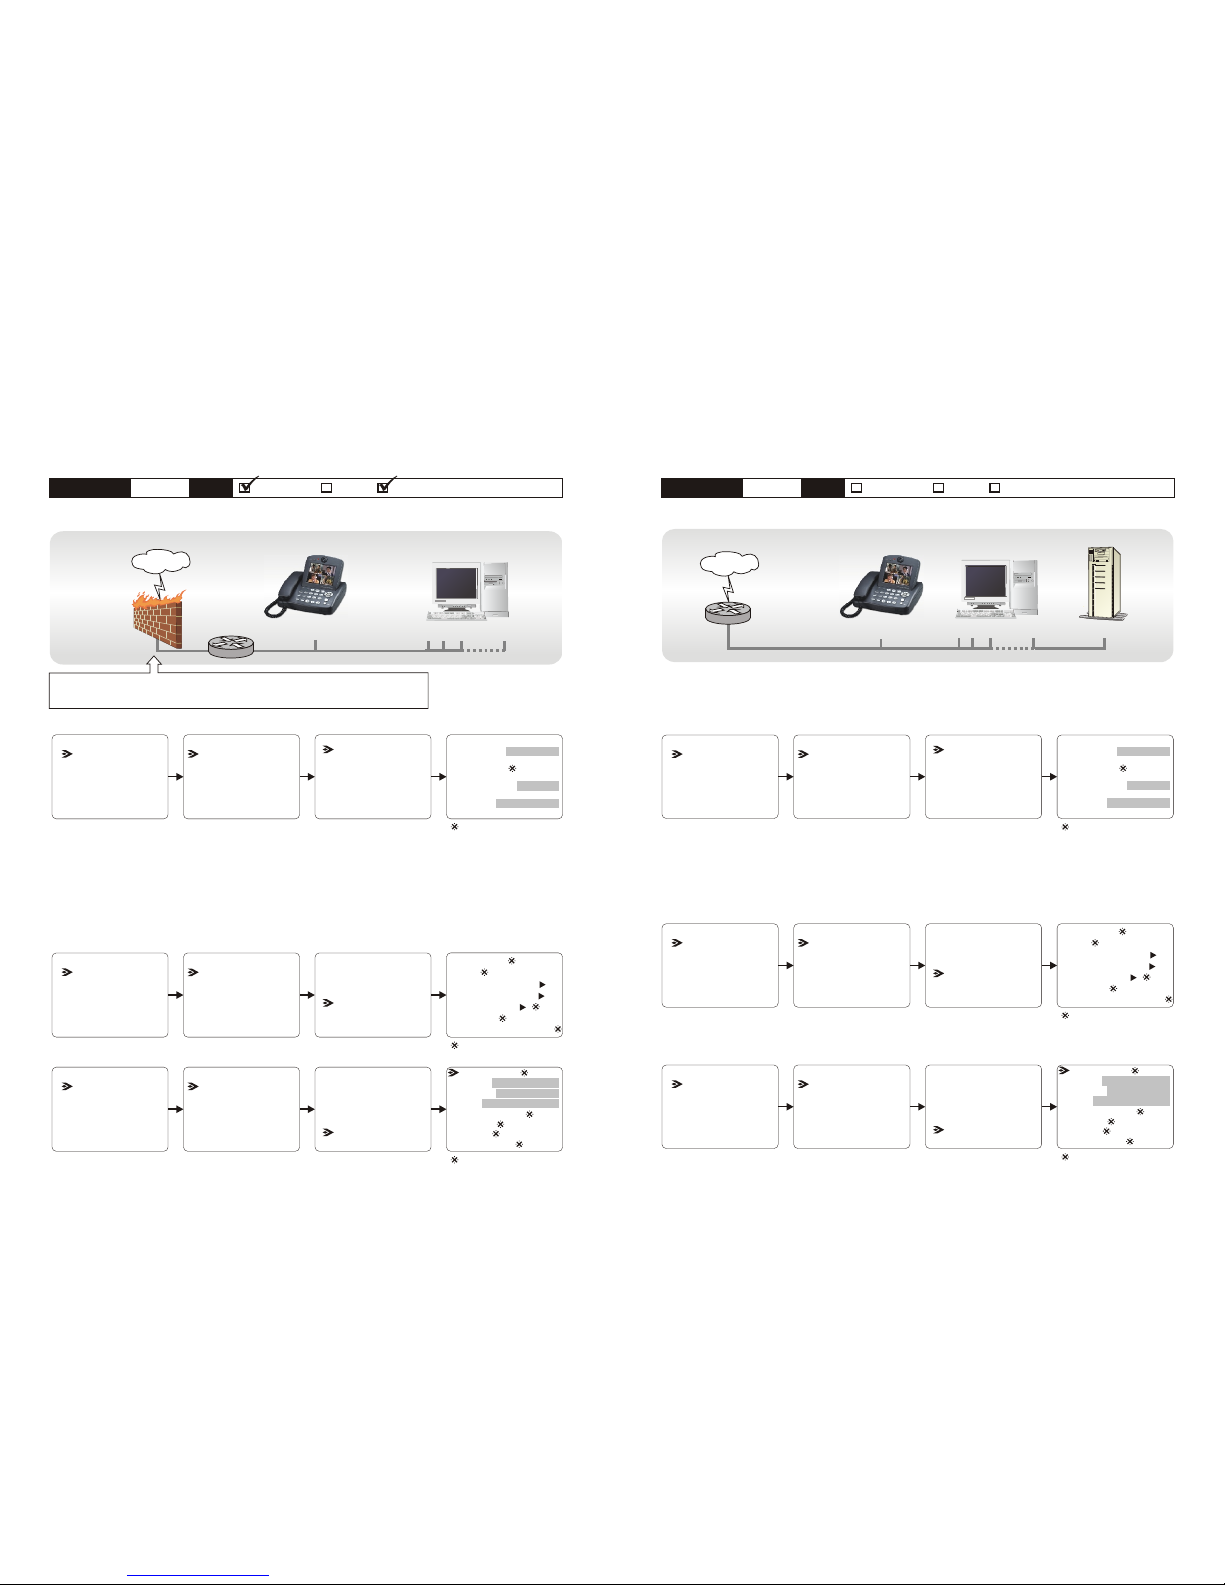
Connection LAN Typ e Firewall NAT Packet Filter
Without a DHCP server connected
VT640P System Setup
IP Address: see note
Phone No. :
Subnet Mask: see note
Gateway: see note
(see p. 37)
(see p. 38)
Internet
Router
Firewall
Server Setup
Network Setup
Terminal Setup
Option
Server Setup
Network Setup
Terminal Setup
Option
Server Setup
Network Setup
Terminal Setup
Option
Phonebook
Configuration
Password
Phonebook
Configuration
Password
Phonebook
Configuration
Password
Bandwidth Setup
Remote Update
System Setup
Bandwidth Setup
Remote Update
System Setup
Bandwidth Setup
Remote Update
System Setup
(see p. 38)
: as default
: as default
: as default
This firewall must be able to enable packets I/O for TCP port 1720-1729 and 70007009 and UDP port 8050-8054 (for VT640P exclusively).
GateKeeper:
DHCP: OFF
PPPoE: OFF
NAT: OFF
Auto Answer:
Ringer:
H.263:
Keep Alive:
Alias:
PPPoE Username ( )
Host Name:
PPPoE Password ( )
Auto Answer Rings (0~9):
NAT Door:
GK Password ( )
Note : IP address, Subnet Mask and Gateway are assigned by your ISP. If you are using an IP
segment, which is x.x.x.0-x.x.x.255, your settings should be:
IP : one chosen from the range between x.x.x.1 to x.x.x.254
Subnet mask : 255.255.255.0
Gateway : one chosen from the range between x.x.x.1 to x.x.x.254, usually x.x.x.254,
and can't be the same as your IP address.
Connection LAN Typ e
Internet
Router
Firewall NAT Packet Filter
VT640P System Setup
IP Address: see note
Phone No. :
Subnet Mask: see note
Gateway: see note
(see p. 37)
(see p. 38)
Note : IP, Subnet Mask and Gateway are assigned by your DHCP server.
Server Setup
Network Setup
Terminal Setup
Option
Server Setup
Network Setup
Terminal Setup
Option
Server Setup
Network Setup
Terminal Setup
Option
Phonebook
Configuration
Password
Phonebook
Configuration
Password
Phonebook
Configuration
Password
Bandwidth Setup
Remote Update
System Setup
Bandwidth Setup
Remote Update
System Setup
Bandwidth Setup
Remote Update
System Setup
(see p. 38)
: as default
: as default
: as default
GateKeeper:
DHCP: ON
PPPoE: OFF
NAT: OFF
Auto Answer:
Ringer:
H.263:
Keep Alive:
Alias:
PPPoE Username ( )
Host Name:
PPPoE Password ( )
Auto Answer Rings (0~9):
NAT Door:
GK Password ( )
System Setup (Cont'd)
System Setup (Cont'd)
VT640P
General PC 1, 2, ...n
VT640P
General PC 1, 2, ...n
DHCP Server
With a DHCP server connected
28
|
25
|
User Manual
IP Broadband Videophone
Page 31
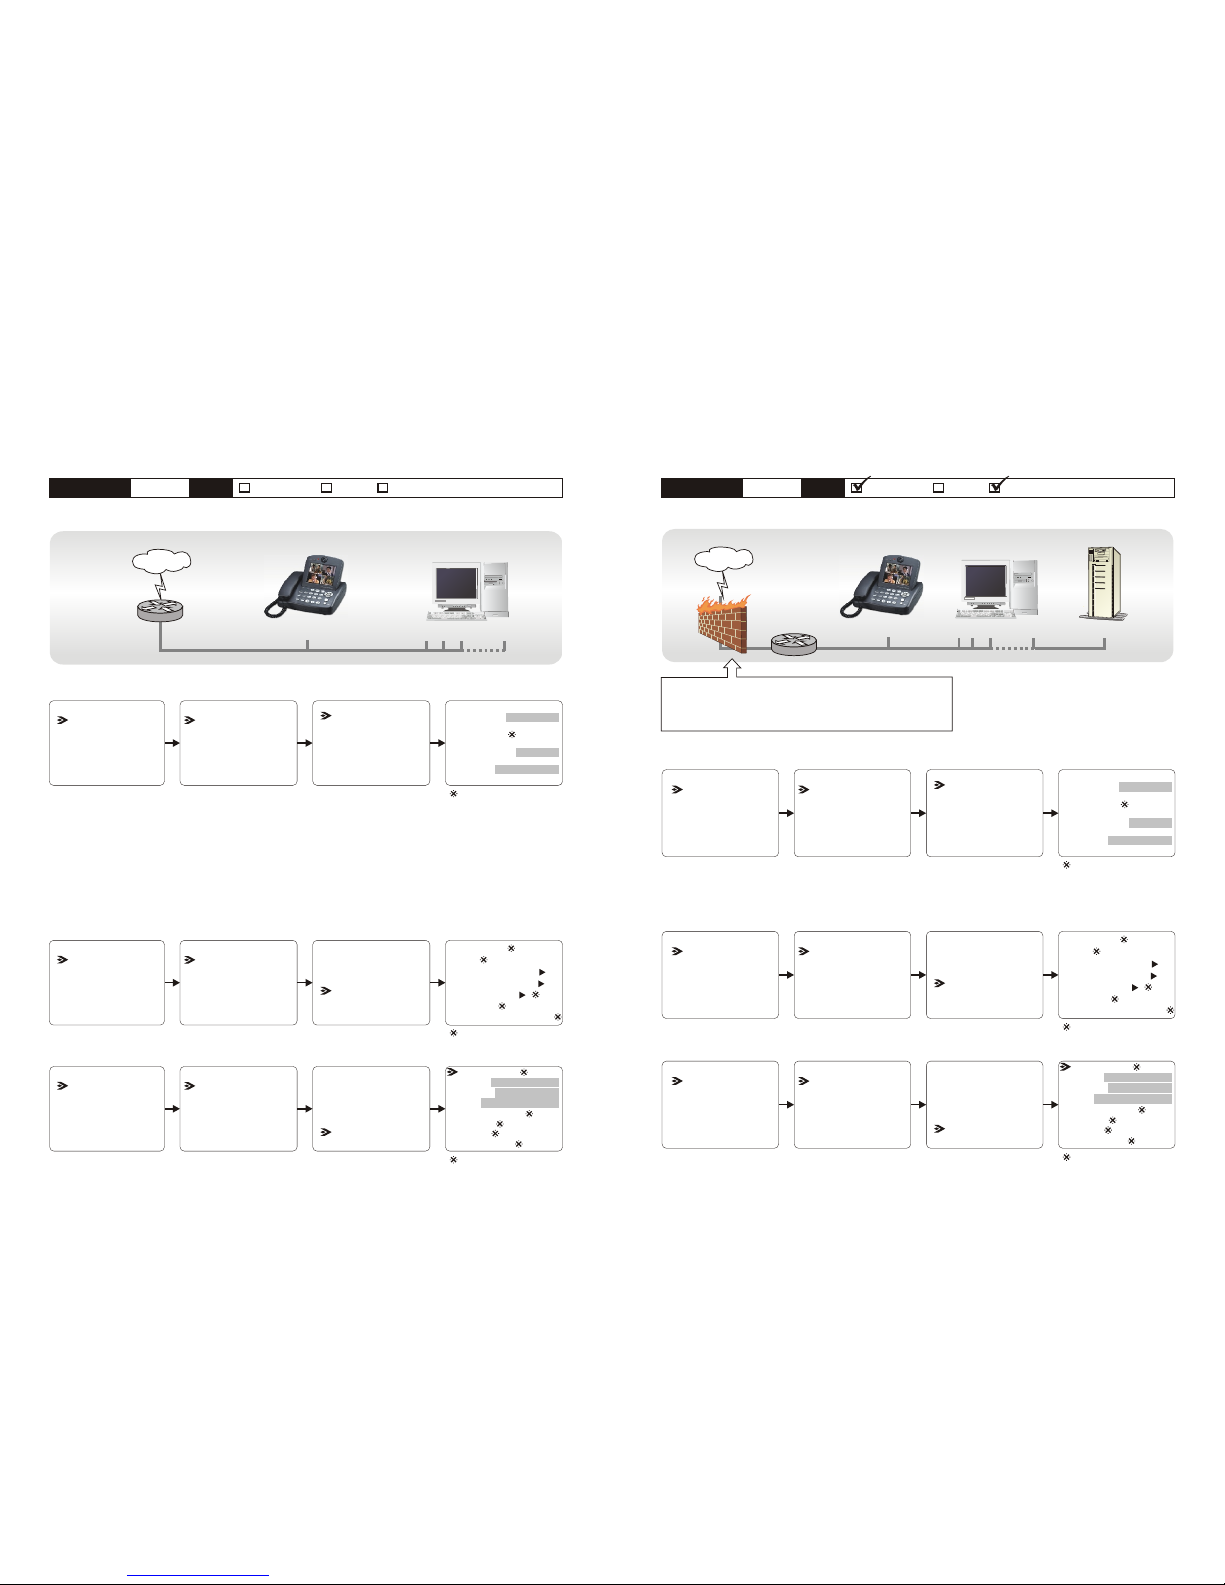
Connection LAN Type Firewall NAT Packet Filter
Internet
With a DHCP server connected
Router
Firewall
VT640P System Setup
IP Address: see note
Phone No. :
Subnet Mask: see note
Gateway: see note
(see p. 37)
(see p. 38)
Note : IP, Subnet Mask and Gateway are assigned by your DHCP server.
VT640P
General PC 1, 2, ...n
DHCP Server
This firewall must be able to enable packets I/O for TCP port
1720-1729 and 7000-7009 and UDP port 8050-8054
(For VT640P exclusively).
Server Setup
Network Setup
Terminal Setup
Option
Server Setup
Network Setup
Terminal Setup
Option
Server Setup
Network Setup
Terminal Setup
Option
Phonebook
Configuration
Password
Phonebook
Configuration
Password
Phonebook
Configuration
Password
Bandwidth Setup
Remote Update
System Setup
Bandwidth Setup
Remote Update
System Setup
Bandwidth Setup
Remote Update
System Setup
(see p. 38)
: as default
: as default
: as default
GateKeeper:
DHCP: ON
PPPoE: OFF
NAT: OFF
Auto Answer:
Ringer:
H.263:
Keep Alive:
System Setup (Cont'd)
Alias:
PPPoE Username ( )
Host Name:
PPPoE Password ( )
Auto Answer Rings (0~9):
NAT Door:
GK Password ( )
Connection LAN Typ e Firewall NAT Packet Filter
Without a DHCP server connected
Note : IP address, Subnet Mask and Gateway are assigned by your ISP. If you are using an IP
segment, which is x.x.x.0-x.x.x.255, your settings should be:
IP : one chosen from the range between x.x.x.1 to x.x.x.254
Subnet mask : 255.255.255.0
Gateway : one chosen from the range between x.x.x.1 to x.x.x.254, usually x.x.x.254,
and can't be the same as your IP address.
IP Address: see note
Phone No. :
Subnet Mask: see note
Gateway: see note
(see p. 37)
(see p. 38)
Internet
Router
VT640P
General PC 1, 2, ...n
VT640P System Setup
Server Setup
Network Setup
Terminal Setup
Option
Server Setup
Network Setup
Terminal Setup
Option
Server Setup
Network Setup
Terminal Setup
Option
Phonebook
Configuration
Password
Phonebook
Configuration
Password
Phonebook
Configuration
Password
Bandwidth Setup
Remote Update
System Setup
Bandwidth Setup
Remote Update
System Setup
Bandwidth Setup
Remote Update
System Setup
(see p. 38)
: as default
: as default
: as default
GateKeeper:
DHCP: OFF
PPPoE: OFF
NAT: OFF
Auto Answer:
Ringer:
H.263:
Keep Alive:
System Setup (Cont'd)
Alias:
PPPoE Username ( )
Host Name:
PPPoE Password ( )
Auto Answer Rings (0~9):
NAT Door:
GK Password ( )
26
|
27
|
User Manual
IP Broadband Videophone
 Loading...