

Vision Research Phantom Miro M Series, Phantom Miro LC Series User Manual
PHANTOM
M / LC
CAMERAS
MANUAL

w w w . v i s i o n r e s e a r c h . c o m
Phantom Miro M & LC Series Camera Manual
PN: ZDOC-64084-MA-0003 Rev 1
Last Updated: Nov. 2012

Phantom Miro M
& LC Series
MANUAL
100 Dey Road, Wayne, New Jersey 07470 USA
Phantom Miro M & LC Series Camera Manual

w w w . v i s i o n r e s e a r c h . c o m
Phantom Miro M & LC Series Camera Manual
Written and produced by the Marketing Department at
Vision Research.
The contents of this manual may be subject to change
without notification.
PN: ZDOC-64084-MA-0003 Rev 1
Last Updated: Nov. 2012
Updated: 06.10.2012

Contents
Introduction
1 1
Quick Start Guides
2 7
Miro LC Touchscreen Interface
3 17
Phantom Software
4 35
CineFlash & CineFlash Dock
5 49
Phantom RCU
6 55
Batteries & Battery Charger
7 57
FAQ/Support
8 63
Phantom Miro M & LC Series Camera Manual
features
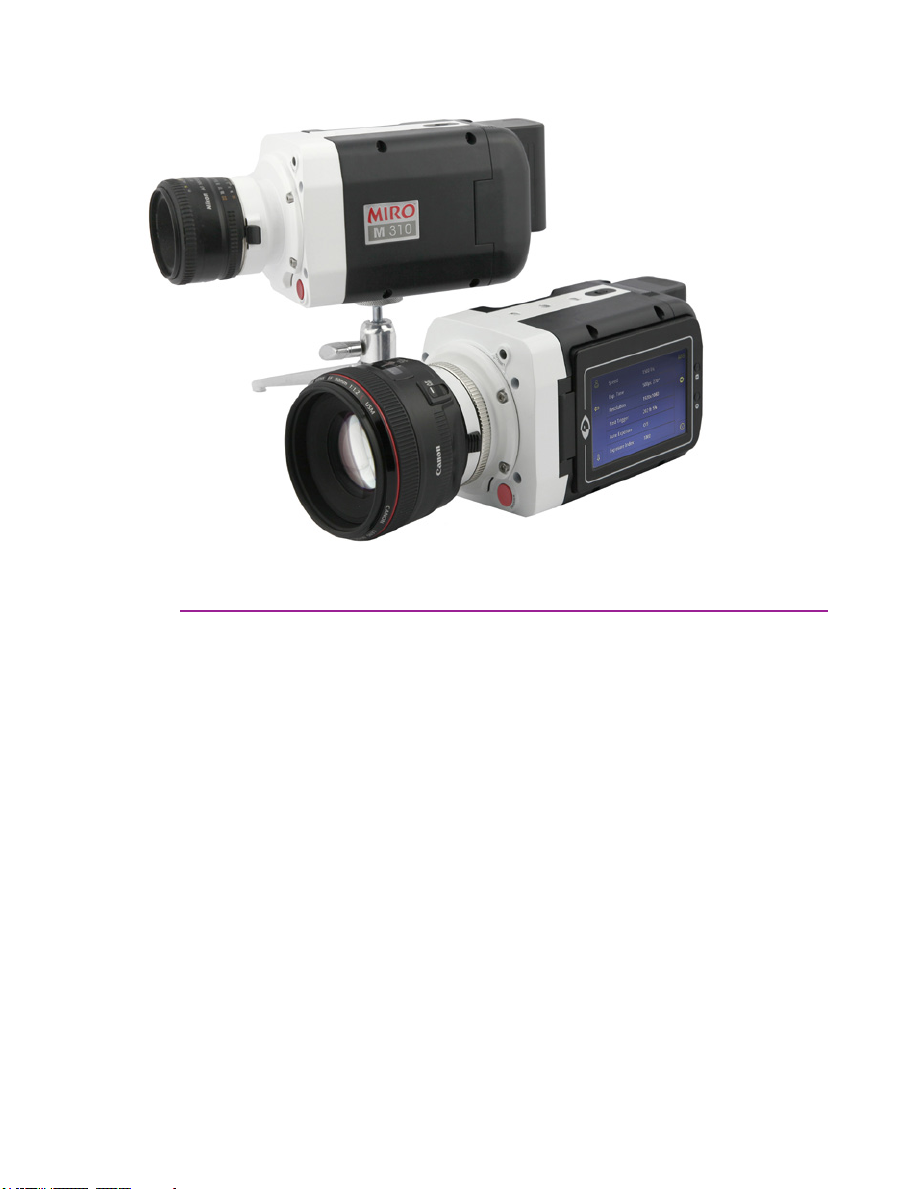
Phantom Miro M310 (top) and Miro LC320S (bottom)
• 1 Megapixel and 2 Megapixel custom-
designed CMOS sensors
• Up to 3.2 Gigapixels/second throughput
• Excellent light sensitivity
• Compact, rugged design
• LC-Series includes flip-out LCD touch
screen for on-camera control and
monitoring
• Rechargeable battery (Sony BP-U30 or
BP-U60)
• Phantom CineFlash® storage system
(60GB, 120GB and 240GB CineFlash;
CineFlash Dock, eSATA Connectivity)
• Image-Based Auto-Trigger
All specifications are subject to change. Updated specifications are avialble on our website.
Phantom Miro M & LC Series Camera Manual
• Factory and user-definable ‘Presets’
can be saved and retrieved
• Extreme Dynamic Range
• Continuous Recording
• Auto-Exposure
• Multi-cine Acquisition
• Internal Mechanical Shutter
• 1Gb Ethernet
• Tiered Service Contracts to protect
your investment
• 3.0 lbs, 1.4kg
• 7.5 x 3.5 x 4 inches, 19 x 19 x 10 cm
(L, W, H)

1
Introduction
Sensor Characteristics
Throughput / Speed
The Miro 110 and Miro 310 are both based on a 1
Megapixel (Mpx) custom-designed CMOS sensor.
The maxiumum resolution is 1200 x 800, with a 20
micron (µm) pixel size and with 12-bit pixel depth.
The Miro 110 and 310 cameras are rated at ISO
11,100T (mono) and 1800T (color).
The Miro 120 and 320S are both based on a >2 Mpx,
custom designed CMOS sensor. The maximum
resolution is 1920 x 1200, with a 10 µm pixel size,
and 12-bit pixel depth. The Miro 120 and 320S are
both rated at ISO 8900T (mono) and 1100T (color).
Both the Miro 110 and Miro 120 cameras provide a
1.6 Gigapixel/second (Gpx/s) throughput while the
Miro 310 and Miro 320S double that for 3.2 Gpx/s
throughput.
These throughputs translate to the Miro 110
yielding over 1600 frames-per-second (fps), the
Miro 310 over 3200 fps, 720 fps for the Miro 120 and
1380 fps for the Miro 320S, all at full resolutions.
Maximum frame rates at reduced resolution are
400,000 fps for the Miro 110, 650,000 for the Miro
310, 250,000 fps for the Miro 120, and 325,000 for
the Miro 320S monochrome.
Exposure
Depending on the model, the minimum exposure
time is either 1 µs or 2 µs for sharp, blur-free
images using a global electronic shutter.
Vision Research’s unique Extreme Dynamic Range
(EDR) feature is standard on all models. With
EDR enabled, each pixel in a frame will receive
one of two exposure times – a short exposure
for potentially overexposed pixels and a longer
exposure for pixels receiving normal light levels.
1
Chapter 1: Introduction

This provides detail in areas of the image that
would otherwise be overexposed. EDR is usually
recommended for monochrome cameras only.
The Shutter Off mode was designed for PIV
applications, and maintains a maximum exposure
regardless of frame rate. This allows for a straddle
time of 500 ns on the Miro 110 and Miro 310 and 1.4
µs on the Miro 120 and Miro 320S monochrome.
Mechanical Shutter
Memory
An internal mechanical shutter for remote and
automatic black references comes standard on all
models. This means each shot is properly black
referenced for maximum image quality without the
need to manually cap the lens or even touch the
camera.
Each camera model comes in three memory
configurations: 3 Gigabytes (GB), 6 GB or 12 GB.
The high-speed internal memory can be segmented
into as many as 16 partitions for Cine storage. (A
Cine is Vision Research’s raw image format that
stores all image data in a compact file.)
At the end of any shot, save your Cine to the
removable Phantom CineFlash storage media at
about 4GB/minute. CineFlash allows you to save a
copy of your Cine to non-volatile memory for later
retrieval, and avoid costly downtime while you
download from camera memory to a computer hard
disk. When done with an experiment, just remove
the CineFlash from the camera, insert it into its
docking station connected to a PC, and drag-anddrop Cines from the CineFlash onto your computer
disk or connected hard drive.
Lensing
2
Phantom Miro M & LC Series Camera Manual
Phantom Miro M- and LC-Series cameras are
available with 4 different interchangable lens
mounts, which must be chosen at the time of
purchase. Choose between a Canon EOS, Nikon
F, C-mount or 35mm PL-mount. The EOS mount
enables the use of compatible EF and EF-S lenses,
and focus and aperture can be adjusted via our
Phantom Remote Control Unit (RCU), Phantom

Software Control
Camera Control
Signaling
Camera Control software (PCC), or using an
adjustment ring on the lens mount. Remote control
of focus and aperture is a huge benefit when
cameras are remotely located and/or difficult to
reach.
Using Phantom Camera Control (PCC) software,
you can configure, capture, view, edit, enhance
and analyze Cine files. Easily extract still shots,
or convert Cines into web- and presentationcompatible formats for sharing with colleagues
and documenting experiments. Use PCC’s
measurement tools to determine distances, angles
and speed. Advanced tools let you crop, scale,
rotate and enhance the image to get to the most
valuable information out of your Cine file.
Control your camera with an extensive suite of
tools in PCC via a 1Gb Ethernet connection, or use
the Phantom RCU and its easy-to-learn and easyto-use touch screen interface.
The Miro LC-Series cameras have a flip-out LCD
touchscreen for on-camera control and monitoring.
Camera settings can be changed with a few taps
on the screen which doubles as a monitor for live
preview and Cine playback from internal memory.
The LCD user interface is available in multiple
languages.
Advanced control signals are available, including
a Frame Synchronization signal (FSYNC) on the
camera back panel. Trigger, Ready, IRIG In, Video
Out, IRIG Out and an Auxiliary signal connection
(Event, Strobe, Memgate) are all available on the
standard capture cable.
Video Out is either NTSC or PAL on the Miro 110,
Miro 310 and Miro 120. An HD-SDI port is available
on the Miro 320S. And, a live image is always
available in PCC, on the RCU or LC-Series touch
screen. You can adjust the video to fill the available
monitor space for framing a shot, and then zoom
to a 1:1 pixel representation (center-cropped) for
focusing using the ‘Autoset’ button on the front of
the camera.
3
Chapter 1: Introduction
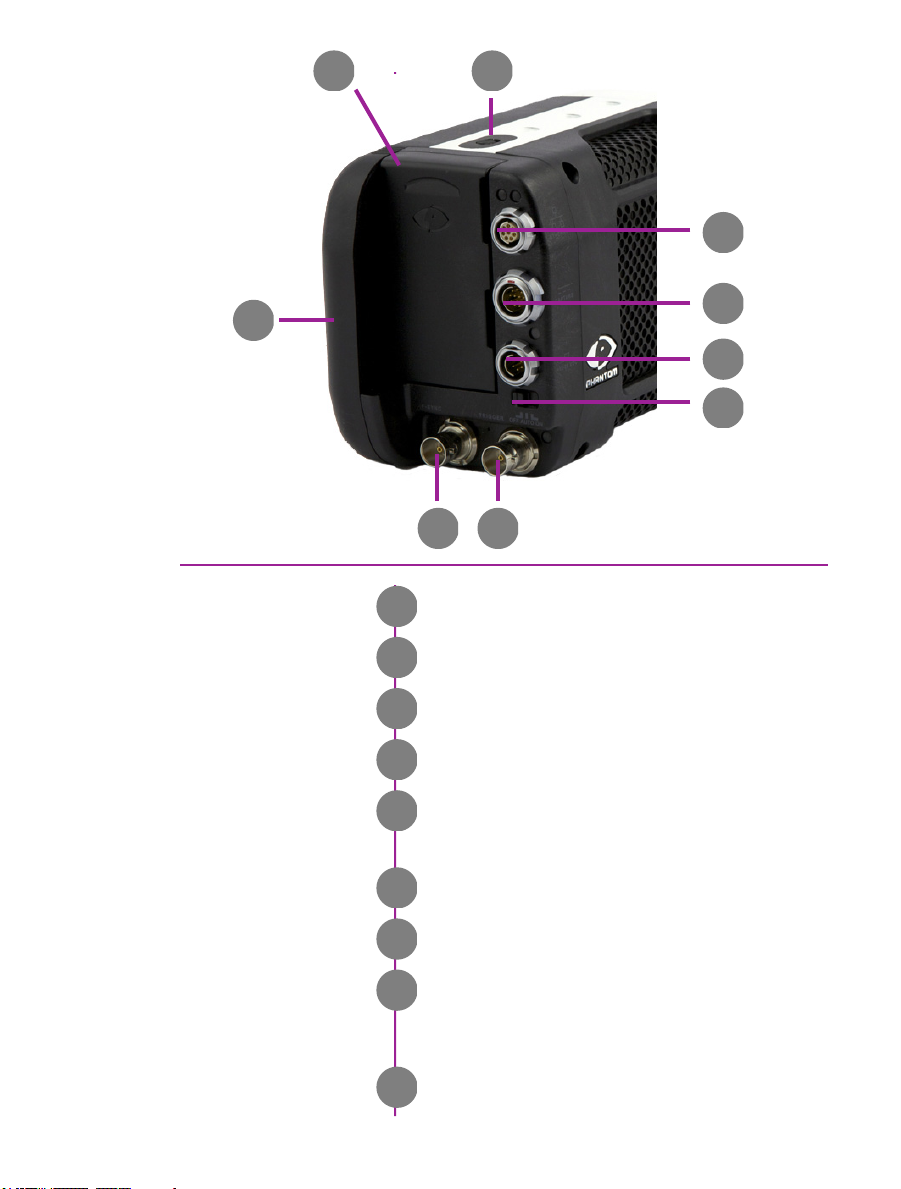
AB
I
C
D
Battery Release
Battery Compartment
CineFlash Compartment
connector panel
HD-SDI (Miro 320S) /
Trigger (Miro 120, 110, 310)
F-Sync
Power Switch
A
B
C
D
E
F
E
Release Switch
Sony BP-U30 or BP-U60 Battery
60GB, 120GB, or 240GB removable Flash drive
Switchable (In/Out) TTL Pulse (Falling Edge)
4:2:2 HD-SDI (1080psf, 1080i, 720p) /
Trigger (Switch closure or TTL Pulse)
OFF/AUTO/ON Switch
H
G
F
DC Input
Capture
1Gbps Ethernet
4
Phantom Miro M & LC Series Camera Manual
12 -28 Volts DC
G
Trigger, Ready, Strobe, A-Sync, Video (120, 110 &
H
310 only), IRIG-B In (Modulated/Unmod.), IRIG-B
Out (Unmod.), Aux (Strobe, Event, MemoryGate)
CAT5 UTP (for control and data transfer)
I

Autoset
A
B
Tap to scroll through video tools functions:
A
Zoom (1:1), Threshold and Live mode
Long press (3 seconds) will perform an internal
CSR (current session reference)
Trigger
B
Tap once to trigger the camera
Long press (5 seconds) will delete the last RAM
Cine file and re-arm the camera
on-camera controls
5
Chapter 1: Introduction
C
A
B
Image shown is of the LCD screen flipped around and
folded back into the side of the camera
Turns on/off ‘Menu’ icons. Exiting the menu is an
Menu
A
electronic reset of the touchscreen. Reset takes
about 5 seconds. Double-clicking the square button
also resets the screen.
lcd panel controls
OSD Display
Menu
6
Phantom Miro M & LC Series Camera Manual
Tapping the center of the screen will
also bring up menu icons
Turns on/off all on-screen displays.
B
Displays the main ‘capture and setting’ control
C
interface.
See ‘Chapter 3: Miro LC Touchscreens’
for a brief description of the various
‘Menu’ screens

Quick Start
2
Prepare Camera
Power Up Camera
Insert Phantom CineFlash
Set Recording Parameters
Guides
Mount camera onto suitable support.
Attach and adjust appropriate lens.
Insert battery or connect appropriate power supply
(12-28VDC) to the DC Input connector, then set the
power switch to the ‘ON’ position.
Insert a Phantom CineFlash, if available. For
detailed instruction see Chapter 5: Phantom
CineFlash & CineDock.
Click the ‘Menu’ button (square) to display touch
screen menu.
Tap the ‘Menu’ icon as to bring up the main capture
and setting control interface.
• Set ‘Resolution’ to the required width x height
• Choose the required ‘Speed’ (frame rate) and
‘Exposure Time’ (shutter)
• Set the ‘Post Trigger’ (trigger position) at the
begining, or the end, or some position within
the internal memory
Scroll up and down for desired setting. Tap once to
select parameter to change.
Perform CSR
Perform White Balance
(Color Cameras Only)
Press (3 seconds) the ‘Autoset’ button (front of
the camera) to perform an internal CSR (Current
Session Reference).
CSR should be performed after all
recording parameters have been set
Tap on ‘AWB’ (Automatic White Balance) icon
(upper right).
Place a white or neutral non-saturated object in the
center square and tap once.
via miro lc touchscreen
7
Chapter 2: Quick Start Guides

‘Arm’ Camera
Press the ‘Trigger’ button (front of camera) for
5 seconds to switch from ‘Pre-trigger’ or ‘Cine
Stored’ to ‘Waiting for Trigger’ (recording) mode.
Trigger
Edit Cine
Save to CineFlash
Verify Save to CineFlash
(optional)
Tap the ‘T’ (Trigger) icon (right-side) or Press the
‘Trigger’ button (front of camera).
Tap the play icon in the ‘Cine Stored’ screen.
Tap ‘Forward’ or ‘Reverse’ icons to play RAM cine
(multiple times to speed up playback).
Tap ‘Pause’ icon to stop playback.
Locate the first image to be saved and select ‘MarkIn’ icon.
Locate the last image to be saved and tap the ‘the
Mark-Out’ icon.
Review the edited Cine.
Apply a long press over the Mark-In
and/or Mark-Out icons to reset Cine file
start/end points respectively
‘Save’ marked frames to Phantom CineFlash.
Tap the ‘file management’ icon on the LCD menu,
and then tap on the ‘CF’ (CineFlash) icon to bring
up the CF menu. This will show the entire list of
files on the CineFlash drive. Ensure the last shot is
there by checking the time and file size.
8
Phantom Miro M & LC Series Camera Manual
Note that the files stored within the CineFlash can
not be played back on the LCD menu or over video.
They can however be viewed in Phantom PCC
software.

‘Re-Arm’ Camera
From the LCD menu, tap on the File Management
icon. The RAM Cine and status will be visible. Tap
on the RAM Cine and then tap the X to delete. Tap
the Record icon to start the camera in capture.
If there is an asterisk* next to the RAM
file that means it has not been saved to
the CineFlash.
Alternatively, a long press (5 seconds) on the front
camera trigger button will also delete the last RAM
Cine and put the camera back in Capture mode.
9
Chapter 2: Quick Start Guides

Prepare Your Computer
Camera controlling computers:
1. Must have either the Microsoft Windows NT,
Window XP Pro, VISTA Business Edition or
Windows 7 operating system installed
2. Firewalls must be turned off
(Contact your IT Group if necessary)
3. Using the ‘Windows Control Panel’ set the IP
address of your computer’s network card to
100.100.100.1 with a 255.255.0.0 subnet mask.
If camera is controlled by multiple computer’s
IP addresses must be unique (i.e., Comp. 1:
100.100.100.1, Comp. 2 100.100.100.2, etc.)
Install PCC Software
Prepare Camera
Install the latest version of Phantom Camera
Control (PCC) software from the accompanying CD
or USB key.
Mount camera onto suitable support.
Attach and adjust appropriate lens.
If necessary, connect the supplied ‘Capture’ cable
to the capture port on the camera. If an external
trigger is being used, connect it to the capture
cable’s ‘trigger’ BNC, or directly to the back of the
camera on the Miro 110, 310 or 120.
Power Up Camera
Connect the 12 - 28 VDC power supply to the
camera’s DC Input connector, then set the power
switch to the ‘ON’ position.
via pcc software
Connect the Camera to
the Computer
Insert Phantom CineFlash
Select Camera for Use
Attach the supplied Ethernet cable bewteen the
Phantom camera and the computer.
Insert a Phantom CineFlash, if available. For
detailed instruction see Chapter 5: Phantom
CineFlash & CineDock.
Start PCC application.
In the ‘Manager’ tab double mouse-click on the
Phantom camera to be used from the ‘Cameras’
group folder.
10
Phantom Miro M & LC Series Camera Manual

Set Recording Parameters
Click the ‘Live’ tab.
Click ‘Cine Settings’ and define following
parameters by either the selecting a value from the
pull-down selection list, or type the required value
into the respective data entry field:
1. Set ‘Resolution’ to the required width x height
2. Choose the required ‘Sample Rate’ and
‘Exposure Time’
3. Ensure the EDR, (Extreme Dynamic Range)
exposure time is set to zero (0).
4. Post Trigger to one (1) by:
a. Moving the ‘T’ (Trigger Position) slider to
the right, or
b. Enter zero (0) into the ‘Last’ data entry
field.
Perform CSR
Perform White Balance
(Color Cameras Only)
‘Arm’ Camera
Trigger
Click on the CSR button to perform a Current
Session Reference.
Move the cursor over a white or neutral nonsaturated object in the image and right mouse
click.
Click the White Balance command pop-up window,
or
Click anywhere, other than the pop-up window to
cancel.
Click the ‘Capture’ button to start recording to the
camera’s internal memory (circular buffer).
Click the ‘Trigger’ button at the bottom of the ‘Live’
panel, or
Provide a switch closure or an external trigger
signal (TTL pulse) via the Trigger connector, or
Press the Trigger button on front of camera.
11
Chapter 2: Quick Start Guides
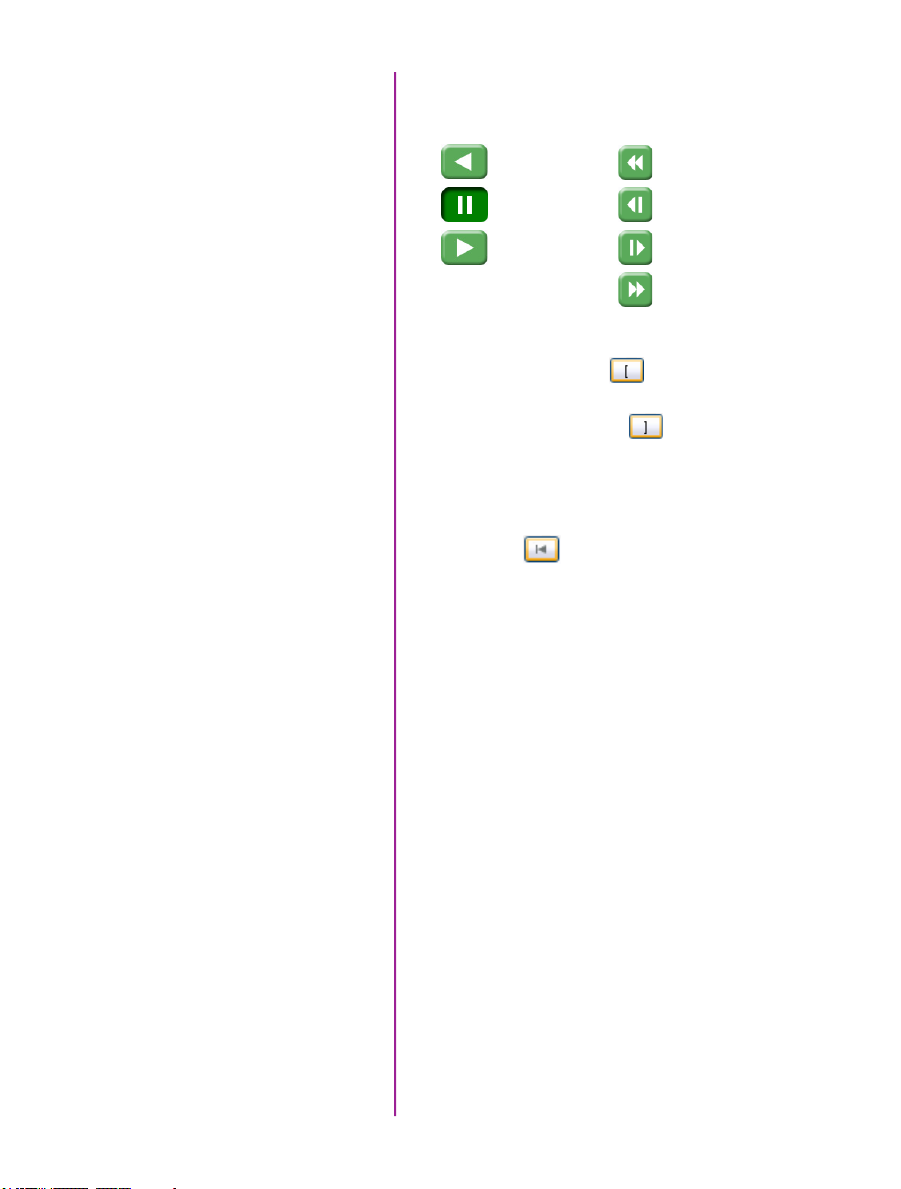
Edit Cine
Click the ‘Play’ tab.
Using the following ‘Video Control Buttons’
Review Edited Cine
Save to Computer
Rewind
Pause
Play
Locate the first image of the Cine to be saved and
click the ‘Mark-In button.
Locate the last image of the Cine to be saved and
click the ‘Mark-Out’ button.
Click ‘Play, Speed, & Options” and enable (check)
‘Limit to Range’.
Under the Video Control Buttons click the ‘Jump to
Start’ button.
Review the edited Cine using the Video Control
Buttons.
Click the ‘Save Cine...’ button at the bottom of the
‘Play’ panel
In the ‘Save Cine’ window:
1. Navigate to the folder where you want to save
the Cine file
2. Enter a file name for the Cine file in the ‘File
name:’ data entry field
3. From the ‘Save as type’ pull-down selection list
select the ‘Cine Raw, *.Cine’ file format
Fast Rewind
Rewind 1 Frame
Advance 1 Frame
Fast Forward
Or, Save to Phantom CineFlash
12
Phantom Miro M & LC Series Camera Manual
4. Click the Save button to begin downloading the
cine file from the camera to the computer’s hard
drive
Click the down-arrow of the ‘Save Cine... button
Select ‘Save RAM Cine to Flash’ (in popup window)
Click the Save button to save the cine file to
Phantrom CineFlash

Confirm Computer Save
(optional)
Click the ‘Open File’ button.
In the ‘Open Cine’ window:
1. Navigate to the folder containing the saved
Cine file.
2. Highlight the Cine file to be opened.
3. Click the Open button.
Using the Video Control Buttons review the saved
Cine file.
Confirm CineFlash Save
‘Re-Arm’ Camera
Click the ‘Manager’ tab.
Double-click on the ‘Cine F#’ file under the camera
used to record the cine.
Using the Video Control Buttons review the saved
Cine file.
After ensuring the Cine file has been saved:
via ‘Manager’ tab:
1. Highlight the recorded Cine file under the
selected Phantom camera, then
2. Click the ‘Remove From Tree’ button to
erase the Cine stored in the camera’s RAM.
3. Click the OK button when the “Delete all cines
from camera?” warning message appears.
via ‘Live’ tab:
1. Click on the Capture button (bottom of ‘Live’
tab), then
2. Click the OK button when the “Delete existing
RAM cines and proceed to new recording?”
warning message appears.
13
Chapter 2: Quick Start Guides

Connect Camera to
Remote Control Unit
Connect the the Remote cable between the RCU
unit and the Miro-RCU Y-cable
Connect the Miro-RCU Y-cable to the power
connector on the camera.
Connect the appropriate power supply to the MiroRCU Y-cable.
On the Miro M & LC320S with HD-SDI, connect a
BNC cable between the ‘video-in’ on the RCU and
the HD-SDI on the rear panel of the camera.
Power Up Camera
Power Up RCU
Insert Phantom CineFlash
Set Recording Parameters
Set the power switch to the ‘ON’ position.
Hold in the RCU ‘Menu’ button (2 seconds).
Insert a Phantom CineFlash, if available. For
detailed instruction see Chapter 5: Phantom
CineFlash & CineDock.
Gently depress the ‘Setup’ button, then the Acq,
(Acquisition), button.
Set the‘Aspect Ratio’: Press the down-arrow (right
of ‘Aspect Ratio’ field) and select an ‘Aspect Ratio’
from the pull-down selection list.
Define the Resolution, Frame Rate, Exposure, and
Post Trigger settings using the Numerical Keypad
to specify the desired setting.
To overwrite the present value:
1. Tap the entry field once, (turn entry field
yellow), then
2. Tap the key pad to enter the desired value.
3. Tap the Enter key to set the value.
To append the value:
1. Tap the entry field twice, (turns entry field
white), then
2. Tap the key pad to append the value.
3. Tap the Enter key to set the value.
via remote control unit
14
Phantom Miro M & LC Series Camera Manual

Press the Return, , icon (upper-left) to return
to the Setup Screen.
Perform CSR
Perform White Balance
(Color Cameras Only)
‘Arm’ Camera
Trigger
Edit Cine
Press the ‘Capture’ button.
Tap the CSR, (Current Session Reference), button
When prompted tap the Begin button.
Tap the ‘White Balance’ button.
Place a white or neutral non-saturated object in
front of the camera.
When prompted tap the Begin button.
Press the Rec, (Record), button.
Apply a trigger to the camera by depressing
the hardware Trigger’ button (on RCU), or apply
‘Trigger-In’ (TTL pulse) signal to the Trigger
connector on attached Capture cable.
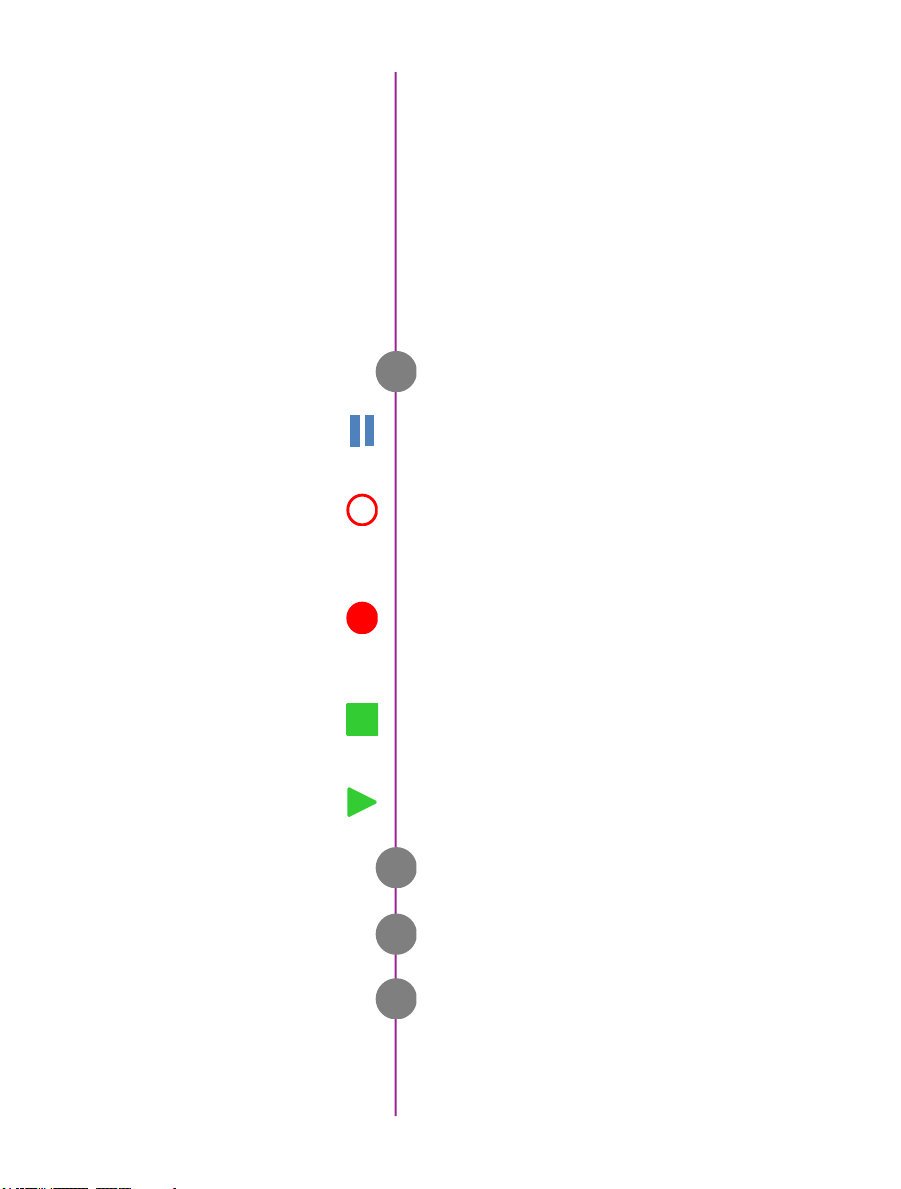
Click the Play button.
Locate the first / last image to be saved by:
Performing a Quick Search:
Rotate the Jog/Scroll dial until desired point in
Cine is achieved, or
Press and hold down on ‘Image Location
Identifier’ arrow, , located just below the
Cine Editor Bar and slide finger right to quickly
advance Cine, slide left to quickly rewind
(present image number is displayed above).
Using Video Control buttons:
Play
Reverse
Pause
Save to CineFlash
Click the Mark-In and Mark-Out buttons to
set the first / last images, respectively, of the Cine
to be saved.
Tap the ‘Save’ button to save the edited RAM Cine
file to the Phantom CineFlash.
15
Chapter 2: Quick Start Guides
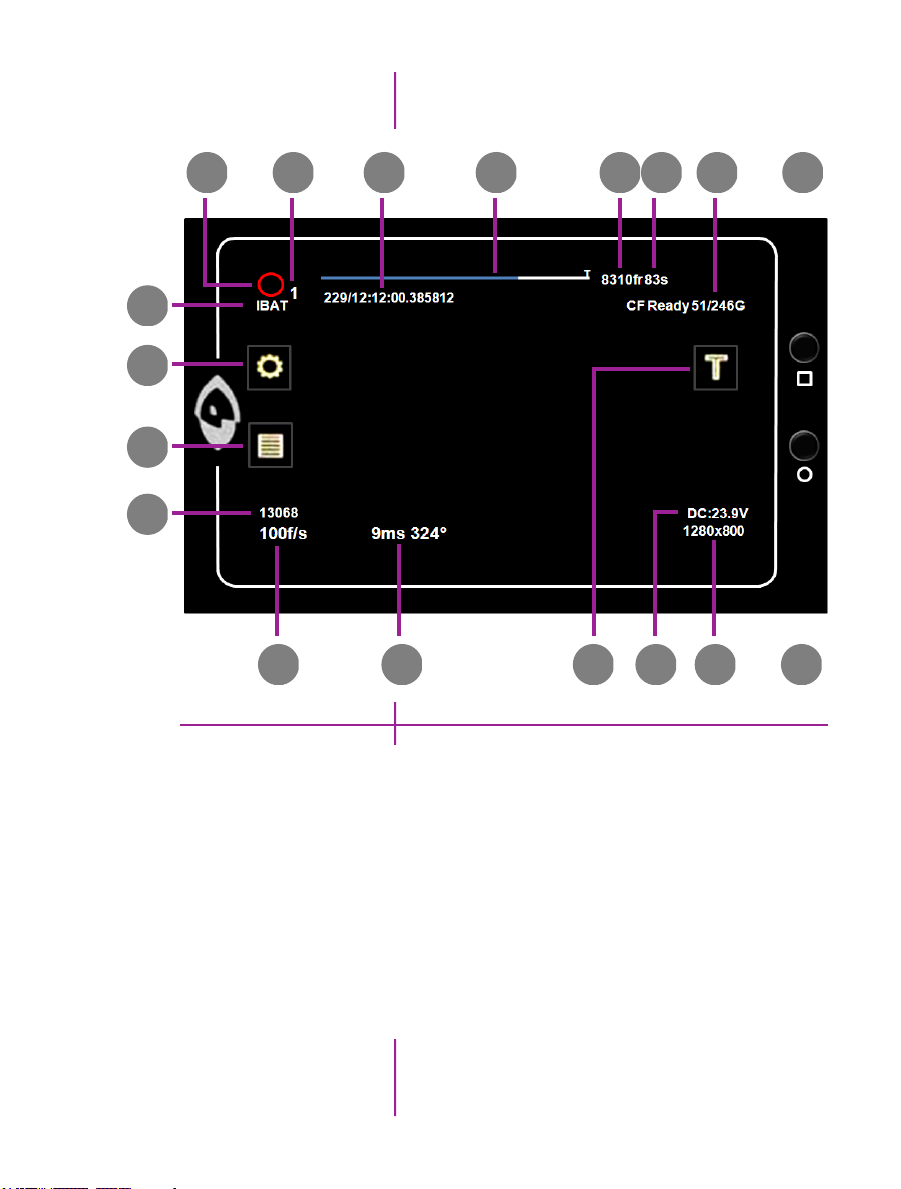
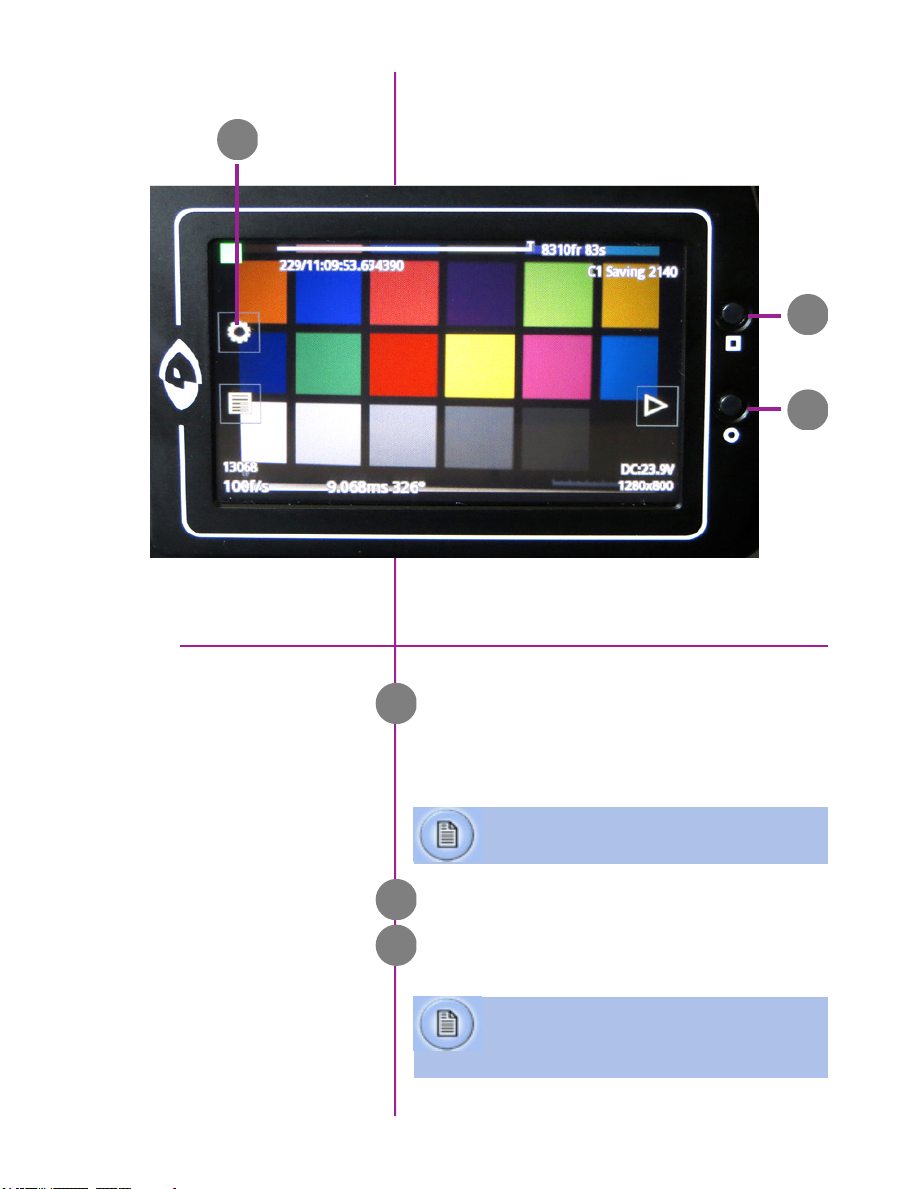
R
P
O
N
A
B C D E F Q H
A Camera State
B Cine # (for multi-Cine setups)
capture & Setting
C Time Stamp
D Internal Memory
E Number of Frames Available
F Record Time
G Trigger
H Menu Button
I OSD Button
16
Phantom Miro M & LC Series Camera Manual
G
J Resolution
K Voltage / Battery Life
L Exposure Time
M Speed
N Serial Number / Name
O Cine Management
P Menu
Q CineFlash Status
R IBAT Enabled
JKLM
I
Miro LC
3
Introduction
Camera State
Touchscreens
The LCD Touchscreen can be used both as a
viewfinder and for touch screen controls.
The display will flip vertically when positioned
upside down (such as mounted against the side of
a camera, facing outward).
The symbol and color will change based on the
A
state of the camera.
Live: camera is not recording to internal memory.
Displays a ‘Live’ image on the LCD and attached video
monitor.
Capture: camera is recording to internal memory
(RAM), and awaiting a trigger signal. Displays a ‘Live’
image on the LCD and attached video monitor.
Triggered: camera has been triggered, and is filling
internal memory (‘Post-Trigger’ frames). Displays a
‘Live’ image on the LCD and attached video monitor.
Cine Stored: recording has ended, and a Cine is stored
in internal memory. Displays a ‘Live’ image on the LCD
and attached video monitor.
Playback: camera is in PLAYBACK mode. RAM Cines
can be selected for playback.
Cine
Time Stamp
Internal Memory
Indicates the internal memory (RAM) partition the
Cine is being recorded into.
B
Indicates the day of the year/hour:minute:second:
microsecond.
C
This ‘time line’ represents all frames available
in the camera’s internal memory (RAM buffer /
circular buffer). The ‘T’ symbol above the time line
D
represents the user-defined trigger point.
Chapter 3: Miro LC Touchscreens
17
 Loading...