

VisionQuest LVQ-42EF1A, LVQ-46EF1A Quick Setup Manual
Align t he lowe r tabs of the ba ck cover t o the remo te
contro l and sna p the cov er into p lace.
Aline é las mue scas de l a tapa tra sera de l compa rtime ntó
de las ba tería s para cer rar el com part imien to.
Inser t two AAA s ize batt eries. M ake sure t o match th e (+)
and (-) e nds of batte ries wi th the (+ ) and (-) e nds ind icated
in the ba ttery c ompar tment .
Inser te dos ba tería s del tip o AAA. As egúres e de la
coloc ación d e los ext remos de c ada bat ería co incid e
con los s ímbol os (+) y (- ) que se in dican e n el
compa rtime ntó de la s bater ías
Pull th e tab of the back c over an d pull up o n the cove r
to open t he batt ery com partm ent of the rem ote con trol.
Pulse e n la tapa t rasera d el mand o a dista ncia pa ra abrir
el comp artim iento d e las bat erías.
St ep 3
St ep 2
Fol low the i nstru ction s below t o insta ll the TV s tand
Sui vez les i nstru ction s suiva ntes
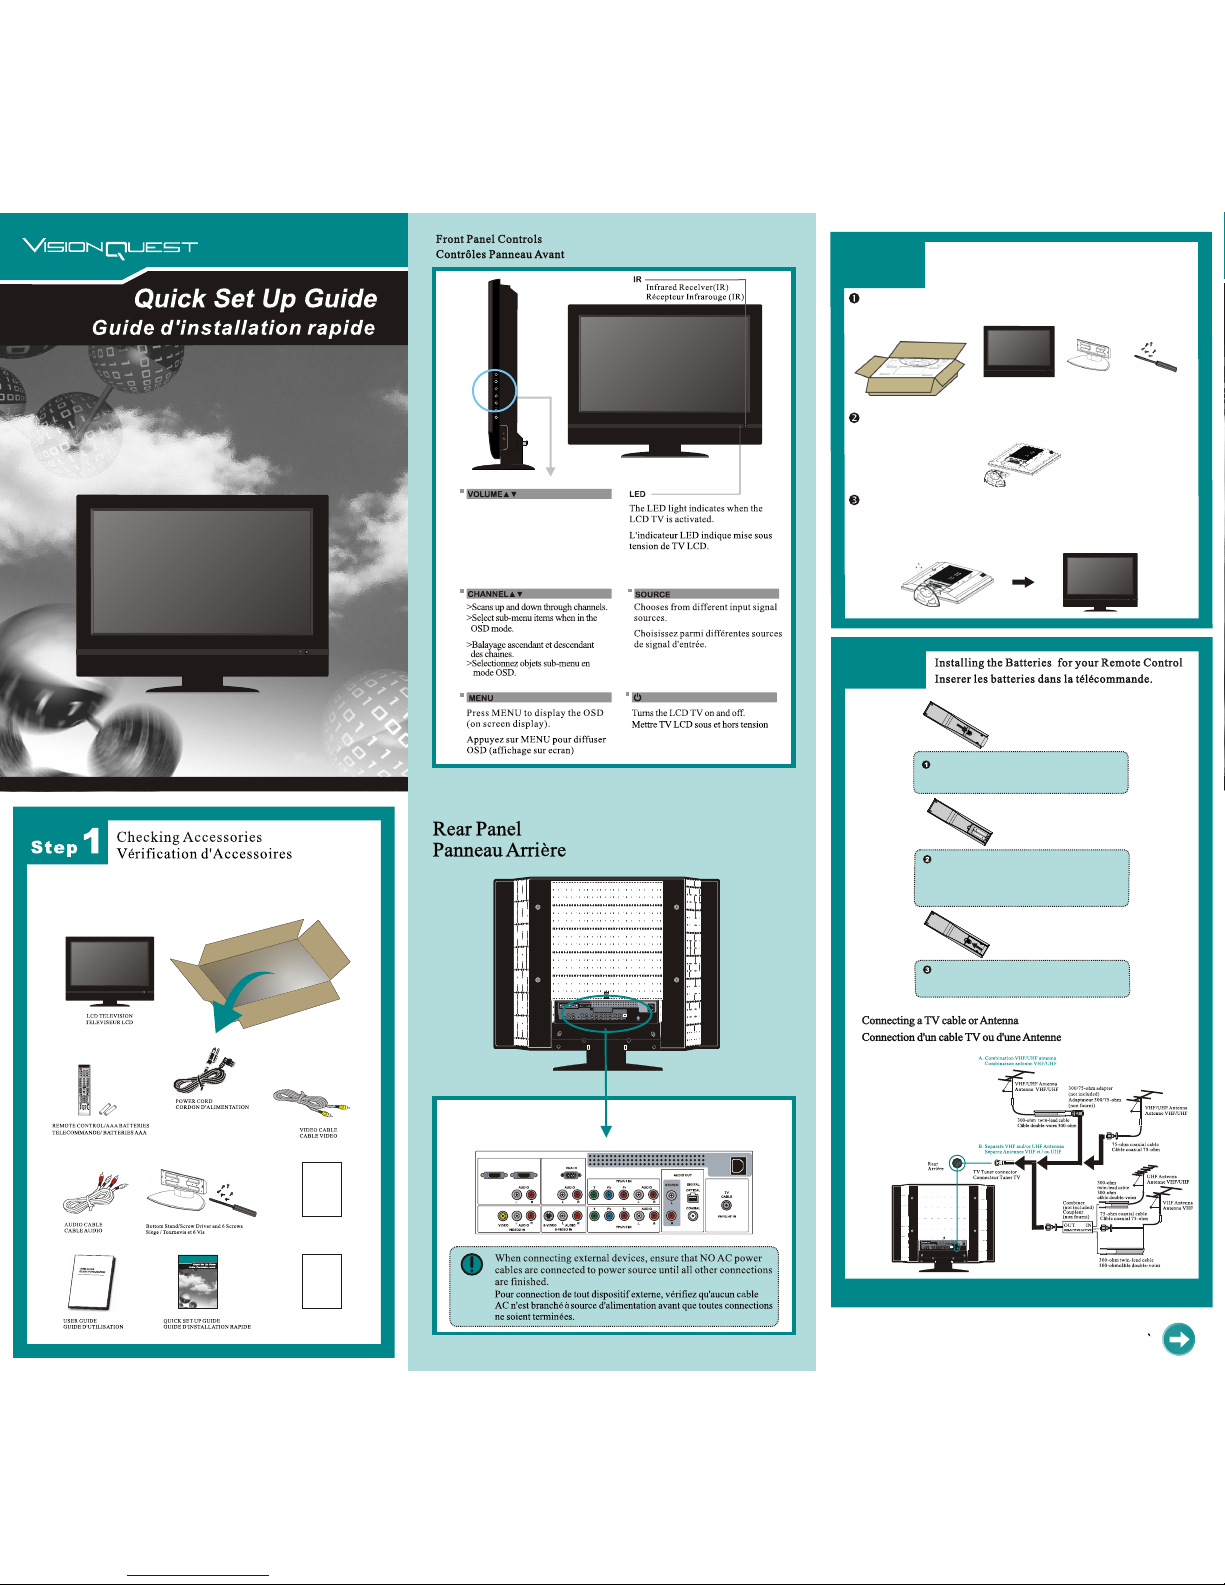
Open t he box, a nd make s ure all n ecess ary par ts are in t he box. The pac kage co ntain s:
Ouvr ez le car ton, et v érifie z que tou s les élé ments n écess aires s ont pré sents L es
élém ents em ballé s sont:
Cover an e ven stabl e surface wi th a soft cloth . Place the LC D TV unit face- down on the clo th.
Posez le T élévise ur écran cri stal sur sa fac e avant sur un ti ssu doux co uvrant une s urface
plane e t solide.
LCD TV
Télé viseu r écran c rista l
Stan d
Supp ort
Scre w Drive r and
6 Scre ws
Vis (6) /Tourne vis
Hold t he TV sta nd and pl ace it on t he six sc rew hol es on the b ack of th e unit as s hown.
the sc rewdr iver to t ighte n the six s crews
Use on the r ear of th e until t he scre w is firml y
fixed i n place .
Tenez le s uppor t TV et pla cez le da ns les si x trous d e vis au do s de l’un ité com me mont ré.
Serr ez les si x vis sol ideme nt à l’ar rière d u haut- parle ur avec t ourne vis.
>Adjusts the volume up and down.
>Changes settings for items and the
value for items when in the OSD mode.
>Reglage de volume son en montee et
baisse.
>Changement de configuration et valeur
pour objets en mode OSD.
WARRANTY C ARD
FICHE DE G ARANT IE
ATTENTIO N CARD
FICHE DE C ONSIG NE
HDMI 1 IN HDMI 2 IN
Continued/Continue
002- S00- VBVISIH

HDMI 1 IN HDMI 2 IN
HDMI 1 IN HDMI 2 IN
HDMI 1 IN HDMI 2 IN
MENUMENU SOURCESOURCE
CH.CH.
VOL.VOL.
CH.CH.
VOL.VOL.
INPUT SOU RCE:
TV(CA BLE/A IR)
HDTV( CABLE /AIR)
VIDEO 1(SID E)
VIDEO 2(REA R)
VIDE0 3(S-V IDEO)
VIDEO 4(YPb Pr1)
VIDEO 5(YPb Pr2)
VIDEO 6(HDM I1)
VIDEO 7(HDM I2)
COMPU TER(V GA)
MENUMENU SOURCESOURCE
CH.CH.
VOL.VOL.
CH.CH.
VOL.VOL.
St ep 6
St ep 7
St ep 8
St ep 4
Co nn ec ti ng External
De vi ce s
Sour ce
Game Co nsole
Conso le de Jeu
Con necti ng a VCR/ Conn ectio n à VCR
AUDI O Cable /Câb le AUDIO
S-VI DEO Cab le/C âble S- VIDEO
A/V C able/ Câble A/V
AUDIO C able/ Câble AUDIO
S-VI DEO Cab le/C âble S- VIDEO
AV Cable /Câb le A/V
Righ t Side
Côté D roit
Rear o f TV/L’ arrie re de Télé Rear o f TV/L’ arrie re de Télé
CAMER A
Con necti ng a DVD Pl ayer/ Conn ectio n à Lecte ur DVD
Rear o f TV/L’ arrie re de Télé
Câble C OMPOS ANT/A UDIO
AUDIO C able/ Câble AUD IO
S-VID EO Cabl e/Câ ble S-V IDEO
A/V Ca ble/ Câble A/V
Rear o f TV/L’ arrie re de Télé
Con necti ng a Digit al TV Ca ble Box o r Digit al Sate llite R eceiv er
Con necti on d’un B oîtie r Câble Té lé Numé rique o u d’un Ré cepte ur Sate llit e Numériq ue
Câble C OMPOS ANT/A UDIO
Satellite antenna cable
Câble antenne satellite
SATELL ITE REC EIVER
RECEP TEUR SAT ELLIT E
TV CABL E BOX
BOITI ER CABL E TELE
VCR
HDMI 1 IN HDMI 2 IN
 Loading...