

Vision Hi-Tech VC59SFHD2 Quick Installation Manual

*
QUICK INSTALLATION GUIDE
2 Megapixel FULL HD Box Camera
◆
Uncompressed high quality Full HD video with full frame rate
Full HD video transmission up to 100M
1920X1080 60p/50p/25p/30p, 1280X720 60p/50p/30p/25p
Enhanced WDR performance
Quick and easy OSD control
Diverse Video output for diverse applications
(HD-SDI & Composite)
2D/3D DNR (Digital Noise Reduction)
Defog function
Dynamic digital zoom and PIP
Pelco-C support (CVBS output with optional controller)
Privacy Masking (8 Polygon Area)
Supports 15 Languages
RS-485 Interface for external control of OSD
(Using controllers, etc.)
12VDC or 12VDC/24VAC
Special features
Dear Customers!
By selecting this product, you have decided to use a professional device that
guarantees highest quality and reliability. We would like to thank you very much
for your confidence and kindly ask you to read the following instructions carefully
before installation and operation in order to take full advantage of all quality
features regarding this product.
CAUTION
CAUTION
RISK OF ELECTRIC
SHOCK
DO NOT OPEN
TO REDUCE THE RISK OF ELECTRIC SHOCK,
DO NOT REMOVE THE COVER (OR BACK).
NO USER SERVICEABLE PARTS INSIDE.
REFER SERVICING TO QUALIFIED PERSONNEL.
The lighting flash with an arrowhead symbol, within an equilateral triangle
is intended to alert the user to the presence of non-insulated dangerous
voltage within the product’s enclosure that may be of sufficient magnitude
to constitute a risk of electric shock to persons.
The exclamation point within an equilateral triangle is intended to alert
the user to the presence of important operating and maintenance
(servicing) instructions in the literature accompanying the appliance.
INFORMATION
This equipment has been tested and found to comply with limits for a Class A digital
device, pursuant to part 15 of the FCC Rules. These limits are designed to provide
reasonable protection against harmful interference when the equipment is operated
in a commercial environment. This equipment generates, uses, and can radiate
radio frequency energy and, if not installed and used in accordance with the
instruction manual, may cause harmful interference to radio communications.
Operation of this equipment in a residential area is likely to cause harmful
interference in which case the user will be required to correct the interference at its
own expense.
WARNING
Changes or modifications not expressly approved by the manufacturer could void
the user’s authority to operate the equipment.
CAUTION – To prevent electric shock and risk of the fire hazards
Do NOT use power source other than that specified.
Do NOT expose this appliance to rain or moisture.
This installation should be made by a qualified service person and should conform to
all local codes.
1. Precautions
• Please read the manual carefully before the installation in order to
set up the camera correctly and to obtain the best picture quality.
• Please keep the manual in good condition for your future reference
and service application.
• Installation and services should be only carried out by an authorized
personnel according to local safety regulations.
• If any liquid or solid matter gets into the housing, immediately
disconnect the camera from power supply and have it checked by
your authorized dealer before reusing.
• Avoid installing the camera at extremely hot or cold places.
• Avoid installing the camera at a place of high humidity.
• Avoid installing the camera at the place exposed to gas or oil.
• If you are not a certified person, never try to dismantle the camera.
To avoid electric shock, never remove the screws or covers.
There are no parts inside that need maintenance by the user.
All maintenance should be carried out by qualified personnel.
• Keep the top glass of the lens always clean in order to obtain the
best picture quality all the time. Be careful not to be stained by
fingerprint.
• Don't face the camera directly toward sunlight or sunlight reflecting
area. Image Sensor may go defective at this condition.
• Please give a special attention to keep the unit from dangerous
drop or external shock during the process of transportation or
handling.
• Never try to touch the camera in wet hand. It may cause an electric
shock.
• Do not expose the camera to radioactivity. It causes a serious
damage on the Image Sensor.
2. Limitation of liability
This publication is provided “AS IS” without warranty of any kind, either express
or implied, including but not limited to, the implied warranties of merchantability,
fitness for any particular purpose, or non-infringement of the third party's right.
This publication could include technical inaccuracies or typographical errors.
Changes are added to the information herein, at any time, for the improvements
of this publication and/or the corresponding product(s).
3. Disclaimer of warranty
In no event shall seller be liable to any party or any person, except for
replacement or reasonable maintenance of the product, for the cases,
including but not limited to below:
(1) Any damage and loss, including without limitation, direct or indirect,
special, consequential or exemplary, arising out of or relating to the
product;
(2) Personal injury or any damage caused by inappropriate use or negligent
operation of the user;
(3) Unauthorized disassemble, repair or modification of the product by the
user;
(4) Inconvenience or any loss arising when images are not displayed, due to
any reason or cause including any failure or problem of the product;
(5) Any problem, consequential inconvenience, or loss or damage, arising
out of the system combined by the devices of third party.
(6) Any claim or action for damages, brought by any person or organization
being photogenic subject, due to violation of privacy with the result of that
surveillance-camera's picture, including saved data, for some reason,
becomes public or is used for the purpose other than surveillance.
Camera x 1
Auto Iris Lens Plug x 1
C-Mount Adaptor x 1
Installation
guide x 1
L-Wrench x 1
(Ø0.84)
QUICK INSTALL GUIDE
True Day / Night Box Camera
◆
Special features
Uncompressed high quality Full HD video with full frame rate
Full HD video transmission up to 100M
1920X1080 60p/50p/25p/30p, 1280X720 60p/50p/30p/25p
Enhanced WDR performance
Quick and easy OSD control
Diverse Video output for diverse applications.
(HD-SDI & Composite)
2D/3D DNR (Digital Noise Reduction)
Defog function
Dynamic digital zoom and PIP
Pelco-C support (CVBS output with optional controller)
Privacy Masking (8 Polygon Area)
Supports 15 Languages
RS-485 Interface for external control of OSD
(Using controllers, etc. )
12VDC or 12VDC/24VAC
4. Package
5.Name and function of each part
5‐1. Right side
Auto IRIS Lens Connector
5-2. Front / Bottom side
2- 1/4"-20UNC
2- 1/4"-20UNC
Fixture can be separated and attached on the bottom side as well.
lease use the supplied clamp screws only to change the position of
the bracket. Using screws more than 5mm depth can do a serious
damage to the inside of this camera.
* Use an international standard 1/4”-20 mounting screw to install the
camera.
Protection Cover
Take off the protection cover.
5.Name and function of each part
5-3. Rear side
12VDC
HD-SDICVBS
TRx TRx GND D/N
POWER
① OSD Control button.
② Power indicator LED Lamp is on when the power is being
supplied.
③ CVBS output (BNC Female)
Connect coaxial cable for composite video signal out.
④ HD-SDI output (BNC Female)
Connect coaxial cable for HD-SDI signal video signal out.
⑤ RS-485 Control port
You can control SETUP menu through this port by using external
controllers like a remote controller that RS-485 Communication is
supported.
⑥ Day & Night Out port
This unit can be synchronized by an External IR LED kit through
this port.
Low : Color(LED Off), High : B/W(LED On)
⑦ Power input terminal
Connect to the power source.
Polarity of the power is self-configured. (Non-polarity).
6. Installation
6-1. Lens
Lens is not supplied with the unit. C-Mount or CS-Mount type of lens
is useable. Please select a lens that has a good F-Stop number in
order to get the best picture quality. Use of DC auto iris lens is
recommended to achieve the best results for operating this product
effectively.
☞
Caution
Please make sure the surface of the lens be always clear. Clean dirt
or water drops with soft cloth in order to avoid the picture blooming
or reflection.
☞
Note
To get the best image quality, please use recommended lenses from
the manufacturer or camera supplier.
1. Please take off the sleeve outer cable of the lens by 10mm.
2. Please take off the sleeve inner cable of the lens by 2mm.
6-2. When using an auto iris lens (DC-drive)
①
②
③ ④
⑤
⑦
⑥
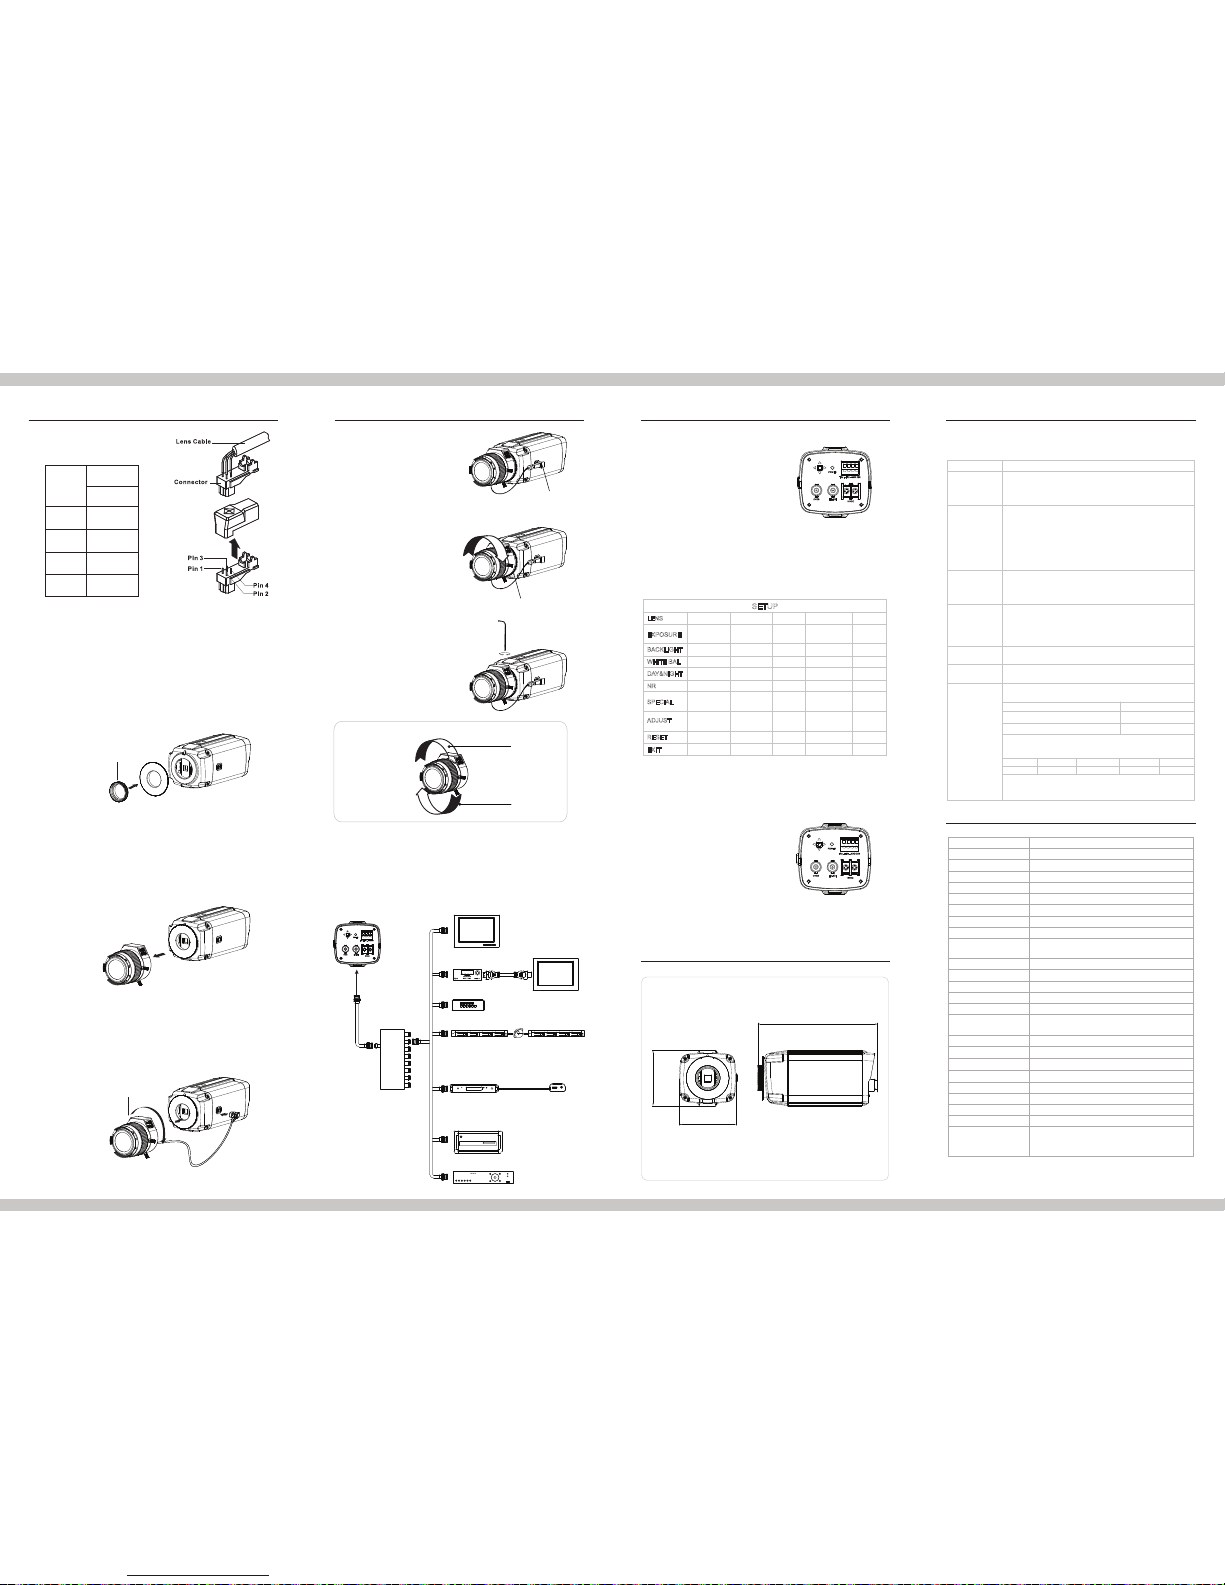
Pin No.
Lens
DC
No.1 Pin
Damping -
No.2 Pin
Damping +
No.3 Pin
Drive +
No.4 Pin
Drive -
Coaxial
5C-HFBT
Max. 100M
Network Server
(Decoder)
Network Server
(Encoder)
SDI-Monitor
Receiver
HD-Monitor
PC-DVR
4ch Digital Splitter
DVR
Stand Alone DVR
Optical Transmitter
Optical cable
Optical Receiver
40Km
Repeater
Coaxial
5C-HFBT
Max. 100M
LENS DC
SHUTTER
D-WDR
WDR
ATW
AUTO
2DNR
CAM TITLE
LANGUAGE
SHARPNESS
FRAMERATE
FACTORY
3DNR
D-EFFECT
DEFECT
MONITOR
VIDEO.OUT
LSC
RESOLUTION RETURN
RETURN
LEVEL
MOTION
RS485
AWC→SET
COLOR B/W
INDOOR OUTDOOR
SMART NR
PRIVACY
PELCO-C
RETURN
VERSION
RETURN
MANUAL
BLC HSBLC OFF
AGC
DEFOG
SENS-UP BRIGHTNESS RETURN
MANUAL
EXPOSURE
BACKLIGHT
WHITE BAL
DAY&NIGHT
NR
SPECIAL
ADJUST
RESET
EXIT
SETUP
6. Installation
3. Solder the wires on the pin-connector (iris-jack) supplied with
the lens according to the pin configuration as shown in the
drawing.
4. Assemble the lens.
5. Connect the Auto Iris jack.
· Please assemble C-Mount adaptor.
· C-Mount adaptor is included in the package.
· Fix the lens by turning it clockwise.
6-3. When using a C-mount Lens
C-Mount ADAPTOR
6-4. When using a CS-mount Lens
· Take off the Protection cover.
· Take off the C-MOUNT adaptor.
· Assemble the CS-MOUNT lens by turning it clockwise.
- When used with an Auto Iris lens, please insert the iris jack into the
Iris socket which is located on the right side of the camera.
- Please set the lens mode by using OSD Switch on the back of the
camera depending on the type of selected lens.
CS-Mount Lens
6. Installation
- Insert the iris jack into the
iris socket.
LENS Connector
- Control the Lens (CS-Mount)
to focus the Lens.
CS-Mount
- Fix the CS-Mount using the
L-Wrench.
L-Wrench
*
Lens adjustment
Tele-Wide
Near-Far
6-5. Application of HD-SDI output
Impedance alliance in the system connection.Make sure to
connect the cable with the power off. Please locate the
impedance switch of each equipment as instructed.
Locate the switch to Hi-z position for the interim equipments
Locate the switch to 75 for the last equipment.
6. Installation
6-6. Power
12VDC camera
Please make sure to use a UL / CE
approved and 12VDC / 450mA
regulated power supply.
12VDC / 24VAC Dual Power camera
(Option)
Please make sure to use a UL / CE
approved and 12VDC / 450mA, 24VAC / 220mA regulated power
supply.
6-7. OSD Manual for functions control
6-8. Setting up the menu
Settings can be made using the OSD Switch located on the back of
the camera.
1. Press the button to access the
SETUP mode. The SETUP menu
is displayed on the monitor.
2. Please select any function you wish
to activate by using the UP / DOWN
selections. The cursor can be moved
up or down by using the UP / DOWN
selections. Position the cursor to point to the function you wish to
operate.
7. Dimension (mm)
66
64
138.8
8. Troubleshooting
Before asking for repairs, refer to the following table. If the problem
persists, please contact the dealer or your service center.
Problems Troubleshooting
Nothing appears
on the screen.
· Please check that the power cord and line connection
between the camera and monitor are fixed properly.
· Please check that you have properly connected
VIDEO cable to the camera VIDEO output jack.
The dim image
on the screen.
· Is lens stained with dirt? Clean your lens with soft,clean
cloth.
· Set the monitor to proper condition.
· If the camera is exposed to too strong light, change
the camera position.
· Please check if the power supply is within the specification&
cables.(Due to the voltage drop with distance and gauges,
LED Will light poor)
· Adjust the contrast feature of the monitor.
· If there is an intermediate device,
set the 75Ω / Hi-Z properly.
(Please check the impedance)
· Please check if the power supply is regulated and is within
the standard requirement of the products.
· Please check the setting of White Balance setup.
· Please check if the camera is facing directly towards
sunlight or fluorescent light.
The dark image
on the screen.
The camera is
not working
properly, and
the body of the
camera is hot.
Color is not
correct.
The screen is
flickering.
RS-485
communication
fails.
· Please check the polarity between RS-485 Control
Port and RS-485 cable.
485 Control Board Connection Port
(+)CONNECTION TERMINAL(TRX+)
(-)CONNECTION TERMINAL(TRX-)
RS-485 Control Port
485+
485-
* RS-485 Communication establishment initial value.
· Please check if the RS-485 Communication establishment
initial value.
UART MODE RET PKTItem Camera ID BAUD RATE
Initial value
1 9600 8-NONE-1 ENABLE
· We recommend that you make ground connect between
camera and controller in order to maintain safety
communication control.
9. Specifications
Effective Pixels
Sensor Device Sony 1/2.8 inch 2.1MP Exmor CMOS Sensor
1952(H) x 1116(V) 2.18 Megapixel
1944(H) x 1104(V) 2.14 Megapixel
Progressive Scan
More than 1100 TVL
More than 52dB
0.2 Lux (AGC On)
1/30s Default,(Long Exposure Mode, ~1Sec)
Total Pixels
Horizontal
S/N Ratio
Min. Illumination
Video Output Format
Digital Output
Day & Night
Serial Port
AV Output
Power Source
Operating Current
Operating Humidity
Weight ( Approx.)
Effective Pixels
Shutter Speed
Video Output
1920 x 1080 60p / 50p / 30p / 25P,
1280 x 720 60p / 50P / 30p / 25p (Mode Select)
1.485G/s, 2.97G/s HD-SDI Output, 1Port CVBS
1V p-p Composite. 75 Ohms
SDI Output
True Day & Night with ICR
Pelco-C support analog video only
CS Mount Lens Option
(2.8 ~ 12mm & 5 ~ 50mm 2Mega Lens)
DC IRIS / Manual Lens Mode Select
DC12V(24VAC / 12VDC Dual Power Option)
170mA
-10°C ~ 50°C
-20°C ~ 60°C
(Humidity : 0%RH ~ 90%RH)
1500g
Video Mode / D&N / AWB / AE / Privacy Mask /
Flickerless / Brightness / Sharpness /
Mirror & Flip / DSS / DNR, etc.
MODEL 2 Megapixel FULL HD Box Camera
Scanning System
Lens
Measurement (mm)
Lens Control
Operating Temperature
Storage Temperature
OSD
specifications are subject to change without prior notice.
*
66(W) x 64(V) x 138.8(L)
140623-1SFHD2
 Loading...