

Page 1
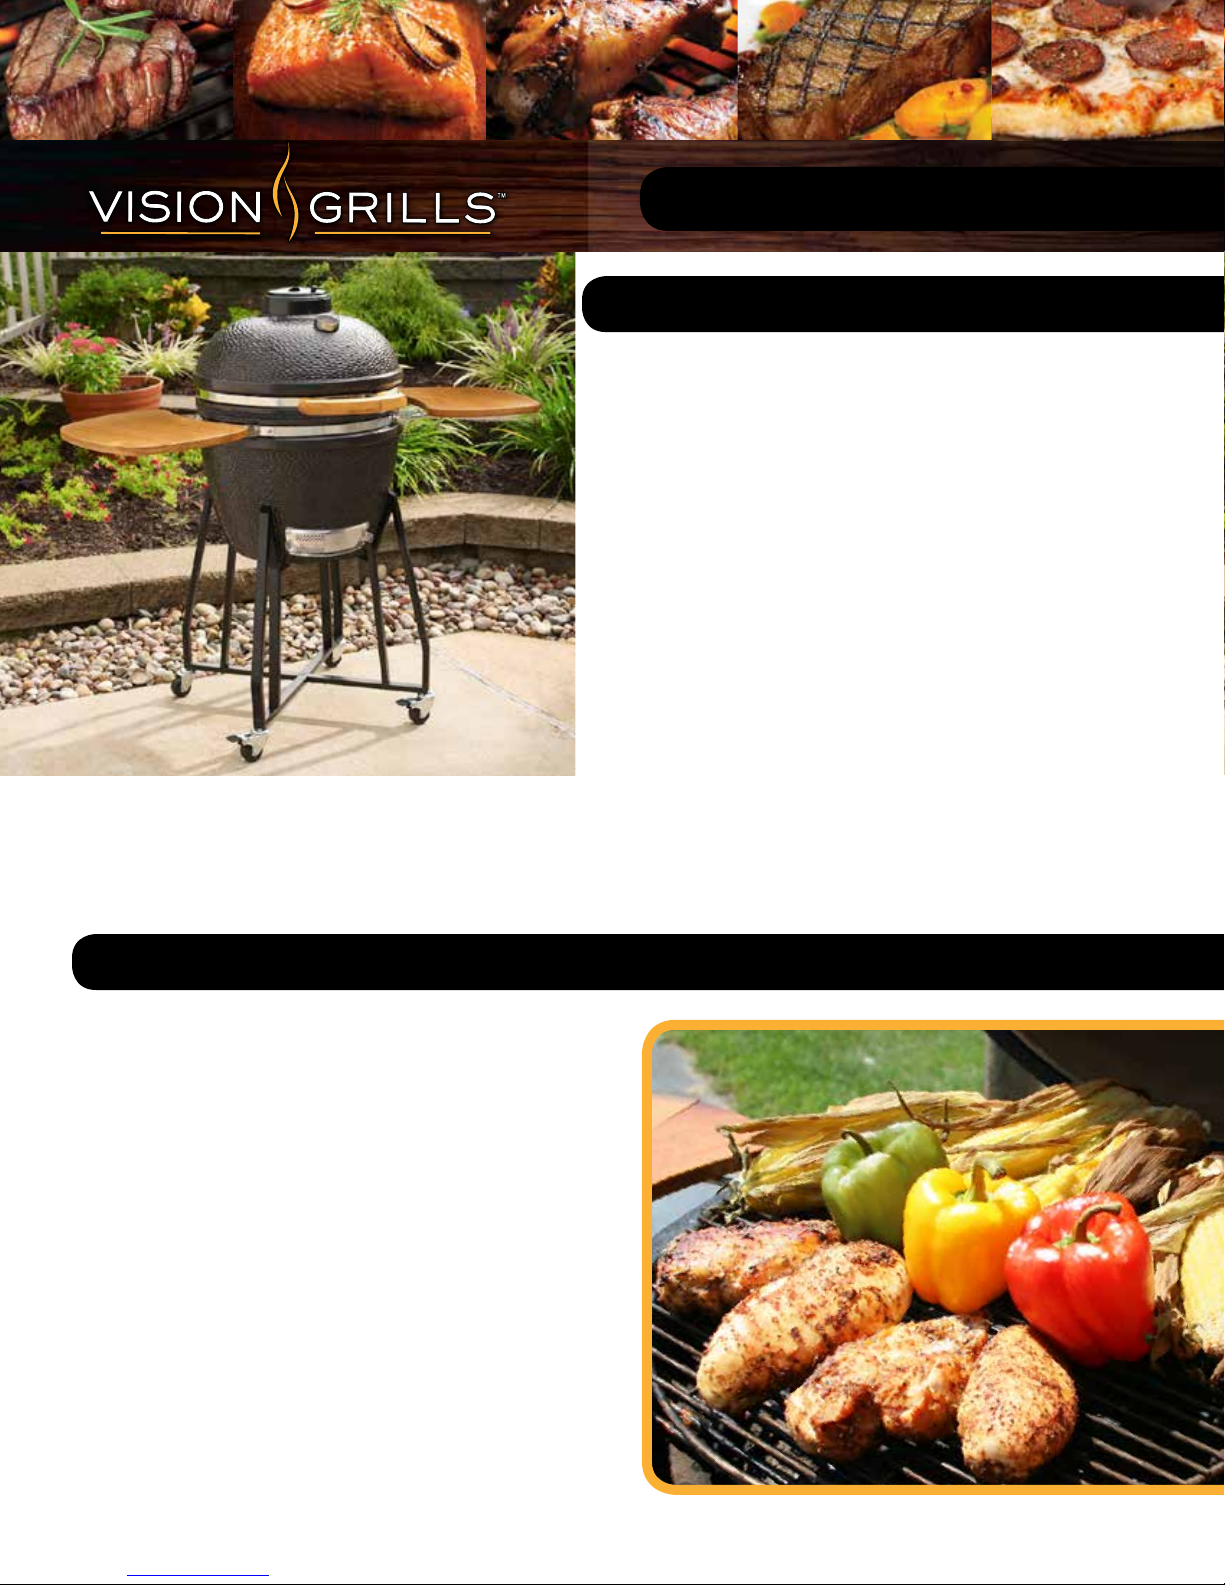
M-Series Kamado Grill
WELCOME
Our Vision Grills Kamado is based on 3,000+ years of clay
pot cooking from around the world. Over generations our
ancestors have continued to refine kamado techniques for
grilling, smoking, baking and cooking all types of meats,
poultry, fish and vegetables. Kamado cooking locks in
moisture and provides a variety of ways to infuse different
tastes into your foods that turns weekend grillers into
neighborhood chefs.
Our Vision Grills Kamado builds on this heritage with
fresh aesthetics, safety and convenience features, a user
friendly easy-lift lid with spring assist and high quality
materials to define a new industry standard for design
and innovation. The thick ceramic construction of our grill
provides superior thermal insulation allowing you to grill,
cook, bake or smoke regardless of the season, from the
hot summer days in our home town of St. Louis to the cold
snowy days in Ottawa Canada.
In this manual we provide the basics to get you cooking and invite you to our website, www.visiongrills.com,
where we share recipes, detailed Use & Care information and contact information if you need more help.
From our entire team here at Vision Grills, thanks for your purchase and welcome to becoming the destination
eatery in your neighborhood!
COOKING WITH YOUR KAMADO
Your new Vision Grills Kamado is the complete outdoor
cooking appliance that allows you to sear, grill, bake and
smoke all types of food. For best results, we recommend
using natural lump charcoal made from hardwoods.
Compared to briquettes, natural charcoals start faster,
burn cleaner and longer, reach higher temperatures and
produce less ash. Left-over natural charcoal also relights
for re-use. Before re-starting the grill, knock off excess
ashes to any remaining charcoal. Routinely empty ashes,
but only empty ashes when grill is cold.
Starting your Vision Kamado Grills is simple and fast:
Open grill lid, open top and bottom vents wide open, fill
the inner fire bowl with enough charcoal to just cover the
air holes, then light the charcoal using either an electric
starter or approved grill starters. After several coals are
burning, spread evenly, close lid, adjust top and bottom
vents, and wait for the Kamado to reach your desired
cooking temperature. As needed, add more charcoal
by using the flip grate feature, being careful not to burn
yourself with the hot food or cooking grate.
Page 2
SET-UP
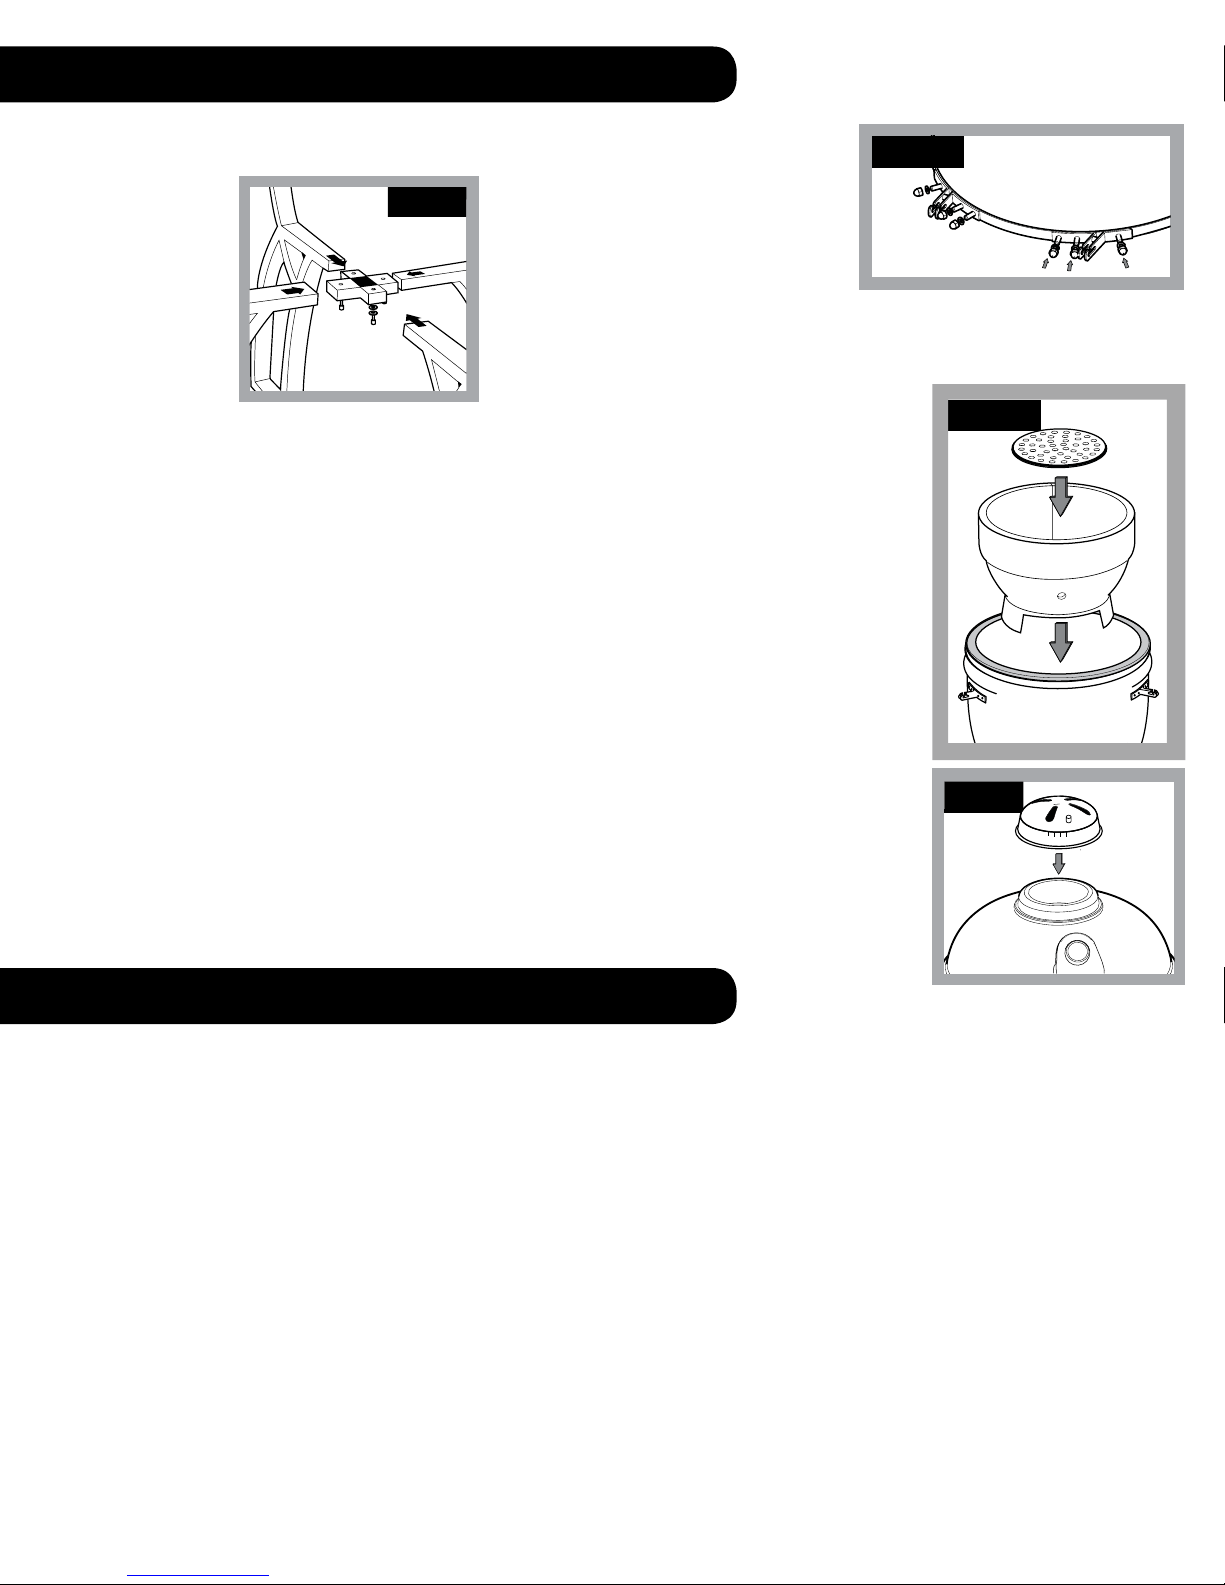
Step 1: Cart Assembly
• Remove bolts,
washers and
locking washers
from the two “X”
connectors.
• Remove paper
washers and begin
assembling the “X”
connectors and
legs.
• Please Note: Top & Bottom “X”
connectors must be assembled
simultaneously.
• Assemble cart by inserting the two “X”
connectors into leg ends and install bolts
and washers in the same order they were
removed from “X” connectors.
• While assembling, only finger-tighten
bolts to allow for adjustment in cart.
Otherwise it can be difficult to get all the
bolts inserted.
• Screw in Standard Rubber Wheels to
rear Cart Legs and the Locking Rubber
Wheels to the front Cart Legs.
• Tighten nuts using wrench provided.
• After cart is assembled, confirm all bolts
are tightened.
STEP 1STEP 1
STEP 1
Step 2: Shelf Brackets
• Remove nuts and washers from
bolts welded on the bottom banding
and remove paper washers.
• Mount shelf brackets over studs
with bracket slots facing up.
Brackets are stamped on the back with letters indicating their
position (e.g., LF=Left Front and RB=Right Back).
• Mount flat washer then acorn nut on each stud and tighten with
wrench provided.
STEP 2
STEP 3a
Step 3: Grill Assembly
• Take all parts out of grill before lifting. The
grill is heavy and will require two people to
lift and guide the Kamado into cart.
• Be sure the Ash Drawer is centered
between the two front legs and the grill is
resting against the two back legs.
• Lower fire bowl into grill with the ash
drawer opening lined up with the opening
in the main ceramic body. Place cast
iron charcoal grate with attached starter
pocket into fire bowl (Step 3a). Align tabs
of starter pocket with electric starter port in
fire bowl.
• Place cooking grates onto grill with hinged
section facing towards front of grill.
• Close lid and press top vent onto grill with
calibrations facing the front (Step 3b).
STEP 3b
0
3
1
2
PLEASE READ THE ENTIRE MANUAL BEFORE OPERATING YOUR
VISION KAMADO GRILL. PLEASE KEEP THIS MANUAL FOR FUTURE
REFERENCE.
ATTENTION! Use caution when cooking as grill surfaces get hot. To
avoid burns, always use protective gloves to adjust top and bottom
vents when grill is in use. Do not wear loose clothing near the grill.
For outdoor cooking use only. Do not operate grill indoors or in
an enclosed space. Use grill only in well ventilated areas. Keep
immediate area around the grill free from combustible materials.
Allow for at least 3 feet/1 metre of clearance around grill (house,
other outdoor products, hanging tree limbs, shrubs, etc.)
WARNING! Keep children and pets away from the grill at all times.
Do not allow children to operate grill. Never leave grill unattended
when in use.
Grill needs to be placed securely on a level base prior to use. Only
operate grill on a hard, stable level surface (concrete patio, ground,
etc.) capable of supporting the grill’s weight when loaded with food.
Never operate grill on wood support surface, wood deck or like
combustible support surfaces under any conditions. Never attempt to
move grill when in operation or cooling down. Never operate this grill
WARNING
within 25 feet/7.5 metres of any flammable liquid. Never operate
this grill within 10 feet/3 metres of a gas cylinder. The grill should not
be placed under combustible structures, such as garage, porch, patio,
or carport. Burning charcoal gives off carbon monoxide, which has no
odor and can cause death.
The use of alcohol, prescription or non-prescription drugs may impair
the operator’s ability to properly assemble or safely operate the grill.
Do not use on boats or recreational vehicles.
CAUTION: Never use lighter fluid, gasoline, or other volatiles to start
your charcoal, as is dangerous and they leave a residual taste in
your food. Use utmost care when adding charcoal to grill. Electric
start-up is recommended. Dispose of cooled ashes by placing
them in aluminum foil, soaking with water and discarding in a noncombustible container.
When cooking above 500º F/260º C, with both top and bottom vents
closed, rapidly opening the lid creates a sudden rush of oxygen into
the grill which can cause a flare-up of flames. When in this cooking
mode, we recommend that, prior to opening the lid, you open both top
and bottom vents to allow oxygen to stabilize inside the grill before
opening, minimizing the possibility of flare-ups.
Page 3
1
0
3
1
2
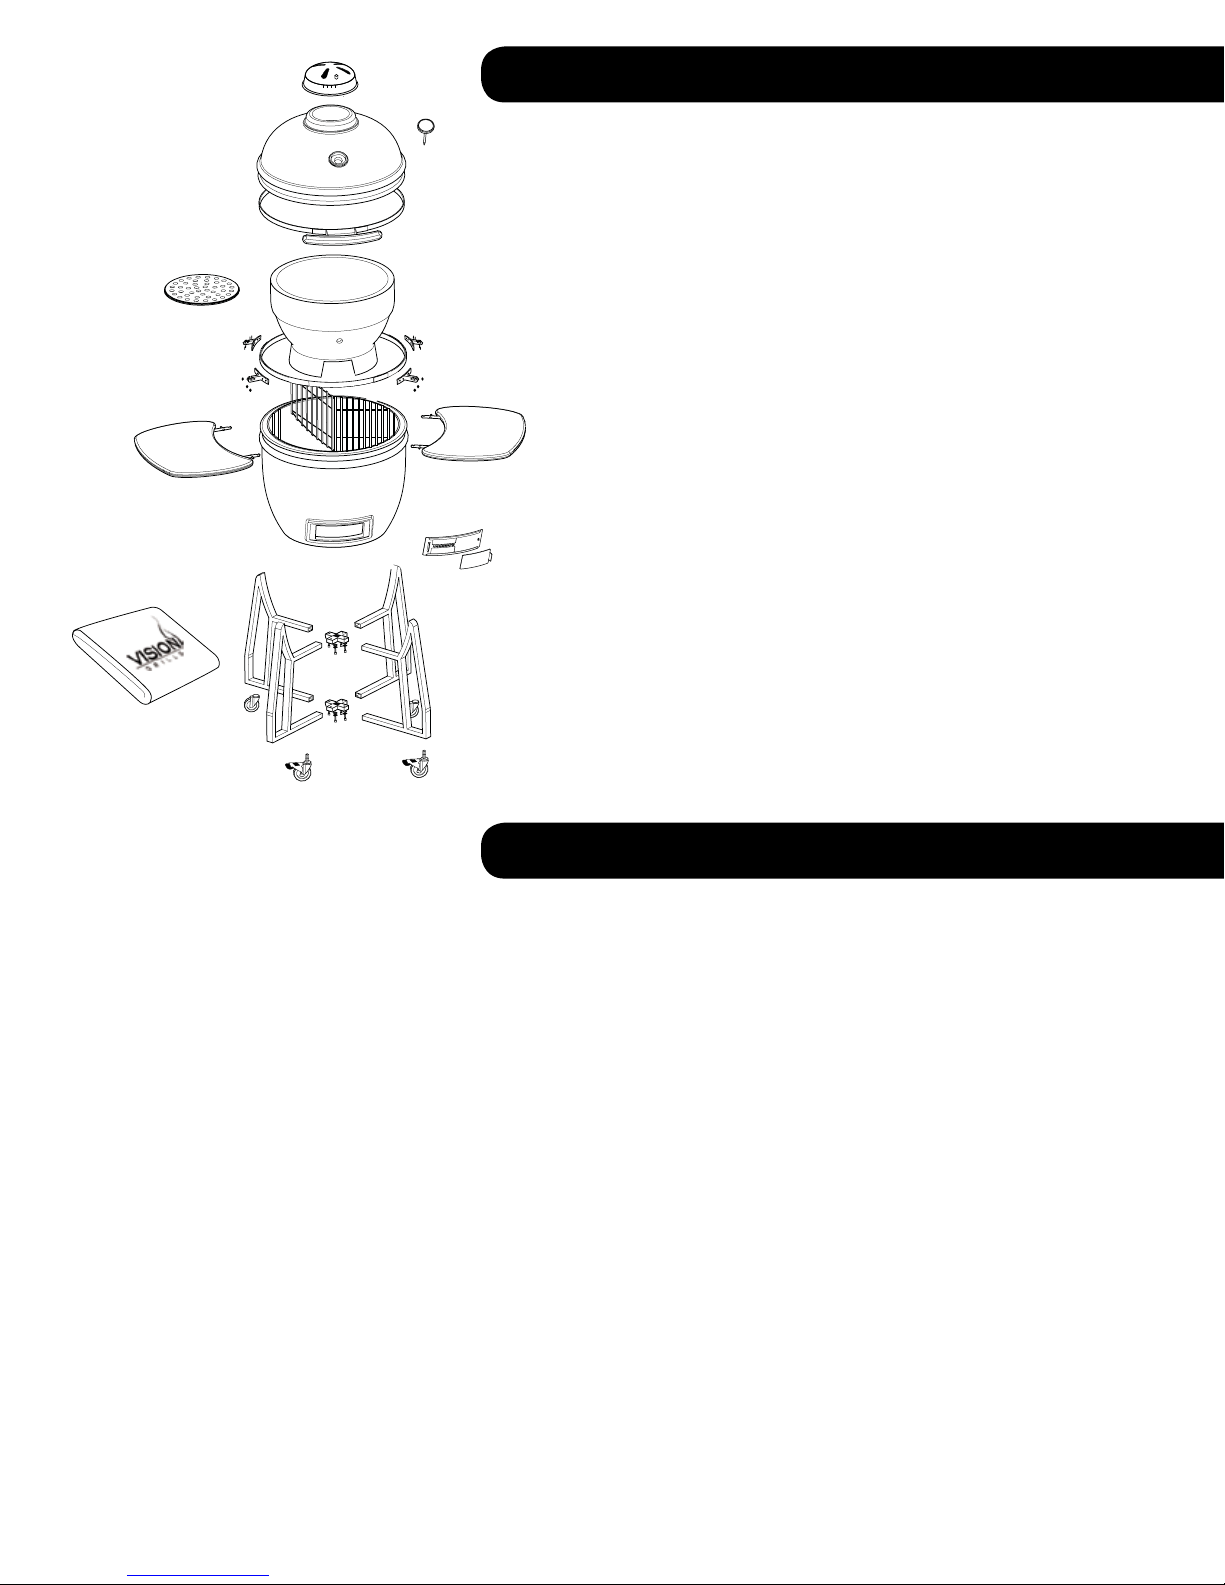
PARTS
18
11
3
4
5
5.2
5.1
15
6
16
9
17
9
14
2
12
7
5.4
5.3
13
6
8
19
9
10
10
14
9
18
PART NAMES PART NUMBERS
1 Cast Aluminum Top Vent
2 Ceramic Dome Top
3 Top Ring Assembly
4 Fire Bowl
5 Bottom Ring Assembly
5.1 Right Front Side Shelf Bracket
5.2 Right Back Side Shelf Bracket
5.3 Left Front Side Shelf Bracket
5.4 Left Back Side Shelf Bracket
6 Wood Shelves (x2)
7 Charcoal Grate
8 Ceramic Dome Bottom
9 Tubular Legs (x4) Straight
10 X Leg Connector and Washers (x2)
11 Thermometer
12 Handle
13 Cooking Grid
14 Rubber Wheels (x2) Small
15 Felt Gasket
16 Bottom Draft Door Frame
17 Bottom Draft Door
18 Locking Rubber Wheels (X2) small
19 Grill Cover
VGKPM-F CA1
VGKPM CD-TCD1
VGKPM RA-B1
VGKPM FB-1
VGKPM RA-B2
VGKPM SB-RF
VGKPM SB-RB
VGKPM SB-LF
VGKPM SB-LB
VGKPM SVL-R/L
VGKPM CG-1
VGKPM TV-F SS2
VGKPM LEG-4
VGKPM LEG-X
VGKPM TMT-1
VGKPM HDL-1
VGKPM CGD-1
VGKPM WHL-2
VGKPM-FLT-1
KSS BD-1
KSS BD-2
VGKPM WHL-L2
VGC GC-M
WARRANTY
Subject to the following terms and conditions, Phase 2, LLC, d/b/a Vision Grills
(“Vision Grills”) warrants to the original purchaser that the ceramic cooker
manufactured or supplied by Vision Grills will be free from defects in material and
workmanship under normal use for the following periods from the original date of
purchase: limited lifetime for all ceramic parts, five (5) years for all metal parts,
one (1) year for temperature gauge, gasket and cover, 90-days for side shelves.
This Limited Lifetime Warranty is contingent upon purchaser registering the
product at www.visiongrills.com/register within 30 days from the date of purchase
along with a copy of the original dated sales receipt which can be attached in
an electronic format (i.e. scan, photograph, etc.) to your registration at www.
visiongrills.com/register. Failure to do so will invalidate the warranty. Any chips or
cracks in the finish of the ceramic cooker present at the time of purchase must
be noted on the original dated sales receipt. This Warranty is not transferable to
subsequent owners. If you cannot register online it will be necessary to contact
Vision Grills customer service at (877) 917-4273 or email [email protected].
If any product covered by this Warranty is defective due to a covered warranty
condition, such product will, at the option of Vision Grills, be repaired to its original
condition or replaced with a comparable new product or part. The repair and/or
replacement of parts shall constitute the extent of the liability and obligations of
Vision Grills under this Warranty. Purchaser is required to provide photographic
evidence to assess the damage when submitting claim.
Scratches, cracks, chips, dents, crazing, or minor cosmetic blemishes of the
exterior glaze not affecting performance are not covered under warranty, as
determined by Vision Grills.
This Warranty does not cover damages caused by improper assembly, improper
care, failure to follow directions of use, misuse, abuse, negligence, extreme
environmental conditions, normal wear and tear, accidents, acts of nature, or
unauthorized repair, alteration or modification, as determined by Vision Grills. This
Warranty does not apply to chips or cracks in the ceramic cooker which may occur
after the ceramic cooker is purchased by the original purchaser. Vision Grills is
not liable for any default or delay in its performance under this Warranty that is
caused by any circumstances beyond its control. This Warranty will be invalidated
if any liquids, including starter lighter fluid, are poured on or in the ceramic
cooker. The protective coating of the ceramic cooker can be compromised by
substances or conditions that are beyond Vision Grills’ control. While Vision Grills
uses rust-resistant materials, the Warranty as to metal parts does not cover rust or
oxidation unless the structural integrity of the ceramic cooker is compromised as
determined by Vision Grills.
This Warranty does not cover purchases with unauthorized resellers and/or third
parties. Warranty coverage is limited to products purchased at an authorized
reseller only.
Commercial use and related applications are not covered under this Warranty.
Warranty coverage is based on normal residential use and maintenance.
Vision Grills shall not be liable for any delay or default under this Warranty caused
by any event or contingency beyond Vision Grills control. This includes acts of
nature, fire, government restrictions or restraints, strikes, reduced supply of
materials or transportation delays.
THIS WARRANTY IS THE EXCLUSIVE WARRANTY OF VISION GRILLS. VISION
GRILLS EXPRESSLY DISCLAIMS ANY AND ALL OTHER WARRANTIES, EXPRESS OR
IMPLIED, INCLUDING WARRANTIES OF FITNESS, MERCHANTABILITY, OR FITNESS
FOR A PARTICULAR PURPOSE. THIS WARRANTY DOES NOT COVER, AND VISION
GRILLS IS NOT LIABLE FOR, ANY DAMAGES RELATING TO LOSS OF TIME, LOSS
OF USE OF EQUIPMENT, INCONVENIENCE, OR ANY INCIDENTAL, SPECIAL AND/OR
CONSEQUENTIAL DAMAGES. PURCHASER’S EXCLUSIVE REMEDY FOR BREACH OF
THIS WARRANTY SHALL BE LIMITED AS SPECIFIED HEREIN TO REPLACEMENT OR
REPAIR OF THE AFFECTED PRODUCT.
Some states do not allow limitations on how long an implied warranty lasts or
the exclusion or limitation of incidental or consequential damages, so the above
limitations and exclusions may not apply to you. This Warranty gives you specific
legal rights, and you may also have other rights which vary from state to state.
Vision Grills does not authorize any person or entity to assume any obligation
or liability on its behalf in connection with the sale and purchase of any of its
products. The purchase of any Vision Grills product from anyone other than Vision
Grills or an authorized dealer will void the Warranty associated with the product.
If you have a question regarding the identity of an authorized dealer, you should
contact Vision Grills before you purchase the product.
To submit a warranty claim, the original purchaser or authorized agent of the
original purchaser must contact Vision Grills at (877) 917-4273 or contact Vision
Grills via e-mail through the website at www.visiongrills.com or
[email protected].
Long-Term Maintenance
• Cover your grill when not in use to extend life and maintain appearance.
• When moving grill, always pull by the back hinge.
Page 4
SMOKING
GRILLING (350 - 450°F)
STARTING
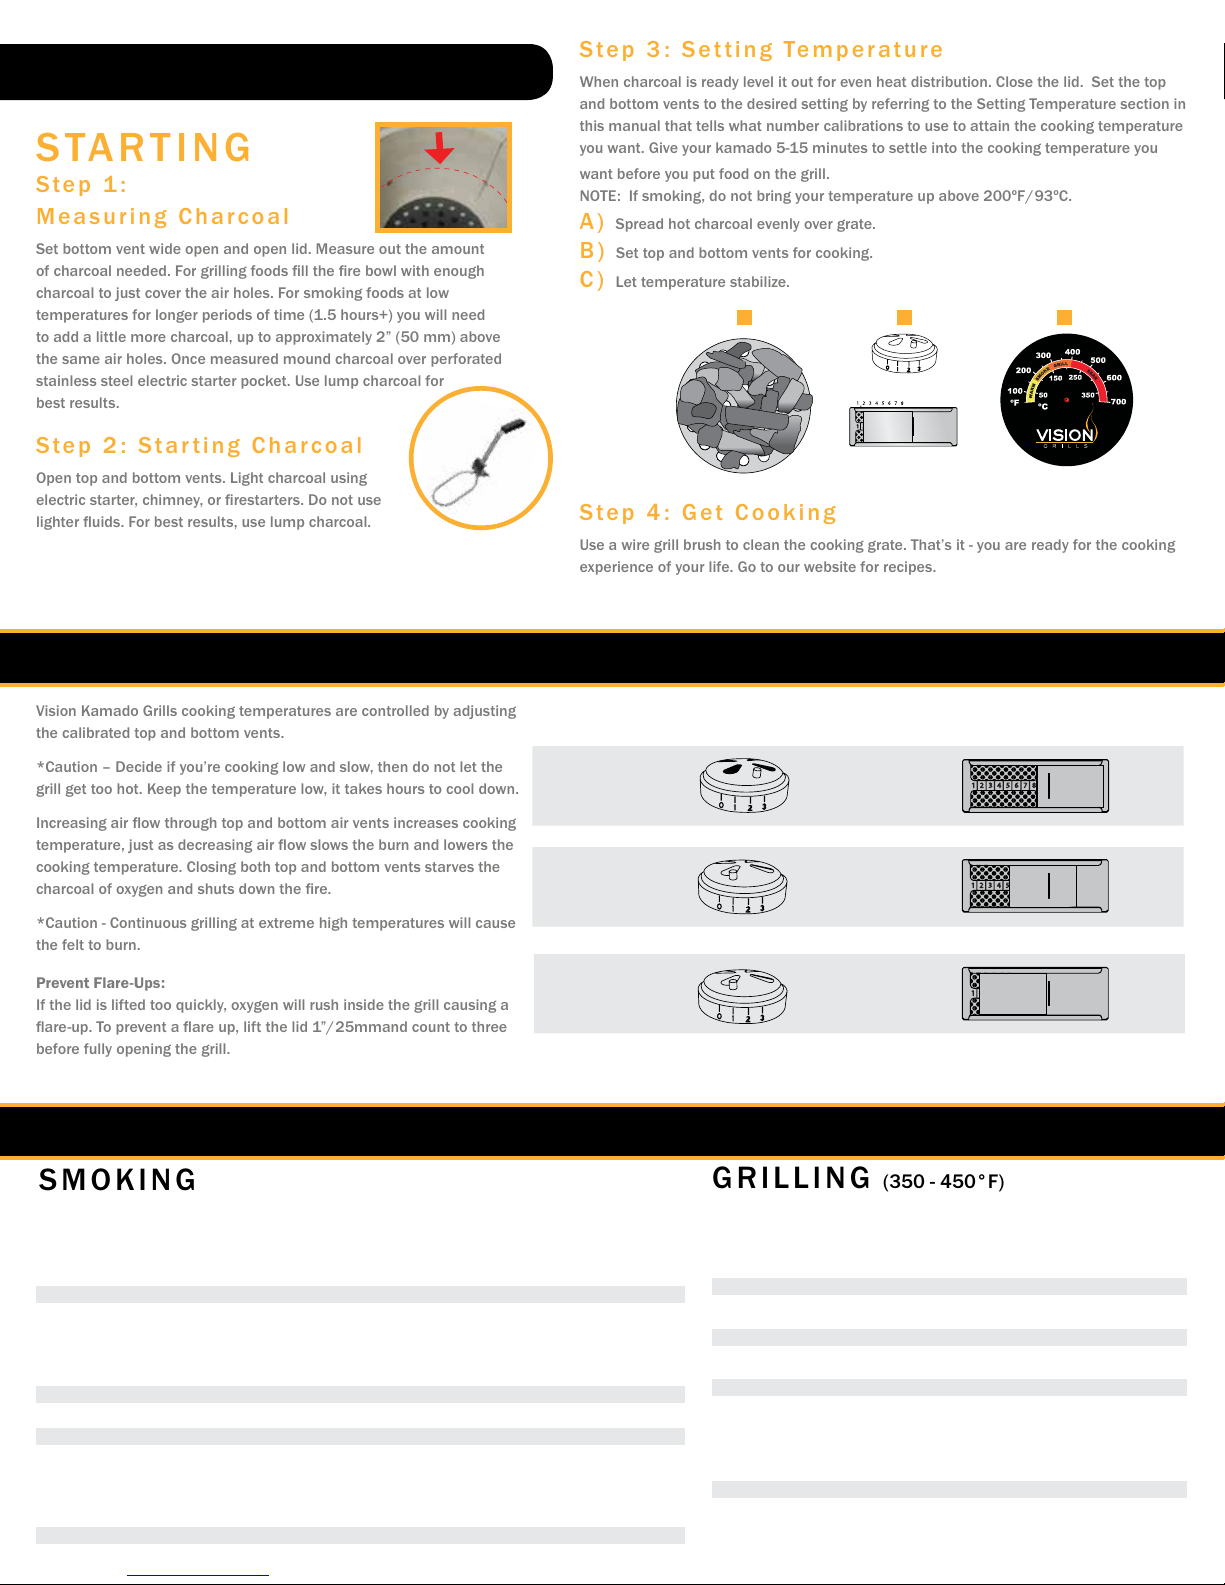
Step 1:
Measuring Charcoal
Set bottom vent wide open and open lid. Measure out the amount
of charcoal needed. For grilling foods fill the fire bowl with enough
charcoal to just cover the air holes. For smoking foods at low
temperatures for longer periods of time (1.5 hours+) you will need
to add a little more charcoal, up to approximately 2” (50 mm) above
the same air holes. Once measured mound charcoal over perforated
stainless steel electric starter pocket. Use lump charcoal for
best results.
Step 3: Setting Temperature
When charcoal is ready level it out for even heat distribution. Close the lid. Set the top
and bottom vents to the desired setting by referring to the Setting Temperature section in
this manual that tells what number calibrations to use to attain the cooking temperature
you want. Give your kamado 5-15 minutes to settle into the cooking temperature you
want before you put food on the grill.
NOTE: If smoking, do not bring your temperature up above 200ºF/93ºC.
A) Spread hot charcoal evenly over grate.
B) Set top and bottom vents for cooking.
C) Let temperature stabilize.
Step 2: Starting Charcoal
Open top and bottom vents. Light charcoal using
electric starter, chimney, or firestarters. Do not use
lighter fluids. For best results, use lump charcoal.
Step 4: Get Cooking
Use a wire grill brush to clean the cooking grate. That’s it - you are ready for the cooking
experience of your life. Go to our website for recipes.
STARTING
Vision Kamado Grills cooking temperatures are controlled by adjusting
the calibrated top and bottom vents.
*Caution – Decide if you’re cooking low and slow, then do not let the
grill get too hot. Keep the temperature low, it takes hours to cool down.
Increasing air flow through top and bottom air vents increases cooking
temperature, just as decreasing air flow slows the burn and lowers the
cooking temperature. Closing both top and bottom vents starves the
charcoal of oxygen and shuts down the fire.
*Caution - Continuous grilling at extreme high temperatures will cause
the felt to burn.
Prevent Flare-Ups:
If the lid is lifted too quickly, oxygen will rush inside the grill causing a
flare-up. To prevent a flare up, lift the lid 1”/25mmand count to three
before fully opening the grill.
Electric Starter
(Sold Seperately)
A B C
Top Vent
Bottom Vent
Control Knob
SETTING TEMPERATURE
SEARING
GRILLING
SMOKING
COOKING TEMPERATURE
Approximate
Cooking Time Smoker Temp (°F) Meat Temp. (°F)
BEEF
Brisket (8 - 12 lbs) 1.5 hours/lb 225 - 250 185 - 205
Short Ribs 5 hours 225 - 250 Pulls back from bones
Tenderloin (3 - 4 lbs) 1-4 hours 225 - 250 120 - 160
PORK
Baby Back Ribs
Shoulder / Butt (6 - 8 lbs) 1.5 hours/lb 225 - 250 170 - 205
Ham (Bone In) 1.5 hours/lb 225 - 250 160
Spare Ribs (2.5 - 3 lbs) 5 - 7 hours 225 - 250 Pulls back from bones
Tenderloin (1.5 - 2 lbs) 2.5 - 3 hours 225 - 250 160
POULTRY
Turkey
(Whole)
Chicken
(1.5 - 2.5 lbs)
15 - 20 min./lb 240 - 275 170
(Whole: 2.5 - 4.5 lbs) 2.
5 hours 225 - 250 Pulls back from bones
5 - 4 hours 250 - 275 170
All cooking times and temperatures are approximate.
Visit foodsafety.gov for additional information on safe minimum cooking temperatures.
TOP VENT BOTTOM VENT
500º+F
260º+C
300º– 450ºF
149º– 233ºC
225º– 250ºF
107º– 121ºC
Beef Temp (°F) Pork Temp (°F)
Rare 125 + 3 min. Rest ---------
Mediu m-Rare 130 - 135 145 + 3 min. Rest
Mediu m 135 - 140 150
Mediu m- Well 140 - 150 155
Well-Don e 155+ 160+
Ground 160
Poultry Temp (°F)
Dar k Meat 165 - 175
White Meat 165
Gro und 170 - 175
 Loading...