

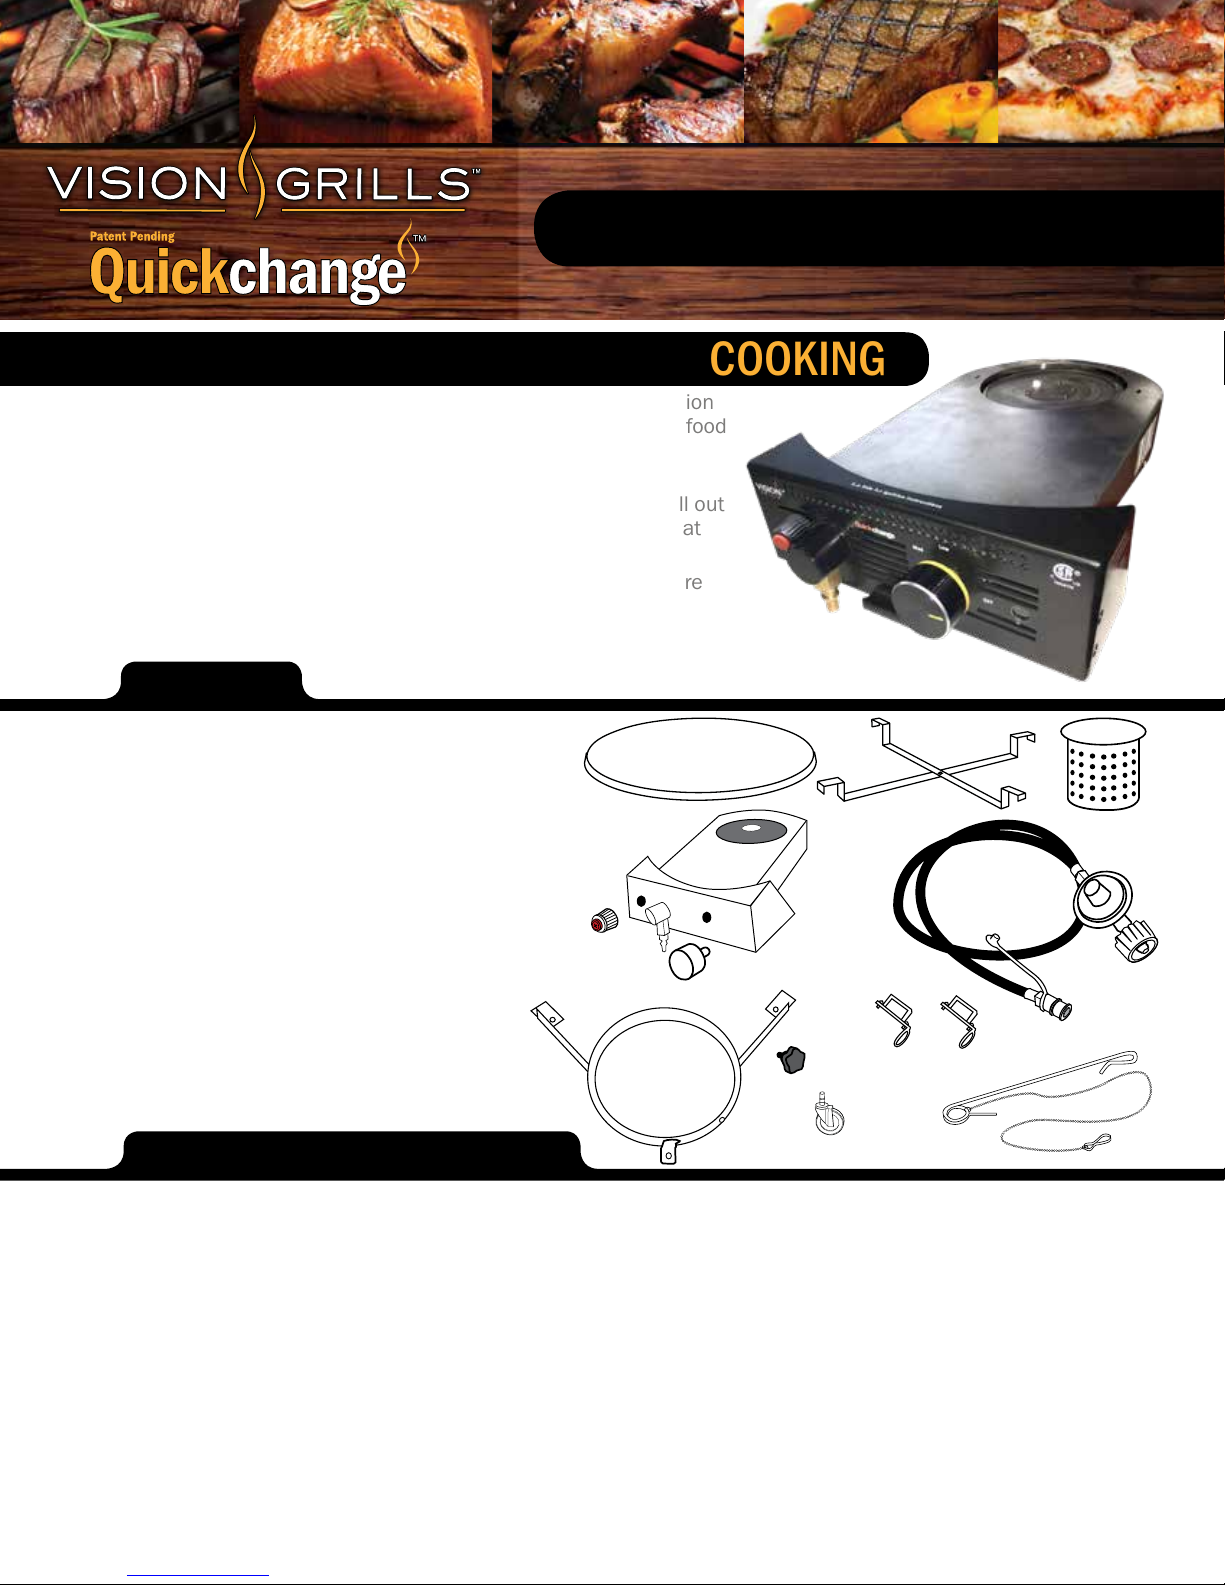
B-Series Kamado Gas Insert
WELCOME TO VERSATILE KAMADO COOKING
Your new Kamado Quickchange Gas Insert completes your existing Vision
Grills Kamado, allowing you to sear, grill, bake, and smoke all types of food
with your choice of Charcoal or Gas.
For those times you want to quickly prepare a meal without the use of
charcoal, you have the Quickchange Gas Insert to help you. Simply pull out
the removable Ash Drawer and slide in the Gas Insert, position the Heat
Exchanger, and fire it up!
Welcome to the newest innovation for versatile Kamado cooking! Before
beginning, make sure to read the following Manual completely for
instructions on operating with GAS.
PARTS
Patent Pending
PART NAMES PART NUMBERS
1 Lava Stone
2 Stainless Steel Stone Bracket
3 Infrared Heat Exchanger
4 Gas Grill Burner Insert
4.1 Gas Grill Burner Insert Knob
4.2 Ignition Button Cap
5 Gas Supply Line w/ Regulator
6 Gas Tank Caddy
6.1 Gas Tank Caddy Knob
6.2 Gas Tank Caddy Rubber Wheel
7 Gas Supply Hose Bracket (x2)
8 Match Ignition Tool
VGK-101R
VGK-BRACKET
VGC-GPIHE
VGC-GPBI-B
VGC-GPBIK
VGC-GPIBC
VGC-GPSLR
VGC-GPTC-SS
VGC-GPTCK
VGC-GPCWHL
VGC-GPGSLC-2
VGC-MIT
1
4
4.2
4.1
6.1
6
6.2
2
3
5
7
8
SAFETY INFORMATION
PLEASE READ THE ENTIRE MANUAL BEFORE OPERATING YOUR VISION GRILLS KAMADO GRILL. PLEASE KEEP THIS MANUAL FOR FUTURE REFERENCE.
ATTENTION! Use caution when cooking as grill surfaces get hot. To avoid burns, always use protective gloves to adjust top and bottom vents when grill is in use. Do not
wear loose clothing near the grill.
ATTENTION! This barbecue will become very hot; do not move it during operation. For outdoor cooking use only. Do not operate grill indoors or in an enclosed space. Use
grill only in well ventilated area around the grill, free from combustible materials. Allow for at least 3 feet/1 meter of clearance around grill (house, other outdoor products,
hanging tree limbs, shrubs, etc.).
WARNING! Keep children and pets away from the grill at all times. Do not allow children to operate grill. Never leave grill unattended when in use.
Grill needs to be placed securely on a level base prior to use. Only operate grill on a hard, stable level surface (concrete patio, ground, etc.) capable of supporting the
grill’s weight when loaded with food. Never operate grill on wood support surface, wood deck or similar combustible support surfaces under any conditions. Never attempt
to move grill when it is in operation or cooling down. Never operate this grill within 25 feet/7.5 meters of any ammable liquid. Never operate this grill within 10 feet/3
meters of a gas cylinder. The grill should not be placed under combustible structures, such as garage, porch, patio, or carport. Burning charcoal or propane gives off carbon
monoxide, which has no odor and can cause death.
The use of alcohol, prescription or non-prescription drugs may impair the operator’s ability to properly assemble or safely operate the grill. Do not use on boats or
recreational vehicles.
CAUTION: Never use lighter uid, gasoline, or other volatiles to start your charcoal, as they are dangerous and leave a residual taste in your food. Use only relighters
complying to EN 1860-3. Use utmost care when adding charcoal to grill. Electric start-up is recommended. Dispose of cooled ashes by placing them in aluminum foil,
soaking with water and discarding in a non-combustible container.
When operating with gas, top vent MUST be open at all times, see instructions.
Always wait for grill to completely cool before opening built-in ash drawer.
When charcoal cooking above 500º F/260º C, with both top and bottom vents closed, rapidly opening the lid creates a sudden rush of oxygen into the grill,
which can cause a flare-up of flames. When in this cooking mode, we recommend that, prior to opening the lid, you open both top and bottom vents to allow
oxygen to stabilize inside the grill, minimizing the possibility of flare-ups.
SET UP
Step 1: Install Gas Caddy to Grill Cart
• Place the Gas Tank Caddy between
the rear legs of the grill cart (Step 1a).
• Fasten mounting brackets to cart
by removing nut and bolt from each
bracket, separating the top bracket
piece from Gas Tank Caddy frame.
STEP 1b
• Slide Gas Tank Caddy under Cart, so top
bracket piece rests on cart frame and is
lined up with bolt hole on bottom of Gas
Tank Caddy.
• Reinsert bolt into frame and tighten
together with nut (Step 1b).
• Use the provided wrench to tighten all
connections.
Step 2: Attach Hose Brackets
STEP 2
• Attach the two hose brackets (used to hold
gas hose), with eyelets facing in, onto the
front and rear legs of cart (Step 2).
• Put the gas tank on the Gas Tank Caddy
and tighten into place using Gas Tank Caddy
knob (Step 3a).
Note: Do NOT allow the hose to touch the ceramic.
STEP 1a
Step 3: Install Gas Tank
• From rear of the grill, feed gas hose through
eyelets of the hose brackets, grill connector first.
Connect gas hose to the Gas Insert using the
Quick Disconnect fitting.
• Make sure the cylinder valve is closed (turn valve
clockwise until tight).
• Inspect valve connections, port, hose and
regulator assembly for any damage or debris.
Remove any debris.
• When connecting regulator
assembly to the valve, hand
tighten the quick coupling nut
clockwise to a complete stop
(Step 3b).
• After the gas hose is connected to
the gas tank and Gas Insert, open
valve on gas tanks and perform
some type of leak test* method to
STEP 3b
test the connection.
Step 4: Install Battery
• Remove Ignition Button Cap by turning
counter clockwise. Insert AA battery (not
included) negative end first.
• Replace Ignition Button Cap by tightening
clockwise.
• Press Red Ignition Button and hold in
to test battery. This will create spark
on burner that will start your grill.
(See STARTING SECTION for starting
operation).
STEP 4
STEP 3a
–
+
WARNING
WARNING: To avoid shock, do not touch spark on burner.
MAINTENANCE &
TROUBLESHOOTING
1) After grill has cooled, use a soft cloth to clean exterior of grill.
2) Clean the cooking grates before and after cooking.
Note: Remove surface dust and grease.
3) Infrared Heat-Exchanger should be clean prior to each use.
a) Check for debris in the heat exchanger.
b) If debris is present, please remove it with a stiff brush.
4) Clean Side Shelves with mild detergent.
5) When grill is cooled, use grill cover to prolong life of grill.
6) When the Gas Insert is not in use:
a) Ensure that the Control Knob is off.
b) Ensure that the valve on gas tank is turned to Closed position.
c) Ensure that there is not gas leakage from the gas hose.
7) Leak Detection Method.
a) Inspect valve connections, port and regulator assembly.
b) Look for any damage or debris. Remove debris.
c) Inspect hose for damage.
d) Turn gas cylinder knob clockwise to Open position.
e) Pour soapy water or Leak Test Solution (sold separately) at the
connection spot of the gas cylinder to check whether there is
gas leakage.
NOTE: Check whether bubbles appear. (If there are no bubbles, there is no air leakage; If
bubbles appear, there is gas leakage.)
f) Repeat Leak Test at the connection spot at the gas entrance of the gas insert to check
whether there is gas leakage.
g) If you can not solve your problem by the above steps, please contact Vision Grills
Customer Service at help@visiongrills.com or www.visiongrills.com.
8) If you are having trouble getting to “HIGH”, review step “7” of “STARTING.” Again, make
sure to push in the Control Knob and turn all the way to the left, until the tick mark is
horizontal. If encountering further issues, contact Customer Service.
Watch For Bubbles
Manual Ignition (Match Ignition) Method of Operation
1. Put match in the ignition tool as
shown.
2. Light match, insert inside the
front right opening as shown.
3. Slide match to the inside back
of the Gas Insert, reaching the
burner.
(Rear Side View shown)
4. Turn the knob to Low and press it
down until it is lit.
If ignition does not occur within 5
seconds, turn the Control Knob to OFF
position. Wait 5 minutes and repeat
the lighting procedure.
5. Light the gas and observe ame
within the Heat Exchanger.
1
2
3
4
5

SMOKING
GRILLING (350 - 450°F)
Lock Top Vent
Turn Cast Iron Top Vent to position 3 (SEAR on
Color Coded Models). Turn locking pin counter
clockwise until it drops down in place, keeping the
Top Vent fully open.
WARNING: When using Quickchange Gas Insert, Top Vent
must be locked open to position 3 (SEAR on Color Coded
Models) at all times.
The Quickchange cooking temperatures are controlled by adjusting the burner knob on the
Gas Insert. Cooking times and temperatures will vary depending on your geographic location.
*Caution – If you’re cooking low and slow, do not let the grill get too hot. Keep the
temperature low, it will take time to cool down.
*Caution - Continuous grilling at high temperatures will cause the felt gasket to burn.
Prevent Flare-Ups:
If the lid is lifted too quickly, oxygen will rush inside the grill causing a flare-up. To prevent a
flare up, lift the lid 1” / 25mm and count to three before fully opening the grill.
Step 2: Remove Ash Drawer
Remove Cooking Grates and Charcoal Grate. Sweep all
excess charcoal and ash into Ash Drawer. Pull out Ash
Drawer and empty ash from drawer, then store in a cool,
dry place.
Step 3: Insert Gas Insert
Slide Gas Insert into grill opening in the base of the grill
until it stops and locks into place.
Step 4: Position Heat Exchanger
Install the stainless steel infrared Heat Exchanger on
top of the Gas Insert. Allow the 2 bottom stems of Heat
Exchanger to drop into the slots on top of the Gas Insert.
Step 5: Place Heat Diffuser Lava Stone
Spread bracket so it makes an “X” shape and lower onto fire bowl,
allowing the bracket to rest on edge of bowl. Lower Lava Stone onto the
bracket. Replace cooking grates with hinged sections facing towards the
front of grill.
Step 6: Connect to Gas Tank
Using the Quick Connect fitting on the Gas Supply Hose, pull back
spring-loaded locking ring and slide over male connection. Once it
has snapped into place, give slight tug on gas line to ensure that it is
securely connected. Turn the valve on gas tank to Open position.
Step 7: Ignite Gas Insert
Use leak test* to ensure there are no leaks. Open grill lid. Confirm the
Control Knob is in the “OFF” position. Press and hold in the Red Ignition
Button.
Device will emit a “clicking” sound.
While holding in Red Ignition Button push in control knob and turn to
LOW setting.
Observe fire is lit in Heat Exchanger. Close grill lid and observe grill
thermometer. Adjust to desired temperature by adjusting Control Knob.
NOTE: In order to get to “HIGH”, push the Control Knob in and turn
counter-clockwise until second “click” is heard and the tick mark is
completely horizontal.
If ignition does not occur within 5 seconds, turn the Control Knob to
OFF position. Wait 5 minutes and repeat the lighting procedure.
Step 1: Fully Open Top Vent
Turn Top Vent to position 3 (or SEAR).
Keep the Top Vent fully open.
WARNING: When using Quickchange Gas Insert,
Top Vent must be open to position 3 (or SEAR) at all
times.
STARTING
ATTENTION: The grill needs to be cooled before switching
from the Ash Drawer to the Quickchange Gas Insert.
SETTING TEMPERATURE
COOKING TEMPERATURE
*Leak Test: Pour Leak Test Solution (not
included) or soapy water at the connection spot
of the gas cylinder to check whether there is
air leakage. If solution produces bubbles this
means there is a leak.
SEARING
400º– 640ºF
200º– 340ºC
GRILLING
300º– 400ºF
150º– 200ºC
SMOKING
175º– 225ºF
Watch For Bubbles
Med
High
Med
High
Med
High
Low
OFF
Low
OFF
Low
OFF
80º– 110ºC
All cooking times and temperatures are approximate.
Visit www.foodsafety.gov for additional information on safe minimum cooking temperatures.
Approximate
Cooking Time Smoker Temp (°F) Meat Temp. (°F)
BEEF
Brisket (8 - 12 lbs) 1.5 hours/lb 225 - 250 185 - 205
Short Ribs 5 hours 225 - 250 Pulls back from bones
Tenderloin (3 - 4 lbs) 1-4 hours 225 - 250 120 - 160
PORK
Baby Back Ribs
Shoulder / Butt (6 - 8 lbs) 1.5 hours/lb 225 - 250 170 - 205
Ham (Bone In) 1.5 hours/lb 225 - 250 160
Spare Ribs (2.5 - 3 lbs) 5 - 7 hours 225 - 250 Pulls back from bones
Tenderloin (1.5 - 2 lbs) 2.5 - 3 hours 225 - 250 160
POULTRY
Turkey
(Whole)
Chicken
(1.5 - 2.5 lbs)
15 - 20 min./lb 240 - 275 170
(Whole: 2.5 - 4.5 lbs) 2.
5 hours 225 - 250 Pulls back from bones
5 - 4 hours 250 - 275 170
Beef Temp (°F) Pork Temp (°F)
Rare 125 + 3 min. Rest ---------
Medium-Rare 130 - 135 145 + 3 min. Rest
Medium 135 - 140 150
Medium-Well 140 - 150 155
Well-Done 155+ 160+
Ground 160
Poultry Temp (°F)
Dark Meat 165 - 175
White Meat 165
Ground 170 - 175

GENERAL INSTRUCTIONS
Subject to the following terms and conditions, Phase 2, LLC, d/b/a Vision Grills
(“Vision Grills”) warrants to the original purchaser that the grill insert manufactured
or supplied by Vision Grills will be free from defects in material and workmanship
under normal use for the following periods from the original date of purchase:
Five years for burner and all other metal parts; 90 days for lava stone & bracket,
quick disconnect, hose and regulator. This Warranty is contingent upon purchaser
registering the product at www.visiongrills.com/register or within 30 days from
the date of purchase along with a copy of the original dated sales receipt which
can be attached in an electronic format (i.e. scan, photograph, etc.) to your
registration at www.visiongrills.com/register. Failure to do so will invalidate the
warranty. Any damages or defects present at the time of purchase must be
noted on the original dated sales receipt. This Warranty is not transferable to
subsequent owners. If you cannot register online, it will be necessary to contact
Vision Grills customer service at (877) 917-4273 or email help@visiongrills.com.
If any product covered by this Warranty is defective due to a covered warranty
condition, such product will, at the option of Vision Grills, be repaired to its original
condition or replaced with a comparable new product or part. The repair and/or
replacement of parts shall constitute the extent of the liability and obligations of
Vision Grills under this Warranty. Purchaser is required to provide photographic
evidence to assess the damage when submitting claim.
This Warranty does not cover damages caused by improper assembly, improper
care, failure to follow directions of use, misuse, abuse, negligence, extreme
environmental conditions, normal wear and tear, accidents, acts of nature, or
unauthorized repair, alteration or modication, as determined by Vision Grills.
Vision Grills is not liable for any default or delay in its performance under this
Warranty that is caused by any circumstances beyond its control. While Vision
Grills uses rust-resistant materials, the Warranty as to metal parts does not cover
rust or oxidation unless the structural integrity of the grill insert is compromised
as determined by Vision Grills.
This Warranty does not cover purchases with unauthorized resellers and/or third
parties. Warranty coverage is limited to products purchased at an authorized
reseller only.
Commercial use and related applications are not covered under this Warranty.
Warranty coverage is based on normal residential use and maintenance.
Vision Grills shall not be liable for any delay or default under this Warranty caused
by any event or contingency beyond Vision Grills’s control. This includes acts
of nature, re, government restrictions or restraints, strikes, reduced supply of
materials or transportation delays.
THIS WARRANTY IS THE EXCLUSIVE WARRANTY OF VISION GRILLS. VISION
GRILLS EXPRESSLY DISCLAIMS ANY AND ALL OTHER WARRANTIES, EXPRESS
OR IMPLIED, INCLUDING WARRANTIES OF FITNESS, MERCHANTABILITY, OR
FITNESS FOR A PARTICULAR PURPOSE. THIS WARRANTY DOES NOT COVER,
AND VISION GRILLS IS NOT LIABLE FOR, ANY DAMAGES RELATING TO LOSS
OF TIME, LOSS OF USE OF EQUIPMENT, INCONVENIENCE, OR ANY INCIDENTAL,
SPECIAL AND/OR CONSEQUENTIAL DAMAGES. PURCHASER’S EXCLUSIVE
REMEDY FOR BREACH OF THIS WARRANTY SHALL BE LIMITED AS SPECIFIED
HEREIN TO REPLACEMENT OR REPAIR OF THE AFFECTED PRODUCT.
Some states do not allow limitations on how long an implied warranty lasts or
the exclusion or limitation of incidental or consequential damages, so the above
limitations and exclusions may not apply to you. This Warranty gives you specic
legal rights, and you may also have other rights which vary from state to state.
Vision Grills does not authorize any person or entity to assume any obligation
or liability on its behalf in connection with the sale and purchase of any of its
products. The purchase of any Vision Grills product from anyone other than Vision
Grills or an authorized dealer will void the Warranty associated with the product.
If you have a question regarding the identity of an authorized dealer, you should
contact Vision Grills before you purchase the product.
To submit a warranty claim, the original purchaser or authorized agent of the
original purchaser must contact Vision Grills at (877) 917-4273 or contact
Vision Grills via e-mail at help@visiongrills.com or through the website at
www.visiongrills.com.
This instruction manual contains important information necessary for the proper assembly and safe use of the appliance. Read and follow all warnings and instructions
before assembling and using the appliance. Keep this manual for future reference.
Always wait for grill to be completely cooled before opening built-in ash drawer.
When charcoal cooking above 500º F/260º C, with both top and bottom vents closed, rapidly opening the lid creates a sudden rush of oxygen into the grill, which can
cause a flare-up of flames. When in this cooking mode, we recommend that, prior to opening the lid, you open both top and bottom vents to allow oxygen to stabilize
inside the grill before opening, minimizing the possibility of flare-ups.
!
DANGER
If you smell gas:
• Shut off gas to the appliance.
• Extinguish any open flame.
• Open lid.
• If odor continues, keep away from the appliance and immediately call your fire department.
1) The installation conforms with the National Fuel Gas Code, ANSI Z223.1/NFPA
54, Natural Gas and Propane Installation Code, CSA B149.1; or Propane Storage
and Handling Code, B149.2.
2) This outdoor cooking gas appliance shall be used only outdoors and shall not be
used in a building, garage or any other enclosed area.
3) This outdoor cooking gas appliance is not intended to be installed in or on boats
and not intended to be installed in or on recreational vehicles.
4) Minimum clearance from sides and back of unit to combustible construction,
32” from sides and 32” from back. The outdoor cooking gas appliance shall not
be used under overhead combustible surfaces.
5) Please inspect the hose before each use of the outdoor cooking gas appliance.
If it is evident there is excessive abrasion or wear, or the hose is cut, it must be
replaced prior to the outdoor cooking gas appliance being put into operation.
The replacement hose assembly shall be that specified by the manufacturer.
6) Lighting Instructions
(a) Read the instructions before lighting.
(b) Open lid during lighting.
(c) Confirm that the control knob on the gas insert is on the “OFF” position.
(d) Open the gas tank valve knob.
(e) Press and hold in the Red ignitor button. Device will emit a clicking sound.
(f) While holding in the Red ignitor button, Push in the control knob and turn to
“Low” position; a “click” will be heard, if operated correctly. Observe fire is lit.
(g) If ignition does not occur within 5 seconds, turn the burner control(s) off, wait
5 minutes, and repeat the lighting procedure.
7) Note
(a) Keep outdoor cooking gas appliance area clear and free from combustible
materials, gasoline and other flammable vapors and liquids.
(b) Do not obstruct the flow of combustion and ventilation air.
(c) Keep the ventilation opening(s) of the cylinder enclosure free and clear from
debris.
(d) Visually check burner flames including pilot burner flame.
8) If parts are missing, contact Vision Grills at (877) 917-4273 or contact Vision
9) The cylinder diameter is 12”, the total height is 18” and volume is 20 lbs.
10) The LP gas supply cylinder(s) to be used must be constructed and marked:
11) If the outdoor cooking gas appliance is not in use, the gas must be turned off
Cylinders must be stored outdoors out of the reach of children and must not be
12) The pressure regulator and hose assembly supplied with the outdoor cooking
13) The cylinder used must include a collar to protect the cylinder valve.
14) (a) Do not store a spare LP-Gas cylinder under or near this appliance;
15) Place dust cap on cylinder valve outlet whenever the cylinder is not in use. Only
16) Instructions, including illustrations, on the proper cylinder orientation to provide
(e) Clean outdoor cooking gas appliance, including special surfaces, with
recommended cleaning agents, if necessary.
(f) Check and clean burner/venturi tubes for insects and insect nests. A clogged
tube can lead to a fire beneath the grill.
Grills via e-mail at help@visiongrills.com or through the website at www.
visiongrills.com.
(a) In accordance with the Specifications for LP-Gas Cylinders of the U.S.
Department of Transportation (D.O.T.) or the National Standard of Canada,
CAN/CSA-B339, Cylinders, Spheres and Tubes for Transportation of
Dangerous Goods; and Commission, as applicable.
(b) Provided with a listed overfilling prevention device.
(c) Provided with a cylinder connection device compatible with the connection
for outdoor cooking appliance.
at the supply cylinder. Storage of an outdoor cooking gas appliance indoors is
permissible only if the cylinder is disconnected and removed from the outdoor
cooking gas appliance.
stored in a building, garage or any other enclosed area.
gas appliance must be used. If pressure regulator and hose assembly are
missing or need to be replaced, contact Vision Grills at (877)917-4273 or
contact Vision Grills via e-mail at help@visiongrills.com or through the website
at www.visiongrills.com.
(b) Never fill the cylinder beyond 80 percent full; and
(c) If the information in “14-(a)” and “14-(b)” is not followed exactly, a fire
causing death or serious injury may occur.
install the type of dust cap on the cylinder valve outlet that is provided with the
cylinder valve. Other types of caps or plugs may result in leakage of propane.
vapor withdrawal.
!
WARNING
• Do not store or use gasoline or other flammable
liquids or vapors in the vicinity of this or any other
appliance.
• Any LP cylinder not connected for use shall not be
stored in the vicinity of this or any other appliance.
WARRANTY
www.visiongrills.com help@visiongrills.com
1-877-917-4273
Vision Grills 1531 Fairview Avenue, Suite B, St. Louis, MO 63132
 Loading...