

Page 1

Visioneer
Strobe XP 100 Scanner
Installation Guide
FOR WINDOWS
Page 2

COPYRIGHT INFORMATION
Copyright © 2002 Visioneer, Inc.
Reproduction, adaptation, or translation without prior written permission is prohibited, except as allowed under the copyright laws.
The Visioneer brand name and logo are registered trademarks of Visioneer, Inc. The PaperPort brand name and logo are registered trademarks of ScanSoft, Inc.
Microsoft is a U.S. registered trademark of Microsoft Corporation. Windows is a trademark of Microsoft Corporation. TextBridge is a registered trademark of
ScanSoft, Inc. ZyINDEX is a registered trademark of ZyLAB International, Inc. ZyINDEX toolkit portions, Copyright © 1990-1998, ZyLAB International,
Inc. All Rights Reserved. All other products mentioned herein may be trademarks of their respective companies.
Information is subject to change without notice and does not represent a commitment on the part of Visioneer. The software described is furnished under a
licensing agreement. The software may be used or copied only in accordance with the terms of such an agreement. It is against the law to copy the software on
any medium except as specifically allowed in the licensing agreement. No part of this document may be reproduced or transmitted in any form or by any
means, electronic or mechanical, including photocopying, recording, or information storage and retrieval systems, or translated to another language, for any
purpose other than the licensee's personal use and as specifically allowed in the licensing agreement, without the express written permission of Visioneer.
Part Number: 05-0525-100
Restricted Rights Legend
Use, duplication, or disclosure is subject to restrictions as set forth in contract subdivision (c)(1)(ii) of the Rights in Technical Data and Computer Software
Clause 52.227-FAR14. Material scanned by this product may be protected by governmental laws and other regulations, such as copyright laws. The customer
is solely responsible for complying with all such laws and regulations.
Visioneer's Limited Product Warranty
If you find physical defects in the materials or the workmanship used in making the product described in this document, Visioneer will repair, or at its option,
replace, the product at no charge to you, provided you return it (postage prepaid, with proof of your purchase from the original reseller) during the 12-month
period after the date of your original purchase of the product.
THIS IS VISIONEER'S ONLY WARRANTY AND YOUR EXCLUSIVE REMEDY CONCERNING THE PRODUCT, ALL OTHER
REPRESENTATIONS, WARRANTIES OR CONDITIONS, EXPRESS OR IMPLIED, WRITTEN OR ORAL, INCLUDING ANY WARRANTY OF
MERCHANTABILITY, FITNESS FOR A PARTICULAR PURPOSE OR NON-INFRINGEMENT, ARE EXPRESSLY EXCLUDED. AS A RESULT,
EXCEPT AS SET OUT ABOVE, THE PRODUCT IS SOLD “AS IS” AND YOU ARE ASSUMING THE ENTIRE RISK AS TO THE PRODUCT'S
SUITABILITY TO YOUR NEEDS, ITS QUALITY AND ITS PERFORMANCE.
IN NO EVENT WILL VISIONEER BE LIABLE FOR DIRECT, INDIRECT, SPECIAL, INCIDENTAL OR CONSEQUENTIAL DAMAGES
RESULTING FROM ANY DEFECT IN THE PRODUCT OR FROM ITS USE, EVEN IF ADVISED OF THE POSSIBILITY OF SUCH DAMAGES.
All exclusions and limitations in this warranty are made only to the extent permitted by applicable law and shall be of no effect to the extent in conflict with the
express requirements of applicable law.
FCC Radio Frequency Interference Statement
This equipment has been tested and found to comply with the limits for the class B digital device, pursuant to part 15 of the FCC Rules. These limits are
designed to provide reasonable protection against interference in a residential installation. This equipment generates, uses and can radiate radio frequency
energy and if not installed, and used in accordance with the instructions, may cause harmful interference to radio communications. However, there is no
guarantee that interference will not occur in a particular installation. If this equipment does cause harmful interference to radio or television reception, which
can be determined by turning the equipment off and on, the user is encouraged to try and correct the interference by one or more of the following measures:
• Reorient or relocate the receiving antenna.
• Increase the separation between the equipment and receiver.
• Connect the equipment into an outlet on a circuit different from that to which the receiver is connected.
• Consult the dealer or an experienced radio/TV technician for help.
This equipment has been certified to comply with the limits for a class B computing device, pursuant to FCC Rules. In order to maintain compliance with
FCC regulations, shielded cables must be used with this equipment. Operation with non-approved equipment or unshielded cables is likely to result in
interference to radio and TV reception. The user is cautioned that changes and modifications made to the equipment without the approval of manufacturer
could void the user's authority to operate this equipment.
This device complies with part 15 of the FCC Rules. Operation is subject to the following two conditions: (1) This device may not cause harmful interference,
and (2) this device must accept any interference received, including interference that may cause undesired operation.
Page 3

TABLE OF CONTENTS i
TABLE OF CONTENTS
Welcome . . . . . . . . . . . . . . . . . . . . . . . . . . . . . . . . . . . . . . . . . . . . . . 1
What’s in the Box . . . . . . . . . . . . . . . . . . . . . . . . . . . . . . . . . . . . . . . 1
The Visioneer Strobe XP 100 Scanner . . . . . . . . . . . . . . . . . . . . . . . . 2
What You Need . . . . . . . . . . . . . . . . . . . . . . . . . . . . . . . . . . . . . . . . . 3
Getting the PaperPort Online Documentation . . . . . . . . . . . . . . . . . 3
Chapter 1: Installing . . . . . . . . . . . . . . . . . . . . . . . . . . . . . . . . . . . . 4
Step 1: Install the PaperPort Software . . . . . . . . . . . . . . . . . . . . . . . . 4
Step 2: Install the Scanner Software . . . . . . . . . . . . . . . . . . . . . . . . . . 6
Step 3: Connect and Calibrate the Scanner . . . . . . . . . . . . . . . . . . . . 7
Step 4: Install the Other Software . . . . . . . . . . . . . . . . . . . . . . . . . . . 9
Checking Out Your Scanner . . . . . . . . . . . . . . . . . . . . . . . . . . . . . . . 9
If the Scanner Does Not Scan Properly . . . . . . . . . . . . . . . . . . . 12
Chapter 2: Scanning . . . . . . . . . . . . . . . . . . . . . . . . . . . . . . . . . . . 13
Two Ways to Scan . . . . . . . . . . . . . . . . . . . . . . . . . . . . . . . . . . . . . . 13
Scanning by Pressing the Scanner Button . . . . . . . . . . . . . . . . . . . . 14
Use the Photo Sleeve to Scan a Photo . . . . . . . . . . . . . . . . . . . . 15
Configuring the Scanner Button . . . . . . . . . . . . . . . . . . . . . . . . . . . 16
About the Configuration Dialog Box . . . . . . . . . . . . . . . . . . . . . 17
Selecting New Settings for the Button . . . . . . . . . . . . . . . . . . . . 19
Creating New Button Configurations . . . . . . . . . . . . . . . . . . . . 20
Editing Your Scanner’s Button Configurations . . . . . . . . . . . . . 23
Setting Preferences . . . . . . . . . . . . . . . . . . . . . . . . . . . . . . . . . . . 24
Scanning from the PaperPort Software . . . . . . . . . . . . . . . . . . . . . . 26
Scanning from a Computer Running Windows 98, Me,
or 2000 . . . . . . . . . . . . . . . . . . . . . . . . . . . . . . . . . . . . . . . . . . . 27
Scanning from a Computer Running Windows XP . . . . . . . . . . 33
Fine Tuning Your Scans . . . . . . . . . . . . . . . . . . . . . . . . . . . . . . 36
Calibrating and Cleaning Your Scanner . . . . . . . . . . . . . . . . . . . . . . 38
Page 4

ii TABLE OF CONTENTS
Troubleshooting . . . . . . . . . . . . . . . . . . . . . . . . . . . . . . . . . . . . . . . 42
How to Uninstall Your Scanner . . . . . . . . . . . . . . . . . . . . . . . . . . . . 44
Step 1: Uninstalling the Visioneer OneTouch Software . . . . . . . 44
Step 2: Uninstalling the PaperPort Software . . . . . . . . . . . . . . . 47
Contacting Visioneer US and Canada Technical Support . . . . . . . . 48
Contacting Visioneer—International Technical Support . . . . . . . . . 49
Visioneer Strobe XP 100 Scanner Specifications . . . . . . . . . . . . . . . 50
Page 5
WELCOME
Congratulations on purchasing your Visioneer Strobe XP 100 USB
scanner. With your scanner, you can quickly scan paper documents and
color photos to place their electronic images on your computer.
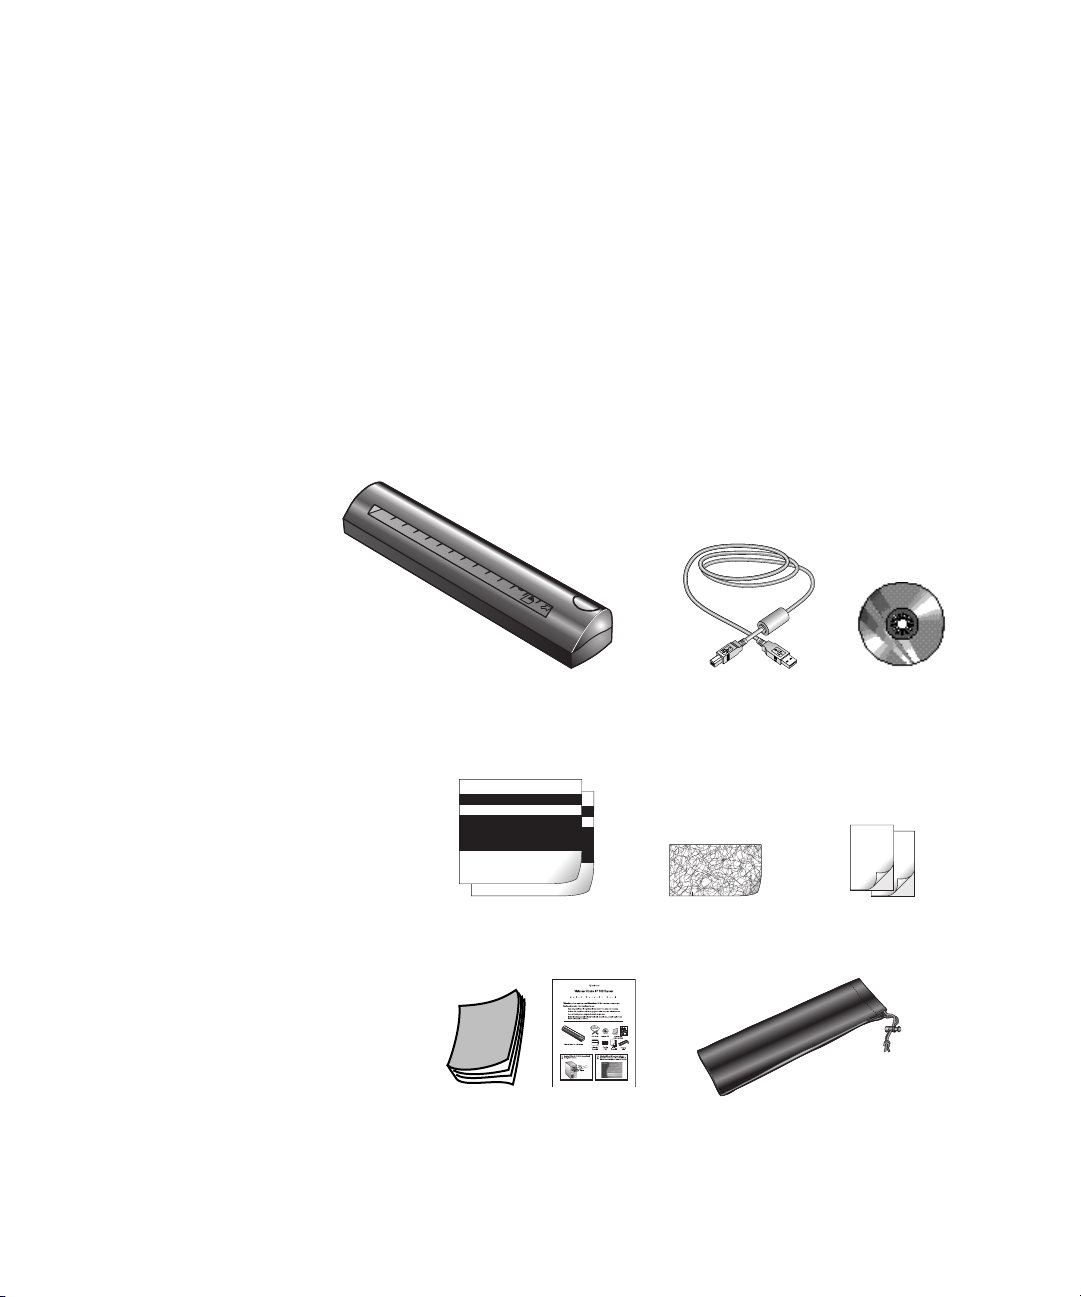
WHAT’S IN THE BOX
Before starting the installation, check the contents of the box to make
sure that all parts are included. If any items are missing or damaged,
contact the dealer where you purchased the scanner.
Visioneer Strobe XP 100 Scanner USB Cable
Calibration Papers (2) Cleaning Paper
Getting Started Guide
and Quick Install Card
VISIONEER STROBE XP 100 SCANNER INSTALLATION GUIDE 1
Carrying Case
Software CD
Photo Sleeves (2)
Page 6
2 VISIONEER STROBE XP 100 SCANNER INSTALLATION GUIDE
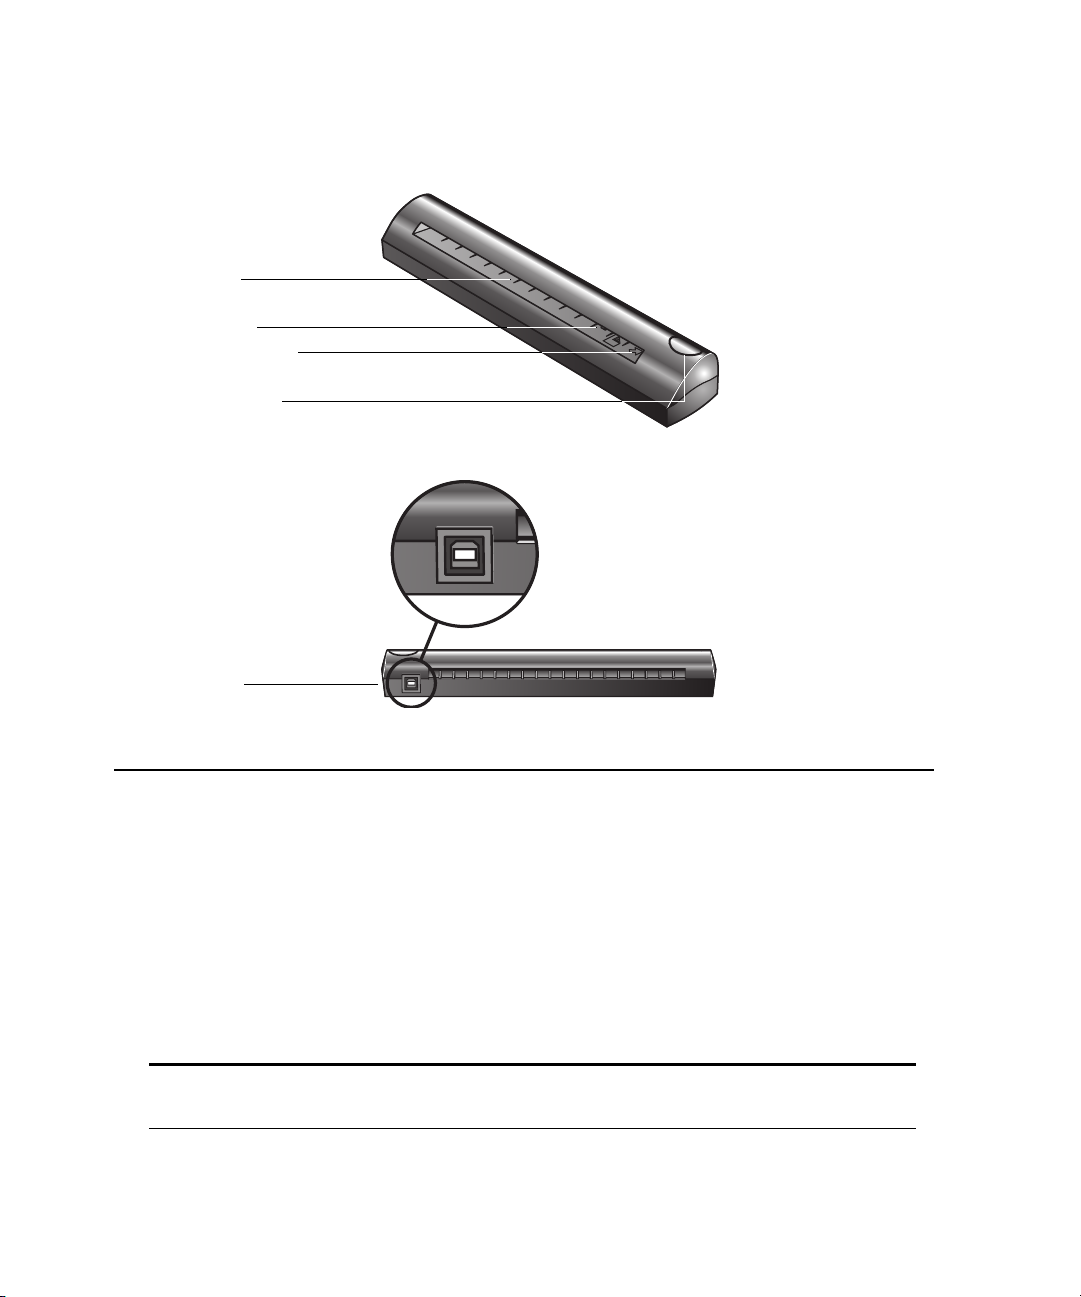
THE VISIONEER STROBE XP 100 SCANNER
Page feed
Page sensor
Alignment arrow
Scanner button
USB port
Page feed. Insert the item you want to scan into the page feed. The scanner grabs the
item and pulls it through while scanning.
Page sensor. Recognizes when an item is inserted into the page feed so the scanner knows
to begin scanning.
Alignment arrow. Shows where to align the top right corner of the item you’re scanning.
Scanner button. Press to start scanning.
Universal Serial Bus (USB) port. Plug the USB cable into this port.
Note: The scanner does not have an on/off switch. Just insert a page into the page
feed and press the scanner button to start scanning.
Page 7

WHAT YOU NEED 3
WHAT YOU NEED
To use the scanner and software, you need the following:
■ IBM PC (or 100-percent compatible) Pentium or equivalent
■ Microsoft Windows 98, Windows 2000, Windows Me, or
Windows XP
■ One available Universal Serial Bus (USB) port on your computer
■ Available internal memory (RAM):
■ Windows 98—32 megabytes (MB) or more
■ Windows 2000, Me, or XP—64 MB or more;
128 MB recommended for Windows XP
■ 70 MB of free hard disk space
■ A VGA or SVGA monitor. Recommended settings for your monitor
are as many colors as possible—High Color (16-bit), True Color
(24-bit or 32-bit). Set the resolution to at least 800 by 600 pixels.
To set your monitor’s colors and resolution, open the Windows
Control Panel, double-click Display, and then click the Settings tab.
■ A CD-ROM drive
GETTING THE PAPERPORT ONLINE DOCUMENTATION
The Installation CD also includes your ScanSoft PaperPort User’s Guide.
This guide provides more detailed information about PaperPort’s
features. Please see the CD to view the manual. You can also print the
manual from the CD.
Page 8

4 VISIONEER STROBE XP 100 SCANNER INSTALLATION GUIDE
Installing
Installation is a quick, four-step process:
■ Install the PaperPort software
■ Install the scanner software
■ Connect and calibrate the scanner
■ Install the other software on the CD
STEP 1: INSTALL THE PAPERPORT SOFTWARE
Note: You must install the PaperPort software before connecting the scanner to your computer. Otherwise, the correct driver software for your scanner will not be installed and it may not work properly.
To install the PaperPort software:
1. Start Microsoft Windows and make sure that no other applications are running.
2. Insert the CD into your computer’s CD-ROM drive. The CD
automatically starts.
Page 9

STEP 1: INSTALL THE PAPERPORT SOFTWARE 5
Note: If the CD does not automatically start, make sure the CD drive’s door is completely shut. If the CD still doesn’t start, click the Windows icon that shows the drives on your computer. (Usually, the icon is named My Computer.) The window shows the drives available on your computer. Double-click the icon for your CD-ROM drive to see the list of files on the CD. Double-click the file named START32.EXE. The CD starts.
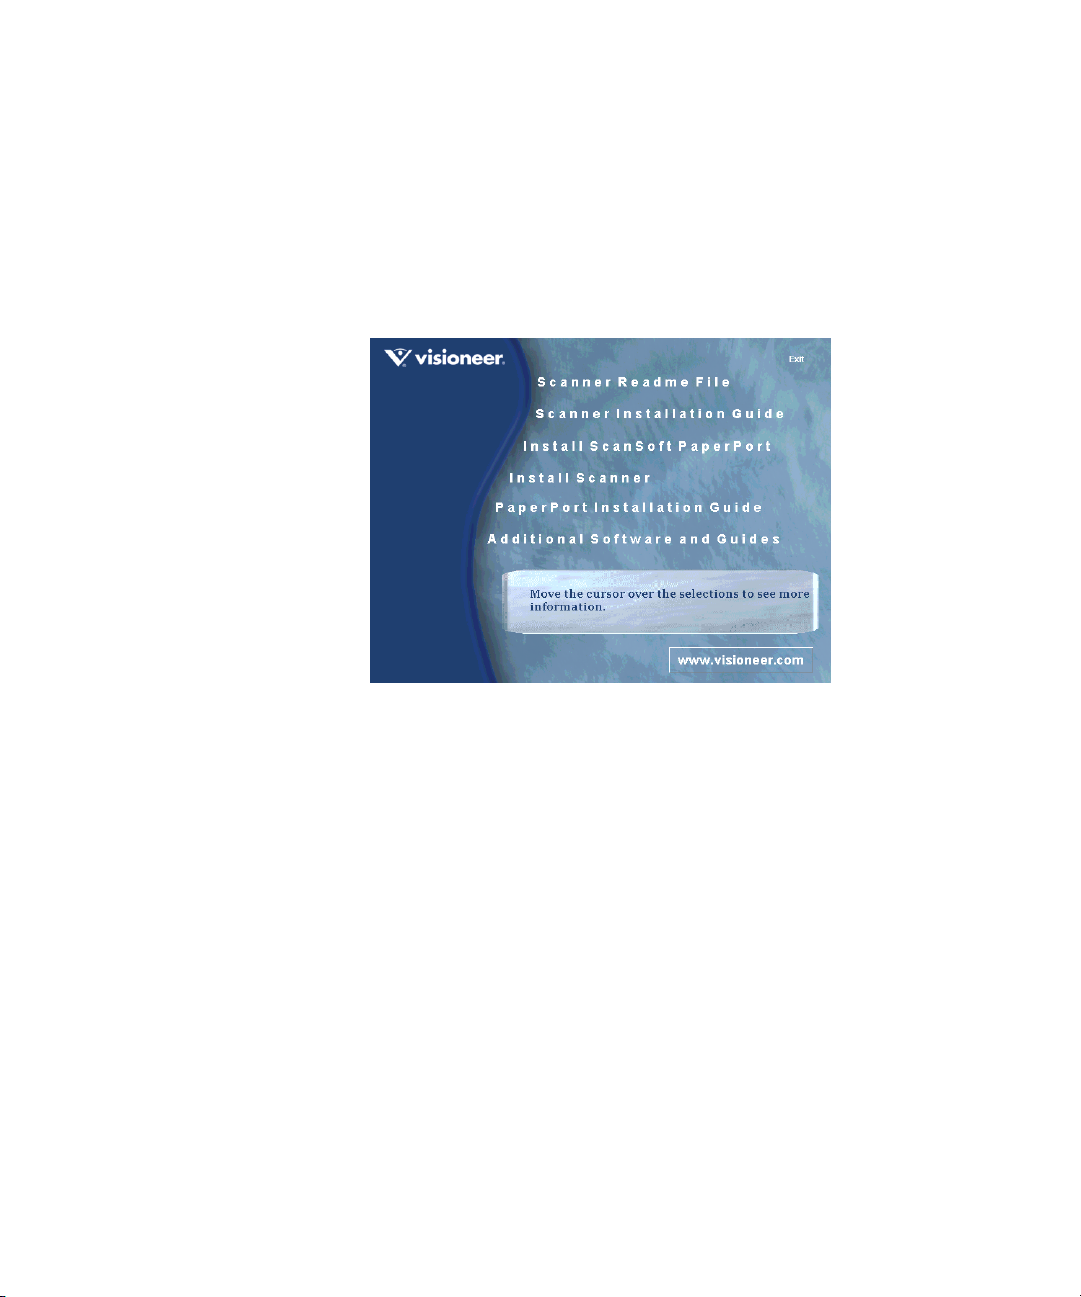
The Installation screen appears.
3. Select Install ScanSoft PaperPort.
4. Follow the instructions on the screen.
5. When installation is finished and the screen appears to restart your computer, click Yes .
6. Remove the CD from the CD-ROM drive.
7. After your computer and Windows have restarted, re-insert the CD
into the CD-ROM drive so you can install the scanner software.
Page 10

6 VISIONEER STROBE XP 100 SCANNER INSTALLATION GUIDE
STEP 2: INSTALL THE SCANNER SOFTWARE
1. On the Installation screen, click Install Scanner.
2. Follow the instructions on the screen.
During installation of the scanner software, a message instructs you
to connect the scanner to the computer.
Do not click the Finish button yet.
3. Follow the steps in the next section to connect the scanner. When
you’re finished, then click Finish in the dialog box above.
Page 11
STEP 3: CONNECT AND CALIBRATE THE SCANNER 7
STEP 3: CONNECT AND CALIBRATE THE SCANNER
The Visioneer Strobe XP 100 scanner connects to any available USB
port. Check your computer’s manual for the USB port location.
Note: You connect the scanner to your computer while the computer is running. You do not have to shut down your computer.
To c o n ne c t yo ur V i s i o n e e r Strobe XP 100 scanner:
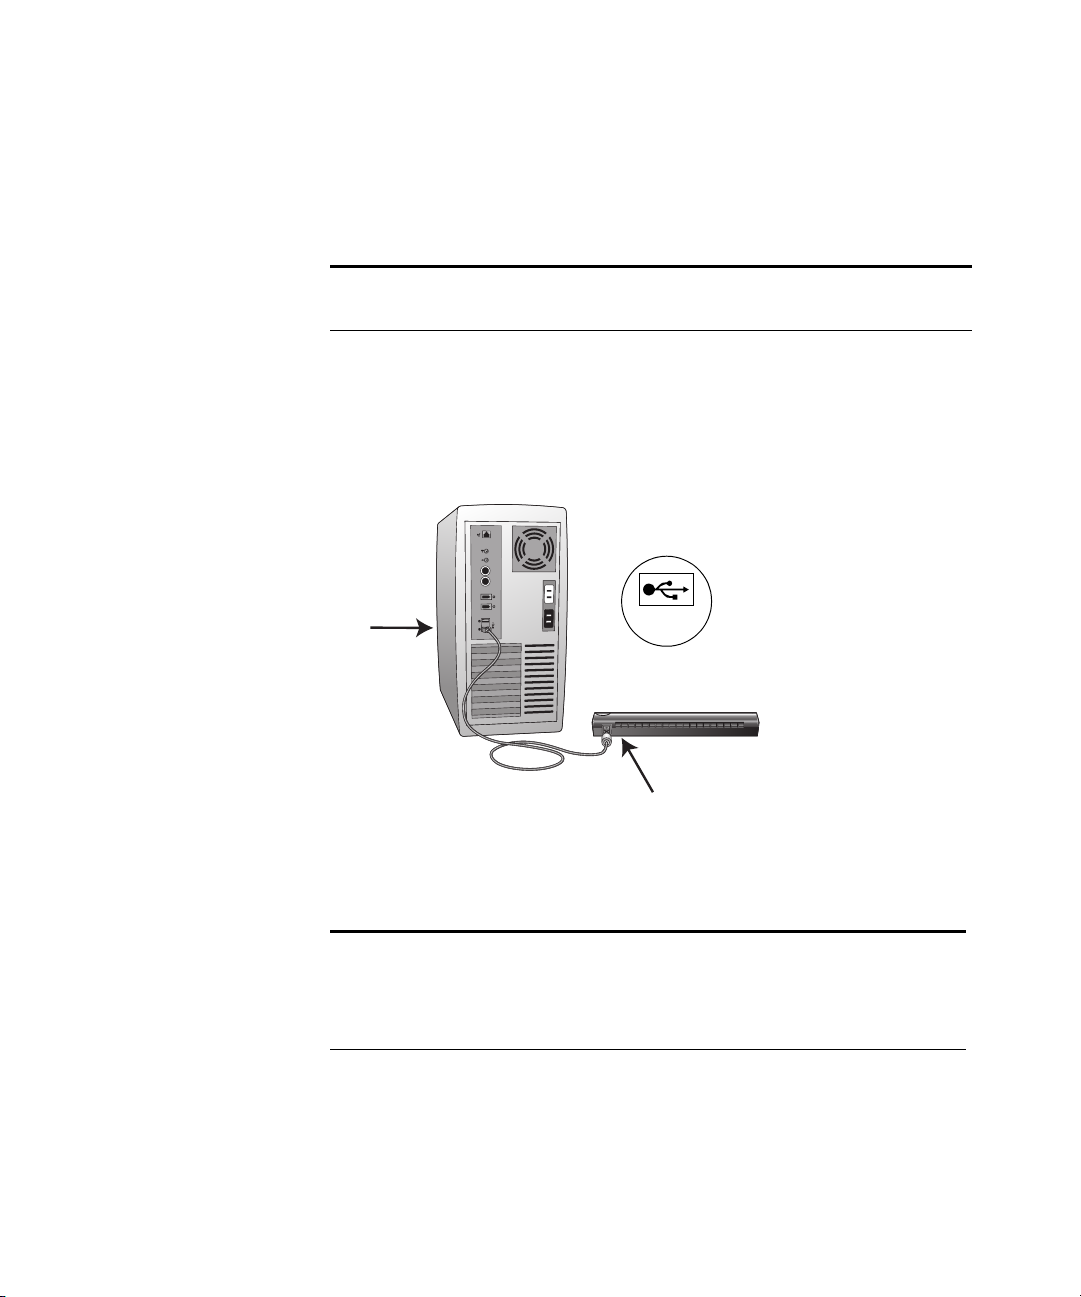
1. Plug the USB cable into the USB port on the back of the scanner.
2. Plug the other end of the USB cable into any USB port on your computer.
USB
The USB symbol identifies the location of the USB port on your
computer. If the plug does not attach easily, make sure that you are
plugging it in correctly. Do not force the plug into the connection.
Note: You can also connect the scanner to a USB port on the computer’s keyboard if it has one, or to a USB hub. If you use a USB hub, it must have its own power supply already plugged into an electrical outlet.
Your computer recognizes that a scanner has been plugged into the
USB port and automatically configures its driver database with the
appropriate software to run the scanner.
Page 12
8 VISIONEER STROBE XP 100 SCANNER INSTALLATION GUIDE
3. Now click the Finish button on the Connect Scanner dialog box.
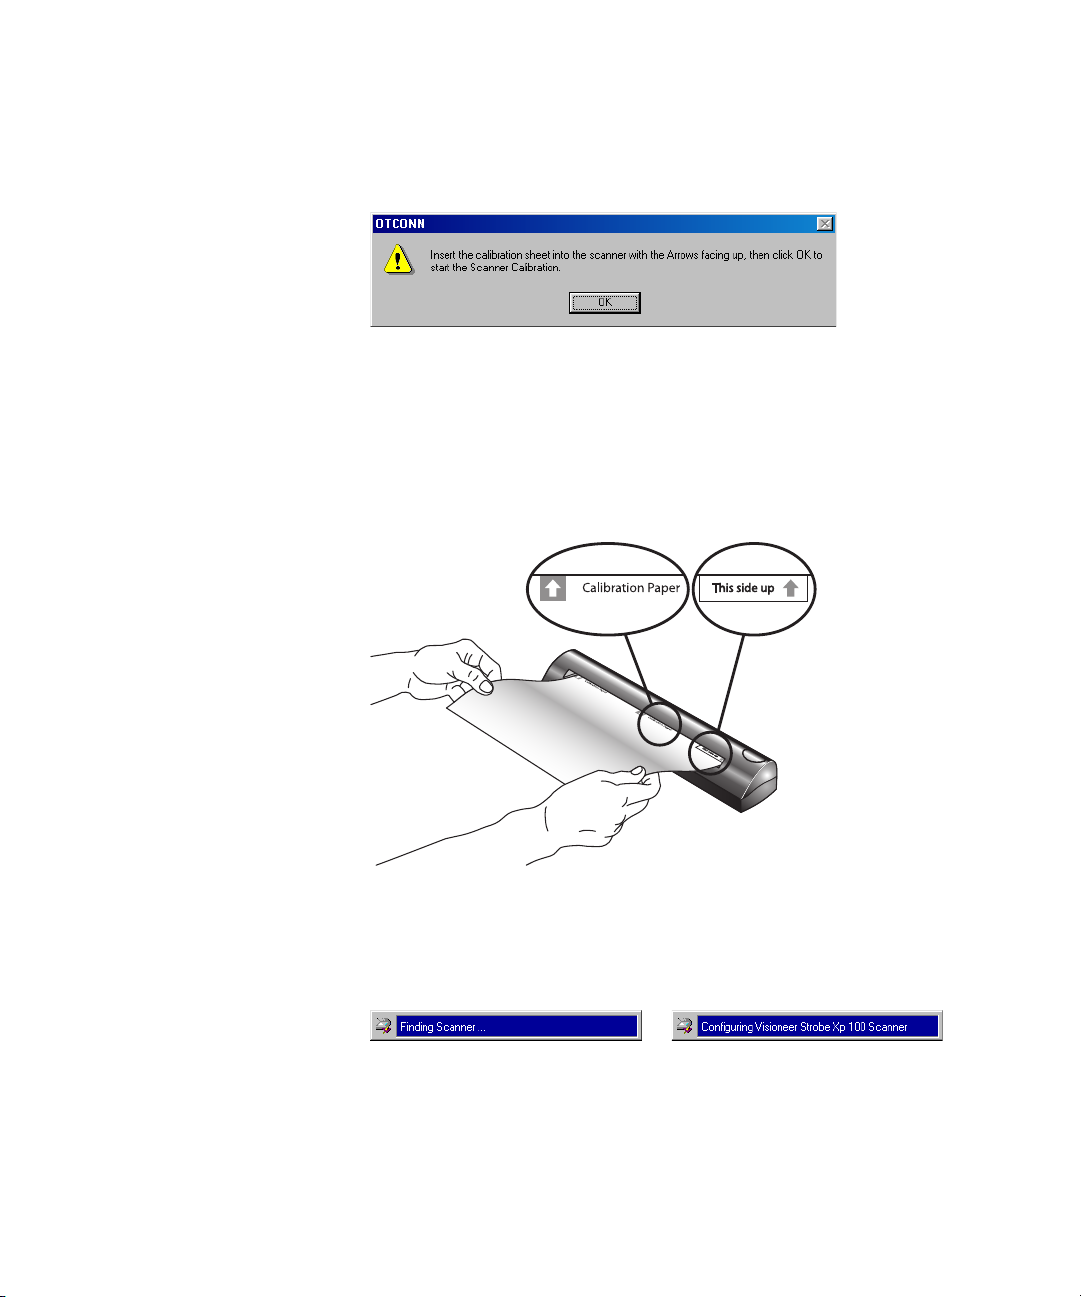
A dialog box appears so you can calibrate the scanner.
To calibrate the scanner:
1. Insert the Calibration Paper that you received with the scanner into
the Page Feed until the scanner “grabs” the paper.
Insert the paper face down. The instructions on the back of the
paper show the correct way to insert the paper.
The scanner feeds the paper through automatically.
When calibration is finished, messages at the bottom of the screen
tell you that the scanner is being found and configured.
That completes the steps to connect your scanner to the computer.
2. Remove the CD from the CD-ROM drive and restart your computer.
Page 13
STEP 4: INSTALL THE OTHER SOFTWARE 9
STEP 4: INSTALL THE OTHER SOFTWARE
You can now install the other software on the CD.
1. After your computer and Windows restart, re-insert the CD into the CD-ROM drive.
2. On the Installation screen, click Additional Software and Guides.
3. Follow the instructions on the screen to install the other software.
When you’re finished, remove the CD from the computer and store
it in a safe place.
In addition to installing the other software from the CD, you can
also view and print the PaperPort User Guide and the scanner’s
Installation Guide.
That’s it! Your scanner is now ready to scan.
CHECKING OUT YOUR SCANNER
Your Visioneer Strobe XP 100 scanner comes with special software,
called the OneTouch software, that you use to configure the button on
the scanner. For example, to scan in black and white instead of color,
you change the button’s configuration using the OneTouch software.
Page 14
10 VISIONEER STROBE XP 100 SCANNER INSTALLATION GUIDE
The OneTouch software adds the scanner icon to the Windows taskbar
(at the bottom right corner of the computer screen).
Scanner Icon
To see the configuration of the scanner button:
1. Place the mouse pointer on the scanner icon in the Windows taskbar.
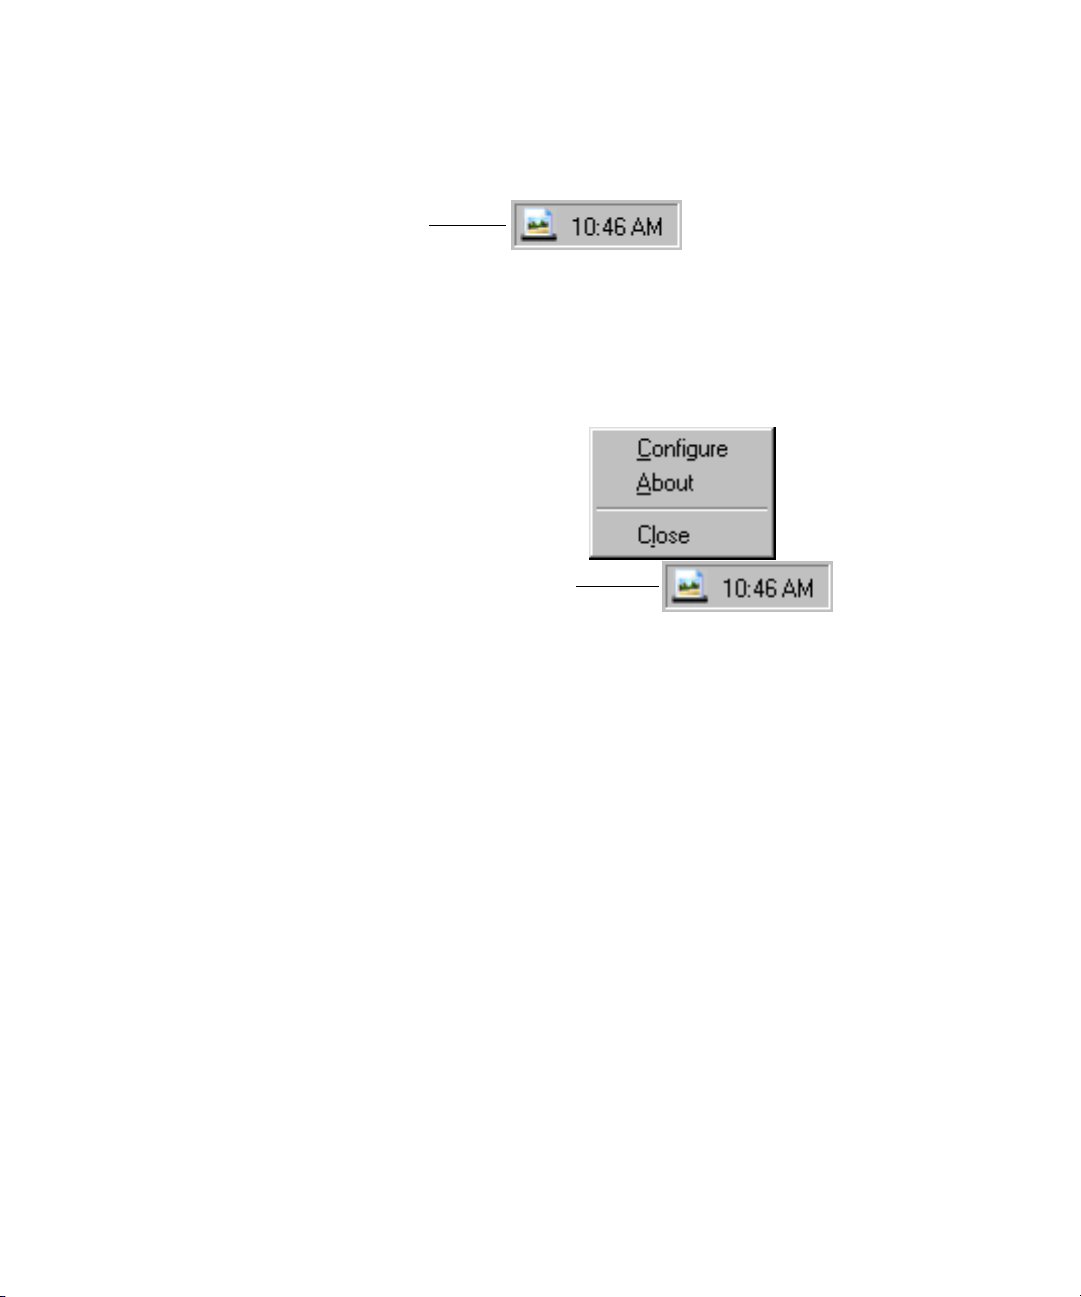
2. Right-click the icon. The shortcut menu appears.
Right-click the Scanner Icon
to see the shortcut menu
3. Choose Configure from the shortcut menu.
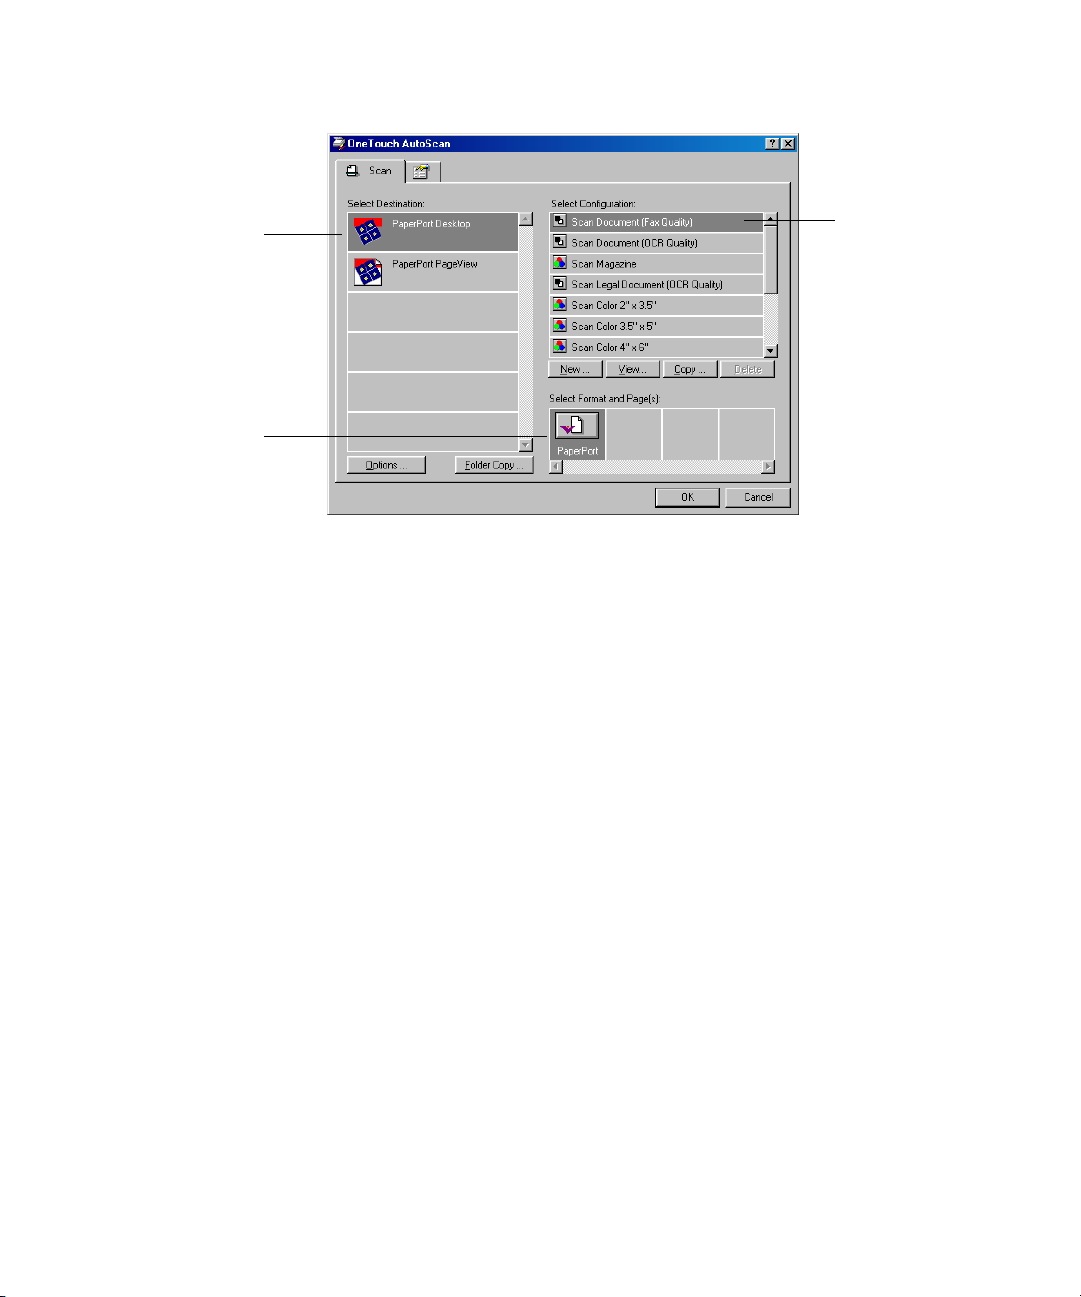
The OneTouch Configuration dialog box shows the current
settings for the scanner button.
For example, the following figure shows the settings pre-selected
when you first receive your scanner. The Scan button is set up to
scan the item in black and white with the configuration named
Scan Document, and then after the scanning is finished, to open
the PaperPort desktop to display the scanned image. The Format
and Page(s) setting is to scan in the PaperPort image format.
Page 15
CHECKING OUT YOUR SCANNER 11
This is the name of
the application where
scanned images will
appear.
This icon shows the
format for an item
scanned with the
button.
These are the
configurations
pre-set for the
scanner button.
To reset the
button to new
settings, click
one of the other
configurations.
The small icons
indicate that a
configuration is
for color, black
and white, or
grayscale.
Use this dialog box to change the settings of the scanner button. See
“Configuring the Scanner Button” on page 16 for details.
4. Click OK to close the dialog box.
Page 16

12 VISIONEER STROBE XP 100 SCANNER INSTALLATION GUIDE
IF THE SCANNER DOES NOT SCAN PROPERLY
If the scanner does not scan properly, check for one of these possible
problems:
• Is the USB cable loose or not plugged in securely? Inspect the
cable connections. Make sure the cable is plugged in securely.
• Did you restart the computer after installing the software? If you
didn’t restart the computer, it may not have loaded all of the software
files. Try restarting your computer.
• Did you plug the scanner into a USB hub? If you’re using a USB
hub to connect the scanner, the hub must have its own power supply.
If the hub does not have its own power supply, plug the scanner into
a different USB port on the computer.
Please see the Readme file in the PaperPort directory on your computer’s
hard drive. The Readme file contains additional information that may
help you diagnose problems with the scanner. Also see
“Troubleshooting” on page 42 for more information.
If you try all the troubleshooting procedures described above and in the
Readme file, and the scanner still does not scan properly, you may have
a malfunctioning scanner. Please see “Contacting Visioneer US and
Canada Technical Support” on page 48 or “Contacting Visioneer—
International Technical Support” on page 49. Also visit our web site at
www.visioneer.com for additional technical information.
Page 17
TWO WAYS TO SCAN 13
Scanning
This section explains how to scan with your Strobe XP 100 scanner.
TWO WAYS TO SCAN
You can scan items by pressing the scanner button or by clicking a Scan
button in the PaperPort software. The basic difference between the two
methods is that when scanning with the button, you use the OneTouch
software’s scanning options, and when scanning from PaperPort you use
its scanning options. Both methods scan equally well, so use the one
with the appropriate options for the item you’re scanning.
• Scan with the scanner button
Insert an item to scan and then press the scanner button. The item is
scanned with the settings already selected for the button. For more
details, see “Scanning by Pressing the Scanner Button” on page 14.
• Scan from the PaperPort software
To scan from the PaperPort software, start the software, and click the
Scan icon on the PaperPort command bar.
You can then select scanning options before you start the scan. See
“Scanning from the PaperPort Software” on page 26 for details.
Note: Always remove any staples or paper clips from the documents before inserting them into the scanner. Staples and paper clips can jam the feed mechanism and scratch the internal components.
Page 18
14 VISIONEER STROBE XP 100 SCANNER INSTALLATION GUIDE
SCANNING BY PRESSING THE SCANNER BUTTON
Pressing the scanner button scans the item, and then sends the image to
a software application or printer on your computer.
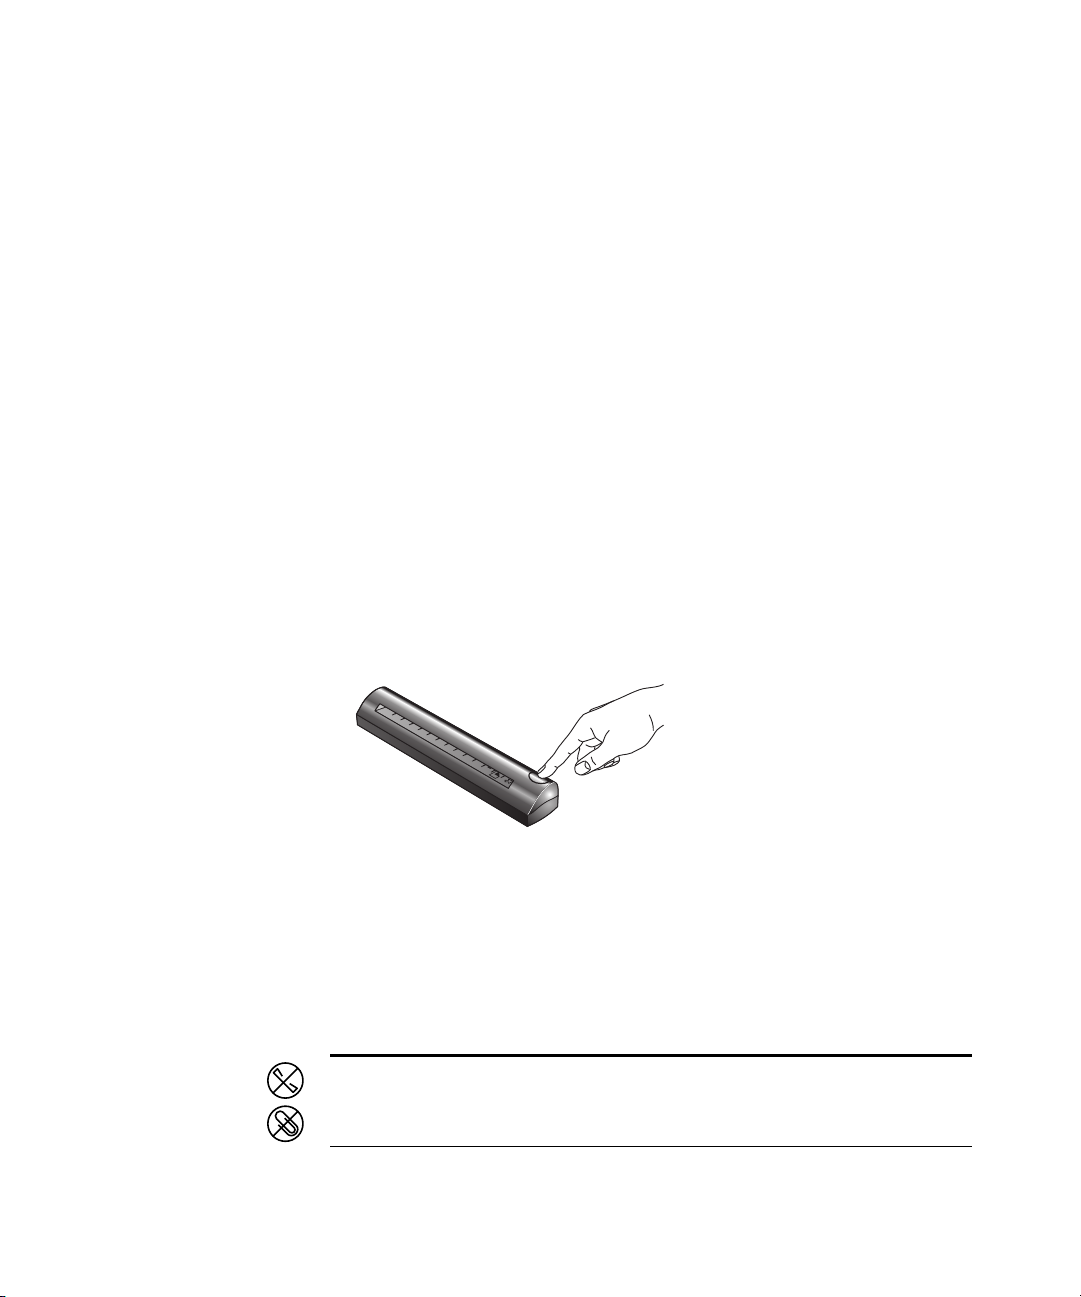
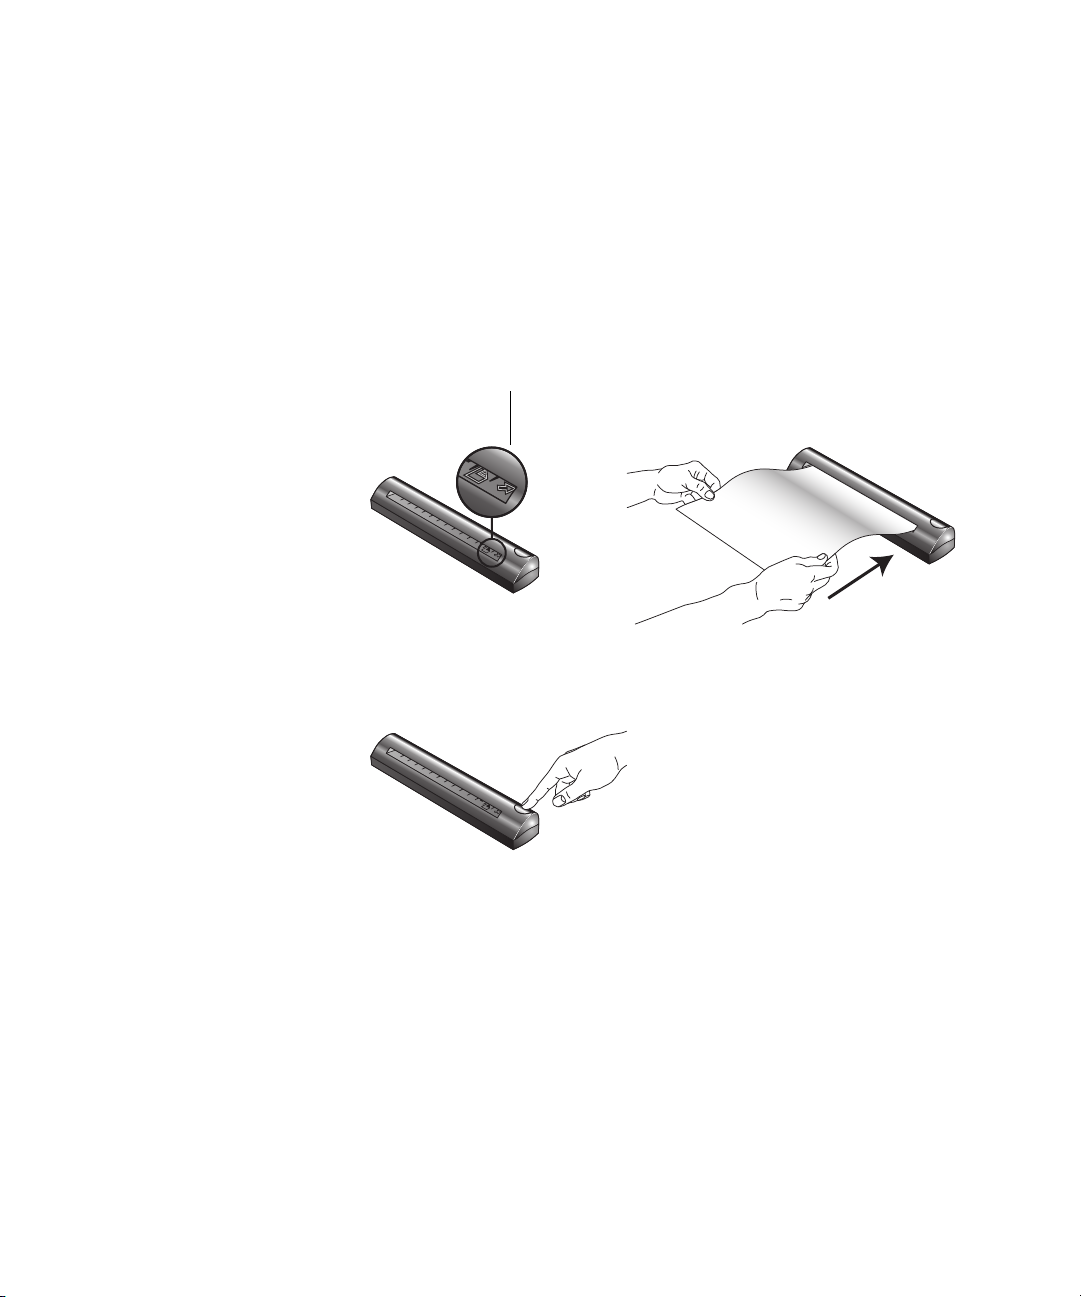
To scan with the scanner button:
1. Align the item with the arrow icon and insert the item, face down, into the paper feed slot.
Alignment arrow
The scanner grabs the top edge of the paper and holds it in place.
2. Now press the scanner button.
The scanner feeds the paper through while it scans.
The item is scanned with the settings—such as color for magazine
articles, or black and white for pages that you want to fax—selected
in the OneTouch configuration dialog box.
See “Selecting New Settings for the Button” on page 19 to select
another configuration and other options for the scanner button.
Page 19

SCANNING BY PRESSING THE SCANNER BUTTON 15
A scan progress window opens and then a “thumbnail” of the
scanned image appears in the destination software. In the following
example, the destination software is the PaperPort desktop.
For Windows XP: only a progress bar appears during the scanning.
USE THE PHOTO SLEEVE TO SCAN A PHOTO
Photographs printed on glossy paper, or other coated paper, may slip
when inserted into the scanner’s paper feed. Use one of the photo sleeves
that you received with your scanner when scanning photos.
1. Separate the clear plastic sleeve from the paper backing and slide the
photo into the sleeve so it fits snugly at the corners.
2. Now insert the photo and sleeve into the scanner’s paper feed slot
with the clear plastic and image facing down.
Page 20

16 VISIONEER STROBE XP 100 SCANNER INSTALLATION GUIDE
CONFIGURING THE SCANNER BUTTON
When you first connect your scanner to a computer, the scanner’s
software configures the scanner button to scan in black and white for a
magazine article and send the scanned image to the PaperPort desktop.
But, you can change the button’s settings by selecting new options from
the button’s Configuration dialog box.
You display the Configuration dialog box from either the shortcut menu
or the Windows Start menu.
To display the Configuration dialog box:
1. Choose Programs from the Windows Start menu and then
ScanSoft PaperPort 8.0 and OneTouch Configure.
You can also just right-click the scanner icon at the bottom right
corner of the Windows desktop and then choose Configure from
the shortcut menu that appears.
Scanner icon
The Configuration dialog box appears.
2. Click the Scan tab on the Configuration dialog box if it is not already selected.
Page 21

CONFIGURING THE SCANNER BUTTON 17
ABOUT THE CONFIGURATION DIALOG BOX
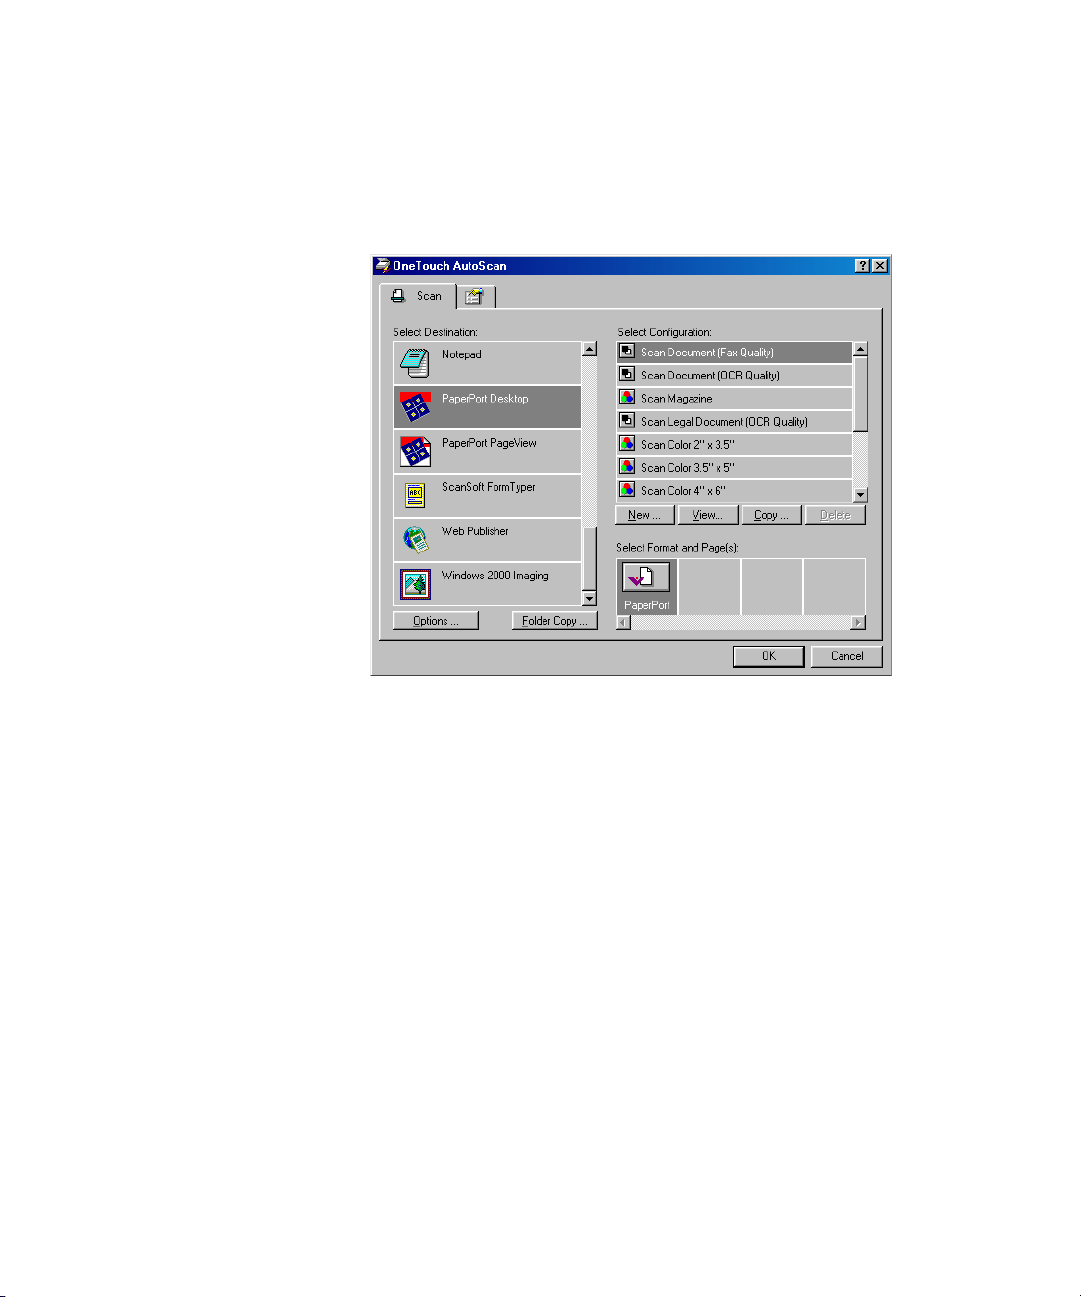
The Configuration dialog box shows the current settings for the scanner
button.
For example, the following figure shows the settings pre-selected when
you first receive your scanner. The Scan button is set up to scan the item
with the configuration named Scan Document, and then after the
scanning is finished, to open the PaperPort desktop to display the
scanned image. The Format and Page(s) setting is to scan in the
PaperPort image format.
Select a software
application to
send the scanned
image to that
application.
Select format
and page(s)
options for the
button.
Click this
tab to set
preferences.
Select a setting
for scanning
the item.
The icons next to the Configuration indicate the type of scanning:
Color GrayscaleBlack and White
The options on the Configuration dialog box are:
Select Destination—the list of applications that can open to display the
scanned image. Select the application that you want to automatically
open to display or process the scanned image. The example above only
shows PaperPort, but you can display a full list of other applications on
Page 22

18 VISIONEER STROBE XP 100 SCANNER INSTALLATION GUIDE
your computer that you can use with the scanner. To see the list, click
the Preferences tab at the top of the dialog box. See “Setting
Preferences” on page 24 for more information.
Select Configuration—the list of the button’s scan configurations. The
configuration settings include: color, black and white, or grayscale,
resolution in dots per inch (dpi), page size, contrast, and brightness. To
see the a configuration’s settings, click its icon in the list. Click the icon
again to close the detailed information.
Clicking an icon expands
the configuration to show
its settings.
You can also click the View button to see more detailed information
about the selected configuration.
Select Format and Page(s)—a set of options for selecting a format for
the scanned image. The formats are bitmap and PaperPort. Bitmaps are
usually for photos or artwork. The bitmap format is available when you
select a destination application other than PaperPort.
Options—displays a dialog box for selecting options about the
destination application for the scanned image. Each destination
application has its own options dialog box.
Folder Copy—displays a dialog box for selecting the folder to use for
storing copies of the scanned images.
Page 23

CONFIGURING THE SCANNER BUTTON 19
SELECTING NEW SETTINGS FOR THE BUTTON
You can select a new destination application, configuration, and image
format for the scanner button to optimize it for the type of scanning
you want to do.
To select new settings for the scanner button:
1. Scroll the list of applications in the Select Destination list and click
the new application you want to use to view and work with the
scanned image.
See “Setting Preferences” on page 24 to display a full list of the
destination applications that you can use with the scanner.
Note: If you select a word processing program such as Microsoft WordPad or Microsoft Word and a configuration for OCR, the text in scanned images is automatically converted to word processing text by the optical character recognition (OCR) software that you receive with the scanner. The converted text then appears in the selected destination application.
2. Click a selection in the Select Configuration list to choose a new
scan configuration for the scanner button.
To scan in color: select one of the configurations indicated by the
small color icon, such as the Scan Magazine configuration.
The configurations are preset for the destination application you
select in the Select Destination list. If you select another
application, the configurations are for that application.
3. Select one of the Format and Page(s) options for the button.
4. Click OK.
Now when you press the scanner button, it scans the image using
the new configuration settings and displays the scanned image in
the new destination application.
Page 24

20 VISIONEER STROBE XP 100 SCANNER INSTALLATION GUIDE
CREATING NEW BUTTON CONFIGURATIONS
You cannot change settings such as brightness or contrast of the preset
configurations. To scan with settings other than those offered by the
preset configurations, you must first create a new configuration for the
scanner button.
To create a new configuration:
1. Scroll the list of applications in the Select Destination list and click
the application for which you want to create a new configuration.
2. Click the New button on the Configuration dialog box.
A dialog box appears for creating a new configuration.
3. Type a name, such as Special Scan for Dark Print.
Note: If you select a printer or other device in the Select Destinations list, the dialog box may have an additional tab for setting specific options or the particular device.
4. Select the scan settings that you want for the new configuration.
Mode—Select Black/White to scan in black and white. For
example, letters and memos are usually scanned in black and white.
Select Grayscale to scan items such as documents containing
Page 25

CONFIGURING THE SCANNER BUTTON 21
drawings or black and white photographs. The scanning produces
an image in varying shades of gray. Select Color to scan color
photographs and other color items.
Resolution—Drag the slider to the right or left to adjust the dots
per inch (dpi) of the resolution. The maximum resolution is 600
dpi; the minimum is 100 dpi. The higher the dpi setting, the
sharper and clearer the scanned image. However, higher dpi settings
take longer to scan and produce larger files for the scanned images.
Brightness and Contrast—Drag the sliders to the right or left to
adjust the brightness and contrast of the scanned image. The
Contrast setting does not apply to the Black/White mode.
5. Click the Page Settings tab to select the scan page settings.
Page Size—Choose a page size from the drop-down list. The
outlines on the picture represent the various page sizes. Clicking
one of those outlines also selects it as the page size for the scan. If
you select the Custom option from the drop-down list, boxes
appear in place of the picture. Enter the horizontal and vertical page
dimensions in the boxes.
AutoCrop—This option lets the scanner automatically determine
the size of the item being scanned. For example, if you scan an
unusual page size, the scanner will automatically determine the size
of the page. This option overrides the Page Size menu selection.
Page 26

22 VISIONEER STROBE XP 100 SCANNER INSTALLATION GUIDE
DeScreen—Select this option when scanning a picture from a
newspaper or magazine article, or other items that contains images
with patterns or dots. Scans of patterns or dots sometimes have a
distorted or wavy appearance. The scanner scans the item to
compensate for the patterns and dots, and produces a clearer image.
The following example shows the effect of descreening a scanned
image from a magazine article.
Original Image Descreened Image
The scanning may slow down a bit when descreen is selected. You
don’t need to select this option when scanning photographs. The
DeScreen setting does not apply to the Black/White mode.
Gamma—The gamma setting adjusts the range of midtone colors
on an image. By changing the gamma you can adjust midtone levels
without losing details from the lightest or darkest areas. You use the
gamma correction to achieve precise color matching of the original
image and how it looks on your computer monitor. Because the
computer cannot always transmit the exact color information to the
hardware, you may have to make some color adjustments using the
gamma feature.
In most cases, however, the default gamma setting works fine and
normally does not need to be adjusted.
6. Click OK.
The Configuration dialog box reappears. Now you can select your
new configuration for the scanner button.
7. Select your new configuration in the Configuration list.
8. Click OK on the Configuration dialog box.
The new configuration and its settings now apply to the button.
Page 27
CONFIGURING THE SCANNER BUTTON 23
EDITING YOUR SCANNER’S BUTTON CONFIGURATIONS
You cannot edit the preset configurations; you can only edit the scanner
button configurations that you created yourself.
To edit a configuration:
1. Display the Configuration dialog box.
2. Select the configuration that you want to edit. It must be one of the
configurations you created. You cannot edit the preset button
configurations.
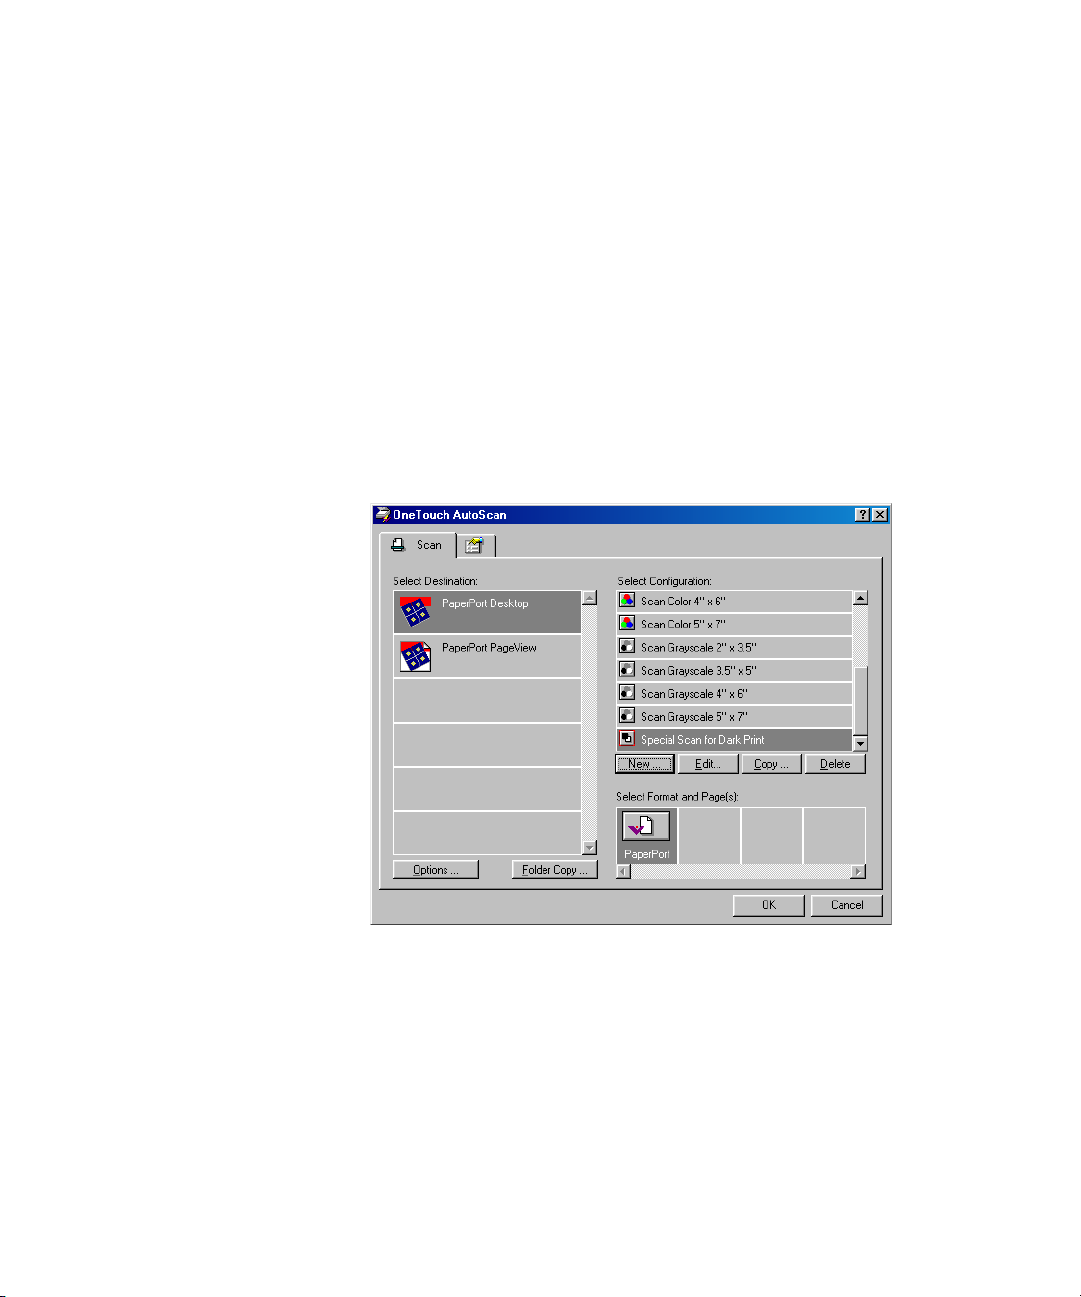
This example shows a configuration that you would have created
earlier named Special Scan for Dark Print.
3. Click the Edit button.
The dialog box with the Scan Settings and Page Settings appears.
4. Edit the settings that you want and click OK.
Page 28

24 VISIONEER STROBE XP 100 SCANNER INSTALLATION GUIDE
SETTING PREFERENCES
The preferences remain the same for each configuration that you select
for the scanner button.
To set preferences:
1. Click the Preferences tab on the Configuration dialog box.
Preferences tab
The Preferences dialog box appears.
2. Select the preferences for the OneTouch software.
Show All Destinations—Clicking this option automatically selects
all the destination applications categories. The list of destination
applications on the Configuration dialog box will include all the
applications on your computer that fall into these categories.
Select Destinations—Select this option to individually choose the
types of applications to include in the list of destination
applications. Click in the boxes for the types of applications to
include.
Show Scan Progress Window—Select this option to see the
window that shows a rendition of the image during the scanning.
Page 29
CONFIGURING THE SCANNER BUTTON 25
Here is a sample of the Configuration dialog box with the Show All
Destinations option selected. As you can see, the Select Destination
list now includes a complete list of applications on your computer
that can receive your scanned images.
The list will also include printers and other devices connected to
your computer so, for example, you can scan an item and print it
right away.
3. Click OK.
Page 30

26 VISIONEER STROBE XP 100 SCANNER INSTALLATION GUIDE
SCANNING FROM THE PAPERPORT SOFTWARE
Instead of using the scanner button, you can scan directly from the
PaperPort software. This is particularly helpful when you’re using
PaperPort to file and save your scanned items.
A Note About Your Scanner and the Twain standard: If your
computer is running Windows 98, Me, or 2000, your scanner can use
the Twain standard for scanning. Twain is a widely recognized
procedure that computers use to receive images from scanners, digital
cameras, and other digital devices. The PaperPort software application
that you received with your scanner uses the Twain standard, and this
Installation Guide shows how to scan with it. Many other graphics and
imaging applications also comply with the Twain standard, so you can
use your scanner with those applications too. To use your scanner with
other Twain software, please see their user guides.
If your computer is running Windows XP: instead of using the Twain
standard, your scanner uses Microsoft’s Windows Image Application
standard for scanning, which is also available from other applications.
Therefore, you can use your scanner with other applications on a
computer running Windows XP too. See “Scanning from a Computer
Running Windows XP” on page 33.
Page 31

SCANNING FROM THE PAPERPORT SOFTWARE 27
SCANNING FROM A COMPUTER RUNNING WINDOWS 98, ME, OR 2000
The instructions in this section are for computers running Windows 98,
Me, or 2000. If your computer is running Windows XP, see “Scanning
from a Computer Running Windows XP” on page 33.
To scan an item from PaperPort:
1. If the PaperPort software isn’t currently running, click the Windows
Start button and from the Programs menu, choose ScanSoft
PaperPort 8.0 and then choose the PaperPort program.
The PaperPort desktop appears.
Scan icon Folders Pane
2. Click the Scan icon on the PaperPort command bar.
Page 32

28 VISIONEER STROBE XP 100 SCANNER INSTALLATION GUIDE
The Folders pane (which shows folders for organizing your scanned
images) is replaced by the Scan pane. You use the Scan pane for
scanning.
Scan Pane
Click this Scan button to
display the Scan Window
3. From the Scanner drop-down list, select your Strobe XP 100 scanner.
4. In the “Scan what?” section, choose to scan a Document or Photograph.
5. Click Settings
to choose the format for the scanned item’s file
name, and the type of file. A dialog box appears to choose those
settings.
6. Click the Scan button at the bottom of the Scan pane.
Page 33

SCANNING FROM THE PAPERPORT SOFTWARE 29
The Strobe XP 100 Scan window opens. You use the Scan window
to select scanning options and to start the scanner.
You click Scan here when you’re ready to scan
instead of pressing the button on the scanner.
7. Select the options for the item you’re scanning.
The options for scanning are:
■ Black and White—scans in black and white. The scanning pixels
are all the same size and are either black or white. Use this setting
for letters, memos, pen and ink drawings, and other black and
white material. This setting produces the smallest file size for
scanned items.
■ Gray—scans the image using up to 256 true shades of gray. Use
this setting to scan black and white photographs and other higher
quality black and white images. You can also scan a color photo
with this setting to turn its colors into gray shades. The file size is
about one third the size of a color scan.
Page 34

30 VISIONEER STROBE XP 100 SCANNER INSTALLATION GUIDE
■ Color—scans the image in full color. Use this setting to scan color
photographs and other color images. The file size is the largest of
the color mode options.
Note: You can see the file size at the bottom of the Scan window.
■ Resolution (dpi)—determines the amount of detail you can see in
the scanned image. The resolution setting for a scan is in dots-perinch (dpi). The higher the resolution, the finer the details,
however, higher dpi settings also take longer to scan and produce
larger files sizes. Usually the higher resolution settings are used for
precision work, such as photographs or fine artwork.
■ Scan Size—selects the size of the item you’re scanning. Choose a
scan size from the drop-down list. The dotted red outline on the
picture area represents the scan size. You can drag the edges and
corners of the red selection box to fit the image.
■ Filter—the descreen filter removes the patterns or dots that
sometimes give a distorted or wavy appearance to pictures from
magazines or newspapers. See page 22 for an example.
■ Brightness—the lightness or darkness of the image. Drag the
slider to make the image lighter or darker.
■ Contrast—the difference between the lighter and darker shades in
the images. Drag the slider to increase or decrease the contrast.
■ Gamma—the range of midtone colors on an image. By changing
the gamma you can adjust midtone levels without losing details
from the lightest or darkest areas.
■ Highlight/Shadow—Images have light and dark areas. The
highlight is the lightest spot on an image; shadow is the darkest
spot. The range of colors between the highlight and shadow
determines the range of colors of the image. Using the Highlight/
Shadow sliders, however, you can extend the original range of
colors between the highlight and shadow to reveal more details in
the midrange colors.
■ Unit—toggles the units on the ruler around the preview picture
from inches to centimeters.
Page 35

SCANNING FROM THE PAPERPORT SOFTWARE 31
■ Reset—returns all the settings on the Scan window to their
original values.
■ Calibrate—displays the dialog box for recalibrating the scanner.
■ Scan—starts the scanner.
■ Cancel—closes the Scan window without scanning.
8. When you’re ready to scan, insert the item, face down, into the
scanner’s Paper Feed until the scanner grabs it. Align the item with
the alignment arrow.
Alignment arrow
The scanner grabs the top edge of the paper.
Don’t press the button on the scanner. The scanner will scan, but it
will use the settings from the OneTouch software instead of the
PaperPort software.
9. To scan with the settings you’ve just selected from the PaperPort
software, click Scan on the Scan window.
The scanner starts scanning and a progress box shows the image as
it is being scanned.
Page 36

32 VISIONEER STROBE XP 100 SCANNER INSTALLATION GUIDE
A thumbnail image of the scanned item appears on the PaperPort
desktop.
You can now use the features of the PaperPort software to work
with the scanned image. See the PaperPort User’s Guide on the CD
that you received with the scanner.
Page 37

SCANNING FROM THE PAPERPORT SOFTWARE 33
SCANNING FROM A COMPUTER RUNNING WINDOWS XP
The instructions in this section are for computers running Windows XP.
If your computer is running another version of Windows, see “Scanning
from a Computer Running Windows 98, Me, or 2000” on page 27.
To scan an item:
1. If the PaperPort software isn’t currently running, click the Windows
Start button and from the All Programs menu, choose the
ScanSoft PaperPort 8.0 program and then choose PaperPort.
The PaperPort desktop appears.
Scan icon Folders Pane
2. Click the Scan icon on the PaperPort command bar.
Page 38

34 VISIONEER STROBE XP 100 SCANNER INSTALLATION GUIDE
The Folders pane (which shows folders for organizing your scanned
images) is replaced by the Scan pane. You use the Scan pane for
scanning.
Scan Pane
Click this Scan button to
display the Scan Window
3. From the Scanner drop-down list, select your WIA Strobe XP 100 scanner.
4. In the “Scan what?” section, choose to scan a Document or Photograph.
5. Click Settings
to choose the format for the scanned item’s file
name, and the type of file. A dialog box appears to choose those
settings.
6. Click the Scan button at the bottom of the Scan pane.
Page 39

SCANNING FROM THE PAPERPORT SOFTWARE 35
The Strobe XP 100 Scan window opens. You use this Scan window
to select scanning options and to start the scanner.
7. Click the button most appropriate for the item you’re scanning.
To scan with the Custom Settings button see the next section, “Fine
Tuning Your Scans”.
8. When you’re ready to scan, insert the item, face down, into the
scanner’s Paper Feed until the scanner grabs it. Align the item with
the alignment arrow.
Alignment arrow
The scanner grabs the top edge of the paper.
9. Now click the Scan button. The scanner starts scanning and a
thumbnail of the image appears on the PaperPort desktop.
Page 40

36 VISIONEER STROBE XP 100 SCANNER INSTALLATION GUIDE
FINE TUNING YOUR SCANS
You can select new settings before you scan an item to fine tune exactly
how you want to scan a particular item.
To select the scanner settings before you scan:
1. On the Strobe XP 100 Scan window, click the text Adjust the quality of the scanned picture.
Click this text to
fine tune your scans
The Advanced Properties dialog box appears.
Page 41

SCANNING FROM THE PAPERPORT SOFTWARE 37
2. Select the options for scanning.
Brightness and Contrast—Drag the sliders to the right or left to
adjust the brightness and contrast of the scanned image. The
Contrast setting does not apply to the setting Black and White
picture or text.
Resolution (DPI)—Click the drop-down list and choose the dots
per inch (dpi) of the resolution. The maximum resolution is 600
dpi; the minimum is 100 dpi. The higher the dpi setting, the
sharper and clearer the scanned image. However, higher dpi settings
take longer to scan and produce larger files for the scanned images.
Picture type—Click the drop-down menu and choose the most
appropriate type for the item you’re scanning.
3. Click OK.
The Custom Settings button is now set to scan with the options
you selected.
If you want to reset the settings and start over, click Reset.
Now when you click the Scan button on the Strobe XP 100 Scan
window the scanner starts scanning using your new settings.
Page 42

38 VISIONEER STROBE XP 100 SCANNER INSTALLATION GUIDE
CALIBRATING AND CLEANING YOUR SCANNER
You calibrated your scanner when first installing it, but after many
hours of use you may find that scanned images may not be a sharp and
clear as when you originally began using the scanner. In that case,
recalibration may solve the problem.
If your scanned images have streaks, smudges, or dirt spots, you may
need to use the Cleaning Paper that you received with the scanner.
The process to calibrate and clean your scanner is slightly different for
Windows XP than for Windows 98, 2000, and Me. Please make sure to
use the correct process below.
To recalibrate or clean your scanner for Windows 98, 2000, or Me:
1. Start the PaperPort software.
2. Click the Scan icon on the PaperPort command bar.
3. Click the Scan button on the PaperPort Scan pane.
The Strobe XP 100 Scan window opens.
Page 43

CALIBRATING AND CLEANING YOUR SCANNER 39
4. Click the Calibrate button.
The Calibrate Page window opens.
5. Follow the instructions on the window and then click the appropriate button.
Remember to store the Calibration Paper and the Cleaning Paper in
their plastic bags for future use.
Do not discard the Cleaning Paper. It can be reused several times if
necessary.
Page 44

40 VISIONEER STROBE XP 100 SCANNER INSTALLATION GUIDE
To recalibrate or clean your scanner for Windows XP:
1. Click the Windows Start button and choose Control Panel.
The Control Panel window appears.
2. Choose Scanners and Cameras.
3. In the Scanners and Cameras window double-click the Strobe XP 100 icon.
The Control Panel for the Strobe XP 100 appears.
Page 45

4. Click the Advanced tab.
CALIBRATING AND CLEANING YOUR SCANNER 41
5. To recalibrate the scanner, insert a Calibration Paper into the
scanner, then click the Calibrate button.
To clean the scanner, insert the Cleaning Paper into the scanner,
then click the Clean button.
If additional cleaning is necessary, add a few drops of alcohol or
similar liquid solution to the Cleaning Paper and clean the scanner
again.
Remember to store the Calibration Paper and the Cleaning Paper in
their plastic bags for future use.
Do not discard the Cleaning Paper. It can be reused several times if
necessary.
Page 46

42 VISIONEER STROBE XP 100 SCANNER INSTALLATION GUIDE
TROUBLESHOOTING
In addition to the troubleshooting information contained in this
section, please see the Readme file in the PaperPort directory on your
computer’s hard drive. The Readme file contains additional information
that may help you diagnose problems with the scanner.
Online help information is also available. Press F1 on the keyboard to
see the help.
If you try all the troubleshooting procedures described in this section
and in the Readme file, and the scanner still has problems, you may
have a malfunctioning scanner. Please see the technical support card
that you received with your scanner for technical assistance telephone
numbers. Also visit our web site at www.visioneer.com for additional
technical information.
Problem: The scanner won’t scan. What’s wrong?
Check for one of these possible problems:
• Is the cable loose or not plugged in securely? Inspect the cable
connections. Make sure the cable is plugged in securely.
• Did you restart the computer after installing the software? If you
didn’t restart the computer, it may not have loaded all of the software
files. Try restarting your computer.
• Did you plug the scanner into a USB hub? If you’re using a USB
hub to connect the scanner, the hub must have its own power supply.
If the hub does not have its own power supply, plug the scanner into
a different USB port on the computer.
• Did you select another scanning source in the PaperPort Scan
Pane? If you use multiple devices with your computer, you may have
selected another source for images. Start the PaperPort software and
click the Scan icon and then make sure Strobe XP 100 is selected as
the scanner.
Page 47

TROUBLESHOOTING 43
Problem: I scanned an item from PaperPort and then, to scan the
next item, I decided to press the scanner’s button. But now the
scanner won’t scan. What’s wrong?
You have to close PaperPort first. Then the scanner button will start the
scanning. This occurs because you already scanned from PaperPort and
the scanner expects you to scan from there and not from the scanner
button.
Problem: During installation I got the error message: PaperPort
Installation is not complete. What do I do?
The installation procedure was not successful. You need to reinstall the
PaperPort software.
Problem: I got the error message: PaperPort cannot allocate enough
memory to perform internal critical operations. What do I do?
Close any other active applications so that additional memory is
available. If you click Continue, PaperPort moves the file to the
PaperPort data directory and renames the file with the prefix “bad.”
This allows you to recover the file later.
To recover the file, you can import it into PaperPort by using the Import
command in the File menu.
Problem: How do I uninstall PaperPort?
See the next section. Uninstalling does not delete your scanned items,
and they remain in the PaperPort Data folder.
Page 48

44 VISIONEER STROBE XP 100 SCANNER INSTALLATION GUIDE
HOW TO UNINSTALL YOUR SCANNER
To uninstall the Visioneer Strobe XP 100 scanner, you remove the
scanner software first, and then remove the PaperPort software, or other
software you installed for the scanner.
STEP 1: UNINSTALLING THE VISIONEER ONETOUCH SOFTWARE
FOR WINDOWS 98, 98 SE, AND ME:
1. Click Start on the Windows taskbar.
2. Choose Settings then Control Panel from the menu.
3. Double-click the Add/Remove Programs icon.
The Add/Remove Programs Properties window opens. Make sure
the Install/Uninstall tab is selected.
4. Scroll the menu of software and select OneTouch Version 3.0.
5. Click the Add/Remove button.
The Select Uninstall Method window opens.
6. Make sure the Automatic option is selected.
Page 49

HOW TO UNINSTALL YOUR SCANNER 45
Important: The Automatic option is selected by default. Visioneer recommends using the Automatic option. The other options are for advanced users only.
7. Click Next.
The Perform Uninstall window opens.
8. Click Finish.
The Visioneer OneTouch software is uninstalled from your
computer. The status light on the scanner turns amber indicating
that the scanner and computer are no longer communicating.
9. If the Remove Shared Components window opens, Visioneer recommends selecting No to All.
10. Unplug the USB cable from your computer and scanner.
11. Close the Add/Remove Program Properties window and the Control Panel window.
12. Restart your computer.
FOR WINDOWS 2000 AND XP:
1. Click Start on the Windows taskbar.
2. For Windows 2000 choose Settings then Control Panel from the menu.
For Windows XP, choose Control Panel from the menu.
3. Double-click the Add/Remove Programs icon.
The window that opens is named Add/Remove Programs
(Windows 2000) or Add and Remove Programs (Windows XP).
4. In the left column of the window, make sure the Change or Remove Programs option is selected.
5. Select the icon for OneTouch Version 3.0.
Page 50

46 VISIONEER STROBE XP 100 SCANNER INSTALLATION GUIDE
6. Click the Change/Remove button.
If two buttons appear instead of a single Change/Remove button,
click Remove.
The Select Uninstall Method Window opens.
7. Make sure the Automatic option is selected.
Important: The Automatic option is selected by default. Visioneer recommends using that option. The other options are for advanced users only.
8. Click Next. The Perform Uninstall window opens.
9. Click Finish.
The Visioneer OneTouch software is uninstalled from your
computer. The status light on the scanner turns amber indicating
that the scanner and computer are no longer communicating.
10. Unplug the USB cable from your computer and scanner.
11. Close the Add or Remove Programs window and the Control Panel window.
12. Restart your computer.
Page 51

HOW TO UNINSTALL YOUR SCANNER 47
STEP 2: UNINSTALLING THE PAPERPORT SOFTWARE
1. Click Start on the Windows taskbar.
2. Choose Settings then Control Panel from the menu.
3. Double-click the Add/Remove Programs icon.
Windows 98, 98SE, or ME: The Add/Remove Programs Properties
window opens. Make sure the Install/Uninstall tab is selected.
Windows 2000 or XP: The Add or Remove Programs window
opens. Make sure the Change or Remove option is selected in the
left column.
4. Scroll the menu of software and select PaperPort 8.0.
5. For Windows 98, 98SE, or ME: Click the Add/Remove button.
For Windows 2000 or XP: Click the Change/Remove button.
The PaperPort Uninstall window opens.
6. Carefully read the Warning information. Click Next.
7. If the Remove Shared Files window opens, select No to All.
Important: Visioneer recommends choosing No to All. Removing shared files could cause other applications not to run correctly.
The PaperPort software is removed. A message appears offering to
keep or remove your scanned image files currently stored on the
computer.
8. Click the No to keep your image files, click Yes to remove the image
files from your computer permanently.
Important: Files created by PaperPort are in a proprietary format (with a .max extension) and cannot be opened by other applications. If you decide to keep your scanned image files and want to be able to view them, you can use the PaperPort Viewer instead of the PaperPort application. Download the viewer from Visioneer’s Web site at
www.visioneer.com
You may see a note about missing software. Click OK.
Page 52

48 VISIONEER STROBE XP 100 SCANNER INSTALLATION GUIDE
9. For Windows XP: Click Finish.
10. Close the Remove Programs From Your Computer window. Close the Control Panel.
11. Restart your computer.
CONTACTING VISIONEER US AND CANADA TECHNICAL
UPPORT
S
Please see the chart below for contact telephone numbers.
Free Support on the Web www.visioneer.com
Support by Fax (541) 884-8474
Support by Telephone
(8:00 am - 5:00 pm Pacific Time, Monday-Friday)
Long distance charges may apply
Express Telephone Support
(8:00 am - 5:00 pm Pacific Time, Monday-Friday)
(541) 884-5548
(900) 776-5724
(Nominal per-minute fee)
Page 53

CONTACTING VISIONEER—INTERNATIONAL TECHNICAL SUPPORT 49
CONTACTING VISIONEER—INTERNATIONAL TECHNICAL
UPPORT
S
Visioneer provides technical support to all registered users in English
and German. Please see the chart below for contact telephone numbers.
For Latin America, call our U.S. Technical Support (1-541-884-5548).
Visioneer bietet allen registrierten Benutzern technische Unterstützung
auf Deutsch und Englisch. Die Kontakttelefonnummern können Sie
der folgenden Tabelle entnehmen.
Usuarios en Latinoamérica, sírvanse llamar al teléfono de apoyo técnico
en los (1-541-884-5548).
Country Te l e p h o n e
Monday - Friday
UK 0870 161 3003
Germany 0180 5 103 003
Rest of Europe 49 1805 440466
Visit www.visioneer-europe.com for more information
Important: Information about contacting Visioneer is subject to change. Please visit our Web site at www.visioneer.com for the latest details.
Page 54

50 VISIONEER STROBE XP 100 SCANNER INSTALLATION GUIDE
VISIONEER STROBE XP 100 SCANNER SPECIFICATIONS
Optical resolution 600 dpi
Bit Depth 36-Bit color (internal, 12-bit a/d converter
recognition, over 68 billion colors)
12-Bit gray (internal, 4096 shades of gray)
Output Bit Depth 24-bit color, 8-bit grayscale, 1-bit black and
white
Scan Method Fast Sheet fed
Interface USB
Scanner dimensions
Height 1.5 inches (3.81 cm)
Width 2.0 inches (5.08 cm)
Length 11.4 inches (28.96 cm)
Weight 11.2 ounces (0.350 kg)
Operating temperature 50°–104° F (5°–35° C without condensation)
Relative humidity 20%–80% (@35° C without condensation)
Safety and agency certifications UL, FCC Class B,
VCCI Class B, CE
Hardware warranty One-year limited warranty
 Loading...