


VirtualReScan 4.0
Installation Guide
10300468-000
Revision A

Copyright
Copyright © 2005 Kofax Image Products, Inc. All Rights Reserved. Printed in USA.
The information contained in this document is the property of Kofax Image Products, Inc.
Neither receipt nor possession hereof confers or transfers any right to reproduce or disclose
any part of the contents hereof, without the prior written consent of Kofax Image Products,
Inc. No patent liability is assumed, however, with respect to the use of the information
contained herein.
Trademarks
Kofax, the Kofax logo, VirtualReScan, the “VRS VirtualReScan” logo, ImageControls, and
Adrenaline are registered trademarks of Kofax Image Products, Inc.; and VRS is a trademark
of Kofax Image Products, Inc.
ISIS is a registered trademark of Pixel Translations, a division of Captiva Software
Corporation.
TWAIN is a registered trademark of the TWAIN Working Group.
All other product names and logos mentioned herein are the property of their respective
companies.
Disclaimer
The instructions and descriptions contained in this document were accurate at the time of
printing. However, succeeding products and documents are subject to change without
notice. Therefore, Kofax Image Products, Inc. assumes no liability for damages incurred
directly or indirectly from errors, omissions, or discrepancies between the product and this
document. An attempt has been made to state all allowable values where applicable
throughout this document. Any values or parameters used beyond those stated might have
unpredictable results.

Contents
How to Use This Guide . . . . . . . . . . . . . . . . . . . . . . . . . . . . . . . vii
Introduction . . . . . . . . . . . . . . . . . . . . . . . . . . . . . . . . . . . . . . . . . . . . . . . . . . . . . . . . . . . vii
How this Guide is Organized . . . . . . . . . . . . . . . . . . . . . . . . . . . . . . . . . . . . . . . . . . viii
Related Documentation . . . . . . . . . . . . . . . . . . . . . . . . . . . . . . . . . . . . . . . . . . . . . . . . . ix
Training . . . . . . . . . . . . . . . . . . . . . . . . . . . . . . . . . . . . . . . . . . . . . . . . . . . . . . . . . . . . . . . . x
Technical Support . . . . . . . . . . . . . . . . . . . . . . . . . . . . . . . . . . . . . . . . . . . . . . . . . . . . . . xi
1 Overview . . . . . . . . . . . . . . . . . . . . . . . . . . . . . . . . . . . . . . . . . . . 1
Introduction . . . . . . . . . . . . . . . . . . . . . . . . . . . . . . . . . . . . . . . . . . . . . . . . . . . . . . . . . . . . 1
Using VRS with Your Scanner . . . . . . . . . . . . . . . . . . . . . . . . . . . . . . . . . . . . . . . . . . . . 2
VRS Plus Features . . . . . . . . . . . . . . . . . . . . . . . . . . . . . . . . . . . . . . . . . . . . . . . . . . . . . . . 3
VRS Scanners: Certified vs. Non-Certified . . . . . . . . . . . . . . . . . . . . . . . . . . . . . . . . . . 4
VRS Component Installers . . . . . . . . . . . . . . . . . . . . . . . . . . . . . . . . . . . . . . . . . . . . . . . . 5
Using VRS with the Adrenaline Image Processing Engine . . . . . . . . . . . . . . . . . . . . 6
VRS System Requirements . . . . . . . . . . . . . . . . . . . . . . . . . . . . . . . . . . . . . . . . . . . . . . . 7
Minimum Requirements . . . . . . . . . . . . . . . . . . . . . . . . . . . . . . . . . . . . . . . . . . . . . . . . 7
Recommended Requirements . . . . . . . . . . . . . . . . . . . . . . . . . . . . . . . . . . . . . . . . . . . 7
TWAIN and ISIS Considerations. . . . . . . . . . . . . . . . . . . . . . . . . . . . . . . . . . . . . . . . . . . 7
USB and FireWire Considerations . . . . . . . . . . . . . . . . . . . . . . . . . . . . . . . . . . . . . . . . . 8
VRS Installation Guide iii

Certified Operating Systems . . . . . . . . . . . . . . . . . . . . . . . . . . . . . . . . . . . . . . . . . . . . . . 8
Certified Interfaces . . . . . . . . . . . . . . . . . . . . . . . . . . . . . . . . . . . . . . . . . . . . . . . . . . . . . . 8
Certified SCSI Scanner Controllers . . . . . . . . . . . . . . . . . . . . . . . . . . . . . . . . . . . . . . . . . 8
Installation Scenarios. . . . . . . . . . . . . . . . . . . . . . . . . . . . . . . . . . . . . . . . . . . . . . . . . . . . . 9
VRS and Ascent Capture. . . . . . . . . . . . . . . . . . . . . . . . . . . . . . . . . . . . . . . . . . . . . . . . 9
Other Kofax Products . . . . . . . . . . . . . . . . . . . . . . . . . . . . . . . . . . . . . . . . . . . . . . . . . 10
Adrenaline SCSI Scanner Controller Requirements . . . . . . . . . . . . . . . . . . . . . . . . . 11
Minimum System Requirements . . . . . . . . . . . . . . . . . . . . . . . . . . . . . . . . . . . . . . . . 11
PCI Slot Requirements. . . . . . . . . . . . . . . . . . . . . . . . . . . . . . . . . . . . . . . . . . . . . . . . . 11
Supported Operating Systems . . . . . . . . . . . . . . . . . . . . . . . . . . . . . . . . . . . . . . . . . . 11
Peripheral Support. . . . . . . . . . . . . . . . . . . . . . . . . . . . . . . . . . . . . . . . . . . . . . . . . . . . 12
2 Installing VRS . . . . . . . . . . . . . . . . . . . . . . . . . . . . . . . . . . . . . . 13
Introduction . . . . . . . . . . . . . . . . . . . . . . . . . . . . . . . . . . . . . . . . . . . . . . . . . . . . . . . . . . . 13
Installation Sequence . . . . . . . . . . . . . . . . . . . . . . . . . . . . . . . . . . . . . . . . . . . . . . . . . . . 14
Install the VRS Software . . . . . . . . . . . . . . . . . . . . . . . . . . . . . . . . . . . . . . . . . . . . . . . . 15
Activating Your VRS License After Installation . . . . . . . . . . . . . . . . . . . . . . . . . . . . . 29
Licensing VRS . . . . . . . . . . . . . . . . . . . . . . . . . . . . . . . . . . . . . . . . . . . . . . . . . . . . . . . . 29
Demonstration Mode . . . . . . . . . . . . . . . . . . . . . . . . . . . . . . . . . . . . . . . . . . . . . . . . 29
Evaluation Mode . . . . . . . . . . . . . . . . . . . . . . . . . . . . . . . . . . . . . . . . . . . . . . . . . . . 30
Activating Your VRS License Without an Internet Connection . . . . . . . . . . . . . . 33
Install the SCSI Scanner Controller . . . . . . . . . . . . . . . . . . . . . . . . . . . . . . . . . . . . . . . 35
Attach the Scanner . . . . . . . . . . . . . . . . . . . . . . . . . . . . . . . . . . . . . . . . . . . . . . . . . . . . . 37
TWAIN Installations . . . . . . . . . . . . . . . . . . . . . . . . . . . . . . . . . . . . . . . . . . . . . . . . . . 37
USB and FireWire Installations . . . . . . . . . . . . . . . . . . . . . . . . . . . . . . . . . . . . . . . . . 38
iv VRS Installation Guide

Post USB/FireWire Driver Installation Procedure . . . . . . . . . . . . . . . . . . . . . . . 38
Verify the Scanner Connection . . . . . . . . . . . . . . . . . . . . . . . . . . . . . . . . . . . . . . . . 40
Resolve the Found New Hardware Wizard Event . . . . . . . . . . . . . . . . . . . . . . . . . . 42
Install the Scanning Application . . . . . . . . . . . . . . . . . . . . . . . . . . . . . . . . . . . . . . . . . 44
Updating VRS . . . . . . . . . . . . . . . . . . . . . . . . . . . . . . . . . . . . . . . . . . . . . . . . . . . . . . . . . 45
Activating the Windows XP Look and Feel . . . . . . . . . . . . . . . . . . . . . . . . . . . . . . . . 46
3 Testing Your VRS Installation . . . . . . . . . . . . . . . . . . . . . . . . . 47
Introduction . . . . . . . . . . . . . . . . . . . . . . . . . . . . . . . . . . . . . . . . . . . . . . . . . . . . . . . . . . . 47
Testing VRS with an ImageControls Application . . . . . . . . . . . . . . . . . . . . . . . . . . . 48
Testing VRS with an ISIS Application . . . . . . . . . . . . . . . . . . . . . . . . . . . . . . . . . . . . . 50
Testing VRS with a TWAIN Application . . . . . . . . . . . . . . . . . . . . . . . . . . . . . . . . . . 52
4 Installing an Adrenaline SCSI Scanner Controller. . . . . . . . . 55
Introduction . . . . . . . . . . . . . . . . . . . . . . . . . . . . . . . . . . . . . . . . . . . . . . . . . . . . . . . . . . . 55
Install the Software . . . . . . . . . . . . . . . . . . . . . . . . . . . . . . . . . . . . . . . . . . . . . . . . . . . . . 56
Install the SCSI Scanner Controller . . . . . . . . . . . . . . . . . . . . . . . . . . . . . . . . . . . . . . . 63
Precautions . . . . . . . . . . . . . . . . . . . . . . . . . . . . . . . . . . . . . . . . . . . . . . . . . . . . . . . . . . 63
Create or Configure a Scan Source . . . . . . . . . . . . . . . . . . . . . . . . . . . . . . . . . . . . . . . . 65
5 Testing Your Adrenaline SCSI Scanner Controll er . . . . . . . . 67
Introduction . . . . . . . . . . . . . . . . . . . . . . . . . . . . . . . . . . . . . . . . . . . . . . . . . . . . . . . . . . . 67
Testing with VCDemo . . . . . . . . . . . . . . . . . . . . . . . . . . . . . . . . . . . . . . . . . . . . . . . . . . 68
VRS Installation Guide v

6 Removing VRS . . . . . . . . . . . . . . . . . . . . . . . . . . . . . . . . . . . . . 71
Introduction . . . . . . . . . . . . . . . . . . . . . . . . . . . . . . . . . . . . . . . . . . . . . . . . . . . . . . . . . . . 71
Removing VRS and Related Components . . . . . . . . . . . . . . . . . . . . . . . . . . . . . . . . . . 71
Deactivating Your License Without an Internet Connection. . . . . . . . . . . . . . . . . 76
A Creating or Configuring a Scan Source. . . . . . . . . . . . . . . . . 79
Introduction . . . . . . . . . . . . . . . . . . . . . . . . . . . . . . . . . . . . . . . . . . . . . . . . . . . . . . . . . . . 79
Creating a Scan Source . . . . . . . . . . . . . . . . . . . . . . . . . . . . . . . . . . . . . . . . . . . . . . . . . . 80
Updating Source Configuration Settings . . . . . . . . . . . . . . . . . . . . . . . . . . . . . . . . . . 87
B VRS Non-Interactive Mode . . . . . . . . . . . . . . . . . . . . . . . . . . . 89
Introduction . . . . . . . . . . . . . . . . . . . . . . . . . . . . . . . . . . . . . . . . . . . . . . . . . . . . . . . . . . . 89
C Using VCDemo . . . . . . . . . . . . . . . . . . . . . . . . . . . . . . . . . . . . . 91
Introduction . . . . . . . . . . . . . . . . . . . . . . . . . . . . . . . . . . . . . . . . . . . . . . . . . . . . . . . . . . . 91
Starting VCDemo . . . . . . . . . . . . . . . . . . . . . . . . . . . . . . . . . . . . . . . . . . . . . . . . . . . . . . 92
Toolbar . . . . . . . . . . . . . . . . . . . . . . . . . . . . . . . . . . . . . . . . . . . . . . . . . . . . . . . . . . . . 94
File Menu . . . . . . . . . . . . . . . . . . . . . . . . . . . . . . . . . . . . . . . . . . . . . . . . . . . . . . . . . . 95
Source Menu . . . . . . . . . . . . . . . . . . . . . . . . . . . . . . . . . . . . . . . . . . . . . . . . . . . . . . . 96
View Menu . . . . . . . . . . . . . . . . . . . . . . . . . . . . . . . . . . . . . . . . . . . . . . . . . . . . . . . . 97
Imaging Menu. . . . . . . . . . . . . . . . . . . . . . . . . . . . . . . . . . . . . . . . . . . . . . . . . . . . . . 98
Help Menu. . . . . . . . . . . . . . . . . . . . . . . . . . . . . . . . . . . . . . . . . . . . . . . . . . . . . . . . . 99
Index. . . . . . . . . . . . . . . . . . . . . . . . . . . . . . . . . . . . . . . . . . . . . 101
vi VRS Installation Guide

How to Use This Guide
Introduction
This guide includes the information that you will need to successfully install and test
VirtualReScan (VRS). The guide outlines the basic system requirements and gives you
step-by-step procedures for installing and testing VRS. Additionally, the guide
includes instructions for installing and testing an Adrenaline SCSI scanner controller
on your computer.
This guide is written with the assumption that you are familiar with basic Windows
functionality and that you know how to set up and use a scanner with your scanning
application.
VRS Installation Guide vii

How this Guide is Organized
This guide consists of the following chapters and appendices:
Chapter 1 - Overview gives a synopsis of the VirtualReScan (VRS) product and
outlines the requirements for running VRS. This chapter also gives an overview of
Adrenaline SCSI scanner controllers and related system requirements.
Chapter 2 - Installing VRS includes the step-by-step VRS installation and license
activation procedure.
Chapter 3 - Testing Your VRS Installation describes how to test your VRS
installation with an ImageControls-based application, an ISIS application, and a
TWAIN application.
Chapter 4 - Installing an Adrenaline SCSI Scanner Controller explains how to
install a Kofax Adrenaline SCSI scanner controller and configure a source
associated with it.
Chapter 5 - Testing Your Adrenaline SCSI Scanner Controller explains how to test
your Kofax Adrenaline SCSI scanner controller with VCDemo, an ImageControlsbased scanning application.
Chapter 6 - Removing VRS explains how to remove VRS and related components.
Appendix A - Creating or Configuring a Scan Source explains the procedure for
using the Kofax Source Manager to add or update a scan source.
Appendix B - VRS Non-Interactive Mode explains how to switch VRS from noninteractive mode to interactive mode.
viii VRS Installation Guide

Appendix C - Using VC Demo gives an overview of VCDemo, a demonstration
application that is included in every VRS and Adrenaline SCSI scanner controller
installation.
Related Documentation
The VRS Installation Guide is just one piece in the VRS documentation set. Your VRS
product package also includes related documentation, as outlined in this section.
VRS User’s Manual
The VRS User’s Manual includes instructions for using VRS and explains the product
features in detail. The manual is intended for all potential scan operators, regardless of
their scanning expertise. This manual is available in PDF format from the VRS user
interface and also from your installation CD. If desired, you can order a printed
manual from the Kofax Web site.
VRS Online Help
The online help provides on-screen assistance with the VRS product. You can access
the online help by pressing F1 from the VRS user interface, or by selecting “VRS Help”
from the Help menu in the VRS Interactive Viewer.
VRS Release Notes
Late-breaking product information is available from the VRS Release Notes. Read the
release notes carefully, as they contain information that may not be available in the
other VRS documentation.
VRS Installation Guide ix

Training
Kofax offers both classroom and computer-based training that will help you make the
most of your Kofax solution. Visit the Kofax Web site at www.kofax.com for complete
details about the available training options and schedules.
x VRS Installation Guide

Technical Support
For technical information about Kofax products, visit the Kofax Web site at
www.kofax.com and select an appropriate option from the Support menu. The Kofax
Support pages provide product-specific information, such as current revision levels,
the latest drivers and software patches, online documentation and user manuals,
updates to product release notes (if any), technical tips, and an extensive searchable
knowledgebase. You can find VRS FAQs on the VRS Support pages.
The Kofax Web site also contains information that describes support options for Kofax
products. Please review the site for details about the available support options. If you
need to contact Kofax Technical Support, please have the following information
available:
• VRS version and build number.
• Scanning application software version.
• Operating system and service pack version.
• Scanner make and model.
• SCSI scanner controller (if applicable).
• Special/custom configuration or integration information.
VRS Installation Guide xi

xii VRS Installation Guide

Chapter 1
Overview
Introduction
This guide gives you important information about installing and testing VRS,
including:
• System requirements that must be met to ensure a successful VRS installation.
• Background information that will help you during the VRS installation process.
• Step-by-step instructions that walk you through the VRS installation procedure.
• Procedures for testing VRS with your scanning application.
Additionally, this guide includes the information that you need to install and test an
Adrenaline SCSI scanner controller on your computer.
Before installing VRS or an Adrenaline SCSI scanner controller, you should review this
chapter to familiarize yourself with important background information and details
about system requirements.
VRS Installation Guide 1

Using VRS with Your Scanner
The VRS license categories are based on support for feature sets (VRS Standard and
VRS Plus), as well as scanner throughput (pages per minute or ppm). VRS can be used
with a wide range of certified scanners that accommodate different levels of
throughput. For details about VRS Plus features, see the next section.
Table 1-1. VRS License Categories
License Description
VRS Standard Supports standard VRS features; used
VRS for Desktop Scanners Supports standard VRS features, VRS Plus
VRS for Workgroup/Departmental
Scanners
VRS for Production Scanners Same as VRS for Workgroup/
primarily with certified scanners with
throughput up to 40 ppm.
features, and certified scanners with
throughput up to 25 ppm.
Supports standard VRS features, VRS Plus
features, and certified scanners with
throughput from 25 to 50 ppm. Also
supports the Adrenaline Image Processing
Engine with Enhanced Bar Code features.
Departmental Scanners, with additional
support for scanner throughput that
exceeds 50 ppm.
2 VRS Installation Guide

VRS Plus Features
In addition to the standard features that are available with every VRS installation,
another set of features is available to users whose license supports VRS Plus:
• Automatic color detection.
• Background smoothing.
• Content-based rotation.
• Blank page deletion.
• White background cropping and deskew.
Users who have a Desktop, Workgroup/Departmental, or Production class license
have access to VRS Plus features; users with a Standard license have the option of
previewing VRS Plus features by selecting Tools | Enable Plus Features Demo from the
VRS Interactive Viewer. While the VRS Plus Features Demo is enabled, users can take
advantage of the features listed above and a “Kofax Demo” stamp is applied to all
scanned images. For more information about the VRS Standard and VRS Plus feature
sets, refer to the VRS User’s Manual or the VRS online help.
VRS Installation Guide 3

VRS Scanners: Certified vs. Non-Certified
When a scanner is certified for VRS, it goes through a rigorous testing process during
which the best default settings are identified and selected. For this reason, we
recommend that you use VRS only with certified scanners. Also, Kofax Technical
Support is available only for VRS-certified scanners. You can use the VRS product page
on the Kofax Web site at www.kofax.com to view the list of VRS-certified scanners. In
addition to listing the scanner name and manufacturer, the VRS product page includes
the following information:
• Driver used for VRS (TWAIN, ISIS, or Kofax SCSI).
• Black or white background support.
• Additional memory required for optimal performance (if applicable).
• Interface certified by VRS (SCSI, USB, or FireWire).
VRS is capable of working with some non-certified or “compatible” scanners, if they
have been configured with the Kofax Source Manager (KSM). It is important to be
aware that you may experience less than optimal image quality when using a noncertified scanner with VRS. Not every scanner can be used with VRS. To be compatible
with VRS, a non-certified scanner must meet the following requirements:
• Ability to output a 256-level grayscale image as a single image.
• TWAIN driver or ISIS driver support. While VRS works best with an ISIS driver,
it also supports some scanners with TWAIN drivers.
To use a non-certified scanner with VRS, you should install the VRS software
according to the instructions in Chapter 2. When prompted to select a scanner during
the VRS installation, select the check box labeled “I will configure my scanner later.”
You will need to install the scanner driver on your own, and then use the Kofax Source
Manager to create a source for the new scanner and make it available to VRS. After
4 VRS Installation Guide

completing the VRS installation, refer to Appendix A, Creating or Configuring a Scan
Source on page 79 to create a scan source for a non-certified scanner.
VRS Component Installers
During the VRS installation process, you are prompted to select the name of your
scanner from a list of certified scanners. The VRS installer uses the name of the certified
scanner to identify the appropriate drivers to install. Because the list of VRS-certified
scanners is updated on a continual basis, some scanners may not be certified in time to
be published in the list that is presented during the installation process. Drivers for
these unlisted certified scanners are made available as “VRS Component Installers,”
which you can download from the Kofax Web site after completing the VRS
installation process. To locate the appropriate VRS Component Installer for your
scanner, refer to the Downloads Library, which is available from the Support pages on
the Kofax Web site.
If you require a VRS Component Installer, complete the standard VRS installation
process according to the instructions in this guide (refer to Install the VRS Software on
page 15). When prompted to select a scanner, select the “I will configure the scanner
later” check box. After the installation is finished, check the Kofax Web site to locate
and download the VRS Component Installer update with the drivers required for your
scanner.
VRS Component Installers are available only for scanners that have been certified for
use with VRS. Non-certified scanners can be used with VRS if they meet the
requirements outlined in VRS Scanners: Certified vs. Non-Certified on page 4.
VRS Installation Guide 5

Using VRS with the Adrenaline Image Processing Engine
The VRS for Workgroup/Departmental Scanners license and the VRS for Production
Scanners license both support the Adrenaline Image Processing Engine (AIPE), which
offers image processing features such as standard bar code reading, forms recognition,
line removal, and much more. As an option, Enhanced Bar Code recognition is also
available with AIPE. See the Enhanced Bar Code Engine appendix in the VRS User’s
Manual for more information on how to take full advantage of this functionality.
Note Because AIPE features are supported only with ImageControls-based and ISISbased applications, the AIPE capabilities will not work with TWAIN applications. If
you need these capabilities in connection with a TWAIN application, you can
download the Adrenaline TWAIN Data Source from the Kofax Web site.
6 VRS Installation Guide

VRS System Requirements
Ensure that you meet the minimum requirements before attempting to install VRS.
Using the recommended requirements will help to assure optimal VRS performance.
Minimum Requirements
• Pentium 4, 1.4 GHz processor, 256 MB RAM.
• Hard drive with 300 Mbytes free disk space for installation.
• Monitor resolution: 800 x 600.
Recommended Requirements
• Pentium 4, 2.0 GHz processor, 512 MB of RAM for color.
• Hard drive with 300 Mbytes free disk space for installation.
• Monitor resolution: 1024 x 768.
Note To check for additional information related to system requirements, visit the
Support pages on the Kofax Web site at www.kofax.com and select the Scanner
Configurator link or the Knowledgebase link.
TWAIN and ISIS Considerations
All VRS scanners are supported by either TWAIN or ISIS drivers. Although some of
these scanners will work with both TWAIN and ISIS drivers, only the driver that
works best with VRS will be certified and supported. If your scanner is certified with a
TWAIN driver, refer to TWAIN Installations on page 37 and follow the instructions that
apply to your scanner. It is not necessary to install an ISIS driver, as VRS includes all
VRS Installation Guide 7

the necessary ISIS software to control the certified scanners. For details, select the VRS
Supported Configurations link from the Support pages on the Kofax Web site.
USB and FireWire Considerations
Some VRS scanners are supported by a USB or FireWire interface. If your scanner
requires a USB or FireWire interface, there may be specific installation instructions that
apply to your scanner. Refer to USB and FireWire Installations on page 38 for more
information.
Certified Operating Systems
VRS has been certified to work on the following operating systems:
• Windows XP Professional.
• Windows 2000 Professional.
You can consult the Kofax Web site for updated information related to operating
systems and service packs.
Certified Interfaces
Only USB, SCSI, and FireWire interfaces are certified with VRS at this time.
Certified SCSI Scanner Controllers
You can consult the Kofax Web site for updates to VRS-supported SCSI scanner
controllers.
8 VRS Installation Guide

Installation Scenarios
If you currently have VRS 3.5 (or later) installed, you can successfully upgrade to
VRS 4.0 without removing your existing installation. If your current VRS installation is
a version released prior to VRS 3.5, it is necessary to upgrade to VRS 3.5 before
upgrading to VRS 4.0. If necessary, verify your existing VRS version by selecting the
About tab from the VRS Interactive Properties dialog box.
If you currently have Software VRS 2.x, you may be required to purchase a VRS 4.0
license (for details, consult with your VRS salesperson). If you are currently running
Hardware VRS 1.03, 1.04, or 1.05, you are required to remove all instances of Hardware
VRS prior to installing VRS 4.0.
You may install VRS 4.0 in conjunction with other Kofax products, except as follows:
VRS 4.0 should not be installed on a system with Hardware VRS versions 1.02, 1.03,
1.04, and 1.05. To ensure optimal VRS performance, refer to the documentation that
accompanied your other Kofax product for specific recommendations.
For more information about removing VRS, refer to Removing VRS on page 71. For
details about upgrading your VRS installation, refer to the VRS Release Notes in your
product package.
VRS and Ascent Capture
VRS 4.0 is included in all Kofax Ascent Capture 7 installations. VRS does not have to be
installed separately because it is included automatically in the Ascent Capture 7
installation process. For details, refer to the Ascent Capture and Ascent Capture Internet
Server Installation Guide.
VRS Installation Guide 9

Other Kofax Products
To get the most up-to-date information about installation of Kofax products, you can
use the Scanner Configurator on the Kofax Web site. The Scanner Configurator can be
used to determine if a particular combination of Kofax products is recommended. The
Scanner Configurator does not list installation order, however. Refer to the
documentation that accompanied your other Kofax product(s) for installation
instructions. See Technical Support on page xi for information on how to contact Kofax
if you need assistance in determining the proper installation order.
10 VRS Installation Guide

Adrenaline SCSI Scanner Controller Requirements
If you are installing an Adrenaline SCSI scanner controller, it should be installed in a
computer that meets the requirements outlined below. For the installation procedure,
refer to Installing an Adrenaline SCSI Scanner Controller on page 55.
Minimum System Requirements
• Pentium 4, 450 MHz.
• 128 MB of RAM.
• Others as required by your scanner. For specific computer requirements, refer to
your scanner documentation or the Scanner Configurator from the Support pages
on the Kofax Web site at www.kofax.com.
PCI Slot Requirements
• 5 Volt PCI slot that can accommodate the length of the controller (175 mm). This
short length is not the same as the Low Profile PCI (LPPCI) specification.
• 32-bit transfer connector (minimum). A 64-bit transfer connector may be used, as
long as it uses 5 Volt signaling.
Supported Operating Systems
• Windows XP Professional.
• Windows 2000 Professional.
VRS Installation Guide 11

Peripheral Support
In order to be properly supported by Kofax, your scanner must be certified to work
with the Adrenaline 450/650/650i SCSI scanner controller. To determine if your
scanner is a certified device, use the Scanner Configurator from the Support pages on
the Kofax Web site at www.kofax.com.
12 VRS Installation Guide

Chapter 2
Installing VRS
Introduction
This chapter explains the basic VRS installation sequence. The applicability of the steps
in the sequence may vary slightly, according to your VRS license and the throughput
supported by the scanner that you plan to use with VRS (refer to Table 1-1 on page 2).
You can check the label on the outside of your VRS product package to verify your
VRS license category.
Before you start the VRS installation process, gather the following:
• VRS installation CD.
•VRS-certified scanner.
• SCSI scanner controller and supporting documentation (if applicable).
• Kofax-certified scanner cable.
Note To get detailed information about Kofax-certified scanner cables, you can select
the Scanner Configurator link from the Kofax Web site at www.kofax.com.
VRS Installation Guide 13

Installation Sequence
You should complete the VRS installation sequence in this order:
1 Install the VRS software (page 15).
2 Install the SCSI scanner controller - if applicable (page 35).
3 Attach the scanner - if applicable (page 37).
4 Resolve the Found New Hardware Wizard Event - if applicable (page 42).
5 Install the scanning application (page 44).
14 VRS Installation Guide

Install the VRS Software
This section explains how to install the VRS 4.0 software. If you currently have VRS 3.5
installed, you can successfully upgrade to VRS 4.0 without removing the existing
instance of VRS. If you have an earlier VRS version, you will need to upgrade to
VRS 3.5 before upgrading to VRS 4.0. For additional guidelines, refer to Installation
Scenarios on page 9 and to the VRS Release Notes in your product package.
X To install the VRS software
1 Close all applications on the computer where you want to install VRS and make
sure that you are logged in as a user with Administrator permissions.
Note Although Administrator permissions are required for the user who
performs the VRS installation, no special permissions are required to use the
VRS application.
2 Insert the VRS installation CD in the appropriate drive. The CD supports
AutoPlay, so the installation will automatically start (if it does not start, run
Setup.exe from the root folder of the installation CD).
If you do not have AutoPlay enabled, select Start| Run and do one of the
following:
•Type D:\setup.exe, where D: is the CD-ROM drive. Click OK.
• Click Browse, navigate to the CD-ROM drive, select setup.exe, and click
Open. From the Run dialog box, click OK.
The VRS installation will begin.
A successful VRS installation requires Microsoft .NET Framework 1.1, which
will be automatically installed if it does not already exist on your computer. If
VRS Installation Guide 15

Microsoft .NET Framework 1.1 does already exist on your computer, the
installer will detect it and proceed to the next phase of the installation process.
Note If Microsoft .NET Framework 1.1 is installed during the VRS installation
process, and you later cancel without completing the entire installation,
Microsoft .NET Framework 1.1 will remain intact and the VRS components
will be removed.
A successful VRS installation also requires Microsoft Internet Explorer 6, which
is available from your installation CD. If the installer does not detect Internet
Explorer 6 on your computer, you will be prompted to install it.
16 VRS Installation Guide

3 The Welcome screen will display, as shown in Figure 2-1.
Figure 2-1. VirtualReScan Welcome Screen
Select one of the installation options that includes the VRS software:
•Install VRS only.
• Install VRS and an Adrenaline SCSI Controller.
If you plan to install the Adrenaline SCSI scanner controller without the VRS
software, you should bypass the procedure in this chapter and proceed to
Chapter 4, Installing an Adrenaline SCSI Scanner Controller on page 55.
VRS Installation Guide 17
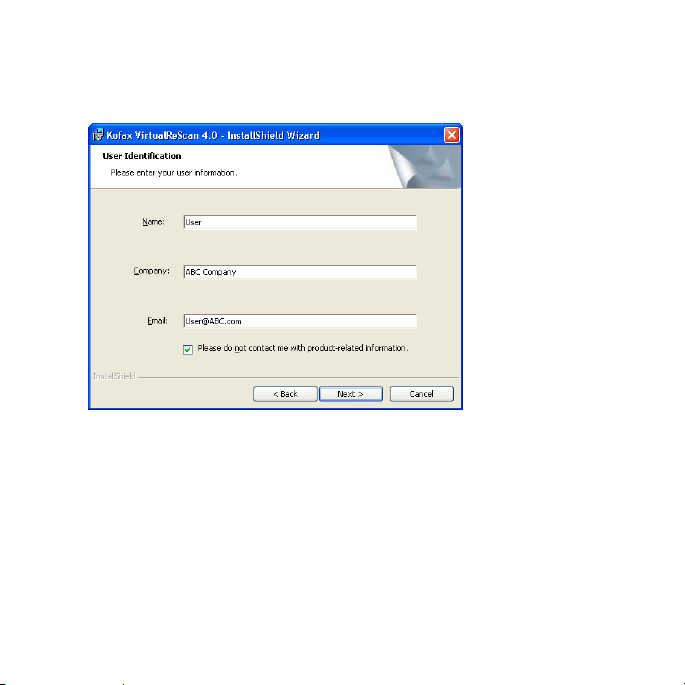
4 The User Identification screen will appear, as shown in Figure 2-2. If you intend
to install VRS in demonstration mode, you can click Next to bypass this screen.
For more information, refer to Demonstration Mode on page 29.
Figure 2-2. User Identification Screen
Do the following:
• Enter your name, company name, and email address.
• If you do not want to receive Kofax product information via email, select the
check box.
• Click Next.
18 VRS Installation Guide

5 The Product Information screen will display, similar to Figure 2-3.
Figure 2-3. Product Information Screen
VRS Installation Guide 19

The information that you need to fill out this screen is available from a preprinted label sheet (refer to Figure 2-4) that is included in your VRS product
box.
Part Number
Serial Number
Product Code
Figure 2-4. Sample Product Information Label
Do one of the following:
• Enter the VRS 4.0 part number, serial number, and product code, as provided
on the license label sheet in your product box (refer to Figure 2-4). Click Next.
• If you intend to install VRS in demonstration mode, leave the entries blank
and click Next to bypass the Product Information screen. In this case, click
“No” when the confirmation prompt displays, to indicate that you are
intentionally bypassing the screen.
Note Please keep the VRS license label in a safe location for future reference.
20 VRS Installation Guide

6 The Destination Folder screen will display, similar to Figure 2-5.
Figure 2-5. Destination Folder Screen
The VRS installation analyzes your system for the amount of space available on
the default drive and lists the Space Required and Space Available values below
the destination folder information.
Accept the default installation folder, which typically is C:\Program
Files\Kofax\Imgctls, or click Change to select another destination. Your
default destination folder may differ from the one described here.
VRS Installation Guide 21

When installing to a drive other than C:, you can verify disk space on the other
drive before proceeding. To check the disk space on an alternate drive:
a From the Destination Folder screen, click Disk Space.
b At the screen similar to Figure 2-6, select a drive from the list. The values for
available and required space will be updated on this screen and on the
Destination Folder screen.
c Click OK to close the screen and return to the VRS installation wizard.
Figure 2-6. Disk Space Settings
7 Click Next to confirm the installation folder. If there is not enough disk space to
continue the installation, you will be notified via a message box:
There is not enough space to install the option(s). Please
free up some disk space or modify your selections.
In this situation, click OK to clear the message. Then click Cancel and Exit Setup
from the subsequent screens to cancel the VRS installation. Once you have
created more disk space, restart the VRS installation.
22 VRS Installation Guide

8 The Certified Scanners screen will display, similar to Figure 2-7.
Figure 2-7. Certified Scanners Screen
Do one of the following:
• Select your VRS-certified scanner from the list and click Next.
• Select the “I will configure my scanner later” check box if you plan to
download a VRS Component Installer for a VRS-certified scanner that does
not appear on the list, and then click Next. For more information, refer to VRS
Component Installers on page 5.
• Select the “I will configure my scanner later” check box if you plan to use VRS
with a non-certified scanner, and then click Next. When using a non-certified
scanner, you will need to use the Kofax Source Manager from the Windows
VRS Installation Guide 23

Control Panel to configure the scanner to work with VRS. For more
information, refer to Appendix A, Creating or Configuring a Scan Source on
page 79.
Note In a limited number of cases, two versions of the same scanner appear on
the Certified Scanners list, with one of them designated for “non-interactive
mode.” Non-interactive mode is the appropriate selection if you want to run
VRS in the background. When non-interactive mode is in effect, you cannot see
or use VRS user interface while documents are being scanned. For more
information, refer to Appendix B, VRS Non-Interactive Mode on page 89.
9 You will be notified when the installation process is ready to begin. If you want
to revise any settings before proceeding with the installation, click Back to
return to the previous screens. Otherwise, click Install to proceed with the
installation process.
A series of update messages will appear while the installation is in progress.
10 If you have Windows XP, a compatibility message may appear if you selected
the VRS installation option that includes an Adrenaline SCSI scanner controller.
24 VRS Installation Guide

If the message appears as shown in Figure 2-8, click “Continue Anyway” to
clear the message and proceed to the next step.
Figure 2-8. Windows XP Logo Compatibility Message
Note If other windows are open while the installation is in progress, you may
have to minimize them to access the compatibility message.
VRS Installation Guide 25

11 The Activate VRS dialog box will display, similar to Figure 2-9, if your product
license supports VRS Plus features.
Figure 2-9. Activate VRS Dialog Box
In the following cases, the Activate VRS dialog box will not display during the
installation process:
• You have a VRS Standard license, which does not support VRS Plus features.
• You bypassed the Product Information screen earlier in the installation
process, because you intend to install VRS in demonstration mode.
26 VRS Installation Guide

12 From the Activate VRS dialog box, you should make the following entries:
a If necessary, you can update the entries in the User Identification section and
the Product Identification section. If desired, select the check box if you do
not want to receive Kofax product information via email.
b The VRS installer will automatically detect and display your machine ID in
the appropriate field. You cannot edit the machine ID.
c In the License Code section, click “Get License Code” to retrieve the code
from the VRS license server. Or, if you already have the license code, enter it
in the text entry field. As another option, leave the license code entry blank if
you intend to install VRS in evaluation mode. Refer to Evaluation Mode on
page 30.
d Click Activate. A confirmation message will display if the activation is
successful. If the installer is unable to connect to the VRS license server, the
“Activate - No Internet Connection” dialog box will display. For
instructions, refer to Activating Your VRS License Without an Internet
Connection on page 33.
13 You will be notified when the VRS installation process is finished. When the
notification appears, click Finish.
14 When prompted, select the option to restart your computer now, and then click
Finish. Do not remove the VRS installation CD until the computer has been
restarted, because it is possible that scanner drivers may be installed after the
computer restarts. The scanner driver installation process may vary, according
to the scanner you selected earlier in the installation process.
15 Once the computer has been restarted and all scanner drivers have been
installed from the CD, remove the installation CD and store it in a safe place.
VRS Installation Guide 27

16 If applicable to your situation, proceed with the download process for a VRS
Component Installer. A VRS Component Installer is required if both of the
following apply:
• You plan to use a VRS-certified scanner that did not appear on the scanner list
presented earlier in the VRS installation process.
• You selected the “I will configure my scanner later” check box during the
VRS installation procedure.
Note To check on the availability of a VRS Component Installer for your
scanner, select the Downloads Library link from the Kofax Web site Support
pages. For more information, refer to VRS Component Installers on page 5.
28 VRS Installation Guide

Activating Your VRS License After Installation
To be eligible for VRS product updates and technical support, you must activate the
license. If you did not activate your VRS license during the installation process, you
can use the procedure in this section to activate your license.
Licensing VRS
If you install VRS without activating the product license, VRS will run in either
demonstration mode or evaluation mode and a reminder will display each time that
you start VRS. VRS runs in demonstration mode if you have not purchased the product
yet. In demonstration mode, you have full access to VRS functionality and the Kofax
logo is stamped on all scanned images. VRS runs in evaluation mode if you have
purchased a product license that has not yet been activated.
Whether you are running VRS in demonstration mode or evaluation mode, you have
access to options for activating a product license.
Demonstration Mode
When you run VRS in demonstration mode, a reminder message appears each time
that you select VRS to indicate that scanned images will be stamped with the Kofax
logo, as shown in Figure 2-10.
Figure 2-10. VRS Demonstration Mode Reminder
VRS Installation Guide 29

Evaluation Mode
When you run VRS in evaluation mode, a reminder message appears each time that
you select VRS, as shown in Figure 2-11. In this mode, VRS is fully functional for a
specific number of days, as listed on the dialog box. When the evaluation period
expires, VRS will switch to demonstration mode if the license has not been activated.
Figure 2-11. Activate VRS Reminder Dialog Box
X To activate your license
1 Do one of the following:
• From the Activate VRS Reminder dialog box, click Activate Now.
• From the Windows Start menu, select Kofax VRS | Activate VRS.
• From the VRS Interactive Viewer and select Help | Activate VRS.
Note If VRS is running in demonstration mode, you cannot activate a VRS
license unless the product has been purchased.
30 VRS Installation Guide

2 The Activate VRS dialog box will display, similar to Figure 2-12.
Figure 2-12. Activate VRS Dialog Box
3 The User Identification and Product Identification sections may be already
filled in, based on entries made during the VRS installation process. If desired,
you can update the entries and select the check box if you do not want to
receive Kofax product information via email. If either section is blank, you
should fill in the required information. To locate the information required for
the Product Identification section, refer to page 19 and page 20.
VRS Installation Guide 31

4 Do one of the following to enter the license code:
• If you do not have a license code, click Get License Code to automatically
obtain the license code from the Kofax license server. If your Internet
connection is not working, you will not be able to receive the code. In that
case, the Activate - No Internet Connection dialog box will display. Refer to
the next section for instructions on how to obtain the license code without a
working Internet connection.
• If you have obtained the VRS license code from another source, enter it in the
text box.
5 Click Activate. A confirmation dialog box will display, indicating that the
license activation process was successful.
32 VRS Installation Guide

Activating Your VRS License Without an Internet Connection
If an Internet connection is not available when you click “Get License Code” from the
Activate VRS dialog box, you will have to use an alternate method to obtain the
required license code. In this case, the Activate - No Internet Connection dialog box
will display and list the options that are available to you.
Figure 2-13. Activate - No Internet Connection Dialog Box
X To activate your license without an Internet connection
1 When the Activate - No Internet Connection dialog box displays, review the on-
screen instructions that explain the three methods for obtaining a license code
without an Internet connection. Whichever method is selected, you will need to
provide the license information contained in the file Activate.txt, which
VRS Installation Guide 33

you can locate by using the path shown on the Activate - No Internet
Connection dialog box.
2 Click OK to close the Activate - No Internet Connection dialog box.
3 Select one of the following methods to contact Kofax for the purpose of starting
the VRS license activation process:
• From another computer with a working Internet connection, send an email
request to activatevrs@kofax.com. You must attach the Activate.txt file
to the email message. The path to the file is listed in the Activate - No Internet
Connection dialog box.
• From another computer with a working Internet connection, launch the
browser and open to http://activate.kofax.com/vrs.During the
activation process, you will need to copy information from the
Activate.txt file and paste it into the form on the Web site. The path to the
file is listed in the Activate - No Internet Connection dialog box.
• Send a request to Kofax via fax at (949) 727-3099. You should print a copy of
the Activate.txt file and include it in your fax message. The path to the
file is listed in the Activate - No Internet Connection dialog box.
Note Unless you specify otherwise, Kofax will send the license code to the
email address that is specified in the Activate.txt file.
4 Once you obtain the license code from Kofax, enter it into the License Code
section of the Activate VRS dialog box, which you can access from the Windows
Start menu or the Help menu in the VRS Interactive Viewer.
34 VRS Installation Guide

Install the SCSI Scanner Controller
This section describes how to install a SCSI scanner controller in your computer. If you
will not be using a SCSI scanner controller, skip this section and proceed to Attach the
Scanner on page 37.
X To install the SCSI scanner controller
1 Shut down your computer and unplug the power cord.
2 Do one of the following:
• If you are using a Kofax Adrenaline 450, 650, or 650i SCSI scanner controller,
refer to Installing an Adrenaline SCSI Scanner Controller on page 55.
• If you are using a non-Kofax SCSI scanner controller, install it in your
computer according to the instructions supplied by the manufacturer.
3 Once the SCSI scanner controller has been installed, plug in the power cord and
start your computer.
VRS Installation Guide 35

4 If you have Windows XP, a compatibility message will appear. Click “Continue
Anyway” to clear the message and proceed to the next step.
Figure 2-14. Windows XP Logo Compatibility Message
Note If other windows are open while you install the SCSI scanner controller,
you may need to minimize them to access the compatibility message.
5 Right-click on My Computer. Select Properties| Hardware | Device Manager.
6 Once the list of devices appears, select SCSI and RAID Controllers and expand
the node to verify that the name of your SCSI scanner controller appears. For
Kofax SCSI scanner controllers, the name will be listed as “Kofax Adrenaline
450/650/650i.”
36 VRS Installation Guide

Attach the Scanner
Your scanner may already be attached to your computer. If not, you can follow the
procedure in this section to ensure that the scanner and computer are properly
connected. Verify that you are using a Kofax-certified scanner cable. If necessary, you
can select the Scanner Configurator from the Kofax Web site at www.kofax.com to
verify that you have the appropriate scanner cable.
X To connect the scanner to your computer
1 Make sure to power off the scanner and computer and unplug the power cord
for both.
2 Attach the scanner cable to the scanner and to the appropriate port (SCSI, USB,
or FireWire) on your computer.
3 Plug in the power cord for your scanner and start it.
4 Plug in the power cord for your computer and then start it. Windows may
launch the Found New Hardware Wizard. If so, proceed to Resolve the Found
New Hardware Wizard Event on page 42 and follow the instructions. Otherwise,
VRS will be ready to use once your scanning application is installed.
TWAIN Installations
To install the TWAIN driver for a VRS-certified scanner, follow the manufacturerprovided TWAIN driver installation instructions for your scanner. The TWAIN driver
can be installed before or after the VRS software installation. To install a non-certified
(compatible) VRS scanner, refer to VRS Scanners: Certified vs. Non-Certified on page 4.
VRS Installation Guide 37

USB and FireWire Installations
This section covers the general procedure for installing and configuring USB or
FireWire scanners with VRS. You should also refer to the manufacturer-provided
installation instructions because some scanners have unique requirements.
X To install and configure USB or FireWire scanners
1 Do one of the following, as applicable:
• Plug in the USB cable from your scanner to the USB port on your computer.
• Plug in the FireWire cable from your scanner to the FireWire port on your
computer.
Windows will detect the device and launch the New Hardware Found wizard.
2 Follow the on-screen instructions to locate the necessary driver on the
installation CD supplied with your scanner.
3 Verify that the scanner is installed correctly. Refer to Verify the Scanner
Connection on page 40.
4 Review the Post USB/FireWire Driver Installation Procedure below.
5 Install your scanning application. Refer to Install the Scanning Application on
page 44.
6 Install VRS. For details, refer to Install the VRS Software on page 15.
Post USB/FireWire Driver Installation Procedure
Some scanners are designed to perform particular actions when certain events occur.
For example, some scanners are set to automatically launch the Microsoft scanning or
38 VRS Installation Guide

imaging application when paper is inserted into the automatic document feeder. For
best results, disable all such device events before installing and using VRS.
X To disable device events
1 From the Windows Start menu, select Control Panel | Scanners and Cameras.
2 Select your scanner from the list of installed devices, and then right-click to
select Properties from the shortcut menu.
3 From the scanner properties dialog box, select the Events tab and then select a
device event from the list of scanner events.
4 From the Actions list, select Take no action.
5 Repeat steps 3-4 until all unnecessary device events are disabled.
Note Clear the Take no action selection to restore a device event.
6 Click Apply, and then select OK to close the scanner properties dialog box.
7 Close the Control Panel.
VRS Installation Guide 39

Verify the Scanner Connection
Use this procedure to verify that your scanner is properly connected.
X To check the scanner connection status
1 From the Windows desktop, right-click on My Computer.
2 Select Manage.
3 From the left pane of the Computer Management console, double-click the
Device Manager icon. The devices on your system will appear in the right pane.
4 Expand the Imaging devices node.
Figure 2-15. Computer Management - Imaging Devices
40 VRS Installation Guide

5 If your scanner appears under Imaging devices, as in Figure 2-15, it has
been properly connected to your system. If your scanner is not listed as an
imaging device, check the USB/FireWire cable connection or try restarting the
computer. Then check again to see if the device is listed. If your scanner still is
not connected, you may need to seek technical support assistance from your
scanner manufacturer.
6 Close the Computer Management console.
VRS Installation Guide 41

Resolve the Found New Hardware Wizard Event
Use the procedure in this section to resolve the Found New Hardware Wizard event
that may occur after you have attached the scanner to your computer.
1 When the Found New Hardware Wizard appears, as in Figure 2-16, select to
install the software automatically and then click Next.
Figure 2-16. Windows Found New Hardware Wizard
2 If the wizard is unable to detect the appropriate drivers and files, another
screen will appear. In this case, select the option labeled “Don’t Prompt Me
Again to Install This Software” and click Finish.
3 Select the option to restart your computer.
42 VRS Installation Guide

Alternatively, Windows 2000 users may use the following procedure:
1 At the screen similar to Figure 2-16, insert the VRS installation CD in the
appropriate drive, select to install the software automatically and then click
Next to search for a driver.
2 Select the option to search CD-ROM drives.
3 Select the option to disable the device, click Finish to end, and then select the
option to restart your computer.
VRS Installation Guide 43

Install the Scanning Application
Use the procedure in this section to install the scanning application that you plan to
use with VRS.
Note If desired, you can perform low-volume scanning with Kofax VCDemo or Scan
Demo, the ImageControls-based demonstration scanning applications that are
included with every VRS installation. For more information about VCDemo, refer to
Appendix C, Using VCDemo on page 91.
X To install the scanning application
1 Install your ImageControls-based, TWAIN, or ISIS scanning application
according to the manufacturer’s instructions.
2 Scan some sample documents to ensure that the application is working
properly.
Note If you are installing an ImageControls-based application in conjunction
with other Kofax products, refer to “Installation Scenarios” on page 9.
44 VRS Installation Guide

Updating VRS
Once your VRS license is in effect, you can obtain product updates as they become
available from Kofax. You can check for VRS product updates by selecting the Check
for Updates function.
X To obtain VRS product updates
1 Do one of the following:
• From the Windows Start menu, select All Programs | Kofax VRS | Check for
Updates.
• From the VRS Interactive Viewer menu bar, select Help | Check for Updates.
2 Follow the on-screen instructions to download and install the desired update.
VRS Installation Guide 45

Activating the Windows XP Look and Feel
In a Windows XP environment, the appearance of the VRS user interface is controlled
by a manifest file, which is used to activate the Windows XP “look and feel.” To enable
the Windows XP look and feel for the VRS user interface, you must rename the VRS
manifest file to correspond to the name of the executable file for your scanning
application. By default, the manifest file is located in the Bin folder of your VRS
installation and the path is usually C:\Program Files\Kofax\Imgctls\Bin. By
default, the manifest file is named VCDEM32P.exe.manifest to correspond to the
name of the VCDemo demonstration scanning application, which is included in every
VRS installation.
The manifest file should be copied to the installation directory for your scanning
application and renamed to <Scan application.exe>.manifest. If you do not
rename the manifest file, the Windows XP look and feel will not be enabled in the VRS
user interface. The availability of VRS functionality and features is not affected by the
activation of the Windows XP look and feel in the user interface.
X To enable the Windows XP look and feel in VRS
1 Locate the manifest file in your VRS installation. The path is typically
c:\Program Files\Kofax\Imgctls\Bin\v cdem32p.exe.manifest.
2 Copy VCDEM32P.exe.manifest to the installation directory for your
scanning application.
3 Rename VCDEM32P.exe.manifest to correspond to the name of the
executable file for your scanning application. For example, if XYZ.exe is the
name of the executable for your scanning application, you would rename the
manifest file to XYZ.exe.manifest.
4 Start your scanning application and select VRS.
46 VRS Installation Guide

Chapter 3
Testing Your VRS Installation
Introduction
Once VRS is installed, it is a good idea to test your installation. You may use VRS with
any scanning application that is based on ImageControls, ISIS, or TWAIN. This chapter
explains how to test VRS with three sample scanning applications: VCDemo
(ImageControls-based), QuickScan Pro (ISIS-based), and Microsoft Office Document
Scanning (TWAIN-based).
VRS Installation Guide 47

Testing VRS with an ImageControls Application
VCDemo is an ImageControls-based demonstration application that ships with VRS.
Follow the instructions in this section to test VRS with VCDemo, which is included
automatically in every VRS installation. For more information about VCDemo, refer to
Appendix C, Using VCDemo on page 91.
X To select VRS from VCDemo
1 Power on your scanner and load the document that you want to scan.
2 Turn on your computer.
3 Start Kofax VCDemo.
4 Select the following scan source:
• <My Scanner > with SVRS, where <My Scanner> corresponds to the make
and model of your scanner.
Figure 3-1. Select Scan Source Dialog Box – VCDemo
Note The choice of sources created at the time of installation will vary,
according to the scanner you are using with VRS.
48 VRS Installation Guide

5 Click OK.
The VRS icon will appear in your Windows taskbar, as shown in Figure 3-2.
VRS Taskbar
Figure 3-2. VRS Icon in Windows Taskbar
6 From VCDemo, select Source | Process Image, or Ctrl+I. If the scan completes
successfully, you are ready to use VRS. For more information, refer to the VRS
User’s Manual, which is available in PDF format from the VRS Help menu and
from the VRS installation CD.
VRS Installation Guide 49

Testing VRS with an ISIS Application
Use this procedure to test VRS with QuickScan Pro, which is an ISIS scanning
application.
X To select VRS from QuickScan Pro
1 Power on your scanner and load the document that you want to scan.
2 Turn on your computer.
3 Start QuickScan Pro.
4 From the Scan menu, click Select Scanner.
5 From the Scanner Selection dialog box, select the Kofax VRS Scanner and
click OK.
Figure 3-3. Selecting the Scan Source from QuickScan Pro
50 VRS Installation Guide

6 The VRS icon will appear in the Windows taskbar to indicate that VRS is active,
similar to Figure 3-4.
VRS Taskbar
Figure 3-4. VRS Icon in Windows Taskbar
7 From the Scan menu, select New Batch.
8 The Kofax VRS ISIS interface will be launched. Once you have selected a profile
and other preferences, click Scan to proceed with the scanning session. If the
scanning process completes successfully, you are ready to use VRS. For more
information, refer to the VRS User’s Manual, which is available in PDF format
from the VRS Help menu and from the VRS installation CD.
VRS Installation Guide 51

Testing VRS with a TWAIN Application
Use the procedure in this section to test VRS with Microsoft Office Document
Scanning, which is a TWAIN application.
Note If you have Windows XP, Microsoft Office Document Scanning and Microsoft
Office Document Imaging are available for testing with VRS, if you included them as
part of your Microsoft Office XP installation. Both are TWAIN applications. If you have
Windows 2000, you can test VRS with Microsoft Imaging for Windows, which is also a
TWAIN application.
X To test VRS with Microsoft Office Document Scanning
1 Power on your scanner and load the document that you want to scan.
2 Turn on your computer.
3 Go to Start | Programs | Microsoft Office Tools| Microsoft Office Document
Scanning. The scanning interface will be launched.
52 VRS Installation Guide

4 From the scanning interface, click Scanner to open the Choose Scanner dialog
box.
Figure 3-5. Choose Scanner dialog box
5 Select the “Kofax Software VRS - TWAIN” scan source and click OK.
6 Click Scan.
7 When the Launching Scanner Driver dialog box displays, click OK. The Kofax
VRS TWAIN interface will launch.
8 The VRS icon will appear in the Windows taskbar to indicate that VRS is active,
similar to Figure 3-6.
VRS Taskbar
Figure 3-6. VRS Icon in Windows Taskbar
VRS Installation Guide 53

9 Set your preferences in the VRS TWAIN interface and load the scanner with the
document you want to scan.
10 Click Scan to proceed with the scanning session. As pages are scanned, they
will appear within the Microsoft Office Document Scanning application
window. For more information, refer to the VRS User’s Manual, which is
available in PDF format from the VRS Help menu and from the VRS
installation CD.
54 VRS Installation Guide

Chapter 4
Installing an Adrenaline SCSI Scanner
Controller
Introduction
This chapter includes the information you will need to install and configure a Kofax
Adrenaline SCSI scanner controller. (If you have a non-Kofax scanner controller, it
should be installed according to the manufacturer’s instructions.) This is the
recommended installation sequence for the Kofax Adrenaline SCSI scanner controller:
1 Install the software (page 56).
2 Install the SCSI scanner controller (page 63).
3 Create or configure a source (page 65).
4 Test your installation (page 68).
If you intend to use the Adrenaline SCSI scanner controller with VRS, you can bypass
the procedure for installing the software on page 56. If you have installed VRS
according to the instructions in Chapter 2, the files and drivers required by the
Adrenaline SCSI scanner controller will already be available. If you plan to use the
Kofax Adrenaline SCSI scanner controller without VRS, follow the instructions in this
chapter for installing the files and drivers required by the controller. You will use the
VRS installation CD and select the option to install “Adrenaline SCSI Controller Only.”
For details, refer to the next section.
VRS Installation Guide 55

Install the Software
This section explains how to install the software that provides the files and drivers
required by your Adrenaline SCSI scanner controller. You will need the VRS
installation CD for this procedure.
X To install the software
1 Close all applications on the computer where you want to install the files
required for the Adrenaline SCSI scanner controller, and make sure that you are
logged in as a user with Administrator permissions.
2 Insert the VRS installation CD in the appropriate drive. The CD supports
AutoPlay, so the installation will automatically start (if it does not start, run
Setup.exe from the root folder of the installation CD).
If you do not have AutoPlay enabled, select Start| Run and do one of the
following:
•Type in D:\setup.exe, where D: is the CD-ROM drive. Click OK.
• Click Browse, navigate to the CD-ROM drive, select setup.exe, and click
Open. From the Run dialog box, click OK.
The installation process will begin.
A successful installation requires Microsoft Internet Explorer 6, which is
available from your installation CD. If the installer does not detect Internet
Explorer 6 on your computer, you will be prompted to install it.
A successful installation also requires Microsoft .NET Framework 1.1, which
will be automatically installed if it does not already exist on your system. If
Microsoft .NET Framework 1.1 does already exist on your system, the installer
will detect it and proceed to the next phase of the installation process.
56 VRS Installation Guide
Note If Microsoft .NET Framework 1.1 is installed as part of the installation
process, and you Cancel later without completing the installation,
Microsoft .NET Framework 1.1 will remain intact and the other components
related to your Adrenaline SCSI scanner controller will be removed.
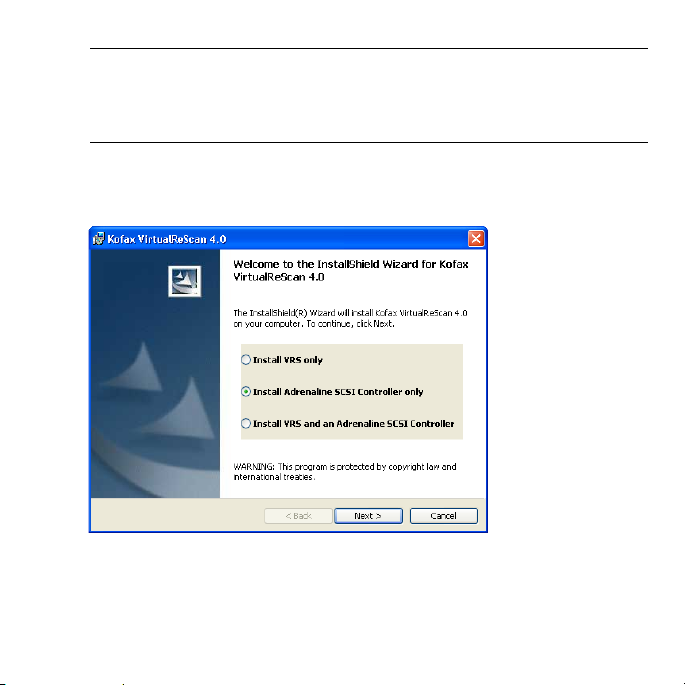
3 When the Welcome screen displays, select the “Install Adrenaline SCSI
Controller only” option and click Next. Refer to Figure 4-1.
Figure 4-1. Welcome Screen
VRS Installation Guide 57

4 The installer analyzes your system for the amount of space available on the
default drive and lists the Space Required and Space Available values below the
destination folder information.
Accept the default installation folder, C:\Program Files\Kofax\Imgctls,
or click Change to select another destination.
Your default destination folder may differ from the one described here.
Figure 4-2. Destination Folder Screen
5 If there is not enough disk space to continue the installation, you will be
notified via a message box:
58 VRS Installation Guide

There is not enough space to install the option(s). Please
free up some disk space or modify your selections.
In this situation, click OK to clear the message. Then click Cancel and Exit Setup
from the subsequent screens to cancel the installation. Once you have created
more disk space, restart the VRS installation process.
–or–
When installing to a drive other than C:, you can verify disk space on the other
drive before proceeding. To check the disk space on an alternate drive:
a From the Destination Folder screen, click Disk Space.
b At the screen similar to Figure 4-3, select a drive from the list. The values for
available and required space will be updated on this screen and on the
VirtualReScan setup page.
c Click OK to close the screen and return to the installation wizard.
Figure 4-3. Disk Space Settings
6 Click Next to confirm the installation folder.
VRS Installation Guide 59

7 The Certified Scanners screen will display, similar to Figure 4-4.
Figure 4-4. Certified Scanners List
Do one of the following:
• Select your scanner from the list and click Next.
• Select the “I will configure my scanner later” check box if your scanner does
not appear on the list. Then click Next.
Note When using a scanner that is not on the list, you will need to use the
Kofax Source Manager to create a source for the Adrenaline SCSI scanner
controller. Refer to Create or Configure a Scan Source on page 65.
60 VRS Installation Guide

8 You will be notified when the installation process is ready to begin. If you want
to revise any setup preferences before proceeding with the installation, click
Back to return to the previous screens. Otherwise, click Install to start the
installation process.
A series of update messages will appear while the installation is in progress.
9 If you have Windows XP, a compatibility message may appear during the
installation process. Click “Continue Anyway” to clear the message and
proceed to the next step.
Figure 4-5. Windows Logo Compatibility Message
VRS Installation Guide 61

Note If other windows are open while the installation is in progress, you may
need to minimize them to access the compatibility message.
10 You will be notified when the installation process is finished. When the
notification appears, click Finish.
11 When prompted, select the option to restart your computer now, and then click
Finish. Do not remove the installation CD until the computer has been
restarted, because it is possible that scanner drivers may be installed after the
computer restarts. The scanner driver installation routine may vary, according
to the scanner selection made earlier in the installation process.
12 Once the computer has been restarted and all scanner drivers have been
installed from the CD, remove the VRS installation CD and store it in a safe
place.
62 VRS Installation Guide

Install the SCSI Scanner Controller
This step gives you the instructions for installing the Adrenaline SCSI scanner
controller in your computer.
Precautions
Follow these precautions when handling your Adrenaline SCSI scanner controller:
• Keep the SCSI scanner controller in its shipping package until installation.
• Turn off and unplug your computer before installing the SCSI scanner controller.
• Discharge static electricity from yourself and the work area by touching the metal
chassis of the computer before handling the SCSI scanner controller.
• Hold the SCSI scanner controller by its edges; do not touch its metal surface.
X To install the SCSI scanner controller
1 Make sure your computer is powered off and unplugged.
2 Wait approximately 10 seconds and remove the shell from the computer.
VRS Installation Guide 63

3 Install the SCSI scanner controller in a PCI slot (refer to PCI Slot Requirements on
page 11).
Figure 4-6. Installing an Adrenaline SCSI Scanner Controller
4 Secure the computer shell back into place.
5 Power on your computer.
6 A message may appear, notifying you that Windows has detected the new
hardware and is searching for its driver. The driver will automatically load.
7 Your Adrenaline SCSI scanner controller will now be ready to use.
64 VRS Installation Guide

Create or Configure a Scan Source
A scan source associated with your Adrenaline SCSI scanner controller must be
selected each time you use your scanning application.
If you selected the name of your scanner from the list presented during the Adrenaline
SCSI scanner controller installation process, a scan source called “XYZ Scanner without
VRS” (where “XYZ Scanner” corresponds to the name of your scanner) will already be
installed and available for selection from your scanning application. If desired, you can
use the Kofax Source Manager to update the configuration settings for this source. For
instructions, refer to Appendix A, Creating or Configuring a Scan Source on page 79.
If your scanner did not appear on the list presented during the installation process, you
should have selected the “I will configure my scanner later” check box. In this case,
you will need to use the Kofax Source Manager (KSM) to create a scan source for use
with the scanner and your Adrenaline SCSI scanner controller. For instructions, refer
to Appendix A, Creating or Configuring a Scan Source on page 79.
Note When using an Adrenaline 450 or 650 scanner controller without VRS, you
cannot successfully use a VRS or AIPE source without obtaining an additional license.
VRS Installation Guide 65

66 VRS Installation Guide

Chapter 5
Testing Your Adrenaline SCSI Scanner
Controller
Introduction
This chapter explains how to test your Adrenaline SCSI scanner controller
configuration with VCDemo, an ImageControls-based demonstration application that
is included with your VRS installation.
VRS Installation Guide 67

Testing with VCDemo
You can test your Adrenaline SCSI scanner controller installation with VCDemo, an
ImageControls-based demonstration application that is included with your VRS
installation.
X To start VCDemo
1 Select Start | Programs | Kofax VRS | VCDemo. The VCDemo application will
display, similar to the following:
Menu bar
Toolbar
Viewing
area,
containing
two view
windows
Status line
Figure 5-1. Main Screen for VCDemo
68 VRS Installation Guide

2 If you want to scan or import images from disk, do the following:
a To scan, make sure your scanner was connected and powered on before
your computer was started. Select Source | Scanner, select a scanner source,
and click OK.
b To import images from disk, select Source | File Import. Select an import
source and click OK.
3 If you want to display an image (a source device is not required), select
File | Open. Select a file from the Open dialog box and click OK.
Note A set of sample TIFF images (SAMPLE1.TIF, SAMPLE2.TIF, etc.) is
installed to your installation Bin folder. If you are importing images or opening
images from disk, you can select one of the sample images.
4 Use the toolbar and menus available on the sample application’s main screen to
select the desired options for your operation. Then, process your images as
desired. For example:
a If you are scanning, you can select Source | Properties to select various
scanner settings. Then, load a batch of pages in your scanner and select
Source | Process Batch to process the batch.
b If you are importing images from disk, you can select Source | Properties to
select various device options and select Source | Process Batch. Then, select
a file from the Open dialog box and click OK.
c If you are displaying an image, you can select File | Print to print the image.
You can use any available option from the toolbar and menus. Options that are
not available for a particular operation will be dimmed. For details about the
VCDemo toolbar and menus, refer to Appendix C, Using VCDemo on page 91.
VRS Installation Guide 69

70 VRS Installation Guide

Chapter 6
Removing VRS
Introduction
This chapter explains how to remove VRS and related components from your
computer. Once you complete the procedure for removing VRS, the default profile is
removed but any existing user-defined VRS profiles are left intact. If desired, you can
reinstall VRS and continue to use the profiles.
Removing VRS and Related Components
This section explains how to use the Add or Remove Programs option in the Control
Panel to remove VRS and related components from your computer.
During the VRS removal process, you will be prompted to deactivate your VRS license.
Unless you are planning to reinstall VRS later on the same computer, the license
should be deactivated.
Note If VRS 4.0 is installed as part of your Ascent Capture 7.0 installation, VRS does
not appear in the Add or Remove Programs list. VRS is removed automatically when
you remove Ascent Capture. For more information, refer to the Installation Guide for
Ascent Capture and Ascent Capture Internet Server.
VRS Installation Guide 71

X To remove VRS
1 Select Start | Control Panel | Add or Remove Programs.
2 Select “Kofax VirtualReScan 4.0” from the list of currently installed programs.
3 Click “Change” to launch the InstallShield wizard that will be used to remove
VRS and related components.
Figure 6-1. Installation Wizard for Removing VRS Components
4 When the Welcome screen displays, as shown in Figure 6-1, click Next to
continue with the VRS removal process.
5 When prompted to reinstall or remove VRS, select “Remove” and then click
Next.
72 VRS Installation Guide

6 You will be prompted to select individual VRS components for removal (refer
to Figure 6-2).
Figure 6-2. VRS Component List
Select the check box next to each component that you want to remove, and then
click Next.
Note the following:
• If you select the VRS 4.0 component from the list, any existing VRS
Component Installers will also be removed. If you intend to remove VRS
Component Installers without removing your VRS 4.0 installation, clear the
“VRS 4.0” check box and then select the “Scanner Component Installer(s)”
check box.
VRS Installation Guide 73

• By default, the Microsoft .NET Framework component is not selected on the
list. You should not select this component for removal unless you are
confident that the Microsoft .NET Framework is not used by any other
applications on your computer.
7 When the Remove the Program dialog box displays, click Remove to start the
removal process.
The installation wizard will remove each component that you specified on the
previous screen. Additionally, you may be prompted to remove specific
scanner drivers, depending on the scanner that you selected during the VRS
installation process. Follow the on-screen instructions and click Yes in response
to confirmation prompts, as applicable.
8 If you selected to remove VRS 4.0, the Deactivate VRS dialog box will display,
and you will be prompted to deactivate your VRS product license (refer to
Figure 6-3).
Figure 6-3. Deactivate VRS Dialog Box
74 VRS Installation Guide

Do one of the following:
• Click “Yes” to deactivate your VRS license immediately. This choice is
appropriate if you plan to activate the same VRS license (with the same serial
number) later on another computer, or if you want to discontinue use of the
VRS license that is currently active.
• Click “No” to keep your license active if you plan to reinstall VRS (with the
same license and serial number) later on the same computer.
• Click “No” to postpone the deactivation process.
Note If you want to deactivate your license later, you will need to double-click
on the file listed in the Deactivate VRS dialog box and then contact Kofax via
the Internet, email message, or fax message to request deactivation.
• Click “No” to postpone deactivation of your VRS license because you do not
have a working Internet connection. In this case, refer to the next section for
instructions.
9 When VirtualReScan and the applicable related items have been removed
successfully, a confirmation message will display, followed by a prompt to
restart your computer. Do both of the following:
• Click Finish to clear the confirmation message.
• Select the option to restart your computer to complete the removal of VRS
components.
VRS Installation Guide 75

Deactivating Your License Without an Internet Connection
License deactivation is typically occurs during the VRS product removal process, as
described in the previous section. The license is deactivated by using the Internet
connection on your computer to contact the Kofax license server. You may need to
deactivate your license without an Internet connection in the following cases:
• Your Internet connection is not available when you try to deactivate the license.
• Your computer has no Internet connection.
X To deactivate your VRS license without an Internet connection
1 From the Deactivate VRS dialog box, click Yes. The Deactivate - No Internet
Connection dialog box will display.
Figure 6-4. Deactivate - No Internet Connection Dialog Box
76 VRS Installation Guide

2 Select one of the following:
• Deactivate and save license information: Select this option to deactivate the
VRS license on your computer and create a file (deactivate.txt) that you
will need later when you contact Kofax to complete the deactivation process.
If you select this option, a confirmation message will appear once the license
has been deactivated on your local computer.
• Do not deactivate: Select this option to cancel the deactivation process and
keep the VRS license in effect.
3 Click OK to close the dialog box.
4 Select one of the following methods to contact Kofax to complete the
deactivation process without an Internet connection:
• From another computer with a working Internet connection, send an email
request to activatevrs_kfx@kofax.com.You must attach the
Deactivate.txt file to the email message. The path to the file is listed in
the Deactivate - No Internet Connection dialog box.
• From another computer with a working Internet connection, launch the
browser and open to http://activate.kofax.com/vrs.During the
deactivation process, you will need to copy information from the
Deactivate.txt file and paste it into the form on the Web site.
• Send a request for deactivation to Kofax via fax at (949) 727-3099. You should
print a copy of the Deactivate.txt file and include it in your fax message.
5 Once you use another computer or a fax machine to contact Kofax and request
deactivation, a confirmation message will be sent to you via email. The
confirmation will be sent to the email address listed in the Deactivate.txt
file.
VRS Installation Guide 77

78 VRS Installation Guide

Appendix A
Creating or Configuring a Scan Source
Introduction
Each time that you start a scanning application, you select a scan source to ensure that
the appropriate drivers are used during your scanning session. If you have installed
VRS or an Adrenaline SCSI scanner controller, several scan sources are already
available for use with your scanning application.
You may need to use the Kofax Source Manager (KSM) to create an additional scan
source if one of the following situations is applicable to your installation:
• You are using VRS with a “compatible” scanner, which is a scanner that has not
gone through the VRS certification process. For more information, refer to VRS
Scanners: Certified vs. Non-Certified on page 4.
• You are using a Kofax Adrenaline SCSI scanner controller (without VRS) with a
“compatible” scanner, and you want to create a source other than the default
source named “XYZ Scanner without SVRS.”
Note When using Adrenaline 450 or 650 scanner controllers without VRS, you cannot
use VRS or AIPE sources without obtaining an additional license.
You can also use KSM to configure settings for an existing scan source. This appendix
explains the procedures for using KSM to create or configure a scan source.
VRS Installation Guide 79

Creating a Scan Source
During the VRS installation process, you are presented with a list of certified scanners.
If your scanner does not appear on the list and a VRS Component Installer is not
available for your scanner, you should use the procedure in this section to create a
source that provides the drivers required to use the non-certified, “compatible”
scanner with VRS. For more information, refer to VRS Scanners: Certified vs. Non-
Certified on page 4 or VRS Component Installers on page 5.
Note To determine if a VRS Component Installer is available for your scanner, refer to
the Downloads Library link from the Support pages on the Kofax Web site.
You should also use the procedure in this section if you are using an Adrenaline SCSI
scanner controller without VRS, and you require a scan source other than “XYZ Scanner
without SVRS,” which is created automatically during the Adrenaline installation
process.
X To create a scan source
1 From the Windows Control Panel, launch the Kofax Source Manager (KSM)
and click Next when the KSM dialog box displays.
80 VRS Installation Guide

2 When the Configured Source list displays, click Create. Refer to Figure A-1.
Figure A-1. Kofax Source Manager
VRS Installation Guide 81

3 The Source Properties dialog box will display, similar to Figure A-2.
Figure A-2. Source Properties Dialog Box
4 Enter and select the following:
a Enter a Source Name. This name is used to reference the scanner or source
device from your scanning application. You can assign any name, as long as
it fits within the naming conventions of your application. Typically, the
source name corresponds to the name of the scanner or source device, along
with a description of the source type. An example source name might be
“Scanner XYZ with ISIS Scanning,” where “Scanner XYZ” corresponds to
the make and model of the scanner.
b Select a Source Type. The source types depend on the software and devices
(VRS, Adrenaline SCSI scanner controller, etc.) that are configured on your
system. Select the type that is appropriate for your installation. For more
information about source types, refer to the Kofax Web site at
www.kofax.com.
5 Click OK.
82 VRS Installation Guide

6 For ISIS and TWAIN scanner source types, a Select Scanner dialog box will
display.
a Because you are not configuring a certified VRS scanner, select
“Compatible.” For more information on certified versus compatible devices,
refer to VRS Scanners: Certified vs. Non-Certified on page 4.
b Select your scanner from the list and click OK. If your scanner does not
appear on the list, click Refresh, or if necessary, reinstall the scanner driver.
c For TWAIN sources, select the check box if you want the TWAIN user
interface associated with the scanner driver to display at scan time.
d Click OK.
Figure A-3. Select Scanner Dialog Box - ISIS Source
Figure A-4. Select Scanner Dialog Box - TWAIN Source
VRS Installation Guide 83

7 For import source types, click OK when the Software Import Properties dialog
box displays.
Figure A-5. Software Import Properties Dialog Box
84 VRS Installation Guide

8 The initial Kofax Source Manager dialog box displays with the new source
added to the list of Configured Sources. The newly created source will now be
available from your scanning application.
New
source
Figure A-6. Kofax Source Manager - New Source Added
9 Click Next to continue. Alternatively, you can do the following:
• To create another source, repeat steps 3-7.
• To remove a source, select it from the list and then click Remove.
• To set a source as the default source, select it from the list of Configured
Sources, and then click Set Default.
VRS Installation Guide 85

• To display information about a source, select it from the list of Configured
Sources, and then click Properties. For details, refer to the next section,
Updating Source Configuration Settings on page 87.
• To display advanced properties associated with options such as JPEG
Compression, click Advanced.
10 When the Kofax contact information screen displays, click Finish and close the
Control Panel.
86 VRS Installation Guide

Updating Source Configuration Settings
If desired, you can use KSM to update the properties that have been configured for an
existing source.
X To update source configuration settings
1 From the Windows Control Panel, launch the Kofax Source Manager (KSM)
and click Next when the KSM dialog box displays.
2 When the Configured Source list displays, select the source that you want to
update and click Properties. Refer to Figure A-7.
Figure A-7. Kofax Source Manager
VRS Installation Guide 87

3 Update the source properties as desired.
4 Click Next to proceed to the Kofax contact information screen and then click
Finish.
5 Close the Control Panel.
88 VRS Installation Guide
 Loading...