

Visioneer VISIONAID 96-0200-000 Maintenance Instructions Manual
Maintenance Kit for an Auto Document Feeder (ADF) with Flatbed Scanner
This Kit Contains
Maintenance
Instructions
1
The contents of this kit should be kept in a clean, dry area and out of the reach of children.
2
Do not attempt to clean the black paper-sensor arm, wipe gently around this area without touching the paper
sensor.
3
This number varies based on scanner model, paper weight, paper texture, size of scan batches and frequ ency
of scanning.
♦ 1 Bottle of Streak-Free De-Ionized Cleaning Solution
♦ 10 Lint-Free Dry Cleaning Cloths (White)
♦ 5 Dry Cleaning Cloths (Blue)
♦ 3 Scan Through Staticide Wipes
♦ 10 Isopropyl Alcohol Pre-Moistened Cleaning Wipes
♦ 2 ADF Pad Assemblies
♦ Cleaning Instructions
♦ Dry Cleaning Cloth & Cleaning Solution (Flatbed Only)
• Spray the flatbed glass with the De-Ionized Cleaning Solution
• Wipe the glass clean using a lint-free dry cloth (white)
• Clean the ADF scan frame (small strip of glass with a white
frame and is the only area where ADF images are captured)
• Spray the cleaning solution onto a dry cleaning cloth (blue) to
clean the outside of the scanner and the cables
♦ Scan-Through Staticide Wipes (ADF Only)
• Pre-moistened 8.5x11 pads; keep sealed until use
• Open the package and take out the pre-moistened pad
• Unfold the pad and place in the ADF
• Scan the pad as you would a regular piece of paper
• Take the pad from the output bed and repeat the scan
process 4 additional times then delete resulting scan images
♦ Pre-Moistened Cleaning Wipes
• Use these wipes between Staticide Scan Through cleanings
• Open the ADF door and wipe down all plastic surfaces
• Wipe and rotate the rollers to ensure the entire surface of
each roller is clean, wipe down the ADF pad
2
• DO NOT vigorously rub these across the rollers
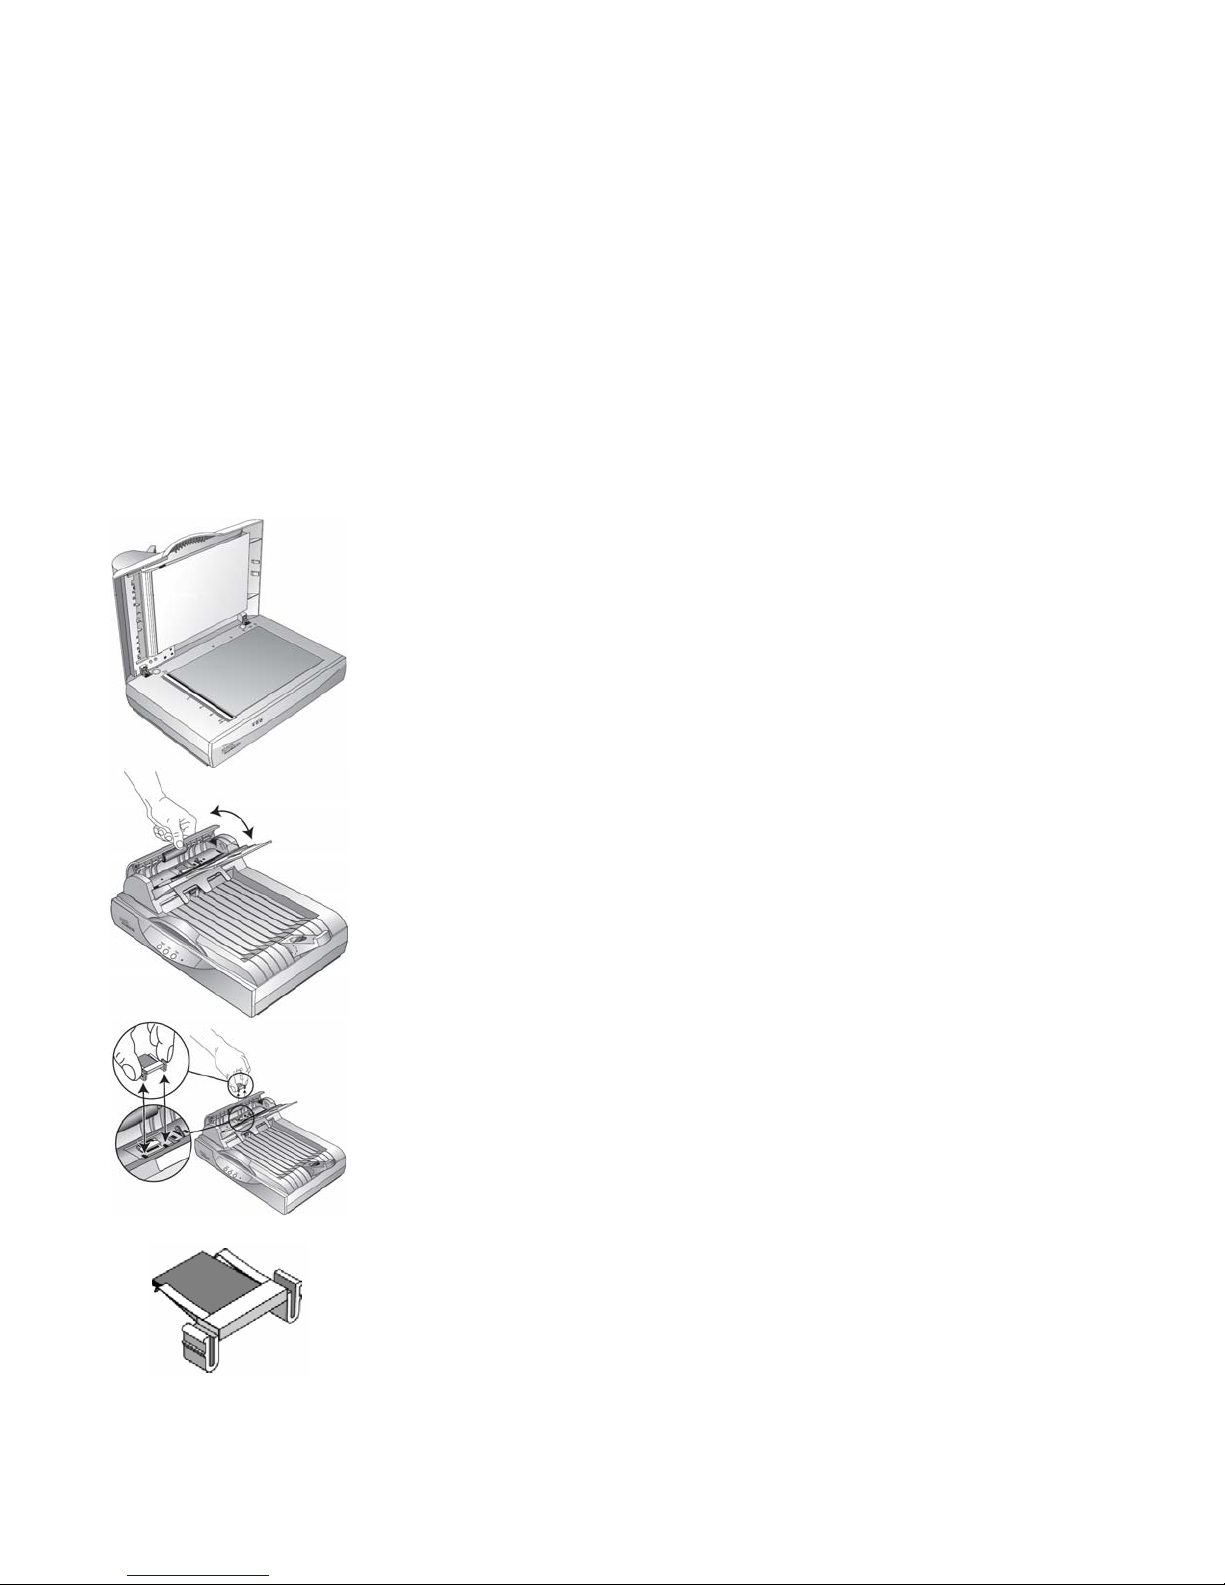
♦ ADF Pad Assemblies
• ADF Pads push the paper against the main pick-up roller and
is a user replaceable, consumable part
3
• Each pad can be used for up to 20,000
scans
• Open the scanner and remove the ADF Pad by pinching the
plastic clips on either side of the metal bar, place a new pad
in the scanner, press on the metal bar until it snaps into place
Note: The scanner should be powered off for all cleaning methods except for when
using the Staticide Pads.
1

Maintenance
How often should I clean the scanner?
♦ Every day or every other day with alcohol wipes if reaching the maximum daily duty
cycle of the scanner.
♦ Every week with the Staticide pads if reaching the maximum daily duty cycle every day.
♦ Every week or every other week with the alcohol wipes if reaching the maximum daily
duty cycle spread over a week period.
♦ Every other week with the Staticide pads if reaching the maximum daily duty cycle
spread over a week period.
♦ Clean the ADF every month if the scanner is used only occasionally.
♦ Clean the Flatbed glass any time lines appear in the scan.
How do I know if the scanner requires cleaning?
♦ When the scanner is jamming multiple times a day.
♦ When the scanner is grabbing multiple pages at one time.
♦ When the scanner is squeaking as it feeds the page through.
♦ When lines appear in the scanned image.
What happens if I don’t clean the scanner?
♦ Excessive dust on the main pick-up roller will make it appear worn and smooth to the
touch, causing the roller to skip across the page instead of grabbing properly.
♦ Excessive dust on the rest of feed rollers in the scanner will make a squeaking sound as
it feeds the paper through.
♦ A worn ADF pad does not push the paper fully against the main pick-up roller causing
multiple pages to be fed at one time.
How often should I replace the ADF pad?
♦ The ADF pad can last up to 20,000
regular cleaning does not resolve miss-feed issues.
♦ When cleaning the scanner, take out the ADF pad and look at it from the side, if the
rubber tip of the pad has a noticeable and severe wear pattern, then replace the pad.
♦ Inspect the ADF pad after cleaning to make sure the silver arms are properly placed.
These arms should be parallel to each other and slightly elevated above the gray
rubber pad (please note picture on opposite side.) If these arms are parallel to the pad,
bent in opposite directions or elevated too high, pages will catch in the scanner. You
can gently bend these arms into the correct position.
Proper maintenance of the scanner will resolve most hardware issues and prevent other
issues from arising.
Please refer to the maintenance section of the scanner installation guide provided with the
scanner for more detailed cleaning instructions.
3
scans, however it should be replaced as needed if
1
The contents of this kit should be kept in a clean, dry area and out of the reach of children.
2
Do not attempt to clean the black paper-sensor arm, wipe gently around this area without touching the paper
sensor.
3
This number varies based on scanner model, paper weight, paper texture, size of scan batches and frequency
of scanning.
 Loading...