

Visioneer PATRIOT P15 User Manual
User’s Guide
Windows®

VISIONEER
PATRIOT P15
S
CANNER USER GUIDE
COPYRIGHT INFORMATION
© 2017 Visioneer, Inc. All rights reserved. The Visioneer brand name and OneTouch® logo are registered trademarks of Visioneer, Inc.
Changes are periodically made to this document. Changes, technical inaccuracies, and typographic errors will be corrected in subsequent
editions. Information is subject to change without notice and does not represent a commitment on the part of Visioneer.
Document Version: 05-0952-000 (June 2017)
This product is covered by one or more of the following patents: 6,064,778, 6,480,304, 7,715,061, 10/838,364, 7,397,587.WO 02/25571,
7,617,985, 11/140,653, 10/787,912
Reproduction, adaptation, or translation without prior written permission is prohibited, except as allowed under the copyright laws. Copyright
protection claimed includes all forms of matters of copyrightable materials and information now allowed by statutory or judicial law or
hereinafter granted, including without limitation, material generated from the software programs which are displayed on the screen such as
styles, templates, icons, screen displays, looks, etc.
The software described is furnished under a licensing agreement. The software may be used or copied only in accordance with the terms of
such an agreement. It is against the law to copy the software on any medium except as specifically allowed in the licensing agreement. No
part of this document may be reproduced or transmitted in any form or by any means, electronic or mechanical, including photocopying,
recording, or information storage and retrieval systems, or translated to another language, for any purpose other than the licensee's personal
use and as specifically allowed in the licensing agreement, without the express written permission of Visioneer.
The PaperPort® brand name and logo are registered trademarks of Nuance Communications, Inc.
ISIS® is a registered trademark of EMC
Adobe®, Adobe® Acrobat®, Adobe® Reader®, and the Adobe® PDF logo are registered trademarks of Adobe Systems Incorporated in the United
States and/or other countries.
Post-It® is a registered trademark of 3M in the United States and/or other countries.
ABBYY®, the ABBYY® logo, ABBYY® Business Card Reader® and ABBYY® FineReader® are either registered trademarks or trademarks of ABBYY
Software Ltd.
Findo® and the Findo® Logo are either registered trademarks or trademarks of FINDO.
Microsoft is a U.S. registered trademark of Microsoft Corporation. Windows™ is a trademark and SharePoint® is a registered trademark of
Microsoft Corporation.
Kensington® is a registered trademark of ACCO Brands Corporation.
ZyINDEX is a registered trademark of ZyLAB International, Inc. ZyINDEX toolkit portions, Copyright © 1990-1998, ZyLAB International, Inc.
All other products mentioned herein may be trademarks of their respective companies and are hereby acknowledged.
2
® Corporation in the United States and/or other countries.
VISIONEER'S LIMITED PRODUCT WARRANTY
Please go to www.visioneer.com, select your product, and then click the “Warranty Program” link to view the warranty terms and conditions for
your scanner.
RESTRICTED RIGHTS LEGEND
Use, duplication, or disclosure is subject to restrictions as set forth in contract subdivision (c)(1)(ii) of the Rights in Technical Data and
Computer Software Clause 52.227-FAR14. Material scanned by this product may be protected by governmental laws and other regulations,
such as copyright laws. The customer is solely responsible for complying with all such laws and regulations.

ROHS AND WEEE COMPLIANCE
This product is compliant with RoHS Regulations of the European Parliament and Council Directive on the Restrictions of the Use of Certain
Hazardous Substances in Electrical and Electronic Equipment (2002/95/EC), and with the Waste Electrical and Electronic Equipment (WEEE)
Directive (2002/96/EC).
UNITED STATES (FCC REGULATIONS)
This equipment has been tested and found to comply with the limits for a Class B digital device, pursuant to Part 15 of the FCC Rules. These
limits are designed to provide reasonable protection against harmful interference in a residential installation. This equipment generates, uses,
and can radiate radio frequency energy and, if not installed and used in accordance with the instruction manual, may cause harmful
interference to radio communications.
However, there is no guarantee that interference will not occur in a particular installation. If this equipment does cause harmful interference to
radio or television reception, which can be determined by turning the equipment off and on, the user is encouraged to try to correct the
interference by one or more of the following measures:
• Reorient or relocate the receiving antenna.
• Increase the separation between the equipment and receiver.
• Connect the equipment into an outlet on a circuit different from that to which the receiver is connected.
• Consult the dealer or an experienced radio/TV technician for help.
This device complies with Part 15 of the FCC Rules. Operation is subject to the following two conditions: (1) This device may not cause harmful
interference, and (2) this device must accept any interference received, including interference that may cause undesired operation.
Changes and modifications to this equipment not specifically approved by Visioneer may void the user’s authority to operate this equipment.
Shielded cables must be used with this equipment to maintain compliance with FCC regulations.
ENERGY STAR FOR THE USA
Energy Program compliance
As an ENERGY STAR® partner, Visioneer Inc. has determined that this product meets the ENERGY STAR guidelines for Imaging Equipment.
ENERGY STAR and the ENERGY STAR mark are registered trademarks owned by the U.S. Environmental Protection Agency. The ENERGY STAR
Imaging Equipment Program is a team effort between the U.S., European Union and Japanese governments and the office equipment
industry to promote energy-efficient copiers, printers, fax, multifunction machine, personal computers, and monitors. Reducing product
energy consumption helps combat smog, acid rain and long-term changes to the climate by decreasing the emissions that result from
generating electricity.
VISUAL DISPLAY
Warning : This device is not intended for use in the direct field of view at visual display workplaces. To avoid incommoding reflections at visual
display workplaces, this device must not be placed in the direct field of view.
CLASS 1 LED
This machine is certified as Class 1 LED product. This means that this machine does not produce hazardous laser radiation.
PRODUCT RECYCLING & DISPOSAL
If you are managing the disposal of your Visioneer® product, please note that the product may contain lead, mercury, Perchlorate, and other
materials whose disposal may be regulated due to environmental considerations. The presence of these materials is fully consistent with
global regulations applicable at the time that the product was placed on the market. For recycling and disposal information, contact your local
authorities. In the United States, you may also refer to the Electronic Industries Alliance web site: http://www.eiae.org
Perchlorate Material - This product may contain one or more Perchlorate-containing devices, such as batteries. Special handling may apply,
please see: http://www.dtsc.ca.gov/hazardouswaste/perchlorate/.
.
SAFETY
Notices and Safety
Please read the following instructions carefully before operating the machine and refer to them as needed to ensure the continued safe
operation of your machine.

Your Visioneer® product and supplies have been designed and tested to meet strict safety requirements. These include safety agency
evaluation and certification, and compliance with electromagnetic regulations and established environmental standards.
WAR NIN G: The safety and environment testing and performance of this product have been verified using Visioneer® materials only.
Unauthorized alterations, which may include the addition of new functions or connection of external devices, may impact the product
certification. Please contact your Visioneer representative for more information.
Operational Safety Information
Your Visioneer® equipment and supplies have been designed and tested to meet strict safety requirements. These include safety agency
examination, approval, and compliance with established environmental standards.
To ensure the continued safe operation of your Visioneer® equipment, follow these safety guidelines at all times:
Do these:
• Always follow all warnings and instructions that are marked on or supplied with the equipment.
• Always use materials specifically designated for this product, the use of other materials may result in poor performance and create a
hazardous situation. Do not use aerosol cleaners, they may be explosive and flammable under certain conditions.
• Always exercise care when moving or relocating equipment.
• Always locate the machine on a solid support surface that has adequate strength to support the weight of the machine.
• Always locate the machine in an area that has adequate ventilation and room for servicing.
Do not do these:
• Never attempt any maintenance function that is not specifically described in this documentation.
• Never remove covers or guards that are fastened with screws. There are no operator serviceable areas within these covers.
• Never locate the machine near a radiator or any other heat source.
• Never override or “cheat” any of the electrical or mechanical interlock devices.
• Always unplug this equipment from the electrical outlet before cleaning.
Emergency Power Off
If any of the following conditions occur, turn off the scanner immediately and disconnect the power cable(s) from the electrical outlet(s).
• The equipment emits unusual odors or makes unusual noises.
• The power cable is damaged or frayed.
• A wall panel circuit breaker, fuse, or other safety device has been tripped.
• Liquid is spilled into the machine.
• The machine is exposed to water.
• Any part of the machine is damaged.
Maintenance Information
• Any operator product maintenance procedures will be described in the user documentation supplied with the product.
• Do not carry out any maintenance on this product which is not described in the customer documentation.
• Do not use aerosol cleaners. The use of cleaners that are not approved may cause poor performance of the equipment, and could cause
a dangerous condition.
• Use supplies and cleaning materials only as directed in this manual.
• Do not remove covers or guards that are fastened with screws. There are no parts behind these covers that you can maintain or service.
• Do not perform any maintenance procedures unless you have been trained to do them by an authorized local dealer or unless a
procedure is specifically described in the user manuals.
• Never place this equipment where people might step on or trip on the power cord.

T ABLE OF CONTENTS
Welcome . . . . . . . . . . . . . . . . . . . . . . . . . . . . . . . . . . . . . . . . . . . . . . . . . . . . . . . . . . . . . . . 7
What’s in the Box. . . . . . . . . . . . . . . . . . . . . . . . . . . . . . . . . . . . . . . . . . . . . . . . . . . . . . . . . . . . . . . . . . . . . . . . . . . . . . . . . . . 7
System Requirements . . . . . . . . . . . . . . . . . . . . . . . . . . . . . . . . . . . . . . . . . . . . . . . . . . . . . . . . . . . . . . . . . . . . . . . . . . . . . . 8
Documentation . . . . . . . . . . . . . . . . . . . . . . . . . . . . . . . . . . . . . . . . . . . . . . . . . . . . . . . . . . . . . . . . . . . . . . . . . . . . . . . . . . . . 8
The Visioneer
LCD Screen. . . . . . . . . . . . . . . . . . . . . . . . . . . . . . . . . . . . . . . . . . . . . . . . . . . . . . . . . . . . . . . . . . . . . . . . . . . . . . . . . . . . . . . .10
Scanner Setup . . . . . . . . . . . . . . . . . . . . . . . . . . . . . . . . . . . . . . . . . . . . . . . . . . . . . . . . . . 13
Connect the Power Cord . . . . . . . . . . . . . . . . . . . . . . . . . . . . . . . . . . . . . . . . . . . . . . . . . . . . . . . . . . . . . . . . . . . . . . . . . .15
Connect the scanner power to the wall . . . . . . . . . . . . . . . . . . . . . . . . . . . . . . . . . . . . . . . . . . . . . . . . . . . . . . 15
Connect the scanner power to the PC. . . . . . . . . . . . . . . . . . . . . . . . . . . . . . . . . . . . . . . . . . . . . . . . . . . . . . . .16
Safety Lock. . . . . . . . . . . . . . . . . . . . . . . . . . . . . . . . . . . . . . . . . . . . . . . . . . . . . . . . . . . . . . . . . . . . . . . . . . . . . . . . . . . . . . . . 17
Installation . . . . . . . . . . . . . . . . . . . . . . . . . . . . . . . . . . . . . . . . . . . . . . . . . . . . . . . . . . . . 19
Install the Software and Connect the Scanner . . . . . . . . . . . . . . . . . . . . . . . . . . . . . . . . . . . . . . . . . . . . . . . . . . . . . .19
Installing the Scanner Driver. . . . . . . . . . . . . . . . . . . . . . . . . . . . . . . . . . . . . . . . . . . . . . . . . . . . . . . . . . . . . . . . . 22
Connect the USB Cable and Turn on the Power . . . . . . . . . . . . . . . . . . . . . . . . . . . . . . . . . . . . . . . . . . . . . . 23
Installing Visioneer OneTouch . . . . . . . . . . . . . . . . . . . . . . . . . . . . . . . . . . . . . . . . . . . . . . . . . . . . . . . . . . . . . . . 25
Installing Additional Applications . . . . . . . . . . . . . . . . . . . . . . . . . . . . . . . . . . . . . . . . . . . . . . . . . . . . . . . . . . . . . . . . . . 26
View the User Guides . . . . . . . . . . . . . . . . . . . . . . . . . . . . . . . . . . . . . . . . . . . . . . . . . . . . . . . . . . . . . . . . . . . . . . . . . . . . . . 28
Register Your Scanner . . . . . . . . . . . . . . . . . . . . . . . . . . . . . . . . . . . . . . . . . . . . . . . . . . . . . . . . . . . . . . . . . . . . . . . . . . . . . 29
®
Patriot P15 Features . . . . . . . . . . . . . . . . . . . . . . . . . . . . . . . . . . . . . . . . . . . . . . . . . . . . . . . . . . . . . . . . . 9
Loading Documents to Scan . . . . . . . . . . . . . . . . . . . . . . . . . . . . . . . . . . . . . . . . . . . . . . . . 31
Supported Document Types . . . . . . . . . . . . . . . . . . . . . . . . . . . . . . . . . . . . . . . . . . . . . . . . . . . . . . . . . . . . . . . . . . . . . . . 31
Documents to Avoid Scanning. . . . . . . . . . . . . . . . . . . . . . . . . . . . . . . . . . . . . . . . . . . . . . . . . . . . . . . . . . . . . . . . . . . . . 32
Unsupported Document Types . . . . . . . . . . . . . . . . . . . . . . . . . . . . . . . . . . . . . . . . . . . . . . . . . . . . . . . . . . . . . . . . . . . . 32
Scanning from the Automatic Document Feeder (ADF) . . . . . . . . . . . . . . . . . . . . . . . . . . . . . . . . . . . . . . . . . . . . . 33
Scan from the Front or Rear Feed Tray . . . . . . . . . . . . . . . . . . . . . . . . . . . . . . . . . . . . . . . . . . . . . . . . . . . . . . . . . . . . . 35
Scanning using AutoLaunch. . . . . . . . . . . . . . . . . . . . . . . . . . . . . . . . . . . . . . . . . . . . . . . . . . . . . . . . . . . . . . . . .36
Using the Carrier Sheet. . . . . . . . . . . . . . . . . . . . . . . . . . . . . . . . . . . . . . . . . . . . . . . . . . . . . . . . . . . . . . . . . . . . . .38
Scanning Interfaces . . . . . . . . . . . . . . . . . . . . . . . . . . . . . . . . . . . . . . . . . . . . . . . . . . . . . . . . . . . . . . . . . . . . . . . . . . . . . . . 41
Maintenance . . . . . . . . . . . . . . . . . . . . . . . . . . . . . . . . . . . . . . . . . . . . . . . . . . . . . . . . . . . 43
Safety Precautions. . . . . . . . . . . . . . . . . . . . . . . . . . . . . . . . . . . . . . . . . . . . . . . . . . . . . . . . . . . . . . . . . . . . . . . . . . . . . . . . .43
Hardware Properties . . . . . . . . . . . . . . . . . . . . . . . . . . . . . . . . . . . . . . . . . . . . . . . . . . . . . . . . . . . . . . . . . . . . . . . . . . . . . . 44
Device Settings . . . . . . . . . . . . . . . . . . . . . . . . . . . . . . . . . . . . . . . . . . . . . . . . . . . . . . . . . . . . . . . . . . . . . . . . . . . . .44
SCANNER USER GUIDE 5

VISIONEER® PATRIOT P15 TABLE OF CONTENTS
Driver Settings . . . . . . . . . . . . . . . . . . . . . . . . . . . . . . . . . . . . . . . . . . . . . . . . . . . . . . . . . . . . . . . . . . . . . . . . . . . . . . 45
Clearing Paper Jams . . . . . . . . . . . . . . . . . . . . . . . . . . . . . . . . . . . . . . . . . . . . . . . . . . . . . . . . . . . . . . . . . . . . . . . . . . . . . . . 46
Cleaning the Scanner. . . . . . . . . . . . . . . . . . . . . . . . . . . . . . . . . . . . . . . . . . . . . . . . . . . . . . . . . . . . . . . . . . . . . . . . . . . . . . 46
Cleaning Inside the Automatic Document Feeder . . . . . . . . . . . . . . . . . . . . . . . . . . . . . . . . . . . . . . . . . . . .47
Replacing the ADF Pad and Roller(s) . . . . . . . . . . . . . . . . . . . . . . . . . . . . . . . . . . . . . . . . . . . . . . . . . . . . . . . . . . . . . . . 49
Replacing the Separation Pad . . . . . . . . . . . . . . . . . . . . . . . . . . . . . . . . . . . . . . . . . . . . . . . . . . . . . . . . . . . . . . .49
Replacing the Feed Roller . . . . . . . . . . . . . . . . . . . . . . . . . . . . . . . . . . . . . . . . . . . . . . . . . . . . . . . . . . . . . . . . . . . 51
Troubleshooting . . . . . . . . . . . . . . . . . . . . . . . . . . . . . . . . . . . . . . . . . . . . . . . . . . . . . . . . . . . . . . . . . . . . . . . . . . . . . . . . . .55
Error Light Troubleshooting Codes . . . . . . . . . . . . . . . . . . . . . . . . . . . . . . . . . . . . . . . . . . . . . . . . . . . . . . . . . . 57
Uninstalling Your Scanner . . . . . . . . . . . . . . . . . . . . . . . . . . . . . . . . . . . . . . . . . . . . . . . . . . . . . . . . . . . . . . . . . . . . . . . . .58
Visioneer
Visioneer
®
Patriot P15 Specifications . . . . . . . . . . . . . . . . . . . . . . . . . . . . . . . . . . . . . . . . . . . . . . . . . . . . . . . . . . . . . . .59
®
Patriot P15 Parts List. . . . . . . . . . . . . . . . . . . . . . . . . . . . . . . . . . . . . . . . . . . . . . . . . . . . . . . . . . . . . . . . . . . . 61
Appendix A: Copy Regulations . . . . . . . . . . . . . . . . . . . . . . . . . . . . . . . . . . . . . . . . . . . . . . 63
United States. . . . . . . . . . . . . . . . . . . . . . . . . . . . . . . . . . . . . . . . . . . . . . . . . . . . . . . . . . . . . . . . . . . . . . . . . . . . . . . . . . . . . . 63
Canada . . . . . . . . . . . . . . . . . . . . . . . . . . . . . . . . . . . . . . . . . . . . . . . . . . . . . . . . . . . . . . . . . . . . . . . . . . . . . . . . . . . . . . . . . . . 64
Other Countries . . . . . . . . . . . . . . . . . . . . . . . . . . . . . . . . . . . . . . . . . . . . . . . . . . . . . . . . . . . . . . . . . . . . . . . . . . . . . . . . . . .65
6 SCANNER USER GUIDE
WELCOME VISIONEER® PATRIOT P15
W ELCOME
Your new Visioneer® scanner can quickly scan stacks of single-sided or double-sided pages and place their
electronic images on your computer.
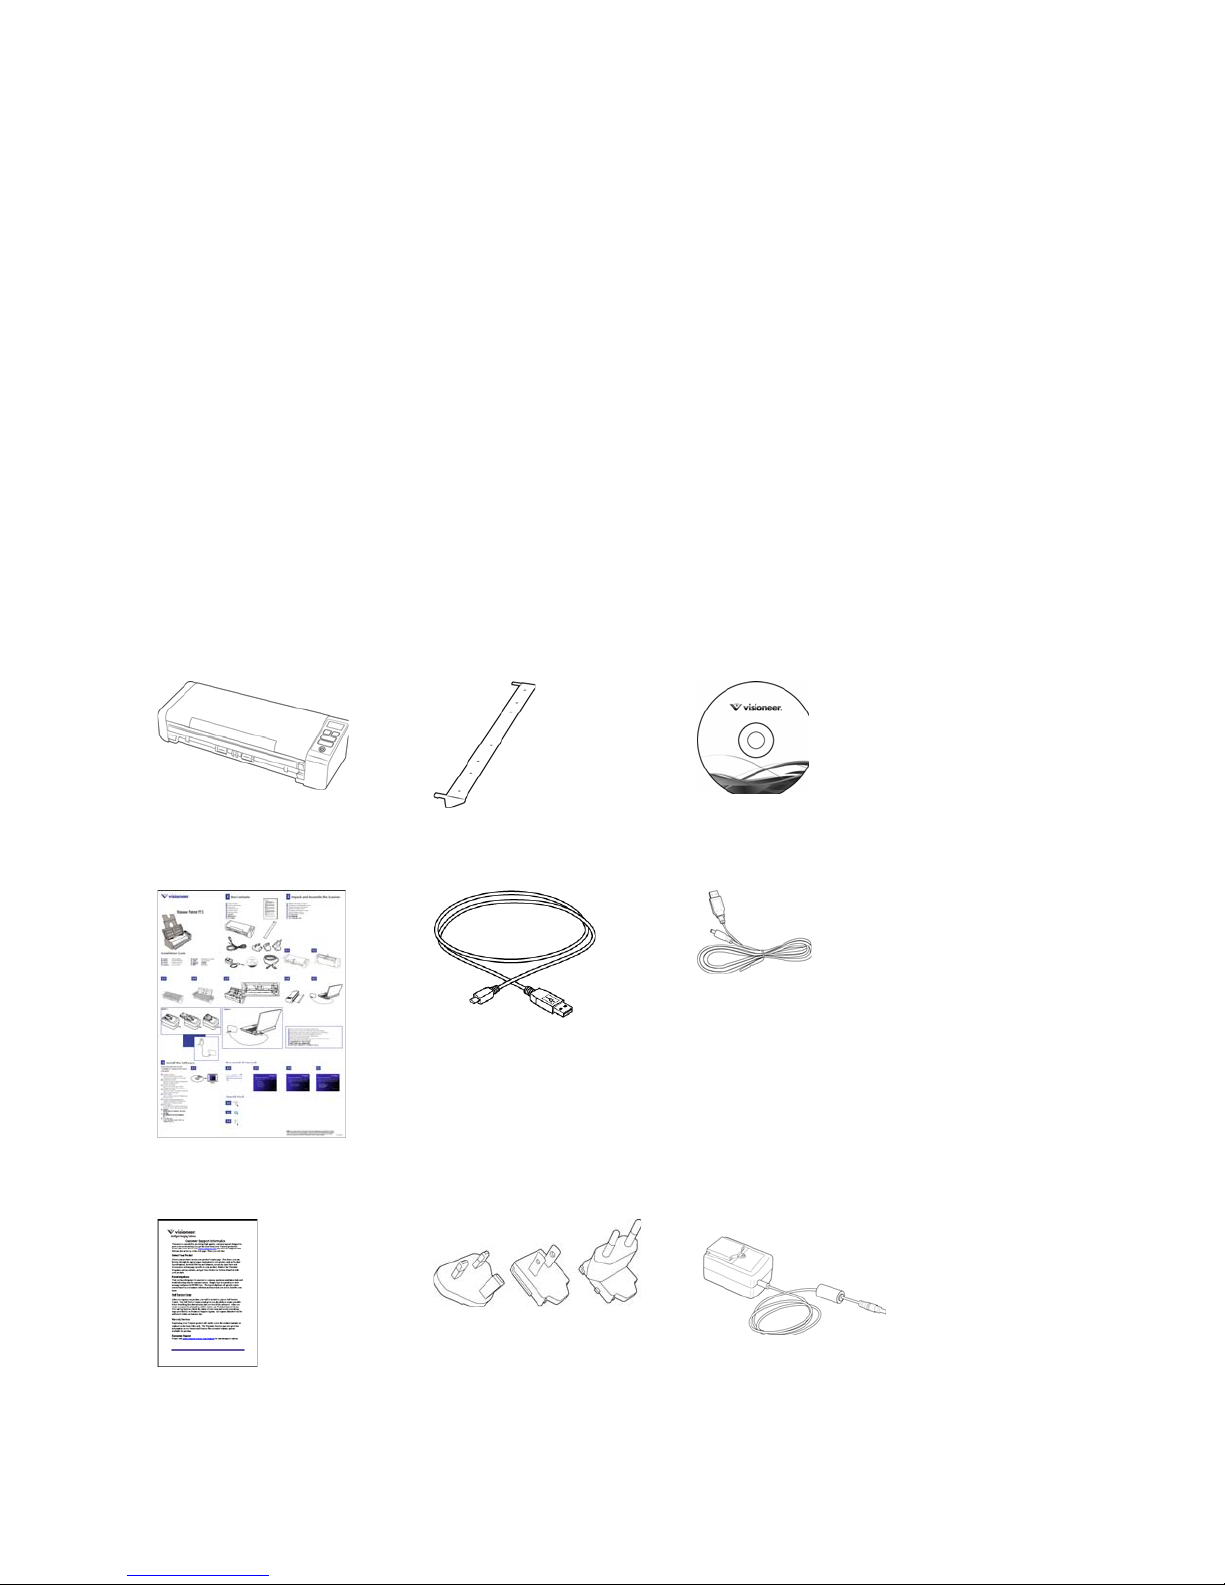
WHAT’S IN THE BOX
Before proceeding, check the contents of the box. If items are missing or damaged, contact the dealer where you
purchased the scanner.
Visioneer® Patriot® P15 Rear paper feed Installation Disc
Quick Install Guide USB Cable USB Power Cable
Warranty Card Power plug adapter Power Supply
S
CANNER USER’S GUIDE 7

VISIONEER® PATRIOT P15 WELCOME
Spare ADF Pad
SYSTEM REQUIREMENTS
■ Intel Pentium 4 or equivalent processor
■ DVD-ROM drive capable of reading Dual Layer DVDs
■ Universal Serial Bus (USB) port
■ Microsoft
● 32-bit or 64-bit Windows 7 (Service Pack 1)
● 32-bit or 64-bit Windows 8 / 8.1
● 32-bit or 64-bit Windows 10
■ 2 gigabyte (GB) internal memory (RAM)
■ Minimum available hard disk space:
● 350 MB for the scanner driver
● 1 GB for Visioneer OneTouch
● 1 to 2 GB for each additional application
®
Windows® operating system:
Please refer page 22 for a list of the applications provided with your scanner.
■ Monitor (recommended settings):
● Color quality of 16-bit or 32-bit
● Resolution set to at least 800 x 600 pixels
Refer to your Windows documentation for instructions on setting the color quality and resolution for the
monitor.
DOCUMENTATION
The following printed documentation is provided in the box:
■ Installation guide—abbreviated scanner setup and installation instructions.
The following soft-copy documentation is available on the installation disc:
■ Scanner user guide—instructions for scanner setup, installation, operation, maintenance, safety, and
warranty
■ OneTouch scanning guide—instructions for configuring and scanning using OneTouch
8 SCANNER USER’S GUIDE

WELCOME VISIONEER® PATRIOT P15
1
2
3
4
5
6
7
■ TWAIN scanning guide—instructions for accessing and scanning using the TWAIN interface
■ Patch code sheets—use with an application that supports detection of patch code data when using the
TWAIN interface. The patch code page layouts have been specifically designed for your scanner. The file
contains Patch 1 layouts for A4 and U.S. Letter size pages.
Make sure you print the correct page size for the paper in your printer. Also, make sure the application you are
using is not set to automatically scale the page to fit on the paper in your printer.
■ ABBYY FineReader Sprint—contains detailed information using the application software, including
information on using Optical Character Recognition to create editable text files from the scanned documents.
■ Findo—contains detailed information using the application.
■ ABBYY Business Card Reader—contains detailed information using the application.
THE VISIONEER® PATRIOT P15 FEATURES
1. Input Tray—Holds the documents in the Automatic Document Feeder for scanning.
● Extension—Pull out and flip open input tray extensions to support various document lengths.
● Paper Guides—Slide to adjust to document width.
2. Automatic Document Feeder—Feeds documents through the scanner during scanning.
● ADF Cover Release— Pull to open the Automatic Document Feeder.
3. Control Panel—OneTouch scanning controls. The buttons are touch sensitive and do not require heavy
pressure to activate.
● LCD Screen—Displays the selected OneTouch function for the Simplex and Duplex buttons.
● Function Buttons—Select the scan setting for the OneTouch buttons. Touch the up or down arrow to
cycle through the settings.
● Simplex Button—Touch to scan single-sided documents.
S
CANNER USER’S GUIDE 9
VISIONEER® PATRIOT P15 WELCOME
1
2
3
4
5
6
7
8
● Duplex Button— Touch to scan double-sided documents.
● Status Light / Power Button—Turns the scanner’s power on/off and indicates the scanner’s status.
4. Front Feed tray—Open to feed items through the front of the scanner.
5. Safety Lock Slot—Connect a Kensington® style safety lock.
6. Rear feed —Feed items through the back of the scanner.
7. Connections—Scanner connection ports.
● Universal Serial Bus (USB) Port—Connect the scanner to the computer via the USB 2.0 cable.
● Power Jack—Connect the power cord to the scanner.
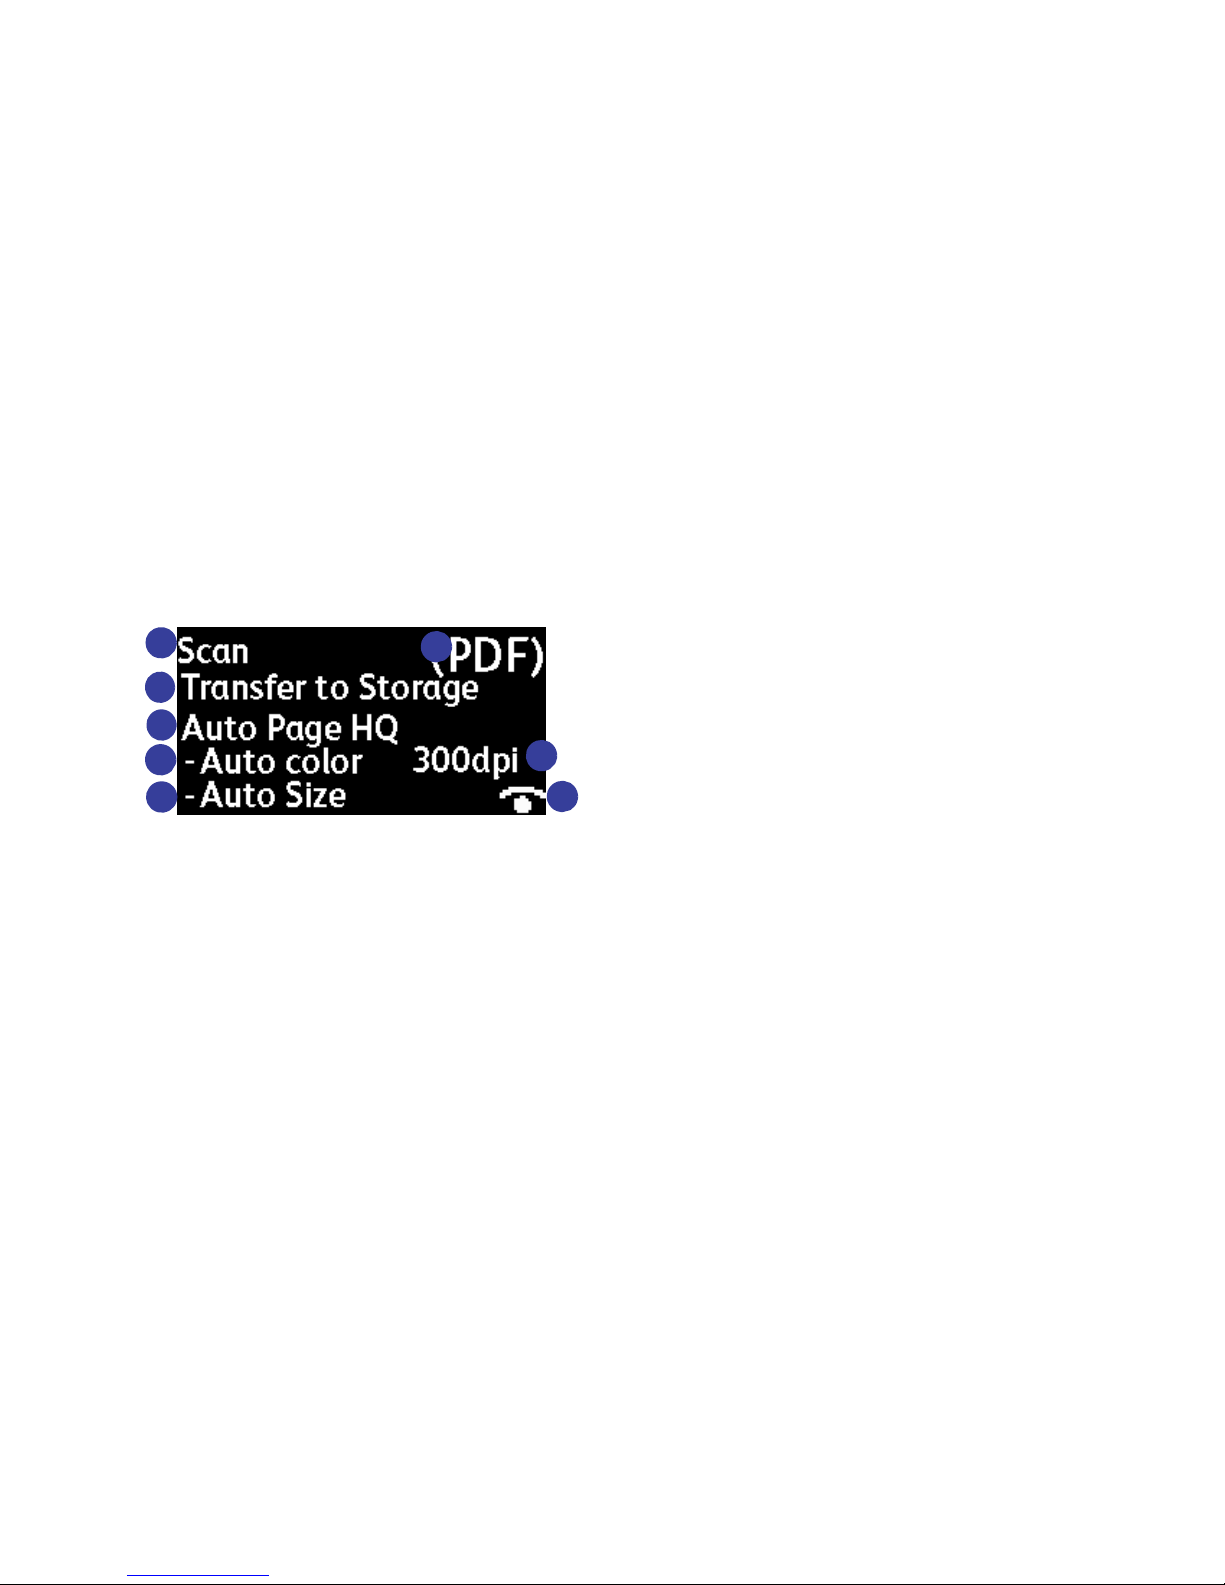
LCD SCREEN
When scanning with OneTouch, The LCD screen displays a summary of the selected scan options.
1. OneTouch Function
2. Destination
3. Configuration name
4. Mode
5. Page Size
6. Format
7. Resolution
8. Acuity — If Acuity is active, this icon will be shown.
It is possible to scroll through all OneTouch functions by touching the up or down function buttons. The final
screen shows scanner and driver information. On this screen only, pressing Simplex or Duplex will cycle through
the information that is available.
1. Counters:
● Tot a l — Total number of scans performed
● Pad Count — Number of scans since the separation pad was replaced. When 30,000 scans are reached, a
notification will be shown on the computer the next time a scan is initiated and the option on the LCD
screen will flash. This counter can be reset in the Device Settings menu.
● Roller Count — Number of scans since the roller was replaced. When 100,000 scans are reached, a
notification will be shown on the computer the next time a scan is initiated. This counter can be reset in
the Device Settings menu.
10 SCANNER USER’S GUIDE

WELCOME VISIONEER® PATRIOT P15
● Clean Count — Number of scans since the scanner was cleaned. When 1,000 scans are reached, a
notification will be shown on the computer the next time a scan is initiated. This counter can be reset in
the Device Settings menu.
2. Scanner Details
● Firmware version—this is the scanner’s firmware version number.
● Serial number—the scanner’s unique identification number.
3. Software Versions
● Driver — this is the version of the scanner’s driver.
● Acuity — this is the version of Acuity installed
● OneTouch — This is the version of OneTouch installed.
S
CANNER USER’S GUIDE 11

VISIONEER® PATRIOT P15 WELCOME
12 SCANNER USER’S GUIDE

S CANNER SETUP
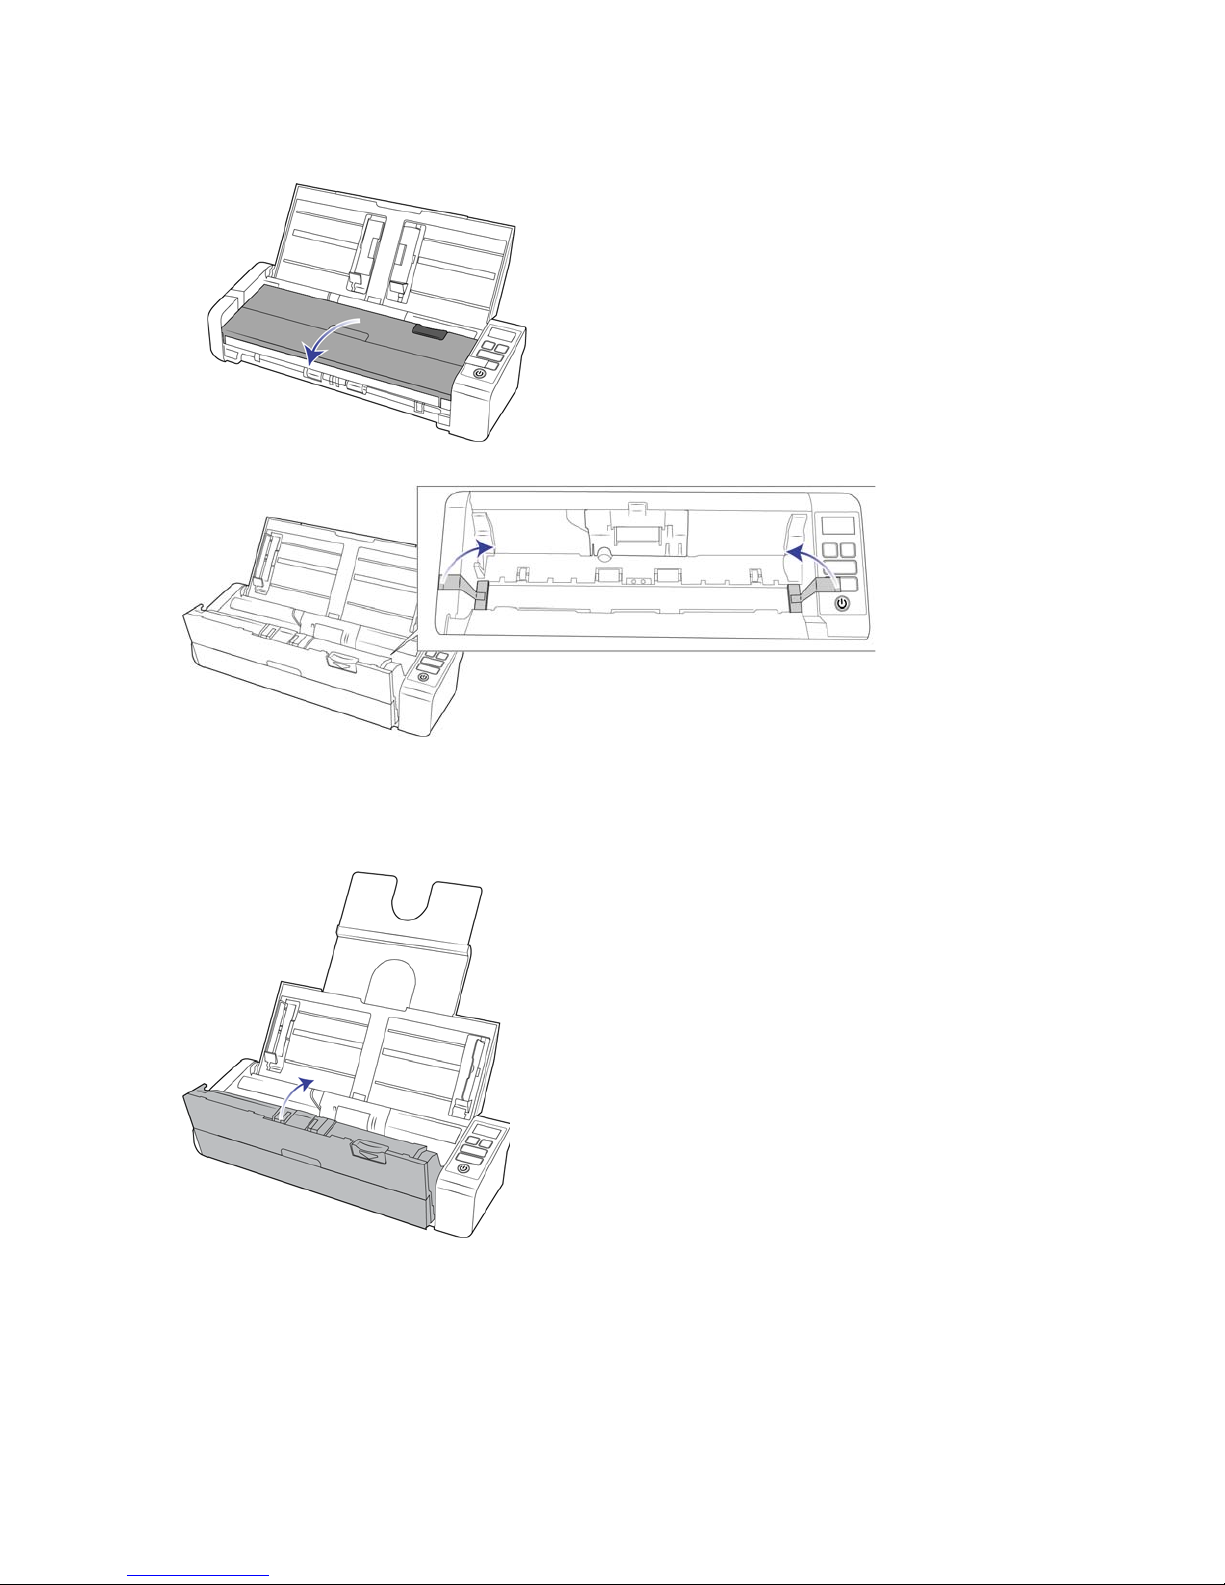
1. Remove the scanner from its protective foam and plastic bag.
2. Remove any shipping tape from the scanner as indicated in the following illustration(s).
The above illustrations are for example purposes only. Your scanner’s packaging may vary slightly.
SCANNER USER’S GUIDE 13
VISIONEER® PATRIOT P15 SCANNER SETUP
3. Open the automatic document feeder cover and remove any tape or protective foam from inside the feeder.
The above illustrations are for example purposes only. Your scanner’s packaging may vary slightly.
4. Close the feeder cover when you are finished.
The above illustrations are for example purposes only. Your scanner’s packaging may vary slightly.
14 SCANNER USER’S GUIDE

SCANNER SETUP VISIONEER® PATRIOT P15
U.K., North America, Europe
5. Attach the rear feed paper guide to the scanner
CONNECT THE POWER CORD
You can power the scanner through the standard power cord to a wall outlet, or use the USB power cord to power
the scanner through a USB port on the computer.
If powered by the USB connection only, the scanner will not be able to reach it’s maximum speed. In order to
reach the maximum rated speed, the supplied power supply should be used.
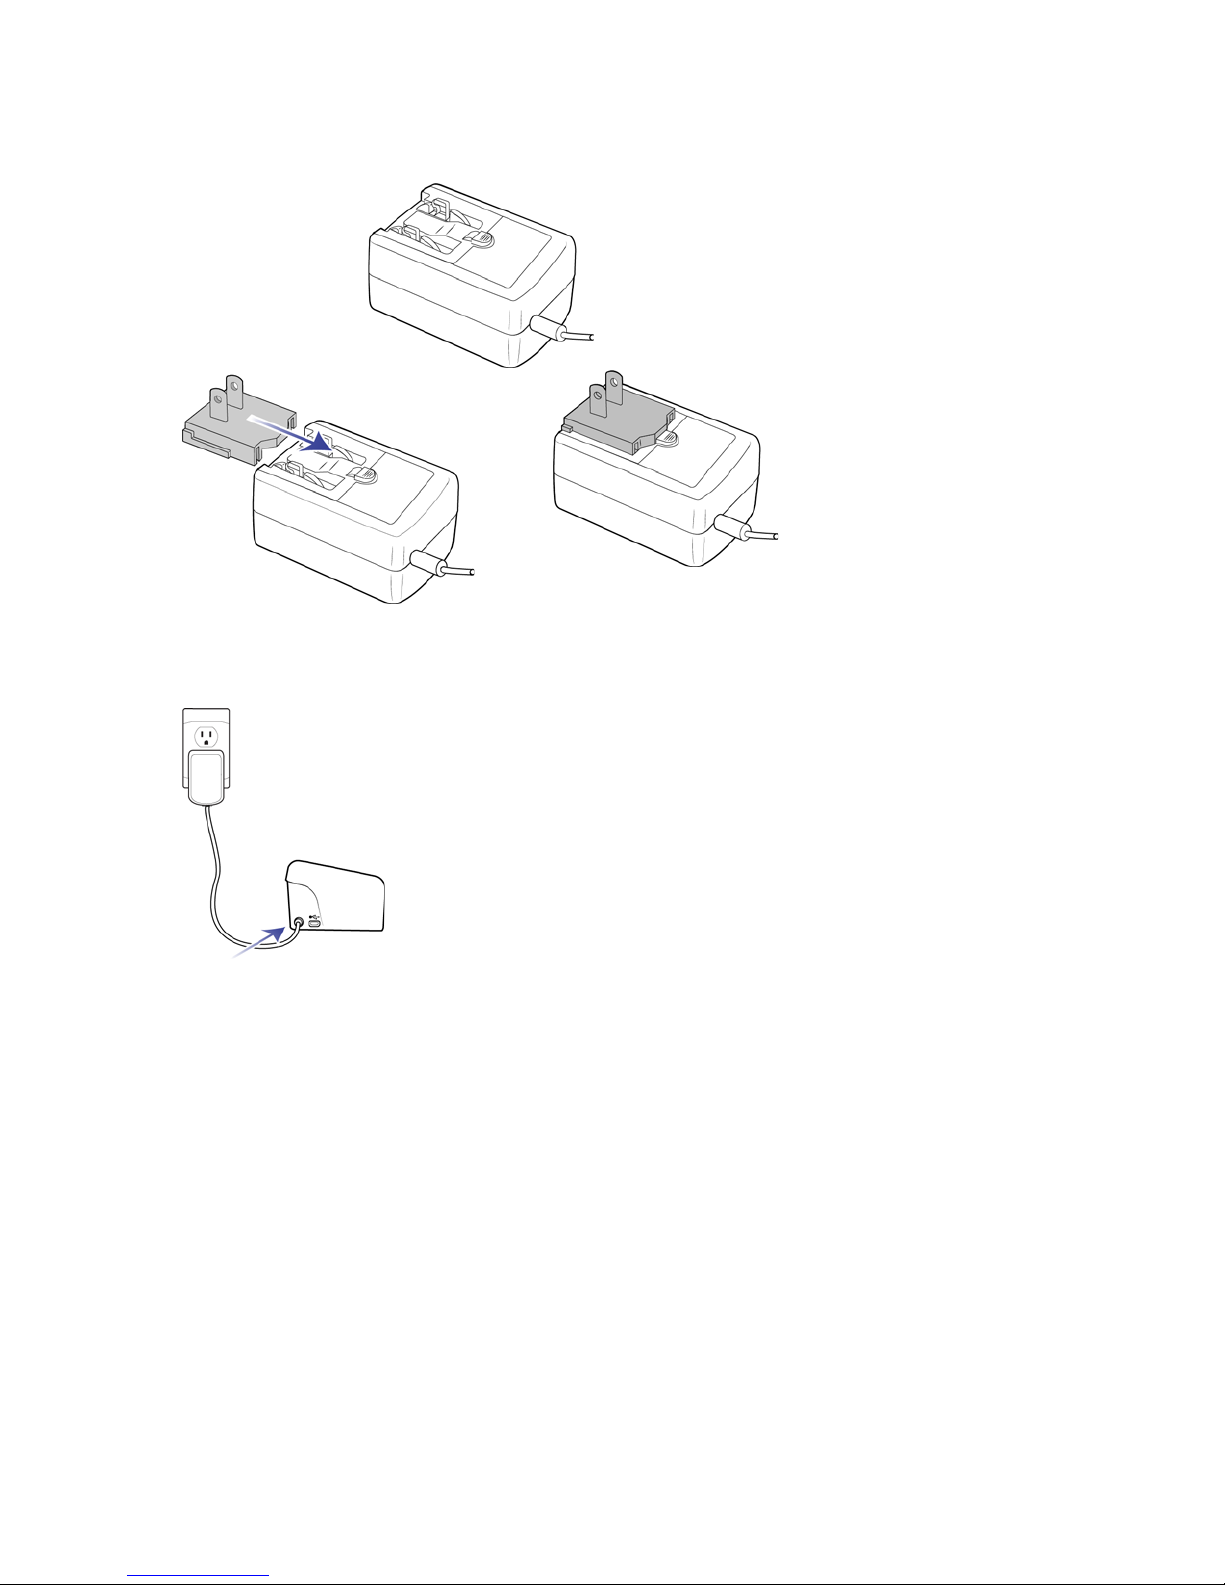
Connect the scanner power to the wall
Note: Only use the power supply (WA-36A24R made by APD) included with your scanner. Connecting any other
type of power supply may damage your scanner, and will void its warranty.
Assemble the power adapter:
1. Select the power plug adapter that is appropriate for the wall outlet in your country.
S
CANNER USER’S GUIDE 15
VISIONEER® PATRIOT P15 SCANNER SETUP
2. Slide the power plug adapter into the power supply base.
3. Plug the power supply into the power port on the scanner.
4. Plug the power cord into the power supply and into a wall outlet.
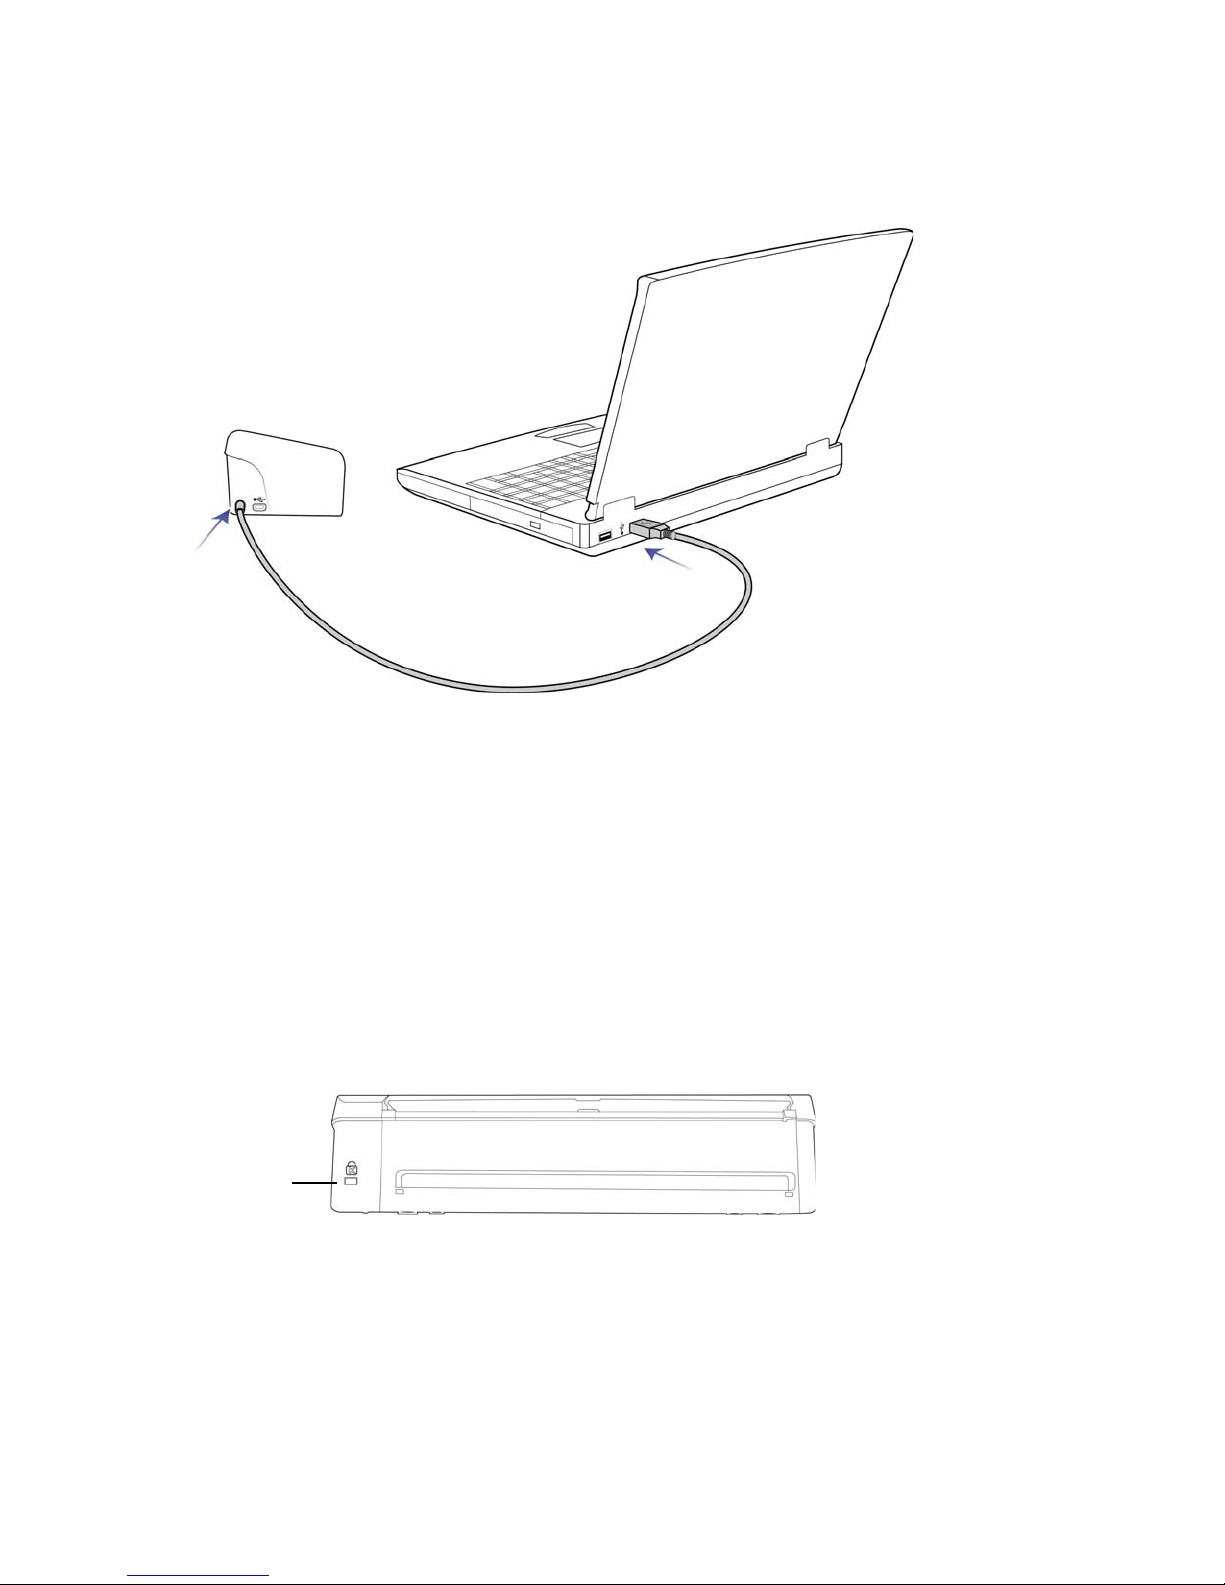
Connect the scanner power to the PC
1. Plug the round end of the USB power cord into the power jack on the scanner.
16 SCANNER USER’S GUIDE
SCANNER SETUP VISIONEER® PATRIOT P15
Use this slot to install a
safety lock. Do not
attempt to insert any
other type of object.
2. Plug the flat end of the USB power cord into an available USB port on the back of the computer. We do not
recommend using a USB hub to power the scanner.
Note: Only use the USB power cable included with your scanner. Connecting any other type of USB power cable
may damage your scanner, and will void its warranty. If you do not have your USB power cable, you can order a
new one by contacting our Customer Service department. Please refer to the Technical Support Card, included
with your scanner, for our company contact information, or visit the Parts & Accessories page for your scanner at
www.visioneer.com.
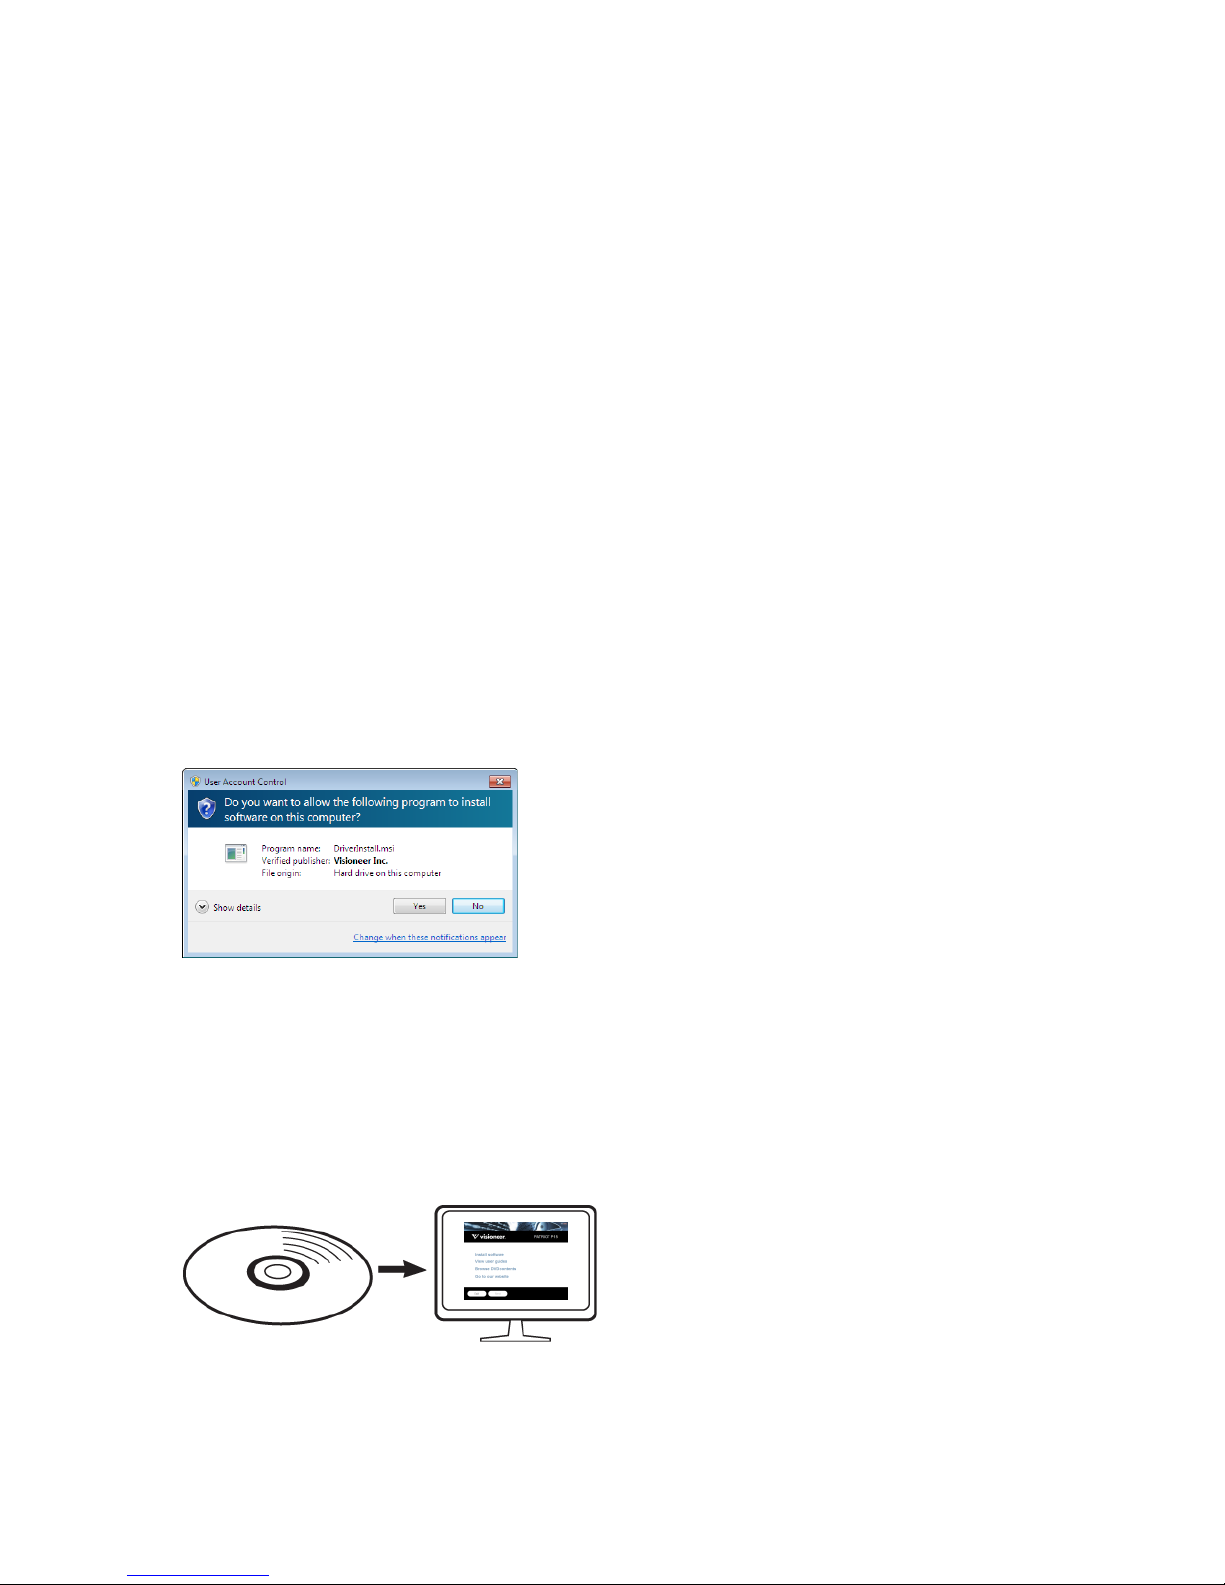
SAFETY LOCK
Your scanner may have a slot for installing a Kensington® style safety lock. This slot can be identified by the lock
icon. It is to the left of the USB port on the scanner. When following the instructions in this document, make sure
you connect the USB cable into the USB port which is identified by the USB symbol.
A lock is not provided with the scanner and this document does not contain instructions on purchasing and
installing a safety lock. If you choose to use a safety lock, please carefully read the installation instructions
provided with the lock. More information about Kensington® locks can be found at www.kensington.com.
S
CANNER USER’S GUIDE 17

VISIONEER® PATRIOT P15 SCANNER SETUP
18 SCANNER USER’S GUIDE
I NSTALLATION
Please make sure of the following before you begin installation:
■ If you are prompted to reboot during installation, please select “No”. Finish installing the rest of the software,
then close all open windows and reboot your computer.
■ The information in this guide may cover software not provided with the scanner you purchased. Please
disregard any information about the software not applicable to your scanner.
■ If your computer has AntiVirus or AntiSpyware software running, you may encounter alerts or messages
during installation asking you to allow the installation to proceed. Although the messages will differ based on
the software your computer is running, in each case you should allow the installation to proceed if that
option is available. Alternatively, you can turn off the AntiVirus or AntiSpyware software before installing your
scanner, but if you do, make sure to turn it back on again when installation is finished.
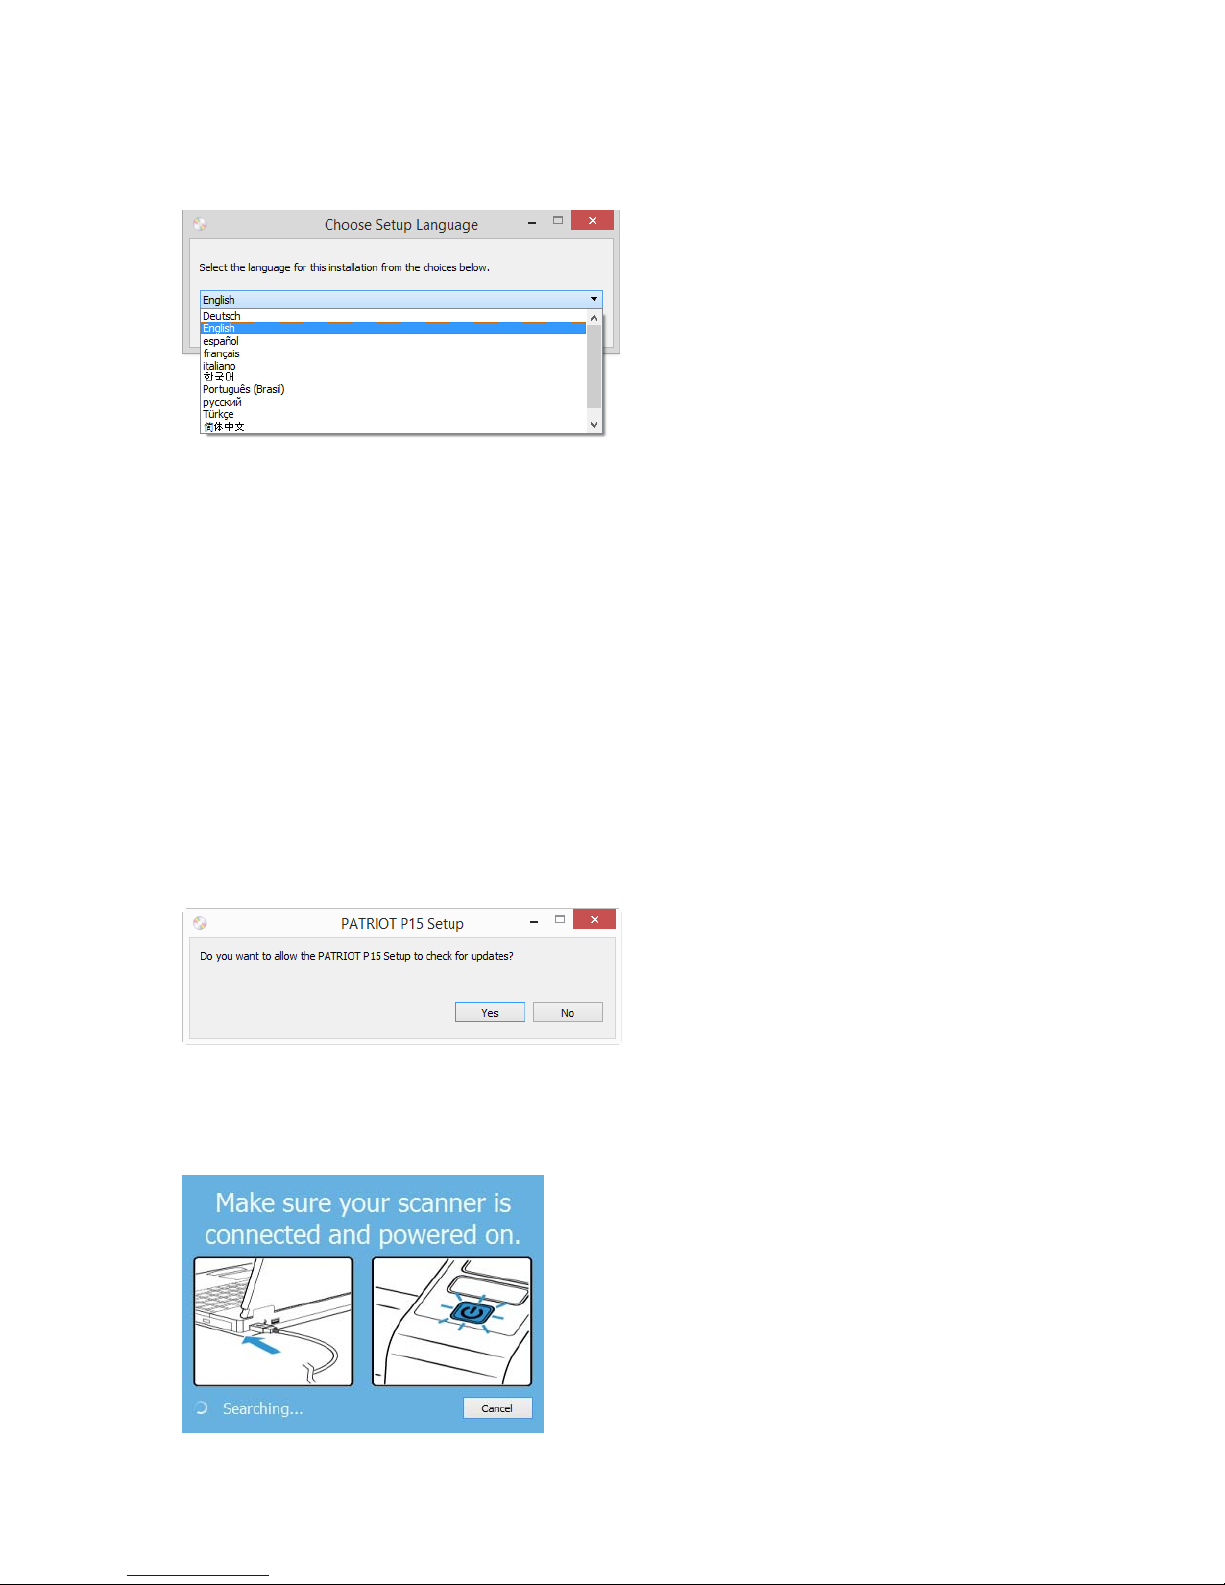
■ If your computer is running Windows Vista or later, you may see the Windows User Account Control screen
asking you to confirm system changes. Click the Yes button to allow the installation to proceed.
INSTALL THE SOFTWARE AND CONNECT THE SCANNER
1. Start Microsoft Windows and make sure that no other applications are running.
2. Insert the installation disc into your computer’s DVD-ROM drive.
The disc automatically starts.
SCANNER USER’S GUIDE 19
VISIONEER® PATRIOT P15 INSTALLATION
3. The Select Language window opens. Click the drop-down menu arrow and select the language to use. Click
OK.
The disc’s Main menu window opens.
Note: If the disc does not start, check the following:
● Make sure the disc drives door is completely shut.
● Make sure the disc was inserted in the drive in the proper direction (label side up).
To launch the disc manually:
● Open the Windows options for your computer’s disc drives.
● Double-click the icon for your DVD-ROM drive.
● The Installation menu for the disc should now open.
If the menu does not open:
❍ From the list of files on the disc, double-click the file named setup.exe.
4. A prompt will be shown to allow the installer to search online for software updates. Select No to install the
software on the disc only.
5. If online updates are approved, it will first check to see if there are newer versions of the installer.
6. Plug the USB cable into the USB port on the scanner then into a USB port on the computer. Turn on the
scanner power.
20 SCANNER USER’S GUIDE
INSTALLATION VISIONEER® PATRIOT P15
Note: Select Cancel to install the software on the disc only.
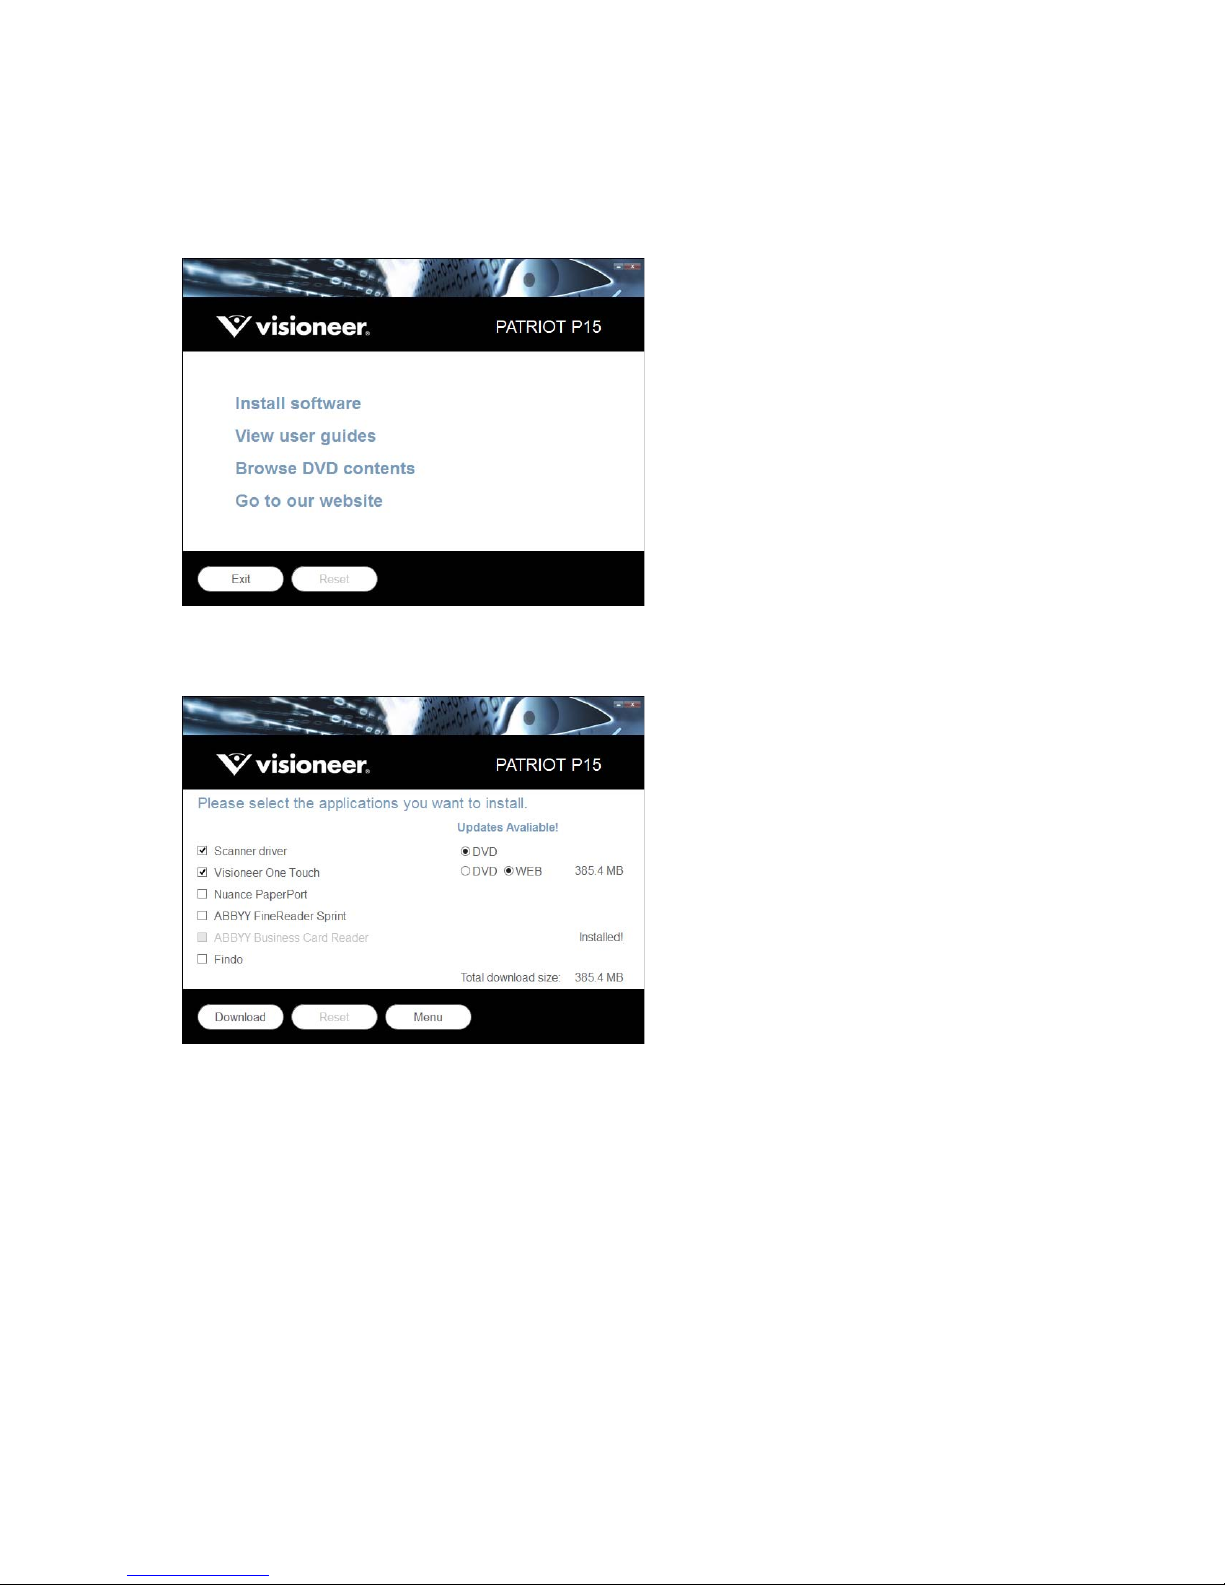
7. When this is complete, the Main Menu will be shown.
8. On the Main menu, select Install software.
9. Make sure the boxes for Scanner Driver and Visioneer OneTouch are selected, as well as any other
applications you want to install.
Note: The software provided with your scanner may differ slightly from the list shown in the window.
10. If a version of the software is already installed on the system, the option will be greyed out. However, if there
is a newer version available on the disc or online, it will be possible to upgrade by selecting the appropriate
button option.
11. If there are newer versions of the software available online, the Web button will be enabled. If there is no
newer version then only the DVD button will be enabled.
Select which option to install the software from.
12. If any of the Web buttons have been selected, the software will have to first be downloaded by clicking
Download.
S
CANNER USER’S GUIDE 21
 Loading...