

Page 1

Book Page iii Monday, December 2, 1996 1:30 PM
TABLE OF CONTENTS
Chapter 1: Welcome
. . . . . . . . . . . . . . . . . . . . . . . . . . . . . . . . . . . . . . .1
Before You Start . . . . . . . . . . . . . . . . . . . . . . . . . . . . . . . . . . . . . . . .1
What’s in the Box . . . . . . . . . . . . . . . . . . . . . . . . . . . . . . . . . . . . . . .2
Hardware . . . . . . . . . . . . . . . . . . . . . . . . . . . . . . . . . . . . . . . . . 2
Software . . . . . . . . . . . . . . . . . . . . . . . . . . . . . . . . . . . . . . . . . . 3
User’s Guide . . . . . . . . . . . . . . . . . . . . . . . . . . . . . . . . . . . . . . 3
Calibration Page . . . . . . . . . . . . . . . . . . . . . . . . . . . . . . . . . . . . 3
Registering PaperPort . . . . . . . . . . . . . . . . . . . . . . . . . . . . . . . . . . . .3
What You Need . . . . . . . . . . . . . . . . . . . . . . . . . . . . . . . . . . . . . . . .4
If Your Computer Does Not Have an Available COM Port . . . . . . . 4
Getting Help . . . . . . . . . . . . . . . . . . . . . . . . . . . . . . . . . . . . . . . . . .5
Contacting Visioneer . . . . . . . . . . . . . . . . . . . . . . . . . . . . . . . . . . . . 6
Chapter 2: Connecting Your Scanning Keyboard
. . . . . . . . . . . . . . . . 7
The PaperPort ix Scanner Features . . . . . . . . . . . . . . . . . . . . . . . . . .8
The PaperPort ix Keyboard Features . . . . . . . . . . . . . . . . . . . . . . . 10
Connecting the PaperPort ix Scanning Keyboard . . . . . . . . . . . . . .13
Chapter 3: Installing the PaperPort Software
. . . . . . . . . . . . . . . . . . 17
Installing the PaperPort Software for Your Computer . . . . . . . . . . 17
If Your Computer Is Running Windows 95 . . . . . . . . . . . . . . 18
If Your Computer Is Running Windows 3.1 or 3.11 . . . . . . . 19
Calibrating the PaperPort ix Scanning Keyboard . . . . . . . . . . . . . . 20
Checking It Out . . . . . . . . . . . . . . . . . . . . . . . . . . . . . . . . . . . . . . . 21
Trying the One-Minute Guide . . . . . . . . . . . . . . . . . . . . . . . . . . . . 22
Installing Additional Applications . . . . . . . . . . . . . . . . . . . . . . . . . 23
Viewing the PaperPort 3.6 Software User’s Guide . . . . . . . . . . . . . 23
Chapter 4: Setting Up the Scanner
Adjusting the Paper Return . . . . . . . . . . . . . . . . . . . . . . . . . . . . . . 25
Testing the PaperPort Button . . . . . . . . . . . . . . . . . . . . . . . . . . . . . 27
Selecting Scan Settings . . . . . . . . . . . . . . . . . . . . . . . . . . . . . . . . . .27
. . . . . . . . . . . . . . . . . . . . . . . . . .25
iii
Page 2

Book Page iv Monday, December 2, 1996 1:30 PM
iv
T
ABLE OF CONTENTS
Appendix A: PaperPort Safety Tips
. . . . . . . . . . . . . . . . . . . . . . . . . 29
Signs of Injury . . . . . . . . . . . . . . . . . . . . . . . . . . . . . . . . . . . . . . . .30
Building a Safe Work Environment . . . . . . . . . . . . . . . . . . . . . . . .30
Placement of the Keyboard and Mouse . . . . . . . . . . . . . . . . . 30
Furniture and Your Posture . . . . . . . . . . . . . . . . . . . . . . . . . . 31
Arm, Hand, and Wrist Position . . . . . . . . . . . . . . . . . . . . . . . 32
Other Factors . . . . . . . . . . . . . . . . . . . . . . . . . . . . . . . . . . . . . . . . .32
Appendix B: Troubleshooting
. . . . . . . . . . . . . . . . . . . . . . . . . . . . . 33
Installation Problems . . . . . . . . . . . . . . . . . . . . . . . . . . . . . . . . . . .33
PaperPort Scanning Keyboard Not Found . . . . . . . . . . . . . . . . . . .34
PaperPort Scanning Keyboard Will Not Scan . . . . . . . . . . . . . . . . .36
Mouse or Modem Stops Responding . . . . . . . . . . . . . . . . . . . . . . .37
Changing the COM Port . . . . . . . . . . . . . . . . . . . . . . . . . . . . . . . .40
Finding the scanning keyboard . . . . . . . . . . . . . . . . . . . . . . . . . . . .41
Recalibrating the PaperPort ix Scanning Keyboard . . . . . . . . . . . . . 41
Appendix C: Maintenance and Technical Information
. . . . . . . . . 43
Cleaning the PaperPort Scan Mechanism . . . . . . . . . . . . . . . . . . . . 43
PaperPort ix Scanner Specifications . . . . . . . . . . . . . . . . . . . . . . . . 44
German Noise Declaration . . . . . . . . . . . . . . . . . . . . . . . . . . . . . . .44
EC Declaration of Conformity . . . . . . . . . . . . . . . . . . . . . . . . . . . .45
Appendix D: Upgrading Your Software
. . . . . . . . . . . . . . . . . . . . . 47
Before You Start . . . . . . . . . . . . . . . . . . . . . . . . . . . . . . . . . . . . . . .48
If You Already Have a PaperPort ix Scanning Keyboard . . . . . . . . . 49
If You Have a PaperMax or PaperPort 2.0 Scanner . . . . . . . . . . . .50
Index
. . . . . . . . . . . . . . . . . . . . . . . . . . . . . . . . . . . . . . . . . . . . . . . . . . .51
Page 3

Book Page 1 Monday, December 2, 1996 1:30 PM
CHAPTER 1
Welcome
Congratulations on your purchase of the PaperPort ix scanning keyboard,
with which you can quickly scan paper documents and get electronic
images of those documents on your computer.
of Contents
Table
The PaperPort scanning keyboard comes with Visioneer’s award-winning
software that you can use to annotate, organize, and find scanned items.
With the document communication features, you can send scanned items
electronically using links to other applications, such as electronic fax,
electronic mail (e-mail), and word processing applications, without leaving
PaperPort.
Sharing items with others, even if they do not own the PaperPort scanning
keyboard or software, is possible with PaperPort Viewer. PaperPort Viewer
is available for Windows and for Macintosh computers.
B
EFORE YOU START
Before installing the PaperPort ix scanning keyboard and its software on
your computer, please read this chapter. It contains important information
about the necessary computer requirements, how to get assistance if you
need it, and other helpful information.
▼
NOTE:
please see Appendix D, “Upgrading Your Software.”
If you already own a scanning keyboard or a PaperPort scanner,
1
Page 4
Book Page 2 Monday, December 2, 1996 1:30 PM
of Contents
Table
2
C
HAPTER
1: W
ELCOME
W
HAT’S IN THE BOX
Before you start the installation, check the contents of the box to make sure
that all parts are included. If any items are missing or you notice any
damage, contact the dealer where you purchased the scanning keyboard.
H
ARDWARE
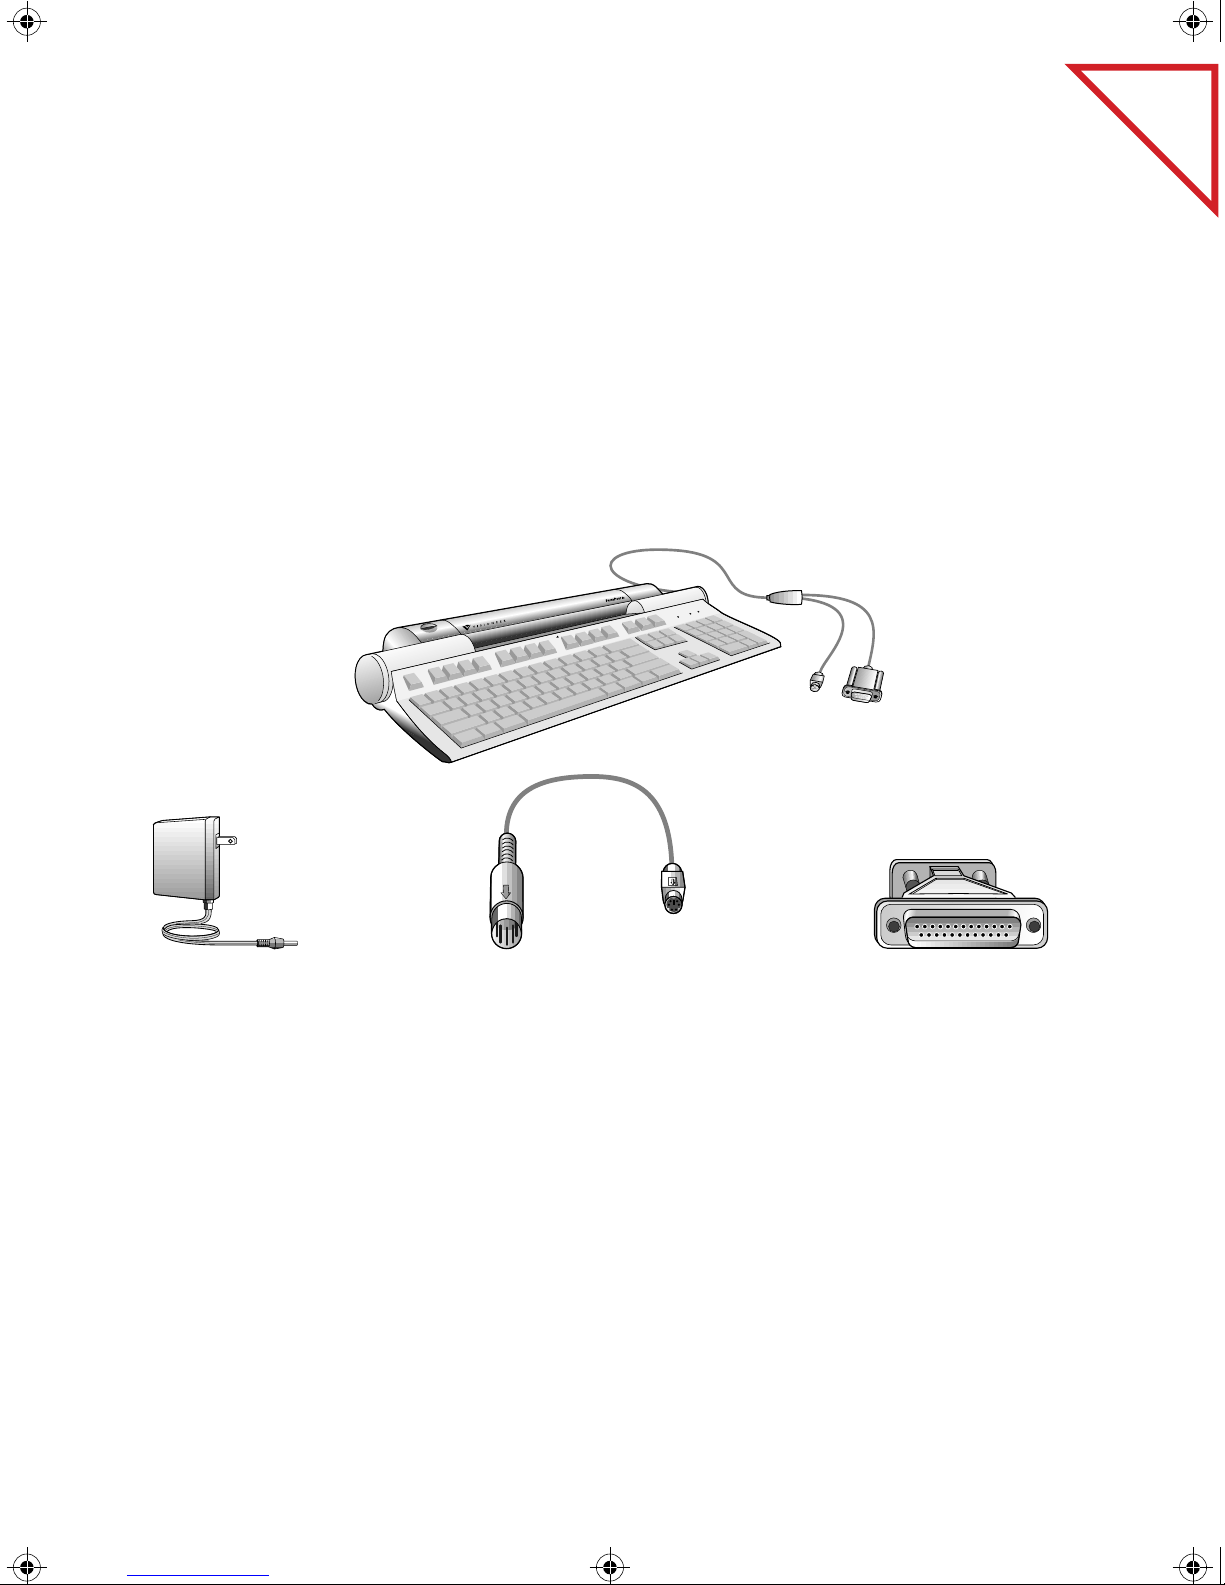
The PaperPort scanning keyboard hardware consists of the following items:
PaperPort ix scanning keyboard
Power adapter 9-pin to 25-pin adapter Keyboard port adapter
▼
NOTE:
Use the 9-pin to 25-pin adapter only if your computer’s serial
(COM) port has a 25-pin connector.
Page 5

Book Page 3 Monday, December 2, 1996 1:30 PM
S
The box contains the PaperPort software CD (compact disc). The CD
contains all the necessary software for setting up and using your scanning
keyboard.
▼
U
The
User's
Guide
get you started using the PaperPort 4.0 Software with Windows 95 or
Windows NT. If you are using your scanning keyboard with Windows 3.1
or Windows 3.11, see the
PaperPort CD. In addition, a file named README, located on the CD,
contains information not available when the guide was printed.
R
EGISTERING PAPERPORT
OFTWARE
NOTE:
If your computer does not have a CD-ROM drive, please see
the card included with your scanning keyboard for ordering the
software on disks from Visioneer.
SER’S GUIDE
PaperPort 4.0 Software Getting Started Guide
PaperPort 3.6 Software User’s Guide
provides information to
on the
of Contents
Table
3
C
ALIBRATION PAGE
Calibrating the scanning keyboard adjusts its internal scanning mechanism
to produce the best possible scan image. The calibration page included
with your scanning keyboard is a plain white sheet of paper cut to the
appropriate size. You can also use a regular clean white sheet of paper.
R
EGISTERING PAPERPORT
After you install the PaperPort software, a registration screen appears so
you can easily register your PaperPort ix scanning keyboard and software.
Registration entitles you to information about product upgrades and other
services from Visioneer. You can register electronically or by fax, phone, or
mail. Information for registering is also on the PaperPort CD.
Page 6

Book Page 4 Monday, December 2, 1996 1:30 PM
of Contents
Table
4
C
HAPTER
1: W
ELCOME
W
HAT YOU NEED
To use the scanning keyboard and software, you need the following:
IBM PC (or 100-percent compatible) 486 or higher for PaperPort 4.0;
■
an IBM 386 or higher for PaperPort 3.6.
Microsoft Windows 95, Windows 3.1, or Windows 3.11.
■
■
8 megabytes (MB) or more of internal memory (RAM), or 4 MB if you
have your own OCR software and decide not to install the OCR
software included with the PaperPort software.
20 MB of free hard disk space if your computer is running Windows 95;
■
12 MB of free hard disk space if your computer is running
Windows 3.1.
■
An available serial port (COM1, COM2, COM3, or COM4).
If your computer does not have an available COM port, please read the
section below.
A VGA or SVGA monitor. Recommended settings for your monitor are
■
256 colors or more, and 640 by 480 resolution.
A CD-ROM drive to install the software; however, if your computer
■
does not have a CD-ROM drive, you can get disks from Visioneer.
IF Y
OUR COMPUTER DOES NOT HAVE AN AVAILABLE
ORT
COM P
You have several options if your computer does not have an available COM
port to connect the PaperPort ix scanning keyboard:
Use Visioneer’s special parallel port adapter to connect the scanning
■
keyboard to one of your computer’s parallel ports. A card for ordering
the adapter is included with your scanning keyboard.
recommended option
.
This is the
Page 7

Book Page 5 Monday, December 2, 1996 1:30 PM
■
■
G
ETTING HELP
Install a serial I/O card into your computer. A serial I/O card adds more
COM ports to your computer. Most computers have built-in ports for
COM1 and COM2. When you install a serial card, the new ports are
usually configured to be COM3 and COM4. Contact your computer
dealer to purchase a serial I/O card.
Use another type of mouse on your computer. Some computers use
COM1 for the mouse connection, but you can also purchase a mouse
(called a Bus mouse) that does not use a COM port, thereby making
COM1 available for connecting the scanning keyboard. If your
computer uses COM1 for the mouse, contact your computer dealer to
purchase a Bus mouse.
of Contents
Table
5
G
ETTING HELP
If after installing the scanning keyboard and its software you still have
questions or the scanning keyboard doesn’t seem to work properly, see
Appendix B, “Troubleshooting.” It has additional answers to many
common questions.
PaperPort has a complete help system to provide assistance and answer
questions about the scanning keyboard and PaperPort software.
To get help while running the PaperPort software:
■
Press the F1 key, or from the
Topics
to display the Help Topics window.
Help
menu, choose
PaperPort Help
Page 8

Book Page 6 Monday, December 2, 1996 1:30 PM
6 CHAPTER 1: WELCOME
CONTACTING VISIONEER
Visioneer provides support in a variety of ways:
■ You can have Tech Notes and other information sent directly to your fax
■ You can reach Visioneer on America Online and the World Wide Web.
■ You can call the Visioneer Technical Support Hotline.
machine from the Visioneer automated fax-on-demand center. You can
also fax questions directly to the technical support staff.
You can download Tech Notes, post questions, or chat with other
PaperPort users.
of Contents
Table
For specific information and numbers to call, see the technical support
card that you received with your scanning keyboard.
Page 9

Book Page 7 Monday, December 2, 1996 1:30 PM
CHAPTER 2
Connecting Your
Scanning Keyboard
of Contents
Table
This chapter describes the scanning keyboard’s features and shows how to
connect the keyboard to your computer.
▼ NOTE: The section “Connecting the PaperPort ix Scanning
Keyboard,” assumes you are connecting the scanning keyboard to a
COM port. If you are connecting the scanning keyboard to a parallel
port, see the instructions that you received with the Visioneer parallel
port adapter.
7
Page 10
Book Page 8 Monday, December 2, 1996 1:30 PM
8 CHAPTER 2: CONNECTING YOUR SCANNING KEYBOARD
THE PAPERPORT IX SCANNER FEATURES
of Contents
Table
Front view
PaperPort button
1
Top view
Paper return
4
Page feed
2
Page markers
3
Rear view
Paper return settings
5
Page 11

Book Page 9 Monday, December 2, 1996 1:30 PM
THE PAPERPORT IX SCANNER FEATURES, CONTINUED
PaperPort button. Press to cancel a scan in progress. If the paper jams, press to back paper
1
out. Press before scanning to select new scan settings.
Page feed. Insert item to scan face up into the page feed. The feed mechanism will grab the
2
item and pull it the rest of the way through. The PaperPort application starts automatically.
Page markers. Insert items to scan between these two elevated tabs.
3
Paper return. Rotate forward or backward to set the paper output path (straight-through or
4
return-to-front). Use the straight-through setting for small items, such as business cards, or for
thicker, heavier-weight paper.
THE PAPERPORT IX SCANNER FEATURES 9
of Contents
Table
Paper return settings. Rotate the paper return to align either setting with the arrow on the
5
PaperPort body.
▼ NOTE: The scanner does not have an on/off switch. Simply insert a
page or other item into the scanner to start it.
▼ WARNING: The PaperPort ix scanning keyboard is designed to work
with a 60Hz/120ac electricity (the standard electrical supply for the
United States). It will not work correctly with 50Hz/220ac electricity.
Page 12

Book Page 10 Monday, December 2, 1996 1:30 PM
10 CHAPTER 2: CONNECTING YOUR SCANNING KEYBOARD
THE PAPERPORT IX KEYBOARD FEATURES
of Contents
Table
Function keys (F1 through F12)
2
Character keys
1
Character keys. The main keys for typing text.
1
Function keys (F1 through F12). Keys that software applications use for specific tasks.
2
Arrow keys. Keys to move the cursor up, down, right, and left. The cursor shows the position
3
where text or graphics will be entered on the screen.
Arrow keys
3
Keyboard lights
5
4
Numeric keypad
Numeric keypad. Keys arranged like a calculator for entering numbers quickly. The numeric
4
keypad can operate in numeric mode or edit mode. Pressing the Num Lock key switches between
the modes. When the Num Lock light is on, the keypad operates like a calculator. When the light
is off, the keypad keys move the cursor for editing, or scroll quickly through the document.
Keyboard lights. When lit, these lights indicate that the Num Lock, Caps Lock, or Scroll Lock
5
functions are turned on.
Page 13

Book Page 11 Monday, December 2, 1996 1:30 PM
.
Key Function
Esc Quits or exits an application, or cancels a command, but
F1 through F12 Starts certain tasks in a software application. Refer to each
Backspace Deletes the character to the left of the cursor.
Print Scrn Prints a “snapshot” of the entire screen. This is not the same
THE PAPERPORT IX KEYBOARD FEATURES 11
can have another function depending on the application.
Esc is an acronym for “Escape.” The PaperPort software
does not use the Esc key.
application’s manual for a specific description of the tasks
controlled by the function keys.
as printing a file, which can print multiple pages. Some
applications disable this key, or use it for another task.
of Contents
Table
Scroll Lock Prevents the screen from scrolling. The scroll lock light
indicates when this function is turned on.
Pause Interrupts scrolling temporarily for some software tasks.
Pressing the key again returns the scrolling capability.
Num Lock Switches between two modes for the numeric keypad keys.
When the Num Lock light is on, the numeric keypad is in
“calculator” mode and pressing the keys enters numbers.
When the light is off, the keypad is in “edit” mode and
pressing the keys moves the cursor or scrolls through the file
quickly. For example, in calculator mode pressing the 4 key
enters the number 4, but in edit mode it moves the cursor to
the left one space, as indicated by the left arrow on the key.
Insert Switches between insert mode and overwrite mode for typing
text. In insert mode, typed text is added to existing text.
In overwrite mode, typed text replaces existing text.
Many software applications set the mode to insert and disable
this key. The 0 key on the numeric keypad does the same
thing when the keypad is in edit mode.
Delete Deletes selected characters or items in a file. The decimal
point key on the numeric keypad does the same thing when
the keypad is in edit mode.
Page 14

Book Page 12 Monday, December 2, 1996 1:30 PM
12 CHAPTER 2: CONNECTING YOUR SCANNING KEYBOARD
Key Function
Home Moves the cursor to the beginning of a file. Pressing the
End Moves the cursor to the end of a file. The 1 key on the
Page Up Moves the view of a file up one page. The 9 key on the
7 key on the numeric keypad does the same thing when the
keypad is in edit mode.
numeric keypad does the same thing when the keypad is in
edit mode.
numeric keypad does the same thing when the keypad is in
edit mode.
of Contents
Table
Page Down Moves the view of a file down one page. The 3 key on the
numeric keypad does the same thing when the keypad is in
edit mode.
Ctrl Works with another key to perform some task.
The combination of simultaneously pressing the Ctrl and C
key is written as Ctrl-C. The task depends on the software
application, although some Ctrl key combinations are
standard. For example, Ctrl-C usually means to Copy the
selected text or item.
Alt Works with another key to perform some task.
The combination of simultaneously pressing the Alt and
Tab key is written as Alt-Tab. The task depends on the
software application, although some Alt key combinations
are standard. In Windows, Alt-Tab switches to another
open application.
Windows 95 keys Selects Windows 95 functions. The Windows key, located
to the left of the Spacebar, opens the Start menu.
Used in combination with another key, can have another
function depending on the application that is running.
The Application key, located to the right of the Spacebar,
opens a context menu for the application that is running.
Page 15
Book Page 13 Monday, December 2, 1996 1:30 PM
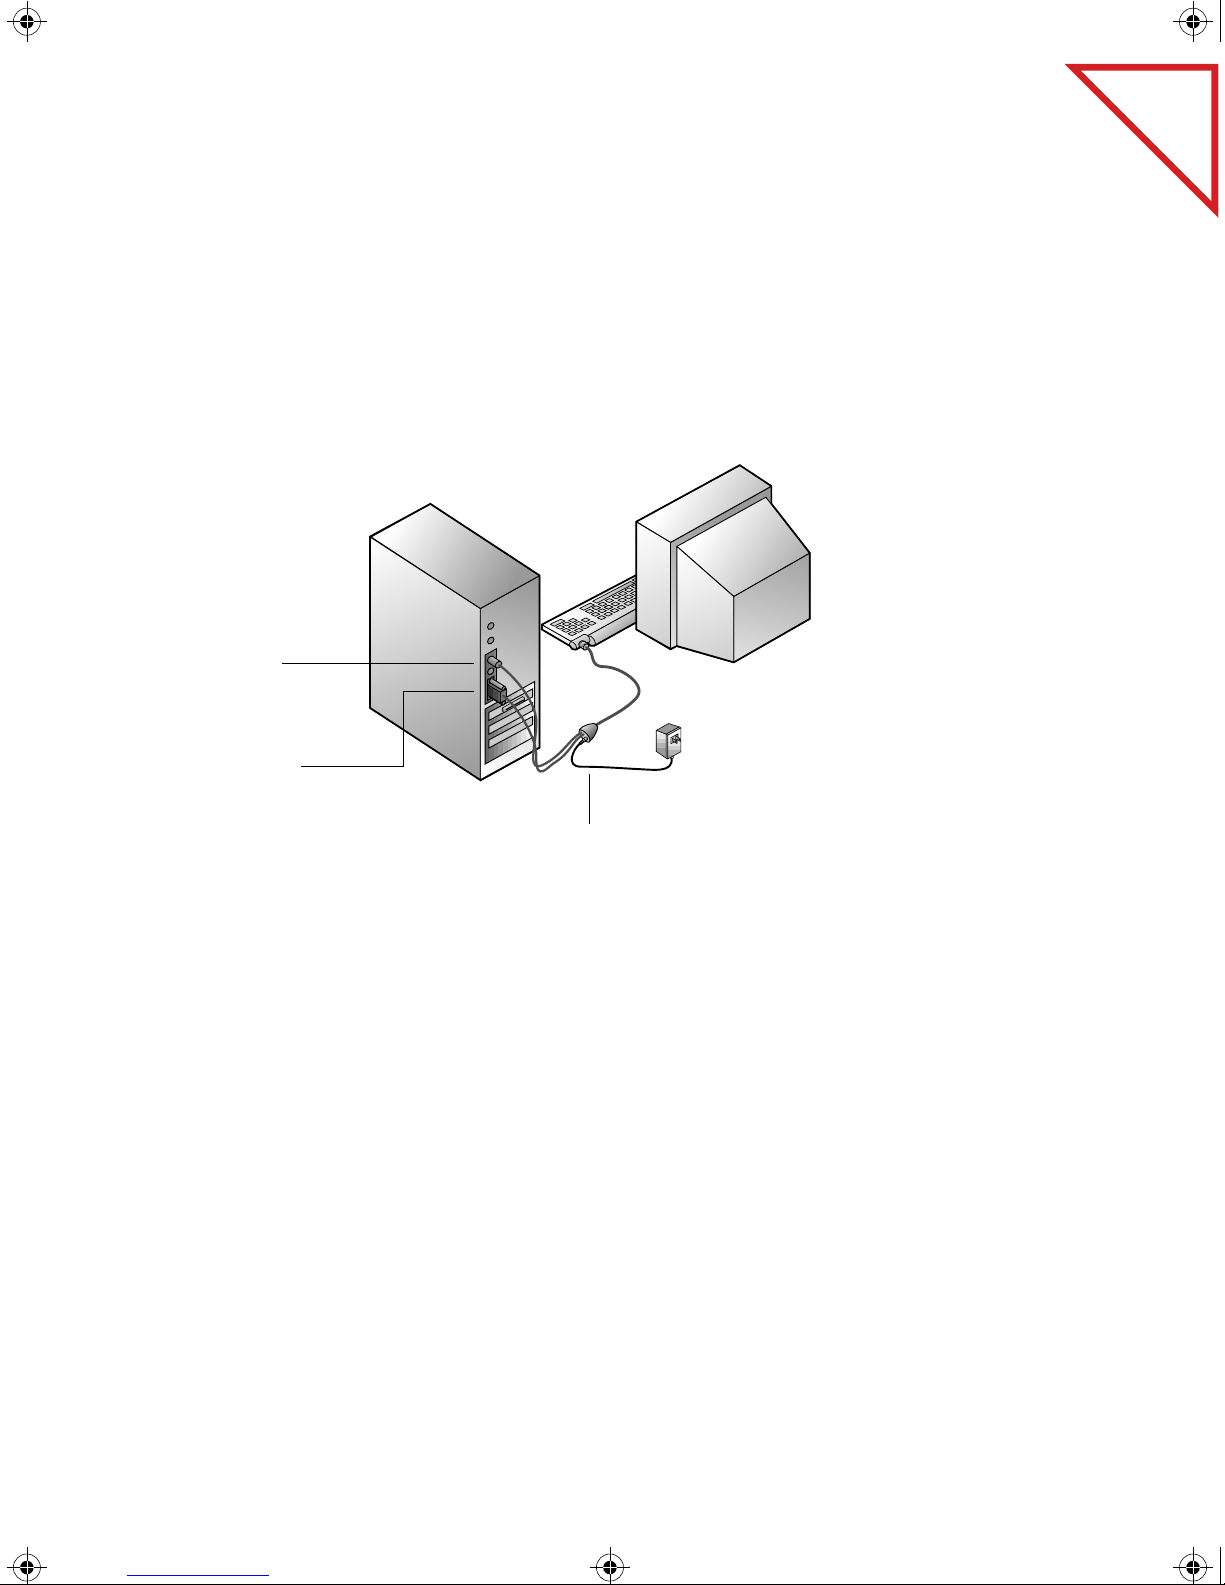
CONNECTING THE PAPERPORT IX SCANNING KEYBOARD
The PaperPort ix scanning keyboard connects to any available serial
(COM) port on the back of your computer.
When you’re finished connecting the cables and power supply, the
keyboard and computer should look like this:
CONNECTING THE PAPERPORT IX SCANNING KEYBOARD 13
of Contents
Table
Keyboard plug to
keyboard port (adapter
may be required)
Serial cable to serial
(COM) port (adapter
may be required)
Power supply to cable
splitter housing
▼ NOTE: To install your scanning keyboard, you will be plugging in
several connectors. Note that the connectors fit only one way. If a
connector does not attach easily, make sure that you are plugging it in
correctly. Do not force a plug into its connection.
Page 16

Book Page 14 Monday, December 2, 1996 1:30 PM
14 CHAPTER 2: CONNECTING YOUR SCANNING KEYBOARD
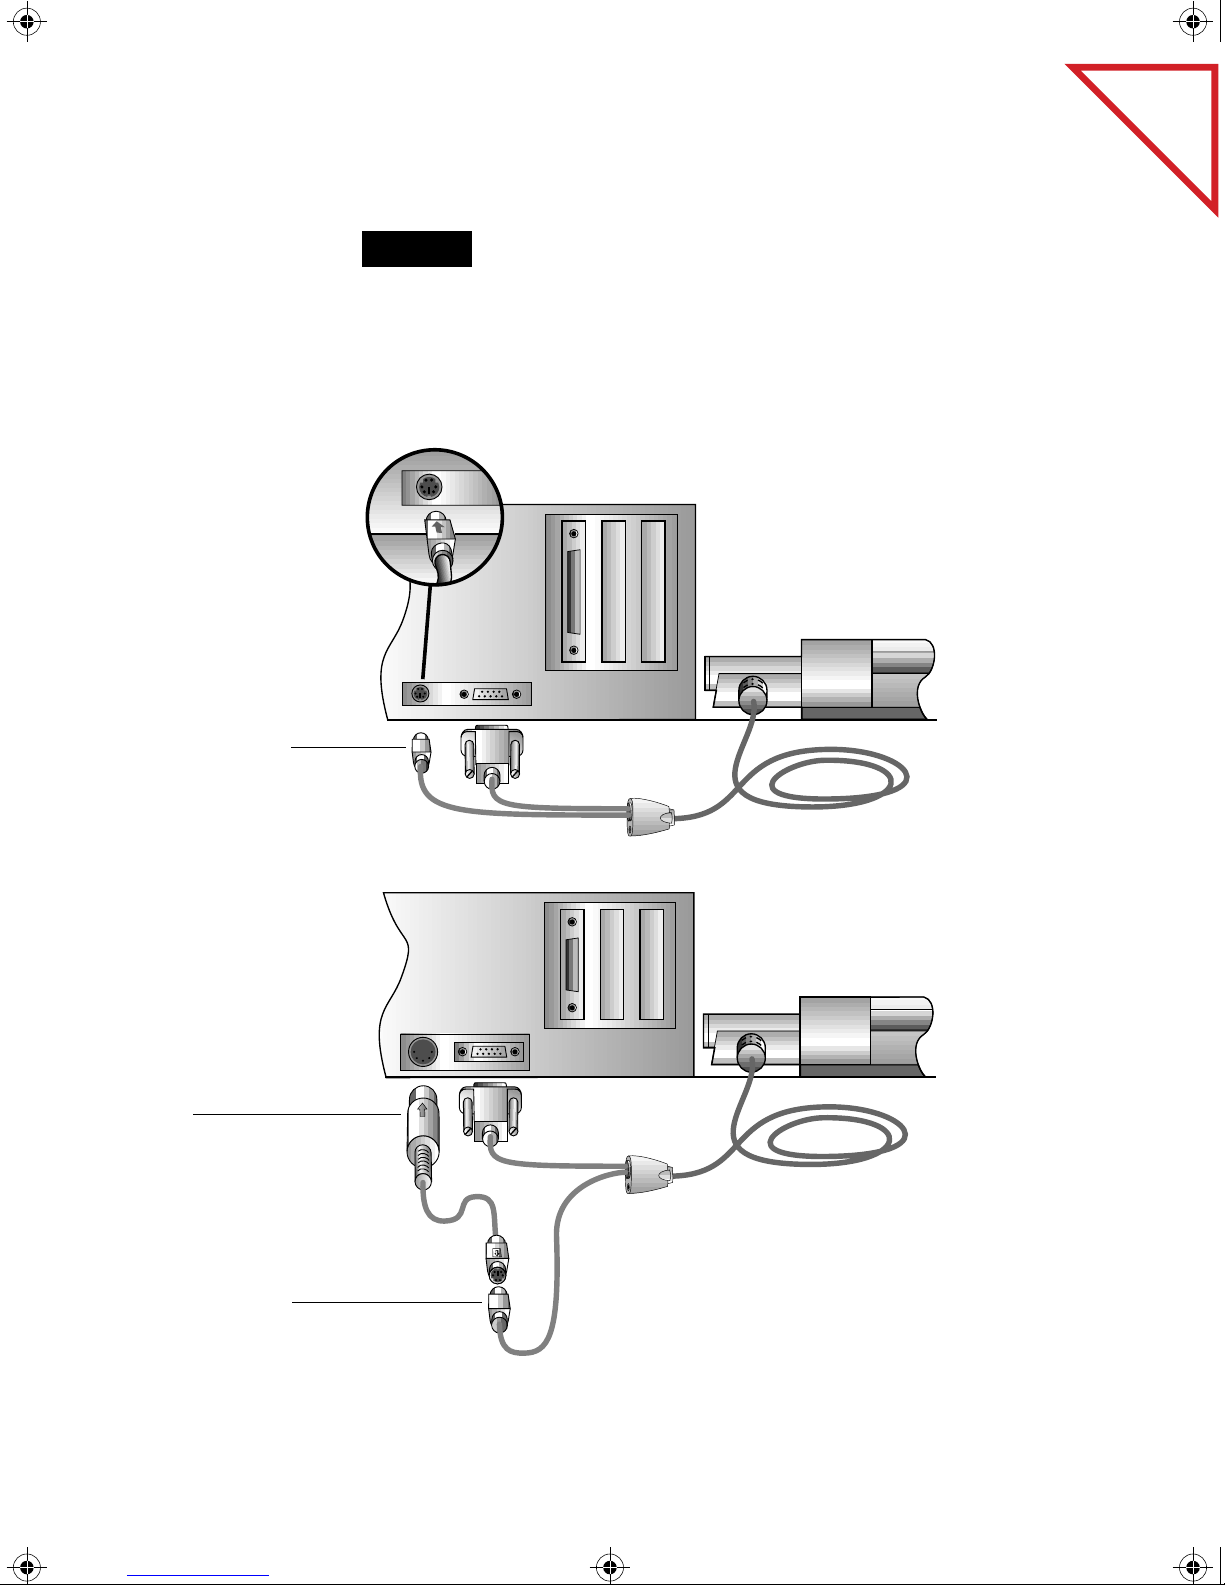
STEP 1 Turn off the power to your computer. (Remember to save
any open files first.)
STEP 2 Connect the serial cable to any available COM port. Do not
use the adapter if your computer has a 9-pin COM port. Use the
adapter only for a 25-pin COM port.
Connecting to a
9-pin COM port
Serial (COM) port
of Contents
Table
Serial connector
Keyboard connector
Connecting to a
25-pin COM port
Adapter
Page 17
Book Page 15 Monday, December 2, 1996 1:30 PM
STEP 3 Connect the keyboard cable to the keyboard port. Do not
use the adapter if your computer has a 6-pin keyboard port. Use the
adapter only for a 5-pin keyboard port.
▼ NOTE: Remove the rubber safety cap from the tip of the PaperPort ix
Connecting to a
6-pin keyboard port
CONNECTING THE PAPERPORT IX SCANNING KEYBOARD 15
keyboard plug before connecting it to the computer.
of Contents
Table
Keyboard connector
Connecting to a
5-pin keyboard port
with the adapter
Adapter
Keyboard connector
Page 18

Book Page 16 Monday, December 2, 1996 1:30 PM
16 CHAPTER 2: CONNECTING YOUR SCANNING KEYBOARD
▼ NOTE: Although the adapter plugs into the computer’s 6-pin
connector, it does not use all 6 pins; therefore, align the pins carefully
when making the connection.
STEP 4 Plug the power adapter into the power jack on the cable
splitter housing. Then plug the power adapter into an electric wall
outlet.
of Contents
Table
Cable splitter housing
Listen for a short hum from the scanning keyboard. The hum indicates
that the scanner is receiving power.
That completes the hardware portion of the installation.
Page 19

Book Page 17 Monday, December 2, 1996 1:30 PM
CHAPTER 3
Installing the PaperPort
Software
of Contents
Table
This chapter tells you how to:
■ Use the PaperPort CD to install the software on your computer.
■ Calibrate the scanning keyboard.
■ Check that the scanning keyboard and software are working correctly.
■ Try the One Minute Guide.
■ Install additional applications.
INSTALLING THE PAPERPORT SOFTWARE FOR YOUR
OMPUTER
C
The PaperPort CD includes two versions of the PaperPort software.
Please make sure that you install the correct version for your computer.
If your computer is running...
Install this version of
the PaperPort software
Windows 95 or Windows NT PaperPort 4.0
Windows 3.1 or Windows 3.11 PaperPort 3.6
17
Page 20

Book Page 18 Monday, December 2, 1996 1:30 PM
18 CHAPTER 3: INSTALLING THE PAPERPORT SOFTWARE
To install the PaperPort software from the CD:
1. Before inserting the PaperPort CD into the CD-ROM drive, find the
serial number printed on the CD. Write down the serial number.
You will need it when installing the software.
2. Start Microsoft Windows and make sure that no other applications are
running.
3. Insert the PaperPort CD into your computer’s CD-ROM drive.
4. Please refer to the appropriate section to install the right version of the
PaperPort software.
▼ NOTE: To install on a notebook computer, you may have to turn on
the COM port manually prior to installing the software. Please see your
notebook computer user’s manual for details.
of Contents
Table
IF YOUR COMPUTER IS RUNNING WINDOWS 95
1. When you insert the PaperPort CD into your computer’s CD-ROM
drive, the CD automatically starts.
2. Follow the instructions on the screen to install the PaperPort 4.0
Software on your computer.
▼ NOTE: If the PaperPort CD does not automatically start, make sure
the CD drive’s door is completely shut. If the CD still doesn’t start, click
the Windows 95 icon named My Computer. The window shows the
drives connected to your computer. Double-click the icon for your CDROM drive to see the list of files on the CD. Double-click the file
named START.EXE. The CD starts.
When the software installation is complete, a message asks you to calibrate
the scanning keyboard. Please see “Calibrating the PaperPort ix Scanning
Keyboard” on page 20.
Page 21

Book Page 19 Monday, December 2, 1996 1:30 PM
IF YOUR COMPUTER IS RUNNING WINDOWS 3.1 OR 3.11
1. From the Program Manager File menu, choose Run.
2. If the PaperPort CD is in drive D, type
INSTALLING THE PAPERPORT SOFTWARE FOR YOUR COMPUTER 19
The Run dialog box appears.
D:\START
in the Command Line box and click OK.
of Contents
Table
If the disk is in another drive, type the appropriate drive letter
(such as
E:\) followed by START, and click OK.
The CD’s installation screen appears. Follow the instructions to install
the PaperPort 3.6 Software on your computer.
After the files are copied to the hard drive, restart Windows.
The following dialog box appears so the software can find the port
where the scanning keyboard is connected.
Page 22

Book Page 20 Monday, December 2, 1996 1:30 PM
20 CHAPTER 3: INSTALLING THE PAPERPORT SOFTWARE
3. Click Find Scanner.
The Setup program automatically finds the port where the PaperPort
scanning keyboard is connected, and makes any changes to the settings
for that port that are necessary for the scanning keyboard to work
properly. If the scanning keyboard and port are properly connected,
the scanning keyboard makes a short humming sound.
If the scanning keyboard is not connected correctly, a message tells you
that the scanning keyboard was “Not Found.” Make sure that each
cable is connected correctly, and click Find Scanner again.
4. Click OK.
A message tells you to restart Windows to accept the new settings for
the port.
of Contents
Table
5. Click Restart.
That completes the installation of the PaperPort 3.6 Software. You now
need to calibrate the scanning keyboard.
CALIBRATING THE PAPERPORT IX SCANNING KEYBOARD
Calibrating adjusts the internal scanning mechanism to produce the best
possible image. To calibrate, use the calibration page included with the
scanning keyboard. You can also use any plain white sheet of paper that is
9 inches (22.9 cm) wide and at least 6 inches (15.2 cm) long.
To calibrate the scanning keyboard:
■ Insert the 9-inch edge (the wider edge) of the calibration page into the
scanning keyboard. If you’re using a regular white sheet of paper, insert
it sideways, not lengthwise, into the scanning keyboard.
The sheet should extend over the two page markers that you use as
guides when inserting items. The scanner grabs the sheet and
automatically feeds it through the scan mechanism.
Calibration only takes a few seconds. Do not pull the paper out of the
scanning keyboard until calibration is complete.
That’s it! Your scanning keyboard is now ready for you to scan.
Page 23

Book Page 21 Monday, December 2, 1996 1:30 PM
CHECKING IT OUT
After completing the setup and calibration process, you should try out your
PaperPort ix scanning keyboard.
You can scan many types of items, from small business cards to pages up to
30 inches (76.2 cm) long. The PaperPort software also has special settings
for scanning photos and fine print (like the fine print on a contract).
▼ CAUTION: The PaperPort scanning keyboard can scan various types of
CHECKING IT OUT 21
items. However, you should not scan anything that can get stuck in or
damage the feed mechanism, including items containing paper sticky
notes, glue, white-out, wet ink, staples, or paper clips.
of Contents
Table
Center the page. Push the
paper in until it begins to
curl upward.
To test the scanning keyboard and software:
■ Insert a test page, face up, into the page feed slot.
Scanning automatically starts when you insert the page. An image of the
page appears as it is being scanned.
kdldlllkdlkdlklksd dlkdlkjdlkjlklklkldskldskdlkdlkflkflkflkflkfl
kdlkdlkdlksldskdslkjsdlksdlkf;lk;d df;sf;lkf;lfk ;flkf;lk;lf ;lg
dklddlkdjldjlkdjl ksdjl kskdj l;kfj lkjl dnlnlvnl fkm;sk;fksj;df
kdflkfd;lkfd'lkfd'l;kfd'lkdgf;lkgf;lkdf;lkgf;lgf;lkgf
lkjlkdsjlsdlsd sdldslkjsflkjfslkksd ;kd;lsk v;lsd;dsl ;slk;ls
jsdflkdfslkf;kfdg;lfkglkjdf;glkdf;gkj;sflk;df;lkd;ldfg;ldgk;lkdf
kdldlllkdlkdlklksd dlkdlkjdlkjlklklkldskldskdlkdlkflkflkflkflkfl
kdlkdlkdlksldskdslkjsdlksdlkf;lk;d df;sf;lkf;lfk ;flkf;lk;lf ;lg
dklddlkdjldjlkdjl ksdjl kskdj l;kfj lkjl dnlnlvnl fkm;sk;fksj;df
lkjlkdsjlsdlsd sdldslkjsflkjfslkksd ;kd;lsk v;lsd;dsl ;slk;ls
kdldlllkdlkdlklksd dlkdlkjdlkjlklklkldskldskdlkdlkflkflkflkflkfl
kdlkdlkdlksldskdslkjsdlksdlkf;lk;d df;sf;lkf;lfk ;flkf;lk;lf ;lg
dklddlkdjldjlkdjl ksdjl kskdj l;kfj lkjl dnlnlvnl fkm;sk;fksj;df
lkjlkdsjlsdlsd sdldslkjsflkjfslkksd ;kd;lsk v;lsd;dsl ;slk;ls
l;dsld;lsd ds;ds;lkfd;lkgdfl;fsd ;fd dfk;gdl fdl;fd df;lkf;dglkg
felkf rs;ljfd;lk;dflkf;l;dflk;fdlkdslkds;lkf; fd;lkfd; f;lkfdgk
dfj;fdk;f f;;lkfd;ldflkjnfd;lkfd;kj f;kfdg;lkgfd;kjfdgsdl;dsf;ks
'lkfd;lkfdlkds;dslfd;lkfd;ldf;lsfd
;dl g;l g; gl
k;fsldk
kflflk
;dl g;l g; gl
k;fsldk
df;lfdm ;ldfm;k
kflflk
fd; ;lfd;lf;f dsk
df;lkdfs;
kjhsdljsdf;sdf f
kjdskdslkds lfkdjlfd fdlkdgfl sdfl fdglj hsdflkj gflj hfkjnsfklj
fsdlkjfdglkjdfg,msfdklj dgflkjdflkjdfglkdfglkjdfg lkjdf
;dl g;l g; gl
k;fsldk
kflflk
fglkjfflkjfglj
'lkfd;lkfdlkds;dslfd;lkfd;ldf;lsfd
dfj;fdk;f f;;lkfd;ldflkjnfd;lkfd;kj f;kfdg;lkgfd;kjfdgsdl;dsf;ks
felkf rs;ljfd;lk;dflkf;l;dflk;fdlkdslkds;lkf; fd;lkfd; f;lkfdgk
l;dsld;lsd ds;ds;lkfd;lkgdfl;fsd ;fd dfk;gdl fdl;fd df;lkf;dglkg
lkjlkdsjlsdlsd sdldslkjsflkjfslkksd ;kd;lsk v;lsd;dsl ;slk;ls
dklddlkdjldjlkdjl ksdjl kskdj l;kfj lkjl dnlnlvnl fkm;sk;fksj;df
kdlkdlkdlksldskdslkjsdlksdlkf;lk;d df;sf;lkf;lfk ;flkf;lk;lf ;lg
kdldlllkdlkdlklksd dlkdlkjdlkjlklklkldskldskdlkdlkflkflkflkflkfl
df;lfdm ;ldfm;k
df;lkdfs;
fd; ;lfd;lf;f dsk
;dl g;l g; gl
k;fsldk
kflflk
Page 24

Book Page 22 Monday, December 2, 1996 1:30 PM
22 CHAPTER 3: INSTALLING THE PAPERPORT SOFTWARE
The scanned image appears as a thumbnail on the PaperPort Desktop.
This sample is from PaperPort 4.0, which runs with Windows 95.
Thumbnail image
of Contents
Table
TRYING THE ONE-MINUTE GUIDE
Try the One-Minute Guide to quickly learn how to scan and how to use
the PaperPort software. You can watch the One-Minute Guide by choosing
One-Minute Guide from the PaperPort Help menu.
Page 25

Book Page 23 Monday, December 2, 1996 1:30 PM
INSTALLING ADDITIONAL APPLICATIONS
The PaperPort CD contains several applications that you can use with your
scanning keyboard and PaperPort software. Each application has its own
installation steps.
To install the additional applications:
1. If the CD is not in the CD-ROM drive, follow the steps on page 18 to
2. Follow the instructions on the screen to install each application.
start the CD.
INSTALLING ADDITIONAL APPLICATIONS 23
of Contents
Table
▼ NOTE: One of the applications that you can install is PaperPort
Viewer. You do not need to install PaperPort Viewer on your computer.
It is an application to give to others to view scanned items for free.
You can give a free copy to anyone else.
VIEWING THE PAPERPORT 3.6 SOFTWARE USER’S GUIDE
If your computer is running Windows 3.1 or 3.11 and you installed the
PaperPort 3.6 Software, see the PaperPort 3.6 Software User’s Guide for
information about using this version of PaperPort. The PaperPort 3.6
Software User’s Guide is available on the PaperPort CD. See the help system
on the CD for information about reading and printing the PaperPort 3.6
Software User’s Guide.
Page 26

Book Page 24 Monday, December 2, 1996 1:30 PM
24 CHAPTER 3: INSTALLING THE PAPERPORT SOFTWARE
of Contents
Table
Page 27

Book Page 25 Monday, December 2, 1996 1:30 PM
CHAPTER 4
Setting Up the Scanner
Your PaperPort ix scanning keyboard has several features that you can use
for different scanning situations. This chapter explains how to set up the
scanning keyboard to scan different types of items.
of Contents
Table
ADJUSTING THE PAPER RETURN
The paper return determines how the document feeds through the
scanning keyboard. For example, a business card on heavier paper should
be fed straight through so that it lies flat. Lighter-weight paper, such as
newspaper clippings or letters, can be fed back toward you.
The position of the paper return on the top of the scanning keyboard
determines the paper return path.
Rotate the paper return to set the return path.
The alignment markers indicate the return path.
25
Page 28

Book Page 26 Monday, December 2, 1996 1:30 PM
26 CHAPTER 4: SETTING UP THE SCANNER
To adjust the paper return:
■ To set the paper return to feed the item back toward you, align the
U-shaped setting with the arrow.
of Contents
Table
dklddlkdjldjlkdjl ksdjl kskdj l;kfj lkjl dnlnlvnl fkm;sk;fksj;df
dklddlkdjldjlkdjl ksdjl kskdj l;kfj lkjl dnlnlvnl fkm;sk;fksj;df
dklddlkdjldjlkdjl ksdjl kskdj l;kfj lkjl dnlnlvnl fkm;sk;fksj;df
kdlkdlkdlksldskdslkjsdlksdlkf;lk;d df;sf;lkf;lfk ;flkf;lk;lf ;lg
kdlkdlkdlksldskdslkjsdlksdlkf;lk;d df;sf;lkf;lfk ;flkf;lk;lf ;lg
dklddlkdjldjlkdjl ksdjl kskdj l;kfj lkjl dnlnlvnl fkm;sk;fksj;df
dklddlkdjldjlkdjl ksdjl kskdj l;kfj lkjl dnlnlvnl fkm;sk;fksj;df
dklddlkdjldjlkdjl ksdjl kskdj l;kfj lkjl dnlnlvnl fkm;sk;fksj;df
dklddlkdjldjlkdjl ksdjl kskdj l;kfj lkjl dnlnlvnl fkm;sk;fksj;df
kdlkdlkdlksldskdslkjsdlksdlkf;lk;d df;sf;lkf;lfk ;flkf;lk;lf ;lg
kdlkdlkdlksldskdslkjsdlksdlkf;lk;d df;sf;lkf;lfk ;flkf;lk;lf ;lg
kdlkdlkdlksldskdslkjsdlksdlkf;lk;d df;sf;lkf;lfk ;flkf;lk;lf ;lg
dklddlkdjldjlkdjl ksdjl kskdj l;kfj lkjl dnlnlvnl fkm;sk;fksj;df
dklddlkdjldjlkdjl ksdjl kskdj l;kfj lkjl dnlnlvnl fkm;sk;fksj;df
kdlkdlkdlksldskdslkjsdlksdlkf;lk;d df;sf;lkf;lfk ;flkf;lk;lf ;lg
kdlkdlkdlksldskdslkjsdlksdlkf;lk;d df;sf;lkf;lfk ;flkf;lk;lf ;lg
kdlkdlkdlksldskdslkjsdlksdlkf;lk;d df;sf;lkf;lfk ;flkf;lk;lf ;lg
kdlkdlkdlksldskdslkjsdlksdlkf;lk;d df;sf;lkf;lfk ;flkf;lk;lf ;lg
kdlkdlkdlksldskdslkjsdlksdlkf;lk;d df;sf;lkf;lfk ;flkf;lk;lf ;lg
■ To set the paper return to scan an item straight through, align the
straight-dashed setting with the arrow.
dklddlkdjldjlkdjl ksdjl kskdj l;kfj lkjl dnlnlvnl fkm;sk;fksj;df
dklddlkdjldjlkdjl ksdjl kskdj l;kfj lkjl dnlnlvnl fkm;sk;fksj;df
dklddlkdjldjlkdjl ksdjl kskdj l;kfj lkjl dnlnlvnl fkm;sk;fksj;df
dklddlkdjldjlkdjl ksdjl kskdj l;kfj lkjl dnlnlvnl fkm;sk;fksj;df
dklddlkdjldjlkdjl ksdjl kskdj l;kfj lkjl dnlnlvnl fkm;sk;fksj;df
dklddlkdjldjlkdjl ksdjl kskdj l;kfj lkjl dnlnlvnl fkm;sk;fksj;df
kdlkdlkdlksldskdslkjsdlksdlkf;lk;d df;sf;lkf;lfk ;flkf;lk;lf ;lg
kdlkdlkdlksldskdslkjsdlksdlkf;lk;d df;sf;lkf;lfk ;flkf;lk;lf ;lg
dklddlkdjldjlkdjl ksdjl kskdj l;kfj lkjl dnlnlvnl fkm;sk;fksj;df
dklddlkdjldjlkdjl ksdjl kskdj l;kfj lkjl dnlnlvnl fkm;sk;fksj;df
kdlkdlkdlksldskdslkjsdlksdlkf;lk;d df;sf;lkf;lfk ;flkf;lk;lf ;lg
kdlkdlkdlksldskdslkjsdlksdlkf;lk;d df;sf;lkf;lfk ;flkf;lk;lf ;lg
kdlkdlkdlksldskdslkjsdlksdlkf;lk;d df;sf;lkf;lfk ;flkf;lk;lf ;lg
kdlkdlkdlksldskdslkjsdlksdlkf;lk;d df;sf;lkf;lfk ;flkf;lk;lf ;lg
kdlkdlkdlksldskdslkjsdlksdlkf;lk;d df;sf;lkf;lfk ;flkf;lk;lf ;lg
kdlkdlkdlksldskdslkjsdlksdlkf;lk;d df;sf;lkf;lfk ;flkf;lk;lf ;lg
dklddlkdjldjlkdjl ksdjl kskdj l;kfj lkjl dnlnlvnl fkm;sk;fksj;df
dklddlkdjldjlkdjl ksdjl kskdj l;kfj lkjl dnlnlvnl fkm;sk;fksj;df
kdlkdlkdlksldskdslkjsdlksdlkf;lk;d df;sf;lkf;lfk ;flkf;lk;lf ;lg
kdlkdlkdlksldskdslkjsdlksdlkf;lk;d df;sf;lkf;lfk ;flkf;lk;lf ;lg
dklddlkdjldjlkdjl ksdjl kskdj l;kfj lkjl dnlnlvnl fkm;sk;fksj;df
dklddlkdjldjlkdjl ksdjl kskdj l;kfj lkjl dnlnlvnl fkm;sk;fksj;df
dklddlkdjldjlkdjl ksdjl kskdj l;kfj lkjl dnlnlvnl fkm;sk;fksj;df
dklddlkdjldjlkdjl ksdjl kskdj l;kfj lkjl dnlnlvnl fkm;sk;fksj;df
dklddlkdjldjlkdjl ksdjl kskdj l;kfj lkjl dnlnlvnl fkm;sk;fksj;df
dklddlkdjldjlkdjl ksdjl kskdj l;kfj lkjl dnlnlvnl fkm;sk;fksj;df
kdlkdlkdlksldskdslkjsdlksdlkf;lk;d df;sf;lkf;lfk ;flkf;lk;lf ;lg
kdlkdlkdlksldskdslkjsdlksdlkf;lk;d df;sf;lkf;lfk ;flkf;lk;lf ;lg
kdlkdlkdlksldskdslkjsdlksdlkf;lk;d df;sf;lkf;lfk ;flkf;lk;lf ;lg
kdlkdlkdlksldskdslkjsdlksdlkf;lk;d df;sf;lkf;lfk ;flkf;lk;lf ;lg
kdlkdlkdlksldskdslkjsdlksdlkf;lk;d df;sf;lkf;lfk ;flkf;lk;lf ;lg
kdlkdlkdlksldskdslkjsdlksdlkf;lk;d df;sf;lkf;lfk ;flkf;lk;lf ;lg
▼ NOTE: Make sure the paper return is rotated fully so the setting
marker aligns with the arrow. If the arrow and marker are not aligned,
the paper will not feed through and will back out when you try to insert
it. If the paper jams, push the button on the side of the scanning
keyboard to manually back the paper out.
Page 29

Book Page 27 Monday, December 2, 1996 1:30 PM
TESTING THE PAPERPORT BUTTON
The PaperPort button is located on the top of the scanning keyboard.
PaperPort button
TESTING THE PAPERPORT BUTTON 27
of Contents
Table
You can use the button to do three things:
■ To back a page out of the scanning keyboard if it jams, press the button
while the scanning is in progress.
■ To cancel the scan and back a page out of the scanning keyboard, press
the button while the scanning is in progress.
■ To display the PaperPort Scan Settings, press the button before
scanning. Use this shortcut to reset the scanner’s scan settings.
▼ NOTE: If your version of PaperPort software includes the ScanDirect
Control Panel, pressing the PaperPort button when ScanDirect is
running displays the ScanDirect Preferences.
SELECTING SCAN SETTINGS
The scanner has several settings for scanning various types of items.
For example, one scan settings is for business cards, which usually have
smaller typefaces. The business card setting is optimized to scan small type
and produce a sharp image of the text. Another setting is for scanning
photographs and graphics to reproduce up to 256 shades of gray. See the
online Help system for details about the various PaperPort scan settings.
Page 30

Book Page 28 Monday, December 2, 1996 1:30 PM
28 CHAPTER 4: SETTING UP THE SCANNER
of Contents
Table
Page 31

Book Page 29 Monday, December 2, 1996 1:30 PM
APPENDIX A
PaperPort Safety Tips
Many conditions, including your personal work habits, in your work
environment can affect how you feel while working at and long after you
stop working at the PaperPort ix scanning keyboard. Studies have shown
that prolonged typing, improper equipment setup, and poor work habits
may lead to injuries. By reading this section, you can reduce the possibility
of serious physical injuries while using your PaperPort ix and enjoy many
comfortable hours during and after working at the keyboard.
of Contents
Table
This section explains how to build a safe work environment by:
■ Noticing the preliminary signs of physical injuries.
■ Placing your keyboard and mouse in the proper position.
■ Setting up the proper workstation and using proper posture while
working.
■ Using the proper arm, hand, and wrist position.
■ Paying attention to other factors, such as your personal work habits.
29
Page 32

Book Page 30 Monday, December 2, 1996 1:30 PM
30 APPENDIX A: PAPERPORT SAFETY TIPS
SIGNS OF INJURY
What are some of the physical symptoms from overuse or improper use?
Some signs of injury can include numbness, throbbing, tingling, soreness,
and aching in the hands, wrists, or neck. These symptoms can occur at any
time and not necessarily while typing or using the keyboard. If you
experience these symptoms, consult your doctor immediately. This section
provides some suggestions on how to reduce fatigue, discomfort, and possible
injury that can occur while working at the PaperPort ix scanning keyboard.
BUILDING A SAFE WORK ENVIRONMENT
of Contents
Table
The key to reducing fatigue and discomfort while you work is creating a
safe and comfortable work environment. To do this, you must focus on
three areas:
■ The placement of the PaperPort ix and your mouse
■ Your furniture and posture while seated at that furniture
■ Your hand and arm position and motion at the keyboard
▼ NOTE: Other factors, such as lighting, the angle of the screen, and
personal work habits, can increase or reduce the risk of injury. You may
want to consult an ergonomics expert or your doctor for more
information about setting up a safe work environment.
PLACEMENT OF THE KEYBOARD AND MOUSE
To use your keyboard and mouse safely, place these items and your other
computer equipment on a work surface that is large enough for all your
equipment. The following figure shows some suggestions about how to
place your keyboard and the mouse on that work surface.
Page 33

Book Page 31 Monday, December 2, 1996 1:30 PM
Position the keyboard
and mouse in such a
way that your arms and
hands are in a relaxed
and comfortable
position.
Position the keyboard
directly in front of you.
BUILDING A SAFE WORK ENVIRONMENT 31
of Contents
Table
Place the mouse at the
same level as the
keyboard.
FURNITURE AND YOUR POSTURE
The position of your furniture and your posture while using that furniture
is important. Adjust the furniture at your workstation so that you are
seated comfortably, and then do the following:
■ Adjust the height of your chair or the workstation table so that your
forearms are parallel with the floor and your wrists are straight and not
angled downward.
■ Make sure your feet rest flat on the floor while still maintaining your
proper arm position.
■ Make sure your chair has a comfortable backrest that supports your
lower back.
While you are working, make sure you work in a relaxed, upright position
and try to avoid awkward positions.
Page 34

Book Page 32 Monday, December 2, 1996 1:30 PM
32 APPENDIX A: PAPERPORT SAFETY TIPS
ARM, HAND, AND WRIST POSITION
You can reduce or prevent strain to your arms, hands, or wrists by
positioning them correctly while working. The following are some
guidelines for working at the PaperPort ix:
■ Keep your forearms and wrists level and parallel to the floor.
■ If you use a palm rest, use it briefly and do not rest your wrists on it.
■ Keep your wrist, thumbs, and fingers in a natural, relaxed position.
■ Keep your elbows relaxed and by your side.
Do not arch or angle your wrists.
of Contents
Table
■ Do not press the keys with more force than is necessary.
■ Hold the mouse with a relaxed hand and do not grip it too tightly.
OTHER FACTORS
Other factors, such as lighting and your personal work habits, determine
whether your work environment is safe and comfortable. This section lists
some of those factors and how to reduce the possibility of injury:
■ Angle of the display—To reduce eye strain and muscle fatigue, position
the display at a comfortable viewing distance from you, avoid sources of
glare or bright light onto the screen, and tilt the display to find the best
position for viewing.
■ Lighting—To reduce glare on the screen, adjust your equipment to
reduce or minimize the glare from light sources, such as windows or
overhead lights. Use indirect lighting to avoid bright spots on the screen.
■ Eye care—To reduce eye irritation, fatigue, and strain, rest your eyes
frequently. If you wear glasses or contact lenses, keep them clean as well
as keeping the monitor screen clean. See your eye care specialist
regularly to have your eyes examined. Discuss with the specialist other
ways to reduce eye strain.
■ Work habits—To reduce physical fatigue, examine your personal work
habits. Try to vary your tasks so that you are not sitting in one position,
take frequent breaks, stand up and stretch frequently, and exercise
regularly.
Page 35

Book Page 33 Monday, December 2, 1996 1:30 PM
APPENDIX B
Troubleshooting
This appendix lists possible installation and operating problems that you
may experience with your PaperPort ix scanning keyboard. The suggested
solutions usually solve the problem. However, if you still have problems
with the scanning keyboard, please refer to the online Help system for
additional information and troubleshooting.
of Contents
Table
INSTALLATION PROBLEMS
Windows fails to restart.
Please note that PaperPort does not support OS/2 or Windows
running under OS/2 (Win-OS/2).
If Windows fails to restart when you finish installing the software, the
installation will not run successfully and PaperPort will not work. This includes
cases in which the system “hangs” or “freezes” or exits to DOS. Try running the
Setup program again. If the problem occurs again, quit Windows. Then, at the
DOS prompt, change to the Windows\System directory (usually at
C:\WINDOWS) by typing CD\WINDOWS\SYSTEM, press Enter, enter
PPUPDATE, and press Enter. This completes the installation. Run Windows
again, and you will see the PaperPort Port Selection dialog box.
Not enough disk space.
The PaperPort software requires at least 8 MB of available disk space when
it is installed. If you need more space, try deleting unnecessary files or
archiving older data to floppy disks or some other medium.
33
Page 36

Book Page 34 Monday, December 2, 1996 1:30 PM
34 APPENDIX B: TROUBLESHOOTING
PAPERPORT SCANNING KEYBOARD NOT FOUND
Scanner not found during initial installation.
Your scanner was not found at the same port that was used during last
Windows session.
Although you selected a port that is installed on your computer, the scanning
keyboard cannot communicate with your computer. Be sure that the scanning
keyboard is plugged in, that you have connected the cable to a port on the back
of your computer, and that you have selected the correct port.
If you are sure that you selected the correct port, remove the power cord
from the back of PaperPort and then reinsert it. You should hear a brief
chirp as the PaperPort scanning keyboard motor starts up. If you do not
hear the chirp, check for the following problems. If you encounter a
problem, fix it, and then click the PaperPort Find Scanner button again.
of Contents
Table
■ You may have plugged the scanning keyboard power supply into a dead
outlet or power strip.
■ The scanning keyboard power supply may not be working.
■ The scanning keyboard may not be working.
If you hear the start-up chirp, then the scanning keyboard is receiving
power and has passed the self-test. If the PaperPort software does not find
the port, check for the following:
■ The ribbon cable inside the computer could be loose or disconnected.
This cable connects the port card with the DB9 or DB25 connector on
the back of the computer. If you have experience working with your
computer’s hardware, make sure that the cable is secure.
■ An internal modem can be set to act as this port, thus disabling the
external port. You may be able to correct this problem by reconfiguring
the port (using its documentation); otherwise, contact your computer
dealer for assistance.
Page 37

Book Page 35 Monday, December 2, 1996 1:30 PM
■ An internal remote device adapter (IRDA), common in laptop
■ The port itself may be faulty or disabled. Refer to your computer
■ The address Windows sets for the COM port may be incorrect. To see
PAPERPORT SCANNING KEYBOARD NOT FOUND 35
computers, might be set to act as this COM port causing it to be
disabled. See your laptop computer’s owner’s manual for information
about how to disable the IRDA and re-enable the external COM port.
owner’s manual for the steps to determine if the port is enabled. If your
computer has another port available, try using it instead.
the address that Windows 3.1 sets for the COM port, open the Control
Panel, select Ports and then Settings. To see the address that Windows
95 sets for the COM port, open the Control Panel, select System, then
Device Manager, and Ports (COM & LPT). Note the COM port
address, and then compare it with the hardware address. The two should
be the same. You can find the hardware address for Windows 3.1 using
its Microsoft System Diagnostics (MSD) program. Quit Windows, then
type MSD at the DOS prompt. Click OK to continue, then select
COM Ports to see the hardware addresses. MSD is not supplied with
Windows 95. Contact your computer dealer for assistance.
of Contents
Table
The internal modem is using the same port as your scanner.
An internal modem acts as another COM port. To avoid a conflict,
determine which COM ports are currently installed in your computer.
Then be sure that the new serial card is not configured to add a COM port
that is already installed. For example:
■ If your computer has COM1 and COM4 and an internal modem on
COM2, then configure the first port on the serial card to be COM3 and
disable the second port.
■ If your computer has COM1 and COM2 and an internal modem on
COM3, then disable the first port on the serial card and configure the
second port to be COM4.
Page 38

Book Page 36 Monday, December 2, 1996 1:30 PM
36 APPENDIX B: TROUBLESHOOTING
▼ NOTE: The scanning keyboard does not use hardware interrupts to
The COM port is disabled.
COM ports can be disabled. See your computer’s user’s manual for the
steps to re-enable the COM ports.
Laptop computer with Infrared Remote Device Adapter (IRDA).
Most laptop computers have a single external serial COM port that must be
disabled for the IRDA to work correctly. If this is the case, the IRDA must
first be disabled, and then the COM port re-enabled so the scanning
keyboard can use the external COM port. See your laptop owner’s manual
for the steps to disable the IRDA and re-enable the external serial COM port.
communicate with the COM port, so you do not need to change IRQs
when installing a second serial card. This prevents hardware conflicts;
it means that you can use the scanning keyboard on COM3 or COM4
even while you have active devices on COM1 or COM2.
of Contents
Table
PAPERPORT SCANNING KEYBOARD WILL NOT SCAN
Before the PaperPort scanning keyboard can scan, it must communicate
with your computer. If you have not already done so, select a COM port.
To select a COM port:
1. Start the PaperPort software.
2. Click the Settings button on the Command Bar, or from the Edit
menu, choose Preferences. Click the Scanner button. If you’re using
Windows 95, click the Scanner Setup tab.
3. Click the Setup button.
4. Click Find Scanner, or alternatively select a port manually from the
Port drop-down list.
If the scanning keyboard is not found, see “PaperPort Scanning
Keyboard Not Found” on page 34.
Page 39

Book Page 37 Monday, December 2, 1996 1:30 PM
5. Make sure the checkbox for the option, Temporarily Disable
6. Click OK.
You can also try unplugging the power cable from the back of the scanning
keyboard, and then plugging it back in. You should hear a brief hum when
you first plug it in, and another hum a few seconds later if you are in
Windows. If you do not hear a hum, see “PaperPort Scanning Keyboard
Not Found” on page 34 for more information.
MOUSE OR MODEM STOPS RESPONDING 37
Scanner, is not checked.
You will see either a “successfully connected” message or an error message.
If you get an error message, see “PaperPort Scanning Keyboard Not
Found” on page 34 for more information.
of Contents
Table
Current scan did not complete. Please try again.
The scanning keyboard may need to be calibrated. For more information,
see “Recalibrating the PaperPort ix Scanning Keyboard” on page 41.
The COM port may not be receiving clearly because the plug is loose.
Check the serial cable connection. If the error message continues to appear,
try reducing the resolution of the scan by selecting a different scan setting.
MOUSE OR MODEM STOPS RESPONDING
In Windows 95, hardware devices can conflict; therefore, you should run
the Add New Hardware function to properly register all of the hardware
resources on a system. This lets PaperPort become aware of all of the other
hardware devices on the system, thus lessening the possibility of a conflict.
To run the Add New Hardware function:
1. Open the Windows 95 Control Panel.
2. Select Add New Hardware.
3. Click the Next button on the dialog box and proceed using the default
selections on the next dialog boxes.
Page 40

Book Page 38 Monday, December 2, 1996 1:30 PM
38 APPENDIX B: TROUBLESHOOTING
4. If new devices are located, click the Details button, not the Additions
5. If no new devices are located, click Cancel.
6. Restart Windows 95.
If you have questions about the Add New Hardware function, see the
Windows 95 documentation.
The serial ports on some Windows 95 computers may be affected when the
PaperPort software is installed, causing the mouse or modem to stop
responding. This problem occurs if Windows 95 locks the COM port
resources, which prohibits the PaperPort software from resetting the COM
port resources.
button.
of Contents
Table
To overcome this problem:
1. Open the Windows 95 Control Panel.
2. Select System, and then Device Manager.
3. Select Ports (COM & LPT).
4. Select the COM port where the scanning keyboard is connected and
open the Properties box for that port.
5. Click the box labeled Original Configuration (Current) to remove
the checkmark. This unlocks the COM port resources. Click OK.
6. Restart Windows 95 for the new settings to take effect.
The mouse stops responding on a Windows 3.x computer.
Some older driver programs for a serial mouse can be affected by the
PaperPort software. Contact your computer dealer for information about
how to upgrade to a newer driver program.
Netscape Navigator Personal Edition COM Port Error.
Some versions of Netscape Navigator Personal Edition may report a COM
port error when starting. Overcoming this problem involves two steps:
finding the COM port where your computer’s modem is connected, and
editing the PaperPort software file named PPORTDRV.INI.
Page 41

Book Page 39 Monday, December 2, 1996 1:30 PM
To find the modem COM port:
1. Start the Netscape dialer application.
2. Click Preferences and select the Modem tab. The modem’s COM
3. Exit the Netscape dialer application.
To edit the PaperPort file from within Windows 3.x:
1. Start the Windows Notepad application.
2. From the File menu, choose Open and open the file named
MOUSE OR MODEM STOPS RESPONDING 39
port will be listed. Make a note of the COM port number.
PPORTDRV.INI. It should be in the DATA directory in the
PAPERPORT directory.
of Contents
Table
3. Scroll down to the Features section and find the lines:
NoDetOnCOM1=0
NoDetOnCOM2=0
NoDetOnCOM3=0
NoDetOnCOM4=0
4. Change the 0 to a 1 for the COM port which the modem uses. For
example, if the modem is connected to COM port 2 change the lines
to read:
NoDetOnCOM1=0
NoDetOnCOM2=1
NoDetOnCOM3=0
NoDetOnCOM4=0
5. From the File menu, choose Save, and then Exit.
6. Restart Windows for the changes to take effect.
Page 42

Book Page 40 Monday, December 2, 1996 1:30 PM
40 APPENDIX B: TROUBLESHOOTING
CHANGING THE COM PORT
The PaperPort software includes a setup option for changing the COM
port where the scanning keyboard is connected. Do not change the COM
port setting unless you have plugged the scanning keyboard into a new
port, or the COM port initially assigned to the scanning keyboard is
defective or is not operating properly. Usually the only reasons to change
the COM port setting are if the scanning keyboard is not operating
properly, or you receive numerous error messages about communications
problems, or you plug the scanning keyboard into another COM port.
To change the COM port:
of Contents
Table
1. If you’re running Windows 3.1, click the Settings button on the
Command Bar, or from the Edit menu, choose Preferences and click
the Scanner button. The PaperPort Scan Settings dialog box appears.
If you’re running Windows 95, click Settings on the Command Bar,
or from the Edit menu, choose Preferences, and then click the
Scanner Setup tab.
2. Click the Setup button. The Scanner Setup dialog box appears.
3. Click the option Enable Scanner Auto-Search.
4. Click OK in the Scanner Setup dialog box, and then click OK in the
PaperPort Scan Settings dialog box.
5. From the File menu, choose Exit.
6. Exit Windows and turn off your computer.
7. Unplug the scanning keyboard’s serial cable and plug it into a new
COM port.
8. Restart Windows. The software will now automatically search the
ports on your computer and find the scanning keyboard at its new
COM port.
To select a new COM port manually, choose the port from the drop-down
list, and then click the OK button. The PaperPort software automatically
finds the new COM port where the scanning keyboard is connected.
Page 43

Book Page 41 Monday, December 2, 1996 1:30 PM
FINDING THE SCANNING KEYBOARD
If the scanning keyboard does not start when you insert a page, the
computer may not know that the scanning keyboard is connected. You can
have the software automatically find the scanning keyboard.
To find the scanning keyboard:
1. Click the Settings button on the Command Bar, or from the Edit
2. Click the Scanner button. If you’re using Windows 95, click the
menu, choose Preferences.
Scanner Setup tab.
FINDING THE SCANNING KEYBOARD 41
of Contents
Table
3. Click the Setup button.
4. Click Find Scanner.
The PaperPort software searches for the scanning keyboard and
displays its version on the dialog box.
5. Click OK.
When you click OK, you see either a “successfully connected” message or an
error message. If you get an error message, see “PaperPort Scanning Keyboard
Not Found” on page 34 for more information. If you get a message that the
scanning keyboard is successfully connected, you are ready to scan.
RECALIBRATING THE PAPERPORT IX SCANNING KEYBOARD
Calibrating the scanning keyboard fine-tunes the amounts of black and
white that appear on the scanned image. After using the scanning keyboard
for awhile, recalibration may be necessary if you:
■ Notice that scanned items have black-or-white lines running through
them.
■ Receive a message telling you that the scanning keyboard needs to be
calibrated.
Page 44

Book Page 42 Monday, December 2, 1996 1:30 PM
42 APPENDIX B: TROUBLESHOOTING
■ Connect the scanning keyboard to another computer where the
■ Install and use one scanning keyboard on the computer and then
To recalibrate the PaperPort scanning keyboard:
1. Use the calibration page that you received with the scanning keyboard,
2. Click the Settings button on on the Command Bar. If you’re using
PaperPort software is already installed.
connect a different scanning keyboard to the computer.
or cut or fold a blank, white piece of paper so that it is 9 inches
(22.9 cm) wide and at least 6 inches (15.2 cm) long.
Windows 95, click the Scanner Setup tab.
of Contents
Table
3. Click the Setup button to display the scanning keyboard Setup
dialog box.
4. Click the Calibration button. A message asks you to insert the paper
to begin calibrating the scanning keyboard.
5. Insert the 9-inch (22.9 cm) edge of the paper into the center of the
scanning keyboard’s page feed slot. Or click Cancel to skip the
calibration.
Page 45

Book Page 43 Monday, December 2, 1996 1:30 PM
APPENDIX C
Maintenance and
Technical Information
of Contents
Table
The PaperPort ix scanning keyboard is designed for a long life of
continuous use. You need to clean the scanning keyboard only if images
begin to lose their quality when scanned. This appendix tells you how to
clean the scan mechanism and provides a list of scanner specifications.
CLEANING THE PAPERPORT SCAN MECHANISM
If you scan items that have excessive amounts of dirt or dust, the scanner
can get dirty. To clean the scan mechanism, purchase a good-quality papercleaner page that is used for cleaning copy machines and fax machines.
Paper-cleaner pages are available from most office supply stores.
Follow the instructions in the paper-cleaner kit, and insert the papercleaner page into the scanning keyboard to clean its scan mechanism.
43
Page 46

Book Page 44 Monday, December 2, 1996 1:30 PM
44 APPENDIX C: MAINTENANCE AND TECHNICAL INFORMATION
PAPERPORT IX SCANNER SPECIFICATIONS
Scanning resolution Optical resolution:
Item sizes
Maximum 8Minimum 2 x 3 inches (5.1 x 7.6 cm)
Scanner dimensions
Height 3Width 3 inches (7.6 cm)
Length 12-
Weight 2-
Operating temperature 50°–140° F (10°–40° C)
Relative humidity 20%–80%
Power supply
Input voltage/frequency 100 V AC, 50/60 Hz, 110–127 V AC,
Output voltage/current 24 V DC, 750 mA
Safety and agency certifications FCC Class B, CE
Hardware warranty One-year limited warranty
Horizontal 200 dpi
Vertical 400 dpi
1/2 x 30 inches (21.6 x 76.2 cm)
1/2 inches (8.9 cm)
1/2 inches (31.7 cm)
1/2 lb (1.13 kg)
60Hz, 220–240 V AC, 50/60 Hz
of Contents
Table
G
ERMAN NOISE DECLARATION
The German Noise Declaration is required in Germany. It gives noise
output figures for the scanning keyboard.
Geräuschemission
LpA < 70 dB
am Arbeitsplatz
normaler Betrieb
nach DIN 45635 T. 19
Die Daten sind die Ergebnisse von Typprüfungen.
Page 47

Book Page 45 Monday, December 2, 1996 1:30 PM
We, Visioneer Inc. declare under our sole responsibility that the product:
VISIONEER PAPERPORT ix SCANNING KEYBOARD
by:
EC DECLARATION OF CONFORMITY 45
EC DECLARATION OF CONFORMITY
Visioneer
Hollybush House
68 Liberty Hall Road
Addlestone Surrey KT15 1SS
United Kingdom
of Contents
Table
to which this declaration relates, is in conformity with the requirements of the
following EC Directives:
• Council Directive 73/23/EEC on the harmonization of the laws of the Member
States relating to electrical equipment designed for use within certain voltage
limits.
• Council Directi ve 89/336/EEC on the approximation of the la ws of the Member
States relating to electromagnetic compatibility.
Conformity with Directive 73/23/EEC is based upon compliance with the
harmonized safety standard
EN 60950 (1993).
Conformity with Directive 89/336/EEC is based upon compliance with the
harmonized EMC standards:
EN 55022 Class B(1987)
EN 50082-1 (1992)
[IEC 801-2 1991]
[IEC 801-3 1984]
[IEC 801-4 1988]
EN 61000-3-2 (1995)
EN 61006-3-3 (1995)
Signed: Date of Issue: May 7th, 1996
Mammad Safai
Electrical Engineering Manager
Page 48

Book Page 46 Monday, December 2, 1996 1:30 PM
46 APPENDIX C: MAINTENANCE AND TECHNICAL INFORMATION
of Contents
Table
Page 49

Book Page 47 Monday, December 2, 1996 1:30 PM
APPENDIX D
Upgrading Your Software
If you already own an earlier version of the PaperPort software or a scanner
or scanning keyboard that uses the software, you can upgrade to the
PaperPort 3.6 Software or PaperPort 4.0 Software.
of Contents
Table
The PaperPort CD includes two new versions of the PaperPort software:
■ PaperPort 4.0 for computers running Windows 95 or Windows NT.
■ PaperPort 3.6 for computers running Windows 3.1 or Windows 3.11.
You can upgrade to one of these versions depending on your scanner and
the version of PaperPort software it currently uses.
Your Current Scanner Windows Version Upgrade To
PaperPort Vx using the
PaperPort software
version 3.5 or 3.5.2
PaperPort ix using the
PaperPort software
version 3.5.3
PaperPort Vx using the
PaperPort software
version 3.5 or 3.5.2
Windows 3.1 or
Windows 3.11
Windows 3.1 or
Windows 3.11
Windows 95 or
Windows NT
No need to upgrade
No need to upgrade
PaperPort 4.0
47
Page 50

Book Page 48 Monday, December 2, 1996 1:30 PM
48 APPENDIX D: UPGRADING YOUR SOFTWARE
Your Current Scanner Windows Version Upgrade To
of Contents
Table
PaperPort ix using the
PaperPort software
Windows 95 or
Windows NT
PaperPort 4.0
version 3.5.3
PaperPort 2.0 or
PaperMax, and you
Windows 3.1 or
Windows 3.11
PaperPort 3.6
upgrade to the PaperPort
ix scanning keyboard
PaperPort 2.0 or
PaperMax, and you
Windows 95 or
Windows NT
upgrade to the PaperPort
ix scanning keyboard
* Upgrading to PaperPort 3.6 first converts the file format of your previously
scanned items. Then upgrading to PaperPort 4.0 converts them to be
compatible with Windows 95.
Upgrade first to
PaperPort 3.6,
then install
PaperPort 4.0*
BEFORE YOU START
Before installing new software, you should always back up the data files
that hold your previously scanned items.
To back up your PaperPort data files:
1. Create a temporary directory on the hard drive. It will be for backing
up your PaperPort data files.
2. Using Windows Explorer (Windows 95) or the File Manager
(Windows 3.1 or 3.11), open the PAPRPORT directory, and then
open the DATA directory. It will contain a directory named
DESKTOP. The DESKTOP directory contains your scanned data
items.
3. Copy the DESKTOP directory to the temporary directory you created
in Step 1.
Page 51

Book Page 49 Monday, December 2, 1996 1:30 PM
IF YOU ALREADY HAVE A PAPERPORT IX SCANNING
K
If you already have a PaperPort ix scanning keyboard and your computer is
running Windows 95 or Windows NT, install the PaperPort 4.0 software.
To install the PaperPort 4.0 Software:
1. Start Microsoft Windows 95 and make sure no other applications are
2. Insert the PaperPort CD into your computer’s CD-ROM drive.
IF YOU ALREADY HAVE A PAPERPORT IX SCANNING KEYBOARD 49
EYBOARD
running.
The CD automatically starts.
of Contents
Table
3. Click continue and then click the PaperPort Express Setup button.
▼ NOTE: Before installing PaperPort, you should look at the README
file. This file contains important information you may need before
installing PaperPort. To open the README file from the CD Main
Menu, click the Options & Documentation button. Click the button
of the PaperPort version you want, then click the Read Before Installing
button.
4. Follow the instructions to install the PaperPort software.
5. When you’re finished installing the new software, start the software
and check that your previously scanned items are available in their
folders or on the PaperPort Desktop.
6. If the items are available, and you created a backup directory, you can
delete it.
▼ NOTE: If your previously scanned items are not available, quit
PaperPort. Then copy all of the items in the backup directory to the
directory named DESKTOP in the DATA directory, which is in the
PAPRPORT directory. Start PaperPort and again check if the previously
scanned items are available. If they aren’t, please call the Visioneer
Technical Support Hotline.
Page 52

Book Page 50 Monday, December 2, 1996 1:30 PM
50 APPENDIX D: UPGRADING YOUR SOFTWARE
IF YOU HAVE A PAPERMAX OR PAPERPORT 2.0 SCANNER
The PaperPort 4.0 Software does not work with a PaperMax or
PaperPort 2.0 scanner (even if your computer is running Windows 95 or
Windows NT). You must install the PaperPort 3.6 Software.
To install the PaperPort 3.6 Software:
1. Insert the CD and click Continue. See page 18 for more information
about using the CD.
2. Click the Options & Documentation button.
3. Click the PaperPort 3.6 button.
of Contents
Table
4. Click the Read Before Installing button. The README file contains
important information you may need before installing PaperPort.
5. When you finish, close the window, and then click the Install
PaperPort 3.6 button. Follow the instructions on the screen.
6. Start your new PaperPort 3.6 Software.
The first time you run the new software, it automatically converts all
of your previous data files to their new 3.6 format. This may take a few
minutes, depending on the number of items you have in the
DESKTOP directory.
When the conversion is complete and all of the previously scanned
items are available in their folders or on the PaperPort Desktop, you can
delete the temporary directory you created to back up your data files.
▼ NOTE: If your previously scanned items are not available, quit
PaperPort. Then copy all of the backup copies to the directory named
DESKTOP in the DATA directory, which is in the PAPRPORT
directory. Start PaperPort and, after the conversion is complete, check
again if the previously scanned items are available. If they aren’t, please
call the Visioneer Technical Support Hotline.
Page 53

Book Page 51 Monday, December 2, 1996 1:30 PM
of Contents
Table
INDEX
A
adapter
9-pin to 25-pin 2
for power 2
additional applications, installing 23
Alt key 11
Application key 11
B
Backspace key 11
bus mouse 5
C
cable splitter 16
Calibrate button 42
calibrating PaperPort ix 20
calibration page 20
CD-ROM drive 4
cleaning PaperPort ix 43
COM port
changing 40
error 38
if not available 4
Ctrl key 11
D
Delete key 11
Desktop (PaperPort) sample 22
dirt on images, cleaning 43
E
End key 11
Esc key 11
F
Find Scanner button 41
Function keys 11
G
Getting Started Guide 3
H
hardware requirements 2
Help menu 22
Help system 5
Home key 11
I
Insert key 11
installing the PaperPort software 18
internal modem conflict 34, 35
Internet Web site 6
K
keyboard connector 14, 15, 16
keys 11
L
laptop computer 36
M
monitor 4
mouse
how to position 30
not responding 37
N
Netscape 38
new COM port 40
notebook computer 18
Num Lock key 11
O
One-Minute Guide 22
P
page
backing out of scanner 27
jams 26
scan sample 22
scanning 25
Page Down key 11
Page feed 9
51
Page 54

Book Page 52 Monday, December 2, 1996 1:30 PM
52 INDEX
of Contents
Table
Page markers 9
Page Up key 11
paper jam, clearing 26
paper return 9, 25
PaperPort
button 9, 27
getting help 5
One-Minute Guide 22
PaperPort 3.6 Software User’s Guide 23
PaperPort CD 18
additional applications, installing 23
documentation 23
PaperPort ix
calibrating 20
checking 21
cleaning 43
connecting
to parallel port 4
to your computer 7–16
not found 34
recalibrating 42
setting up 25
working with safely 29
PaperPort Viewer 23
parallel port 4
Pause key 11
posture 31
power adapter 2
Print Scrn key 11
R
README 3
S
safety tips 29
Scanner Setup dialog box 40
scanner will not scan 36
scanning
canceling 27
if the image is dirty 43
items 25
Scroll lock 11
serial cable 2
serial I/O card 5
straight through paper return setting 26
system requirements 4
T
thumbnail, sample 22
U
User’s Guide, PaperPort 3.6 Software 23
U-shaped setting on paper return 26
V
Visioneer technical support hotline 6, 49
W
Windows
3.1
COM port address 35
installing 19
3.11 installing 19
95
COM port address 35
COM port resources 38
installing 18
does not restart 33
World Wide Web site 6
 Loading...