


TABLE OF CONTENTS
PART ONE: Getting Started
Chapter 1: Quick Guide
Learning the Basics . . . . . . . . . . . . . . . . . . . . . . . . . . . . . . . . . . . . 1
Starting the PaperPort Software . . . . . . . . . . . . . . . . . . . . . . . 2
The Practice Example . . . . . . . . . . . . . . . . . . . . . . . . . . . . . . 3
Selecting and Deselecting Items . . . . . . . . . . . . . . . . . . . . . . . 4
Saving an Item . . . . . . . . . . . . . . . . . . . . . . . . . . . . . . . . . . . . 4
Stacking Pages . . . . . . . . . . . . . . . . . . . . . . . . . . . . . . . . . . . . 5
Displaying an Item in Page View . . . . . . . . . . . . . . . . . . . . . . 7
Organizing and Finding Scanned Items . . . . . . . . . . . . . . . . . 8
Adding Comments to a Page . . . . . . . . . . . . . . . . . . . . . . . . 10
Exiting the PaperPort Software . . . . . . . . . . . . . . . . . . . . . . 12
Getting the Most from PaperPort . . . . . . . . . . . . . . . . . . . . . . . . 12
Sending a Fax with PaperPort . . . . . . . . . . . . . . . . . . . . . . . 13
Printing a Spreadsheet to the PaperPort Desktop . . . . . . . . . 14
Letting PaperPort Do Your Typing (with OCR) . . . . . . . . . 16
Scanning Photos . . . . . . . . . . . . . . . . . . . . . . . . . . . . . . . . . 18
. . . . . . . . . . . . . . . . . . . . . . . . . . . . . . . . . 1
PART TWO: Using PaperPort
Chapter 2: Scanning Items
Scanning to Get the Best Image . . . . . . . . . . . . . . . . . . . . . . . . . 23
Changing Brightness . . . . . . . . . . . . . . . . . . . . . . . . . . . . . . 25
Tips for Scanning Groups of Items . . . . . . . . . . . . . . . . . . . 25
Improving the Image Quality . . . . . . . . . . . . . . . . . . . . . . . . 26
Cleaning Pages . . . . . . . . . . . . . . . . . . . . . . . . . . . . . . . . . . . 29
Setting Desktop Preferences . . . . . . . . . . . . . . . . . . . . . . . . . . . . 31
Scanning with an HP Scanner . . . . . . . . . . . . . . . . . . . . . . . . . . 32
. . . . . . . . . . . . . . . . . . . . . . . . . . . . . . 23
iii

Chapter 3: Working on the PaperPort Desktop
. . . . . . . . . . . . . 35
Working in Desktop View . . . . . . . . . . . . . . . . . . . . . . . . . . . . . 36
The Command Bar . . . . . . . . . . . . . . . . . . . . . . . . . . . . . . . 36
Displaying and Hiding Desktop Features . . . . . . . . . . . . . . . 38
Moving Thumbnails . . . . . . . . . . . . . . . . . . . . . . . . . . . . . . 39
Deleting Items . . . . . . . . . . . . . . . . . . . . . . . . . . . . . . . . . . . 39
Giving Titles to Items . . . . . . . . . . . . . . . . . . . . . . . . . . . . . 40
Working in Page View . . . . . . . . . . . . . . . . . . . . . . . . . . . . . . . . 42
The Command Bar . . . . . . . . . . . . . . . . . . . . . . . . . . . . . . . 42
The Annotation Tools . . . . . . . . . . . . . . . . . . . . . . . . . . . . . 43
Displaying and Hiding the Annotation Tool Bar . . . . . . . . . 44
Zooming In or Out on a Page . . . . . . . . . . . . . . . . . . . . . . . 44
Fitting an Item into a Window . . . . . . . . . . . . . . . . . . . . . . 44
Panning an Item . . . . . . . . . . . . . . . . . . . . . . . . . . . . . . . . . 45
Inverting an Item . . . . . . . . . . . . . . . . . . . . . . . . . . . . . . . . . 45
Rotating Pages . . . . . . . . . . . . . . . . . . . . . . . . . . . . . . . . . . . 46
Switching Views . . . . . . . . . . . . . . . . . . . . . . . . . . . . . . . . . . . . . 47
PaperPort Automatically Saves . . . . . . . . . . . . . . . . . . . . . . . . . . 47
Selecting and Deselecting Items . . . . . . . . . . . . . . . . . . . . . . . . . 48
Undoing an Action . . . . . . . . . . . . . . . . . . . . . . . . . . . . . . . . . . . 49
Chapter 4: Working with Stacks
. . . . . . . . . . . . . . . . . . . . . . . . . . 51
Stacking Items . . . . . . . . . . . . . . . . . . . . . . . . . . . . . . . . . . . . . . 52
Using Drag and Drop to Create Stacks . . . . . . . . . . . . . . . . 53
Using the Stack Command . . . . . . . . . . . . . . . . . . . . . . . . . 54
Moving Between Pages in a Stack . . . . . . . . . . . . . . . . . . . . . . . . 55
Unstacking Pages . . . . . . . . . . . . . . . . . . . . . . . . . . . . . . . . . . . . 56
Reordering Pages in a Stack . . . . . . . . . . . . . . . . . . . . . . . . . . . . 57
Inserting a Page into a Stack . . . . . . . . . . . . . . . . . . . . . . . . . . . . 58
Duplicating Items . . . . . . . . . . . . . . . . . . . . . . . . . . . . . . . . . . . . 59
Chapter 5: Getting Organized with Personal Folders
. . . . . . . . . 61
An Example: Keeping Track of Your Medical Bills . . . . . . . . . . . 62
Suggestions for Your Personal Folders . . . . . . . . . . . . . . . . . . . . 63
About the Folders . . . . . . . . . . . . . . . . . . . . . . . . . . . . . . . . . . . . 64
Filing Items in Folders . . . . . . . . . . . . . . . . . . . . . . . . . . . . . . . . 65
iv

Displaying All the Items in a Folder . . . . . . . . . . . . . . . . . . . . . . 67
Seeing What Is in a Folder . . . . . . . . . . . . . . . . . . . . . . . . . . . . . 68
Creating New PaperPort Folders . . . . . . . . . . . . . . . . . . . . . . . . 70
Giving a Folder a New Title . . . . . . . . . . . . . . . . . . . . . . . . . . . . 71
Displaying the Folders . . . . . . . . . . . . . . . . . . . . . . . . . . . . . . . . 71
Adjusting the Folders Column Width . . . . . . . . . . . . . . . . . . . . 72
Deleting Folders . . . . . . . . . . . . . . . . . . . . . . . . . . . . . . . . . . . . . 74
Chapter 6: Getting Items On and Off the
PaperPort Desktop
. . . . . . . . . . . . . . . . . . . . . . . . . . . . . . . . . . 75
Importing Files from Other Applications . . . . . . . . . . . . . . . . . . 76
Working with Color and Grayscale Images . . . . . . . . . . . . . . . . 77
Importing PaperPort Items Saved as Files . . . . . . . . . . . . . . . . . . 78
Finding Files to Import . . . . . . . . . . . . . . . . . . . . . . . . . . . . 79
Exporting PaperPort Items . . . . . . . . . . . . . . . . . . . . . . . . . . . . . 80
Exporting Files with Compression . . . . . . . . . . . . . . . . . . . . . . . 83
Printing from Other Applications . . . . . . . . . . . . . . . . . . . . . . . 84
Adding Summary Information to Items . . . . . . . . . . . . . . . . . . . 85
Finding Items . . . . . . . . . . . . . . . . . . . . . . . . . . . . . . . . . . . . . . . 86
Finding Annotations . . . . . . . . . . . . . . . . . . . . . . . . . . . . . . . . . 90
Using Windows Object Linking and Embedding . . . . . . . . . . . . 91
Additional Ways To Use OLE . . . . . . . . . . . . . . . . . . . . . . . 93
Editing an OLE Object . . . . . . . . . . . . . . . . . . . . . . . . . . . . 94
Chapter 7: Annotating Items
. . . . . . . . . . . . . . . . . . . . . . . . . . . . . 97
A Look at the Annotation Tools . . . . . . . . . . . . . . . . . . . . . . . . . 98
Copying, Cutting, and Pasting Information . . . . . . . . . . . . . . . . 98
Copy and Paste Options . . . . . . . . . . . . . . . . . . . . . . . . . . . 99
Cropping an Image . . . . . . . . . . . . . . . . . . . . . . . . . . . . . . . . . 101
Working with Sticky Notes . . . . . . . . . . . . . . . . . . . . . . . . . . . 102
Adding Sticky Notes . . . . . . . . . . . . . . . . . . . . . . . . . . . . . 103
Collapsing and Expanding Sticky Notes . . . . . . . . . . . . . . . 104
Adding Text to a Page . . . . . . . . . . . . . . . . . . . . . . . . . . . . . . . 105
Highlighting Information . . . . . . . . . . . . . . . . . . . . . . . . . . . . . 106
Adding Freehand Annotations . . . . . . . . . . . . . . . . . . . . . . . . . 107
Drawing Lines and Arrows . . . . . . . . . . . . . . . . . . . . . . . . . . . . 108
v

Creating a New Item . . . . . . . . . . . . . . . . . . . . . . . . . . . . . . . . 109
Adding Graphics to Items . . . . . . . . . . . . . . . . . . . . . . . . . . . . 109
Fine-Tuning Annotations . . . . . . . . . . . . . . . . . . . . . . . . . . . . . 111
Selecting the Font and Color . . . . . . . . . . . . . . . . . . . . . . . 111
Editing Annotation Text . . . . . . . . . . . . . . . . . . . . . . . . . . 114
Moving and Resizing Annotations . . . . . . . . . . . . . . . . . . . 114
Copying, Cutting, and Pasting Annotations . . . . . . . . . . . . . . . 115
Displaying and Hiding Annotations . . . . . . . . . . . . . . . . . . . . . 116
Undoing Annotations . . . . . . . . . . . . . . . . . . . . . . . . . . . . . . . . 116
Deleting Annotations . . . . . . . . . . . . . . . . . . . . . . . . . . . . . . . . 117
Chapter 8: Using PaperPort Links
. . . . . . . . . . . . . . . . . . . . . . . 119
Overview of Using Links . . . . . . . . . . . . . . . . . . . . . . . . . . . . . 120
The PaperPort Links . . . . . . . . . . . . . . . . . . . . . . . . . . . . . 120
Basic Steps for Using Links . . . . . . . . . . . . . . . . . . . . . . . . 122
Converting Text with OCR Software . . . . . . . . . . . . . . . . . . . . 122
Processing Text Using OCR Software . . . . . . . . . . . . . . . . 123
Printing Items . . . . . . . . . . . . . . . . . . . . . . . . . . . . . . . . . . . . . 124
Using PaperPort with an Electronic Fax . . . . . . . . . . . . . . . . . . 125
Reading Faxes in PaperPort . . . . . . . . . . . . . . . . . . . . . . . . 126
Using PaperPort with E-mail . . . . . . . . . . . . . . . . . . . . . . . . . . 127
Using PaperPort with Lotus cc:Mail . . . . . . . . . . . . . . . . . . 127
Displaying E-mail Messages Sent from PaperPort . . . . . . . 128
Setting Link Preferences . . . . . . . . . . . . . . . . . . . . . . . . . . . . . . 128
PART THREE: Appendixes
Appendix A: Messages
Link Messages . . . . . . . . . . . . . . . . . . . . . . . . . . . . . . . . . . . . . 138
Memory Messages . . . . . . . . . . . . . . . . . . . . . . . . . . . . . . . . . . 139
Desktop Messages . . . . . . . . . . . . . . . . . . . . . . . . . . . . . . . . . . 141
Disk and File Messages . . . . . . . . . . . . . . . . . . . . . . . . . . . . . . . 141
Other Messages . . . . . . . . . . . . . . . . . . . . . . . . . . . . . . . . . . . . 142
. . . . . . . . . . . . . . . . . . . . . . . . . . . . . . . . . 137
vi

Appendix B: Troubleshooting
Image Quality and Appearance . . . . . . . . . . . . . . . . . . . . . . . . . 145
Printing Problems . . . . . . . . . . . . . . . . . . . . . . . . . . . . . . . . . . 147
Electronic Fax Problems . . . . . . . . . . . . . . . . . . . . . . . . . . . . . . 148
OCR Problems . . . . . . . . . . . . . . . . . . . . . . . . . . . . . . . . . . . . . 148
Importing and Exporting Files . . . . . . . . . . . . . . . . . . . . . . . . . 149
Missing E-Mail Links . . . . . . . . . . . . . . . . . . . . . . . . . . . . . . . . 150
. . . . . . . . . . . . . . . . . . . . . . . . . . . 145
Appendix C: Obtaining and Installing PaperPort Viewer
Obtaining Extra Copies of PaperPort Viewer . . . . . . . . . . . . . . 154
Installing PaperPort Viewer for Windows . . . . . . . . . . . . . . . . 154
Hardware and Software Requirements . . . . . . . . . . . . . . . . 154
Installing from the PaperPort CD . . . . . . . . . . . . . . . . . . . 155
Installing from Disks . . . . . . . . . . . . . . . . . . . . . . . . . . . . . 155
Installing PaperPort Viewer for Macintosh . . . . . . . . . . . . . . . . 156
Hardware and Software Requirements . . . . . . . . . . . . . . . . 156
Using the Macintosh Installer . . . . . . . . . . . . . . . . . . . . . . 156
Starting PaperPort Viewer . . . . . . . . . . . . . . . . . . . . . . . . . . . . 157
Appendix D: Technical Information
Installation Log . . . . . . . . . . . . . . . . . . . . . . . . . . . . . . . . . . . . 159
Uninstalling PaperPort . . . . . . . . . . . . . . . . . . . . . . . . . . . . . . . 159
PaperPort Software Specifications . . . . . . . . . . . . . . . . . . . . . . . 160
Glossary
Index
Contacting Visioneer
. . . . . . . . . . . . . . . . . . . . . . . . . . . . . . . . . . . . . . . . . . . . 163
. . . . . . . . . . . . . . . . . . . . . . . . . . . . . . . . . . . . . . . . . . . . . . . 169
. . . . . . . . . . . . . . . . . . . . . . . . . . . . . . . . . . . 177
. . . . . . . . . . . . . . . . . . . . . 159
. . . . . 153
Calibration Page
vii

viii

PART ONE
Getting Started
of Contents
Table
VISIONEER

of Contents
Table

CHAPTER 1
Quick Guide
of Contents
Table
“Learn by doing.”
—Anonymous (Proverb)
Welcome to the
is a quick guide that explains how to use the PaperPort software. The
quick guide has two major sections:
• “Learning the Basics” will help you to quickly get acquainted with
the basic features of the PaperPort software. If you are in a hurry to
get started, this section contains what you need.
• “Getting the Most from PaperPort” shows you how to do certain
special tasks by using several practice exercises.
L
EARNING THE BASICS
The practice exercises in this section show you how to:
• Select and deselect items
• Save items automatically without using a Save command
• Combine single items into a multipage item
• Display an item in separate views
• Organize items in folders
PaperPort 3.6 Software User’s Guide
. This first chapter
• Add comments (called
annotations
) to an item
1

Thumbnail of
the scanned image
S
TARTING THE PAPERPORT SOFTWARE
The easiest way to start the PaperPort software is to simply scan an item.
When scanning is complete, the PaperPort software starts automatically
and the PaperPort Desktop, or Desktop View, appears.
A thumbnail—a small image representing the item you scanned—
appears on the PaperPort Desktop. The following sample shows the item’s
thumbnail on the PaperPort Desktop.
of Contents
Table
2
1: Quick Guide
You can also start the PaperPort software without scanning an item by:
• Double-clicking the PaperPort
• Pushing the PaperPort button on your scanner.
• Printing to the PaperPort Desktop from another application. For more
information, see Chapter 6, “Getting Items On and Off the PaperPort
Desktop.”
• Starting PaperPort from the Windows File Manager as you would any
other application.
icon in the Program Manager.
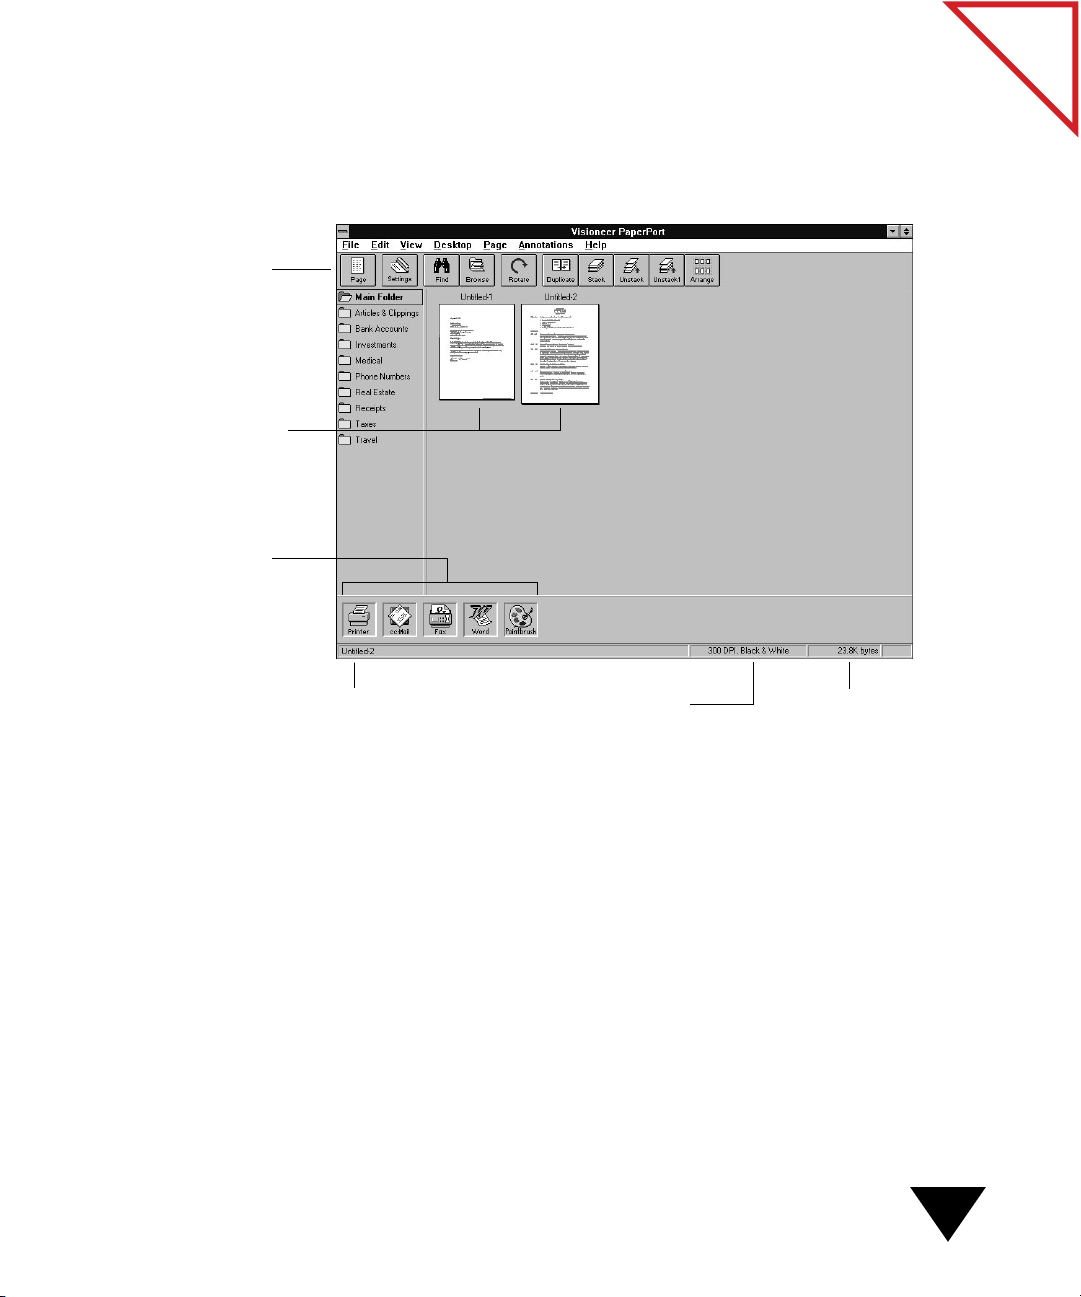
The Command Bar has
shortcuts for choosing
menu commands, such
as switching views or
finding items.
Thumbnails—images of
scanned items.
The Link Bar contains
icons for printing, sending
a fax or an e-mail message,
reading text into your
word-processing
application, sending
scanned items to other
applications, and using
Paintbrush.
THE P
RACTICE EXAMPLE
The practice exercises in “Learning the Basics” use two scanned pages
consisting of a cover letter and resumé as shown in the following figure.
Name of selected item File size
Scan setting for
the selected item
of Contents
Table
▼
NOTE:
If you want to follow along with these practice exercises on
your computer, you can scan any two pages into PaperPort.
Learning the Basics
3

S
ELECTING AND DESELECTING ITEMS
After you scan an item, it is automatically highlighted, or selected, on the
PaperPort Desktop. A selected item has a red (or dark) line around it. To
work with a scanned item—for example, to move an item, to drag an
item to a link, or to display an item in Page View—you must select it.
To select or deselect an item:
1. Click any empty space on the PaperPort Desktop. Notice that both
untitled thumbnails are no longer selected.
Newly scanned items are untitled until you give them a name. You’ll
see how to do that in the next few pages.
2. Click one of the thumbnails, such as Untitled-2, to select it.
Untitled-2 is highlighted.
3. To deselect the item, click another item or click anywhere on the
PaperPort Desktop.
of Contents
Table
TIP:
▼
S
AVING AN ITEM
Because PaperPort automatically saves an item after you scan it or make
changes to it, you do not need to use a Save command to save an item
that is on the PaperPort Desktop.
You might want to save an item when you want the item in another file
format—for example, BMP or TIFF. Using the Export command, you can
save an item and then open the item in another application. With the
Export command, you can also save an item as a file. For more information,
see Chapter 6, “Getting Items On and Off the PaperPort Desktop.”
To select multiple items, click each thumbnail while holding
down the Shift key or the Ctrl key, or click on the PaperPort Desktop
and drag a rectangle around the items to select.
4
1: Quick Guide

S
TACKING PAGES
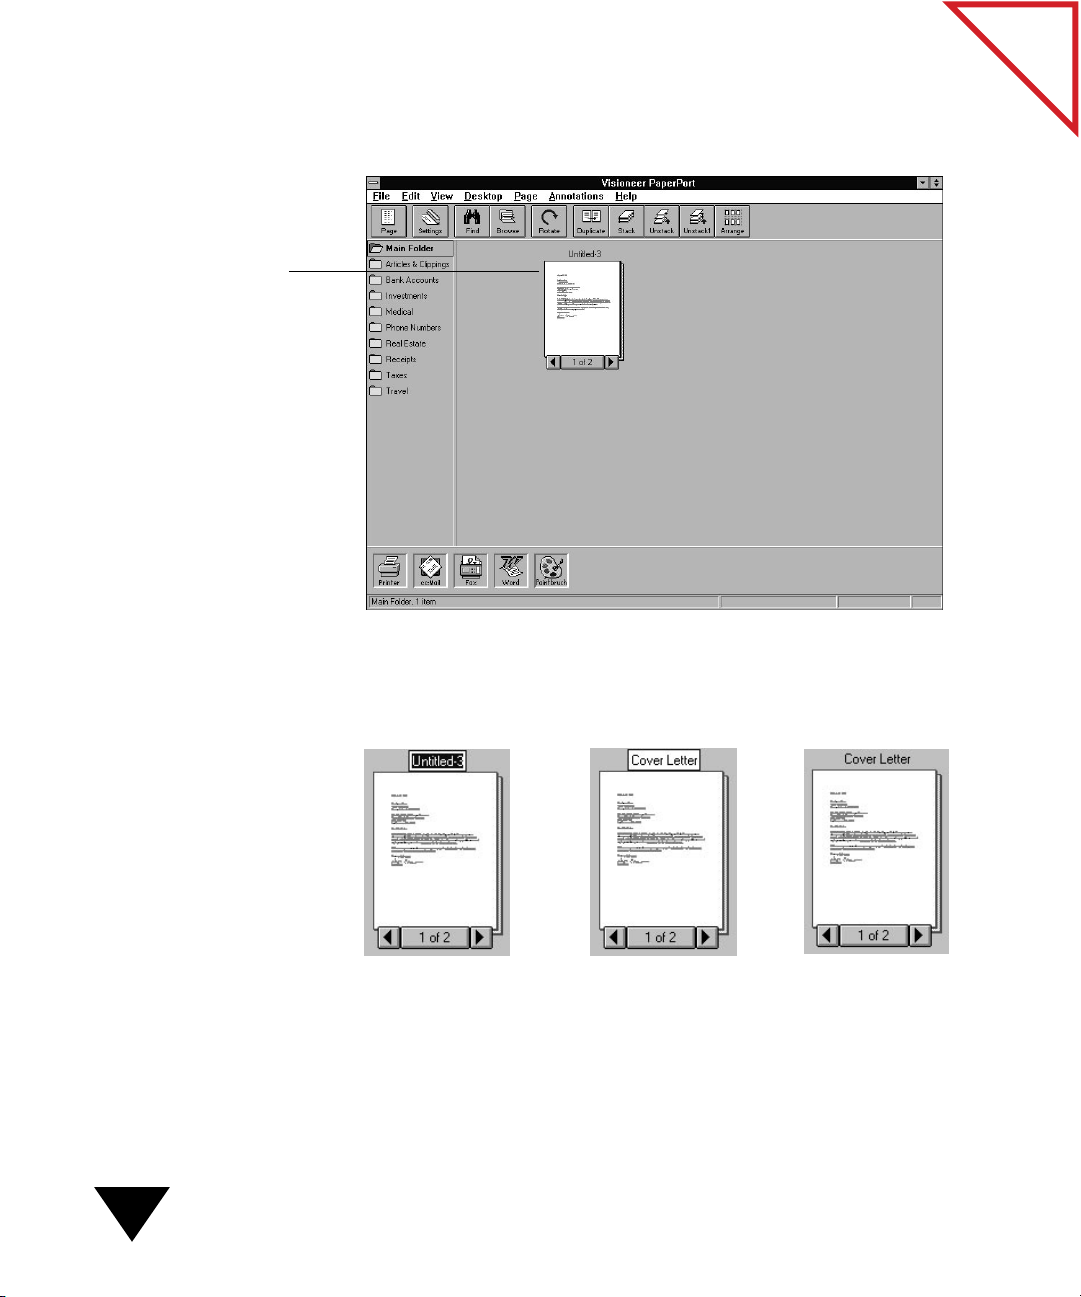
When you scan individual pages, you can combine the thumbnails for
those pages into a stack. For example, if you have scanned a 10-page
report, 10 individual thumbnails appear on the PaperPort Desktop. By
stacking the thumbnails, you can work with the report as a single item.
In this section, you will practice using the drag-and-drop method to
create a stack. For more information about stacking items, see Chapter 4,
“Working with Stacks.”
To create a stack using the drag-and-drop method:
1. Click an empty space on the PaperPort Desktop. Make sure that no
items are selected.
2. Drag and drop the item onto the other item. To drag and drop, select
the item and hold down the mouse button. Using the mouse, drag
the item until it is on top of the page that you want underneath it.
When the other item is highlighted, release the mouse button.
of Contents
Table
Learning the Basics
5
PaperPort creates a
new, untitled item.
For this exercise, drag and drop the cover letter on top of the resumé.
You now have the stack Untitled-3 on the PaperPort Desktop.
of Contents
Table
6
1: Quick Guide
3. Assign a title to the stack with the cover letter and resumé.
Select the item and
click its title.
Type a new title and
press Return.
The item now has
a new title.
You use the same process to give titles to individual pages.
D
ISPLAYING AN ITEM IN PAGE VIEW
Page View displays the details of the current page so that you can get a
close-up of a page’s information or add comments to a page.
To view a stack in Page View:
1. On the PaperPort Desktop, double-click the stack, or select the stack
and click the
Page
icon on the
Command Bar
. The first page of the
stack appears in Page View, as shown in the following figure.
of Contents
Table
The Document Navigator
displays the previous or
next item on the PaperPort
Desktop or a list of all items.
Use the Annotation Tool
Bar for adding notes,
highlighting areas, or cutting
and pasting a section.
The Status Bar shows the item’s
title, scanned dpi, or the page’s
percentage of enlargement or
reduction when the cursor is in
the page boundaries.
The Page Navigator displays the previous or next page when you click the left
or right arrow. Click the middle of the
Page Navigator to go to a specific page.
The Zoom Navigator reduces the page
(zoom out) or magnifies the page (zoom in).
Click the middle of the Zoom Navigator to
return the page to its actual (100%) size.
2. Click the right arrow in the Page Navigator to move forward one
page. Click the left arrow to move backward one page.
Learning the Basics
7

▼
TIP:
To go to a specific page, click the middle of the Page Navigator
(where it displays the number of pages). Enter the page number when
the Go To Page dialog box appears.
O
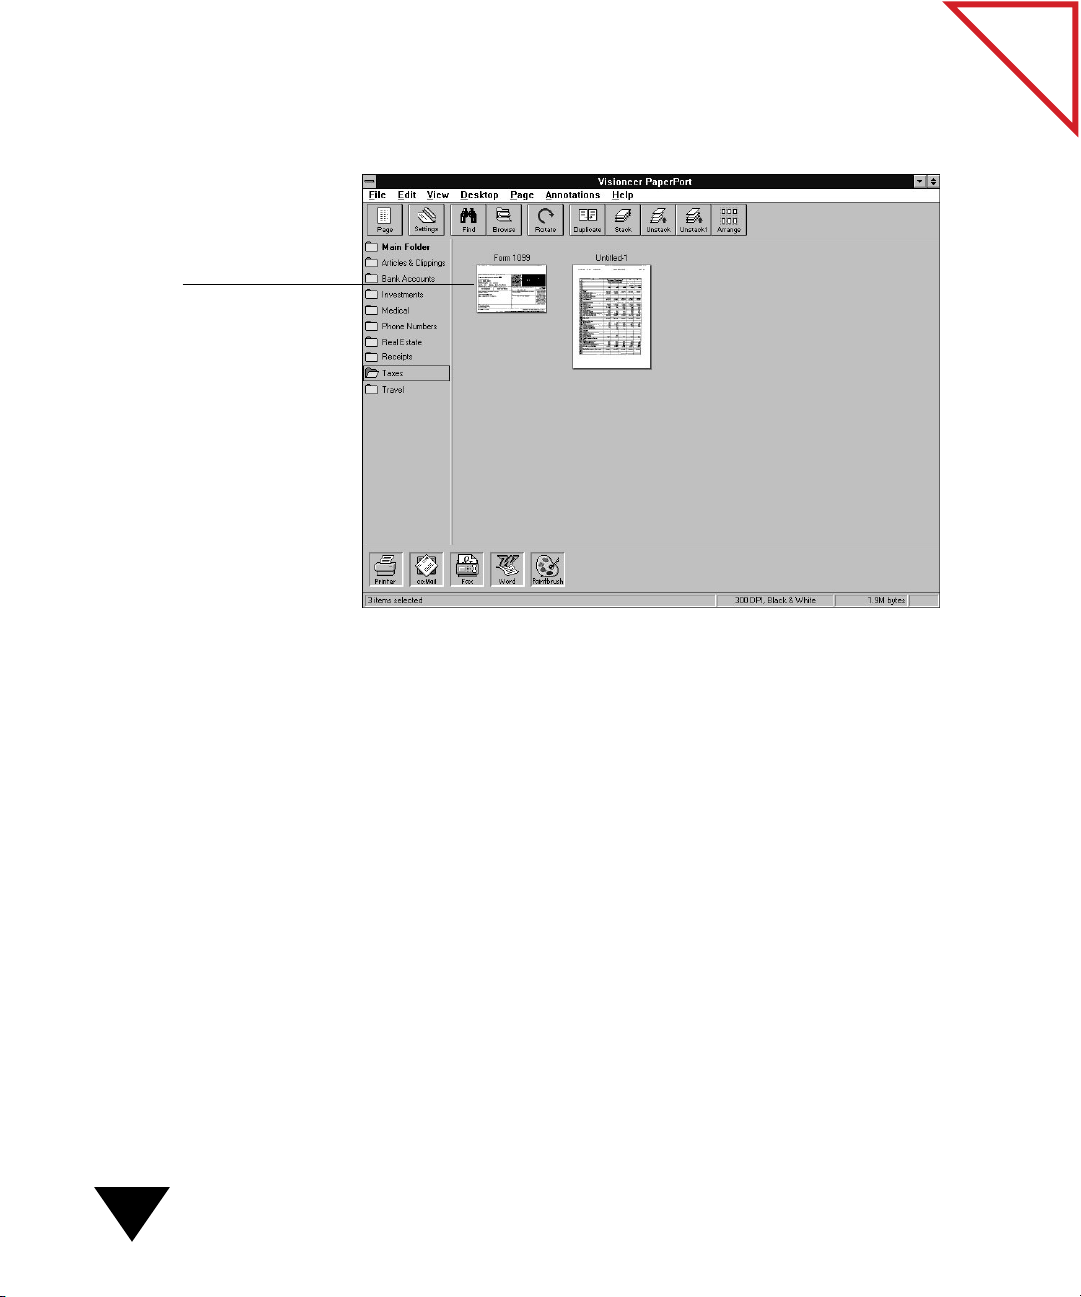
RGANIZING AND FINDING SCANNED ITEMS
As you use PaperPort, you will probably scan literally hundreds of items,
ranging from business correspondence and tax receipts, to your personal
letters and interesting articles that you want to keep. Using PaperPort’s
personal folders, you can quickly organize and store your important
papers. Using Paperport’s browse and find features, you can just as
quickly find the scanned items again.
To organize your scanned items in PaperPort folders:
1. In the PaperPort Desktop View, select the item.
2. Drag the item into a folder. The following example shows a business
card being dragged into a folder.
of Contents
Table
When the pointer is this
shape:
...the item is not correctly
positioned on a folder
title, or you are trying to drop
it onto the folder where the
item is already filed.
1: Quick Guide
8
A thumbnail of
the selected item.
3. When you release the mouse button, the folder flashes to let you
know that the item is safely stored in that folder.
To see the items in a folder:
• Click the folder to open it. All of its items appear on the PaperPort
Desktop. (You may need to scroll the PaperPort Desktop window to
see all of the items.)
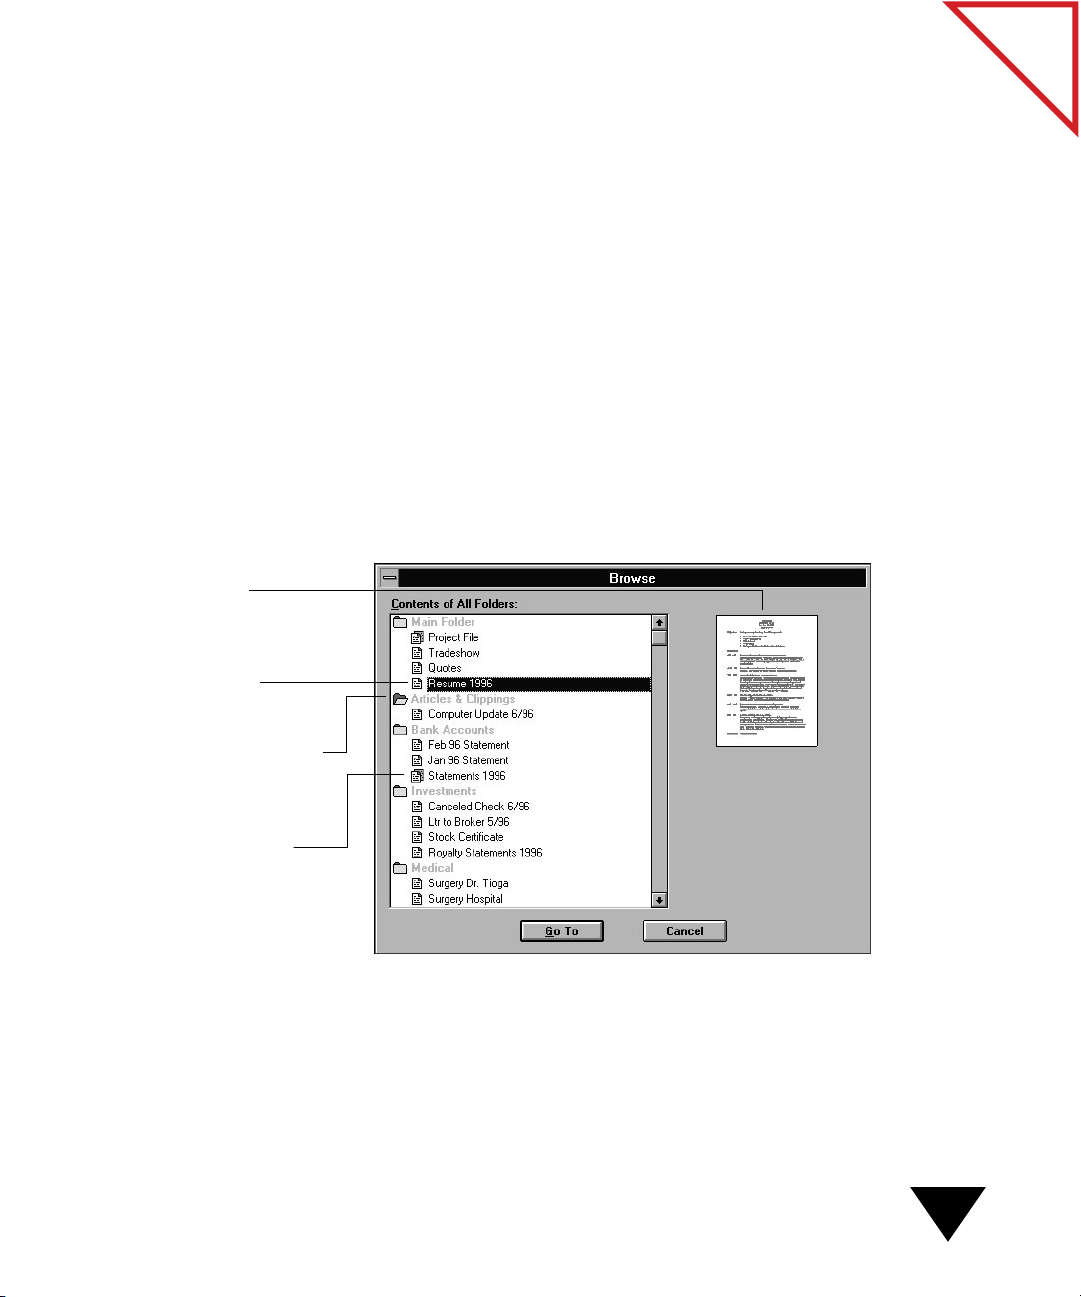
To see a list of items in the folders:
1. From the
Edit
menu, choose
Browse
, or click the Browse button on
the Command Bar.
2. The Browse dialog box appears. From the Desktop View, the dialog
box lists all of the folders and their contents as shown here. From
Page View, the dialog box lists the items in the folder that is already
open.
of Contents
Table
The selected item
is highlighted.
This open folder indicates
it is the one currently open
on the PaperPort Desktop.
This symbol indicates
the item is a multipage
stack.
3. Select an item in the list. Its thumbnail is displayed so that you can
determine if it is the item you want.
4. Click Go To. That item is selected and ready for you to work with it.
Learning the Basics
9

PaperPort also has extensive search and retrieval features so that you can
find items based on their titles, text, date, and so forth. For more details
about finding and retrieving items, see Chapter 6, “Getting Items On and
Off the PaperPort Desktop.”
ADDING COMMENTS TO A PAGE
After you have displayed an item in Page View, you can use the
Annotation Tool Bar to add various types of comments, or annotations,
to a page. For example, the Highlighter tool highlights text in the same
way as a felt-tip marker. You can select a color and then highlight the text.
You can also use the Sticky Note tool to create notes and place them in a
document—just like real sticky notes.
In the next exercise, you will practice using the Sticky Note tool. For
more information about using the Annotation tools, see Chapter 7,
“Annotating Items.”
of Contents
Table
To add a sticky note:
1. On the PaperPort Desktop, double-click an item, or select the item
and click the Page icon on the Command Bar. The page appears in
Page View.
2. On the Annotation Tool Bar, click the Sticky Note icon. The cursor
changes to a small sticky-note symbol with a crosshair.
3. Position the cursor where you want to add the sticky note.
4. Click anywhere in the item. The default note size appears and is
ready for you to begin typing. The following figure shows a sample of
a note border.
10
1: Quick Guide
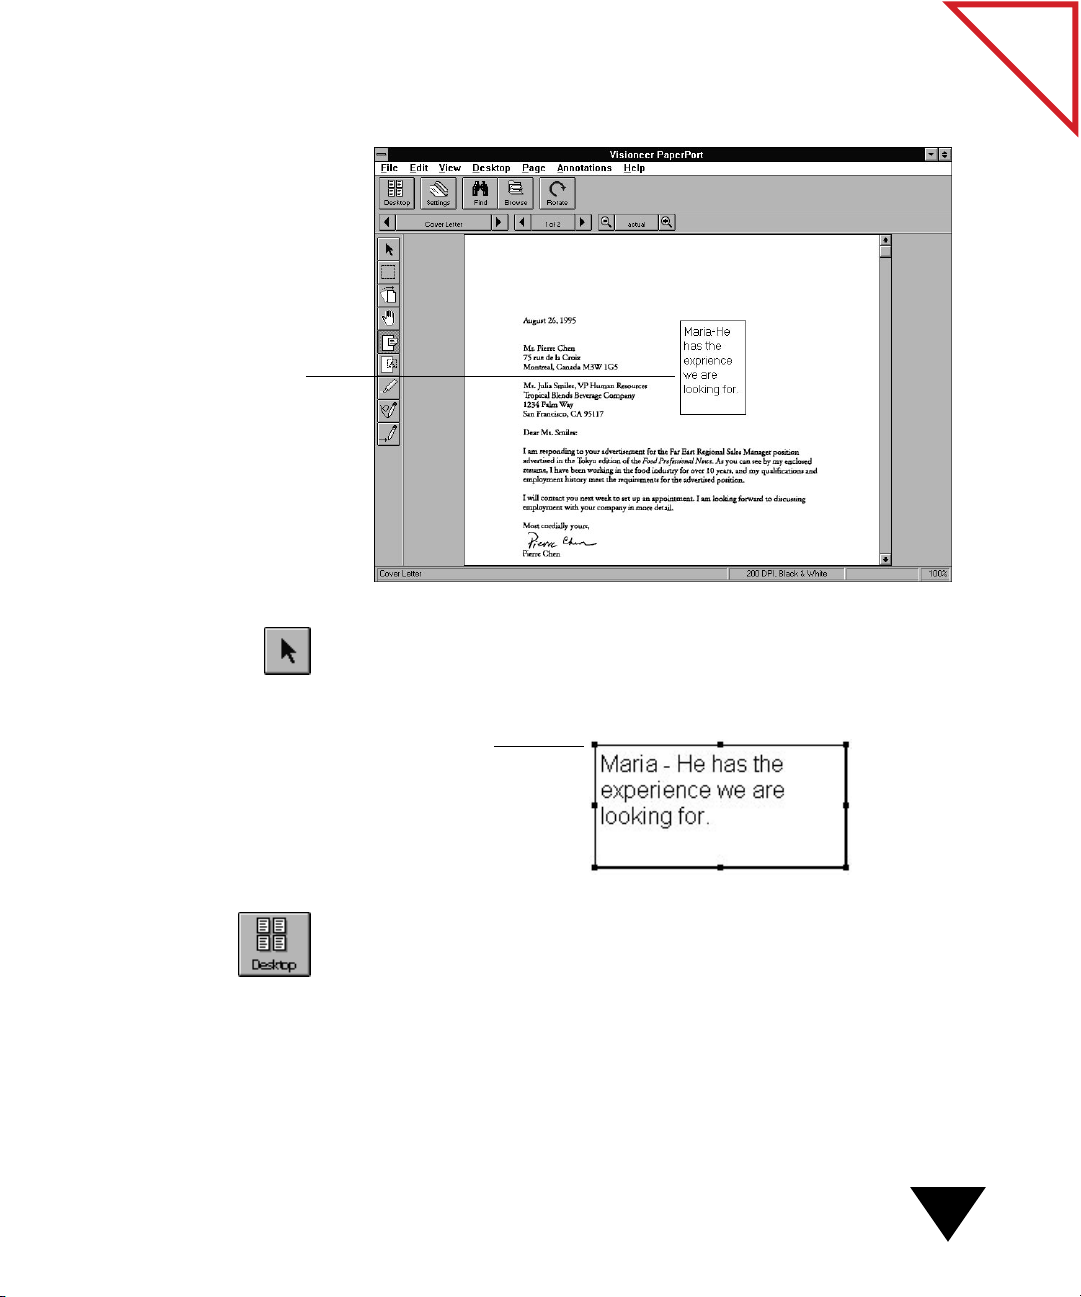
Sample
sticky note
5. Type the note, as shown in the following figure.
of Contents
Table
6. Practice changing the size and shape of the note. Click the Pointer
icon on the Annotation Tool Bar, and select the note.
7. To resize the note box, drag one of the handles.
Drag the handle
diagonally to change
the size of the note.
8. From the View menu, choose Desktop View, or click the Desktop
icon on the Command Bar to display the PaperPort Desktop.
Learning the Basics
11

EXITING THE PAPERPORT SOFTWARE
To exit the PaperPort software:
• From the File menu, choose Exit.
The next time you start PaperPort, all the items will appear on
the PaperPort Desktop in the same position as when you quit.
GETTING THE MOST FROM PAPERPORT
Now that you know the basics of using the PaperPort software, you are
ready to learn how powerful it can be. For example, PaperPort
automatically links to supported applications that are already installed on
your computer, such as electronic fax, graphics, or word-processing
applications. You can use a PaperPort link to send an item to the linked
application right from the PaperPort Desktop.
of Contents
Table
This section shows how to do some typical tasks using PaperPort features,
including:
• Sending a PaperPort item by using the electronic fax software
• Printing to the PaperPort Desktop from another application
• Changing a PaperPort item from an image to text
• Scanning photographs and adjusting the scan settings
12
1: Quick Guide
SENDING A FAX WITH PAPERPORT
To send a fax with PaperPort, your computer must have:
• A fax modem.
• Fax software for your fax modem. If you have fax software that
PaperPort recognizes, it automatically displays a Fax link icon on the
Link Bar, and no special setup is needed. To add other fax software to
the Link Bar, see Chapter 8, “Using PaperPort Links.”
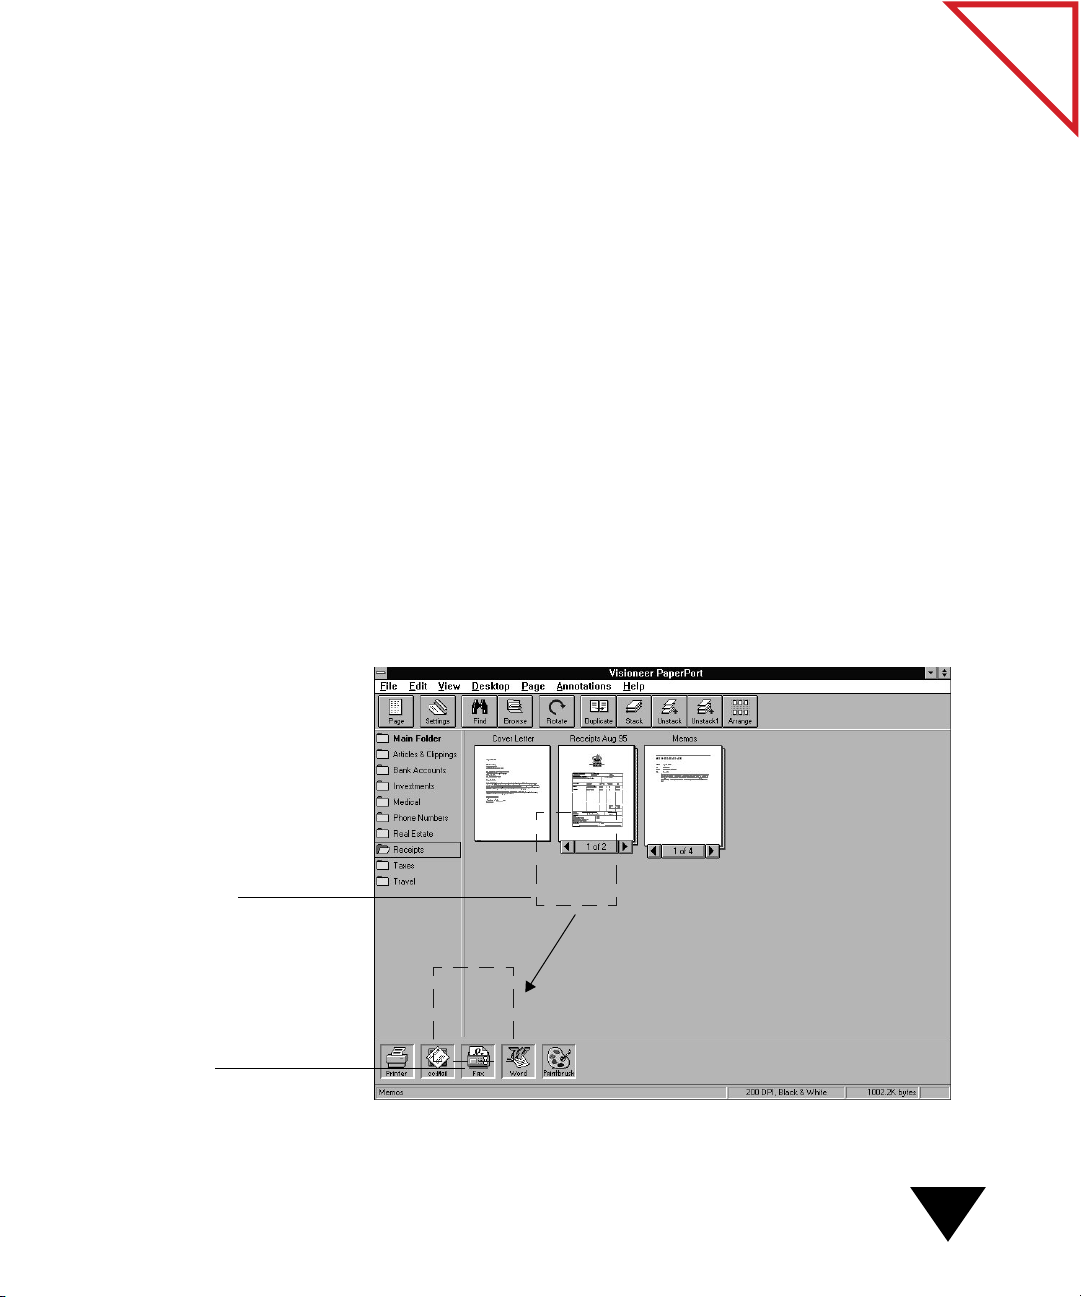
The following example shows you how to send a scanned item as an
electronic fax using the drag-and-drop method. For example, you have
scanned several invoices and stacked them, and you now want to fax them
to your bookkeeper. This section shows how drag and drop works.
To send a fax from PaperPort:
1. On the PaperPort Desktop, select the stack that you want to send,
and hold down the mouse button.
of Contents
Table
The dotted rectangle shows
what happens as you drag
the selected stack.
When the Fax icon is
highlighted, release the
mouse button.
2. While holding down the mouse button, drag the stack onto the Fax
icon on the Link Bar, as shown in the following figure.
Getting the Most from PaperPort
13
3. Release the mouse button when the Fax icon is highlighted. The fax
application starts.
4. Send the fax as you normally would.
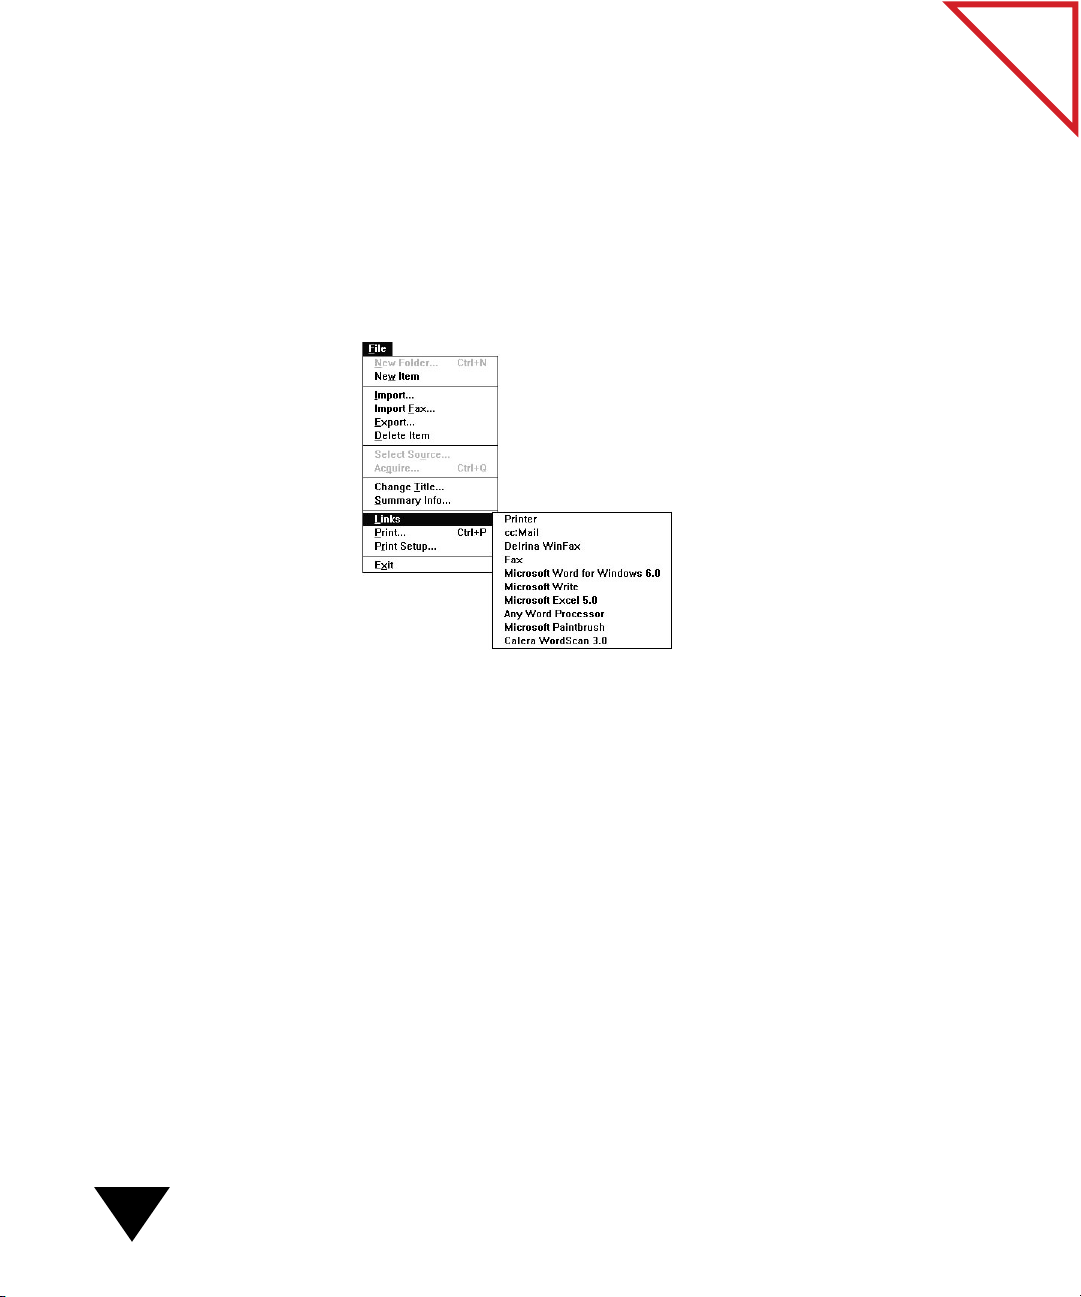
▼ NOTE: You can also send a fax from Page View. Choose Links from
the File menu, and then choose the name of your fax application from
the submenu. For more information about sending a fax, see
Chapter 8, “Using PaperPort Links.”
of Contents
Table
14
PRINTING A SPREADSHEET TO THE PAPERPORT DESKTOP
In the following example, you want to send an income tax form and a
spreadsheet from PaperPort to your accountant. You have the form on
paper, but the spreadsheet is in a spreadsheet program, such as Microsoft
Excel. You could print the spreadsheet and scan it, but there is an easier
way: printing to the PaperPort Desktop.
To print a spreadsheet to the PaperPort Desktop:
1. Scan the tax form, and display it on the PaperPort Desktop.
Now you want to get the spreadsheet from Excel onto the PaperPort
Desktop. (You can get documents from other applications into
PaperPort, not just from spreadsheets.)
2. Start Excel and open the spreadsheet file.
1: Quick Guide
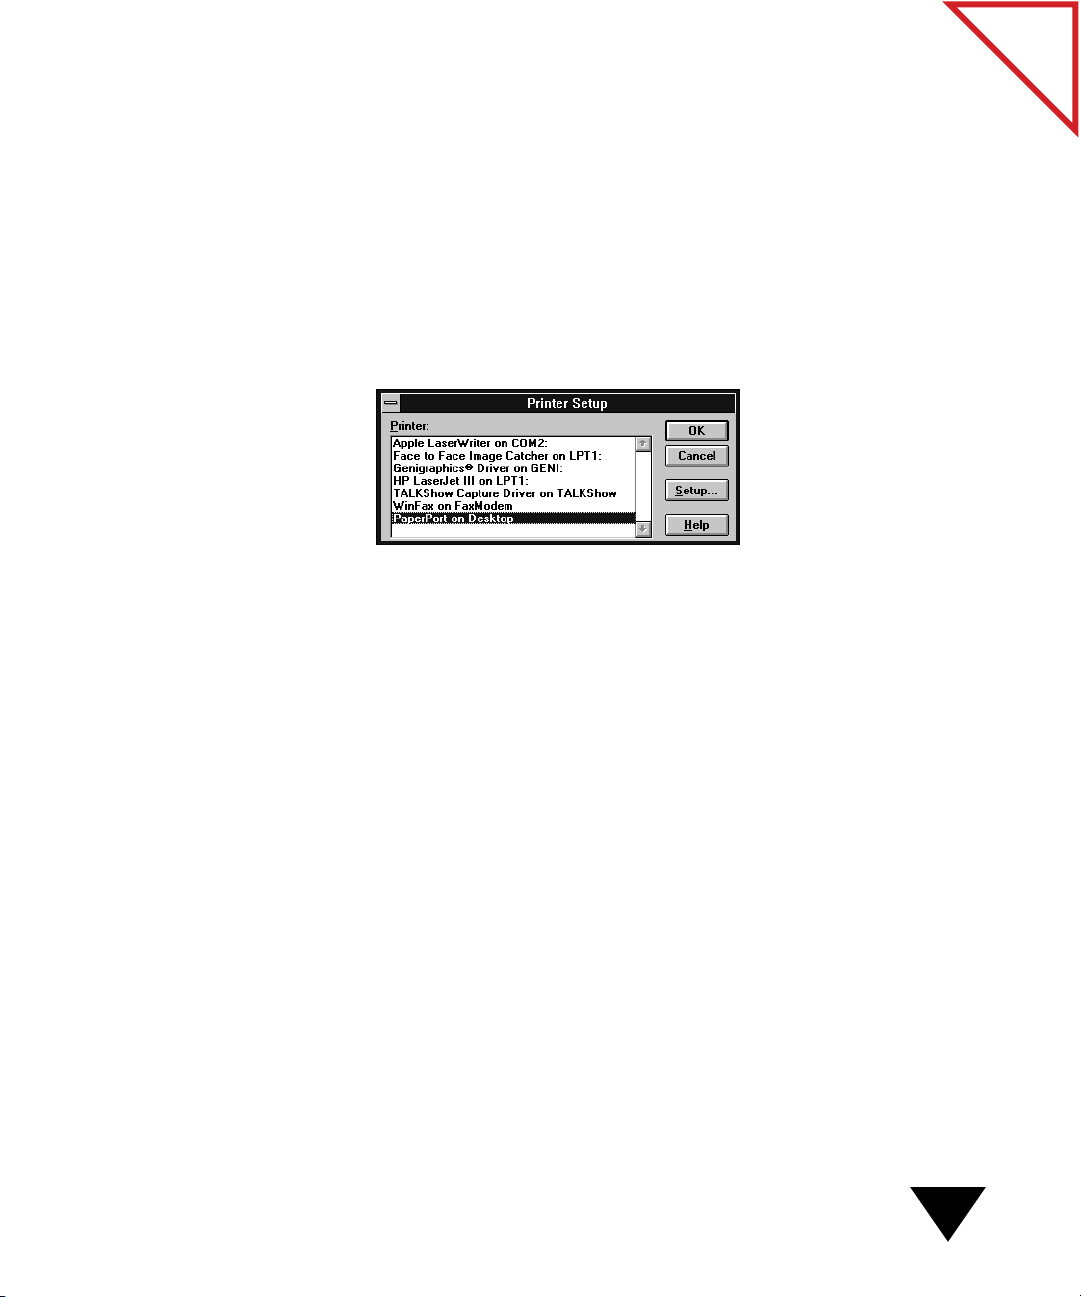
3. From Excel’s File menu, choose Page Setup. In the Page Setup dialog
box, click Print, and then click the Printer Setup button.
Other applications have different steps for selecting a printer; for
example, in Microsoft Word, choose Print from the File menu, and
then click Printer to select PaperPort on Desktop as the current
printer. Usually the command to select a printer is found in an
application’s File menu.
The dialog box for setting up the printer appears. The following
dialog box is from Microsoft Excel.
4. Select PaperPort on Desktop as the printer.
of Contents
Table
5. Click OK. Instead of being printed to the printer, the spreadsheet is
printed to the PaperPort Desktop.
Getting the Most from PaperPort
15
The PaperPort Desktop displays
the form that you scanned and
the spreadsheet that was printed
to the PaperPort Desktop
from Excel.
The PaperPort Desktop appears and displays the spreadsheet as a
PaperPort image.
of Contents
Table
16
If you want to fax the form and the spreadsheet, first stack the items and
then drag and drop the stack onto the Fax icon on the Link Bar.
LETTING PAPERPORT DO YOUR TYPING (WITH OCR)
When you scan an item, it is an image (or a picture), and you cannot edit
its text. However, using the OCR software that is shipped with PaperPort
or using a PaperPort-supported OCR application, you can convert the
image into text and read the text into your word-processing application.
That process changes the scanned image into “real” text that you can edit.
If you want to edit a printed page but do not want to use a red pencil, you
can scan the page, read it into your word processor, and then edit the page
online.
1: Quick Guide
▼ NOTE: The OCR software may not always convert all text with
100 percent accuracy; therefore, check the document for spelling
errors while editing it.
To convert a PaperPort item to text:
1. Scan the item if you have not already done so.
2. Select the item on the PaperPort Desktop.
3. Drag and drop the selected item onto the Word-Processing icon on
the Link Bar.
If Page View is displayed, choose Links from the File menu. Then
choose your word processor from the Links submenu.
of Contents
Table
Drag the selected item onto
the Word-Processing icon.
Release the mouse button
when the Word-Processing
icon is highlighted.
The OCR application reads the text into your word-processing
application. The word-processing application starts.
4. Edit the text in the word processor.
Getting the Most from PaperPort
17
You can also drag and drop a spreadsheet onto a Spreadsheet icon. In that
case, the OCR software converts the numbers and text, then opens the
spreadsheet application. In most cases, the column-by-column structure
of the original spreadsheet is maintained with the converted numbers and
text. To learn more about using the OCR link, see Chapter 8, “Using
PaperPort Links.”
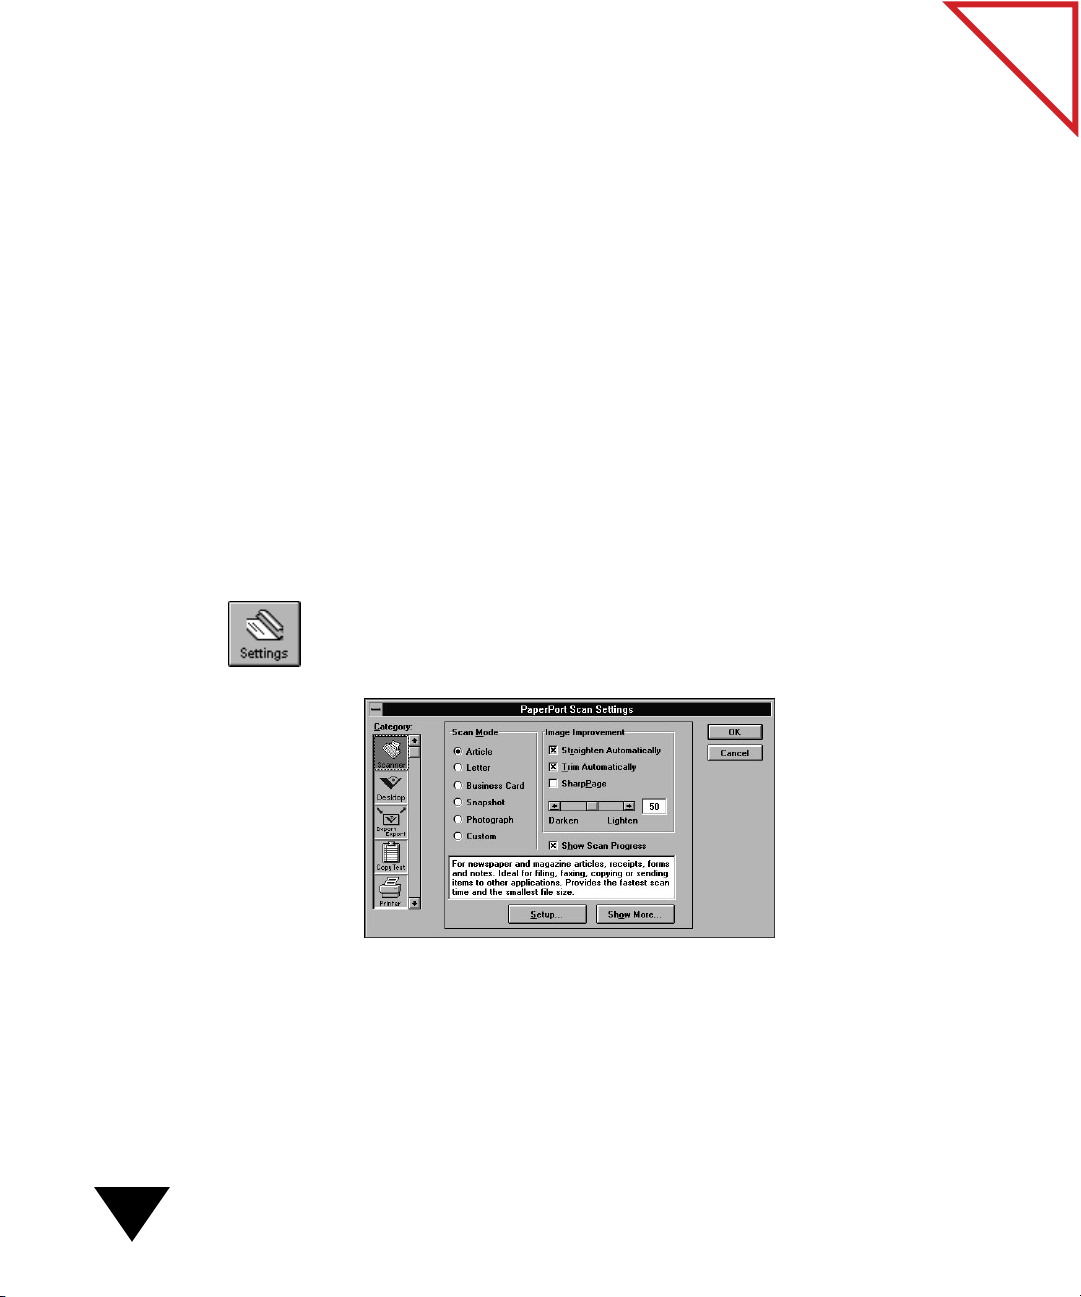
SCANNING PHOTOS
With PaperPort, you can scan pictures of your kids, the family dog, office
mates, real estate, special events, and even magazine advertisements. For
example, you could scan a photograph of a family member, attach it to an
e-mail message, and mail the image to a coworker.
Before scanning the photograph, select the Photograph mode in the
PaperPort Scan Settings.
To scan a photo:
1. Click the Settings button on the Command Bar, or from the Edit
menu, choose Preferences and click the Scanner button. The
PaperPort Scan Settings dialog box appears.
of Contents
Table
18
▼ NOTE: If the PaperPort software is not running, you can also press
the PaperPort button on the scanner to see the PaperPort Scan Settings
dialog box.
2. In the Scan Mode options, select Photograph.
1: Quick Guide

3. Click OK.
4. Scan your photo.
▼ TIP: You may need to adjust the Image Improvement setting, making
it either darker or lighter, to make the photo look the way you want.
of Contents
Table
Getting the Most from PaperPort
19

of Contents
Table
20
1: Quick Guide

PART TWO
Using PaperPort
of Contents
Table
VISIONEER

of Contents
Table
 Loading...