


AVN422HD h.264 High Definition
IP Audio Video Node
User’s Manual
©2011 Visionary Solutions, Inc. All rights reserved.
Please visit the support section of our web site at www.vsicam.com
for manuals, other documentation, and software downloads.
Visionary Solutions, Inc.
2060 Alameda Padre Serra
Suite 100
Santa Barbara, CA 93103
T:805-566-5811
F:805-566-5813
www.vsicam.com
May 16, 2011
Revision 1.0.4 (compatible with version 05B firmware)

About This Guide
VSI recommends that you download the most recent version of this Manual from
www.vsicam.com.
Legal Considerations
Intellectual Property Rights
Visionary Solutions, Inc. warrants that it, or its licensors, have good and clear title or
right to license the PackeTV® Manager and its components and to manufacture and
distribute the AVN422HD, free and clear of all liens and encumbrances.
No part of this document may be copied or reproduced in any form or by any means,
electronic or mechanical, for any purpose without the express written permission of
Visionary Solutions, Inc.
All rights, title, copyrights in and to the design, firmware object and source code of the
AVN422HD belong exclusively to and are the property of Visionary Solutions, Inc.
All rights, title, and copyrights in and to the PackeTV® Manager and any copies of the
PackeTV® Manager belong exclusively to and are the property of Visionary
Solutions, Inc.
Limited Liability
In no event shall Visionary Solutions, Inc. be liable, whether in contract, tort, or
otherwise, to OEM or Customers for (a) any damages resulting from loss of use, data
or profits howsoever arising hereunder in relation to or in connection with Visionary
Solutions, Inc. Software, (b) any special, indirect, incidental or consequential
damages, even if Visionary Solutions, Inc. has been advised of the possibility thereof.
Visionary Solutions, Inc.’s total liability in contract, tort or otherwise arising out of, in
connection with or in relation to the Software or otherwise under this Agreement shall
be limited to the amount pa id to Visionary Solutions, Inc. or and authorized Visionary
Solutions, Inc. reseller for the Visionary Solutions, Inc. Software or Hardware for a
Customer in the 12 month period immediately preceding the event which has given
rise to the liability.
The contents of this document are subject to revision without notice due to continued
progress in methodology, design, and manufacturing. Visionary Solutions, Inc. shall
have no liability for any error or damages of any kind resulting from the use of this
document.
Trademark Acknowledgements
All trademarks or registered trademarks are properties of their respective owners.
Visionary Solutions, Inc., Limited 12-Month AVN422HD
Warranty
We appreciate your purchase of this Visionary Solutions, Inc. product. We feel
confident that in normal use it will provide years of satisfactory performance.
Visionary Solutions, Inc. warrants to the original user that the video equipment
supplied by us will be free of defects in materials and workmanship for a period of
twelve (12) months from th e date of purchase from Visionary Solutions, Inc. or an
authorized reseller of Visionary Solutions, Inc. Visionary Solutions, Inc.’s obligation
under this warranty shall be to the repair including any necessary parts and the cost
of labor connected therewith, or at its option, the exchange or the refund of the
purchase price, of any video equipment that is determined by us to have a
manufacturing defect within the wa rranty period.
Replacement parts furnished in connection with this warranty shall be warranted for a
period equal to the unexpired portion of the original equipment warranty.
Warranty Exclusions
This warranty does not apply to repairs or replacements necessitated by any cause
beyond the control of Visionary Solutions, Inc., including, but not limited to, acts of
nature, improper installation, misuse, lack of proper maintenance, accident, voltage
fluctuations, and unauthorized repairs or modifications.
This warranty becomes void in the event serial numbers are altered, defaced, or
removed.
Visionary Solutions, Inc. reserves the right to make changes in the design, or make
additions to, or improvements upon, this product without incurring ob ligations to
install the same on products previously manufactured.
The foregoing warranty is in lieu of all other warranties, expressed or implied,
including, but not limited to, the implied warranties of merchantability and fitness for a
particular purpose. Visionary Solutions, Inc. neither assumes nor authorizes any
person to assume for it any other obligations or liabilities in connection with the sale
of its products. In no event shall Visionary Solutions, Inc. or its authorized resellers be
liable for special or consequential damages arising from the use of its products, or
any delay in the performance of this warranty due to causes beyond its control.
IN THE U.S.A., SOME STATES DO NOT ALLOW LIMITATIONS ON HOW LONG
AN IMPLIED WARRANTY LASTS AND/OR THE EXCLUSION OR LIMITATION OF
CONSEQUENTIAL DAMAGES, SO THE PREVIOUSLY STATED LIMITATIONS ON
IMPLIED WARRANTY AND CONSEQUENTIAL DAMAGES MAY NOT APPLY TO
YOU.
Customer Obligations
The original, dated, bill of sale should be retained as proof of purchase and must be
presented to the Visionary Solutions, Inc. or a Visionary Solutions, Inc. Authorized
Service Center when this equipment is to be serviced under the provisions of this
warranty.
The cost of transportation to and from the Authorized Service Center is the
responsibility of the user.
How to Obtain Warranty Service
Should this equipment require warranty service you may obtain specific information
on how to obtain this service by directly contacting Visionary Solutions, Inc., or the
reseller who sold you this equipment.

AVN422HD User’s Manual Contents
Contents
Chapter 1 Introduction ......................................................................... 1
1.1 Features ........................................................................................... 1
1.2 Product Description ........................................................................ 2
1.2.1 AVN422HD Front Panel ......................................................... 2
1.2.2 Shipping Inventory ................................................................. 3
1.3 The MPP1700 ................................................................................... 3
1.3.1 MPP1700 Front Panel Slots .................................................. 4
1.4 The MPP200 ..................................................................................... 4
1.4.1 MPP200 Front Panel Slots .................................................... 4
1.4.2 MPP200 Rear Panel .............................................................. 5
Chapter 2 Installing the AVN422HD .................................................... 6
2.1 Blade Installation and Removal ........................................................ 6
2.2 Minimum Connections Installation .................................................... 6
Chapter 3 Connecting to the Network ................................................ 8
3.1 Unicast and Multicast Transmissions over the Network ................... 8
3.2 IGMP Querying and IGMP Snooping ............................................... 8
3.3 DHCP IP Configuration ..................................................................... 9
3.4 Static IP Configuration ...................................................................... 9
Chapter 4 Operating the AVN422HD ................................................. 11
4.1 PackeTV® Configuration Utility ...................................................... 11
4.2 AVN422HD Console Interface ........................................................ 11
4.3 AVN422HD Browser Interface ........................................................ 11
4.4 AVN Control Protocol (API) ............................................................ 11
Chapter 5 Using the Console Interface ............................................. 12
5.1 Connecting With a HyperTerminal Session .................................... 12
5.2 Console Interface ........................................................................... 14
5.2.1 Network Configuration ......................................................... 15
5.2.2 Using the Network Configuration Wizard ............................. 15
iii

Contents AVN422HD User’s Manual
Chapter 6 Using the Browser Interface ............................................ 16
6.1 The Web Management Login Page ................................................ 16
6.2 The Browser Interface Main Page .................................................. 17
6.3 Browser Interface Tree Menu ......................................................... 19
6.4 Channel Page ................................................................................. 19
6.4.1 Channel Status .................................................................... 20
6.4.2 Channel Input ...................................................................... 21
6.4.2.1 Video Input Control ............................................... 21
6.4.2.2 Audio Input Control ............................................... 22
6.4.3 Channel Encoding ............................................................... 22
6.4.3.1 Encoding Control ................................................... 22
6.4.4 Channel Stream ................................................................... 23
6.4.5 Channel SAP Page .............................................................. 24
6.5 Device Page ................................................................................... 25
6.5.1 Device Status ....................................................................... 25
6.5.2 Device ID ............................................................................. 26
6.5.3 Device Network .................................................................... 27
6.6 Advanced Page .............................................................................. 28
6.6.1 Advanced Status .................................................................. 28
6.6.2 Advanced System ................................................................ 28
6.6.3 Advanced Events ................................................................. 28
6.6.4 Advanced Alarm .................................................................. 28
6.6.5 Advanced Stats .................................................................... 29
6.6.5.1 System Statistics ................................................... 29
6.6.5.2 Video Input Statistics ............................................. 29
6.6.5.3 Encoding Statistics ................................................ 29
6.7 Administration Page ....................................................................... 30
6.7.1 Administration Status ........................................................... 30
6.7.2 Administration Config ........................................................... 31
6.7.3 Administration Users ............................................................ 32
6.7.4 Administration FactDef ........................................................ 33
6.7.5 Administration Upgrade ....................................................... 33
Chapter 7 Troubleshooting ................................................................ 35
7.1 Checking the Firmware ................................................................... 35
7.2 Support ........................................................................................... 35
7.3 Factory Default Settings ................................................................. 35
iv

AVN422HD User’s Manual Contents
Chapter 8 Field Upgrade .................................................................... 37
8.1 Firmware Component Overview ..................................................... 37
8.2 Firmware Component Versions ...................................................... 37
8.2.1 Browser Interface: To Determine Both the Current and Latest
Version Information 37
8.2.2 Via the Internet: To Determine the Latest Available Firmware
Component Version 37
8.3 Updating Firmware Components .................................................... 38
8.3.1 General Firmware Component Update Procedure .............. 38
8.3.1.1 Browser Interface .................................................. 38
8.3.1.2 PackeTV® Configuration Utility ............................. 39
8.3.2 Custom Firmware Component Update Procedure ............... 39
8.3.2.1 Browser Interface .................................................. 39
8.3.2.2 PackeTV® Configuration Utility ............................. 39
Chapter 9 Unit Connections .............................................................. 40
9.1 Ethernet Connector ........................................................................ 40
9.2 Ethernet Serial Connector .............................................................. 40
9.3 HDMI Connector ............................................................................. 41
9.4 Audio Terminal Block Connector .................................................... 42
9.4.1 Pinouts ................................................................................. 42
9.4.2 Configuration ....................................................................... 42
Chapter 10 Technical Specifications ................................................ 43
Chapter 11 Safety and Compliance Information .............................. 44
Glossary of Terms ............................................................................... 45
v

Contents AVN422HD User’s Manual
vi

AVN422HD User’s Manual Chapter 1 Introduction
Chapter 1 Introduction
Visionary Solutions, Inc., introduces the high definition AVN422HD h.264 (AVC, MPEG-4 part 10)
over IP encoder “blade” (card) with the Media Processing Platform (MPP), a high density
rackmount system for video over IP transport. Plug an HDMI (DVI-D with optional adaptor cable)
video source directly into the blade, plug into the network via the RJ-45 connection, and stream
real time high definition quality video over your LAN or WAN. The MPP, with AVN422HD blades,
is suitable for all applications requiring cost effective, low bitrate video distribution over IP
networks. There are currently two MPP chassis options. The MPP1700 has the option of dual
redundant power supplies and holds up to 17 AVN422HD blades. The MPP200 has one power
source and holds up to two AVN422HD blades.
1.1 Features
• Stand-Alone Operation. The AVN422HD runs independently of any other server. To stream
and view live HD video, all that is needed is an AVN422HD encoder and any standardscompliant h.264 HD decoder (hardware or software). The AVN422HD is easy to access and
®
configure by any of three methods: PackeTV
Browser Interface, or the AVN Control Protocol (API). TCP/IP, HTTP, and other Internetrelated protocols are supported. The Console Interface can be used for network configuration
only (IP Address, Netmask, Gateway, and DNS), and not general device control.
Configuration Utility (not currently supported),
• The Media Processing Platform Chassis (MPP200 & MPP1700).
— The MPP200 is a high density 2-slot chassis (holds 2 AVN422HD blades) that houses
Visionary Solutions’ IPTV MPP blades, including the AVN422HD h.264 over IP encoder
blade, or any other dual slot blade or up to two single slot blades. The MPP200 is
designed to stand alone or be rack mounted with one side “ear.”
— The MPP1700 is a high density rack mount blade chassis for IPTV. It is scalable with
17 available blade slots, capable of holding up to 17 AVN422HD h.264 over IP encoder
blades, or any combination of single and dual slot blades adding up to or less than
17 slots. The MPP1700 features modular architecture and a dual redundant power
supply.
• Coming Soon for h.264! PackeTV
with the AVN422HD encoder enabling extensive control and configuration, as well as various
viewing options.
®
(Optional). PackeTV® software will work in conjunction
• Superior Audio/Video Quality. h.264 (MPEG-4 Part 10/AVC) hardware compression and
Visionary Solutions’ optimized transmission technology provides a high definition video full
frame rate IP video stream. The stream can be viewed by an unlimited number of clients on a
LAN or WAN provided that bandwidth is available. Refer to the table on the following page for
details on video and audio formats.
1
Chapter 1 Introduction AVN422HD User’s Manual
Video
Input Format Bitrate h.264
1080p @ 24 fps 6 Mbps to 20 Mbps High Profile Level 4.0
1080i @ 59.94/60 fps 6 Mbps to 20 Mbps High Profile Level 4.0
1080i @ 50 fps 6 Mbps to 20 Mbps High Profile Level 4.0
720p @ 59.94/60 fps 4 Mbps to 20 Mbps High Profile Level 4.0
720p @ 50 fps 4 Mbps to 20 Mbps High Profile Level 4.0
576i @ 50 fps 2 Mbps to 20 Mbps Main Profile Level 3.0
480i @ 59.94 fps 2 Mbps to 20 Mbps Main Profile Level 3.0
Audio
The audio compression is either Advanced Audio Codec (AAC) (128 to 512 kbps audio
encoding) or MPEG-1 Layer 2 (128 or 384 kbps audio encoding) with up to a 48 kHz sample
rate.
• Video Inputs. The AVN422HD includes one HDMI input (DVI-D with optional adaptor cable)
for connecting video and audio source equipment.
• Audio Inputs. The AVN422HD includes embedded HDMI audio as well as a terminal block
connector for Balanced and Unbalanced audio inputs. The terminal block connector allows
for easy on-site connections regardless of the cabling outputs of the audio source. The
AVN422HD features user control of audio parameters, including mute, pre-amp and volume.
See sections 1.2.1 AVN422HD Front Panel and 6.4.2.2 Audio Input Control for additional
information about audio inputs.
• Security. Administrators can create and modify accounts for authorized users, as well as
allow anonymous viewing.
1.2 Product Description
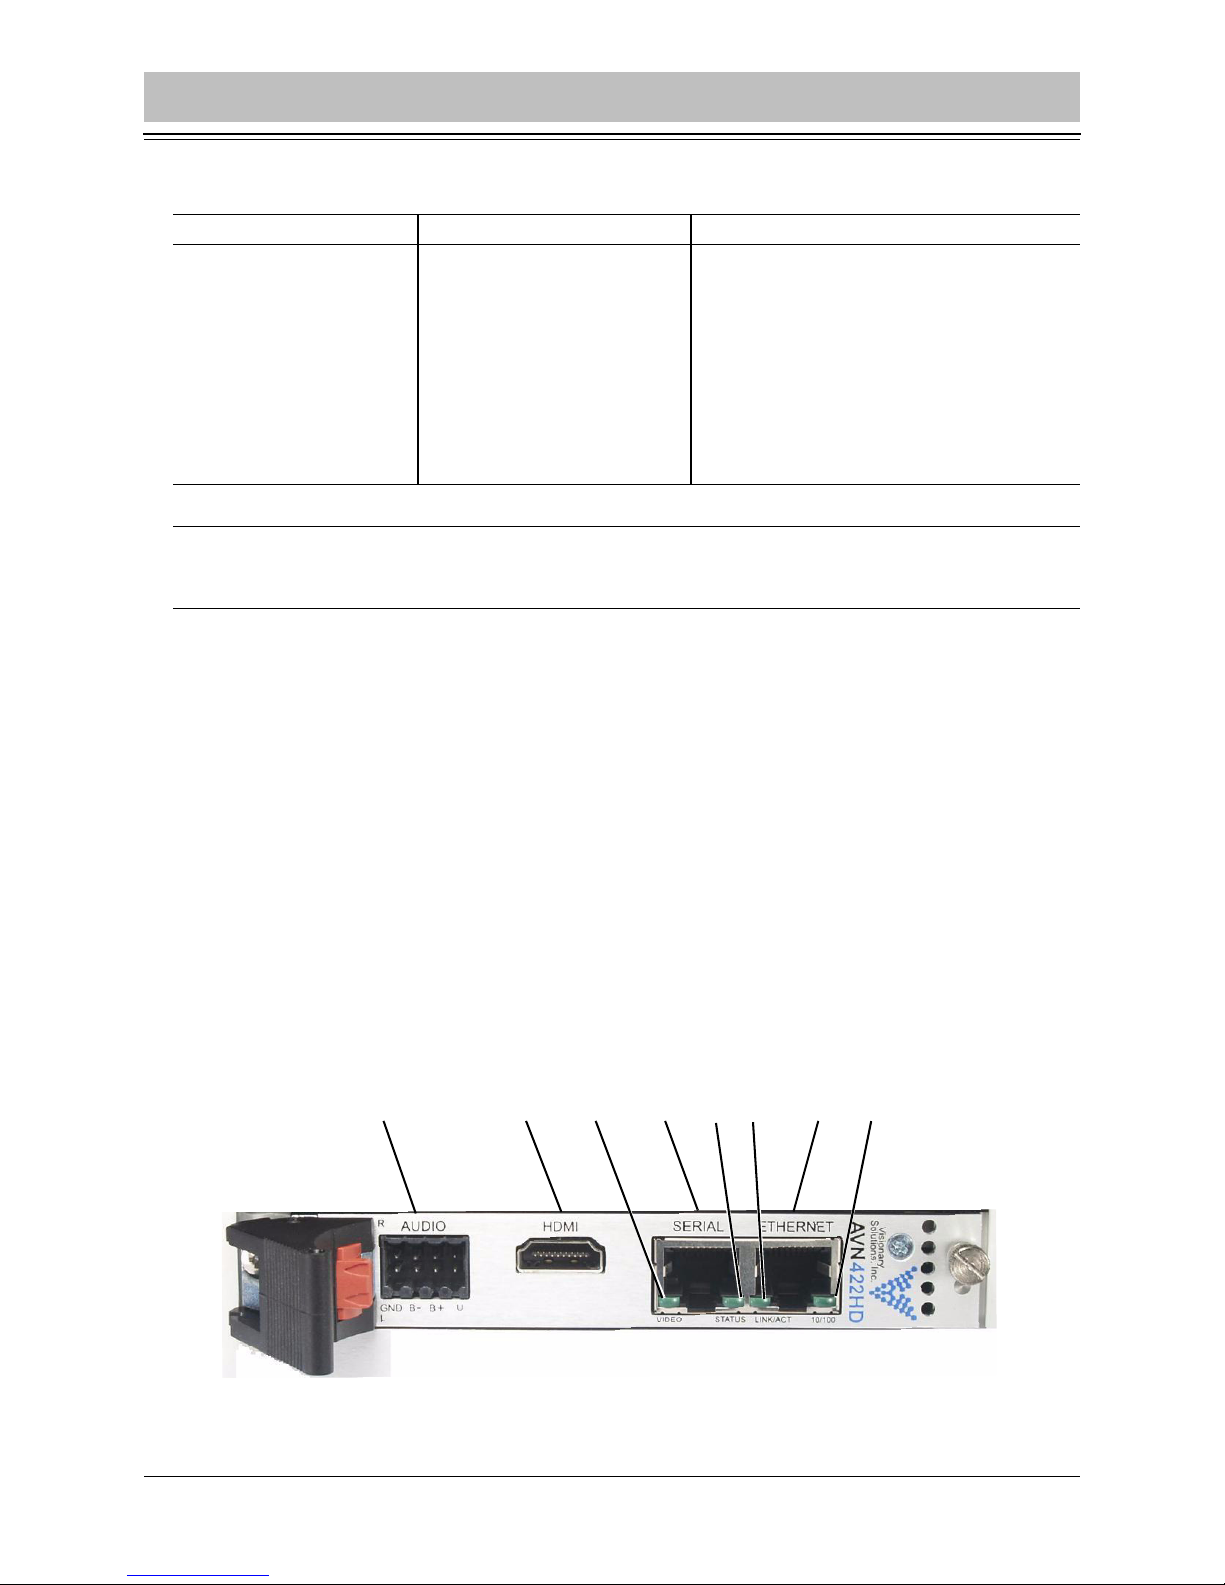
1.2.1 AVN422HD Front Panel
12 546783
2

AVN422HD User’s Manual Chapter 1 Introduction
1. Audio Connector – provides support for right/left, balanced and unbalanced audio. See
Chapter 9 Unit Connections for terminal block pinout information.
2. HDMI Connector – provides input for HDMI (DVI-D with optional adaptor cable) video
sources.
3. Video LED – indicates the state of the video input signal. It will illuminate solid green when a
valid video source is detected for the selected video input. It will blink at a speed of 4 times
per second when the unit is properly encoding video.
4. Serial Connector – an RJ-45 connector which allows RS-232C (full-duplex, no handshaking)
and RS-422 (full-duplex) communication. See Chapter 9 Unit Connections for pinout
information.
5. Status LED – blinks once every second when properly installed, powered, and operational.
6. Link/Act LED – indicates the status of the Ethernet link. It will illuminate solid green when a
10 or 100 Mbit Ethernet link is established. It will blink to indicate activity (Tx or Rx).
7. Ethernet Connector – an RJ-45 network connector, 10/100 Tx.
8. 10/100 LED – indicates the speed of the connection. It will illuminate green when the link is
100 Mbit, and will remain off for 10 Mbit connections.
1.2.2 Shipping Inventory
Your AVN422HD is shipped with the following:
• One AVN422HD
• One captive screw to use for installing the blade into the handle if desired
• One Wiedenmuler terminal block connector for audio connections
• One Quick Start Guide.
1.3 The MPP1700
The Media Processing Platform (MPP) 1700 is a high density, rack mount blade chassis used in
VSI IPTV applications.
Slots 1-17 on the chassis can be filled with any VSI blade product. Slots 18 and 20 can be filled
with power supplies. At least one of the power supply slots must be filled, and for dual redundant
power supply support, both power supply slots must be populated.
3
Chapter 1 Introduction AVN422HD User’s Manual
1.3.1 MPP1700 Front Panel Slots
Blade Slots
Power Supply
Slots
Refer to the MPP1700 User’s Manual for more information about the MPP1700.
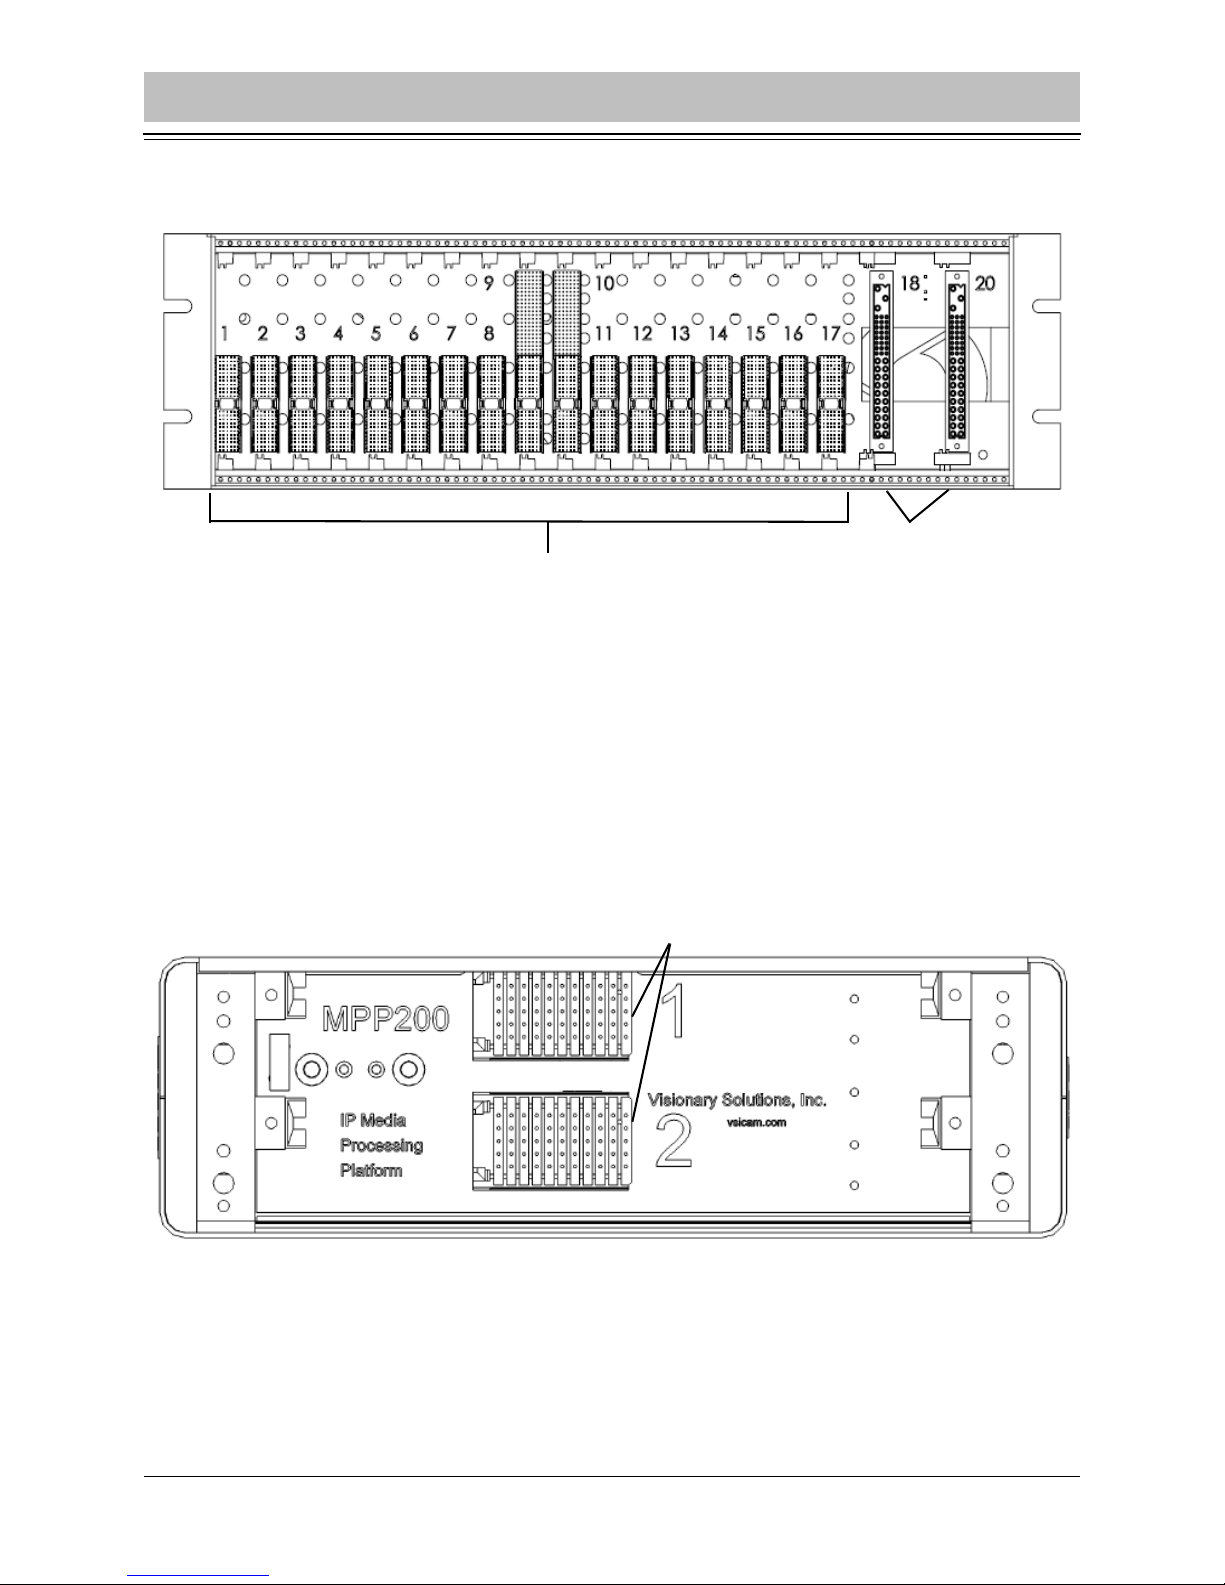
1.4 The MPP200
The Media Processing Platform (MPP) 200 is a high density, blade chassis used in VSI IPTV
applications. It can be rack mounted in a 1U space or used as a stand alone.
Slots 1 and 2 on the chassis can be filled with any VSI blade product.
1.4.1 MPP200 Front Panel Slots
Blade Slots
4

AVN422HD User’s Manual Chapter 1 Introduction
1.4.2 MPP200 Rear Panel
Refer to the MPP200 User’s Manual for more information about the MPP200.
5

Chapter 2 Installing the AVN422HD AVN422HD User’s Manual
Chapter 2 Installing the AVN422HD
2.1 Blade Installation and Removal
Note: It is important that the module be properly aligned with the slot guides before it is
inserted into the appropriate slot on the chassis. It is recommended that the user’s
line of sight be level with the middle of the backplane in order to see both slot
guides clearly.
Install a VSI blade into the chassis as follows:
Caution: Use proper ESD precautions when installing or removing a VSI blade to
avoid damaging the unit’s circuitry.
1. Slide the blade, open end first, into the desired slot on the chassis until it plugs into the
connector located on the backplane at the rear of the unit.
2. Use the bottom ejector handle to securely seat the blade into the chassis and to properly
mate the rear connectors. The handle should lock closed when properly inserted to secure
the unit.
3. Tighten the captive thumb screw located at the top of the blade to provide a more secure
mounting.
4. If desired, an additional Phillips screw can be installed through the handle.
5. The Status LED will blink once per second when the blade is properly installed, powered, and
operational.
To remove a VSI blade:
1. Loosen the mounting screw at the top of the blade.
2. If installed, loosen the additional Phillips screw in the ejector handle.
3. Press the red tab on the bottom of the ejector handle to unlock the blade.
4. Pull down on the handle and pull the blade out of its slot away from the chassis.
2.2 Minimum Connections Installation
The minimum connections to the AVN422HD should include an HD video source connected to
the HDMI (DVI-D with optional cable adaptor) video input, and an RJ-45 LAN connection to the
Ethernet connector.
6

AVN422HD User’s Manual Chapter 2 Installing the AVN422HD
To connect the AVN422HD:
1. Connect the cable from the desired HD video source (HDMI or DVI-D with optional adaptor
cable) to the HDMI connector.
2. Connect an Ethernet cable to the Ethernet RJ-45 connector. The other end of the Ethernet
cable should be connected to a switch or hub on your LAN network.
7

Chapter 3 Connecting to the Network AVN422HD User’s Manual
Chapter 3 Connecting to the Network
3.1 Unicast and Multicast Transmissions over the Network
A Unicast transmission sends IP packets to a single recipient on a network. A Multicast
transmission sends IP packets to a group of hosts on a network. If the streaming video is to be
distributed to a single destination, then you would start a Unicast stream by setting the
destination IP address and port on the AVN equal to the destination's values. If you want to view
the stream at multiple concurrent locations, then you would set the AVN's destination IP address
to a valid Multicast IP address (224.0.0.0 - 239.255.255.255).
Note that while the Multicast IP address range is from 224.0.0.0 - 239.255.255.255, the first octet
(224.xxx.xxx.xxx) is generally reserved for administration. VSI recommends setting the first octet
to 225 and the remaining three octets to the AVN's IP address. For example, if the AVN's IP
address is 192.168.1.53, then set the destination IP address to 225.168.1.53 for Multicast
streaming.
Since Multicasting is a relatively new technology, some legacy devices that are part of your
network might not support Multicasting.
Before using the AVN422HD in Multicast streaming mode, check the functional specifications of
your network infrastructure to ensure that the Multicast stream will not create major traffic on your
network. Verify that your backbone switch supports Internet Group Messaging Protocol (IGMP)
snooping, which allows the core of your network to ignore the traffic streams that Multicasting
may generate.
3.2 IGMP Querying and IGMP Snooping
IGMP is a session-layer (Layer 3) protocol used to establish membership in a Multicast group
and can register a router to receive specific Multicast traffic. (Refer to RFC 1112 and RFC 2236
for information on IGMP versions 1 and 2.)
Multicast aware switches are slowly making their way into the network cores for businesses and
universities that have heavy traffic to move through their networks. Multicast filtering is achieved
by dynamic group control management. By default, all Multicast traffic should be blocked until
requested by a Multicast group member. (Default behavior depends on switch manufacturer.)
The master of the IGMP filter lists is the router or switch that is configured to act as the IGMP
Querier. The responsibility of the Querier is to send out IGMP group membership queries on a
timed interval, to retrieve IGMP membership reports from active members, and to allow updating
of the group membership tables.
A Layer 2 switch supporting IGMP Snooping can passively snoop on IGMP Query, Report, and
Leave (IGMP version 2) packets transferred between IP Multicast routers/switches and IP
Multicast hosts to determine the IP Multicast group membership. IGMP snooping checks IGMP
packets passing through the network, picks out the group registration, and configures
Multicasting accordingly.
8

AVN422HD User’s Manual Chapter 3 Connecting to the Network
Without IGMP Querying/Snooping, Multicast traffic is treated in the same manner as a Broadcast
transmission, which forwards packets to all ports on the network. With IGMP Querying/Snooping,
Multicast traffic is only forwarded to ports that are members of that Multicast group. IGMP
Snooping generates no additional network traffic, which significantly reduces the Multicast traffic
passing through your switch.
If your network distribution core does not support IGMP Querying/Snooping, the AVN streams
will still function as designed but your network may be subjected to high traffic loads and
condensed collision domain due to the broadcasting action used by the older switch or hub. If this
is the case, you may wish to isolate the streaming nodes within the network so that the streams
may be viewed without crossing the normal network traffic along its path.
Otherwise, for a general performance improvement, you may consider upgrading your network
core to a switch that is Multicast aware.
3.3 DHCP IP Configuration
The AVN422HD has Dynamic Host Configuration Protocol (DHCP) enabled as the factory
default. If your network has a DHCP server on it, the AVN422HD will automatically acquire an IP
address. If the AVN422HD is not able to find a DHCP server, it will default to the IP Address,
Subnet Mask and Gateway that are configured into the unit. The factory default IP address is
192.168.1.253.
To disable or enable DHCP on the AVN422HD, use either the Console Interface (refer to section
) or the Browser Interface (refer to section 6.5.3 Device Network).
To assign a static IP address for the AVN422HD, refer to the following section.
3.4 Static IP Configuration
If the AVN422HD is not able to find a DHCP server, it will default to the IP Address, Subnet Mask
and Gateway that are configured into the unit. The factory default is 192.168.1.253.
It is strongly recommended that the AVN422HD be statically configured to a specific IP address.
This enables the AVN422HD to be consistently found at the same address. Prior to statically
configuring the AVN422HD, check with your IT department and/or make sure the IP address to
be assigned is not in use by any other device on the LAN.
To assign a static IP address to the AVN422HD, follow these steps:
1. Power on the AVN422HD blade and connect the console (light blue) and the network cables.
2. Run a terminal emulation program such as HyperTerminal or Minicom to communicate via
console (refer to section 5.1 Connecting With a HyperTerminal Session). Use the following
communication parameters: Bits per second (38400), Data bits (8), Parity (None), Stop bits
(1), Flow Control (None).
3. Press Enter to get the login prompt.
9

Chapter 3 Connecting to the Network AVN422HD User’s Manual
4. Log in to the unit with the valid username/password (by default admin/admin).
5. An unconfigured unit automatically starts the Network Configuration Wizard, and will prompt
the user to enter an IP Address, Netmask, Gateway, and DNS Server.
6. Once the values have been entered, the AVN422HD should reboot and be accessible at its
newly assigned address. Type the unit’s IP address into a browser (http://xxx.xxx.xxx.xxx) to
bring up the AVN422HD’s Browser Interface (refer to Chapter 6 Using the Browser Interface).
7. For previously configured units, press “n” and then Enter from the Console Interface to
unlock the display and start the Network Configuration Wizard (see step 5 above).
8. Units can be reconfigured at any time using the Console Interface as described in the
previous step.
10

AVN422HD User’s Manual Chapter 4 Operating the AVN422HD
Chapter 4 Operating the AVN422HD
The AVN422HD has three control interfaces that you can use to operate and configure the AVN
units:
• PackeTV
a Windows-based PC.
®
Configuration Utility (not currently supported) – GUI-based programs installed on
• Browser Interface – uses a browser interface.
• AVN Control Protocol Application Programming Interface (AVNCP API) – available upon
request from Visionary Solutions, Inc.
The AVN’s Console Interface may only be used to configure the unit’s network settings (IP
Address, Netmask, Gateway and DNS). This interface does NOT support general device control.
4.1 PackeTV® Configuration Utility
This section is under development.
4.2 AVN422HD Console Interface
For information on using the AVN422HD Console Interface, refer to Chapter 5 Using the Console
Interface.
4.3 AVN422HD Browser Interface
The AVN422HD must be on a network in order to connect to its Browser Interface. Once
connected:
1. Type the following URL (http://xxx.xxx.xxx.xxx) into your browser, where the
xxx.xxx.xxx.xxx corresponds to the AVN422HD’s IP address.
2. Click Enter/Go. The AVN422HD’s Web Management Login Page will display.
3. Enter the Username and Password of the AVN422HD and click the Login button. The
AVN422HD’s Browser Interface pages will display.
Refer to Chapter 6 Using the Browser Interface for information about the Browser Interface
pages and their functionality.
4.4 AVN Control Protocol (API)
For programmers who wish to integrate AVN control functionality into their own applications, the
AVN Control Protocol (API) offers all the "hooks" needed. Contact avntech@vsicam.com for
AVN422HD API documentation. Available to prequalified customers only.
11

Chapter 5 Using the Console Interface AVN422HD User’s Manual
Chapter 5 Using the Console Interface
In order to use the AVN422HD's Console Interface, you must use a terminal emulation program
such as HyperTerminal for Windows based PCs or Minicom for Linux based PCs. The following
section describes how to connect to the AVN422HD using HyperTerminal.
5.1 Connecting With a HyperTerminal Session
To access the AVN422HD’s Console Interface, establish a HyperTerminal session.
Note: If you do not have HyperTerminal installed, go to the Windows Control Panel >
Add or Remove Programs > Add/Remove Windows Components, and install it
from there.
1. Connect the light blue serial cable (provided with Media Processing Platform chassis
MPP1700 and MPP200) to the serial port on the AVN422HD and to a serial COMM port on
your PC (typically the COM1 port).
Note: The AVN422HD uses a light blue RJ-45 to DB9-F serial cable.
2. On your PC, go to the Windows Start button, select Programs > Accessories >
Communications > HyperTerminal.
12

AVN422HD User’s Manual Chapter 5 Using the Console Interface
3. The program will prompt you to describe your connection the first time you connect. Enter a
name for the connection. You can also select an icon to create a short cut on your desktop
and save these settings for when you launch HyperTerminal at a future time.
4. Specify the port that you are connected to on your PC (typically COM1 or COM2).
13

Chapter 5 Using the Console Interface AVN422HD User’s Manual
5. Configure the Port Settings as below in order to communicate with the AVN422HD.
6. Once you have finished entering the configuration changes, click OK. The screen should go
blank.
7. Power on your AVN422HD. After some initial boot-up text, the login prompt will display.
Alternatively, if the AVN422HD is already powered up, press Enter to bring up the login
prompt.
8. Enter the Username and Password (admin, admin by default) of the unit. After valid
authentication, the Console Interface will display on your monitor (see 5.2 Console Interface).
5.2 Console Interface
Note: The Console Interface can only be used for device network configuration and
cannot be used for general device control. For general device control, please use
one of the other interfaces (Browser, PackeTV®, or API).
The AVN422HD Console Interface may be used to configure the unit’s network settings.
14

AVN422HD User’s Manual Chapter 5 Using the Console Interface
5.2.1 Network Configuration
An AVN422HD is considered to be either configured or unconfigured depending upon previous
actions.
— An unconfigured unit does not have any network configuration settings. When the
Console Interface is opened for the first time, the Network Configuration Wizard
automatically appears and prompts the user to enter four pieces of information: the IP
Address, Netmask, Gateway and DNS Server values.
— A configured unit is one where the network configuration settings have been entered
and saved. When the Console Interface is opened on a configured unit, it will display the
basic network information about the unit and that it is in a “Locked” state. To change any
of the current values, the user will need to unlock the Console Interface and activate the
Network Connection Wizard. Doing this will automatically resets the network
configuration settings back to the unconfigured state.
If any typing errors occur during the configuration steps, just press the Enter key and re-enter the
desired values.
5.2.2 Using the Network Configuration Wizard
1. Open the Console Interface.
a. If configuring an unconfigured unit, the Network Configuration Wizard appears; or
b. Press n (lower case “n”) followed by the Enter key to unlock the display and open the
Network Configuration Wizard.
2. Please Enter Unit IP Address:
a. To configure the unit statically (recommended), enter the AVN’s new IP address and
press Enter.
b. To enable DHCP on the unit, enter 0.0.0.0 and press Enter.
3. Please Enter Unit Netmask: Enter the AVN’s new Netmask address, commonly
255.255.255.0, and press Enter.
4. Please Enter Unit Gateway: Enter the AVN’s new Gateway address. This value is critical for
updating firmware as it enables the AVN to find the Internet and download updates as
needed.
5. Please Enter DNS Server: Enter the AVN’s new DNS Server address, commonly 4.2.2.1,
and press Enter.
To restart the entire configuration, press n (lower case “n”) followed by the Enter key.
15

Chapter 6 Using the Browser Interface AVN422HD User’s Manual
Chapter 6 Using the Browser Interface
Note: The screen captures in this chapter may differ slightly than the menus on your
AVN. If you have any questions, please contact VSI technical support.
6.1 The Web Management Login Page
The login page allows authorized users to login to the AVN422HD's Browser Interface pages
using their Username and Password. The default Username and Password are admin/admin.
The AVN422HD must be on a network in order to connect to its Browser Interface. Once
connected:
1. Type the following URL (http://xxx.xxx.xxx.xxx) into your browser, where the
xxx.xxx.xxx.xxx corresponds to the AVN422HD’s IP address.
2. Click Enter/Go. The AVN422HD’s Web Management Login Page will display.
16

AVN422HD User’s Manual Chapter 6 Using the Browser Interface
3. Click Manage Device to open the web server authentication prompt.
4. Enter the Username and Password of the AVN422HD and click the OK button. The
AVN422HD’s Browser Interface menu will display.
6.2 The Browser Interface Main Page
Once you log in to AVN422HD using your browser (refer to the previous section), you will be
directed to the Browser Interface main page.
Navigation Panel
Main Section Buttons
Common Buttons Drop Down Box
Information Icons
Options
17

Chapter 6 Using the Browser Interface AVN422HD User’s Manual
The Main Section Buttons provide quick access to the four main sections for the AVN’s Browser
Interface. These sections always display across the top of the page: Channel, Device, Advanced,
and Administration. Refer to the sections that follow for a description of each of these sections
and their sub-pages.
Each main section provides access to a number of Sub-pages, which are listed along the left
hand side of each page. As each sub-page is selected, the main viewing area will change and
offer additional page options.
Note: The following buttons may display on several of the pages, but will only apply to
the settings on the page where they appear. Setting changes on other pages will
need to be saved separately.
Update – The Update button changes the device's settings to those currently displayed on the
page. Only settings displayed on the page are updated. Updated settings are not
device’s memory and will be lost after a reboot.
Save – The Save button both updates the current page's settings to the device and saves them
to memory. Saved settings are persistent and will be used after a reboot.
saved to the
Default – The Default button changes and updates the device's settings to their default values.
Only the settings displayed on the current page are updated to default values. For example if the
current page is Channel Encoding, only the encoding settings will be returned to their default
values (Video Bitrate, Video Size, etc.). Default values are updated but not saved. If the default
settings are to be saved after a reboot, you will need to click the Save button after clicking the
Default button.
– The question mark button next to many settings opens a context sensitive help file with
details about the setting.
The available values for each feature display in the Drop Down Box for that parameter.
18

AVN422HD User’s Manual Chapter 6 Using the Browser Interface
6.3 Browser Interface Tree Menu
The following table provides a menu tree overview of the Browser Interface’s main sections and
their sub-sections.
Browser Interface Menu Tree
Channel Page > Status > Start/Stop
View
Input > Update
Save
Default
Encoding > Update
Save
Default
Stream > Update
SAP > Update
Device Page > Status
ID > Update
Network > Update
Advanced Page > Status
System – Under Development
Events – Displays the unit’s event log.
Alarms – Under Development
Stats – Displays the current System and Video
Input statistics.
Administration Page > Status
Config – Displays the unit’s settings
Users > Add User
FactDef (Factory Default)
Upgrade
Save
Default
Save
Default
Save
Default
Save
Default
Sync Time
Save User Config
Reset Default User Config
Edit User
Delete User
6.4 Channel Page
The Channel page allows users to view and configure most of the device's channel/stream
settings, including inputs, encoding, and destination parameters.
19

Chapter 6 Using the Browser Interface AVN422HD User’s Manual
6.4.1 Channel Status
The Channel Status page displays the current status (Streaming or Not Streaming) and allows
the user to Start and Stop the channel. The main viewing area provides a general overview of the
AVN422HD's major channel settings including: Audio and Video Inputs, Encoding Settings, and
Stream Control. Settings cannot be changed from this page, except for starting and stopping the
channel.
20

AVN422HD User’s Manual Chapter 6 Using the Browser Interface
6.4.2 Channel Input
The Channel Input page allows the configuration of both the audio and video inputs.
6.4.2.1 Video Input Control
Source – Displays the current Video Source, HDMI. Note that DVI-D can be used as a video
source with an adaptor cable.
Format – Displays the current Video Format and allows the editing of this parameter. If Auto is
selected, the AVN detects the input video format and the Video Format is automatically adjusted
for proper encoding.
Status – Displays the Video Format status detected on the selected input.
Brightness – Displays the current Video Brightness and allows the editing of this parameter.
Possible values range from –128 to 127.
Contrast – Displays the current Video Contrast and allows the editing of this parameter. Possible
values range from 0 to 255.
Saturation – Displays the current Video Saturation and allows the editing of this parameter.
Possible values range from 0 to 255.
Hue – Displays the current Video Hue and allows the editing of this parameter. Possible values
range from –128 to 127.
21

Chapter 6 Using the Browser Interface AVN422HD User’s Manual
6.4.2.2 Audio Input Control
Source – Displays the current Audio Source and allows the editing of this parameter. Possible
values are Balanced or Unbalanced.
Mute – Displays the current Audio Mute and allows the editing of this parameter. Possible values
are Muted or Not Muted.
Pre-Amp – Displays the current Audio Pre-Amp and allows the editing of this parameter.
Possible values range from 0 to 24 dB.
Volume – Displays the current Audio Volume and allows the editing of this parameter. Possible
values range from –64 to 24 dB.
6.4.3 Channel Encoding
The Channel Encoding page allows the configuration of the encoding settings.
6.4.3.1 Encoding Control
Tota l Bitrate – Displays the Total Bitrate (audio and video bitrates combined), and allows the
editing of this parameter. Possible values vary depending upon the Video Input Format and
selected Audio Bitrate.
Video Bitrate – Displays the current Video Bitrate. This value cannot be modified directly but is
based upon the Total Bitrate and selected Audio Bitrate values.
Audio Bitrate – Displays the current Audio Bitrate and allows the editing of this parameter.
Possible value ranges are dependent upon audio format (MPEG or AAC)
Audio Format – Displays the current Audio Format and allows the editing of this parameter.
Possible values are: AAC or MPG (MPEG-1 Layer 2). The AAC Audio Format is currently under
development and has been disabled as a selection.
22

AVN422HD User’s Manual Chapter 6 Using the Browser Interface
6.4.4 Channel Stream
The Channel Stream page allows the configuration of the Stream Output Control.
Stream Mode – Displays the current Stream Mode and allows the editing of this parameter.
Possible values are:
Transport Stream UDP (13818-1 MPEG-2 TS) *Default
Transport Stream RTP (13818-1 MPEG-2 TS) + RTP encapsulation
Stream Destination – Displays the current Stream Destination and allows the editing of this
parameter. The format of this parameter is the destination IP address, colon ":" and then the
destination port number (xxx.xxx.xxx.xxx:xxx).
Stream at Bootup – Displays the current Stream at Bootup time in seconds and allows editing of
this parameter. Possible values are: 0 to 90 seconds. Note that a value of 0 means Stream at
Bootup will be disabled (the AVN422HD will not automatically start streaming upon boot up).
Stream Kicker – This parameter controls if and when a running / playing stream gets
automatically restarted (stopped then started). If set to 0, the stream will not be automatically
restarted but will continue to play until stopped by the user. If set to a value greater than zero, the
stream will be automatically restarted every X minutes where X equals the configured number.
The default value is 0 / disabled.
Stream TTL – This parameter controls the streams Time-To-Live (TTL), which is effectively the
number of network "hops" that the stream will cross before "dying." For Unicast streams, TTL
values are defined as network segments, which are effectively routers/switches. For Multicast
streams, the TTL value is more loosely defined as "scope" which is network dependent and not
always directly associated with network segments. The default value is 8.
Stream QOS– This parameter controls the stream Quality of Service (QOS) through a network.
Parameters P0 through P2 are precedence bits (0 to 7, 0 is highest). D is a low delay request bit.
23

Chapter 6 Using the Browser Interface AVN422HD User’s Manual
T is a high throughput request bit. R is a high reliability request bit. Any other scheme utilizing the
setting of the upper 6 bits of the Type of Service (TOS) byte in the IP header may also be used.
AUX1 Destination – Displays the destination IP address and port for Auxiliary Stream 1 and
allows the value to be changed.
AUX2 Destination – Displays the destination IP address and port for Auxiliary Stream 2 and
allows the value to be changed.
6.4.5 Channel SAP Page
The Channel Session Announcement Protocol (SAP) page allows the SAP settings to be
configured.
SAP Enabled – Displays the current SAP Enabled status and allows the editing of this
parameter. When SAP is enabled (Yes), SAP announcements are broadcast over the network at
the SAP announce frequency. When SAP is disabled (No), no SAP announcements are
broadcast over the network.
SAP Announce Frequency – Displays the current SAP Announce Frequency and allows the
editing of this parameter. The SAP Announce Frequency determines how often (in seconds) the
SAP announcement is broadcast. The default value is 30 seconds.
SAP Scope – Displays the current SAP Scope and allows the editing of this parameter. SAP
Scope determines how "far" the SAP broadcast will go on the network. Scope, as pertains to
SAP, is loosely defined. It is network dependent and not always directly associated with network
segments. The default value is 32.
SAP Session Name – Displays the current SAP Session Name and allows the editing of this
parameter. SAP session's name is often used or displayed in SAP aware applications.
24

AVN422HD User’s Manual Chapter 6 Using the Browser Interface
SAP Session Info – Displays the current SAP Session Info and allows the editing of this
parameter. SAP session's info is often used or displayed in SAP aware applications.
SAP Session Author – Displays the current SAP Session Author and allows the editing of this
parameter. SAP session's author is often used or displayed in SAP aware applications.
SAP Session Copyright – Displays the current SAP Session Copyright and allows the editing of
this parameter. SAP session's copyright is often used or displayed in SAP aware applications.
SAP Session Keywords – Displays the current SAP Session Keywords and allows the editing of
this parameter. SAP session's keywords can be used by SAP aware applications.
SAP Session Extra Data – Displays the current SAP Session Extra Data and allows the editing
of this parameter. SAP session's extra data can be used by SAP aware applications.
6.5 Device Page
The Device page allows for the viewing and configuration of all the device's settings, including
device descriptors (name, location, comments), network information.
6.5.1 Device Status
The Device Status page Displays the current settings of the device. No settings can be changed
from this page.
ID Settings – Displays the current ID settings (Product Code, Serial Number, Name, Location).
Network Settings – Displays the current network settings (IP Address, Netmask, Gateway,
DNS, Use DHCP).
25

Chapter 6 Using the Browser Interface AVN422HD User’s Manual
6.5.2 Device ID
The Device ID page allows the configuration of the ID settings.
Product Code – read only and cannot be changed.
Serial Number – read only and cannot be changed.
FW Version – Firmware Version is read only and cannot be changed.
Slot ID – read only and cannot be changed. The Slot ID corresponds to the slot number of the
chassis the blade currently occupies.
Device Name – an editable character string used to help ID the device. The device name can be
up to 64 characters long.
Device Location – an editable character string used to help describe the location of the device.
The device location can be up to 64 characters long.
Device Comments – an editable character string used for general comments regarding the
device. Comments can be up to 256 characters long.
26

AVN422HD User’s Manual Chapter 6 Using the Browser Interface
6.5.3 Device Network
The Device Network page allows the configuration of the device network settings.
IP Address – Displays the IP address of the device and allows its configuration.
Subnet Mask – Displays the subnet mask of the device and allows its configuration.
Gateway – Displays the gateway of the device and allows its configuration.
DNS Server – Displays the DNS server of the device and allows its configuration.
Time Server – Displays the IP address of a time server and allows its configuration.
Time Offset – Displays the number of time zones ahead of Greenwich Mean Time (GMT). For
Pacific Standard Time (PST), the time offset is either 7 or 8 depending upon daylight savings.
DHCP Enabled – Options are Yes or No.
DHCP Valid – Displays whether a valid DHCP server is detected on the device’s network
segment. Options are Yes or No.
Sync Time button – Synchronizes the encoder’s time with the time of the specified Time Server.
27

Chapter 6 Using the Browser Interface AVN422HD User’s Manual
6.6 Advanced Page
The Advanced page allows for the viewing and configuration of all the settings which do not fit
nicely into the Channel and Device groups. These settings include Status, System, Events,
Alarms, and Stats.
6.6.1 Advanced Status
This feature is partially implemented.
6.6.2 Advanced System
Not currently implemented.
6.6.3 Advanced Events
Displays internal events log.
6.6.4 Advanced Alarm
Not currently implemented.
28

AVN422HD User’s Manual Chapter 6 Using the Browser Interface
6.6.5 Advanced Stats
Displays System, Video Input, and Encoding Statistics since the last power cycle, reboot, or
Factory Default reset.
The Clear button sets all the stats back to "zero" or appropriate values.
6.6.5.1 System Statistics
System Uptime – Displays the amount of time the encoder (system) has been powered on.
Video Uptime – Displays the amount of time the encoder has detected “good” video.
Streaming Uptime – Displays the amount of time the encoder has been streaming.
System Temperature – Displays the current encoder (system) temperature.
Lowest Temperature – Displays the lowest registered temperature.
Highest Temperature – Displays the highest registered temperature.
6.6.5.2 Video Input Statistics
Sync Loss – Displays the number of times “No Video” is reported while streaming.
Stream Restarts – Displays the number of times a stream had to be stopped and restarted
because of a video input error.
6.6.5.3 Encoding Statistics
Video Errors – Displays the number of video errors detected by the encoder.
Audio Errors – Displays the number of audio errors detected by the encoder.
Muxing Errors – Displays the number of multiplexing (muxing) errors detected by the encoder.
29

Chapter 6 Using the Browser Interface AVN422HD User’s Manual
Fifo Overflow – Displays the number of Fifo Overflows detected by the encoder.
Encoder Restarts – Displays the number of times the encoder has had to restart because of a
detected encoder error.
Stream Restarts – Not currently used.
6.7 Administration Page
The Administration page provides status for viewing and the configuration of all administration
related settings, including Config, Users, Factory Default and Upgrade.
6.7.1 Administration Status
The Administration Status page is partially implemented.
30

AVN422HD User’s Manual Chapter 6 Using the Browser Interface
6.7.2 Administration Config
The Administration Config (Configuration Data) page displays an overview of all the encoder's
configured settings. This page is read only.
31

Chapter 6 Using the Browser Interface AVN422HD User’s Manual
6.7.3 Administration Users
The Administration Users page displays all of the authorized users, along with their respective
passwords and user levels. Use this page to add, modify, delete, save and restore user settings.
Note: The illustration above shows a System Users page with the Default Admin User,
along with two added users with Channel and Start/Stop user level authorization
respectively.
Edit User – Click to change the Password and Level fields. Once clicked, the Edit User button
changes to Update User. After entering changes, make sure to click the Update User button to
save the changes for the user before clicking the Save User Config button to make the changes
persistent.
Note: The Default Admin User cannot be deleted or have its Username or User Level
modified. Only the Password may be changed.
Delete User – Deletes the user. Make sure to click the Save User Config button after deletion to
make the change persistent.
Add User – Displays the Add User page which allows for the creation and addition of a new
user. Enter the Username, Password and Level fields as desired and click the Add User To
Database button. Make sure to click the Save User Config button after creating the user to
make the changes persistent.
Save User Config – Saves all of the user page changes to flash memory so that they will be
persistent.
Reset Default User Config – Removes any added users and returns the Default Admin User to
its default username and password values (admin/admin). Make sure to click the Save User
Config button after reset to make the changes persistent.
32

AVN422HD User’s Manual Chapter 6 Using the Browser Interface
About User Levels:
There are four possible authorization levels which can be assigned to a given user.
Admin – The Admin user level has full administrative authorization and can modify all device
parameters, including other users. Note that you can only change the default admin user's
password, and not the Username or Level, and the default admin user cannot be deleted. Other
admin users can be created with different Usernames, but the Default Admin User will always
exist in the list.
Channel – The Channel user has the ability to configure, update and save any setting in the
Channel pages, including Input, Encoding, Stream, and SAP, as well as the ability to view the
Advanced pages, Events and Stats. All other browser pages (Device and Administration) are
disabled.
Start/Stop – The Start/Stop user only has the ability to start and stop the device's stream
(including any auxiliary streams). They can also view all the settings on the Channel and
Advanced pages, but cannot configure, update, or save them.
Invalid – The Invalid user cannot log in to the device. This user level can be assigned to disable
a previously saved user, if deleting the user is not desirable.
6.7.4 Administration FactDef
Clicking the FactDef button causes the AVN422HD to reset all of its settings to Factory Default
values, including network settings.
6.7.5 Administration Upgrade
The Administration Upgrade page displays all of the current firmware "image/component"
versions and allows each firmware component to be upgraded independently (refer to Chapter 8
Field Upgrade).
Note: In order to upgrade firmware components, the AVN422HD must have a valid
Gateway IP address configured and be on a network that has access to the
Internet.
The AVN422HD has four firmware components:
1. Root File System
2. Linux Kernel
3. U-Boot Boot Loader (Boot Loader)
4. Configuration Partition (not currently implemented).
Each firmware component must be updated independently, but not all components will always
need to be updated. The Root File System is the most likely to change, and therefore the most
likely to require updating. If two or more image/components need to be updated, the updates
33

Chapter 6 Using the Browser Interface AVN422HD User’s Manual
must be performed in the order specified above (1. Root File System, 2. Linux Kernel, 3. Boot
Loader, and 4. Configuration Partition).
Warning: Failure to upgrade the firmware components in the proper order can
cause the AVN422HD to become non-operational and require that it
be reprogrammed by VSI at customer’s expense.
However, only out-of-date components need to be updated. For example, if both the Root File
System and the Boot Loader components are out-of-date, update the Root File System
component first and the Boot Loader second. The Linux Kernel, which is not out-of-date in this
example, would not need to be updated. If it did, update it after the Root File System and before
the Boot Loader.
Component – Displays the current firmware component name.
Installed Version – Displays the current firmware component version information.
Latest Available Version – Displays the most current firmware component version available.
Note: The Latest Available Version column and Upgrade Latest buttons are only
enabled if the encoder blade is properly configured for a given network (valid
Gateway and DNS) and has the ability to request data (firmware components)
from the public Internet.
Actions:
Upgrade Latest – This button causes the corresponding component to be upgraded to the latest
version. After each upgrade, the AVN422HD automatically reboots.
Upgrade Custom Image – This button is for advanced users only and requires specific
component files in order to work properly. **IMPORTANT** Improper use of this option can
seriously impair the functionality of the AVN422HD, requiring it to be returned to VSI for
repair at the customer’s expense.
34

AVN422HD User’s Manual Chapter 7 Troubleshooting
Chapter 7 Troubleshooting
This section provides useful information to help you to resolve any difficulty you might have with
your AVN422HD.
7.1 Checking the Firmware
It is important to know the version of the AVN422HD firmware in order to troubleshoot the unit. To
find the firmware version of your AVN422HD, select one of the following methods:
1. From the PackeTV
2. From the AVN422HD Browser Interface pages, navigate to the Device ID page (refer to
section 6.5.2 Device ID), and the firmware version is shown.
®
Configuration Utility, this functionality is not currently implemented.
7.2 Support
Should you require any technical assistance, please contact your VSI reseller. If your questions
cannot be answered immediately, your reseller will forward your queries through the appropriate
channels to ensure a rapid response.
If you are connected to the Internet, you can:
• Download user documentation. Go to www.vsicam.com/index.php?p=iptv_documentation.
• Find answers to resolved problems in the FAQ database. Search by product, category, or
phrases. Go to www.vsicam.com/index.php?p=faq
• Report problems to VSI support staff by sending an email to: avntech@vsicam.com.
• Visit the Customer Support section of the VSI web site at www.vsicam.com.
.
7.3 Factory Default Settings
This procedure provides a way to reset the AVN422HD configurations back to the factory default
settings, which may be necessary or desirable in certain circumstances.
If restoring the Factory Default, it is recommended that it be performed through the Browser
Interface as described in section 6.7.4 Administration FactDef.The unit will reboot to its Factory
Default settings. Note that a Factory Reset causes all of the settings, including the network
settings, to be reset to Factory Default values. Performing a Factory Default reset will restore the
DHCP settings to DHCP-On, causing the unit to acquire a new IP address. If there is no DHCP
server available on the network segment, the AVN422HD will automatically reset to default IP
address 192.168.1.253.
35

Chapter 7 Troubleshooting AVN422HD User’s Manual
However, if necessary (possibly due to lack of ability to communicate with the unit due to
misconfiguration), a hardware reset procedure is provided below.
To return the AVN422HD to the Factory Default settings:
1. Remove the AVN422HD blade from the chassis (see 2.1 Blade Installation and Removal).
2. Locate the Factory Default DIP switch near the top center of the AVN422HD blade's PCB.
3. If present, remove the plastic cover from the DIP switch.
4. Set the left DIP switch into the Factory Default position as labeled on the unit.
Warning: Do not change the position of the other dip switch.
5. With the chassis powered on, insert the AVN422HD blade back into the chassis.
Warning: Do not remove the blade or turn off power to the unit until the default
is complete as described below.
6. Observe the Status and Video LEDs on the front of the unit.
7. Wait for these lights to be "solid" on (no blinking); this indicates that the default reset is
complete.
8. Remove the blade from the chassis to return the DIP switch to the Normal Operation setting,
then re-install the blade.
36

AVN422HD User’s Manual Chapter 8 Field Upgrade
Chapter 8 Field Upgrade
8.1 Firmware Component Overview
The AVN422HD h.264 encoder blade is built on top of an embedded Linux software platform.
The Overall functionality of the system software is best looked at in four distinct pieces.
1. Root File System. The Root File System contains all of the necessary scripts and libraries
for Linux, as well as all of the additional value added software for user interfaces, encoding
and streaming control, and everything else that runs outside of the context of the Linux
Kernel.
2. Linux Kernel. The Linux Kernel is the core of the running system after control is handed over
by the Boot Loader. The Linux Kernel is responsible for virtualizing access to the underlying
hardware and controlling all of the running processes in the system.
3. U-Boot Boot Loader. The U-Boot Boot Loader (Boot Loader) is responsible for early system
initialization and configuration. It allows for updating and system configuration, but is locked
down to prevent system level accidents.
4. Configuration Partition. Not currently implemented.
8.2 Firmware Component Versions
In order to determine if a firmware upgrade is required, you will need two pieces of information:
namely what is currently installed and what is available. This is most easily done through the
Browser Interface as you can view both the current versions and the latest versions that are
available.
8.2.1 Browser Interface: To Determine Both the Current and Latest Version
Information
1. Open the Browser Interface.
2. Navigate to the Administration Upgrade page (refer to section 6.7 Administration Page).
This will display both the Current Version and Latest Version component information.
8.2.2 Via the Internet: To Determine the Latest Available Firmware Component
Version
1. Open a browser.
2. Go to http://www.vsicam.com/files/AVN4XX/LATEST/versions_HD.txtto view the latest
released firmware component versions (images) and their release dates.
37

Chapter 8 Field Upgrade AVN422HD User’s Manual
8.3 Updating Firmware Components
Each firmware component must be updated independently, but not all components will always
need to be updated. The Root File System is the most likely to change, and therefore the most
likely to require updating. If two or more image/components need to be updated, the updates
must be performed in the following order:
— Root File System
— Linux Kernel
— Boot Loader, and
— Configuration Partition (not currently implemented).
Warning: Failure to upgrade the firmware components in the proper order can
cause the AVN422HD to become non-operational and require that it
be reprogrammed by VSI at customer’s expense.
However, only out-of-date components need to be updated. For example, if both the Root File
System and the Boot Loader components are out-of-date, you would update the Root File
System component first and the Boot Loader second. The Linux Kernel, which is not out-of-date
in this example, would not need to be updated. If it did, you would update it after the Root File
System and before the Boot Loader.
Only one firmware component can be updated at a time.
8.3.1 General Firmware Component Update Procedure
Note: In order to use the general firmware component update procedures, the
AVN422HD will need to be on a network that has access to the Internet, and all
the network settings, including the Gateway and DNS addresses, will need to be
configured correctly. If this information is not configured correctly, the device will
not be able to download the required firmware files and the "Upgrade" buttons will
be disabled.
8.3.1.1 Browser Interface
1. Open the Browser Interface.
2. Navigate to the Administration Upgrade page (refer to section 6.7 Administration Page).
3. Determine which firmware components need updating by comparing the Current Version
information to the Latest Version information.
4. Click on the Upgrade Latest button for the firmware component to upgrade.
**IMPORTANT** Remember to upgrade the firmware components in order
above in section 8.3 Updating Firmware Components.
as described
5. Select Yes when prompted to proceed with the component upgrade.
38

AVN422HD User’s Manual Chapter 8 Field Upgrade
6. Select OK when told to wait for the page to reload before proceeding.
7. Wait (5+ minutes) for the unit to reboot and the Browser Interface to reload. Note that when
the reboot is complete, the Browser Interface will open to the Channel Status page.
8.3.1.2 PackeTV® Configuration Utility
Not Currently Implemented.
8.3.2 Custom Firmware Component Update Procedure
In the case that Internet connectivity is not available or that a firmware component version other
than the latest released version from the standard location is desired, use one of the following
procedures.
8.3.2.1 Browser Interface
1. Open the Browser Interface.
2. Navigate to the Administration Upgrade page (refer to section 6.7 Administration Page) and
click on the Upgrade Custom Image button.
3. From the Custom Upgrade page, specify the following values:
a. The firmware image/component to update;
b. The HTTP URL, to specify where the firmware component is located; and
c. The MD5 checksum URL, to specify where the MD5 checksum is located.
4. Click on the Upgrade Latest button for the firmware component to upgrade.
**IMPORTANT** Remember to upgrade the firmware components in order
above in section 8.3 Updating Firmware Components.
5. Select Yes when prompted to proceed with component upgrade.
6. Select OK when told to wait for the page to reload before proceeding.
7. Wait (5+ minutes) for the unit to reboot and the Browser Interface to reload. Note that when
the reboot is complete, the Browser Interface will open to the Channel Status page.
as described
8.3.2.2 PackeTV® Configuration Utility
Not Currently Implemented.
39

Chapter 9 Unit Connections AVN422HD User’s Manual
Chapter 9 Unit Connections
9.1 Ethernet Connector
Pin Function
1TX+
2TX-
3RX+
4
5
6RX-
7
8
9 Shield Ground
View is looking into the connector.
9.2 Ethernet Serial Connector
Pin Function
1 RS422 TX+
2 RS422 TX-
3 RS232C TXD
4 Signal Ground
5GPIO
6 RS232C RXD
7 RS422 RX-
8 RS422 RX+
9 Shield Ground
View is looking into the connector.
Alternate View.
40

AVN422HD User’s Manual Chapter 9 Unit Connections
9.3 HDMI Connector
Pin Function
1 TMDS Data2+
2 TMDS Data2 Shield
3 TMDS Data2–
4 TMDS Data1+
5 TMDS Data1 Shield
6 TMDS Data1–
7 TMDS Data0+
8 TMDS Data0 Shield
9 TMDS Data0–
10 TMDS Clock+
11 TMDS Clock Shield
12 TMDS Clock–
13 CEC
14 Reserved (N.C. on device)
15 SCL
16 SDA
17 DDC/CEC Ground
18 +5 V Power (max 50 mA)
19 Hot Plug Detect
Type A (Female) HDMI
View is looking into the connector.
41

Chapter 9 Unit Connections AVN422HD User’s Manual
9.4 Audio Terminal Block Connector
9.4.1 Pinouts
See the following paragraph for instructions on configuring the supplied Audio terminal block
connector (supplied).
Pin Function
1A Right Ground
2A Right Balanced Audio Negative
3A Right Balanced Audio Positive
4A Right Unbalanced Audio
1B Left Ground
2B Left Balanced Audio Negative
3B Left Balanced Audio Positive
4B Left Unbalanced Audio
View is looking into the connector.
9.4.2 Configuration
The following describes how to configure the Audio terminal block connector:
1. Cut and strip the wires on the cable that will connect to your audio source. The strip length
should be approximately 1/4 inch long.
2. For each connection, insert a small object, such as a screw driver, into the terminal block’s
latch in order to open the wire clamp.
3. Insert each wire into its wire clamp.
4. Release the latch allowing the wire clamp to close.
42

AVN422HD User’s Manual Chapter 10 Technical Specifications
Chapter 10 Technical Specifications
h.264h.264 Stream Information:
• Video
HD:
h.264 MPEG-4 AVC Compression
High Profile at level 4 (HP@L4)
5 Mbps to 20 Mbps
Resolutions: 1080p@24, 1080i@59.94/60, 1080i@50, 720p@59.94/60,
720p@50
SD:
h.264 MPEG-4 AVC SD Video Compression
Main Profile at Level 3 (MP@L3)
2 Mbps to 20 Mbps
Resolutions: 576i@50, 480i@59.94
• Audio
AAC (Advanced Audio Codec) with configurable audio encoding from 128 to 512 kbps with a
48 kHz sample rate
MPEG-1 Layer 2 with configurable audio from 64 to 384 kbps with a 48 KHz sample rate.
Network Connection:
• One RJ-45 connector on dual connector, twisted pair cable. 10baseT or 100baseTX Fast
Ethernet.
Serial connector:
• One RJ-45 connector on dual connector.
Audio Input:
• Audio Terminal Block Connector:
— Left and Right balanced audio, maximum input level 1 VRMS.
— Left and Right unbalanced audio, maximum input level 1 VRMS.
Video Input:
• One HDMI connector (DVI-D supported with adaptor cable).
Power Supply: Powered through the MPP chassis (MPP200 or MPP1700).
43

Chapter 11 Safety and Compliance Information AVN422HD User’s Manual
Chapter 11 Safety and Compliance
Information
This product can only be used in a VSI blade system. Unintended use of this product, or use with
non-VSI listed components, is forbidden and violates safety approvals.
Safety Approval: UL Listed I.T.E. E257717
44
44

AVN422HD User’s Manual Glossary of Terms
Glossary of Terms
AAC Advanced Audio Coding
AC Alternating Current
AFF Adaptive Frame/Field per Picture
AT Active Tunnel
ATSC Advanced Television Systems Committee
AUX Auxiliary
AV Audio Video
B Frames Bidirectional Frames (pictures)
BNC Bayonet Neill-Concelman (connector)
CC Closed Captioning
CCTV Closed Circuit Television
CD Compact Disc
cm centimeter
CPU Central Processing Unit
CRC Cyclic Redundancy Check
CVBS Composite Video Broadcast Signal
DHCP Dynamic Host Configuration Protocol
DVI-D Digital Visual Interface - Digital only
ESD Electrostatic Discharge
FEC Forward Error Correction
fps frames per second
FTP File Transfer Protocol
GND Ground
GMT Greenwich Mean Time
GPIO General Purpose Input/Output
h.264 Video compression standard, also known as
MPEG-4 AVC (Advanced Video Coding) or
MPEG-4 Part 10
45

Glossary of Terms AVN422HD User’s Manual
HD High Definition
HDMI High Definition Multimedia Interface
HTTP Hyper Text Terminal Protocol
Hz Hertz
I Frame Intracoded Frames (pictures)
I/O Input/Output
IGMP Internet Group Messaging Protocol
IPTV Internet Protocol Television
in. inch
IP Internet Protocol
kbps kilobits per second (1 kbps =1,000 bits per second)
kg kilogram
kHz kilohertz
LAN Local Area Network
MAC Media Access Control
MB Mega byte
Mbps Megabits per second
MHz Megahertz
MPEG Motion Picture Experts Group
ms millisecond
NTSC National Television Standards Committee (USA)
P Frames Predicted Frames (pictures)
PAL Phase Alternating Line (Europe)
PHY Phase Alternating Line (Europe)
PID Packet Identifier
PT Passive Tunnel
PTZ Pan Tilt Zoom (device)
QOS Quality of Service
TCP/IP Transmission Control Protocol/Internet Protocol
46

AVN422HD User’s Manual Glossary of Terms
RAM Random Access Memory
RCA Radio Corporation of America
RFC Request for Comments
RFC 1112 Host Extensions for IP Multicasting
RFC 2236 Internet Group Management Protocol, Version 2
RTSP Real Time Streaming Protocol, based on Live555
SAP Session Announcement Protocol
SMTP Simple Mail Transfer Protocol
TOS Type of Service
TTL Time to Live (IP)
UDP User Data Protocol
VBI Vertical Blanking Interval
VDC Volts Direct Current
Vrms Volts Root Mean Square
47
 Loading...