

Helix HD
User Manual
English, Version 1
Copyright (C) 2008-2017, VisionAid International Ltd, all rights reserved.

Table of Contents
General description ................................................................................... 3
Improvement program ............................................................................... 3
Ownership and intellectual property .......................................................... 4
Safety ........................................................................................................ 5
Pacemaker Safety Guidelines ................................................................ 5
General Safety Guidelines ...................................................................... 5
Box contents .............................................................................................. 6
Unpacking ................................................................................................. 7
Positioning Helix HD for use ...................................................................... 7
Unfolding Helix HD ................................................................................. 7
Folding Helix HD for transport ................................................................ 9
Plugging in: ................................................................................................ 9
Display connection .................................................................................. 9
HDMI Switcher connection (if required) ................................................ 10
Power connection ................................................................................. 10
Insert batteries into the control pad ......................................................... 11
Turning on / off ........................................................................................ 11
Positioning documents ............................................................................ 12
Adjusting camera head height ................................................................. 12
Lowering camera head (higher magnification) ...................................... 12
Raising camera head (lower magnification) .......................................... 12
Control pad explained ............................................................................. 13
Overlay.................................................................................................. 13
Magnification ......................................................................................... 14
Colour Mode ......................................................................................... 14
Contrast ................................................................................................ 14
Reading Guides .................................................................................... 15
1

2
Input Select ........................................................................................... 15
Settings ................................................................................................. 15
Settings Menu Layout .............................................................................. 16
Reading guides (Lines and blinds) ..................................................... 16
Screen brightness (1-100) .................................................................. 17
Screen size (inches) ........................................................................... 17
Custom colour combination ................................................................ 17
Menu text size (1-20) .......................................................................... 17
Language ........................................................................................... 17
Control pad battery (0-100%) ............................................................. 18
Advanced settings .............................................................................. 18
About Helix HD ................................................................................... 18
Exit ..................................................................................................... 19
Updating your Helix HD ........................................................................ 19
Hints and Tips - Troubleshooting ............................................................ 21
The unit does not turn on ...................................................................... 21
Nothing appears on your display .......................................................... 21
The image does not change ................................................................. 21
Smudges or blemishes appear on the display ...................................... 21
Does not focus correctly ....................................................................... 21
Control pad is not working .................................................................... 22
Reset to factory settings ....................................................................... 22
Terms and conditions of sale ................................................................ 23
Appendix A: Technical Information .......................................................... 24

3
General description
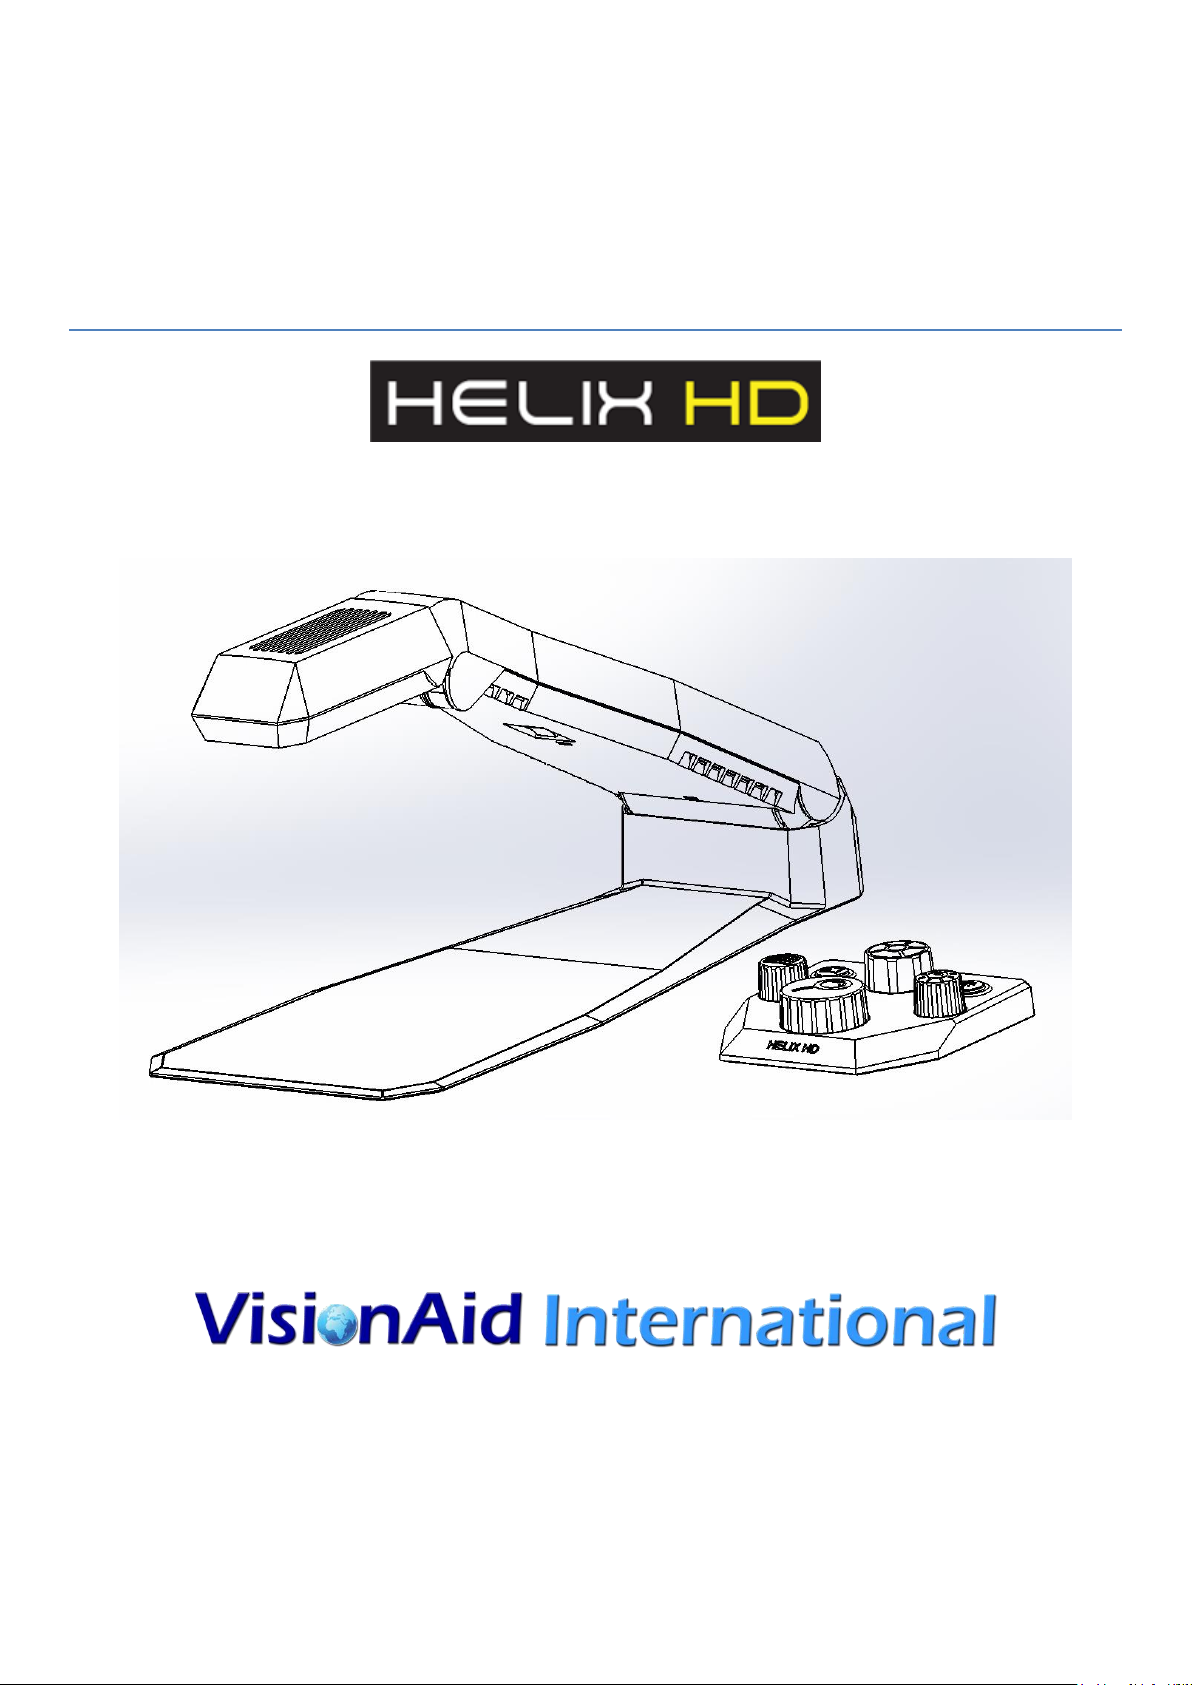
Congratulations on choosing the Helix HD transportable video magnifier.
The Helix HD has a unique dual-camera system that offers an
exceptionally wide magnification range, from 2x to 300x (display size
dependent). This complete solution is ideal for users requiring full page
margin magnification through to those needing much higher levels of
magnification. It connects via HDMI to any suitable display (TV screen or
computer monitor). The Helix HD is supplied with a tactile wireless control
pad which provides simple and intuitive controls.
Improvement program
Users are the best people to help us further improve and develop our
products so if you have any ideas or suggestions, no matter how small,
please do contact us:
Email:
suggestions@visionaid.com
Post:
Helix HD Suggestions
VisionAid International Ltd.
Bridge Lodge
Spalding
Lincolnshire
PE11 3AU
United Kingdom
Phone:
+44 (0) 1775 711 977
Thank you and enjoy your new Helix HD video magnifier!

4
Ownership and intellectual property
The software installed on the Helix HD makes use of third party software
libraries that are redistributed under their own respective licenses.
Copyright (C) 2009-2016 D. R. Commander. All Rights Reserved.
Copyright (C) 2000-2015, Intel Corporation, all rights reserved.
Copyright (C) 2009-2011, Willow Garage Inc., all rights reserved.
Copyright (C) 2009-2015, NVIDIA Corporation, all rights reserved.
Copyright (C) 2010-2013, Advanced Micro Devices, Inc., all rights
reserved.
Copyright (C) 2015, OpenCV Foundation, all rights reserved.
Copyright (C) 2015, Itseez Inc., all rights reserved.
Copyright (C) 2015 The Qt Company Ltd.
Third party copyrights are property of their respective owners.

5
Safety
Pacemaker Safety Guidelines
Do not use the Helix HD near inadequately shielded medical devices.
There are 2 magnets located within the base of the Helix HD and 3 in the
control pad. The magnets used are: Neodymium N42 22 x 11 x 2 mm.
If you have a pacemaker fitted please consult the manufacturer’s
guidelines for safe operating distances.
Do not place the control pad or Helix HD directly on your chest.
General Safety Guidelines
Please handle the Helix HD with care as rough handling may
damage internal components and will void your warranty.
Always operate the unit in a place where the temperature is between
10°and 35°C (50°and 95°F). Do not expose to excessive heat, cold
or direct sunlight.
Keep the unit away from wet areas, rain, and other sources of fluid,
moisture and chemicals. Do not submerge the unit.
Do not attempt to repair the unit; any unauthorised attempt will void
the product warranty. Please contact your distributor.
Use only the supplied power adapter.
Always unplug the Helix HD before cleaning. Only use a soft damp
cloth to clean the exterior. Do not use cleaning agents or abrasive
materials as they will damage your unit.
Please be aware of the risk of explosion if the battery is replaced by
an incorrect battery type.
Use of the Helix HD other than as described in this manual will
exclude it from warranty.
6
Box contents
Camera
Camera
Base
Control pad
Your Helix HD box contains the following items:
1. Helix HD video magnifier.
2. Helix HD control pad (with magnetic control pad overlay).
3. 2 x AAA batteries.
4. HDMI cable.
5. Power supply.
6. Laminated Quick Reference Guide.
7. User Manual.
If any of these items are missing from your box, please contact your local
distributor immediately.

7
Unpacking
Carefully open the box and remove the Quick Reference Guide and the
User Manual. Remove the top foam sheet. Take out the HDMI cable (in
plastic bag).
Lift the Helix HD out of its box (the control pad is located under the
camera arm in the transport position). Place the Helix HD with its foam
base down, onto a flat surface.
Remove the power supply and 2 x AAA batteries from the small
compartment at the end of the box.
Positioning Helix HD for use
When placing the Helix HD onto a surface for use, ensure it is clean, flat
and large enough for you to position the items you wish to view under the
camera head. For optimal image quality try not to place the Helix HD
directly underneath any bright lighting or direct sunlight.
Unfolding Helix HD
1) Place the Helix HD on a flat stable surface.

8
2) Place one hand on the base and use your other to lift the front
narrow section of the camera arm. Raise the camera arm from its
transport position to the second (high) click position (approximately
30 degrees).
3) Grasp the top of the camera head (underneath the camera arm) and
carefully rotate it downwards, towards you and up (approximately
160 degrees) until it is parallel to the base of the unit. This is its first
click position (high), used for lower levels of magnification. For more
information please see Adjusting camera head height on page 12.
4) Remove the control pad from its stowed position.

9
Folding Helix HD for transport
To fold the Helix HD for transport, please carefully follow the unfolding
steps in reverse order.
Plugging in:
All connections for the Helix HD are located on the rear panel of the
unit.
Display connection
IMPORTANT:
Before inserting the HDMI connector, make sure that the flat edge of the
HDMI connector is facing upwards. Damage caused by incorrect insertion
will void your warranty.
1) Insert one end of the HDMI cable into the MON connection located
on the bottom left of the rear panel.
2) Insert the other end of the HDMI cable into a suitable display (TV
screen or computer monitor).

10
HDMI Switcher connection (if required)
The Helix HD has an integrated HDMI switcher that can be used to
connect an additional video device such as a digital TV box or DVD
player. This function simplifies switching between the Helix HD and the
additional device. It is also useful if you have no available HDMI
connections on your chosen display.
1) Insert the HDMI cable from your existing device e.g. digital TV box
or DVD player, into the IN connection.
2) To show the connected device on your display either switch off the
Helix HD, or press the external Input Select button located on the
top left of the Helix HD Control pad explained (see on page 13). The
Helix HD must be connected to the mains and the mains power
switched on for the HDMI switcher to function.
Power connection
1) Insert the round connector from the power adapter into the round
PWR connection on the right-hand side of the rear panel.
2) Insert the mains plug into a wall socket and ensure it is switched on.

11
Insert batteries into the control pad
Remove the battery cover located on the underside of
the control pad.
Remove the 2 AAA batteries from their
plastic film.
Insert 2 AAA batteries into the
battery compartment matching the –
and + symbols correctly.
Turning on / off
The on / off rocker switch is located in the centre of the underside of the
camera arm approximately 12cm (4.7 inches) from the back of the unit
and 22cm (8.7 inches) from the front.
To turn the Helix HD on, rock the
switch away from you.
After turning on, the Helix HD will take
approximately 10 seconds to show the
Helix HD logo on your display.
If nothing appears on your display
check that the correct input source is
selected (for further details please
consult your display’s user manual).
To turn the Helix HD off, rock the switch towards you.

12
Positioning documents
The Helix HD cameras are located in the underside of the camera head.
Place the document / object on the base, with the area you are wanting to
view directly underneath the camera head.
Adjusting camera head height
Helix HD features 2 camera head heights: high and low. The high position
is for lower levels of magnification. The low position is for higher levels of
magnification. It is important to note that for both positions the camera
head should always remain parallel with the base.
Lowering camera head (higher magnification)
With the camera head and
camera arm in the high
position, grasp the sides of
the camera head and lower
the camera arm until it
clicks into the first (low) click
position.
Next, raise the camera head so
that it remains parallel with the
base.
Raising camera head (lower magnification)
With the camera head and camera arm in the low position, grasp the
sides of the camera head and raise the camera arm until it clicks into the
second (high) click position.
Next, lower the camera head so that it remains parallel with the base.

13
Control pad explained
Magnification
Contrast
Settings
Input
Select
Reading
Guides
Colour Mode
Overlay
Simply lift the magnetic overlay off the control pad to show all dials and
buttons.
If you only require the basic features of your Helix HD, simply place the
magnetic overlay back over the advanced feature controls on the control
pad.
Helix HD Bluetooth control pad with magnetic overlay removed.
The dial and button names will be used as labelled throughout the
manual.

14
Magnification
Rotate: Clockwise to increase magnification and anticlockwise to
decrease magnification.
Quick press: Handwriting mode, locks the focus and optimises camera
settings for writing.
Press and hold: Overview mode which reduces magnification to the
minimum level. A rectangle appears displaying the area the Helix HD will
zoom back to upon release.
Colour Mode
Quick press: Switch between full colour for viewing pictures and
enhanced reading colours for reading text.
Rotate: When in enhanced reading colour mode, rotate the dial to cycle
the colour options: white on black, black on white, blue on yellow, yellow
on blue, green on black, black on green, yellow on black and black on
yellow.
If one of the above colour combinations is not suitable it is possible to
create your own. Once you have created your custom colour combination
it will store this in addition to the above. When you rotate the colour Mode
dial in enhanced reading colour mode it will appear automatically. Please
follow the instructions in Custom colour combination to customise (see
page 17).
Contrast
Rotate: Clockwise to increase contrast and anticlockwise to decrease.
Quick press: Turn the lights off / on.

15
Press and hold: Enter Freeze mode. A snowflake icon will appear in the
top right corner of your display. This is useful for viewing items without
having to continue to hold them.
Reading Guides
Quick press: Cycle through the guides; two vertical lines, two horizontal
lines, horizontal blinds, vertical blinds, multiple lines and signature box.
Rotate: Resize currently selected guide.
Press and hold: Turn off the guides and stores the last used reading
guide. Quick press again to return to last used guide.
Input Select
Quick press: Switch between the Helix HD and another connected video
device (see HDMI Switcher connection (if required) on page 10).
Settings
Quick press: Helix HD Settings appear on display.
Rotate Magnification dial to navigate through the on-screen menu. Quick
press the Magnification dial to confirm selection.
Select the Back option or quick press the Settings button to return to the
previous menu.
To exit Settings menus select Exit in main Settings menu or quick press
on the Settings button.

16
Settings Menu Layout
Settings
Reading guides (Lines and blinds)
Signature guide
Simple: default setting (when rotating the Reading Guides dial it
adjusts width and height simultaneously).
Advanced: allows adjustment of all signature box parameters; useful
for larger signature boxes e.g. passport applications.
When the signature box is displayed:
1. Rotate reading guides dial to adjust width, quick
press to confirm.
2. Rotate dial to adjust height, quick press to confirm.
3. Rotate dial to adjust horizontal position, quick press
to confirm.
4. Rotate dial to adjust vertical position, quick press to
confirm.
Line thickness (1-10)
Allows you to adjust the thickness of the horizontal lines, vertical
lines and signature guides.
Line thickness in multi-line mode (1-10)
Allows you to adjust the line thickness of the multi-line guide.
Line colour (multiple)
Allows you to select the line colour of the horizontal, vertical,
signature and multi-line guides.
Line opacity (10-100)
Default setting is 100 (no opacity).
Allows you to adjust the opacity of the horizontal, vertical, signature
and multi-line guides.
Blind opacity (10-100)
Default setting is 100.

17
Allows you to adjust the opacity of the horizontal and vertical blind
guides.
Back
Screen brightness (1-100)
Adjust to your desired level (1 is least bright and 100 is brightest).
Screen size (inches)
This should automatically adjust to your display screen size. If your
screen is not supported please enter your screen size manually here.
This information allows your Helix HD to accurately display the
magnification level.
Custom colour combination
Foreground colour
Yellow, White, Pale Green, Orange, Red, Light Yellow, Light
Salmon, Light pink, Light Cyan, Light Blue, Khaki, Green, Cyan,
Black, Beige and Aquamarine.
Background colour
Same as foreground colour options shown above.
Back
Menu text size (1-20)
Default setting is 14. Adjusts the size of text used in all menus to suit your
requirement.
Language
English (UK), Danish, Dutch, French, German, Polish, Russian, Italian,
Japanese, Korean, Portuguese, English (US), Arabic, Chinese,
Norwegian, Spanish (more available).

18
Control pad battery (0-100%)
Advanced settings
Handwriting focus control
Locked: default setting. Autofocus is active until handwriting mode is
selected. See
Magnification on page 14.
Manual: when Manual is selected quick press on the magnification
dial to select manual focus adjustment. Rotate the dial to
adjust focus. Quick press again to return to auto-focus.
Lighting
Automatic: default setting. Helix HD selects the appropriate
lighting level.
Off: for viewing shiny material e.g. mobile phone screens etc.
Low: for use in bright environments.
Medium: for use with glossy print e.g. magazines.
High: for use in poorly lit or dark environments.
Power line frequency
This needs to match your country’s power line frequency to prevent
image banding.
50 Hz
60 Hz
Reset to defaults
Will reset automatically to all defaults if selected.
Back
About Helix HD
No update available on USB stick (For updates see page 19)
Manufacturer information
VisionAid International details
Distributor information
Distributor details

19
Software version
Serial number
Open source licences
Back
Exit
Updating your Helix HD
Your Helix HD is fully software upgradeable. If new features become
available a software update can be downloaded from the VisionAid
International website. Please contact us or your distributor to find out if an
update is available.
You will need access to a computer and a minimum 4GB USB 2.0
memory stick.
Downloading
Once you have contacted your local distributor they will send you a link to
download the latest software onto your computer.
Copying to a USB stick
Copy the files you have downloaded to the root folder of your USB
memory stick.
Inserting USB stick into your Helix HD
Plug the USB stick into the USB port on the rear panel of your Helix HD.
The USB stick will only insert one way up so take care when inserting.
Forcing the USB stick into the USB port incorrectly can damage the unit
and your memory stick; this will not be covered by warranty.
Installing the update
Follow this path in Settings to install the update:
Settings
o About Helix HD
Install image: version to be installed.
(Quick press to install update).

20
Installation may take up to 5 minutes. Do not turn off the Helix HD or
unplug the USB stick while the update is in progress. After installation is
complete your Helix HD will automatically restart to finalise the update
process.

21
Hints and Tips - Troubleshooting
The unit does not turn on
Check the connection to the power adapter on the rear panel.
Ensure the power adaptor is plugged in and the mains power is
switched on.
Ensure the unit’s rocker switch is on (rock the switch away from
you).
Nothing appears on your display
Ensure that the HDMI connection is fully inserted into the MON port
located on the rear panel of the Helix HD.
Check that the opposite end of the HDMI connection is fully inserted
into the appropriate input on your display.
On your display ensure that HDMI is selected as the input source.
Please consult your display’s user manual for further input
instruction.
If you have an additional video device connected to the IN port at the
rear of the Helix HD, ensure that the HDMI switcher has been
selected to display the correct source (see page 10).
The image does not change
Ensure Freeze mode is not active (snowflake icon in the top right
corner of your display); press or rotate any control pad control to
deactivate Freeze mode.
Smudges or blemishes appear on the display
Turn off the Helix HD and clean the camera lens (the underside of
the camera head) with a dry lint free cloth.
Does not focus correctly
Ensure the handwriting mode is not selected (see page 14).
Check that the item you are trying to view is not too close to the
camera (it should be approximately 40mm away from the camera
head).

22
Make sure that you have the Helix HD positioned at its correct height
position for the level of magnification you require (see page 12).
Control pad is not working
Ensure the batteries are located correctly in the control pad battery
compartment located on the underside of the control pad.
Control pad battery level is low: The control pad will display an on-
screen warning if its battery level is low. If the battery level is low
replace the batteries (see page 11) with 2 AAA batteries.
If the display says that there is no control pad connected press one
of the dials on the control pad and wait 30 seconds for it to connect.
Make sure that your control pad is not more than 8 metres from the
Helix HD.
Reset to factory settings
Follow this path in Settings to Reset to default factory settings:
o Settings
Advanced settings
Reset to defaults
(Quick press to reset).

23
Terms and conditions of sale
This product is guaranteed from manufacturing faults for 24 months from
the date of purchase. If you have any issues with the product and you did
not purchase directly from VisionAid International then please contact
your retailer in the first instance.
For all returns and repairs contact your authorised distributor.
This product is CE marked and fully complies with all applicable EU
legislation.
The WEEE logo on the product or its box indicates that this
product must not be disposed of or dumped with your other household
waste. You are liable to dispose of all your electronic or electrical waste
equipment by relocating over to the specified collection point for recycling
of such hazardous waste. Isolated collection and proper recovery of your
electronic and electrical waste equipment at the time of disposal will help
conserve natural resources. Moreover, proper recycling of the electronic
and electrical waste equipment will ensure the safety of human health
and the environment. For more information about electronic and electrical
waste equipment disposal, recovery, and collection points, please contact
your local authority, household waste disposal service, shop from where
you purchased the equipment, or manufacturer of the equipment.
© VisionAid International 2017

24
Appendix A: Technical Information
General information
Footprint (WxD)
400 x 150 mm
15.7 x 5.9 inches
Unit dimensions (Folded) (LxWxH)
400 x 150 x 80 mm
15.7 x 5.9 x 3.1 inches
Unit dimensions (In operation)
(LxWxH)
(footprint remains unchanged)
400 x 150 x 210 mm
15.7 x 5.9 x 8.3 inches
Unit weight:
1.10 kg (2.5 lbs)
Control pad weight:
0.16 kg (0.35 lbs)
Display connection:
HDMI & DVI
Colour mode:
True colour, 8 Simplified
enhanced colour modes and 1
customisable
Operating conditions
Relative Humidity:
<70%, no condensation
Temperature:
10 to 35 °C
Storage and transport conditions
Relative humidity:
<95%, no condensation
Temperature:
-20 °C to 60 °C
 Loading...