

Page 1

Page 2

Page 3

1
GENERAL SAFETY 2
GENERAL INFORMATION 3
I. UNPACKING 3
II. FEATURES 3
III. REMOTE CONTROL UNIT (RCU) 4
IV. HOW TO SETTING RCU FOR TV 6
V. FRONT PANEL 8
VI. REAR PANEL 9
INSTALLING EQUIPMENT 10
CHANNEL LIST GUIDE 11
MENU GUIDE 13
MAIN PAGE 13
I. CHANNEL MANAGER 13
II. INSTALLATION 15
III. OPTIONS 20
IV. UTILITY 22
V. ACCESSORY 23
PVR Guide 24
TROUBLESHOOTING 31
SPECIFICATIONS 32
BRAND LIST 178
TABLE OF CONTENTS
To disconnect the apparatus from the mains, the plug must be pulled out
from the mains socket, therefore the mains plug shall be readily operable.
Page 4

2 3
GENERAL SAFETY
Please read the following recommended instructions carefully to avoid the risk of
your physical Injury before the product is operated.
Do not cover the receiver and keep clear space around the receiver for sufficient.
Check the receiver’s operation voltage 90~250V, 50Hz~60Hz Max, 40W Keep liquid
away from the receiver.
The receiver shall not be exposed to dripping or splashing and no objects that filled
with liquid shall not be placed on the receiver.
Unplug the receiver from the wall outlet before cleaning.
Use a soft cloth and a mild solution of washing-up liquid to clean the casing.
Do not block the receiver’s ventilation slots which are provided for ventilation and
protection from overheating.
Please maintain the receiver in a free airflow.
Do not allow the receiver to be exposed to hot, cold or humid condition.
Do not use any cable and attachment that are not recommended as these may
damage your equipment.
Please unplug the receiver from the wall outlet and disconnect the cable between
the receiver and the antenna when you will not use it for long time.
Do not remove the cover to reduce the risk of electric shock.
Do not attempt to service the receiver yourself.
Refer all serving to qualified service personnel.
Manual may be updated as new features.
WARNING
Page 5

GENERAL INFORMATION
Please ensure that the following items are included with the receiver in your pack-
ing.
1) Remote Control Unit (RCU)
2) Batteries (2EA)
3) User’s Manual
4) A/V Cable
Supports MPEG-2, MPEG-4, H.264 and fully DVB compliant.
Satellite receiver.
2 Slots common interface for Viaccess, Irdeto, Cryptoworks, Nagravision, Conax,
Mediaguard and etc.
1 Slot smart card.
DiSEqC 1.0, 1.1, 1.2 and USALS.
Aspect ratio adjustment 4:3 (16/9 crop), 4:3 (16/9 letterbox), 16:9 (4/3 pillar box).
User friendly OSD and operation.
Total 8,000 Channels Programmable.
Multi-language audio support
Multi-language menu text support.
Favorite channel selections.
Parental Guide and rating control.
EPG(Provider Electronic Program Guide) for On Screen Channel Information.
On-Screen Display with 16 bit Color.
Zoom Function in Pause.
Dolby Digital Bitstream Out through S/PDIF(Optical & Coaxal).
Seletable output for 1080i, 720P, 576P and 576i format.
Multiple Video Outputs “HDMI, Component(YPbPr), SCART(RGB, CVBS)”.
USB 2.0 Host (Access to HDD, USB memory, Others etc).
Upgrade Software & Update Channel Database through USB 2.0 Port.
I. UNPACKING
II. FEATURES
Page 6
4 5
GENERAL INFORMATION
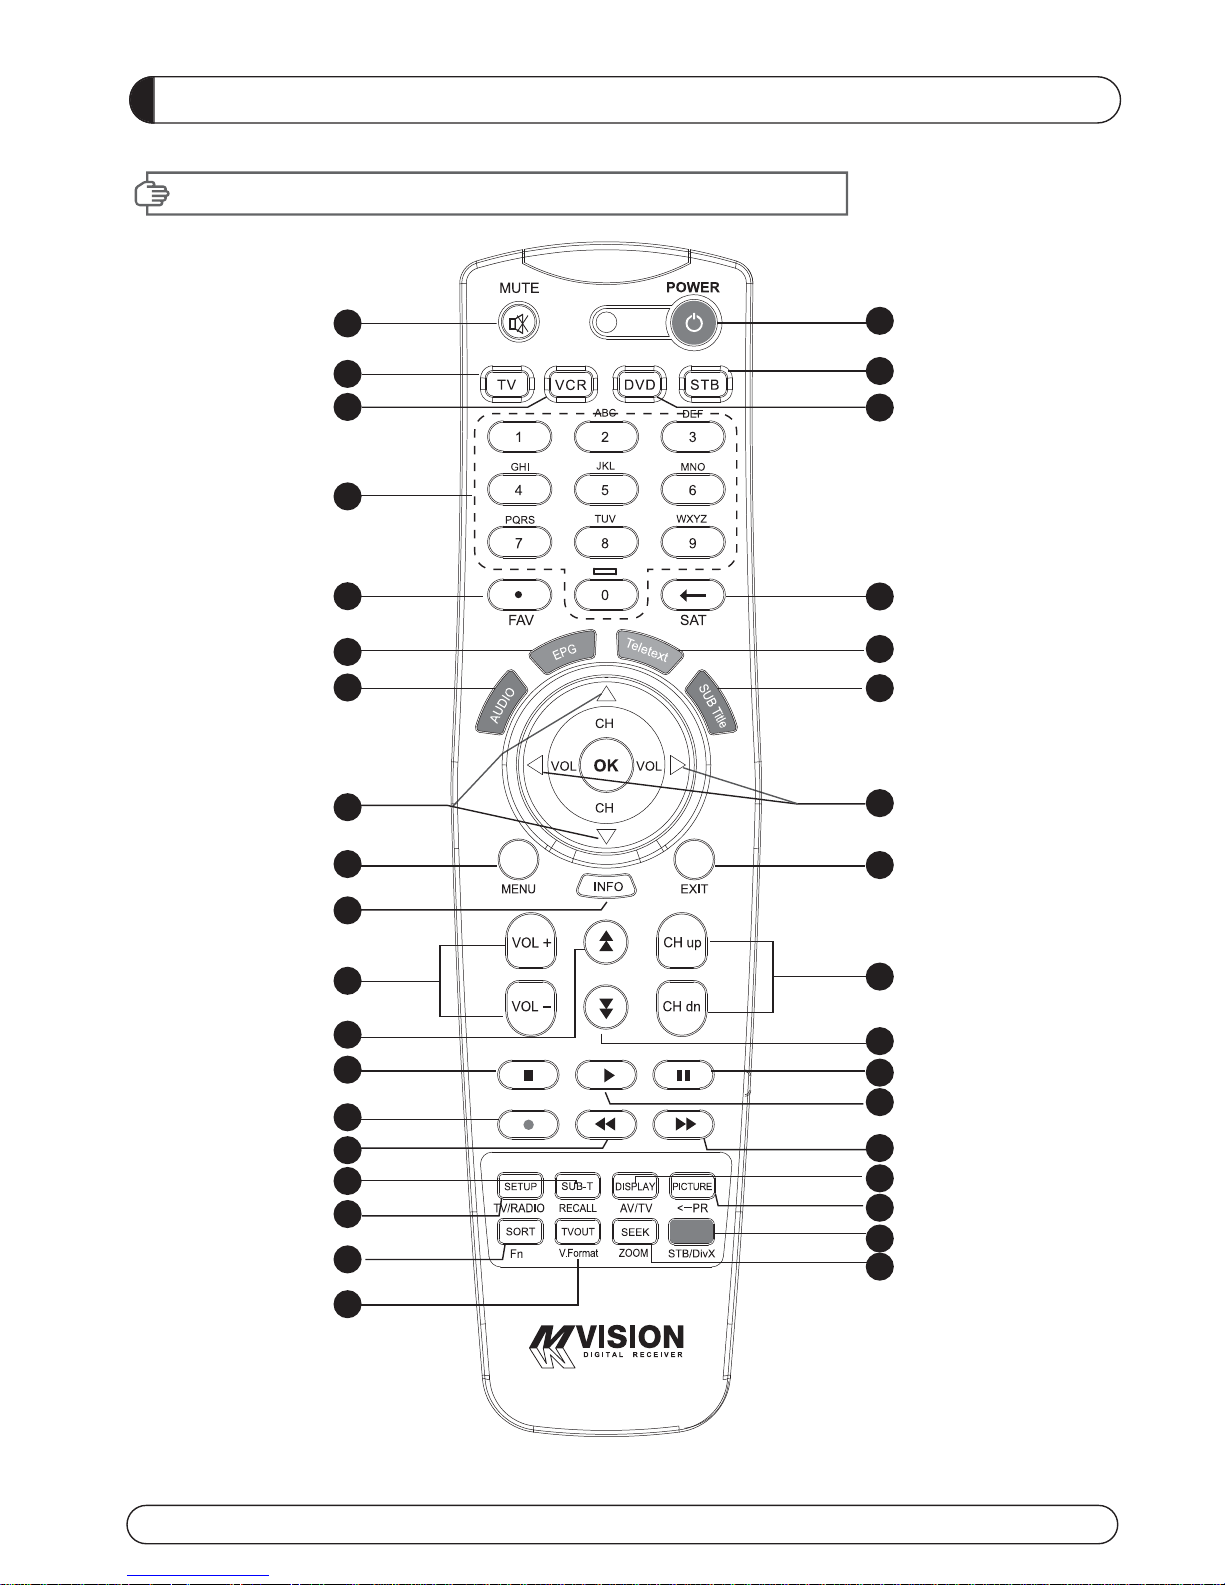
III. REMOTE CONTROL UNIT (RCU)
1
2
3
4
5
6
8
7
9
10
11
12
13
14
15
16
18
19
21
23
25
27
29
31
33
17
20
22
24
26
28
30
32
34
35
36
Page 7

GENERAL INFORMATION
III. REMOTE CONTROL UNIT (RCU)
1. MUTE Enables or disables the audio.
2. POWER Swithches the receiver between operation and standby mode.
3. TV TV mode.
4. STB STB mode.
5. VCR VCR mode.
6. DVD DVD mode.
7. Numeric buttons Selects the TV or Radio service channels and individual menu.
8. FAV Toggles the selected favorite mode.
9. SAT Toggles the selected Satellite list.
10. EPG Displays the TV or Radio program guide.
(Electronic Program Guide)
11. Teletext Enables teletext mode.
12. Audio Changes the audio languages.
13. Subtitle Enables subtitle mode.
14. Changes channels or moves to the item in the menu.
15. Adjusts the volume or moves to left or move item in the menu.
16. MENU Displays the main menu on screen.
17. EXIT Returns to the previous menu or normal viewing mode from a menu.
18. INFO Displays the program information box on the screen and edit the name of favorite channel list.
19. V+/V- Turns volume up or down.
20. P+/P- Changes channels up or down on normal mode.
21. Moves up a page in the channel list.
22. Moves down a page in the channel list.
23. STOP Stops recording or playing.
24. PAUSE Pauses the playing picture or go to normal mode.
25. Record Records the program.
26. Play Displays file lists and plays slow/normal.
27. Rewind Stars reverse playback and changes the speed of reverse playback.
28. F/F States fast forward or fast motion playback and changes the speed of forward playback.
29. RECALL Selects the previously viewed channel.
30. AV/TV Selects the TV or AV mode.
31. TV/RADIO Switches between TV and Radio.
32. PR Reserved.
33. Fn Reserved.
34. STB/DivX Reserved.
35. ZOOM Selects ZOOM IN/ OUT.
36. V.Format Switches to HD Type.
Page 8
6 7
1
2
3
4
5
6
GENERAL INFORMATION
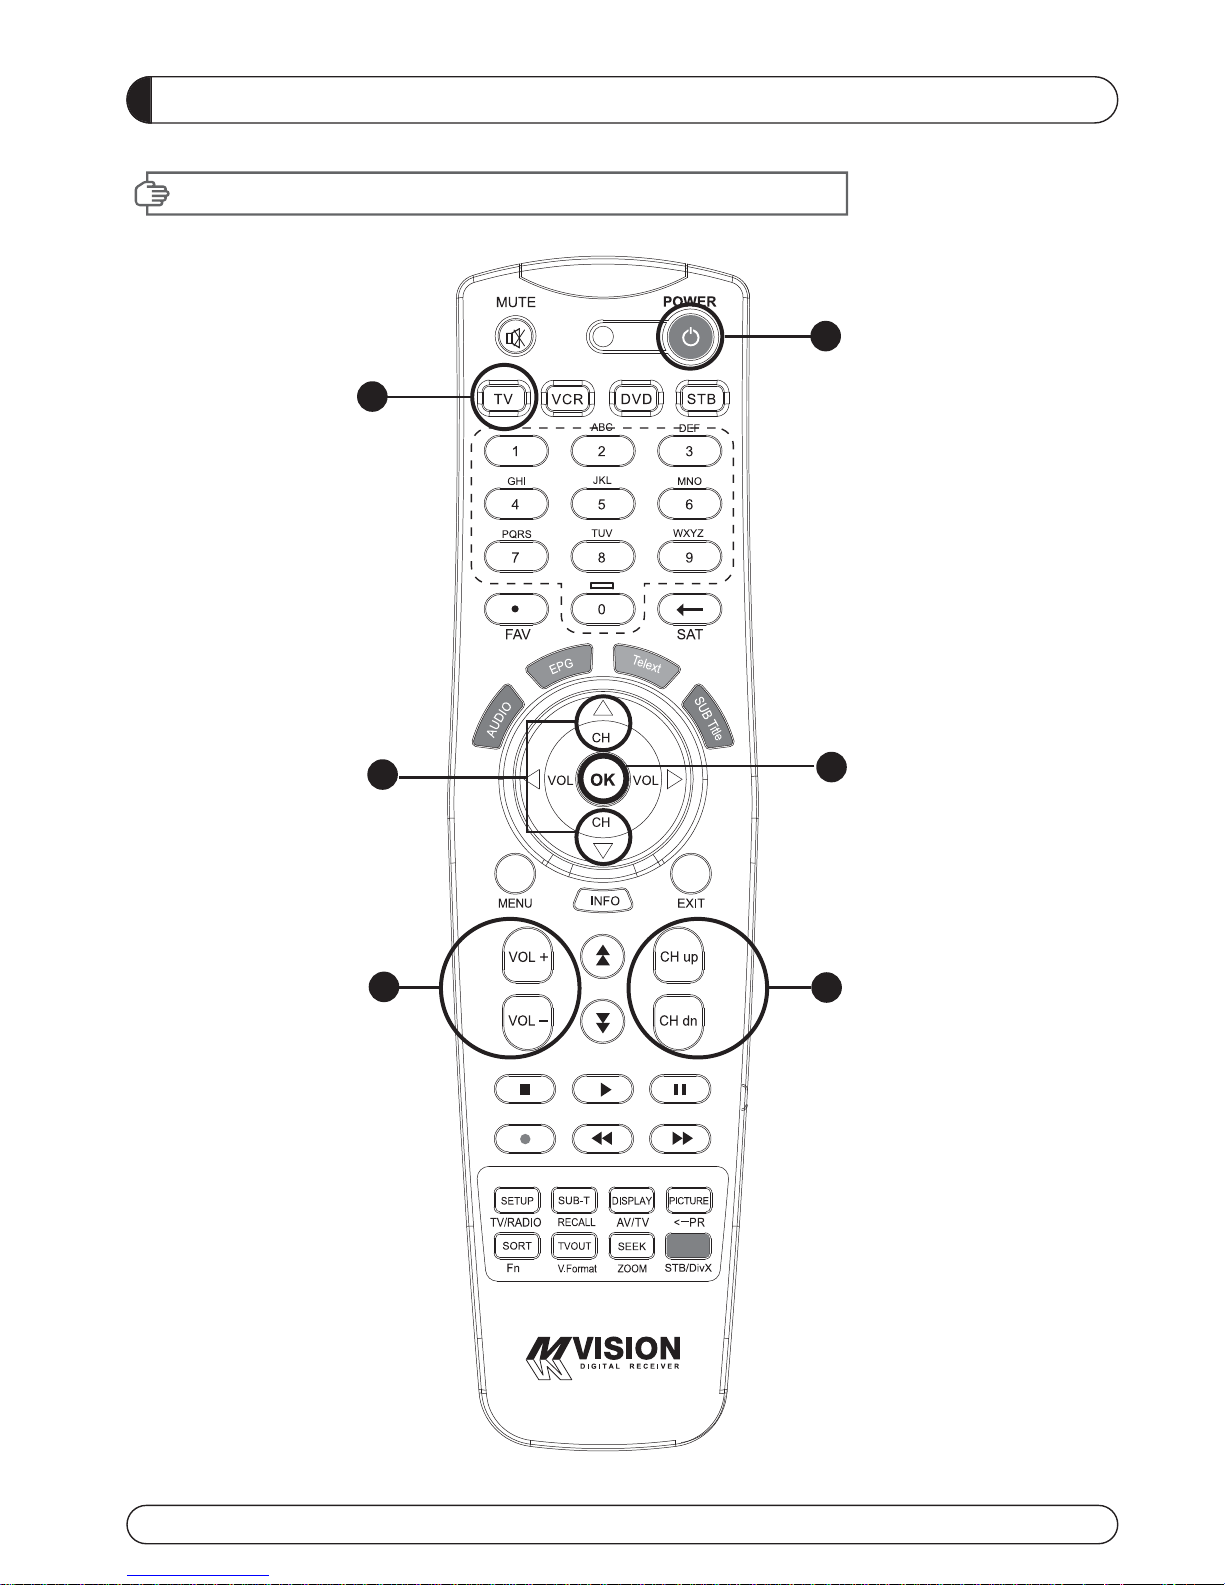
IV. HOW TO SETTING RCU FOR TV
Page 9

1
3
6
4
2 5
GENERAL INFORMATION
IV. HOW TO SETTING RCU FOR TV
1. Manual Search
At first, Turn on the TV
1) Press "OK" key and "TV LED Lamp" in RCU at the same time for more than 2 or 3 seconds.
Then the "TV LED Lamp" will turn on/off 2 times ( will be twinkled 2 times ).
2) Find the the TV code in Brand List ( the code is composed of 4 digits ) and insert the 4 digits.
( If the 4 digits were inserted correctly,
"TV LED Lamp" will be twinkled 2 times and TV will
be turn off ==> go to 3)-1.
but if the codes were inserted wrong the "TV LED Lamp" will be twinkled long only 1 time and
TV will be kept turning on ) ==> go to 3)-2.
==> In this step, you should insert 4 digits of code with 10 seconds. If not this setting process
will be failed.
3) - 1 If TV turns off, press "OK" Key and TV LED Lamp will be twinkled 2 times again.
Please turn on the TV using "Power button" in RCU and check volume key and
channel Key or any other keys of RCU whether they working properly If the power buttons
works but other keys does not work, it means the code was not inserted correctly.
Please start again from the step 1) and insert other code of the TV Brand. Normally TV brand
has several codes, not unique.
3) -2 Please start again from the step 1) and insert other code of the TV Brand. Normally TV brand
has several codes not unique.
2. Auto Search
At first, Turn on the TV
1) Press "OK" key and "TV LED Lamp" in RCU at the same time for more than 2 or 3 seconds.
Then the "TV LED Lamp" will turn on/off 2 times ( will be twinkled 2 times ).
2) Press the
UP or Down Key until the TV turns off.
3) When the TV turns off, press the OK key and the TV LED Lamp will be twinked 2 times.
4) Please turn on the TV using "Power button" in RCU and check volume key and channel
Key
or any other keys of RCU whether they working properly.
5) If the power buttons works but other keys does not work, it means the auto serching was not
done properly Pleaes start again from step 1) to step 4) until all keys of RCU works well.
Page 10
8 9
GENERAL INFORMATION
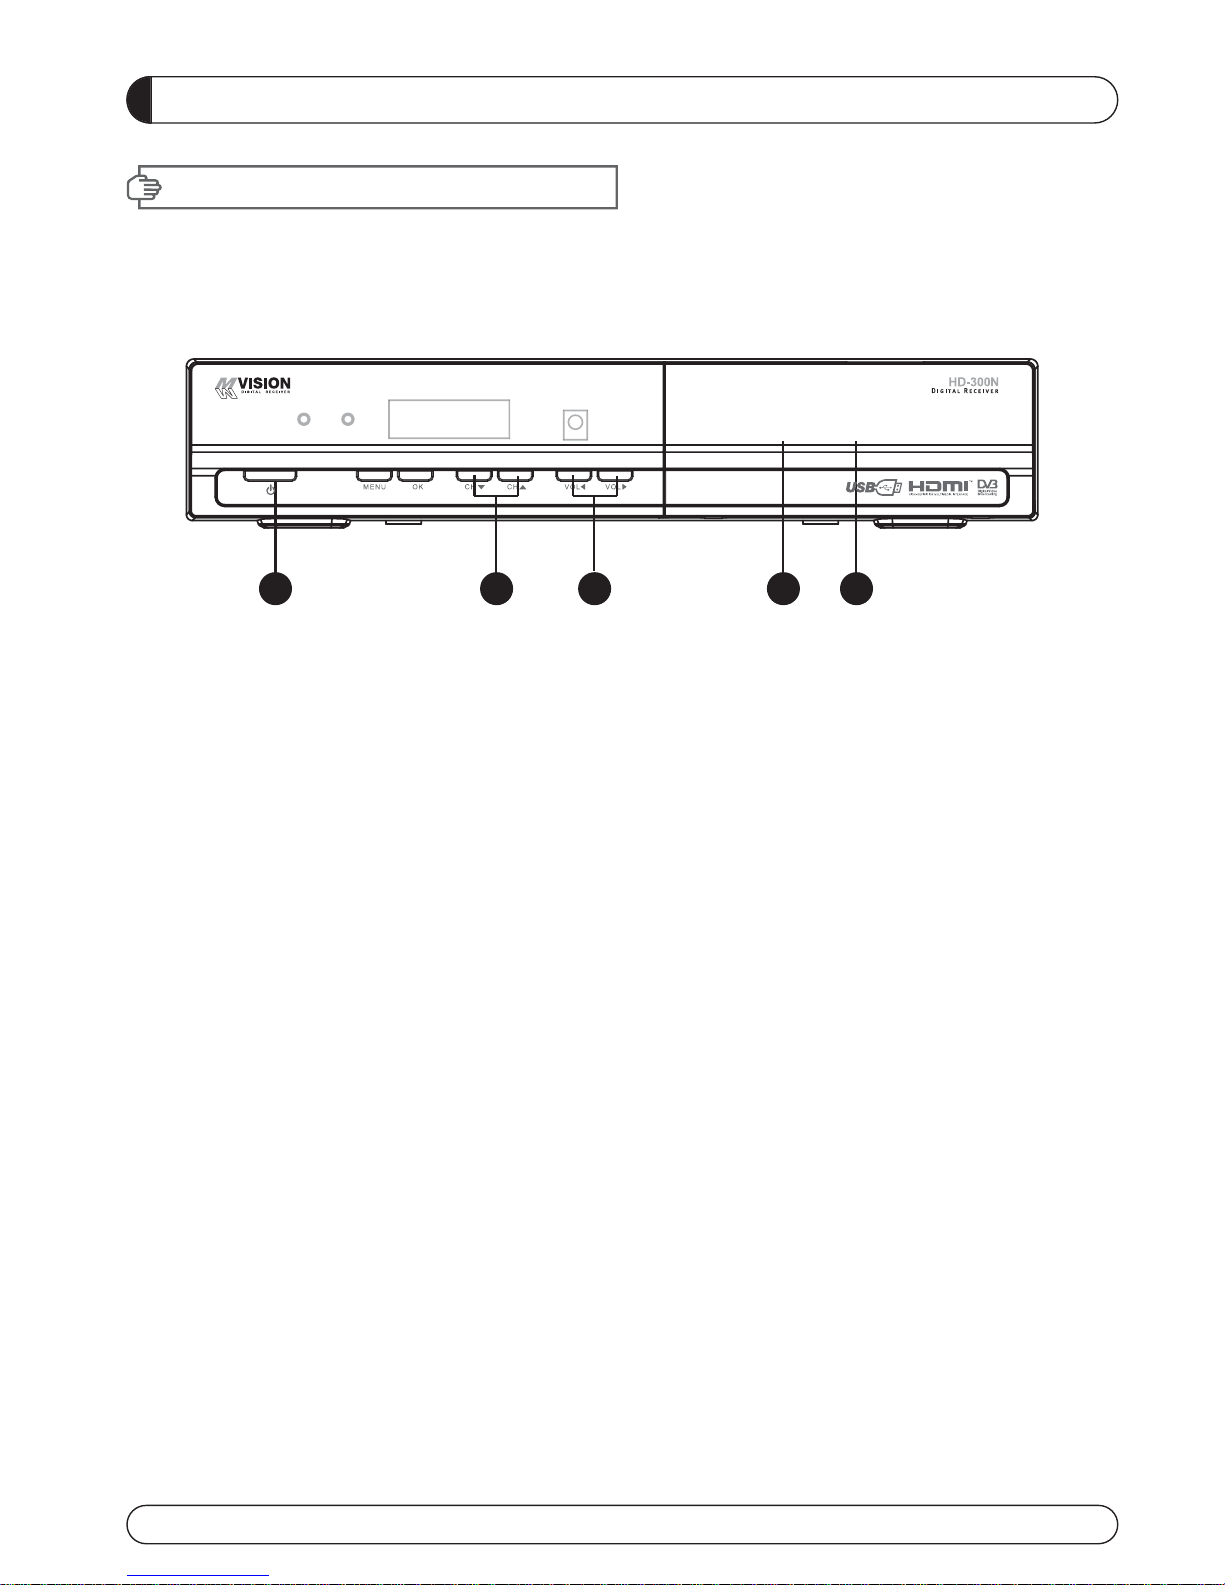
V. FRONT PANEL
NOTE: All USB 2.0 flash drive may not be compatible with the product.
1. POWER Switches the receiver power On and Standby.
2. CH Up/Down Channel up / down or selects the item of Menu.
3. VOL Up/Down Volume up/down or selects the item of Menu.
4. SMART SLOT Insert Smart Card.
5. CI SLOT Insert CAM.
1 2 3 4 5
Page 11

GENERAL INFORMATION
VI. REAR PANEL
1
2 3 4
6
5
7
8
91011
13
14
12
1. SAT IN Connects to Satellite antenna cable.
2. LOOP OUT Connects to another STB.
3. YPbPr Connects to Component jack of TV.
4. VIDEO Connects VIDEO to the TV or other eguipment.
5. TV SCART Connects to TV SCART cable.
6. VCR SCART Connects to VCR SCART cable.
7. COAXIAL Output for connecting to a amplifier.
8. OPTICAL Output for connecting to a amplifier.
9. HDMI Connects to HDMI jack of TV.
10. RS 232 Connects to personal computer for software upgrade.
11. Ethernet Connects to Lan cable.
12. USB Connects to USB device.
13. POWER SUPPLY 90~250V AC, 50/60Hz, 40W.
14. POWER BUTTON Turns On/Off.
Page 12
10 11
INSTALLING EQUIPMENT
This section explains several ways of connecting the receiver to your existing
TV, VCR and Hi-Fi system.
You can choose one of the following setups that we recommend.
If you have any problem or need help, consult your dealer or service provider.
Please ensure that the following items are included with the receiver in your packing.
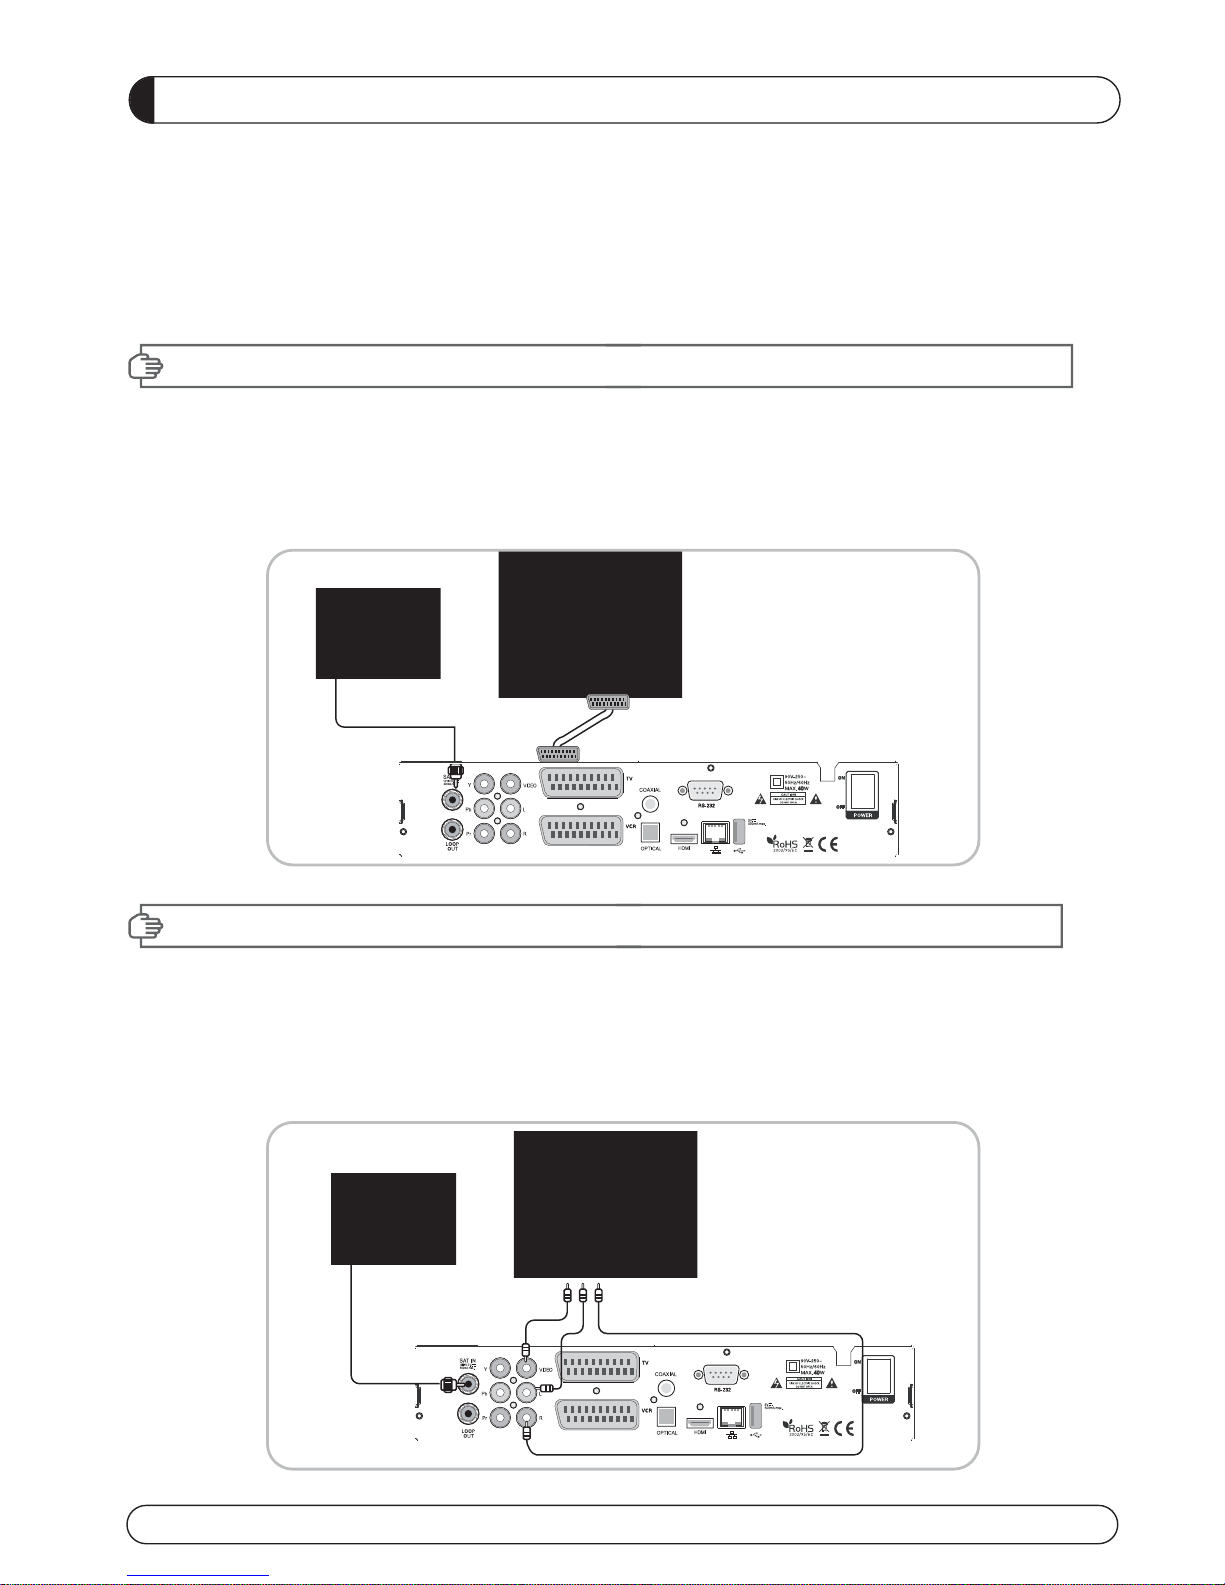
I-1. Connecting the receiver to TV with the SCART cable
Connect one end of the SCRAT cable to the TV SCRAT cocket on the rear panel of the
receiver and the other end to a SCRAT socket on the TV.
II-1.Connecting the receiver to TV with the CINCH cable
Connect one end of the CINCH cable to the Audio-R(Red), the Audio-L(White)and the Video (Yellow) socket on
the rear panel of the receiver and and other end to the Audio-R(Red), the Audio-L(White) and the
VIDEO(Yellow) socket on the TV.
I. CONNECTING THE RECEIVER TO TV
II. CONNECTING THE RECEIVER TO TV WITH CINCH CABLE
Page 13

CHANNEL LIST GUIDE
1. Normal Live Mode
a) When you select one channel, information bar appears
automatically on the screen for few seconds. This bar
provides you the current channel information.
b) Press INFO button to see the information during normal
live mode.
2. Simple Channel List
a) Press OK on the normal live mode to go to the channel
list.
b) When detail channel list is displayed on screen press
RED button to go to simple channel list.
3. Detail Channel List
a) Press OK on the normal live mode to go to the channel
list.
b) When simple channel list is displayed on screen press
RED button to go to detail channel list.
c) Press and to sort by Alphabet.
d) Press SAT button to sort by Satellite and FAV
button for Favorite 1~8.
e) Press GREEN button to return to All Channel or EXIT to
return to the current live channel.
f) Press the SAT key to show Satellite Pop-UP Window then
select satellite. Channel list of selected satellite will be
displayed.
g) Press the FAV key to show Favorite Pop-UP Window then
select FAV list. Channel list of selected FAV will be displayed.
h) Press the Green key then all searched channel list will
be displayed.
Page 14

12 13
CHANNEL LIST GUIDE
4.EPG (Electronic Program Guide)
a) Press EPG button on the live mode.
b) EPG of the current channel appears on the screen.
c) Select the channel that you want to watch program.
d) It will be appear like rightside picture.
5. ZOOM IN/OUT
a) By pressing ZOOM key in a normal live mode, you
can use Zoom In/Out fuction.
b) You can select zoom size with RED/GREEN key.
c) You can select the start position with key.
d) After select Zoom size and pisition, you can start
zoom function with OK key.
e) With key, you can move zooming screen.
Page 15

MAIN PAGE
MENU GUIDE
I. CHANNEL MANAGER
Press the MENU button on the RCU to open Main
Page on the screen. Main Page will be displayed.
1. You can move into the main page using
on the RCU.
2. Press OK to confirm your selection.
3. Press EXIT to return to the previous menu or press
MENU to go to the current live channel.
I. Channel Manager
II. Installations
III. Options
This section may help you to organize channels according to your preference.
1. Select Channel Manager in the Main Page with and press OK.
2. TV Channel Manager Page displays on the screen.
3. Select the mode that you want using .
4. To see the channel that you choose, go to the channel and then press RED botton.
5. Press EXIT to return to the previous menu or press MENU to go to the current live channel.
I-1. Favorite
I-2. Rename
I-3. Move
I-4. Lock
I-5. Delete
I-1. Favorite
1. Using go to the Favorite mode then press
YELLOW button to choose Favorite 1~8.
2. Press OK on the channel that you want to add
or delete.
3. will be marked at the end of selected channel
name bar. To delete press OK again.
4. Selected channels will be automatically saved.
5. If you want to check the saved Favorite Channel List
go to other mode(Rename~Delete) except Favorite
and then press FAV button to check Favorite 1~8.
6. Press EXIT to return to the previous menu or press
MENU to go to the current live channel.
7. Press BLUE button to rename Favorite.
IV. Utility
V. Accessory
Page 16

14 15
I. CHANNEL MANAGER
MENU GUIDE
I-2. Rename
1. Using
go to the Rename mode.
2. Select the channel that you want to rename using
and
then press OK.
3. Keypad Dialog displays on the screen.
4. Edit the name entering NUMBERS and / or WORDS in the
Keypad Dialog.
5. Press EXIT to return to the previous menu or press MENU to
go to the current live channel.
I-3. Move
1. Using
go to the Move mode.
2. Select channels which you want to move by pressing OK key.
3. Move cursor that you want to place on than press GREEN button.
4. Press EXIT to return to the previous menu or press MENU to
go to the current live channel.
I-4. Lock
1. Using
go to the Lock mode.
2. Select the channel that you want to lock and then press OK.
will be marked at the end of the selected channel name bar.
To delete press OK again.
3. Press EXIT to go to Main Page or press MENU to go to the
current live channel.
I-5. Delete
1. Using
go to the Delete mode.
2. Select the channel that you want to delete and then press OK.
will be marked on the selected channel number.
To delete press Blue button again.
3. Press YELLOW button to delete TP. Select one channel and
press Blue button.
All channels of that TP will be automatically selected.
4. Press YELLOW button to delete Satellite. Select one channel
and press Blue button. All channels of that the Satellite will
be automatically selected.
5. Press EXIT to return to the previous menu or press MENU to
go to the current live channel.
6. Message Box displays on the screen.
7. Select OK on the Message Box and then press OK to delete
the markedchannels.
Page 17

MENU GUIDE
This section may help you to set up antenna and
scan satellite or transponder, etc. Select Installations
in Main Page using
and press OK.
Press EXIT to return to the previous menu or press
MENU to go to the current live channel.
II-1. Satellite Search
II-2. DiSEqC Switch
II-3. Motor Setup
II-4. Home Streaming
II-5. Factory Default
II-1 Satellite Search
1.You can move the cursor using and press OK
when you select the value that you want.
a) Satellite
- Press OK to display the Satellite List Box.
- Select the proper Satellite and then press OK.
b) DiSEqC
- Press OK to display the DiSEqC Port List.
- Select the proper DiSEqC port and then press OK.
c) LNB
- Press OK to display the LNB Frequency List.
- Select the proper LNB Frequency and then
press OK.
- You can also input directly the numbers using
NUMBER KEY on the RCU.
d) 22KHz Tone
- Select the one among None, 0 KHz or 22 KHz
depending on the user’s antenna switch box.
e) Search Option
- Press OK to display the Search Option list.
- Select the Search Option that you want and then
press OK.
II. INSTALLATION
f) Search
- Press Search to start scan channels.
- SAT Rename : To rename SAT, Press the
Green button on the RCU.
TP EDIT : To Edit TP, Press the RED
button on the RCU.
Page 18

16 17
MENU GUIDE
II-2. DiSEqC Switch
1. Select Channel Search in Installation using
and press OK.
a) If you select DiSEqC Switch and press OK on the
menu will be, DiSEqC Switch Page will be displayed.
b) Select the proper Satellite of each DiSEqC port
(A~D) using and and press SEARCH.
Selected Satellites will be searched automatically.
II-3 Motor Setup
1. You can move the cursor using and press OK
when you select the value that you want.
a) Motor Type : DiSEqC 1.2, USAL
- Press OK to display Motor Type
- Select the proper Motor Type and then press OK.
b) Satellite
- Press OK to Display the Satellite List Box
- Select the proper Satellite and then press OK.
c) Drive & Driver Step
- Select the direction using .
d) Frequency
- Press OK to Display the Frequency List.
- Select the proper Frequency and then press OK.
e) Motor Movement
- Search the appropriate position of the selected
Satellite using.
II. INSTALLATION
Page 19

II. INSTALLATION
MENU GUIDE
f) Motor Control
Select the position using and then press OK.
Message box displays on the screen.
- Store Sat position : Stores the current position
of the motor for the selected satellite.
- Goto Sat Position : Moves the motor to the stored posi-
tion of the selected satellite.
- Goto Center : Goes to the center of the motor.
- Limit off : disable East, West limit.
- Set East Limit : Set current position as East Limit.
- Set West Limit : Set current position as
West Limit.
- Recaluation Position.
- Reset Position : Resets all stored position
of the motor.
g) Satellite Position
- Input directly the position using NUMBER KEY on
the RCU
- Select the direction using (WEST / EAST).
h) Search Option
- Press OK to display the Search Option list.
- Select the Search Option that you want and then
press OK.
i) Search
- Press Search to start scan channels.
- Press OK to start scanning.
TP EDIT : To Edit TP Press the RED button on
the RCU.
2. Edit my local position
- Press Green Button to edit local Position.
a) Longitude
- Input directly the Longitude using NUMBER KEY on the RCU.
- Select the direction using (WEST / EAST).
b) Latitude
- Input directly the Latitude using UNMBER KEY on the RCU.
- Select the direction using (NORTH/SOUTHd).
3. Press EXIT to return to the previous menu or press MENU to go to the current live channel.
Page 20

18 19
MENU GUIDE
II. INSTALLATION
II-4. Home Streaming
1. PC setting
***Execute 'Home Streaming' program.
a) Go to ‘Preference’ Tab.
b) Select ‘Default URL’ check-box and assign the
download folder by using “Browse” button It is
assigned to “c:\download” but must specify the
destination folder personally to be able to receive
movie files in PC.
Note: Only default server available currently.
2. STB setting
a) Go to Home streaming menu ( Menu
Accessory Network Home streaming ) and
Click Home Streaming.
b) IP-Name Edit Pad will appear & Input Server IP
by numeric buttons of RCU.
c) The IP address must be same as IP address
shown in preference tap of Home Streaming program.
3. Playing the Movie File by Home Streaming
a) Press “Fn” key of RCU in normal view of STB and
then the movie file list in PC will be appeared in
TV Screen.
b) Select the file which you want to see by using
navigation keys of RCU and press “OK” buttons to
play the movie file.
Please see the right picture for better
understanding.
Page 21

MENU GUIDE
II-5. Factory Default
Use Factory Default function only when you want
to return the receiver to the condition of factory
default. All settings and channels will be deleted.
1. Select Factory Default in Installations using and press
OK.
2. Message box displays on the screen.
3. Select OK to return the receiver to the condition of factory
default and then press OK.
4. Press EXIT to return to the previous menu or press MENU
to go to the current live channel.
II. INSTALLATION
Page 22

20 21
This section may help you to set up OSD language,
time, etc. Select Options in Main Page using
and press OK.
Press EXIT to return to the previous menu or
press MENU to go to the current live channel.
III-1. OSD Setup
III-2. Control Panel
III-3. Time Adjust
III-4. Parental Lock
III-1. OSD Setup
1. Select OSD Setup in Options using and
press OK.
a) OSD Language
- Press OK to display OSD Language list.
- Select the language that you want and then
press OK.
b) Audio Language
- Press OK to display Audio Language list.
- Select the language that you want and then press OK.
c) Subtitle Language
- Press OK to display Subtitle.
- Select the language that on want and then press OK.
d) Display Info Bar
- Press OK to display Display Info Bar time list.
- Select the second that you want to display and then press OK.
e) Transparency
- Adjustment of transparency level.
2. Press EXIT to return to the previous menu or press MENU to go to the current live channel.
III. OPTIONS
MENU GUIDE
Page 23

MENU GUIDE
III. OPTIONS
III-2. Control Panel
1. Select TV Setup in Options using and press OK.
a) HD Type
- Select HD video Output.
b) TV Type
- Select your TV type.
c) Aspect Ratio
- Select screen ratio.
d) Screen Control
- Select screen display modes.
e) Brightness
- Adjustment of screen brightness.
f) Contrast
- Adjustment of screen contrast.
g) Saturation
- Adjustment of screen Saturation.
2. Press EXIT to return to the previous menu or press MENU to
go to the current live channel.
III-3. Time Adjust
Set your local time according to your location.
1. Select Time Setup in Options usingand press OK.
2. Time Adjust page displays on the screen.
3. Move the cursor using, and press OK when you
select the value that you want. (Input Hour directly using
number keys on the RCU)
4. Press EXIT to return to the previous menu or press MENU to
go to the current live channel.
III-4. Parental Lock Setup
1. Select Parental Lock Setup in Options usingand press OK.
2. Parental Lock Page displays on the screen.
3. You can lock and unlock Parental Lock selecting ON or OFF
using (For Channels).
4. You can lock and unlock Install Lock selecting ON or OFF
using (For Installation Settings).
5. Enter new password if you want to change the current password.
6. Confirm your new password entering new password again.
7. Press EXIT to return to the previous menu or press MENU to go to the current live channel.
Note. DEFAULT PASSWORD IS 0000
Page 24

22 23
MENU GUIDE
IV
. UTILITY
This section may help you to use USB, etc.
Select Utility in Main Page using and press OK.
IV -1. System Information
IV -2. Timer
IV -3. Calendar
IV
-1.
System Information
This option help you to know the current S/W and
H/W version. Also provides you the product name.
1. Select System Information in Options using and
pres OK.
2. Press EXIT to return to the previous menu.
IV
-2.
Timer
The Unit(Set top box) will be turned off/on automatically
after a specified time
IV
-3.
Calendar
Page 25

MENU GUIDE
V
. ACCESSORY
This section may help you to use USB, etc.
Select Utility in Main Page using and press OK.
V -1. USB
V -2. Common Interface
-1 USB
The receiver is equipped with host.
1. Select USB in Utility with and press OK.
2. If you want to save Sofware or Database, press Green
button on the RCU.
3. Select the file which you want to save using and OK
button.
4. After downloading the selected file, the receiver will
reboot automatically.
-2 Common Interface
The receiver is equipped with one slot of Common
Interface which have access to the scrambled the pay per
view services with various conditional access modules
and a valid smart card.
The programs that can be descrambled are determined
by the conditional access module and smart card that you
use.
1. Select Common Interface in utility with and press OK.
2. Common Interface displays on the screen.
(The phrase ‘No Module’ is indicated when the
conditional access module is not istalled)
3. Insert the conditional access module into Slot 1.
4. The name of the Slot differs according to each inserted
conditional access module.
5. Press EXIT to return to the previous menu or press
MENU to go to current live channel.
Page 26

24 25
PVR GUIDE
PVR GUIDE
This section may help you how to use PVR function on
this STB.
I.
Recommended Devices
If you want to use PVR function, you need to prepare
equipment as below.
- External USB Hard Disk Drive.
- Flash memory stick
- Format Type: FAT16/32 (System does not support NTFS
and other file system)
II. Record Function
II-1 Reserved Recording
1. Time Reserved Recording
: Set desired recording time- in “Utility -> Timer” to
record at set time.
N
NOOTTEE :: HHooww ttoo sseett uupp bbeeffoorree yyoouu ssttaarrtt ““TTiimmee RReeccoorrdd””
- STB set up in default.
- Please change “OFF” to “Recording” in Active menu.
- Once you set “Recording” in Active menu, you will see
the detail menu for PVR. ( Cycle, Channel Type, Channel
name, Start Time, Duration).
- Press the “Ok” button to select Channel Name.
2. EPG Reserved Recording
: Used to record a selected event from EPG.
- Press the EPG button to go into EPG menu while watching a program on screen.
- To select event play on time: Move from the EPG to
select the event and press the “RECORD button” on RCU.
- If you want cancellation, press more “RECORD button”
once.
- If you want several reserved recording, move and press
the “RECORD button” on RCU.
Page 27

PVR GUIDE
PVR GUIDE
II. Record Function
II-2 Instant Recording
- Press “RECORD button” on RCU to start recoding program.
- While Recoding program
- Press “PAUSE” key to execute “Time Shift”
- You can use “LEFT/RIGHT button” to view desired time while
recoding program.
- Press “OK button” on RCU to display Recording file list
During Recording you can watch also other channels which
are located in same TP. In case of watching other channels
during recording, You should come back to the recording
channels in channel list to stop recording.
- If you press “STOP button” on RCU, current program you are
watching will stop and Live TV will be stored in USB memory
space.
Page 28

26 27
PVR GUIDE
PVR GUIDE
III. Playback Function
- To play previously recorded program, press “Play button”on
RCU.
- Use the arrow buttons to select the file which you want to
play and press “OK button” to play.
- While Playing program.
- If you press “LEFT/RIGHT button” on RCU button while
recoding live TV or recorded file play, current program you
ware watching will stop and picture will re-restart from
where it was moved by “LEFT/RIGHT button” on RCU.
IV. Trick Mode Function
- If you want to play other recorded file during Playback,
press “Play” button.
- If you press “FF(Fast Forward) button” during Timeshift or
Playback, the file will be played at 2X speed and if you press
the “FF button” one more time, the file will be played to 8X
speed.
- If you press the “REW(Rewind) button” during Timeshift or
Playback, the file will rewind at 2X speed and if you press
the “REW button” one more time, the file will rewind to 8x
speed.
- FF/REW function will back to normal play if you press "PLAY
button”.
Page 29

PVR GUIDE
PVR GUIDE
V. Time Shift Function
- If you want to execute “Time Shift” in Live mode You should
set “On” of Time Shift In PVR Option (Accessory -> PVR ->
TimeShift “ON”).
- To star Time Shift in Live mode, press “PAUSE” to start.
- Time shift will played during 30 minutes in Live Mode.
- To start “Play back” during Timeshift press “PLAY” key.
- You can move “play position” using LEFT/RIGHT button during Time Shift.
VI. Format
- You can do FAT32 Format the HDD formatted by FAT32 and
NTFS also.
- You can do Format also the multi partitioned HDD.
- When NTFS formatted HDD is inserted, POPUP message
will appear.
- Press “OK” button to move to “C:, D:, E:, F: NEXT°” in case
of Multi partitioned HDD.
- In case of NTFS multi partitioned HDD, you must format by
FAT 32.
Page 30

28 29
PVR GUIDE
PVR GUIDE
VII. MP3 Play
- Select MP3 file which you want to play in USB menu.
- After you select MP3 file, MP3 play window will be executed.
VIII. JPG View
- Select JPG file which you want to see in USB menu.
- Press OK to see the JPG which you want to.
- You can rotate the image by using LEFT/RIGHT button.
IX. Software Upgrade
- Select * UAD file which you want to upgrade in USB menu.
Page 31

PVR GUIDE
PVR GUIDE
X. How to play the record by PVR of 'HD-XXX' in
PC or Divx Player
X-1 How to play in PC
A) Play KM Player.
B) Select Language.
1) Click right button of Mouse -> Language >
your language.
C) Change the extension name of the recorded file to
*.mpg”.
Example : Welcome to A_131821 -> Welcome to
A_131821.mpg
D) Select the file which you want to play.
1) Click right button of Mouse -> Open Files(S) > Select.
X-2 How to Play in “Divx Player”
A) The file format must be changed to “.avi” format to play in
DivX Player.
B) Select a destination folder where to be saved the file which
will be changed to *.avi.
1) Click right button of Mouse -> Capture -> Select
Capture Folder.
C) Repeat A) -> B) -> C) -> D) of No.1 how to play in PC.
D) Capture the fie which is being played currently to convert
into *.avi.
1) Click right button of Mouse ->Capture -> Video Quick
Capture.
2) Then the playing file is saved in designated folder by *.avi
format.
E) If the playing file is STB SD channel, it is saved by SD and If
the file is HD or H.264 it saved by HD or H.264. If user does
not have DivX player which can play HD or H.264 (at least
CPU sigma8634), he must convert the file SD so that the
general SD DivX player (CPU sigma8511) can play the file.
Page 32

30 31
PVR GUIDE
PVR GUIDE
X-3 How to Convert the file by Divx Manager
A) Play Divx Manager.
1) Setting -> Model ->Rapsody RSH-250/350
B) Select the folder where the file that you want to convert is.
Then the file's information will appear.
C) And select the file which you want to convert and select
“Convert”.
D) Select “Encoding Start” -> It starts “Converting”.
NOTE: Web site for downloading
1. Kmplayer
1) Enter this site : http://2bwithu.tistory.com/245.
2) Download 2 files to 1 folder and unzip the archived file.
After unzip, you can install only click exe file.
2. Divx Manger
1) Enter this site :
http://www.modix4u.co.kr/upboard/view.asp?fcprimkey=44
2) Click below for English version.
Page 33

Check that the power cable is plugged into the power sock-
et.
Check the dish and adjust it.
Check the cable connection and correct it.
Check channel and video output.
Check the volume level of the TV and receiver.
Check the mute status of TV and receiver.
Check the cable connection and correct.
Replace batteries.
Aim the remote control unit directly to the receiver.
Checking that nothing blocks the front panel.
Check the Conditional Access Module and smart card are
appropriate for the selected service.
Check the Conditional Access Module and smart card are
correctly inserted or not.
Check the signal strength and the signal quality in the
menu.
Check the LNB and replace the LNB if necessary.
Check the LNB cable.
Check the Dish and adjust it.
Go to the Option and select System Information.
Contact your Service Provider.
Problem
Nothing appears on the Front
Panel or No power supply
No Picture
No Sound
Remote Control Unit dose not
work
Service is not running or
scrambled
“No Signal” on the screen
Tuner Defective Check
You have forgotten your
secret PIN Code
Solution
TROUBLESHOOTING
Page 34

32 33
SPECIFICATIONS
Item
Specification
SMART CARD 1 SLOT, ISO 7816, GSM11.11 and EMV (payment systems) compatibility
2 SLOTS
PCMCIA DVB Common Interface Standard
(Viaccess, Irdeto, Nagra Vision, Conax, Crytoworks, AlpahCrypt..)
.Conditional Access Module Interface
Item
Type 1 F Type, IEC169-24, Female
Frequency Rage 950MHz to 2150MHz
RF Impedance 75 Ohm unbanlanced
Signal Level -65 to -25 dBm
LNB Power 13.5/18.5Vdc +/- 5%, 0.5Amax, Overload Protected
22KHz Tone Frequency : 22KHz +/- 2KHz, 0.6Vpp +/- 0.2V
DiSEqC Control Version1.0, 1.2, Tone burst A/B
Demodulation QPSK, 8PSK
Input Symbol Rate
DVB-S QPSK : 2~45 Msps
DVB-S2 8PSK/QPSK : 10~30Msps
FEC Decoder
1/2, 2/3, 3/4, 3/5, 4/5, 5/6, 8/9, 9/10 in DVB-S2 mode.
1/2, 2/3, 3/4, 5/6 and 7/8 in DVB-S mode.
Specification
. Tuner & Channel
Item
Specification
. System & Memory
Main Processor STi7101
Flash Memory 8 Mbytes
System Memory 128 Mbytes
A/V Memory 64 Mbytes
Channel Capacity Digital Channel : 8,000
Front 7-Keys, 7-SEGMENT DISPLAY
Page 35

SPECIFICATIONS
Item
HDMI HD Video/Audio Output
TV SCART Output RGB, CVBS, L, R Output with Volume control
VCR Scart In/Out RGB, CVBS, L, R In
CVBS, L, R Out
RCA Output
CVBS, L, R Output(Yellow, White, Red Jack) with Volume Control
Component Video(YPbPr) Out
SPDIF Dolby Digital Bitstream Out(Coaxal, Optical)
- RS-232, Bit Rate : 115,200baud
Data Interface Connector : 9-pin D-sub Male type
- USB : USB 2.0, Type A Connector
Specification
. A/V & Date In/Out
Item
Input Voltage AC 90V ~ 250V, 50Hz ~ 60Hz
Power Consumption Max 40W
Protection
Separate Internal Fuse
The input shall the lighting protection
Specification
. Power Supply
Item
Size(WxHxD) 290mm x 50mm x220mm
Weight 1.5 KG
Specification
. Physical Specification
Item
Operating Temperature 0 °C ~ 40 °C
Storage Temperature -10 °C ~ 50 °C
Operating Humidity Range 10~85% RH, Non-condensing
Storage Humidity Range 5~90% RH, Non-condensing
Specification
. Environmental Condition
Item
Transport Stream 13818-1 MPEG-2, H.264/AVC Transport stream Specification
Profile Level MPEG-2 MP@ML, MP@HL, MPEG-4 H.264/AVC
Input Rate Max. 90Mbit/s
Aspect Ratio 4:3, 16:9, Letter Box
Frame Rate 25Hz for PAL, 30Hz for NTSC
Video Resolution 576i, 576p, 720p, 1080i
Teletext Through VBI or BSD
Audio Decoding MPEG-1 Layer 1 & 2, Dolby Downmix
Audio Mode Single Channel/Dual Channel Joint Stereo/Stereo
Frequency Response 20~20kHz, <+/-2dB
Specification
. MPEG Transport Stream & A/V Decoding
Page 36

BRAND LIST
TV
178
A.R.Systems 0051 0601 1001 0701 0811
Accent 0011 0051 1001
Accuphase 1001 2551
Adcom 1131
ADL 2171
Admiral 0141 0151 0221 0451 0661 0761
Adyson 0341 0351
AEA 0051 1001
AEG 1061 2411
Agashi 0341 0351 0451
AGB 0941
Agef 0141
Aiko 0011 0031 0051 0101 0271 0341 0351
0451 0641 0691 0771 1001
Aim 0051 0101 0331 0751 1001 1371 1551
1701
Aiwa 1341 1361 2521 2541 2561
Akai 0011 0031 0051 0101 0261 0271 0331
0341 0351 0361 0451 0641 0691 0711
0821 0831 0941 0961 1001 1051 1061
1161 1211 1281 1311 1391 1401 1461
1521 1981 2261
Akashi 0011 1861
Akiba 0051 0361 0461 0811 1001
Akito 0051 1001
Akura 0011 0051 0361 0451 0461 0751 1001
1271 1391 2621
Alaron 0341
Alba 0011 0041 0051 0221 0341 0361 0421
0621 0681 0691 0761 0781 0871 1001
1271 1391 1981 2521 2541
Alkos 0031
Allorgan 0321 0351
Allstar 0051 1001
All-Tel 1881
Ambassador 0251
Amplivision 0351 0511 0681
Amstrad 0011 0051 0251 0361 0451 0651 0691
0751 0771 0941 1001 1211 1981 2521
Anam 0011 0051 1001
Anam National 0051 1001 1221
Andersson 2041
Anglo 0011 0451
Anitech 0011 0051 0161 0451 0461 1001
Ansonic 0011 0051 0161 0171 0221 0421 0441
0501 0681 0701 0741 1001 1271 2361
2521
Apollo 0821
Arcam 0341 0351
Arcen Ciel 0201
Ardem 0051 0861 1001 1171 1391
Aristona 0051 1001
Arthur Martin 0221
ASA 0091 0141 0171 0181 0581
Asberg 0051 0161 1001
Asora 0011
Astra 0051 1001
Asuka 0341 0351 0361 0451 0461 2521
ATD 1331
Atlantic 0051 0321 0341 0441 0511 1001
Atori 0011
Auchan 0221
BRAND CODE NO. BRAND CODE NO.
Page 37

BRAND LIST
179
Audiosonic 0011 0051 0201 0351 0361 0451 0561
0681 0701 0861 1001 1391 1401
Audioton 0351 0451 0681 0861
Audioworld 1331
Aumark 0081
Autovox 0141 0321 0351 0421 0591
AVP 2521 2541
AWA 0011 0021 0041 0051 0191 0211 0341
0351 0451 0701 0751 1001 1061
Axxent 0011
Axxon 1391
B&D 2171
Baird 0101 0111 0201 0331 0351 2521
Bang&Olufsen 0141 1021
Barco 0221
Basic Line 0011 0051 0221 0351 0361 0461 0571
0701 0811 1001 1271 1981
Bastide 0351
Baur 0011 0051 0271 0301 0591 0641 0931
0951 0981 1001 1971 2381
Bazin 0351
Beaumark 0261
Beko 0031 0051 0681 0761 0861 1001 1391
1401 1711 1981 1061
Belson 2081
Bemmett 0051 1001
BenQ 2491
Beon 0051 0761 1001
Berthen 1271
Best 0561 0681
Bestar 0051 0681 0701 1001
Bestar-Daewoo 0701
Binatone 0351
Black Diamond 1001 1091 1731 1741 1981
Black Panther 0161
Black Star 0421
Black Strip 0031
Blacktron 0461
Blackway 0361 0461
Blaupunkt 0041 0241 0271 03010711 0951 0981
Blue Sky 0051 0361 0461 0811 0871 1001 1271
1391 1401 1981 2081 2521 2541 2551
2571
Blue Star 0461
Bondstec 0421
Boots 0011 0351
Bosch 0511
Boxlight 1491
BPL 0051 0461 1001
Brandt 0201 0471 0551 1011 1131
Brandt Electronique
0471 0551
Brinkmann 0051 0761 0861 1001 1271
Brionvega 0051 0141 0651 1001
Britannia 0341 0351
Brother 0451
Bruns 0141
BSR 0221 0641
BTC 0361
Bush "0011 0041 0051 0221 0331 0351 0361
0451 0461 0591 0621 0641 0661 0691
0701 0871 1001 1091 1101 1251 1271
1331 1391 1621 1981 2211 2261 2411
2501 2521 2541 2561"
Canton 0361
Capsonic 0451
Carad 0051 1001 1081 1271 1981
Page 38

BRAND LIST
180
Carena 0051 0811 1001
Carrefour 0041 0051 0091 1001
Carver 0241
Cascade 0011 0051 1001
Casio 0051 0221 0591 1001 2521
Cathay 0051 1001
CCE 0051 0351 1001
Celestial 1721 1731 1741
Centrex 1641 1761
Centrum 1981
Centurion 0051 1001
Century 0141 0391 0421
CGE 0221 0421 0681 0761 2521
Cimline 0011 0361
Cinex 1211 2411
Citizen 0081
City 0011
Clarivox 0051 0091 0161 0761 1001
Clatronic 0011 0051 0161 0351 0361 0421 0451
0511 0681 0691 1001 1061 1211 1391
2521
Clayton 1981
CMS 0341
CMS hightec 0351
Combitech 2541
Concorde 0011
Condor 0011 0051 0161 0221 0341 0421 0451
0461 0511 0681 0741 0751 1001
Conia 1561 1741
Conrad 0051 1001
Contec 0011 0021 0041 0051 0211 0341 0451
1001
Continental Edison
0201 0471 0871
Cosmel 0011 0051 0561 1001
Crosley 0141 0421 0221
Crown 0011 0051 0331 0571 0681 0761 0861
0871 1001 1061 1281 1381 1391 1401
1981 2571
CS Electronics 0341 0361 0421
CTC 0421
Curtis Mathes 0151 0231 0361
Cybertron 0361
Cytronix 2311
Daewoo 0011 0051 0341 0351 0361 0701 0911
1001 1181 1261 1821 1921 2001 2511
2541 2551
Dainichi 0341 0361
Dansai 0011 0031 0041 0051 0331 0341 0351
0451 1001
Dansette 0751
Dantax 0681 0861 1061 1391 1401 2541
Datsura 0331
Davis 1491
Dawa 0011 0051 1001
Daytek 1331 1371 2111
Dayton 2111
Daytron 0011 0051 0701 1001
de Graaf 0061 0221 0331 0661 0961
DEC 1661 1861
Decca 0051 0101 0351 0941 1001 1121 2001
2521 2541
Deitron 0051 0361 0701 1001
Dell 2271
Denko 0451
Denver 0051 1001 1041 1061 2071 2631
Desmet 0011 0051 0141 0511 1001
Page 39

BRAND LIST
181
Diamant 0051 1001
Diamond 0011 0341 0451 0691 1311 1331 1691
1731 1751 1861
Digatron 0051 1001
Digiline 0051 0181 1001 1271
Digitex 1731
Digitor 0051 1001 1871 1931
Digivision 0641
DigiX 1921
DiK 0051 1001
Dixi 0011 0051 0141 0351 0421 1001
DL 0051 1041 1641 1831 1951
Domland 0731
Doric 0591
Dream Vision 2461
DSE 1871 1931 2411
DTS 0011
Dual 0051 0221 0351 0441 0591 0601 0731
1001 1161 2001 2521
Dumont 0091 0101 0141 0161 0171 0351 2521
Dunai 0221
Durabrand 0051 1001 2361
Dux 0051 1001
D-Vision 0051 1001
DVX 1951
Dynatron 0051 1001
Easy Leaving 2661
Easy Living 2661
Ecco 1371 1611
Edison-Minerva 0871
E-Elite 0361
Eiki 1481
Elbe 0051 0221 0271 0351 0361 0391 0441
0501 0641 0651 0681 0741 0781 0941
1001 1081 1151
Elbe-Sharp 0941
Elcit 0141 0161 0221 0421 0941
Elekta 0011 0051 0451 0461 1001
Elfunk 2121
ELG 0051 1001
Elin 0011 0051 0171 0181 0221 0341 0591
0641 0961 1001
Elite 0051 0361 0511 1001
Elman 0161
Elta 0011 0341 0451
Emco 0421
Emerson 0051 0091 0141 0221 0251 0261 0421
0461 0511 0521 0641 0681 0691 0861
1001 1391 2521 2551
Emperor 0461
Enzer 1311 1551
Epson 1811
Erres 0051 1001
ESC 0051 0351 1001
Est_le 0221
Etron 0001 0011 0051 0221 1001
Eurofeel 0351 0451
EuroLine 0051
Euroman 0051 0341 0351 0451 0681 1001
Europa 0051 1001
Europhon 0051 0161 0221 0341 0351 0421 0941
1001
Excel 0051 1001
Expert 0221 0321 0441
Exquisit 0051 0421 1001
Fagor 0051 1001
Page 40

BRAND LIST
182
Family Life 0051 1001
Fenner 0011 0701
Ferguson 0031 0051 0111 0171 0191 0201 0391
0471 0551 0641 0781 0961 1001 1011
1131 1981 2521
Fidelity 0051 0221 0341 0451 0641 0661 0691
0751 0931 1001 2521 2531 2541
Filsai 0351
Finlandia 0071 0101 0221 0331 0471 0581 0641
0661 0961
Finlux 0051 0091 0101 0141 0161 0171 0181
0221 0351 0581 0741 0761 0821 0831
0891 0941 1001 1061 1121 1141 1161
1391 1401 2411
Firstline 0011 0051 0101 0161 0221 0331 0341
0351 0391 0421 0521 0591 0641 0701
0741 1001 1271 1391 1711 1981 2041
2081 2551
Fisher 0041 0071 0101 0141 0171 0211 0221
0331 0351 0591 0641 0681 0991
Flint 0051 0101 0361 0451 0811 1001 1081
FNR 0161
Force 2031
Formenti 0051 0141 0221 0341 0511 0861 1001
Formenti-Phoenix
0341 0511
Fortress 0141 0151
Fraba 0051 0681 1001
Friac 0011 0051 0161 0681 0911 1001 1081
1241
Frontech 0011 0221 0351 0421 0451 0591 0661
Fujimaro 1881
Fujitsu 0011 0051 0101 0161 0221 0321 0351
0441 0601 0641 1001 1301 1851
Fujitsu General 0011 0221 0321 0351
Fujitsu Siemens 2311
Funai 0451 0751 1271
Furichi 1861
Futronic 0451 1661 1861
Future 0051 1001
Galaxi 0161 0051 1001 0641 0221
Galaxis 0681 0761 1001 0161 0051
Galeria 0011
GBC 0011 0221 0361 0661 0701
GE 0201 0261 0461 0471 0551 1011 1131
1481
Geant Casino 0221
GEC 0051 0101 0221 0351 0591 0641 0941
1001
Geloso 0011 0221 0421 0661 0701
General 0201 0471
General Electric 0471
General Technic 0011
Genesis 0011 0051 1001
Genexxa 0011 0051 0221 0361 0751 1001
Gericom 1881 2171 1921 2311
Giant 0351
Goldfunk 1271
Goldhand 0341
Goldline 0561
GoldStar (LG) 0001 0011 0051 0061 0201 0221 0261
0341 0351 0421 0481 0641 0661 0681
0711 1001 1061 1391 1401 2571
Gooding 0871
Goodmans 0011 0031 0041 0051 0101 0351 0361
0451 0481 0551 0691 0701 0831 0871
0911 0941 1001 1011 1151 1181 1261
1271 1921 1981 2261 2501 2541 2551
Gorenje 0681
Page 41

BRAND LIST
183
GPM 0361
Gradiente 0051 0241 1001
Graetz 0051 0221 0571 0641 0691 1001 1391
Gran Prix 1211
Granada 0041 0051 0071 0101 0191 0221 0331
0351 0371 0381 0551 0571 0631 0661
0821 0941 0961 1001 1011
Grandin 0011 0051 0221 0361 0461 0511 0701
0811 1001 1081 1271 1391 1401 1881
1981 2081
Gronic 0161 0221 0351
Grundig 0011 0041 0051 0091 0261 0271 0301
0681 0781 0871 0921 0951 0981 1001
1041 1151 1371 1501 2181 2321 2541
2561 2581
Grunkel 2041
H&B 1711
H_her 1391 2411 1881
Haaz 1371
Haier 0451 1331
Halifax 0341 0351 0451
Hammerstein 0081 0451
Hampton 0341 0351
Hanimex 0361 2541
Hanseatic 0011 0051 0141 0221 0351 0461 0501
0511 0591 0641 0681 0711 0731 0911
1001 1181 1261 1391 1711
Hantarex 0011 0051 0161 0391 0941 1001 1771
Hantor 0051 1001
Harsper 1881
Harwa 1611 2101 2291
Harwood 0011 0051 0751 0871 1001
Hauppauge 0051 1001
HCM 0011 0051 0351 0361 0451 0461 0751
0761 1001
Hedzon 0051 1001
Hema 0011 0351
Hemmermann 0591
Hifivox 0201
Higashi 0341
Highline 0051 0451 1001
Hikona 0361
Hinari 0011 0041 0051 0221 0331 0361 0451
0621 0781 0871 1001 2541
Hisawa 0361 0461 0811 1081 1391 2541
HISense 0331 1831
Hit 0141
Hitachi 0041 0051 0061 0101 0181 0191 0201
0221 0261 0291 0351 0371 0591 0631
0641 0661 0821 0831 0841 0891 0911
0931 0941 0961 1001 1031 1141 1181
1421 1511 1671 1981 1991 2001 2031
2191 2371 2421
Hitachi Fujian 0191 0371
Hitsu 0011 0361 0811 1081
HMV 0141
Home Electronics
1061
Homyphon 0051 1001
Hoshai 0361 0461 0811
Huanyu 0341 0701
Hugoson 1941 2171
Hygashi 0341 0351
Hyper 0011 0341 0351 0421
Hypersonic 0641
Hypson 0051 0351 0391 0451 0461 0811 1001
1271 1391 1401 2541 2571
Page 42

BRAND LIST
184
Hyundai 0051 1001 1371 1551 1861 1881 1891
2221
Iberia 0051 1001
ICE 0011 0051 0341 0351 0361 0451 0691
1001
Ices 0341 0361
Ict 0051 1001 2001
Imperial 0051 0221 0421 0591 0641 0681 0741
0761 1001 1151
Indiana 0051 1001
InFocus 1491 1541 2051
Ingelen 0221 0641 0871 1081 1391 2341
Ingersoll 0011
Inno Hit 0011 0051 0101 0161 0351 0361 0451
0461 0481 0941 1001 2041
Innovation 0051 1001
Innowert 1881 2311
Interactive 0051 0141 0201 0221 0641 0681 0741
0931 1001
Interbuy 0011 0051 0421 0451 0931 1001
Interfunk 0051 0141 0201 0221 0421 0591 0641
0681 0931 1001
Internal 0051 0701 0911 1001 2551
International 0341
Intervision 0011 0051 0161 0221 0351 0361 0421
0451 0461 0681 0691 0711 1731 0811
0861 0871 1001
Irradio 0011 0051 0361 0421 0481 0691 1001
Isukai 0051 0361 0461 0811 1001
ITC 0351 0511
ITS 0011 0051 0341 0361 0451 0461 0691
1001
ITT 0221 0331 0571 0581 0591 0641 0821
0831 0961 1081
ITT Nokia 0221 0331 0571 0581 0591 0641 0661
0821 0831 0961 1061 1081 1161
ITV 0051 0421 0451 0701 1001
JDV 2621
Jean 0041
JEC 0031
JMB 0051 0701 0781 0911 1001 1181 2541
Jocel 1381
Jubilee 1001
JVC 0041 0151 0361 0691 0761 1061 1231
1301 1471
Kaisui 0011 0051 0341 0351 0361 0461 0811
1001
Kambrook 0711
Kamp 0341
Kapsch 0171 0221 0321 0441 0641
Karcher 0051 0161 0221 0451 0461 0681 1001
1061 1081 1391 1621 2411
Kathrein 0051 1001
Kawa 0691
Kawasho 0341
KB Aristocrat 0221
Kendo 0051 0161 0221 0421 0651 0661 0681
0711 0741 0931 1001 1081
Kennedy 0221 0321 0781
Kennex 1981
Kenwood 0181
KIC 0351
Kingsley 0341
Kiota 0001
Kiton 0051 1001 1271
Kneissel 0051 0391 0441 0501 0651 0681 0701
0741 0781 0911 1001 1081 2541
Page 43

BRAND LIST
185
Kolster 0051 0161 0421 0591 1001
Konichi 0011
Konka 0051 0361 0691 0761 1001 1041 1191
1391 1561 1631
Kontakt 0871
Korpel 0051 1001
Korting 0141 0511 0681
Kosmos 0051 1001
Kotron 0451 0751
Koyoda 0011
Kraking 0391
KTV 0351
Kuba 0221 0591
Kuba Electronic
0221 0591
Kyoshu 0451 0751 0761
Kyoto 0221 0341 0351
L&S Electronic 1391 1881
LaSAT 0681 0861
Leader 0011
Lecson 0051 1001
Legend 0011 0561
Lemair 0741
Lenco 0011 0051 0171 0221 0701 1001 1431
Lenoir 0011
Lesa 0421
Levis Austria 0051 1001
Leyco 0051 0101 0451 1001
LG 0001 0011 0051 0201 0221 0261 0341
0351 0481 0681 0711 1001 1061 1331
1391 1401 1771 2011 2021 2081 2431
2571
Liesenk & Tter 0051 1001
Liesenkotter 0051 1001
Lifetec 0011 0051 0361 0451 0701 0931 1001
1241 1271 1301 1981 2001
liyama 2171
Lloyd's 0001 0011
Lodos 1981
Loewe 0051 0141 0501 0651 0681 0931 0941
1001 1171 1241 1651
Logik 0001 0011 0021 0081 0451 0691 1331
1611 1921 2171
Logix 1271
Luker 2621
Luma 0011 0051 0221 0321 0441 0651 0661
0701 0741 1001
Lumatron 0051 0111 0221 0321 0351 0441 0451
0641 0651 0661 1001
Lux May 0011 0051 1001
Luxor 0221 0291 0331 0351 0481 0591 0631
0641 0661 0821 0931 0891 0961 1161
1981 2041 0831
LXI 0261
Madison 0051 1001
Magnadyne 0141 0161 0221 0421 0941
Magnafon 0111 0161 0341 0941
Magnavox 0041 0051 1001 1641
Magnum 0051 1001 1211 1391 1401 2301
Mandor 0451
Manesth 0031 0051 0221 0351 0451 0511 0661
1001
Manhattan 0051 0221 1001 1271 1621 1981
Marantz 0051 0751 1001
Marelli 0141
Mark 0011 0051 0341 0351 0701 1001 1391
1401
Page 44

BRAND LIST
186
Master's 0911
Masuda 0011 0051 0351 0361 0451 0691 1001
Matsui 0011 0021 0031 0041 0051 0071 0101
0221 0251 0271 0301 0331 0351 0551
0591 0621 0661 0691 0771 0781 0811
0871 0941 1001 1141 1391 1981 2541
Matsushita 1221
Matsuvisma 1041
Maxam 0451
Maxdorf 1611
Maxim 2411 2621
MCE 0011
Mediator 0051 1001
Medion 0051 0411 0931 1001 1271 1331 1391
1711 1921 1981 2001 2241 2301 2361
2501 2541
Megas 1081
Megatron 0261
MEI 0051 1001 1981
Melectronic 0011 0051 0171 0181 0201 0221 0271
0301 0341 0351 0421 0471 0581 0591
0641 0701 0741 0831 0891 0931 1001
1181 1261
Memorex 0011 0081 0261
Memphis 0011 0051 0101
Mercury 0001 0011 0051 1001
Merritt 0221 0641 0961
Metz 0051 0141 0271 0301 0671 0721 0801
0951 0981 1001 1041 1271 1531 1981
MGA 0051 0171 0261 0361 1001
Micromaxx 0051 1001 1151 1271 1711 1981
Microstar 1711
Mikomi 2031
Minato 0051 1001
Minerva 0091 0191 0271 0301 0871 0941 0951
0981
Minoka 0051 0751 1001
Mirror 2501
Mitsubishi 0041 0141 0151 0191 0261 0331 0951
1001 1981 2571 0931 0051
Mitsuri General 0221
Mivar 0341 0351 0481 0491 0501 0681 0941
1071
Monaco 0011
Morgan's 0051 1001
Motorola 0151
MTC 0081 0221 0341 0591 0641 0681 0931
MTlogic 1391
Multistandard 0161
Multitec 0051 0861 1001 1271 1981 2411
Multitech 0011 0051 0161 0341 0351 0421 0451
0591 0661 0681 0861 1001
Murphy 0101 0171 0221 0341
Musikland 0051 0361 0421 1001
Myryad 0051 1001
NAD 0221 0231 0261 0641
Naiko 0051 1001 1061 2621
Nakimura 0051 0701 1001
Naonis 0221 0661
NAT 0381
National 0381
NEC 0011 0021 0041 0051 0241 0351 0411
0511 0701 0811 0911 1001 1041 1261
1351 1591 2061 2461
Neckermann 0051 0141 0221 0271 0351 0421 0511
0591 0661 0681 0741 0751 0931 0981
1971 2381 1001
Page 45

BRAND LIST
187
NEI 0051 0221 0561 0691 1001
Neovia 1881
Nesco 0421 2541
Netsat 0051 1001
Network 0561
Neufunk 0011 0051 0361 0461 1001 1081 1391
New Tech 0011 0051 0351 1001
New World 0361
Nfren 1681
Nicamagic 0341
Nikkai 0011 0031 0041 0051 0101 0341 0351
0361 0451 0561 1001
Nikko 0261
Nishi 0851
Nobliko 0091 0161 0341
Nogamatic 0201
Nokia 0201 0221 0331 0511 0571 0581 0591
0641 0701 0821 0831 0891 0961 1061
1081 1161
Nordic 0351
Nordmende 0051 0201 0221 0301 0471 0551 1001
1011 1391
Norfolk 0221
Normerel 0051 1001
Novak 0051 1001
Novatronic 0051 0181 0701 1001
Nurnberg 0221 0641
NU-TEC 0811 1331
Oceanic 0221 0331 0641 0821 0831 0961
Odeon 0451
Okano 0011 0051 0101 0451 0681 1001
Omega 0451
Omni 1331 1641 1761 1951
Onwa 0161 0361 0691 0771 1051
Opera 0051 1001
Optimus 0231 1221
Optonica 0151
Orbit 0051 1001
Orion 0011 0021 0051 0161 0251 0451 0511
0521 0621 0751 0781 0941 1001 1241
1391 1921 2541 2561 2611
Orline 0051 0361 1001
Ormond 0051 1001 1271 1981
Orsowe 0941
Osaki 0051 0101 0351 0361 0451 0621 0701
0751 1001
Osio 0051 0481 1001
Oso 0361
Osume 0041 0051 0101 0211 0361 1001
Otto Versand 0011 0041 0051 0151 0201 0271 0301
0351 0381 0421 0461 0511 0591 0641
0931 0941 0951 0981 1001 1971 2381
Pace 2541
Pacific 0051 0781 1001 1391 1981 2001
Pael 0341
Palladium 0051 0141 0221 0271 0351 0421 0591
0661 0681 0741 0761 0981 1001 1151
1241 1391 1971 2001 2381
Palsonic 0001 0051 0351 0361 0451 0711 0751
0761 1001 1331 1611 1631
Panama 0011 0051 0341 0351 0421 0451 1001
Panashiba 0001
Panasonic 0001 0051 0191 0221 0381 0641 0671
0941 0961 1001 1221 1841 1851 2331
2441
Panavision 0051 0741 1001
Page 46

BRAND LIST
188
Papouw 0051 1001
Pathe Cinema 0221 0341 0391 0501 0511 0591 0681
Pathe Marconi 0201
Pausa 0011
Perdio 0051 0101 0221 0341 0461 0511 1001
Perfekt 0051 1001
Philco 0051 0141 0221 0421 0681 0761 1001
Philex 0221
Philharmonic 0351
Philips 0011 0051 0141 0271 0391 0701 0981
1001 1431 1441 1601 2231 2491
Phocus 2301 2321
Phoenix 0051 0101 0141 0221 0341 0511 0681
0861 1001
Phonola 0051 0141 0341 1001
Pilot 0051 1001 1371 1381
Pioneer 0021 0051 0201 0221 0231 0241 0471
0641 0681 0861 0931 1001 1291 1581
Pioner 0681 0861
Plantron 0011 0051 0451 1001
Playsonic 0051 0351 0571 1391 1401
Plus 1591
Policom 0091 0141 0161 0201 0221 0321 0391
0641 0951
Polytron 0461 1321
Poppy 0011
Portland 0701 2551
Powerpoint 0051 0871 1001 1331
Prandoni-Prince
0421 0641 0661 0941
Precision 0351
Premier 0011 0451
President 1861
Prima 0011 0451 0751
Princess 1331
Prinston 1981
Prinz 0101 0291 0591 0641
Profex 0011 0221 0641 0661
Profi 0011
Profitronic 0051 0161 1001
Proline 0051 0101 0521 0741 1001 1121 1131
1151 1181
Prosonic 0051 0341 0351 0681 0691 0701 1001
1271 1391
Protech 0011 0051 0161 0221 0351 0421 0451
0461 0561 0591 0761 0861 1001 1271
1981
Proton 0261
Provision 0051 0911 1001 1391 1981
Pye 0051 0141 0591 0701 0751 0981 1001
Pymi 0011
Quadral 0361
Quasar 0011 0421 1221 1881
Quelle 0011 0021 0041 0051 0091 0171 0181
0201 0211 0271 0301 0351 0421 0451
0481 0581 0591 0641 0931 0951 0981
1001 1271 1971 1981 2381
Questa 0041
R_Line 0051 0221 1001
Radialva 0051 0201 0221 0361 0471 0561 1001
Radiola 0051 0351 1001
Radiomarelli 0051 0141 0421 0941 1001
RadioShack 0051 0261 1001
Radiotone 0011 0051 0451 0681 0751 0761 1001
1211 1271 1981
Rank 0091
Rank Arena 0041 0211 1051 1551
Page 47

BRAND LIST
189
RBM 0091
RCA 0151 0551 1011 1131 1551
Realistic 0261
Recor 0051 0761 1001
Rectiligne 0051 1001
Rediffusion 0041 0581 0641 0961
Redstar 0051 1001
Reflex 0051 1001 1271 1981
Relisys 1881 1981 1901 1911 2111 2131 2141
2151 2161 2281 2311
Reoc 1181 1391 2551
Revox 0051 0681 1001
Rex 0221 0321 0421 0441 0451 0661 0741
RFT 0051 0101 0141 0451 0501 0681 1001
Rhapsody 0341
Ricoh 0051 1001
Rinex 0761 1611
Roadstar 0011 0051 0361 0451 0461 0761 1001
1271 1981 2071 2341 2561
Robotron 0141
Rodex 0051 1001
Rover 0041 1901
Rowa 0011 0341 0351 0451 1041 1331 1381
Royal Lux 0551 0681 0751
Rukopir 0051 1001
Saba 0141 0201 0221 0471 0551 0641 0901
0941 0961 1011 1131 1391
Saccs 0391
Sagem 0461 0811 1081 1781
Saisho 0011 0021 0221 0251 0351 0451 0941
Saivod 0051 1001 1271 1381 2621 1981
Saka_ 0221
Sakyno 0811
Salora 0221 0291 0331 0481 0571 0591 0631
0641 0661 0831 0941 0961 1121
Salsa 0551
Sambers 0161 0941
Samsung 0011 0051 0081 0101 0151 0221 0261
0331 0341 0351 0451 0481 0681 0851
1001 1041 1111 1131 1201 2201 2251
Sandra 0341 0351
Sanela 0391
Sansui 0051 0691 0811 1001 1051 1241 1371
1451 1461 1871 1931
Santon 0011
Sanyo 0011 0021 0041 0051 0071 0101 0171
0191 0211 0221 0241 0331 0341 0351
0501 0571 0681 0861 0991 1001 1351
1431 1481 2121
Save 0051 1001
Saville 2541
SBR 0051 1001
Schaub Lorenz
0591 0641 0701 0861 0961 1061 1391
2081
Schneider 0051 0221 0351 0361 0421 0441 0591
0601 0641 0691 0731 1001 1211 1271
1391 1981 2001 2541 2551
Scotland 0221
Scott 0261
Sears 0261
Seaway 1181
Seelver 0051 1001 1981
SEG 0011 0041 0051 0161 0221 0341 0651
0361 0421 0451 0591 0651 0871 1001
1181 1271 1981 2041 2341 2361 2551
SEI 0051 0141 0161 0221 0251 0321 0591
0941 1001 1971 2381
Page 48

BRAND LIST
190
Sei-Sinudyne 0051 0141 0161 0321 0941 1001 1971
2381
Seleco 0041 0221 0321 0441 0451 0581 0651
0661 0691 0741 0781
Sencora 0011
Sentra 0011 0031 0361 0591
Serino 0151 0341 0811 1081
Sharp 0041 0151 0211 0431 0881 0941 1231
1581 2041 2091 2351
Shintoshi 0051 1001
Shivaki 0051 0261 0701 0781 1001
Show 0011 0101 0761
Siarem 0141 0161 0221 0941
Siemens 0051 0211 0271 0301 0641 0951 0981
1001
Siera 0051 1001 1041
Siesta 0681
Silva 0051 0341 0641 1001 1211
Silva Schneider
2411
Silver 0041 0051 0221 0641 0811 1001 1401
SilverCrest 0051 1001 1981
Singer 0011 0051 0141 0161 0221 0421 0551
0781 1001 2401
Sinotec 1611
Sinudyne 0051 0141 0161 0221 0251 0321 0591
0641 0941 1001 1971 2381 2541
Skantic 0631
Sky 0051 0261 0461 1001 1921
Skymaster 018
Skysonic 1311 1551
Sliding 1881
SLX 1271
Smaragd 0871
Soemtron 1881 2311
Sogera 0511
Solavox 0051 0101 0221 0641 0961 1001
Sonawa 0361
Soniko 0051 1001
Sonitron 0331 0351 0571 0681
Sonneclair 0051 1001
Sonoko 0011 0051 0351 0451 0461 1001
Sonolor 0221 0331 0461 0641 0961 1971 2381
Sontec 0011 0051 0681 1001
Sony 0021 0041 0051 0161 0211 0611 1001
1801 1971 2381 2451 2471
Sound & Vision
0051 0161 0361 0701 1001
Soundesign 0261
Soundwave 0051 0511 0761 1001 1401
Spectra 0011
Ssangyong 0011
Staksonic 0011
Standard 0011 0051 0351 0361 0511 0701 1001
1981
Starlite 0011 0051 0221 0451 0751 1001
Stenway 0361 0461
Stern 0221 0321 0441 0451 0661 0741 0781
Stevison 2411 2621
Strato 0011 0051 0451 1001
Strong 0051 1001 1981 2031 2041
Stylandia 0351
Sunic Line 0051 1001
Sunkai 0051 0361 0521 0621 0811 0871 1001
1081 1881
Sunstar 0011 0051 0451 0691 1001
Sunwood 0011 0051 1001
Superla 0341 0351 0941
Page 49

BRAND LIST
191
Supersonic 0331 0451 1001 1331 1701
SuperTech 0011 0051 0341 0361 1001
Supra 0011 0261 0701
Susumu 0361 0471 0551
Sutron 0011
Svasa 1701
Swissline 0421
Sydney 0341 0351
Symphonic 2521
Sysline 0051 1001
Sytong 0341
T+A 0801
Tandberg 0201 0221 0561 0641 0651 0671 0741
Tandy 0101 0151 0221 0351 0361 0421
Tashiko 0041 0221 0241 0341 0351 0661
Tatung 0021 0051 0101 0351 0941 1001 1121
1141 2411 1291 2541
TCM 1391
Teac 0011 0051 0241 0261 0351 0451 0461
0591 0751 0761 0811 0931 1001 1271
1331 1371 1381 1391 1431 1571 1981
2031 2361 2481 2551 2601
TEC 0011 0051 0221 0351 0421 0441 0551
0561 0641 1001
Tech Line 0051 1001 1271 2361
Techica 0361
Technema 0511
TechniSat 0051 0221 1001 1241
Technisson 1391 2301
Technosonic 0051 1001
Techwood 2041
Tecnimagen 1001
Tedelex 0011 0051 0331 0351 0761 1001 1041
1061 1331 1371 1951 2401
Teiron 0011
Teknika 0081
Teleavia 0201 0471
Telecor 0051 0221 0351 0361 0441 0731 1001
Telefunken 0051 0111 0201 0471 0551 0861 0901
1001 1011 1041 1131 1381 1391 1731
1961 1331
Telefusion 0051 1001
Telegazi 0051 0221 0361 0441 0451 1001
Telemeister 0051 0511 1001
Telesonic 0051 1001
Telestar 0011 0051 0751 1001
Telesystem 1891
Teletech 0011 0051 0421 0561 1001 1271 1981
Teleton 0041 0221 0321 0351 0441 0591 0661
Televideon 0221 0341 0511
Teleview 0051 1001
Telexa 0161
Tempest 0011 0051 0451 1001
Tennessee 0051 1001
Tensai 0011 0051 0171 0181 0221 0351 0361
0421 0511 0691 0701 0711 1001 1401
1981
Tenson 0011 0511
Tesla 0051
Tevion 0051 1001 1211 1271 1391 1981 2001
2241 2301 2311
Texet 0011 0341 0351 0361 0701
Thomas 2521
Thomson 0051 0201 0471 0551 0591 1001 1011
1131
Thorn 0021 0031 0041 0051 0071 0091 0101
0111 0171 0191 0201 0371 0391 0551
0631 0641 0701 0911 0931 0951 0971
1001 1971 2381
Page 50

BRAND LIST
192
Thorn-Ferguson 0031 0111 0171 0191 0201 0391 0551
0641 0911
Tiny 2101 2291
Tiny Digital 1251
TMK 0251 0361
Tobishi 0361
Tokai 0011 0051 0101 0221 0351 0561 0701
1001 1271 1981
Tokaido 1981
Tokyo 0031 0341
Tomashi 0361 0461
Tongtel 1041 1641
Toshiba 0011 0031 0041 0051 0081 0091 0161
0201 021 2301 2541 2561 2591
Towada 0161 0351 0591
Toyoda 0011 0451 0691
Trakton 0011 0351 0451
Trans Continens
0051 0351 0861 1001 1271 1981
TRANS-continents
1121
Transonic 0011 0051 0451 0761 0811 0931 1001
1041 1331 1381
Transtec 0341
Triad 0051 0361 1001
Trical 0211
Trident 0351 0941
Tristar 0361 0451
Trumph 0051 0251 0581 0941 1001
Tsoschi 0461
TVTEXT 95 1001
Uher 0051 0321 0441 0511 0681 0701 0761
0831 0861 1001
Uitravox 0051 0161 0221 0341 0421 0701 1001
Unic Line 0051 0591 0811 0821 1001
United 0051 1001 1391 1401 2541 2561
Universal 0051 1001
Universum 0011 0021 0041 0051 0091 0171 0181
0201 0211 0221 0241 0251 0301 0351
0421 0451 0481 0561 0581 0591 0641
0651 0681 0741 0761 0821 0831 0891
0931 0951 0981 1001 1161 1271 1971
1981 2041 2341 2361 2381
Univox 0051 0141 0221 0391 0561 1001
Utax 0221
V7Videoseven 2481 0261 1921
Vestel 0051 0221 0351 1001 1271 1981 2041
Vexa 0011 0051 1001
Videologic 0341 0361
Videologique 0341 0351 0361
Videosat 0421 1
VideoSystem 0051 1001
Videotechnic 0341 0351 0511 0701
Videoton 0221 0631
Vidikron 0161 1481
Vidtech 0041 0261
Viewpia 1891
Viper 0561
Visiola 0341
Vision 0051 0351 0451 0511 1001
Vistar 0321 0641
Vortec 0051 1001
Voxson 0051 0141 0221 0261 0661 0761 1001
Waltham 0051 0201 0351 0471 0631 0761 1001
1271 1981
Watson 0011 0051 0221 0361 0511 0731 1001
1981 2361 2541 1271
Watt Radio 0161 0221 0341 0591
Page 51

BRAND LIST
193
Wega 0041 0051 0141 1001
Wegavox 0011 0051 1001
Welltech 1391
Weltblick 0051 0351 0511 1001
Weston 0051 1001
Wharfedale 0051 1001 1871 1961 2411
White Wwatinghouse
0051 0341 0511 0561 1001 2551
Windsor 1271 1981
Windstar 0461 0561
Windy Sam 1001
Wintel 1391
World-of-Vision 1881 1901 1921 1941 2301 2311
Worldview 0071 0811
Xenius 1181
Xlogic 1331 1861
Xoro 2101 2171 2211
Xrypton 0051 1001
X-View 2081
Yamaha 1221 1671
Yamishi 0051 0351 0361 0461 0811 1001
Yokan 0051 1001
Yoko 0011 0051 0341 0351 0361 0421 0451
0571 0681 1001
Yorx 0361
Zanela 0391
Zanussi 0321 0351 0661
Zenith 2551
Zenor 0571
ZX 2541
VCR
Accent 0132
Accuphase 0342
Adyson 0132
Aim 0202 0262 0352
Aiwa 0002 0012 0032 0062 0212 0262 0272
0362 0372 0402 0412
Akai 0032 0062 0162 0192 0222 0262 0272
0352
Akashi 0132
Akiba 0132
Akura 0062 0132
Alba 0002 0132 0142 0202 0222 0262 0272
Allorgan 0192
Allstar 0142
Amstrad 0002 0132 0202
Anitech 0132
Ansonic 0002
Aristona 0142
ASA 0032 0142
Asuka 0002 0032 0042 0132 0142
Audiosonic 0202
AVP 0002 0272
AWA 0032 0082 0202 0352
Baird 0002 0062 0152 0162 0202
Basic Line 0132 0152 0202
Beko 0152
Bestar 0202
Black Diamond 0202 0352
Black Panther 0202
Blaupunkt 0022 0142 0182 0462
Blue Sky 0002 0032 0132 0202 0262 0272 0292
0352 0412
Bondstec 0132
Brandt 0062 0232 0242
BrandtElectronique
0062
Page 52

BRAND LIST
194
Brinkmann 0262
Bush 0002 0132 0142 0202 0222 0262 0272
0352 0372
Carena 0142
Carrefour 0092
Casio 0002
Cathay 0202
CGE 0002 0062
Cimline 0132
Clatronic 0002 0132
Combitech 0272
Condor 0202
Crown 0032 0132 0202 0292
Cyrus 0142
Daewoo 0092 0202 0262 0272 0342 0352
Dansai 0132 0202
Dantax 0272
Daytron 0202
de Graaf 0072 0112 0142 0152 0172
Decca 0002 0062 0122 0142 0262 0272
Deitron 0202
Denko 0132
Diamant 0032
DSE 0352
Dual 0002 0062 0142 0202 0262
Dumont 0002 0142 0152
Elbe 0042 0202
Elcatech 0132
Elin 0192
Elsay 0132
Elta 0132 0202
Emerson 0002 0092 0132
ESC 0192 0202
Etzuko 0132
EuroLine 0262
Ferguson 0002 0062 0202 0232 0242
Fidelity 0002 0132 0192 0272 0282
Finlandia 0002 0072 0142 0152 0172
Finlux 0002 0072 0142 0152
Firstline 0032 0072 0082 0092 0132 0202 0262
0412
Fisher 0042 0102 0152
Flint 0262
Frontech 0132
Fujitsu 0002
Fujitsu General
0032
Funai 0002
Galaxi 0002
Galaxis 0202
GE 0232
GEC 0142
General Technic
0262
Genexxa 0152
Goldhand 0132
GoldStar 0002 0032 0292
Goodmans 0002 0032 0132 0142 0192 0202 0262
0272 0342 0352
GPX 0032
Graetz 0062 0152 0192
Granada 0002 0032 0072 0112 0142 0152 0182
0192
Grandin 0002 0032 0132 0202
Grundig 0022 0132 0142 0182 0232 0262 0272
0372
H_her 0202 0352
Haaz 0262
Page 53

BRAND LIST
195
Hanimex 0272
Hanseatic 0032 0042 0142 0202
Hanwood 0132
HCM 0132
Hinari 0062 0132 0192 0202 0272
Hisawa 0272
Hischito 0092
Hitachi 0002 0062 0072 0142 0152 0172 0192
0322
Hornyphon 0142
Hypson 0002 0032 0132 0202 0272 0292
Imperial 0002 0192
Ingersoll 0192
Inno Hit 0132 0192 0202
Interbuy 0032 0132
Interfunk 0142 0152
Internal 0202 0342
International 0032 0202
Intervision 0002 0032 0202 0262
Irradio 0032 0132 0142
ITT 0062 0152 0162 0192
ITT Nokia 0112
ITV 0032 0202
JMB 0262 0272
Joyce 0002
JVC 0062 0122 0302
Kaisui 0132
Kambrook 0032
Karcher 0202
Kendo 0032 0132 0162 0202 0222 0262
Kenwood 0042 0062
KIC 0002
Kimari 0102
Kneissel 0032 0202 0262 0272
Kolster 0262
Korpel 0132
Kuba 0102
Kuba Electronic
0102
Kuwa 0182
Kyoto 0132
Lenco 0202
Leyco 0132
LG 0002 0032 0202 0292 0412
Lifetec 0262
Loewe 0032 0142 0182 0462
Logik 0132 0162 0192
Lumatron 0202 0322
Lux May 0132
Luxor 0082 0102 0112 0132 0152 0162 0222
Magnavox 0142 0352
Magnum 0352
Manesth 0092 0132 0142
Marantz 0042 0142
Mark 0002 0202
Mastec 0352
Master's 0202
Matsui 0002 0322 0192 0262 0272 0372
Mediator 0142
Medion 0262 0272
Melectronic 0002 0032 0042
Memorex 0002 0032 0102 0112 0152
Memphis 0132
Metronic 0142
Metz 0032 0142 0182 0382 0462
Micormay 0262
Micromaxx 0262
Page 54

BRAND LIST
196
Migros 0002
Mitsubishi 0002 0082 0122 0142 0292 0352
Multitec 0032
Multitech 0002 0132 0152
Murphy 0002
Myryad 0142
NAD 0152
Naiko 0262 0352
National 0182 0462
NEC 0032 0042 0052 0062 0122 0152 0202
0412
Neckermann 0062 0142
Nesco 0002 0132 0272
Neufunk 0032
Nikkai 0132 0202
Nokia 0062 0072 0112 0142 0152 0162 0192
0202 0222
Nordmende 0062 0122 0232 0242
NU-TEC 0262
Oceanic 0002 0062 0112 0142 0152 0162
Okano 0132 0202 0222 0262
Onimax 0352
Orbit 0132
Orion 0262 0272 0372 0452
Orson 0002
Osaki 0002 0032 0132
Osume 0132
Otto Versand 0142
Pace 0272
Pacific 0002
Palladium 0032 0062 0132 0192 0222 0262 0282
Palsonic 0002 0132 0352
Panasonic 0182 0382 0422 0462
Pathe Cinema 0082
Pathe Marconi 0062
Perdio 0002
Philco 0042 0132
Philips 0142 0322 0432 0442
Phoenix 0202
Phonola 0142
Pioneer 0072 0122 142 0472
Portland 0202 0342
Prinz 0002
Profitronic 0142 0192
Proline 0002 0202 0232 0242 0352
Prosco 0202
Prosonic 0002 0222
Protech 0142 0202
Provision 0202
Pye 0002 0142
Quasar 0202
Quelle 0142
Radialva 0032 0112 0132 0142
Radiola 0142
Radionette 0032 0412
Rank 0062
Rank Arena 0062
RCA 0232
Reoc 0202 0262 0342
Rex 0062
RFT 0132
Roadstar 0032 0132 0142 0192 0202 0372
Royal 0132
Saba 0062 0202 0232 0242
Saisho 0262
Salora 0082 0152 0162
Page 55

BRAND LIST
197
Samsung 0192 0282 0332
Sansui 0062 0122 0132 0162 0262
Sanyo 0102 0112 0122 0152
Saville 0192 0202 0272
SBR 0142
ScanSonic 0192
Schaub Lorenz 0002 0062 0152 0162 0222
Schneider 0002 0032 0072 0132 0142 0192 0202
0272 0352
Seaway 0202
SEG 0132 0142 0192 0202 0342 0352 0392
SEI 0142
Sei-Sinudyne 0142
Seleco 0032 0062
Sentra 0132
Setron 0132
Sharp 0032 0112 0312
Shintom 0132 0152
Shivaki 0032
Siemens 0032 0142 0152 0232
Siera 0142
Silva 0032
Silver 0202
Singer 0092 0262
Sinudyne 0142 0272
Smaragd 0262
Sonitron 0102
Sonneclair 0132
Sonoko 0202
Sonolor 0112
Sontec 0032 0202
Sonwa 0352
Sony 0012 0022 0162 0402
Soundwave 0032 0262
Ssangyong 0132
Standard 0202
Starlite 0032 0152
Stern 0202
Sunkai 0202 0262
Sunstar 0002
Suntronic 0002
Sunwood 0132
Supra 0032 0192 0262
Symphonic 0002 0132
T+A 0182
Tandberg 0202
Tashiko 0002 0032 0112 0142 0192
Tatung 0002 0062 0082 0112 0142 0262 0272
Tchibo 0262
TCM 0262
Teac 0002 0032 0062 0132 0142 0202 0212
0322 0342 0352
TEC 0132 0202
Tech Line 0132
Technics 0182
TechniSat 0262
Tedelex 0032 0262 0352
Teleavia 0062
Telefunken 0062 0202 0232 0242 0352
Telestar 0032
Teletech 0002 0132 0202
Tenosal 0132
Tensai 0002 0032 0132 0202
Tevion 0262 0352
Texet 0202
Thomson 0062 0122 0202 0232 0242
Page 56

BRAND LIST
198
Thorn 0032 0062 0152
Thorn-Ferguson
0232
Tokai 0032 0062 0132 0152
Tokiwa 0132
Topline 0262
Toshiba 0062 0082 0092 0142 0272 0372
Towada 0132
Tradex 0142
Tredex 0202
Triad 0202
Uher 0032 0192
Ultravox 0202
Unitech 0192
United 0262 0372
United Quick Star
0202
Universum 0002 0032 0142 0152 0162 0192 0262
0392
Victor 0122
Video Technic 0002
Watson 0142 0202 0272 0352
Weltblick 0322
Wharfedale 0322 0352
World 0262
Yamaha 0622
Yamishi 0132 0202
Yokan 0132
Yoko 0032 0132 0192
Yoshita 0132
Zenith 0342
ZX 0262 0272
DVD
3DLAB 0073
4Kus 1163
Acoustic Solutions
0333 0383 1383 1843
AEG 0503 0553 0573 1783
AFK 1123 1283 1333
Aim 0293
Airis 0233 0863 1313 1443 1523 1543 1623
Aiwa 0053 0173 0283 1763 1073 1393
Akai 0273 0313 0333 0473 0533 0573 0713
0823 0843 0973 1053 1073 1353 1583
1693 1933 0553
Akashi 0663
Akira 0293
Akl 0363 0723
Akura 0843 0923 1083 1223 1233 1633
Alba 0073 0233 0283 0293 0333 0353 033
0383 0543 0923 1083
Alize 1113
All-Tel 0533 1863
Amitech 0503 0703
Amoi 0713
Amoisonic 0463 0653
Amstrad 0333 1053
AMW 0783
Ansonic 0443 0623
Apex Digital 0233 0933
Arena 0713
Aria 0833
Arianet 0833
Asono 1313
ATACOM 1313
ATD 0363
A-Trend 0343
Audiosonic 0273
Page 57

BRAND LIST
Audioworld 0573
Audix 0973 1023
Auvio 0693 0993
Avious 1203
AWA 0383 0783
Axion 0383
Baier 0433
Base 1863
Basic Line 0333
Baze 0233 0843 1203
BBK 0743 0983 1313 1873
Bellagio 0783 1403
Belsonic 1703
Best Buy 0733
Black Diamond 0333 0473 0643 0823 1553
Blaupunkt 0353
Blue Sky 0193 0233 0283 0293 0333 0493 0693
1703
BlueTinum 1243
BNI 1523
Boghe 0853 1293
Boman 0543 0553 0843
Brainwave 0503 1053 1363
Brandt 0013 0083 0193
Britannia 0413
Bush 0023 0263 0273 0283 0293 0333 0353
0373 0383 0603 0623 0643 0813 0823
1203 1803 0933
Cambridge Audio
0423 0983 1043
CAT 0293 0563 1643
Celestial 0233
cello 1823 1893
Centrex 0233 0853
Centrum 0333 0533 0563 0833 0863
CGV 0423 0503
Cinea 0683
Cinetec 0333 0783
cineULTRA 0293
Clairtone 1433
Classic 0383 1943
Clatronic 0233 0533 0553 0603 1203
Clayton 0333
clio 1513
Coby 0383 1033
Codex 1353
Compacks 1623
Conia 0023 0233 0463 0653 0713 1523
Contel 0553
Continental Edison
0623 0783 1433
CrossWood 1133
Crown 0193 0273 0493 0503
Crypto 1333
C-Tech 0483 1123
CVG 1213
cybercom 0623
CyberHome 0343 0593 0803 0893
Cytron 0193 0313 0623 1573
Daenyx 0783
Daewoo 0313 0343 0503 0633 0643 0773 0783
1093 1213
Daewoo international
0293 0783
Dalton 0903
Dansai 0503 0543 1053
Dantax 0283 0373
Daytek 0783 0863
Dayton 0783
199
Page 58

BRAND LIST
DCE 0623
DEC 0293 0603
Decca 0503
Denon 0003 0163 1923
Denver 0293 0553 0603 0843 0973 1033 1493
1523 1733 1763 1853
Denzel 0213
Diamond 0193 0373 0423 0483
Digihome 0333
digiRED 0353
Digitali 0833
Digitor 0863 0273
Digitrex 0233 0853 0933
Dik 0623
Dinamic 0553
DiviDo 0313
DK digital 0623 0673 1413 1453
DL 0723
DMTECH 0543 0573 1003
Dragon 0623
DSE 0643 1123 1693 1643
Dual 0193 0213 0333 0383 0533 0543 0573
0623
Durabrand 0623
D-Vision 1053
DVX 0483
Eagletec 0343
Easy Home 0733
eBench 1123
E-Boda 0373
Eclipse 0373 0423
E-Dem 1313
Electrohome 0503
Elfunk 0703
Elin 0503
Ellion 0703 1773
Elta 0273 0503 0553 0573 1053 1113
Eltax 0473 1503 1513 1523
Emerson 0123 0313
Encore 1723
Energy Sistem 1583
Enzer 0213 0473
EuroLine 0553 0973 1053 1353
Eurostar 1693
Fenner 1693
Ferguson 0193
Finlux 0123 0233 0393 0423 0503 0543 1103
1203
Fintec 0333 1213
Firstline 0193 0763
Funai 0243 0283
GE 0353
Germatic 0923
Giec 1293 1643
Global Solutions 0483
Global Sphere 0483
Go Video 0543
GoldStar 0393
Goodmans 0193 0273 0333 0373 0383 0423 0543
0573 0603 0643 0813 0853 1083 1293
1453
GP Audio 1083
Graetz 0213
Gran Prix 0623
Grandin 0233 1453
Grunding 0073 0193 0223 0253 0283 0313 0333
0373 0573 0853 1933 1943
200
Page 59

BRAND LIST
Grunkel 0503 1143
GVG 1213
H&B 0333 0603 0683 0703 1353 1363 1773
H_her 0623 1313
Haaz 0423 0483
Haier 0693 0993
Hanseatic 0393 0543 0573 1133
Harman/Kardon 0303
HCM 0553
HDT 0313
HE 0383
Hen_ 0333
Himage 1173
HiMAX 0693 0733
Hiper 1423
Hitachi 0113 0203 0213 0333 0533 0733
Hiteker 0233 1153
Home Electronics
0383
Home Tech Industries
1313 1863
Hyundai 0473 0543 0703 1143 1333 1713
ICP 1133
Ingelen 0553
ISP 0283
JBL 0303
JDB 0383
JDV 1333 1633
Jeken 0293
Jepssen 1263 1443
JMB 0283
JVC 0013 0073 0093 0133 0753 1193 1373
jWIN 0923
Kansai 1023
kansas Technologies
1353
Karcher 0543
Kendo 0293 0333 0623
Kennex 0333 0503 0673 0843
Kenwood 0003 0063
KeyPlug 0503
Kiiro 0363 0503 0723
Kingavon 0603
Kiss 0213 0683
Koda 0603 1343
Koss 0193
KXD 0733 1523
Lawson 0313 0483
lekei 1553
lenco 0193 0293 0333 0503 0603 0623 1203
Lenoxx 0273 0663
Lexia 0293
LG 0123 0393 0763
Lifetec 0193 0623 1573
Limit 0483
LiteOn 0943 1163 1743 1883
Lodos 0333
Loewe 0073 0393
Logiclab 0483
Logix 0313 0543 1013
Luker 1633
Lumatron 0313 0333 0383 0393 0643 0843 1003
1053 1523
Luxman 0113
Luxor 0333 0383 0853 1043 1943
Magestic 1033
Magnavox 0013 0073 0243 0333 0603 1083
Magnex 0373 1203
Manhattan 0313 0333
201
Page 60

BRAND LIST
Marantz 0073
Maraton 1153
Mark 0283 0333 0823 1933
Marquant 0503
Mastec 0873 1783
Matrix 1383
Matsui 0193 0233 0333 0283 0823 1943
Maxdorf 0553
Maxim 0333 1383 1693
MBO 0273 0383
MDS 0293
Mecotek 0503
Mediencom 0413 0723
Medion 0143 0193 0543 0623 0813 0993 1563
1573
MEI 0573
Memorex 0623
Memory 0383 0923 0973
Metz 0043 0103 0333
MiCO 0373 0423 1253 1293 1303 1453
Microboss 0363
Micromaxx 0283 1573 1933
Micromedia 0013 0073
Micromega 0073
Microsoft 0033
Microstar 0623
Minato 0433
Minax 0333
Minerva 0313
Minix 1983
Minoka 0503
Minowa 1203
Mirror 0433 0813
Mitsubishi 0333
Mizuda 0603 0733 1863
Monbel 1693
Monyka 0213
MP 0693
MPX 0693
Mtlogic 1473
Mustek 0383 1943
Mx Onda 0193 1373 0423 1253 1303 1453
Myryad 1453
Mystral 0623 1143
NAD 0393
Naiko 0503 0853 1633
NEC 0123 0763
Neufunk 0213
Nevir 0503 0623
Nintaus 0583 0923
Nordmende 0623
Noriko 0433
Nowa 0693
NU-TEC 0023 1333 1823
Okano 0433
Omni 0273 0293 0413 0643 0673 1023 1333
1543
Onix 0663
Onkyo 0013
Oopla 1163
Optim 0693
Optimus 0043 0103
Orava 0603
Orbit 0783
Orion 0283 0873 1063 1353 1933
Oritron 0193
202
Page 61

BRAND LIST
203
OTIC 1553
P&B 0603 1863
Pacific 0333 0433 0483 0573 0623
Palladium 0283 0533
Palsonic 0233 0263 0653 0713 0933
Panasonic 0033 0883
Panda 0353 0543
Papouw 0053
peeKTON 0843 1313 1833
Philips 0013 0073 0183 0243 1163 1953
Philo 1563
Phonotrend 0293 1203
Pioneer 0043 0103 0153 1903
Playgo 1473
Plu2 0703
Pointer 0503
Portland 0273 0503
Powerpoint 0363 0723 0783
Prima 0473 1333 1823
Prima Electronic
0473
Prinz 0623
Prism 0873 1133
Prodisma 0723
Proline 0193 0233 0253 0323 0573 0643 1853
Proscan 0033
Proson 0333 0983
Prosonic 0293 0433 1033 1213 1593
Provision 0293 0603 1183
Radionette 0393 0763
Raite 0213
Rank Arena 0363 1253
RCA 0033 0193 0493
REC 0003 0263 0413 0473
Red Star 0443 0453 0503 0553 0843 1033 1563
1793
Relisys 1573
Reoc 0433 0483
Revoy 0293 0683
Rex 0663
Rimax 1113
Ritech 1613
Roadstar 0263 0273 0293 0333 0383 0603 0643
0843 0923 1583
Ronin 0323 0783
Rotel 0093 0133
Rowa 0023 0043 0353 0443 0853 1153
Rownsonic 0373 0563
Saba 0083 0193 1493
Sabaki 0483
Saivod 0443 0503 0623 1633
Salora 0393
Sampo 0433
Samsung 0003 0113 0403 0613 0963
Sansui 0283 0373 0423 0483 0503 1333 1343
1553 1933
Sanyo 0223 0283 0333 0573 0793
Scan 0313 0653 0703
ScanMagic 0383 1943
ScanSonic 0733
SCE 0563
Schaub Lorenz 0503 0553 1363
Schneider 0543 0193 0313 0333 0533 0553 0573
0623 1013 1133
Schwaiger 0433
Scientific Labs 0483 1543
Scott 0193 0233 0363 0723 0903 1353
Page 62

BRAND LIST
204
Seeltech 1313 1543
SEG 0213 0333 0453 0483 0783 0823
Shanghai 0233
Sharp 0143 0283 0333 0433 1643 1753
Sherwood 0353 0393
Shinco 0353
Sigmatek 0733 1313
Silva 0553 0623 0823
Silva Schneider 0623
Singer 0273 0373 0423 0483
Sinotec 0463
Skymaster 0383 0483
Skysonic 0473
Skyworth 0473 0843
Slim Art 0503
Slim Devices 0053
SM Electronic 0273 0383 0483
Smat 0313 0333 0363
Sogo 0723
Sonashi 0623
Soniko 0553
Sontech 1143
Sony 0053 0113 0513 0953 1913
Sound Color 1353
Sound master 0483
Soundmax 0483
Soundwave 0543
Spectra 0783
Standard 0193 0483 0553 0623 0843
Star Cluster 0483 1123
Star Clusters 0483 1323
Star Sound 1823
Starmedia 0603 0833 0863 1313
Stevison 1633
Strong 0333
Sumvision 1823
Sunfly 0733
Sunkai 0503 0703
Sunwood 0553
SuperTech 1443
Supervision 0383 0483
SVA 0233 0433
Synn 0483
T.D.E Systems 1143
Tandberg 0333 7933
Tangent 1513 1523
Targa 0393 1323
Tatung 0503
Teac 0023 0103 0123 0353 0393 0443 0483
0573 0643 0873 1273 1323 1653 1683
TEC 0843
Technica 1003 1243
Technics 0003
Technika 0503 0623 1003 1053 1203
Technosonic 0923 1053
Techwood 0073 0333
Tedelex 0273 1333
Telefunken 0553 0563 0573 0973
Teletech 0333
Tensai 0193 0273 0503
Tevion 0193 0483 0643 0903 1323 1673
Theta Digital 0103
Thomson 0033 0083 1663
Tokai 0213 0553 1843
Tokiwa 0313
Tom-Tec 0563 1853
Page 63

BRAND LIST
205
Tongtel 0463
Top Suxess 1313
Toshiba 0013 0913 1963
TRANS continents
0623 0783 1203 1533
Transonic 0233 1203 1813
Tredex 0693
Trio 0503
Truvision 0733 1863
TSM 1313
Umax 0273 1113
United 0233 0283 0293 0383 0483 0553 0573
0973 1003 1053 1203 1243 1333 1353
1553 1833
Universal Multimedia
0483
Universum 0123 0333 0393 0533 0573 1323
Uptek 0453
upXus 1483 1563
Venturer 0573
Vestel 0333
Vieta 0313 1473
Viewmaster 0743 0983 1313
Voxson 0273 0383 0623
Vtrek 1333
Waitec 1313
Walkvision 0353
Welkin 0623
Wellington 0333
Welltech 1293
Weltstar 0333
Wesder 0293
Wharfedale 0253 0373 0423 0433 0483
Wilson 0623 1353
Windy Sam 0113
Wistar 1813
Woxter 1113 1313 1543
Xbox 0033
Xlogic 0483 0503
XMS 0263 0503 0553
Xoro 1243 1263 1293 1423 1433 1443
Yakumo 0853 0933
Yamada 0783 0853 0933 1113 1163 1743
Yamaha 0003 0073 0183
Yamakawa 0213 0323 0783 1023
Yelo 0363
Yukai 0383
Zenith 0013 0123 0303
Zennox 1473
Page 64

 Loading...