

Page 1

User’s Manual
freedom
M A C H I N E
tm
Page 2

Page 3

About Your Freedom Machine 1
Freedom Machine at a Glance 2-3
Safety and Care 4-5
Setting up Freedom Machine 6
Turning on Freedom Machine 7
Changing Viewing Mode 8-9
Changing Magni cation 10
Changing Brightness 11
Using the X-Y Table 12
Using the Monitor Arm 13-14
Troubleshooting 15-16
Contact Information 16
Warranty 17-18
Table of Contents
Page 4

Page 5

1
About Your Freedom Machine
Congratulations on your purchase of Freedom Machine from Vision
Technology. You have selected a precision-engineered product
designed to give you years of performance and reading
enjoyment.
Freedom Machine is a high de nition compabitle, full color,
auto-focus video magni er, designed to enhance the quality of life
for the visually impaired. With the monitors adjustable arm and
durable steel frame construction, Freedom Machine can provide the
user with great exibility and monitor sizes up to 30 inches.
Freedom Machine enables individuals with low vision to read, write,
view photos, enjoy hobbies, and more. View in color or enhanced
high-contrast viewing modes. Freedom Machine also includes 8
di erent color combinations for text and background to provide
optimum viewing when reading. With easy-to-use dials that are
color coded you can reduce or enlarge the image, change viewing
modes for the greatest visibility, and modify how bright the
image appears.
Please read this user’s manual and learn the Freedom Machine’s
features and operation before using this product. Freedom
Machine is ready to use right out of the box! Familiarize yourself
with Freedom Machine ‘s features and controls before using it and
you’ll be able to enjoy the bene ts from your purchase.
Thank you for choosing the Vision Technology Freedom Machine.
Page 6

2
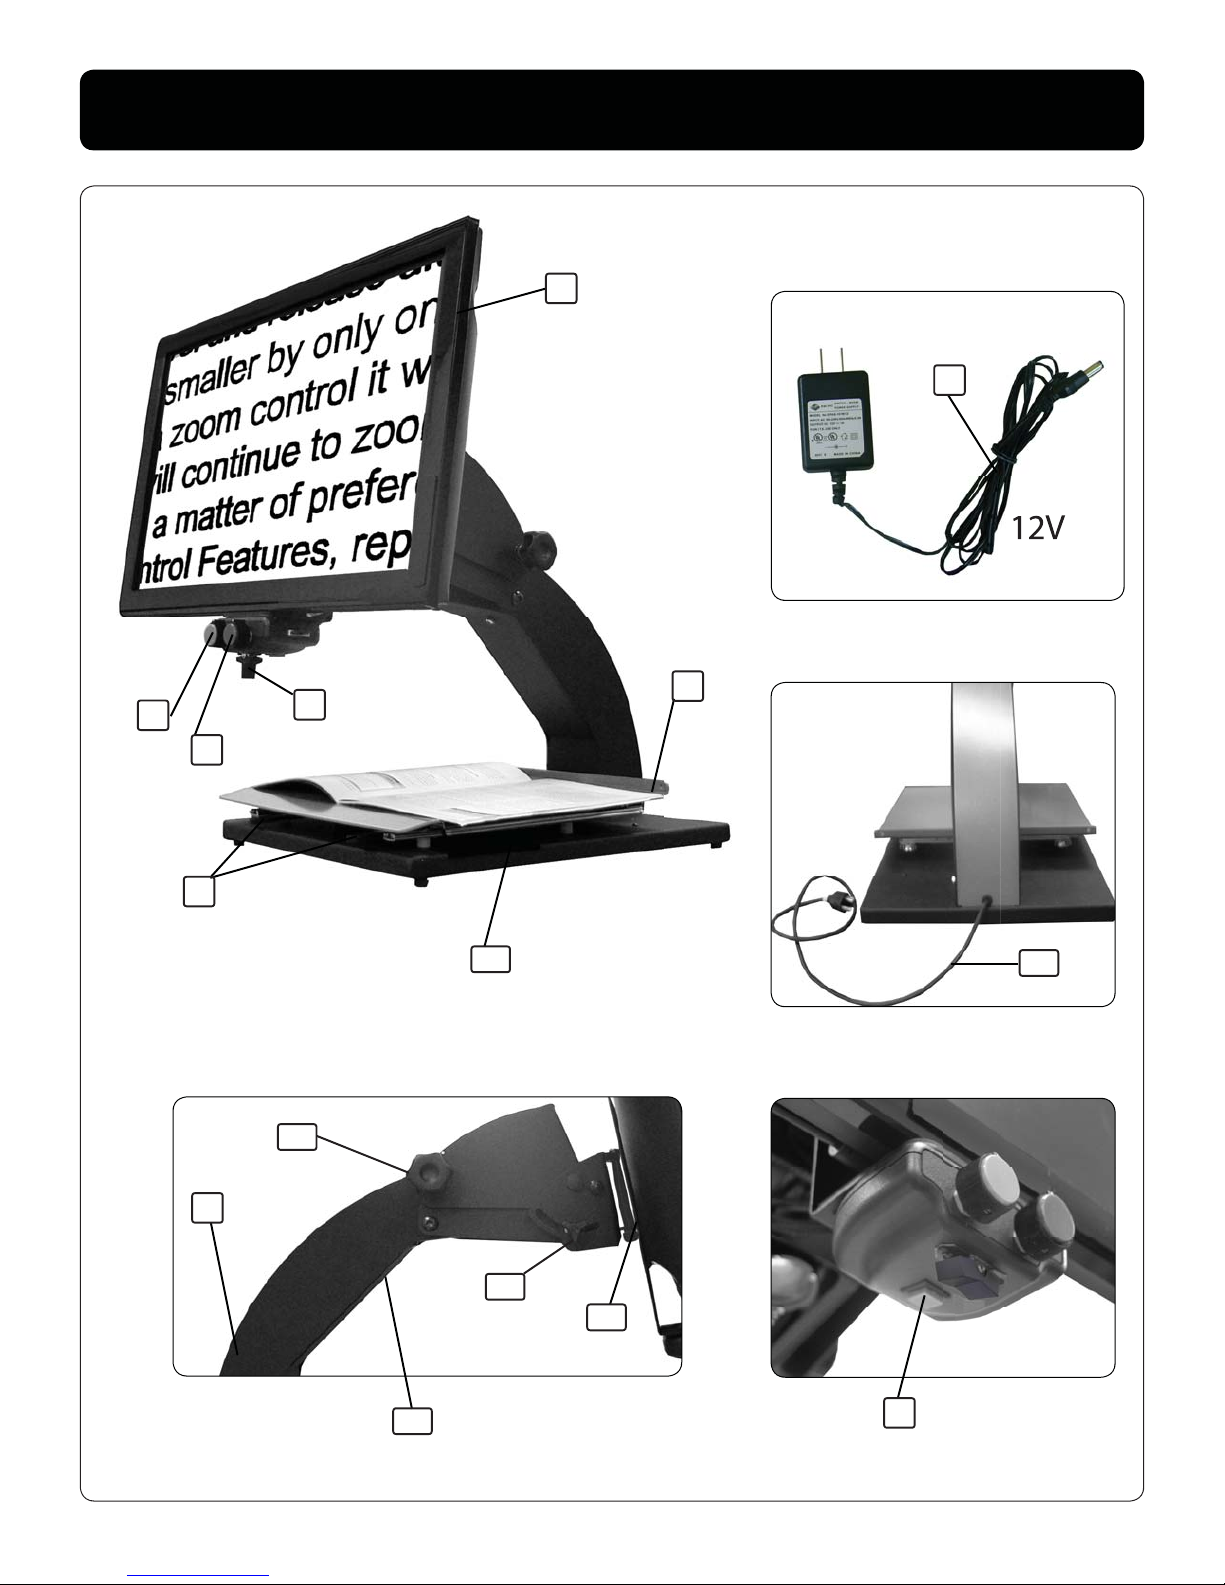
Freedom Machine at a Glance
1. Flat Panel Monitor
2. Flat Panel Monitor Arm
3. Freedom Machine Power Button
4. Viewing Mode Dial
5. Magni cation Dial
6. Brightness Switch
7. X-Y Table
8. X-Y Table Braking Levers
9. Freedom Machine 12V power supply
10. Monitor Cord
11. Resistance Adjust
12. Tilt Adjust
13. Monitor Swivel Adjust
14. Recessed handles for carrying Freedom Machine
15. Weight Adjust
Please familiarize yourself with the components and controls of
your Freedom Machine:
Page 7
3
Freedom Machine at a Glance
1
3
4
5
6
7
8
10
12V
2
11
12
9
13
14
15
Page 8

4
Safety and Care
To get the most life from your Freedom Machine, please review
these safety and care measures carefully.
The Freedom Machine video magni er is designed for enlarging and
enhancing images to improve the quality of life for people who have
low vision. The level to which the Freedom Machine can improve the
ability to see images and text depends on a person’s individual
condition and level of vision degeneration.
Freedom Machine is not designed to restore vision, correct eye
conditions or stop vision loss. A low vision specialist can best
diagnose the Freedom Machine for a patient’s speci c condition.
Safety Measures:
- Freedom Machine is only to be used on a level surface, like a
desk or table.
- Do not set Freedom Machine on a imsy or unstable table. This
could result in the Freedom Machine falling causing
serious damage.
- Only use Freedom Machine indoors. Exposing the Freedom
Machine to extreme changes in temperature may cause
damages to the eletronics and glass optics.
- Place the power cords behind Freedom Machine and away from
foot tra c to avoid a person tripping on the cord causing
damage.
- Do not use Freedom Machine near water to prevent electrical
shock.
- Only use Freedom Machine power supplies. Using di erent
power supplies may cause serious damage to the electrical
components.
Page 9

5
Safety and Care
Moving Freedom Machine
- To move the Freedom Machine from room to room (short
distances), grip the plug at its base and disconnect, do not pull
on any plugs.
- Secure all cords and lock the X-Y table.
- Carry Freedom Machine by the two recessed handles on the
sides of the base unit; pickup from behind Freedom
Machine. Do not carry Freedom Machine by its monitor or
monitor arm.
- Place the Freedom Machine in its new location before
reassembling any cords or accessories.
- Always turn the power o when Freedom Machine is not in use.
- Always unplug Freedom Machine before cleaning. Use a soft
damp cloth to clean the exterior. Do not use cleaning agents or
abrasive materials as they may cause damage.
Page 10

6
Setting Up Freedom Machine
1. Place Freedom Machine on a
sturdy and level table or desk,
where you will be using it.
2. Lift and carry Freedom Machine
by the two recessed handles on the
sides of the base unit; pickup from
behind Freedom Machine. (Do not
lift Freedom Machine by the
monitor or by the monitor arm).
Place it on the table or desk that
you selected.
(see
Picture 1, item #14 on page 3
)
3. Plug Freedom Machine 12V
power supply cord into electrical
outlet and the other end into the
power jack on Freedom Machine.
(
Picture 2, item #9 on page 3
)
4. Plug the monitor cord into the
electrical outlet. This cord is
permanantly attached to the unit.
(see
Picture 3, item #10 on page 3
)
Picture 1
Picture 2
Picture 3
Page 11

7
Turning on Freedom Machine
Power Button
The power button on Freedom Machine is located behind the
brightness switch on the bottom of the control box.
- Press the power button. A beep will occur and the reading
table lights will illuminate, indicating the power is ON.
- The screen will come on momentarily.
(Check the user manual of the monitor for information)
- If using a power strip/ surge bar, make sure its power switch is
turned ON. If the power strip/ surge bar comes with a
circuit breaker, make sure its circuitbreaker has been reset.
Freedom Machine Power Button
Brightness Switch
Page 12

8
You can choose a viewing option by turning the LEFT dial on the control
box. You can turn the dial to 15 di erent options (Figure 1). When you
change to a di erent mode, the mode number and description appears
on screen (Figure 2).
# Description
0 Full Color
1 Black / White
2 White / Black
3 Blue / Yellow
4 Brightness Default Reset
5 Yellow / Blue
6 Black / Yellow
7 Yellow / Black
8 Black / Green
9 Green / Black
10 Blue / White
11 White / Blue
12 Vertical Masking
13 Horizontal Masking
14 Vertical Lines
15 Horizontal Lines
Changing Viewing Mode
Mode Dial
9
10
11
12
13
14
15 1
2
3
4
5
6
7
8
0
Color/ Mode
(
Figure 2)
(
Figure 1)
Mode Description
Mode Number
Mode Dial
Page 13

9
(Mode 0) Full Color
This mode provides true color for text, pictures and objects.
(Mode 1) Enhanced Positive Image
This mode enhances the contrast to o er crisp text for reading, with
a white background and black text.
(Mode 2) Enhanced Negative Image
This mode enhances the contrast to o er crisp text for reading, with
a black background and white text.
(Mode 3, 5-11) Color Combinations
These modes provide enhanced contrast to o er crisp text for
reading, with various color combinations.
(Mode 4) Brightness Reset
This modes resets brightness to default. Press brightness switch to
the left. (See Page 11)
(Mode 12-13) Masking
These modes provide screen masking to guide text for reading.
You can decrease or increase the size of the masking by pressing the
brightness switch left or right (See Page 11).
(Mode 14-15) Lines
These modes provide line markers to guide text for reading.
You can decrease or increase the position of the lines by pressing the
brightness switch left or right
(See Page 11).
Changing Viewing Mode
Page 14

Changing Magni cation
Magni cation Dial
You can increase and decrease the size of the text or image by
turning the RIGHT dial on the control box.
There are 16 levels of magni cation.
- To increase size, turn the dial clockwise, or to the right. (
Figure 1)
- To decrease size, turn the dial counterclockwise, or to the left.
(
Figure 2)
(
Figure1)
(
Figure 2)
10
Magni cation Dial Magni cation Dial
Page 15

11
Changing Brightness
Brightness Switch
You can decrease or increase the brightness of the text or image by
using the brightness switch on the bottom of the control box
- To increase the brightness, press switch to the right
- To decrease the brightness, press switch to the left.
Reset Brightness
You can reset the brightness by turning the mode dial to position 4,
and pressing the brightness switch to the left. (See Page 8)
Freedom Machine Brightness Switch
Page 16

12
Using the X-Y Table
- To lock the X-Y table slide both levers all the way out. (
Figure 1)
- To unlock the X-Y table, slide both levers all the way in. (
Figure 2)
- To lock the side-to-side movement slide the left lever all the way
out. (
Figure 3)
- To lock the back-and-forth movement slide the right lever all the
way out. (
Figure 4)
- Position the levers to control the resistance of the table slides.
Locking the X-Y Table
(
Figure1)
(
Figure 2)
(
Figure 3)
(
Figure 4)
1. With the X-Y table unlocked, place your book on it.
2. Select desired magni cation.
3. Slide the X-Y table, which will ow words across the screen.
4. At the end of a text line, slide table back to the beginning.
Reading with the X-Y Table
Page 17

13
Using the Monitor Arm
Resistance Adjust
Freedom Machine is ready to use out of the box. You do not need to
adjust any of the dials to use the machine.
* All dials turn clockwise. Make sure they are tightened down
before use.
Tilt Adjust - Use this dial to control the tilt angle of the monitor.
(
Figure 1, Page 14)
Swivel Adjust - Place your hands on the monitor and swivel left and
right. (
Figure 2, Page 14)
Weight Adjust - If you purchased Freedom Machine base unit by
itself, use this set screw to calibrate weight capacity of the monitor.
Maximum weight capacity is 22 pounds. (
Figure 3, Page 14)
Resistance Adjust - After calibrating the weight capacity, use this dial
to set the resistance of how the monitor will move.
(
Figure 3, Page 14)
Tilt Adjust
Swivel Adjust
Weight Adjust
Page 18

Using the Monitor Arm
14
(
Figure 2)
(
Figure 1)
(
Figure 3)
Page 19

15
Troubleshooting
Make sure the power supply cord is securely connected to the
electrical outlet. Make sure the opposite end of the power supply
cord is securely connected to the Freedom Machine. Next, press the
square shaped red power button on the Freedom Machine control
box. The
1. Why is the power not working?
The most common reason for a blurry or out-of focus image is
caused by dust or debris on the camera’s protective lens. Clean the
protective lens with a non-abrasive lens cleaning towel.
2. Why is the image out of focus?
Make sure the Freedom Machine power button is pressed inward
and that the power supply is connected. Try turning on and o the
Freedom Machine twice.
3. Why is my reading table dim?
Position the braking levers so they are close together. Next, move the
reading table in a small circular motion. If you can’t move the table
at all check to see if there is a small object obstructing the reading
table’s movement. If you are able to move the table, gradually make
the circular motion larger. To lubricate the reading tables ball
bearings, use a non-corrosive lubrication.
4. Why is my reading table not moving smoothly?
Turn the brightness button to maximum brightness.
5. Why is my image appearing dim on screen?
Page 20

16
Troubleshooting
Check the knob located behind the monitor. This is the tension knob
that controls if the monitor is going the be stationary or going to
be adjustable. Turn the knob to adjustable position and place your
hands on the left and right side of the monitor. Try slowly moving the
monitor downward and upward.
6. Why is my monitor not moving smoothly?
No. The Freedom Machine uses LED ‘s for its lighting source. LED’s are
designed to give you years of trouble free service. LED’s are highly
energy e ecient and rated for over 150,000 hours of usage.
7. Will I ever need to replace the light bulbs?
If you have questions or require technical assistance call :
1-800-560-7226, Monday - Friday 8am - 4:30pm CST.
Contact Information:
Toll Free: 1-800-560-7226
Phone: (314) 890-8300
Fax: (314) 890-8383
www.visiontechnology.com
Sales: clientservices@vti1.com
Support: technicalsupport@vti1.com
Mailing Address:
Vision Technology, Inc.
8501 Delport Drive
Saint Louis MO 63114-5905
The sticker is located underneath the X-Y table. Move the X-Y table
left or right to see your Freedom Machine’s serial number.
7. Where is the serial number sticker located?
Page 21

THREE-YEAR LIMITED WARRANTY ON PARTS AND LABOR
Covers units purchased and currently located in the 50 United States and Puerto Rico.
Vision Technology, Inc. Provides a warranty to the original purchaser of its products against defects in materials and
workmanship for a period of three years. If a Vision Technology, Inc. product is defective within the warranty period,
Vision Technology, Inc. will either repair or replace the unit at its sole option and discretion.
To obtain warranty service, contact Vision Technology, Inc. Technical Support via email: technicalsupport@vti1.com or
via phone at 800-560-7226 from 8:00AM to 4:00PM Monday through Friday Central Standard Time, or visit
www.visiontechnology.com. Proof of purchase in the form of a purchase receipt or copy thereof is required. A
completed and signed Warranty Registration form received within 30 days from purchase date. The Limited Warranty is
non-transferable and applies to products only while the product is in the possession of the original consumer
purchaser.
Parts and Labor
There will be no charge for parts or labor during the warranty period. Replacement parts and units may be new or
recerti ed at Vision Technology, Inc. option and sole discretion. Replacement parts and units are warranted for the
remaining portion of the original warranty.
Limitations and Exclusions
Vision Technology’s three-year limited warranty only covers defects in materials and workmanship. Items not covered
include but are not limited to cosmetic damage, normal wear and tear, misuse, signal issues, power surges, and
damages from shipping, acts of God, any sort of customer misuse, installation, customer modi cations, adjustments,
and set-up issues. Units with unreadable or removed serial numbers are not covered. This warranty does not cover
products sold for commercial use, “AS IS”, “FACTORY RECERTIFIED”, or by a non-authorized reseller. Monitor not included.
TWO-YEAR LIMITED WARRANTY EXTENSION
A two year warranty extension is available for an additional $349.00. This can only be selected by the original
purchaser. A check made payable to VISION TECHNOLOGY must be received with the warranty registration. You can
register for the warranty extension by phone at 1-314-890-8300.
< CUT HERE >
Warranty
17
Date:
Print Name
Address:
City, State, Zip Code:
Phone Number, Email :
Signature:
Serial Number:
Page 22

Warranty Registration Card
Warranty
®
< CUT HERE >
Warranty Registration Car
d
2 Year Warranty Extension:
($349.00)
This section completed by Vision Technology Sta :
Page 23

Notes
Page 24

The Freedom Machine video magni er is designed for enlarging
and enhancing images to improve the quality of life for people
who have low vision. The level to which the Freedom Machine
can improve the ability to see images and text depends on a
person’s individual condition and level of vision degeneration.
Freedom Machine is not designed to restore vision, correct eye
conditions or stop vision loss. A low vision specialist can best
diagnose the Freedom Machine for a patient’s speci c condition.
www.visiontechnology.com
1-800-560-7226
(314) 890-8300
Copyright © Vision Technology, Inc.
Copyright 2010 Vision Technology. All rights reserved.
Product speci cations subject to change with notice.
Vision Technology
®
 Loading...