

VisioFocus 06400 User Manual
Manuale Utente
Leggere attentamente le
istruzioni prima di utilizzare il
termometro.
Türkçe Tanitma
ve Kullanma
Kilavuz
Termometreyi kullanmadan
önce bu talimatları dikkatlice
okuyun.
User Manual
Read these instructions
carefully before using
the thermometer
IT
TR
EN
1.
2.
3.
4.
5.
6.
7.
8.
9.
10.
11.
12.
13.
Fig./Şek. 10
6
3
4
5
2
8
1
9
7
12
10
11
13
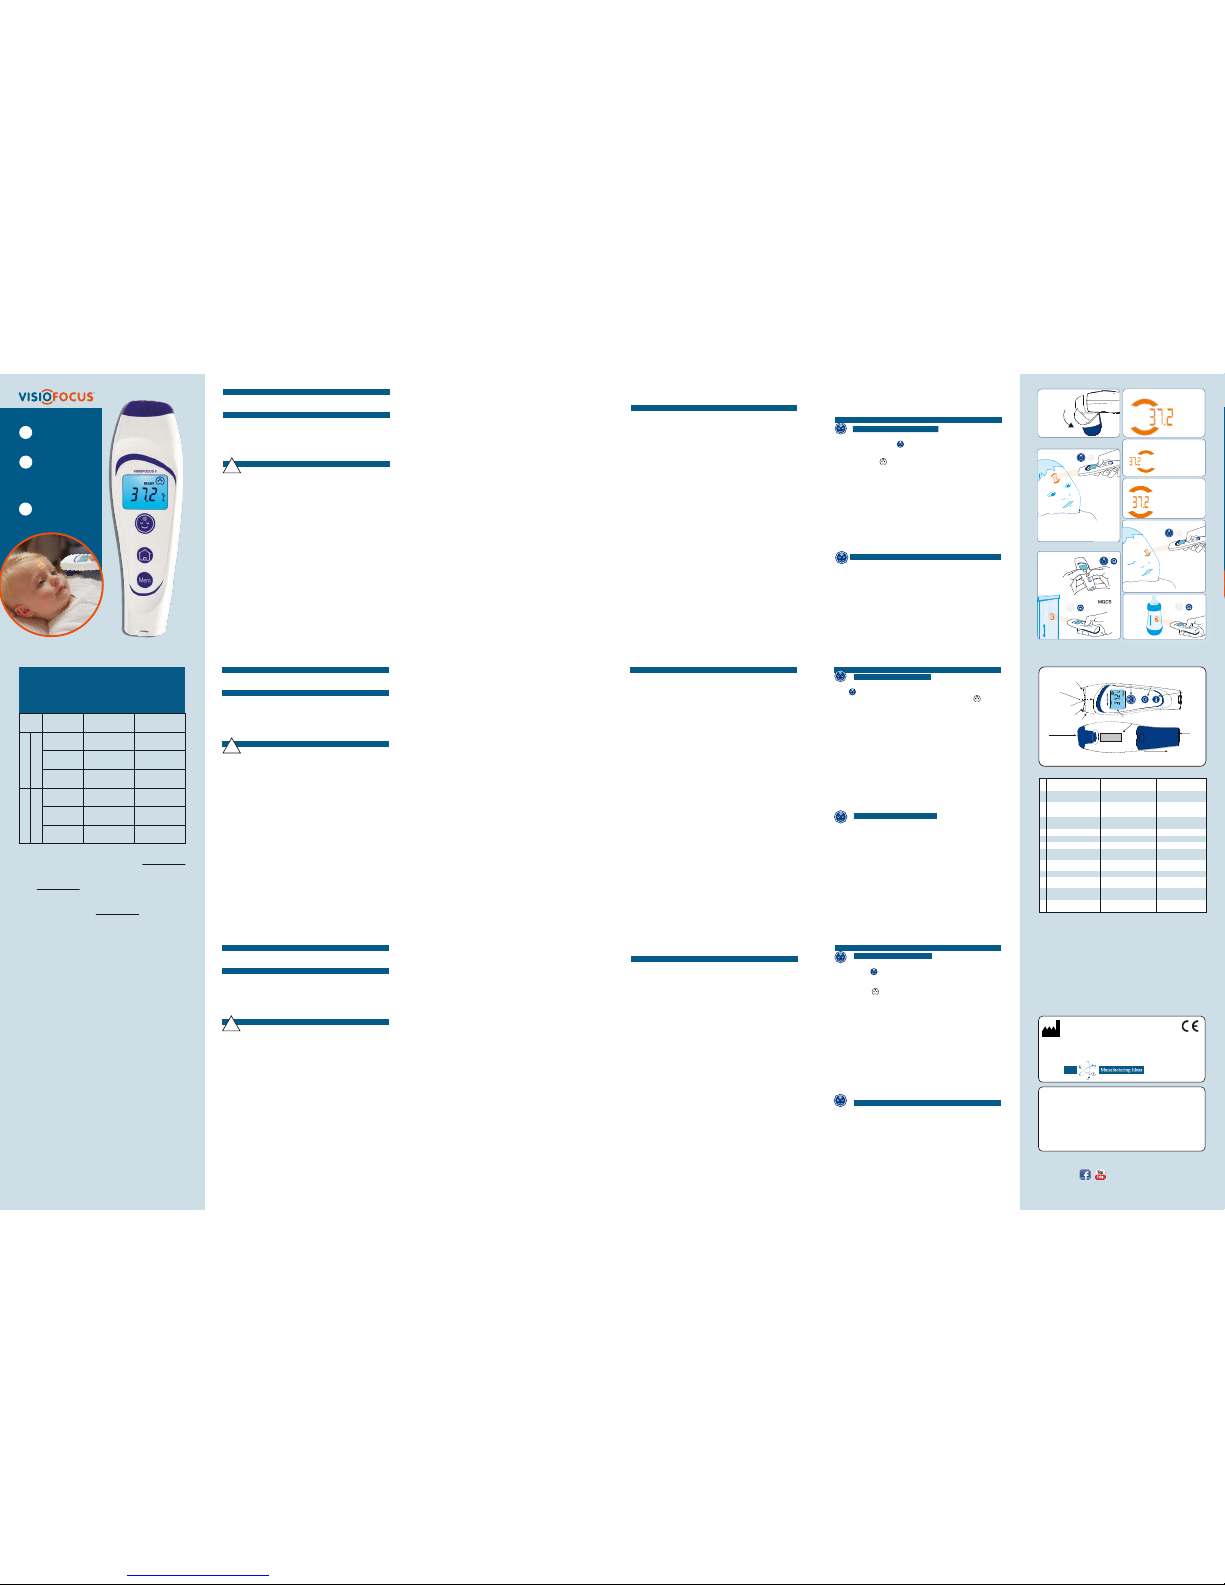
Sensor (dalga
kılavuzunun alt kısmında)
Nişan ışığı
Isı ölçümlerinin alından
alınması için “yüz”
butonu
Diğer ısı ölçümlerini
almak için “ev” butonu
“Hafıza” butonu
LCD ekran
Prob
Nişan ışığı
Yaldızlı dalga kılavuzu
Koruyucu kapak
Seri numarasını taşıyan
etiket
Pil bölmesi (4 x AAA)
Pil bölmesini açmak için
kaydırma yeri
Sensore (sul fondo della
guida d’onda)
Luce di puntamento
Pulsante “Faccia”
per le misurazioni
sulla fronte
Pulsante “Casa” per le
altre misurazioni
Pulsante “memoria”
Display LCD
Puntale
Luce di puntamento
Guida d’onda dorata
Cappuccio protettivo
Etichetta con numero di
serie
Sportello batterie (4 x
AAA)
Far scorrere lo sportello
per aprirlo
Sensor (at the bottom
of the gilt guide wave)
Aiming light
“Face” button for
forehead’s
measurement
“Home” button for
other measurements
Memory button
LCD display
Tip
Aiming light
Parabolic gilt guide
wave
Protective cap
Label with serial
number
Battery door (4 x AAA
batteries)
Lift the cover to
remove it
Compilate questa tabella ed usatela come riferimento. Nel caso consultiate un
medico, informatelo sul tipo di misurazione eseguita e sulla normale temperatura
rilevata in condizioni di benessere. Puoi scaricare dal sito www.visiofocus.com
la tabella in formato più grande.
Bu tabloyu doldurun ve başvuru amaçlı kullanın. Doktorunuza ne tip bir termometre
kullandığınızı ve kişinin iyi sağlık koşullarındaki normal vücut ısısını bildirin.
Tabloyu www.visiofocus.com adresinden daha büyük boyutta indirebilirsiniz.
Fill out this table and use it for refere nce. Tell your ph ysician what type of
thermometer you have used and the person's normal temperature when in good
health conditions.
Download the table in bigger size at www.visiofocus.com.
GARANZIA
Tecnimed s.r.l. garantisce questo prodotto contro eventuali difetti di conformità per la durata di 24 mesi
dalla data di acquisto (farà fede lo scontrino o altro documento fiscale).
Dalla garanzia sono escluse le batterie e gli eventuali danni procurati da batterie difettose o esaurite e gli
eventuali danneggiamenti all'involucro dovuti all'incuria o cattivo uso. La garanzia decade inoltre nei seguenti
casi:
- il prodotto è stato manomesso, danneggiato o è stato usato impropriamente;
- l'etichetta posta sul retro e riportante il numero di serie è stata asportata, danneggiata o resa illeggibile;
- il prodotto è stato aperto o riparato da personale non autorizzato;
- il prodotto ha subito danni dovuti alla non osservanza delle presenti istruzioni.
Per ricevere assistenza contattare il produttore al Numero Verde 800-930321.
In caso di necessità di intervento, verrà rilasciato un Numero di Autorizzazione di Rientro.
Nel caso in cui il prodotto sia stato acquistato tramite un Negozio On Line su Internet, gli interventi in
garanzia possono essere forniti solamente attraverso il rivenditore su Internet dal quale il prodotto è stato
acquistato. In caso di difetto di conformità, il prodotto sarà riparato o sostituito a giudizio del produttore.
L'eventuale riparazione/sostituzione del prodotto non estende la durata della garanzia.
Se, a seguito di verifica tecnica effettuata dal produttore, il prodotto dovesse risultare privo di difetti di
conformità (soggetti a garanzia), Tecnimed si riserva il diritto di addebitare il costo della verifica tecnica e
della successiva spedizione. In nessun caso Tecnimed è responsabile per eventuali danni relativi all’uso
improprio del prodotto o per costi superiori al costo originale del prodotto.
GARANTİ
Tecnimed s.r.l., ürünü satın alma tarihinden itibaren (yazar kasa fişinde veya başka bir mali doküman
üzerinde belirtilen) 24 ay boyunca uygunluk eksikliğine karşı garanti eder. Teknik servis prosedürleri için
Bayiniz tarafından verilen talimatları izleyin.
Bu garanti pilleri ve kusurlu veya bitmiş pillerden kaynaklanan hasarı veya dikkatsiz veya hatalı kullanımdan
dolayı gövdeye verilen zararı kapsamaz. Bu garanti ayrıca;
- ürünün kurcalanmış, hasar görmüş veya yanlış kullanılmış olması,
- seri numarasını taşıyan arka kısımdaki etiketin sökülmüş, zarar görmüş veya okunamaz hale getirilmiş
olması,
- ürünün yetkisi olmayan personel tarafından açılmış ve onarılmış olması,
- ürünün işbu kılavuzda verilen talimatlara riayet edilmemesinden dolayı hasar görmüş olması hallerinde
de geçersiz olur.
Teknik Servis öngörülmesi halinde, Üretici veya Bayinizle temasa geçin.
Ürünün bir online mağaza üzerinden satın alınmış olması durumunda, garanti hizmeti sadece, ürünün satın
alınmış olduğu İ nternet Satıcısı aracılığıyla sağlanabilir. Herhangi bir uygunlu k eksikliği durumunda,
Üreticinin veya Bayinin, kendi takdirinde, karar verdiği üzere, ürün ya onarılacak ya da değiştirilecektir.
Ürünün herhangi bir şekilde onarılmış veya değiştirilmiş olması orijinal satın alma tarihinden itibaren 2 yıllık
orijinal garanti süresini uzatmaz. Eğer, teknik değerlendir me sonrasında, ürünün iş bu garanti şart ve
koşullarının kapsamına girmediğinin bulunması halinde (uygunluk eksikliği bulunmadığı için), Tecnimed
teknik doğrulama ve teslimat için bir hizmet bedeli talep etme hakkını saklı tutar. Hiçbir koşul altında,
Tecnimed ürünün hatalı kullanımıyla ilgili hasarlardan dolayı veya ürünün orijinal fiyatını aşan masraflar
için sorumlu tutulamaz.
WARRANTY
Tecnimed s.r.l. guarantees this product against any lack of conformity for 24 months as of the date of
purchase (indicated on the cash register receipt or other fiscal document). Follow the instructions given by
your Dealer for the technical service procedures. This warranty does not cover the batteries and any
damage caused by defective or run down batteries or damage to the casing due to carelessness or improper
use. The warranty is also voided if:
- the product is tampered with, damaged or used improperly.
- the label on the back bearing the serial number is removed, damaged or rendered illegible.
- the product is opened or repaired by unauthorized personnel.
- the product has been damaged due to non-compliance with the instructions given in this manual.
If Technical Service is required, contact the Manufacturer or your Dealer.
In case the Product was purchased through an Online-store, warranty service can only be provided through
the Internet Seller, where the product was purchased.
In case of any lack of conformity, the product will be either repa ired or replaced, as decided by the
Manufacturer or Dealer, at their sole discretion. Any repaired or replaced product does not extend the
original warranty beyond the period of 2 years from original date of purchase. If, after technical evaluation,
the Product is found not to be covered by the terms and conditions of this Warranty (because no lack of
conformity are found), Tecnimed reserves the right to charge a handling fee for technical verification and
delivery. Under no circumstance may Tecnimed be held responsible for damages related to the improper
use of the product or for costs exceeding the original price of the product.
serie / serisi / series
VISIOFOCUS
®
modello / modeller / model: VisioFocus 06400
Dispositivo medico di classe IIa, testato clinicamente
Sınıf IIa Tıbbi Cihaz (Avrupa Direktifleri uyarınca) – Klinik olarak test edilmiştir
Class IIa medical device (according to the European Directives) - Clinically tested
Brevetti nr. / Paten no.ları / Patents no. US 6,196,714 – US 6,527,439 –
US 7,001,066 – EP0909377 – EP1283983B1 – EP1051600B1. Altri brevetti
internazionali depositati ed in via di concessione / Diğer uluslar arası patentler
inceleme sürecinde / Other international patents pending
Cod. 96406/ITE-4 r.03 160129
0051
Prodotto in Italia da / Manufactured in Italy by
TECNIMED srl /
İtalya’ da TECNIMED srl., tarafından üretilir.
P.le Cocchi, 12 -21040 Vedano O. (VA) - ITALY
Tel. +39 0332 402350 - info@tecnimed.eu
www.visiofocus.com
ITALY
TECNIMED
Türkiye Tek Yetili Distribütörü : Ecrin Özel Sağlık Ltd.Şti.
Sağlık Mah. Adakale Sok. 8/3 Sıhhiye-Ankara (TÜRKİYE)
T:+90 312 431 37 71
F:+90 312 435 37 34
info@ecrinmedikal.com.tr - www.ecrinmedikal.com.tr
www.visiofocus.com.tr
Fronte
Alin
Forehead
Palpebra
Göz kapaği
Eyelid
TEMPERATURA DEI MEMBRI DELLA FAMIGLIA in condizioni di buona
salute, in vari momenti della giornata
AİLE ÜYELERİNİN VÜCUT ISILARI
Günün farklı zamanlarında ve iyi sağlık koşullarında
TEMPERATURES OF FAMILY MEMBERS
in good health, through the day
NOME / AD / NAME
Mattina
Sabah
Morning
Pomeriggio
Oğleden sonra
Afternoon
Sera
Akşam
Night
NOME / AD / NAME
Mattina
Sabah
Morning
Pomeriggio
Oğleden sonra
Afternoon
Sera
Akşam
Night
Follow us on:
Fig./Şek.
7
9
Fig./Şek.
8
Misura alternativa sulla
palpebra /
Alternatif ölçme – göz
kapağından /
Alternative measurement
from the eyelid
Fig./Şek. 6
Sì: distanza corretta
e termometro
perpendicolare
alla fronte
DOĞRU: Termometre
doğru mesafede ve alnın orta
noktasına dik mesafede
YES: correct distance and thermome-
ter perpendicular to the forehead
Fig./Şek. 2
Fig./Şek. 5
Sì: distanza corretta e
perpendicolare
DOĞRU: Termometre
doğru mesafede ve dik
pozisyonda
YES: correct distance and
perpendicular
No: troppo
lontano
Yanlış: Çok
uzak
No: too far
Fig./Şek. 3
No: troppo vicino
Yanlış: Çok Yakın
No: too close
Fig./Şek. 4
Fig./Şek. 1
90°
USO PREVISTO
VisioFocus® è un termomet ro in frarosso destin ato a lla m isurazion e del la
temperatura corporea di bambini e adulti.
1. PREFAZIONE
Nato dall’evol uzione di Thermofocus®, il primo termome tro al mondo senz a
contatto, VisioFocus è davvero facile da usare.
È in grado di rilevare la temperatura di bambini o adulti senza toccare la pelle: è
sufficiente che venga avvicinato alla fronte fino ad una distanza che il termometro
stesso indicherà. Con VisioFocus non dovete più inserire il termometro in alcuna
parte del corpo del vostro bambino. Se il vostro bambino dorme, con VisioFocus
non si sveglierà e se è sveglio, VisioFocus non gli darà alcun fastidio.
01 - Italiano -
2. ATTENZIONE
Leggete attentamente le istruzioni prima di utilizzare il termometro
1. VisioFocus è talmente facile da usare che potreste essere tentati di utilizzarlo
nelle situazioni più disparate. Per evitare di ottenere misurazioni anomale limitatevi
ad usarlo nelle stesse condizioni in cui utilizzereste un termometro normale.
2. Usate VisioFocus in un ambiente con temperatura uniforme, stabile e compresa
tra i 10 e i 45°C, e privo di correnti d’aria.
3. Se il termometro proviene da un ambiente con temperatura diversa da quella
dell’ambiente in cui state operando (anche da un cassetto, un armadietto..), prima
di utilizzarlo eseguite la Calibrazione manuale (MQCS - par. 8, pag. 6). In alternativa
attendete almeno 5 minuti, affinché possa stabilizzarsi, oppure aspettate la fine
del conto alla rovescia sul display senza toccarlo.
4. Non usate il termometro sulla fronte sudata, perché il valore rilevato non
sarebbe attendibile.
5. Evitate di rilevare la temperatura ad un soggetto esposto a correnti d'aria o
che nei minuti precedenti la lettura:
- abbia camminato, corso o fatto esercizio fisico;
- provenga da ambienti ventilati o con una temperatura diversa rispetto a quella
dell'ambiente in cui state usando il termometro;
- abbia indossato berretti, cappelli o sciarpe;
- sia stato esposto ad agenti che possano aver alterato la temperatura della
fronte, come d occe, s hampoo, asciugaca pelli, spugnature , ecc.; anche
appoggiare la mano sulla fronte può alterare la temperatura.
In tutt i ques ti cas i è necessar io att endere alcuni minuti per consentir e la
stabilizzazione della temperatura della fronte. Come alternativa, potete misurare
la temperatura sulla palpebra (par. 4.2 – pag. 4).
6. L’area della quale viene rilevata la temperatura corrisponde alla proiezione
della temperatura. Assicuratevi che quest’area non comprenda sopracciglia o
capelli, oppure gli indumenti. Se cambiate il punto di misurazione sulla fronte
otterrete risultati diversi. Per questo è importante indirizzare le due luci sempre
sul medesimo punto, esattamente al centro della fronte (a metà tra l’inizio del naso
e l’attaccatura dei capelli), tenendo il termometro perpendicolare alla fronte.
!
02 - Italiano -
7. Si racco manda di li berare un’area di 1 cm intor no al la pro iezione della
temperatura; se necessario, spostare i capelli dalla fronte qualche minuto prima
per evitare di ottenere una temperatura più alta del rea le.
8. Quando effettuate una misurazione ricordate che in presenza di olii e cosmetici
e di una maschera di ossigeno, la temperatura rilevat a può essere più bassa
della temperatura corporea reale, mentre se la zona è ostruita da capelli o
indumenti la temperatura ril evata può essere leggermente più alta.
9. La temperatura corporea rilevata sulla fronte può essere influenzata da elevata
sudorazione o da trauma cran ico.
10. Nel caso di persone anziane, l a temperatura corporea rilevat a sulla fro nte
può essere più bassa della r eale corporea.
11. La g uida d’onda dorata (figura 10) è la parte più de licata del termometro.
È costit uita da uno specchietto concavo , rivest ito di oro, che d eve ess ere
mantenuto pulito ed integro. Un suo eventuale danneggiament o, o la presenza
di polvere o altra sporcizia , altererebbero l’esito dell a misurazione.
12. Evitate di m anipolare il termom etro, ed in par ticolare il puntale, più a lungo
dello stretto necessario pri ma della misurazione.
13. Non usate il termometro a contatto con l’orecchio o altre parti del corpo.
14. Non usat e il termom etro a cont atto con og getti o liq uidi. Non i mmergere il
termometro in acq ua o altri l iquidi. Se è penetrato del l iquido nel termom etro
contattare immediatamente il distributore per l’Assisten za. Chiudere sempre il
cappuccio protettivo per evitare che pulviscolo o altro sporco possano penetrare
nel puntale.
15. Non usate Thermof ocus su una persona che sta iniziando una te lefonata
con un cellulare o un cordle ss, o in presenza di forti c ampi elettromagnetici.
16. Tenete il te rmometro lonta no dall’acqua e da fonti di ca lore ed evitate di
esporlo ai raggi diretti del sole. Non sott oponetelo ad urti e non usa telo se è
stato danneggiato o non funz iona correttamente.
17. Se non vengono osservat e le suddette precauzioni, potreste ottenere
temperature molto basse o molto alte, che tuttavia non sarebbero attribuibili
ad un cattivo funzionamento del prodotto.
18. La sicur ezza f oto-biolo gica d elle l uci di punt amento è gar antita in
conformità alla Norma 62471.
19. L’apparecchio è un delicato strumento di misura e non deve essere usato
dai bambini piccoli o come un giocattolo. Tenere lontano dalla portata dei
bambini o di persone con ridotte capacit à motorie o sensoriali. Pi ccole
parti possono essere ingerit e o inalate.
20. L’uso di questo t ermometro non deve sostituir si alla consultazion e di un
medico. Riferite al vostro medico quale tipo di termometro avete usato e in quale
parte del corpo avete misura to la temperatura.
21. Se movimenti bruschi del bamb ino rendono difficile effettuar e correttamente
la misurazione, aiutatevi avvicinando il termo metro alla fronte con le luci di
puntamento già accese.
22. Se dove misurare la temperatura a voi stessi, potete uti lizzare uno specchio;
oppure, se avete un bambino di almeno s ei anni, provate ad insegnargli l’uso
di VisioFocus.
23. Non entrando mai in contatt o con il cor po, VisioFocus non richiede alcuna
protezione igienica “usa e g etta”.
3. COME LAVORA
VisioFocus rileva le emissioni infrarosse emesse naturalmente da ogni corpo ed
in particolare dalla fronte degli esseri umani. La fronte è il luogo ideale per rilevare
la temperatura , essendo percorsa dall'arteria temporale, la quale riceve un
notevole afflusso di sangue tramite l’aorta e la carotide. La fronte, inoltre, è l'unica
parte della testa non coperta da capelli a diretto contatto con il cervello. Il cervello
è l'organo più importante e delicato del nostro corpo, è anche quello che può
subire i danni maggiori da una temperatura troppo elevata. La testa, infine, è la
parte del corpo che per prima cambia la propria temperatura man mano che la
febbre sale o scende.
Ad ogni misurazione, VisioFocus esegue, in pochi centesimi di secondo, una
serie di 125 rilevazioni, che vengono amplificate ed elaborate dal suo sofisticato
microprocessore, insieme al valore della tempe ratura ambiente, in modo da
mostrare sul display la temperatura corporea corretta.
È importante sapere che non esiste un'unica temperatura "normale" uguale
per tutti: ogni persona ha la propria ed essa varia nel corso della giornata
anche secondo l'attività fisica o mentale sv olta (il pianto nel caso d i un
bambino). Inoltre muta da zona a zona del corpo e può essere influenzata dalla
temperatura esterna e da diversi altri fattori, a seconda del tipo di misurazione
eseguita.
A causa della dissipazione di calore alla quale le parti non protette da indumenti
sono esposte, la temperatura che si può riscontrare sulla fronte di una persona
è solitamente più bassa rispetto a quella di altre zone coperte.
Per questo motivo, usando il pulsante “faccia”, il software di VisioFocus applica
automaticamente un correttivo in modo da fornire una lettura approssimativamente
paragonabile alle misurazioni effettuate in altre zone del corpo – misurazioni
ascellare o orale o rettale – comunemente usate nei paesi dove il termometro è
venduto. In alcuni modelli, esiste una sola impostazione; in questo caso, VisioFocus
fornisce una lettura approssimativamente paragonabile alla temperatura interna
(come misurata a livello rettale).
È comunque sempre possibile cambiare il riferimento, tenendo presente che,
rispetto alla lettura in modalità ascellare, una lettura in modalità “orale” fornisce
un valore di 0,2°C più alto, e una lettura in modalità “rettale” è di 0,8°C più alta
(leggete il paragrafo 11 a pag. 10).
In alcuni paesi vengono forniti modelli con un'unica impostazione e in questo
caso VisioFocus fornisce una lettura paragonabile alla temperatura interna come
misurata in sede rettale.
La temperatura rilevabile con VisioFocus sulla fronte di una persona sana può
variare da 35 a 37,5°C, ma in un adulto può anche essere inferiore a 35°C (in
modalità ascellare).
È opportuno conoscere la temperatura normale di ogni membro della famiglia in
03 - Italiano -
condizioni ottimali di salute e nei vari momenti della giornata, per valutare meglio
eventuali stati febbrili. Per aiutarvi, potete compilare la tabella “temperatura dei
membri della famiglia” e usarla come riferimento.
4. COME SI USA
4.1 Misurazione sulla fronte
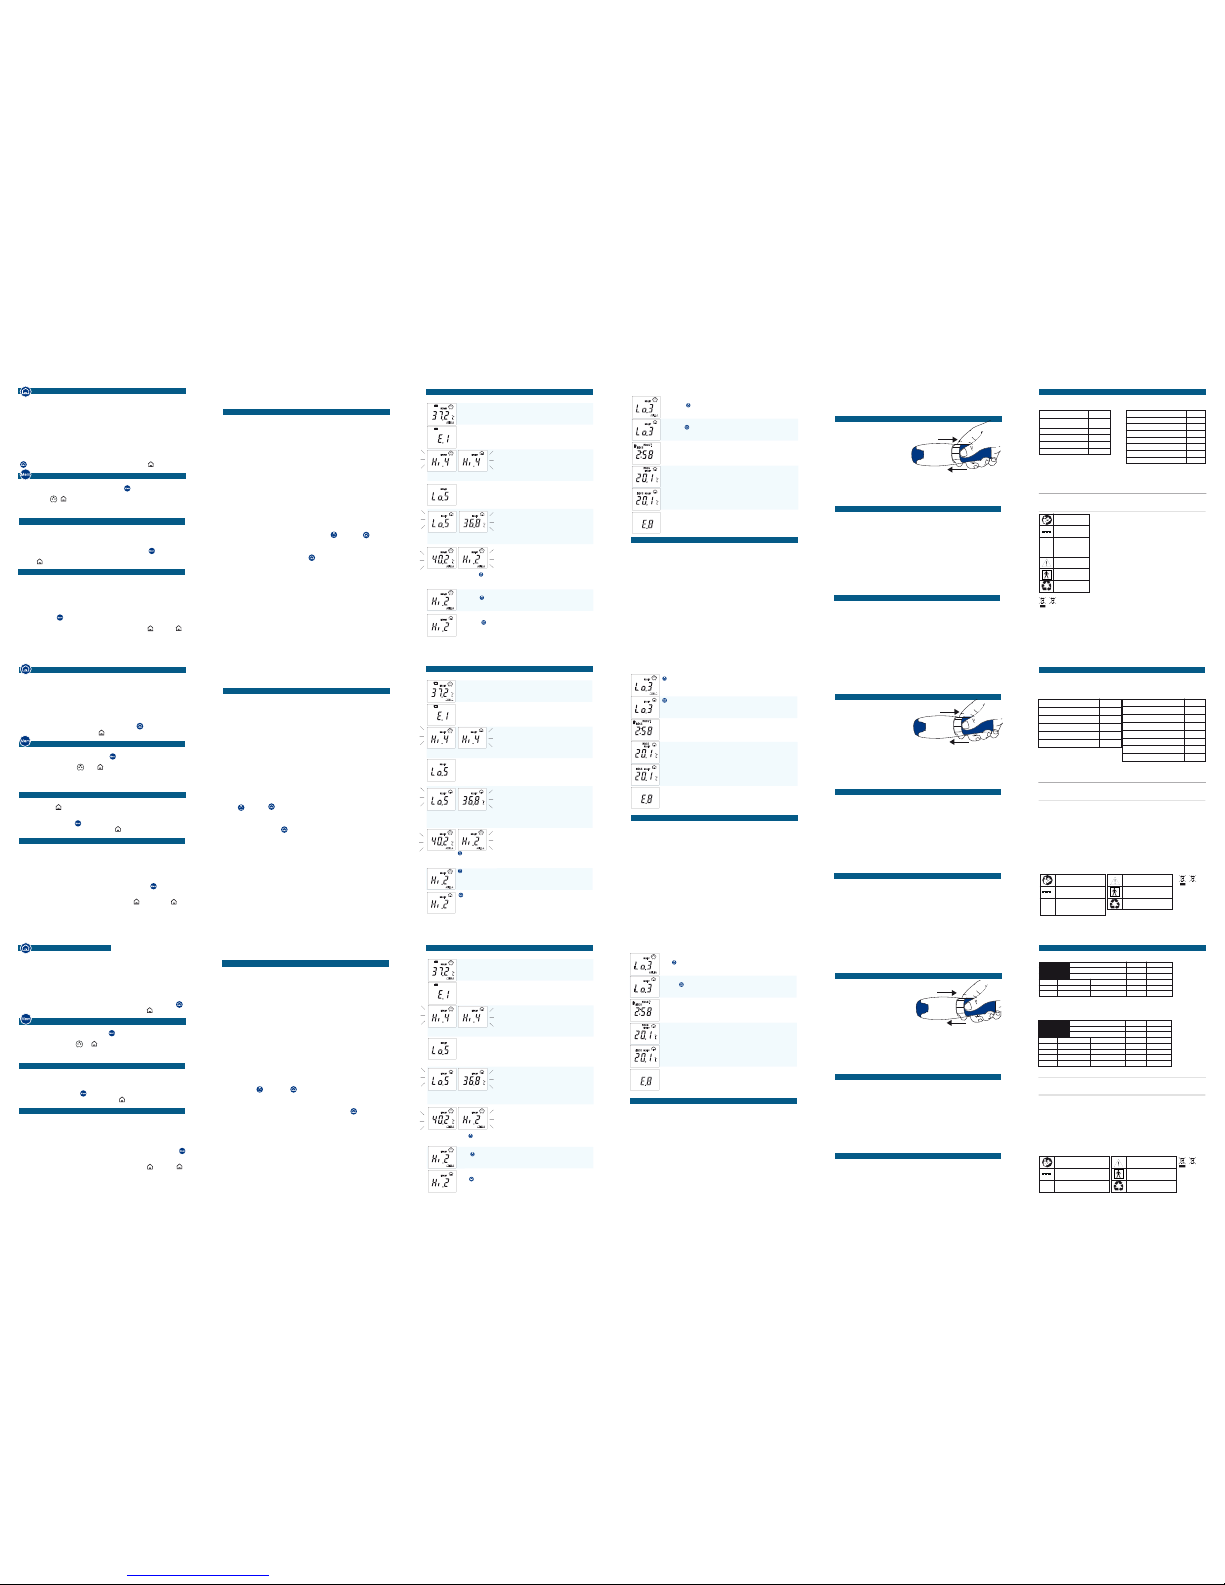
- Aprite il cap puccio protett ivo facendolo ruotare di cir ca 90° (fig. 1 ).
- Premete il pulsan te “faccia” e tenetelo p remuto. Si accend eranno le due
luci di puntamento ed inizierete a vedere sul la fronte la temperatura proiettata
tra due archi . Il display comin cerà a visua lizzare la t emperatura rilevata ,
insieme al sim bolo .
- Avvicinate o allontanate V isioFocus perp endicolarmente al centro del la
fronte fino a quando la tem peratura si p osizionerà com pletamente tr a i due
archi (fig. 2): se il termometro è troppo lontan o o troppo vicino vedrete invece
la temperatura al di fuori d ei due archi ( fig. 3 and 4).
- Quando ved rete la tem peratura esa ttamente in mezzo ai du e archi (fig.
5), il termometro si trova esattamente al la distanza per la quale è stato tarato:
rilasciate il pulsan te tenendo fermo il termo metro fino al lampeggi o delle luci.
Potete leggere la temperatu ra rilevata a nche sul dis play che si i lluminerà in
azzurro. Se ne cessario è pos sibile eseguir e subito un'al tra misurazion e.
- Chiudete il cappuccio protettivo. Dopo 20 secondi di non utilizzo, il termometro
andrà in stan d-by visualizz ando la tempe ratura ambien te per 4 ore prima di
spegnersi (”Mass ima prestazione ”, par. 7). Se prefe rite che si spenga s ubito
dopo i 20 seco ndi, impostate lo in “Risparm io Energia”, p ar. 7, pagina 5).
4.2 In caso di sudore: misurazione sulla palpebra
Talvolta la fronte può manifestare sudorazione, ad esempio quando la febbre
diminuisce, rendendo la temperatura rilevata troppo bassa. Non è sufficiente
asciugare la fronte. In questo caso è possibile prendere la temperatura, sempre
a distanza, sulla palpebra chiusa (fig.6). Non preoccupatevi se il bambino apre
l’occhio durante questa misurazione: le luci sono innocue.
L’accuratezza non è garantita ma questa misurazione può essere considerata una
valida approssimazione della temperatura corporea. Essa è indicata, negli adulti,
anche quando la misurazione frontale è alterata dalla presenza di oli o cosmetici
oppure nelle persone anziane.
04 - Italiano -
KULLANIMA YÖNELİK AÇIKLAMA
VisioFocus® her yaştaki kişilerin vücut ısısını aralıklarla ölçmek için amaçlanmış
bir kızılötesi termometredir.
1. GİRİŞ
VisioFocus’ un - Thermofocus® evrimi, dünyanın ilk temassız termometresi –
kullanımı gerçekten kolaydır. Bir çocuk veya yetişkinin vücut ısısını deri ile temas
etmeden ölçme becerisine sahiptir: Termometrenin kendisinin size belirteceği bir
mesafeden cihazı sadece alın bölgesine yaklaştırmanız yeterlidir. VisioFocus
termometrenin çocuğunuzun vücudunun herhangi bir bölümüne yerleştirilmesine
gerek yoktur. Eğer bebeğiniz uyuyorsa, VisioFocus’ u bebeğinizi uyandırmadan
kullanabilirsiniz ve eğer bebeğiniz uyanıksa, VisioFocus onu rahatsız etmeyecektir.
01 - Türkçe -
2. UYARI
Termometreyi kullanmadan önce bu talimatları dikkatlice okuyun.
1. Vi sioFocus ‘un kullanı mı si zi ge niş ç eşitlilik teki durumlarda kull anmaya
özendirecek kadar kolaydır. Bununla birlikte, anormal ölçümlerden kaçınmak,
termometreyi sadece normal bir termometre de kullanabileceğiniz durumlarda
kullanın.
2. VisioFocus’ u cereyansız, 10 ve 45 °C sabit sıcaklıktaki bir odada kullanın.
3. Termometrenin başka bir odada (veya hatta bir çekmece, dolap vb) muhafaza
edilmesi halinde, kullanmadan önce, manüel kalibrasyon işlemini yapın (MQCS
– paragraf 8, sayfa 6). Alternatif olarak, cihaza dokunmadan, sıcaklığın stabil
hale gelmesi için 5 dakika kadar veya ekran üzerindeki geri sayım tamamlanıncaya
kadar bekleyin.
4. Termometreyi terli bir alın üzerinde kullanmayın, çünkü ısı ölçümü güvenilir
olmayabilir.
5. Kişinin cereyanda oturuyor olması veya
- yürümüş, koşmuş veya egzersiz yapmış olması,
- havalandırılmış başka bir odadan veya termometrenin kullanıldığı odanınkinden
farklı bir sıcaklıktan gelmiş olması,
- bir başlık, şapka veya eşarp kullanmış olması,
- alın ısısını değiştirebilecek ajanlara maruz kalmış olması hallerinde – örneğin,
duş şampuanı, saç kurutucu, sabunlanmak vb., hatta alna dokunmak bile ısı
değişikliğine yol açabilir – bir ısı ölçümü yapmayın.
Tüm yukarıda anılan durumlarda, alın sıcaklığı stabil olana kadar bekleyin. Alternatif
olarak, ateşi göz kapağı ölçün (bkz: paragraf 4.2 – sayfa 4).
6. Isı ölçümü ateş olduğu öngörülen bölgede yapılır. Bu bölgenin kaş, saç veya
kıyafet içermemesi son derece önemlidir. Ölçüm noktasının değiştirilmesi farklı
sonuçlar verecektir. Bu nedenle, aynı nokta üzerindeki iki ışığın her zaman alın
bölgesinin tam orta noktasını hedef alması (burnun üst kısmı ile alındaki saç
hizası arasın daki orta nokta) ve termometre yi alına dik tutm anız gerektiğ ini
hatırlayın.
!
02 - Türkçe -
7. Isı iz düşüm nokt ası boyunca 1c m b ir serbest ala n o lduğundan em in
olun. Gerekirse, alındaki kılları fırçalayarak temizleyim, ancak bu işlemin birkaç
dakika önceden yapılması gerektiğini hatırlayın, aksi takdirde ısı ölçüm değeri
gerçek vücut ısısından yüksek çıkacaktır.
8. Vücut ısısı ölçümü yaparken, yağ, makyaj veya oksijen maskesi varsa, algılanan
sıcaklığın gerçek vücut ısısından düşük olabileceğini unutmayın; diğer taraftan,
bölgede saç veya kıyafetin engel oluşturması halinde, algılanan sıcaklık biraz
yüksek olabilir.
9. Alın dan ıs ı ölçme işlemi aşırı ter leme, yüzeysel yaralar v eya kaf a
yaralanmalarından etkilenebilir.
10. Kişinin yaşlı olması halinde, alın ölçüm değeri gerçek vücut ısısından düşük
olabilecektir.
11. Yaldızlı dalga kılavuzu (şekil 10) termometrenin en hassas parçasıdır. Temiz,
dupduru ve el sürülmemiş vaziyette tutulması gereken altın-kaplı bir içbükey
aynadan oluşur. Her türlü hasar, toz veya kir ateş ölçüm değerini değiştirecektir.
12. Termometreyi ve özellikle de uç kısmını ölçüm yapmadan önce gerekli olandan
daha uzun süre elinizde tutmayın.
13. Termometreyi doğrudan kulağa veya vücudun diğer kısımlarına temas ettirerek
kullanmayın.
14. Termometreyi doğrudan objeler veya sıvılarla temas halind e kullanmayın.
Termometreyi suya veya diğer sıvıların içine batırmayın. Termometrenin içine su
girerse, Teknik Hizmet için derhal Bayinizle temasa geçin. Termometrenin ucuna
toz ve kir girmesini engellemek için, her zaman kapağını takın.
15. Cihazı hiçbir zaman cep telefonu veya telsiz telefonla konuşan bir kişi üzerinde
veya güçlü elektromanyetik alanların olduğu durumlarda kullanmayın.
16. Termometreyi su, ısı kaynakları ve doğrudan güneş ışınlarından uzak tutun.
Bir yerlere çarpmayın veya düşürmeyin ve zarar görmesi veya işlevini gereği gibi
yerine getirmemesi halinde kullanmayın.
17. Yukarıda anılan önlemlere riayet edilmemesi çok düşük veya çok yüksek
sıcaklık ölçümlerine yol açabilir; bu da ürün arızalarına atfedilemez.
18. Nişan ışıkları EN 62471 sayılı standartta ana hatları verilen foto-biyolojik
güvenlik gerekliliklerini karşılar.
19. Ünit e hassas bir ölçüm cihazıdır v e küçük çocuklar t arafında n
kullanılmamalıdır. Bir oyuncak değildir. Çocukların veya sınırlı duyumotor
becerileri olan kişi lerin eriş emeyeceği yerlerde m uhafaza ed in. Küçük
parçalar yutulabilir veya solunabilir.
20. Bu termometre tıbbi konsültasyon yerine kullanılamaz. Dokt orunuza ne tip
termometre kullandığınızı ve vücudun hangi bölgesinden ısı ölçümü yaptığınızı
belirtin.
21. Çocuğun rahat durmaması ölçme işlemini zorlaştırı yor ise, nişan ışıklarını
termometreyi alın bölgesine yaklaştırmadan önce açın.
22. Kendi vücut ısınızı ölçerken, bir ayna kullanın veya altı yaşından büyük bir
çocuğunuz varsa, ona VisioFocus’ u nasıl kullanacağını öğretebilirsiniz.
23. Termometre vücutla asla temas etmediği için, VisioFocus herhangi bir “tek
kullanımlık” muhafaza kapağı gerektirmez.
3. NASIL ÇALIŞIR
VisioFocus vücut tarafından ve özellikle alın bölgesinden doğal olarak yayılan
kızıl ötesi ışınları algılar.
Alın vücut ısısı ölçümü için ideal bölgedir, çünkü aort ve karotid arterinden akan
kanı alan temporal arter buradan geçer.
Ayrıca, alın, başın beyinle doğrudan temasta olduğu, tüyle kaplı olmayan tek
bölgesidir.
Beyin insan vücudunun en önemli ve en hassas ve ateş nedeniyle zarar görmeye
en elverişli organıdır.
Son olarak, baş insan vücudunun ateş yükseldikçe veya düştükçe ısısı değişen
ilk bölümüdür.
Her ısı ölçümüyle, sadece saniyenin yüzde birleri içerisinde, VisioFocus 125
ölçüm yapar. Daha sonra gelişmiş mikro işlemcisi oda sıcaklığı ile birlikte bu bilgiyi
büyütür ve işler ve ekranda doğru vücut ısısını gösterir.
Herkes için geçerli tek bir “normal” vücut ısısı olmadığının unutulmaması
önemlidir: her insanın kendine özgü vücut ısısı vardır ve bu ısı gün boyunca
fiziksel veya akli çalışmaya (örneğin bir bebeğin ağlaması) bağlı olarak
değişiklik gösterir.
Ayrıca, ıs ı vücudun bir bölgesinden diğerine de farkl ılık göste rir, dış ortam
sıcaklığından etkilenebilir ve ölçme tipine bağlı olarak diğer faktörler de dahil
olabilir.
Vücudun açıkta olan kısımlarından ısı dağılımından dolayı, alın bölgesindeki ısı
genel olarak açıkta olmayan bölgelerden daha düşüktür.
Bu nedenle, “yüz” butonuna basıldığında, VisioFocus yazılımı otomatik olarak bir
düzeltme faktörü uygular ve dolayısıyla sonuçta ortaya çıkan değer diğer ölçme
bölgeleriyle karşılaştırılabilir – cihazın satıldığı ülkelerde yaygın olarak koltuk altı,
oral veya rektal ölçüm yapılır.
Aksiller, oral veya rek tal oku malar m üşterinin tercihin e göre yapılır – ba zı
modellerde tek bir ayar bulunur ve VisioFocus vücut ısısına, yani rektal ısına
yaklaşık bir okuma verir.
Bununla birlikte, referans değer değiştirilebilir. Unutmayın, “ağızdan” yapılan bir
ölçüm değeri genel olarak “koltuk altından” yapılan bir ölçüm değerinden 0.2° C
daha yüksek iken, “rektal” bir ölçüm değeri 0.8 °C daha yüksektir (bkz: paragraf
11, sayfa 10).
Bazı ülkelerde, modeller tek ayarlı olarak tedarik edilir ve bu durumda, VisioFocus
rektal ölçümle karşılaştırılabilir bir ölçüm sağlar.
Sağlıklı bir kişinin alın bölgesinden yapılan VisioFocus ısı ölçümü 35 ve 37 °C
arasında değişebilir, buna rağmen bir yetişkinde, 35 °C’ nin bile altında olabilir
(“koltuk altı” modunda).
Ateş konusunda doğru hüküm vermek için, aile üyelerinizin sağlıklı koşullardaki
ve günün değişik zamanlarındaki normal vücut ısılarını bilmeniz gereklidir.
Bu konuda size yardımcı olmak amacıyla, “Aile üyeleri vücut ısıları” tablosunu
doldurun ve bir başvuru kaynağı olarak saklayın.
03 - Türkçe -
4. NASIL KULLANILIR
4.1 Alından ölçme
- Koruyucu kapağı 90° döndürerek açın (Şek. 1)
- “Yüz” butonuna basıl ı tutun. İki nişan ışığı açılır , alının iki kemer arasına
yansıtılan, ısı ölçüm değerlerini görmeye başlayacaksınız. Ekran sembolü
ile birlikte ısı değerini göstermeye başlar.
- VisioFocus’ u alın bölgesinin merkezine dik olarak tutmaya devam ederken,
cihazı ısı ölçümü iki kemer arasında düz bir şeklinde belirginleştirilinceye kadar
alına doğru veya geriye doğru hareket ettirin (Şek. 2): Termometrenin alına çok
yakın veya çok uzak olması halinde, ısı iki kemer arasına düşmeyecektir (Şek. 3
ve 4).
- Isı değerini iki kemer arasındaki orta noktad a gördüğünüzde, termometre
doğru mesafede demektir (Şek. 5): butonu serbest bırak ın ve termo metreyi,
ışıklar yanarken, sabit tutun. Isı değerini aynı zamanda açık mavi ışıklı ekranda
da okuyabilirsiniz Gerekirse, de rhal başka bir ölçüm yapabilirsin iz.
- Koruyucu kapağı kapatın. Termometre 20 saniye kadar atıl durumda kaldığında,
bekleme moduna geçer ve kapanmadan önce 4 saat oda sıcaklığını gösterecektir
(Pik Performans” modu – paragraf 7). Termometrenin 20 saniyelik aranın ardından
hemen kapanmasını istiyorsanız, “Enerji Tasarrufu” moduna ayarlayın (paragraf
7, sayfa 5).
4.2 Terleme durumunda:
ölçümü göz kapağı yapın
Bazı zamanlar, alın, örneğin ateş damlaları gibi, terleme işaretleri gösterebilir ve
bu durumda ölçüm düşük bir değerle sonuçlanabilir. Alnı silmek yeterli değildir.
Bu durumda, ısıyı, yine belirli bir mesafeden, kapalı göz kapağına çok yakın bir
tarama yapmak suretiyle ölçebilirsiniz (Şek. 6). Ölçüm yaparken çocuğunuzun
gözlerini açabilecek olması sizi endişelendirmesin: ışıklar zararsızdır.
Kesinlik garantisi verilmez, ancak bu tarz ölçümler bir kişinin vücut ısısının geçerli
bir tahmini olarak düşünülebilir. Yetişkinlerde, bu tarz ölçümler ayrıca alında yağ
veya makyaj olduğunda da belirtilir; ilave olarak, bu yaşlılar için de geçerlidir.
04 - Türkçe -
4. HOW TO USE IT
4.1 Forehead measurement
- Open the protective cap by rotating it 90° (fig. 1)
- Press the “face” button and hold it down. The two aiming lights go on and
you will begin to see the temperature reading, projected o nto the f orehead
between two arches. T he display starts to show the tempera ture, togeth er
with the symbo l .
- While keeping the VisioFocus perpendicular to the center of the forehead,
move it in or back it away from the forehead until the temperature reading is set
squarely between the two arches (fig. 2): if the thermometer is too close, or too
far away, the temperature will not fall between the two arches (fig. 3 and 4).
- When you see the temperature at the midpoint between the two arches, the
thermometer is at the right distance (fig. 5): release the button and keep the
thermometer steady while the lights flash. You can also read the temperature on
the display, lit in light blue. If necessary, you can immediately take another reading.
- Close the protective cap. When the thermometer remains idle for 20 seconds,
it reverts to stand-by mode and will display the room temperature for 4 hours
before shutting off (“Peak Performance” mode – par. #7). If you want it to shut
down immediately after the 20 second interval, set it on “Energy Saving” mode
(par. 7, page 5).
4.2 In case of sweating: take the reading on the eyelid
At times, the forehead can show signs of sweat, for example as a fever drops,
and this can result in a low reading. Dry the forehead is not enough. In this case,
you can take the temperature reading, again from a distance, on the closed eyelid
(fig. 6). No need to worry that your child could open its eyes while you are taking
the reading: the lights are harmless.
Precision is not gu aranteed, but such reading can be con sidered a va lid
approximation of one's body temperature. In adults, such reading is also indicated
when one has oil or make-up on the forehead; moreover it is also valid for the
elderly.
04 - English -
require any “dispos able” protection co vers.
3. HOW IT WORKS
VisioFocus detects the infrared radiation naturally emitted by the body and, in
particular, from the human forehead. The forehead is the ideal site for taking a
temperature reading because it is crossed by the temporal artery which receives
blood flowing from the aorta and carotid artery. Moreover, the forehead is the only
part of the head in direct contact with the brain that is not covered by hair. The
brain is the most important, most delicate organ in the human body and it is the
most susceptible to injury from fever. Finally, the head is the first part of the body
to change temperature as a fever rises and falls.
With each temperature measurement, in just a few hundredths of a second your
VisioFocus takes a series of 125 readings. Its sophisticated microprocessor then
amplifies and processes this information along with the room temperature and
shows the correct body temperature on the display.
It is important to remember that there is not a single "normal" temperature
valid for everyone: each person has his/her own body temperature, and this
varies throughout the da y in response to physical or mental effort (for
example a baby's crying).
Moreover, the temperature differs from one area of the body to another; it can be
affected by the outside temperature and, depending on the type of reading taken,
other factors may also come into play.
Due to heat dispersion from uncovered parts of the body, the temperature at the
forehead is generally lower than that in covered zones.
Therefore, when the “face” button is pressed, the VisioFocus software automatically
applies a correction factor and thus the resulting value is comparable to other
temperature reading sites commonly used in the countries where the unit is sold
— axillary, oral or rectal reading, according to the customer’s choice —. In some
models, according to the country, there is only one setting and VisioFocus provides
a reading, which is an approximation of the core temperature, that is, of the rectal
temperature.
Nevertheless, the reference value can be changed. Remember, an “oral” reading
is generally 0.2°C (0.4°F) higher than an axillary reading while a “rectal” reading is
0.8°C (1.4°F) higher (see paragraph 11 on page 10).
In some countries, models are supplied with a single setting and, in this case,
VisioFocus provides a reading comparable to a rectal temperature reading.
The VisioFocus temperature reading taken on the forehead of a healthy person
can range between 35 and 37.5°C (95 and 99.5ºF) although, in an adult it may
even be below 35°C (95°F) (in axillary mode).
To correctly judge a fever, you need to know the normal temperatures of your family
members when they are in good health condition and at various times of the day.
To help you with this, fill out the table “Family member temperatures” and keep it
as a reference.
03 - English -
02 - English -
hairline) and keep the thermometer per pendicular to the forehead.
7. Ma ke c ertain that a 1 c m (0 .4 in ) ar ea i s fr ee al l th e wa y aro und the
temperature projec tion po int. I f nece ssary, brush away a ny hai r from the
forehead but reme mber, this must be done a few minutes beforeh and or the
temperature reading will be higher tha t the real body te mperature.
8. When ta king a t emperature rea ding, remember that if oils, mak e-up or a n
oxygen mask are present, the temper ature detected may be lower than the
real body temperature; on the other hand, if hair or clothing obstructs the area,
the temperature det ected may be slight ly higher.
9. The forehead temperature reading can be affe cted by profuse sweating,
superficial wounds or by head injury.
10. If th e subject is elderly, the forehe ad reading may be lower than the true
body temperature.
11. The gilt waveguide ( figure 10) is the most d elicate part of the ther mometer.
It is composed of a gold-plated concave mirror that must be kept clean, crystal
clear and intact. A ny damage, dust or dirt will alter th e temperature readi ng.
12. Do not handle the t hermometer, and in particular the tip, for lo nger than
strictly necessary before taking the r eading.
13. Do not use the thermometer in direct conta ct with the ear or other parts of
the body.
14. Do not use the thermometer in direct contact with objects or liquids. Do
not submerge the thermomet er in water or other liquids. If water seeps into
the thermometer, contact your De aler immediately for Technical Service. To
prevent dust or dir t infiltrations in the tip, always cl ose the cap.
15. Do not use the device on a subj ect making a call with a mobile or cordless
telephone or in the presence of strong electromagnetic f ields.
16. Keep the thermometer awa y from water, sources of h eat and out of direct
sunlight. Avoid knocking and drop ping it, and do not use it if damaged or if not
functioning properl y.
17. Failure to observ e the above-mentione d precautions may le ad to very
low or very hig h temperatu re readings , which cannot be attribu ted to
product malfunction s.
18. The aiming lights meet the photo-biological safety requirements outlined
in standard EN 6247 1.
19. The unit is a delicate measurement instrument and must not be used by
small children. It is not a toy. Keep it out of the reach of children or persons
with limited sensorimotor skills. Small parts can be ingested or inhaled.
20. Using this thermometer m ay not substi tute medical c onsultation. Tel l your
physician what type of thermo meter you are using and where on th e body the
temperature reading was taken.
21. If the child’s fidgeting mak es it dif ficult to take a c orrect reading , turn th e
aiming lights on be fore bringing the t hermometer close t o the forehead.
22. When taking yo ur own temperature, use a mirror; or, if you have a chil d
over six years of a ge, you can teach h im to use VisioFoc us.
23. Si nce i t nev er com es in to co ntact with the b ody, VisioFocu s does not
INDICATION FOR USE
VisioFocus® is an infrared thermometer intended for intermittent measurement
of human body temperature in people of all ages.
1. FOREWORD
VisioFocus - the Thermofocus® evolution, the world's first non-contact thermometer
- is truly easy to use. It is capable of measuring a child or adult's temperature
without ever coming into contact with the skin: just bring it close to the forehead,
at the distance that the thermometer itself will tell you.
The VisioFocus thermometer does not need to be placed in any parts of your
child's body. If your baby is sleeping, you can use VisioFocus without waking him
up; and, if the child is awake, VisioFocus will not bother him.
01 - English -
2. WARNING
Read these instructions carefully before using the thermometer
1. VisioFocus is so easy to use that you will be tempted to use it in a wide variety
of situations. However, to avoid reading anomalies, use it only under the same
conditions you would use a normal thermometer.
2. Use VisioFocus in a room that is draft-free, at a steady temperature between
10 and 45°C (50 and 113°F).
3. If the thermometer was stored in anoth er room (or even in a drawer, cabinet,
etc.), before using it, run the manual calibration procedure (MQCS - par 8,
page 6). Alternatively, witho ut touching the unit, wait at least 5 minutes for the
temperatu re to stab ilize or u ntil the c ountdown on the display has been
completed.
4. Do not use the thermometer on a sweaty forehead, since the temperatu re
reading would be un reliable.
5. Do not take a temperature reading if the person is sit ting in a draf t or if the
subject has:
- been walking, run ning or exercising;
- come from another room t hat was venti lated or at a different t emperature
than the room where the thermometer is used;
- been wearing a ca p, hat or scarf;
- been exposed to agents that could alter forehead temperature - e.g. shower,
shampoo, hair-dri er, sponging, etc.; even tou ching the for ehead can alte r
the temperature.
In all the above cases, w ait a few minutes for the forehead temperature to
stabilize. As alternative, take the temperature reading on the eyelid (see par. 4.2
- page 4).
6. The temper ature reading is ta ken in the area where the temperature is
projected. It is of major importance to make sure that this area does not include
eyebrows, hair or clothing. Changing the reading point will give different results.
Therefore, remember, always aim the two lights on the same spot, precisely at
the cen ter of the forehead (midwa y betw een the top of t he nose and the
!
modello / modeller / model
VisioFocus 06400
WHAT IS SHOWN
ON THE DISPLAY
DESCRIPTION
PROBLEM
SOLUTION
Forehead reading with
button :
the display
reads "Lo.3".
The forehead temperature
appears too low (<34.0°C
or <93.2°F).
Make certain the waveguide
is not soiled or damaged
and that the subject has not
come from a cold room.
Reading the temperature
with button :
the display
reads "Lo.3".
The surface temperature
read is below the operating
limit (<1°C or <33.8°F).
The temperature reading
cannot be taken.
The display reads the
countdown, in minutes
and seconds, required for
VisioFocus automatic
calibration.
The thermometer has not
stabilized. The symbols
prompt you to choose
between:
• wait until the AQCS
countdown has run its
course - remember to not
touch the thermometer
during this time • or perform
an MQCS (par. 8, page 6).
While in stand-by mode,
the room temperature
displayed is accompanied
by the symbol MQCS or
AQCS.
The thermometer has
undergone
automatic or
manual quick
calibration:
Precision is guaranteed,
but to ensure a perfect
reading, wait until normal
thermometer calibration
has been completed
(from 10 to 30 minutes).
The display reads "E.8".
The thermometer was
moved before the light
started flashing, or the area
is subject to strong
electromagnetic fields.
Wait until the lights flash
before moving the
thermometer; make certain
that there are no mobile or
cordless telephones in the
vicinity.
10. TROUBLESHOOTING
1.The display does not turn on: t he batteries are completely dea d or incorrectly
inserted; replace or reinsert them.
2.The temperature is not projected between the two arches: the unit is not at
the correct distance; move the thermometer forward or back until the projec ted
temperature falls precisely between the two arches (fig. 5).
3.The projected temperature is not clearly visible: the room lighting is too strong;
shade the subject.
4.The waveguide is damaged or water has seeped into the thermometer: contact
your Dealer right away for technical service.
5.The thermometer temperature reading is too low:
- make certain that the conditions outlined in the warnings have been met;
- check that the waveguide is not soiled or damaged; if it is, clean it as indicated
in par. 12, page 09 or contact your Dealer for technical service;
- check that the thermometer is perp endicular to the f orehead as indicated in
figure 2.
6. The thermomet er temp erature reading is too high: make cer tain th at the
08 - English -
“E.1” and the battery
symbol appear on the
display, or the unit
does not turn on at all.
Remove the batteries
immediately and replace
them when necessary
(see chapter 11
on page 9).
The batteries are
dead.
Obtain the new
batteries for changing
them when the signal
E.1 (below) appears.
During normal
operation, the battery
symbol appears on
the display.
The batteries are
running low but it is
still possible to take
several readings.
ITEM DISPLAYED
9. MEANING OF DISPLAY MESSAGES
The temperature detected
exceeds the limit for
unit operation (>80°C or
>176°F).
The temperature reading
cannot be taken.
Reading with
button : the value
displayed changes to
“Hi.2”.
Seek medical attention.
The person has a
very high fever
(above 40°C or 104°F).
"Hi.4" appears on the
display.
The room temperature is
too high (above 45°C or
113°F).
Move to another,
cooler site.
Reading with
button :
the display reads
"Hi.2".
The temperature
detected exceeds the
limit for operation with
this button (>42.5°C or
>108.5ºF).
Make certain that you use
the right button. Make
certain that all necessary
conditions have been met.
Reading with
button :
the display
reads "Hi.2".
The room temperature is
between 5 and 15.9°C
(41 and 60.6ºF).
The display
reads "Lo.5".
The room temperature
is too low (below
10°C/50°F with “face”
button or below
5°C/41°F with “home”
button).
Move to another,
warmer room.
The displays shows
"Lo.5" and the value
alternately.
The temperature reading
can be taken but accuracy
is not guaranteed.
DESCRIPTION
PROBLEM
REMEDY
07 - English -
06 - English -
- When the desired setting appears, release the button.
Only one setting can be modified at a time.
8. ROOM TEMPERATURE CALIBRATION
If the thermometer is handled at length or if there is a significant temperature
difference with respect to the room temperature, a countdown will appear on the
display indicating that you should wait until automatic temperature calibration has
been completed. At this point you have 3 options:
1. Au tomatic Quick Cal ibration Syst em ( AQCS): withou t to uching the
thermometer, wait until the countdown has run its course and automatic quick
calibration is com pleted. T he countd own will continue updating as l ong as
differences in temperature are detected (for example, because the thermometer
has been handled). At the end of the countdown, the thermometer can take
sufficiently accurate readings. When the thermometer is in stand-by mode, “AQCS”
appears on the disp lay indicating that automatic quic k calibration has been
performed. During the countdown is not possible to make a body temperature
measurement. To detect the body temperature you need to wait until the count
down has run its course (without touching the thermometer) or you can perform
manual calibration (MQCS) as explained below.
2. Manual Quick Calibration System (MQCS): the alternative is to promptly
correct the thermometer temperature, adapting it to the real temperature of the
room where the reading is to be taken. Proceed as follows (the room temperature
must be in the 10-45°C (50-113°F) temperature range):
- press the “face” and “home” buttons (fig. 8) simultaneously: the symbol
CAL will appear and the display will light up in blue. Open the cap.
- within 10 seconds focus the thermometer on an internal wall (not the inside of
an external wall) or wardrobe with uniform temperature and at a point approximately
80/150 cm (30 to 60 inches) from the floor. Press the "home” button (fig. 9);
- release the b utton: the lights flash s lowly and the d isplay show s the room
temperatur e. To ensur e a reliabl e temp erature reading , do not focus the
thermometer on an outside wall, window, source of heating or cooling (radiator,
air conditioner, lamp, computer, surface in contact with the human body, etc.).
- The thermometer is ready to take a reading.
Manual quick calibration (MQCS) can also be performed without the countdown
if, for example, you need to move between rooms at different temperatures.
This system, too, enables the thermometer to take sufficiently accurate readings.
In this case, when the thermometer is in stand-by mode, “MQCS” appears on the
display indicating that manual quick calibration has been performed.
conditions outlined in the w arnings ha ve been m et (chapt er 2, pag e 1).
7. The ther mometer appear s bloc ked o r doe s not reve rt to stand -by a fter
being i dle for 20 seco nds, or the aimi ng LED s remai n on a fter th e
button is released: reset the thermometer by removing and reinserting the batteries.
11. REPLAC ING THE B ATTERIES
- Set your thumb in the oval hollow on the
back of th e unit, p ress down and slide the
battery ha tch out a s shown i n figure 1 1
- Remove t he batter y hatch.
- Remove t he old ba tteries a nd
dispose of them as required in the
containers provided for this purpose.
- Insert 4 new AAA - LR03 b atteries,
preferably alkaline batterie s, careful ly comply ing
with the p osition i ndicated in their h ousing.
- To clo se t he h atch, slide it in the opposi te d irection fro m wh ich it w as
opened . Af ter changi ng t he batter ies, let the ther momete r st abiliz e fo r
20 minutes before tak ing a tem perature readi ng, o r ru n a manua l qui ck
calibratio n (MQCS, chapter 8 , page 6).
- Rem ove t he b atteries if you do not e xpect to use t he t hermomete r
for a long time.
12. CLEANING
CLEANING THE WAVEGUI DE: the thermometer waveguide is v ery delicate.
Therefore, when the th ermometer is not being used, we recommend that you
always keep the cap on. Ho wever, if you need to rem ove dust or dirt from the
waveguide or sensor at its base, use a cotton swab tha t has been sli ghtly
dampened with alc ohol. Re move all dirt and m ake c ertain that noth ing
accumulates at the b ottom of the wavegui de where the sensor is located. Do
not use any other objects or liquids as the surfac e of the lens or sensor could
easily be scratched or damaged. Never let any excess liquid penetrate into the
waveguide and sensor.
CLEANING T HE THERMOM ETER BODY: use a soft cloth dam pened wit h
soap and water and poss ibly re-wipe with a sodium h ypochlorite disinfectant.
DO NOT USE the thermometer f or at least 30 minutes after cleaning.
13. DISPLAY
The VisioFocus Display is ba cklit in 5 colours:
1. light blue (button used: FACE. See par. 4.1 and 4.2);
2. green (button used: HOME. See par. 4.3);
3. violet (button used: MEM, memory function. See par. 5 );
4. orange (button used: MEM, ambient temperature functio n. See par. 6);
5. blue (MQCS function. See par. 8).
Fig. 11
open
close
09 - English -
10 - English -
Power supply 4 AAA (LR03) alkaline batteries - 1.5 V (included)
Life of high quality batteries: up to 3 years or 30,000 readings (depending on use)
Dimensions: 144 x 43.5 x 21.5 mm (5.67 x 1.71 x 0.85 inches) - including cap
Weight: 98 gr. (3.46 oz.) - batteries included
Distance from the subject: calculated using an optical aiming system (approximately 6 cm/2.36 inches).
Large, clearly visible, backlit display in 5 colors: light blue, green or violet, depending on the button used (respectively,
“face”, “home” or “Mem”); orange and blue depending on the function (respectively, room temperature and MQCS).
Atmospheric pressure range of operating conditions: from 700 hPa to 1,060 hPa.
Relative humidity range of operating conditions: from 15 % to 93 %, non-condensing.
Keep in a clean, dry place, preferably at a temperature ranging between +16 and +40°C (60.8 and 104°F). Store at
a temperature incl uded between -10 and +60°C (14 and 140°F) and in any case not lower than -18°C (-0.4 °F)
or higher than +70°C (158°F).
Expected life: 10 years
VisioFocus is a class IIa medical device (per Directive 93/42/EEC and subsequent amendments and integrations)
tested in hospitals, private clinics and medical offices. Contact the manufacturer for clinical precision, characteristics
and procedures. Tecnimed srl, P.le Cocchi, 12 - 21040 Vedano Olona (VA) - Italy undertakes full responsibility for
this product's compliance with the reference standards. VisioFocus is compliant with the pertinent ASTM standard
(E1965-98:2009) and CEI EN 60601-1, 60601-1-2 and 60601-1-11 standards. Internally power ed equipment for
continuous operation.The VisioFocus LEDs emit low light radiation in compliance with IEC 62471.
14. TECHNICAL CHARACTERISTICS
VISIOFOCUS® Non-contact infrared thermometer
Dispose of the
device in
compliance with
applicable
legislation regarding
electrical equipment
and batteries.
Follow instructions for use
Device designed for
continuous use
Protected against insertion of objects
>12,5 mm and against vertical drippin g
water when tilted up to 15°.
ATTENTION: read the
warnings
Recyclable material
Applied part: type BF
IP 22
(3)
When the room temperature is between 5 and 9.9 °C (41 and 48.2°F): accuracy and the operating range are not
guaranteed and the symbol “Lo.5" and the temperature value are displayed alternately.
(1)
When the room temperature is between 10 and 15,9°C (50-59°F) or between 40 and 45°C (104-113°F), accuracy and the
operating range are not guaranteed and the symbol “Lo.5" or “Hi.4” and the temperature value are displayed alternately.
(2)
The ASTM E1965-98-2009 standard requires +/-0.2°C (+/-0.4°F) accuracy for infrared thermometers i n the
37-39°C (98.6-102.2°F) temperature range while the ASTM E667-86 and E 1112-86 standards require +/ - 0.1°C
(+/-0.2°F) precision for mercury and elec tronic thermometers in that same temperature range.
Measurement range
Room temperature working range
Resolution
93.2/108.5°F
50/113°F
(1)
0.1
+/- 0.5°F
+/- 0.4°F
(2)
+/- 0.5°F
Taking the body
temperature at
the forehead
34,0/42,5°C
10/45°C
(1)
0,1
+/-0,3°C
+/-0,2°C
(2)
+/-0,3°C
Accuracy
Accuracy
Accuracy
from 34,0 to 35,9°C
from 36,0 to 39,0°C
from 39,1 to 42,5°C
from 93.2 to 96.7°F
from 96.8 to 102.2 °F
from 102.3 to 108.5°F
33.8/176°F
41/113 °F
(3)
0.1
+/- 1.8°F
+/- 0.5°F
+/- 0.4°F
+/- 0.5°F
+/- 1.8°F
Measurement range
Room temperature working range
Resolution
1,0/80,0°C
* 5/45°C
(3)
0,1
+/-1,0°C
+/-0,3°C
+/-0,2°C
+/-0,3°C
+/-1,0°C
Accuracy
Accuracy
Accuracy
Accuracy
Accuracy
from 1,0 to 19,9°C
from 20,0 to 35,9°C
from 36,0 to 39,0°C
from 39,1 to 42,5°C
from 42,6 to 80,0°C
from 33.8 to 67.9°F
from 68.0 to 96.7°F
from 96.8 to 102.2 °F
from 102.3 to 108.5°F
from 108.7 to 176 °F
Other
readings
05 - English -
4.3 Other readings
VisioFocus can also be used to read the temperature of objects and liquids in the
1-80°C (33.8-176°F) temperature range. For example:
1. tempe rature o f a baby's f eed bott le (fig. 7), food, bath, et c. In this c ase,
remember to mix the liquid well before taking the reading (with hot liquids or foods,
take the reading quickly to prevent condensation from forming on the lens and
wait 30 min. before taking another reading).
2. temperature of a wound, inflammation, scar (for medical use);
3. room temperature by pointing the thermometer against a wall or a piece of
furniture (also see par. 6 “Room Temperature”);
Proceed as you would for a forehead reading but press the “home” button ;
the display will light up in green and show the house symbol .
5. MEMORY FUNCTION
The memory function lets you call up the last 9 temperature readings.
To activate this function, press the "Mem” button twice: the display will light
up in violet and the value of the last reading will be shown accompanied by the
number 1 and the symbol or depending on which button was used for
that reading. Pressing the button again calls up the second to last, third to last
reading and so on, accompanied by the numbers 2, 3, etc.
6. ROOM TEMPERATURE
When the thermometer is in stand-by mode (“Peak Performance” - see par. 7),
the room temperature and the symbol flash and remain displayed automatically
for 4 hours after the last reading is taken.
To display the room temperature on the backlit display, while the thermometer is
in stand-by mode, press the button once: the display illuminates in orange
showing the room temperature and the symbol flashing.
7. HOW TO CHANGE THE SETTINGS
Depending on where it is to be sold, your thermometer leaves the factory preset
to: Centigrade (°C) or Fahrenheit (°F); and referred to AXILLARY, ORAL or
RECTAL, CORE temperature readings, or only to internal temperature readings
(no symbol will be shown); and display off when in stand-by mode (“Energy
Savings”) or always on (“Peak Performance”).
If necessary, these settings can be modified as follows:
- while the thermometer is off or in stand-by mode, press and hold the “Mem”
button; afte r about 8 secon ds the display changes, sho wing the settings in
sequence:
°C; °F; AXILLA; ORAL; RECTAL; CORE; “on” ; “off” .
If the thermometer was produced with the sole internal temperature setting, the
AX., ORAL, RECTAL and CORE settings would not be available for changing.
7. Termometrenin kullanımı engellenmiş görunuyor, nişan LED’ leri buton serbest
bırakıldıktan sonra yanmaya devam ediyor veya termometre 20 saniyelik atıl
durumdan sonra bekleme moduna dönmuyor: pilleri çıkartıp yeniden takarak
termometreyi sıfırlayın.
11. PİLLERİN DEĞİŞTİRİLMESİ
- Başparmağınızı ünitenin arka tarafındaki oval
çukura yerleştirin, pil bölmesini aşağı basıp
kaydırmak suretiyle Şekil 11’ de
görüldüğü gibi açın.
- Pil bölmesini çıkartın.
- Eski pilleri çıkartın ve onları
öngörüldüğü şekilde bu amaç için
sağlanan konteynırlara atın.
- 4 adet yeni AAA – LR03 pil, tercihen alkali pil,
dikkatlice gövdelerinde belirtilen pozisyona uygun şekilde takın.
- Bölme yi kapa tmak iç in, böl meyi aç ılan y önün te rsi yön de kayd ırın. P illeri
değiştirdikten sonra, bir ölçüm yapmadan veya manüel hızlı kalibrasyon (MQCS)
yürütmeden (bölüm 8, sayfa 6) önce termometren in 20 dakika stabil h ale
gelmesine izin verin.
- Termometreyi uzun bir süre kullanmayacaksanız, pilleri çıkartın.
12. TEMİZLİK
DALGA KILAVUZU NUN T EMİZLENM ESİ: T ermometr enin dalga kılavuz u
son derece hassastır. Bu nedenl e, termomet re kullanıl madığında, kapağını
her zam an kapa lı tutm anızı t avsiye ediyoruz. Ancak, dalga kılavuzu veya
alt kısm ındaki s ensorun kir vey a tozunu temizle meniz ge rekiyorsa, alkolle
hafif nemlendiril miş pamuklu çubuk kul lanın. Tüm kiri temizl eyin ve sensorun
bulunduğu dal ga kılavuzun un alt kısm ında birikmi ş hiçbir ş ey olmadığın dan
emin olun. Lenslerin veya sensorun yüzey i kolaylıkla çizilebileceğ i veya hasar
görebileceği için başka objeler veya sıvıl ar kullanmayın. Dal ga kılavuzu veya
sensora fazla sı vının girmesin e asla izin verme yin.
TERMOM ETRE GÖVDES İNİN TEMİZL ENMES İ: S abunl u su yla hafif
nemlendirilmiş yumuşak bir bez kullanın ve mümkünse sodyum hipoklorit dezen-
fektan ile yenid en silin.
Termometreyi temizledikten s onra en az 30 dakika KULLANM AYIN.
13. EKRAN
VisioFocus Ekranının 5 renkt e arka aydınlatması vardır:
1. Açık mavi (kullanılan but on: YÜZ; bkz: paragraf 4.1 v e 4.2);
2. Yeşil (kullanılan buton: EV; bkz: paragraf 4.3);
3. Mor (kullanılan buton: ME M; hafıza fonksiyonu; bkz: p aragraf 5);
4. Turuncu (kullanılan buton: MEM; ortam sıcaklığı fonksiyonu; bkz: paragraf 6);
5. Mavi (MQCS fonksiyonu; bk z: paragraf 8).
Şek. 11
açık
kapalı
09 - Türkçe -
10 - Türkçe -
14. TEKNİK ÖZELLİKLER
VISIOFOCUS® Temassız Kızılötesi Termometre
Güç besleme: 4 AAA (LR03) alkali pil – 1,5 V (dahil)
Yüksek kaliteli pillerin ömrü: en fazla 3 yıl veya 30.000 okuma (kullanıma bağlı)
Boyutlar: 144 x 43.5 x 21.5mm – kapak dahil
Ağırlık 98gr – (piller dahil)
Denekten uzaklık: optik hedefleme sistemi kullanarak hesaplanır (yaklaşık 6cm).
5 renkli geniş, görünür, arkadan aydınlatmalı gösterge: kullanılan düğmeye göre (“yüz”, “oda” veya “Mem”) sırasıyla
açık mavi, yeşil veya mor; fonksiyona göre (oda ısısı ve MQCS) sırasıyla turuncu ve mavi
İşletim şartları için atmosfer basıncı: 700hPa veya 1,050hPa
İşletim şartları için bağıl nem aralığı: %15-%93, yoğuşmasız
Tercihen +16-40°C arasında temiz ve kuru bir yerde tutunuz. -10 ile +60°C arasında depolayınız, asla -18°C altında
veya +70°C üstünde depolamayınız.
Beklenen ömür: 10 yıl.
VisioFocus 93/42/EEC Yönergesi ve onun sonraki tadilatları ve eklemelerine göre sınıf IIa medikal aygıttır, hastanelerde,
özel kliniklerde ve muayenehanelerde test edilmiştir. Klinik hassasiyet, karakteristikler ve prosedürler için imalatçıya
başvurunuz. Tecnimed srl, p. Le Cocchi, 12-21040 Vedano Olona (VA) – İtalya bu ürünün referans standartlara tam
uyumuyla ilgili tüm sorumluluğu üstlenir. VisioFocus ASTM standardı (E1965-98:2009) ve CEI EN 60601-1, 60601-1-2
ve 60601-1-11 standartlarıyla uyumludur. Sürekli kullanıma uygun pilli ekipman. VisioFocus LED’leri IEC 62471 ile
uyumlu hafif ışık radyasyonu yayar.
Aygıtı yürürlükteki
elektrikli ekipmanlar
ve pillerle ilgili
mevzuata göre atın.
Kullanım talimatlarına uyun.
Sürekli kullanım için
tasarlanmış aygıt
DİKKAT: Uyarıları okuyun
Geri dönüştürülebilir materyal
Uygulanan parça: tip BF
IP 22
Ölçüm aralığı
Oda ısısı çalışma aralığı
Çözünürlük
Doğruluk 34-35,9°C arasında
Doğruluk 36-39°C arasında
Doğruluk 39,1-42,5°C arasında
(1)
34,0/42,5°C
10/45°C
(1)
0,1
+/-0,3°C
+/-0,2°C
(3)
+/-0,3°C
Ölçüm aralığı
Oda ısısı çalışma aralığı
Çözünürlük
Doğruluk 1.0-19.9°C arasında
Doğruluk 20.0-35.9°C arasında
Doğruluk 36.0-39.0°C arasında
Doğruluk 39.1-42.5°C arasında
Doğruluk 42.6-80.0°C arasında
1,0/80,0°C
5/45°C
(2)
0,1
+/-1,0°C
+/-0,3°C
+/-0,2°C
+/-0,3°C
+/-1,0°C
Vücut ısısının alından ölçülmesi
Diğer okumalar
(1)
Oda ısısı 10-15,9°C/40-45°C arasında olduğunda
doğruluk ve çalışma aralığı garanti edilemez ve
“Lo.5”/“Hi.4” ve ısı değeri birbiri ardına gösterilir.
(2)
Oda ısısı 5-9,9°C arasında olduğunda
doğruluk ve çalışma aralığı garanti edilemez ve “Lo.5” ve ısı değeri birbiri ardına gösterilir.
(3)
ASTM E1965-98-2009 standardı kızılöncesi termometreler için doğruluğu n 37-39°C vücut ısısı aralı ğında
+/-0,2°C olmasını gerektirirken, ASTM E66 7-86 ve E1112-86 standardı c ıvalı ve elektronik termomet reler için
doğruluğun aynı ısı aralığında +/- 0,1°C olmasını gerektirmektedir.
12.5 mm'den büyük nesnelerin
ve 15 derece eğik konumdayken
dikey olarak damlayan suyun
girmesine karşı korumalıdır.
butonu ile alından ısı
ölçümü yaparken,
ekranda “Lo.3” okunuyor.
Alın ısısı çok düşük
(<34.0 °C).
Dalga kılavuzunun kirli veya
zarar görmüş olmadığından
ve ısı ölçümü yapılan kişinin
soğuk bir odadan
gelmediğinden emin olun.
butonu ile ölçüm
yaparken, ekranda
“Lo.3” okunuyor.
Okunan yüzey sıcaklığı
çalışma limitinin altında
(<1 °C).
Isı ölçümü yapılamaz.
Ekranda VisioFocus
otomatik kalibrasyonu için
öngörülen dakika ve
saniye olarak geri sayım
okunuyor.
Termometre stabil değil.
Semboller sizi seçim
yapmanız için uyarıyor:
* AQCS geri sayımı bitene
kadar bekleyin – bu süre
içinde termometreye
dokunmamanız gerektiğini
unutmayın * ya da, bir MQCS
yürütün (par. 8, sayfa 6)
Bekleme modunda iken,
görüntülenen oda
sıcaklığına MQCS veya
AQCS sembolü eşlik
ediyor.
Termometrede otomatik
veya manüel hızlı
kalibrasyon yürütülmüştür:
Kesinlik garanti edilir,
ancak kusursuz bir ölçüm
sağlamak için, normal
termometre kalibrasyonu
tamamlanana kadar
bekleyin (10 ila 30 dakika).
Ekranda “E.8” okunuyor.
Termometre ışık
yanmadan önce hareket
ettirilmiştir, ya da bölge
güçlü manyetik alanlara
maruzdur.
Termometreyi hareket
ettirmeden önce ışığın
yanmaya başlamasını
bekleyin; etrafta cep veya
telsiz telefon olmadığından
emin olun.
10. SORUN GİDERME
1. Ekran açılmıyor: pille r tamamen bitmiş olabilir veya ya nlış takılmış olabilir;
değiştirin veya yeniden takın.
2. Derece iki kemer arasına yansıtılmıyor: ünite doğru mesafede değildir; termom
treyi muhtemel derece tam olarak iki kemer arasına düşene kadar ileri veya geri
hareket ettirin (Şek. 5).
3. Muhtemel derece açı k bir şekilde görünür değil: oda aydınlatma sı çok güçlü
olabilir; ölçüm yapılan bölgeyi hafif karartın.
4. Dalga kılavuzu hasar gördü veya termometreye su girdi:
teknik hizmet için, derhal Bayinizle temasa geçin.
5. Termometre ısı ölçümü çok düşük:
- uyarılarda a na hatları ver ilen koşulları n karşılandığı ndan emin olun ;
- dalga kılavuzun kirli veya hasarlı olup olmadığını kontrol edin; kirli ise bölüm 12 sayfa,
09’ da belirtildiği gibi temizleyin veya teknik hizmet için Bayinizle temasa geçin;
- termometrenin Şekil 2’ de gösterildiği şekilde alın bölgesine dik pozisyonda olup
olmadığını kontrol edin.
6. Termometre ısı ölçümü çok yüksek: uyarılarda ana hatları verilen koşulların
karşılandığından emin olun (bölüm 2, sayfa 1).
08 - Türkçe -
GÖRÜNTÜLENE
KALEM
AÇIKLAMA
PROBLEM
ÇÖZÜM
Ekranda “E.1” ve pil
sembolü görünüyor
veya ünite hiç
açılmıyor.
Pilleri derhal çıkartın ve
gerektiğinde yenileri ile
değiştirin (bkz: bölüm 11,
sayfa 9).
Pillerin ömrü bitmiş.
E.1 (aşağıdaki) sinyali
göründüğünde
değiştirmek için, yeni
piller edinin.
Normal işlem
sırasında, ekranda pil
sembolü görünüyor.
Pillerin gücü düşük,
ancak hala birden
fazla ölçüm almak
mümkün.
GÖRÜNTÜLENE
KALEM
9. EKRAN MESAJLARIN ANLAMI
Algılana sıcaklık ünitenin
çalışması için belirlenen
sınırları aşıyor (>80 °C).
Isı ölçümü yapılamaz.
butonuyla ölçüm
yaparken, gösterilen
değer “Hi.2” olarak
değişiyor.
Tıbbi yardım arayın.
Kişinin ateşi çok yüksek
(40 °C’ nin üzerinde).
Ekranda “Hi.4” ibaresi
görünüyor.
Oda sıcaklığı çok yüksek
(45 °C’ nin üzerinde).
Daha soğuk başka bir
alana taşıyın.
butonuyla ölçüm
yaparken, ekranda “Hi.2”
okunuyor.
Algılanan sıcaklık bu
butonla işlem yapmak için
belirlenen sınırları aşıyor
(>42.5 °C).
Doğru butonu
kullandığınızdan emin olun.
Tüm gerekli koşulların
karşılanmış olduğundan
emin olun.
butonuyla ölçüm
yaparken, ekranda
“Hi.2” okunuyor.
Oda sıcaklığı 5 ve 15.9
°C arasında.
Ekranda “Lo.5” ibaresi
geliyor.
“Face” (yüz) düğmesinde
Oda sıcaklığı çok düşük
(°10 C’ nin altında).
“Home” (ev) düğmesinde
Oda sıcaklığı çok düşük
(5 °C’ nin altında).
Daha sıcak başka bir
odaya taşıyın.
Ekranda “Lo.5” ibaresi
okunuyor veya ekran
“Lo.5” ve değeri sırayla
gösteriyor.
Isı ölçümü
yapılabilir, ancak doğruluk
garanti edilmez.
AÇIKLAMA
PROBLEM
ÇÖZÜM
07 - Türkçe -
06 - Türkçe -
- İstenilen ayarlar göründüğünde, butonu serbest bırakın.
Bir kerede sadece birayar değiştirilebilir.
8. ODA SICAKLIĞI KALİBRASYONU
Termometreye uzun süre dokunulması veya oda sıcaklığı bakımından önemli bir
sıcaklık far kının olması h alinde, ekra nda otomatik s ıcaklık kali brasyonu
tamamlanın caya k adar b eklemeniz gerek tiğine işaret eden bir g eri sa yım
görünecektir. Bu noktada, üç seçeneğiniz vardır:
1. Otomatik Hızlı Kalibrasyon Sistemi AQCS (Automatic Quick Calibration
System): termomet reye do kunmadan, geri sayım bitene ve oto matik hızlı
kalibrasyon ta mamlanana kad ar bekleyin. Geri sayım sıcakl ıktaki farklı lıklar
algılandığı sürece güncell emeye d evam ed ecektir (örneğin, termome treye
dokunulmuş ol duğu için). Geri sayım sonun da, termomet re yeterince doğru
ölçümler yapabilir. Termometre bekleme modunda iken, ekranda “AQCS” ibaresi
görünür; otomatik hızlı kalibrasyonun tamamlanmış olduğuna işaret eder.
Geri sayım sırasında vücut ısısının doğru yapılması mümkün değildir. Vücut
ısısını tayin etmek için geri sayımın bitm esini beklemeni z (te rmometreye
dokunmadan ) veya aşağıda tanıml andığı gibi ma nuel ka librasyın (MQCS)
yapmanız gerekir.
2. Manüe l Hızlı Kalibra syon Sis temi MQ CS (Manu al Quick Calibr ation
System): alternatif, termometreyi ölçümün yapılacağı gerçek oda sıcaklığına
alıştırmak suretiyle termometre sıcaklığının hızla düzeltilmesidir. Aşağıdaki şekilde
ilerleyin (oda sıcaklığı 10 – 45 °C sıcaklık aralığında olmalıdır).
- “Yüz” ve “Ev” butonlarına aynı anda basın (Şek. 8): CAL sembolü
görünecek ve ekran ışığı mavi olacaktır. Kapağı açın.
- 10 saniye içerisinde, termometreyi bir iç duvara (bir dış duvarın iç tarafına değil)
veya sıcaklığı her yerde aynı bir dolaba, zeminden yaklaşık 80/150cm yüksekte
bir noktaya odaklayın. “Ev” butonuna basın (Şek. 9);
- Butonu serbest bırakın: ışıklar yavaşça yanar ve ekran oda sıcaklığını gösterir.
Güvenilir bir sıcaklık ölçümü elde edilmesini sağlamak için, termometreyi bir dış
duvar, pencere, ısıtma veya soğutma kaynağı (radyatör, klima, lamba, bilgisayar,
insan vücudu ile temas halindeki yüzeyler vb) üzerine odaklamayın.
- Termometre ölçüm yapmaya hazırdır.
Manüel hızlı kalibra syon (MQCS) ayrıca, örn eğin, farklı sıcaklı klardaki odalar
arasında geçiş yapmanız gerekmesi halind e, geri sayım yürütü lmeden de
yapılabilir.
Bu sistem, ayrıca, termometrenin yeterince doğru ölçümler yapmasına da izin
verir. Bu durumda, termometre bekleme modunda iken, ekranda “MQCS” ibaresi
görünür; bu manüel hızlı kalibrasyonun yapılmış olduğuna işaret eder.
05 - Türkçe -
4.3 Diğer Ölçümler
VisioFocus aynı zamanda 1-80 ° C sıcaklık aral ığındaki objele rin ve sıvılar ın
ısısını ölçmek için de kulla nılır. Örneğin ;
1. Bir bebeğin b iberonunun, mamasının, banyosunun vb., ı sısı (Şek. 7). B u
durumda, ölçmeden önce sıvıyı iyice çalkala mayı unutmayın (sıca k sıvı veya
yiyeceklerde, lens üzeri nde yoğuşma oluşumunu önlemek içi n ölçümü hızlı
bir şekilde ya pın ve diğer ö lçüme geçmeden 30 dakika bek leyin).
2. Bir yara, i ltihap, sıyrık ısısı (medika l kullanım içi n)
3. Termo metreyi bir du vara ve ya bir mobilya ya karş ı tutma k suret iyle, o da
sıcaklığı (ayr ıca bkz: parag raf 6 “Oda Sıc aklığı”).
Alından ölç me yapıyorm uş gibi ilerleyin, ancak “Ev” buton una basın;
ekran yeşil re nkte aydınlana cak ve ev sembolünü g österecektir.
5. HAFIZA FON KSİYONU
Hafıza fonksiy onu son 9 ısı ölçümünü geri çağırmanıza iz in verir.
Bu fonksiyonu et kinleştirmek iç in, “Mem” buton una iki kere bası n; ekran
rengi mora dö necek ve ekra nda 1 s ayısı ve ölçü m iç in hangi buto nun
kullanıldığına bağlı olarak vey a sem bolü ile bir likte son öl çüm değeri
gösterile cektir. Buton a te krar basıldığ ında ikinci son ölçüm, üçün cü k ez
basıldığında üçün cü son ölçüm çağrılacak ve bu şekilde devam edecek olup ,
eşlik eden say ı 2, 3 …. Olar ak gidecektir.
6. ODA SICAKL IĞI
Termometre b ekleme modu nda iken (“Pek Perf ormans” – bkz: para graf 7),
oda sıcaklığ ı ve s embolü yana r ve son ölçümün yapılmasından sonra 4
saat otomatik olarak ekranda gösterilmeye devam eder.
Oda sıcaklığını arkadan aydınlatmalı ekranda görü ntülemek için, termomet re
bekleme mod unda iken, butonuna bir ke re basın; ekran r engi turun cu
olacak ve oda sıcak lığını gö sterecekti r ve sembolü yanacakt ır.
7. AYARLAR NASI L DEĞİŞTİRİLİR
Nerede satılacağına bağlı olarak, termometrenin varsayılan ayarlar ı Santigrat
(°C) veya Fahrenhayt (°F) ol arak yapılır; ve KOLTUK ALT I (“AXILLA”), ORAL
(“ORAL”) veya REKTAL (“R ECTAL”) ısı veya VÜCUT (“CORE”) ıs ısı ölçüm
moduna işaret edilir veya yalnızca iç ısı okumaları gösterilir (işaret gösterilmez);
bekleme modunda ekran kararır (“Enerji Tasarrufu ) veya her zaman açık (“Pik
Performans) du rumda ayarlıdı r.
Gerekirse, bu ayarlar aşağıd aki şekilde de ğiştirilebilir :
- Term ometre kapalı veya bekleme modund a iken , “Mem ” butonuna 8
saniye kadar basılı tutun, ekran gö rüntüsü değişir ve ayarlar aşağıd aki sırada
görüntülenir:
°C; °F; AXILLA ; ORAL; RECTAL ; CORE; on (a çık) ; o ff (kapalı) .
Termometre yalnızca iç ısı ayarında üretilmişse AX, ORAL, RECTAL ve CORE
ayarları değiştirilemez.
05 - Italiano -
4.3 Altre misurazioni
È possibile usare Vi sioFocus an che per r ilevare la temperatura di ogget ti e
liquidi, da 1 a 80°C. Ad ese mpio:
1. la tempe ratura del biberon (fig . 7), dell a pappa, de l bagnetto, ecc. avend o
l’accortezza di mescolare ben e i liquidi pr ima di effettua re la misurazi one (in
caso di liquidi o alimenti cald i, eseguite la rilevazione velo cemente per evitare
la formazione di condens a sulla guid a d’onda ed attendete 30 min. pri ma di
altre misurazi oni);
2. la temper atura in cor rispondenza d i ferite, in fiammazioni, cicatrici (pe r uso
medico);
3. la temperatura ambiente puntando il termometro contro un muro o un mobile
(vedete anche par. 6 “Temper atura Ambiente ”).
Procedete come per una misurazione sulla fronte ma premendo il tasto “cas a”
; il d isplay si illu minerà in verd e e mostrerà i l simbolo .
5. FUNZIONE MEMORIA
La funzione memoria consente di richiamare i valori delle ultime 9 misurazioni.
Per attivarla, premete due volte il pulsante “Mem” : il display si illuminerà in
violetto e visualizzerà il valore dell’ultima rilevazione accompagnato dal numero
1 e dal simbolo o a seconda del pulsante utilizzato per quella misurazione.
Ripremendo ripetutamente il pulsante , il display visualizzerà la penultima, la
terzultima misurazione, ecc, accompagnate dai numeri 2, 3, ecc.
6. TEMPERATURA AMBIENTE
Quando il termometro è in stand-by (“Massima Prestazione” - par. 7) la temperatura
dell’amb iente, unitamen te a l si mbolo lamp eggiant e, vi ene mostrata
automaticamente sul display per 4 ore dopo l’ultima misurazione.
Per visu alizzare la t emperatura ambien te con il d isplay retroillum inato, a
termometro in stand-by premete una sola volta il pulsante : il display si
illuminerà in arancio mostrando la temperatura dell’ambiente e visualizzerà il
simbolo lampeggiante.
7. COME CAMBIARE le IMPOSTAZIONI
Secondo il paese dove viene venduto, il vostro termometro è uscito dalla fabbrica
con le impostazioni in: gradi Centigradi (°C) o gradi Fahrenheit (°F); riferimento
ascellare (“AXILLA”), orale (“ORAL”), rettale (“RECTAL”), o interna (”CORE”); e
display spento quando in st and-by (“Risparmio Energi a”) o sempre acceso
(“Massima Prestazione”).
Se necessario, è possibile modificare le impostazioni procedendo come segue:
- a termometro spento o in stand-by, premete e tenete premuto (senza rilasciarlo)
il pulsante “Mem” ; dopo 8 secondi, la visualizzazione cambierà mostrando
in sequenza le impostazioni:
°C; °F; AXILLA; ORAL; RECTAL; CORE; “on” ; “off” .
Se il termometro è stato prodotto con la sola impostazione di temperatura interna,
06 - Italiano -
le impostazioni AX., ORAL, RECTAL e CORE non compaiono nella sequenza.
- Quando compa re l’impostazi one desiderata , rilasciate i l pulsante.
È possibile ca mbiare solo un ’impostazione alla volta
8. CALIBRAZIONE ALLA TEMPERATURA AMBIENTE
Se il termometro viene manipolato a lungo o se riscontra una certa differenza di
temperatura rispetto alla temperatura dell’ambiente, sul display comparirà il conto
alla rovescia che inviterà ad attendere la stabilizzazione automatica. A questo
punto si hanno 3 possibilità:
1. Sistem a di calibrazion e rapida automat ica AQCS (Automa tic Quic k
Calibration System): attendete la fine del conto alla rovescia senza toccare il
termometro affinché esso completi la stabilizzazione rapida automatica. Il conto
alla rovescia continuerà ad aggiornarsi fino a quando le condizioni di alterazione
della temperatura perdurano (ad esempio perché il termometro viene maneggiato).
Al termine del conto alla rovescia il termometro sarà in grado di eseguire misurazioni
sufficientemente accurate. La scritta “AQCS” sul display del termometro in stand-by
indica che il termometro ha subito l’AQCS.
Durante il conto alla rovescia non è p ossibile effettuare una misur azione. È
necessario attendere la fine del conto alla rovescia (senza toccare il termometro)
o è p ossibile ef fettuare la calibrazio ne manuale MQCS, come spieg ato nel
paragrafo successivo.
2. Sistema di calibrazione rapida manuale MQCS (Manual Quick Calibration
System): in alternativa è possibile correggere immediatamente la temperatura
interna del termometro ed adattarla a quella reale dell’ambiente in cui si vuole
eseguire la misurazione. Procedete come segue (la temperatura ambiente deve
essere compresa tra 10 e 45°C):
- premete contemporaneamente i pulsanti “faccia” e “casa” (fig. 8):
comparirà il simbolo CAL. Aprite il cappuccio protettivo.
- entro 10 secondi puntate il termometro contro una parete interna (non perimetrale)
o un armadio avente temperatura costante e collocato a circa 80/150 cm dal
pavimento, e premete il pulsante “casa” (fig. 9);
- rilasciate il pulsante: le luci lampeggeranno lentamente e il display indicherà la
temperatura dell’ambiente. Per essere sicuri che questa temperatura sia verosimile,
evitate di puntare il termometro contro pareti esterne, finestre, fonti di calore o
freddo (caloriferi, condizionatori, lampade, computer, superfici a contatto con il
corpo umano, ecc).
- Il termometro è pronto per eseguire una misurazione.
La stabilizzazione manuale MQCS è possibile anche in assenza del conto alla
rovescia in caso ci si debba spostare tra locali con temperature diverse.
Anche questo sistema metterà il termometro in grado di eseguire misurazioni
sufficientemente accur ate e la scritta “MQCS” sul display del termometro in
stand-by ricorda che il termometro ha subito l’MQCS.
Il display visualizza
“E.1” e il simbolo delle
batterie, oppure non si
accende per niente.
Togliete immediatamente le
batterie e sostituitele
quando necessario (leggete
il paragrafo 10 a pag. 10).
Le batterie sono
completamente
scariche.
Procuratevi le batterie
per sostituirle quando
compariàt il simbolo
“E.1” (vedete sotto).
Il simbolo delle
batterie si accende
durante il normale
funzionamento.
Le batterie si stanno
scaricando ma è ancora
possibile eseguire un buon
numero di misurazioni.
VISUALIZZAZIONE
DEL DISPLAY
9. SIGNIFICATO DEI MESSAGGI SUL DISPLAY
La temperatura rilevata è
al di sopra dei limiti ope-
rativi dell’apparecchio.
(>80°C).
Non è possibile rilevare
la temperatura.
Misurazione
con pulsante
:
il valore visualizzato si
alterna a “Hi.2”.
Consultate un medico.
Presenza di febbre
molto alta
(oltre 40°C).
Il valore visualizzato
si alterna a “Hi.4”.
Temperatura ambiente
troppo alta (oltre 45°C).
Spostatevi in un luogo
più fresco.
Misurazione
con pulsante :
il display visualizza
"Hi.2".
La temperatura rilevata è
al di sopra dei limiti ope-
rativi dell’apparecchio
con questo pulsante
(>42,5°C).
Assicuratevi che sia stato
utilizzato il pulsante
adatto.
Misurazione
con pulsante : il
display visualizza
"Hi.2".
Temperatura ambiente
compresa tra 10 e 15,9°C
con pulsante “faccia” e
compresa tra 5 e 9,9°C
con pulsante “casa”.
Il display mostra "Lo.5".
Temperatura ambiente
troppo bassa (<10°C con
pulsante “faccia” e <5°C
con pulsante “casa”).
Spostatevi in un
ambiente più caldo.
Il display visualizza "Lo.5"
alternato al valore.
La misurazione è possibile
ma la precisione non è
garantita.
DESCRIZIONE
PROBLEMA
SOLUZIONE
07 - Italiano -
VISUALIZZAZIONE
DEL DISPLAY
DESCRIZIONE
PROBLEMA
SOLUZIONE
10. EVENTUALI PROBLEMI E SOLUZIONI
1. Il display non si accende:
- l e b atteri e sono comp letam ente scar iche opp ure sono st ate inse rite
erroneamente; sostituitele o reinseritele correttamente.
2. La temperatura proiettata non si trova al centro dei due archi:
- la distanza non è corretta; spostate il termometro avanti o indietro fino a quando
la proiezione della temperatura sarà visibile esattamente in mezzo ai due archi.
3. La proiezione della temperatura è poco visibile:
- la luce ambiente è troppo elevata; fate ombra al soggetto.
4. La guida d’onda è danneggiata o è penetrata acqua nel termometro:
- contattate immediatamente l’Assistenza al numero verde 800-930321.
5. La temperatura rilevata dal termometro appare troppo bassa:
- verificate che siano rispettate le condizioni previste nelle avvertenze;
- verificate che la guida d’onda non sia sporca o danneggiata, in tal caso pulite
come indicato al par. 12, pag. 9 o contattate l’assistenza;
- verificate che il termometro sia perpendicolare alla fronte (fig. 2).
6. La temperatura rilevata dal termometro appare troppo alta:
- verificate che siano rispettate le condizioni previste nelle avvertenze (par. 2.1).
Misurazione sulla fronte
con pulsante : il
display visualizza "Lo.3".
Temperatura della fronte
apparentemente troppo
bassa (<34,0°C).
Verificate che la guida
d’onda non sia sporca o
che il soggetto non
provenga da un ambiente
con bassa temperatura.
Misurazione
con pulsante : il
display visualizza "Lo.3".
La temperatura della
superficie rilevata è al di
sotto dei limiti operativi
(<1°C).
Non è possibile rilevare
la temperatura.
Il display visualizza il
conto alla rovescia, in
minuti e secondi,
necessario a VisioFocus
per ricalibrarsi
automaticamente.
Il termometro non è
stabilizzato. I simboli
dopo la parentesi graffa
invitano a scegliere tra:
• attendere la fine del
conto alla rovescia per
l’AQCS senza toccare
il termometro
• oppure eseguire l’MQCS
(leggete il par. 7 a pag. 7).
Durante lo stand-by, la
visualizzazione della
temperatura ambiente è
accompagnata
dal simbolo MQCS o
AQCS.
Il termometro ha subito
una stabilizzazione rapida
automatica o manuale:
potete effettuare una
misurazione accurata.
Per una misurazione
perfetta, attendete la
calibrazione normale
del termometro
(dai 10 ai 30 minuti).
Il display visualizza "E.8".
Il termometro è stato
mosso prima del lampeggio delle luci, oppure si
è in presenza di forti campi
elettromagnetici.
Attendete il lampeggio delle
luci prima di muovere il termometro; assicuratevi che
non ci siano telefoni cellulari
o cordless nelle vicinanze.
08 - Italiano -
10 - Italiano -
Alimentazione: 4 batterie tipo AAA (LR03) alcaline da 1,5 V (incluse)
Autonomia con batterie di qualità: fino a 3 anni o 30.000 letture (secondo l’uso)
Dimensioni: mm 144 x 43,5 x 21,5 - compreso cappuccio di protezione
Peso: gr. 98 - (batterie comprese)
14. CARATTERISTICHE TECNICHE
VISIOFOCUS® Termometro infrarosso a distanza
Distanza dal soggetto: stabilita mediante sistema di puntamento ottico (circa
6 cm).
Display ampio e ben visibile, dotato di retroilluminazione a 5 colori: azzurro, verde
o violetto, a seconda del pulsante utilizzato (rispettivamente “faccia”, “casa” o
“Mem”); arancio e blu a seconda delle funzioni (rispettivamente visualizzazione
della temperatura ambiente e MQCS).
Intervallo di pressione atmosferica di utilizzo: da 700 hPa a 1,060 hPa.
Intervallo di umidità relativa di utilizzo: da 15 % a 93 %, non-condensante.
Conservare in un luogo asciutto e pulito, preferibilmente ad una temperatura
compresa tra +16 e +40°C. Non conservare a una temperatura inferiore a -18°C
e superiore a +70°C.
Durata di vita prevista del dispositivo: 10 anni.
VisioFocus è un dispositivo medico di classe IIa (secondo la direttiva 93/42/CEE
e s.m.i.). Il suo sistema di misurazione è stato testato in ospedali e cliniche private
e studi medici. Gli studi clinici sono disponibili su richiesta al fabbricante.
Termometro infr arosso con forme ai req uisiti stab iliti dall a norma ASTM
(E1965-98:2009) e alle n orme CE I EN 60601-1 , 60601 -1-2 e 60601- 1-11.
Apparecchio con sorgente elettrica interna, previsto per uso continuo.
Tecnimed srl, P.le Cocchi, 12 - 21040 Vedano Olona (VA) - Italia assume piena
responsabilità della conformità di questo prodotto alle norme di riferimento.
I led di VisioFocus emettono esigue radiazioni luminose in conformità IEC 62471.
Leggere le istruzioni
per l’uso
Apparecchio previsto
per uso continuo
Protetto contro l’inserimento di oggetti >12,5
mm e contro l’ingresso
di gocce d’acqua
ATTENZIONE:
leggere le avvertenze
Materiale riciclabile
Parte applicata
tipo BF
Ai sensi dell’art. 13 del Decreto Legislativo 25 luglio 2005, n. 151 “Attuazione delle Direttive 2002/95/CE,
2002/96/CE e 2003/108/CE, relative alla riduzione dell’uso di sostanze pericolose nelle apparecchiature
elettriche ed elettroniche, nonché allo smaltimento dei rifiuti” e ai sensi dell’art. 22 del D. Lgs. 20 novembre
2008, n. 188: il simbolo del cassonetto barrato indica che il prodotto alla fine della propria vita utile deve essere raccolto
separatamente dagli altri rifiuti, così come le pile esauste. L’utente dovrà, pertanto, conferire l’apparecchiatura giunta
a fine vita agli idonei centri d i raccolta differenziat a dei rifiuti elettronici ed ele ttrotecnici. L’adeguata ra ccolta
differenziata per l’avvio successiv o dell’apparecchiatura dimessa e delle pile esauste al riciclaggio, a l trattamento
e allo smaltimento ambientalmente compatibile contribuisce ad evitare possibili effetti negativi sull’ambie nte e sulla
salute e favorisce il reimpiego e/o riciclo dei materiali di cui è composta l’appa recchiatura. Lo smaltimento abusivo
del prodotto da parte dell’ut ente comporta l’applicazione delle sanzioni amministrative previste dalla normativa
vigente.
Intervallo di misura
Intervallo di temperatura
ambiente
Risoluzione
Precisione da 34,0 a 35,9°C
Precisione da 36,0 a 39,0°C
Precisione da 39,1 a 42,5°C
34,0/42,5°C
10/45°C
(1)
0,1
+/-0,3°C
+/-0,2°C
(2)
+/-0,3°C
Intervallo di misura
Intervallo di temperatura ambiente
Risoluzione
Precisione da 1,0 a 19,9°C
Precisione da 20,0 a 35,9°C
Precisione da 36,0 a 39,0°C
Precisione da 39,1 a 42,5°C
Precisione da 42,6 a 80,0°C
1,0/80,0°C
5/45°C
(3)
0,1
+/-1,0°C
+/-0,3°C
+/-0,2°C
+/-0,3°C
+/-1,0°C
Misurazioni sulla fronte
Altre misurazioni
(3)
In ambienti con temperatura compresa tra 5 e
9,9°C, la precisione ed il range operativo non sono
garantiti ed il valore letto viene alternato a "Lo.5".
(1)
Con temperatura ambiente tra 10 e 15,9°C o tra 40 e
45°C, la precisione e il range operativo non sono garantiti
ed il valore letto viene alternato a "Lo.5" o “Hi.4”.
(2)
Il grado di accuratezza richiesto dalle n orme ASTM
E1965-98-2009 per i termometri infrarosso per
temperature tra 37 e 39°C è di +/-0,2°C, mentre per i
termometri a mercurio ed elettronici le n orme ASTM
E667-86 e E1112-86 prevedono una precisio ne di +/0,1°C per temperature tra 37 e 39°C.
IP 22
09 - Italiano -
7. Il termometro appare bloccato, non va in posizione di riposo dopo 20 secondi
di inutilizzo o i led di puntamento rimangono accesi dopo il rilascio del pulsante:
- resettate il termometro togliendo e rimettendo le batterie.
11. SOSTITUZIONE BATTERIE
- Premete con il pollice nel la piccola nicchia ovale pos ta sul retro
dell’apparecchio e fate scor rere lo sportello
batterie come illustrato nel la figura 11.
- Togliete lo sportello batterie.
- Asportate le vecchie batterie e
gettatele negli appositi con tenitori.
- Inserite 4 nuove batterie tipo
AAA - LR03 (ministilo),
preferibilmente alcaline, pr estando attenzione
alla posizione indicata nell e rispettive sedi.
- Richiudete lo sportello facendolo scorrere in senso inv erso a quello di apertura.
Dopo il cambio delle batterie, lasciate stabilizzare il termomet ro per 20 minuti prima
di effettuare una misurazione oppure eseguite l’MQCS (par. 7, pa gina 7).
- Togliete le batterie se prevedete di non us are il termometro per lungo tempo .
12. PULIZIA
PULIZIA DEL LA GUIDA D’ONDA: la gu ida d’onda del termometro è molto
delicata. Si raccomanda q uindi di proteggere sem pre il termometro con i l suo
cappuccio, quando non è in uso. Se , tuttavia, fosse necessario pu lire la guida
d’onda o il sensore situato in fondo ad essa per rimuovere eventuale polvere
o altro sporco, usate un bastoncino di cotone leggermente inumidito con alcool.
Assicuratevi di asportare tutto lo sporco evitando di accumularne sul fondo
della guida d’onda dove si trova il sensore. Non uti lizzate altri oggetti o li quidi
che potrebbero facilmente graffiare o danneggiare la superficie della lente o
del sensore. Durante quest a operazione assicuratevi che eventuale liquido in
eccesso non penetri tra la g uida d’onda ed il sensore.
PULIZIA D EL CORPO D EL TERMOM ETRO: us ate un pann o morbid o
leggermente inumidito con acqua e sapone e d eventualmente ripassate con
un disinfettante.
NON USARE il termometro per almeno 30 minuti dopo la sua pulizia.
13. DISPLAY
Il display di VisioFocus è r etroilluminato in 5 colori:
1. azzurro (pulsante utilizz ato: “faccia”. Rif. Par. 4.1 e 4.2);
2. verde (pulsante utilizzat o: “casa”. Rif. Par. 4.3);
3. viola (pulsante utilizzat o: “Mem”, funzione “memoria” . Rif. Par. 5);
4. arancio (pulsante utilizzato: “Mem”, funzione “temperatura ambiente”. Rif. Par. 6);
5. blu (funzione MQCS. Rif. Par. 8).
Fig. 11
apri
chiudi
 Loading...