

Page 1
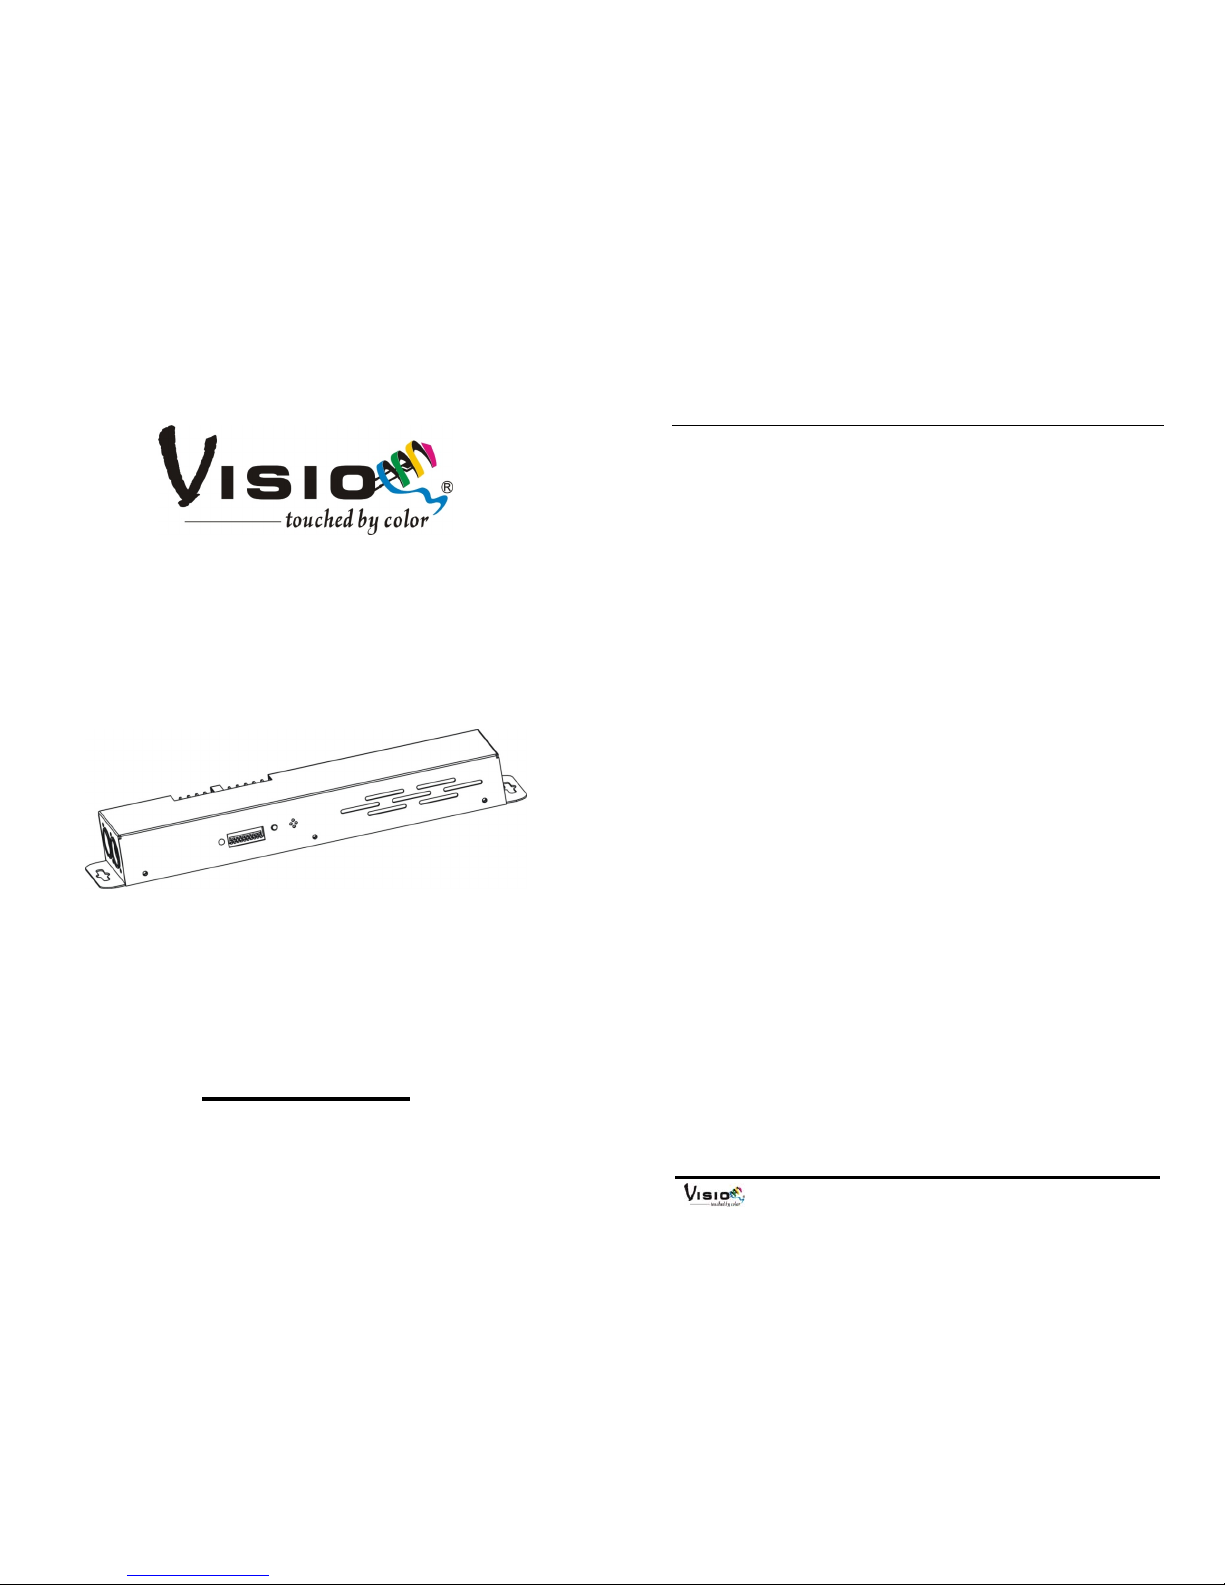
LED HANDY CON 50
LED-HC50
User Manual
Please read the instructions carefully before use
LED-HC 50
1-
TABLE OF CONTENTS
1. Safety Instructions
2. Technical Specifications
3. Function
4. Installation
5. DMX512 Address setting
6. How to control the fixture
7. DMX 512 Connection
8. Troubleshooting
9. Fixture Cleaning
Page 2
LED-HC 50
2-
1. Safety Introductions
WARNING
y Please kee p this User Manual for future consultation. If you sell the fixture to
another user, be sure that they also receive this instruction booklet.
y Unpack and check carefully there is no transportation damage before using the
fixture.
y Before operating, ensure that the voltage and frequency of power supply match
the power requirements of the fixture.
y Disconnect mains power before servicing and maintenance.
y Use safety chain when fixes this fixture.
y In the event of serious operating pro blem, stop using the fixture immediately.
Never try to repair the fixture by yourself. Repairs carried out by unskilled people
can lead to damage or malfunction. Please contact the nearest authorized
technical assistance center. Always use the same type spare parts.
y Do not touch any wire during operation and there might be a hazard of electric
shock.
y To prevent or reduce the risk of electrical shock or fire, do not expose the fixture
to rain or moisture.
y There are no user serviceable parts inside the fixture. Do not open the housing
or attempt any repairs by yourself. In the unlikely event your fixture may require
service, please contact your nearest dealer.
Please read the instructions carefully which includes
important information about the installation, operation and
maintenance.
LED-HC 50
3-
2.Technical Specifications
y A compact LED controller for all kinds of DC 24V passive RGB Fixtures.
y Come with switch power supply inside
y Built-in programs under Master/Slave mode triggered by music.
y 4 different ways of DMX addressing
y Terminals for linking LED-Wall Dimmer, and it provides power to LED Wall Dimmer .
y Power input: 100-250V~50/60Hz
y Power output: DC 24V
y Max Load: 50W
y Channels
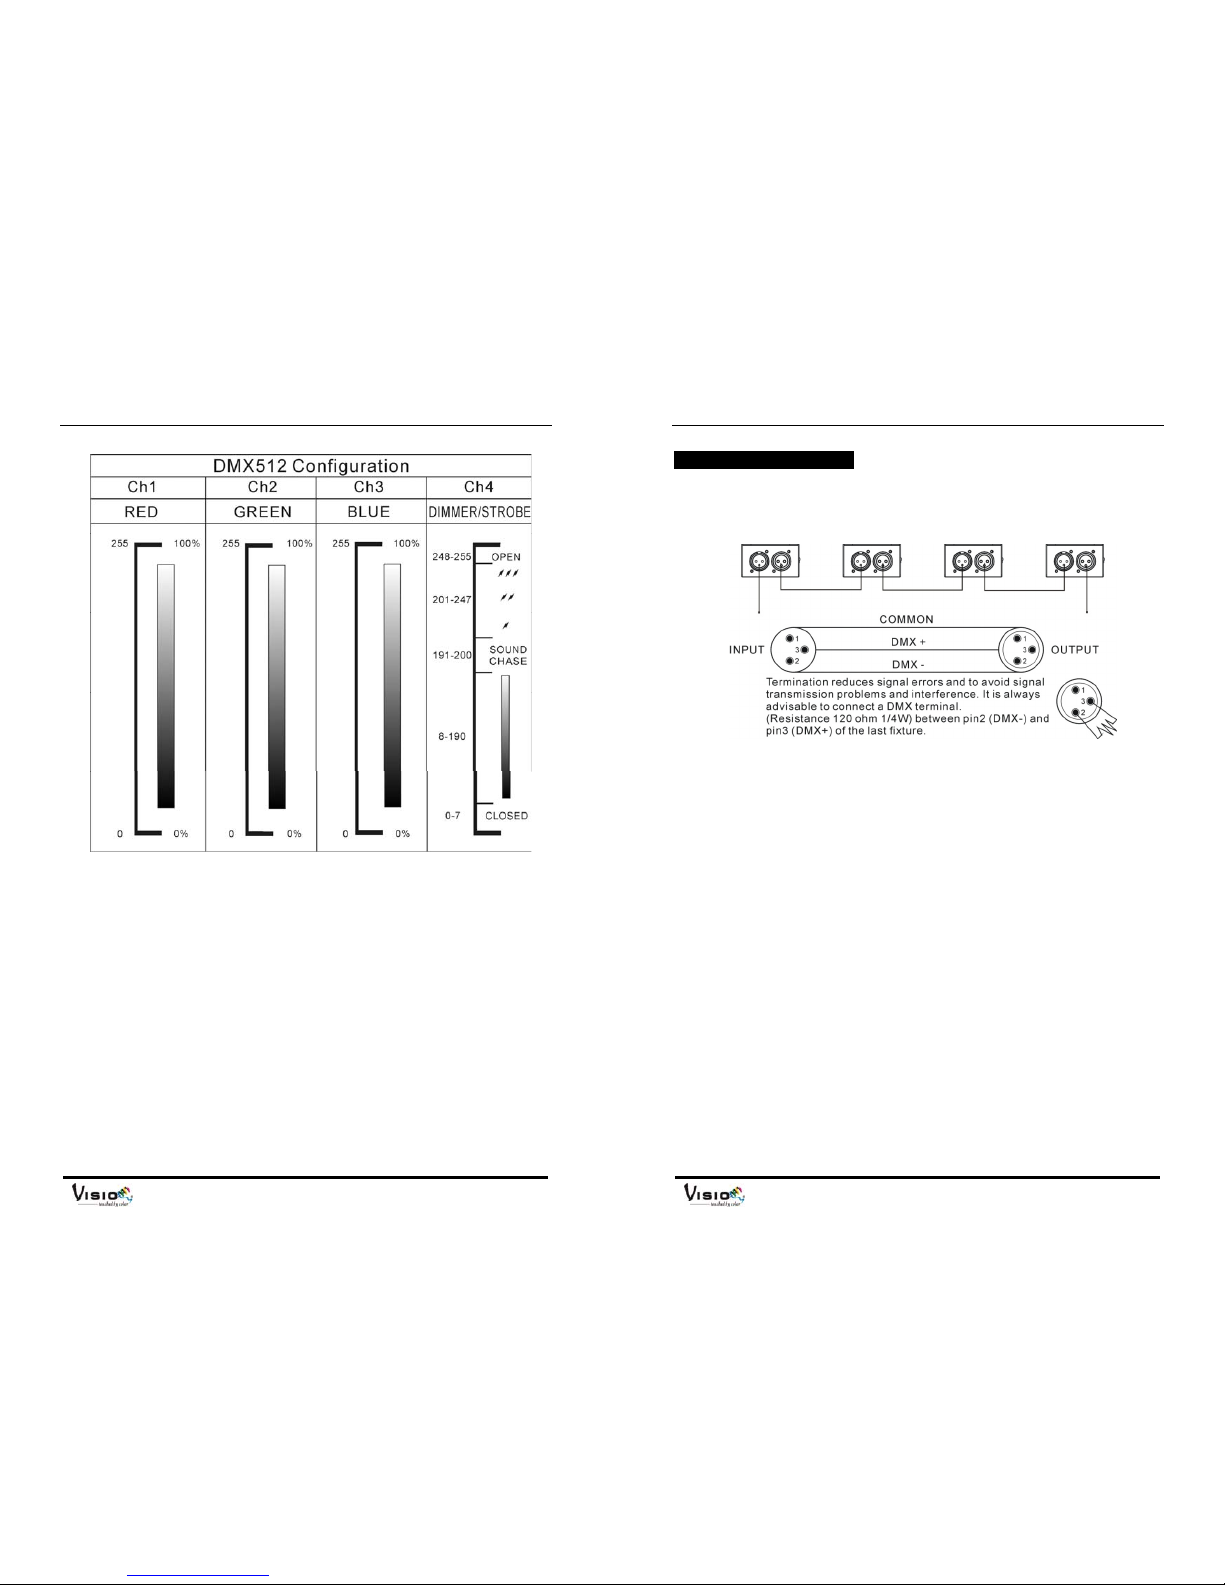
Channel 1 = Red
Channel 2 = Green
Channel 3 = Blue
Channel 4 = Dimmer / Strobe
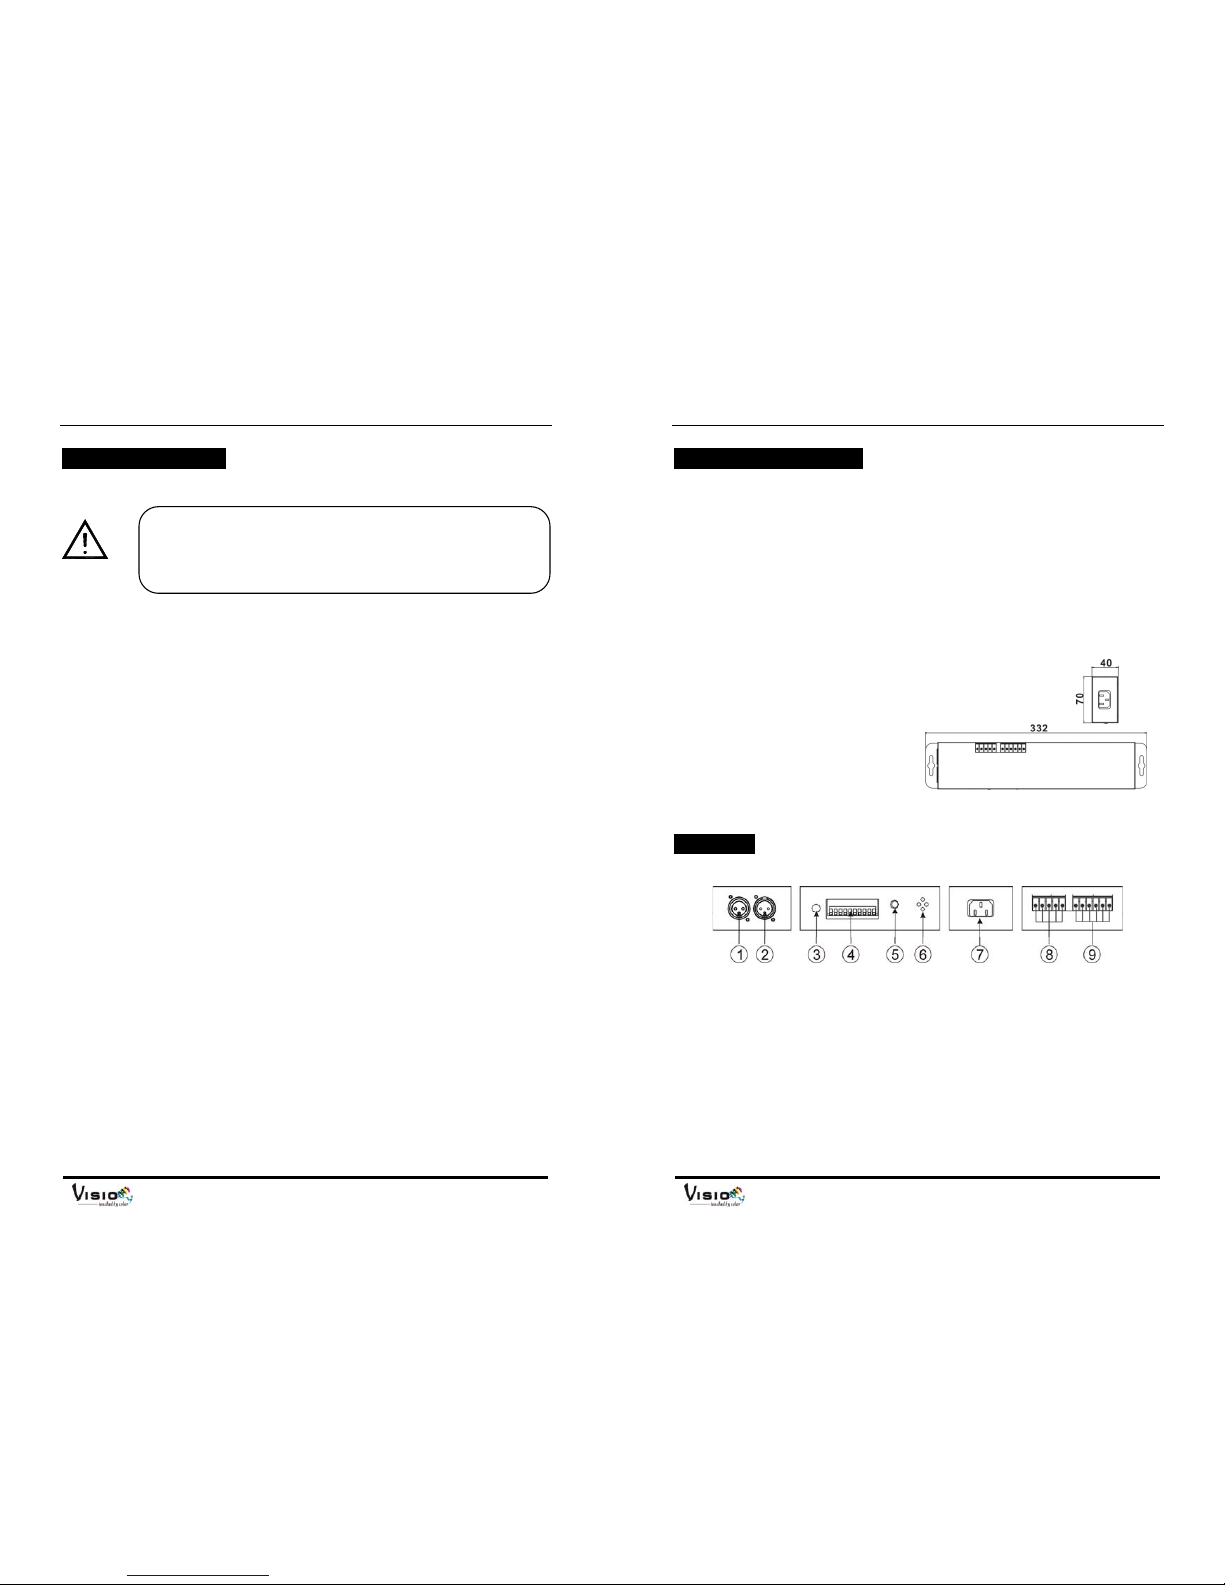
y Dimension:332 x 70 x 40mm
y Weight: 1 kg
3. Function
1. DMX OUTPUT: output DMX signal
2. DMX INPUT: input DMX signal
3. LED: show the status of the unit
4. DIP SWITCH: used to set the start address of the unit or choose functions
5. AUTO DMX ADDRESS: used to set start address automatically.
6. MICROPHONE: used to receive voice for sound control
7. POWER SOCKET: for power input
8. LED-WD CONNECTOR: used to receive the signal of LED-WD only
9. SIGNAL OUTPUT: output signal and power for light
Page 3
LED-HC 50
4-
4. Installation
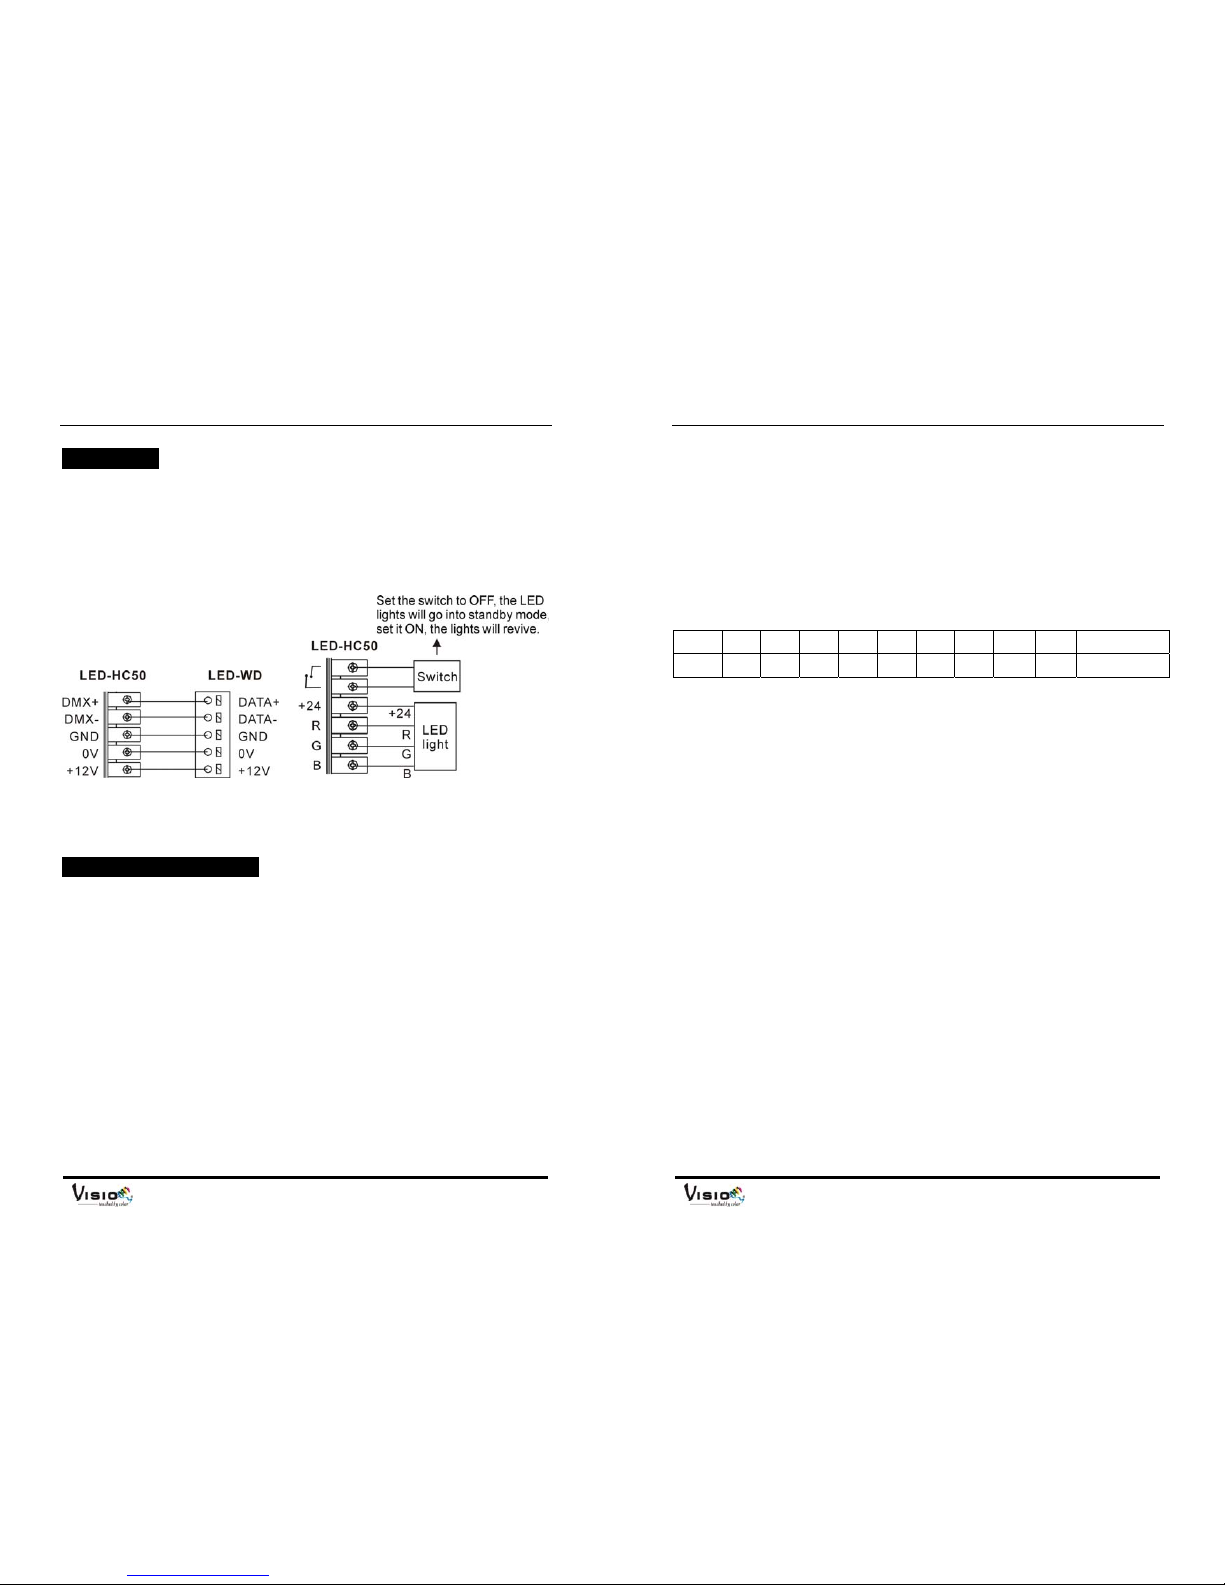
1. Ensure that mains power supply is off before installing or wiring the LED fixture
2. Unscrew the screws and connect the wires as diagrams below
3. Tight the screws.
CAUTIONS:the LED controller total output power consumption is 50 watt.
5. DMX512 Address Setting
Each fixture needs to have a start address set to receive the data sent by the
controller. The address number is between 0-511 (usually 0 & 1 are equal to 1). The
address, also know as the start channel, is the first channel used to receive
instructions from the controller.
There are four ways to set the fixture DMX start address:
A. DMX address setting by dip-switches
B. Auto DMX addressing
C. Remote DMX address setting by CA-T DMX TESTER
D. Remote DMX address setting by universal DMX controller
If you use the function B, C or D to set the DMX start address, the fixtures o f
the chain all DIP switch MUST be set to OFF.
LED-HC 50
5-
When you set the address by DMX controller and dip-switch at the same
time, the order of the DMX controller will be invalid.
A. DMX address setting by dip-switches
1. Set the start address by dip-switch as the diagram below
2. Hold the AUTO DMX ADDRESS button for about 5 seconds, the LED
lights blinking indicating the address is set successfully.
Dip # 1 # 2 # 3 # 4 # 5 # 6 # 7 # 8 # 9 # 10
Value 1 2 4 8 16 32 64 128 256 Master/Slave
• Examples:
Channel 01:dip / on : # 1(=1)
Channel 05:dip / on : # 1, # 3(1+4=5)
Channel 09:dip / on : # 1, # 4 (1+8=9)
Channel 13:dip / on : # 1, # 3, # 4(=13)
B. Auto DMX addressing
1. The DMX address of fixture can be set automatically. Set all dip-switches to OFF
and hold the
AUTO DMX ADDRESS button of the first unit for about 5 seconds,
the fixture will be set the DMX start address to 1, and the other fixtures of the
chain will be set their own DMX start address automatically.
2. The LED fixtures use four channels, the next fixture’s will be automatic calculate
their own DMX address, not need to calculate the DMX channels of each fixtur e
in the chain. (Fixture 1 = 1, Fixture 2 = 5, Fixture 3 = 9, Fixture 4 = 13, Fixture…)
3. No need to turn the fixture off when you change the DMX address, as new DMX
address setting will be effect at once. Every time you turn the fixture on, it will be
ready to receive DMX signal or run the built-in programs.
Page 4
LED-HC 50
6-
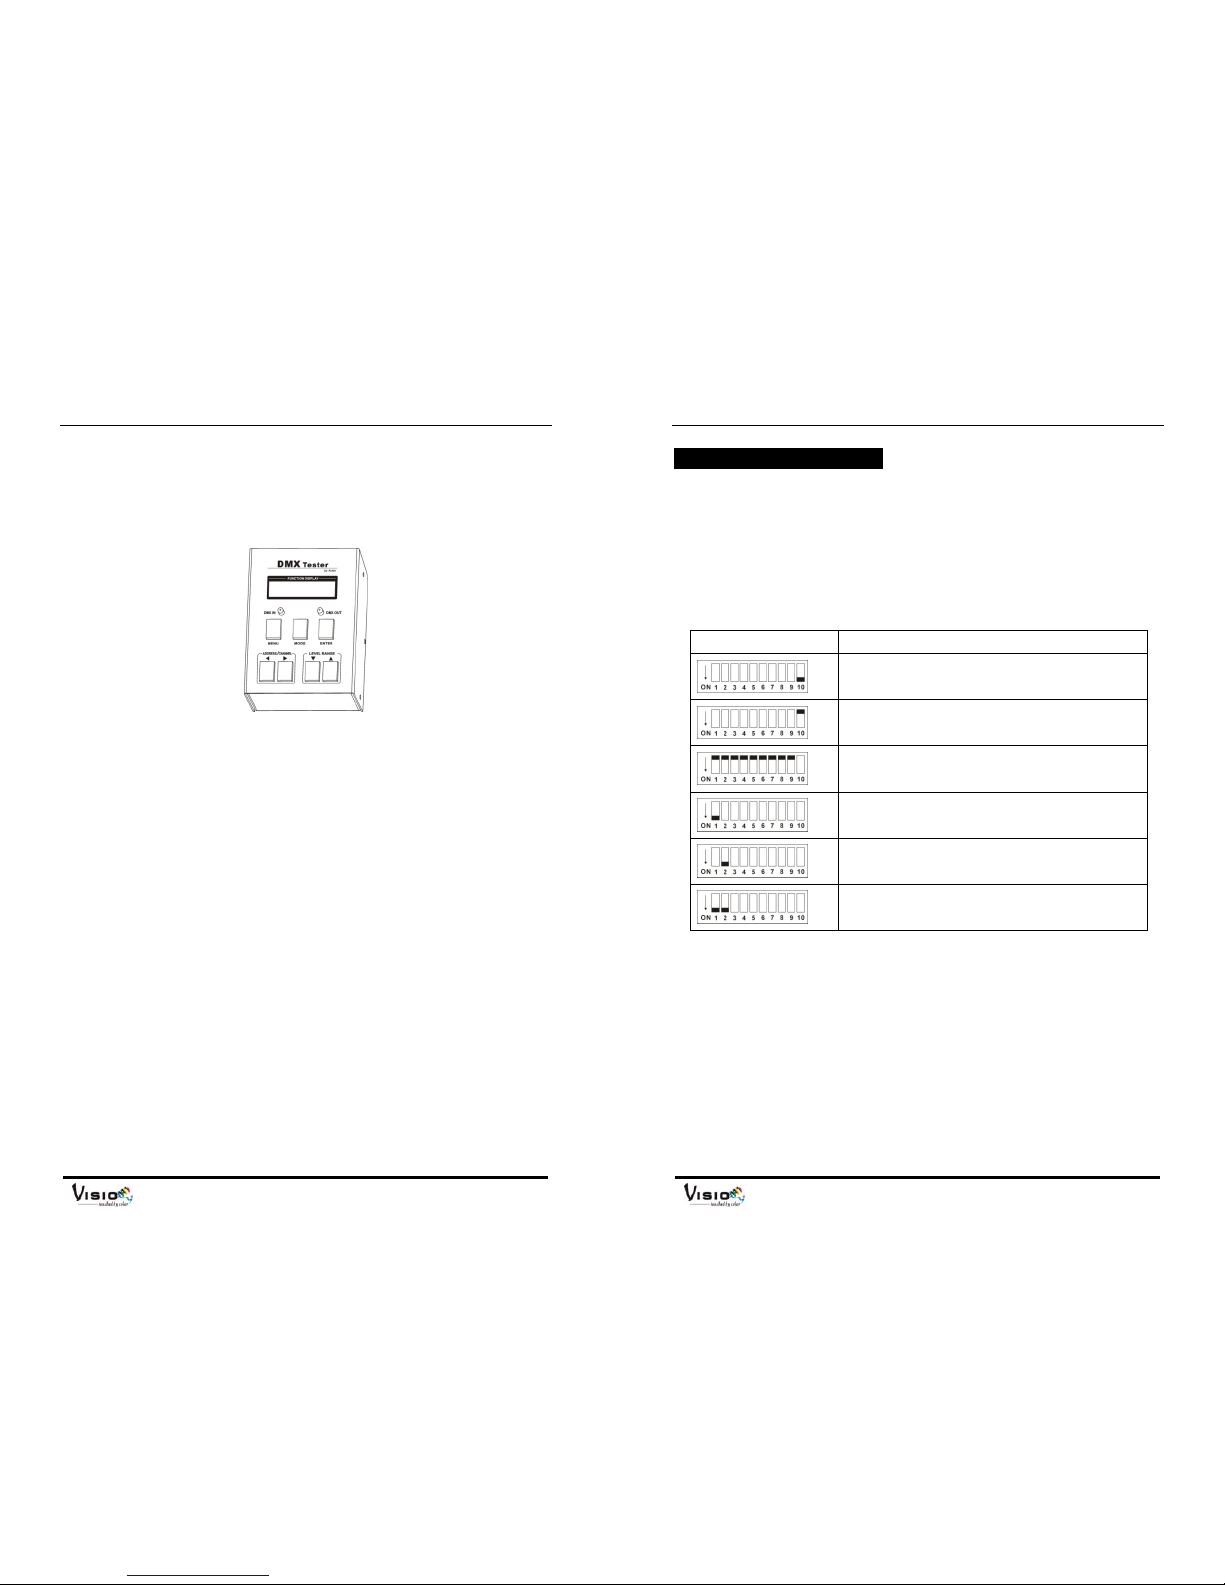
C. Remote DMX address setting by CA-T DMX TESTER
The fixture can be set the DMX address remotely by CA-T DMX TESTER. Pleas e
refer to the CA-T user manual to set the DMX address to the fixture.
D. Remote DMX address setting by universal DMX controller
y Make sure the DMX cables of all units are connected.
y Connect the first unit to a universal DMX controller.
y Connect all units to the mains so they are switched on.
y Set all DMX-channels on your DMX-controller to zero (value 000).
y Set the DMX-channel, that you want to assign as DMX start address on you unit,
tot maximum (value 255).
y Press the “Auto DMX address” button on the unit shortly.
y If you want to set another unit to the same DMX start address, simply press it’s
“Auto DMX address” button and it will receive the same address.
y Done!
An example to make things clear:
y We will set the DMX start address of a unit to 106:
y Connect the unit to the DMX-controller as described above and make sure all is
switched on.
y Set all DMX-channels on the controller to zero (000).
y Now set DMX-channel 106 to maximum (255).
y Press the “Auto DMX address” button on the unit shortly.
y Done! Your unit now has DMX address 106!
LED-HC 50
7-
6. How to control the fixture
There are three ways to control the fixture
A. Control by DIP switches
B. Control by Universal DMX controller
C. Master/Slave operation
A. Control by DIP switches
Dip switches setting Mode
Master
Slave
Sound
Chase
Use Dip switch 3, 4, 5 to choose chase speed (1-8)
Fade
Use Dip switch 3, 4, 5 to choose fade speed (1-8)
Color
Use Dip switch 6, 7, 8, 9 to choose color (16)
B. Control by universal DMX controller
If you use a controller with 5 pins DMX connector, you need to use a 5 to 3 pin
adapter. The fixture uses four channels. Please refer to the following diagram to use
your controller to activate the fixture.
Page 5
LED-HC 50
8-
C. Master/Slave operation
The fixture will allow you to link 16 fixtures together and operate without a controller.
In Master/Slave mode, the first fixture will control the others to give an automatic,
sound activated, synchronized light show. This function is good when you want an
instant show. The first fixture it’s DMX input cable will have nothing connect it, and
the other fixtures will be set in slave mode automatically. Their DMX input cables
connect the last fixture DMX output cable (daisy chain). Any fixture ca n act as a
Master or as a Slave
LED-HC 50
9-
7. DMX512 Connection
The DMX 512 is widely used in intelligent lighting control, with a maximum of 512
channels.
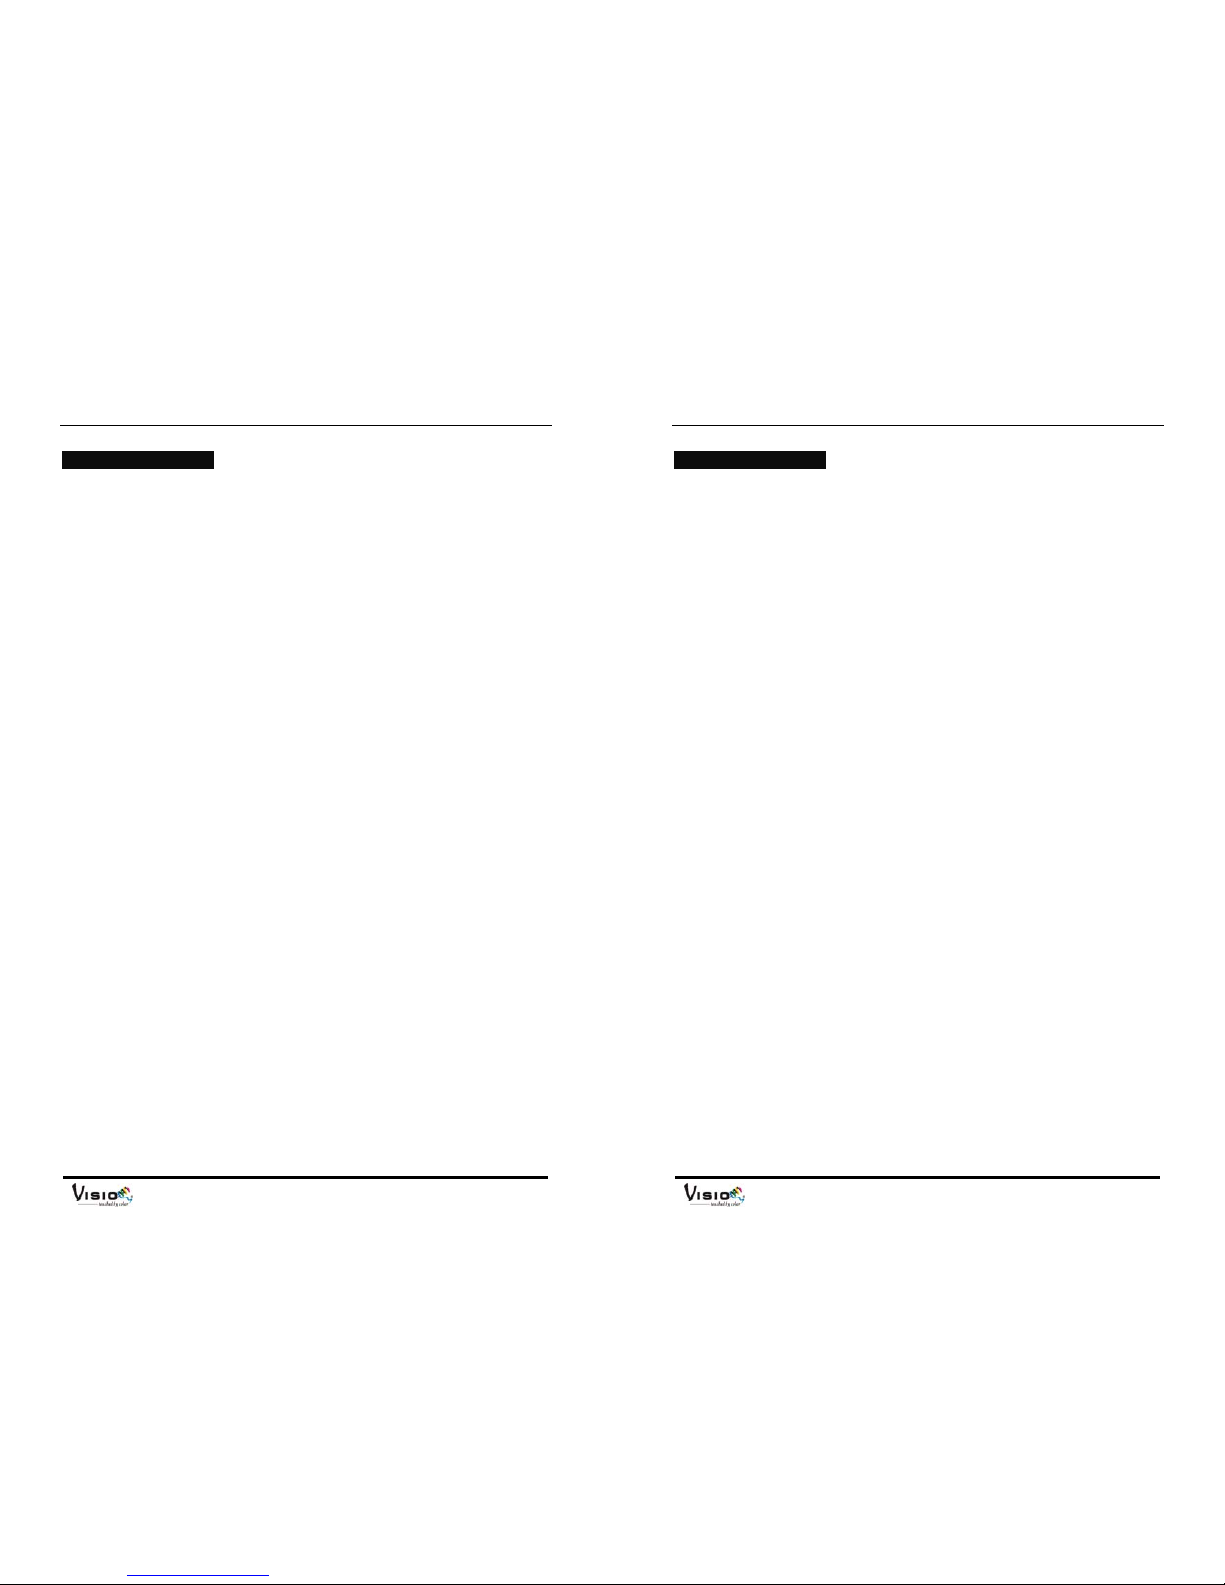
1. If you using a controller with 5 pins DMX o utput, you need to use a 5 to 3 pin
adapter-cable.
2. At last unit, the DMX cable has to be terminated with a terminator. Solder a 120
ohm 1/4W resistor between pin 2(DMX-) and pin 3(DMX+) into a 3-pin XLR-plug
and plug it in the DMX-output of the last unit.
3. Connect the unit together in a `daisy chain` b y XLR plug from the output of the
unit to the input of the next unit. The cable can not branched or split to a `Y`
cable. DMX 512 is a very high-speed signal. Inadequate or damaged cables,
soldered joints or corroded connectors can easily distort the signal and shut
down the system.
4. The DMX output and input connectors are pass-through to maintain the DMX
circuit, when one of the units’ power is disconnected.
5. Each lighting unit needs to have an addr ess set to receive the data sent by the
controller. The address number is between 0-511 (usually 0 & 1 are equal to 1).
6. The end of the DMX 512 system should be terminated to reduce signal errors.
7. 3 pin XLR connectors are more popular than 5 pin XLR.
3 pin XLR: Pin 1: GND, Pin 2: Negative signal (-), Pin 3: Positive signal (+)
5 pin XLR: Pin 1: GND, Pin 2: Negative signal (-), Pin 3: Positive signal (+)
Page 6
LED-HC 50
10-
8. Troubleshooting
Following are a few common problems that may occur during operation. Here are
some suggestions for easy troubleshooting:
A. The fixture does not work
1. Check the connection of power and main fuse.
2. Measure the mains voltage on the main connector.
B. Not responding to DMX controller
1. DMX LED sho uld be on. If no t, check DMX c onnectors a nd cables to se e if lin k
properly.
2. If the DMX LED is on and no response to the channel, check the address
settings and DMX polarity.
3. If you have intermittent DMX sign al problems, check the pi ns on connectors or
on PCB of the fixture or the previous one.
4. Try to use another DMX controller.
5. Check if the DMX cables run near or run alongside to high voltage cables that
may cause damage or interference to DMX interface circuit.
C. No response to the sound
1. Make sure the fixture does not receive DMX signal.
2. Check microphone to see if it is good by tapping the microphone.
LED-HC 50
11-
9. Fixture Cleaning
The cleaning of internal must be carried out periodically. Cleaning frequency
depends on the environment in which the fixture operates: damp, smoky or
particularly dirty surrounding can cause greater accumulation of dirt.
y Clean with soft cloth using normal glass cleaning fluid.
y Always dry the parts carefully.
y Clean the external at least every 20 days.
Page 7
LED-HC 50
12-
EC Declaration of Conformity
We declare that our products (lighting equipments) comply with the
following specification and bears CE mark in accordance with the provision
of the Electromagnetic Compatibility (EMC) Directive 89/336/EEC.
EN55014-2: 1997 A1: 2001, EN61000-4-2: 1995; EN61000-4-3:
2002;
EN61000-4-4: 1995; EN61000-4-5: 1995, EN61000-4-6: 1996,
EN61000-4-11: 1994.
&
Harmonized Standard
EN60598-1: 2000+ALL: 2000+A12: 2002
Safety of household and similar electrical appliances
Part 1: General requirements
 Loading...