

Visco VSC-37V3 Operating Instructions Manual
VSC-37V3
i
IMPORTANT SAFETY INSTRUCTIONS
1. Read these instructions.
2. Keep these instructions.
3. Heed all warnings.
4. Follow all instructions.
5. Do not use this apparatus near water.
6. Clean only with dry cloth.
7. Do not block any ventilation openings. Install in accordance with the manufacturer's
instructions.
8. Do not install near any heat sources such as radiators, heat registers, stoves, or
other apparatus (including amplifiers) that produce heat.
9. Do not defeat the safety purpose of the polarized or grounding-type plug. A polarized
plug has two blades with one wider than the other. A grounding type plug has two
blades and a third grounding prong. The wide blade or the third prong is provided for
your safety. If the provided plug does not fit into your outlet, consult an electrician for
replacement of the obsolete outlet.
10. Protect the power cord from being walked on or pinched particularly at plugs,
convenience receptacles, and the point where they exit from theapparatus.
11. Only use attachments/accessories specified by the manufacturer.
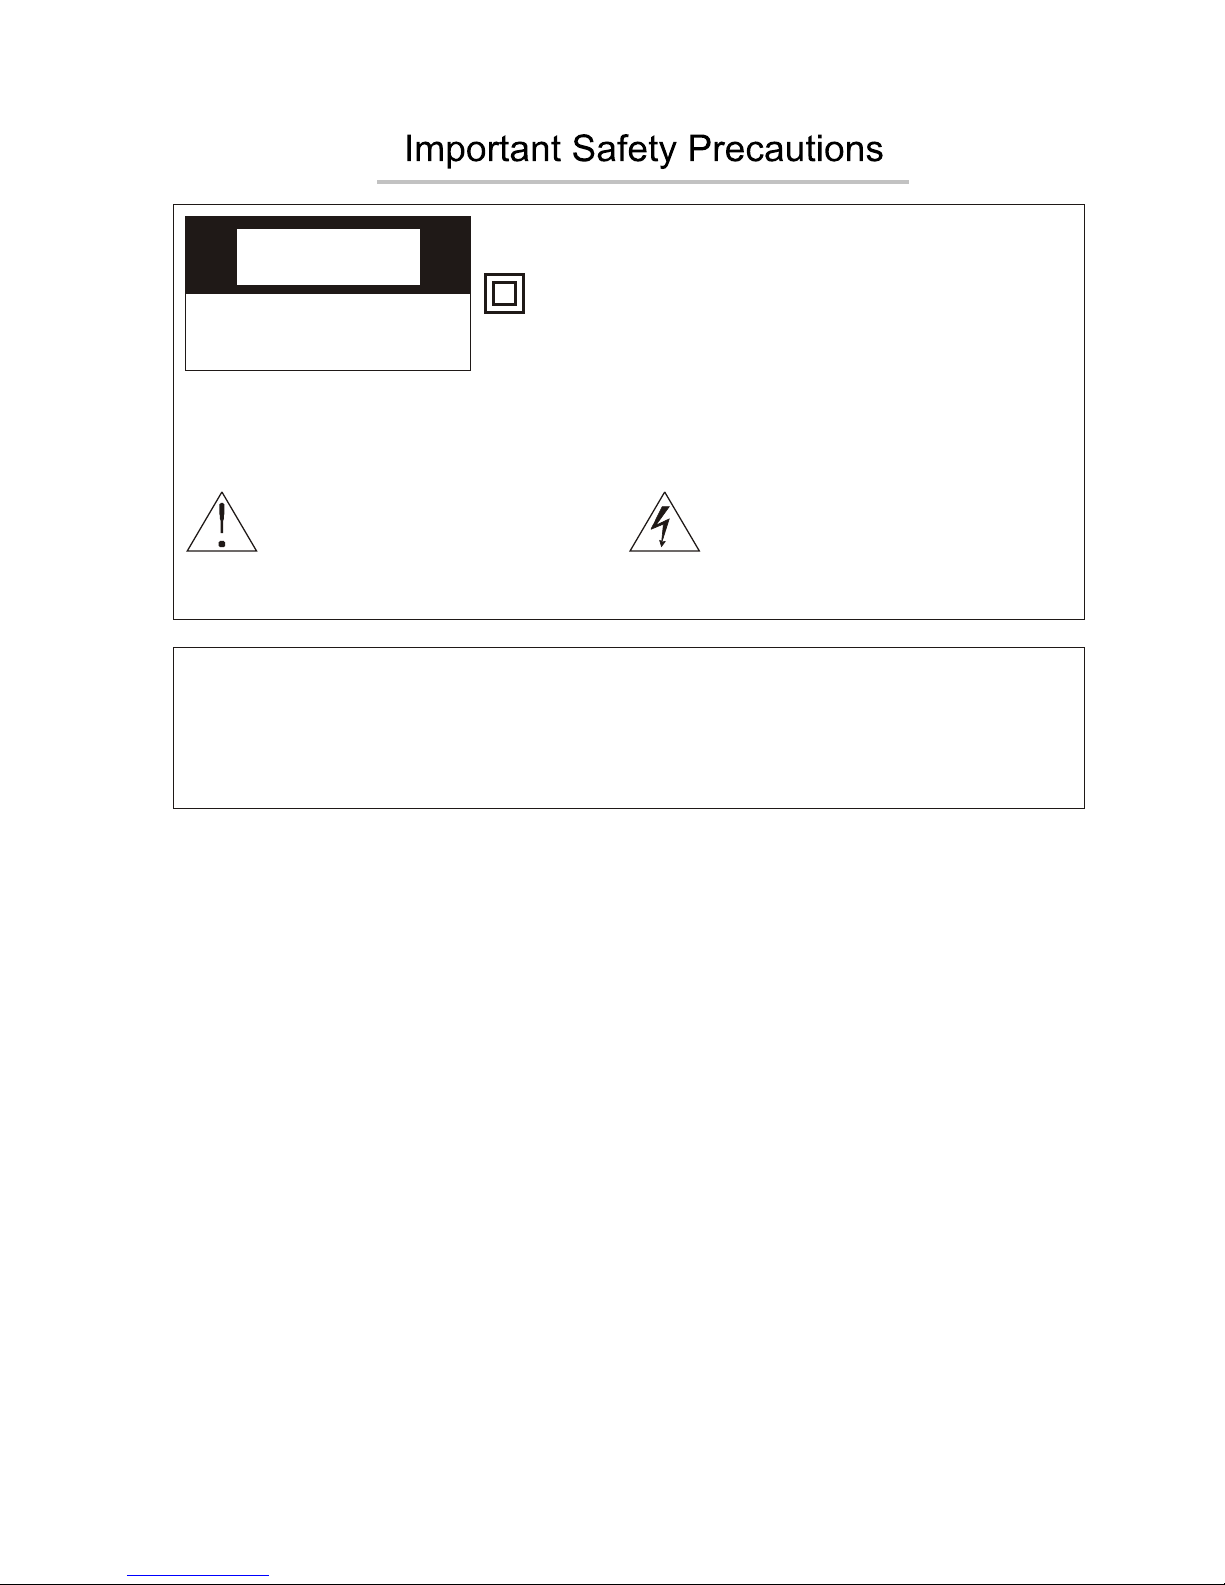
CAUTION
RISK OF ELECTRIC SHOCK
DO NOT OPEN
This symbol indicates that this product incorporates
double insulation between hazardous mains voltage
and user accessible parts.
When servicing use only identical replacement parts.
This symbol indicates important
instructions accompanying the
product.
WARNING
To reduce the risk of fire or electric shock, do not expose this product to rain or
moisture.
The apparatus must not be exposed to dripping or splashing. Objects filled with
liquids, such as vases or drinking glasses, must never be placed on the apparatus.
This symbol indicates "dangerous
voltage" inside the product that
presents a risk of electric shock or
personal injury.
Caution: To reduce the risk of electric shock, do not remove cover (or back). No user
serviceable parts inside. Refer servicing to qualified service personnel.

ii
12. Use only with the cart, stand, tripod, bracket, or table specified
by the manufacturer, or sold with the apparatus. When a cart is
used, use caution when moving the cart/apparatus combination
to avoid injury from tip-over.
13. Unplug this apparatus during lightning storms or when unused
for long periods of time.
14. Refer all servicing to qualified service personnel.
Servicing is required when the apparatus has been damaged in any way, such as
power-supply cord or plug is damaged, liquid has been spilled or objects have fallen
into the apparatus, the apparatus has been exposed to rain or moisture, does not
operate normally, or has been dropped.
15. If an outside antenna or cable system is connected to the product, be sure the
antenna or cable system is grounded so as to provide some protection against
voltage surges and built-up static charges. Section 810 of the National Electrical
Code, ANSI/NFPA No. 70-1984 (Section 54 of Canadian Electrical Code, Part 1)
provides information with respect to proper grounding of the mast and supporting
structure, grounding of the lead-in wire to an antenna-discharge unit, size of
grounding conductors, location of antenna-discharge unit, connection to grounding
electrode. See following example.
16. Mains plug is used as the disconnect device. It shall remain readily operable and
should not be obstructed during intended use.
This apparatus shall be connected to a mains socket outlet with a protective earthing
connection.
ELE CTRIC
SER VICE
EQU IPMEN T
NEC -NATIO NAL ELEC TRICA LCODE
POW ER SERV ICE GRO UNDIN G
ELE CTROD E SYSTE M
(NE C A RT 250 PART H)
GRO UND CLA MPS
GRO UNDIN G CONDU CTORS
(NE C SECTI ON 810- 21)
ANT ENNA
DIS CHARG E UNINT
(NE C SECTI ON 810- 21)
ANT ENNA
LEA D IN
WIR E

1
Welcome you to purchase VISCO LCD TV
Welcome you to high quality image world VISCO colour LCD TV brings you. We sincerely hope
VISCO TV brings you the brand new visual and audio enjoyment.
This operating instructions can help you operate this TV set easily.
Read this manual before operating the unit for being familiar with its features and keep it for future
reference.
Introduction
Features 3
Specifications 4
External connection
Antenna/cable connection 5
Stand and wall mounted 5
DVD, computer connection 6
General Description
Overview of front and right panel 7
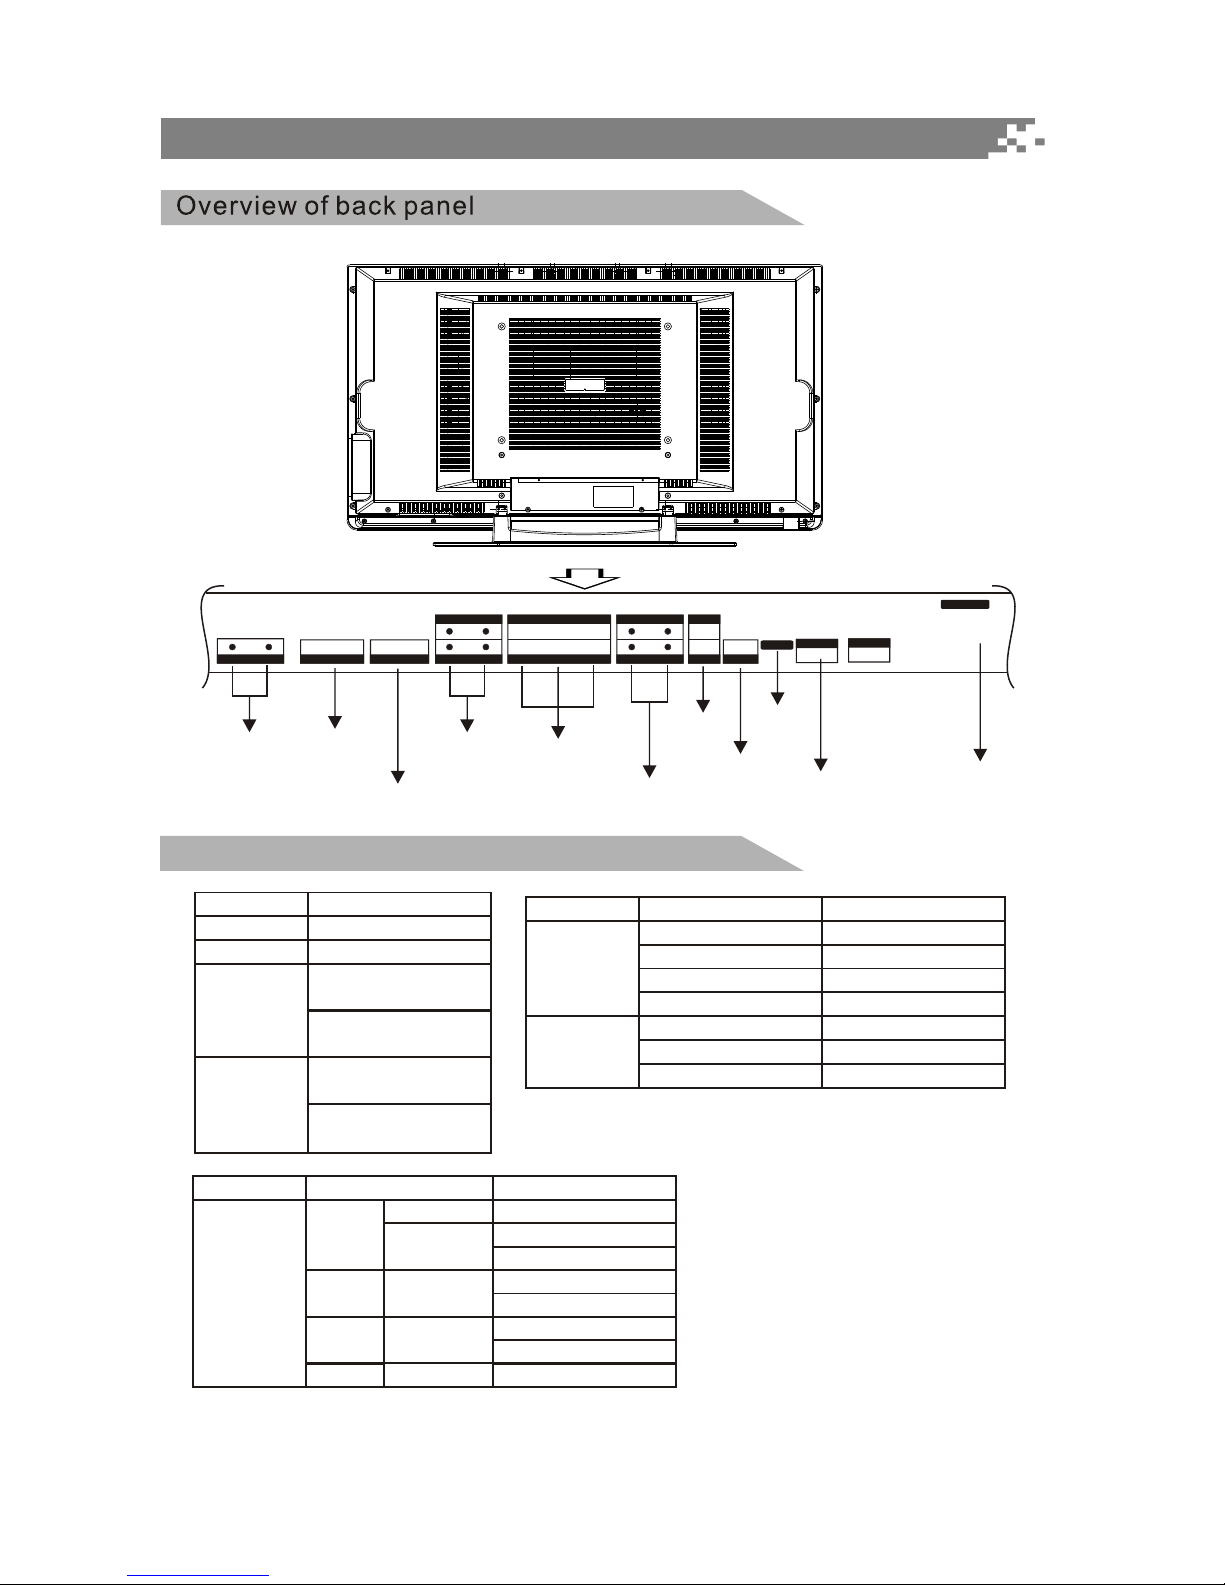
Overview of back panel 8
Supporting Signals 8
Overview of remote control 9
Basic operation
Turning the TV On and Off 11
Language setup 12
Source setup 12
Audio Channel List 13
Audio Type List 13
Aspect ratio setup 14
Auto search 14
Channels List 15
Channels Selection 15
Volume adjustment and Mute setup 16
PIP Audio 16
Audio picture displaying 16
PIP-POS Setup 16
Current channel Information 17
Password inputting 17
EPG menu 18
Menu system introduction
Video 19
Video Setup 19
PC Setup 20
Audio 20
Audio Setup 20
SPDIF Out 21
TV Channel 21
Auto Search 21
Manual Search 22
Channel Edit 22
Information 23
Closed Caption 25

CCD Mode 25
Analog Caption 25
Digital Caption 26
Style 26
Time setup 27
Current Time 27
Auto Turn-Off 28
Sleep Timer 28
Time Zone 29
DayLight Saving 29
System Setup 30
OSD Setup 30
Password 31
MPAA Rating 32
TV Rating 32
C.E.Rating 33
C.F. Rating 33
OPEN V-CHIP 34
Troubleshooting 35
Picture defects and the reason 36
Package accessories 36
Appendix 1 TV Rating setup rule 37
Appendix 2 PIP function 39
Appendix 3 Universal remote control 40
Notes:
If you are using the television first time, please read the basic operation before operating.
2
Manufactured under license from Dolby Laboratories.
"Dolby" and the double-D symbol are trademarks of Dolby Laboratories.

3
Input terminals used for external equipment connection
One ANTENNA jack One CABLE jack
One S-VIDEO input One computer RGB/PC input
Two YPbPr inputs Four AUDIO inputs
One HDMI input One AV input
One AV output One AUDIO output
One SPDIF output
Note:
1. If input the DVI signal by HDMI jack, you must input the audio of DVI by the audio way of RGB/PC.
2. The AV output and Audio output are depending on the main picture. But if the main picture is
YPbPr/VGA/HDMI/DTV, the AV output is no signal.
3. If inputting signal is DTV, the SPDIF will switch to DTV. If inputting signal is HDMI, the SPDIF will
switch to HDMI. SPDIF is set to disable when input other signal.
! TV adopts 37 " TFT LCD display screen
! HDTV Compatible(480i, 480p,720p, 1080i)
! Support American TV Standard 8VSB/Free 64/256QAM,NTSC System, ATSC System
! Connect to computer directly to realize TV/monitor combo.
! Zero X radiation complies to green environment protection requirement
! Soft picture and no harm to your eyes
! Ultra-thin and ultra-light features to realize wall mounted
! 16:9 wide screen(480i,480p,720p,1080i)
! Dual channel operation (PIP/PBP)
! Dual Channel Inverse Color Space Conversion (ICSC) for both Main Picture and PIP/PBP channels.
! Temporal and spatial Digital Noise Reduction image processing for both MP and PIP/PBP picture
channels
! Color edge enhancement improves the chroma transient such that the chroma edge looks sharper
than the original signal
! Pixel-based motion and edge adaptive deinterlacing
! Advanced Chroma Processing for both MP and PIP/PBP channels supporting green color stretch
and blue color stretch
! True 1080i deinterlacing and processing
! Closed captioning/TEXT services/V-CHIP
! SAP/STEREO/MONO; BTSC.
! Equalizer
! ESS (Extended Spatial Stereo)
! support HDMI/DVI input
! support SPDIF ouput
! Off timer: Set the timer for the TV to turn off at the preset time automatically.
4
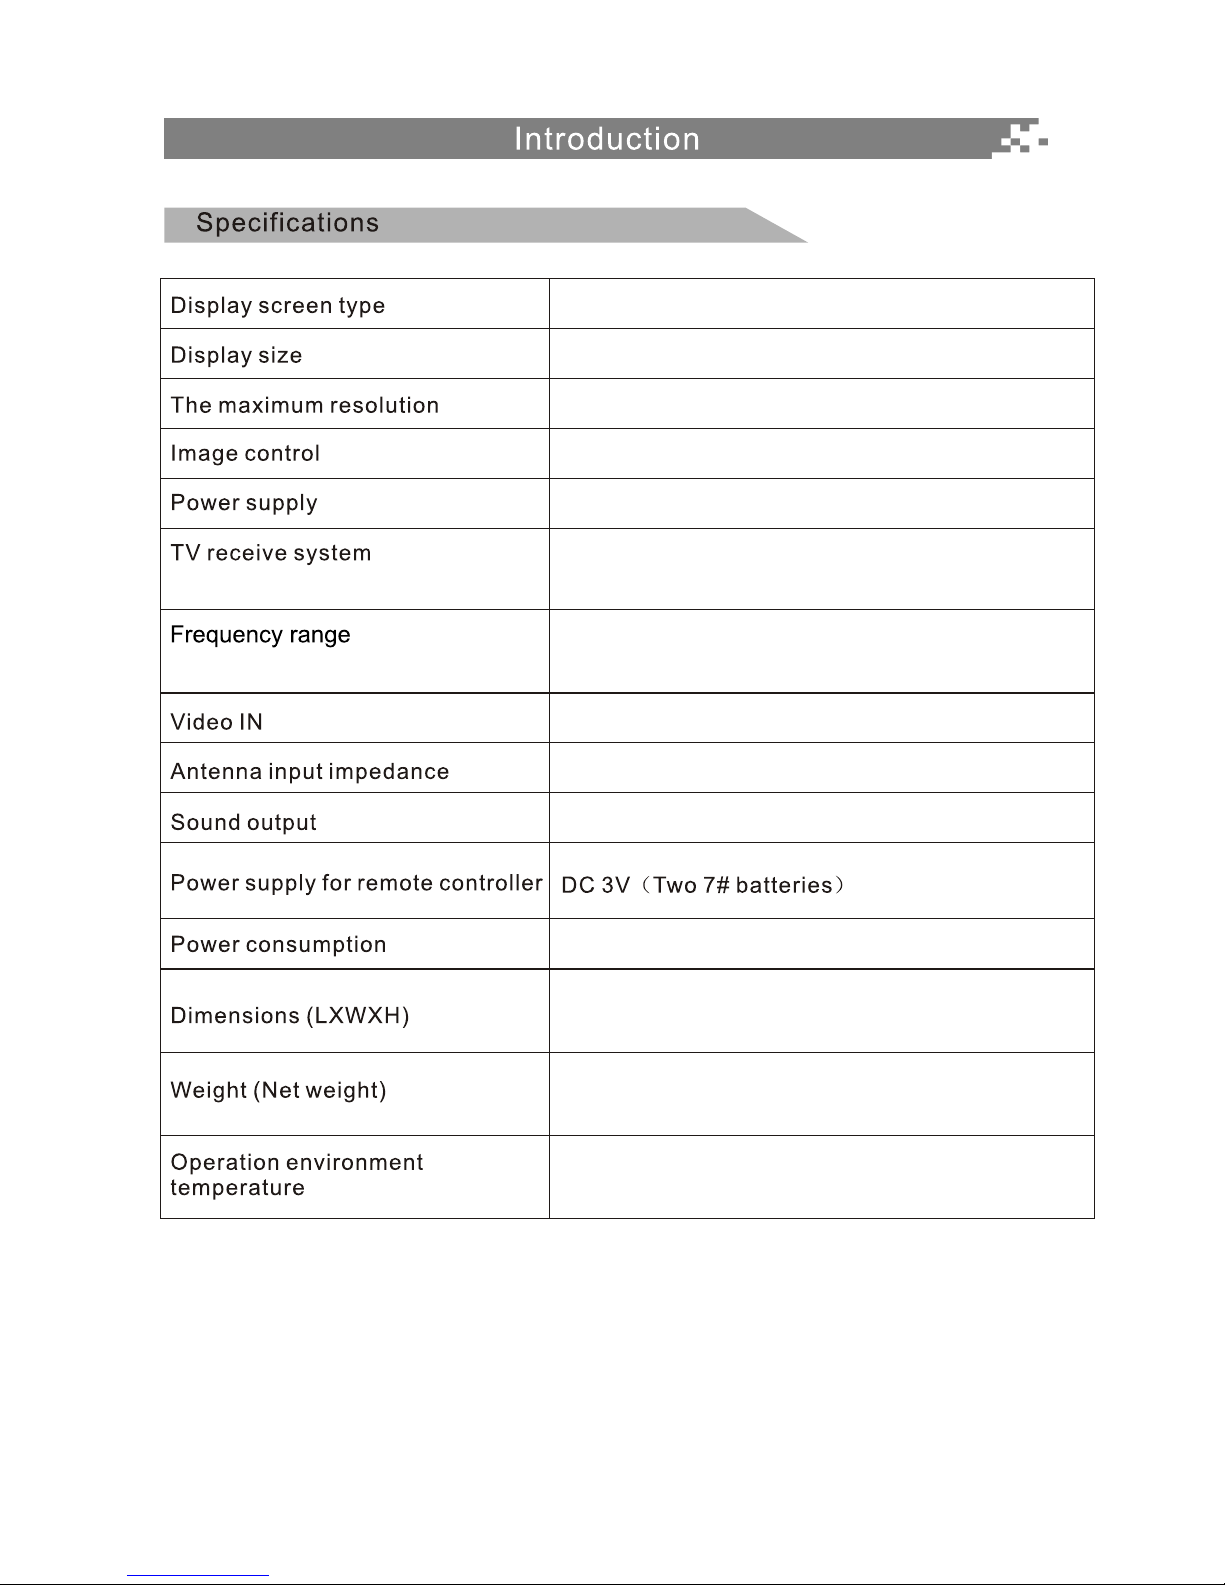
Fine digital control
AC 110-240V 60Hz
NTSC3.58, NTSC4.43
75W (Unbalance)
2X5W
200W
1366X768
37 inches diagonal (max.)
Colour active matrix LCD display
42.8"X25.3"X9.8” (TV With stand)
66.1Ibs (TV with stand)
o o
0 C-40 C
American TV Standard 8VSB/Free 64/256QAM,
NTSC System, ATSC System
Antenna: 2~69; Cable: 2~135 (Analog: 2-125,
Digital: 2-135)
Note:
1. Due to TV may be used with different display screen, weight marked in this user's
manual or in packaging box are subject to change without notice.
2. In case of any design change, a notice will not be released.
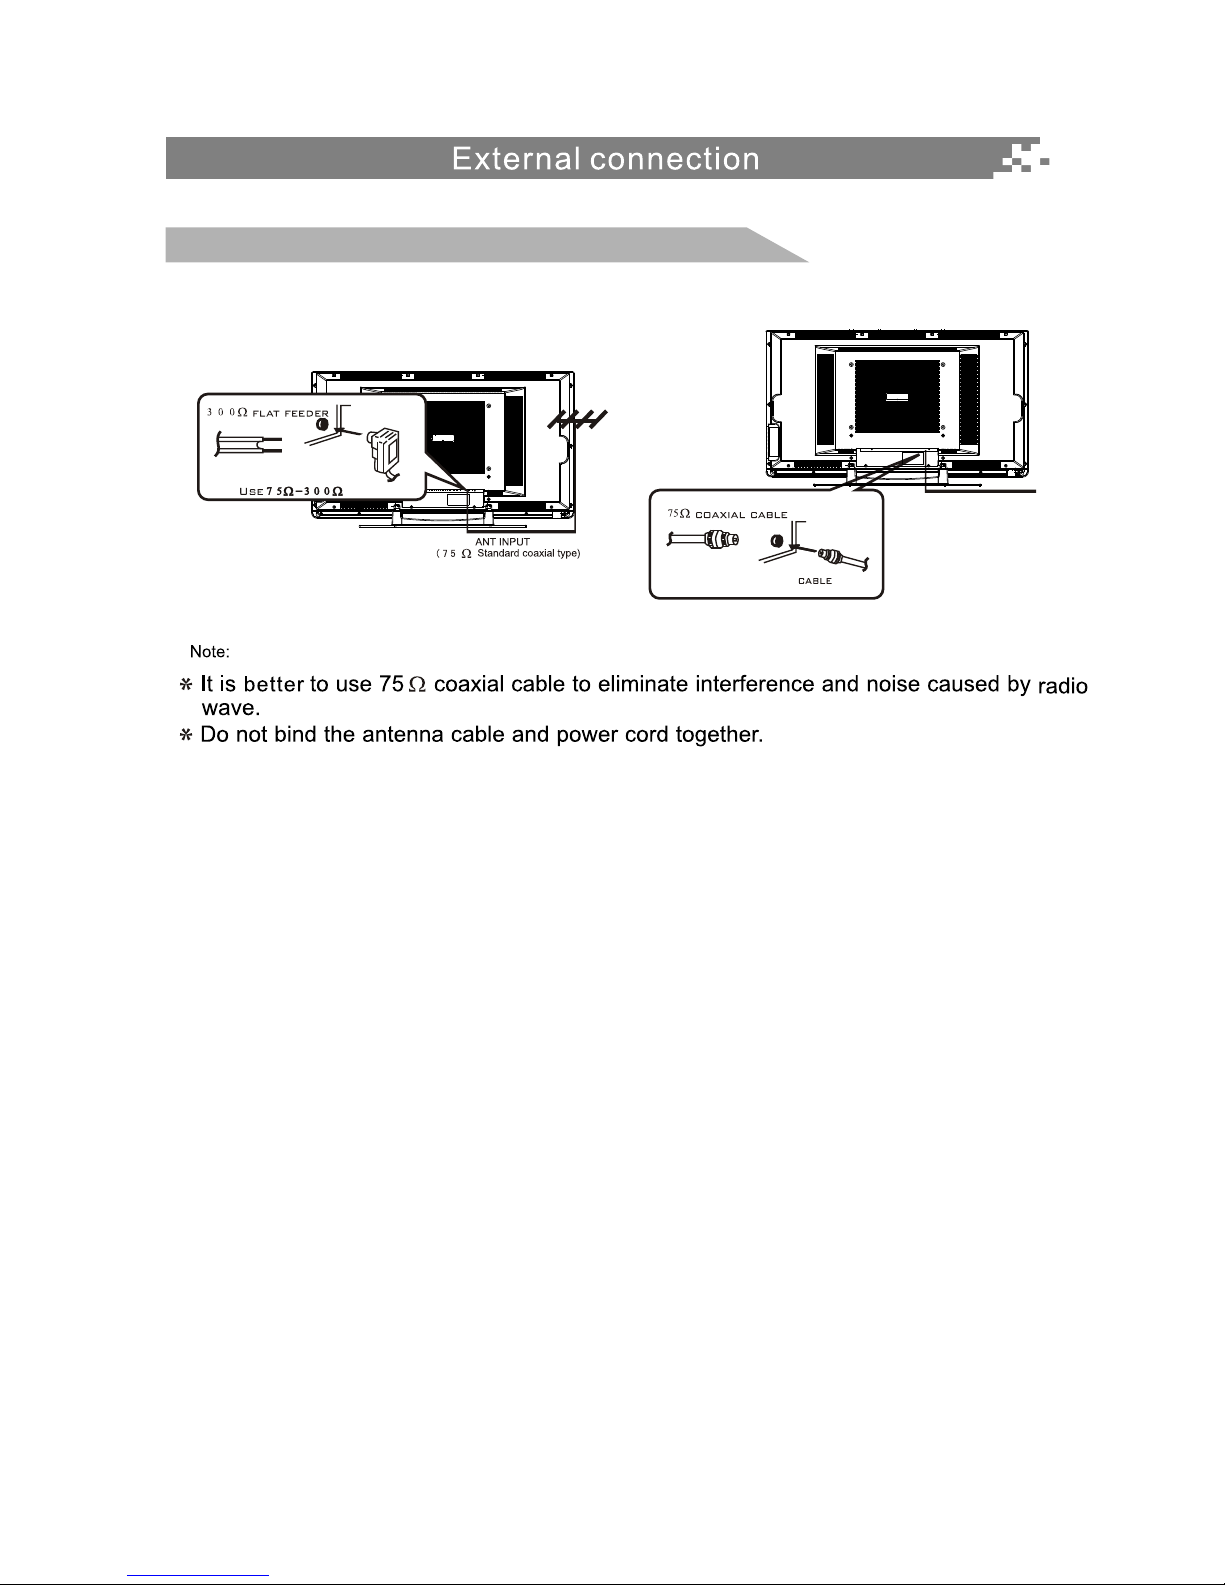
5
Antenna input impedance of this unit is 75W. VHF/UHF 75W coaxial cable can be
connected to the cable jack directly,
Antenna/cable connection
Cable input
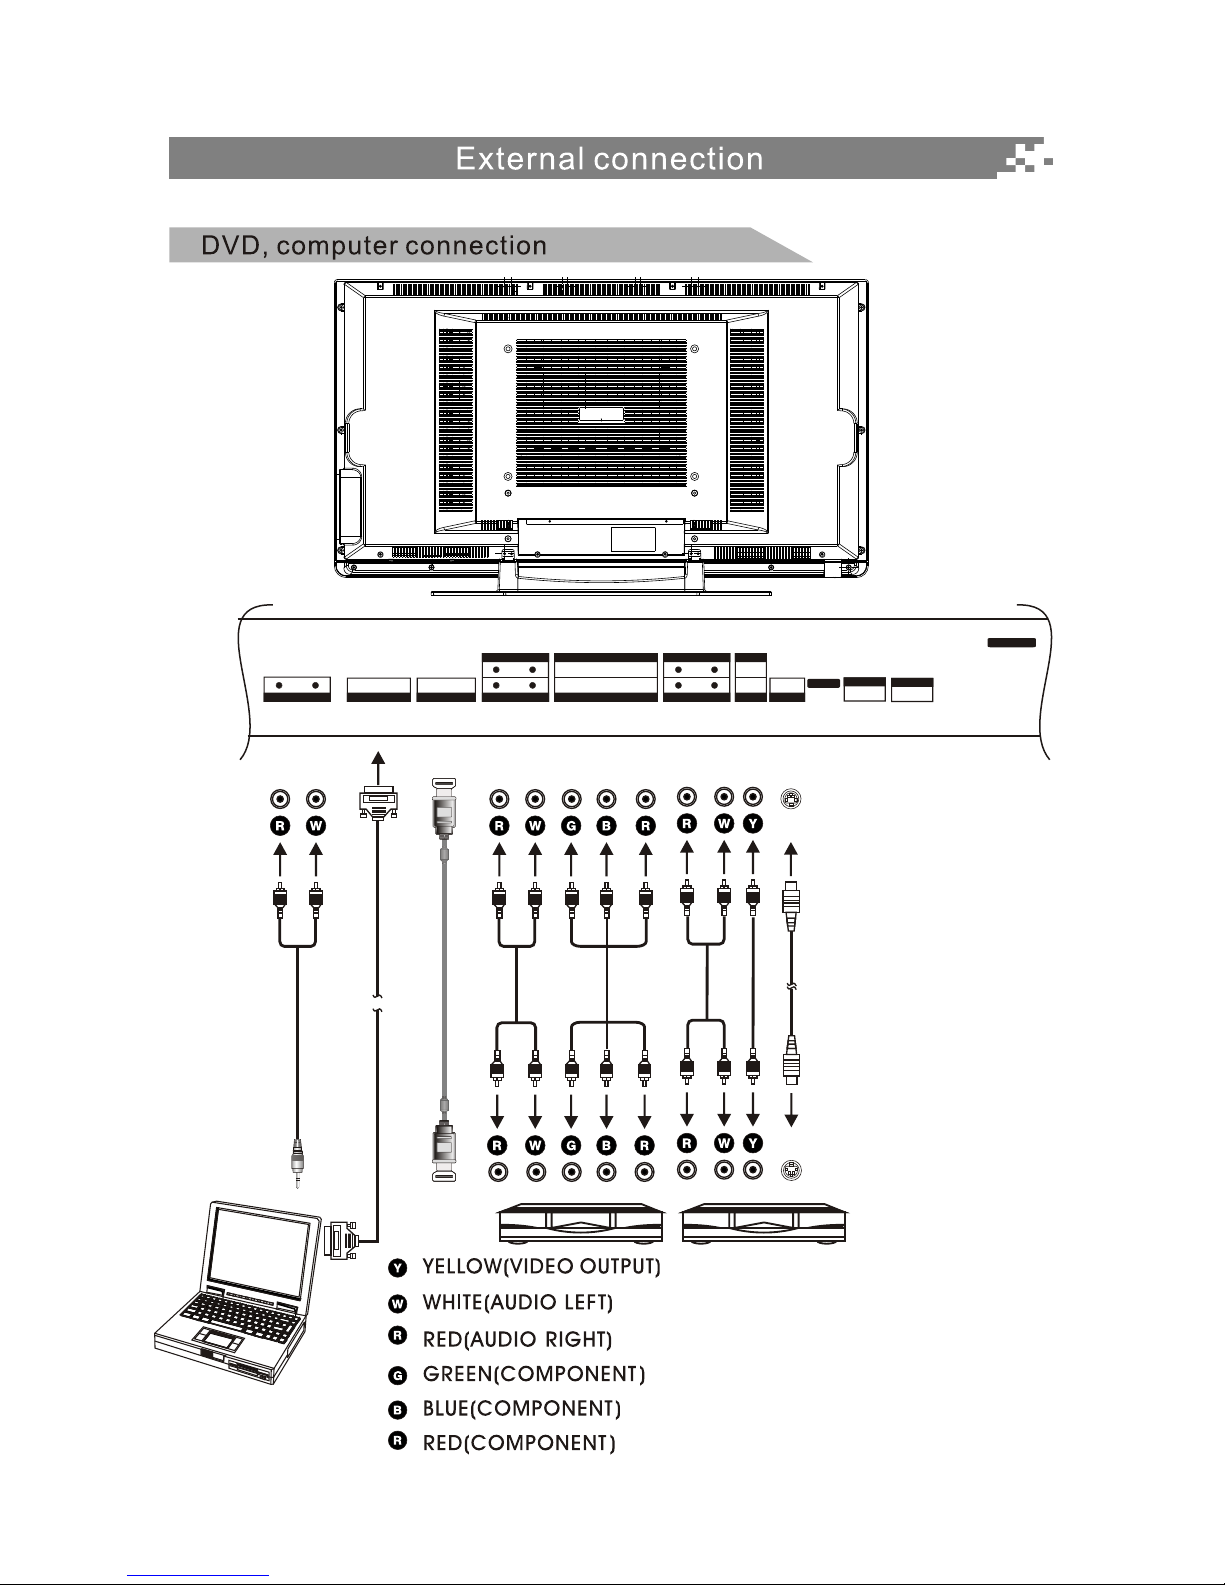
Computer
6
YYPbPbPr
Pr
INININ IN IN ININ
COMPONENT 2 IN
COMPONENT 1 IN
OUTIN
OUT
VIDEO
-AUDIO--AUDIO-
-AUDIO--AUDIO--AUDIO- RGB/PC HDMI S-VIDEO
IN
ANTENNA
IN
CABLE
AC INPUT
VIDEO
RR
RRR
LL
LLL
SPDIF
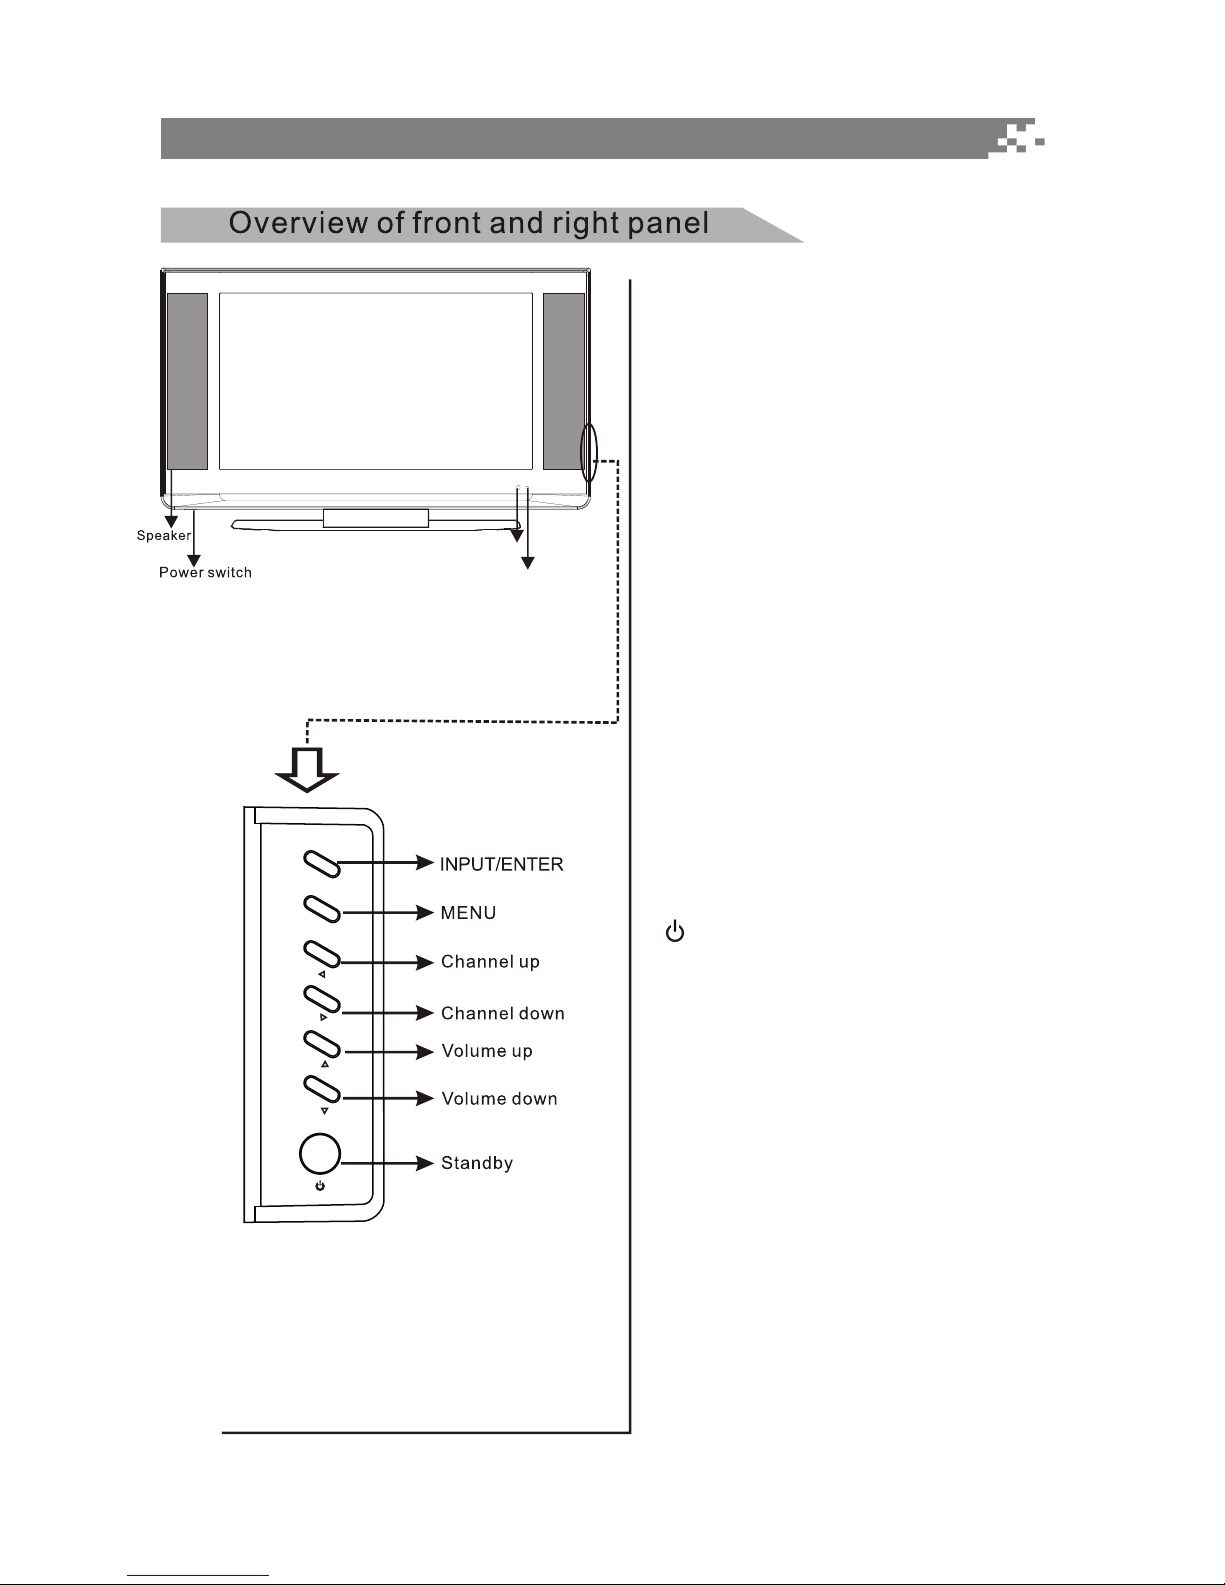
1. ON/OFF
Press this key to turn TV on or off.
2. Power indicator
Green: In power on mode.
Yellow: In standby mode.
3. IR remote sensor
Point remote control at this sensor to
conduct remote control.
4. VOLv/w
Press these two buttons to increase or
decrease the volume, and they are also
used for menu selection.
5. CHr/s
Press these two buttons to select channel
or select menu.
6. Menu
Press this key to display OSD menu or
exit from current menu to previous menu.
7.
Press this button to enter standby mode
under normal play, and press this button
to enter normal play mode under standby
mode.
8. INPUT/ENTER
Press this button to display the selectable
signal source for source.
In OSD menu, use this key to confirm and
enter into next submenu.
7
General Description
P T
I
N
U
/E
N
R
T
E
N
M
U
E
C
H
C
H
V
OL
VO
L
Power in dicator
IR remot e se nsor
RGB/PC
AUDIO input
Supporting signals
8
RGB/PC input
HDMI input
Component
AUDIO input
Component
signal input
AUDIO output/input
VIDEO
output/input
SPDIF
Antenna input
AC input
S-VIDEO input
General Description
YYPbPbPr
Pr
INININ IN IN ININ
COMPONENT 2 IN
COMPONENT 1 IN
OUTIN
OUT
VIDEO
-AUDIO--AUDIO-
-AUDIO--AUDIO--AUDIO- RGB/PC HDMI S-VIDEO
IN
ANTENNA
IN
CABLE
AC INPUT
VIDEO
RR
RRR
LL
LLL
SPDIF
Resolution
Resolution
Source Mode
Source
Source
VGA
Antenna
Cable
Component
8VSB
Free 64/256QAM
60Hz
70Hz
60Hz
60Hz
50/60Hz
480i
480p
720p
50/60Hz
1080i
HDMI
50/60Hz
50/60Hz
480p
720p
60Hz
1080i
640x480
720x400
PC/VGA
PC/HDMI
SVGA
XGA
SXGA
75Hz
60Hz
75Hz
60Hz
75Hz
60Hz
800X600
1024X768
1280X1024
Vertical Frequency
Vertical Frequency
CVBS
S-Video
NTSC 3.58
NTSC 4.43
NTSC 3.58
NTSC 4.43

9
General Description
PIP
PAGE UP
FAV
ACTIVE
VIDEO
ACTIVE
AUDIO
SAP
MTS
PICTURE
INFO.
INPUT
SLEEP
ASPECT
CCD EPG
SWAP
FREEZE
PIP
POSITION
LIST
ALL
LIST
AUDIO
PAGE
DOWN
1
3
5
7
14
24
28
29
34
9
16
18
21
22
26
30
32
35
20
11
12
2
4
6
8
15
10
17
19
21
23
25
29
33
29
27
31
29
36
21
21
13
1. LED: Press any button, the led will light.
2. POWER: Turns your TV on or off.
3. SLEEP: Sets the sleep timer. Press the key
repeatedly to select sleep time.
4. ASPECT: Changes the aspect ratio.
5. INPUT: Selects input source.
6. ACTIVE VIDEO: Switch the operating target
between MP and PIP/PBP.
7. PICTURE: Selects picture mode.
8. SAP/MTS: Selects SAP/MTS.
9. INFO: Displays the channel information.
10. ACTIVE AUDIO:Toggles current audio between MP
audio and PIP/PBP audio.
11. 0~9: Digital keys.
12. : Uses to enter a program number
for multiple program channels.
13. PRE.CH: Returns to the previous channel.
14. DVD: Switches the remote control to
DVD mode.
15. VCR: Switches the remote control to
VCR mode.
16. TV: Switches the remote control to TV
mode.
17. MUTE: Mutes the sound.
18. VOLr/s: Changes your TV's volume.
19. CHr/s: Changes channels.
20. OK: Validation key.
21. Arrow buttons: Use to move cursor up/down/left/
right for menus in TV mode.
22. MENU: Displays the main menu.
23. EXIT: Exit the menu.
24. FAV: Selects favorite channels.
25. LIST ALL: Displays all channel lists.
26. PAGE UP: Turns to previous page.
27. LIST AUDIO: Displays Audio channel lists.
28. CCD: Displays captions during closedcaption source.
29. Arrow buttons: Use to move cursor up/down/left/
right for menus in DVD mode.
30. PAGE DOWN: Turns to next page.
10
31. EPG: Displays EPG.
32. FREEZE: Pause the image, press again to return to normal screen.
33. OK: Validation key for DVD mode.
34. PIP POSITION: Selects the position for PIP window.
35. PIP: PIP/PBP on or off.
36. SWAP: Toggles between PIP and MP.
Install your remote control batteries
General Description
Universal remote control operation please refer to Appendix 3.
11
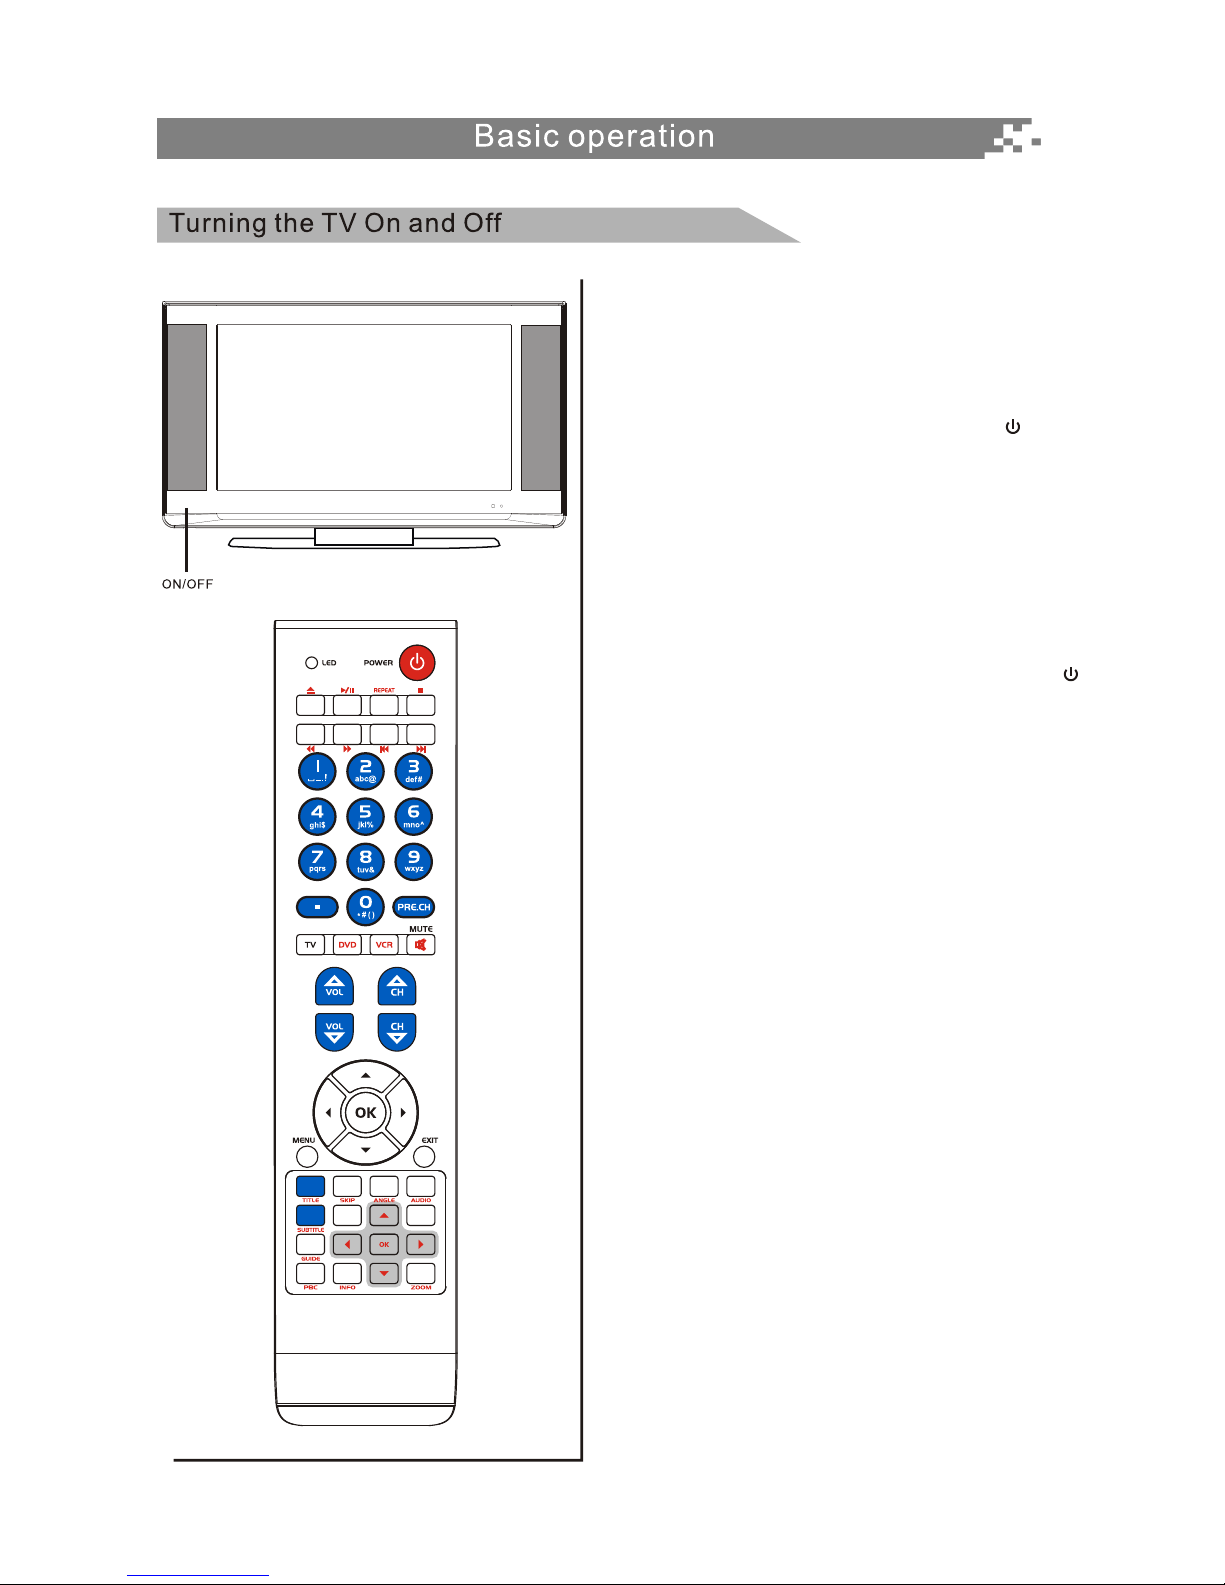
How to turn the TV on or off
1. Insert AC power plug into the wall outlet, then turn
on the AC power switch.
2. If the screen does not turn on, please press
POWER button on the remote control or button
on the right panel of LCD TV.
3. One LOGO will be displayed on the screen after
turning on TV 6 seconds, normal picture will be
displayed on the screen after 18 seconds. If no
signal input, "No Signal" will be displayed on the
screen.
4. If you need to turn off the TV temporarily, just
press POWER button on the remote control or
button on the right panel and your TV will switch
to standby mode.
5. If you want to turn TV off completely, you should
turn off the AC power switch or unplug the power
cord.
6. After turning TV off, you should turn on TV again
at least 20 seconds later.
Status indication lamp
Green: In power on mode.
Yellow: In standby mode.
Auto power off
1. If there is no signal detected in TV Mode for 5
minutes, the TV will go to standby.
2. If there is no signal detected in VGA Mode for 5
minutes, the TV will go to standby.
Memory before turning TV off
The settings of picture and the preset channels will
be memorized at turning off the unit.
When being started up again, the unit will work
according to the mode set before being turned off.
PIP
PAGE UP
FAV
ACTIVE
VIDEO
ACTIVE
AUDIO
SAP
MTS
PICTURE
INFO.
INPUT
SLEEP
ASPECT
CCD EPG
SWAP
FREEZE
PIP
POSITION
LIST
ALL
LIST
AUDIO
PAGE
DOWN
12
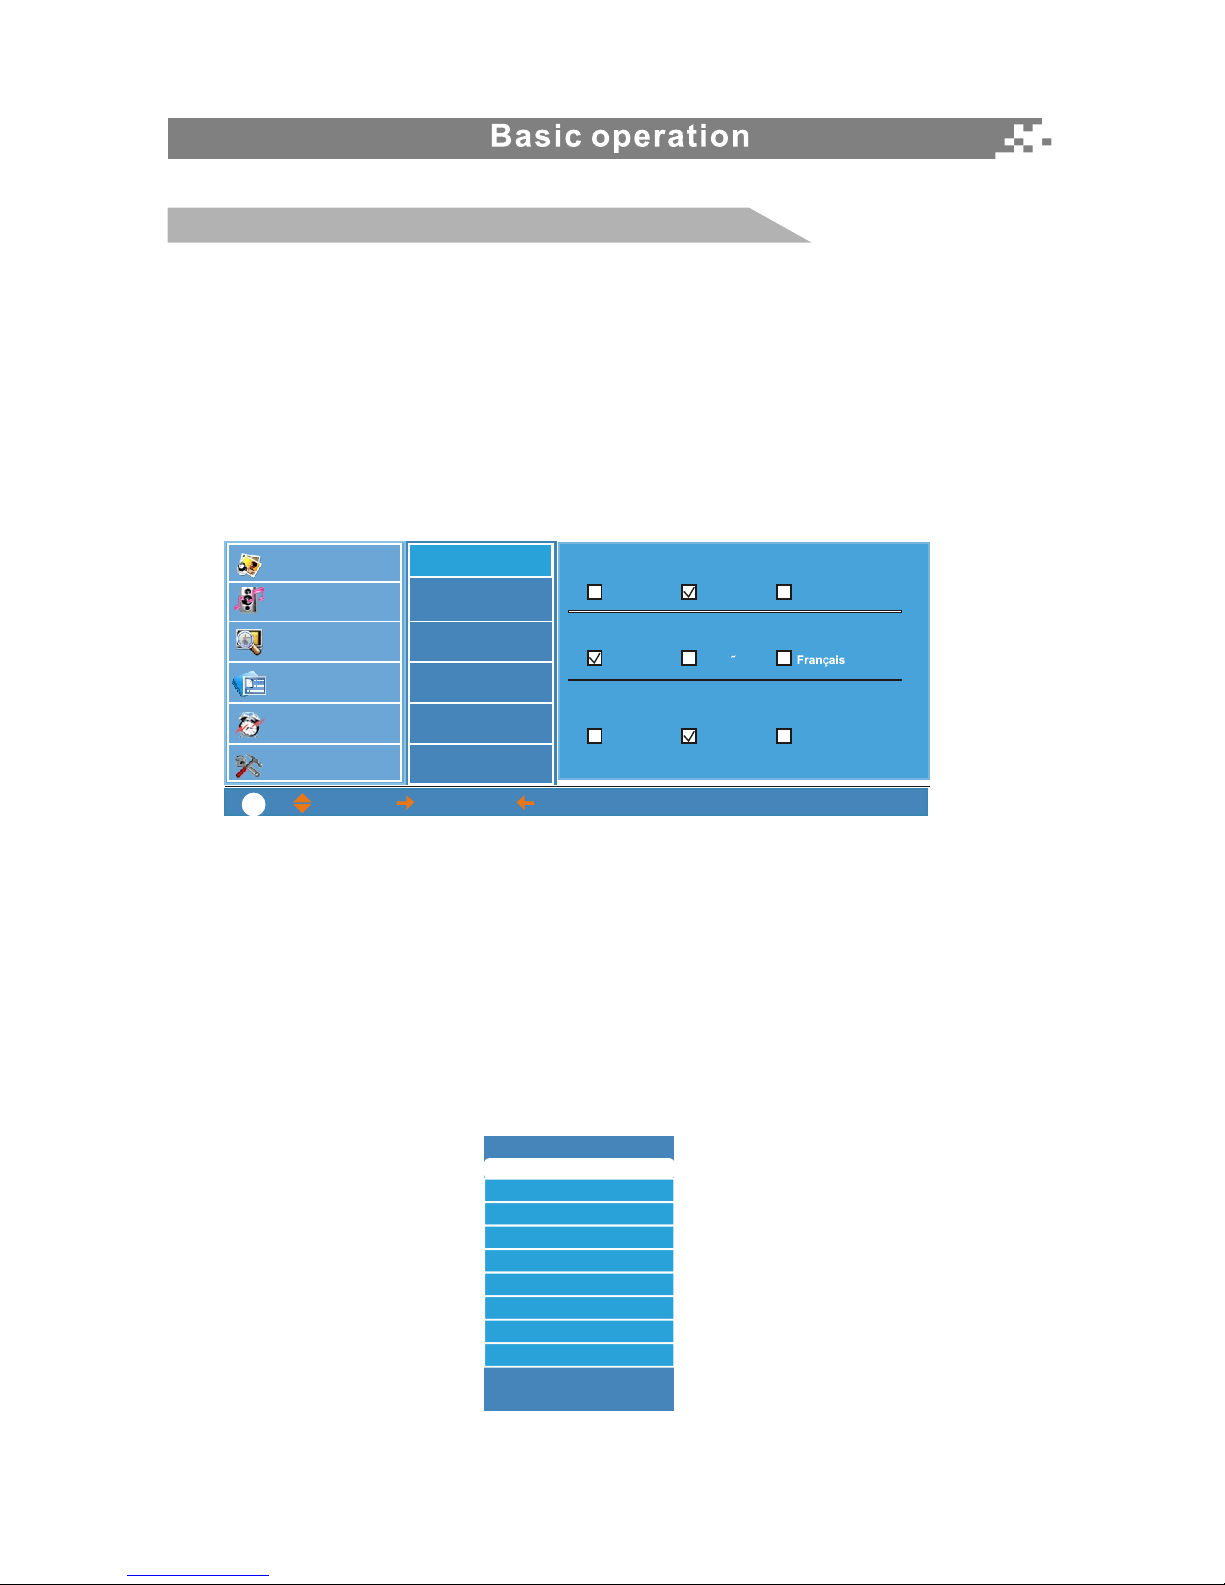
Source Setup
There are separate source lists for main source and PIP source, if you are setting main picture,
the title of the menu is "Select Main Source", if you are setting PIP, the title of the menu is "Select
PIP Source".
1. Main source selection
Press INPUT key on the remote control to enter Select MAIN Source submenu. There are eight
options for you to select: ANTENNA, CABLE, COMPOSITE, S-VIDEO, COMPONENT1,
COMPONENT2, PC VGA and HDMI.
Use p/q arrow keys to move the cursor to the source you desired and press OK key to confirm.
Language setup
1. Press MENU key to enter main menu, use p/q arrow key to select System Setup, then
press OK or ukey to enter System Setup submenu. Use p/q key to select OSD Setup,
press OK or ukey to enter OSD Setup submenu.
2. USE p/q arrow key to choose Select Menu Language, there are three options for you
to select: English, Spanish and French. Press t/u key to move the cursor to the option
you desired and press OK key to confirm.
Menu operation
Select MAIN Source
ANTENNA
Up/Down: Move Cursor,
OK: Change MAIN Source
COMPOSITE
S_VIDEO
COMPONENT1
COMPONENT2
PC VGA
HDMI
Video
Audio
TV Channel
Closed Caption
Time Setup
System Setup
OSD Setup
Select OSD Timeout
Select Menu Language
Select OSD Transparency
10 Sec
English
Low
30 Sec
espanol
Normal
60 Sec
High
Password
MPAA Rating
TV Rating
CE Rating
CF Rating
: MOVE,
: SELECT, : PREVIOUS, MENU: EXIT
?
13
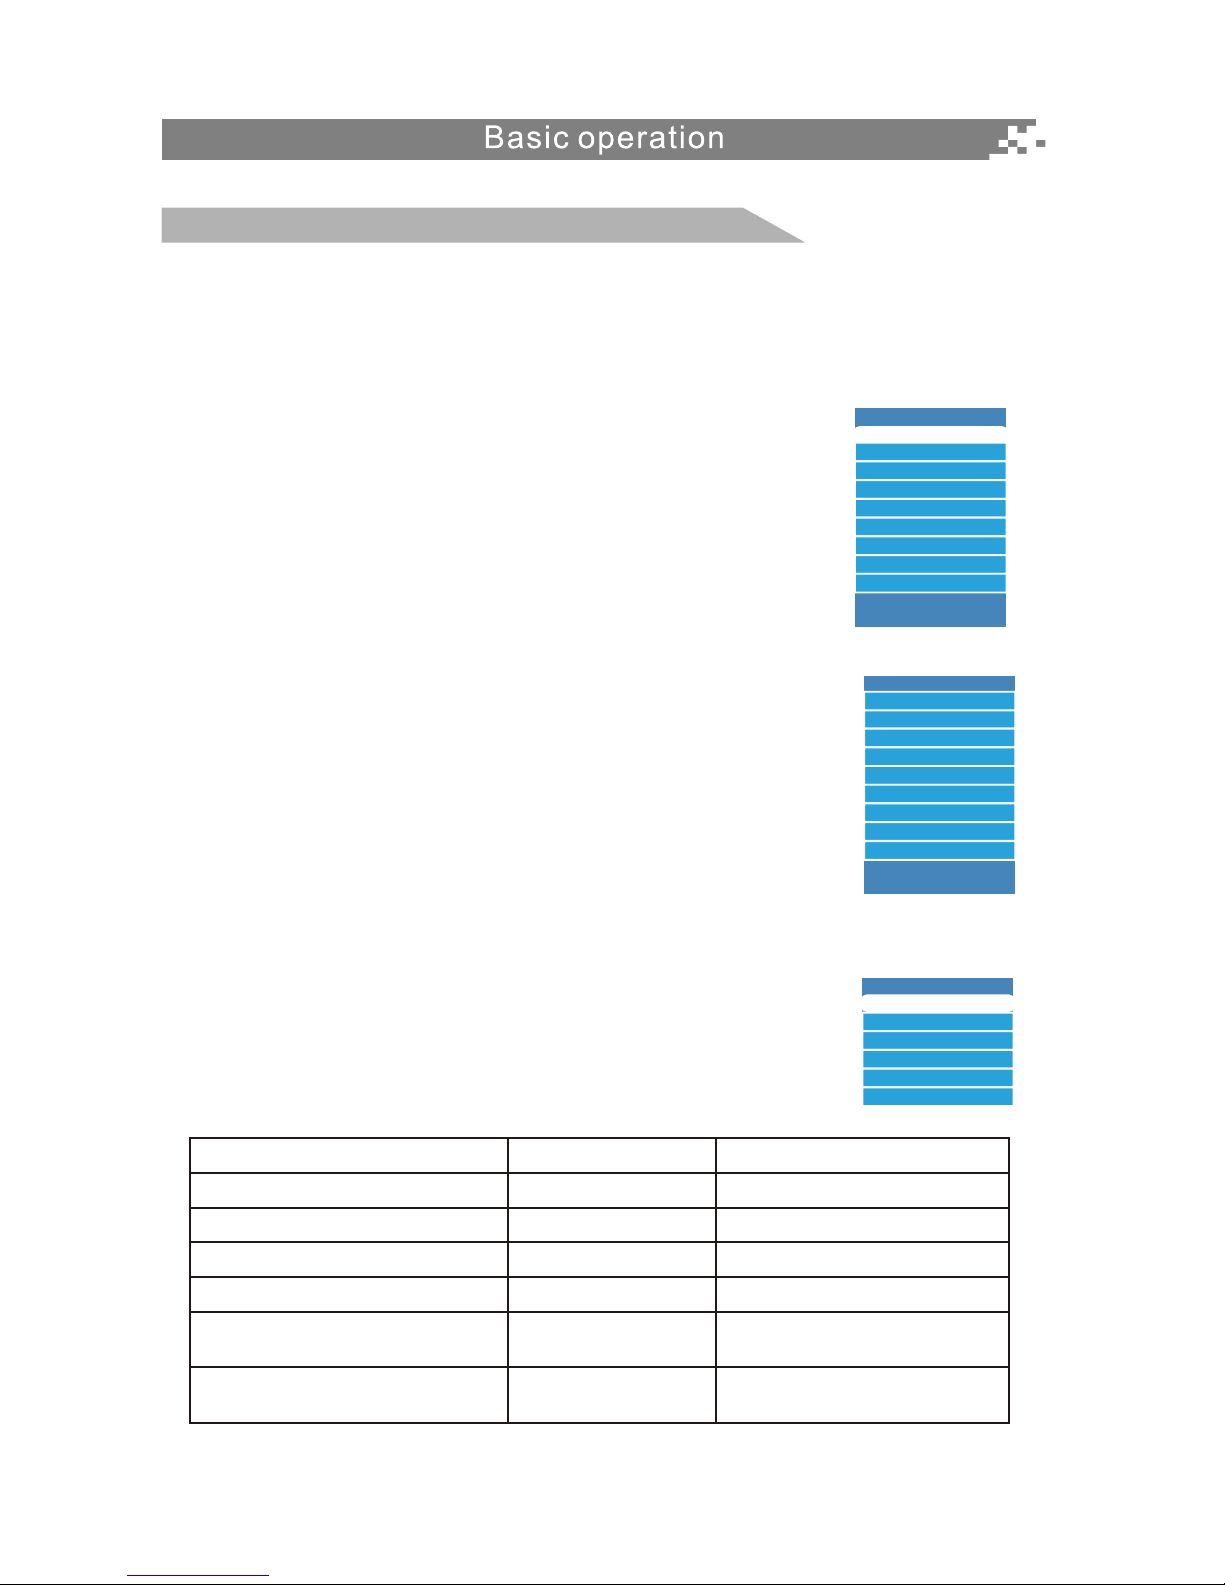
Menu operation
2. PIP source selection
Press PIP key on the remote control first, then press INPUT key on the remote control to enter
Select PIP Source submenu. There are eight options for you to select: ANTENNA, CABLE,
COMPOSITE, S-VIDEO, COMPONENT1, COMPONENT2, PC VGA and HDMI.
Use p/q arrow key to move the cursor to the source you desired and
press OK key to confirm.
Notes: 1. If the source can't be selected in current status, the source will
be displayed in gray.
2. Only when you select Antenna + Cable in Auto Search submenu,
Cable option will be displayed in this menu.
3. PIP function please refer to Appendix 2.
Audio Channel List
Press LIST AUDIO key on the remote control to display the Audio
Channels List, use p/q key to move the cursor to the audio type
you desired and press OK key to confirm.
Select PIP Source
Audio Channels List
Analog Audio Mode
ANTENNA
Up/Down: Move Cursor,
OK: Change MAIN Source
Up/Down: Move Cursor,
OK: Change MAIN Source
COMPOSITE
S_VIDEO
COMPONENT1
COMPONENT2
PC VGA
HDMI
The following table lists the alternative audio modes and the default
setting of every audio mode, you can select the audio mode you
desired with the SAP/MTS key on the remote control.
Audio Type List
Input signal
Stereo + SAP Stereo/SAP/Mono Stereo
Stereo
SAP/Mono
Mono Mono
Depend on current program
Depend on current program
Mono
Audio1, Audio 2,...
Only 1 Audio
Stereo/Mono
SAP
Mono
Digital programs including
multiple audio channels
Digital programs only with
one audio channel.
Stereo
Options Default
Mono

14
Aspect ratio setup
Press ASPECT key on the remote control to enter Scaling submenu, there are four options for you to
select: Auto, 4:3, 16:9, Zoom. Usep/q arrow key to move the cursor to the option you desired and
press OK key to confirm.
If Scaling is not set to Auto, you should select Scaling mode depending on current program aspect
ratio.
Auto Search
1. Press MENU key on the remote control to enter the main menu, use p/q key to select TV
Channel and press OK or u key to enter TV Channel submenu. Press p/q key to move the
cursor to Auto Search, then press OK or u key to enter Auto Search submenu, the following OSD
will be displayed on the screen.
2. Use p/q key to move the cursor to Source, there are three options for you to select: Antenna,
Cable and Antenna+ Cable, press p/q key to move the cursor to the source you need, press OK
key to confirm. If you have selected Cable or Antenna+Cable, three options will be displayed
under Antenna+Cable: STD, HRC and IRC. Press arrow keys to move the cursor to the option you
desired, then press OK key to confirm.
3. Use p/q key to move the cursor to OK option, then press OK key on the remote control to start
searching. If you want to stop searching, just press EXIT key or move the cursor to Cancel option
and press OK.
Menu operation
Scaling
Auto
4:3
16:9
Zoom
Video
Audio
TV Channel
Closed Caption
Time Setup
System Setup
Auto Search
Source
Antenna
Cable
Manual Search
Channel Edit
Info
: MOVE,
ENTER: SELECT, EXIT: PREVIOUS,
?
Antenna + Cable
STD
HRC IRC
Ok
Cancel
Cable Tuner: Search physical channel 6, 0 found.
15
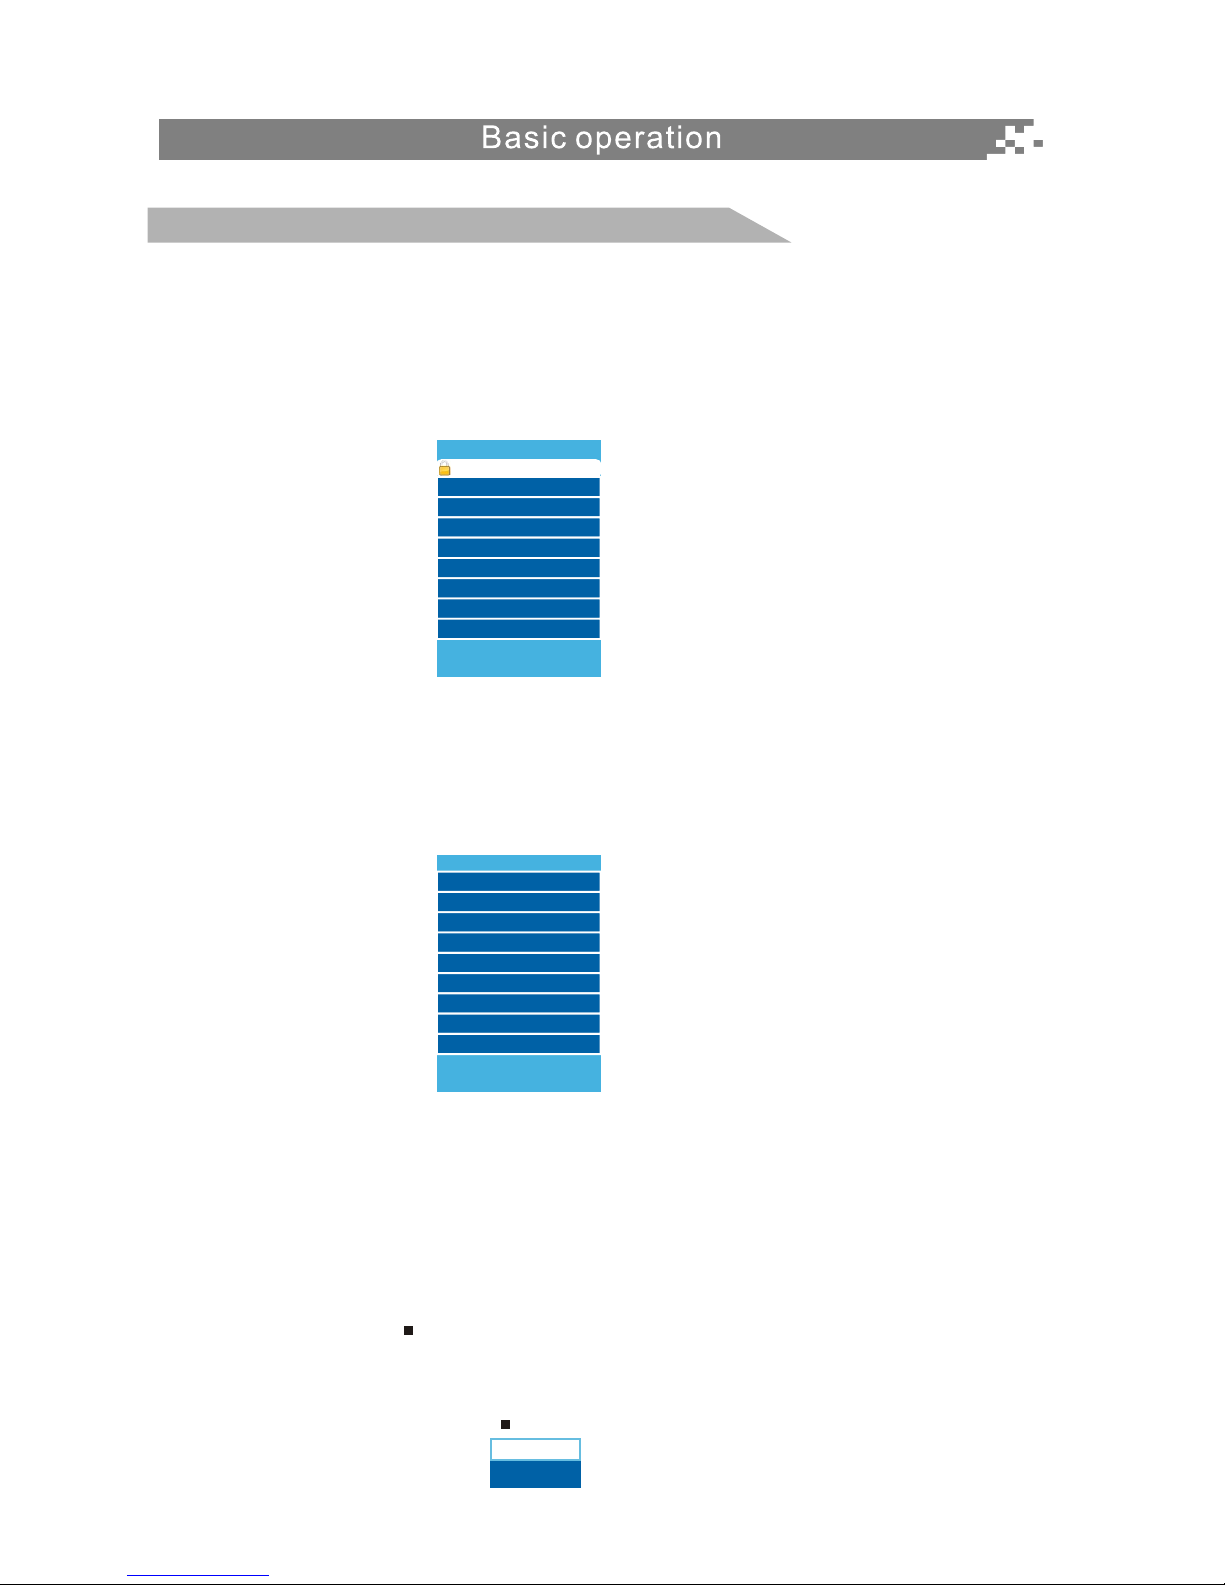
Channels List
1. All Channel List
Press LIST ALL key on the remote control to display All Channels List menu. Use p/q arrow key
to move the cursor to the program you need, and press OK key to confirm. If there are more than
one page in the list, you can press PAGE DOWN or PAGE UP keys to turn to next page or previous
page.
2. Fav List
Press FAV key on the remote control to display Fav List, In Favorite Channels List, if the channel is
audio channel, the icon will displays in front of channel number. Press p/q arrow keys to move
the cursor to the program you need, and press OK key to confirm.
Notes: If the source can't be selected, the source will be displayed in gray.
All Channels List menu is separately for main picture and PIP.
Channels selection
There are four ways to select channel:
1. Using 0~9,DOT and ENTER keys on the remote control to select channel directly.
2. Using CHr/s key on the remote control or on your TV to select channel.
3. Press PRE.CH key to turn to previous channel, press it again to return to current channel.
Note: PRE.CH is not activated if no channel has been changed after TV turning on.
4. Select channels from All Channels List or Favorite Channels List.
Notes: When you use 0~9, and ENTER keys to select channel directly, the first three number are
for main program number, the last three number are for minor program number. For example,
If you press 4, 5, 6, 7, 8, 9, Main Picture displays 456.789; press 4,5,6,7,8 and Main Picture
displays 456.78; press 4,5, 6, , 7, 8 and Main Picture displays 456.78..
Menu operation
All Channels List
38.11 ATSC-11
Up/Down: Move Cursor,
OK: Change MAIN Channel
Favorite Channels List
All Channels List
Up/Down: Move Cursor,
OK: Change MAIN Channel
MAIN
456.789
16
Volume adjustment and Mute setup
Volume adjustment
Press VOLv/w key on the remote control or on the TV to display Volume menu, adjust the volume
of TV between 0 to 100 by using VOLv/w key:
( To increase the volume, press VOL w key;
( To decrease the volume, press VOLv key;
Mute
Press MUTE key on the remote control to display MUTE icon on the left bottom of the screen, and the
volume of TV will be turned off, press MUTE key again to turn on the volume.
Mute can be canceled by using one of the methods below:
( Mute will be canceled if you press MUTE button again.
( Mute will be canceled if you press VOL w key.
PIP Audio
During PIP displaying, press ACTIVE AUDIO key on the remote control to display the menu which
indicating current audio is from either MP or PIP/PBP, then you can use this key to toggle between
MP and PIP/PBP.
Audio picture displaying
If the program you are receiving is audio program, TV will insert one pictures into Video automatically,
and display it on the screen.
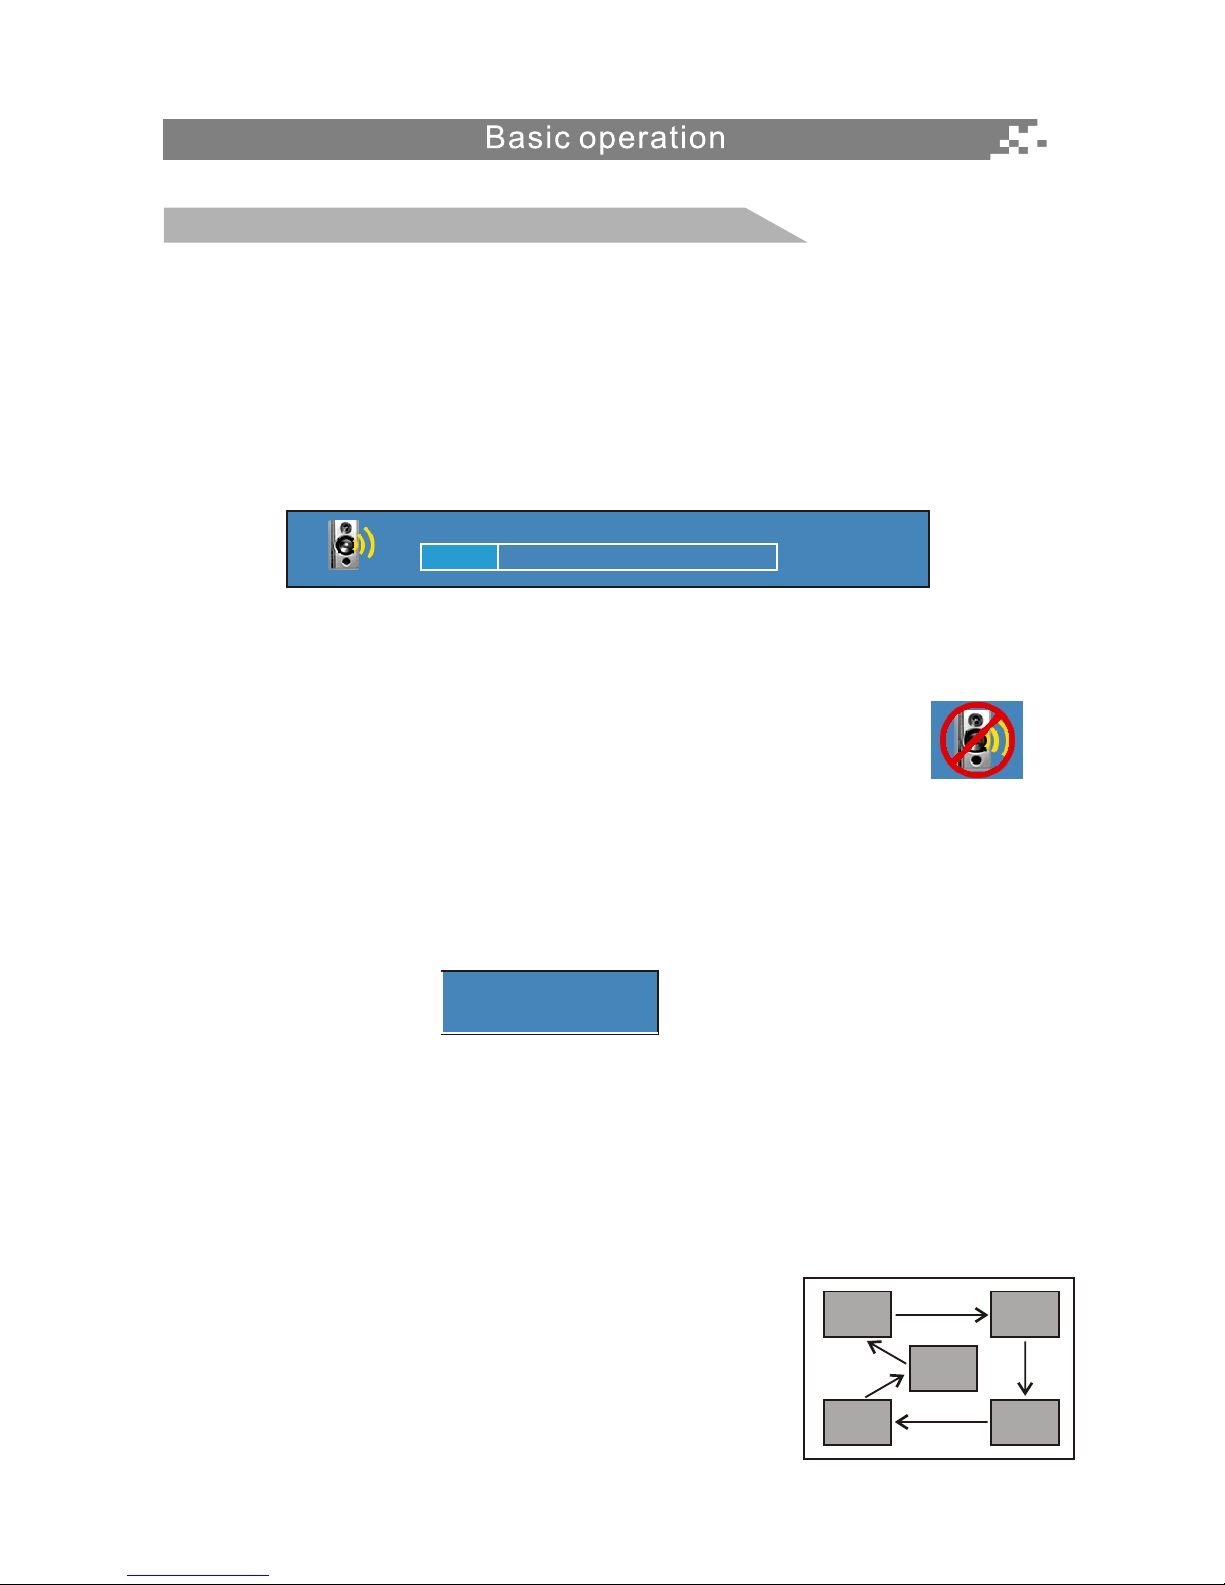
PIP-POS setup
Press PIP POSITION key on the remote control to quickly switch the position for PIP window, there are
five positions can be selected as follows.
Using the PIP POSITION key
Press PIP POSITION to quickly select the position for PIP window.
Menu operation
Volume
PIP Audio
22
PIP frame
Main frame
 Loading...