

VISA VE-LFIX User Manual
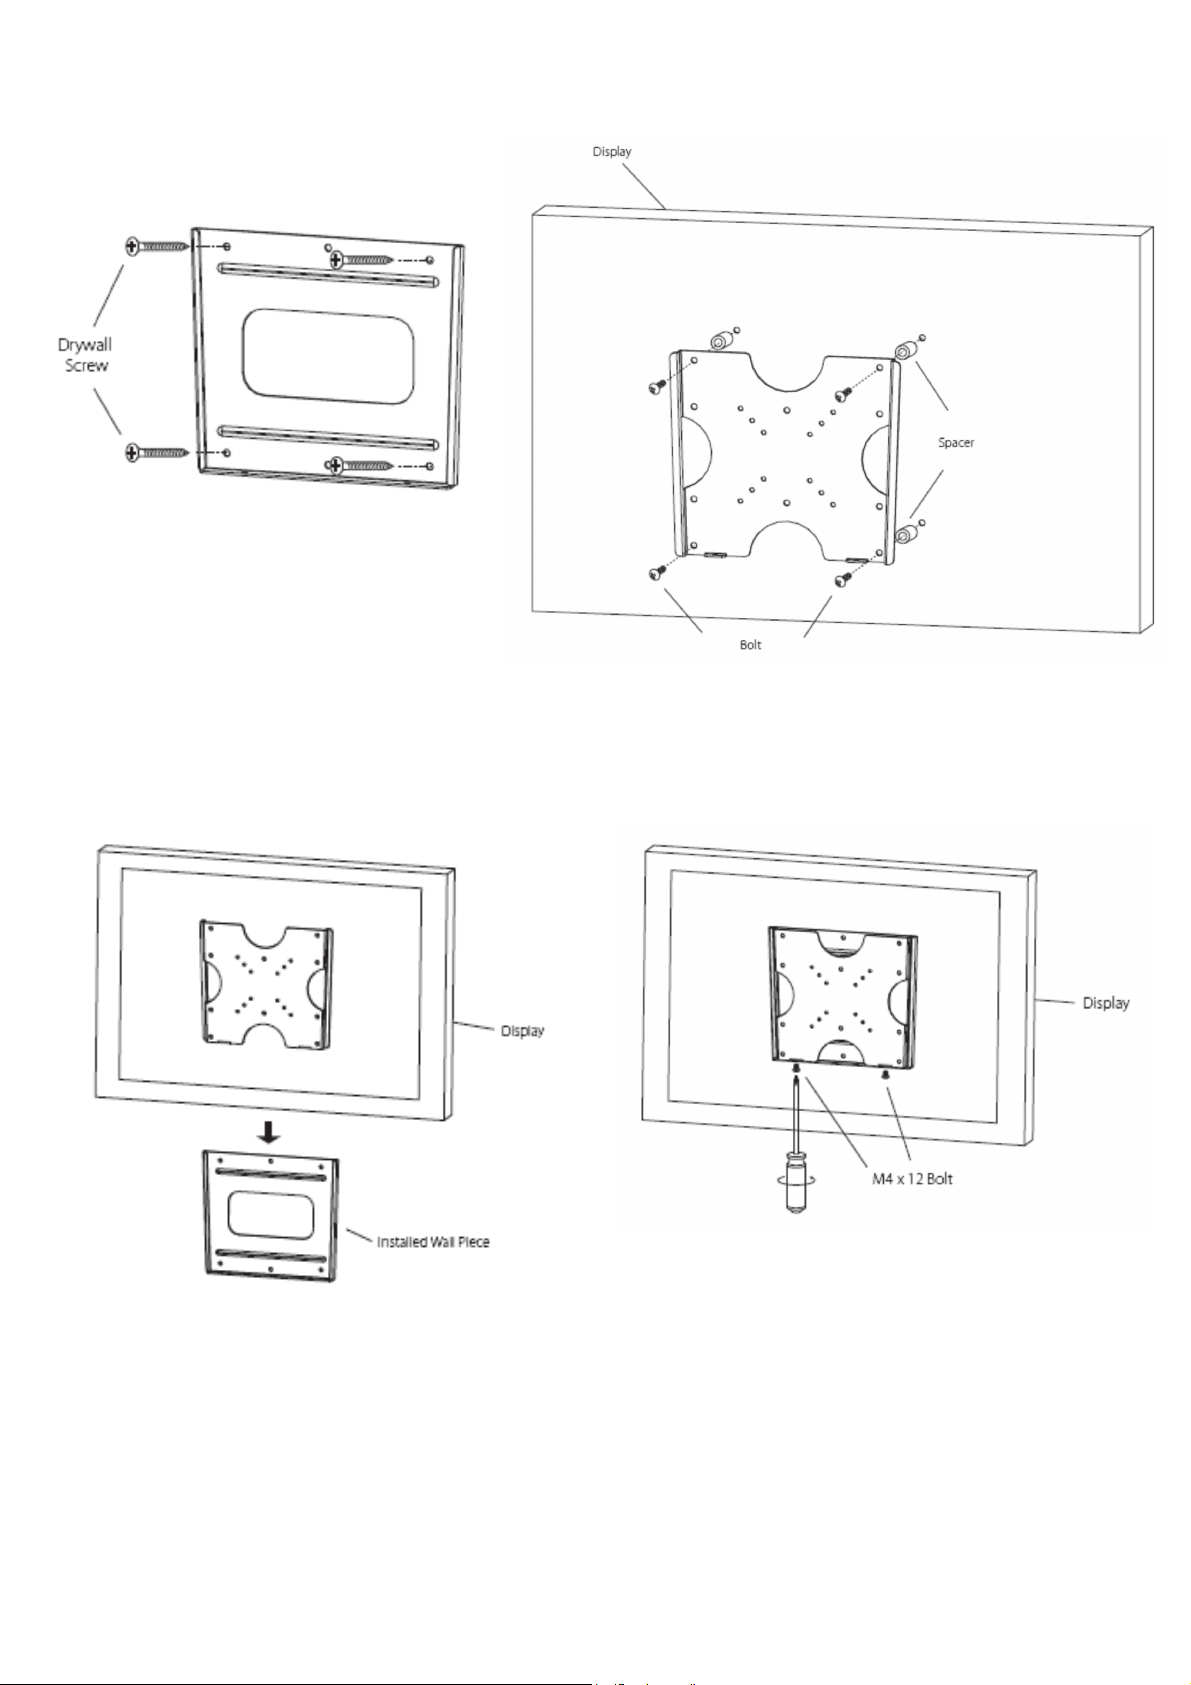
Fig.1
Fig.2
Fig.3 Fig.4
Libretto istruzioni e di montaggio del supporto per Monitor / TV LCD/PLASMA
Contenuto della confezione:
1) 4 viti autofilettanti 60mm 2) 4 tasselli ad espansione 8mm
3) 6 bulloni M4x12mm 4) 4 bulloni M4x30mm 5) 4 Distanziatori M4/M5
4 bulloni M6x12mm 4 bulloni M6x35mm 4 Distanziatori M4/M5
ATTENZIONE:
Seguire attentamente istruzioni e schemi di montaggio prima di installare ed utilizzare il supporto.
Si declina ogni responsabilità in caso di mancata osservazione delle istruzioni, delle limitazioni d’uso e per modifiche apportate al prodotto.
PRECAUZIONI:
La portata massima del supporto è indicata sulla scatola. Non sovraccaricare il supporto per nessun motivo
L’installatore deve assicurarsi della validità e della consistenza della parete dove sarà applicato il supporto, evitando strutture non sufficientemente robuste per
questo tipo d’uso.
Il prodotto è adatto per installazioni su pareti in mattoni pieni in laterizio, in cemento armato, oppure in legno pieno o travi in legno. Per applicazioni su
legno si possono usare esclusivamente le viti autofilettanti in dotazione prive del tassello. Per l’installazione su pareti di materiali diversi, vi consigliamo
di rivolgervi ad un installatore qualificato.
STEP 1 – Montaggio della base di ancoraggio
Attrezzatura:
a) Scegliere la posizione dove installare il prodotto, evitando punti dove passano tubi dell’acqua
o cavi elettrici.
b) Appoggiare la base del supporto sulla parete nella posizione desiderata con l’apertura rivolta verso l’alto (Fig.1)
c) Contrassegnate i quattro fori sulla parete.
Per pareti in muratura: eseguire la foratura con l’uso del trapano. Inserite i tasselli (2),
fissate la base di ancoraggio stringendo le viti (1).(Fig.1)
Per pareti in legno: fissare la base di ancoraggio stringendo le viti (1).
d) Assicurarsi che la base sia rigidamente fissata alla parete in ciascun punto di ancoraggio.
trapano, punte in widia da 8mm, cacciavite.
Il prodotto non è idoneo ad ambienti esterni
STEP 2 – Montaggio della piastra sul pannello posteriore del LCD
Importante:
e/o con lo schermo appoggiato in giù per evitare danni sulla sua superficie.
Esaminare la parte posteriore del monitor LCD:
- se la superficie è piana, fissare la piastra utilizzando i bulloni da 12mm (3);
- altrimenti utilizzate i bulloni da 30mm(4) e i distanziatori (5). (Fig.2)
Attenzione
STEP 3 - Assemblaggio finale
Per completare l’installazione,
- inserire la piastra con il TV/Monitor LCD montato nell’apposita guida della base di ancoraggio;
- arrivato in fondo (verso il basso Fig.3) inserire le due viti di sicurezza (Fig.4) ed avvitare in senso orario
Nota
Manutenzione:
Per la pulizia utilizzare un panno inumidito con una soluzione di acqua tiepida e sapone neutro.
Non utilizzare solventi
Mediante la presente garanzia, il Produttore si impegna a sostituire il prodotto solo in caso di difetti di fabbricazione che limitano l'utilizzo dello stesso come previsto.
La presente garanzia non copre incidenti diretti o indiretti e danni risultanti dall'utilizzo del prodotto, infortuni, manomissione, mancato rispetto delle istruzioni, uso
improprio, negligenza e qualsivoglia altro utilizzo.
Il Produttore non potrà in alcun caso essere considerato responsabile per eventuali incidenti.
La presente garanzia copre tutte le altre garanzie, implicite e/o esplicite.
Il Produttore è l'unica autorità responsabile della presente garanzia. Nessun altra parte ha diritto di interpretare eventuali responsabilità emerse prima e dopo la
vendita del prodotto.
La presente garanzia limitata si estende solo al primo acquirente originale per un periodo di
Non effettuare MAI il montaggio con il monitor LCD collegato alla rete elettrica
a non stringere troppo i bulloni.
: per rimuovere la piastra, basta svitare le due viti di sicurezza in senso antiorario e sfilare il TV/monitor LCD verso l’alto.
GARANZIA
5 anni.
Instructions and assembly of wall mount for LCD/PLASMA TV / Monitor
Pack contents:
1) 4 x self-tapping screws (60mm) 2) 4 x wall anchors (8mm)
3) 6 x M4 x bolts (12mm) 4) 4 x M4 x bolts (30mm) 5) 4 x spacers M4/M5
4 x M6 x bolts (12mm) 4 x M6 x bolts (35mm) 4 x spacers M4/M5
PLEASE NOTE:
Study the following instructions and assembly diagrams with care prior to installing and using the mount.
We do not accept any responsibility for failure to follow the instructions and limits of use and for any alterations made to the product.
PRECAUTIONS:
The wall mount’s maximum capacity is shown on the box. Do not overload the mount for any reason.
The person responsible for installation must check the soundness and firmness of the wall which the product will be mounted on, avoiding walls that are not strong
enough for this type of use.
The product is suitable for mounting on walls made of bricks, reinforced concrete, wood or wooden beams. The self-tapping screws provided may be
used without the wall anchors when mounted on wood. We recommend you use a qualified installer to mount the product on walls made of other
material.
STEP 1 – Mounting of platform
Equipment: Drill, 8mm widia bits ,screwdriver.
a) Choose the position where you wish to install the product, avoiding spots crossed by water
pipes or electrical cables.
b) Place the mount basis on the wall in the desired position keeping the overture in the upper position (see fig. 1)
c) Mark the four (4) holes on the wall.
For brick walls: make the holes in the wall using the drill. Insert the four wall anchors (2) and mount the basis by tightening the screws (1) (fig. 1).
For wood walls: mount the platform by tightening the four screws (1) (fig. 1)
d) Ensure the basis is firmly fixed to the wall.
The product is not suitable for use outdoors
STEP 2 – Plate mounting on the LCD rear panel
Important: NEVER mount the product with the LCD monitor plugged in and/or with the screen
faced downwards to avoid damaging the screen surface.
Examine the rear of the LCD monitor:
- if the surface is flat, mount the plate using the 12mm bolts (3) ;
- otherwise use the larger bolts (30mm) (4) and spacers (5) (fig.2).
Warning: Avoid over-tightening the bolts.
STEP 3 – Final mounting
To complete installation:
- Insert the plate (with the LCD/Plasma screen mounted on it) into the guidelines of the basis (already fixed on the wall) moving it carefully downwards ;
- when the plate completely reached the end-stroke, insert the two security screws and tighten them screwing clockwise
Note: to remove the plate, just unscrew the two security screws anticlockwise and slip off the Lcd/Plasma screen moving it carefully upwards.
Maintenance:
Use a damp cloth soaked in lukewarm water and mild detergent to clean the product. Do not use solvents.
WARRANTY
Manufacturer by this warranty engage itself to only replace this product in case of workmanship defects causing limitation to the use of the product as described.
This warranty does not cover direct or indirect incidents, and damages resulting from the use of this product, accidents, tampering, inability to follow the instructions,
mishandling, neglect and any other use.
Manufacturer will at no time be liable for any incidents.
This warranty covers all the other warranties, be they implied and/or expressed.
The Manufacturer is the sole authority for this warranty, no others are allowed to interpret any liabilities before and after sales of this product.
This limited warranty only extends to the first original purchaser for
5 years .
 Loading...