

ViRZTEX 60002 Users Manual
BATTERY SAFETY INFORMATION:
- Batteries should always be replaced by an adult.
- Do not mix old and new batteries.
- Do not mix alkaline, standard(Carbon-Zinc), or rechargeable(Nickel-Cadmium or Nickel Metal Hydride) batteries.
- Non-rechargeable batteries are not to be recharged.
- Rechargeable batteries are to be removed from the toy before being charged(if removable).
- Rechargeable batteries are only to be charged under adult supervision(if removable).
- Dierent types of batteries or new and used batteries are not to be mixed.
- Only batteries of the same or equivalent type as recommended are to be used.
- Batteries are to be inserted with the correct polarity.
- Exhausted batteries are to be removed from the toy.
- The supply terminals are not to be short-circuited.
- Do not dispose of battery in re. Battery may explode or leak as a result.
- Remove batteries from the toy before prolonged storage.
- Disposed of used batteries properly.
- Please retain this information for future reference.
CAUTION:
(SAFE USE OF LITHIUM POLYMER RECHARGEABLE BATTERY)
Aero Graviteer™ is powered by a light-weight Lithium Polymer rechargeable battery and extra care must be taken during use. Failure to follow
these care and handling instructions can quickly result in severe, permanent damage to the Lithium Polymer rechargeable battery and its
surroundings.
- Charge Aero Graviteer™ ONLY with the provided Radio Controller/ Charger. NEVER attempt to charge with any other charger.
- The newly purchased Aero Graviteer™ is only partially charged. Full charge your Aero Graviteer™ before rst use.
- Do not recharge Aero Graviteer™ immediately after use. Wait for 10 minutes before recharging.
- Do not charge near re, or where temperature is extremely high, or where it is wet or damp.
- During charging, keep your Aero Graviteer™ away from combustible materials including paper, plastic, carpets, vinyl, leather, wood and never charge inside a
full-sized automobile!
- Never attempt to disassemble or modify Aero Graviteer™ as it may damage the Lithium Polymer rechargeable battery inside.
- Always store Aero Graviteer™ in cool and dry place. Keep away from direct sunlight.
- Do not allow Aero Graviteer™ to get wet.
- Always switch o the Aero Graviteer™ after use or before storage!
- Never leave your Aero Graviteer™ and Radio Controller/ Charger unattended at any time during charging.
- Always full charge your Aero Graviteer™ before prolonged storage. Examination and recharging should be carried out periodically.
- If your Aero Graviteer™ shows severe damages or deformation under improper use and handling, stop using immediately and disposed of properly.
FCC/EMC REQUIREMENTS:
This device complies with Part 15 of the FCC Rules. Operation is subject to the following two conditions: (1) this device may not cause harmful interference, and (2)
this device must accept any interference received, including interference that may cause undesired operation.
Note : This equipment has been tested and found to comply with the limits for a Class B digital device, pursuant to Part 15 of the FCC Rules. These limits are
designed to provide reasonable protection against harmful interference in a residential installation. This equipment generates, uses and can radiate radio
frequency energy and, if not installed and used in accordance with the instructions, may cause harmful interference to radio communications. However, there is no
guarantee that interference will not occur in a particular installation. If this equipment does cause harmful interference to radio or television reception, which can
be determined by turning the equipment o and on, the user is encouraged to try to correct the interference by one or more of the following measures:
- Reorient or relocate the receiving antenna.
- Increase the separation between the equipment and receiver.
- Connect the equipment into an outlet on a circuit dierent from that to which the receiver is connected.
- Consult the dealer or an experienced radio/TV technician for help.
Warning: Changes or modications to this unit not expressly approved by the party responsible for compliance could void the user’s authority to
operate the equipment.
RSS-310 OF INDUSTRY CANADA:
VALID FOR CANADA ONLY – This Category II radiocommunication device complies with Industry Canada Standard RSS-310.
Ce dispositif de radiocommunication de catégorie II respecte la norme CNR-310 d’Industrie Canada.
Hereby, Dekko Toys Company Ltd., declares that this AERO GRAVITEER™
Helicopter is in compliance with the essential requirements and other
2008 Dekko Toys Company Ltd.
Dekko Toys® is a registered trademark of Dekko Toys Co., Ltd. in Hong Kong and/or other countries.
AERO GRAVITEER™ is a trademark of Dekko Toys Co., Ltd.
All rights reserved.
Dekko Toys Company Ltd., 1204-05, Tower A, New Mandarin Plaza, 14 Science Museum Road,
Tsimshatsui East, Kowloon, Hong Kong
Tel: (852) 3620 2290 Fax: (852) 3107 0313
Dekko Toys Europe bvba, Remise 3, 3930 Hamont, Belgium
Tel: (32) 11 80 62 10 Fax: (32) 11 40 18 20
relevant provisions of Directive 1999/5/EC.
www.dekkotoys.com
Contains LiPo battery pack.
Battery pack must be recycled
or disposed of properly
Li-ion
Carefully read the provided instruction manual as it contains important information.
Conform to product safety standard ASTM F963-07 and EN71 regulatory requirements.
Please retain this information for future reference.
P/N #60002-IS-EN-01-R0
If at any time in the future you should need to
dispose of this product please note that waste
electrical products should not be disposed of
with household waste. Please re cycle where
facilities exist. Check with your local authority
or retailer for recycling advice.(Waste
Electrical and Elec tronic Equipment Directive)
Product and colors may vary.
Item#60002(27.145MHz)
MADE IN CHINA
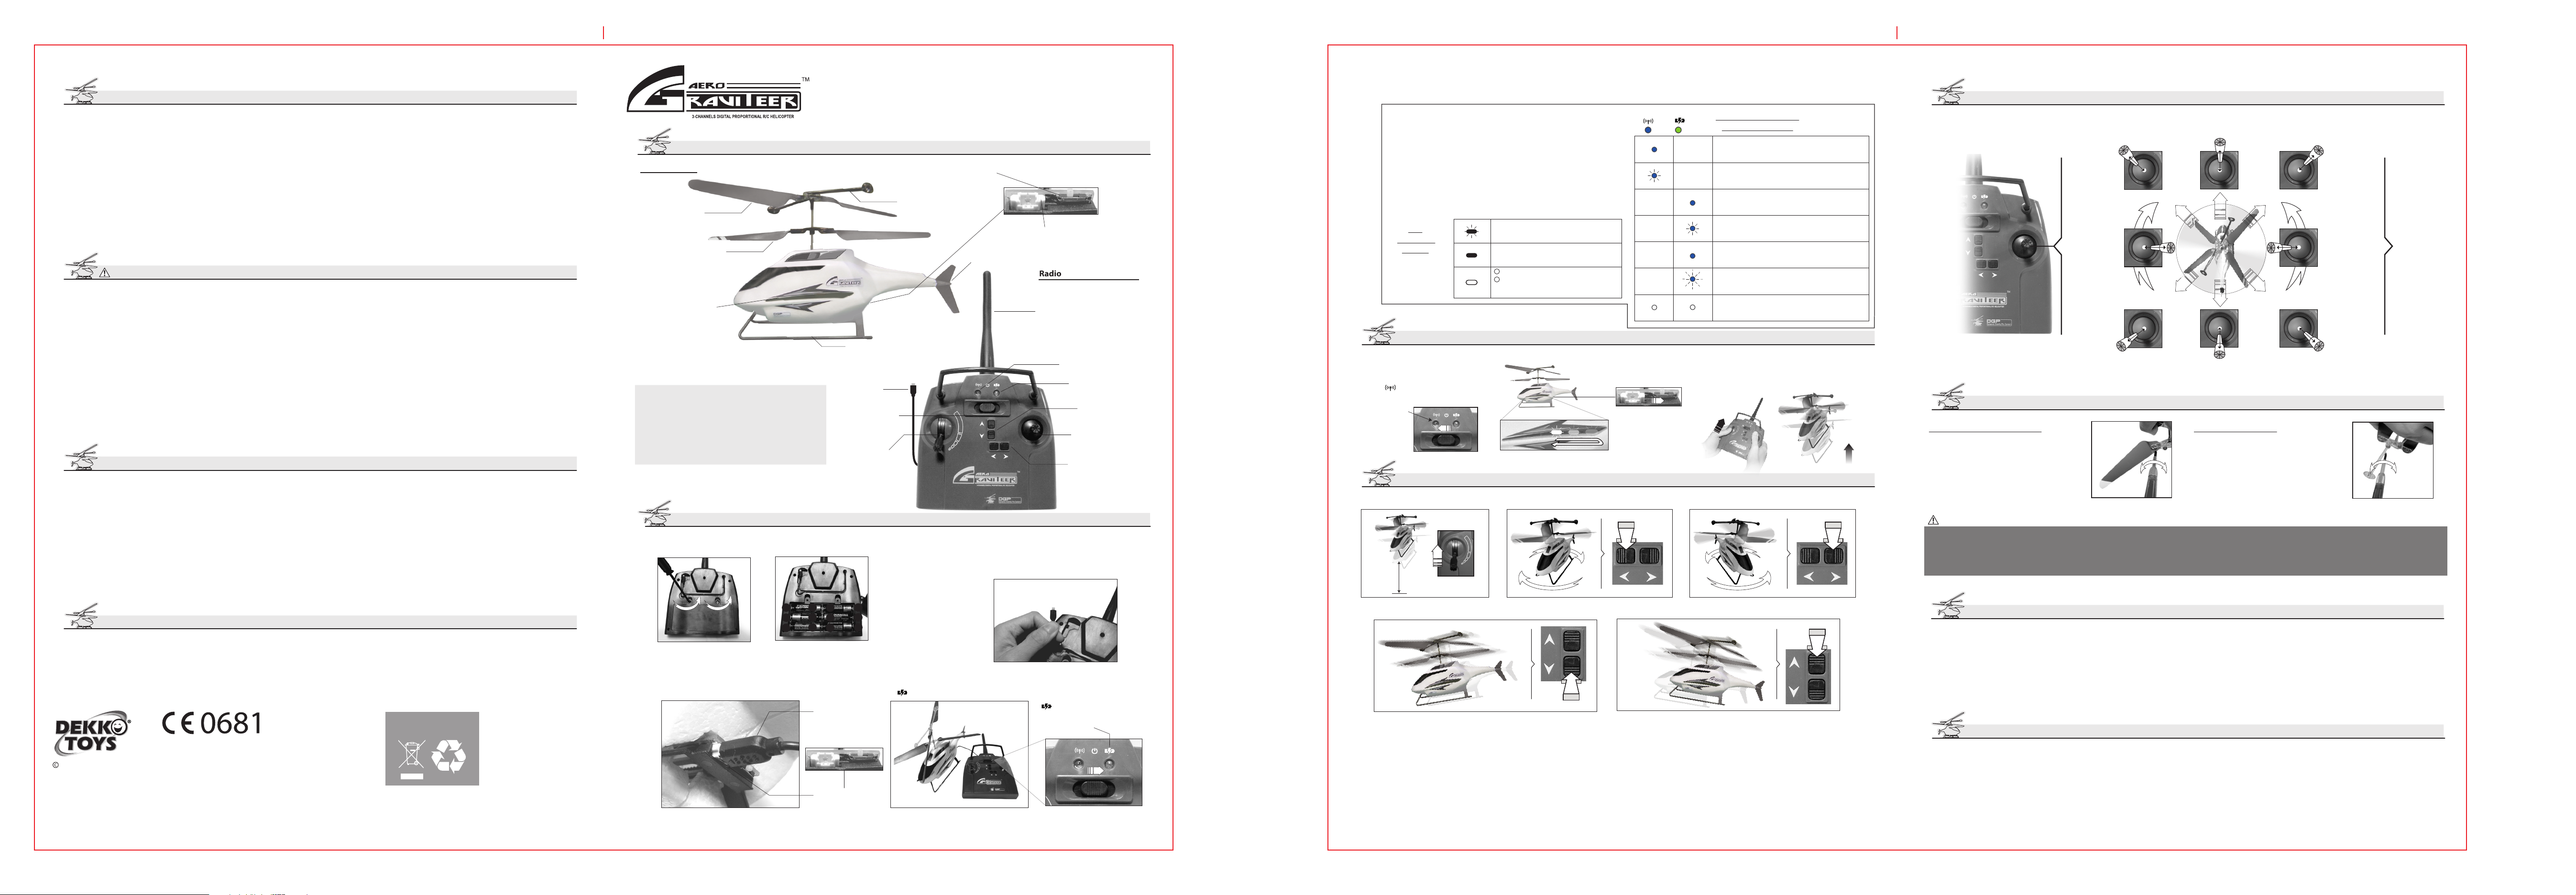
CONTENTS LIST AND PARTS IDENTIFICATION:
Aero Graviteer™
Upper Rotor Blade
Lower Rotor Blade
Dynamic Gravity
Pro System (DGP)
LED Window
Check to make sure contents are complete:
1)
Aero Graviteer™ 3-Channels R/C Helicopter x 1
2) Radio Controller/ Charger x 1
3) Instruction Manual x 1
4) Spare Upper Rotor Blade x 2
5) Spare Lower Rotor Blade x 2
6) Spare Fly Bar x 2
GETTING STARTED:
Unscrew the battery door
1
Insert the charge plug into helicopter as shown
5
Battery Installation - Radio Controller/ Charger
2
-
+
-
Note: For best performance, alkaline batteries
are recommended.
Aero Graviteer™ 3-Channels Digital Proportional R/C Helicopter
Easy to Fly! Anyone can master it like a PRO!
Instruction Manual
Power Switch
OFF ON
Fly Bar
Charge Socket
Tail Fin
Radio Controller/ Charger
Antenna
Landing Gear
Power Indicator
Charge Plug
Throttle Control
+
-
-
+
+
-
Charge Plug
Power Switch
Charge Socket
Charging/
On/ O/ Switch
Stick
Install 6 x 1.5V AA(LR6)
batteries (not included) in
battery compartment.
Make sure to follow the
correct positive (+) and
+
negative (-) polarities
-
with the corresponding
+
markings inside the
battery compartment.
Slide the “Charging/ On/ O” switch of the Radio Controller/ Charger
6
to “ ” position
OFF ON
Reinstall battery door and tighten the screws.
3
Pull out the charge plug from the back of
4
Radio Controller/ Charger.
“ ” LED will ash red when
charging. Once completed, it
will turn green.
Charging Indicator
Trimmer
for Forward/ Backward
Directional
Control Stick
Trimmer
for Yaw Control
8+
NOTE:
(1) Charging takes around 30-45 minutes.
(2) Shorter charging time may occur if your Aero Graviteer™ is
only partially drained.
(3) Turn o your Aero Graviteer™ and disconnect it from the
radio controller/ charger when charging is completed or before
storage.
(4) Average ight time is around 3-4 minutes o one full
charge.
(5) Charge time and ight time may vary depending on radio
controller battery level.
LED
Indication
of DGP:
(Helicopter)
Red Flash
STANDBY MODE: Waitiing for radio controller
to turn on.
READY: Successful communication with radio
controller.
Red
1
Helicopter is turned o.
2
Helicopter goes into sleep mode after being
O
idle for 15 minutes.
Blue
Blue
Blue Flash
O O
Red/ Green
Red Flash
Green
Red Rapid Flash
LED Indication of Radio
Controller/ Charger:
Normal Operation in Flight Mode.
Radio Controller/ Charger battery level low. Replace the
6 x 1.5v AA(LR6) batteries with brand new ones.
CHARGE MODE: Helicopter disconnected/ not connected.
Red
CHARGE MODE: Charging in progress.
CHARGE MODE: Charging completed.
Helicopter faulty. Charging is stopped.
SLEEP MODE: When the Remote Controller/ Charger is
idle for 15 minutes, or when charging is completed for 15
minutes, it will automatically shut-o to preserve battery.
PREPARING TAKE-OFF:
Slide the “Charging/ On/
1
O” switch of the Radio
Controller/ Charger
to “ ” position
Blue LED
lights up
Turn on your Aero Graviteer™
2
Power Switch
OFF ON
During startup, the DGP
LED red light will move
backward and return to
reach to its neutral position.
Now your Aero Graviteer™ is
ready to take o !
Press your left thumb onto the throttle stick
3
and push up slowly and gently. The upper and
lower rotors will spin and build up to speed
gradually. Your Aero Graviteer™ will take o
now!
TRIM CORRECTION:
Hovering
1
3 feet
(1m)
Out of Trim: Drift forward
2
C
(1) Hovering
- Hover your Aero Graviteer™ about 3 feet(1m) above ground (keep it at constant altitude). You may need to continuously adjust throttle
gently up or down to achieve hovering.
(2) Trimming - If your Aero Graviteer™ shows one of the followings:
A. Spin clockwise - gently tap the LEFT trimmer button until the hovering helicopter stops spinning.
B. Spin counter - clockwise - gently tap the RIGHT trimmer until the hovering helicopter stops spinning.
C. Drift forward - gently tap the BACKWARD trimmer button until the hovering helicopter stays stationary.
D. Drift backward - gently tap the FORWARD trimmer button until the hovering helicopter stays stationary.
E. Stay straight – no trimming is required.
(3) When trimming is done, your Aero Graviteer™ is ready to traverse at your command.
Out of Trim: Spinning clockwise
2
A
Tap
Out of Trim: Drift backward
2
D
Out of Trim: Spinning counter-clockwise
2
B
TapTap
Tap
DIRECTIONAL FLIGHT CONTROL (AFTER TRIM CORRECTION):
Turn left and
go forward
Turn right Turn left
Turn left and
go backward
Go forward straight
Go backward straight
Turn right and
go forward
Turn right and
go backward
REPLACE ROTOR BLADE AND FLY BAR :
REPLACE ROTOR BLADE REPLACE FLY BAR
CAUTION! Before replacing the rotor-blades,
make sure both the controller and helicopter
are switched “OFF”.
-Use a screwdriver to unscrew the rotor-blade.
-Replace the rotor-blade.
-Tighten up the screw.
Loosen
Tighten
CAUTION! Before replacing the y-bars, make
sure both the controller and helicopter are
switched “OFF”.
-Use a screwdriver to unscrew the y-bar.
-Replace the y-bar.
-Tighten up the screw.
Loosen
Tighten
NOTE: BUILT-IN ELECTRONIC PROTECTION
Aero Graviteer™ is designed and built in with electronic protection. The helicopter will automatically shut o if the rotors are stalled or battery
level gets too low. If you nd the helicopter shut o itself during play, check carefully whether there is any bad deformation to the helicopter
before reset. To reset, simply slide the helicopter’s ON/OFF switch to OFF and then ON again. If the battery level gets too low that the helicopter
cannot lift o, recharge it immediately.
FLYING TIPS:
- Always press and push gently the throttle and direction sticks during ight control. The digital proportional controls respond precisely to small movement of
control stick.
- Beware of turbulence and strong winds in the ying area. Your Aero Graviteer™ may wobble, or be blown o its track, or even dive back to ground as a result.
- Never y your Aero Graviteer™ over 10 feet(3m) above ground or get too close to the ceiling and wall.
- If your Aero Graviteer™ is about to hit onto an obstacle, crash, or losing control, release the throttle stick immediately and let the helicopter fall freely and safely
back to ground.
- Always full charge your Aero Graviteer™ before use.
- In cold or high altitude environments, your Aero Graviteer™ may not perform as good.
IMPORTANT SAFETY INFORMATION:
- Keep Aero Graviteer™ clear from face and eyes at all times.
- Keep ngers away from spinning rotors and y bar.
- Always y in wide open space without any obstacles.
- Do not y towards people or animals.
- Do not y under adverse weather condition.
- Always y in warm and sunny days, with little or no wind.
- Do not y in temperatures below 45°F/7°C.
- Adult supervision recommended at all times.
 Loading...