

Page 1
MANUAL DE INSTRUCCIONES
OPERATING INSTRUCTIONS
MODE D’ EMPLOI
GEBRAUCHSANWEISUNG
MANUALE D’ISTRUZIONI
MANUAL DE INSTRUÇÕES
ИНСТРУКЦИЯ ПО ЭКСПЛУАТАЦИИ
RT188N
Lijadora rotorbital
Rotary orbital sander
Ponceuse rotorbitale
Exzenterschleifer
Levigatrice rotorbitale
Lixadeira rotorbital
Электро-вибро-шлифовальная машина
Page 2
MANUAL DE INSTRUCCIONES
OPERATING INSTRUCTIONS
MODE D'EMPLOI
GEBRAUCHSANWEISUNG
MANUALE D'ISTRUZIONI
MANUAL DE INSTRUÇÕES
ИНСТРУКЦИЯ
ПО
ЭКСПЛУАТАЦИИ
ESPAÑOL Lijadora rotorbital RT188N
ENGLISH RT188N Rotary orbital sander
FRANÇAIS Ponceuse rotorbitale RT188N
DEUTSCH Exzenterschleifer RT188N
ITALIANO Levigatrice rotorbitale RT188N
PORTUGUÉS Lixadeira Rotorbital RT188N
РУССКИЙ RT188N Электро-вибро-шлифовальная машина
página/page
Seite/pagina
страница
3
6
8
11
13
16
18
Fig. 2
2
Fig. 1
Page 3
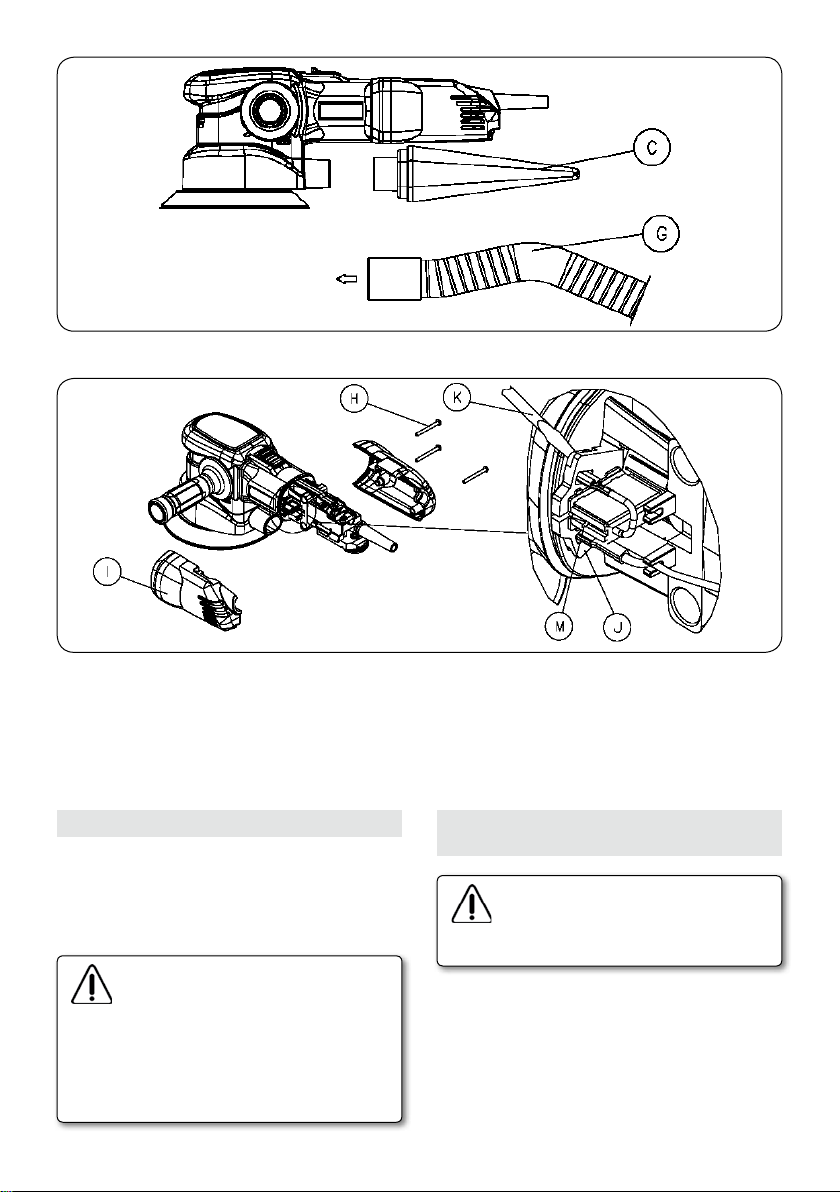
Fig. 3
Fig. 4
ESPAÑOL
LIJADORA ROTORBITAL
ELECTRÓNICA RT188N
Importante
Antes de utilizar la máquina lea atentamente éste MANUAL DE INSTRUCCIONES
y el FOLLETO DE INSTRUCCIONES GENERALES DE SEGURIDAD que se adjunta.
Asegúrese de haberlos comprendido antes
de empezar a operar con la máquina.
Conserve los dos manuales de instrucciones para posibles consultas posteriores.
1. INSTRUCCIONES DE SEGURIDAD
PARA EL MANEJO DE LA LIJADORA
Antes de utilizar la máquina, lea atentamente el FOLLETO DE INSTRUCCIONES
GENERALES DE SEGURIDAD que se adjunta con la documentación de la misma.
1. Asegúrese antes de conectar la máquina, que la
tensión de alimentación, corresponda con la indicada
en la chapa de características.
2. Peligro, mantener la mano alejada del área de trabajo.
No coger la máquina por debajo mientras está en
funcionamiento.
3. Inspeccionar y sacar los clavos de la superficie de
lijado, antes de empezar a trabajar.
3
Page 4

4. Desconecte la máquina de la red eléctrica antes de
realizar cualquier operación de mantenimiento.
5. Nunca deje una herramienta eléctrica antes que sus
partes móviles hayan dejado de moverse completamente.
6. Nunca usar la lijadora, donde haya líquidos o excesiva
humedad.
7. Si emplea Vd. abrasivos adhesivos, es conveniente
retirar el disco una vez finalizado el trabajo, ya que,
pasados unos días, podría presentar dificultades el
despegarlo del plato. No intente volver a pegar en el
plato un disco de papel abrasivo, una vez haya sido
despegado, la reducción del poder adherente, podría
ocasionar un desprendimiento del disco abrasivo, con
peligro para el usuario. Asegúrese, antes de pegar un
nuevo disco abrasivo, que el plato está libre de suciedad.
8. El polvo producido durante el lijado puede resultar
tóxico o nocivo para la salud (por ejemplo: pinturas
al plomo, algunas maderas y metales). Se recomienda
utilizar siempre la conexión para la aspiración de polvo.
9. Piezas de recambio: Usar sólo recambios originales.
2. CARACTERÍSTICAS TÉCNICAS
Potencia absorbida...................................…900 W
R.p.m en vacío…....……..............…………....3.500-7.500
Diámetro órbita..........................…....................7 mm
Diámetro disco abrasivo..……...........................150 mm
Peso...............................................................….2,6 Kg
Nivel de Presión acústica Ponderado A...........................89 dBA
Nivel de Potencia acústica Ponderada A......................100 dBA
Incertidumbre de la medición.......................................K = 3 dBA
¡Usar protectores auditivos!
Nivel total de emisión de vibraciones...................ah: 7,9 m/s
Incertidumbre de la medición.....................................K: 1,5 m/s
3. EQUIPO ESTÁNDAR
En el interior de la caja Ud. encontrará los elementos
siguientes:
1. Plato blando base velcro 8845485
2. Disco papel esmeril grano 120.
3. Llave ALLEN e/c: 6 mm.
4. Conjunto bolsa aspiración.
5. Manual de instrucciones y documentación diversa.
4. ACCESORIOS OPCIONALES Y HERRAMIENTAS
1. Plato blando base adhesivo ref. 8845487
2. Plato duro base adhesivo ref. 8846367
3. Plato duro base velcro ref. 8846366
4. Acoplamiento de aspiración estándar 3,5 m ref.
6446073
5. APLICACIONES
Especialmente indicada para trabajos de reparación en
4
carrocerías de automóviles, y en el lijado y pulido de
chapas metálicas. Con los abrasivos adecuados también
puede utilizarse en el lijado de superficies de madera,
dejando un acabado de gran calidad.
Gracias a sus dos movimientos (rotativo y orbital), permite
realizar operaciones de desbaste y acabado con una gran
rapidez, dejando las superficies completamente lisas y sin
ningún tipo de rayas. Dadas sus características, resulta
ideal para los delicados lijados en trabajos de barnizados.
La lijadora está equipada con un sistema de aspiración
forzada del polvo de lijado y una bolsa de recogida de éste.
6. PREPARACIÓN DE LA MÁQUINA
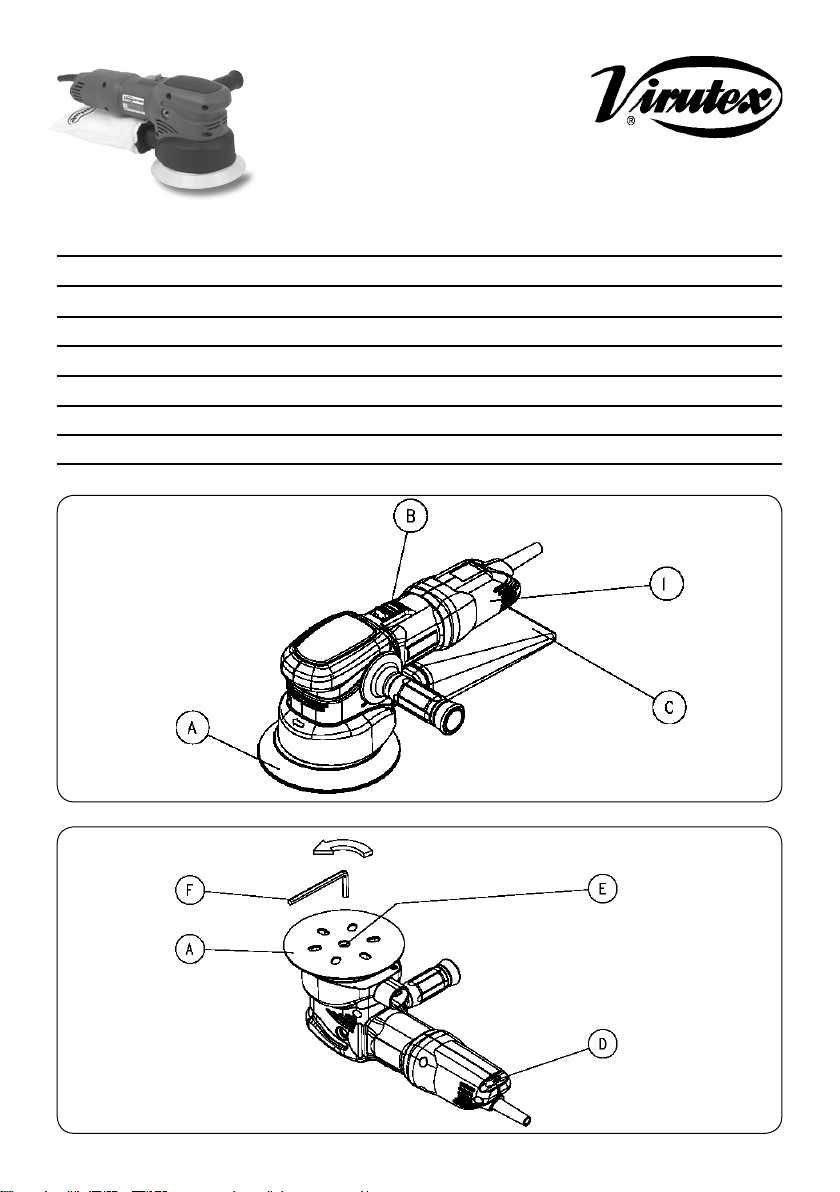
Situar el disco abrasivo sobre el plato "A" (Fig. 1) y colocarlo
haciendo coincidir sus agujeros con los agujeros del plato.
Si el plato es de base adhesiva, separar con precaución
el papel protector del disco con objeto de no ensuciar su
parte adhesiva y presionar sobre el disco para conseguir
una perfecta adherencia.
Es importante verificar, antes de comenzar el trabajo, que el
disco ha quedado bien adherido al plato en toda su superficie.
En caso de no disponer de discos abrasivos con orificios
de aspiración, éstos pueden ser realizados copiando, los
que dispone el plato.
7. PUESTA EN MARCHA
Antes de conectar la máquina a la red, comprobar que la
tensión de alimentación es la misma que la indicada en
la chapa de características. Mantener firmemente sujeta
la máquina, y presionar hacia delante el pulsador "B"
(Fig. 1) el cual se quedará enclavado en la posición de
marcha. Para parar la máquina presionar simplemente
sobre la parte trasera del pulsador y este retornará
2
automáticamente a su posición de reposo.
2
Poner la máquina sobre la superficie de trabajo y efectuar
los desplazamientos precisos para conseguir la calidad de
acabado deseada. No es necesario efectuar una gran presión
sobre la máquina durante el trabajo, ya que los mejores
acabados se consiguen con el propio peso de la máquina.
La regulación electrónica de la velocidad, permite trabajar
a la velocidad idónea para cada superficie y abrasivo,
lo que resulta especialmente conveniente para el lijado
de materiales termosensibles, que requieren velocidades
de lijado reducidas. Para la regulación de la velocidad,
hacer girar el botón "D" a la velocidad de trabajo que
se requiera (Fig. 2).
8. CAMBIO DE PLATO ESMERILADO
Desconectar la máquina de la red eléctrica, antes de efectuar cualquier operación
de mantenimiento.
Desprender el disco abrasivo del plato esmerilado (A)
ITALIANO
Page 5

(Fig. 2), y quitar el tornillo "E" mediante la llave ALLEN
e/c: 6 mm suministrada con el equipo.
Para colocar un nuevo plato seguir el mismo proceso
a la inversa.
9. CONEXIÓN A UNA ASPIRACIÓN EXTERIOR
Para conectar la máquina a los aspiradores AS182K,
AS282K, u otra fuente externa de aspiración, deberá
montarse el acoplamiento de aspiración ref. 6446073 (accesorio opcional). Para ello, retirar la bolsa de aspiración
"C", y encajar en su lugar la boquilla, del acoplamiento
de aspiración "G" (Fig. 3).
El otro extremo del acoplamiento de aspiración, permite
la conexión a la fuente externa de aspiración elegida.
10. MANTENIMIENTO ESCOBILLAS Y COLECTOR
Desconectar la máquina de la red eléctrica, antes de efectuar cualquier operación
de mantenimiento.
Es importante sustituir las escobillas
cuando tengan una longitud mínima
de 10 mm.
Cambio de escobillas.
Quitar los tornillos "H" (Fig. 4) que sujetan las tapas
laterales "I" y separar ambas. Extraer los portaescobillas "J" con la ayuda de un pequeño destornillador "K",
haciendo palanca sobre una de las pestañas laterales
del portaescobillas.
Desplazar hacia atrás el extremo del muelle "M". Retenerlo
en esta posición para extraer la escobilla y sustituirla
por una nueva original de VIRUTEX.
Colocar de nuevo el portaescobillas procurando que
asiente firmemente en la carcasa y que cada una de
las escobillas presionen suavemente sobre el colector.
Montar las tapas "I" con sus correspondientes tornillos,
asegurándose de no pellizcar ningún cable en el ensamblaje de ambas.
Es aconsejable dejar en marcha la máquina en vacío
durante 15 minutos, para conseguir una correcta
adaptación de las escobillas.
Si observa que el colector presenta quemaduras o resaltes, debe hacerlo reparar
en un Servicio Técnico VIRUTEX. Para esta
operación no utilizar nunca papel esmeril.
Mantenga siempre el cable y el enchufe
¡
en buenas condiciones de servicio.
11. LUBRICACIÓN Y LIMPIEZA
La máquina se entrega totalmente lubricada de fábrica no
precisando cuidados especiales a lo largo de su vida útil.
Es importante limpiar siempre cuidadosamente la
máquina después de su utilización mediante un chorro
de aire seco.
Mantener el cable de alimentación en perfectas condiciones de uso.
Mantener libres y limpias, las aberturas de ventilación
y refrigeración de la máquina.
12. NIVEL DE RUIDO Y VIBRACIONES
Los niveles de ruido y vibraciones de esta herramienta
eléctrica han sido medidos de acuerdo con la Norma
Europea EN 60745-2-4 y EN 60745-1 y sirven como base
de comparación con máquinas de semejante aplicación.
El nivel de vibraciones indicado ha sido determinado
para las aplicaciones principales de la herramienta,
y puede ser utilizado como valor de partida para la
evaluación de la exposición al riesgo de las vibraciones.
Sin embargo, el nivel de vibraciones puede llegar a ser
muy diferente al valor declarado en otras condiciones
de aplicación, con otros útiles de trabajo o con un
mantenimiento insuficiente de la herramienta eléctrica
y sus útiles, pudiendo llegar a resultar un valor mucho
más elevado debido a su ciclo de trabajo y modo de uso
de la herramienta eléctrica.
Por tanto, es necesario fijar medidas de seguridad de
protección al usuario contra el efecto de las vibraciones,
como pueden ser mantener la herramienta y útiles de
trabajo en perfecto estado y la organización de los
tiempos de los ciclos de trabajo (tales como tiempos
de marcha con la herramienta bajo carga, y tiempos de
marcha de la herramienta en vacío y sin ser utilizada
realmente ya que la reducción de estos últimos puede
disminuir de forma sustancial el valor total de exposición).
13. GARANTÍA
Todas las máquinas electroportátiles VIRUTEX tienen
una garantía válida de 12 meses, a partir del día de su
suministro, quedando excluidas todas las manipulaciones o daños ocasionados por manejo inadecuado o por
desgaste natural de la máquina.
Para cualquier reparación, dirigirse al Servicio Oficial
de Asistencia Técnica VIRUTEX.
14. RECICLAJE DE LAS
HERRAMIENTAS ELÉCTRICAS
Nunca tire la herramienta eléctrica con el resto de residuos domésticos. Recicle las herramientas, accesorios y
embalajes de forma respetuosa con el medio ambiente.
Respete la normativa vigente de su país.
Aplicable en la Unión Europea y en países europeos
con sistemas de recogida selectiva de residuos:
La presencia de esta marca en el producto o en el
material informativo que lo acompaña, indica que al
finalizar su vida útil no deberá eliminarse junto con
5
Page 6
otros residuos domésticos.
Conforme a la Directiva Europea 2002/96/CE los usuarios
pueden contactar con el establecimiento donde adquirieron el producto, o con las autoridades locales pertinentes,
para informarse sobre cómo y dónde pueden llevarlo
para que sea sometido a un reciclaje ecológico y seguro.
VIRUTEX, se reserva el derecho de modificar sus productos
sin previo aviso.
moving parts have completely stopped.
6. Never use the sander where there are liquids or
excessive moisture.
7. If you use abrasive adhesives, it is recommended that
you remove the disc once you have finished work, as it
may be difficult to separate it from the plate after several
days. Do not try to stick a sandpaper disc to the plate
once it has been removed, as the reduced adhesiveness
may cause the disc to separate during use, with danger
of injury to the user. Before attaching a new disc, make
sure that the plate is completely clean.
8. The dust produced during sanding may prove to be
toxic or harmful to health (for example: lead paints,
certain woods and metals).
We recommend that you always have the dust collector
connected.
9. Spare Parts: Only use genuine spare parts.
ENGLISH
RT188N ELECTRONIC
ROTARY ORBITAL SANDER
Important
Read these OPERATING INSTRUCTIONS
and the attached GENERAL SAFETY
INSTRUCTIONS LEAFLET carefully before
using the machine. Make sure you have
understood them before operating the
machine for the first time.
Keep both sets of instructions for any
future queries.
1. SAFETY INSTRUCTIONS
FOR OPERATING THE SANDER
Before using the machine, carefully read
the GENERAL SAFETY INSTRUCTIONS
LEAFLET included with the machine
documentation.
1. Before plugging in the machine, ensure that the
power supply voltage is the same as that stated on the
machine specifications plate.
2. Danger, keep hands clear of the working area.
Do not grasp the underside of the machine while it
is running.
3. Inspect and remove all nails from the surface to be
sanded before beginning work.
4. Unplug the machine from the electrical outlet before
performing any maintenance operations.
5. Never leave an electrical tool unattended before all
6
2. SPECIFICATIONS
Input power...........................................................……900 W
R.P.M. (no load)………………............................….3,500-7,500
Orbit diameter................…...............................7 mm
Sanding disc diameter..........................................….150 mm
Weight.........................................................2.6 Kg
Weighted equivalent continuous
acoustic pressure level A..................................................89 dBA
Acoustic power level A...................................................100 dBA
Uncertainty...................................................................K = 3 dbA
Wear ear protection!
Vibration total values.................................................ah: 7.9 m/s
Uncertainty....................................................................K: 1.5 m/s
3. STANDARD EQUIPMENT
The box contains the following items:
1. Velcro soft sandind plate 8845485
2. Sanding disc gr.120
3. ALLEN key e/c: 6 mm.
4. Dust collection bag assembly
5. Operating instructions and miscellaneous documentation
4. OPTIONAL ACCESSORIES AND TOOLS
1. Adhesive soft sanding plate ref. 8845487
2. Adhesive soft sanding plate ref. 8846367
3. Velcro soft sanding plate ref. 8846366
4. Standard dust collector attachment 3.5 m ref. 6446073
5. APPLICATIONS
Especially indicated for car body repair work and the
sanding and polishing of sheet metal. It may also be
used for sanding wood surfaces when the appropriate
2
2
Page 7
sandpaper is fitted, giving a high-quality finish.
Its two movements (rotary and orbital) means smoothing
or finishing operations can be done quickly, leaving a
completely smooth, scratch-free surface.
Its specifications make it ideal for delicate sanding with
varnishing jobs.
The sander is fitted with a sanding dust collection system
and a duct collection bag.
To connect the machine to dust collectors AS182K,
AS282K or another external suction source, the dust
collector attachment ref. 6446073 (optional accessory)
must be attached. To do this, remove collection bag "C",
and fit nozzle "G" of the dust collector attachment in
its place (Fig. 3).
The chosen external suction source may then be hooked
up to the other end of the suction connection.
6. PREPARING THE MACHINE
Place the sanding disc on plate "A" (Fig. 1) and match
up its holes with those on the plate.
If the plate has an adhesive base, carefully remove the
protective paper on the disc to prevent dirt coming into
contact with the adhesive part and exert pressure on
the disc until it is well attached.
Before starting work, check that the whole surface of
the disc is well stuck to the plate.
Should the discs not have suction holes, these may be
made by copying those on the plate.
7. STARTING UP
Before plugging in the machine, ensure that the power
supply voltage is the same as that stated on the machine
specifications plate. Hold the machine firmly and push
switch "B" (Fig. 1) forward to the on position. To stop
the machine, simply press the back of the switch and it
will return to the off position.
Place the machine over the surface to be sanded and
work the surface until the required finish is obtained.
You do not need to exert much pressure on the machine
while working as the best finishes are obtained using
just the weight of the machine itself.
The electronically regulated speed allows you to work
at the most appropriate speed for each surface and
sandpaper. This is particularly useful for heat-sensitive
surfaces, which require lower sanding speeds. To adjust
the speed, turn button "D" to the required working
speed (Fig. 2).
10. MAINTENANCE OF BRUSHES AND COLLECTOR
Unplug the machine from the electrical
outlet before performing any maintenance operations.
Brushes should be changed when they have a minimum
length of 10 mm.
Changing Brushes
Remove screws "H" (Fig. 4) that fasten the side covers
"I" and detach both. Remove the brush-holder "J" with
small screwdriver "K", using one of the brush-holder
side tabs to lever it out.
Push back the end of spring "M". Keep it in this position
to extract the brush and replace it with a new genuine
VIRUTEX brush.
Reinsert the brush-holder, ensuring that it is firmly
positioned in the casing and that each of the brushes
exerts a small amount of pressure on the collector.
Re-attach the covers "I" with the corresponding screws,
making sure that no wires get caught in the process.
It is advisable to allow the machine to run for 15 minutes in order to ensure that the brushes have properly
settled into place.
If the collector shows signs of burns or
protuberances, it should be repaired by
VIRUTEX Technical Service. Never use
emery paper for this operation. Keep the
lead and plug in good working condition.
8. CHANGING THE SANDING PLATE
Unplug the machine from the electrical
outlet before performing any maintenance operations.
Remove the sanding disc from the sanding plate (A) (Fig.
29 and remove screw "E" using the ALLEN key e/c: 6 mm
supplied with the machine. To attach a new plate, carry
out the same operation in reverse.
9. CONNECTING THE MACHINE
TO AN EXTERNAL DUST COLLECTOR
11. LUBRICATION AND CLEANING
The machine comes fully lubricated from the factory
and does not require special care during its working life.
Always clean the machine carefully after use with a
dry air blower.
Keep the power cable in perfect condition.
Keep the machine’s vent and cooling openings clean
and unobstructed.
12. NOISE AND VIBRATION LEVELS
The noise and vibration levels of this device have been
measured in accordance with European standard EN
60745-2-4 and EN 60745-1 and serve as a basis for com-
7
Page 8
parison with other machines with similar applications.
The indicated vibration level has been determined for
the device’s main applications and may be used as an
initial value for evaluating the risk presented by exposure to vibrations. However, vibrations may reach levels
that are quite different from the declared value under
other application conditions, with other tools or with
insufficient maintenance of the electrical device or its
accessories, reaching a much higher value as a result
of the work cycle or the manner in which the electrical
device is used.
Therefore, it is necessary to establish safety measures
to protect the user from the effects of vibrations, such
as maintaining both the device and its tools in perfect
condition and organising the duration of work cycles
(such as operating times when the machine is subjected
to loads, and operating times when working with no-load,
in effect, not in use, as reducing the latter may have a
considerable effect upon the overall exposure value).
13. WARRANTY
All VIRUTEX portable electrical tools are guaranteed for 12
months from the date of supply, excluding any damage
resulting from incorrect use or natural wear and tear
on the machine. All repairs should be carried out by the
official VIRUTEX technical assistance service.
14. RECYCLING ELECTRICAL EQUIPMENT
Never dispose of electrical equipment with domestic waste. Recycle equipment, accessories and packaging in ways
that minimise any adverse effect on the environment.
Comply with the current regulations in your country.
Applicable in the European Union and in European
countries with selective waste collection systems:
If this symbol appears on the product or in the accompanying information, at the end of the product's useful
life it must not be disposed of with other domestic waste.
In accordance with European Directive 2002/96/EC, users
may contact the establishment where they purchased the
product or the relevant local authority to find out where
and how they can take the product for environmentally
friendly and safe recycling.
VIRUTEX reserves the right to modify its products without prior notice.
8
FRANÇAIS
PONCEUSE ROTORBITALE
ÉLECTRONIQUE RT188N
Important
Avant d'utiliser la machine, lisez attentivement ce MANUEL D'INSTRUCTIONS et la
BROCHURE D'INSTRUCTIONS GÉNÉRALES
DE SÉCURITÉ qui vous sont fournis avec
cette machine. Assurez-vous de bien
avoir tout compris avant de commencer
à travailler sur la machine.
Gardez toujours ces deux manuels
d'instructions à portée de la main pour
pouvoir les consulter, en cas de besoin.
1. INSTRUCTIONS DE SÉCURITÉ POUR
LE MANIEMENT DE LA PONCEUSE
Avant d'utiliser la machine, veuillez lire attentivement la BROCHURE
D'INSTRUCTIONS GÉNÉRALES DE SÉCURITÉ qui est jointe à la documentation
de la machine.
1. Vérifier avant de brancher la machine si la tension
d'alimentation correspond à celle indiquée sur la plaque
des caractéristiques.
2. Attention, toujours maintenir les mains éloignées de
la zone de travail.
Ne pas prendre la machine par le dessous quand elle
est en marche.
3. Vérifier s'il y a des clous sur la surface à poncer, si
c'est le cas, les retirer avant de commencer à travailler.
4. Débrancher la machine du secteur, avant toute
opération d'entretien.
5. Ne jamais abandonner un outil électrique avant l'arrêt
complet de ses parties mobiles.
6. Ne jamais utiliser la ponceuse dans des endroits trop
humides ou mouillés.
7. Si vous employez des abrasifs adhésifs, il faut retirer
le disque quand le travail est fini, car sinon, quelques
jours après, il pourrait être difficile de le décoller du
plateau. Ne pas essayer de recoller un disque de papier
abrasif sur le plateau; en effet, après l'avoir décollé, la
réduction de l'adhérence pourrait causer un décollement
du disque abrasif, ce qui pourrait être dangereux pour
l'utilisateur. Vérifier que le plateau est bien propre avant
de coller un nouveau disque abrasif.
8. La poussière produite par le ponçage peut être toxique ou nocive pour la santé (par exemple: peintures au
Page 9

plomb, certains bois et métaux).
Il faut toujours utiliser le kit d'aspiration pour la poussière.
9. Pièces de rechange: N'utiliser que des pièces de
rechange d'origine.
2. CARACTÉRISTIQUES TECHNIQUES
Puissance absorbée.............................................900 W
Tr/min à vide................…..........................3.500-7.500
Diamètre orbite................................................7 mm
Diamètre disque abrasif.............................150 mm
Poids................................................................2,6 Kg
Niveau de pression acoustique
continu équivalent pondéré A..........................................89 dBA
Niveau de puissance acoustique A................................100 dBA
Incertitude.....................................................................K = 3 dbA
Porter une protection acoustique!
Valeurs totales des vibrations..................................ah: 7,9 m/s
Incertitude..................................................................K: 1,5 m/s
3. ÉQUIPEMENT STANDARD
La mallette contient les éléments suivants:
1. Plateau souple velcro 8845485
2. Disque papier abrasif grain 120.
3. Clé six pans o/c: 6 mm
4. Ensemble sac aspiration.
5. Mode d’emploi et documentation diverse.
Si le plateau est à base adhésive, décoller soigneusement
le papier de protection du disque en évitant de salir
sa partie adhésive et appuyer sur le disque pour une
parfaite adhérence.
Il est important de vérifier, avant de commencer le travail,
si le disque est bien collé sur toute la surface du plateau.
Si on ne dispose pas de disques abrasifs avec des trous
d'aspiration, on peut les réaliser en copiant ceux qui se
trouvent sur le plateau.
7. MISE EN MARCHE
Avant de brancher la machine sur le secteur, vérifier si la
tension d'alimentation est la même que celle indiquée sur
la plaque des caractéristiques. Bien tenir la machine et
pousser vers l'avant le bouton "B" (Fig. 1), qui restera fixé
sur la position marche. Pour arrêter la machine, il suffit
d'appuyer sur la partie arrière du bouton, il reviendra
automatiquement à sa position de repos.
2
Poser la machine sur la surface de travail et faire les
2
déplacements nécessaires pour obtenir la qualité de
finition voulue. Il n'est pas nécessaire de trop appuyer
sur la machine durant le travail, car son propre poids
suffit pour effectuer les meilleures finitions.
Le réglage électronique de la vitesse permet de travailler
à la vitesse idéale pour chaque surface et abrasif, ce
qui convient tout particulièrement pour le ponçage de
matériaux sensibles à la chaleur, demandant de petites
vitesses de ponçage. Pour le réglage de la vitesse, tourner
le bouton "D" sur la vitesse de travail voulue (Fig. 2).
4. ACCESSOIRES OPTIONNELS ET OUTILS
1. Plateau souple adhésif réf. 8845487
2. Plateau souple adhésif ref. 8846367
3. Plateau souple velcro ref. 8846366
4. Kit d'aspiration standard 3,5 m réf. 6446073
5. APPLICATIONS
Tout particulièrement conçue pour les travaux de réparation sur les carrosseries d'automobiles, pour le ponçage
et le polissage de tôles. Elle peut également être utilisée
pour le ponçage de surfaces en bois en utilisant les
abrasifs adéquats, pour une finition de grande qualité.
Grâce à ses deux mouvements (rotatif et orbital), elle
permet de réaliser très rapidement des opérations de
dégrossissage et de finition, en laissant les surfaces
complètement lisses et sans rayures.
Étant donné ses caractéristiques, elle est idéale pour les
ponçages délicats en travaux de vernissages.
La ponceuse est équipée d'un kit d'aspiration forcée de la
poussière de ponçage et d'un sac de récupération de celle-ci.
6. PRÉPARATION DE LA MACHINE
Poser le disque abrasif sur le plateau "A" (Fig. 1) en
faisant coïncider ses trous avec les trous du plateau.
8. CHANGEMENT DU PLATEAU
Débrancher la machine du secteur, avant
toute opération d'entretien.
Décoller le disque abrasif du plateau (A) (Fig. 2) et retirer
la vis "E" à l'aide de la clé six pans o/c: 6 mm fournie avec
l'équipement. Pour poser un nouveau plateau, suivre le
même procédé en sens inverse.
9. BRANCHEMENT SUR UN ASPIRATEUR EXTERNE
Pour brancher la machine sur les aspirateurs AS182K,
AS282K, ou une autre source externe d'aspiration, il
faut monter le kit d'aspiration réf. 6446073 (accessoire
optionnel). Pour ce faire, retirer le sac d'aspiration "C" et
emboîter à sa place la buse "G" du kit d’aspiration (Fig. 3).
L'autre extrémité du raccord d'aspiration permet le
branchement sur le système d'aspiration externe voulu.
10. ENTRETIEN DES BALAIS ET DU COLLECTEUR
9
Page 10

Débrancher la machine du secteur, avant
toute opération d'entretien.
Il est recommandé de remplacer les balais quand ils
atteignent 10 mm de longueur minimum.
Changement des balais.
Retirer les vis "H" (Fig. 4) qui fixent les couvercles latéraux
"I" et séparer les deux. Retirer les porte-balais "J" à l'aide
d'un petit tournevis "K" en faisant levier sur l'une des
languettes latérales du porte-balais.
Déplacer vers l'arrière l'extrémité du ressort "M". Le
retenir dans cette position pour extraire le balai et le
remplacer par un balai neuf d’origine VIRUTEX.
Reposer le porte-balais en prenant soin de bien l'asseoir
dans la carcasse, pour que chaque balai pousse doucement sur le collecteur.
Remonter les couvercles "I" avec les vis correspondantes, en s'assurant de ne pas pincer un câble lors de
l'assemblage des deux couvercles.
Il est conseillé de laisser la machine en marche à vide durant 15 minutes, pour une correcte adaptation des balais.
Si le collecteur présente des brûlures
ou des ressauts, le faire réparer par un
Service Technique VIRUTEX. Pour le réparer, ne jamais utiliser de papier émeri.
Toujours maintenir le câble et la prise
dans de bonnes conditions de service.
11. LUBRIFICATION ET NETTOYAGE
La machine est livrée entièrement lubrifiée d'origine,
elle n'a donc pas besoin d'entretien particulier au cours
de sa vie utile.
Il est important de toujours bien nettoyer la machine
après l'emploi avec un soufflage d'air sec.
Conserver le câble d'alimentation en parfait état.
Les ouvertures de ventilation et de refroidissement de
la machine doivent être nettoyées pour éviter toute
obstruction.
12. NIVEAU DE BRUIT ET DE VIBRATIONS
Les niveaux de bruit et de vibrations de cet appareil
électrique ont été mesurés conformément à la norme
européenne EN 60745-2-4 et EN 60745-1 et font
office de base de comparaison avec des machines aux
applications semblables.
Le niveau de vibrations indiqué a été déterminé pour
les principales applications de l’appareil, et il peut être
pris comme valeur de base pour l’évaluation du risque
lié à l’exposition aux vibrations. Toutefois, dans d’autres
conditions d’application, avec d’autres outils de travail
ou lorsque l’entretien de l’appareil électrique et de
ses outils est insuffisant, il peut arriver que le niveau
10
de vibrations soit très différent de la valeur déclarée,
voire même beaucoup plus élevé en raison du cycle de
travail et du mode d'utilisation de l'appareil électrique.
Il est donc nécessaire de fixer des mesures de sécurité
pour protéger l'utilisateur contre les effets des vibrations,
notamment garder l’appareil et les outils de travail en
parfait état et organiser les temps des cycles de travail
(temps de fonctionnement avec l’appareil en service,
temps de fonctionnement avec l’appareil à vide, sans être
utilisé réellement), car la diminution de ces temps peut
réduire substantiellement la valeur totale d’exposition.
13. GARANTIE
Toutes les machines électroportatives VIRUTEX ont une
garantie valable 12 mois à partir de la date de la fourniture, étant exclus toutes manipulations ou dommages
causés par un maniement incorrect ou par usure naturelle
de la machine. Pour toute réparation, s'adresser au
service officiel d'assistance technique VIRUTEX.
14. RECYCLAGE DES OUTILS ÉLECTRIQUES
Ne jetez jamais un outil électrique avec le reste des déchets ménagers. Recyclez les outils, les accessoires et les
emballages dans le respect de l'environnement. Veuillez
respecter la réglementation en vigueur dans votre pays.
Applicable au sein de l'Union Européenne et dans
les pays européens dotés de centres de tri sélectif
des déchets:
Ce symbole présent sur le produit ou sur la documentation informative qui l'accompagne, indique qu'en fin de
vie, ce produit ne doit en aucun cas être éliminé avec le
reste des déchets ménagers.
Conformément à la directive européenne 2002/96/CE,
tout utilisateur peut contacter l'établissement dans
lequel il a acheté le produit, ou les autorités locales
compétentes, pour se renseigner sur la façon d’éliminer le
produit et le lieu où il doit être déposé pour être soumis
à un recyclage écologique, en toute sécurité.
VIRUTEX se réserve le droit de modifier ses produits
sans avis préalable.
Page 11

DEUTSCH
ELEKTRONISCHE
EXZENTERSCHLEIFMASCHINE RT188N
Achtung!
8. Der beim Schleifen entstehende Schleifstaub (z. B.
Bleifarben, bestimmte Hölzer und Metalle) kann giftig
oder gesundheitsschädlich sein.
Daher wird die Verwendung einer Staubabsaugvorrichtung empfohlen.
9. Ersatzteile: Verwenden Sie ausschließlich Originalersatzteile.
Lesen Sie bitte vor Benutzung der
Maschine die beiliegende GEBRAUCHSANWEISUNG und die ALLGEMEINEN
SICHERHEITSHINWEISE sorgfältig durch.
Stellen Sie sicher, dass Sie sowohl die
Gebrauchsanweisung als auch die allegemeinen Sicherheitshinweise verstanden
haben, bevor Sie die Maschine bedienen.
Bewahren Sie beide Gebrauchsanweisungen zum späteren Nachschlagen auf.
1. UNFALLVERHÜTUNGSVORSCHRIFTEN FÜR
DEN BETRIEB DER SCHLEIFMASCHINE
Lesen Sie vor der Benutzung der Maschine
sorgfältig die den Unterlagen der Maschine beigelegte BROSCHÜRE ÜBER DIE
ALLGEMEINEN UNFALLVERHÜTUNGSVORSCHRIFTEN.
1. Prüfen Sie vor dem Anschließen der Maschine, ob die
Netzspannung mit den Angaben auf dem Typenschild
übereinstimmt.
2. Achtung Gefahr! Die Hand nicht in den Arbeitsbereich halten.
Die Maschine nicht von unten her anfassen, solange
diese in Betrieb ist.
3. Die zu bearbeitende Oberfläche nach Nägeln absuchen
und diese vor Beginn der Schleifarbeiten entfernen.
4. Ziehen Sie immer den Netzstecker, bevor Sie Wartungsarbeiten an der Maschine durchführen.
5. Legen Sie elektrische Werkzeuge erst ab, nachdem
alle rotierenden Teile zum Stillstand gekommen sind.
6. Verwenden Sie die Schleifmaschine niemals in nasser
oder sehr feuchter Umgebung.
7. Wenn Sie anhaftende Schleifmittel verwenden, sollten Sie die Scheibe nach Beendigung der Arbeit von
der Maschine abnehmen, da sonst nach einigen Tagen
Schwierigkeiten beim Ablösen auftreten könnten. Ein
einmal abgenommenes Schleifmittel sollte nicht erneut
auf den Schleifteller aufgeklebt werden. Die verringerte
Haftfähigkeit könnte dazu führen, dass sich das Schleimittel mit der entsprechenden Gefahr für den Benutzer
vom Schleifteller löst. Achten Sie beim Aufkleben einer
neuen Schleifscheibe darauf, dass die Oberfläche des
Schleiftellers sauber ist.
2. TECHNISCHE DATEN
Leistungsaufnahme......................................900 W
U/min im Leerlauf...........................3.500-7.500
Durchmesser Kreisbahn..........................7 mm
Durchmesser Schleifscheibe...................150 mm
Maschinengewicht ohne Kabel......................2,6 Kg
Gewichteter akustischer Dauerdruckpegel A.............89 dBA
Akustischer Druckpegel A.............................................100 dBA
Unsicherheit..................................................................K = 3 dBA
Gehörschutz tragen!
Schwingungsgesamtwerte....................................ah: 7,9 m/s
Unsicherheit.............................................................K = 1,5 m/s2
3. STANDARDAUSSTATTUNG
In der Verpackung finden Sie folgende Bestandteile:
1. Weicher Schleifteller mit Klettbefestigung 8845485
2. Schleifpapierscheibe Körnung 120
3. Innensechskantschlüssel, SW 6 mm
4. Saugbeuteleinheit
5. Gebrauchsanweisung und verschiedene Unterlagen
4. OPTIONALES ZUBEHÖR UND WERKZEUGE
1. Weicher Schleifteller mit Klettbefestigung, Best.-Nr.
8845487
2. Weicher Schleifteller mit Klettbefestigung, Best.-Nr.
8846367
3. Weicher Schleifteller mit Klettbefestigung, Best.-Nr.
8846366
4. Standard-Absauganschluss 3,5 m, Best.-Nr. 6446073
5. ANWENDUNGSBEREICH
Besonders geeignet für Karosserie-Instandsetzungsarbeiten und zum Schleifen und Polieren von Blechen. Mit
den geeigneten Schleifmitteln kann die Maschine auch
zum Schleifen von Holzflächen eingesetzt werden, womit
hochwertige Schleifresultate erzielt werden.
Aufgrund der beiden Bewegungsrichtungen (Dreh- und
Schwingbewegung) können sowohl Grob- als auch
Feinschliffarbeiten sehr schnell ausgeführt und absolut
glatte und riefenfreie Oberflächen erzielt werden.
Aufgrund ihrer Merkmale ist die Maschine ideal für den
Feinschliff bei Lackierarbeiten.
Die Schleifmaschine ist mit einem System zur Zwangsabsaugung des Schleifstaubs und einem Staubauffangbeutel
11
2
Page 12

ausgestattet.
Ablauf in umgekehrter Reihenfolge durch.
6. VORBEREITUNG DER MASCHINE
Die Schleifscheibe auf den Schleifteller "A" (Abb. 1) setzen
und die Löcher in der Schleifscheibe zu den Bohrungen
im Schleifteller ausrichten.
Bei einem Schleifteller mit Haftbefestigung das
Schutzpapier der Schleifscheibe vorsichtig abnehmen,
damit die Klebefläche nicht verschmutzt wird, und
die Schleifscheibe andrücken, um eine einwandfreie
Haftung zu erreichen.
Vor Beginn der Arbeit sollten Sie unbedingt die perfekte
Anhaftung der gesamten Schleifscheibenfläche am
Teller überprüfen.
Sollten Ihre Schleifscheiben keine Staubabsauglöcher
aufweisen, können Sie diese selbst durch Kopieren der
Bohrungen im Schleifteller anbringen.
7. INBETRIEBNAHME
Überprüfen Sie vor Netzanschluss des Geräts, ob die
Netzspannung mit der auf dem Typenschild angegebenen
Spannung übereinstimmt. Halten Sie die Schleifmaschine fest in der Hand und schieben Sie Schalter "B"
nach vorn (Abb. 1), der in der Betriebsposition einrastet. Zum Ausschalten des Geräts drücken Sie einfach
hinten auf den Schalter; dieser rastet automatisch in
Ruhestellung ein.
Setzen Sie die Schleifmaschine auf die zu bearbeitende
Fläche auf und führen Sie diese mit präzisen Bewegungen,
um das gewünschte Schleifergebnis zu erreichen. Es ist
nicht notwendig, während des Arbeitens einen großen
Druck auf die Maschine auszuüben; denn die besten
Schleifergebnisse werden allein durch das Eigengewicht
der Schleifmaschine erzielt.
Mit dem elektronischen Geschwindigkeitsregler kann die
Arbeitsgeschwindigkeit an die jeweilige Oberfläche und
das Schleifmittel angepasst werden. Das ist besonders
beim Schleifen temperaturempfindlicher Werkstoffe
praktisch, wo niedrigere Schleifgeschwindigkeiten
erforderlich sind. Zur Einstellung der Geschwindigkeit
drehen Sie den Knopf "D" auf die gewünschte Arbeitsgeschwindigkeit (Abb. 2).
8. WECHSEL DES SCHLEIFTELLERS
Ziehen Sie immer den Netzstecker, bevor
Sie Wartungsarbeiten an der Maschine
durchführen!
Lösen Sie die Schleifscheibe vom Schleifteller (A) (Abb. 2),
und drehen Sie die Schraube "E" mit dem mitgelieferten
Innensechskantschlüssel SW 6 mm heraus. Zur Befestigung des neuen Schleiftellers führen Sie den gleichen
12
9. ANSCHLUSS EINER EXTERNEN
ABSAUGVORRICHTUNG
Für den Anschluss der Maschine an die Absaugvorrichtungen AS182K, AS282K oder an eine andere
externe Absaugvorrichtung muss der Absauganschluss
Best.-Nr. 6446073 (optionales Zubehör) angeschlossen
werden. Dazu den Saugbeutel "C" abnehmen und an
seiner Stelle den Stutzen "G" des Absauganschlusses
anschließen (Abb. 3).
Am anderen Ende des Absauganschlusses kann die gewünschte externe Absaugvorrichtung angeschlossen werden.
10. WARTUNG DER KOHLEBÜRSTEN
UND DES SCHLEIFRINGS
Ziehen Sie immer den Netzstecker, bevor
Sie Wartungsarbeiten an der Maschine
durchführen!
Die Kohlebürsten müssen ausgewechselt werden, sobald
sie ihre Mindestlänge von 10 mm erreicht haben.
Wechsel der Kohlebürsten.
Drehen Sie die Schrauben "H" (Abb. 4) heraus, mit denen
die Seitenverkleidungen "I" festgeschraubt sind, und
nehmen Sie beide Teile ab. Nehmen Sie den Kohlebürstenhalter "J" mit Hilfe eines kleinen Schraubenziehers "K"
heraus, indem Sie ihn als Hebel an einer der seitlichen
Aussparungen des Kohlebürstenhalters ansetzen.
Drücken Sie das Ende der Feder "M" nach hinten. Halten
Sie sie in dieser Position, um die Kohlebürste herauszunehmen und durch eine Original-VIRUTEX-Kohlebürste
zu ersetzen.
Setzen Sie den Kohlebürstenhalter wieder ein und
achten Sie darauf, dass er fest im Gehäuse sitzt und
die einzelnen Kohlebürsten einen leichten Druck auf
den Schleifring ausüben.
Bringen Sie die Verkleidungen "I" mit den entsprechenden
Schrauben wieder an und achten Sie darauf, dass dabei
kein Kabel eingeklemmt wird.
Danach sollte die Maschine ca. 15 Minuten lang lastfrei laufen, damit sich die Kohlebürsten perfekt anpassen können.
Weist der Schleifring Verbrennungsspuren
oder Sprünge auf, muss er von einem Technischen Kundendienst VIRUTEX instand
gesetzt werden. Dazu niemals Schleifpapier
verwenden. Stets auf einen guten Zustand
des Kabels und des Steckers achten.
11. SCHMIERUNG UND REINIGUNG
Die Maschinen werden werkseitig völlig geschmiert aus-
Page 13

geliefert, und benötigen über ihre gesamte Lebensdauer
keine besondere Pflege.
Die Maschine muss nach der Verwendung immer
sorgfältig durch Abblasen mit trockener Druckluft
gereinigt werden.
Sorgen Sie dafür, dass das Stromkabel immer in einwandfreiem Zustand ist.
Die Belüftungs- und Kühlöffnungen der Maschine müssen immer sauber und offen gehalten werden.
12. LÄRM- UND SCHWINGUNGSPEGEL
Die Lärm- und Vibrationswerte dieses Elektrowerkzeugs
wurden in Übereinstimmung mit der europäischen
Norm EN 60745-2-4 und EN 60745-1 gemessen und
dienen als Vergleichsgrundlage bei Maschinen für
ähnliche Anwendungen.
Der angegebene Vibrationspegel wurde für die
wesentlichen Einsatzzwecke des Werkzeugs ermittelt
und kann bei der Beurteilung der Gefahren durch
die Aussetzung unter Vibrationen als Ausgangswert
benutzt werden. Die Vibrationswerte können sich
jedoch unter anderen Einsatzbedingungen, mit anderen
Arbeitswerkzeugen oder bei einer ungenügenden Wartung
des Elektrowerkzeugs oder seiner Werkzeuge stark vom
angegebenen Wert unterscheiden und aufgrund des
Arbeitszyklus und der Einsatzweise des Elektrowerkzeugs
einen bedeutend höheren Wert aufweisen.
Es ist daher erforderlich, Sicherheitsmaßnahmen zum
Schutz des Anwenders vor den Vibrationen festzulegen.
Dazu können die Aufrechterhaltung des einwandfreien
Zustands des Werkzeugs und der Arbeitsutensilien sowie
die Festlegung der Zeiten der Arbeitszyklen gehören (wie
Laufzeiten des Werkzeugs unter Last und im Leerlauf,
ohne tatsächlich eingesetzt zu werden, wodurch die
Gesamtzeit der Vibrationsauswirkungen bedeutend
verringert werden kann).
13. GARANTIE
Für alle tragbaren Elektrowerkzeuge von VIRUTEX wird
eine 12-monatige Garantie ab Lieferdatum gewährt.
Jegliche Eingriffe durch unbefugtes Personal bzw.
Schäden, die auf eine unsachgemäße Handhabung oder
auf natürlichen Verschleiß der Maschine zurückzuführen
sind, fallen nicht unter die Garantie.
Zur Durchführung von Reparaturen wenden Sie sich
bitte an den VIRUTEX-Kundendienst.
14. RECYCELN VON ELEKTROWERKZEUGEN
Entsorgen Sie Elektrowerkzeuge nie zusammen mit den
restlichen Hausabfällen. Recyceln Sie die Werkzeuge, das
Zubehör und die Verpackungen umweltgerecht. Beachten
Sie die geltenden Rechtsvorschriften Ihres Landes.
Anwendbar in der Europäischen Union und in Ländern
mit Mülltrennsystemen:
Das Vorhandensein dieser Kennzeichnung auf dem
Produkt oder im beiliegenden Informationsmaterial
bedeutet, dass das Produkt nach seiner Nutzungsdauer
nicht zusammen mit anderen Haushaltsabfällen entsorgt
werden darf.
Gemäß der EU-Richtlinie 2002/96/EG können sich die
Nutzer an die Verkaufsstelle, bei der sie das Produkt
erworben haben, oder an die zuständigen örtlichen
Behörden wenden, um in Erfahrung zu bringen, wohin
Sie das Produkt zur umweltgerechten und sicheren
Entsorgung bringen können.
VIRUTEX behält sich das Recht vor, technische Änderungen ohne vorherige Ankündigung vorzunehmen.
ITALIANO
LEVIGATRICE ROTORBITALE
ELETTRONICA RT188N
Importante
Prima di utilizzare la macchina, leggere
attentamente questo MANUALE DI ISTRUZIONI e il PROSPETTO DELLE NORME
GENERALI DI SICUREZZA allegato. Non
cominciate a lavorare con la macchina
se non siete sicuri di avere compreso
integralmente il loro contenuto.
Conservare tutti e due i manuali per
eventuali consultazioni successive.
1. PRESCRIZIONI DI SICUREZZA
PER L'USO DELLA LEVIGATRICE
Prima di utilizzare l'apparecchio, leggere attentamente il FOGLIETTO DELLE
PRESCRIZIONI DI SICUREZZA allegato alla
documentazione.
1. Prima di collegare a rete l’apparecchio, verificare
che la tensione di alimentazione corrisponda a quella
indicata sulla targhetta d’identificazione.
2. Pericolo: tenere le mani lontane dalla zona di lavoro.
Non prendere mai la macchina da sotto mentre è in
13
Page 14

funzione.
3. Prima di cominciare a lavorare, ispezionare la superficie
da tagliare e rimuovere gli eventuali chiodi.
4. Prima di realizzare qualsiasi intervento di manutenzione, scollegare l'apparecchio dalla rete elettrica.
5. Dopo l'uso, non lasciare incustodito un apparecchio
elettrico se le sue parti mobili non sono completamente
ferme.
6. Non usare mai la levigatrice in presenza di liquidi o
di umidità eccessiva.
7. Quando si usano abrasivi adesivi, è opportuno rimuovere il disco subito dopo aver terminato il lavoro
in modo da evitare che, dopo qualche giorno, diventi
difficile staccarlo dal piatto. Non tentare di riapplicare
un disco adesivo già utilizzato; una volta staccato, il
ridotto potere adesivo potrebbe provocarne lo scollamento e creare una situazione di rischio per l'utente.
Assicurarsi, prima di incollare un nuovo disco abrasivo,
che il piatto sia pulito.
8. La polvere prodotta dalle operazioni di levigatura può
essere tossica o nociva per la salute (ad esempio: vernici
al piombo, alcuni legni e metalli).
Si raccomanda l'uso sistematico di un sistema di aspirazione delle polveri.
9. PEZZI DI RICAMBIO: Usare solo ricambi originali.
2. CARATTERISTICHE TECNICHE
Potenza assorbita.......................................…900 W
Velocità a vuoto (giri/min)………...........3.500-7.500
Diametro orbita................….................................7 mm
Diametro disco abrasivo.............…...............150 mm
Peso.............................................................2,6 Kg
Livello di pressione acustica continuo equivalente
ponderato A.......................................................................89 dBA
Livello di potenza acustica A..........................................100 dBA
Incertezza della misura..................................................K = 3 dBA
Usare la protezione acustica!
Valori totali delle oscillazioni...................................ah: 7,9 m/s
Incertezza della misura...............................................K: 1,5 m/s
3. APPARECCHIATURA STANDARD
All'interno della confezione sono presenti i seguenti
componenti:
1.Piatto morbido velcro 8845485
2.Disco carta abrasiva grana 120.
3.Chiave ALLEN: 6 mm.
4.Kit sacco di aspirazione.
5.Manuale di istruzioni e altra documentazione
4. ACCESSORI OPZIONALI E UTENSILI
1. Piatto morbido adesivo rif. 8845487
2. Piatto morbido adesivo rif. 8846367
14
3. Piatto morbido velcro rif. 8846366
4. Raccordo di aspirazione standard 3.5 m rif. 6446073
5. APPLICAZIONI
Particolarmente indicata per gli interventi di riparazione
delle carrozzerie automobilistiche e per la levigatura e
la lucidatura di superfici metalliche. Con gli abrasivi
adeguati, si può utilizzare anche per la levigatura di
superfici in legno, con ottimi risultati di finitura.
Grazie ai suoi due movimenti (rotativo e orbitale), è
possibile realizzare con grande rapidità operazioni di
spianatura e rifinitura, lasciando le superfici completamente lisce e senza alcuna traccia evidente.
Date le sue caratteristiche, è ideale per gli interventi particolarmente delicati legati alle operazioni di verniciatura.
La levigatrice è dotata di un sistema di aspirazione forzata
e di un sacchetto di raccolta della polvere di levigatura.
6. PREPARAZIONE DELL'APPARECCHIO
Inserire il disco abrasivo sul piatto "A" (Fig. 1) e sistemarlo
in modo da far coincidere i suoi fori con quelli del piatto.
Se il piatto è quello adatto ai dischi adesivi, rimuovere
con cautela il foglio protettivo del disco per non sporcare
la superficie adesiva e premere il disco contro il piatto
fino alla perfetta incollatura.
Prima di iniziare il lavoro, è importante verificare che
il disco sia perfettamente incollato al piatto, su tutta
la superficie.
Se i dischi abrasivi non sono dotati dei fori di aspirazione,
è possibile realizzarli usando, come riferimento, quelli
presenti sul piatto.
7. MESSA IN FUNZIONE
Prima di collegare l'apparecchio alla rete elettrica,
verificare che la tensione di alimentazione corrisponda
a quella riportata sulla targhetta d'identificazione.
Afferrare saldamente l'apparecchio e spingere in avanti
l'interruttore "B" (Fig. 1), che rimarrà bloccato in po-
2
sizione di funzionamento. Per spegnere l'apparecchio
2
basta premere sulla parte posteriore dell'interruttore,
che ritornerà automaticamente in posizione di riposo.
Avvicinare l'apparecchio alla superficie di lavoro ed
effettuare i movimenti necessari ad ottenere la rifinitura
desiderata. Durante il lavoro non è necessario premere
eccessivamente dato che, per ottenere i migliori risultati,
è sufficiente il peso dell'apparecchio.
La regolazione elettronica della velocità permette di selezionare la velocità adatta a ogni superficie e a ogni tipo
di abrasivo ed è particolarmente utile per la levigatura
di materiali termosensibili per i quali la velocità deve
essere ridotta. Per effettuare la regolazione, ruotare la
manopola "D" sulla velocità desiderata (Fig. 2).
8. CAMBIO DEL PIATTO
Page 15

Scollegare l'apparecchio dalla rete
elettrica prima di realizzare qualsiasi
operazione di manutenzione.
Staccare il disco abrasivo dal piatto (A) (Fig. 2) ed estrarre
la vite "E" con la chiave ALLEN da 6 mm in dotazione.
Per montare un nuovo piatto, effettuare le stesse operazioni al contrario.
9. COLLEGAMENTO A UN ASPIRATORE ESTERNO
Per collegare l'apparecchio agli aspiratori AS182K,
AS282K o a un altro sistema esterno di aspirazione,
occorre montare il raccordo di aspirazione rif. 6446073
(accessorio opzionale). Per farlo, rimuovere il sacchetto
di aspirazione "C" e installare, al suo posto, il tubo "G"
del raccordo di aspirazione (Fig. 3).
L'altra estremità del raccordo di aspirazione permette
il collegamento della macchina all'aspiratore esterno
desiderato.
10. MANUTENZIONE SPAZZOLE E COLLETTORE
Scollegare l'apparecchio dalla rete
elettrica prima di realizzare qualsiasi
operazione di manutenzione.
È necessario sostituire le spazzole quando raggiungono
una lunghezza minima di 10 mm.
Sostituzione delle spazzole.
Svitare le viti "H" (Fig. 4) di fissaggio dei pannelli laterali
"I" e aprirli. Estrarre il portaspazzole "J" con un piccolo
cacciavite "K", facendo leva su uno dei bordi laterali
del portaspazzole.
Spostare all'indietro l'estremità della molla "M" e trattenerla in questa posizione, in modo da poter estrarre la
spazzola e sostituirla con una nuova originale VIRUTEX.
Rimontare il portaspazzole, controllando che sia perfettamente inserito in sede e che ognuna delle spazzole
eserciti una leggera pressione sul collettore.
Montare i pannelli "I" con le relative viti, controllando di non schiacciare nessun filo elettrico durante
l'assemblaggio.
È consigliabile lasciare in funzione l'apparecchio per
15 minuti, senza utilizzarlo, per permettere il perfetto
adattamento delle spazzole.
Se il collettore è bruciato o deformato,
farlo riparare da un Servizio Tecnico VIRUTEX. Per questa operazione non usare
mai carta vetrata. Mantenere in buono
stato il cavo e la spina elettrica.
11. LUBRIFICAZIONE E PULIZIA
L'apparecchio viene fornito già lubrificato e non ha
bisogno di interventi particolari nel corso della sua
vita operativa.
Dopo l'uso, è importante pulire accuratamente
l'apparecchio con un getto d'aria compressa.
Tenere il cavo di alimentazione in perfette condizioni
d'uso.
Tenere libere e pulite le aperture di ventilazione e di
raffreddamento dell'apparecchio.
12. LIVELLO DI RUMORE E VIBRAZIONI
I livelli di rumore e vibrazioni di questo apparato
elettrico sono stati misurati in conformità con la Norma
Europea EN 60745-2-4 e EN 60745-1 e fungono da
base di confronto con macchine per applicazioni simili.
Il livello di vibrazioni indicato è stato determinato
per le principali applicazioni dell’apparato e può
essere utilizzato come punto di partenza per la
valutazione dell’esposizione al rischio delle vibrazioni.
Ciononostante, il livello di vibrazioni può variare
notevolmente rispetto al valore dichiarato in altre
condizioni di applicazione, con altri strumenti di lavoro
o in caso di manutenzione insufficiente dell’apparato
elettrico e dei suoi strumenti, e può aumentare
notevolmente come conseguenza del ciclo di lavoro e
del modo d’uso dell’apparato elettrico.
Pertanto è necessario stabilire misure di sicurezza per
la protezione dell’utente dall’effetto delle vibrazioni,
ad esempio mantenendo l’apparato e gli strumenti
di lavoro in perfetto stato e pianificando i tempi dei
cicli lavorativi (ad esempio i tempi di funzionamento
dell’apparato sotto carico e i tempi di funzionamento a
vuoto quando l'apparato non viene realmente utilizzato,
dato che la riduzione di questi ultimi può ridurre in
modo sostanziale il valore totale dell’esposizione).
13. GARANZIA
Tutti gli elettroutensili portatili di VIRUTEX hanno una
garanzia valida 12 mesi a decorrere dal giorno d'acquisto,
che non comprende le eventuali manipolazioni né i
danni provocati da uso improprio o dalla normale usura
dell'apparecchio.
Per qualsiasi riparazione, rivolgersi al Centro Ufficiale
di Assistenza Tecnica VIRUTEX.
14. SMALTIMENTO DI APPARECCHI ELETTRICI
Non buttare mai gli apparecchi elettrici con il resto dei
rifiuti domestici. Smaltire gli apparecchi, gli accessori
e gli imballaggi nel rispetto dell'ambiente. Rispettare la
normativa vigente nazionale.
Applicabile nell’Unione Europea e nei paesi europei
con sistemi di raccolta differenziata dei rifiuti:
15
Page 16

La presenza di questo marchio sul prodotto o sul materiale
informativo che lo accompagna indica che, al termine
della sua vita utile, non dovrà essere eliminato insieme
ad altri rifiuti domestici.
Conformemente alla Direttiva Europea 2002/96/CE,
gli utenti possono contattare il punto vendita presso
cui è stato acquistato il prodotto, o le autorità locali
pertinenti, per informarsi su come e dove portarlo per
il suo smaltimento ecologico e sicuro.
VIRUTEX si riserva il diritto di modificare i propri prodotti
senza preavviso.
PORTUGUÉS
antes de começar a trabalhar.
4. Desligue a máquina da rede eléctrica antes de efectuar
qualquer operação de manutenção.
5. Nunca abandone uma ferramenta eléctrica enquanto
as respectivas partes móveis não estiverem totalmente
paradas.
6. Nunca use a lixadora em zonas que contenham líquidos
ou humidade excessiva.
7. Se utilizar lixas autocolantes é aconselhável retirar
o disco uma vez concluído o trabalho, uma vez que,
decorridos alguns dias, poderá ser difícil desprender
o disco do prato. Não tente voltar a colar um disco de
papel autocolante no prato depois de o mesmo ter sido
descolado. A redução do poder aderente poderia provocar
um desprendimento do disco de lixa, com perigo para o
utilizador. Antes de colar um novo disco de lixa, certifiquese de que o prato se encontra completamente limpo.
8. A poeira produzida durante a lixagem pode ser
tóxica ou nociva para a saúde (por exemplo: pinturas
que contenham chumbo, determinadas madeiras e
metais). É aconselhável utilizar sempre a ligação para a
aspiração de poeira.
9. Peças de substituição: utilizar apenas peças de origem.
LIXADEIRA ROTORBITAL
ELECTRÓNICA RT188N
Importante
Antes de utilizar a máquina leia atentamente este MANUAL DE INSTRUÇÕES e
o FOLHETO DE INSTRUÇÕES GERAIS DE
SEGURANÇA anexo. Assegure-se de os
ter compreendido antes de começar a
trabalhar com a máquina.
Conserve os dois manuais de instruções
para possíveis consultas posteriores.
1. INSTRUÇÕES DE SEGURANÇA PARA
O MANUSEAMENTO DA LIXADEIRA
Antes de utilizar a máquina, leia atentamente o FOLHETO DE INSTRUÇÕES
GERAIS DE SEGURANÇA que acompanha
a documentação da mesma.
1. Antes de ligar a máquina certifique-se de que a tensão
de alimentação corresponde à tensão indicada na placa
de características.
2. Perigo: mantenha as mãos afastadas da área de
trabalho.
Não pegue na máquina pela parte de baixo enquanto
esta estiver em funcionamento.
3. Inspeccione e retire os pregos da superfície a lixar
16
2. CARACTERÍSTICAS TÉCNICAS
Potência absorvida................................900 W
R.p.m. sem carga.....................................3.500-7.500
Diâmetro da órbita.................................................7 mm
Diâmetro do disco de lixa...............................150 mm
Peso.................................................................2,6 Kg
Nível de pressão acústica contínuo
equivalente ponderado A...............................................89 dBA
Nível de potência acústica A...........................................100 dBA
Incerteza.........................................................................K = 3 dBA
Usar protecção auricular!
Valores totais de vibração.....................................ah: 7,9 m/s
Incerteza........................................................................K: 1,5 m/s
3. EQUIPAMENTO STANDARD
No interior da caixa encontrará os seguintes elementos:
1. Prato flexível com base de velcro, ref. 8845485
2. Disco de lixa, grão 120
3. Chave ALLEN e/c: 6 mm.
4. Conjunto de saco de aspiração.
5. Manual de instruções e documentação diversa.
4. ACESSÓRIOS OPCIONAIS E FERRAMENTAS
1. Prato flexível com base aderente, ref. 8845487
2. Prato flexível com base aderente, ref. 8846367
3. Prato flexível com base de velcro, ref. 8846366
4. Acoplamento de aspiração standard de 3,5 m, ref.
6446073
2
2
Page 17

5. APLICAÇÕES
Especialmente indicada para trabalhos de reparação em
carroçarias de automóveis e na lixagem e polimento
de chapas metálicas. Com as lixas adequadas também
pode ser utilizada para lixar superfícies de madeira,
proporcionando um acabamento de grande qualidade.
Graças aos seus dois movimentos (rotativo e orbital),
permite realizar operações de desbaste e de acabamento
com enorme rapidez, deixando as superfícies completamente lisas e sem qualquer tipo de riscos. Dadas as suas
características, é ideal para os delicados polimentos com
lixa nos trabalhos envernizados.
A lixadora encontra-se equipada com um sistema de
aspiração forçada da poeira de lixagem e com um saco
de recolha da mesma.
6. PREPARAÇÃO DA MÁQUINA
Posicionar o disco de lixa sobre o prato "A" (Fig. 1) e
colocá-lo no prato, fazendo coincidir os respectivos
orifícios com os orifícios do prato. Se o prato for de
base aderente, separar com cuidado o papel protector
do disco, para não sujar a zona autocolante, e exercer
pressão sobre o disco para conseguir uma aderência
perfeita. Antes de dar início ao trabalho, é importante
verificar se o disco ficou bem aderido ao prato em toda
a sua superfície. Caso não disponha de discos de lixa
com orifícios de aspiração, estes podem ser efectuados
copiando os orifícios existentes no prato.
7. ACCIONAMENTO
Antes de ligar a máquina à rede certifique-se de que a
tensão de alimentação corresponde à indicada na placa
de características. Segurar bem a máquina, e empurrar o
botão "B" (Fig. 1) para a frente, que ficará bloqueado na
posição de funcionamento. Para parar a máquina basta
exercer pressão sobre a parte traseira do botão e este
retornará automaticamente à sua posição de repouso.
Colocar a máquina sobre a superfície de trabalho e
efectuar os deslocamentos necessários para obter a
qualidade de acabamento desejada. Não é necessário
exercer uma grande pressão sobre a máquina durante
o trabalho, uma vez que os melhores acabamentos são
aqueles que se obtêm com o próprio peso da máquina.
A regulação electrónica da velocidade permite trabalhar
à velocidade ideal para cada superfície e lixa, o que é
especialmente conveniente para lixar materiais sensíveis
ao calor, que requerem velocidades de lixagem reduzidas.
Para a regulação da velocidade, rodar o botão "D" para
seleccionar a velocidade de trabalho necessária (Fig. 2).
8. SUBSTITUIÇÃO DO PRATO
Desligue a máquina da rede eléctrica antes de
efectuar qualquer operação de manutenção.
Desprender o disco de lixa do prato (A) (Fig. 2) e retirar
o parafuso "E" com a chave ALLEN e/c: 6 mm, fornecida
com o equipamento.
Para colocar um novo prato, efectuar o mesmo procedimento pela ordem inversa.
9. LIGAÇÃO A UM DISPOSITIVO
DE ASPIRAÇÃO EXTERIOR
Para ligar a máquina aos aspiradores AS182K, AS282K ou
a outro dispositivo externo de aspiração, deverá montar o
acoplamento de aspiração ref. 6446073 (acessório opcional). Para tal, retire o saco de aspiração "C" e, no seu lugar,
encaixe o tubo "G" do acoplamento de aspiração (Fig. 3).
A outra extremidade do acoplamento de aspiração
permite a ligação à fonte externa de aspiração escolhida.
10. MANUTENÇÃO DAS ESCOVAS E DO COLECTOR
Desligue a máquina da rede eléctrica antes de
efectuar qualquer operação de manutenção.
É importante substituir as escovas sempre que estas
atingirem um comprimento mínimo de 10 mm.
Substituição das escovas.
Retirar os parafusos "H" (Fig. 4) que fixam as tampas
laterais "I", e separar ambas as tampas. Extrair os portaescovas "J" com a ajuda de uma pequena chave de
parafusos "K", fazendo alavanca sobre um dos grampos
laterais do porta-escovas. Deslocar para trás a extremidade da mola "M". Mantenha-a nesta posição para extrair a
escova e substitua-a por uma nova original da VIRUTEX.
Colocar novamente o porta-escovas, certificando-se de
que este fica bem assente na carcaça, e que cada uma
das escovas exerce uma ligeira pressão sobre o colector.
Montar as tampas "I" com os respectivos parafusos,
tendo cuidado para não prender nenhum cabo na
montagem de ambas.
É aconselhável deixar a máquina em funcionamento sem
carga durante 15 minutos, para conseguir uma correcta
adaptação das escovas.
Se o colector apresentar quaisquer
indícios de queimaduras ou ressaltos,
deverá tomar as medidas necessárias para
que este seja reparado pela Assistência
Técnica VIRUTEX. Não utilize nunca papel esmeril para solucionar o problema.
Mantenha sempre o cabo e a ficha em
boas condições de serviço.
17
Page 18

11. LUBRIFICAÇÃO E LIMPEZA
Esta máquina é fornecida de fábrica com lubrificação
total, não requerendo por isso quaisquer cuidados
especiais ao longo da sua vida útil.
Após a utilização da máquina é importante limpá-la
sempre com um jacto de ar seco, com muito cuidado.
Mantenha o cabo de alimentação em perfeitas condições
de utilização.
Mantenha as aberturas de ventilação e refrigeração da
máquina livres e limpas.
12. NÍVEL DE RUÍDO E VIBRAÇÕES
Os níveis de ruído e vibrações desta ferramenta eléctrica
foram medidos de acordo com a Norma Europeia
EN 60745-2-4 e EN 60745-1 e servem como base de
comparação com uma máquina de aplicação semelhante.
O nível de vibrações indicado foi determinado para as
principais aplicações da ferramenta e pode ser utilizado
como valor de partida para a avaliação da exposição ao
risco das vibrações. Contudo, o nível de vibrações pode
alcançar valores muito diferentes do valor indicado
noutras condições de aplicação, com outros dispositivos
de trabalho ou com uma manutenção deficiente
da ferramenta eléctrica e respectivos dispositivos,
podendo resultar num valor muito mais elevado devido
ao seu ciclo de trabalho e modo de utilização.
Por conseguinte, é necessário estabelecer medidas de
segurança para protecção do utilizador contra o efeito
das vibrações, tais como a manutenção da ferramenta,
conservação dos respectivos dispositivos em perfeito
estado e organização dos períodos de trabalho (tais como
os períodos de trabalho com a ferramenta em carga e
períodos de trabalho com a ferramenta em vazio e sem ser
realmente utilizada, uma vez que a redução da carga pode
diminuir de forma substancial o valor total da exposição).
13. GARANTIA
Todas as máquinas electroportáteis VIRUTEX têm uma
garantia válida por 12 meses a partir da data de entrega,
ficando excluídas quaisquer manipulações ou danos
causados pelo seu manuseamento indevido ou pelo
desgaste natural da máquina.
Para qualquer reparação, dirija-se ao Serviço Oficial de
Assistência Técnica VIRUTEX.
informativo que o acompanha indica que, no final da
sua vida útil, não se deve proceder à sua eliminação em
conjunto com outros resíduos domésticos.
Nos termos da Diretiva Europeia 2002/96/CE, os utilizadores podem contactar o estabelecimento onde adquiriram
o produto, ou as autoridades locais competentes, para
obter informações sobre como e onde poderão levar o
produto para que este seja submetido a uma reciclagem
ecológica e segura.
A VIRUTEX reserva-se o direito de modificar os seus
produtos sem aviso prévio.
РУССКИЙ
RT188N ЭЛЕКТРО-ВИБРОШЛИФОВАЛЬНАЯ МАШИНА
ОЧЕНЬ ВАЖНО
Прежде, чем начать
пользоваться станком
прочтите внимательно это
РУКОВОДСТВО и прилагаемую
БРОШЮРУ С ИНСТРУКЦИЯМИ
ПО БЕЗОПАСНОСТИ. До того,
как приступить к работе на
станке удостоверьтесь, что Вы
хорошо освоили их содержание.
Сохраните руководство и
брошюру для возможных
последующих консультаций.
1. ИНСТРУКЦИЯ ПО БЕЗОПАСНОМУ ИСПОЛЬЗОВАНИЮ ШЛИФМАШИНКИ
14. RECICLAGEM DAS FERRAMENTAS ELÉTRICAS
Nunca elimine a ferramenta elétrica com os restantes
resíduos domésticos. Recicle as ferramentas, os acessórios
e as embalagens de uma forma que respeite o meio
ambiente. Respeite os regulamentos em vigor no seu país.
Aplicável na União Europeia e nos países europeus
com sistemas de recolha seletiva de resíduos:
A presença deste símbolo no produto ou no material
18
Перед использованием машинки,
внимательно прочитайте
Генеральную инструкцию по
безопасности, включенную
в комплект документации
машинки.
- Прежде, чем подключить машинку к сети,
убедитесь в том, что напряжение, указанное
Page 19

на шильдике машинки, соответствует
напряжению сети.
- держите руки подальше от рабочей зоны.
Не хватайтесь за нижнюю часть машинки во
время ее работы.
- перед работой необходимо обследовать
поверхность, которую собираетесь шлифовать,
и удалить с нее все предметы и частицы
- перед выполнением каких-либо технических
работ необходимо отключить машину от сети
- не оставляйте машинку без присмотра до
полной остановки всех движущихся частей
- не используйте шлифмашинку при
чрезмерной влажности
- если Вы используете самоклеющиеся
абразивные материалы, то рекомендуется
снимать диск сразу после окончания работы,
поскольку через несколько дней будет
очень сложно отделить его от подошвы.
Не пытайтесь вторично приклеить диск,
поскольку пониженная приклеиваемость
может привести к тому, что диск отклеится
во время работы и повредить пользователя.
Перед приклеиванием нового диска,
необходимо убедиться в том, что подошва
совершенно чиста.
- пыль, образующаяся после шлифования,
может оказаться токсичной или вредной для
здоровья (например: свинцовосодержащие
краски или определенные виды дерева и
металлов). Мы рекомендуем всегда подключать
машинку к пылезаборному устройству.
- всегда используйте только оригинальные
запчасти фирмы Вирутекс
2. ТЕХНИЧЕСКИЕ ХАРАКТЕРИСТИКИ
Мощность…………….........……….....……900 W
Холостая скорость в минуту…..…….3.500-7.500
Диаметр шлифподошвы………..….....….150 мм
Диаметр оси…………….……….....…………7 мм
Вес машины……………........……….....…..2,6 Kg
Эквивалентный уровень
акустического давления A........................89 дБ(A)
Уровень акустического давления A......100 дБ(A)
Диапазон колебания.............................K = 3 дБ(A)
Используйте индивидуальные
средства защиты слуха!
Уровень вибрации общий.................a
Диапазон колебания...............................K: 1,5 м/с2
: 7,9 м/с
h
1. Velcro мягкая шлиф.подошва 8845485
2. Шлифовальный диск зернистостью 120
3. Ключ 6 мм
4. Пылезаборный мешок в сборе
5. Инструкции по эксплуатации и различная
документация
4. ДОПОЛНИТЕЛЬНЫЕ ПРИСПОСОБЛЕНИЯ
1. Приклеивающаяся мягкая шлифовальная
подошва (8845487).
2. Приклеивающаяся мягкая шлифовальная
подошва (8846367).
3. Velcro мягкая шлиф.подошва (8846366)
4. Стандартный шланг 3,5 м для
подсоединения машинки к пылезаборному
устройству (6446073)
5. ПРИМЕНЕНИЯ
Специально разработана для ремонтных
работ автомобилей, а также для шлифовки
и полировки листов металла. Также можно
использовать для шлифовальных работ
деревянных поверхностей, используя
соответствующую зернистость шлиф.
материала, можно добиться высокого
качества финишной отделки.
Два вида движений (ротационное и
орбитальное) должны выполняться быстро,
оставляя совершенно гладкую поверхность.
Эти особенности делают машинку
незаменимой для выполнения работ на
лакированных поверхностях.
Шлифмашинка оснащена системой
пылезабора и пылезаборным мешком.
6. ПОДГОТОВКА МАШИНЫ
Установите шлифовальный диск на подошву
"А" (рис. 1) и совместите отверстия диска с
отверстиями машинки.
Если подошва оснащена приклеивающейся
основой, аккуратно удалите защитную бумагу
для предотвращения попадания грязи на
поверхность, оказывайте давление на диск
до тех пор, пока диск не приклеится должным
образом.
Перед началом работы проверьте, что
поверхность отверстий диска сильно
прилегает к подошве.
2
При отсутствии дырок на диске, их можно
сделать, скопировав с подошвы.
3. СТАНДАРТНАЯ КОМПЛЕКТАЦИЯ
В коробке содержатся следующие
наименования:
7. ВКЛЮЧЕНИЕ МАШИНЫ
Перед включением машины необходимо
убедиться в том, что напряжение в сети
19
Page 20

соответствует указанному на шильдике
машинки. Держите машинку крепко и
нажимайте на переключатель "В" (рис. 1) в
направлении "вкл." Для остановки машины
просто отожмите переключатель и он
вернется в положение "выкл."
Разместите машинку на поверхность, которую
собираетесь шлифовать и работайте до тех
пор, пока не достигнете желаемого результата.
Нет необходимости оказывать дополнительное
давление на машинку во время работы,
поскольку ее собственный вес оптимален для
достижения наилучшего результата.
Электронная регулировка скорости позволяет
работать на индивидуально соответствующей
скорости на любой поверхности. Это
частично подходит для работы с
чувствительными к нагреву поверхностями,
которые требуют более низкой скорости. Для
регулировки скорости поворачивайте кнопку
"D" до желаемой рабочей скорости (рис. 2).
8. ЗАМЕНА ШЛИФОВАЛЬНОЙ ПОДОШВЫ
Отключите машину от сети прежде чем выполнять какие-либо
технические работы.
Снимите шлифовальный диск с подошвы (А)
(рис. 29) и открутите винт "Е" с пом.ключа 6
мм, входящего в комплект поставки машины.
Для присоединения новой подошвы выполните
те же операции в обратном порядке.
9. ПОДСОЕДИНЕНИЕ МАШИНЫ К ВНЕШНЕМУ
ПЫЛЕЗАБОРНИКУ
Для подсоединения машинки к пылесосам
AS182, AS282 или к-л другому внешнему
пылезаборному устройству необходимо
использовать специальный шланг 6446073
(дополнительная комплектация). Для
этого снимите пылезаборный мешок "С" и
установите отверстие "G" вместо него (рис. 3).
Другой конец нужно подключить к пылесосу
или какому-либо другому внешнему
пылезаборному устройству.
10. УСТАНОВКА ЩЕТОК И КОЛЛЕКТОРА
Отключите машину от сети прежде чем выполнять какие-либо
ремонтно-наладочные работы.
20
Щетки должны быть заменены когда их длина
достигнет минимум 10 мм.
Замена щеток
Открутите винты "Н" (рис. 4), которые
удерживают боковые кожухи "I" и снимите
кожухи. Удалите щеткодержатель "J",
используя маленькую отвертку "К" как рычаг.
Оттяните конец пружины "М", удерживая
ее в таком положении, извлеките щетку и
замените ее новой оригинальной фирмы
Вирутекс.
Снова вставьте щеткодержатель, убедясь
в том, что он правильно "сел", и каждая из
щеток оказывает небольшое давление на
коллектор.
Установите кожухи "I" соответствующими
винтами, убедитесь в том, что не защемлен
никакой провод. Желательно запустить
машину на холостой ход на 15 мин. для
притирания щеток.
Если на коллекторе присутствуют следы возгорания или появились выпуклости, необходимо
выполнить ремонт в уполномоченных сервисных центрах
фирмы Вирутекс. никогда не
используйте наждачную бумагу
для устранения подобных неисправностей. Содержите вилку и
кабель в хорошем состоянии.
11. ЧИСТКА И СМАЗКА
Машина поставляется с завода полностью
смазанная и не требует дополнительного
ухода на протяжении срока ее работы. Всегда
после работы необходимо продувать машину
струей воздуха.
Содержите кабель в хорошем состоянии.
Машине необходима вентиляция, поэтому
машинку нельзя загромождать.
12. ШУМ И УРОВЕНЬ ВИБРАЦИИ
Уровень шума и вибрации этого устройства
были измерены в соответствии с
европейским стандартом EN 60745-2-4
и EN 60745-1 и служат основанием для
сравнения с другими машинами с подобными
характеристиками.
Обозначенный уровень вибрации был
определен для основных операций и может
использоваться как начальное значение для
того, чтобы оценить риски, возникающие
вследствие вибрации. Однако, колебания
Page 21

могут достигнуть уровней, которые
отличаются от объявленного значения при
других условиях эксплуатации, с другими
инструментами или с недостаточным
техническим обслуживанием устройства
или его приспособлений, достигая намного
более высокой величины в результате цикла
работы или способа, которым используется
устройство.
Необходимо принять меры по обеспечению
безопасности пользователя от повышенной
вибрации, например, поддержание
устройства в чистоте и своевременное
техническое обслуживание устройства,
приспособлений и инструмента, а также
организация продолжительности циклов
работы (например, операционное время под
нагрузкой и время простоя, т.к. сокращение
последнего может существенно влиять на
уровень вибрации).
13. ГАРАНТИЯ
Все портативные инструменты фирмы
Вирутекс имеют гарантию 12 месяцев с
даты поставки. Исключение составляют
повреждения, являющиеся следствием
неправильного использования или
естественного износа.
Все ремонтные работы должны выполняться
в официальных сервисных центрах Вирутекс.
В соответствии с Европейской Директивой
2002/96/EC, пользователь может уточнить
у продавца или соответствующих местных
властей, где и как можно утилизировать
данное изделие без вреда для окружающей
среды с целью его безопасной переработки.
Вирутекс оставляет за собой право
модифицировать инструмент без
предварительного уведомления
14. ПЕРЕРАБОТКА ЭЛЕКТРООБОРУДОВАНИЯ
Никогда не утилизируйте
электрооборудование с бытовыми отходами.
Оборудование, оснастка и упаковка должны
подвергаться переработке, минимизирующей
любое отрицательное воздействие на
окружающую среду. Утилизацию необходимо
производить в соответствии с правилами,
действующими в вашей стране.
Для стран, входящих в Европейский Союз
и стран с системой селективного сбора
отходов:
Если нижеприведенный символ указан
на продукте или в сопровождающей
документации, в конце срока его
использования запрещается утилизация
данного изделия совместно с бытовыми
отходами.
21
Page 22

Page 23

Page 24

http://www.virutex.es/registre
Acceda a toda la información técnica.
Access to all technical information.
Accès à toute l’information technique.
Zugang zu allen technischen Daten.
Accedere a tutte le informazioni tecniche.
Aceso a todas as informações técnicas.
Dostęp do wszystkich informacji technicznych.
Доступ ко всей технической информации.
8896385 032013
Virutex, S.A.
Antoni Capmany, 1
08028 Barcelona (Spain)
www.virutex.es
 Loading...