

Page 1
MANUAL DE INSTRUCCIONES
OPERATING INSTRUCTIONS
MODE D’ EMPLOI
GEBRAUCHSANWEISUNG
MANUALE D’ISTRUZIONI
MANUAL DE INSTRUÇÕES
ИНСТРУКЦИЯ ПО ЭКСПЛУАТАЦИИ
INSTRUKCJA OBSŁUGI
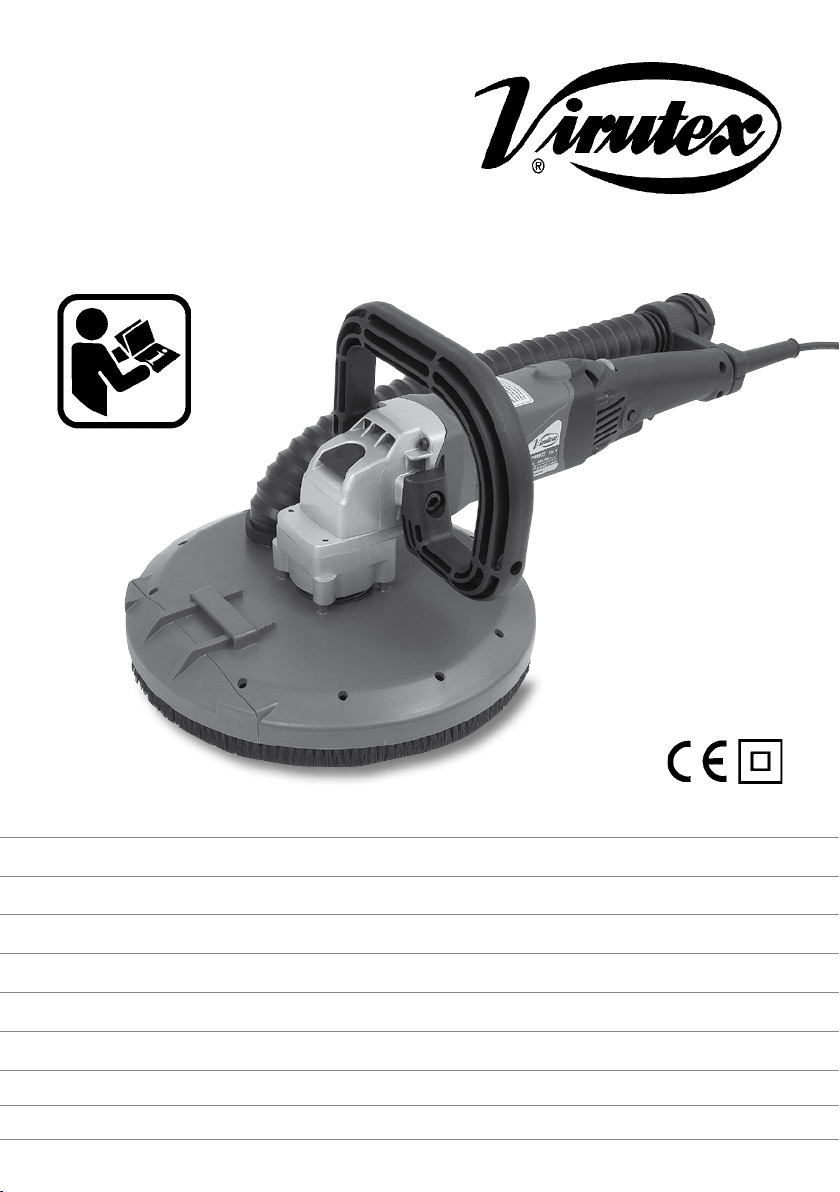
LPM97S
Lijadora de paredes manual
Hand-held drywall sander
Ponceuse manuelle murs et plafonds
Handwandschleifmaschine
Levigatrice di pareti manuale
Lixadora de paredes manual
Шлифовальная машина для стен и потолков
Ręczna szlierka do ścian suchych
Page 2
MANUAL DE INSTRUCCIONES
OPERATING INSTRUCTIONS
MODE D'EMPLOI
GEBRAUCHSANWEISUNG
MANUALE D'ISTRUZIONI
MANUAL DE INSTRUÇÕES
ИНСТРУКЦИЯ
INSTRUKCJA OBSŁUGI
ПО
ЭКСПЛУАТАЦИИ
página/page
seite/pagina
страница/strona
ESPAÑOL Lijadora de paredes manual LPM97S
ENGLISH Hand-held drywall sander LPM97S
FRANÇAIS Ponceuse manuelle murs et plafonds LPM97S
DEUTSCH Handwandschleifmaschine LPM97S
ITALIANO Levigatrice di pareti manuale LPM97S
PORTUGUÉS Lixadora de paredes manual LPM97S
РУССКИЙ LPM97S Шлифовальная машина для стен и потолков
POLSKA Ręczna szlierka do ścian suchych LPM97S
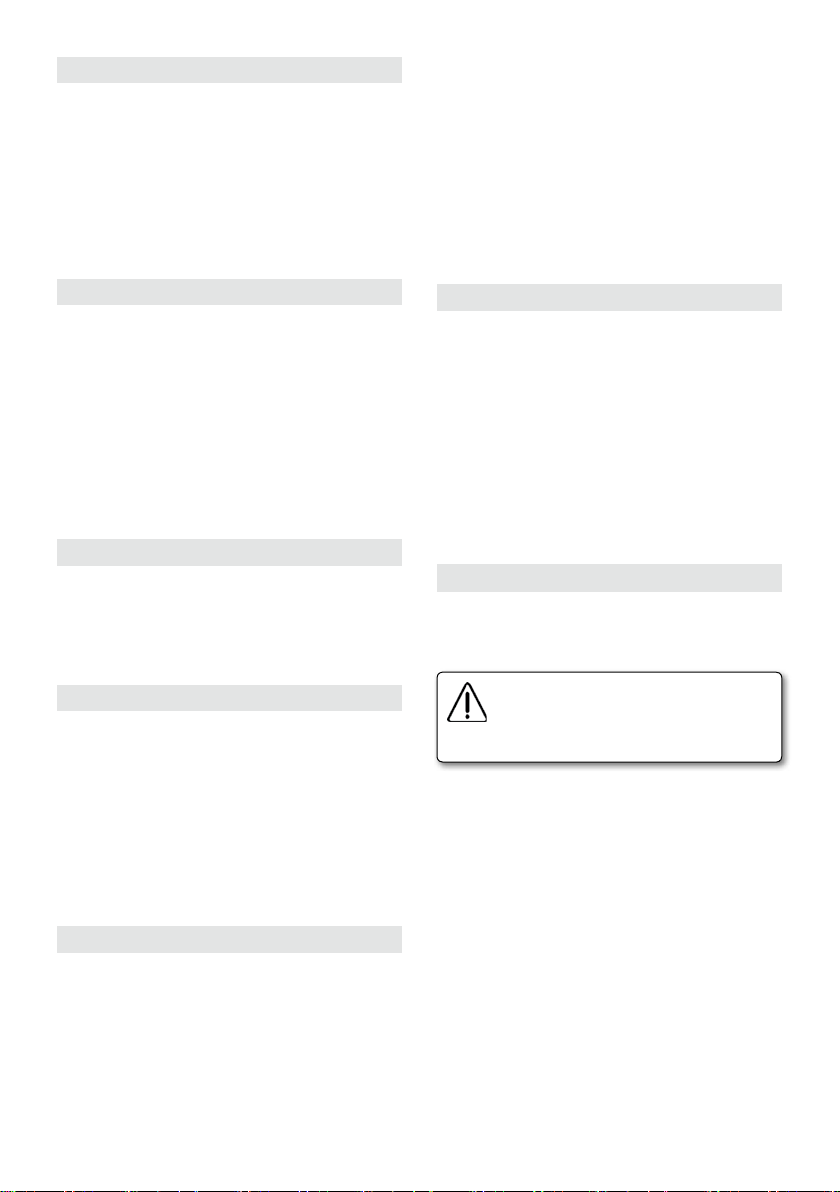
A
J
I
Fig. 1
Fig. 3
Fig. 4
D
4
8
11
16
20
24
28
34
Fig. 2
2
Page 3
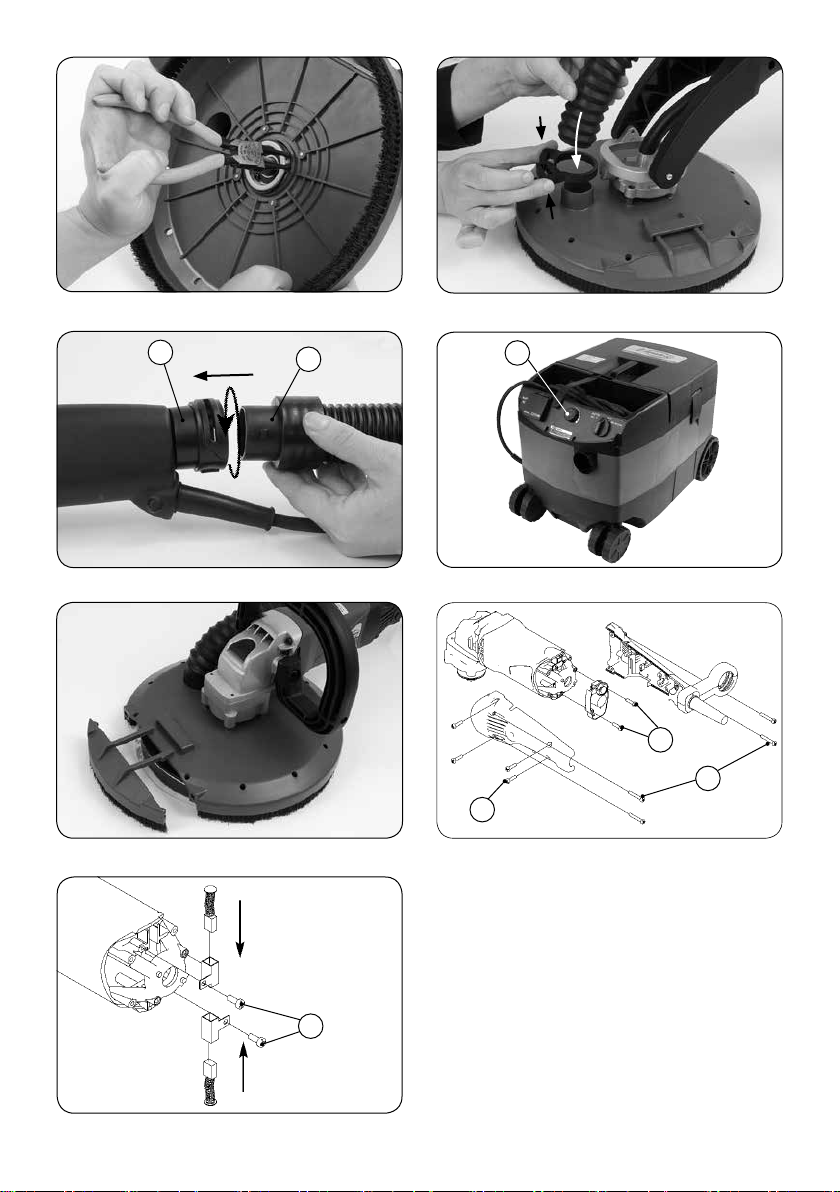
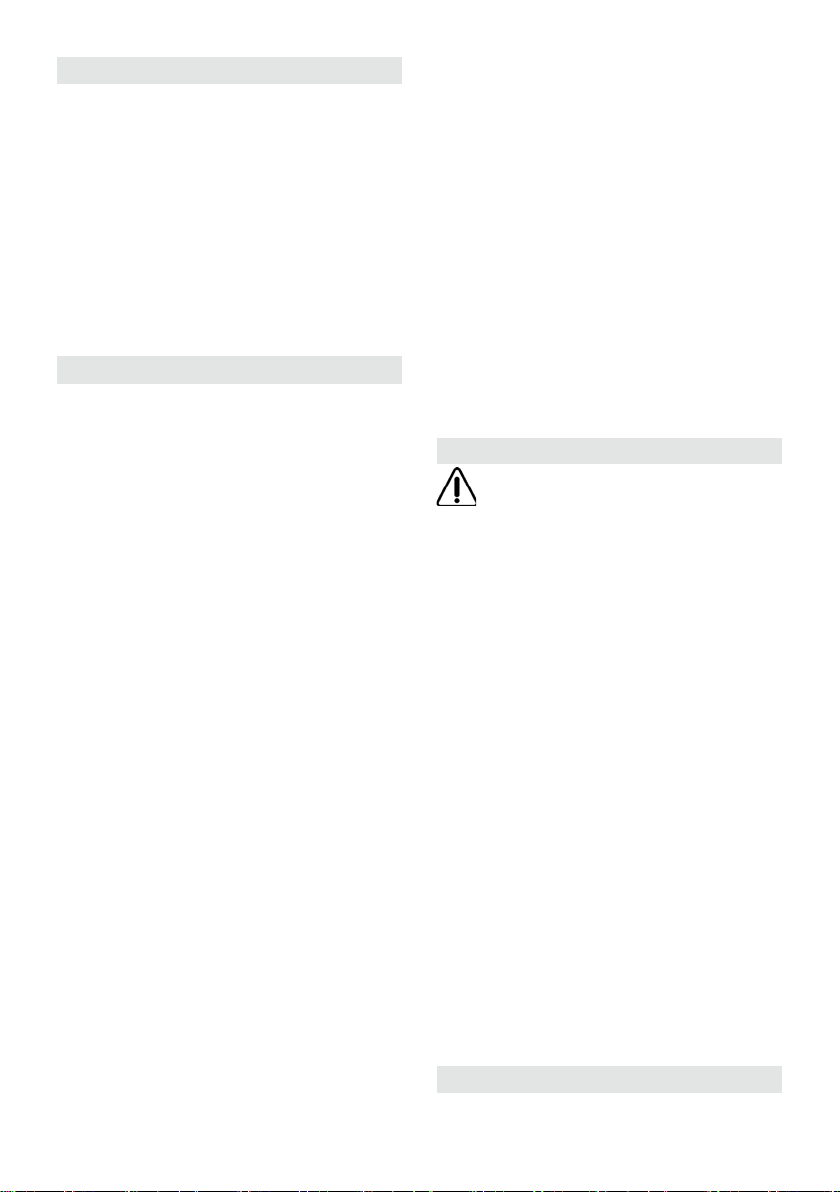
Fig. 5
Fig. 6
Fig. 7
Fig. 9
F
E
Fig. 8
H
L
K
K
Fig. 10
Fig. 11
M
3
Page 4

ESPAÑOL
LIJADORA DE PAREDES MANUAL
LPM97S
Importante
Antes de utilizar la máquina lea atentamente éste MANUAL DE INSTRUCCIONES
y el FOLLETO DE INSTRUCCIONES GENERALES DE SEGURIDAD que se adjunta.
Asegúrese de haberlos comprendido antes
de empezar a operar con la máquina.
Conserve los dos manuales de instrucciones para posibles consultas posteriores.
USO CONFORME A LO PREVISTO
La lijadora de paredes LPM97S se ha diseñado para
lijar paredes de masilla, techos y paredes interiores y
exteriores, así como para eliminar restos de moqueta,
capas de pintura, revestimientos, restos de adhesivos y
revoques flojos.
La lijadora de paredes debe usarse siempre conectada a
un dispositivo de aspiración.
El usuario es el responsable de los daños y accidentes
producidos por un uso indebido.
1. INSTRUCCIONES DE SEGURIDAD PARA EL
MANEJO DE LA LIJADORA DE PAREDES
• Mantenga siempre sus manos lejos del disco lijador
giratorio. El disco puede rebotar hacia su mano.
• La exposición prolongada al polvo de lijado de las
paredes puede afectar la función respiratoria. Emplee
siempre un aspirador con una bolsa apropiada para el
polvo de paredes instalada, y use una máscara respiratoria apropiada.
• El lijado de pinturas de plomo es extremadamente
tóxico, por lo que debe ser realizado únicamente por
profesionales bien entrenados para ello y dotados del
equipo especial para eliminar estas pinturas.
• Manténgase bien asentado sobre el suelo y conserve
el equilibrio. No se sobrepase. Use el andamio adecuado
para el trabajo que realiza.
• Use siempre el equipo de seguridad adecuado para
lijar, gafas de seguridad y máscara respiratoria.
• No suelte nunca la máquina hasta que el disco no
esté completamente parado. El disco giratorio podría
engancharse en la superficie de depósito y sacudir la
máquina fuera de su control.
• No deje la máquina en funcionamiento mientras la
lleve consigo. El disco podría engancharse en su ropa y
producir lesiones de gravedad.
• No utilice la máquina en la cercanía de substancias infla-
4
mables, las chispas podrían prender en esas substancias.
• Con la lijadora LPM97S no pueden ni deben realizarse
lijados de desbastado, cepillados, pulidos o tronzados con
muela. Realizar con la máquina trabajos para los que
no ha sido diseñada, resulta peligroso y puede causar
daños personales.
• Sujete siempre la máquina con las dos manos para lijar
con ella. Una pérdida del control de la máquina puede
causarle daños personales.
• Sujete siempre el aparato por las empuñaduras aislantes cuando realice trabajos en los que el disco abrasivo
pudiera entrar en contacto con conductores eléctricos
ocultos. El contacto con los conductores eléctricos
pondría bajo tensión las partes metálicas de la máquina,
causando una descarga eléctrica.
• Mantenga el cable alejado del área de trabajo de la
máquina. Controle que el cable se mantiene por detrás
suyo mientras lija.
• No utilice la máquina si el cable está dañado. Los
cables dañados aumentan el riesgo de descarga eléctrica.
• Pare la máquina inmediatamente si nota vibraciones
inusuales o cualquier otra anomalía, y compruebe la
máquina hasta encontrar la causa.
• El polvo que se levanta al trabajar con esta máquina
puede ser perjudicial para la salud. Use un buen sistema
de aspiración, póngase una máscara respiratoria adecuada y recoja el polvo que se deposita con un aspirador.
• Nunca forzar una máquina que parezca tener dificultades de marcha o que presente alguna deficiencia; quizá
haya un problema técnico, en cuyo caso la continuación
del trabajo podría dañar irreversiblemente la máquina.
En todos los casos en que la máquina ya no funcione
correctamente, hacerla revisar por un servicio autorizado.
• Utilizar sólo accesorios originales.
2. CARACTERÍSTICAS
Motor universal........................................................230 V 50 Hz
Clase de protección............II / doble cuadrado normativo
Potencia.......................................................................1.200 W
Velocidad en vacío........................................650-1.300 rpm
Velocidad a plena carga............................390-780 rpm
Diámetro del abrasivo........................................225 mm
Peso..................................................................................3,1 Kg
Nivel de Presión acústica Ponderado A............................82 dBA
Nivel de Potencia acústica Ponderada A.......................93 dBA
Incertidumbre de la medición.......................................K = 3 dBA
¡Usar protectores auditivos!
Nivel total de emisión de vibraciones...................ah: <2,5 m/s
Incertidumbre de la medición.....................................K: 1,5 m/s
3. CONTENIDO. EQUIPO ESTANDAR
En el interior de la maleta Ud. encontrará los elementos
2
2
Page 5

siguientes:
• Lijadora de paredes manual LPM97S.
• Conector de bayoneta.
• Un disco abrasivo de Gr. 80.
• Manuales de seguridad, de instrucciones y documentación diversa.
4. CONEXIÓN ELÉCTRICA
Compruebe siempre que la corriente de suministro
es del mismo voltaje que el indicado en la chapa de
características de la máquina.
Bajo ninguna circunstancia se puede usar la máquina si
el cable de toma de corriente esta dañado.
Un cable dañado o en mal estado debe ser inmediatamente substituido por un Servicio Técnico Autorizado,
no trate de repararlo Ud. mismo.
Trabajar con el cable en mal estado puede conducir a
un accidentes eléctrico.
5. CONTROL ELECTRÓNICO
Arranque suave: Control electrónico del arranque que
asegura una puesta en marcha suave y un aumento
progresivo de la velocidad.
Velocidad controlada: Ud. puede regular la velocidad
de rotación del disco ininterrumpidamente, entre 650
y 1.300 rpm en vacio, con la ruedecilla de ajuste (A, Fig.
1). De este modo podrá ajustar la velocidad de lijado de
forma óptima para cada material.
El control electrónico de velocidad, la mantendrá
constante incluso a plena carga y podrá obtener un
lijado perfecto.
Aconsejamos usar las velocidades altas cuando haya
que arrancar mucho material y las bajas para lijados
más finos y para mejorar el control sobre la máquina.
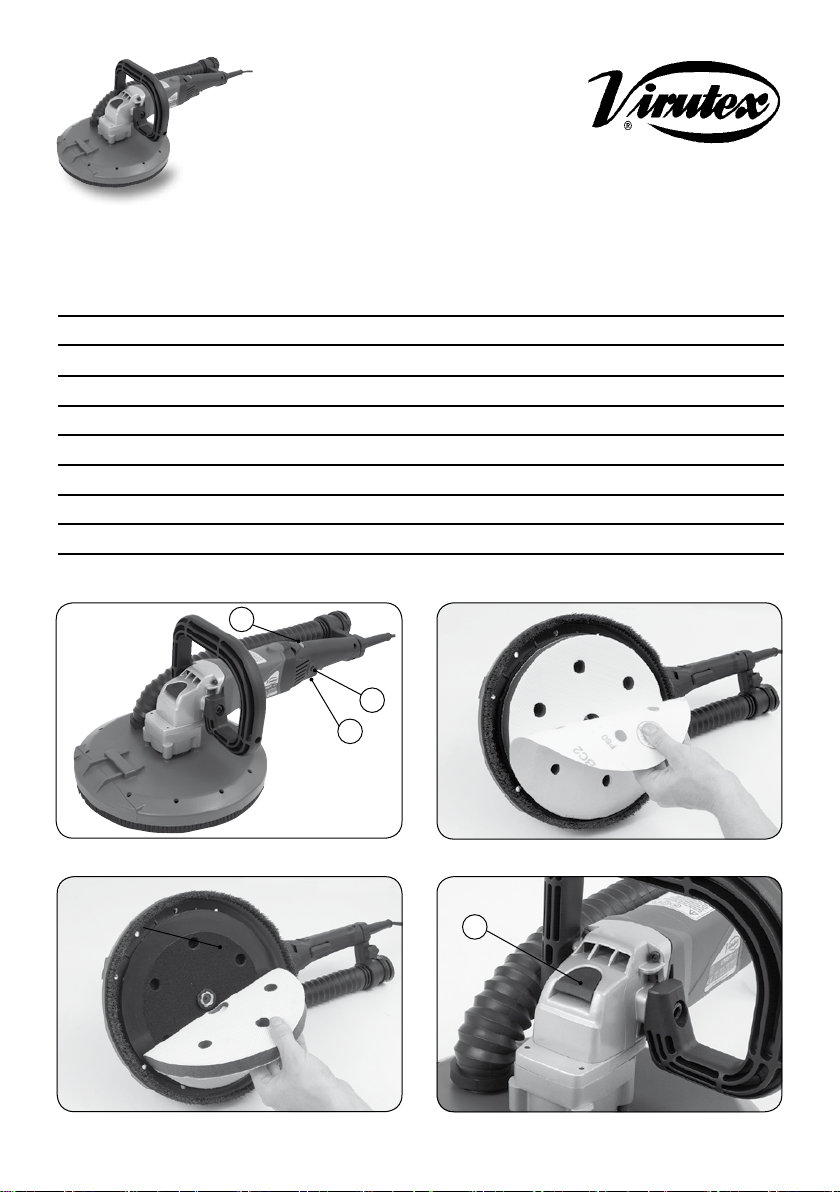
6. FIJACIÓN DEL ABRASIVO
Desenchufe la máquina de la red eléctrica.
Arranque el abrasivo gastado, cuidando de que el plato
esponjoso se mantenga en su sitio.
Centre cuidadosamente los agujeros del abrasivo (B, Fig.
2) sobre los del plato y presione sobre el abrasivo para
que quede retenido por el velcro del plato.
7. CAMBIO DEL PLATO ESPONJOSO
El plato esponjoso debe estar perfectamente plano para
lijar correctamente y obtener un buen resultado.
Si el plato se ha deformado o se ha dañado por el trabajo,
obtendremos lijados irregulares y de mala calidad. Se
debe cambiar el plato sin demora cuando se haya dañado.
Para substituir el plato esponjoso, desenchufe la máquina
de la red eléctrica.
El plato lijador lleva velcro en las dos caras, por tanto
para cambiarlo, tire de él hasta arrancarlo del plato base
y sustitúyalo por uno nuevo. (C, Fig. 3).
8. CAMBIO DE LA CUBIERTA DEL PLATO
Funciones de la cubierta: El cepillo situado en la periferia de la cubierta del plato, tiene la doble función de
mantener el disco abrasivo bien alineado con la superficie
que se está lijando y conseguir un trabajo más eficaz
del sistema de aspiración.
El cepillo de la cubierta se consume por el uso continuado
de la máquina, dejando de garantizar la correcta posición
del plato y la eficacia de la aspiración, por lo que cuando
esto ocurra, debe cambiarse la cubierta entera.
Para cambiar la cubierta siga los siguientes pasos:
• Desenchufe la máquina de la red eléctrica.
• Presione el bloqueador del eje (D, Fig.4), haciendo
girar el plato hasta que el eje quede enclavado. Gire
el plato lijador en sentido antihorario para extraerlo
de la máquina.
• Presione ahora la cubierta hacia abajo contra el muelle
(Fig. 5) y con la ayuda de unas alicates especiales para
anillos elásticos, retire el anillo elástico que sujeta la
cubierta a la caja de engranajes.
• Finalmente extraiga con cuidado el tubo de aspiración
(Fig. 6), saque la cubierta del plato y cámbiela por una
nueva actuando en sentido inverso para su montaje.
9. MONTAJE DEL TUBO DE ASPIRACIÓN
• Desenchufe la máquina de la corriente eléctrica.
• Primero desmonte el terminal conector del tubo de su
aspirador y móntele el conector de bayoneta (E, Fig. 7)
que se incluye en el equipo de la máquina.
• Introduzca ahora el conector de bayoneta (E, Fig. 7)
de su tubo de aspiración, en el conector giratorio (F,
Fig. 7) de la máquina.
• Cuando el conector de bayoneta esté completamente
dentro, sujete el conector giratorio para que no gire,
y haga girar el de bayoneta en sentido horario hasta
bloquearlo. (Fig. 7).
• Para desmontar el tubo de aspiración, deberá proceder
en sentido inverso.
10. ASPIRACIÓN
La exposición prolongada al polvo de lijado de las paredes
puede afectar la función respiratoria. Emplee siempre
un aspirador con una bolsa apropiada para el polvo de
paredes instalada.
Si no usa la bolsa apropiada, aumentará
el nivel de polvo en la zona de trabajo y la
exposición prolongada a este riesgo puede
causarle problemas respiratorios.
Ajuste de la potencia de aspiración:
• Si emplea el aspirador compacto ASC482U de Virutex,
u otro aspirador de potencia regulable apropiado, puede
5
Page 6

ajustar Ud. la potencia de aspiración de acuerdo a la
superficie sobre la que esté trabajando.
• Regule la rueda de ajuste (H, Fig. 8), para obtener la
aspiración apropiada.
• Empiece por una aspiración baja, e increméntela poco
a poco girando la rueda (H, Fig. 8), hasta conseguir la
aspiración apropiada.
• Una aspiración elevada hace mas descansado el
trabajo de lijar techos y paredes.
• Si la aspiración es excesiva hará vibrar la máquina,
será más difícil guiarla y puede sobrecargarla. Si así
ocurriera, deberá parar el trabajo de inmediato hasta
que la máquina se haya enfriado.
11. PUESTA EN MARCHA Y PARO DE LA MÁQUINA
Asegúrese que la tensión de la red sea la misma que se
indica en la placa de características y que el interruptor
está desconectado en posición “O”, antes de enchufar
la máquina a la red.
Para poner la máquina en marcha presione el interruptor
de gatillo (I, Fig. 1), y suéltelo para pararla.
Si desea mantener la máquina en marcha continua,
puede fijar el seguro (J, Fig. 1) del interruptor. Para
quitar el seguro, deberá pulsar el interruptor y soltarlo
a continuación.
La máquina no se detiene inmediatamente, sino que el
abrasivo sigue girando por un tiempo antes de detenerse.
Tenga cuidado que éste no entre en contacto con nadie
ni con nada y no suelte la máquina hasta que se haya
detenido completamente el disco abrasivo.
12. COMO USAR LA MÁQUINA
Para trabajar de forma segura y tener siempre el control
de la máquina, ésta debe sujetarse siempre con las dos
manos.
Es muy importante mantenerse firmemente sobre los dos
pies, particularmente cuando se trabaja sobre andamios.
Lijando:
• Si tenemos la lijadora de paredes y el aspirador
preparados, se han tomado las medidas de seguridad
explicadas y vamos provistos del equipo de seguridad
necesario, pondremos en primer lugar la máquina en
marcha y tras ella el aspirador.
Si emplea el aspirador Virutex ASC482U u otro aspirador
que tenga arranque automático integrado, solo necesitará poner en marcha la máquina.
• Aplique la máquina sobre la superficie que va a lijar,
contactando con ella suavemente y con la presión mínima
para mantener el cabezal abrasivo plano contra ella.
• Ahora puede reajustar la velocidad, para que sea la
más apropiada al trabajo que va a realizar.
• No sobrecargue la máquina aplicando excesiva presión. Los mejores resultados de lijado se consiguen con
una presión moderada. La calidad y el rendimiento de
lijado dependen fundamentalmente de la elección del
6
abrasivo adecuado.
• La mejor técnica de lijado consiste en efectuar largos
recorridos de va y ven, manteniendo el cabezal en
constante movimiento. No deje la máquina quieta en
un mismo lugar, pues dejará marcas en la superficie.
• Desconecte la máquina cuando haya terminado el
trabajo de lijado.
Lijando cerca de los bordes:
• La lijadora dispone de de un sector de la cubierta
del cabezal extraíble, que permite reducir la distancia
lateral entre la pared / el techo y el plato lijador. (Fig. 9).
• Cuando la máquina trabaja sin el sector de la cubierta
del cabezal, la aspiración pierde eficacia, razón por la
éste debe extraerse sólo cuando es necesario y se debe
volver a montar en cuanto ya no lo es.
• Para quitar el sector de la cubierta:
• Desconecte la máquina de la corriente eléctrica.
• Presione entre si los dos retenedores que sostienen
el sector, y extráigalo de su soporte. (Fig. 9)
• Guarde el sector extraido en un lugar próximo y
seguro, para poder montarlo de nuevo.
• Para montar de nuevo el sector proceda del mismo
modo.
Recomendaciones:
Asegúrese de usar el disco mas adecuado para el trabajo
de lijado que va a realizar.
Los discos abrasivos demasiado granados quitan mucho
material a su paso, a veces en exceso y resultan difíciles
de controlar, mientras que los de grano demasiado fino
tienden a embozarse con facilidad.
Trate de evitar cuando lije, los cantos puntiagudos y
los clavos, pues suelen dañar el disco abrasivo e incluso
algunas veces el plato esponjoso.
13. MANTENIMIENTO Y LIMPIEZA
Desconecte la máquina de la red eléctrica antes de
proceder a cualquier manipulación.
• Todos los trabajos de mantenimiento o de reparación
de la máquina que exijan abrir la carcasa del motor solo
pueden ser realizados por un Servicio Oficial Autorizado.
• Compruebe periódicamente el estado del cable y el
enchufe, y si presentan deterioros hágalos cambiar por
un Servicio Oficial Autorizado.
• Mantenga siempre limpias las ventanas de circulación
de aire de la carcasa, para asegurar la refrigeración
del motor.
• Limpie la conexión del tubo aspirador con la cubierta
del plato para que no se obstruya.
Cambio de escobillas:
Es importante substituir las escobillas cuando tengan
una longitud mínima de 6 mm.
• Para inspeccionar o substituir las escobillas, primero
desconecte la máquina de la red eléctrica.
Page 7
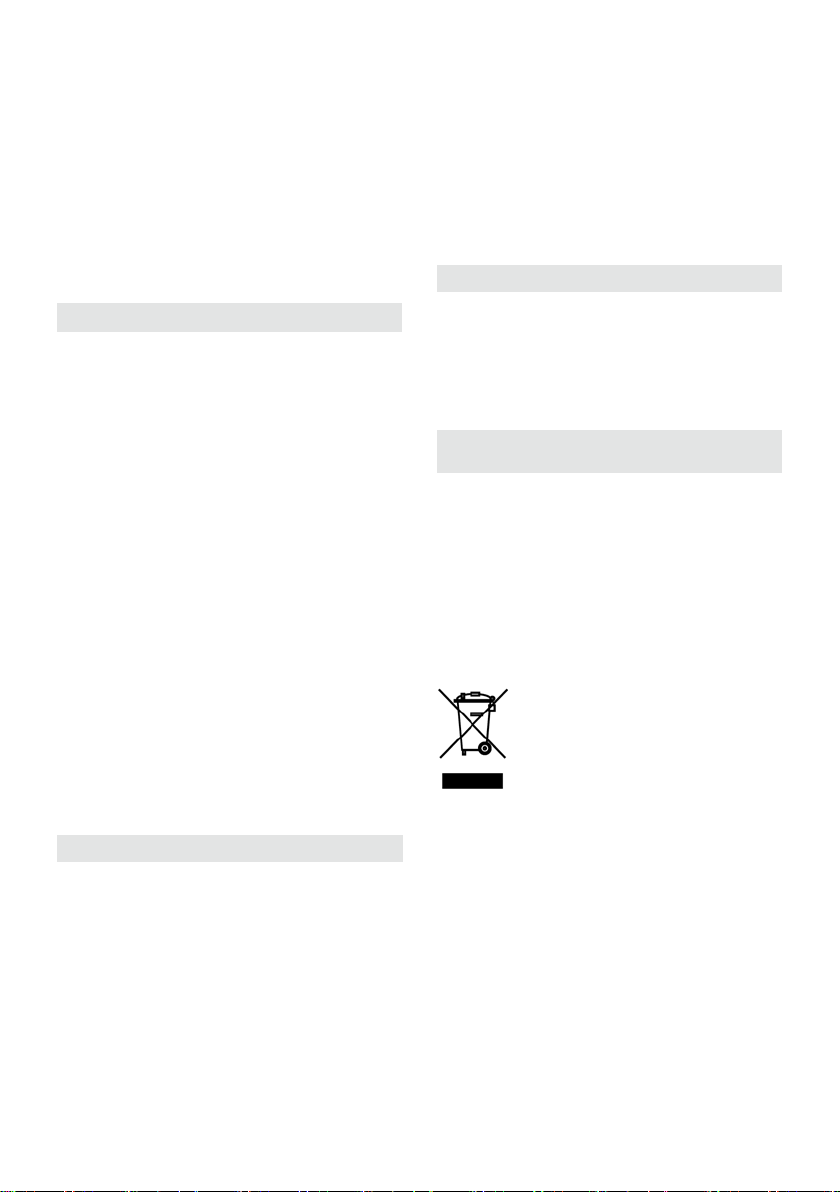
• Quite el tubo de aspiración y desmonte las empuñaduras derecha e izquierda, quitando los tornillos (K, Fig.
10) que las sujetan.
• Saque los dos tornillos (L, Fig. 10) que sujetan el circuito
electrónico y separe éste hacia un lado, cuidando de no
dañar las conexiones del circuito.
• Suelte los dos tornillos (M, Fig. 11) que sujetan los
portaescobillas.
• Inspeccione o cambie las escobillas si procede.
• Es aconsejable dejar la máquina en marcha en vacío
durante algunos minutos, después de un cambio de
escobillas.
14. ACCESORIOS, RECAMBIOS Y ABRASIVOS
Utilice solamente accesorios y consumibles originales
Virutex diseñados para esta máquina.
• Aspirador ASC482U (tubo de aspiración incluido)
• Maleta de transporte (se incluye de origen)
• Recambio cubierta del plato completa 9702711
• Recambio plato lijador esponjoso (doble velcro)
9745948
• Recambio plato soporte rígido (velcro) 9702709
• Disco abrasivo para lijar superficies:
• De cemento bastas o granulares y papel de empapelar
grano 24, 9791114, paquete de 12 u.
• De masillas y pinturas. Lijado basto, grano 40,
9791115, paquete de 25 u.
• De masillas y pinturas. Lijado basto, grano 60,
9791116, paquete de 25 u.
• De masillas y pinturas. Lijado basto, grano 80,
9791117, paquete de 25 u.
• De masillas y pinturas. Lijado basto grano 100,
9791118, paquete de 25 u.
• Exigentes de masillas y pinturas. Lijado fino, grano
120, 9791119, paquete de 25 u.
• Exigentes de masillas y pinturas. Lijado fino, grano
150, 9791120, paquete de 25 u.
• Exigentes de masillas y pinturas. Lijado fino, grano
180, 9791121, paquete de 25 u.
15. NIVEL DE RUIDO Y VIBRACIONES
Los niveles de ruido y vibraciones de esta herramienta
eléctrica han sido medidos de acuerdo con la Norma
Europea EN 60745-1 y sirven como base de comparación
con máquinas de semejante aplicación.
El nivel de vibraciones indicado ha sido determinado
para las aplicaciones principales de la herramienta,
y puede ser utilizado como valor de partida para la
evaluación de la exposición al riesgo de las vibraciones.
Sin embargo, el nivel de vibraciones puede llegar a ser
muy diferente al valor declarado en otras condiciones
de aplicación, con otros útiles de trabajo o con un
mantenimiento insuficiente de la herramienta eléctrica
y sus útiles, pudiendo llegar a resultar un valor mucho
más elevado debido a su ciclo de trabajo y modo de
uso de la herramienta eléctrica.
Por tanto, es necesario fijar medidas de seguridad de
protección al usuario contra el efecto de las vibraciones,
como pueden ser mantener la herramienta y útiles de
trabajo en perfecto estado y la organización de los
tiempos de los ciclos de trabajo (tales como tiempos
de marcha con la herramienta bajo carga, y tiempos de
marcha de la herramienta en vacío y sin ser utilizada
realmente ya que la reducción de estos últimos puede
disminuir de forma sustancial el valor total de exposición).
16. GARANTÍA
Todas las máquinas electroportátiles VIRUTEX, tienen una
garantía válida de 12 meses a partir del día de suministro,
quedando excluidas todas las manipulaciones o daños
ocasionados por manejos inadecuados o por desgaste
natural de la máquina. Para cualquier reparación, dirigirse
al servicio oficial de asistencia VIRUTEX, S.A.
17. RECICLAJE DE LAS
HERRAMIENTAS ELÉCTRICAS
Nunca tire la herramienta eléctrica con el resto de residuos domésticos. Recicle las herramientas, accesorios y
embalajes de forma respetuosa con el medio ambiente.
Respete la normativa vigente de su país.
Aplicable en la Unión Europea y en países europeos con
sistemas de recogida selectiva de residuos:
La presencia de esta marca en el producto o en el
material informativo que lo acompaña, indica que al
finalizar su vida útil no deberá eliminarse junto con
otros residuos domésticos.
Conforme a la Directiva Europea 2002/96/CE los usuarios
pueden contactar con el establecimiento donde adquirieron el producto, o con las autoridades locales pertinentes,
para informarse sobre cómo y dónde pueden llevarlo
para que sea sometido a un reciclaje ecológico y seguro.
VIRUTEX se reserva el derecho de modificar sus productos
sin previo aviso.
7
Page 8

ENGLISH
HAND-HELD DRYWALL SANDER
LPM97S
Important
Read these OPERATING INSTRUCTIONS
and the attached GENERAL SAFETY
INSTRUCTIONS LEAFLET carefully before
using the machine. Make sure you have
understood them before operating the
machine for the first time.
Keep both sets of instructions for any
future queries.
INTENDED USE
The LPM97S dry wall sander has been designed to sand
walls with fillers, ceilings and interior and exterior walls
and to remove remains of carpets, paint coats, linings,
remains of glue and loose plasterwork.
The dry-wall sander should always be used connected
to a vacuum cleaner device.
Users are responsible for any damage and accidents
caused by improper use.
1. SAFETY INSTRUCTIONS FOR OPERATING THE
DRY WALL SANDER
• Always keep your hands a safe distance away from the
rotating sanding disc. The disc could rebound towards
your hands.
• Prolonged exposure to sanding dust from walls can
affect breathing. Always use vacuum cleaner with a
suitable bag fitted for dust from walls and use a suitable
breathing mask.
• Lead paint sanding is highly toxic and should only be
done by specially trained professionals equipped with
special equipment for removing this paint.
• Stand firmly on the ground and keep your balance.
Do not overstretch. Use a suitable platform for the
work carried out.
• Always use suitable safety equipment for sanding,
safety goggles and a breathing mask.
• Never let go of the machine until the disc has fully
stopped. The rotary disc could get caught on the work
surface and knock the machine out of your control.
• Do not leave the machine operating while carrying
it with you. The rotary disc could get caught in your
clothes and cause serious injuries.
• Do not use the machine near inflammable substances,
as the sparks could ignite them.
• The LPM97S sander cannot and must not be used for
abrasive blasting, planing, polishing or sawing. Using
the machine for work for which it was not designed is
dangerous and could cause personal injuries.
• Always hold the machine with two hands for sanding.
Losing control of the machine could cause personal
injuries.
• Always grip the device by the insulating handles when
carrying out jobs in which the abrasive disc could come
into contact with hidden electrical cables. Contact with
electrical cables would charge the metal parts of the
machine, causing an electric shock.
• Keep the mains lead away from the machine’s working
area. Ensure that the lead remains behind you as you sand.
• Do not use the machine if the lead is damaged. Damaged
leads increase the risk of electric shock.
• Stop the machine immediately if you notice any
unusual vibrations or any other irregularity, and check
the machine until you find the cause.
• The dust produced when working with this machine
could be harmful to your health. Use a good vacuum
cleaner system, wear a suitable breathing mask and pick
up any dust that falls with a vacuum cleaner.
• Never force a machine that appears to have operating
difficulties or shows some sort of weakness. There may
be a technical problem, in which case continuing to work
could damage the machine irreparably. Have the machine
checked by an authorised service centre whenever the
machine is not working properly.
• Use only original accessories.
2. SPECIFICATIONS
Universal motor........................................230 V 50 Hz
Protection level.........................II / double on regulation chart
Power rating.................................................................1,200 W
No-load speed..............................................650-1,300 rpm
Full-load speed.............................................390-780 rpm
Disc diameter..........................................................225 mm
Weight.........................................................................3.1 kg
Weighted equivalent continuous acoustic pressure level
A.........................................................................................82 dBA
Acoustic power level A.................................93 dBA
Uncertainty....................................................................K = 3 dBA
Wear ear protection!
Vibration total values..........................................ah: < 2.5 m/s
Uncertainty.................................................................K: 1.5 m/s
3. CONTENTS STANDARD EQUIPMENT
You will find the following parts inside the case:
• LPM97S hand-held dry wall sander.
• Bayonet connector.
• 1 Abrasive disc grit 80.
• Safety and instruction manuals and miscellaneous
documentation.
2
2
8
Page 9
4. ELECTRICAL CONNECTION
Check the power supply is always the same voltage as
that indicated on the machine's specifications plate.
The machine may at not be used under any circumstances
if the power lead is damaged.
A lead that is damaged or in poor condition should be
immediately replaced by an authorised technical service;
do not try to repair it yourself.
Working with a lead in poor condition can cause electrical accidents.
Change the cover in the following way:
• Unplug the machine.
• Press the shaft lock (D, Fig. 4), turning the plate until
the shaft is locked in position. Turn the sanding plate
anti-clockwise to remove it from the machine.
• Now press the cover down against the spring (Fig.
5) and with the help of some special pliers, take off
the retaining ring attaching the cover to the gear box.
• Finally, remove the dust collector tube with care (Fig.
6), take off the plate cover and replace it, turning it in
the opposite direction for attachment.
5. ELECTRONIC CONTROLS
Smooth starting: Electronic starting controls that ensure
a smooth start and gradual increase in speed.
Controlled speed: You can set the uninterrupted disc
turning speed, from 650 to 1,300 rpm with no load, by
using the thumb wheel (A, Fig. 1). You can in this way
set the best possible sanding speed for each material.
The electronic speed adjuster will keep its speed constant,
even at full loads to provide perfect sanding.
We advise using the highest speeds when a lot of material
needs to be removed and low speeds for finer sanding
and to improve control of the machine.
6. ATTACHING THE ABRASIVE DISC
Unplug the machine. Take off the used disc, ensuring
that the sponge plate remains in position.
Carefully align the holes in the disc (B, Fig. 2) with those
on the plate and press the disc so that it is held in place
by the Velcro on the plate.
7. CHANGING THE SPONGE PLATE
The sponge plate should be perfectly smooth for proper
sanding and good results.
If the pad has become misshapen or damaged by work,
the sanding will be irregular and poor quality. You should
change the pad immediately when it has been damaged.
To replace the sponge plate, unplug the machine from
the mains.
The sanding plate has Velcro on both sides, therefore to
change it you have to pull it until it comes off the base
plate and replace it with a new one. (C, Fig. 3).
8. CHANGING THE PLATE COVER
Cover functions: The brush on the edge of the plate
cover has the dual function of keeping the abrasive
disc properly aligned with the surface it is sanding and
to enable the vacuum cleaning system to work more
effectively.
The brush on the cover becomes worn with constant
machine use, no longer guaranteeing the correct position
of the plate and effective dust collection. When this
occurs you should change the whole cover.
9. VACUUM CLEANER TUBE INSTALLATION
• Unplug the machine.
• Take the connector terminal off the vacuum hose first
and attach the bayonet connector (E, Fig 7) which is
included as part of the machine’s equipment.
• Now insert the bayonet connector (E, Fig. 7) on the
dust collector tube into the swivel connector (F, Fig. 7)
on the machine.
• When the bayonet connector is fully inserted, hold
the swivel connector to stop it turning and turn the
bayonet clockwise until it is locked in position. (Fig. 7).
• To remove the vacuum tube, turn it in the opposite
direction.
10. DUST COLLECTION
Prolonged exposure to sanding dust from walls can
affect breathing. Always use a vacuum cleaner with a
suitable bag fitted for dust from walls.
If you do not use a suitable bag, it will
increase the dust level in the working
area and prolonged exposure to this risk
may cause breathing problems.
Adjusting vacuum cleaning power:
• If you use the Virutex ASC482U compact vacuum
cleaner, or another vacuum cleaner with suitable
adjustable power, you may adjust the vacuum suction
power according to the surface area you are working on.
• Adjust the speed wheel (H, Fig. 8) to obtain the right
suction.
• Start with low suction and gradually increase it by
turning the wheel H, Fig. 8), until you achieve the right
suction.
• A high suction level makes the job of sanding
ceilings and walls easier.
• If the suction level is excessive it will cause the
machine to vibrate, make it difficult to direct it and
could overload it. If this occurs, you should stop work
immediately until the machine has cooled down.
9
Page 10
11. STARTING AND STOPPING THE MACHINE
Ensure the mains voltage is the same as indicated on the
specifications plate and that the switch is off in the “O”
position before plugging the machine in.
Push the trigger switch to start up the machine (I, Fig.
1) and release it to stop it.
If you wish to keep the machine running constantly, you
can set the switch lock (J, Fig. 1). To take off the switch
lock, press the switch and then release it.
The machine does not stop immediately and the abrasive
disc continues to turn for some time before stopping.
Ensure that it does not come into contact with anybody
or anything and do not let go of the machine until the
abrasive disc has completely stopped.
12. HOW TO USE THE MACHINE
To work safely and to remain in control of the machine
at all times, you should always hold it with two hands.
The best way to do this is to hold the machine with one
hand on the main handle, the one at the rear, and the
other hand on the part of the column covered with the
softgrip, or by using the D handle if it is fitted.
It is very important to stand firmly on both feet, particularly when working on platforms.
Sanding:
• If the wall sander and vacuum cleaner are ready, the
safety measures have been taken and the necessary
safety equipment is in use, the machine can be started
first followed by the vacuum cleaner.
If you use the Virutex ASC482U vacuum cleaner or
another vacuum cleaner with automatic built-in starting,
you will only have to start up the machine.
• Place the machine on the surface you are going to
sand, making smooth contact with the latter and with
minimum pressure in order to keep the sanding head
flat against it.
• You can now reset the speed to the ideal speed for
the work to be done.
• The articulated head allows the abrasive disc to follow
the contours of the work surface.
• Do not overload the machine by applying excessive
pressure.
The best sanding results are achieved with moderate
pressure. Sanding quality and performance mainly
depend on the right choice of abrasive disc.
• The best sanding technique consists in long strokes
back and forth, keeping the head in constant motion.
Do not let the machine stop in the same place, since it
will leave marks on the surface.
• Turn the machine off when the sanding work has
finished.
Sanding near the edges:
• The sander has an extractable head cover section that
makes it possible to reduce the distance at the side
between the wall/ceiling and the sanding plate. (Fig. 10)
10
• When the machine is working without the head cover
section, the vacuum cleaner loses effectiveness, so it
should only be extracted when necessary and should
be refitted as soon as possible.
• To take off the cover section:
• Unplug the machine.
• Press between the two snap rings fastening the
section and take it off its mount (Fig 10).
• Keep the extracted section close at hand in a safe
place to be able to fit it on again.
• Proceed in the same way to fit the section.
Recommendations:
Ensure you use the best disc for the sanding to be done.
If the abrasive discs are too coarse-grained they remove a
lot of material as they work; this is sometimes too much
and makes it difficult to control, while those that are
too fine-grained tend to get easily muffled.
Try to avoid sharp points and nails when sanding, as these
can damage the abrasive disc and even the sponge plate.
13. MAINTENANCE AND CLEANING
Turn the machine off at the mains before performing
any operation.
• All maintenance work or repairs on the machine that
require the motor casing to be opened can only be carried
out by an authorised official service centre.
• Regularly check the state of the lead and the plug, and
change them if they are damaged using an authorised
official service.
• Always keep the air circulation windows on the casing
clean to ensure motor cooling.
• Clean the dust collector tube connection with the
plate cover so that it is not obstructed.
Changing brushes:
Brushes should be changed when they have a minimum
length of 6 mm.
• To inspect or replace the brushes, first turn the machine
off at the mains.
• Remove the vacuum tube and take off the right and
left handles by removing the screws (K, Fig. 10) that
attach them.
• Unscrew the two screws (L, Fig. 10) that fasten them
to the electronic circuit and move the latter to one side,
being careful not to damage the circuit connections.
• Unscrew the two screws (M, Fig. 11) attaching the
brush-holder.
• Inspect or change the brushes if necessary.
• It is advisable to allow the machine to run for a few
minutes with no load after changing the brushes.
14. ACCESSORIES AND SANDING DISCS
Only use original Virutex accessories and consumable
items designed for this machine.
Page 11
• ASC482U dust collector (collection tube included)
• Transport case (included as standard)
• Spare full plate cover 9702711
• Sanding sponge plate (double Velcro) 9745948
• Rigid sanding plate (Velcro) 9702709
• Abrasive disc for sanding surfaces:
• For rough or granular cement and wallpaper, grain
24, 9791114, packet of 12.
• For fillers and paints. Rough sanding, grain 40,
9791115, packet of 25.
• For fillers and paints. Rough sanding, grain 60,
9791116, packet of 25.
• For fillers and paints. Rough sanding, grain 80,
9791117, packet of 25.
• For fillers and paints. Rough sanding, grain 100,
9791118, packet of 25.
• Difficult fillers and paints. Rough sanding, grain
120, 9791119, packet of 25.
• Difficult fillers and paints. Rough sanding, grain
150, 9791120, packet of 25.
• Difficult fillers and paints. Rough sanding, grain
180, 9791121, packet of 25.
15. NOISE AND VIBRATION LEVEL
The noise and vibration levels of this device have been
measured in accordance with European standard EN
60745-1 and serve as a basis for comparison with other
machines with similar applications.
The indicated vibration level has been determined for
the device’s main applications and may be used as an
initial value for evaluating the risk presented by exposure to vibrations. However, vibrations may reach levels
that are quite different from the declared value under
other application conditions, with other tools or with
insufficient maintenance of the electrical device or its
accessories, reaching a much higher value as a result
of the work cycle or the manner in which the electrical
device is used.
Therefore, it is necessary to establish safety measures
to protect the user from the effects of vibrations, such
as maintaining both the device and its tools in perfect
condition and organising the duration of work cycles
(such as operating times when the machine is subjected
to loads, and operating times when working with no-load,
in effect, not in use, as reducing the latter may have a
considerable effect upon the overall exposure value).
17. RECYCLING ELECTRICAL EQUIPMENT
Never dispose of electrical equipment with domestic waste. Recycle equipment, accessories and packaging in ways
that minimise any adverse effect on the environment.
Comply with the current regulations in your country.
Applicable in the European Union and in European
countries with selective waste collection systems:
If this symbol appears on the product or in the accompanying information, at the end of the product’s useful
life it must not be disposed of with other domestic waste.
In accordance with European Directive 2002/96/EC, users
may contact the establishment where they purchased the
product or the relevant local authority to find out where
and how they can take the product for environmentally
friendly and safe recycling.
VIRUTEX reserves the right to modify its products
without prior notice.
FRANÇAIS
PONCEUSE MANUELLE POUR MURS ET
PLAFONDS LPM97S
Important
Avant d'utiliser la machine, lisez attentivement ce MANUEL D'INSTRUCTIONS et la
BROCHURE D'INSTRUCTIONS GÉNÉRALES
DE SÉCURITÉ qui vous sont fournis avec
cette machine. Assurez-vous de bien
avoir tout compris avant de commencer
à travailler avec la machine.
Gardez toujours ces deux manuels
d'instructions à portée de la main pour
pouvoir les consulter, en cas de besoin
16. WARRANTY
All VIRUTEX power tools are guaranteed for 12 months
from the date of purchase, excluding any damage which
is a result of incorrect use or of natural wear and tear
on the machine. All repairs should be carried out by the
official VIRUTEX technical assistance service.
UTILISATION CONFORME À L’EMPLOI PRÉVU
La ponceuse LPM97S a été conçue pour poncer les murs
mastiqués, les plafonds et les parois intérieures et extérieures, ainsi que pour éliminer les restes de moquette,
de couches de peinture, de revêtements, d’adhésifs et
les crépis qui se détachent.
La ponceuse doit toujours être branchée sur un dispositif
d’aspiration.
11
Page 12

L’utilisateur est responsable des dommages et des
accidents causés par une utilisation non appropriée.
1. INSTRUCTIONS DE SÉCURITÉ POUR LE MANIEMENT DE LA PONCEUSE
• Toujours tenir les mains à l’écart du disque de ponçage
rotatif. Le disque peut rebondir vers la main.
• L’exposition prolongée à la poussière de ponçage des
murs peut affecter la fonction respiratoire. Toujours
employer un aspirateur muni d’un sac spécialement
conçu pour la poussière de murs, et utiliser un masque
respiratoire correct.
• Le ponçage de peintures au plomb est extrêmement
toxique, c’est pourquoi il doit être uniquement réalisé
par des professionnels dûment préparés et équipés d’une
protection spéciale pour décaper ce type de peintures.
• Se tenir bien stable sur le sol et conserver l’équilibre.
Ne pas dépasser les limites de ses forces. Utiliser un
échafaudage adapté au travail à réaliser.
• Toujours utiliser l’équipement de sécurité approprié
pour le ponçage, des lunettes de sécurité et un masque
respiratoire.
• Ne jamais lâcher la machine tant que le disque n'est
pas complètement à l’arrêt. Le disque rotatif pourrait
s’accrocher à la surface de travail et secouer la machine
en la mettant hors de contrôle.
• Ne pas laisser la machine en marche lors des déplacements et du transport. Le disque rotatif pourrait
s’accrocher aux vêtements et causer des lésions graves.
• Ne pas utiliser la machine à proximité de substances
inflammables, les étincelles pourraient mettre le feu à
ces substances.
• La ponceuse LPM97S n’est pas conçue et ne doit pas
être utilisée pour réaliser des ponçages d’ébauchage,
des rabotages, des polissages ou des tronçonnages à la
meule. Il est dangereux d’utiliser cette machine pour
effectuer des travaux pour lesquels il n’a pas été conçu,
cela pourrait causer des dommages corporels.
• Toujours tenir la machine avec les deux mains pour
le ponçage. Une perte de contrôle de la machine peut
causer des dommages corporels.
• Toujours tenir la machine par les poignées isolantes
quand on réalise des travaux où le disque abrasif pourrait
entrer en contact avec des conducteurs électriques cachés. Le contact avec les conducteurs électriques mettrait
les parties métalliques de la machine sous tension, tout
en provoquant une décharge électrique.
• Maintenir le câble à l’écart de la zone de travail. Toujours
vérifier que le câble est derrière soi lors du ponçage.
• Ne pas utiliser l’outil si le câble est endommagé. Les
câbles détériorés augmentent le risque de décharge
électrique.
• Éteindre immédiatement la machine si on remarque
des vibrations inhabituelles ou toute autre anomalie, et
en vérifier la cause.
• La poussière soulevée par le fonctionnement de cette
machine peut être nocive pour la santé. Utiliser un bon
système d’aspiration, mettre un masque respiratoire
approprié et aspirer la poussière qui se dépose avec
un aspirateur.
• Ne jamais forcer une machine qui semble avoir des
difficultés à avancer ou qui présente des défaillances ;
il s’agit peut-être d’un problème technique qui pourrait
endommager la machine de manière irréversible si on
continue à travailler dans ces conditions. Dans tous les
cas où la machine ne fonctionnerait pas correctement,
la faire contrôler par un service agréé.
• N’utiliser que des accessoires originaux.
2. CARACTERISTIQUES
Moteur universel.................................................230 V 50 Hz
Classe de
protection................II / symbole double carré réglementaire
Puissance..................................................................1.200 W
Vitesse à vide......................................................650-1.300 t/min
Vitesse en pleine charge..........................390–780 t/min
Diamètre de l’abrasif..................................................225 mm
Poids.....................................................................................3,1 kg
Niveau de pression acoustique continu équivalent pon-
déré A...............................................................................82 dBA
Niveau de puissance acoustique A.................................93 dBA
Incertitude......................................................................K = 3 dBA
Porter une protection acoustique!
Valeurs totales des vibrations.................................ah: < 2,5 m/s
Incertitude.....................................................................K: 1,5 m/s
3. CONTENU. ÉQUIPEMENT STANDARD
La mallette contient les éléments suivants:
• Ponceuse manuelle de murs et plafonds LPM97S.
• Raccord à baïonnette.
• 1 disque abrasif grain de 80.
• Manuel de sécurité, mode d’emploi et documentation
diverse.
4. BRANCHEMENT ÉLECTRIQUE
Toujours vérifier que la tension du secteur est la même
que celle indiquée sur la plaque des caractéristiques
de la machine.
Il ne faut utiliser la machine sous aucun prétexte si le
câble de branchement est détérioré.
Un câble endommagé ou en mauvais état doit être immédiatement remplacé par un service technique agréé,
ne jamais essayer de le réparer soi-même.
Le fonctionnement avec un câble en mauvais état peut
provoquer un accident électrique.
2
2
12
Page 13

5. CONTRÔLE ÉLECTRONIQUE
Démarrage progressif: contrôle électronique du démarrage qui garantit une mise en marche en douceur et
une augmentation progressive de la vitesse.
Vitesse contrôlée: il est possible de régler la vitesse de
rotation du disque de façon ininterrompue, entre 650
et 1.300 t/min à vide, avec la molette de réglage (A,
Fig. 1). Ceci permet de régler la vitesse de ponçage en
fonction de chaque matériau.
Le contrôle électronique de la vitesse permet de maintenir une vitesse constante, même à pleine charge, et
d’obtenir un ponçage parfait.
Il est recommandé d’utiliser les grandes vitesses pour
arracher de grosses quantités de matériau et les vitesses
plus faibles pour des ponçages plus fins et pour mieux
maîtriser l’appareil.
6. FIXATION DE L’ABRASIF
Débrancher la machine du secteur.
Arracher l’abrasif usé, en prenant soin de ne pas déplacer
le plateau en mousse.
Centrer soigneusement les trous de l’abrasif (B, Fig. 2)
sur ceux du plateau et appuyer sur l’abrasif pour qu’il
s’accroche sur le velcro du plateau.
7. CHANGEMENT DU PLATEAU EN MOUSSE
Le plateau en mousse doit être parfaitement plat pour
un ponçage correct et pour obtenir un bon résultat.
Si le plateau s’est déformé ou s’il est détérioré par le travail, les ponçages seront irréguliers et de mauvaise qualité.
Il faut changer le plateau dès qu’il est endommagé.
Pour remplacer le plateau en mousse, débrancher la
machine du secteur.
Le plateau de ponçage comporte du velcro de chaque
côté, donc pour le changer, il faut tirer sur celui-ci
pour l’arracher du plateau de base et le remplacer par
un neuf. (C, Fig. 3).
8. CHANGEMENT DU COUVERCLE DU PLATEAU
Fonctions du couvercle: la brosse située à la périphérie du couvercle du plateau a une double fonction:
maintenir le disque abrasif bien aligné avec la surface
de ponçage et obtenir une meilleure performance du
système d’aspiration.
La brosse du couvercle s’use lors de l’utilisation de la
machine, ce qui ne garantit plus la position correcte du
plateau et réduit l’efficacité de l’aspiration. Dans ce cas,
il faut changer le couvercle dans son ensemble.
Pour changer le couvercle, la marche à suivre est
la suivante:
• Débrancher la machine du secteur.
• Appuyer sur le dispositif de blocage de l’axe (D, Fig.4) en
faisant tourner le plateau jusqu’à ce que l’axe se bloque.
Faire tourner le plateau de ponçage dans le sens contraire
des aiguilles d’une montre pour l’extraire de la machine.
• Pousser maintenant le couvercle vers le bas contre
le ressort (Fig. 5) et à l’aide de pinces à circlips, retirer
le circlip qui fixe le couvercle à la boîte d’engrenages.
• Pour terminer, retirer avec soin le tuyau d’aspiration
(Fig. 6), démonter le couvercle du plateau et le remplacer
par un neuf en le montant dans l'ordre inverse.
9. MONTAGE DU TUYAU D’ASPIRATION
• Débrancher la machine du secteur.
• Démonter tout d’abord le raccord du tuyau de
l’aspirateur et installer sur celui-ci le raccord à baïonnette
(E, Fig. 7) qui est fourni avec la machine.
• Introduire maintenant le raccord à baïonnette (E, Fig.
7) du tuyau d’aspiration, dans le raccord rotatif (F, Fig.
7) de la machine.
• Quand le raccord à baïonnette est complètement à
l’intérieur, fixer le raccord rotatif pour qu’il ne tourne
plus et faire tourner celui à baïonnette dans le sens des
aiguilles d’une montre pour le bloquer. (Fig. 7).
• Pour démonter le tuyau d’aspiration, il faut procéder
à l’inverse.
10. ASPIRATION
L’exposition prolongée à la poussière de ponçage des
murs peut provoquer des troubles respiratoires. Toujours
employer un aspirateur muni d’un sac conçu pour la
poussière de murs.
Si on n’utilise pas un sac approprié, le
niveau de poussière augmentera dans la
zone de travail et l’exposition prolongée
à ce risque peut causer des troubles
respiratoires.
Réglage de la puissance d’aspiration:
• Si on utilise l’aspirateur compact ASC482U de Virutex,
ou un autre aspirateur approprié à puissance réglable,
on peut régler la puissance d’aspiration de l’aspirateur
en fonction de la surface sur laquelle on travaille.
• Régler la molette de réglage (H, Fig. 8), pour obtenir
l’aspiration appropriée.
• Commencer par une aspiration faible et augmenter
petit à petit la puissance en tournant la molette (H, Fig.
8), pour obtenir l’aspiration appropriée.
• Une aspiration puissante facilite le ponçage de
plafonds et de murs.
• Si l'aspiration est excessive, elle fera vibrer la machine, ce qui peut rendre son guidage plus difficile et la
surcharger. Si cela arrive, il faut stopper immédiatement
le travail jusqu’à ce que la machine refroidisse.
13
Page 14

11. MISE EN MARCHE ET ARRÊT DE LA MACHINE
S’assurer que la tension du secteur est la même que
celle indiquée sur la plaque des caractéristiques et que
l’interrupteur est à l’arrêt en position "0", avant de
brancher la machine sur le secteur.
Pour mettre la machine en marche, appuyer sur
l’interrupteur à gâchette (I, Fig. 1) et le lâcher pour
l’arrêter.
Pour maintenir la machine en marche continue, il
faut mettre le verrouillage de sécurité (J, Fig. 1) de
l’interrupteur. Pour débloquer le verrouillage de sécurité,
il faut appuyer sur l’interrupteur et le lâcher ensuite.
La machine ne s’arrête pas immédiatement, l’abrasif
continue de tourner un certain temps avant de s’arrêter.
Éviter que celui-ci n’entre en contact avec des personnes
ou des objets et ne pas lâcher la machine tant que le
disque abrasif n’est pas complètement à l’arrêt.
12. MODE D’EMPLOI DE LA MACHINE
Pour travailler en toute sécurité en ayant toujours le
contrôle de la machine, il faut toujours le tenir avec
les deux mains.
Pour ce faire, le meilleur moyen est de le saisir par la
poignée principale, c'est-à-dire la poignée arrière, avec
une main, et de le tenir de l’autre main par la partie de la
colonne gainée de soft grip, ou par la poignée auxiliaire
si elle est montée.
Il est très important de rester bien stable sur ses deux
pieds, en particulier quand on travaille sur des échafaudages.
Ponçage:
• Une fois que la ponceuse et l'aspirateur sont prêts, que
toutes les mesures de sécurité expliquées ont été prises
et que l’on porte l’équipement de sécurité nécessaire,
il faut mettre tout d'abord la machine en marche, puis
l'aspirateur.
Si on utilise un aspirateur Virutex ASC482U ou tout autre
aspirateur à démarrage automatique intégré, il suffit de
mettre la machine en marche pour allumer l’aspirateur.
• Appliquer la machine sur la surface à poncer, en
prenant doucement contact avec cette dernière et en
faisant un minimum de pression pour maintenir la tête
d’abrasion à plat contre elle.
• Maintenant, on peut régler de nouveau la vitesse, pour
l’adapter au mieux au travail à réaliser.
• La tête articulée permet au disque abrasif de suivre
les contours de la surface de travail.
• Ne pas surcharger la machine en appliquant une
pression excessive.
Les meilleurs résultats de ponçage s’obtiennent avec
une pression modérée. La qualité et la performance
du ponçage dépendent essentiellement du choix de
l’abrasif approprié.
• La meilleure technique de ponçage consiste à faire de
longs va-et-vient, en maintenant la tête en mouvement
14
constant. Ne pas laisser la machine trop longtemps au
même endroit, cela pourrait laisser des marques sur
la surface.
• Débrancher la machine, quand le travail de ponçage
est fini.
Ponçage près des bords:
• La ponceuse dispose d’un secteur du couvercle de la
tête extractible, ce qui permet de réduire la distance
latérale entre le mur / le plafond et le plateau de
ponçage. (Fig. 10).
• Quand la machine fonctionne sans le secteur du
couvercle de la tête, l’aspiration perd de son efficacité,
c'est pourquoi ce dernier ne doit être enlevé que lorsque
c'est nécessaire et doit être remonté dès que possible.
• Retrait du secteur du couvercle:
• Débrancher la machine du secteur.
• Faire pression sur les deux butées de retenue qui
fixent le secteur et le retirer de son support. (Fig. 10).
• Ranger le secteur ainsi enlevé dans un endroit sûr
et à proximité, pour pouvoir le remonter.
• Pour remonter le secteur, procéder de la même
façon.
Recommandations:
S'assurer d'utiliser le disque le mieux adapté au travail
de ponçage à réaliser.
Les disques abrasifs au grain trop gros retirent beaucoup
de matériau sur leur passage, voire trop de matériau, et
sont difficiles à contrôler, alors que ceux au grain trop
fin ont tendance à s'engorger facilement.
Lors du ponçage, il faut éviter les arêtes vives et les
clous, car ils peuvent endommager le disque abrasif et,
parfois même, le plateau en mousse.
13. ENTRETIEN ET NETTOYAGE
Débrancher la machine du secteur avant toute manipulation.
• Tous les travaux d’entretien ou de réparation de la
machine exigeant d’ouvrir la carcasse du moteur doivent
être uniquement réalisés par un service officiel agréé.
• Vérifier périodiquement l’état du câble et de la prise,
et les faire remplacer par un service officiel agréé s’ils
sont détériorés.
• Toujours bien nettoyer les fenêtres de circulation d’air
de la carcasse, pour assurer le refroidissement du moteur.
• Nettoyer la prise du tuyau d'aspiration sur le couvercle
du plateau pour éviter qu'elle se bouche.
Changement des balais:
Il est recommandé de remplacer les balais quand ils
atteignent 6 mm de longueur minimum.
• Pour vérifier ou remplacer les balais, débrancher tout
d’abord la machine du secteur.
• Retirer le tuyau d’aspiration et démonter les poignées
droite et gauche, en dévissant les vis (K, Fig. 10) de fixation.
Page 15

• Retirer les deux vis (L, Fig. 10) qui fixent le circuit
électronique et mettre celui-ci sur un côté, en évitant
d’endommager les branchements du circuit.
• Dévisser les deux vis (M, Fig. 11) qui fixent les portebalais.
• Vérifier ou changer les balais s’il y a lieu.
• Il est recommandé de faire marcher la machine à vide
pendant quelques minutes après avoir changé les balais.
14. ACCESSOIRES ET DISQUES ABRASIFS
N’utiliser que des accessoires et des disques d’origine
Virutex conçus pour cette machine.
• Aspirateur ASC482U (tube d'aspiration fourni)
• Mallette de transport (fourni d’origine).
• Couvercle du plateau complet 9702711
• Plateau de ponçage en mousse (double velcro) 9745948
• Plateau support rigide (velcro) 9702709
• Disque abrasif pour ponçage des surfaces:
• En ciment, grossières ou granulaires, et papier peint,
grain 24, 9791114, paquet de 12 u.
• Mastiquées et peintes. Dégrossissage, grain 40,
9791115, paquet de 25 u.
• Mastiquées et peintes. Dégrossissage, grain 60,
9791116, paquet de 25 u.
• Mastiquées et peintes. Dégrossissage, grain 80,
9791117, paquet de 25 u.
• Mastiquées et peintes. Dégrossissage, grain 100,
9791118, paquet de 25 u.
• Délicates, mastiquées et peintes. Finition, grain 120,
9791119, paquet de 25 u.
• Délicates, mastiquées et peintes. Finition, grain 150,
9791120, paquet de 25 u.
• Délicates, mastiquées et peintes. Finition, grain 180,
9791121, paquet de 25 u.
15. NIVEAU DE BRUIT ET DE VIBRATIONS
Les niveaux de bruit et de vibrations de cet appareil
électrique ont été mesurés conformément à la norme
européenne EN 60745-1 et font office de base de comparaison avec des machines aux applications semblables.
Le niveau de vibrations indiqué a été déterminé pour
les principales applications de l’appareil, et il peut être
pris comme valeur de base pour l’évaluation du risque
lié à l’exposition aux vibrations. Toutefois, dans d’autres
conditions d’application, avec d’autres outils de travail
ou lorsque l’entretien de l’appareil électrique et de ses
outils est insuffisant, il peut arriver que le niveau de
vibrations soit très différent de la valeur déclarée, voire
même beaucoup plus élevé en raison du cycle de travail
et du mode d'utilisation de l'appareil électrique.
Il est donc nécessaire de fixer des mesures de sécurité
pour protéger l'utilisateur contre les effets des vibrations,
notamment garder l’appareil et les outils de travail en
parfait état et organiser les temps des cycles de travail
(temps de fonctionnement avec l’appareil en service,
temps de fonctionnement avec l’appareil à vide, sans être
utilisé réellement), car la diminution de ces temps peut
réduire substantiellement la valeur totale d’exposition.
16. GARANTIE
Tous les machines électro-portatives VIRUTEX ont une
garantie valable 12 mois à partir de la date d'achat, en
étant exclus toutes manipulations ou dommages causés
par des maniements inadéquats ou par l'usure naturelle
de la machine. Pour toute réparation, s'adresser au service
officiel d'assistance technique VIRUTEX.
17. RECYCLAGE DES OUTILS ÉLECTRIQUES
Ne jetez jamais un outil électrique avec le reste des déchets ménagers. Recyclez les outils, les accessoires et les
emballages dans le respect de l’environnement. Veuillez
respecter la réglementation en vigueur dans votre pays.
Applicable au sein de l’Union Européenne et dans les pays
européens dotés de centres de tri sélectif des déchets:
Ce symbole présent sur le produit ou sur la documentation informative qui l’accompagne, indique qu’en fin de
vie, ce produit ne doit en aucun cas être éliminé avec le
reste des déchets ménagers.
Conformément à la directive européenne 2002/96/CE,
tout utilisateur peut contacter l’établissement dans
lequel il a acheté le produit, ou les autorités locales
compétentes, pour se renseigner sur la façon d’éliminer le
produit et le lieu où il doit être déposé pour être soumis
à un recyclage écologique, en toute sécurité.
VIRUTEX se réserve le droit de modifier ses produits
sans avis préalable.
15
Page 16

DEUTSCH
HANDWANDSCHLEIFMASCHINE
LPM97S
Achtung
Lesen Sie bitte vor Benutzung der Maschine die beiliegende GEBRAUCHSANWEISUNG und die ALLGEMEINEN SICHERHEITSHINWEISE sorgfältig durch.
Stellen Sie sicher, dass Sie sowohl die
Gebrauchsanweisung als auch die allegemeinen Sicherheitshinweise verstanden
haben, bevor Sie die Maschine bedienen.
Bewahren Sie beide Gebrauchsanweisungen zum späteren Nachschlagen auf.
BESTIMMUNGSGEMÄSSE VERWENDUNG
Die Wandschleifmaschine LPM97S wurde zum Abschleifen der Spachtelmasse von Wänden sowie allgemein
zum Abschleifen von Innen- und Außenwänden sowie
Decken, zum Entfernen von Teppichbodenresten, Anstrichen, Verkleidungen, Klebstoffresten und lockeren
Verputzen entwickelt.
Die Wandschleifmaschine muss während der Verwendung
an eine Absaugvorrichtung angeschlossen sein.
Für eventuelle Schäden und Unfälle, die durch einen
unsachgemäßen Gebrauch verursacht werden, ist der
Benutzer verantwortlich.
1. UNFALLVERHÜTUNGSVORSCHRIFTEN FÜR
DEN BETRIEB DER WANDSCHLEIFMASCHINE
• Bringen Sie Ihre Hände nie in die Nähe der drehenden
Schleifscheibe. Die Scheibe könnte zurückprallen und
Sie verletzen.
• Eine längere Einwirkung des Schleifstaubs beim
Wandschleifen kann die Atemfunktion beeinträchtigen.
Verwenden Sie beim Arbeiten immer eine Saugvorrichtung mit einem geeigneten Staubbeutel für den
Wandstaub sowie eine geeignete Staubschutzmaske.
• Der Schleifstaub von bleihaltigen Anstrichen ist hochgiftig. Daher sollten derartige Schleifarbeiten nur von
entsprechend ausgebildeten Fachleuten durchgeführt
werden, die über eine Spezialausrüstung zum Entfernen
dieser Art von Anstrichen verfügen.
• Achten Sie stets auf einen sicheren Stand, und arbeiten
Sie immer im Gleichgewicht. Vermeiden Sie überstreckte
Arbeitspositionen. Verwenden Sie ein geeignetes Arbeitsgerüst für die durchzuführenden Arbeiten.
• Verwenden Sie stets eine geeignete Schutzausrüstung, Schutzbrillen sowie eine Staubschutzmaske zum
Schleifen.
• Legen Sie die Maschine erst ab, wenn die Schleifscheibe
vollständig zum Stillstand gekommen ist. Andernfalls
könnte die drehende Scheibe von der Ablagefläche
zurückprallen und die Maschine außer Kontrolle geraten.
• Schalten Sie die Maschine beim Gehen ab. Die drehende
Schleifscheibe könnte sich in der Kleidung verfangen
und schwere Verletzungen verursachen.
• Verwenden Sie die Maschine nicht in der Nähe von
brennbaren Stoffen. Diese könnten sich durch entstehende Funken entzünden.
• Die Schleifmaschine LPM97S darf nicht für grobe
Schleifarbeiten, zum Abhobeln, für Polierarbeiten oder
zum Schneiden mit Trennscheibe eingesetzt werden. Die
nicht bestimmungsgemäße Verwendung der Maschine
ist gefährlich und kann zu Personenschäden führen.
• Halten Sie die Maschine beim Schleifen stets mit beiden
Händen fest. Wenn die Maschine außer Kontrolle gerät,
besteht die Gefahr von schweren Verletzungen.
• Halten Sie die Maschine immer an den isolierten
Griffen, wenn Sie Arbeiten ausführen, bei denen die
Schleifscheibe mit versteckten elektrischen Leitern
in Kontakt kommen könnte. Durch einen eventuellen
Kontakt mit elektrischen Leitern werden die Metallteile
der Maschine unter Strom gesetzt, und Sie könnten einen
Stromschlag erhalten.
• Achten Sie darauf, dass das Netzkabel nie in den Arbeitsbereich der Maschine kommt. Das Kabel sollte sich
beim Schleifen immer hinter Ihnen befinden.
• Verwenden Sie die Maschine nicht, wenn das Kabel
beschädigt ist. Beschädigte Kabel erhöhen die Stromschlaggefahr.
• Schalten Sie die Maschine sofort aus, wenn Sie ungewöhnliche Vibrationen oder sonstige Auffälligkeiten
wahrnehmen, und überprüfen Sie die Maschine, bis die
Ursache gefunden ist.
• Der Schleifstaub, der beim Arbeiten mit dieser Maschine entsteht, kann Ihre Gesundheit beeinträchtigen.
Verwenden Sie eine gute Absaugvorrichtung sowie eine
geeignete Staubschutzmaske, und entfernen Sie den
anfallenden Staub mit einem Staubsauger (nicht kehren).
• Wenn die Maschine Schwierigkeiten beim Schleifen
oder eine schwache Leistung aufweist, sollten Sie sie nicht
durch höheren Kraftaufwand überlasten. Möglicherweise
liegt ein technisches Problem vor, sodass die Maschine
bei Fortsetzen der Arbeit beschädigt werden könnte.
Wenn die Maschine nicht einwandfrei funktioniert, sollte
sie in jedem Fall von einem offiziellen Kundendienst
überprüft werden.
• Verwenden Sie nur Original-Zubehörteile.
2. TECHNISCHE DATEN
Universalmotor..............................................230 V 50 Hz
Schutzklasse................II / Vorgeschr. Kennzeichnung:
Doppelquadrat Leistung................................................1200 W
Drehzahl im Leerlauf............................650 - 1300 U/min
16
Page 17

Geschwindigkeit bei Volllast...............390 - 780 U/min
Durchmesser der Schleifscheibe..................225 mm
Gewicht...............................................................3,1 kg
Gewichteter akustischer Dauerdruckpegel A...............82 dBA
Akustischer Druckpegel A..............................................93 dBA
Unsicherheit..................................................................K = 3 dBA
Gehörschutz tragen!
Schwingungsgesamtwerte...................................ah: <2,5 m/s
Unsicherheit................................................................K = 1,5 m/s
3. INHALT - STANDARDAUSSTATTUNG
Im Koffer finden Sie folgende Teile:
• Handwandschleifmaschine LPM97S.
• Bajonettstecker.
• 1 Schleifscheibe mit der Körnung 80.
• 1 Zusatzgriff.
• Gebrauchsanleitung, Sicherheitsanleitung und verschiedene Unterlagen.
4. STROMANSCHLUSS
Vergewissern Sie sich immer, dass die Netzspannung mit
der auf dem Typenschild angegebenen Betriebsspannung
der Maschine übereinstimmt.
Die Maschine darf auf keinen Fall verwendet werden,
wenn das Netzkabel beschädigt ist.
Ein beschädigtes oder verschlissenes Kabel muss
umgehend von einem offiziellen Kundendienst ausgetauscht werden. Versuchen Sie nicht, das Kabel selbst
zu reparieren.
Das Arbeiten mit beschädigtem Netzkabel kann zu
Stromunfällen führen.
5. ELEKTRONISCHE REGELUNG
Stoßfreier Anlauf: Die elektronische Anlaufregelung
gewährleistet ein stoßfreies Anlaufen der Maschine und
eine allmähliche Steigerung der Drehzahl.
Drehzahlregelung: Die Leerlaufdrehzahl der Schleifscheibe ist mit dem Einstellrad (A, Abb. 1) stufenlos
zwischen 650 und 1.300 U/min einstellbar. Auf diese
Weise kann für jedes Material die optimale Schleifgeschwindigkeit eingestellt werden.
Der elektronische Drehzahlregler hält die Drehzahl
auch bei Volllast konstant und sorgt für ein perfektes
Schleifergebnis.
Es wird empfohlen, für grobe Schleifarbeiten hohe
Drehzahlen und für feine Schleifarbeiten sowie zur
Verbesserung der Kontrolle über die Maschine niedrige
Drehzahlen einzustellen.
6. BEFESTIGUNG DER SCHLEIFSCHEIBE
Ziehen Sie den Netzstecker der Maschine.
Ziehen Sie vorsichtig die verbrauchte Schleifscheibe ab,
und achten Sie dabei darauf, dass sich der schwammartige
Schleifteller nicht löst.
Setzen Sie die neue Schleifscheibe vorsichtig so auf,
dass die Löcher (B, Abb. 2) über jenen des Schleiftellers
zu liegen kommen. Drücken Sie die Schleifscheibe
anschließend fest gegen die Klettbefestigung des
Schleiftellers.
7. AUSTAUSCH DES SCHLEIFTELLERS
2
2
Für ein gutes Schleifergebnis muss der schwammartige
Schleifteller vollkommen eben sein.
Wenn der Schleifteller beim Arbeiten verformt oder
sonst in irgendeiner Form beschädigt wurde, erhalten
Sie unregelmäßige Schleifergebnisse. Wechseln Sie daher
den Schleifteller bei Beschädigung unverzüglich aus.
Zum Austauschen des Schleiftellers ziehen Sie den
Netzstecker der Maschine.
Der Schleifteller ist auf beiden Seiten mit Klettbefestigungen versehen. Lösen Sie den Schleifteller durch
Ziehen von der Auflage, und ersetzen Sie ihn durch
einen neuen Schleifteller (C, Abb. 3).
8. AUSTAUSCH DER TELLERABDECKUNG
Funktionen der Abdeckung: Die Bürste am Rand der
Tellerabdeckung hilft bei der Ausrichtung der Schleifscheibe an der bearbeiteten Oberfläche und verstärkt
gleichzeitig die Wirksamkeit der Absaugung.
Die Bürste der Tellerabdeckung ist ein Verschleißteil.
Wenn die ordnungsgemäße Ausrichtung des Schleiftellers und die Wirksamkeit der Absaugung nicht mehr
gewährleistet sind, muss die gesamte Tellerabdeckung
ausgetauscht werden.
Zum Austauschen der Abdeckung gehen Sie wie
folgt vor:
• Ziehen Sie den Netzstecker der Maschine.
• Drücken Sie auf die Arretiervorrichtung der Welle (D,
Abb. 4), und drehen Sie den Teller, bis die Welle arretiert
ist. Drehen Sie den Schleifteller gegen den Uhrzeigersinn,
um diesen von der Maschine abzunehmen.
• Drücken Sie nun die Tellerabdeckung nach unten gegen
die Feder (Abb. 5), und entfernen Sie den Sicherungsring,
der die Abdeckung am Getriebegehäuse hält, mit Hilfe
einer Sicherungsringzange.
• Abschließend ziehen Sie vorsichtig den Saugschlauch
heraus (Fig. 6), nehmen Sie die Tellerabdeckung ab, und
tauschen Sie diese durch eine neue aus. Dazu gehen Sie
in der umgekehrten Ausbaureihenfolge vor.
9. MONTAGE DES SAUGSCHLAUCHS
• Ziehen Sie den Netzstecker der Maschine.
• Nehmen Sie zuerst den Stecker vom Saugschlauch
ab, und setzen Sie den im Lieferumfang der Maschine
enthaltenen Bajonettstecker (E, Abb. 7) auf.
17
Page 18

• Führen Sie nun den Bajonettstecker (E, Abb. 7) des
Saugschlauchs in den Drehstecker (F, Abb. 7) der
Maschine ein.
• Wenn der Bajonettstecker vollständig eingeführt ist,
halten Sie den Drehstecker fest, sodass er sich nicht
mitdreht, und drehen Sie den Bajonettstecker im Uhrzeigersinn, bis er arretiert ist (Abb. 7).
• Zum Abnehmen des Saugschlauches gehen Sie in der
umgekehrten Reihenfolge vor.
10. ABSAUGUNG
Eine längere Einwirkung des Schleifstaubs beim
Wandschleifen kann die Atemfunktion beeinträchtigen.
Verwenden Sie daher immer eine Saugvorrichtung mit
einem geeigneten Staubbeutel für den Wandstaub.
Bei Nichtverwendung eines geeigneten
Staubbeutels steigt die Staubkonzentration
am Arbeitsplatz. Eine länger andauernde
Staubeinwirkung kann zu Atemproblemen
führen und Ihre Gesundheit gefährden.
Einstellung der Saugleistung:
• Bei Verwendung des Kompakt-Staubsaugers ASC482U
von Virutex oder eines anderen Staubsaugers mit regelbarer Leistung können Sie die Saugstärke des Staubsaugers
entsprechend der bearbeiteten Oberfläche regeln.
• Drehen Sie am Einstellrad (H, Abb. 8), um die Saugstärke einzustellen.
• Beginnen Sie mit einer geringen Saugstärke, und
steigern Sie diese allmählich durch Drehen am Rad (H,
Abb. 8), bis die gewünschte Saugleistung erreicht ist.
• Eine hohe Saugleistung erleichtert das Bearbeiten von
Decken und Wänden.
• Eine zu starke Saugleistung bringt die Maschine zum
Vibrieren, sodass diese schwer zu führen ist, und kann
außerdem eine Überlastung der Maschine zur Folge haben. In diesem Fall ist die Arbeit sofort zu unterbrechen,
bis die Maschine abgekühlt ist.
11. EIN- UND AUSSCHALTEN DER MASCHINE
Vergewissern Sie sich, dass die Netzspannung mit der auf
dem Typenschild angegebenen Spannung übereinstimmt
und dass der Schalter in der Position "O" steht, bevor
Sie die Maschine einstecken.
Zum Einschalten der Maschine drücken Sie den Auslöser
(I, Abb. 1), und zum Ausschalten lassen Sie diesen los.
Wenn Sie die Maschine dauernd eingeschaltet lassen
wollen, arretieren Sie den Auslöser mit der Sicherung (J,
Abb. 1). Zum Entfernen der Sicherung drücken Sie den
Auslöser, und lassen Sie ihn anschließend los.
Die Maschine bleibt nicht sofort stehen, sondern die
Schleifscheibe dreht sich noch eine Weile weiter.
Halten Sie die Schleifscheibe von Personen und Gegens-
tänden fern, und legen Sie die Maschine erst ab, wenn die
Schleifscheibe vollständig zum Stillstand gekommen ist.
12. VERWENDUNG DER MASCHINE
Halten Sie die Maschine immer mit beiden Händen fest,
sodass Sie jederzeit die Kontrolle über diese haben und
sicher arbeiten können.
Am besten Sie halten die Maschine mit einer Hand am
(unten befindlichen) Hauptgriff und mit der anderen an
dem mit Softgrip verkleideten Teil des Schaftes bzw. am
Zusatzgriff, sofern dieser montiert ist.
Achten Sie unbedingt auf einen sicheren, beidbeinigen
Stand, vor allem wenn Sie auf einem Arbeitsgerüst
arbeiten.
Schleifarbeiten:
• Wenn die Wandschleifmaschine und der Staubsauger
bereit sind, die genannten Sicherheitsmaßnahmen getroffen wurden und die erforderliche Schutzausrüstung
bereit ist, schalten Sie zuerst die Schleifmaschine und
anschließend den Staubsauger ein.
Bei Verwendung des Virutex-Staubsaugers ASC482U bzw.
eines anderen Staubsaugers mit automatischem Anlauf
brauchen Sie nur die Schleifmaschine einzuschalten.
• Halten Sie die Maschine gegen die zu bearbeitende
Oberfläche. Üben Sie dabei nur den Mindestdruck aus,
der erforderlich ist, um den Schleifkopf flach an der
Wand zu halten.
• Anschließend können Sie die Geschwindigkeit an die
durchzuführenden Schleifarbeiten anpassen.
• Der Gelenkkopf ermöglicht es der Schleifscheibe,
sich an die Konturen der zu bearbeitenden Oberfläche
anzupassen.
• Vermeiden Sie eine Überlastung der Maschine durch
zu starken Druck.
Die besten Schleifergebnisse erzielen Sie mit mäßigem
Druck. Die Qualität der Schleifergebnisse sowie die
Schleifleistung sind hauptsächlich von der Wahl einer
geeigneten Schleifscheibe abhängig.
• Die beste Schleiftechnik ist das Ausführen langer Hinund Herbewegungen, sodass der Schleifkopf ständig in
Bewegung ist. Halten Sie die Maschine nicht still an einer
Stelle, um Schleifspuren an der Oberfläche zu vermeiden.
• Schalten Sie die Maschine nach Beendigung der
Schleifarbeiten aus.
Schleifen in Ecken:
• Zum Verkürzen des Seitenabstands zwischen der
Wand/Decke und dem Schleifteller kann ein Ausschnitt
der Tellerabdeckung herausgezogen und abgenommen
werden (Abb. 10).
• Wenn der herausziehbare Ausschnitt der Tellerabdeckung abgenommen ist, verliert die Absaugung an
Wirkung. Daher sollte dieser Ausschnitt nur bei Bedarf
abgenommen und anschließend sofort wieder aufgesteckt werden.
• Abnehmen des abziehbaren Ausschnitts der Te-
18
Page 19

llerabdeckung:
• Ziehen Sie den Netzstecker der Maschine.
• Drücken Sie die beiden Sicherungen, die den Ausschnitt
halten, gegeneinander, und ziehen Sie diesen ab (Abb. 10).
• Bewahren Sie den abgenommenen Ausschnitt an einer
sicheren Stelle in der Nähe auf, und montieren Sie ihn
nach dem Bearbeiten der Ecken wieder.
• Zum Montieren des Ausschnitts gehen Sie auf analoge
Weise vor.
Empfehlungen:
Verwenden Sie die jeweils am besten geeignete Schleifscheibe für die durchzuführenden Schleifarbeiten.
Schleifscheiben mit einer zu groben Körnung entfernen
zu viel Material bei einem Schleifdurchgang und sind
schwer zu kontrollieren. Schleifscheiben mit einer zu
feinen Körnung verstopfen dagegen zu schnell.
Vermeiden Sie nach Möglichkeit beim Schleifen den
Kontakt mit spitzen Kanten oder Nägeln, da dadurch
die Schleifscheibe oder sogar der schwammartige
Schleifteller beschädigt werden könnten.
13. WARTUNG UND REINIGUNG
Ziehen Sie vor der Durchführung jeder Art von Arbeiten
an der Maschine den Netzstecker ab!
• Sämtliche Wartungs- bzw. Reparaturarbeiten an der
Maschine, für die das Motorgehäuse geöffnet werden
muss, dürfen nur vom offiziellen Kundendienst durchgeführt werden.
• Überprüfen Sie regelmäßig den Zustand des Netzkabels sowie des Netzsteckers, und lassen Sie diese von
einem offiziellen Kundendienst austauschen, wenn Sie
Schäden feststellen.
• Halten Sie die Lüftungsöffnungen im Gehäuse stets
sauber, um ein Überhitzen des Motors zu vermeiden.
• Reinigen Sie regelmäßig den Anschluss zwischen
Saugschlauch und Tellerabdeckung, sodass dieser nicht
verstopft wird.
Wechsel der Kohlebürsten:
Die Kohlebürsten müssen ausgewechselt werden, sobald
sie ihre Mindestlänge von 6 mm erreicht haben.
• Ziehen Sie vor dem Überprüfen bzw. Austauschen der
Kohlebürsten den Netzstecker ab.
• Nehmen Sie den Saugschlauch ab. Lösen Sie anschließend die Befestigungsschrauben (K, Abb. 10) des
rechten und linken Griffs, und nehmen Sie die Griffe ab.
• Lösen Sie die beiden Befestigungsschrauben (L, Abb. 10)
der elektronischen Regelung, und heben Sie diese nach
einer Seite ab. Achten Sie dabei darauf, die Anschlüsse
der Schaltung nicht zu beschädigen.
• Lösen Sie die beiden Befestigungsschrauben (M, Abb.
11) des Kohlebürstenhalters.
• Überprüfen Sie die Kohlebürsten und tauschen Sie
diese ggf. aus.
• Nach dem Ersatz der Kohlebürsten sollte die Maschine
einige Minuten im Leerlauf betrieben werden.
14. ZUBEHÖR UND SCHLEIFSCHEIBEN
Verwenden Sie nur Original-Zubehör- und -Verschleißteile von Virutex, die für diese Maschine ausgelegt
sind.
• Staubsauger ASC482U (mit Saugschlauch)
• Transportkoffer (im Lieferumfang enthalten)
• Ersatzteil Tellerabdeckung, komplett 9702711
• Ersatzteil schwammartiger Schleifteller (mit doppelter
Klettbefestigung) 9745948
• Ersatzteil Auflageteller, steif (mit Klettbefestigung)
9702709
• Schleifscheiben für folgende Oberflächen:
• Für grobe oder körnige Zementoberflächen sowie
Papiertapeten, Körnung 24, 9791114, Packung zu 12
Stk.
• Für Spachtelmassen und Anstriche. Grobschleifen,
Körnung 40, 9791115, Packung zu 25 Stk.
• Für Spachtelmassen und Anstriche. Grobschleifen,
Körnung 60, 9791116, Packung zu 25 Stk.
• Für Spachtelmassen und Anstriche. Grobschleifen,
Körnung 80, 9791117, Packung zu 25 Stk.
• Für Spachtelmassen und Anstriche. Grobschleifen,
Körnung 100, 9791118, Packung zu 25 Stk.
• Für Spachtelmassen und Anstriche. Feinschleifen,
Körnung 120, 9791119, Packung zu 25 Stk.
• Für Spachtelmassen und Anstriche. Feinschleifen,
Körnung 150, 9791120, Packung zu 25 Stk.
• Für Spachtelmassen und Anstriche. Feinschleifen,
Körnung 180, 9791121, Packung zu 25 Stk.
15. GERÄUSCHPEGEL UND VIBRATIONSSTÄRKE
Die Lärm- und Vibrationswerte dieses Elektrowerkzeugs
wurden in Übereinstimmung mit der europäischen Norm
EN 60745-1 gemessen und dienen als Vergleichsgrundlage bei Maschinen für ähnliche Anwendungen.
Der angegebene Vibrationspegel wurde für die wesentlichen Einsatzzwecke des Werkzeugs ermittelt und kann
bei der Beurteilung der Gefahren durch die Aussetzung
unter Vibrationen als Ausgangswert benutzt werden. Die
Vibrationswerte können sich jedoch unter anderen Einsatzbedingungen, mit anderen Arbeitswerkzeugen oder
bei einer ungenügenden Wartung des Elektrowerkzeugs
oder seiner Werkzeuge stark vom angegebenen Wert
unterscheiden und aufgrund des Arbeitszyklus und der
Einsatzweise des Elektrowerkzeugs einen bedeutend
höheren Wert aufweisen.
Es ist daher erforderlich, Sicherheitsmaßnahmen zum
Schutz des Anwenders vor den Vibrationen festzulegen.
Dazu können die Aufrechterhaltung des einwandfreien
Zustands des Werkzeugs und der Arbeitsutensilien sowie
die Festlegung der Zeiten der Arbeitszyklen gehören (wie
Laufzeiten des Werkzeugs unter Last und im Leerlauf,
19
Page 20

ohne tatsächlich eingesetzt zu werden, wodurch die
Gesamtzeit der Vibrationsauswirkungen bedeutend
verringert werden kann).
16. GARANTIE
Alle Elektrowekzeuge von VIRUTEX habe eine garantie
von 12 Montaen ab dem Lieferdatum. Hiervon augeschlossen sind alle Eingriffe oder Schäden aufgrund von
unsachgemässen Gebrauch oder natürlicher Abnutzung
des Geräts.
Wenden Sie sich im Falle einer Reparatur immer an den
zugelassenen Kundendiest von VIRUTEX.
17. RECYCELN VON ELEKTROWERKZEUGEN
Entsorgen Sie Elektrowerkzeuge nie zusammen mit den
restlichen Hausabfällen. Recyceln Sie die Werkzeuge, das
Zubehör und die Verpackungen umweltgerecht. Beachten
Sie die geltenden Rechtsvorschriften Ihres Landes.
Anwendbar in der Europäischen Union und in Ländern
mit Mülltrennsystemen:
Das Vorhandensein dieser Kennzeichnung auf dem
Produkt oder im beiliegenden Informationsmaterial
bedeutet, dass das Produkt nach seiner Nutzungsdauer
nicht zusammen mit anderen Haushaltsabfällen entsorgt
werden darf.
Gemäß der EU-Richtlinie 2002/96/EG können sich die
Nutzer an die Verkaufsstelle, bei der sie das Produkt
erworben haben, oder an die zuständigen örtlichen
Behörden wenden, um in Erfahrung zu bringen, wohin
Sie das Produkt zur umweltgerechten und sicheren
Entsorgung bringen können.
VIRUTEX behält sich das Recht vor, die Produkte ohne
vorherige Ankündigung zu verändern.
ITALIANO
LEVIGATRICE DI PARETI MANUALE LPM97S
Importante
Prima di utilizzare la macchina, leggere
attentamente questo MANUALE DI ISTRUZIONI e il PROSPETTO DELLE NORME
GENERALI DI SICUREZZA allegato. Non
cominciate a lavorare con la macchina
se non siete sicuri di avere compreso
integralmente il loro contenuto.
Conservare tutti e due i manuali per
eventuali consultazioni successive.
USO PREVISTO
La levigatrice di pareti LPM97S è concepita per levigare
pareti stuccate, soffitti e muri interni o esterni, ed inoltre
per eliminare resti di moquette, strati di pittura, rivestimenti, residui di adesivi e intonaci friabili.
La levigatrice di pareti va sempre usata collegata a un
dispositivo di aspirazione.
L'operatore è responsabile degli eventuali danni e
infortuni provocati dall'uso improprio.
1. NORME DI SICUREZZA PER L'USO DELLA
LEVIGATRICE DI PARETI
• Tenere sempre le mani lontane dal disco levigatore
rotante. Il disco potrebbe rimbalzare verso la mano.
• L'esposizione prolungata alle polveri prodotte dalla
levigatura delle pareti può nuocere alle funzioni respiratorie. Utilizzare sempre un aspiratore munito di sacchetto
adatto alla polvere delle pareti e indossare un'apposita
mascherina di protezione delle vie respiratorie.
• La levigatura di vernici al piombo è un'operazione
estremamente tossica e deve quindi essere eseguita
soltanto da professionisti appositamente preparati e
dotati di apparecchiature specifiche per la rimozione
di tali prodotti.
• Assumere una posizione stabile e mantenere saldamente l'equilibrio. Non eccedere i propri limiti. Usare il
ponteggio adatto al lavoro da eseguire.
• Usare sempre l'equipaggiamento di sicurezza adeguato
per levigare, occhiali di sicurezza e mascherina.
• Non allentare la presa sulla macchina finché il disco
non è completamente fermo. Il disco rotante potrebbe
impigliarsi nella superficie di appoggio e scuotere la
macchina in modo incontrollato.
• Non lasciare la macchina in funzione mentre la si
porta con sé. Il disco rotante potrebbe impigliarsi negli
indumenti e provocare gravi lesioni personali.
• Non utilizzare la macchina nei pressi di sostanze in-
20
Page 21

fiammabili: le scintille potrebbero provocare un incendio.
• Con la levigatrice LPM97S non si possono e non si
devono eseguire levigature di sgrossatura, piallature,
lucidature o tranciature a mola. L'esecuzione di lavori
per i quali la macchina non è stata concepita è pericolosa
e può provocare lesioni personali.
• Per levigare impugnare sempre la macchina con entrambe le mani. Se si perde il controllo della macchina
si corre il rischio di procurarsi lesioni personali.
• Per eseguire lavori durante i quali il disco abrasivo
potrebbe toccare conduttori elettrici nascosti, reggere
la macchina usando sempre le impugnature isolanti.
Il contatto con i conduttori elettrici metterebbe in
tensione le parti elettriche della macchina, provocando
una scarica elettrica.
• Tenere il cavo lontano dalla zona di lavoro della
macchina. Controllare che il cavo resti dietro di sé
mentre si leviga.
• Non utilizzare la macchina se il cavo è danneggiato.
I cavi danneggiati aumentano il rischio di scariche
elettriche.
• In caso di vibrazioni insolite o altre anomalie spegnere
immediatamente la macchina e ispezionarla fino a
rintracciare la causa.
• Le polveri sollevate durante la lavorazione possono
essere nocive alla salute. Usare un buon sistema di aspirazione, indossare un'apposita mascherina e raccogliere
con un aspiratore le polveri depositatesi.
• Non forzare mai la macchina qualora presenti difficoltà di movimento o eventuali anomalie; il problema
potrebbe essere imputabile a motivi tecnici, nel qual
caso continuando il lavoro si rischierebbe di danneggiare
irrimediabilmente la macchina. In tutti i casi in cui la
macchina non funzioni correttamente farla controllare
da un servizio tecnico autorizzato.
• Utilizzare solo accessori originali.
2. CARATTERISTICHE
Motore universale..............................................230 V 50 Hz
Classe di protezione...........................................................II /
Potenza...........................................................1.200 W
Velocità a vuoto....................................650-1.300 giri/min
Velocità a pieno carico..........................390-780 giri/min
Diametro dell'abrasivo.............................225 mm
Peso........................................................................................3,1 Kg
Livello di pressione acustica continuo equivalente
ponderato A.......................................................................82 dBA
Livello di potenza acustica A...........................................93 dBA
Incertezza della misura...................................................K = 3 dBA
Usare la protezione acustica!
Valori totali delle oscillazioni.................................ah: <2,5 m/s
Incertezza della misura................................................K: 1,5 m/s
3. CONTENUTO. APPARECCHIATURA STANDARD
All'interno della valigetta sono presenti i seguenti
elementi:
• Levigatrice di pareti manuale LPM97S.
• Connettore a baionetta.
• 1 Disco abrasivo grana 80.
• Manuali di sicurezza, di istruzioni e altra documentazione.
4. COLLEGAMENTO ELETTRICO
Verificare sempre che la corrente di alimentazione
abbia lo stesso voltaggio indicato sulla targhetta
d'identificazione della macchina.
Non usare la macchina in nessun caso se il cavo elettrico
è danneggiato.
Un cavo danneggiato o in cattivo stato deve essere immediatamente sostituito da un Servizio di Assistenza Tecnica
Autorizzato; non cercare di ripararlo personalmente.
Se si lavora con il cavo in cattivo stato si rischia un
infortunio elettrico.
5. CONTROLLO ELETTRONICO
Avviamento dolce: Controllo elettronico dell'avviamento
che garantisce una messa in moto dolce e un aumento
progressivo della velocità.
Velocità controllata: La velocità di rotazione del disco
è regolabile continuamente, da 650 a 1.300 giri/min a
vuoto, tramite la rotella di regolazione (A, Fig. 1). Ciò
consente di regolare la velocità de levigatura ottimale
per ogni tipo di materiale.
Il controllo elettronico della velocità la mantiene costante anche a pieno carico e consente di ottenere una
levigatura perfetta.
Si consiglia di utilizzare velocità elevate quando occorre asportare molto materiale e velocità basse per
levigature più leggere e per avere un migliore controllo
sulla macchina.
6. FISSAGGIO DELL'ABRASIVO
Scollegare la macchina dalla presa di corrente.
Togliere l'abrasivo consumato, facendo in modo che il
piatto spugnoso rimanga in posizione.
Centrare con precisione i fori dell'abrasivo (B, Fig. 2)
su quelli del piatto e premere l'abrasivo per fissarlo al
velcro del piatto.
7. SOSTITUZIONE DEL PIATTO SPUGNOSO
Il piatto spugnoso deve rimanere perfettamente piano
per poter levigare correttamente e ottenere un buon
risultato.
2
Se il piatto si è deformato o ha subito danni da usura, si
2
otterranno levigature irregolari e di qualità scadente. Se
il piatto è danneggiato occorre cambiarlo senza indugio.
21
Page 22

Per sostituire il piatto spugnoso, scollegare la macchina
dalla presa di corrente.
Il piatto levigatore è rivestito di velcro su entrambe le
superfici, quindi, per cambiarlo, occorre tirarlo separandolo dal piatto base e quindi sostituirlo con un piatto
nuovo (C, Fig. 3).
8. SOSTITUZIONE DELLA CALOTTA DEL PIATTO
Funzioni della calotta: La spazzola posta sulla circonferenza della calotta del piatto ha il doppio scopo di
mantenere il disco abrasivo bene allineato alla superficie
che si sta levigando e di consentire una migliore efficacia
del sistema di aspirazione.
Con l'uso continuato della macchina, la spazzola della
calotta si consuma e non è più in grado di garantire la
corretta posizione del piatto e l'efficacia dell'aspirazione;
pertanto, quando ciò si verifica, occorre sostituire la
calotta completa.
Per sostituire la calotta effettuare le seguenti
operazioni:
• Scollegare la macchina dalla presa di corrente.
• Premere il dispositivo di bloccaggio dell'asse (D, Fig. 4),
facendo ruotare il piatto fino a bloccare l'asse. Ruotare
il piatto levigatore in senso antiorario per estrarlo dalla
macchina.
• Premere la calotta verso il basso contro la molla (Fig.
5) e, con l'aiuto di un paio di pinze specifiche per anelli
elastici, rimuovere l'anello elastico che fissa la calotta
alla scatola degli ingranaggi.
• Quindi estrarre con cautela il tubo di aspirazione (Fig.
6), togliere la calotta dal piatto e sostituirla con una
calotta nuova ripetendo in ordine inverso la procedura
di smontaggio.
9. MONTAGGIO DEL TUBO DI ASPIRAZIONE
• Scollegare la macchina dalla presa di corrente.
• In primo luogo smontare il terminale connettore del
tubo dell'aspiratore e montare il connettore a baionetta
(E, Fig. 7) fornito con la macchina.
• Quindi inserire il connettore a baionetta (E, Fig. 7) del
proprio tubo di aspirazione, nel connettore girevole (F,
Fig. 7) della macchina.
• Quando il connettore a baionetta sarà completamente
inserito, tenere fermo il connettore girevole in modo
che non giri, e ruotare in senso orario il connettore a
baionetta fino a bloccarlo (Fig. 7).
• Per smontare il tubo di aspirazione, ripetere le stesse
operazioni in ordine inverso.
10. ASPIRAZIONE
L'esposizione prolungata alle polveri prodotte dalla
levigatura delle pareti può nuocere alle funzioni respiratorie. Utilizzare sempre un aspiratore munito di
sacchetto adatto alla polvere delle pareti.
22
Se non si usa il sacchetto adatto, il livello di
polveri nell'ambiente di lavoro aumenterà
e l'esposizione prolungata a tali polveri
potrà causare problemi respiratori.
Regolazione della potenza di aspirazione:
• Se si utilizza l'aspiratore compatto ASC482U della
Virutex, o un altro apposito aspiratore a potenza regolabile, si potrà regolare la potenza di aspirazione in base
al tipo di superficie su cui si sta lavorando.
• Agire sulla rotella di regolazione (H, Fig. 8), per ottenere
l'aspirazione adeguata.
• Incominciare con una bassa potenza di aspirazione,
aumentandola poco a poco ruotando la rotella (H, Fig.
8) fino ad ottenere l'aspirazione adeguata.
• Un'aspirazione elevata facilita le operazioni di levigatura dei soffitti e delle pareti.
• Un'aspirazione eccessiva provocherà vibrazioni alla
macchina, ostacolandone il maneggio e rischiando di
surriscaldarla. Se dovesse surriscaldarsi, interrompere
immediatamente il lavoro per permettere alla macchina
di raffreddarsi.
11. ACCENSIONE E SPEGNIMENTO DELLA
MACCHINA
Prima di collegare la macchina alla rete, verificare che la
tensione di alimentazione corrisponda a quella indicata
sulla targhetta d'identificazione e che l'interruttore si
trovi in posizione “O”.
Per accendere la macchina premere l'interruttore a
grilletto (I, Fig. 1) e per spegnerla rilasciarlo.
Se si vuole mantenere costantemente accesa la macchina,
inserire la sicura (J, Fig. 1) dell'interruttore. Per togliere
la sicura, premere l'interruttore e rilasciarlo.
La macchina non si arresta immediatamente: l'abrasivo
continua a girare per un po' prima di fermarsi.
Fare attenzione che l'abrasivo non tocchi niente e nessuno
e non lasciare la macchina finché il disco abrasivo non
è completamente fermo.
12. MODALITÀ D'USO DELLA MACCHINA
Per lavorare in modo sicuro e mantenere sempre il
controllo della macchina, impugnarla sempre con
entrambe le mani.
Il metodo migliore per farlo è quello di afferrare la
macchina con una mano sull'impugnatura principale,
quella posteriore, e l'altra mano sulla parte del manico
rivestita di softgrip, o sull'impugnatura ausiliaria eventualmente montata.
È estremamente importante poggiare stabilmente
entrambi i piedi, soprattutto quando si lavora su un
ponteggio.
Levigatura:
• Dopo aver preparato la levigatrice di pareti e
Page 23

l'aspiratore, adottato le misure di sicurezza prescritte
e indossato l'equipaggiamento di sicurezza necessario, accendere prima la macchina e successivamente
l'aspiratore.
Se si utilizza l'aspiratore Virutex ASC482U, o un altro
aspiratore munito di avviamento automatico, sarà
sufficiente accendere la macchina.
• Accostare la macchina alla superficie da levigare,
toccandola solo leggermente e con la pressione minima
sufficiente a mantenere la testina abrasiva appoggiata
piatta contro la superficie.
• A questo punto si può regolare la velocità adattandola
al lavoro da svolgere.
• La testina articolata consente al disco abrasivo di
seguire i contorni della superficie di lavoro.
• Non sovraccaricare la macchina esercitando troppa
pressione.
I migliori risultati di levigatura si ottengono con una
pressione moderata. La qualità e la resa della levigatura
dipendono sostanzialmente dalla scelta dell'abrasivo
adeguato.
• La migliore tecnica di levigatura consiste nell'effettuare
lunghe passate avanti e indietro, mantenendo la testina
in costante movimento. Per non rigare la superficie non
tenere la macchina ferma sullo stesso punto.
• Terminata la levigatura scollegare la macchina dalla
presa di corrente.
Levigatura vicino ai bordi:
• La levigatrice è munita di un settore asportabile dalla
calotta della testina, che permette di ridurre la distanza
laterale tra la parete / il tetto e il piatto levigatore (Fig. 10).
• Quando la macchina lavora senza il settore della calotta
della testina, l'aspirazione perde efficacia; per tale motivo
va tolto soltanto quando è necessario e rimontato non
appena la lavorazione lo permette.
• Per togliere il settore della calotta:
• Scollegare la macchina dalla presa di corrente.
• Premere tra di loro i due elementi di ritenzione che
trattengono il settore ed estrarlo dal supporto (Fig. 10).
• Riporre il settore in un luogo vicino e sicuro, per poterlo
rimontare quando necessario.
• Per rimontare il settore procedere come per lo
smontaggio.
Consigli:
Usare sempre il disco più adatto al tipo di levigatura
da svolgere.
I dischi abrasivi a grana molto grossa asportano molto
materiale, a volte troppo, e sono difficili da controllare,
mentre i dischi a grana molto fine tendono a intasarsi
con facilità.
Durante la levigatura cercare di evitare gli spigoli aguzzi
e i chiodi, dato che tendono a danneggiare il disco
abrasivo e a volte anche il piatto spugnoso.
13. MANUTENZIONE E PULIZIA
Scollegare la macchina dalla presa di corrente prima di
eseguire qualsiasi intervento sulla stessa.
• Tutti gli interventi di manutenzione o di riparazione
della macchina che richiedano l'apertura della carcassa
del motore possono essere svolti soltanto da un Servizio
di Assistenza Ufficiale Autorizzato.
• Verificare periodicamente lo stato del cavo e della
spina, se danneggiati farli sostituire da un Servizio di
Assistenza Ufficiale Autorizzato.
• Per assicurare la refrigerazione del motore, tenere
sempre puliti gli sfiati di circolazione dell'aria presenti
sulla carcassa.
• Pulire il collegamento tra il tubo di aspirazione e la
calotta del piatto per evitare che si ostruisca.
Sostituzione delle spazzole:
È necessario sostituire le spazzole quando raggiungono
una lunghezza minima di 6 mm.
• Per ispezionare o sostituire le spazzole, prima scollegare
la macchina dalla presa di corrente.
• Togliere il tubo di aspirazione e smontare le impugnature di destra e di sinistra, rimuovendo le viti (K, Fig.
10) di fissaggio.
• Rimuovere le due viti (L, Fig. 10) che fissano il circuito
elettronico e spostarlo di lato facendo attenzione a non
danneggiare le connessioni del circuito.
• Allentare le due viti (M, Fig. 11) che fissano i portaspazzole.
• Ispezionare le spazzole ed eventualmente sostituirle.
• Dopo il cambio delle spazzole, è consigliabile lasciare in
funzione la macchina per alcuni minuti senza utilizzarla.
14. ACCESSORI ED ABRASIVI
Utilizzare soltanto accessori e materiali di consumo
originali Virutex concepiti per questa macchina.
• Aspiratore ASC482U (tubo d'aspirazione incluso)
• Valigetta di trasporto (inclusa di serie)
• Calotta del piatto completa 9702711
• Piatto levigatore spugnoso (doppio velcro) 9745948
• Piatto supporto rigido (velcro) 9702709
• Disco abrasivo per levigare superfici:
• Di cemento grezze o granulari e carta da parati, grana
24, 9791114, confezione da 12 unità.
• Stuccate e tinteggiate. Levigatura grezza, grana 40,
9791115, confezione da 25 unità.
• Stuccate e tinteggiate. Levigatura grezza, grana 60,
9791116, confezione da 25 unità.
• Stuccate e tinteggiate. Levigatura grezza, grana 80,
9791117, confezione da 25 unità.
• Stuccate e tinteggiate. Levigatura grezza grana 100,
9791118, confezione da 25 unità.
• Fini: stuccate e tinteggiate. Levigatura fine, grana
120, 9791119, confezione da 25 unità.
• Fini: stuccate e tinteggiate. Levigatura fine, grana
23
Page 24

150, 9791120, confezione da 25 unità.
• Fini: stuccate e tinteggiate. Levigatura fine, grana
180, 9791121, confezione da 25 unità.
15. LIVELLI DI RUMORE E DI VIBRAZIONI
I livelli di rumore e vibrazioni di questo apparato elettrico sono stati misurati in conformità con la Norma
Europea EN 60745-1 e fungono da base di confronto
con macchine per applicazioni simili.
Il livello di vibrazioni indicato è stato determinato per
le principali applicazioni dell’apparato e può essere
utilizzato come punto di partenza per la valutazione
dell’esposizione al rischio delle vibrazioni. Ciononostante,
il livello di vibrazioni può variare notevolmente rispetto
al valore dichiarato in altre condizioni di applicazione,
con altri strumenti di lavoro o in caso di manutenzione
insufficiente dell’apparato elettrico e dei suoi strumenti,
e può aumentare notevolmente come conseguenza del
ciclo di lavoro e del modo d’uso dell’apparato elettrico.
Pertanto è necessario stabilire misure di sicurezza per
la protezione dell’utente dall’effetto delle vibrazioni,
ad esempio mantenendo l’apparato e gli strumenti
di lavoro in perfetto stato e pianificando i tempi dei
cicli lavorativi (ad esempio i tempi di funzionamento
dell’apparato sotto carico e i tempi di funzionamento a
vuoto quando l'apparato non viene realmente utilizzato,
dato che la riduzione di questi ultimi può ridurre in modo
sostanziale il valore totale dell’esposizione).
16. GARANZIA
Tutte le machine elettroportatili VIRUTEX hanno una
garanzia di 12 mesi valida a partire della data di consegna, con l'esclusione di tutte le manipolazioni o danni
derivanti da un uso inadeguato o dall'usura normale
della macchina.
Per qualunque riparazione rivolgersi al servizio autorizzato di assistenza tecnica VIRUTEX.
17. SMALTIMENTO DI APPARECCHI ELETTRICI
Non buttare mai gli apparecchi elettrici con il resto dei
rifiuti domestici. Smaltire gli apparecchi, gli accessori
e gli imballaggi nel rispetto dell’ambiente. Rispettare la
normativa vigente nazionale.
Applicabile nell’Unione Europea e nei paesi europei con
sistemi di raccolta differenziata dei rifiuti:
La presenza di questo marchio sul prodotto o sul materiale
informativo che lo accompagna indica che, al termine
della sua vita utile, non dovrà essere eliminato insieme
ad altri rifiuti domestici.
24
Conformemente alla Direttiva Europea 2002/96/CE,
gli utenti possono contattare il punto vendita presso
cui è stato acquistato il prodotto, o le autorità locali
pertinenti, per informarsi su come e dove portarlo per
il suo smaltimento ecologico e sicuro.
La VIRUTEX si riserva il diritto di modificare i propi
prodotti senza preaviso.
PORTUGUÉS
LIXADORA DE PAREDES MANUAL
LPM97S
Importante
Antes de utilizar a máquina leia atentamente este MANUAL DE INSTRUÇÕES e
o FOLHETO DE INSTRUÇÕES GERAIS DE
SEGURANÇA anexo. Assegure-se de os
ter compreendido antes de começar a
trabalhar com a máquina.
Conserve os dois manuais de instruções
para possíveis consultas posteriores.
UTILIZAÇÃO RECOMENDADA
A lixadora de paredes LPM97S foi concebida para lixar
paredes de massa, tectos e paredes interiores e exteriores,
bem como para eliminar restos de alcatifa, camadas
de tinta, revestimentos, restos de colas e reboco solto.
Utilizar a lixadora de paredes sempre conectada a um
dispositivo de aspiração.
Os danos e acidentes produzidos pela utilização incorrecta desta ferramenta são da inteira responsabilidade
do seu utilizador.
1. INSTRUÇÕES DE SEGURANÇA PARA O MANUSEAMENTO DA LIXADORA DE PAREDES
• Mantenha sempre as mãos afastadas do disco lixador
rotativo. O disco pode saltar e atingir as suas mãos.
• A exposição prolongada ao pó da lixagem das paredes
pode afectar os órgãos respiratórios. Utilize sempre um
aspirador com saco apropriado para o pó das paredes e
uma máscara de respiração adequada.
• A lixagem de tintas à base de chumbo é extremamente
tóxica, pelo que apenas deve ser levada a cabo por
profissionais com formação adequada e dotados do
equipamento especial para a remoção deste tipo de tintas.
• Mantenha-se sempre firmemente apoiado no solo e
conserve o equilíbrio. Procure sempre não se exceder no
trabalho. Utilize sempre o andaime adequado
para o trabalho a realizar.
• Utilize sempre o equipamento de segurança adequado para lixar, óculos de segurança e uma máscara
Page 25

respiratória.
• Nunca solte a máquina antes de o disco se encontrar
completamente parado. A disco giratório pode prender-se
à superfície do depósito e sacudir a máquina de forma
incontrolável.
• Nunca transporte a máquina com ela em funcionamento. O disco giratório pode prender-se à sua roupa
e causar lesões graves.
• Não utilize a máquina na proximidade de substâncias
inflamáveis, uma vez que as chispas causadas por ela
podem incendiá-las.
• A lixadora LPM97S não foi concebida para efectuar a
lixagem de desbaste, escovamento, polimento ou corte
com pedra de amolar. Utilizar a máquina em trabalhos
para os quais não foi concebida é perigoso e pode
provocar danos pessoais.
• Segure sempre a máquina com ambas as mãos ao lixar.
Uma perda momentânea do controlo da máquina pode
causar danos pessoais.
• Segure sempre a máquina pelas pegas isolantes ao
realizar trabalhos em que o disco abrasivo possa entrar
em contacto com condutores eléctricos ocultos. O
contacto com os condutores eléctricos colocaria sob
tensão as partes metálicas da máquina, provocando
uma descarga eléctrica.
• Mantenha o cabo afastado da área de trabalho da
máquina. Assegure-se de que o cabo está sempre atrás
de si enquanto trabalha com a lixadora.
• Não utilize a máquina se o cabo estiver danificado. Os
cabos danificados aumentam o risco de uma descarga
eléctrica.
• Pare a máquina imediatamente se notar qualquer
vibração fora do normal ou qualquer outra anomalia, e
inspeccione a máquina até encontrar a causa.
• O pó produzido ao trabalhar com esta máquina pode
ser prejudicial para a saúde. Utilize um bom sistema de
aspiração, coloque uma máscara respiratória adequada
e recolha o pó produzido com um aspirador.
• Nunca force uma máquina que pareça ter problemas
de funcionamento ou que apresente alguma deficiência;
pode tratar-se de uma anomalia técnica que danificaria
a máquina de modo irreversível com a continuação do
trabalho. Se a máquina deixar de funcionar correctamente, submeta-a a uma revisão por um serviço de
assistência técnica autorizado.
• Utilize unicamente acessórios originais.
2. CARACTERISTICAS
Motor universal....................................................230 V 50 Hz
Classe de protecção.................................................II /
Potência.......................................................................1.200 W
Velocidade sem carga.................................650-1.300 rpm
Velocidade em plena carga...............................390 -780 rpm
Diâmetro do disco abrasivo.................................225 mm
Peso..................................................................................3,1 Kg
Nível de pressão acústica contínuo equivalente pon-
derado A...........................................................................82 dBA
Nível de potência acústica A.................................93 dBA
Incerteza...........................................................................K = 3 dBA
Usar protecção auricular!
Valores totais de vibração......................................a
Incerteza.........................................................................K: 1,5 m/s2
: <2,5 m/s
h
3. CONTEÚDO. EQUIPAMENTO STANDARD
No interior da mala encontrará os seguintes elementos:
• Lixadora de paredes manual LPM97S.
• Conector de baioneta.
• Disco abrasivo de Gr. 80.
• Manual de segurança, instruções e documentação
diversa.
4. CONEXÃO ELÉCTRICA
Verifique sempre se a corrente de alimentação tem uma
voltagem idêntica à indicada na chapa de características
da máquina.
Nunca utilize a máquina se o cabo da alimentação de
corrente estiver danificado.
Um cabo danificado ou em mau estado deverá ser
imediatamente substituído por um Serviço Técnico
Autorizado. Nunca tente repará-lo por sua própria conta.
Trabalhar com o cabo em mau estado pode dar origem
a um acidente eléctrico.
5. CONTROLO ELECTRÓNICO
Arranque suave: Controlo electrónico do arranque
que assegura um accionamento suave e um aumento
progressivo da velocidade.
Velocidade controlada: Pode regular a velocidade de
rotação do disco ininterruptamente entre 650 e 1.300
rpm sem carga, utilizando a roda de ajuste da velocidade
(A, Fig. 1). Deste modo poderá seleccionar a velocidade
de lixagem mais apropriada para cada material.
O controlo electrónico de velocidade manterá a velocidade constante mesmo ao trabalhar a plena carga,
permitindo obter uma lixagem perfeita.
Aconselhamos utilizar as velocidades altas quando for
necessário arrancar muito material, e as velocidades
baixas para uma lixagem mais fina e para ter melhor
controlo sobre a máquina.
6. FIXAÇÃO DO DISCO ABRASIVO
Desligue a máquina da rede de alimentação eléctrica.
Retire o disco abrasivo gasto, de maneira a que o prato
esponjoso não saia da sua posição.
Centre cuidadosamente os orifícios do disco abrasivo (B,
Fig. 2) sobre os orifícios do prato, e pressione o disco
abrasivo para que este fique agarrado ao velcro do prato.
25
2
Page 26

7. SUBSTITUIÇÃO DO PRATO ESPONJOSO
Para uma lixagem correcta e para obter um bom resultado, o prato esponjoso deve estar perfeitamente plano.
Se o prato estiver deformado ou tiver sido danificado
durante o trabalho, a lixagem será irregular e de má
qualidade. Se o prato estiver danificado, substitua-o
imediatamente.
Para substituir o prato esponjoso, desligue a máquina
da rede de alimentação eléctrica.
O prato lixador tem velcro nas duas faces; para o substituir, puxe-o até o arrancar do prato-base e substitua-o
por um prato lixador novo. (C, Fig. 3).
8. SUBSTITUIÇÃO DA COBERTURA DO PRATO
Função da cobertura: A escova situada na periferia
da cobertura do prato tem a dupla função de manter o
disco abrasivo correctamente alinhado com a superfície
a lixar e de permitir um funcionamento mais eficaz do
sistema de aspiração.
A escova da cobertura vai sendo consumida pelo uso
da máquina, deixando com o tempo de garantir a correcta posição do prato e a eficácia da aspiração, pelo
que deverá substituir-se a cobertura na sua totalidade
quando a escova estiver desgastada.
Para substituir a cobertura, siga os seguintes passos:
• Desligue a máquina da rede de alimentação eléctrica.
• Pressione o bloqueador do eixo (D, Fig. 4), fazendo
girar o prato até que o eixo fique bloqueado. Gire o
prato lixador no sentido contrário ao dos ponteiros do
relógio para o retirar da máquina.
• Pressione a cobertura para baixo, contra a mola (Fig.
5) e com a ajuda de um alicate especial para anéis
elásticos, retire o anel elástico que segura a cobertura
à caixa da engrenagem.
• Finalmente, retire com cuidado o tubo de aspiração (Fig.
6), remova a cobertura do prato e substitua-a por uma
nova, procedendo de modo inverso para a sua montagem.
9. MONTAGEM DO TUBO DE ASPIRAÇÃO
• Desligue a máquina da rede de alimentação eléctrica.
• Desmonte primeiro o terminal conector do tubo do
seu aspirador e monte o conector de baioneta (E, Fig.
7) incluído no equipamento da máquina.
• Introduza o conector de baioneta (E, Fig. 7) do tubo de
aspiração no conector giratório (F, Fig. 7) da máquina.
• Quando o conector de baioneta estiver completamente
introduzido no conector, segure o conector giratório para
que este não gire e faça rodar o conector de baioneta
no sentido horário até o bloquear. (Fig. 7).
• Para desmontar o tubo de aspiração, proceder de
modo inverso.
10. ASPIRAÇÃO
A exposição prolongada ao pó da lixagem das paredes
26
pode afectar os órgãos respiratórios. Utilize sempre um
aspirador com um saco de recolha apropriado para o
pó de paredes.
Se não utilizar o saco apropriado, aumentará o nível de pó na área de trabalho,
podendo a exposição prolongada a este
risco causar problemas respiratórios.
Ajuste da potência de aspiração:
• Se utiliza o aspirador compacto ASC482U de Virutex,
ou outro aspirador apropriado de potência regulável,
pode ajustar a potência de sucção do aspirador de acordo
com a superfície em que estiver a trabalhar.
• Regule a roda de ajuste (H, Fig. 8) para obter a sucção
apropriada.
• Comece por uma sucção baixa e incremente a potência
de sucção pouco a pouco, girando a roda (H, Fig. 8) até
conseguir a sucção apropriada.
• Uma sucção elevada torna mais fácil o trabalho de
lixar tectos e paredes.
• Se a sucção for excessiva, a máquina vibrará, sendo
mais difícil orientá-la e correndo-se o risco de a sobrecarregar. Se tal ocorrer, pare imediatamente o trabalho
até que a máquina tenha arrefecido.
11. ACCIONAMENTO E PARAGEM DA MÁQUINA
Verifique se a tensão da rede é a mesma que se indica na
placa de características e se o interruptor está desligado,
na posição “O”, antes de ligar a máquina à rede.
Para pôr a máquina em funcionamento, prima o interruptor de gatilho (I, Fig. 1) e solte-o quando quiser
para pará-la.
Se deseja manter a máquina em funcionamento contínuo, pode fixar o dispositivo de bloqueio (J, Fig. 1) do
interruptor. Para soltar o dispositivo de bloqueio do
interruptor, prima o interruptor e solte-o em seguida.
A máquina não pára imediatamente, pois o disco abrasivo
continua a girar durante algum tempo até se imobilizar
por completo.
Tenha cuidado para evitar que ele toque em pessoas
ou objectos e não solte a máquina enquanto o disco
abrasivo não estiver completamente parado.
12. COMO UTILIZAR A MÁQUINA
Para trabalhar de forma segura e manter sempre o
controlo da máquina, esta deve segurar-se sempre com
as duas mãos.
O melhor modo de o fazer consiste em segurar a máquina com uma mão pela empunhadura principal e com
a outra mão na parte da coluna forrada com softgrip,
ou na pega auxiliar, se a mesma se encontrar montada.
É muito importante manter uma posição firmemente
assente em ambos os pés, particularmente ao realizar
Page 27

trabalhos sobre andaimes.
Como lixar:
• Depois de preparada a lixadora de paredes e o aspirador,
e uma vez tomadas as medidas de segurança explicadas
e dotados do equipamento de protecção e segurança
necessário, em primeiro lugar deve colocar-se a máquina
em funcionamento e depois o aspirador.
Se utilizar o aspirador Virutex ASC482U ou outro aspirador com arranque automático integrado, apenas será
necessário pôr a máquina em funcionamento.
• Aplique a máquina sobre a superfície a lixar. O contacto
da máquina com a superfície a lixar deverá ser suave,
exercendo uma pressão mínima para manter o cabeçal
abrasivo plano contra a superfície.
• Agora poderá reajustar a velocidade, adequando-a da
melhor forma ao trabalho que vai realizar.
• O cabeçal articulado permite ao disco abrasivo seguir
os contornos da superfície de trabalho.
• Não sobrecarregue a máquina aplicando uma pressão
excessiva.
Os melhores resultados de lixagem conseguem-se
aplicando uma pressão moderada. A qualidade e o
rendimento da lixagem dependem fundamentalmente
da escolha do disco abrasivo adequado.
• A melhor técnica de lixagem consiste em efectuar
passagens longas de vai-vem, mantendo o cabeçal, em
constante movimento. Não deixe a máquina fixar-se no
mesmo lugar, para evitar marcas na superfície.
• Desligue a máquina depois de terminado o trabalho
de lixagem.
Como lixar perto das bordas:
• A lixadora dispõe de uma secção da cobertura do cabeçal
extraível, que permite reduzir a distância lateral entre a
parede / o tecto e o prato lixador. (Fig. 10).
• Quando a máquina trabalha sem esta secção da
cobertura do cabeçal, a aspiração perde eficácia, pelo
que a secção da cobertura só deverá extrair-se quando
for necessário, voltando a montar-se logo que possível.
• Para retirar o sector da cobertura:
• Desligue a máquina da rede de alimentação eléctrica.
• Pressione os dois retentores que seguram a secção da
cobertura e retire-a do seu suporte. (Fig. 10)
• Guarde a secção da cobertura retirada num lugar
próximo e seguro para poder montá-la novamente logo
que seja possível.
• Siga os mesmos passos para montar novamente a
secção da cobertura.
Recomendações:
Assegure-se de que utiliza o disco mais adequado para
o trabalho de lixagem a realizar.
Os discos abrasivos com demasiado grão eliminam
muito material à sua passagem, por vezes em excesso,
e tornam-se difíceis de controlar, enquanto que os de
grão demasiadamente fino têm tendência a perder a
capacidade de lixagem com facilidade.
Ao lixar, evite as esquinas agudas e os pregos, uma vez
que podem danificar o disco abrasivo e por vezes até
o prato esponjoso.
13. MANUTENÇÃO E LIMPEZA
Desligue a máquina da rede de alimentação eléctrica
antes de proceder a qualquer manipulação.
• Todos os trabalhos de manutenção e de reparação
da máquina que requeiram a abertura da carcaça do
motor devem ser sempre realizados por um Serviço
Oficial Autorizado.
• Verifique periodicamente o estado do cabo e da ficha
de ligação e, se estes estiverem deteriorados, substitua-os
por um Serviço Oficial Autorizado.
• Mantenha sempre limpas as aberturas de circulação de
ar da carcaça, para assegurar a refrigeração do motor.
• Limpe a conexão do tubo aspirador com a cobertura
do prato para que esta não fique obstruída.
Substituição das escovas:
É importante substituir as escovas sempre que estas
alcancem um comprimento mínimo de 6 mm.
• Para inspeccionar ou substituir as escovas, desligue
primeiro a máquina da rede eléctrica.
• Retire o tubo de aspiração e desmonte as pegas da
direita e da esquerda, retirando os parafusos (K, Fig. 10)
que as seguram.
• Retire os dois parafusos (L, Fig. 10) que seguram o circuito electrónico e separe-o para um lado, com cuidado
para não danificar as ligações do circuito.
• Retire os dois parafusos (M, Fig. 11) que seguram os
porta-escovas.
• Inspeccione as escovas e substitua-as se for necessário.
• É aconselhável deixar a máquina funcionar sem estar
submetida a qualquer carga durante alguns minutos
depois de substituir as escovas.
14. ACESSÓRIOS E DISCOS ABRASIVOS
Utilize apenas acessórios e consumíveis originais Virutex
concebidos para esta máquina.
• Aspirador ASC482U (tubo de aspiração incluido)
• Mala de transporte (incluída de origem)
• Cobertura do prato completa 9702711
• Prato lixador esponjoso (duplo velcro) 9745948
• Prato de suporte rígido (velcro) 9702709
• Disco abrasivo para lixar superfícies:
• De cimento bruto ou granulares e papel de parede
grão 24, 9791114, embalagem de 12 unid.
• De massas e pinturas. Lixagem grossa, grão 40,
9791115, embalagem de 25 unid.
• De massas e pinturas. Lixagem grossa, grão 60,
9791116, embalagem de 25 unid.
• De massas e pinturas. Lixagem grossa, grão 80,
9791117, embalagem de 25 unid.
• De massas e pinturas. Lixagem grossa, grão 100,
27
Page 28

9791118, embalagem de 25 unid.
• Acabamento de massas e pinturas. Lixagem fina,
grão 120, 9791119, embalagem de 25 unid.
• Acabamento de massas e pinturas. Lixagem fina,
grão 150, 9791120, embalagem de 25 unid.
• Acabamento de massas e pinturas. Lixagem fina,
grão 180, 9791121, embalagem de 25 unid.
15. NIVEL DE RUIDO E VIBRAÇÕES
Os níveis de ruído e vibrações desta ferramenta eléctrica
foram medidos de acordo com a Norma Europeia EN
60745-1 e servem como base de comparação com uma
máquina de aplicação semelhante.
O nível de vibrações indicado foi determinado para as
principais aplicações da ferramenta e pode ser utilizado
como valor de partida para a avaliação da exposição ao
risco das vibrações. Contudo, o nível de vibrações pode
alcançar valores muito diferentes do valor indicado
noutras condições de aplicação, com outros dispositivos
de trabalho ou com uma manutenção deficiente da
ferramenta eléctrica e respectivos dispositivos, podendo
resultar num valor muito mais elevado devido ao seu
ciclo de trabalho e modo de utilização.
Por conseguinte, é necessário estabelecer medidas de
segurança para protecção do utilizador contra o efeito
das vibrações, tais como a manutenção da ferramenta,
conservação dos respectivos dispositivos em perfeito
estado e organização dos períodos de trabalho (tais
como os períodos de trabalho com a ferramenta em
carga e períodos de trabalho com a ferramenta em vazio
e sem ser realmente utilizada, uma vez que a redução
da carga pode diminuir de forma substancial o valor
total da exposição).
16. GARANTIA
Todas as máquinas electro-portáteis VIRUTEX possuem
uma garantia válida por 12 meses contados a partir
do dia do seu fornecimiento, ficando dela excluídas
todas aquelas manipulações ou danos ocasionados por
utilizações não adequadas ou pelo desgaste natural da
máquina. Para qualquer reparação, há que se dirigir ao
Serviço Oficial de Assistência Técnica VIRUTEX.
17. RECICLAGEM DAS FERRAMENTAS ELÉTRICAS
Nunca elimine a ferramenta elétrica com os restantes
resíduos domésticos. Recicle as ferramentas, os acessórios
e as embalagens de uma forma que respeite o meio
ambiente. Respeite os regulamentos em vigor no seu país.
Aplicável na União Europeia e nos países europeus com
sistemas de recolha seletiva de resíduos:
A presença deste símbolo no produto ou no material
informativo que o acompanha indica que, no final da
sua vida útil, não se deve proceder à sua eliminação em
conjunto com outros resíduos domésticos.
28
Nos termos da Diretiva Europeia 2002/96/CE, os utilizadores podem contactar o estabelecimento onde adquiriram
o produto, ou as autoridades locais competentes, para
obter informações sobre como e onde poderão levar o
produto para que este seja submetido a uma reciclagem
ecológica e segura.
A VIRUTEX reserva para si o direito de poder modificar
os seus productos, sin a necesidade de aviso prévio.
РУССКИЙ
LPM97S ШЛИФОВАЛЬНАЯ МАШИНА ДЛЯ
СТЕН И ПОТОЛКОВ
Важно!
Перед началом эксплуатации
оборудования внимательно
прочитайте данную ИНСТРУКЦИЮ
ПО ЭКСПЛУАТАЦИИ и
прилагаемую ОБЩУЮ
ИНСТРУКЦИЮ ПО ТЕХНИКЕ
БЕЗОПАСНОСТИ. Перед
запуском инструмента в первый
раз убедитесь в том, что все
изложенное в данных документах
Вам понятно.
Сохраните комплект документации
для обращения к ней в будущем.
ОБЛАСТЬ ПРИМЕНЕНИЯ
Шлифовальная машина LPM97S разработана
для шлифовки стеновых и потолочных
покрытий, как внутренних, так и внешних, и
удаления старых лакокрасочных покрытий,
линий разметки, остатков клея и штукатурки.
В процессе эксплуатации шлифовальная
машина обязательно должна использоваться
в сочетании с пылеудаляющим аппаратом.
Ответственность за любые повреждения,
вызванные неправильной эксплуатацией
или эксплуатацией с нарушением техники
безопасности, полностью лежит на
пользователе.
Page 29

1. ИНСТРУКЦИЯ ПО ТЕХНИКЕ БЕЗОПАСНОСТИ
ПРИ ИСПОЛЬЗОВАНИИ ШЛИФОВАЛЬНОЙ
МАШИНЫ ДЛЯ СТЕН И ПОТОЛКОВ
• Во избежание повреждений всегда держите руки
на безопасном расстоянии от вращающегося
шлифовального диска.
• Пыль при шлифовании может быть вредна
для здоровья. В процессе эксплуатации
всегда используйте пылеудаляющий аппарат
с соответствующим мешком для сбора пыли
и средства индивидуальной защиты органов
дыхания.
• Отходы шлифования красок, в состав которых
входит свинец, токсичны. Подобные работы
должны выполняться специально обученным
персоналом и специальным инструментом.
• В процессе работы твердо стойте на ногах
и сохраняйте равновесие. Не тянитесь. Для
работ на высоте используйте специальные
платформы.
• При шлифовании всегда используйте
соответствующую одежду, защитные очки и
дыхательную маску.
• Никогда не кладите машинку до полной остановки
шлифовального диска. Бесконтрольный
инструмент с вращающимся диском может
послужить причиной несчастного случая или
поломки инструмента.
• Не переносите машинку во включенном
состоянии, т.к. диск может захватить одежду и
вызвать серьезные ранения.
• Никогда не используйте шлифовальную
машинку во взрывоопасных помещениях или
рядом с легко воспламеняемыми субстанциями,
т.к. искры в процессе шлифования могут быть
причиной возгорания.
• Шлифовальная машинка LPM97S не может
и не должна использоваться для абразивного
измельчения, строгания или распиловки.
Использование инструмента для выполнения
работ для которых он конструктивно не был
рассчитан опасно и может послужить причиной
нанесения ущерба имуществу и здоровью.
• Всегда держите машинку двумя руками. Потеря
контроля над инструментом может послужить
причиной нанесения ущерба имуществу и
здоровью.
• Держите инструмент за специальные
изолированные рукоятки, т.к. в процессе
шлифования возможен контакт шлифовального
диска со скрытой проводкой, что может
послужить причиной поражения электрическим
током.
• Следите за положением питающего кабеля.
Убедитесь, что при шлифовании кабель
находится сзади вас.
• Пыль, образуемая в процессе шлифования,
может быть вредной для Вашего здоровья.
Всегда используйте пылеудаляющий аппарат
и защитную маску. Всегда убирайте рабочее
место, т.к. ни один пылеудаляющий аппарат не
удаляет 100% пыли в процессе шлифования.
• Запрещается использовать инструмент
с поврежденным питающим кабелем.
Поврежденный кабель может послужить
причиной поражения электрическим током.
• При первых признаках неисправности
(запах, повышенный уровень вибрации и т.д.)
немедленно прекратите работу. Запрещается
использовать поврежденный инструмент, т.к
это может послужить причиной возникновения
неустранимых неисправностей. В случае
обнаружения повреждений обратитесь в
сервисный центр для ремонта инструмента.
• Используйте только оригинальные запасные
части и принадлежности.
• Если есть проблемы в процессе
эксплуатации инструмента, или инструмент
работает не на полную мощность, отключите
его, т.к. дальнейшая эксплуатация может
привести к поломке инструмента. При первых
признаках неисправности (повышенная
вибрация, повышенный шум, повышенный
нагрев, потеря мощности, снижение
частоты вращения, повышенное искрение
угольных щеток, дым, запах гари и т.п.)
немедленно прекратите работу и обратитесь
к специалисту авторизованного сервисного
центра.
• Используйте только оригинальное
дополнительное оборудование.
2. ТЕХНИЧЕСКИЕ ХАРАКТЕРИСТИКИ
Двигатель........................................230 В, 50 Гц
Уровень защиты...............................................II
Потребляемая мощность.......................1200 Вт
Холостая скорость...................650-1,300 об/мин
Скорость под нагрузкой............390-780 об/мин
Диаметр шлифовального диска...........225 мм
Вес..............................................................3.1 кг
Эквивалентный уровень
акустического давления A........................82 дБ(A)
Уровень акустического давления A.......93 дБ(A)
Диапазон колебания.............................K = 3 дБ(A)
Используйте индивидуальные
средства защиты слуха!
Уровень вибрации общий.................a
: <2,5 м/с
h
29
2
Page 30

Диапазон колебания...............................K: 1,5 м/с2
3. СТАНДАРТНАЯ КОМПЛЕКТАЦИЯ
Стандартная комплектация включает:
• LPM97S Шлифовальная машинка.
• Соединительная муфта.
• 1 ключ сервисный шестигранный.
• 1 лист шлифовальный Р80.
• Комплект документации.
4. ПОДКЛЮЧЕНИЕ К ЭЛЕКТРОСЕТИ
Перед подключением инструмента к внешней
питающей электросети убедитесь в том, что
напряжение сети соответствует указанному
на шильдике инструмента.
Ни при каких обстоятельствах не используйте
инструмент с поврежденным силовым
кабелем.
В случае повреждения силового кабеля
он должен быть немедленно замен в
специализированном сервисном центре.
Не пытайтесь производить ремонт
самостоятельно.
Поврежденный кабель может послужить
причиной поражения электрическим током.
5. СИСТЕМЫ ЭЛЕКТРОНИКИ
Плавный пуск: Электронная система
плавного пуска обеспечивает безударный
запуск и постепенное увеличение частоты
вращения тарелки.
Система регулировки частоты вращения:
Позволяет установить требуемую частоту
вращения шлифовального диска в диапазоне
от 650 до 1,300 об/мин (холостая скорость)
при помощи дискового регулятора (A, Рис.
1). Таким образом, Вы можете подобрать
оптимальную частоту вращения для каждого
типа обрабатываемого материала. Кроме
того, система поддерживает постоянную
частоту вращения под нагрузкой.
Рекомендуем установить наибольшие
обороты если требуется снятие большого
количества материала и более низкие для
финишного шлифования и обеспечения
контроля над инструментом.
6. УСТАНОВКА ШЛИФОВАЛЬНОГО ДИСКА
Отключите инструмент от внешней питающей
электросети.
Удалите использованный шлифовальный
материал. Убедитесь, что проставочная
тарелка осталась на своем месте.
Аккуратно наложите новый шлифовальный
30
материал, совместив при этом отверстия
пылеудаления на шлифовальном материале
и тарелке (Рис. 2).
7. ЗАМЕНА ПРОСТАВОЧНОЙ ТАРЕЛКИ
Для обеспечения наилучших результатов
шлифования проставочная тарелка должна
быть гладкой и без повреждений.
При естественном износе или повреждении
проставочной тарелки в процессе
эксплуатации шлифование может быть
неравномерным и с низким качеством. При
повреждении или износе проставочной
тарелки она должна быть заменена
незамедлительно.
При замене проставочной тарелки
отключите инструмент от внешней питающей
электросети.
Проставочная тарелка оснащена системой
Velcro (система крепления типа «липучка») с
обеих сторон, поэтому для ее замены просто
отделите проставочную тарелку от основной
и замените ее на новую, совместив при этом
отверстия пылеудаления (Рис. 3).
8. ЗАМЕНА ЗАЩИТНОГО КОЖУХА
Функции кожуха: Щетки, расположенные
по краям защитного кожуха, имеют двойное
назначение. С одной стороны компенсируют
неравномерность усилия прижима
инструмента к обрабатываемой поверхности,
а с другой стороны обеспечивают наиболее
эффективное пылеудаление в процессе
шлифования.
В процессе эксплуатации щетки подвержены
естественному износу, в результате чего
снижается эффективность пылеудаления и
компенсации неравномерности прижима. В
этом случае меняется весь защитный кожух.
Для замены кожуха необходимо:
• Отключите инструмент от внешней
питающей электросети.
• Нажмите на стопор шпинделя (D, Рис. 4) и
поверните подошву для фиксации шпинделя.
Отверните шлифовальную тарелку (против
часовой стрелки) и снимите ее с инструмента.
• Прижмите кожух вниз (Рис. 5) и при
помощи специального съемника удалите
фиксирующее кольцо, удерживающее кожух
на редукторе.
• Отсоедините патрубок системы
пылеудаления (см. Рис. 6), снимите кожух и
замените его на новый. Соберите инструмент,
выполнив изложенное выше, в обратной
последовательности.
Page 31

9. ПОДКЛЮЧЕНИЕ ВНЕШНЕГО
ПЫЛЕУДАЛЯЮЩЕГО АППАРАТА
• Отключите инструмент от внешней
питающей электросети.
• Присоедините соединительную муфту (E,
Рис. 7), входящую в стандартный комплект
поставки, к шлангу пылеудаляющего
аппарата.
• Вставьте соединительную муфту (E, Рис.
7) в гнездо (F, Рис. 7) на конце рукоятки
инструмента.
• Зафиксируйте муфту в гнезде, повернув его
по часовой стрелке (Рис. 7).
• Для отсоединения шланга пылеудаления
поверните переходник в противоположную
сторону.
10. ПЫЛЕУДАЛЕНИЕ
Вдыхание пыли в процессе
шлифования может повредить Вашему
здоровью. При шлифовании ВСЕГДА
используйте пылеудаляющий аппарат с
соответствующими мешками для сбора пыли.
В случае, если используются не
предназначенные для сбора такого
рода отходов мешки, повышается
уровень запыленности рабочей
зоны, что может повредить Вашему
здоровью.
Настройка усилия всасывания:
• При использовании пылеудаляющего
аппарата Virutex ASC482U Вы можете
регулировать усилие всасывания
в зависимости от типа и состояния
обрабатываемой поверхности.
• Для регулировки усилия всасывания
поворачивайте регулировочное колесо
(H, Рис. 8) до достижения необходимых
параметров.
• Начните с наименьшего усилия
всасывания и постепенно повышайте его,
вращая регулировочное колесо (H, Рис.
8), до достижения необходимого усилия
всасывания.
• Правильно подобранное усилие
всасывания обеспечивает нормальное и
плавное перемещение инструмента по
стенам и потолку.
• Чрезмерное усилие всасывания может
послужить причиной увеличения вибрации,
затруднений при управлении инструментом
или перегрузке. В случае перегрузки
инструмента НЕМЕДЛЕННО прекратите
работу и дайте инструменту остыть.
11. ПУСК И ВЫКЛЮЧЕНИЕ ИНСТРУМЕНТА
Перед подключением инструмента к сети
убедитесь в том, что напряжение питающей
электросети соответствует указанному
на шильдике инструмента, выключатель
находится в положении «ВЫКЛ.» ("O").
Для запуска инструмента переведите
выключатель (I, Рис. 1) в положение «ВКЛ»
("I"). Для выключения отпустите выключатель.
Если Вы хоте использовать инструмент
продолжительное время используйте
блокиратор выключателя (J, Рис. 1). Для
выключения инструмента просто нажмите на
блокиратор.
При выключении шлифовальный диск не
остановится мгновенно и какое-то время
продолжит вращаться перед полной
остановкой.
Не выключайте инструмент под нагрузкой и
убедитесь в том, что диск не коснется коголибо или чего-либо до полной остановки.
Не кладите инструмент до полной остановки
шлифовального диска.
12. КАК ИСПОЛЬЗОВАТЬ ИНСТРУМЕНТ
Для обеспечения безопасности работы и
сохранения контроля над инструментом
ВСЕГДА держите инструмент двумя руками.
Для наиболее надежного захвата держите
инструмент одной рукой за основную
рукоятку, а другой за D-образную рукоятку.
Очень важно в процессе шлифования
надежно стоять на обеих ногах, особенно при
работе на платформе.
Шлифование:
• Если шлифовальная машина и
пылеудаляющий аппарат готовы, меры
техники безопасности соблюдены и одеты
необходимые средства индивидуальной
защиты, можно включать шлифовальную
машину и пылеудаляющий аппарат.
При использовании пылеудаляющего
аппарата Virutex ASC482U и подключении
инструмента к нему, благодаря системе
синхростарта, вам достаточно включить
только инструмент. Пылеудаляющий аппарат
включится автоматически (при условии, что
пускатель находится в положении «AUTO»).
• Приложите инструмент к обрабатываемой
поверхности с минимальным усилием
прижима, обеспечив плавный контакт
тарелки и стены для равномерного
31
Page 32

прилегания шлифовального материала к
обрабатываемой поверхности.
• Установите требуемую частоту вращения
шлифовальной тарелки.
• Шарнирный механизм в месте сочленения
тарелки и рукоятки обеспечивает надежное
прилегание тарелки к стене или потолку.
• Не перегружайте инструмент, оказывая
чрезмерное усилие прижима.
Наилучший результат шлифования
достигается при умеренном усилии прижима
в процессе шлифования и во многом зависит
от правильного выбора шлифовального
материала.
• Наиболее оптимальная техника
шлифования - возвратно поступательное
движение вперед и назад, сохраняя
постоянный контакт подошвы с
поверхностью. Не выключайте инструмент,
когда шлифовальный материал находится в
контакте с обрабатываемой поверхностью,
т.к. это может привести к образованию
глубоких рисок на шлифуемой поверхности.
• По окончании шлифования выключите
инструмент.
Шлифование в зоне углов:
• Инструмент оснащен защитным кожухом
со съемным сегментом, что позволяет
уменьшить расстояние между стеной
(потолком) и шлифовальной тарелкой. (Рис.
10)
• При снятом сегменте защитного кожуха
снижается эффективность пылеудаления,
поэтому снятие сегмента осуществляется
только по необходимости с немедленной
установкой его на место как только это будет
возможно.
• Для снятия сегмента защитного кожуха:
• Отключите инструмент от внешней
питающей электросети.
• Нажмите между двумя фиксаторами,
удерживающими сегмент на кожухе, и
снимите сегмент (Рис. 10).
• Сохраните снятый сегмент в надежном
месте для его последующей установки.
• Для установки снятого сегмента
выполните действия описанные ранее.
Рекомендации:
Убедитесь, что зернистость диска
соответствует выполняемой работе и стадии
шлифования.
Если используется диск с крупным зерном
происходит большой съем материала,
в тоже время усложняется контроль
за инструментом. Использование
мелкозернистых шлифовальных материалов
32
в начальной стадии шлифования влечет за
собой преждевременное забивание зерна.
В процессе шлифования ИЗБЕГАЙТЕ
касания крепежных элементов, гвоздей,
шурупов и т.д., т.к. это может послужить
причиной повреждения шлифовального
материала и проставочной тарелки.
13. ОБСЛУЖИВАНИЕ И ОЧИСТКА
Перед проведением наладочных работ,
работ по обслуживанию и чистке ВСЕГДА
отключайте инструмент от внешней
питающей электросети.
• Все работы по наладке, обслуживанию и
чистке инструмента должны выполняться
квалифицированным специалистом, а
ремонтные работы ТОЛЬКО специалистами
специализированного сервисного центра.
• Регулярно проверяйте состояние
электрического кабеля и вилки. В
случае их повреждения замените их в
специализированном сервисном центре.
• Вентиляционные окна на инструменте
должны всегда содержаться в чистоте для
обеспечения достаточного охлаждения
двигателя.
• Регулярно очищайте патрубок системы
пылеудаления и защитный кожух.
Замена угольных щеток:
Угольные щетки подлежат замене при их
остаточной длине 6 мм.
• Для проверки состояния или замены
угольных щеток отключите инструмент от
внешней питающей электросети.
• Отсоедините шланг пылеудаляющего
аппарата. Отверните четыре винта (К, Рис.
10) и снимите крышки.
• Отверните два винта (L, Рис. 10) и аккуратно
сдвиньте в сторону блок электроники. Не
повредите контакты.
• Отверните два винта (М, Рис. 11)
удерживающие щеткодержатели.
• Проверьте состояние и степень износа
угольных щеток. При необходимости
замените их.
• После замены угольных щеток необходимо
включить инструмент на несколько минут в
холостом режиме.
14. ДОПОЛНИТЕЛЬНАЯ КОМПЛЕКТАЦИЯ И
ШЛИФОВАЛЬНЫЙ МАТЕРИАЛ
Используйте только оригинальные (Virutex) запчасти и расходные материалы,
Page 33

специально разработанные для этой
машины.
• ASC482U пылеудаляющий аппарат
(соединительный шланг включен)
• Транспортировочная сумка (включено в
стандартный комплект поставки)
• Защитный кожух арт. 9702711
• Проставочная тарелка (с двусторонней
системой фиксации Velcro) арт. 9745948
• Шлифовальная подошва (с системой
фиксации Velcro) арт. 9702709
• Шлифовальный материал:
• Для обработки цемента и снятия обоев,
зернистость 24, арт. 9791114, уп. 12 шт.
• Для наполнителей и красок. Зернистость
40, арт. 9791115, упак. из 25 шт.
• Для наполнителей и красок. Зернистость
60, арт. 9791116, упак. из 25 шт.
• Для наполнителей и красок. Зернистость
80, арт. 9791117, упак. из 25 шт.
• Для наполнителей и красок. Зернистость
100, арт. 9791118, упак. из 25 шт.
• Для трудных наполнителей и красок.
Зернистость 120, арт. 9791119, упак. из 25 шт.
• Для трудных наполнителей и красок.
Зернистость 150, арт. 9791120, упак. из 25 шт.
• Для трудных наполнителей и красок.
Зернистость 180, арт. 9791121, упак. из 25 шт.
15. УРОВЕНЬ ШУМА И ВИБРАЦИИ
Уровень шума и вибрации этого устройства
были измерены в соответствии с
европейским стандартом EN 60745-1 и
служат основанием для сравнения с другими
машинами с подобными характеристиками.
Обозначенный уровень вибрации был
определен для основных операций и может
использоваться как начальное значение для
того, чтобы оценить риски, возникающие
вследствие вибрации. Однако, колебания
могут достигнуть уровней, которые
отличаются от объявленного значения при
других условиях эксплуатации, с другими
инструментами или с недостаточным
техническим обслуживанием устройства
или его приспособлений, достигая намного
более высокой величины в результате цикла
работы или способа, которым используется
устройство.
Необходимо принять меры по обеспечению
безопасности пользователя от повышенной
вибрации, например, поддержание
устройства в чистоте и своевременное
техническое обслуживание устройства,
приспособлений и инструмента, а также
организация продолжительности циклов
работы (например, операционное время под
нагрузкой и время простоя, т.к. сокращение
последнего может существенно влиять на
уровень вибрации).
16. ГАРАНТИЙНЫЕ ОБЯЗАТЕЛЬСТВА
Все электроинструменты фирмы Virutex имеют гарантию 12 месяцев со дня
покупки. Гарантия не распространяется
на те случаи, когда повреждение явилось
результатом неправильной эксплуатации или
естественного износа. При необходимости
ремонта обращайтесь в пункты
техобслуживания или уполномоченным
представителям фирмы Virutex.
17. ПЕРЕРАБОТКА ЭЛЕКТРООБОРУДОВАНИЯ
Никогда не утилизируйте
электрооборудование с бытовыми отходами.
Оборудование, оснастка и упаковка должны
подвергаться переработке, минимизирующей
любое отрицательное воздействие на
окружающую среду. Утилизацию необходимо
производить в соответствии с правилами,
действующими в вашей стране.
Для стран, входящих в Европейский Союз
и стран с системой селективного сбора
отходов:
Если нижеприведенный символ указан
на продукте или в сопровождающей
документации, в конце срока его
использования запрещается утилизация
данного изделия совместно с бытовыми
отходами.
В соответствии с Европейской Директивой
2002/96/EC, пользователь может уточнить
у продавца или соответствующих местных
властей, где и как можно утилизировать
данное изделие без вреда для окружающей
среды с целью его безопасной переработки.
Компания VIRUTEX оставляет за собой
право вносить изменения в конструкцию
или стандартный комплект поставки без
предварительного уведомления.
33
Page 34

РOLSKA
RĘCZNA SZLIFIERKA DO ŚCIAN SU-
CHYCH LPM97S
Ważne
Przeczytaj uważnie niniejszą
INSTRUKCJĘ OBSŁUGI oraz
załączoną BROSZURĘ Z OGÓLNĄ
INSTRUKCJĄ BEZPIECZEŃSTWA przed użyciem urządzenia. Upewnij się,
że je zrozumiałeś przed pierwszym
użyciem urządzenia. Zachowaj obie
instrukcje na przyszłość.
PRZEZNACZENIE
Szlierka do ścian suchych LPM97S została
zaprojektowana do szlifowania ścian z
wypełnieniami, sutów oraz wewnętrznych i
zewnętrznych ścian, a także do usuwania resztek okładzin, warstw farby, wykładzin, resztek
kleju i luźnych pozostałości po materiałach
lepkich.
Szlierka do ścian suchych powinna być
zawsze używana w połączeniu z urządzeniem
odpylającym.
Użytkownik jest zawsze odpowiedzialny za jakiekolwiek zniszczenia lub wypadki, spowodowane
niewłaściwym użytkowaniem urządzenia.
1. INSTRUKCJE BEZPIECZEŃSTWA PRZY
OBSŁUDZE SZLIFIERKI DO ŚCIAN SUCHYCH
• Zawsze trzymaj ręce w bezpiecznej odległości
od dysku szlifującego. Dysk może odskakiwać w
kierunku twoich rąk.
• Przedłużający się kontakt z pyłem powstałym
w wyniku szlifowania ścian może wpływać
niekorzystnie na proces oddychania. Zawsze
używaj urządzenia odpylającego z odpowiednią
torbą do pochlaniania pyłów ze ścian i korzystaj
z odpowiedniej maseczki ochronnej.
• Szlifowanie farb ołowiowych jest wysoce toksyczne i powinno być wykonywane jedynie przez
specjalnie przeszkolony personel, wyposażony
w specjalny sprzęt do usuwania tego rodzaju
farby.
• Stój pewnie na podłożu i trzymaj równowagę.
Nie przeprostowuj się. Do wykonywanych robót
korzystaj z wygodnych podestów.
• Zawsze używaj odpowiedniego sprzętu
zabezpieczającego przy szlifowaniu, okularów
ochronnych oraz maseczki na twarz.
34
• Nigdy nie odkładaj urządzenia dopóki dysk
się całkowicie nie zatrzyma. Obracający się
dysk może uszkodzić obrabianą powierzchnię i
spowodować utratę kontroli nad urządzeniem.
• Nie pozostawiaj urządzenia włączonego w
trakcie przenoszenia go z miejsca na miejsce.
Obracający się dysk może wejść w kontakt z
twoją odzieżą, powodując poważne urazy.
• Nie używaj urządzenia w pobliżu łatwopalnych
substancji, gdyż ewentualne iskry mogłyby
spowodować ich zapalenie.
• Szlierka LPM97S bezwzględnie nie może
być używana do prac ściernych, strugania, polerowania ani piłowania. Użycie szlierki niezgodnie z jej przeznaczeniem jest niebezpieczne i
może powodować poważne urazy.
• Przy szlifowaniu, zawsze trzymaj urządzenie
obiema rękoma. Utrata kontroli nad urządzeniem
może powodować poważne urazy.
• Zawsze trzymaj urządzenie za uchwyty
zapewniające izolację, przy wykonywaniu prac
gdzie dysk szlifujący może mieć kontakt z
ukrytymi kablami elektrycznymi. Kontakt z kablami elektrycznymi może powodować przeniesienie ładunku na metalowe części urządzenia, co
może być przyczyną porażenia prądem.
• Trzymaj kabel zasilający z dala od obszaru
szlifowania. Upewniaj się, że podczas szlifowania, kabel jest za tobą.
• Nie używaj urządzenia, jeśli kabel jest uszkodzony. Uszkodzone kable zwiększają ryzyko
porażenia prądem.
• Wyłącz urządzenie bezzwłocznie, jeśli
zauważyłeś jakiekolwiek nietypowe wibracje lub
inne odstępstwa od normy, po czym sprawdź
urządzenie aż znajdziesz ich przyczynę.
• Pył powstały w wyniku pracy z tym
urządzeniem, może być szkodliwy dla zdrowia.
Używaj dobrego systemu odpylającego, noś
odpowiednią maseczkę ochronną i sprzątaj pył,
którego nie zebrało urządzenie odpylające.
• Nigdy nie przeciążaj urządzenia, jeśli wykazuje
ono oznaki wadliwości podczas użytkowania.
Może to być spowodowane technicznym problemem, w którego wypadku kontynuowanie
pracy może doprowadzić do nieodwracalnego
zniszczenia urządzenia. Za każdym razem, gdy
urządzenie nie funkcjonuje poprawnie, oddaj je
do sprawdzenia w autoryzowanym serwisie.
• Używaj tylko oryginalnych akcesoriów.
2. DANE TECHNICZNE
Silnik uniwersalny...............................230 V 50 Hz
Poziom ochrony.........................II / podwójny na
schemacie regulacji
Moc..........................................................1200 W
Page 35

Prędkość bez obciążenia............650-1300 obr/min
Prędkość przy pełnym obciążeniu...390-780 obr/
min
Średnica dysku.......................................225 mm
Waga..........................................................3,1 kg
Doradzamy stosowanie najwyższych prędkości
podczas usuwania wielu rodzajów materiałów
oraz niskich prędkości do szlifowania
dokładnego i zachowania precyzyjnej kontroli
urządzenia.
Mierzona równowartość ciśnienia akustycznego jest
stała przy płaszczyźnie A........................82 дБ(A)
Akustyczna siła dla płaszczyzny A.......93 дБ(A)
Odchylenie.............................................K = 3 дБ(A)
Osłaniać uszy!
Całkowita wartość wibracji....................a
Odchylenie..............................................K: 1,5 м/с2
: <2,5 м/с
h
3. STANDARDOWE WYPOSAŻENIE
Wewnątrz opakowania znajdują się następujące
elementy:
• Ręczna szlierka do ścian suchych LPM97S.
• Złącze bagnetu.
• 1 klucz serwisowy Allen’a.
• 1 arkusz ścierny o ziarnistości 80.
• Instrukcje bezpieczeństwa i obsługi oraz
pozostała dokumentacja.
4. PODŁĄCZENIE ELEKTRYCZNE
Upewnij się, że w źródle zasilania jest to
samo napięcie, co na tabliczce znamionowej
urządzenia.
Urządzenie pod żadnym względem nie może
być używane jeśli kabel zasilający jest uszkodzony.
Kabel, który jest uszkodzony lub jest w
niezadowalającym stanie, powinien zostać
bezzwłocznie wymieniony przez autoryzowany
serwis techniczny; nie próbuj napraiwć go
samodzielnie.
Praca z urządzeniem, którego kabel jest w złym
stanie, może powodować wypadki elektryczne.
5. KONTROLE ELEKTRONICZNE
Łagodny rozruch: Elektroniczna kontrola startu,
która zapewnia łagodne rozpoczęcie pracy i
stopniowe przyśpieszanie prędkości obrotów.
Kontrola prędkości: Możesz ustawić prędkość
obracania się dysku, bez przerywania pracy, w zakresie od 650 do 1300 obr/min bez
obciążenia, za pomocą pokrętła (A, Rys. 1). W
ten sposób możesz ustawić najlepszą prędkość
szlifowania dla każdego materiału.
Elektroniczna kontrola prędkości utrzyma stałą
prędkość, nawet przy pełnym obciążeniu, aby
zapewnić perfekcyjne szlifowanie.
6. ZAKŁADANIE ARKUSZA ŚCIERNEGO
Odłącz urządzenie od źródła zasilania.
Zdejmij zużyty arkusz upewniając się, że dysk
z gąbką jest w odpowiedniej pozycji. Dokładnie
dopasuj otwory na arkuszu ściernym (B, Rys. 2)
do otworów na dysku i dociśnij arkusz tak, aby
trzymał się pewnie dzięki podkładce Velcro na
2
dysku.
7. WYMIANA DYSKU Z GĄBKĄ
Dysk z gąbką powinien być idealnie gładki w
celu zapewnienia prawidłowego szlifowania i
zadowalających rezultatów.
Jeśli dysk został odkształcony lub uszkodzony
podczas pracy, szlifowanie będzie nieregularne i niskiej jakości. Należy wymienić dysk
bezzwłocznie, jeśli został on uszkodzony.
Aby wymienić dysk z gąbką, odłącz urządzenie
od źródła zasilania.
Dysk posiada podkładkę Velcro po obu stronach,
zatem aby go wymienić, należy pociągnąć go aż
odklei się od płyty głowicy, po czym zastąpić go
nowym (C, Rys. 3).
8. WYMIANA OSŁONY GŁOWICY
Funkcje osłony: szczotki na krawędzi osłony
głowicy spełniają podwójną funkcję. Utrzymują
dysk ścierny właściwie ustawiony względem
szlifowanej powierzchni i umożliwiają bardziej
wydajną pracę urządzenia odpylającego.
Szczotki na osłonie głowicy zużywają się w
wyniku eksploatowania urządzenia. Zużyte szczotki nie gwarantują prawidłowej pozycji dysku i
efektywnego odciągu pyłów. W takim wypadku,
należy wymienić całą osłonę.
Wymień osłonę w następujący sposób:
• Odłącz urządzenie od źródła zasilania.
• Wciśnij blokadę (D, Rys. 4), obracając dysk aż
trzpień zablokuje się w swojej pozycji. Obracaj
dysk ścierny w kierunku przeciwnym do ruchu
wskazówek zegara aby wyjąć go z urządzenia.
• Następnie dociśnij osłonę (Rys. 5) i za pomocą
specjalnych szczypiec, usuń pierścień mocujący
osłonę do przekładni.
• Na końcu usuń rurę odprowadzania pyłów oraz
pierścień trzymający (Rys. 6), zdejmij osłonę
głowicy i zastąp ją, wkręcając ją w przeciwnym
kierunku
35
Page 36

9. INSTALACJA RURY ODPROWADZANIA
PYŁÓW
• Odłącz urządzenie od źródła zasilania.
• Zdejmij złącze z węża odciągu i podłącz złącze
bagnetu (E, Rys. 7), które jest w standardowym
wyposażeniu urządzenia.
• Następnie włóż złącze bagnetu (E, Rys. 7)
na rurze odciągu w złącze obrotowe (F, Rys. 7)
urządzenia.
• Gdy złącze bagnetu jest całkowicie włożone,
przytrzymaj złącze obrotowe aby się nie
obracało i wkręć bagnet w kierunku zgodnym z
ruchem wskazówek zegara, aż zablokuje się on
w swojej pozycji (Rys. 7).
• Aby usunąć rurę odciągu, obracaj ją w przeciwnym kierunku.
napięciu podanemu na tabliczce znamionowej
urządzenia i czy włącznik jest w pozycji "O" wyłączony, przed podłączeniem urządzenia do
sieci.
Wciśnij spust aby uruchomic urządzenie (I, Rys.
1) i zwolnij go aby je wyłączyć.
Jeśli życzysz sobie aby urządzenie działało
w sposób ciągły, możesz ustawić przycisk
blokujący (J, Rys. 1). Aby zwolnić przycisk
blokujący, wciśnij go, a następnie zwolnij.
Po wyłączeniu, urządzenie nie zatrzymuje się
od razu, dysk szlifujący obraca się jeszcze przez
pewien moment zanim całkowicie się zatrzyma.
Upewnij się, że dysk nie będzie miał kontaktu
z nikim ani z czymkolwiek i nie pozostawiaj
urządzenia dopóki dysk szlifujący się całkowicie
nie zatrzyma.
10. ODCIĄG PYŁÓW
Przedłużający się kontakt z pyłem powstałym w
wyniku szlifowania ścian może wpływać niekorzystnie na proces oddychania. Zawsze używaj
urządzenia odpylającego z odpowiednią torbą
do pochłaniania pyłów ze ścian.
Jeśli nie używasz odpowiedniej torby do pochłaniania, spowoduje to
zwiększenie poziomu pyłów w obszarze pracy, a przedłużający się kontakt
z takim zjawiskiem może powodować
problemy z oddychaniem.
Dostosowanie mocy ssania odciągu:
• Jeśli używasz kompaktowego urządzenia
odpylającego ASC482U rmy Virutex, lub innego
odkurzacza z kontrolą mocy ssania, możesz
dostosować siłę ssania adekwatnie do powierzchni, którą szlifujesz.
• Dostosuj pokrętło (H, Rys. 8) aby uzyskać
właściwą siłę ssania.
• Rozpocznij z małą mocą ssania i stopniowo
zwiększaj ją przez obracanie pokrętła (H, Rys.
8), dopóki nie uzyskasz właściwej mocy.
• Wysoka moc ssania ułatwia szlifowanie
sutów i ścian.
• Jeśli siła ssania jest zbyt duża, będzie to
powodowało wpadanie urządzenia w wibracje,
utrudni jej sterowanie i może spowodować
jej przeciążenie. W takim wypadku należy
bezzwłocznie przerwać pracę aż urządzenie
ostygnie.
11. URUCHAMIANIE I WYŁĄCZANIE
URZĄDZENIA
Upewnij się, że napięcie w sieci odpowiada
36
12. JAK KORZYSTAĆ Z URZĄDZENIA
Aby pracować bezpiecznie i aby zachować
pełną kontrolę nad urządzeniem, należy zawsze
trzymać je obiema rękami.
Najlepszym sposobem na to jest trzymanie
jedną ręką za uchwyt główny, znajdujący się od
czoła urządzenia, a drugą ręką za część korpusu pokrytą warstwą softgrip, lub przez użycie
uchwytu D, jeśli jest zamontowany.
Bardzo ważne jest aby stać pewnie na obu nogach, zwłaszcza przy pracy na platformach.
Szlifowanie:
• Jeśli szlierka do ścian i urządzenie odpylające
są gotowe do pracy, zostały dokonane pomiary
bezpieczeństwa i zastosowaliśmy niezbędne
środki bezpieczeństwa, urządzenie może zostać
uruchomione z jednoczesnym uruchomieniem
urządzenia odpylającego.
Jeśli posiadasz odkurzacz ASC482U rmy
Virutex, lub inny odkurzacz z wbudowanym,
automatycznym rozruchem, wystarczy, że uruchomisz szlierkę.
• Przyłóż urządzenie do powierzchni, którą
będziesz szlifował, zapewniając delikatny
kontakt i z minimalnym naciskiem, aby głowica
szlifująca spoczywała płasko na powierzchni.
• W tym momencie możesz dostosować
prędkość do idealnych obrotów dla danego typu
pracy, jaką zamierzasz wykonać.
• Przegubowa głowica pozwala dyskowi
ściernemu podążać po konturach obrabianej
powierzchni.
• Nie przeciążaj urządzenia poprzez dodatkowy,
nadmierny nacisk.
Najlepsze rezultaty szlifowania uzyskujemy
stosując umiarkowany nacisk. Jakość i wykonanie szlifowania w głównej mierze zależy od
wyboru arkusza ściernego.
Page 37

• Najlepsza technika polega na długich
pociągnięciach do przodu i do tyłu, utrzymując
głowicę w stałym ruchu. Nie dopuszczaj do zatrzymania urządzenia w jednym miejscu, aby nie
pozostawiło ono sladów na powierzchni.
• Wyłącz urządzenie po zakończeniu pracy.
Szlifowanie blisko krawędzi:
• Szlierka posiada specjalną, rozkładaną osłonę
głowicy, która umożliwia zmniejszenie dystansu z jednej strony, pomiędzy ścianą/sutem a
dyskiem sciernym (Rys. 9).
• Gdy urządzenie pracuje z rozłożoną osłoną
głowicy, odkurzacz traci na swej efektywności.
Należy więc rozkładać osłonę tylko gdy jest to
niezbędne i składać ją ponownie, najwcześniej
jak to możliwe.
• Aby rozłożyć osłonę głowicy:
• Odłącz urządzenie od źródła zasilania.
• Naciśnij pomiędzy dwoma zaczepami
trzymającymi zdejmowalną część osłony i wyjmij
ją z osłony (Rys. 9).
• Przechowuj zdjętą część osłony w pobliżu,
w bezpiecznym miejscu, aby móc ją z powrotem
dopasować.
• Aby zamontować zdejmowalną część,
postępuj w odwrotnej kolejności.
Zalecenia:
Upewnij się, że używasz najlepszego arkusza
ściernego do danego rodzaju pracy.
Jeśli arkusz ścierny jest zbyt gruboziarnisty,
będzie usuwał podczas pracy dużo materiału;
to zjawisko może się okazać nadmierne i
mogą wystąpić utrudnienia w kontrolowaniu
urządzenia, podczas gdy arkusze o zbyt drobnej
ziarnistości mają tendencję do zalepiania się
obrabianym materiałem.
Podczas szlifowania, staraj się unikać kontaktu
z ostrymi krawędziami i gwóźdzmi, jako że mogą
one uszkodzić arkusz ścierny a nawet dysk
szlifujący.
13. KONSERWACJA I CZYSZCZENIE
Przed przystąpieniem do jakichkolwiek prac
konserwacyjnych, odłącz urządzenie od źródła
zasilania.
• Wszelkie operacje wymagające otwarcia
obudowy silnika, mogą być wykonywane jedynie
przez autoryzowany, ocjalny punkt serwisowy.
• Sprawdzaj regularnie stan kabla zasilającego i
wtyczki. Wymieniaj je w autoryzowanym, ocjalnym punkcie serwisowym, jeśli się uszkodzą.
• Zawsze dbaj o to aby wywietrzniki w obudowie
były czyste i drożne, dzięki czemu zapewnione
będzie chłodzenie silnika.
• Czyść złącze rury od odciągu pyłów oraz
osłonę głowicy, aby zapobiec ich oblepianiu.
Wymiana szczotek:
Szczotki należy wymieniać gdy osiągną one
minimalną długość 6 mm.
• W celu sprawdzenia lub wymiany szczotek,
odłącz uprzednio szlierkę od źródła zasilania.
• Wyjmij rurę odciągu pyłów zdejmij prawą i lewą
część obudowy, odkręcając śrubki (K, Rys. 10),
które je trzymają.
• Odkręć dwie śrubki (L, Rys. 10), które mocują
obwód elektroniczny i odsuń obwód, uważając
aby nie uszkodzić jego przewodów.
• Odkręć dwie śrubki (M, Rys. 11) mocujące
trzymadełka szczotek.
• Sprawdź, a w razie potrzeby, wymień szczotki.
• Wskazane jest uruchomienie urządzenia na kilka minut działania bez obciążenia, po wymianie
szczotek.
14. AKCESORIA I ARKUSZE ŚCIERNE
Używaj jedynie oryginalnych akcesoriów i
części eksploatacyjnych rmy Virutex, zaprojektowanycvh do tego urządzenia.
• Urządzenie odpylające ASC482U (z załączoną
rurą)
• Walizka do transportowania (załączona w
standardzie)
• Zapasowa osłona głowicy 9702711
• dysk szlifujący z gąbki (z podwójną podkładką
Velcro) 9745948
• Sztywny dysk szlifujący (Velcro) 9702709
• Arkusze ścierne do szlifowania powierzchni:
• Szorstki lub ziarnisty cement i tapety,
ziarnistość 24, 9791114, zestaw 12szt.
• Wypełnienia i farby. Szorstkie szlifowanie,
ziarnistość 40, 9791115, zestaw 25szt.
• Wypełnienia i farby. Szorstkie szlifowanie,
ziarnistość 60, 9791116, zestaw 25szt.
• Wypełnienia i farby. Szorstkie szlifowanie,
ziarnistość 80, 9791117, zestaw 25szt.
• Wypełnienia i farby. Szorstkie szlifowanie,
ziarnistość 100, 9791118, zestaw 25szt.
• Ciężkie Wypełnienia i farby. Szorstkie szlifowanie, ziarnistość 120, 9791119, zestaw 25szt.
• Ciężkie Wypełnienia i farby. Szorstkie
szlifowanie, ziarnistość 150, 9791120, zestaw
25szt.
• Ciężkie Wypełnienia i farby. Szorstkie
szlifowanie, ziarnistość 180, 9791121, zestaw
25szt.
15. HAŁAS I WIBRACJE
Pomiary poziomów hałasu oraz wibracji opis-
37
Page 38

ywanego urządzenia zostały dokonane zgodnie
ze standardem europejskim EN 60745-1 i służą
jako punkt odniesienia przy porównaniach z innymi urządzeniami o podobnych zastosowaniach.
Przedstawiony poziom wibracji został określony
dla podstawowych zastosowań urządzenia i
może on być uznany za wartość wyjściową przy
szacowaniu ryzyka związanego z wpływem
wibracji. Jednakże, wibracje mogą osiągnąć
poziomy, które będą odbiegały od przedstawionej wartości jeśli warunki zastosowania będą
inne, jeśli zastosujemy inne urządzenia lub jeśli
urządzenie, jego układ elektryczny lub akcesoria
nie będą konserwowane we właściwy sposób.
Wówczas poziom wibracji może osiągać wyższą
wartość, w zależności od wykonywanej pracy i
sposobu w jaki korzystamy z urządzenia.
Dlatego też, należy określić wytyczne
bezpieczeństwa, aby uchronić użytkownika
przed działaniem wibracji, takie jak dbanie
o to, aby urządzenie oraz jego układy były
utrzymywane w idealnym stanie i ustalanie
okresów pracy (czas pracy, gdy urządzenie jest
poddawane obciążeniom oraz czas pracy, gdy
urządzenie nie jest poddawane obciążeniom,
czyli nie jest używane, jako że ograniczenie
czasu pracy bez obciążenia może mieć istotny
wpływ na całościową wartość oddziaływania).
16. GWARANCJA
Wszystkie urządzenia elektryczne rmy VIRUTEX posiadają 12-miesięczną gwarancję od
daty dostawy. Gwarancja nie obejmuje wszelkich
uszkodzeń powstałych w wyniku niewłaściwej
eksploatacji urządzeń jak również wynikających
z ich naturalnego zużycia.
W wypadku konieczności naprawy prosimy
zwrócić się do ocjalnego serwisu obsługi klienta
VIRUTEX.
nia domowego.
Zgodnie z Europejską Dyrektywą 2002/96/
EC, użytkownik może skontaktować się ze
sprzedawcą, od którego nabył produkt lub z odpowiednimi władzami lokalnymi, aby dowiedzieć
się gdzie oraz w jaki sposób może oddać zużyty
produkt do bezpiecznej, przyjaznej środowisku
utylizacji.
VIRUTEX zastrzega sobie prawo do dokonywania zmian technicznych w urządzeniach bez
uprzedzenia.
17. UTYLIZACJA URZĄDZEŃ
ELEKTRYCZNYCH
Nigdy nie usuwaj sprzętu elektrycznego
razem ze śmieciami domowymi. Utylizuj
sprzęt, akcesoria i opakowania w sposób,
który zminimalizuje jakikolwiek negatywny ich
wpływ na środowisko. Stosuj się do przepisów
obowiązujących w Twoim kraju.
Zastosowanie w Unii Europejskiej oraz w
krajach europejskich stosujących selektywną
zbiórkę odpadów:
Jeśli poniższy symbol pojawia się na produkcie lub na dołączonej do niego informacji, nie
należy po zakończeniu okresu jego żywotności
wyrzucać go wraz z innymi odpadami pochodze-
38
Page 39

Page 40

http://www.virutex.es/registre
Acceda a toda la información técnica.
Access to all technical information.
Accès à toute l’information technique.
Zugang zu allen technischen Daten.
Accedere a tutte le informazioni tecniche.
Aceso a todas as informações técnicas.
Dostęp do wszystkich informacji technicznych.
Доступ ко всей технической информации.
9796620 092014
Virutex, S.A.
Antoni Capmany, 1
08028 Barcelona (Spain)
www.virutex.es
 Loading...