

Page 1
MANUAL DE INSTRUCCIONES
OPERATING INSTRUCTIONS
MODE D’ EMPLOI
GEBRAUCHSANWEISUNG
MANUALE D’ISTRUZIONI
MANUAL DE INSTRUÇÕES
ИНСТРУКЦИЯ ПО ЭКСПЛУАТАЦИИ
AS182K / AS282K
Aspirador
Aspirator
Aspirateur
Sauger
Aspiratore
Aspirador
Пылесос
Page 2
MANUAL DE INSTRUCCIONES
OPERATING INSTRUCTIONS
MODE D'EMPLOI
GEBRAUCHSANWEISUNG
MANUALE D'ISTRUZIONI
MANUAL DE INSTRUÇÕES
ИНСТРУКЦИЯ
ПО
ЭКСПЛУАТАЦИИ
ESPAÑOL Aspirador AS182K-AS282K
ENGLISH AS182K-AS282K Aspirator
FRANÇAIS Aspirateur AS182K-AS282K
DEUTSCH Sauger AS182K-AS282K
ITALIANO Aspiratore AS182K-AS282K
PORTUGUÉS Aspirador AS182K-AS282K
РУССКИЙ AS182K-AS282K Пылесос
página/page
seite/pagina
страница
3
5
8
11
13
16
18
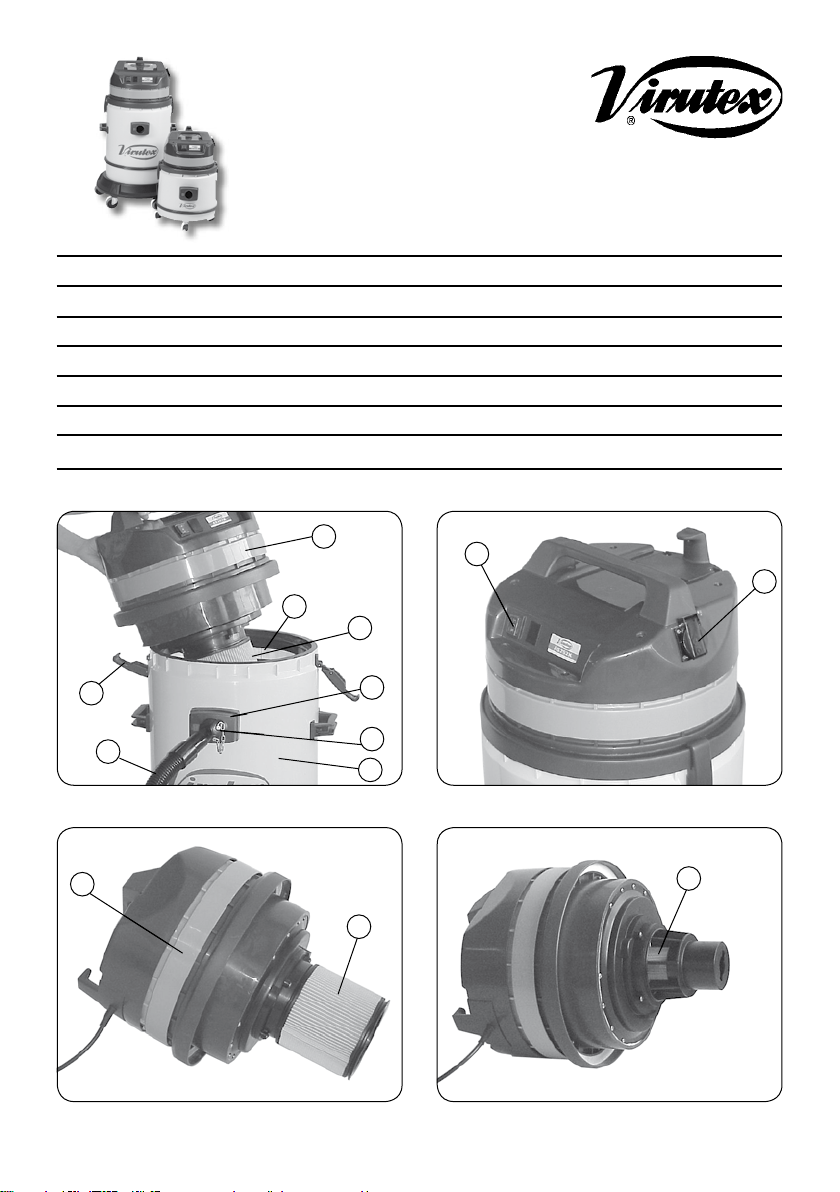
Fig. 1
J
A
B
K
E
J
C
D
P
Fig. 3
B
H
Fig. 2
G
Fig. 4
I
2
Page 3
ESPAÑOL
ASPIRADOR AS182K-AS282K
Importante
Antes de utilizar la máquina lea atentamente éste MANUAL DE INSTRUCCIONES y el FOLLETO DE INSTRUCCIONES
GENERALES DE SEGURIDAD que se
adjunta. Asegúrese de haberlos comprendido antes de empezar a operar
con la máquina.
Conserve los dos manuales de instrucciones para posibles consultas
posteriores.
Leer atentamente el FOLLETO DE
INSTRUCCIONES GENERALES DE
SEGURIDAD que se adjunta con la
documentación de la máquina.
Antes de conectar el aspirador a la
red, verificar que la tensión de alimentación sea igual a la indicada en
el aspirador.
Antes de conectar la herramienta
eléctrica al aspirador, comprobar que
la tensión del aspirador sea igual a la
de dicha herramienta.
1. CARACTERÍSTICAS TÉCNICAS
AS182K
Potencia max...............................................1200 W
Refrigeración..............................................by-pass
Aire aspirado.............................................170 m3/h
Depresión columna de agua................2200 mm H2O
Capacidad contenedor......................................27 l
Enchufe tele control................................1500 W max
Peso............................................................8,2 Kgs
AS282K
Potencia max..............................................1200 W
Refrigeración..............................................by-pass
Aire aspirado.............................................170 m3/h
Depresión columna de agua................2200 mm H2O
Capacidad contenedor......................................72 l
Enchufe tele control................................1500 W max
Peso.........................................................22 Kgs
2. DESCRIPCIÓN
A - Filtro de polyester para colocarlo en el depósito
durante la aspiración de polvo. Cuando aspiremos
líquidos es necessario retirarlo.
B - Cartucho filtro para polvos muy finos. Cuando
aspiremos líquidos es necessario retirarlo.
C - Entrada de aspiración. (Boca de aspiración).
D - Acoplamiento en "Y".
E - Manguera flexible.
G - Toma para herramienta eléctrica.
H - Interruptor
I - Boya. Su función consiste en evitar que el líquido
recogido penetre al motor durante la aspiración.
J - Bloque del motor (cabezal).
K - Ganchos para cerrar el bloque del motor con el
depósito. (Cierre cabezal).
P - Depósito exterior.
Para conseguir una mayor eficiencia
del aspirador es conveniente limpiar
los filtros después de cada uso.
3. ACCESORIOS OPCIONALES (pag. 14 y 15)
8246233 Kit aspirador
8299160 Bolsa filtro de papel para AS182K
8299161 Bolsa filtro de papel para AS282K
USO DE LA BOLSA FILTRO DE PAPEL
Use la bolsa recogedora de polvo solo con el cartucho
filtro colocado.
La bolsa garantiza la recuperación de los polvos
aspirados en condiciones higiénicas.
La aspiración de materiales cortantes o húmedos
puede dañar la bolsa de recolección polvo.
Cambiar la bolsa cuando los materiales aspirados
alcanzan las dos terceras partes de la capacidad
total.
La bolsa no puede ser reutilizada debe siempre
sustituirse.
4. ASPIRADOR DE POLVO / FORMA DE USO
- Colocar los filtros A y B (Fig. 1 y 3). Si usa bolsa
filtro de papel, coloque sólo el cartucho de filtro
B (Fig. 3).
- Si el aspirador lleva bolsa de papel, colocarla en el
interior del depósito (boca de aspiración).
- Montar el cabezal del aspirador en el depósito y
3
Page 4
cerrarlo con los ganchos K, (Fig. 1).
- Colocar la manguera de aspiración E en la boca del
depósito C (Fig. 1)
- Enchufar el aspirador y presionar el interruptor H
para ponerlo en marcha. (Fig. 2).
5. ASPIRADOR DE LÍQUIDOS /
FORMA DE USO
- Retirar los filtros A y B (Fig. 1 y 3)
- Montar el cabezal del aspirador en el depósito y
cerrarlo con los ganchos K, (Fig. 1).
- Conectar la manguera E en la boca de aspiración
C (Fig. 1).
- Enchufar el aspirador y presionar el interruptor H
para ponerlo en marcha (Fig. 2).
Si desea volver a utilizar el aspirador para aspirar
polvo, se deben volver a montar los filtros tal como
se encontraban originalmente.
No utilizar nunca el aspirador para el
trasiego de líquidos "inflamables"
Si se observa salida de liquido o espuma
del aparato, cortar inmediatamente la
alimentación eléctrica.
6. UTILIZACIÓN CON HERRAMIENTAS
ELÉCTRICAS
Antes de utilizar el aspirador, comprobar (Fig. 1):
- Que el saco de filtro A, ó la bolsa filtro de papel,
esté bien insertado en el interior del aspirador.
- Que el filtro suplementario B esté bien insertado
en la parte superior del cuerpo.
A partir de la tobera C, empalmar, por el siguiente
orden:
1. el acoplamiento en "Y" (D)
2. el tubo flexible (E)
3. la herramienta eléctrica
Conectar la clavija de la herramienta eléctrica en
la toma suplementaria G (Fig. 2) situada en la parte
superior del cabezal del aspirador.
Conectar la clavija del aspirador a una toma de
corriente y colocar el interruptor H (Fig. 2) en la
posición "II".
En estas condiciones, cada vez que se ponga en marcha
la herramienta el aspirador se pondrá también en
marcha de forma automática.
Si al conectar una máquina portátil con regulación
electrónica al aspirador, observara que éste no se
pone automáticamente en marcha, al arrancar la
4
máquina, bastará con girar 180° la clavija de conexión de la máquina en el aspirador para solucionar
el problema.
Gracias al empalme en "Y" es posible utilizar hasta
2 herramientas simultáneamente con un mismo
aspirador.
7. INSTRUCCIONES GENERALES
A SEGUIR ESTRICTAMENTE
• Evitar cualquier uso de la máquina que no esté
especificado en este manual, ya que puede ser
peligroso.
• Cuando el aparato esté en funcionamiento, no
acercar el tubo de aspiración a partes delicadas del
cuerpo (ojos, boca o orejas). Pueden ser dañados.
• Antes de ponerlo en funcionamiento, asegurarse
de que todos los componentes están correctamente
montados.
• Comprobar que la clavija se adapta perfectamente
al enchufe.
• Comprobar que el voltaje indicado en la parte
superior del cabezal, es el mismo que proporciona
la toma de corriente.
• No utilizar nunca el aparato cerca de sustancias
inflamables, explosivas o tóxicas (no aspirar la ceniza
de la chimenea).
• Recordar siempre desconectar el aparato antes de
intentar cualquier reparación. No dejar el aparato en
funcionamiento sin vigilancia, puede ser utilizado por
niños o personas no conscientes de sus actos.
• No utilizar el cable eléctrico para levantar o desenchufar el aparato.
• No sumergir nunca ni utilizar componentes agresivos, para limpiar el aparato.
• Comprobar que el cable eléctrico, enchufe o cualquier otra parte del aparato no están dañados. En caso
de que lo estuviera, no utilizarlo, y ponerse en contacto
con el Servicio Técnico para su reparación.
• Siempre que se utilicen extensiones (alargos) para
el cable eléctrico, comprobar que estén siempre en
superficies secas y protegidas del agua.
• Nunca debe utilizarse el aparato para recoger agua
de containers, lavabos, tubos, etc.
• No dejar nunca el aparato enchufado ni en funcionamiento si no se utiliza.
• Asegurarse de que el flotador I (Fig. 4) no está
dañado ni obstruido, ya que su función es la de parar
la aspiración cuando el tanque está completamente
lleno de líquido, o en caso de que el aparato se
haya volcado.
• En caso de que el aparato vuelque, levantarlo antes
de desconectar.
Page 5
• En caso de que saliera líquido o espuma, desconectar
inmediatamente.
• No utilizar nunca disolventes agresivos o detergentes.
• El fabricante no se hace responsable de cualquier
daño causado a personas, animales o cosas, por
una incorrecta utilización del aparato, o bien por
no respetar las indicaciones especificadas en este
manual.
8. MANTENIMIENTO
Antes de cualquier intervención en el aspirador,
desconectar la clavija de la red. Toda intervención
en la máquina deberá ser realizada por personal
cualificado.
Para un buen funcionamiento del aspirador es
aconsejable:
- Eliminar periódicamente el polvo y los detritos,
sacudiendo el saquito de filtro. Limpie frecuentemente
el cartucho filtro con un pincel de cerdas blandas.
En caso de excesivas inscrustaciones del filtro, no
dude en cambiarlo.
Se aconseja tener siempre un filtro de repuesto.
- Tener siempre limpios los canales de aspiración. (Una
excesiva presencia de suciedad provoca una pérdida
de aspiración y el sobre calentamiento del motor)
- Las partes rotativas del aparato no necesitan lubrificación alguna ya que están provistas de cojinetes
autolubricantes.
- Hay que controlar el espesor de las escobillas de
carbón del motor, en condiciones normales de uso,
cada 12 meses o, en todo caso, cambiarlas cuando
su espesor se reduzca a 9 mm.
9. GARANTÍA
Todas las máquinas electroportátiles VIRUTEX, tienen una garantía válida de 12 meses a partir del
día de su suministro, quedando excluidas todas las
manipulaciones o daños ocasionados, por manejos
inadecuados o por desgaste natural de la máquina.
Para cualquier reparación, dirigirse al servicio oficial
de asistencia VIRUTEX.
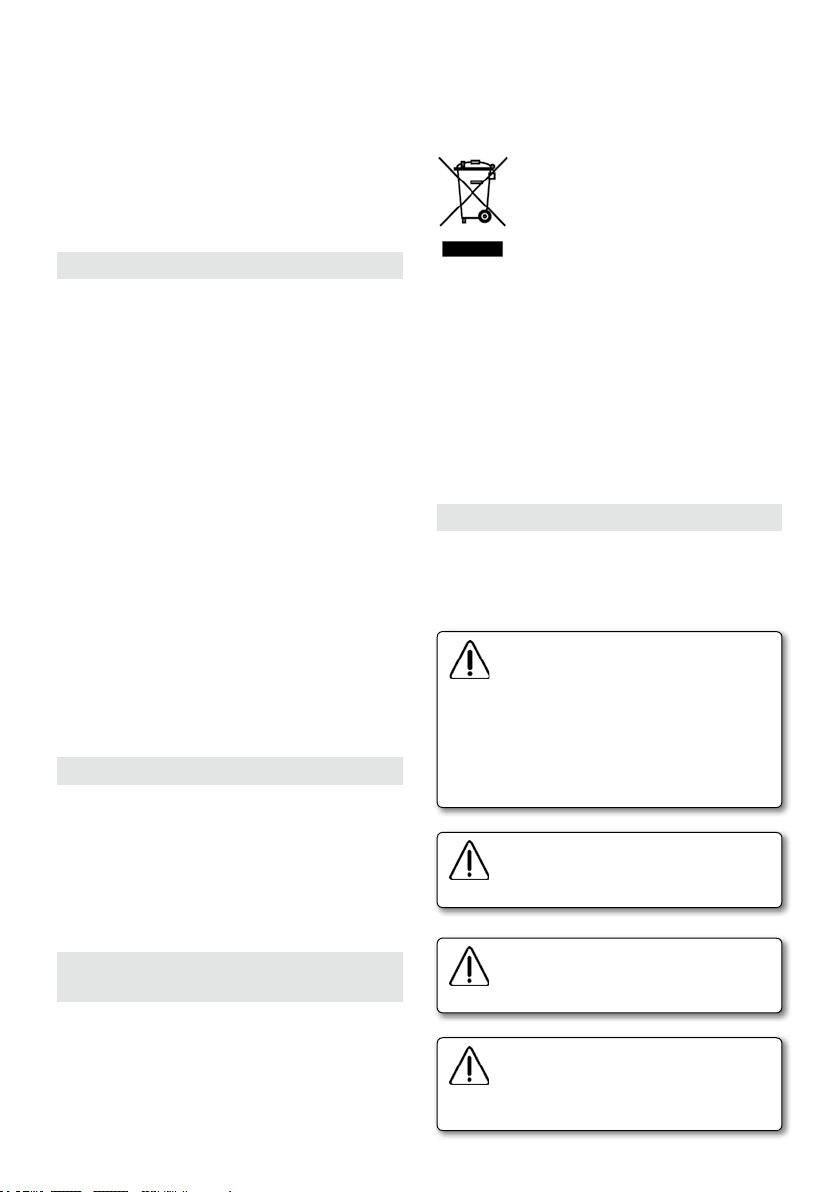
10. RECICLAJE DE LAS
HERRAMIENTAS ELÉCTRICAS
Nunca tire la herramienta eléctrica con el resto de
residuos domésticos. Recicle las herramientas, accesorios y embalajes de forma respetuosa con el medio
ambiente. Respete la normativa vigente de su país.
Aplicable en la Unión Europea y en países europeos
con sistemas de recogida selectiva de residuos:
La presencia de esta marca en el producto o en el
material informativo que lo acompaña, indica que
al finalizar su vida útil no deberá eliminarse junto
con otros residuos domésticos.
Conforme a la Directiva Europea 2002/96/CE los
usuarios pueden contactar con el establecimiento
donde adquirieron el producto, o con las autoridades
locales pertinentes, para informarse sobre cómo y
dónde pueden llevarlo para que sea sometido a un
reciclaje ecológico y seguro.
VIRUTEX se reserva el derecho de modificar sus
productos sin previo aviso.
ENGLISH
AS182K-AS282K ASPIRATOR
Important
Read these OPERATING INSTRUCTIONS
and the attached GENERAL SAFETY
INSTRUCTIONS LEAFLET carefully
before using the machine. Make sure
you have understood them before operating the machine for the first time.
Keep both sets of instructions for any
future queries.
Read carefully the GENERAL SAFETY
INSTRUCTIONS LEAFLET, which is included in the machine documentation.
Before connecting the aspirator to the
mains ensure that the voltage is the
same as that on the aspirator.
Before connecting a power tool to
the socket ensure that the voltage
on the aspirator is the same as that
of the tool.
5
Page 6

1. TECHNICAL CHARACTERISTICS
AS182K
Power max..............................................1200 W
Cooling.................................................by-pass
Air delivery............................................170 m
Water column vacuum...................2200/mm H
Container capacity.......................................27 l
3
/h
2
Remote control socket.......................1500 W max
Weight......................................................8,2 Kg
AS282K
Power max..............................................1200 W
Cooling.................................................by-pass
Air delivery.............................................170 m3/h
Water column vacuum....................2200/mm H
Container capacity........................................72 l
2
Remote control socket.......................1500 W max
Weight.......................................................22 Kg
2. DESCRIPTIÓN
A - Polyester filter to set into the tank to pick up
dust, and to remove for liquid suction.
B - Filtering cartridge for very fine dust. To be removed
for liquid suction.
C - Suction inlet
D - The "Y" coupling
E - Flexible hose.
G - Outlet for electric tool.
H - Switch.
I - Float: its purpose is to avoid that liquid may goes
inside motor block during suction.
J - Motor block.
K - Hooks for tightening of motor block to tank.
P - Tank.
If sucked in along with the dust, sharp or wet items
could damage the dust bag.
Change the bag when it has filled to two thirds
with dust.
The bag cannot be reused. It must always be changed.
O
4. DRY SUCTION /
OPERATING INSTRUCTIONS
- Insert the filters A and B (Fig. 1 and 3). If a paper
filter bag is used, install only the cartridge for filter
B (Fig. 3).
- If a paper bag is provided, insert it in the tank on
the deflector.
- Assembly the head on tank and block it by hooks
O
K, (Fig. 1).
- Connect the flexible E hose to the inlet C (Fig. 1).
- Connect the plug to a power socket and turn switch
H (Fig. 2), to position I (Fig. 2)
5. LIQUID SUCTION / OPERATING
INSTRUCIONS
- Remove the filters A and B (Fig. 1 and 3)
- Assembly the head on tank and block it by hooks
K (Fig. 1).
- Connect the flexible E hose to the inlet C (Fig. 1).
- Connect the plug to a power socket and turn switch
H (Fig. 2), to position I (Fig. 2)
If you wish to use the machine for dust collection
again, the filters must be replaced in their original
positions.
Never use the aspirator for decanting
flammable liquids.
In order to keep in good efficiency the
machine it is useful to clean the filters
after each utilization.
3. OPTIONAL ACCESSORIES
(pag. 14 and 15)
8246233 Aspirator kit
8299160 Paper filter bag for AS182K
8299161 Paper filter bag for AS282K
FITTING THE DUST BAG
Only use the dust bag together with the filter
cartridge.
The bag collects all the dust in conditions of hygiene.
6
If any liquid or foam leaks out of the
appliance, switch off the electrical
supply emmediately.
6. USE WITH POWER TOOLS
Before using the aspirator ensure (Fig. 1):
- That the bag filter A, or the paper filter bag is
correctly inserted inside the aspirator.
- That the supplementary filter B is correctly inserted
in the upper part of the body.
Above nozzle C connect in the following order:
1. The "Y" coupling (D)
2. The flexible tube (E)
3. The power tool
Page 7

Connect the plug of the tool to the supplementary
socket G (Fig. 2) on the upper part of the aspirator
head.
Connect the aspirator plug to the mains and turn
switch H (Fig. 2) to position "II".
In these conditions each time the tool is started the
aspirator will also be automatically started.
If, on connecting a electronically regulated portable
machine to the aspirator, you should notice that the
aspirator does not start up automatically when the
machine is turned on, just turn the connection plug
of the machine in the aspirator through an angle of
180° to rectify the problem.
The "Y" connection makes it possible to use up
to two power tools simultaneously with only one
aspirator.
7. INSTRUCTION TO BE
STRICTLY FOLLOWED
• The use of this machine for anything not specified in this manual may be dangerous and must be
avoided.
• The suction nozzle should be kept away from the
body, especially delicate areas such as the eyes, ears
and mouth.
• The equipment should be correctly assembled
before use.
• Ensure that power sockets used are correct for
the machine.
• Check the voltage indicated on the rating plate is
the same as the supply voltage.
• These machines are not designed for picking up
health eddangering dusts or inflammable/esplosive
substances.
• Never leave the equipment unattended whilst
in use.
• Never carry out any maintenance on the machine
without first disconnecting from the mains supply, if
the machine is to be left unattended or can bereached
by childrens or others persons not aware about their
action, the supply should also be terminated.
• The main supply cable should not be used to pull
or lift the machine.
• The machine should never be emersed in water or
a pressure jet of water used for cleaning.
• Periodically examine the mains cable and machine
for damage. If any damage is found contact your
service centre for repair.
• Should extension cables be used, ensure that the
cable rating is suitable for use with the equipment.
Do not use the cable coiled as this could result in a
voltage drop or overheating. Keep dry at all times.
• The equipment should not be used to pick up water
from containers lavatories, tubs, etc.
• Ensure that the float I (Fig. 4) is not damaged or
obstructed by anything that may stop it from rising.
The floats function is to stop the suction when
the tank is full or if the machine should overturn
accidentally.
• If the equipment should overturn it is recommended that the machine should be stood up before
switching off.
• If foam / liquid should come from the machine
exhaust switch off immediately.
• Aggressive solvents or detergents should not be
used.
• The manufacturer cannot be held responsible for
any damage/injury caused to persons or property,
because of the incorrect use of the machine due to
procedures being used which are not specified in
this instruction manual.
8. MAINTENANCE
Before carrying out any work on the aspirator remove
the plug from the mains.
All work carried out on the machine must be done
by qualified technicians.
To ensure the machine is kept in good working order
we recommend you:
- Regularly remove dust and dirt by shaking out the
filter bag. Regularly clean the filter cartridge with
a soft-haired brush.
The filter cartridge must be discarded when excessively encrusted or damaged, and replaced with a
new filter.
It is recommended to keep a spare filter handy.
- Always keep the aspiration pipes clean (too much
dirt causes loss of aspiration and overheating of
the motor)
-The rotating parts of the machine do not need any
lubrication as they are equipped with auto-lubricating
bearings. The thickness of the carbon brushes on
the motor must be checked, in normal conditions,
every 12 months or changed when they are reduced
to 9 mm thick.
9. WARRANTY
All VIRUTEX power tools are guaranteed for 12
months from the date of purchase, excluding any
damage which is a result of incorrect use or of natural
wear and tear on the machine. All repairs should
be carried out by the official VIRUTEX technical
assistance service.
7
Page 8

10. RECYCLING ELECTRICAL EQUIPMENT
Never dispose of electrical equipment with domestic
waste. Recycle equipment, accessories and packaging
in ways that minimise any adverse effect on the
environment. Comply with the current regulations
in your country.
Applicable in the European Union and in European
countries with selective waste collection systems:
If this symbol appears on the product or in the accompanying information, at the end of the product’s
useful life it must not be disposed of with other
domestic waste.
In accordance with European Directive 2002/96/EC,
users may contact the establishment where they
purchased the product or the relevant local authority
to find out where and how they can take the product
for environmentally friendly and safe recycling.
VIRUTEX reserves the right to modify its products
with out prior notice.
FRANÇAIS
Avant de brancher l'aspirateur sur
le secteur, vérifier que la tension
d'alimentation est bien la même que
celle indiquée sur l'aspirateur.
Avant de brancher l'outil électrique à
l'aspirateur, vérifier que la tension de
l'aspirateur est bien la même que celle
de l'outil électrique.
1. CARACTÉRISTIQUES TECHNIQUES
AS182K
Puissance max........................................1200 W
Refroidissement....................................by-pass
Débit d'air...............................................170m3/h
Dépression à colonne d'eau............2200 mm H2O
Capacité cuve..............................................27 L
Prise télécommande.........................1500 W max
Poids.........................................................8,2 Kg
AS282K
Puissance max........................................1200 W
Refroidissement....................................by-pass
Débit d'air..............................................170m
3
Dépression à colonne d'eau............2200 mm H2O
Capacité cuve..............................................72 L
Prise télécommande........................1500 W max
Poids.........................................................22 Kg
/h
ASPIRATEUR AS182K-AS282K
Important
Avant d'utiliser la machine, lisez attentivement ce MANUEL D'INSTRUCTIONS
et la BROCHURE D'INSTRUCTIONS
GÉNÉRALES DE SÉCURITÉ qui vous
sont fournis avec cette machine. Assurez-vous de bien avoir tout compris
avant de commencer à travailler sur
la machine.
Gardez toujours ces deux manuels
d'instructions à portée de la main pour
pouvoir les consulter, en cas de besoin.
Lire attentivement la BROCHURE
D'INSTRUCTIONS GÉNÉRALES DE
SÉCURITÉ qui est jointe à la documentation de la machine.
8
2. DESCRIPTION
A - Filtre en polyester à insérer dans la cuve pour
aspirer la poussière et à enlever pour l'aspiration
des liquides.
B - Cartouche filtrante pour poussières très fines, et
à enlever pour l'aspiration des liquides.
C - Connecteur d'aspiration.
D - Le raccord en "Y".
E - Tuyau flexible.
G - Prise pour outil électrique.
H - Interrupteur.
I - Flotteur pour empêcher le liquide aspiré de penetrer
dans le bloc moteur.
J - Bloc moteur.
K - Crochets pour le serrage du bloc moteur sur la cuve.
P - Cuve.
Pour assurer une parfaite efficacité
d'aspiration des poussières, il est nécessarie de nettoyer les filtres de l'appareil
après chaque utilisation.
Page 9

3. ACCESSOIRES
OPTIONNELS (pag. 14 et 15)
8246233 Kit aspirateur
8299160 Sac filtre en papier pour AS182K.
8299161 Sac filtre en papier pour AS282K.
UTILISATION DU SAC FILTRE EN PAPIER
Utiliser le sac ramasse-poussière filtre en papier
seulement lorsque la cartouche filtre est montée.
Le sac garantit la récupération des poussières aspirées
dans des conditions d'hygiéne.
L'aspiration de matières coupantes ou humides peut
endommager le sachet.
Changer le sachet quand les matières aspirées ont
atteint les deux tiers de sa capacité. Le sachet ne
peut pas être réutilisé mais il doit toujours être
remplacé.
4. ASPIRATION POUSSIERE /
MODE D'EMPLOI
- Insérer les filtres A et B (Fig. 1 et 3). Si on utilise
le sac filtre en papier, ne placer que la cartouche
filtrante B (Fig. 3).
- Si on prévoit l'utilisation du filtre en papier,
l'indroduire dans la cuve en l'insérant sur le déflecteur.
- Monter la tête sur la cuve et la bloquer avec les
crochets K, (Fig. 1).
- Insérer le tube flexible E dans le connecteur C
(Fig. 1).
- Brancher l'aspirateur, et demarrer avec l'interrupteur
H (Fig. 2).
5. ASPIRATION DES
LIQUIDES / MODE D'EMPLOI
- Enlever les filtres A et B (Fig. 1 et 3).
- Monter la tête sur la cuve en la bloquant avec les
crochets K, (Fig. 1).
- Insérer le tube flexible E dans le connecteur C
(Fig. 1).
- Brancher l'aspirateur, et demarrer avec l'interrupteur
H (Fig. 2).
Si vous souhaitez réutiliser l'aspirateur pour aspirer
de la poussière, il faudra remonter les filtres à leur
place d'origine.
Ne jamais utiliser l'aspirateur pour
le transvasement de liquides "inflammables".
Si de la mousse ou du liquide sort
de l'appareil, coupez immédiatement
l'alimentation électrique.
6. UTILISATION AVEC L'OUTIL ÉLECTRIQUE
Avant d'utiliser l'aspirateur, vérifier (Fig. 1):
- Que le sachet de filtre A, ou le sac filtre en papier,
est bien placé à l'intérieur de l'aspirateur.
- Que le filtre supplémentaire B est bien placé sur la
partie supérieure du corps.
A partir de la tuyère C, brancher dans l'ordre suivant:
1. le raccord en "Y" (D)
2. le tube flexible (E)
3. l'outil électrique
Brancher la prise de l'outil électrique sur la prise supplémentaire G (Fig. 2) située sur la partie supérieure
de la tête de l'aspirateur.
Brancher la prise de l'aspirateur sur une prise de
courant et mettre l'interrupteur H (Fig. 2) en position "II".
Dans ces conditions, chaque fois qu'on mettra en
marche l'outil électrique, l'aspirateur se mettra
également en marche automatiquement.
Si en branchant une machine portative à réglage
électronique sur l'aspirateur, celui-ci ne se met pas
automatiquement en marche quand on démarre
la machine, il suffira de tourner à 180° la fiche de
raccordement de la machine à l'aspirateur pour
résoudre le problème.
Grâce au raccord en "Y", il est possible d'utiliser
jusqu'à 2 outils électriques simultanément avec le
même aspirateur.
7. INDICATIONS A
OBSERVER SCRUPULEUSEMENT
• Toute utilisation autre que celle indiquée sur le
présent manuel peut constituer un danger qui peut
donc être évité.
• Quand l'appareil est en fonctionnement, il faut
éviter de mettre l'orifice d'aspiration près d'une
partie délicate du corps comme les yeux, la bouche
ou les oreilles.
• Avant l'utilisation, l'appareil doit être monté correctement dans son ensemble.
• Vérifier que la prise murale soit conforme à la
fiche de l'appareil.
• Vérifier avant de brancher la machine si la tension
d'alimentation correspond à celle indiquée sur la
plaque des caractéristiques du moteur.
• Ne pas aspirer de substances inflammables (exemple:
9
Page 10

cendres de cheminée), des poussières explosives ou
dangereuses pour la santé.
• Ne pas laisser l'appareil en foctionnement sans
surveillance.
• Enlever toujours la fiche de la prise de courant
avant d'effectuer quelque intervention que ce soit
sur l'appareil, ou quand celui-ci reste sans surveillance
ou à la portée des enfants ou des personnes non
resposables de leurs actes.
• Ne pas tirer ou soulever l'appareil en utilisant le
cable électrique.
• Ne pas immerger l'appareil dans l'eau pour le
nettoyage ni le laver avec un jet d'eau.
• Contrôler scrupuleusement si le cable électrique,
la fiche ou des parties isolées de l'appareil ne soient
pas endommagées et dans un tel cas ne pas utiliser
l'appareil mais s'adresser au Service après vente pour
sa réparation.
• Dans le cas où une rallonge électrique viendrait à
être utilisée, il faut s'assurer que cet ajout soit sur
des surfaces sèches et protégées des projections
éventuelles d'eau.
• S'assurer que le flotteur I (Fig. 4), qui a la fonction d'arrêter l'aspiration quand la cuve se trouve
complètement pleine de liquide ou dans le cas d'un
renversement de l'appareil, ne présente aucun endommagement ou obstruction qui puisse empécher
la montée de ce flotteur.
• En cas de renversement, il fau recommander de
relever l'appareil avant de l'éteindre.
• Eteindre immédiatement l'appareil en cas
d'écoulement de liquide ou de mousse.
• Ne pas utiliser l'appareil pour aspirer l'eau de
récipients, éviers, bassins, etc.
• Ne pas utiliser des solvants ou des détergents
agressifs.
• Le fabricant décline toute responsabilité pour des
dommages causés aux personnes, animaux ou choses
par suite de manque de respect de ces instructions ou
si l'appareil a été utilisé d'une façon anormale.
En cas d'encrassement excessif, ou s'il s'est détérioré,
le remplacer sans tarder.
Il est conseillé de toujours posséder un filtre de
réserve.
- Bien nettoyer les canaux d'aspiration.
(Une présence excessive de saleté provoque une perte
d'aspiration et le surchauffage du moteur)
- Les parties rotatives de l'appareil n'ont besoin
d'aucune lubrification car elles sont pourvues de cous-
sinets auto-lubrifiants. Il faut contrôler l'épaisseur des
charbons du moteur, dans des conditions normales
d'utilisation, tous les 12 mois ou, de toute façon, les
changer quand leur épaisseur arrive à 9 mm.
9. GARANTIE
Toutes les machines électro-portatives VIRUTEX
ont une garantie valable12 mois à partir de la date
d'achat, en étant exclus toutes les manipulations ou
dommages causés par des maniements inadéquats
ou par l'usure naturelle de la machine. Pour toute
réparation, s'adresser au service officiel d'assistance
technique VIRUTEX.
10. RECYCLAGE DES OUTILS ÉLECTRIQUES
Ne jetez jamais un outil électrique avec le reste des
déchets ménagers. Recyclez les outils, les accessoires
et les emballages dans le respect de l’environnement.
Veuillez respecter la réglementation en vigueur dans
votre pays.
Applicable au sein de l’Union Européenne et dans
les pays européens dotés de centres de tri sélectif
des déchets:
Ce symbole présent sur le produit ou sur la documentation informative qui l’accompagne, indique
qu’en fin de vie, ce produit ne doit en aucun cas être
éliminé avec le reste des déchets ménagers.
8. ENTRETIEN
Avant toute intervention sur l'aspirateur, débrancher
la prise du secteur.
Toute réparation sur la machine doit être effectuée
par un personnel qualifié.
Pour un bon fonctionnement de l'aspirateur, il est
conseillé de:
- Éliminer périodiquement la poussière et les détritus,
en secouant le sachet de filtre. Nettoyer fréquemment la cartouche filtre à l'aide d'un pinceau à
poils souples.
10
Conformément à la directive européenne 2002/96/
CE, tout utilisateur peut contacter l’établissement
dans lequel il a acheté le produit, ou les autorités
locales compétentes, pour se renseigner sur la façon
d’éliminer le produit et le lieu où il doit être déposé
pour être soumis à un recyclage écologique, en
toute sécurité.
VIRUTEX se réserve le droit de modifier ses produits
sans avis préalable.
Page 11

DEUTSCH
Gewicht.....................................................22 Kg
SAUGER AS182K-AS282K
Wichtiger Hinweis: Lesen Sie bitte vor
Benutzung der Maschine die beiliegende GEBRAUCHSANWEISUNG und die
ALLGEMEINEN SICHERHEITSHINWEISE
sorgfältig durch.
Stellen Sie sicher, dass Sie sowohl
die Gebrauchsanweisung als auch
die allegemeinen Sicherheitshinweise
verstanden haben, bevor Sie die Maschine bedienen. Bewahren Sie beide
Gebrauchsanweisungen zum späteren
Nachschlagen auf.
Lesen Sie die den Geräteunterlagen
beiliegende BROSCHÜRE DER ALLGEMEINEN SICHERHEITSHINWEISE
aufmerksam durch.
Überprüfen Sie vor Anschluß des
Saugers ans Stromnetz, ob die Netzspannung mit der auf dem Sauger
angegebenen übereinstimmt.
Versichern Sie sich vor Anschluß des
Elektrowerkzeugs an den Sauger, daß
die Saugerspannung mit der des Elektrowerkzeugs übereinstimmt.
1. TECHNISCHE DATEN
AS182K
Leistung max..........................................1200 W
Kühlung.................................................By-pass
Luftdurchsatz........................................170 m3/h
Wassersäulen-Unterdruck.............2200 mm H2O
Fassungsvermögen des Behälters................27l
Stecker Fernbedienung....................1500 W max
Gewicht.....................................................8,2 Kg
AS182K
Leistung max...........................................1200 W
Kühlung..............................................By-pass
Luftdurchsatz........................................170 m
3
/h
Wassersäulen-Unterdruck............2200 mm H2O
Fassungsvermögen des Behälters..............72l
Stecker Fernbedienung....................1500 W max
2. BESCHREIBUNG
A - Polyesterfilter nur zum Trockensaugen; vor dem
Naßsaugen unbedingt zu entternen!
B - Feinststaub-Filtereinsatz. Beim Absaugen von
Flüssigkeit bitte Filter abnehmen!
C - Saugstutzen.
D - "Y" Verbindungsteil.
E - Saugschlauch.
G - Anschluß für Elektrowerkzeug.
H - EIN/AUS-Schalter.
I - Schwimmer: Er verhindert, daß während des
Saugens Flüssigkeit in den Motorkopf eintritt.
J - Motorkopf.
K - Befestigungsklammern.
P - Behälter.
Um die Leistungsfähigkeit des Gerätes
zu erhalten, wird empfohlen, nach
jedem Gebrauch zu reinigen.
3. ZUBEHÖR AUF WUNSCH
(seite 14 und 15)
8246233 Suger-Set
8299160 Papier-Filterbeutel für AS182K.
8299161 Papier-Filterbeutel für AS282K.
VERWENDUNG DES STAUBSACKS
Den staubsack nur mit eingefügtem filtereinsatz
verwenden.
Der Beutel garantiert, daß das Saubsaugen unter
hygienischen Bedingungen stattfindet.
Das Aufsaugen von schneidendem oder feuchtem
Material kann den Staubbeutel beschädigen.
Der beutel muß ersetzt werden, wenn er zu zwei
Dritteln mit Staub gefüllt ist. Der Beutel darf nicht
wiederverwendet werden, sondern es ist stets ein
neuer zu benutzen.
4. TROCKENSAUGEN /
BEDIENUNGSHINWEISE
- Textifilter A und B in Behälter einsetzen (Abb. 1
und 3). Falls Sie Papier-Filterbeutel verwenden, nur
Filtereinsatz B (Abb. 3).
- Papierfilter auf den im Gerät befindlichen Stutzen
schieben.
- Motorkopf auf Behälter setzen und mit den Klammern befestigen K (Abb. 1).
- Saugschlauch E am Saugstutzen C anschließen
(Abb. 1).
11
Page 12

- Stecker in Steckdose stecken, dann Gerät einschalten H (Abb. 2).
5. NASS-SAUGEN / BEDIENUNGSHINWEISE
- Textifilter A und B abnehmen (Abb. 1 und 3).
- Motorkopf auf den Tank setzen und mit Klammern
befestigen K (Abb. 1).
- Schlauch E am Saugstutzen C anschließen
(Abb.1).
- Stecker in Steckdose stecken, dann Gerät einschalten H (Abb. 2).
Soll das Gerät erneut als Staubsauger eingesetzt
werden, entfernen Sie setzen Sie die Filter wieder
in ihrer ursprünglichen Stellung ein.
Verwenden Sie den Sauger nie zum
Umfüllen von brennbaren Flüssigkeiten.
Ziehen Sie sofort den Netzstecker,
wenn Flüssigkeit oder Schaum aus dem
Gerät ausläuft.
6. EINSATZ MIT ELEKTROWERKZEUGEN
Überprüfen Sie vor Gebrauch des Saugers, ob
(Abb.1):
- Das Filtersäckchen A, Filterbeutel einsetzen richtig
in das Saugerinnere eingelegt.
- Der Zusatzfilter B richtig in das Saugeroberteil
eingelegt ist.
Schließen Sie ausgehend vom Anschlußstutzen C
die folgenden Elemente in der angegebenen Reihenfolge an:
1."Y"-Verbindungsteil (D)
2.Schlauch (E)
3.Elektrowerkzeug
Stecken Sie den Stecker des Elektrowerkzeugs in die
zusätzliche Steckdose G (Abb. 2) des Saugers, die sich
am Oberteil des Saugerkopfes befindet.
Schließen Sie den Stecker des Saugers an eine Netzsteckdose an und bringen Sie den Schalter H (Abb.
2) in Stellung "II".
Hierdurch wird jedesmal bei Inbetriebnahme des
Elektrowerkzeugs auch der Sauger automatisch in
Gang gesetzt.
Wenn Sie beim Anschluß einer elektronisch geregelten
tragbaren Maschine an den Sauger feststellen, daß
dieser nicht automatisch mit anspringt wenn die
Maschine angestellt wird, reicht es, den Anschlußstecker Maschine-Sauger um 180° zu drehen, um das
12
Problem zu beseitigen.
Es besteht die Möglichkeit, mit Hilfe des "Y"-Verbindungsteils gleichzeitig bis zu zwei Elektrowerkzeuge
mit dem Sauger zu bedienen.
7. INFORMATIONEN FÜR DEN
EINSATZ UND IHRE SICHERHEIT
• Jeder Gebrauch des Gerätes, der in dieser Anleitung
nicht beschrieben ist, kann gefährlich sein und muß
daher vermieden werden.
• Wenn das Gerät arbeitet sorfältig darauf achten, daß
die Saugdüse nicht an eine empfindliche Körperstelle
gehalten wird, wie Augen, Mund oder Ohren.
• Vor dem Gebrauch muß das Gerät mit allen Teilen
Korrekt zusammen-sgesetzt werden.
• Überprüfen Sie, ob Steckdose und Gerätestecker
zusammenpassen.
• Das Gerät nur ddann anschließen, wenn die auf
dem Typenschlid angegebene Spannung mit der
Netzspannung übereinstimmt.
• Das Gerät niemals in der Nähe entflammbarer,
explosiver oder giftiger Substanzen benutzen ( z.B.
Kaminasche).
• Vor jeder Wartung, Reiningung, dem Filterwechsel
und nach dem Gebrauch Gerät ausschalten und
Netzstecker ziehen. Gerät nicht unbeaufsichtigt
lassen, nicht in der Reichweite von Kindern oder
Personen lassen, die sich ihrer Handlungen nicht
bewußt sind.
• Niemals das Gerät an der Anschlußleitung ziehen
oder hochheben.
• Das Gerät zur Reinigung nicht in Wasser tauchen
oder mit einem Wasserstrahl reinigen.
• Sorfältig überprüfen, ob die Netzanschlußleitung,
das Gehäuse oder andere Teile des Gerätes beschädigt
sind; fall ja das Gerät keinesfalls benutzen und Reparatur beim Kundendienst veranlassen.
• Falls elektrische Verlängerungen benutzt werden,
immer sicherstellen, daß diese für die entsprechende
Anwendung geeignet sind.
Niemals das Gerät benutzen, um Wasser aus Behältern,
Waschbecken, Wannen, etc zu saugen.
• Das in Betrieb befindliche Gerät niemals unbeaufsichtigt lassen.
• Stellen Sie sicher, daß der Schwimmer I (Fig. 4)
nicht beschädigt oder blockiert ist, oder das Gerät
umkippt.
• Falls das Gerät umgekippt ist, Gerät sofort ausschalten, Netzstecker ziehen und erst dann das Gerät
richtig aufstellen.
• Das Gerät sofort ausschalten und Netzstecker
ziehen, wenn Flüssigkeit oder Schaum austritt.
Page 13

• Keine aggressiven Lôsungsmittel oder Reiningungsmittel verwenden.
• Der Hersteller ist nicht verantwortlich für jedweden
Schaden an Personen oder Gegenständen, verursacht
durch falschen Gebrauch des Gerätes oder durch
Nichtbeachten der in dieser Anleitung gegebenen
Instruktionen.
8. WARTUNG
Ziehen Sie vor jeglichem Eingriff in den Sauger den
Netzstecker.
Jeglicher Eingriff in das Gerät ist von qualifiziertem
Personal auszuführen.
Zur Gewährleistung einer einwandfreien Funktionsweise des Saugers empfehlen wir:
- In gewissen Zeitabständen durch Ausschütteln des
Filters und des Nylonfilters Staub und Rückstände
zu entfernen. Den Filtereinsatz häufig mit einem
weichen Pinsel säubern.
Wenn der Einsatzfilter zu stark verschmutzt oder
beschädigt ist, wechseln Sie ihn unbedingt aus.
Es empfiehlt sich, stets einen Ersatz-Einsatzfilter
vorrätig zu halten.
- Die Saugkanäle immer sauberzuhalten (eine zu
starke Verschmutzung verursacht einen Verlust an
Saugleistung und eine Überhitzung des Motors).
- Die Drehteile des Geräts erfordern keinerlei
Schmierung, da sie selbstschmierende Kugellager
haben.
- Unter normalen Betriebsbedingungen ist die Stärke
der Kohlebürsten des Motors alle zwölf Monate zu
überprüfen und diese in jedem Fall auszutauschen,
sobald sie sich auf 9 mm abgenutzt haben.
9. GARANTIE
Alle Elektrowrkzeuge von VIRUTEX habe eine garantie von 12 Monaten ab dem Lieferdatum. Hiervon
ausgeschlossen sind alle Eingriffe oder Schäden
aufgrund von unsachgemäßem Gebrauch oder
natürlicher Abnutzung des Geräts. Wenden Sie sich
im Falle einer Reparatur immer an den zugelassenen
Kundendienst von VIRUTEX.
Produkt oder im beiliegenden Informationsmaterial
bedeutet, dass das Produkt nach seiner Nutzungsdauer nicht zusammen mit anderen Haushaltsabfällen
entsorgt werden darf.
Gemäß der EU-Richtlinie 2002/96/EG können sich die
Nutzer an die Verkaufsstelle, bei der sie das Produkt
erworben haben, oder an die zuständigen örtlichen
Behörden wenden, um in Erfahrung zu bringen, wohin
Sie das Produkt zur umweltgerechten und sicheren
Entsorgung bringen können.
VIRUTEX behält sich das Recht vor, die Produkte ohne
vorherige Ankündigung zu verändern.
ITALIANO
ASPIRATORE AS182K-AS282K
Importante
Prima di utilizzare la macchina, leggere
attentamente questo MANUALE DI ISTRUZIONI e il PROSPETTO DELLE NORME
GENERALI DI SICUREZZA allegato. Non
cominciate a lavorare con la macchina
se non siete sicuri di avere compreso
integralmente il loro contenuto.
Conservare tutti e due i manuali per
eventuali consultazioni successive.
Leggere attentamente le ISTRUZIONI
GENERALI DI SICUREZZA allegate alla
documentazione della macchina.
10. RECYCELN VON ELEKTROWERKZEUGEN
Entsorgen Sie Elektrowerkzeuge nie zusammen
mit den restlichen Hausabfällen. Recyceln Sie die
Werkzeuge, das Zubehör und die Verpackungen
umweltgerecht. Beachten Sie die geltenden Rechtsvorschriften Ihres Landes.
Anwendbar in der Europäischen Union und in
Ländern mit Mülltrennsystemen:
Das Vorhandensein dieser Kennzeichnung auf dem
Leggere attentamente le ISTRUZIONI
GENERALI DI SICUREZZA allegate alla
documentazione della macchina.
Prima di collegare l'utensile elettrico all'aspiratore, controllare che la
tensione dell'aspiratore sia la stessa
dell'utensile elettrico.
13
Page 14

1. CARATTERISTICHE TECNICHE
AS182K
Potenza max............................................1200 W
Raffreddamento.....................................by-pass
Aria aspirata..........................................170 m3/h
Resa aspirazione liquidi..................2200 mm H2O
Capacità contenitore......................................27 l
Spina tele-controllo..........................1500 W max
Peso.........................................................8,2 Kg
AS282K
Potenza max............................................1200 W
Raffreddamento.....................................by-pass
Aria aspirata.........................................170 m
Resa aspirazione liquidi..................2200 mm H
Capacità contenitore.....................................72 l
3
/h
2
Spina tele-controllo...........................1500 W max
Peso..........................................................22 Kg
danneggiare il sacco raccoglipolvere.
Cambiare il sacco quando i materiali aspirati hanno
raggiunto i due terzi della capienza.
Il sacco non può essere riutilizzato ma deve sempre
essere sostituito.
4. ASPIRAZIONE POLVERE / MODO
DI OPERARE
- Inserire il filtros A e B (Fig. 1 e 3). Se si usa il
sacchetto filtro di carta, mettete solo la cartuccia
filtrante B (Fig. 3)
- Se è previsto l'uso del filtro incarta, inserirlo nel
fusto calzandolo sul deflettore.
- Montare la testa sul fusto e bloccarla con i ganci
K (Fig. 1).
O
- Inserire il tubo flessibile E nel bocchettone C (Fig. 1).
- Accendere l'apparecchio dopo aver collegato la
spina ad una presa H (Fig. 2).
2. DESCRIZIONE
A- Filtro in poliestere da inserire nel fusto per aspirare
polvere e da togliere per aspirare liquidi.
B - Cartuccia filtrante per polveri molto fini, da
togliere per aspirare liquidi.
C - Bocchettone di aspirazione.
D - L'attacco a "Y".
E - Tuboflex 2,5 m.
G - Attacco per macchina utensile elettrica.
H - Interruttore.
I - Galleggiante: impedisce al liquido aspirato di
invadere il blocco motore.
J - Blocco motore.
K - Ganci per il serraggio del blocco motore sul fusto.
P - Fusto.
Per mantenere in perfetta efficienza
l'apparecchio per l'aspirazione di
polvere è necessario pulire il filtros
scuotendolo dopo ogni utilizzo.
3. ACCESSORI OPZIONALI (pag. 14 e 15)
8246233 Kit aspirazione
8299160 Sacchetto filtro di carta per AS182K.
8299161 Sacchetto filtro di carta per AS282K.
IMPIEGO DEL SACCO RACCOGLIPOLVERE
Utilizzare il sacco raccoglipolvere solo con la cartuccia
filtro inserita.
Il sacco garantisce il recupero della polvere aspirata
in condizioni di igiene.
L'aspirazione di materiali taglienti o umidi può
14
5. ASPIRAZIONE LIQUIDE /
MODO DI OPERARE
- Togliere il filtros A e B (Fig. 1 e 3).
- Montare la testa sul fusto e bloccarla con i ganci
K (Fig. 1).
- Inserire il tubo flessibile E nel bocchettone C (Fig. 1).
- Accendere l'apparecchio dopo aver collegato la
spina ad una presa H (Fig. 2).
Quando si desidera impiegare di nuovo l'utensile per
l'aspirazione delle polveri, è necessario rimontare i
filtri nella loro posizione iniziale.
Non utilizzare mai l'aspiratore per
travasare liquidi "infiammabili".
Non utilizzare mai l'aspiratore per
travasare liquidi "infiammabili".
6. USO CON UTENSILI ELETTRICI
Prima di fare uso dell'aspiratore, verificare quanto
segue (Fig. 1):
- Che il sacchetto filtrante A, oppure il sacchetto
filtro di carta sia inserito correttamente all'interno
dell'aspiratore.
- Che il filtro supplementare B sia inserito correttamente nella parte superiore del corpo.
Cominciando dall'ugello C, collegare nel seguente
ordine:
1. l'attacco a "Y" (D)
2. il tubo flessibile (E)
3. l'utensile elettrico
Page 15

Collegare la spina dell'utensile elettrico alla presa
supplementare G (Fig. 2) situata nella parte superiore
della testa dell'aspiratore.
Collegare la spina dell'aspiratore a una presa di
corrente e mettere l'interruttore H (Fig. 2) in posizione "II".
In questa situazione, tutte le volte che si accende
l'utensile elettrico si avvierà automaticamente anche
l'aspiratore.
Se, quando si collega una machina portatile con regolazione elettronica all'aspiratore, quest'ultimo non
dovesse attivarsi automaticamente con l'accensione
della macchina, basterà girare di 180° la spina di
collegamento della macchina nell'aspiratore per
risovere il problema.
Con l'attacco a Y è possibile utilizzare contemporaneamen-te due utensili elettrici con un solo aspiratore.
7. INDICAZIONI DA
OSSERVARE SCRUPOLOSAMENTE
• Ogni utilizzo diverso da quelli indicati sul presente manuale può costituire pericolo pertanto deve
essere evitato.
• Quando l'apparecchio è in funzione, evitare di
mettere l'orifizio di aspirazione vicino a parti delicate
del corpo come acchi, bocca, orecchie.
• Prima dell'uso l'apparecchio deve essere montato
correttamente in ogni sua parte.
• Accertarsi che la presa sia conforme alla spina
dell'apparecchio.
• Accertarsi che il valore di tensione indicato sul
blocco motore corrsponda a quello della fonte di
energia cui si intende collegare l'apparecchio.
• Non aspirare sostanze infiammabili (es. cenere nel
camino), esplosive, tossiche o pericolose per la salute.
• Non lasciare incustodito l'apparecchio funzionante.
• Togliere sempre la spina dalla presa di corrente prima
di effettuare qualsiasi intervento sull'apparecchio o
quando questo rimane incustodito o alla portata di
bambini o di persone non coscienti dei loro atti.
• Non tirare mai o alzare l'apparecchio utilizzando
il cavo elettrico.
• Non immergere l'apparecchio in acqua per la pulizia
né lavarlo con getti d'acqua.
• Controllare scrupolosamente se cavo, spina o parti
dell'apparecchio risultano danneggiate e in tal caso
non utilizzare assolutamente l'apparecchio ma rivolgersi al Servizio Assistenza per la sua riparazione.
• Nel caso vengano utilizzate prolunghe elettriche
assicurarsi che queste appoggino su superfici asciutte
e protette da eventuali spruzzi d'acqua.
• Assicurarsi che il galleggiante I (Fig. 4), che ha la
funzione di fermare l'aspirazione quando il fusto sia
completamente pieno di liquido o in caso di ribaltamento dell'apparecchio, non presenti danneggiamenti
od ostruzioni che possano impedirne la salita.
• In caso di ribaltamento si raccomanda di rialzare
l'apparecchio prima di spegnerlo.
• Spegnere immediatamente l'apparecchio in caso
di fuoriuscita di liquido o schiuma.
• Non usare l'apparecchio per aspirare acqua da
recipienti, lavandini, vasche, etc.
• Non usare solventi e detergenti aggressivi.
• Il fabbricante declina ogni responsabilità per danni
causati a persone, animali o cose in seguito al mancato
rispetto di queste istruzioni o se l'apparecchio viene
usato in modo irragionevole.
8. MANUTENZIONE
Prima di eseguire interventi sull'aspiratore, staccare
la spina dalla presa di corrente elettrica.
Tutti gli interventi dovranno essere eseguiti da
personale qualificato.
Per un buon funzionamento dell’aspiratore, consigliamo di:
- Eliminare periodicamente la polvere e i residui,
scuotendo il sacchetto filtrante. Pulire frequentemente la cartuccia filtro con un pennello a setole
morbide.
In caso di eccessive incrostazioni o se deteriorato,
procedere senz'altro alla sostituizione.
Si consiglia di avere sempre un filtro di scorta.
- Mantenere sempre puliti i condotti di aspirazione
(l'eccesso di sporcizia fa diminuire la potenza di aspirazione e causa il surriscaldamento del motore).
- Le parti rotanti dell'aspiratore non devono essere
lubrificate perché sono già provviste di cuscinetti
autolubrificanti. Occorre controllare lo spessore
delle spazzole di carbone del motore ogni 12 mesi,
in condizioni di uso normale, e comunque sostituirle
quando il loro spessore non supera i 9 mm.
9. GARANZIA
Tutte le macchine elettroportatili VIRUTEX hanno
una garanzia di 12 mesi valida a partire della data di
consegna, con l'esclusione di tutte le manipulazioni
o danni derivanti da un uso inadeguato o dall'usura
normale della macchina. Per qualunque riparazione
rivolgersi al servizio autorizzato di assistenza tecnica
VIRUTEX.
10. SMALTIMENTO DI APPARECCHI ELETTRICI
Non buttare mai gli apparecchi elettrici con il resto
15
Page 16

dei rifiuti domestici. Smaltire gli apparecchi, gli
accessori e gli imballaggi nel rispetto dell’ambiente.
Rispettare la normativa vigente nazionale.
Applicabile nell’Unione Europea e nei paesi europei
con sistemi di raccolta differenziata dei rifiuti:
La presenza di questo marchio sul prodotto o sul
materiale informativo che lo accompagna indica
che, al termine della sua vita utile, non dovrà essere
eliminato insieme ad altri rifiuti domestici.
Conformemente alla Direttiva Europea 2002/96/CE,
gli utenti possono contattare il punto vendita presso
cui è stato acquistato il prodotto, o le autorità locali
pertinenti, per informarsi su come e dove portarlo
per il suo smaltimento ecologico e sicuro.
La VIRUTEX si riserva il diritto di modificare i propri
prodotti senza preaviso.
Antes de ligar a ferramenta eléctrica
ao aspirador, há que verificar se a
tensão do aspirador é igual à da dita
ferramenta eléctrica.
1. CARACTERISTICAS TECNICAS
AS182K
Potência max..........................................1200 W
Arrefecimento........................................................ by-pass
Aspiração .............................................................. 170 m3/h
Depressão coluna de água .................... 2200 mm. H2O
Capacidade do contentor...........................................27 l
Ficha tele controlo.............................1500 W max
Peso .............................................................................. 8,2 Kg
AS282K
Potência max...........................................1200 W
Arrefecimento........................................................ by-pass
Aspiraçao .............................................................. 170 m3/h
Depressão coluna de água .................... 2200 mm. H2O
Capacidade do contentor...........................................72 l
Ficha tele controlo............................1500 W max.
Peso ............................................................................... 22 Kg
PORTUGUÉS
ASPIRADOR AS182K-AS282K
Importante
Antes de utilizar a máquina leia atentamente este MANUAL DE INSTRUÇÕES
e o FOLHETO DE INSTRUÇÕES GERAIS
DE SEGURANÇA anexo. Assegure-se de
os ter compreendido antes de começar
a trabalhar com a máquina.
Conserve os dois manuais de instruções
para possíveis consultas posteriores.
Leia atentamente o FOLHETO DE
INSTRUÇÕES GERAIS DE SEGURANÇA
que se anexa juntamente com a documentação da máquina.
Antes de ligar o aspirador à corrente
eléctrica, há que verificar se a tensão
de alimentação é igual à indicada no
aspirador.
16
2. DESCRIÇÃO
A - Filtro de polyester para colocar no interior do
tanque durante a aspiração de poeiras. Deve ser
retirado quando se aspirar liquidos.
B - Cartucho filtro para pós muito finos. Deve ser
retirado quando se aspirar liquidos.
C - Entrada de aspiração no tanque.
D - A ligação em "Y".
E - Mangueira fléxivel.
G - Tomada para ferramenta eléctrica.
H - Interruptor.
I - Boia de paragem: a sua finalidade é evitar a entrada
de lìquidos no bloco de motor durante a aspiração.
J - Bloco de motor.
K - Fechos para aperto do bloco de motor ao tanque.
P - Tanque.
De forma a manter o bom funcionamento do aparelho, é util limpar o
filtros depois de cada utilização.
3. ACESSÓRIOS OPCIONAIS (pag. 14 e 15)
8246233 Kit aspirador
8299160 Bolsa filtro de papel para AS182K
8299161 Bolsa filtro de papel para AS282K
Page 17

USO DA BOLSA FILTRO DE PAPEL
Use a bolsa recolhedora de pó somente tendo o
cartucho filtro colocado.
A bolsa garante a recuperação, em condições higiénicas, dos pós aspirados.
A aspiração de materiais cortantes ou húmidos pode
danificar a bolsa de recolha de pó.
Substituir a bolsa quando os materiais aspirados
atingirem dois terços da capacidade total.
A bolsa não pode voltar a ser utilizada; deve ser
sempre substituída.
4. INSTRUÇÕES DE UTILIZAÇÃO
(ASPIRAÇÃO DE POEIRAS)
- Inserir os filtros A e B (Fig. 1 e 3). Se usar bolsa
filtro de papel, coloque somente o cartucho de
Filtro B (Fig. 3).
- Se usar saco de papel, inserilo no deflector do
tanque.
- Juntar a cabeça de aspiração ao tanque. Prender
com os fechos K (Fig. 1).
- Ligar a mangueira fléxivel E à entrada de aspiração
C (Fig. 1).
- Ligar a ficha do aspirador à tomada de corrente.
(Fig. 2).
5. INSTRUÇÕES DE UTILIZAÇÃO
(ASPIRAÇÃO DE LÍQUIDOS)
- Retirar os filtros A e B (Fig. 1 e 3).
- juntar a cabeça de aspiração ao tanque. Prender
com os fechos K. (Fig. 1).
- Ligar a mangueira fléxivel E à entrada de aspiração
C (Fig. 1).
- Ligar a ficha do aspirador à tomada de corrente.
(Fig. 2).
Se desejar voltar a utilizar o aspirador para aspirar
pó, deven voltar a montar os filtros, tal como se
encontravam originalmente.
Não utilizar nunca o aspirador para o
trasfego de líquidos "inflamáveis".
Se observar saída de líquido ou de
espuma do aparelho, corte imediatamente a alimentação eléctrica.
6. UTILIZAÇÃO COM FERRAMENTAS
ELECTRICAS
Antes de utilizar o aspirador, há que verificar (Fig. 1):
- Que o saquinho de filtro A, ou a bolsa filtro de papel
esteja bem introduzido no interior do aspirador.
-Que o filtro suplementar B esteja bem introduzido
na parte superior do corpo.
A partir da tubagem C, há que montar, pela seguinte
ordem:
1.A ligação em "Y" (D).
2.O tubo flexível (E).
3.A ferramenta eléctrica.
Ligar a ficha da ferramenta eléctrica à tomada
suplementar G (Fig. 2), situada na parte superior da
cabeça do aspirador.
Ligar a ficha do aspirador a uma tomada de corrente eléctrica e colocar o interruptor H (Fig. 2)
na posição "II".
Nestas condições, em cada vez que se ponha a ferramenta eléctrica em funcionamento, o aspirador
também entrará em funcionamento de uma forma
automática.
Se, ao ligar uma máquina portátil com regulação
electrónica ao aspirador, observasse que este não
entra automaticamente em funcionamiento ao
arrancar a máquina, será suficiente girar de 180°
a ficha de ligação da máquina ao aspirador, para
solucionar o problema.
Graças à ligação em "Y", torna-se possível a utilização
simultânea de 2 ferramentas eléctricas com um
mesmo aspirador.
7. ESTAS INSTRUÇÕES DEVEM
SER RIGOROSAMENTE RESPEITADAS
• Qualquer utilização do equipamento não especificada neste manual poderá ser perigosa, devendo
por isso ser evitada.
• Quando a máquina está em funcionamento, ter
cuidado para não posicionar o acessório de aspiração
perto de partes delicadas do corpo, como os olhos,
boca e ouvidos.
• Antes da sua utilização, o equipamento deve ser
ligado correctamente a todos os acessórios.
• Verificar se a tomada de electricidade é compatível
com a ficha da máquina.
• Verificar se a voltagem do motor corresponde à
voltagen da rede disponível para ligação do equipamento.
• Nunca usar o equipamento perto de substâncias
inflamáveis, explosivas o tóxicas (esemplo: cinzas de
chaminé, diluentes).
• Nunca esquecer de desligar o aparelho da rede
antes de proceder a qualquer reparação ou assistência técnica.
• Nunca puxar ou levantar o equipamento pelo
17
Page 18

cabo eléctrico.
• Não mergulhar a máquina em àgua para limpeza.
• Verificar regularmente o estado de conservação do
cabo eléctrico, ficha e outras partes do equipamento.
Se existirem componentes danificados, não deverá
utilizar o equipamento.
• No caso de utilizar uma extensão eléctrica, tomar as
devidas precauções para que a mesma esteja sempre
sobre superficies secas.
• Nunca deixar o equipamento a trabalhar sem
vigilância.
• Deve ter a certeza que a boia I (Fig. 4) de paragem
está em bom estado e não está obstruída.
• No caso de tombar, é recomendável levantar o
aspirador antes de o desligar.
• Não aspirar solventes ou detergentes agressivos.
• O fabricante não é responsável por danos em pessoas
ou objectos, causados por uso indevido do aparelho
ou por não respeitar as instruções deste manual.
8. MANUTENÇÃO
Antes de qualquer intervenção no aspirador, há que
desligar a ficha da tomada de corrente eléctrica.
Qualquer intervenção na máquina deverá ser realizada
por pessoal qualificado.
Para um bom funcionamento do aspirador, torna-se
aconselhável:
-Eliminar periodicamente o pó e os resíduos, sacudindo o saquinho de filtro Limpe com frequência o cartucho filtro, usando um pincel de cerdas macias.
Em caso de sucessivas incrustações no filtro, não
duvide em substitui-lo.
É aconselhável dispor sempre de um filtro de reposição.
-Manter sempre limpos os canais de aspiração (uma
excessiva presença de sujidade provoca uma perda de
aspiração e o super-aquecimento do motor).
-As partes rotativas do aparelho não necessitam de
lubrificação alguma, visto que estão providas de
chumaceiras auto-lubrificantes.
-Há que controlar a espessura das escovas de carvão
do motor em cada 12 meses, quando as condições de
uso forem normais. Mas, em qualquer caso, haverá
que substitui-las quando a sua espessura se reduzir
até 9 mm.
9. GARANTIA
Todas as máquinas electro-portáteis VIRUTEX possuem
uma garantia válida por 12 meses contados a partir
do dia do seu fornecimento, ficando dela excluídas
todas aquelas manipulações ou danos ocasionados por
utilizações não adequadas ou pelo desgaste natural da
máquina. Para qualquer reparação, há que se dirigir
18
ao Serviço Oficial de Assistência Técnica VIRUTEX.
10. RECICLAGEM DAS
FERRAMENTAS ELÉTRICAS
Nunca elimine a ferramenta elétrica com os restantes resíduos domésticos. Recicle as ferramentas,
os acessórios e as embalagens de uma forma que
respeite o meio ambiente. Respeite os regulamentos
em vigor no seu país.
Aplicável na União Europeia e nos países europeus
com sistemas de recolha seletiva de resíduos:
A presença deste símbolo no produto ou no material
informativo que o acompanha indica que, no final da
sua vida útil, não se deve proceder à sua eliminação
em conjunto com outros resíduos domésticos.
Nos termos da Diretiva Europeia 2002/96/CE, os
utilizadores podem contactar o estabelecimento
onde adquiriram o produto, ou as autoridades locais
competentes, para obter informações sobre como
e onde poderão levar o produto para que este seja
submetido a uma reciclagem ecológica e segura.
A VIRUTEX reserva para si o direito de poder modificar
os seus productos, sin a necessidade de aviso prévio.
РУССКИЙ
ПЫЛЕСОС AS182K-AS282K
Очень важно
Прежде, чем начать
пользоваться станком
прочтите внимательно это
РУКОВОДСТВО и прилагаемую
БРОШЮРУ С ИНСТРУКЦИЯМИ
ПО БЕЗОПАСНОСТИ. До того,
как приступить к работе на
станке удостоверьтесь, что Вы
хорошо освоили их содержание.
Сохраните руководство и
брошюру для возможных
последующих консультаций.
Page 19

Внимательно прочитайте общую
инструкцию по безопасности,
которая прилагается к пакету
документов. Прежде чем подключить
вытяжной агрегат к сети, убедитесь
в том, что
напряжение агрегата
совпадает с напряжением станка,
а напряжение сети соответствует
напряжению агрегата.
1. ТЕХНИЧЕСКИЕ ДАННЫЕ
модель AS282K
Мощность...........................................1200 Вт
Охлаждение..................................проточное
Расход всасывания.................170 куб. м. / час
Разряжение (вод. столб.).................22000 мм
Объем контейнера..................................72 л
Разъем для подключения
электроинструмента.........................1500 Вт
Вес.........................................................22 кг
модель AS182K
Мощность.........................................1200 Вт
Охлаждение................................проточное
Расход всасывания..................170 куб. м. / час
Разряжение (вод. столб)..............2200 мм
Объем контейнера..................................27 л
Разъем для подключения
электроинструмента.........................1500 Вт
Вес..........................................................8,2 кг
2. ОПИСАНИЕ
А - дополнительный Фильтр
В – фильтр
С – входное отверстие для присоединения
шланга.
D – Y – образное соединение
E – эластичный шланг
G – розетка для присоединения
электроинструмента
H – переключатель
I – насос:
J – моторный блок
K – защелка
P – резервуар для мусора
3. ДОПОЛНИТЕЛЬНЫЕ ПРИНАДЛЕЖНОСТИ
(СТРАНИЦА 14, 15)
8246233 Набор комплектующих деталей к
вытяжному агрегату.
8299161 Бумажный мешок для мусора к
пылесосу AS282K
8299160 Бумажный мешок для мусора к
пылесосу AS182K
Используйте бумажный мешок для мусора
к пылесосу только вместе с фильтровым
картриджем.
Мешок собирает всю пыль в условиях гигиены.
При попадании в мешок острых или влажных
предметов, мешок придет в негодность.
Заменяйте мешок при его заполненности на
две трети.
Мешок не может быть использован вторично.
4. ИСПОЛЬЗОВАНИЕ АГРЕГАТА В КАЧЕСТВЕ
ПЫЛЕСБОРНИКА
- Вставьте фильтры А и В (рис. 1 и 3). Если
мешок уже используется вставьте только
картридж для фильтра В (рис. 3)
- Если мешок уже заправлен, вставьте его в
емкость на дефлектор
- Подсоедините гибкий шланг Е к вводному
отверстию С (рис. 1)
- Подключите к сети и поверните
переключатель Н (рис. 2) в позицию I (рис. 2)
5. ИСПОЛЬЗОВАНИЕ АГРЕГАТА ДЛЯ ОТСОСА
НЕГОРЮЧИХ ЖИДКОСТЕЙ
- Снимите мешки А и В (рис. 1 и 3)
- Наденьте насадку на емкость и закрепите
зажимом К (рис. 1)
- Подсоедините гибкий шланг Е к вводному
отверстию С (рис. 1)
- Подключите к сети и поверните
переключатель Н (рис. 2) в позицию I (рис. 2)
Если Вы снова захотите снова использовать
машину для отсоса пыли, вставьте мешки в
их начальное положение.
Никогда не используйте
агрегат для отсоса легко
воспламеняющихся жидкостей.
Если Вы заметили, что из агрегата
вытекает жидкость или пена,
немедленно отключите его от сети.
6. РАБОТА С ЭЛЕКТРОИНСТРУМЕНТАМИ.
Рис. 1. Прежде чем использовать вытяжной
агрегат, убедитесь в том, что фильтр А
(рис. 1) правильно заправлен в агрегат и
надежно закреплен эластичным фиксатором.
Необходимо, чтобы нейлоновый первичный
фильтр В был правильно прикреплен к
верхней части корпуса.
Входное отверстие С подсоединяется в
следующем порядке:
1."Y"-образный соединитель D.
2.Шланг Е
19
Page 20

3. Электроинструмент.
Рис. 2. Подсоедините штепсельную вилку
к силовой розетке G (2), расположенной в
верхней части головки агрегата. Соедините
вилку агрегата с источником питания и
поставьте переключатель Н (рис. 2) в
позицию II.
В этой позиции, как только Вы включаете
электроинструмент, агрегат начинает
работать автоматически.
Если, в случае подключения к вытяжному
агрегату машинки с плавным пуском
(электронная регулировка), вы
обнаруживаете, что вытяжной агрегат не
включается автоматическим одновременно
с машинкой, тогда поверните на 180 вилку
машинки в розетке агрегата.
При помощи Y-образного соединения можно
использовать два электроинструмента
одновременно.
7. ИНСТРУКЦИЯ, ТРЕБУЮЩАЯ СТРОГОГО
СОБЛЮДЕНИЯ
Использование этой машины для к-либо
операций, не названных в этом руководстве
может быть опасным
Всасывающее отверстие должно быть
удалено от таких деликатных частей тела
пользователя, как глаза, уши, рот
Оборудование должно быть правильно
собрано перед использованием
Проверьте соответствие напряжения в сети
указанному на плате инстр-та
Эта машина не предназначена для сбора
вредных и легковоспламеняющихся
субстанций
Не оставляйте без присмотра включенный
аппарат
Для выполнения любых работ по
техобслуживанию необходимо отключить
аппарат от сети.
Все работы должны выполняться
квалифицированными специалистами.
Для того чтобы агрегат работал в
нормальном режиме, необходимо регулярно
очищать фильтры от грязи и пыли, а также
содержать шланги в чистоте и периодически
проверять состояние кабеля.
Вращающиеся части аппарата не
нуждаются в смазке, так как снабжены
самосмазывающимися подшипниками.
Толщина угольных щеток на моторе
проверяется через каждые 12 месяцев. В
случае если их толщина уменьшается до 9
мм., они подлежат замене.
20
8. ТЕХОБСЛУЖИВАНИЕ
Прежде чем выполнять какие-либо
ремонтные работы, отключите пылесос от
сети.
Все ремонтные работы должны выполняться
квалифицированными специалистьами.
Для того, чтобы быть уверенным в том, что
машина содержится в хорошем состоянии мы
рекомендуем Вам:
- регулярно удалять грязь и пыль, вытряхивая
фильтр-мешок. Регулярно чистите фильтркартридж мягкой щеткой.
Фильтр-картридж должен быть выброшен
и заменен новым, если он поврежден или
чрезмерно засорен.
Рекомендуем держать под рукой запасной
фильтр.
-Труба всегда должна быть чистой (засор
может уменьшить силу всасывания и
привести к перегреву двигателя).
- Вращающиеся части машины не нуждаются
в дополнительной смазке, поскольку
они оснащены самосмазывающимися
подшипниками. Толщина карбоновых щеток
на двигателе должна проверяться, их
необходимо заменять каждые 12 месяцев.
Или если их толщина меньше 9 мм.
9. ГАРАНТИЙНЫЕ ОБЯЗАТЕЛЬСТВА
Вся продукция VIRUTEX имеет гарантию
в течение 12 месяцев с даты поставки, за
исключением дефектов, которые возникли в
результате неправильного применения или
по причине естественного износа и поломки
механизма.
Любой ремонт должен выполняться
уполномоченным сервисным центром VIRUTEX.
10. ПЕРЕРАБОТКА ЭЛЕКТРООБОРУДОВАНИЯ
Никогда не утилизируйте
электрооборудование с бытовыми отходами.
Оборудование, оснастка и упаковка должны
подвергаться переработке, минимизирующей
любое отрицательное воздействие на
окружающую среду. Утилизацию необходимо
производить в соответствии с правилами,
действующими в вашей стране.
Для стран, входящих в Европейский Союз
и стран с системой селективного сбора
отходов:
Если нижеприведенный символ указан
на продукте или в сопровождающей
документации, в конце срока его
использования запрещается утилизация
Page 21

данного изделия совместно с бытовыми
отходами.
В соответствии с Европейской Директивой
2002/96/EC, пользователь может уточнить
у продавца или соответствующих местных
властей, где и как можно утилизировать
данное изделие без вреда для окружающей
среды с целью его безопасной переработки.
В связи с постоянным совершенствованием
и модернизацией продукции VIRUTEX
оставляет за собой право вносить изменения
в продукцию без предварительного
оповещения.
21
Page 22

ACCESORIOS OPCIONALES • OPTIONAL ACCESSORIES • ACCESSOIRES OPTIONNELS
ZUBEHÖR AUF WUNSCH • ACCESSORI OPZIONALI • ACESSÓRIOS OPCIONAIS
Ref. 8246233
6
1
7
2
3
• KIT ASPIRADOR
• DUST COLLECTOR KIT
• KIT ASPIRATEUR
• SAUGER-SET
• KIT ASPIRATORE
• KIT ASPIRADOR
4
Nº Referencia • Reference Denominación • Description
Référence • Bestellnr. Description • Bezeichnung
Riferimento • Referência Denominazione • Denominação
1 8299157 Mangera Flexible 2 m • Flexible hose 2 m • Tuyau exible 2 m
Saugschlauch 2 m • Tuboex 2 m • Mangueira éxivel 2 m
2 8299158 Cepillo doble uso • Aspirmatic double use brush • Suceur pédale
Doppelwertige Düse • Spazzola doppio uso • Escova duplo uso
3 8299159 Boquilla de líquidos • Wet tool • Suceur eau • Wassersaugdüse
Spazzola ventosa • Boquilha para humidades
4 8202131 Boquilla plana • Flat lance • Lance plate • Fugendüse • Lancia
piatta • Chupador de fenda
5 8299092 Cepillo redondo de PVC • PVC round brush • Brosse ronde PVC
Rundbürste PVC • Pannello PVC • Escova redonda para PVC
6 8202316 Tubo • Pipe • Tube • Rohr • Tubo • Tubo
7 8202317 Tubo acodado • Wand • Coude • Handgriff • Impugnatura • Punho
8 8202134 Boquilla triangular • Triangular nozzle • Buse triangulaire • Dreiecks Düse • Ugello triangolare • Boquilha triangular
5
8
22
Page 23

BOLSA FILTRO DE PAPEL
8299160 - Bolsa de papel ltro para AS182K.
Paper lter bag for AS182K.
A
Sac ltre en papier pour AS182K.
Papier-Filterbeutel für AS182K.
Sacchetto ltro di carta per AS182K.
Bolsa ltro de papel para AS182K
8299161 - Bolsa de papel ltro para AS282K.
Paper lter bag for AS282K.
B
Sac ltre en papier pour AS282K.
Papier-Filterbeutel für AS282K.
Sacchetto ltro di carta per AS282K.
Bolsa ltro de papel para AS282K.
A
B
23
Page 24

http://www.virutex.es/registre
Acceda a toda la información técnica.
Access to all technical information.
Accès à toute l’information technique.
Zugang zu allen technischen Daten.
Accedere a tutte le informazioni tecniche.
Aceso a todas as informações técnicas.
Dostęp do wszystkich informacji technicznych.
Доступ ко всей технической информации.
8296275 102013
Virutex, S.A.
Antoni Capmany, 1
08028 Barcelona (Spain)
www.virutex.es
 Loading...