

Page 1
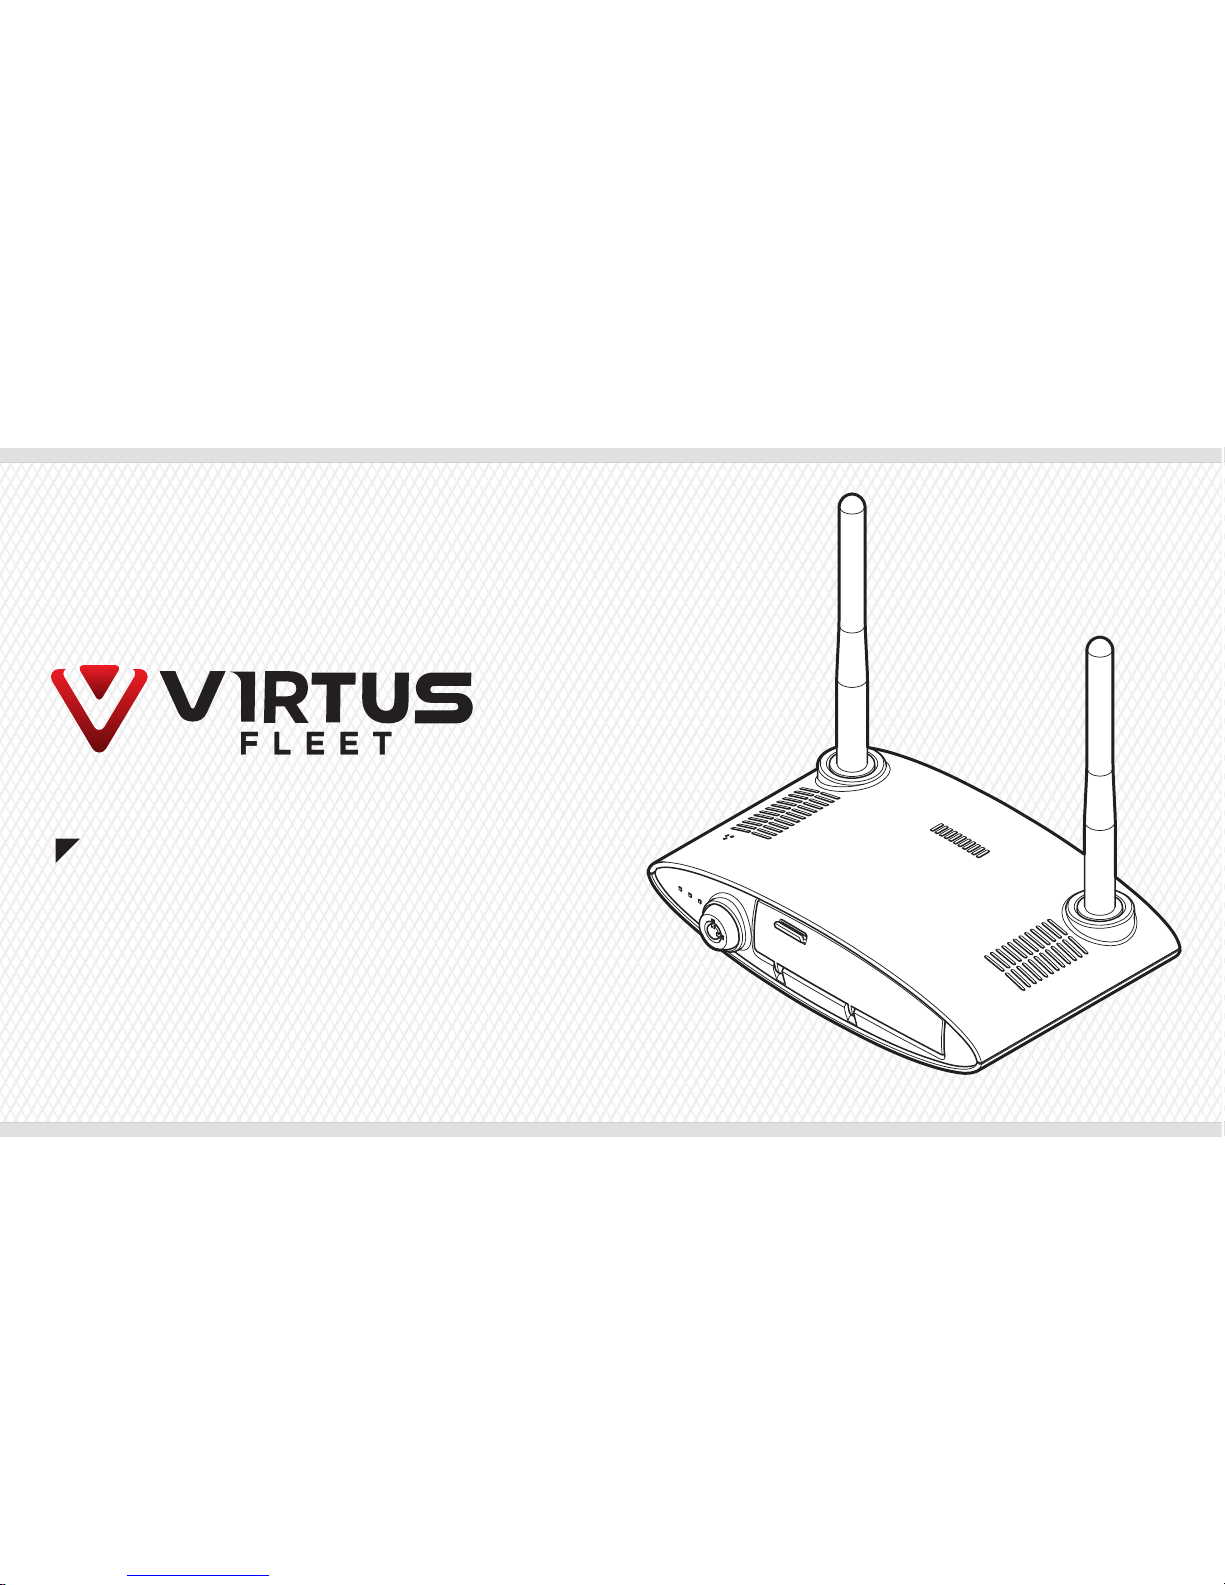
» Please read this user manual before using the device to ensure safe and proper use.
Vehicle Video Recorder | Device Manual
Zeus
Page 2

Page 3

Introduction
This user manual shows how to install the device and use its main functions. Please read this user manual
thoroughly before use of the device.
This user manual also includes the warranty certificate.
Copyright
The content of this document is protected by copyright law. Copyright © 2016 by Virtus Fleet LTD All rights
reserved. Virtus Fleet LTD. has intellectual property rights for VIRTUS FLEET and this user manual.
No part of this user manual is to be used, photocopied, or distributed, or shown to third parties without the prior
consent of Virtus Fleet LTD.
Disclaimer
This manual is subject to change without notice. Virtus Fleet LTD does not warrant this document is errorfree. Virtus Fleet LTD assumes no liability for damage incurred directly or indirectly from errors, omissions, or
discrepancies between the device and this manual.
Page 4
Zeus
Introduction
Safety information 3
Instructional icons 3
WARNING 4
CAUTION 6
Package components 8
Product specification 11
Getting started 12
Device layout 12
Mounting the microSD cards 14
Insert the microSD card 15
Remove the microSD card 16
Mounting the USIM card 17
Insert the USIM card 17
Remove the USIM card 18
Installation 19
Device installation layout (recommend) 20
Installing the main device 21
Installing the cameras 25
Installing the GPS 28
Installing the E-call kit 29
Mount the SD cards and USIM card 30
Connect constant power cable 31
Device status 32
Operation modes 32
LED Status display 33
Video recording 34
SD card memory proportion per settings 34
Recording type 35
Event types 36
Table of contents
Data transmission 37
Event data transmission 37
Status report 38
NAND memory 39
E-call 40
Calling scenario 40
Upon no reception 41
Reception scenario 41
Installing the PC viewer 42
Using the PC viewer 49
Screen description 50
Control panel description 52
Device setting 53
Updating the firmware 57
CE WARNING 58
Warranty Card 59
Page 5
Safety information
Device Manual
3
Safety information
Please read this safety information carefully before use of the device.
Keep the following warnings and cautions to prevent unexpected accidents or property damage.
Instructional icons
WARNING
Situations that may cause injury or death in case of failure to follow the instruction.
CAUTION
Situations that may cause injury or property damage in case of failure to follow the instruction.
Useful information for operation of the device.
To indicate on the rating plate that the equipment is suitable for direct current only; to identify
relevant terminals.
Page 6

Safety information
Zeus
4
WARNING
Failure to comply with safety warnings and regulations may cause serious injury or death.
• Do not disassemble, repair, or modify the device
yourself.
It may cause fire, electric shock, or malfunction. For
internal inspection or repair, contact the Virtus Fleet Service
Representative or the sales headquarters.
• If any foreign matter enters the device, stop operation
immediately.
Contact the Virtus Fleet Service Representative or the sales
headquarters for repair.
• Do not store it in a high humid environment.
In case of failure by non-compliance with the instruction,
contact the Virtus Fleet Service Representative or the sales
headquarters.
• Make sure the power is turned off when attaching or
detaching a camera.
It may cause malfunction.
• Make sure the power is turned off when installing the
device.
It may cause an accident or electric shock when installing
the device.
• Do not install the device where it can interfere with the
driver’s vision.
It may cause an accident.
• Do not operate the device when any malfunction is
found in the device.
• If the device is used out of the optimal temperature
range (-20 to 60 °C), the device performance may
decrease or it may cause malfunction.
• Avoid exposing the device to high temperature such as
microwave ovens, stoves, or hair driers.
It can cause explosion or malfunction when overheated.
Page 7

Safety information
Device Manual
5
• Avoid exposing the device to direct sunlight in summer.
It can cause fire or malfunction.
• Use only accessories provided by the manufacturer.
Using generic accessories may cause the device to
malfunction or an accident.
• Do not install the device where it can interfere with the
vehicle system such as an air bag restraint system.
The vehicle system can be interfered, and may cause
physical injury.
• Use the correct input voltage.
Otherwise it can cause explosion, fire, or malfunction.
• Make sure that the device is installed properly.
The device can fall as a result of vibration, and may cause
physical injury.
Page 8

Safety information
Zeus
6
CAUTION
Failure to comply with safety cautions and regulations can cause injury or property damage.
• Do not drop or cause an impact to the device.
It can cause damage or malfunction.
• Do not use your device for a while if the device is
overheated.
Prolonged exposure of your skin to an overheated device
may cause low temperature burn symptoms.
• In the circumstance with excessive light change, the
recorded video can be distorted.
While entering or exiting a tunnel, in the excessive change
of brightness, or in the excessive backlight, the quality of
recorded video can deteriorate.
• Do not operate the device with wet or oil-stained hands.
It can cause damage or malfunction.
• Clean the lens regularly.
Foreign material attached to the lens can affect the
recording quality.
• Excessively tinted glass can distort the recorded video
or cause it to be indistinct.
• The event recording may not be generated when an
impact is not enough intensity.
You may change the sensitivity of the impact detection from
the settings.
• Do not operate the device with pointed objects such as
awls or nails.
It can cause damage or malfunction.
• Do not store your device near magnetic fields.
It can cause damage or malfunction.
• Check the device, microSD card, and recording
capability periodically and replace it as necessary.
When the malfunction is found, stop operating and contact
the Virtus Fleet Service Representative or the sales
headquarter.
Page 9

Safety information
Device Manual
7
• Back up important data to other storage media.
It is required to back up important data regularly to other
separate storage media to store safe for long time.
• If you want to connect the device with the constant
power cable, the installation must be serviced by a
professional car mechanic.
• The battery of the vehicle may discharge while in long
term parking.
• Risk of explosion if battery is replaced by an incorrect
type.
Page 10
Safety information
Zeus
8
Package components
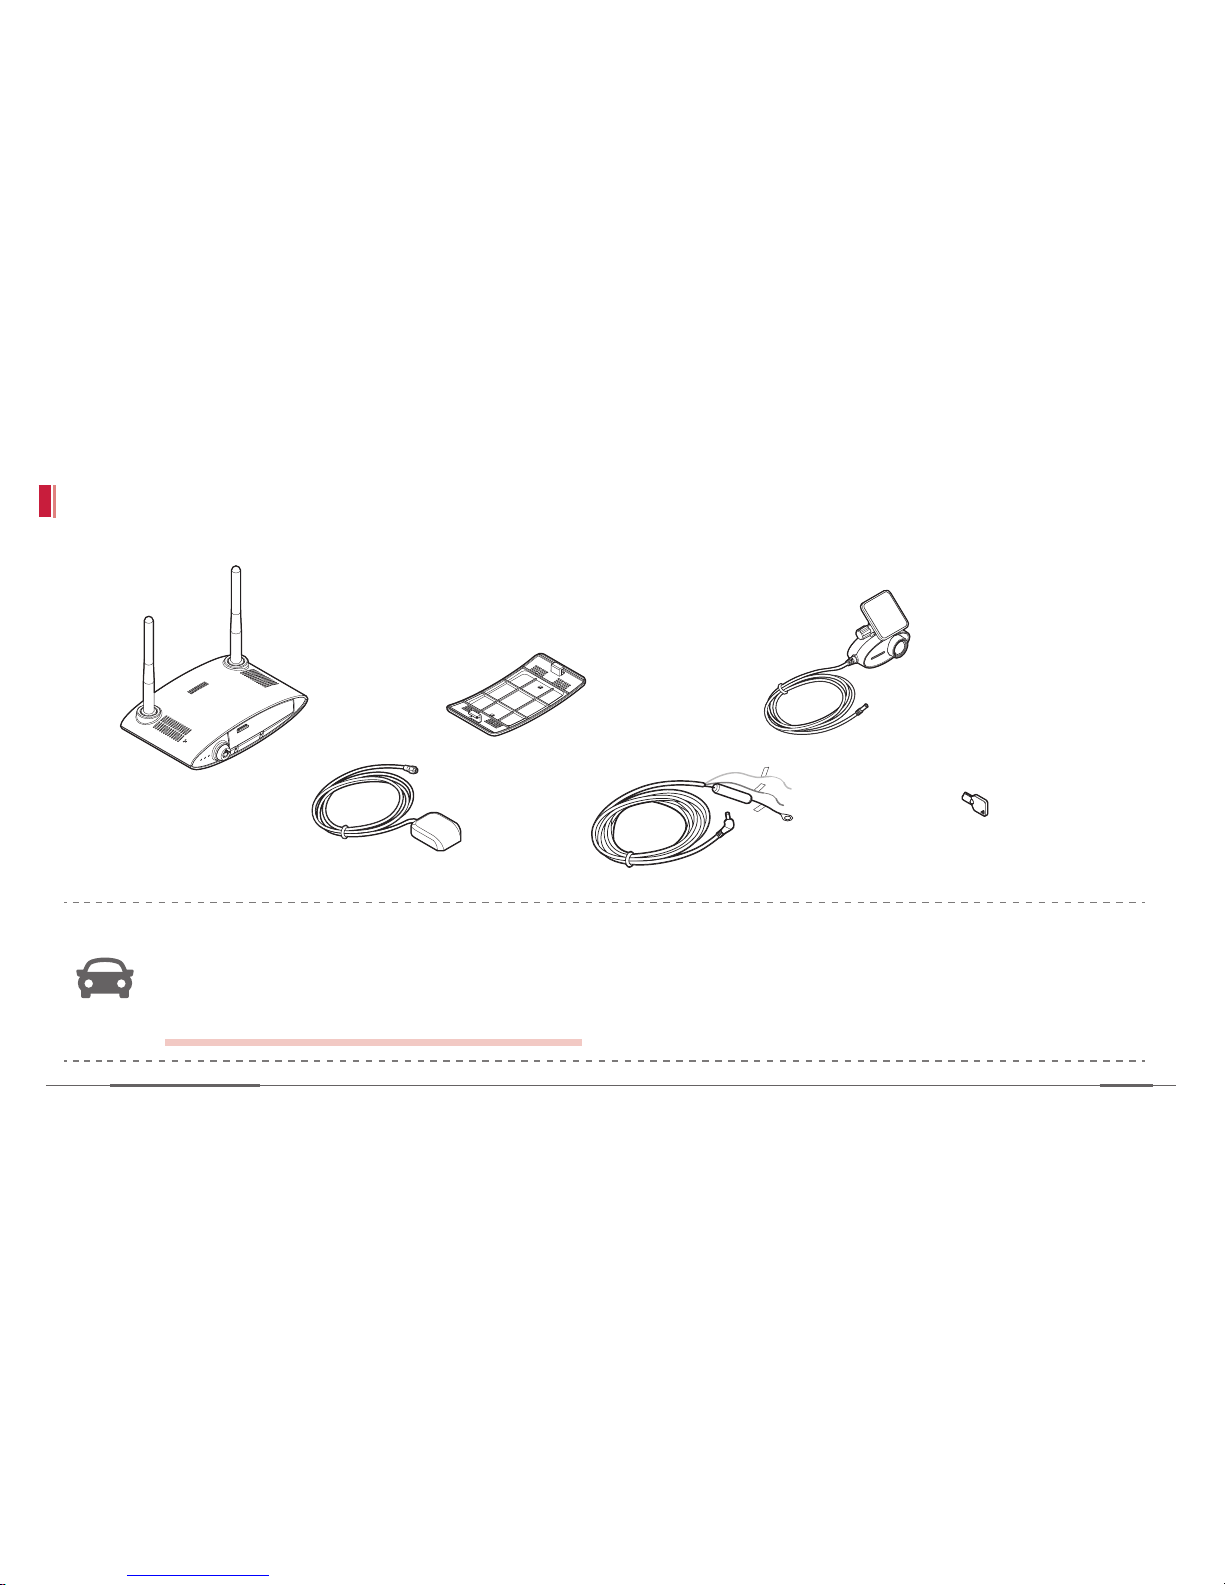
The product package has the following package components:
• Pictures of the components may differ from the actual ones.
• To enhance the performance of the device, components may be changed without prior notice.
• To download the dedicated PC viewer, APPs, firmware and manuals, login to the user webpage.
http://213.39.58.186:6081/html/LoginVirtus.html
2
6
1
5
3
4
BAT(+)
ACC(+)
GND
Page 11

Safety information
Device Manual
9
No. Description
1
Body (including antenna) Body of the device.
2
Body holder Used to fix the body.
3
Front view camera (3 m) Camera to be Installed on the front of the vehicle.
4
External GPS (3 m) GPS unit that sends the vehicle’s location information.
5
Power supply cable (5 m) Long cable used to supply power.
6
Key Key used to lock the front cover on the device. With locked, the driver cannot extract
a set of SD cards.
Page 12

Safety information
Zeus
10
The optional components are as follows:
No. Description
1
Rear view camera
(IR waterproof camera)
Camera to be installed to record the internal/rear view.
2
Front view camera (3 m) Camera to be installed to record the front view.
3
Extension cables Different lengths of cable to supply to the cameras. 4/8/12 m cables available.
4
Emergency button (voice call kit) Used for emergency call.
5
Dome camera case Camera protection.
6
Right angle connector Provides more space during installation stage.
2 3 4 5 61
Page 13
Safety information
Device Manual
11
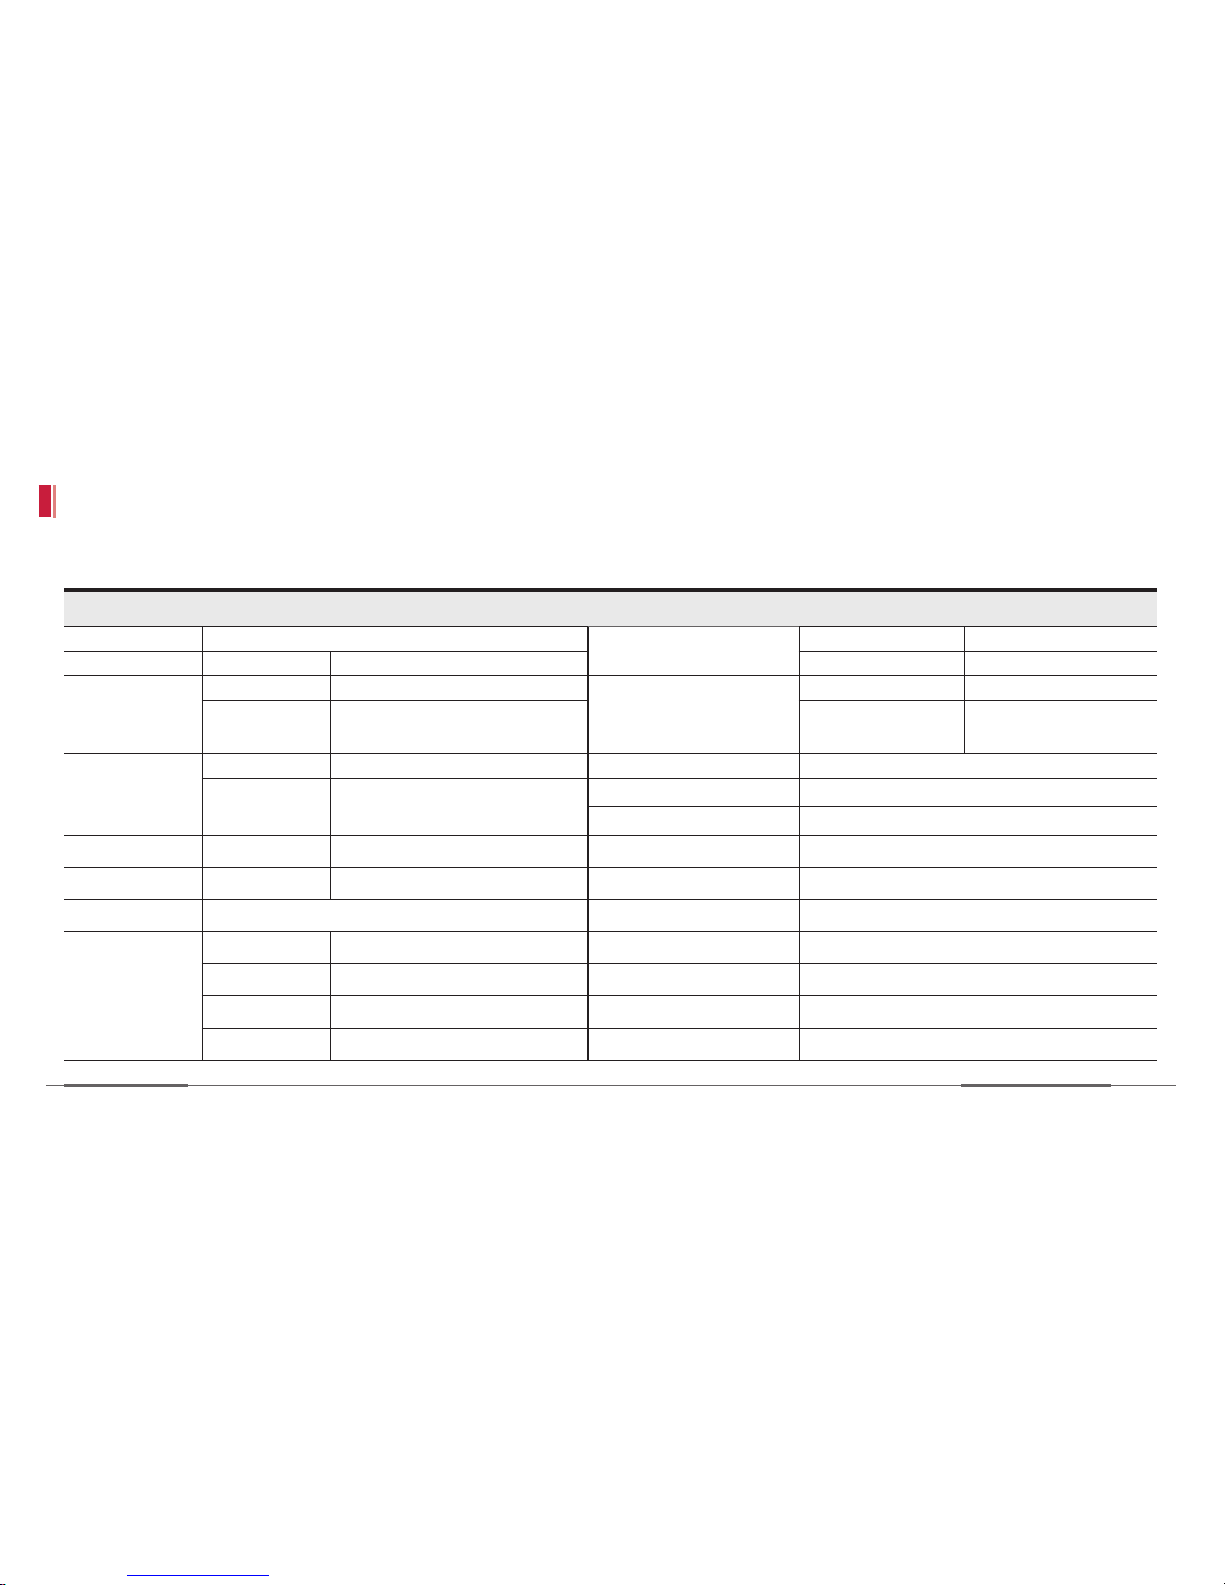
Product specification
The specifications of the product are as follows:
Device Specifications
Channel Max 2 channels GPS Type External
Video CAM 1 / CAM 2 HD 15 FPS Speed 1 Hz / 9600 bps
Viewing Angle CAM 1 140° Sensor G-Sensor 3-axis Accelerometer
CAM 2 162° (IR / IP67) Tamper Sensor 2 Tamper Detection
Sensors
Camera Cable Type MCX MIC Internal / External
Length Max. 15 m Speaker Internal / External
Video Format AVI (H.264, Audio: PCM)
Storage Type Dual Micro SD Card LED 3 Status indication LEDs
Capacity Max. 128 GB (64 GB X 2 Slots) Battery 2,000 mAh Li-Ion Battery
Locker Key Type Operation Temperature -20 to 60 °C
Network Type LTE / 3G Dimension/Weight 145 x 87 x 37.5 mm / 205.6 g
Frequency 800 - 2,600 MHz Certification CE, RoHS
Antenna Dual External Helical Antenna Language English
SIM USIM
Page 14
Getting started
Zeus
12
Getting started
Device layout
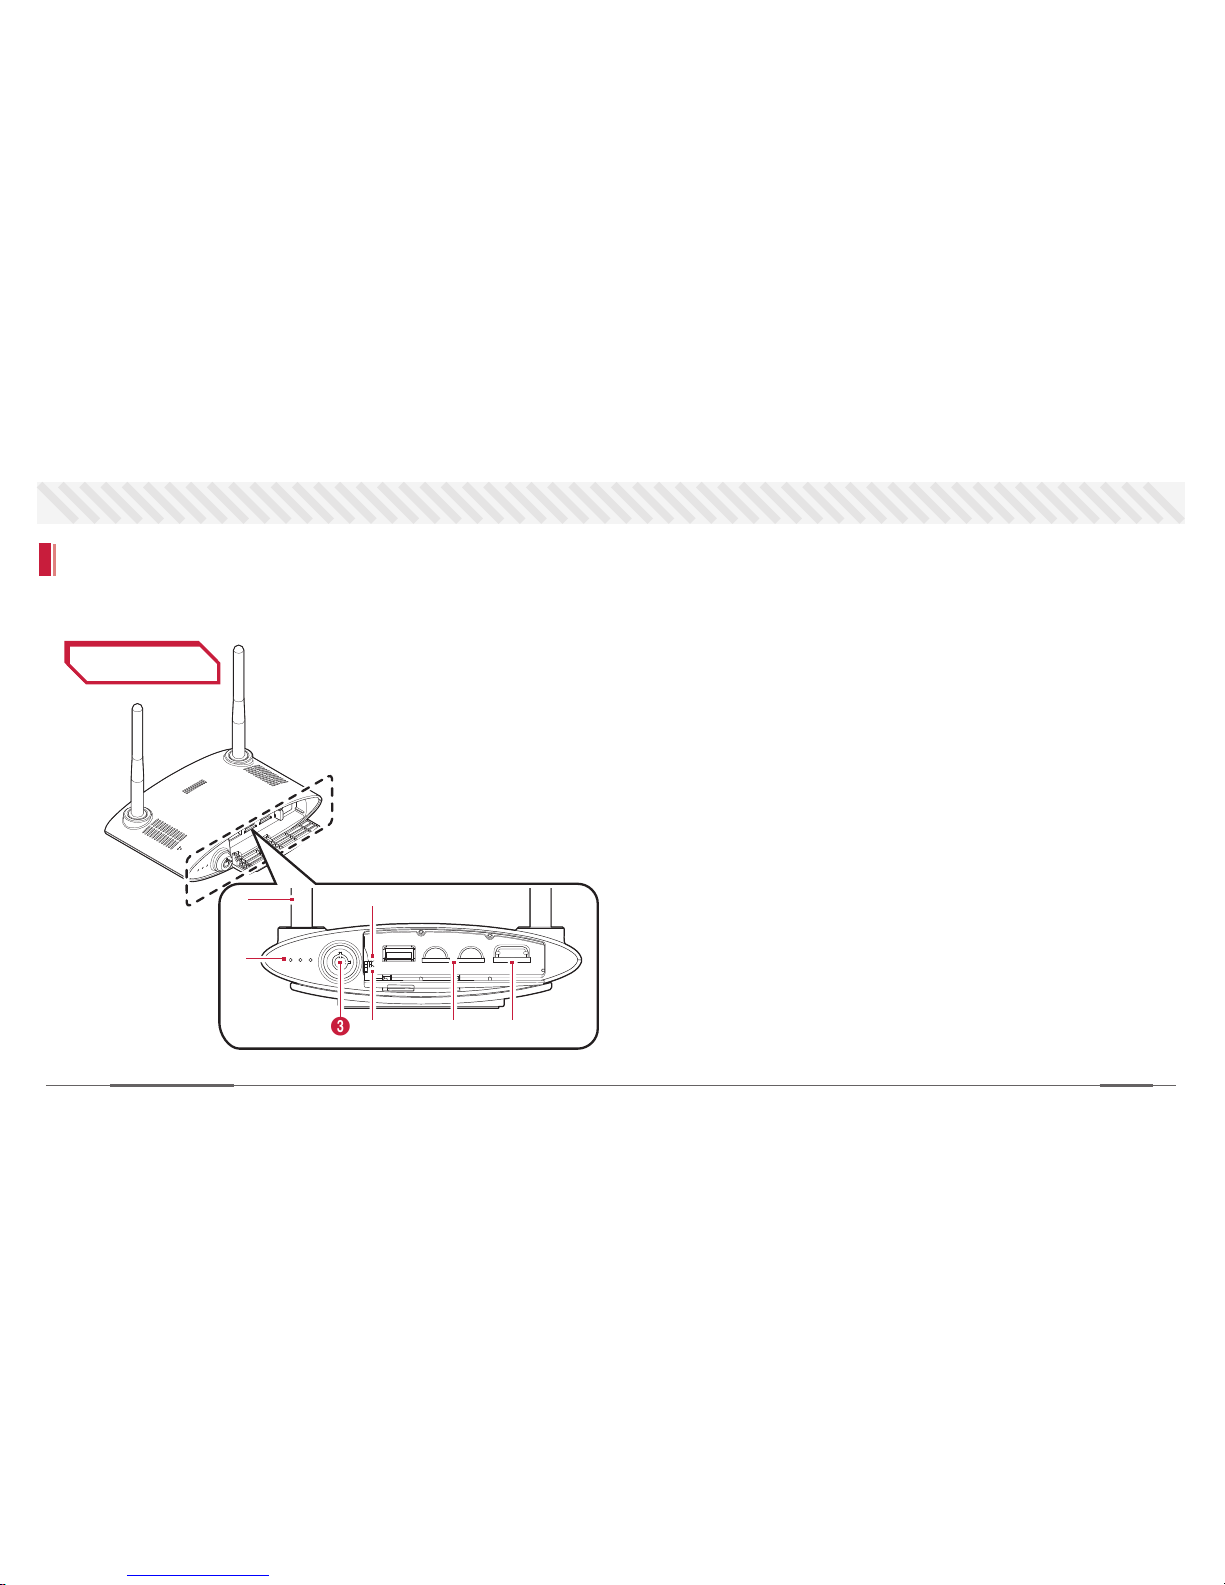
Learning the name of the parts will assist you when you install the device and check how to use it.
Front View
1 Antenna : Double helical antenna for network connection
2 LED light signal : RED - device on/off,
GREEN - cam is recording,
BLUE - connected to network
3 This lock needs a key to get access to the data
4 R : Reset Pinhole
5 P : Power off Pinhole (Only works when using internal battery)
6 Double SD card slots : 128GB of data can be stored
7 Sim card slot : data are sent via 3G/4G network
1
2
3 6 75
4
Page 15
Getting started
Device Manual
13
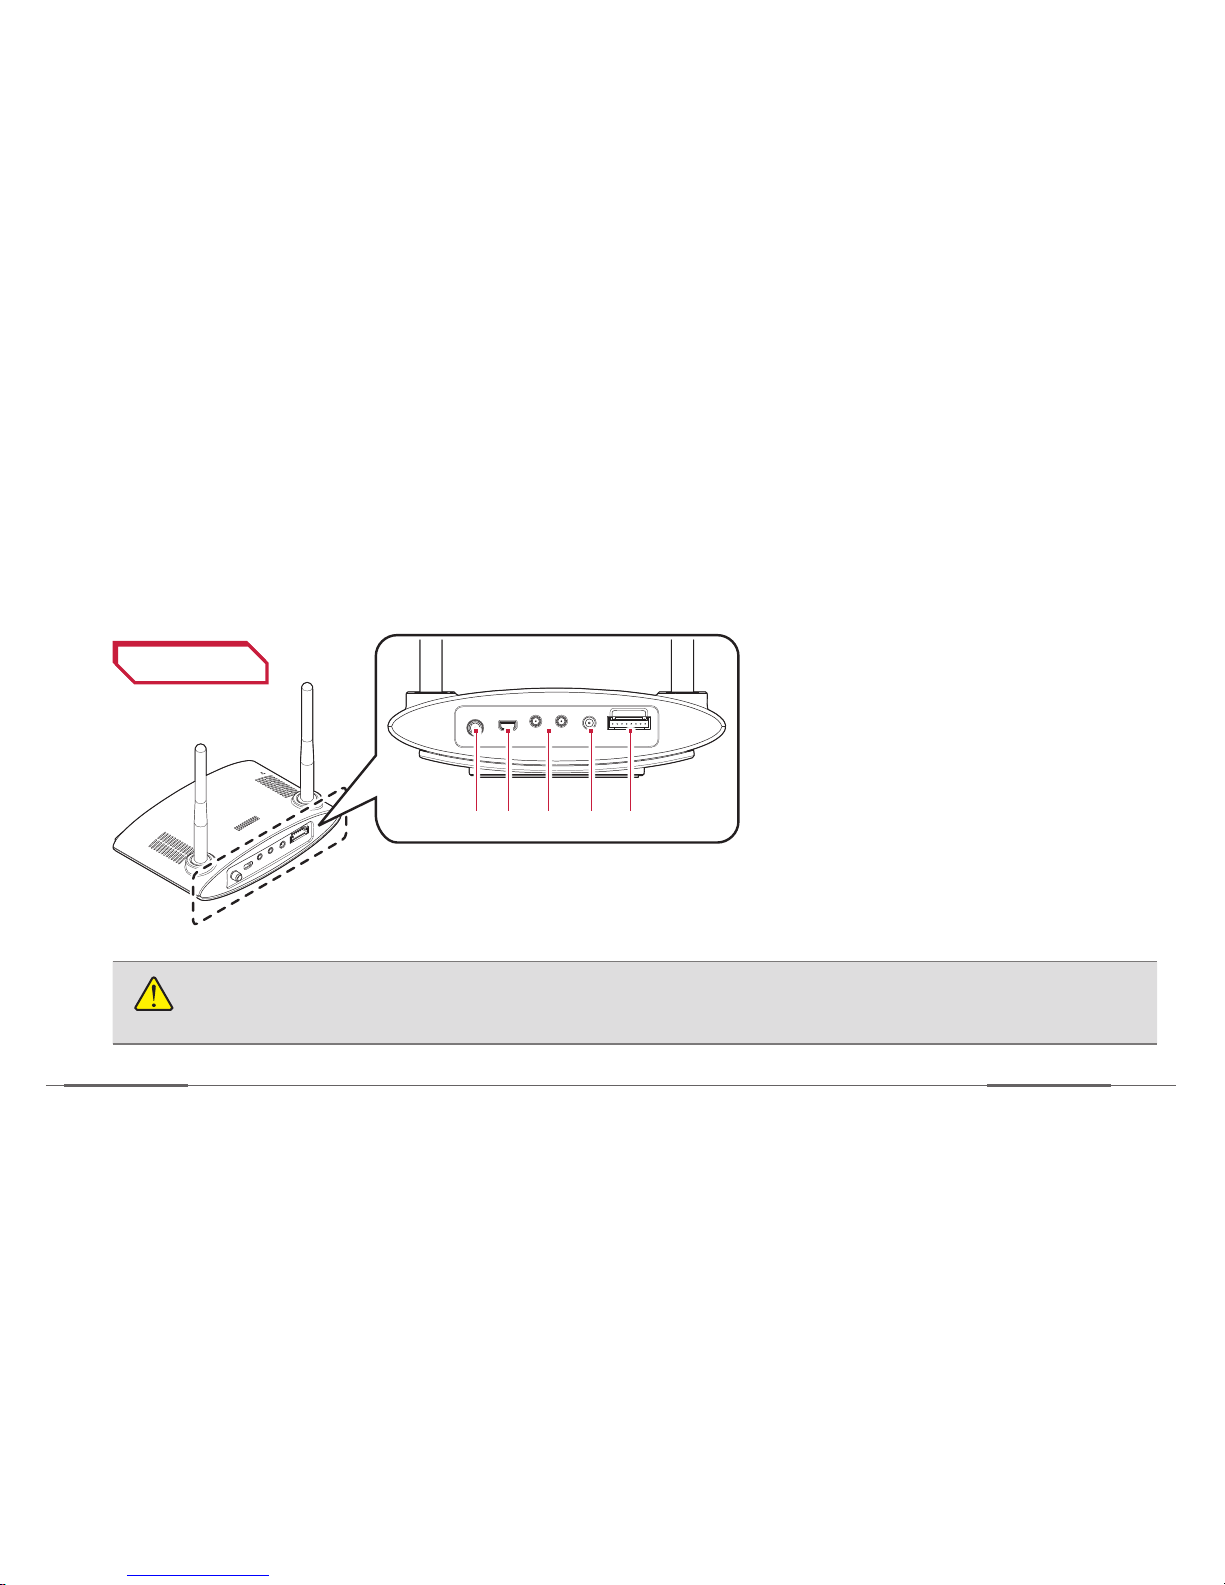
Rear View
1 2 3 4 5
1 GPS slot : receives location info
2 HDMI port can be used for camera
angle testing during installation
process
3 Cam slots for front & rear cameras
4 Power cord slot
5 Voice call slot for the E-button
CAUTION
When removing the connectors from their slots, you must hold the very end part of the connectors when
pulling them out.
Page 16
Getting started
Zeus
14
Mounting the microSD cards
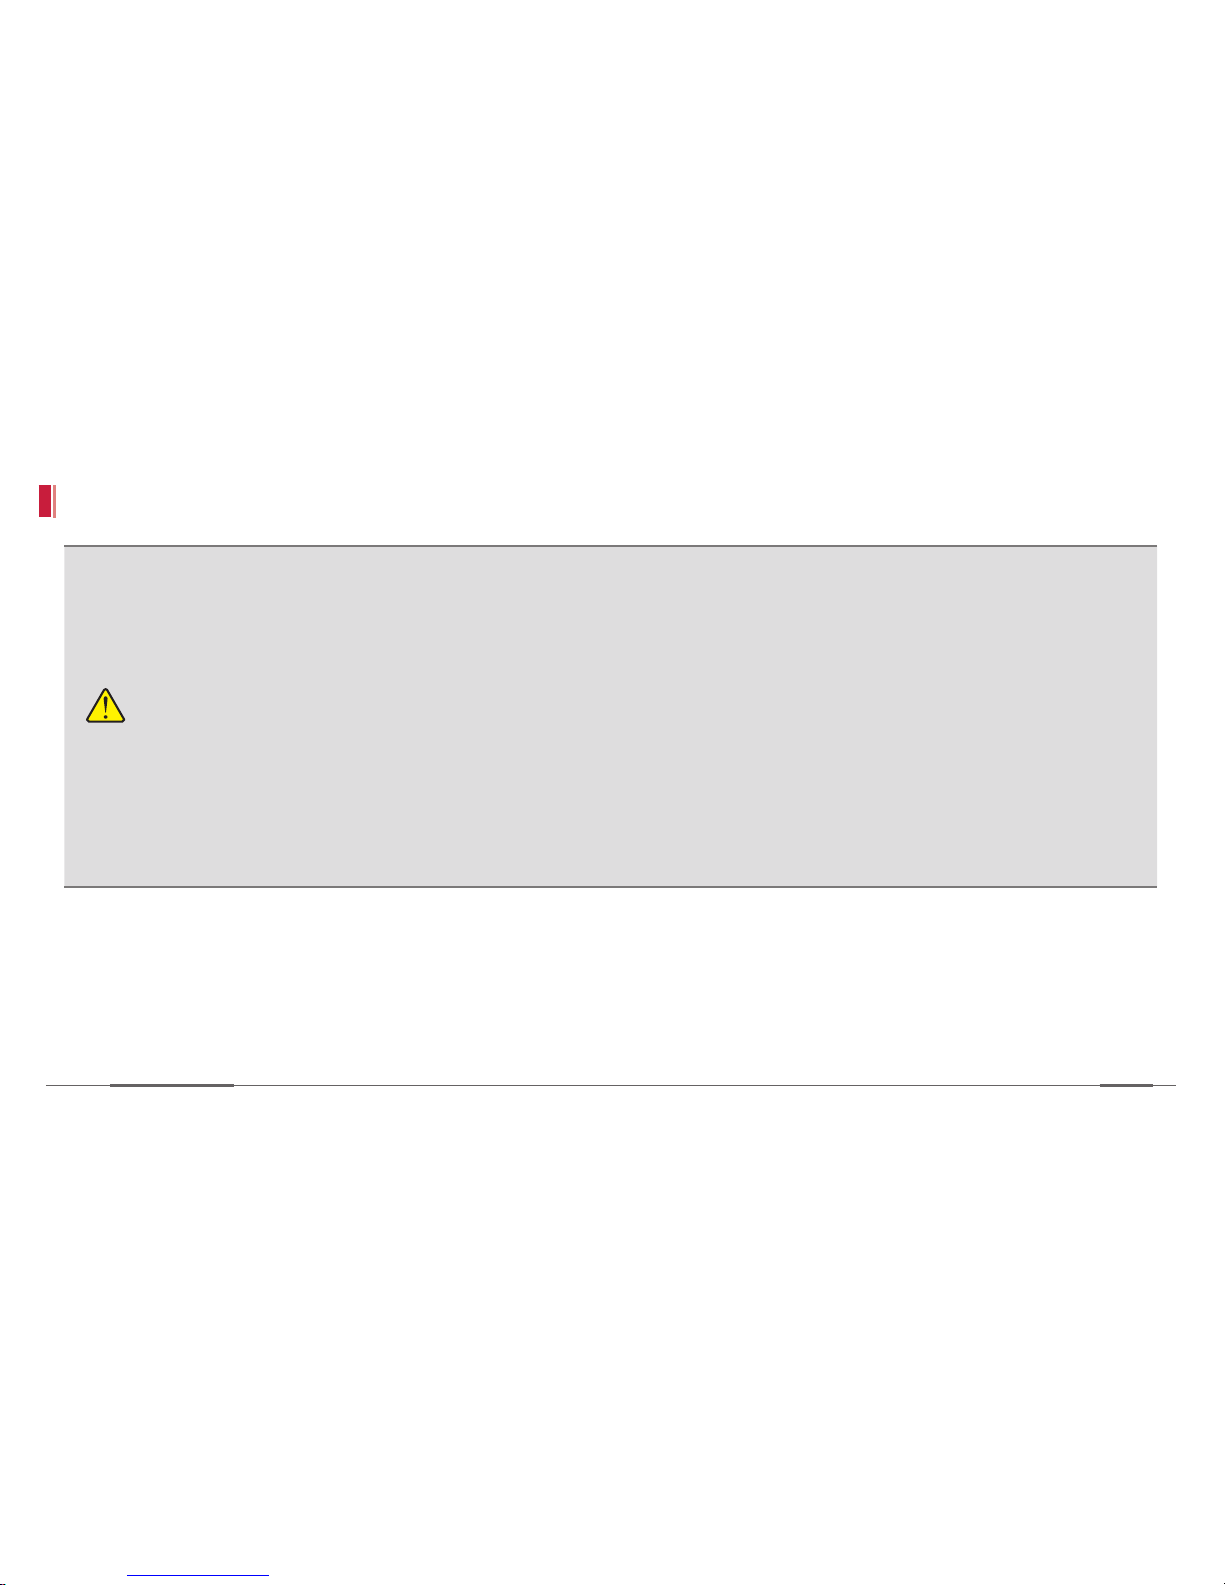
CAUTION
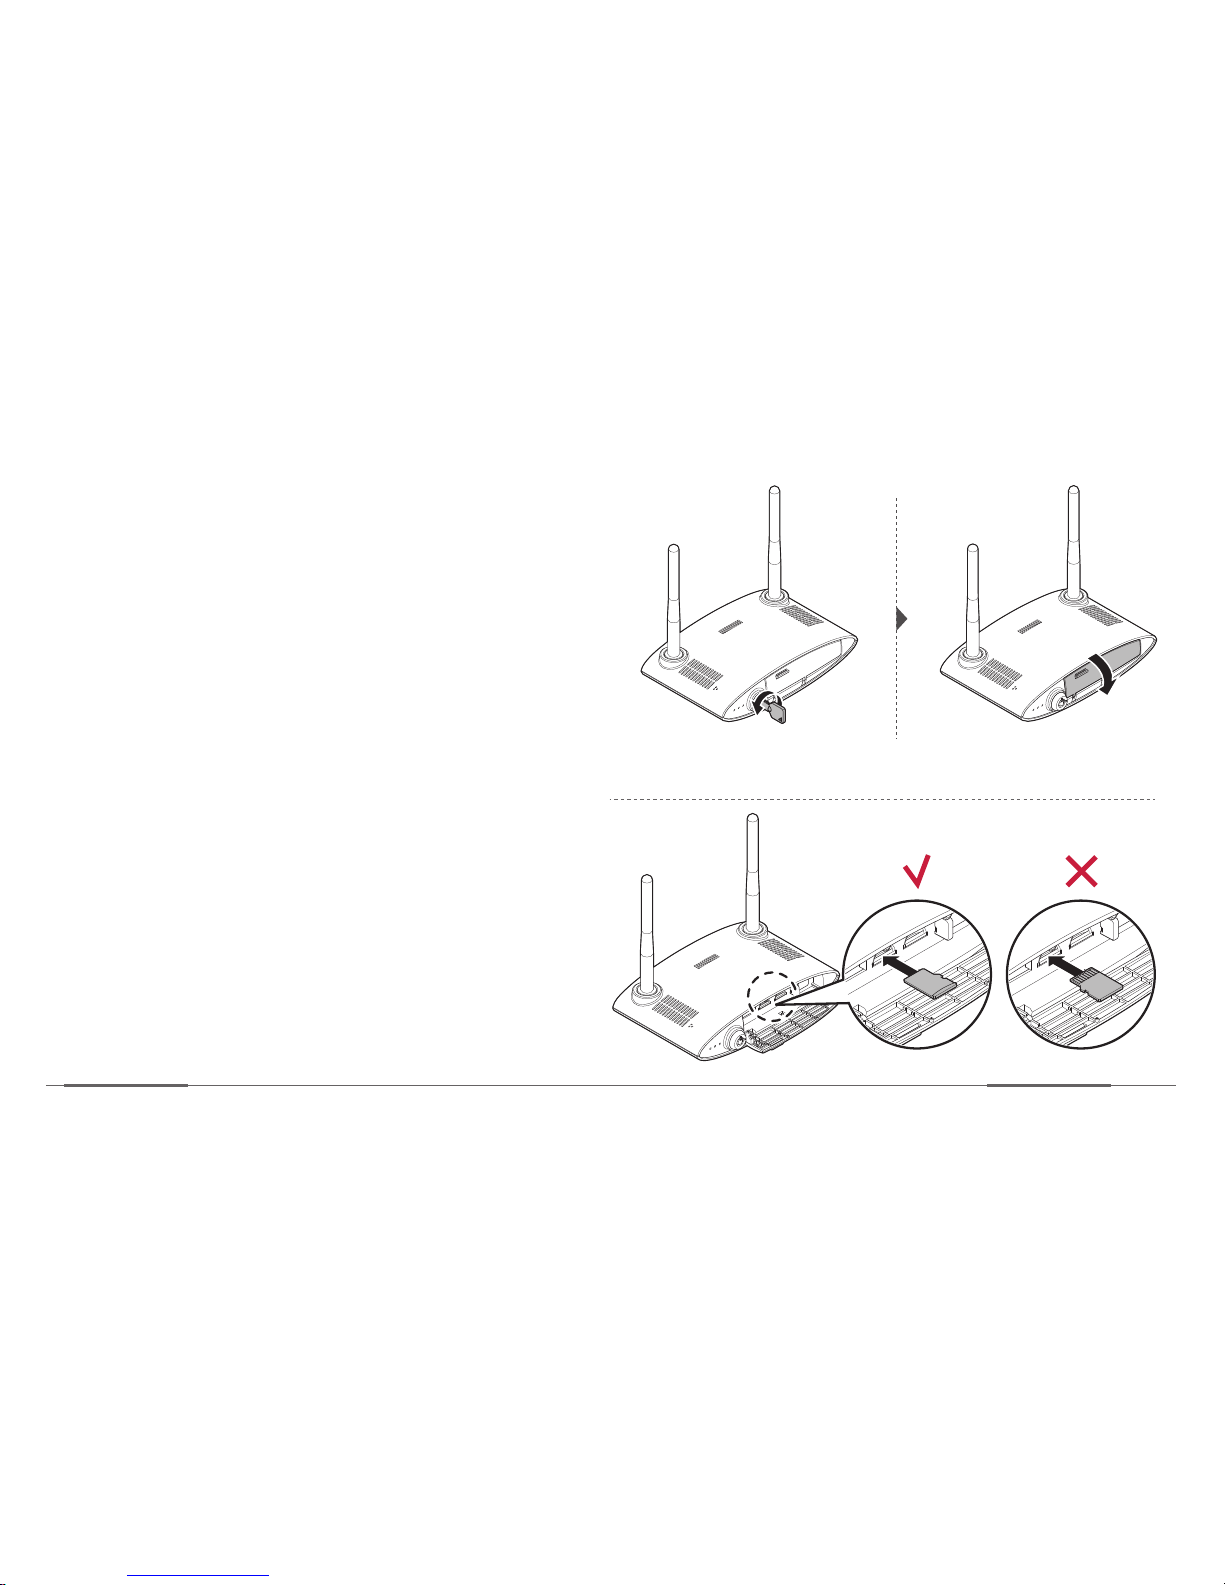
• Be sure to use a microSD card with UHI-1/class 10/16-64 GB.
• Be sure to use a same types of microSD cards for dual slots. ie UHI-1 & UHI-1 or class 10 & class 10.
• You can insert the microSD card regardless of the device’s power status.
• When the SD card is removed while the device is turned on (not recommended), the alert will sound and the device
may not finish recording the final file. And the data may be damaged or malfunction caused.
• The microSD cards are not inserted upside down. Do not apply force to the insert them.
• Note that the microSD card is a consumable item. Therefore it may needs to be replaced once in a while.
• Note that when the microSD card (as well as cable and SIM card) is removed from its slot, the error sound (three
beeps) is generated.
Page 17
Getting started
Device Manual
15
]Insert the microSD card
1. Open the cover of the microSD card slot.
2. Insert the microSD card with the gold-colored
contacts facing downward until it locks into the
slot with a click sound.
3. Close the cover of the microSD card slot.
Page 18
Getting started
Zeus
16
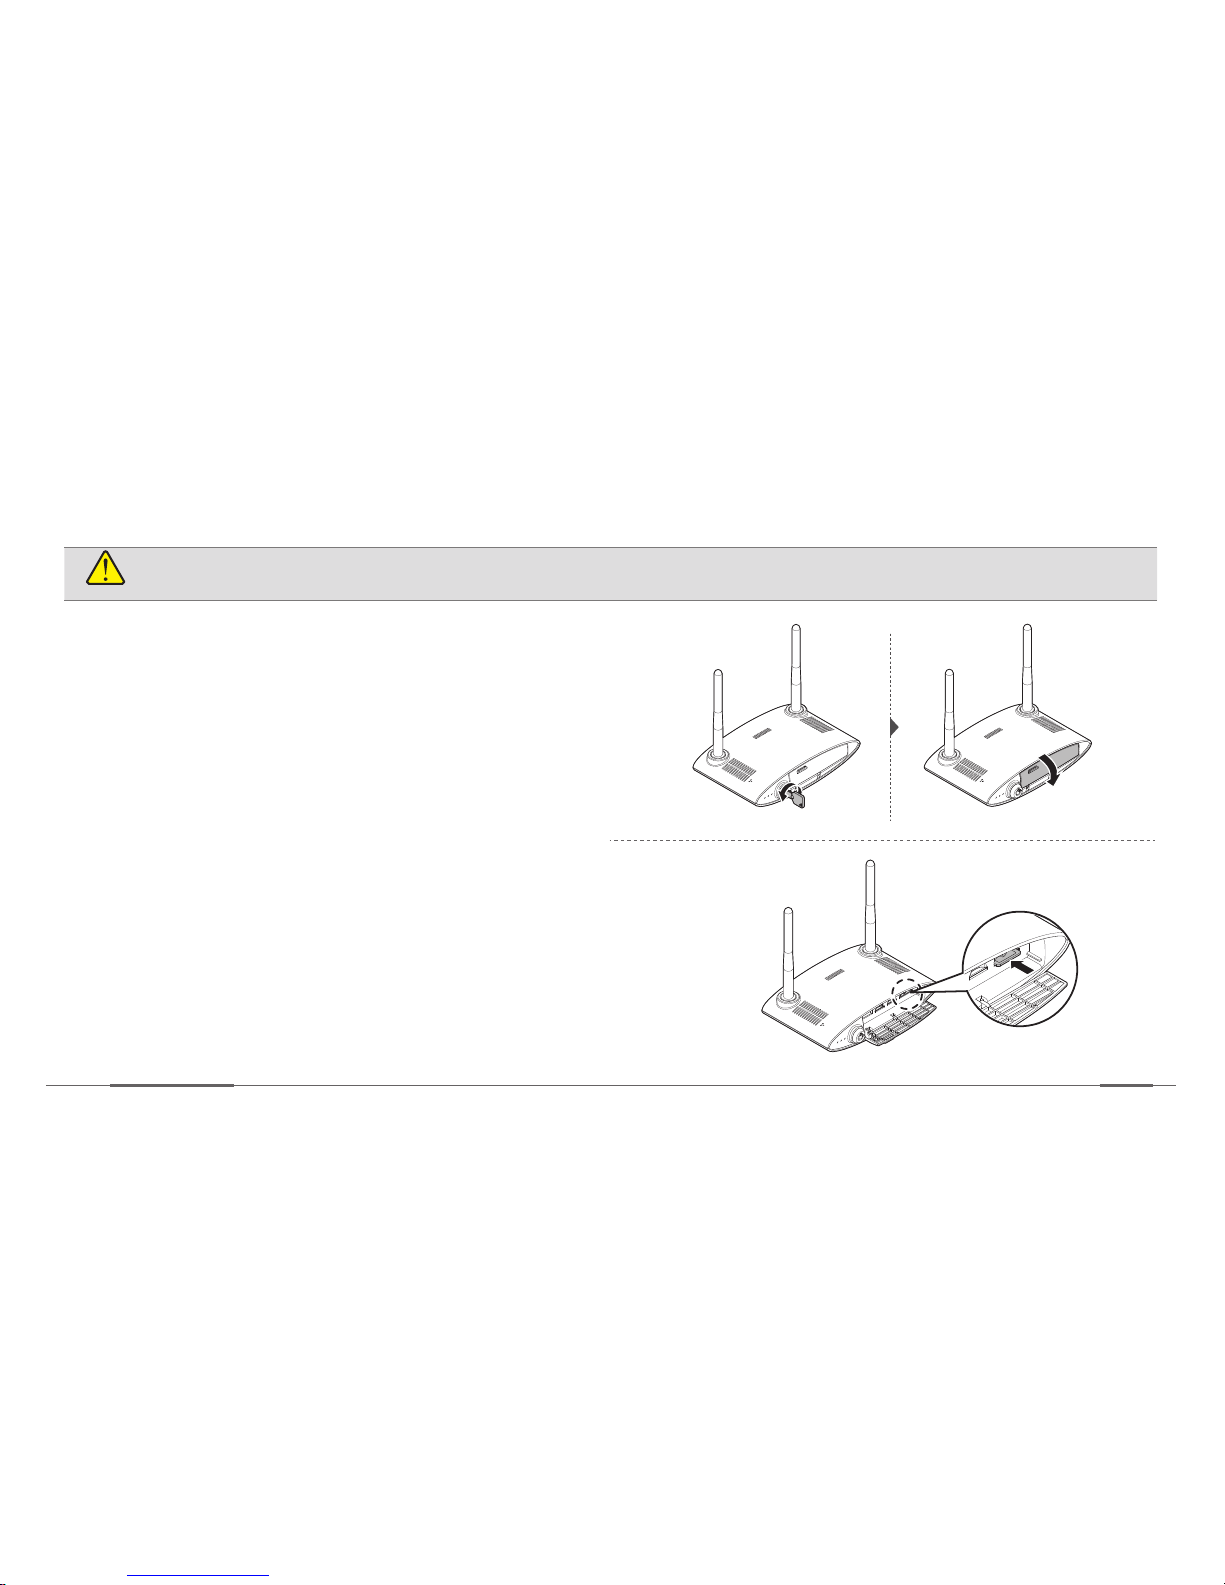
]Remove the microSD card
CAUTION
Be careful not to damage your fingernails when you open the card slot.
1. Open the cover of the microSD card slot.
2. Push the top edge of the microSD card inwards
with your fingertip to release it, and pull it out of
the slot.
»Make sure that the microSD card doesn’t pop out
while trying to remove it.
3. Close the cover of the microSD card slot.
Page 19
Getting started
Device Manual
17
Mounting the USIM card
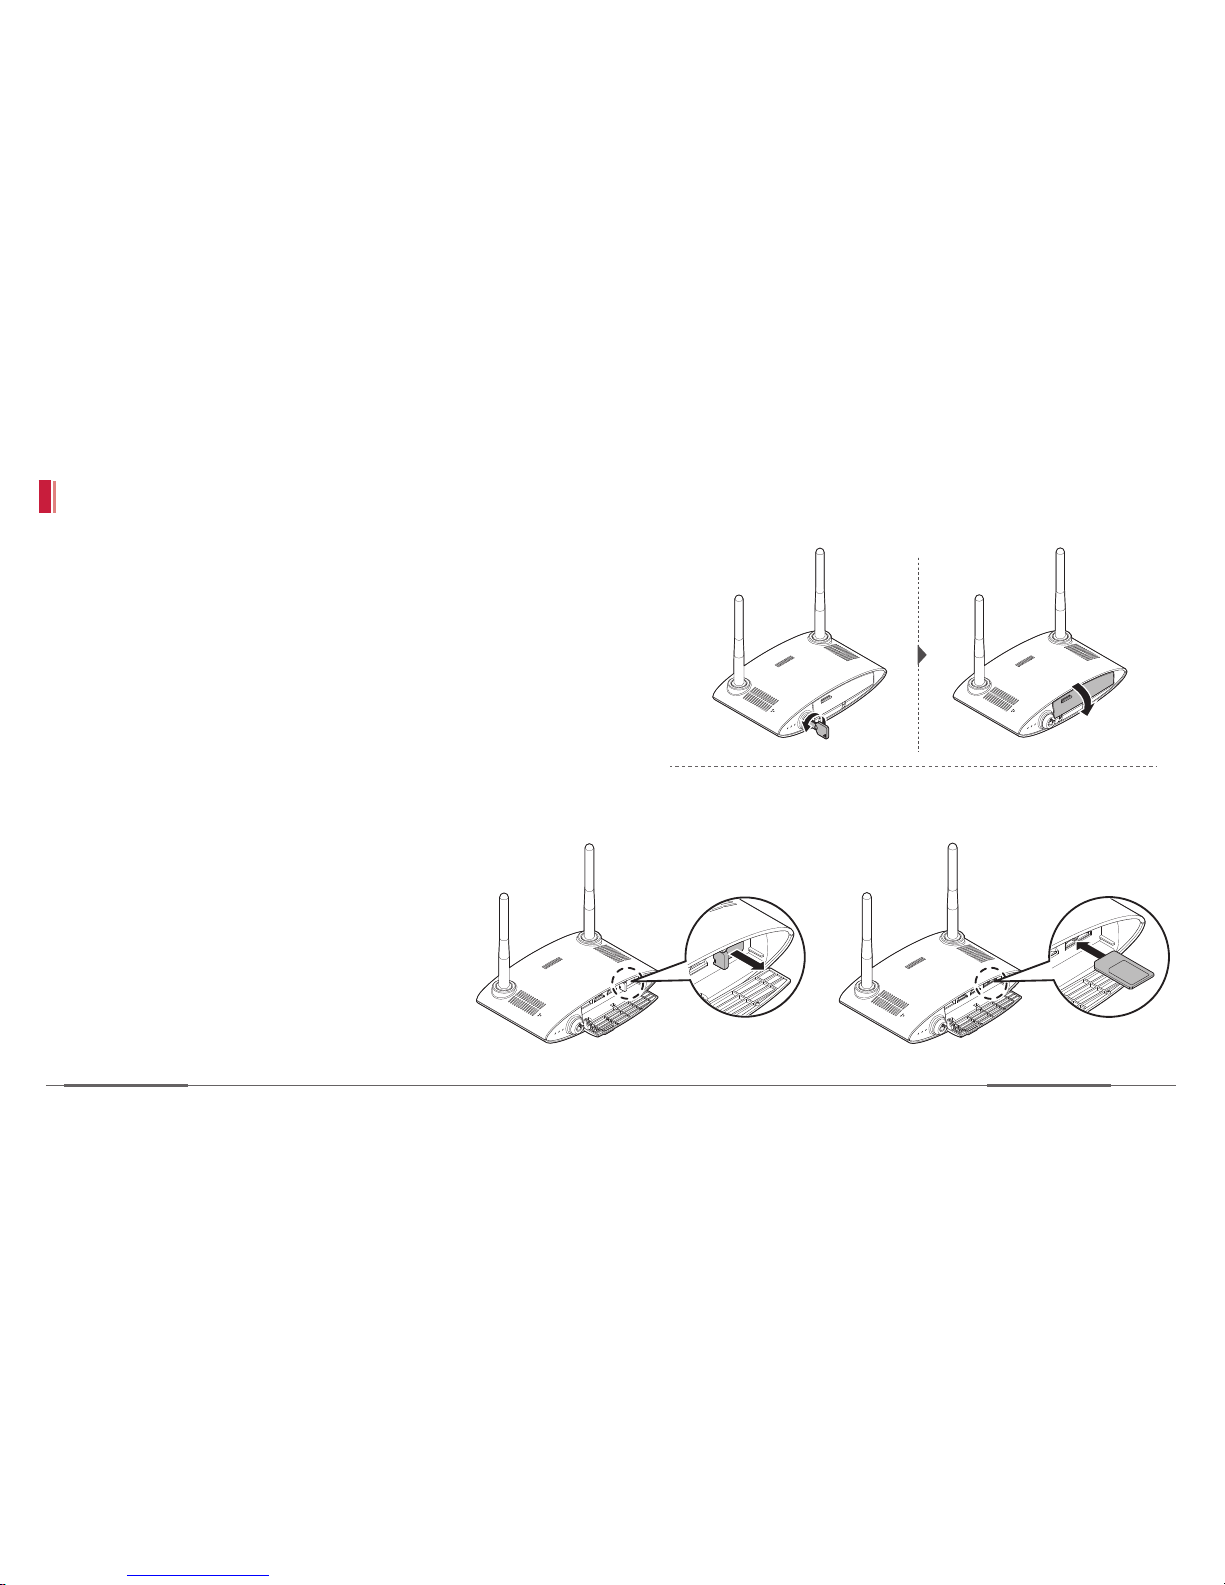
]Insert the USIM card
1. Open the cover of the USIM card slot.
2. Insert the USIM card with the gold-colored contacts
facing downward until it locks into the slot.
3. Close the cover of the USIM card slot.
»You can only insert the standard(mini) USIM card size.
Page 20
Getting started
Zeus
18
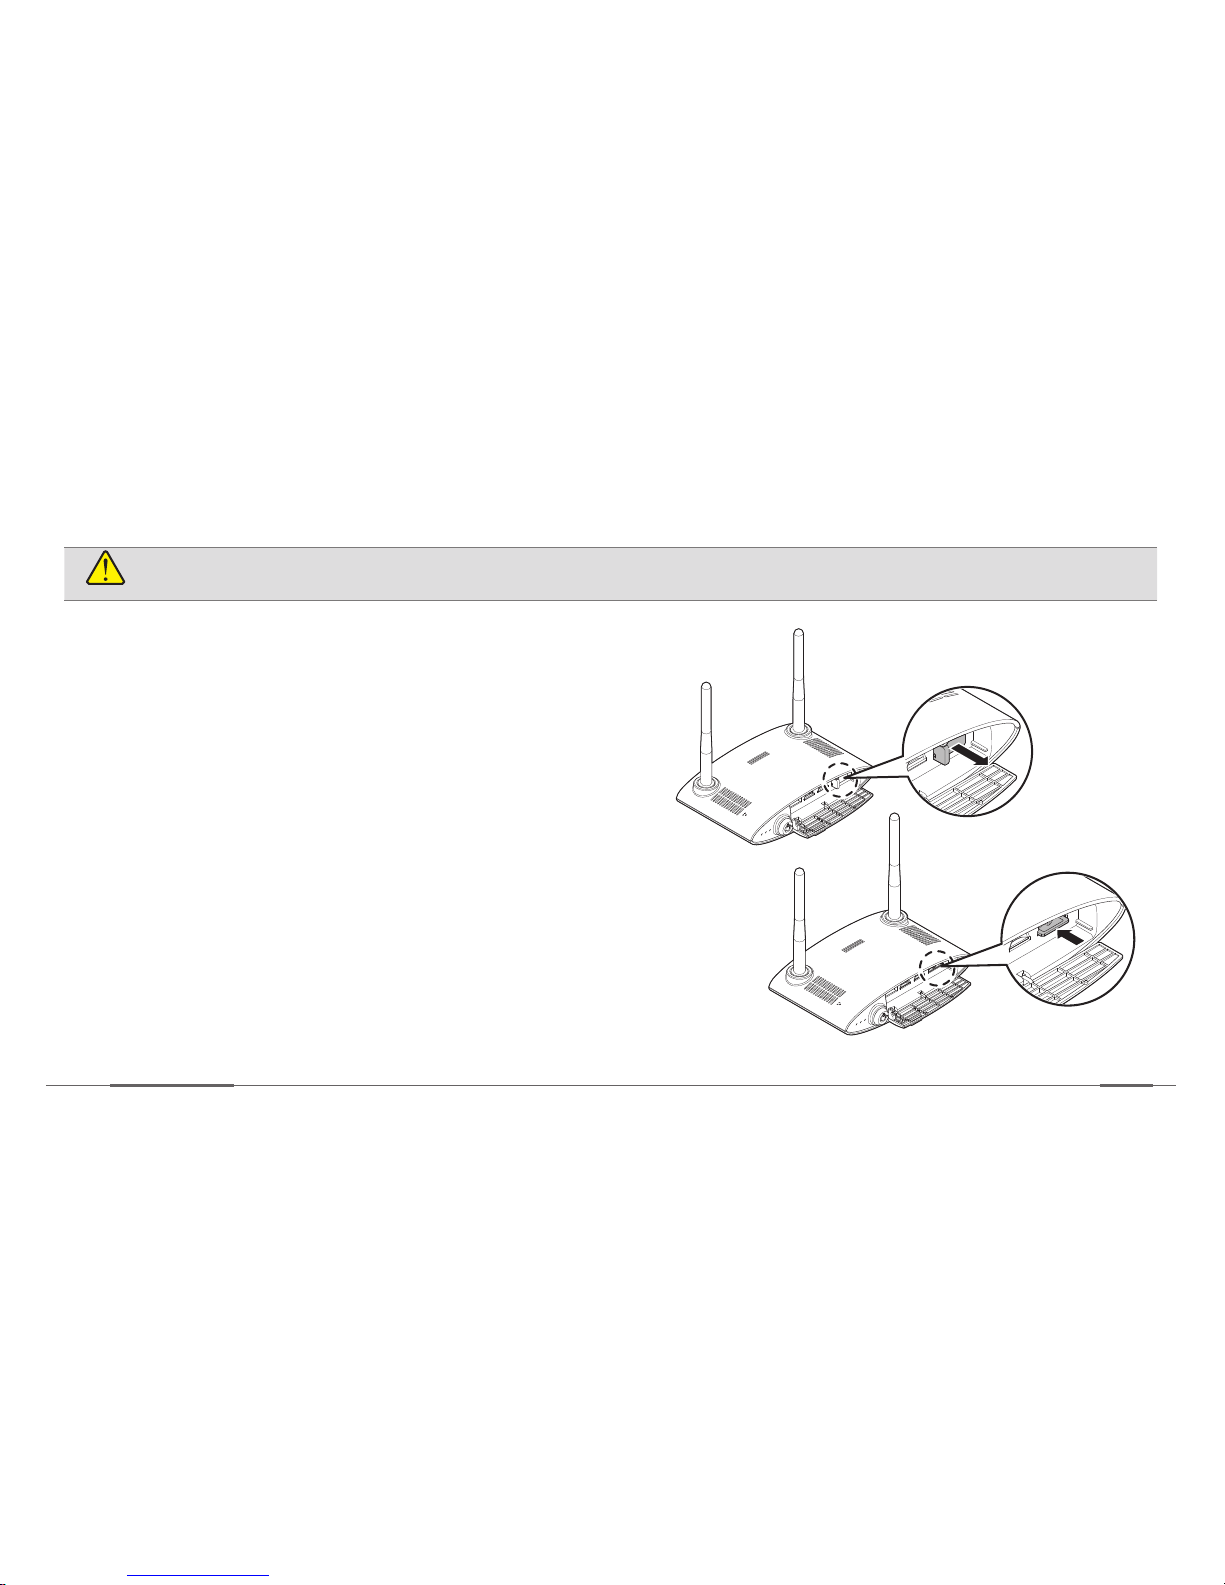
]Remove the USIM card
CAUTION
Be careful not to damage your fingernails when you open the card slot.
1. Open the cover of the USIM card slot.
2. Push the top edge of the USIM card inwards to
release it, and pull it out of the slot.
»Make sure that the USIM card doesn’t pop out while
trying to remove it.
3. Close the cover of the USIM card slot.
Page 21
Installation
Device Manual
19
Installation
For use of this network black box system, it is required to install the following:
CAUTION
Before installation of the device, make sure that the engine is off and the ignition key is not inserted.
• Keep the glasses clean to have quality image.
• Keep the external GPS and antenna of device from the metals eg. metallic car seat, as the signal can be
interfered.
• The quality of recorded images can be poor depending on the place or the level of lighting during recording.
• GPS reception and image quality can be poor when the glasses are excessively tinted with a metallic component.
• Device
refer to pg
21
• PC Viewer
refer to pg
43
• App Viewer for Driver
Download the APP and its manual from the user webpage
• App Viewer for Manager
Download the APP and its manual from the user webpage
Page 22
Installation
Zeus
20
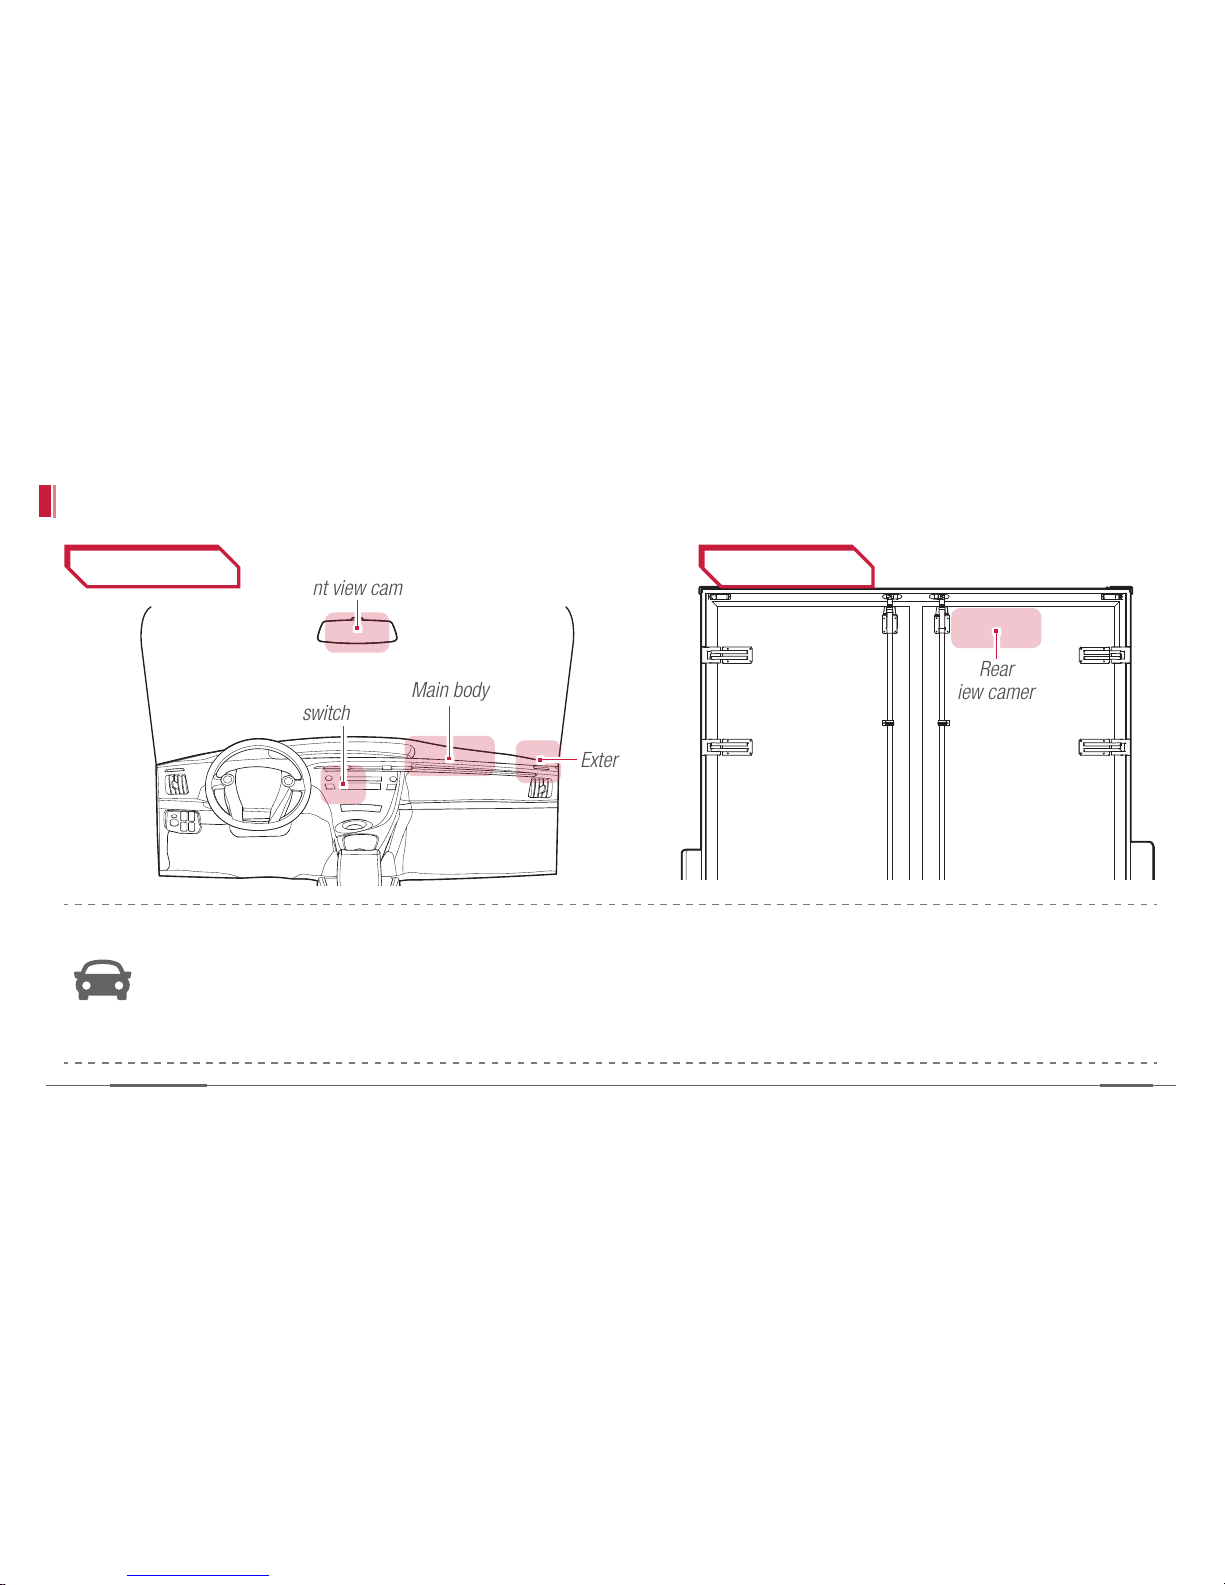
Device installation layout (recommend)
RearFront
Front view camera
Emergency
switch
Main body
External GPS
Rear
view camera
• Main unit can be installed on the dashboard, within the dashboard or in the fusebox.
• Front cam can be installed on the dashboard or on the window
• Rear cam can be installed rear side of a vehicle or outside.
• GPS should be placed near the window side of dashboard and must face towards the sky.
Page 23
Installation
Device Manual
21
Installing the main device
You may use the constant power cable to connect the main device as below instruction.
In order to install the device, follow the steps below:
CAUTION
• If you want to connect the device with the constant power cable, the installation must be serviced by a professional
vehicle mechanic.
• Select an appropriate location for mounting the device in a vehicle. Never place the device on the place near a
metallic object or where the driver’s field of vision is blocked.
Page 24
Installation
Zeus
22
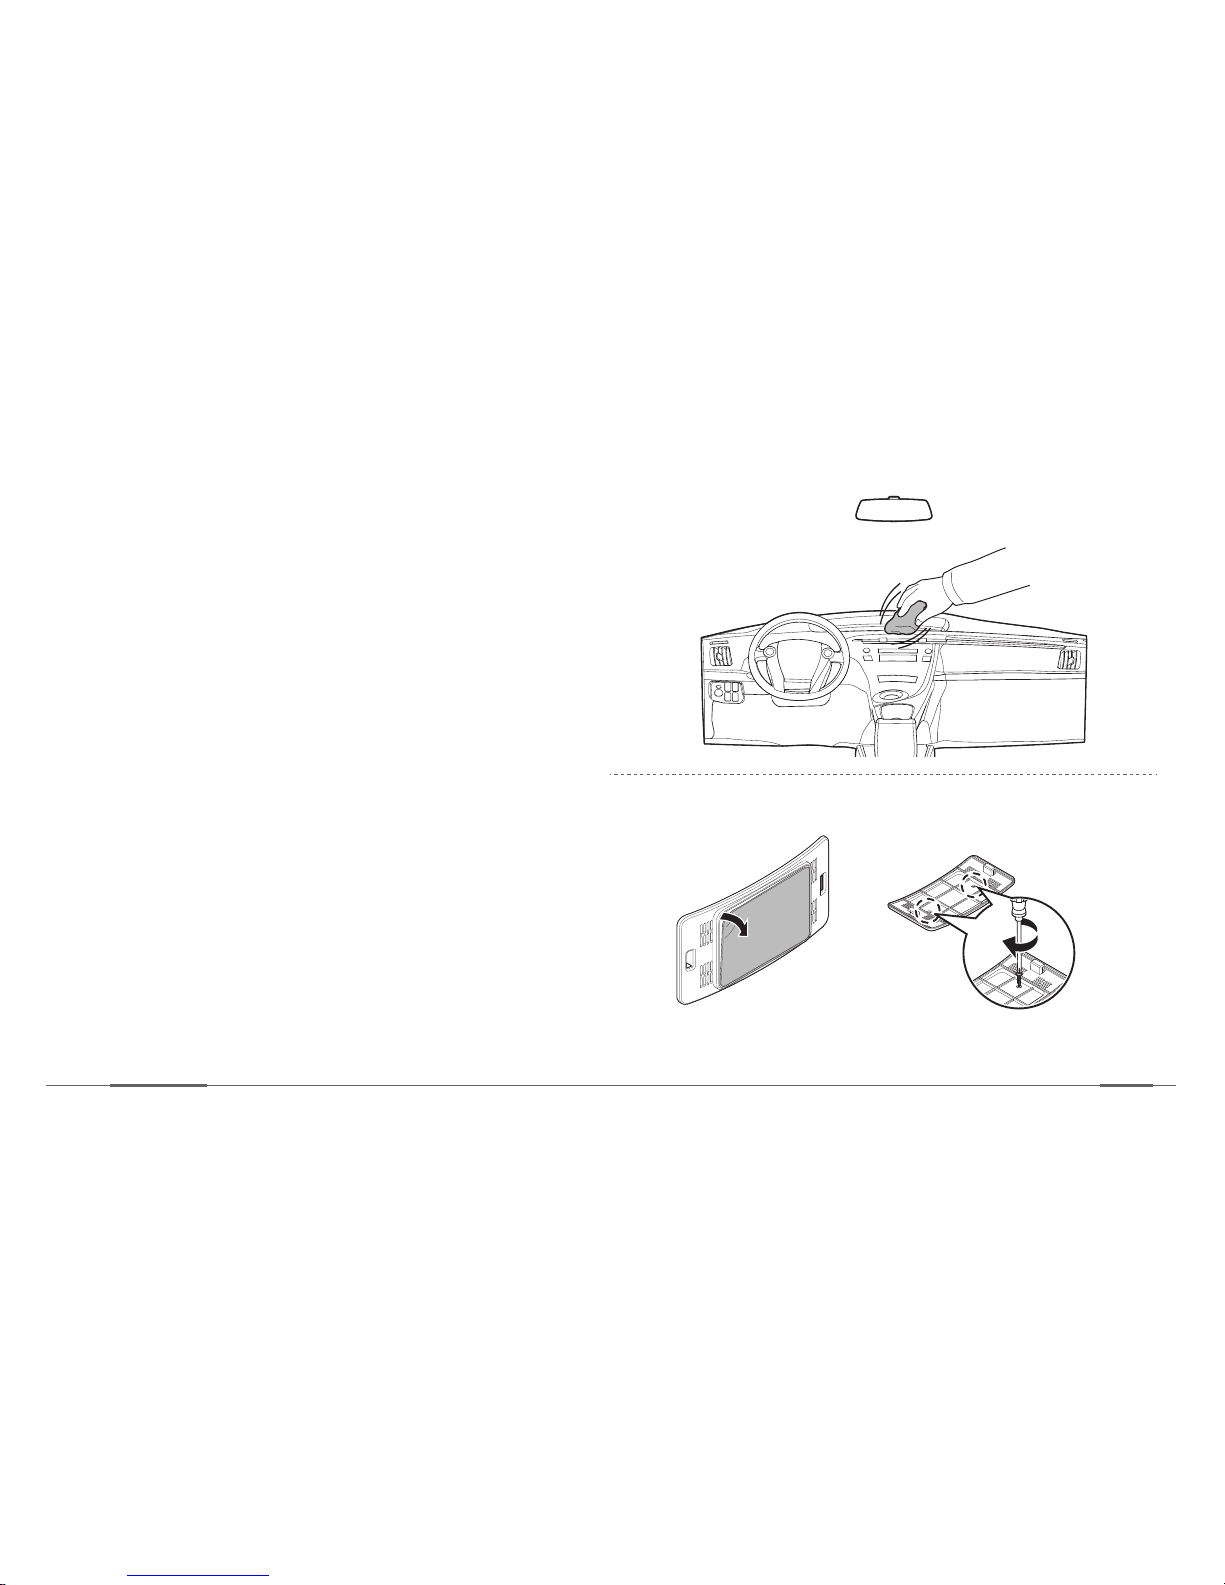
1. Clean the installation place with a dry cloth.
2. Remove the double-sided tape from the body
holder and place it on the installation spot. You
can also fix the device holder on the installation
spot with screw bolts into a desired position.
1
2
Page 25
Installation
Device Manual
23
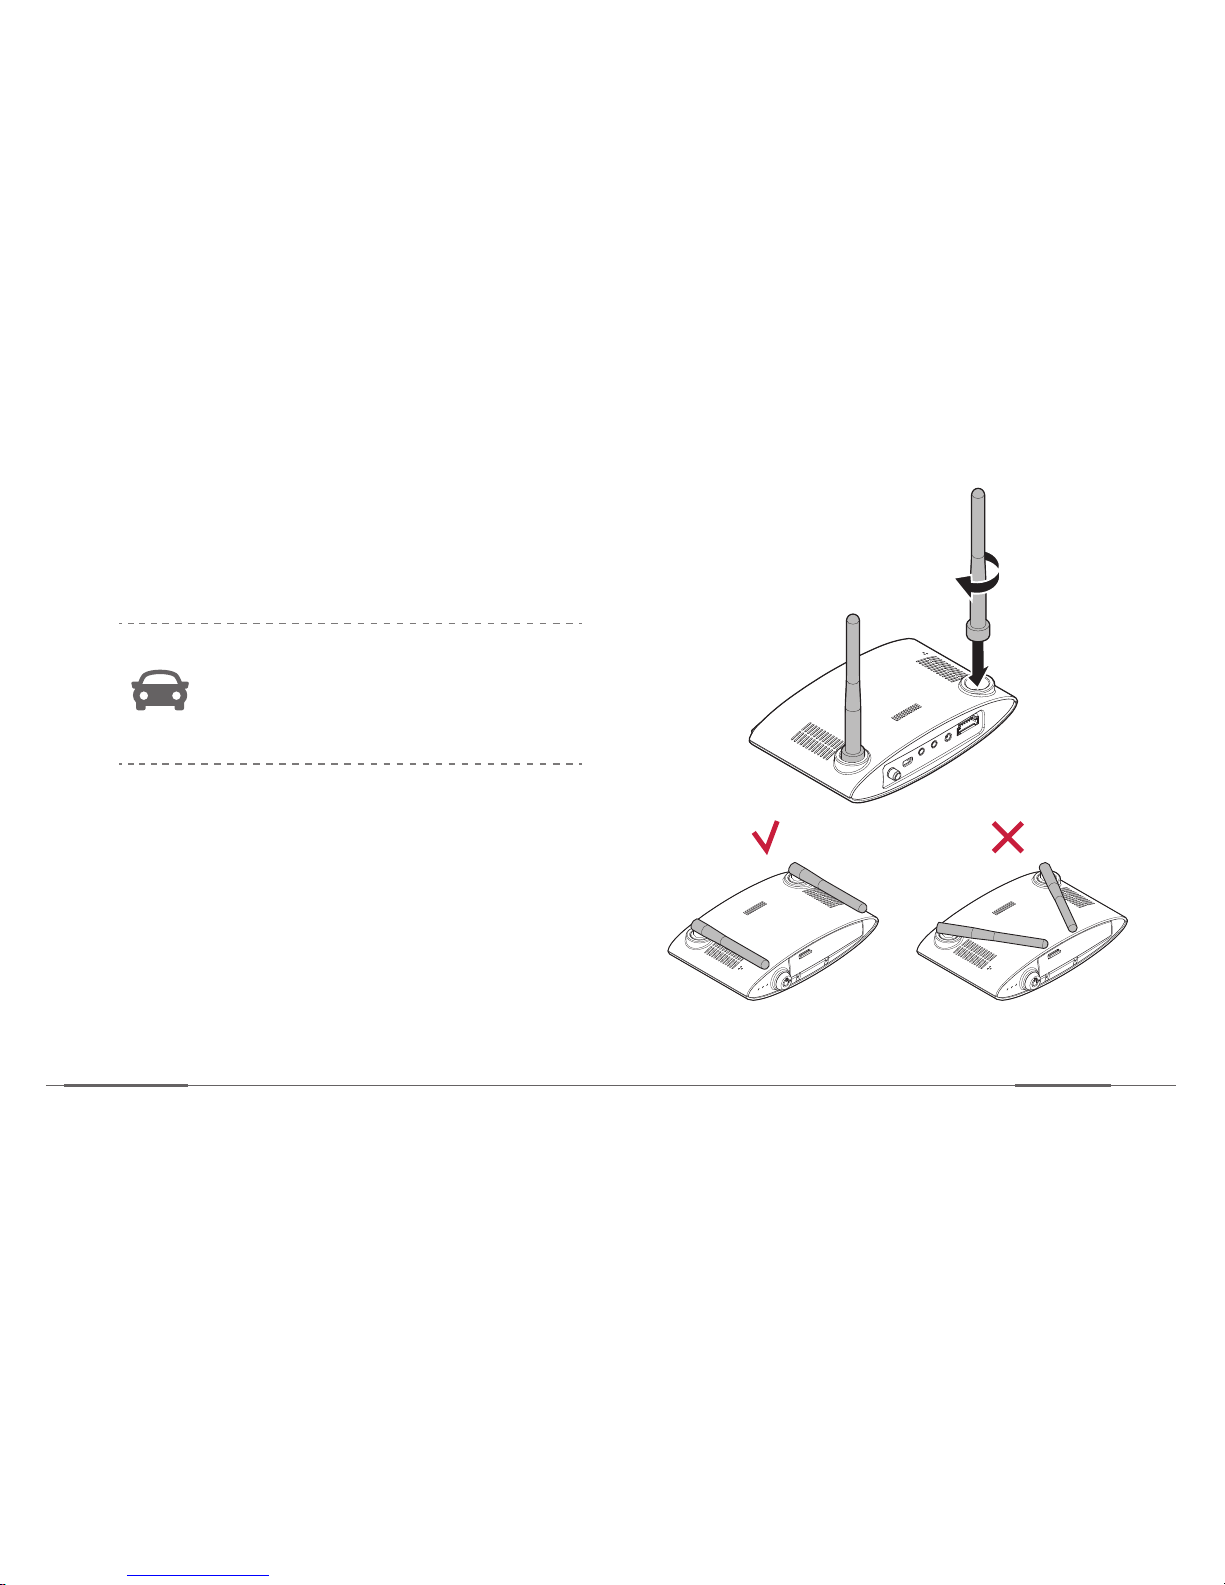
3. Connect the antennas by turning them in
clockwise. They do not lock in to the place so
please stop turning them when they become firm
to turn.
After assembly of antennas, adjust to
prevent communication interference
between them as shown in the following
figure
1
2
Page 26
Installation
Zeus
24
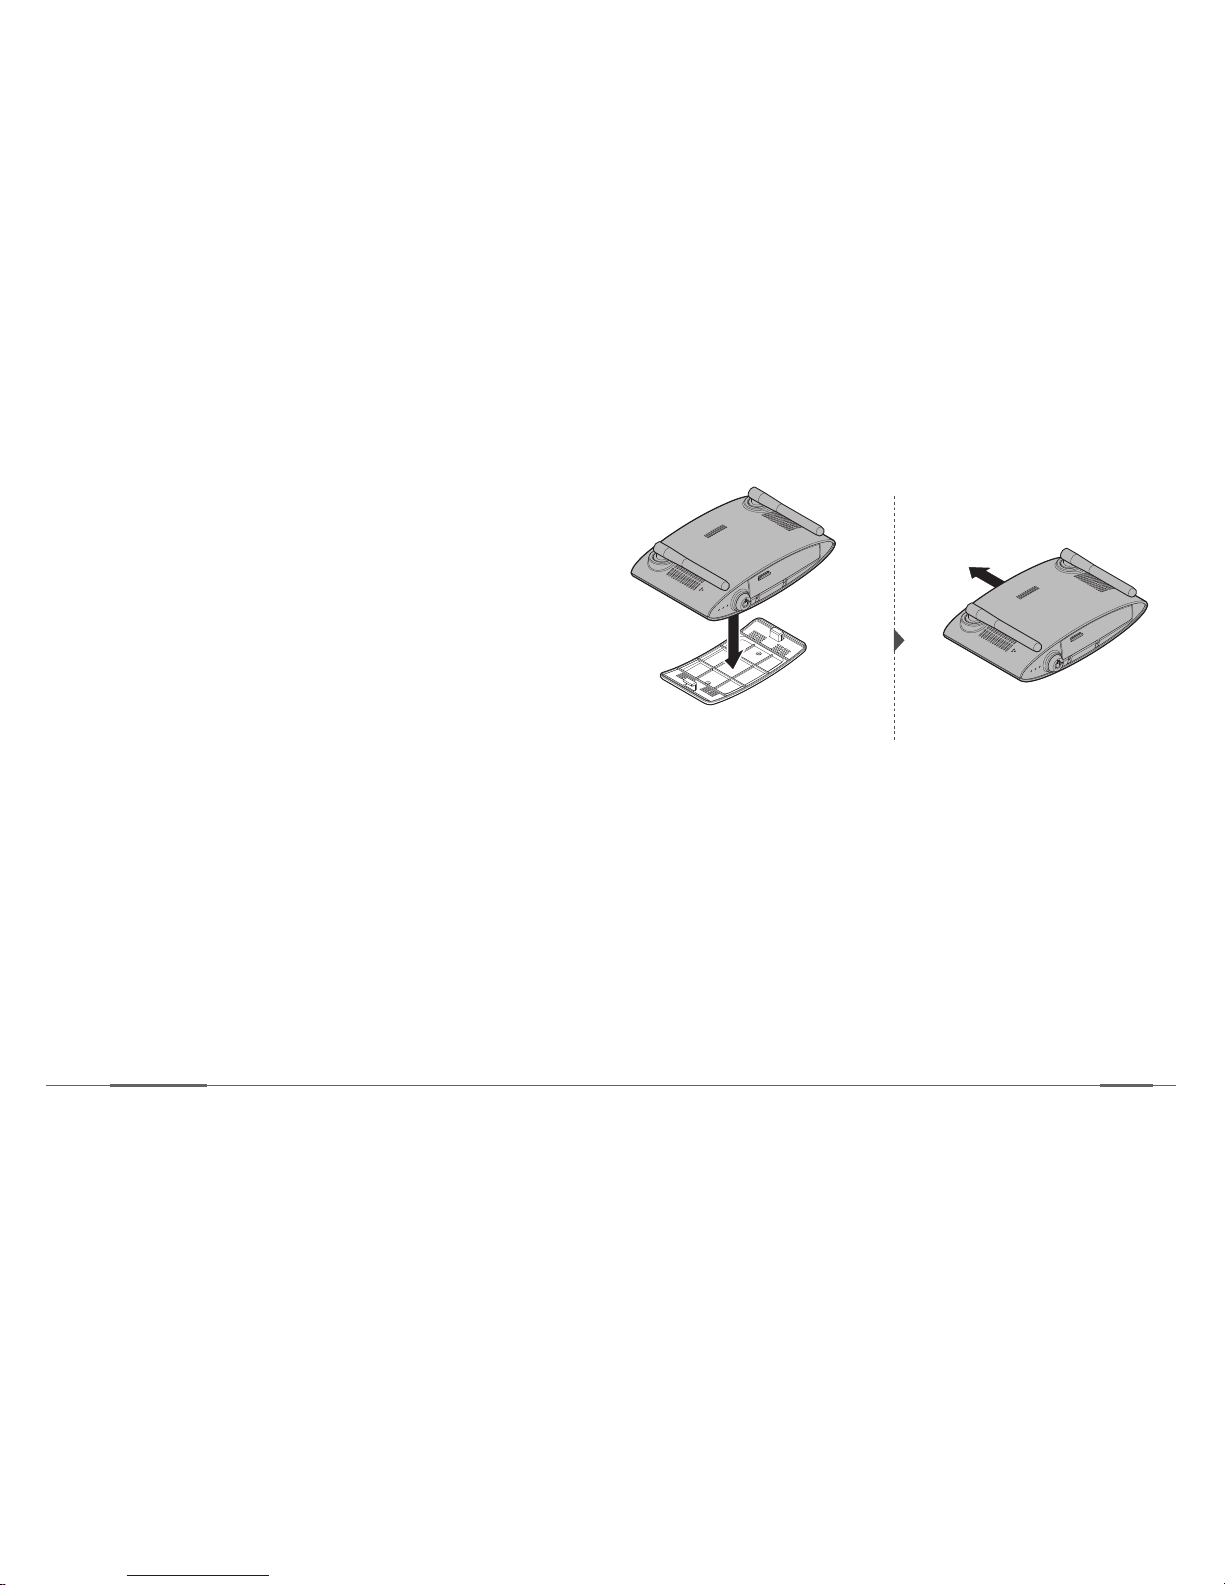
4. Attach the body of the device to the body holder.
You can fix the device holder on the installation
spot with screw bolts into a desired position.
Page 27
Installation
Device Manual
25
Installing the cameras
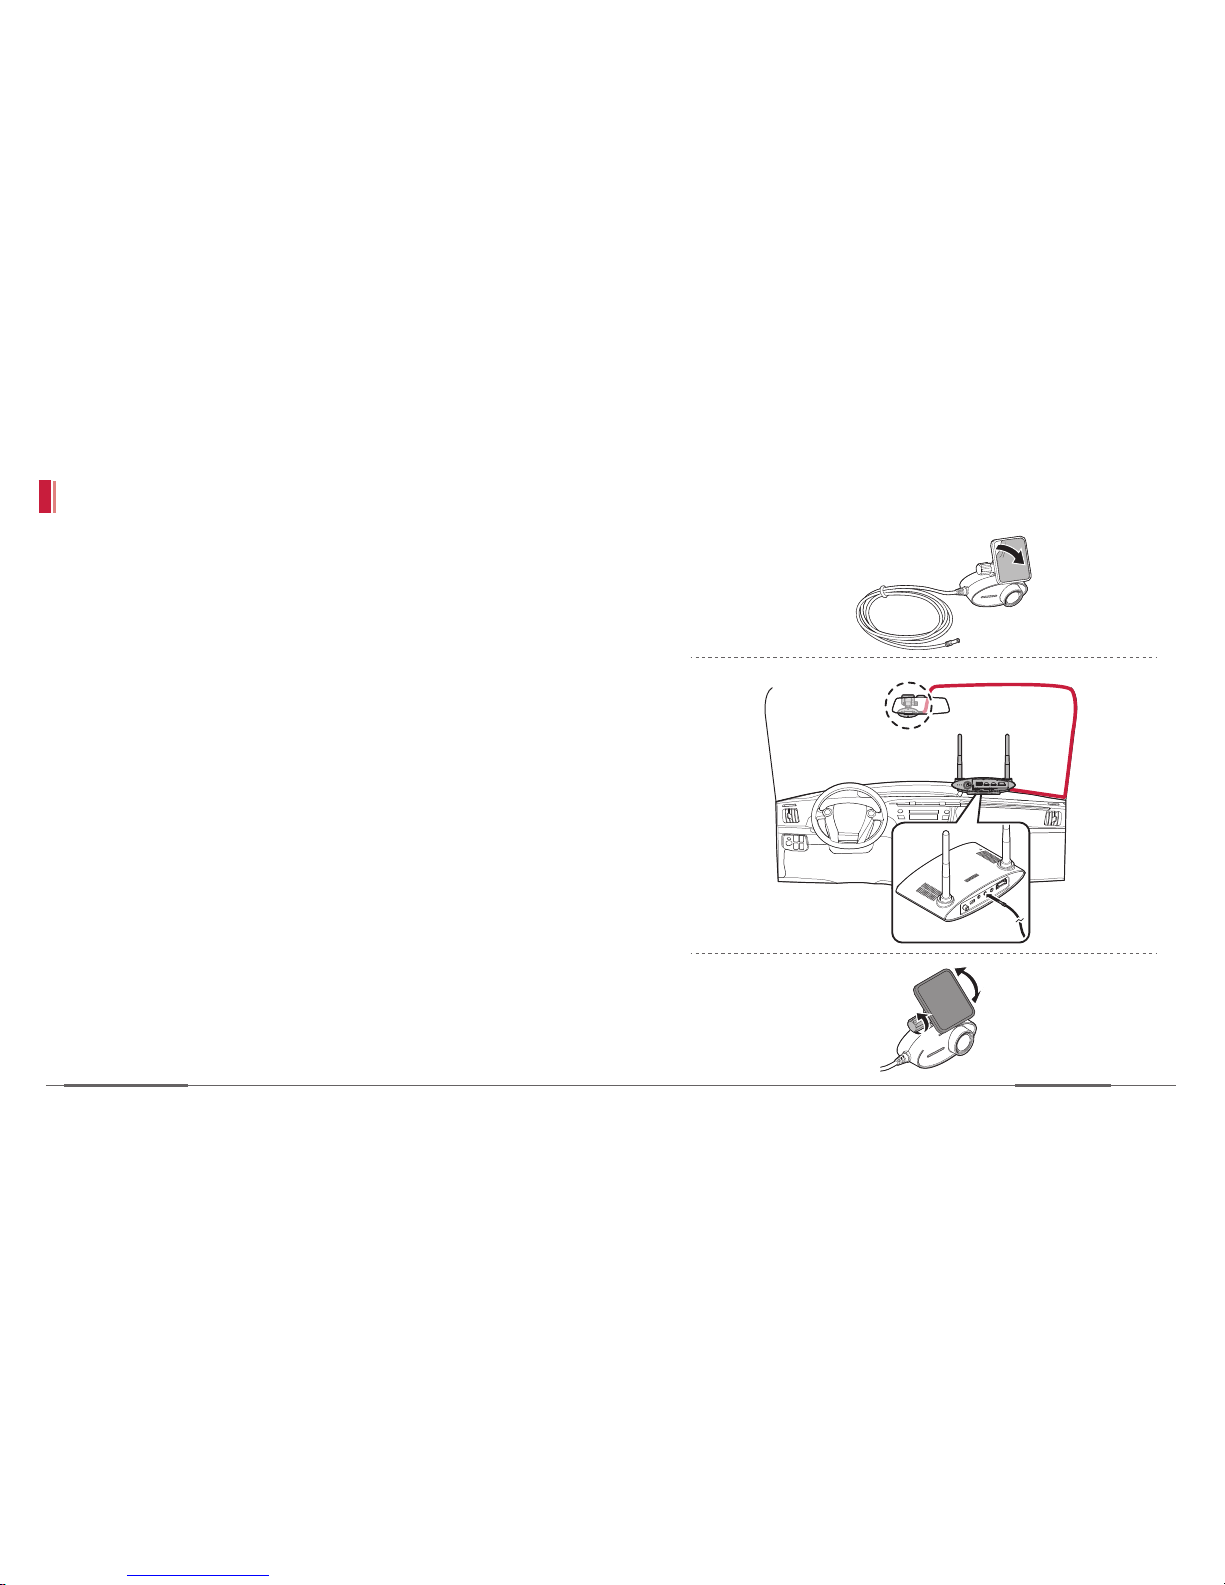
1. Remove the double-sided tape from the
mounting bracket.
2. Install the front camera at the front side of
the vehicle (windshield, rear-view mirror or
dashboard).
3. Unscrew the bolt on the camera cradle and
adjust the camera angle.
1
2
1
2
Page 28
Installation
Zeus
26
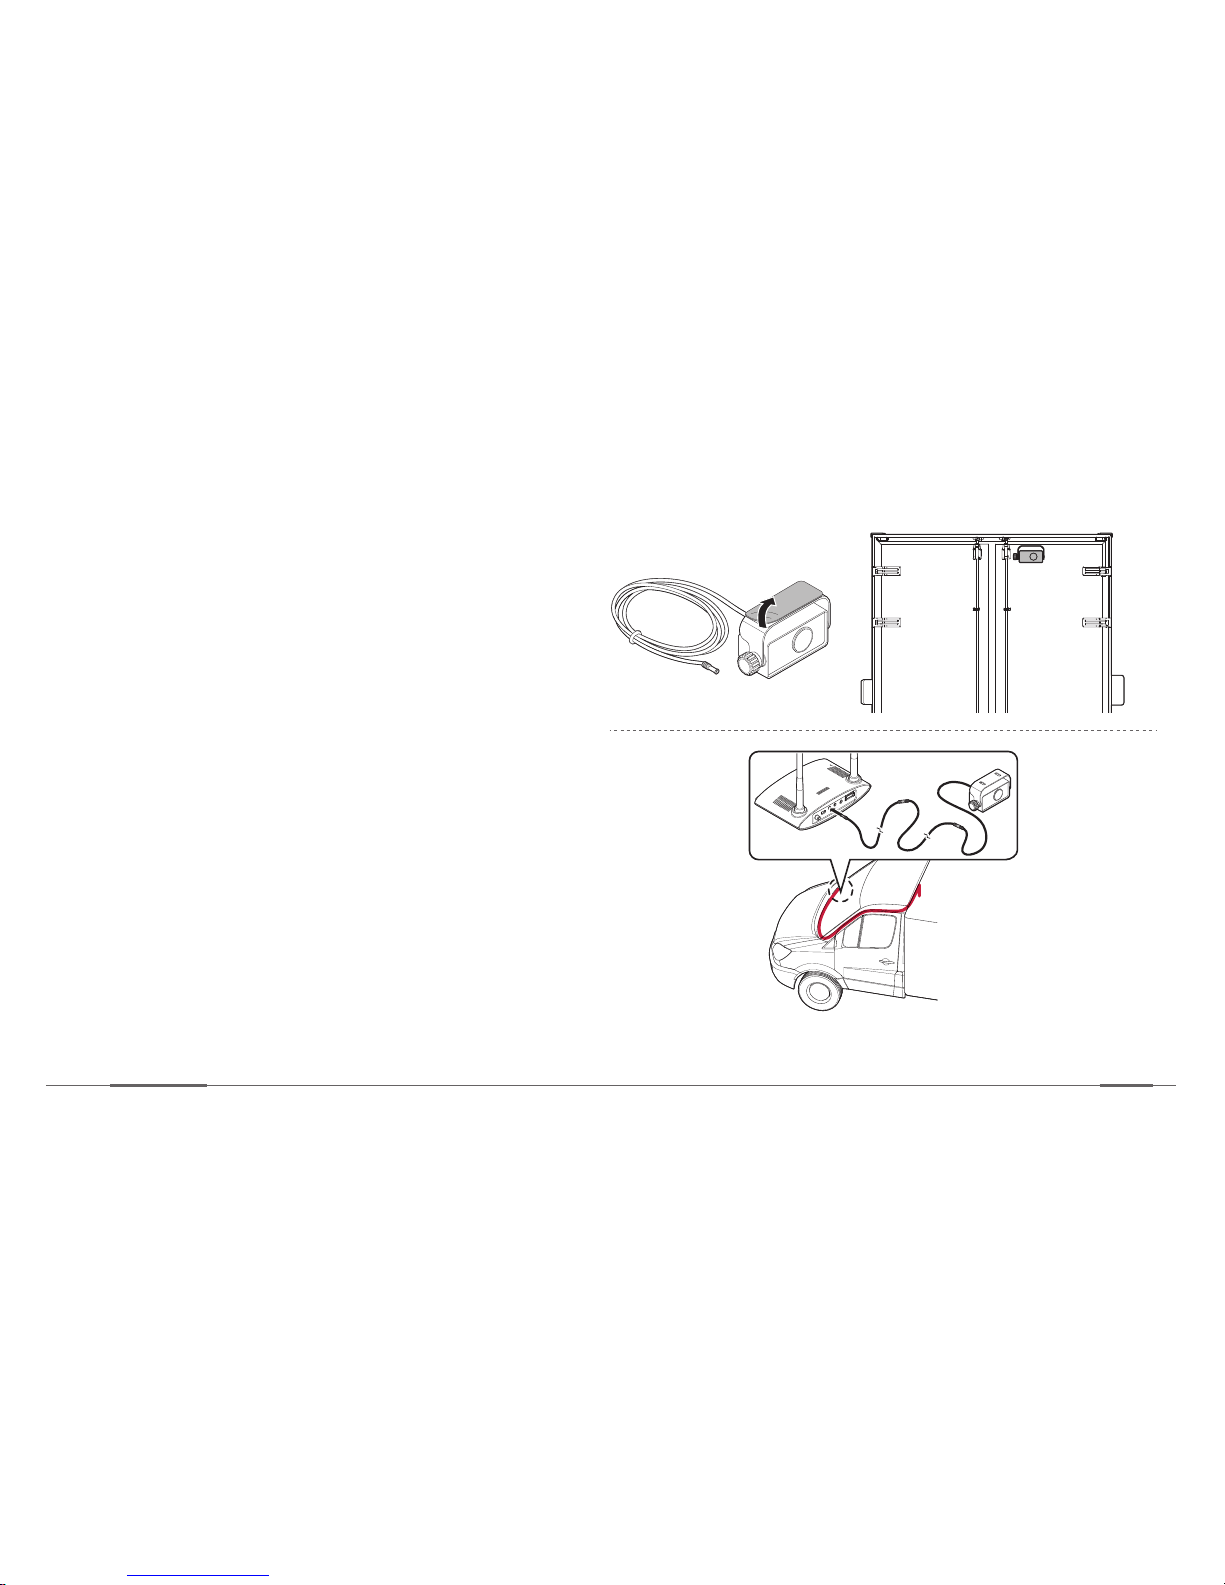
4. Remove the double-sided tape from the
mounting bracket.
5. Install the rear camera at the rear side of the
vehicle to the center.
6. Interconnect the extension cable with the rear
camera cable and insert it into the camera port
of device.
7. Tidy up the cables by filling them in the gaps of
the plastic frames around the windows.
Page 29
Installation
Device Manual
27
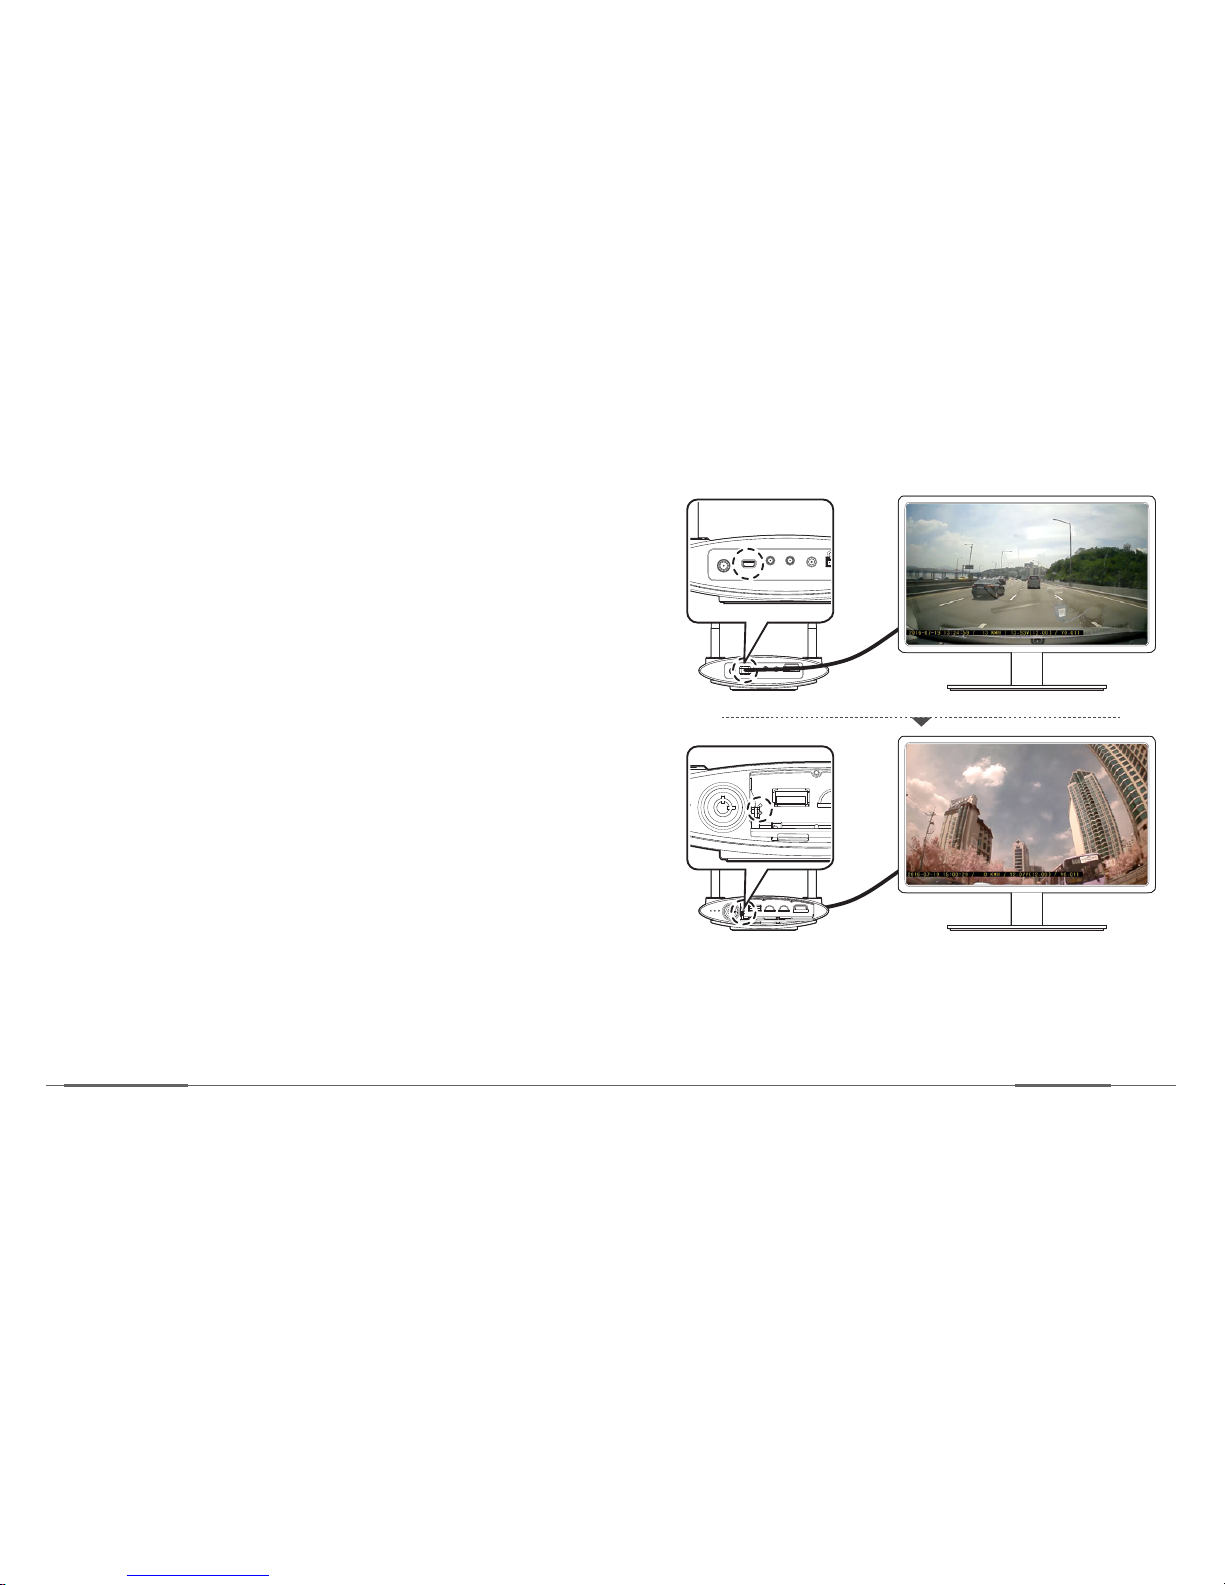
8. If necessary, connect a monitor to a HDMI port
and check how the videos are being recorded
from the monitor. Press the pinhole with a
P-mark on the device to switch the monitor
screen to the rear camera view.
Page 30
Installation
Zeus
28
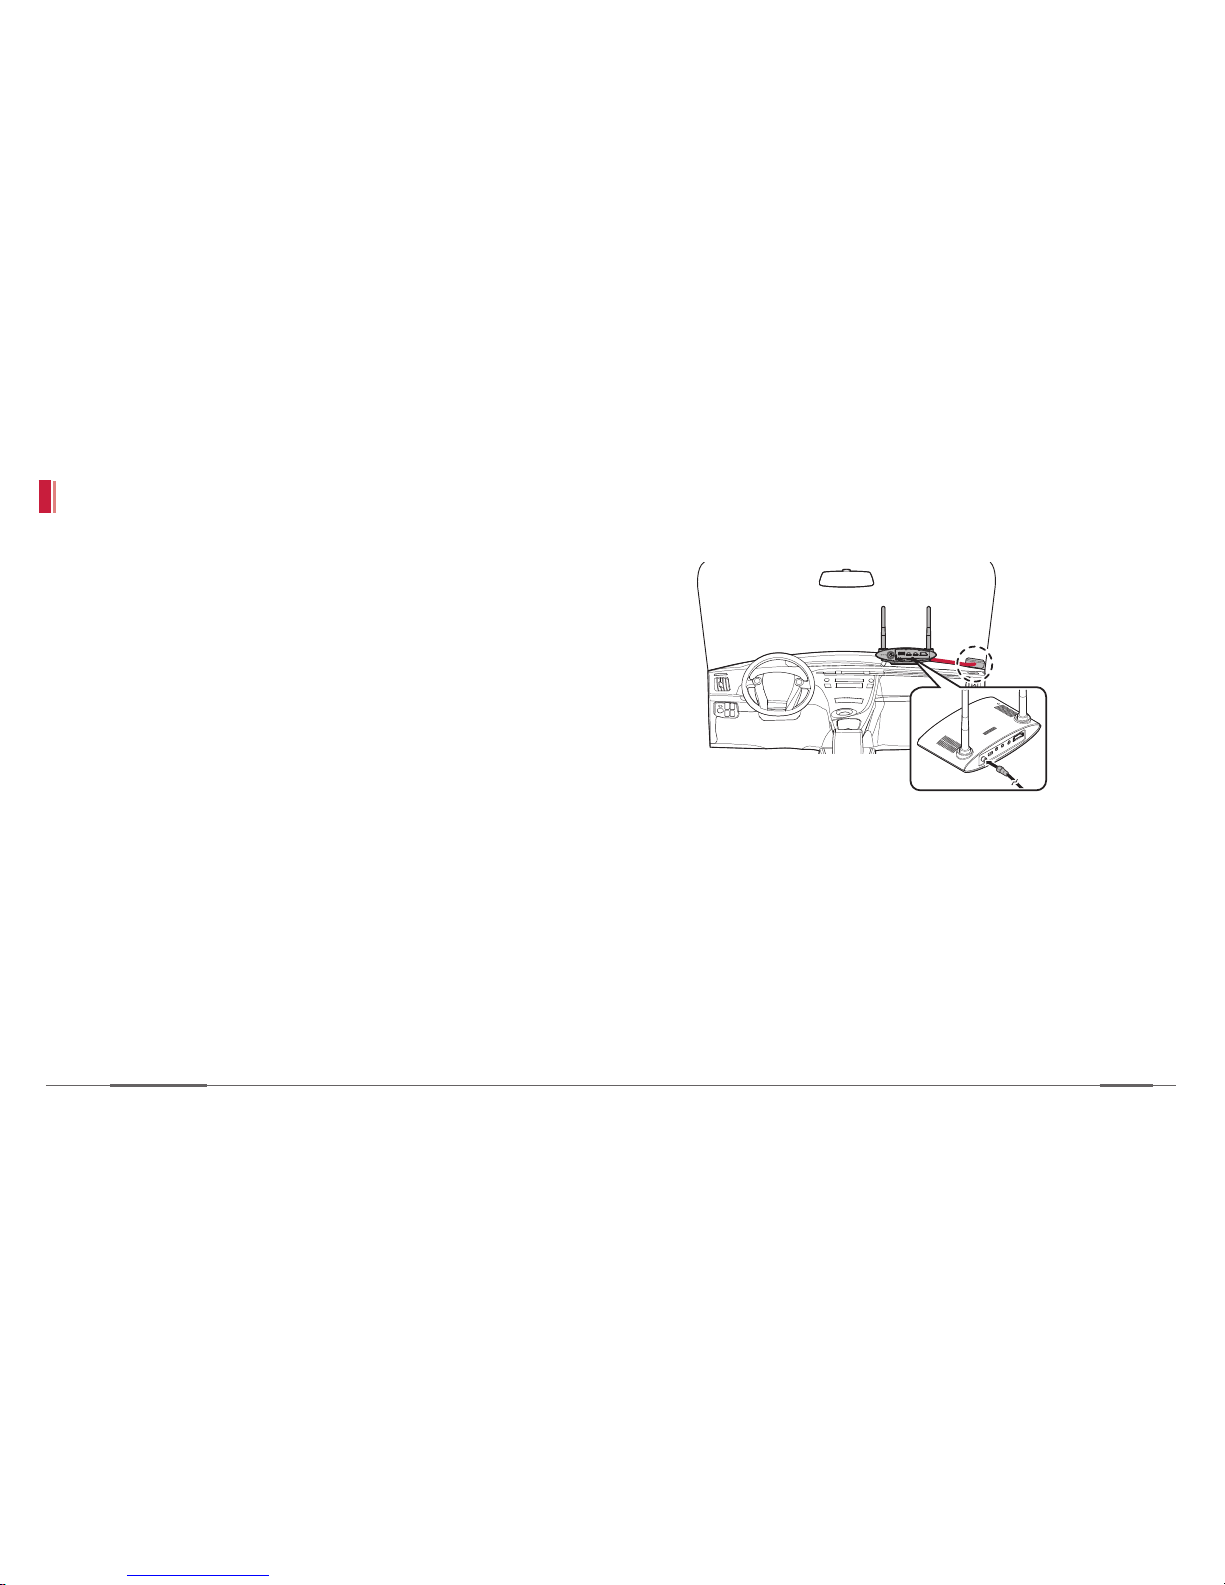
1. Connect the cable of the external GPS on the
window side facing the sky direction.
Installing the GPS
Page 31
Installation
Device Manual
29
Installing the E-call kit
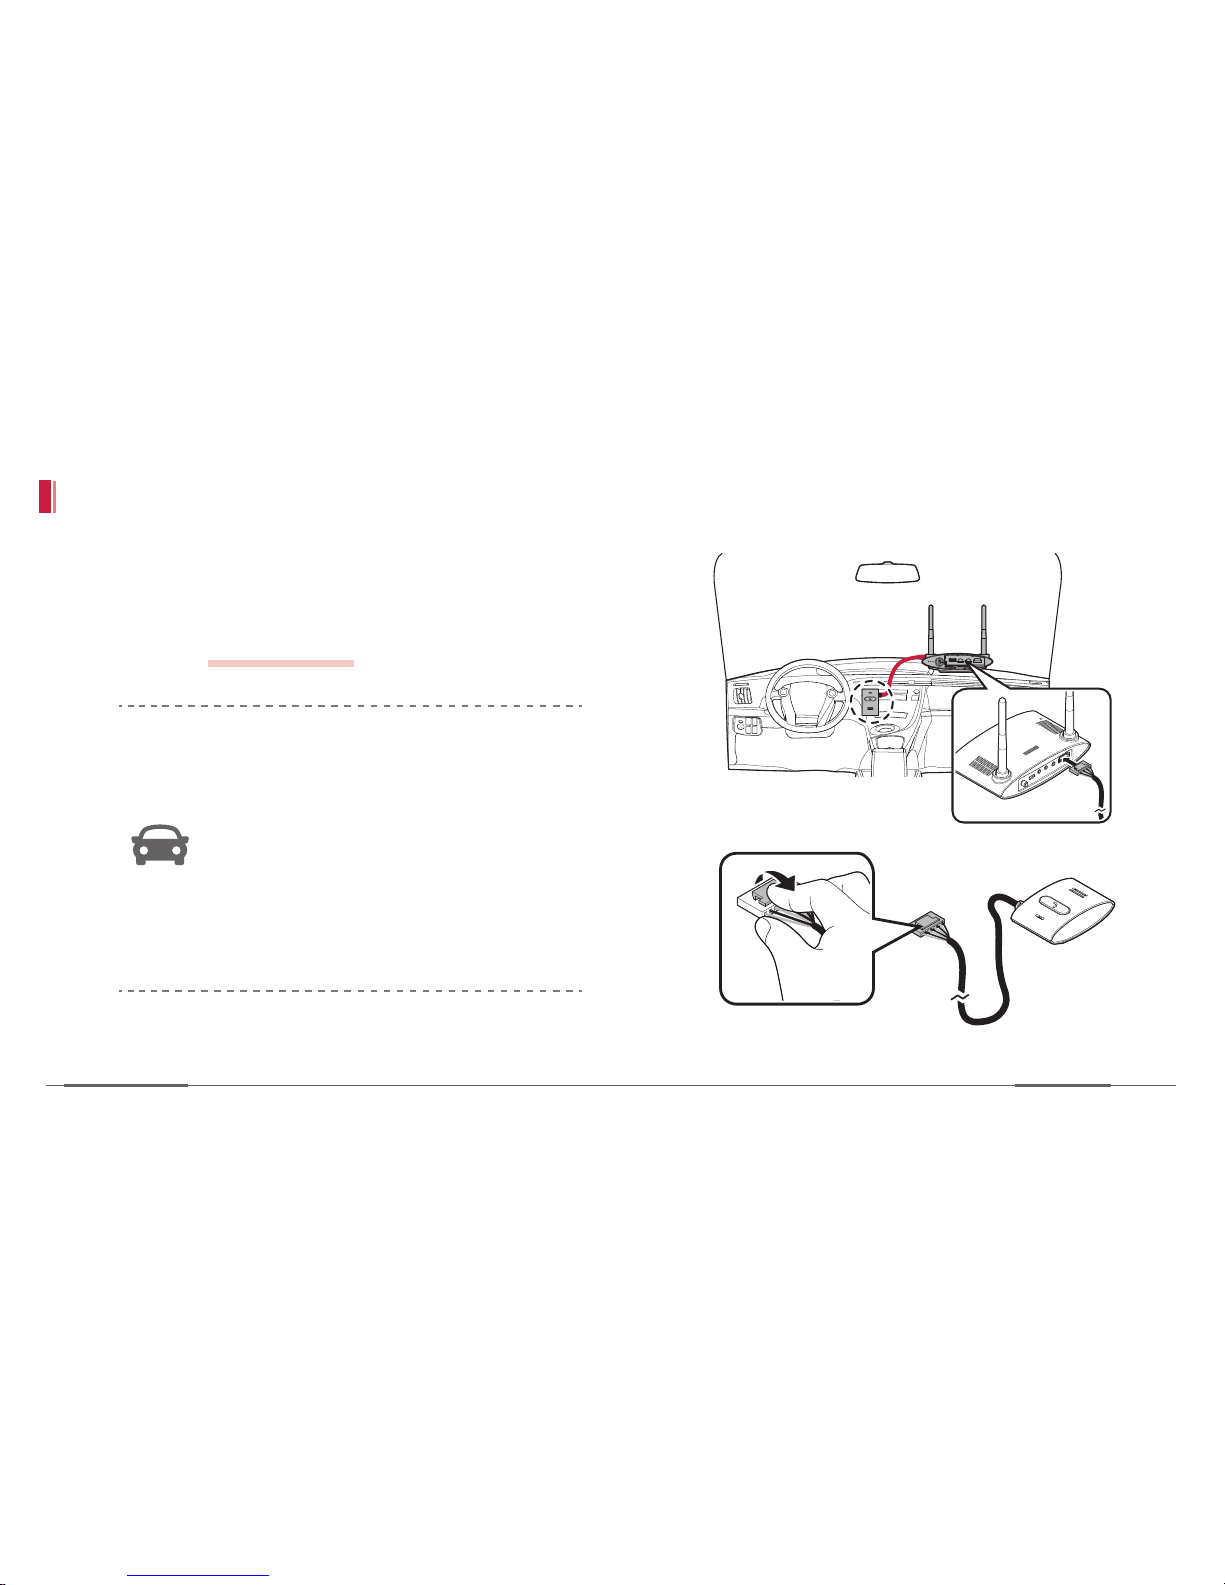
1. Connect the cable of the Emergency button. If
pressed with the power on, you can make a call
with an operator. Type in the destination phone
number.
refer to pg 56 ~ 57
For installation of the Emergency button,
be sure to note the following:
• Keep a distance of 30 cm from driver
so that he can easily touch it.
• Install the Emergency button to face it
towards the driver.
• Remove the cable from the device
while pressing the clip on its head.
Page 32
Installation
Zeus
30
Mount the SD cards and USIM card
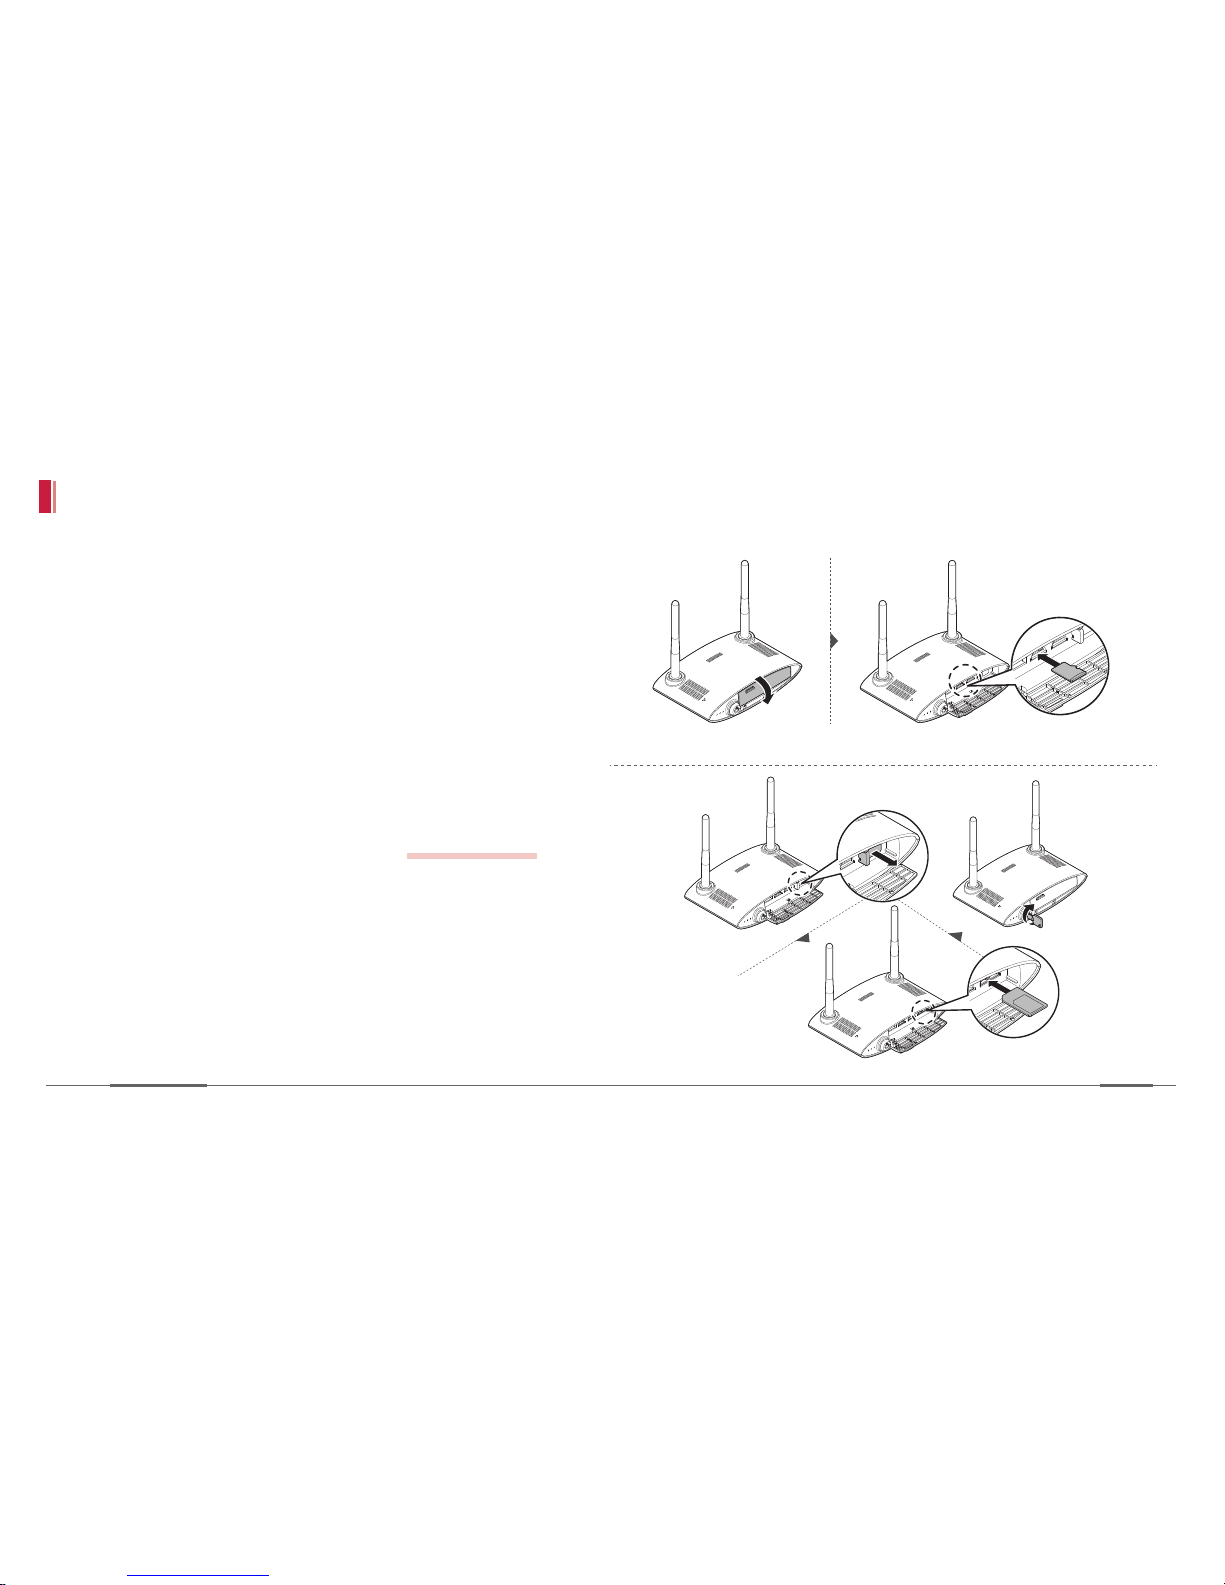
1. Open the cover of the front panel and insert the
SD card into the first SD card slot.
2. Insert the USIM card. To enable the network
connection, type in the APN information from the
viewer program before hand.
refer to pg 54-57
3. Lock the cover with the provided key.
Page 33
Installation
Device Manual
31
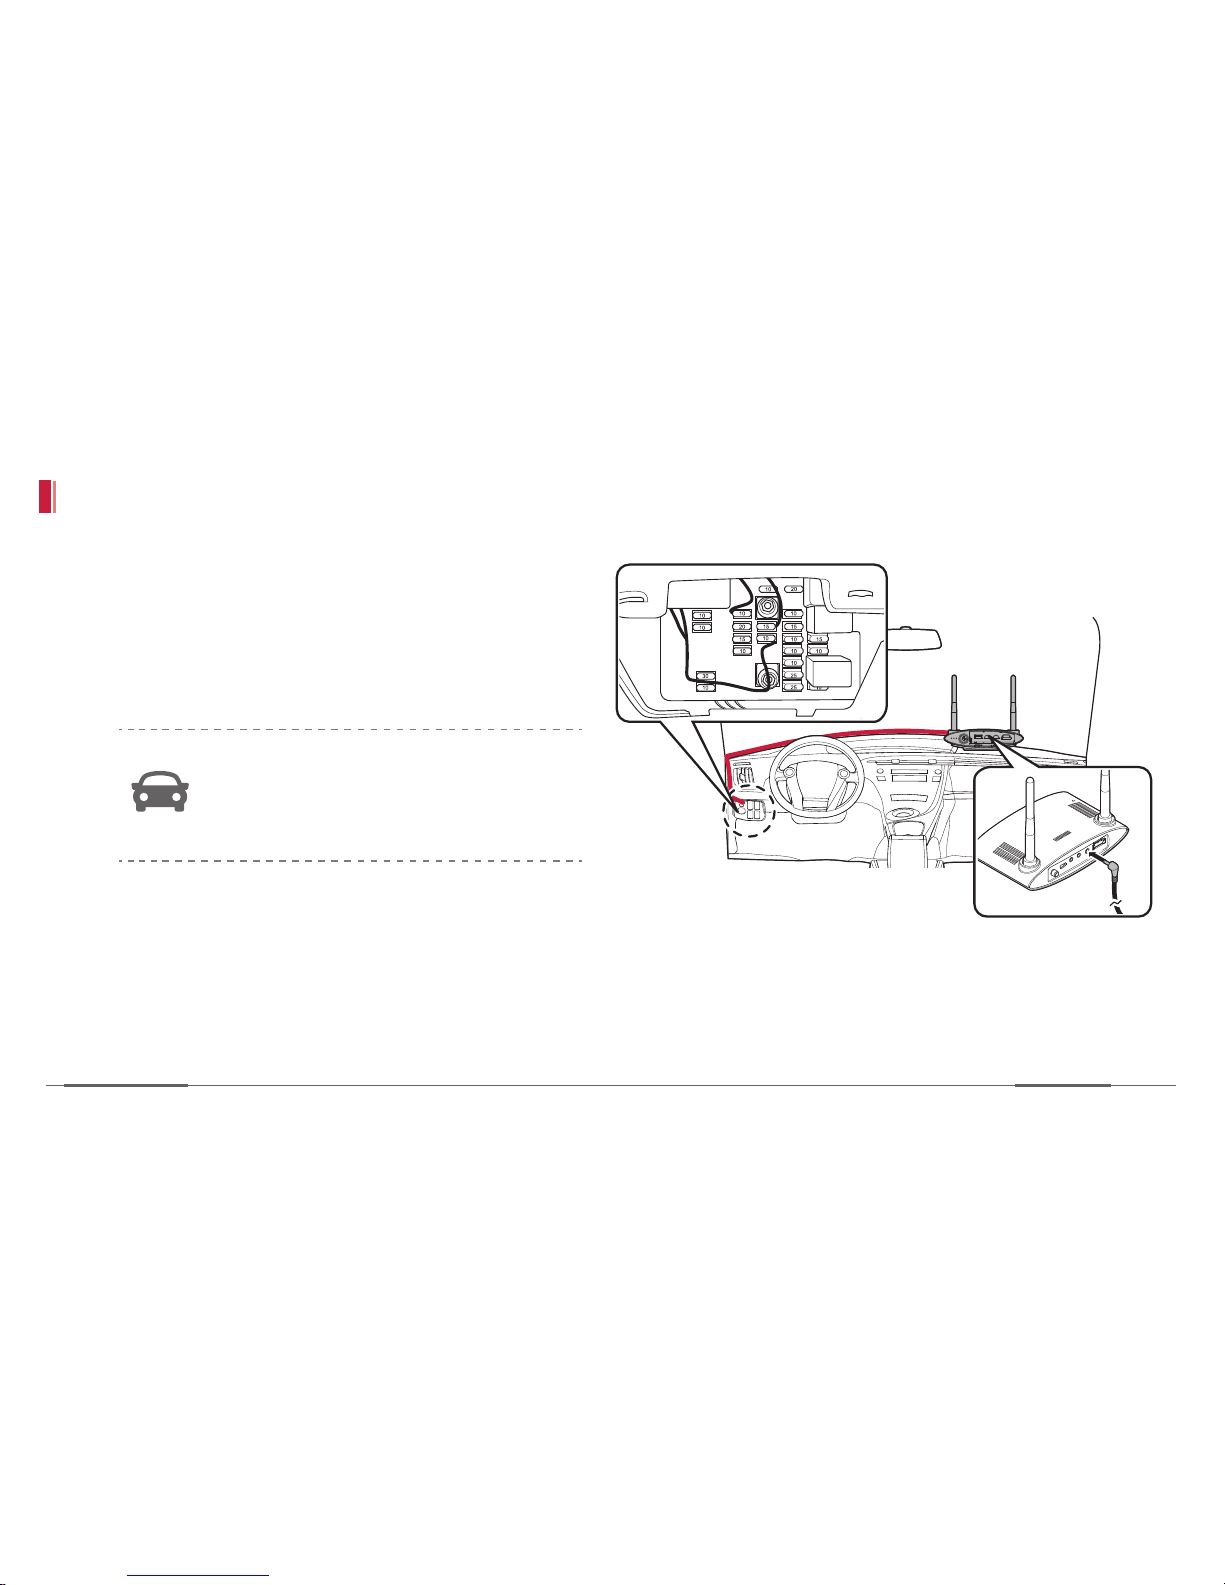
Connect constant power cable
1. Plug the constant power cable into the fuse box
(ACC, B+, and Ground) and connect it to the
device. When the device is turned on, the power
lamp lights red on the front panel. Then tidy up
the cable.
The power connection method to the
fuse box may differ depending on the car
maker so see the car maker’s website or
contact a mechanic
2. Start the engine and check if the device works
properly by seeing the status lights of device;
red, green and blue, are all turned on.
1
2
Page 34
Installation
Zeus
32
Device status
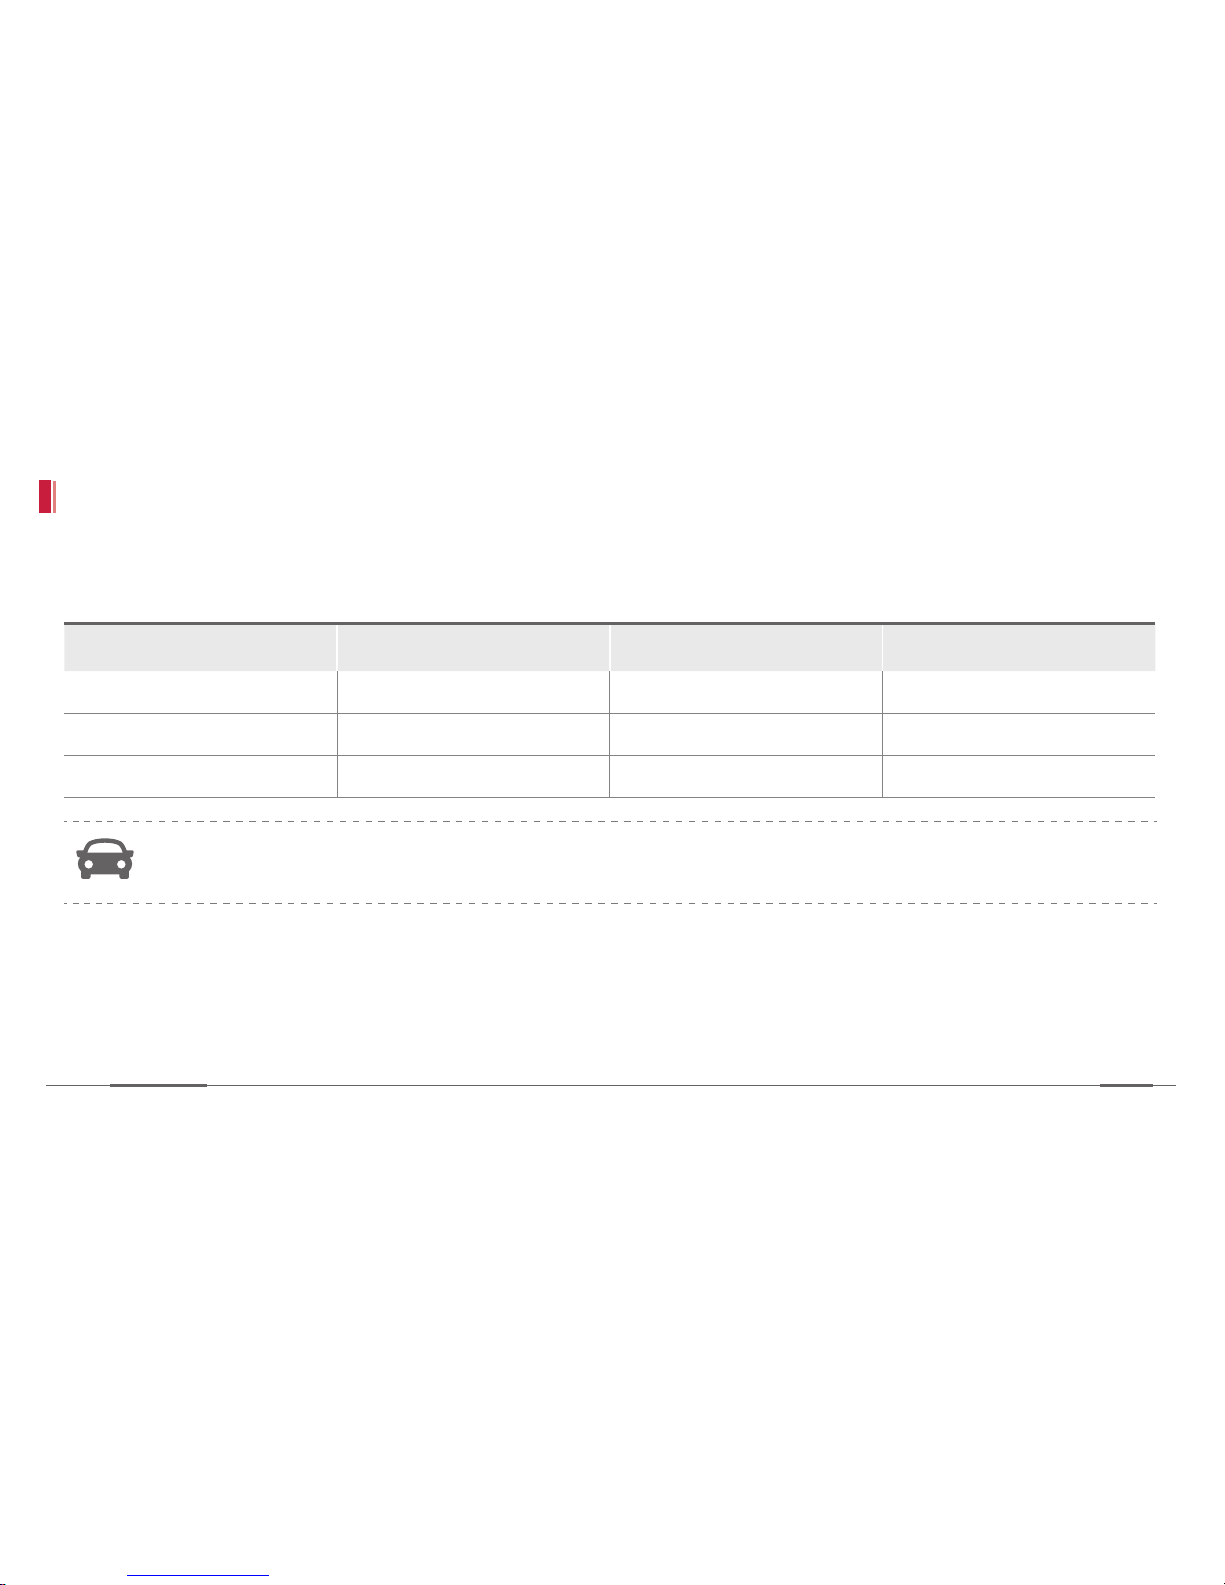
]Operation modes
Parked mode stops driving when it reaches the selected voltage and the device activates GPS mode in which the
internal battery is used.
Ignition Power ACC power Device internal battery
Driving mode On On Charging
Parked mode On Off On hold
GPS mode Off Off Use
Page 35
Installation
Device Manual
33
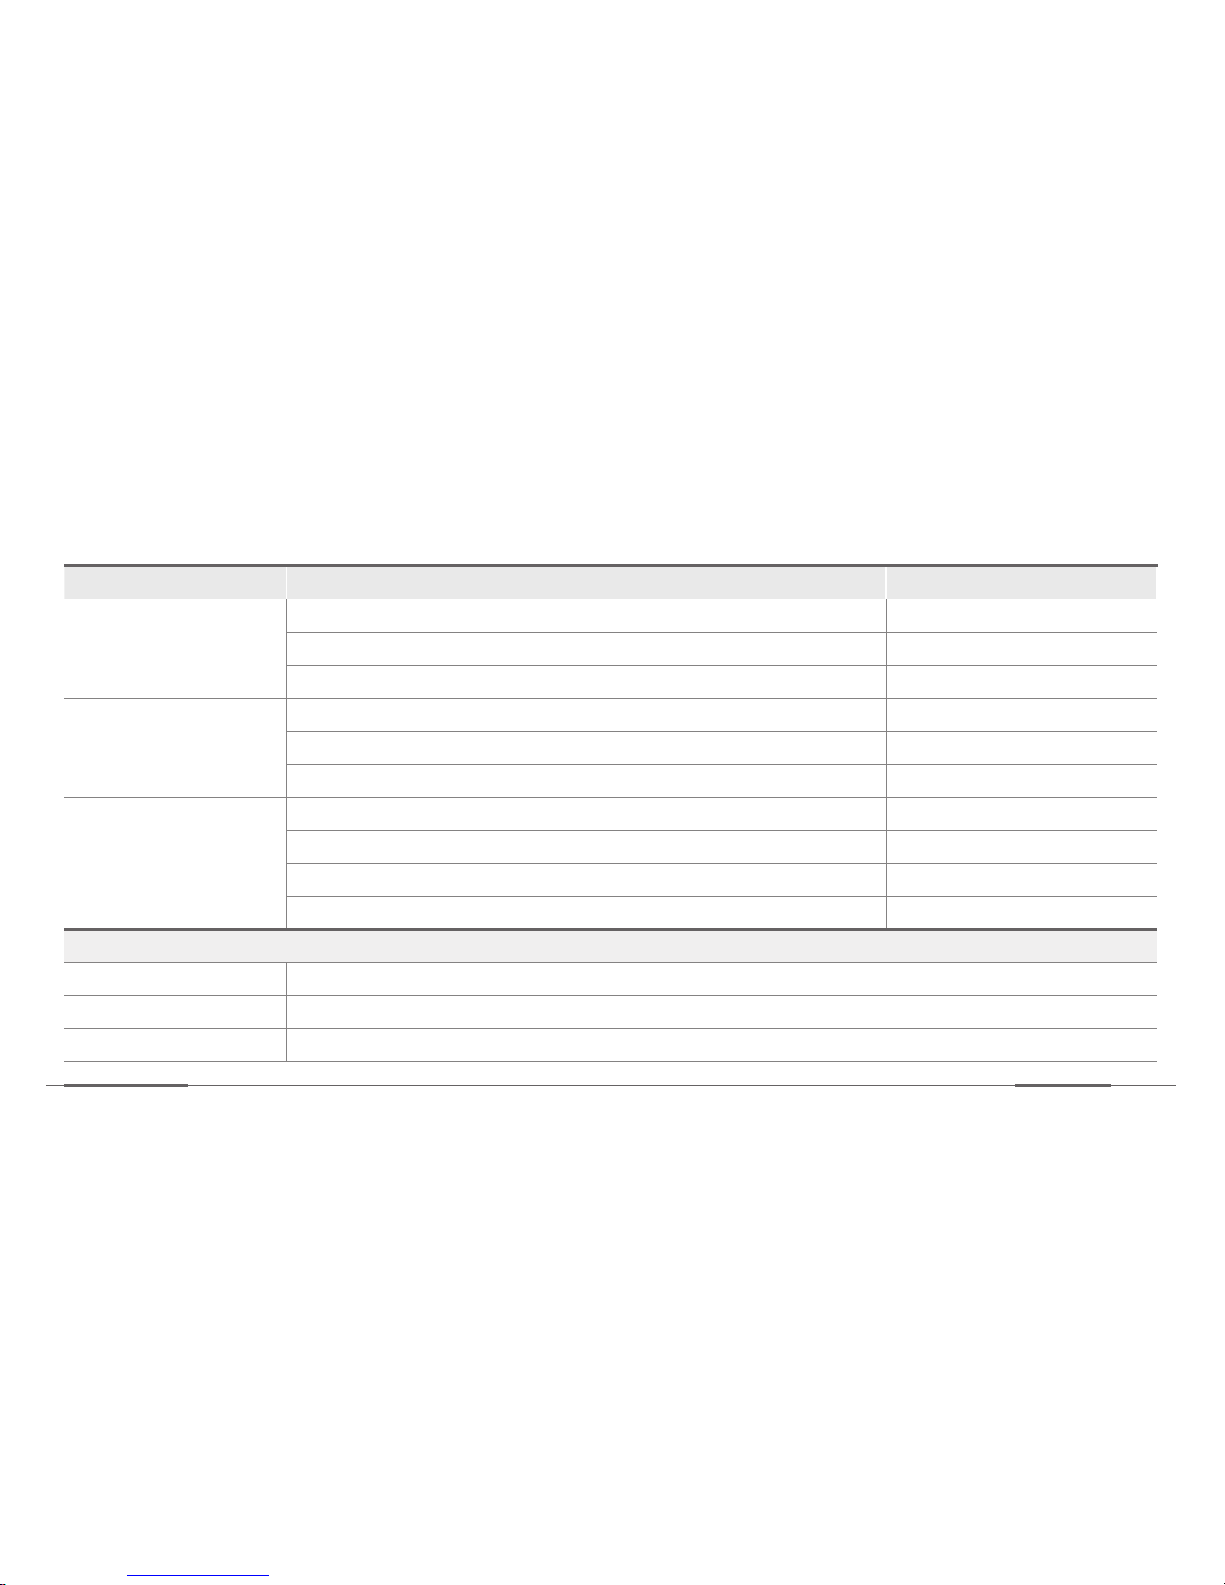
]LED Status display
»LED indicates status as follows:
LED Type Condition LED Display
Red Vehicle battery is being used Always ON
Internal battery is being used Slow blinking
Power OFF OFF
Green Recording is in progress while in driving Always ON
Event recording is in progress Blinking
Recording is not in progress OFF
Blue Command is receiving Fast blinking
Connection with network is successful, but not with the server Slow blinking
Network connection made with the server Always ON
Network connection failure OFF
Special Case
Occurrence of error All LEDs blink three times
Rebooting All LEDs blink once
Firmware update All LEDs blink consecutively, followed by all LEDs blinking altogether
Page 36
Installation
Zeus
34
Video recording
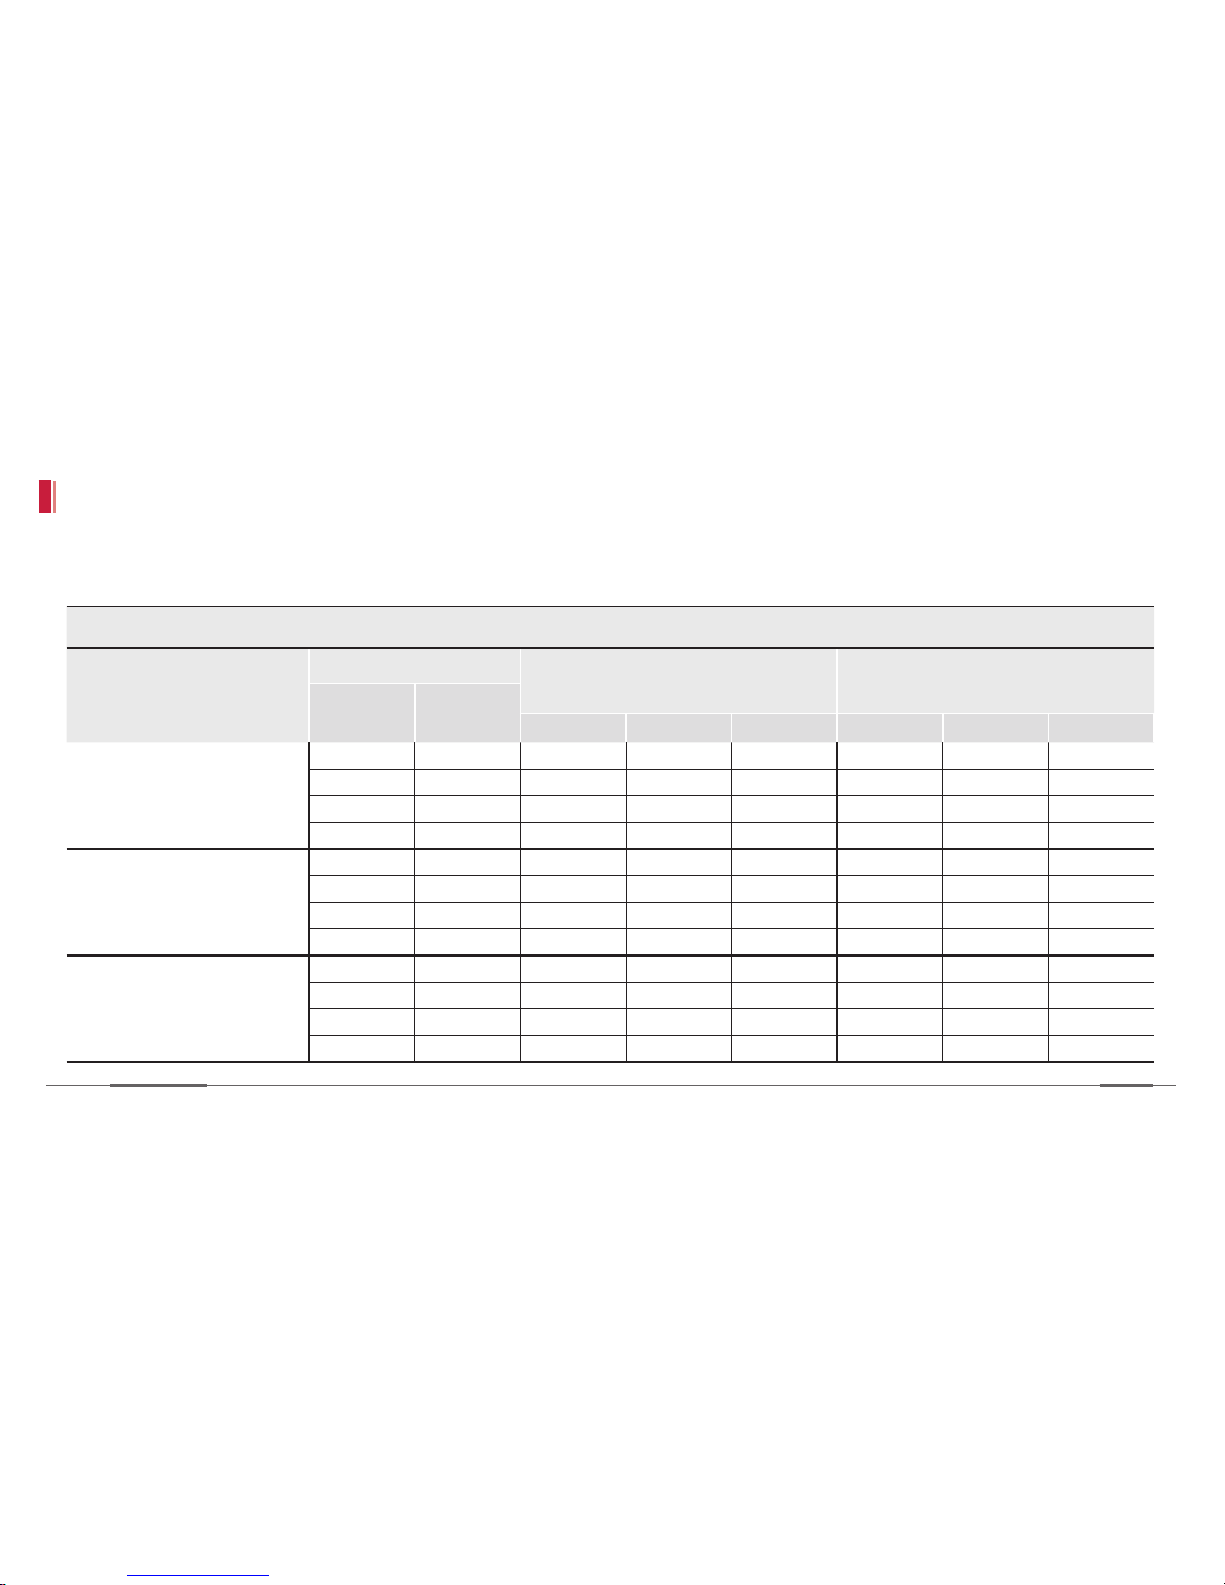
]SD card memory proportion per settings
»The flowing table shows the recording times for each folder in your SD card.
TOTAL RECORDING TIME OF RECORDING FILES PER FOLDER
PROPORTION
MEMORY(UNIT: GB)
RECORDING TIME
(APPROX. IN MIN) 1CH
RECORDING TIME
(APPROX. IN MIN) 2CH
MEMORY
SPACE
USABLE
SPACE
DRIVING EVENTS PARKED DRIVING EVENTS PARKED
Setting 1
[D-20% E-60% P-20%]
16 14.5 117 351 117 56 168 56
32 29.4 234 702 234 112 336 112
64 59.2 468 1404 468 224 671 224
128 118.8 936 2808 936 448 1343 448
Setting 2
[D-30% E-50% P-20%]
16 14.5 175 292 117 84 140 56
32 29.4 351 585 234 168 280 112
64 59.2 702 1170 468 336 559 224
128 118.8 1404 2340 936 671 1119 448
Setting 3
[D-40% E-40% P-20%]
16 14.5 234 234 117 112 112 56
32 29.4 468 468 234 224 224 112
64 59.2 936 936 468 448 448 224
128 118.8 1872 1872 936 895 895 448
Page 37
Installation
Device Manual
35
]Recording type
Event video size
»10 MB (format free)
Video length
»1CH-20 sec (5 sec before & 15 sec after the incident)
»2CH-10 sec (5 sec before & 5 sec after the incident)
Video file information (file format)
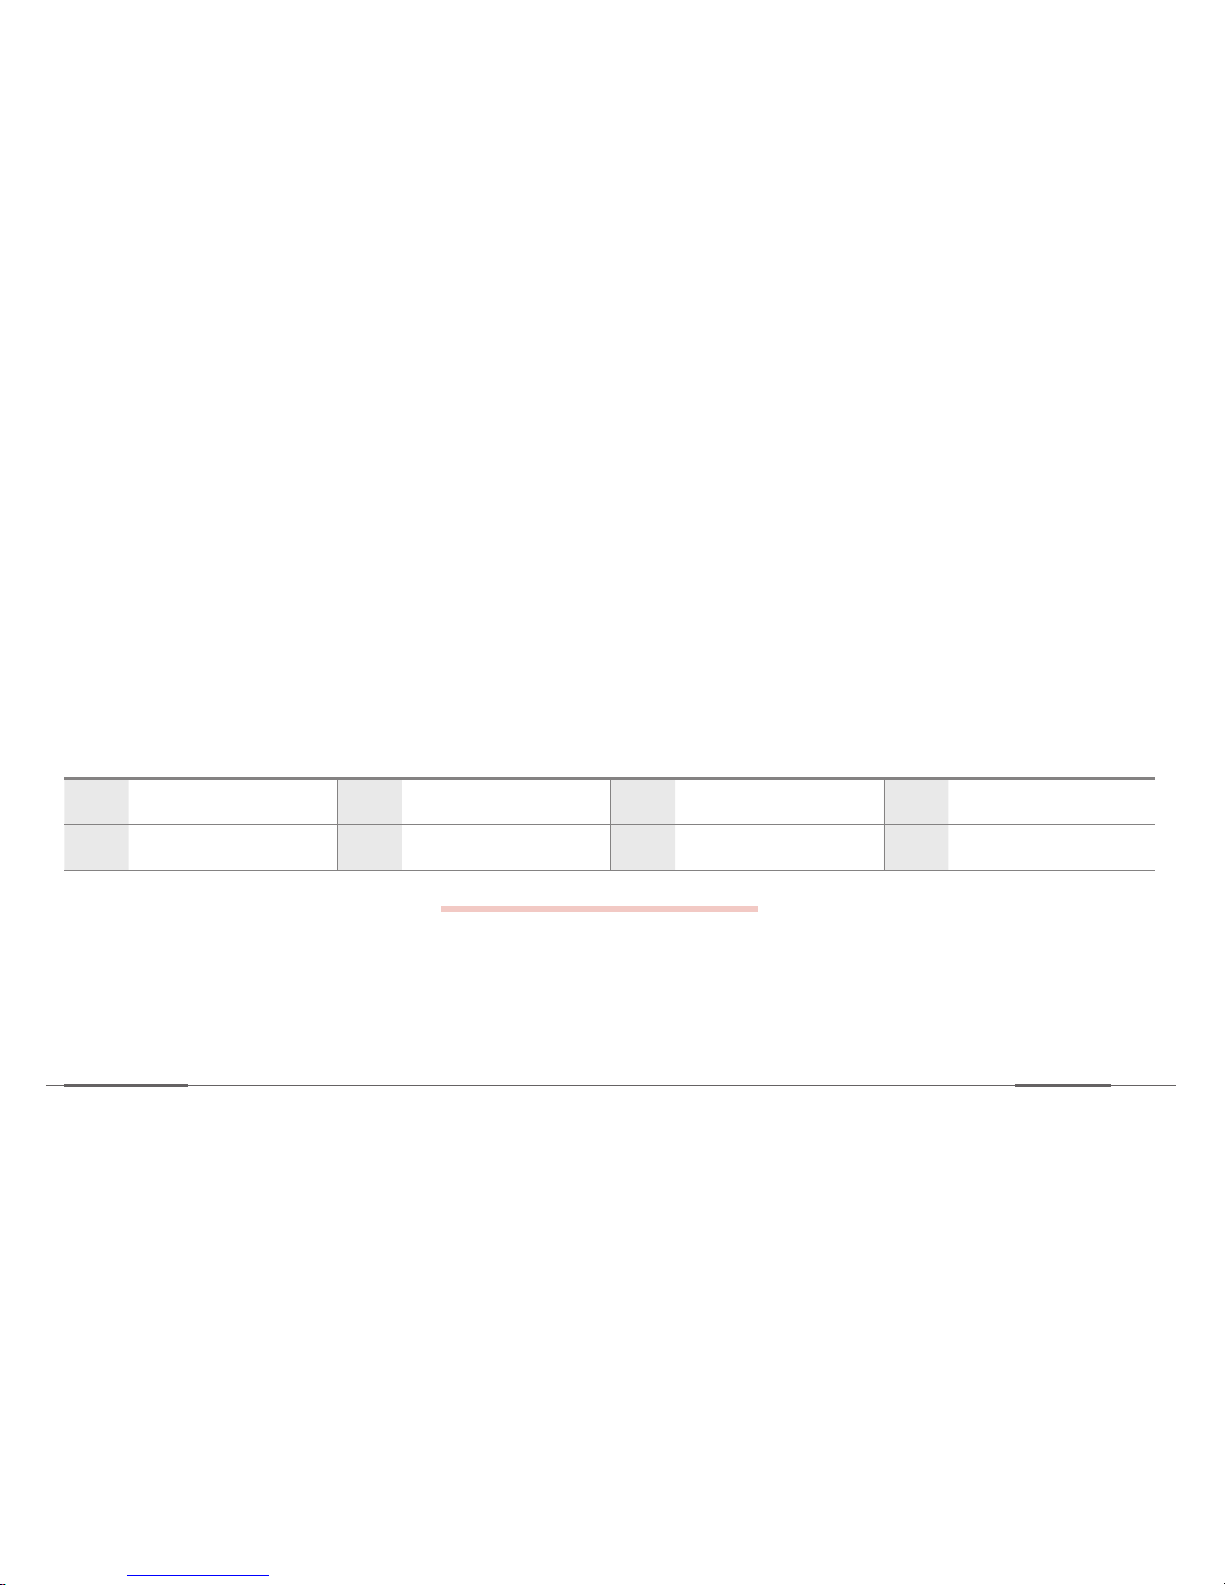
»AVI file - e.g. YYMMDD_HHMMSS_D_F.avi
For more information about video information, see
“Installation of Viewer Program (page 43).”
YY
year
MM
month
DD
day
HH
hour
SS
second
D
mode
F
front view
Recording method
»All types of videos; driving and event files that are saved will
be over-written by the newer videos.
»The video availability period before it gets over-written
depends on the size of SD cards and setting of memory
allocation.
Page 38
Installation
Zeus
36
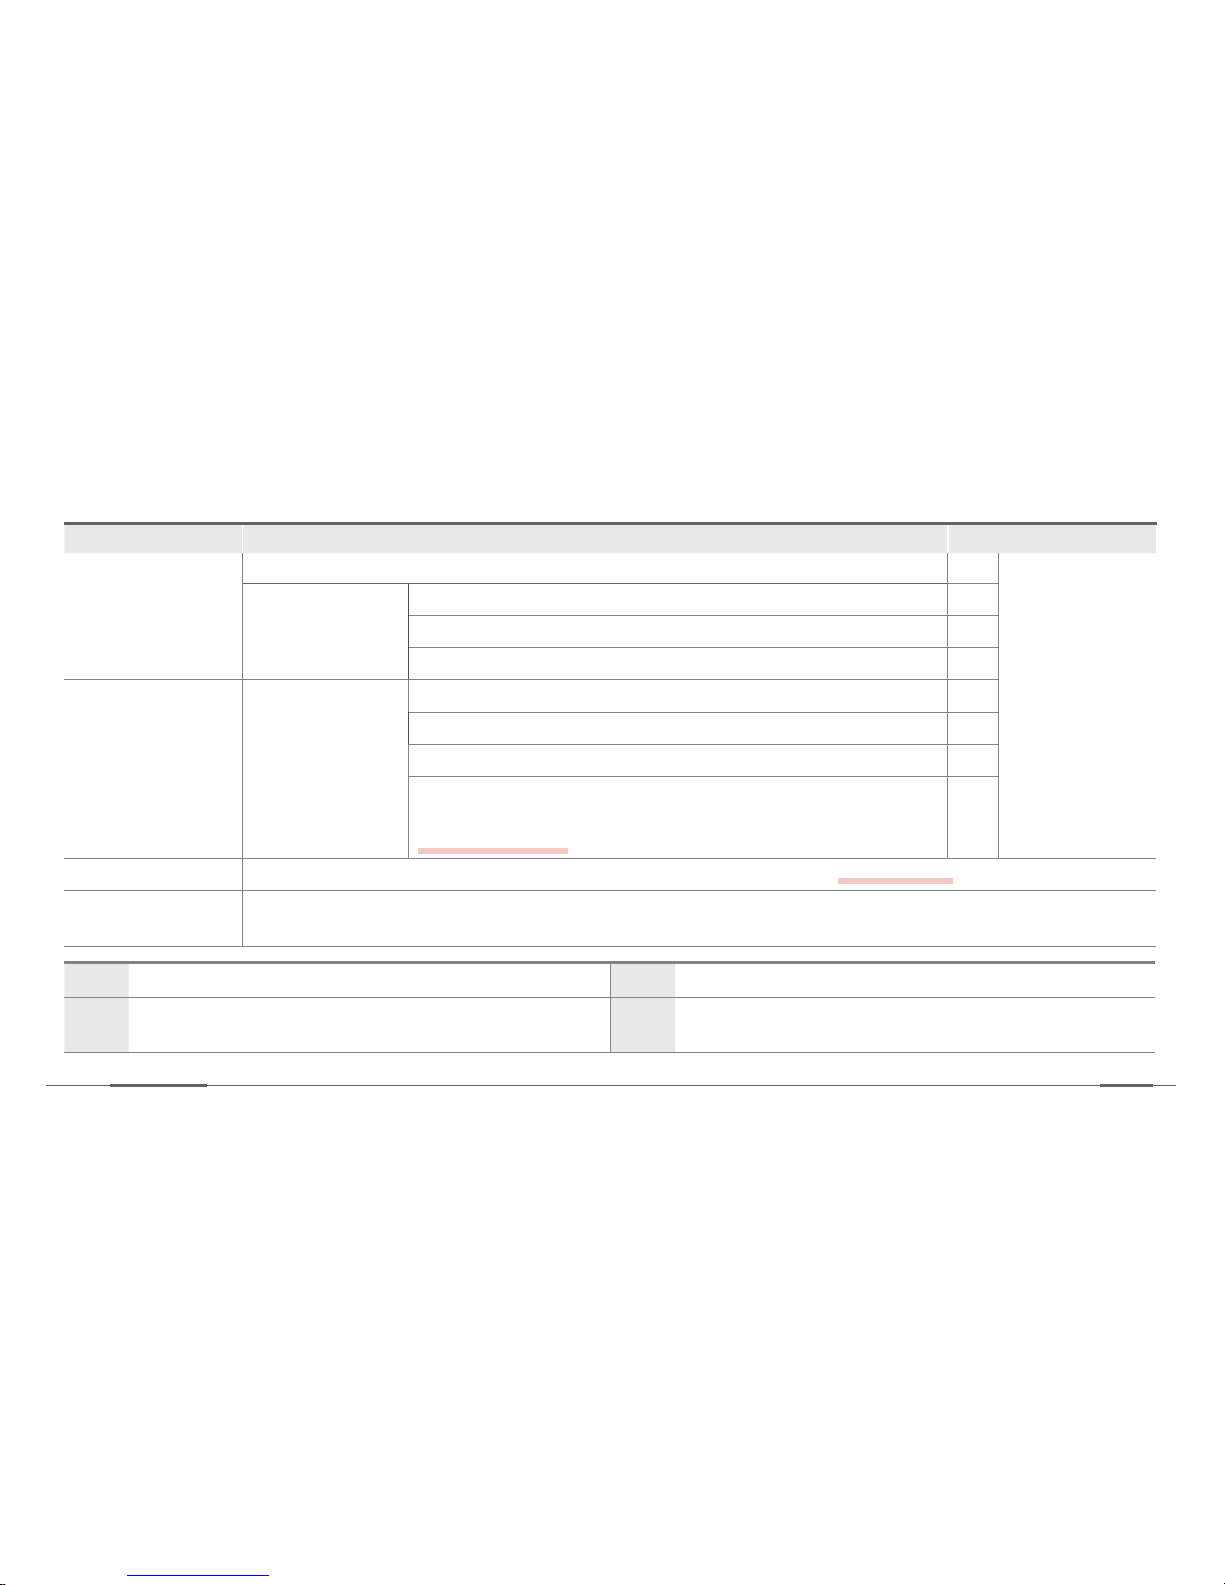
]Event types
Device Mode Recording Type Display
Driving mode Continuous D F- Forward
R- Rear
2- Both
channels
Event G Sensor GE
E-call PE
Geo-fence (STOLEN) FE
Parked mode Event G Sensor GE
E-call PE
Geo-fence (STOLEN) FE
Motion Sensor
*May turned off from the viewer settings pg or user webpage.
refer to pg 54~57
ME
GPS mode Video recording is unavailable, only sends status report to the server.
refer to pg 39
High-temp mode Device sleeps if the temp. is reached higher than 100 °C. Becomes functional again when the temp.
reaches below 80 °C
GE
Event file generated during impact.
PE
Event file generated during E-call.
FE
Event file generated when a vehicle moves out the
geo-fence.
ME
Event file generated when a motion is detected during
parked mode.
Page 39
Installation
Device Manual
37
Data transmission
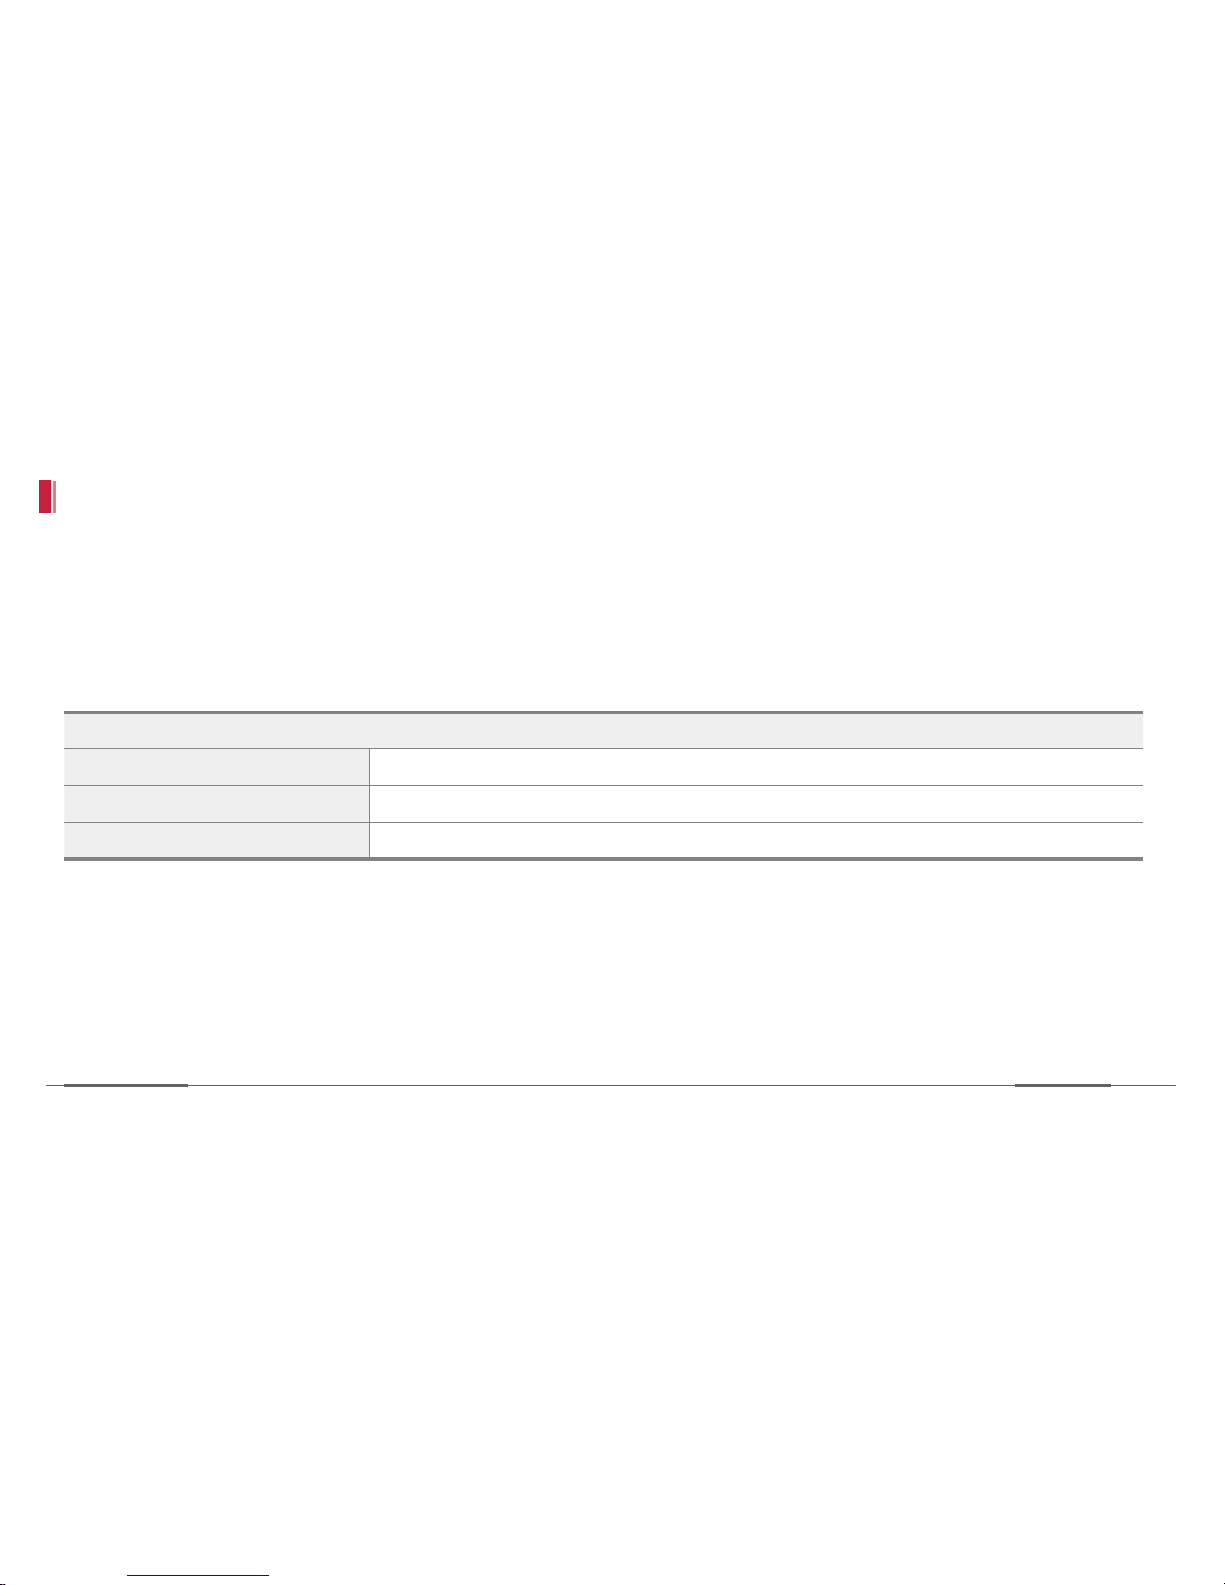
]Event data transmission
»Upload image files with GPS data ie. Location and time.
»Number of image file uploading can be configured from the viewer setting page and from the user webpage.
»Selecting the different number of image files can vary the time point of image taken.
]Video data transmission
»After checking the image files from the user webpage or from the APP, retrieve the video files if necessary.
(HD recording quality with 15 FPS, 10 MB/file)
»Livestreaming is available from the user webpage (320 X 180 recording quality with 15 FPS, approx. 2.8MB/min). Livestreaming
is unavailable during the voice call.
Time point
One image file
Taken at the point of event occurrence.
Two image files
Taken at the point of event occurrence & 1.5 sec after.
Three image files
Taken at the point of event occurrence & 1.5 sec after & 3 sec after.
Page 40
Installation
Zeus
38
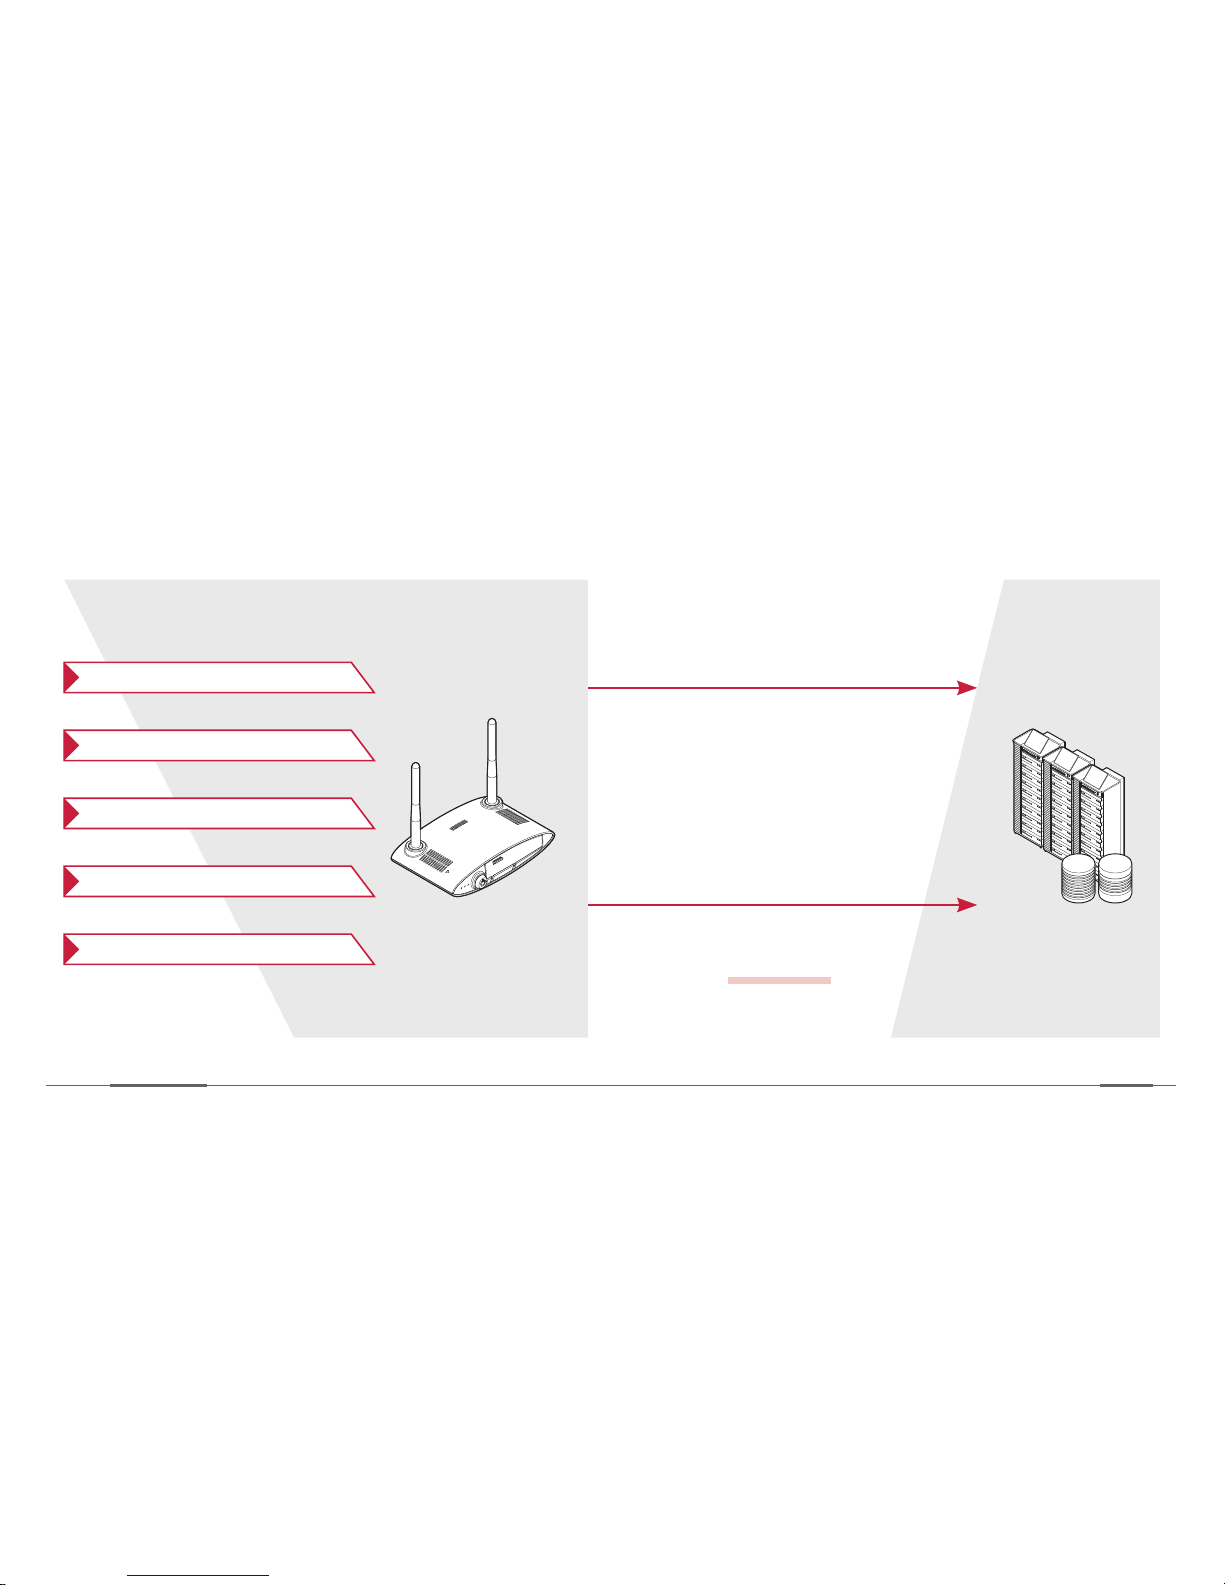
Device (data collection) Server
Collection interval of 3 sec,
transmission interval of 1 min
Transmit status report till the power of device
is completely depleted. Transmission of these
data are viable during GPS mode as well.
Status report are stored for a certain time
period until the network environment gets
feasible again.
refer to pg 39
* Status report transmission
Resending upon transmission failure
]Status report
»It is used to periodically report vehicle status to the server.
Power status (B+, ACC, Internal)
Network type & sensitivity
Vehicle voltage
GPS reception sensitivity
GPS (speed, position, bearing)
Page 41
Installation
Device Manual
39
NAND memory
The NAND memory in the device sends the following data to the server and data are erased if they are
successfully sent. The data are saved for some time if the data transmission is unsuccessful.
Logs
Device logs are saved for 5 days and will be overwritten by the new logs.
Status reports
Reports are saved up to 12 hours if not sent to the server.
Event alerts
Event alerts are 2 kb each and are saved up to 5000 alerts, if not sent to the server.
Event images
Event images are 55 kb each and are saved up to 1000 files, if not sent to the server.
Only the status reports are sent to the server during GPS mode. Recording/image files are not sent/retrieved during
GPS mode.
Page 42
Installation
Zeus
40
E-call
Outgoing numbers: maximum 1, incoming numbers: maximum 3.
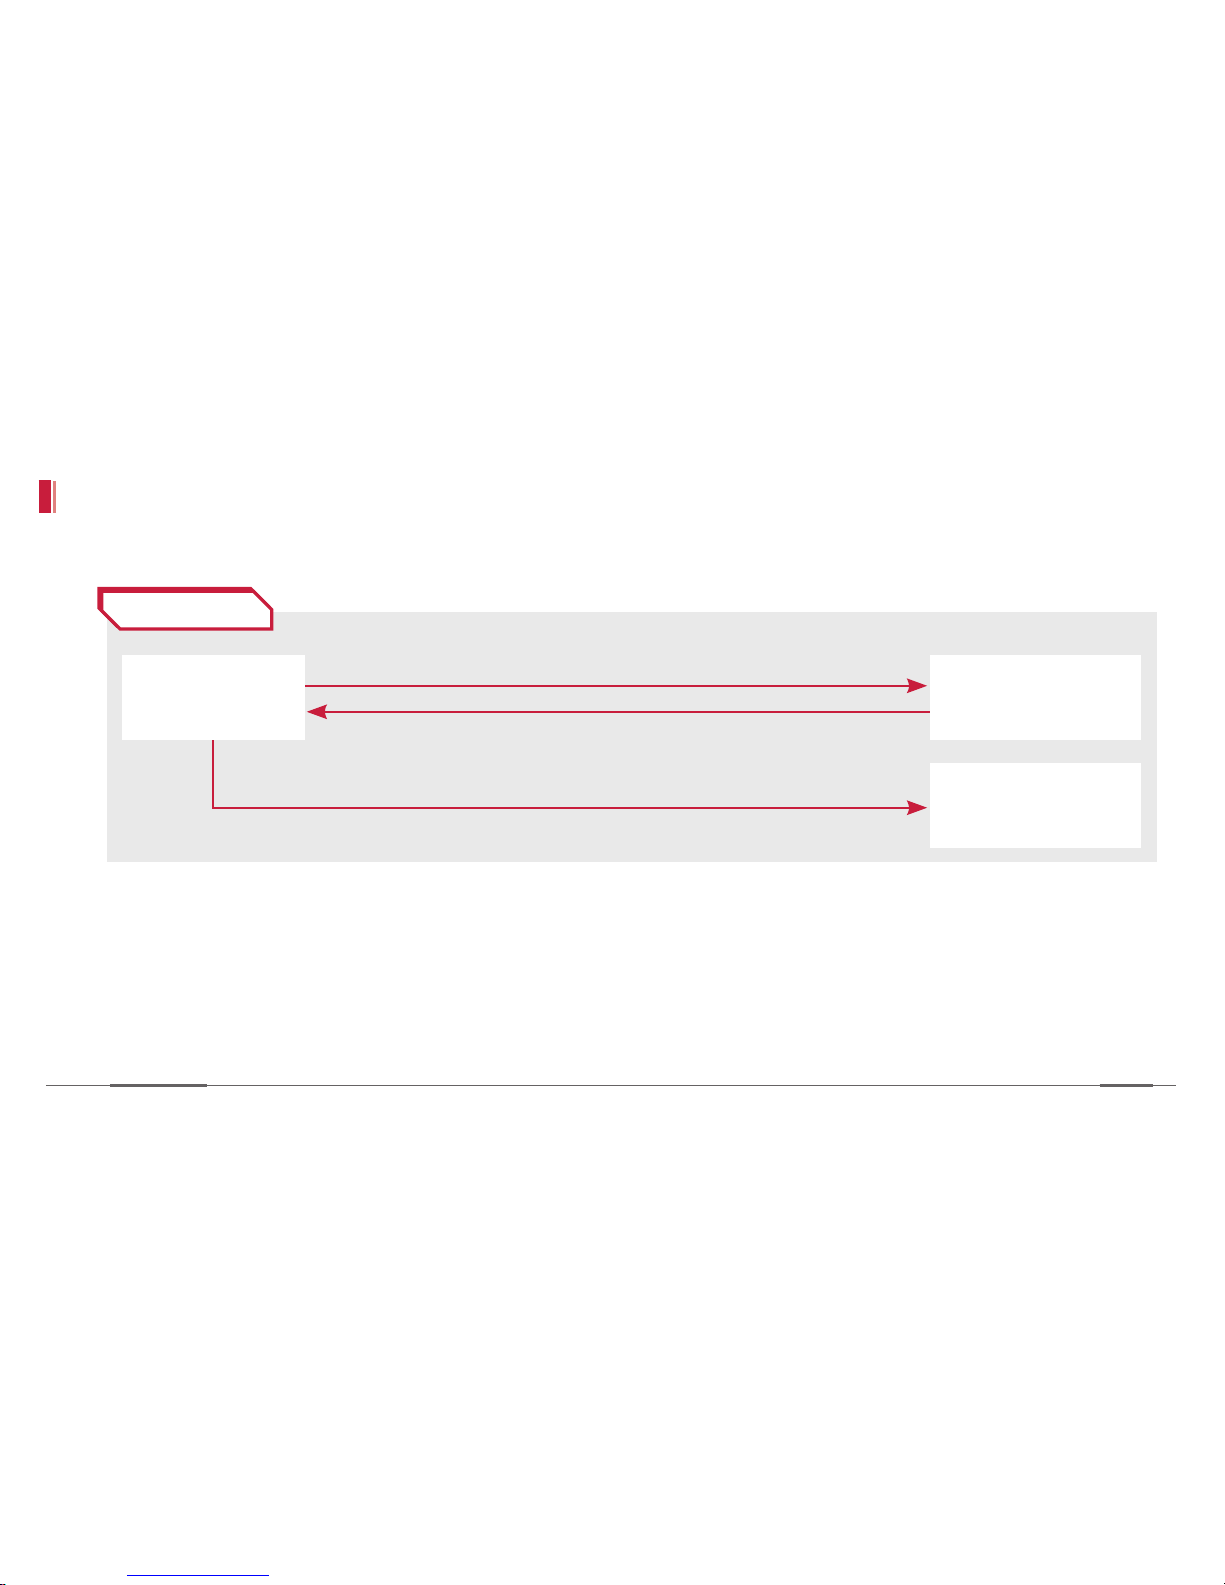
]Calling scenario
»Press the Voice E-call button.
»Call is made to the designated number. (Event recording file gets stored when the E-button is pressed.)
»Call to the manager ends. (The driver cannot end the call, so make sure to turn off the voice mail service.)
»After the call ends, event images are uploaded with the GPS data/date.
Dials to the driver-designated number, redial once upon failure
Call ends by the manager
Event video recording and storing to the device
Driver
(E-button)
Manager
(designated number)
Server
Accident
Page 43
Installation
Device Manual
41
]Upon no reception
»Calling for 20 seconds and redialing is made within 10 seconds.
]Reception scenario
»Call is made by the manager.
»After a melody rang, the device automatically receives the call.
»The manager ends the call.
»After the call ends, event images are uploaded with the GPS data/date.
The video transmission is unavailable during the voice call ie. livestreaming, file retreiving.
Page 44
Installation
Zeus
42
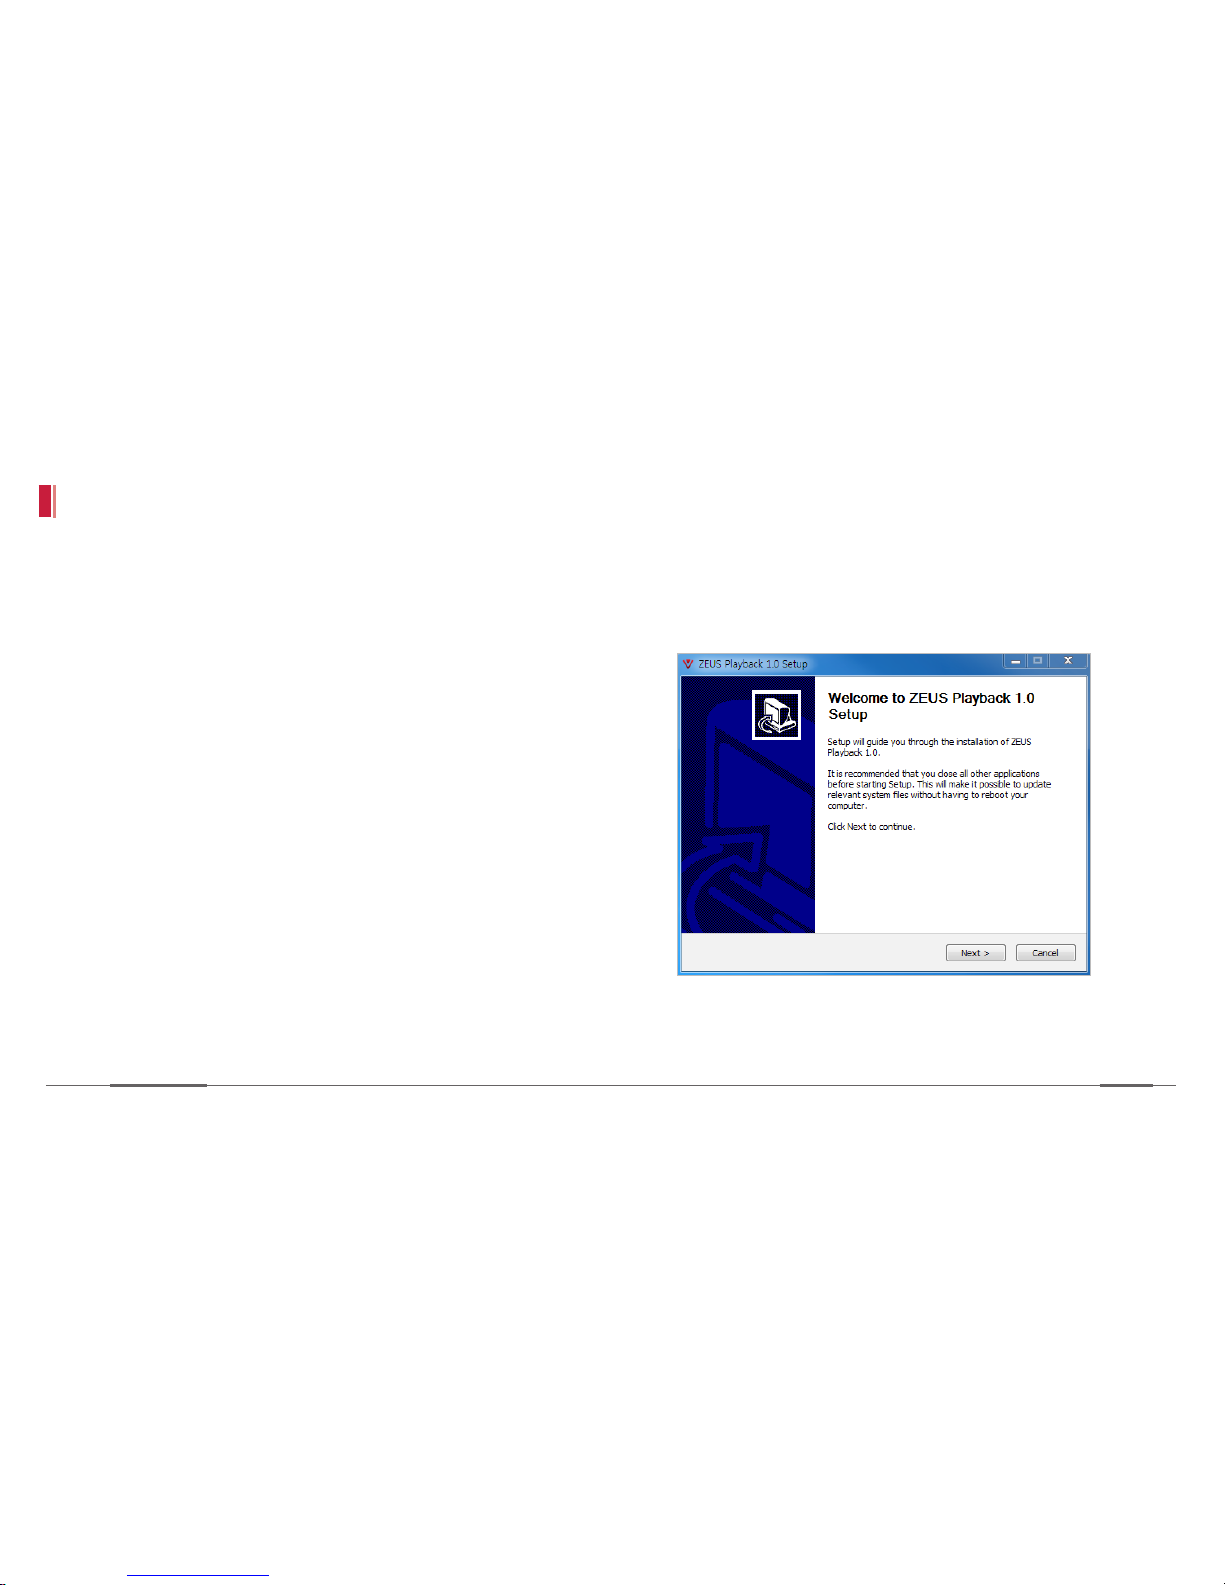
1. Download the installation file for PC Viewer.
2. Run the execution file for installation and click Next
to proceed with installation.
Installing the PC viewer
The driver can play the recorded video on the computer through the dedicated PC viewer of Viewer program.
Install the dedicated viewer on the computer as follows:
Page 45
Installation
Device Manual
43
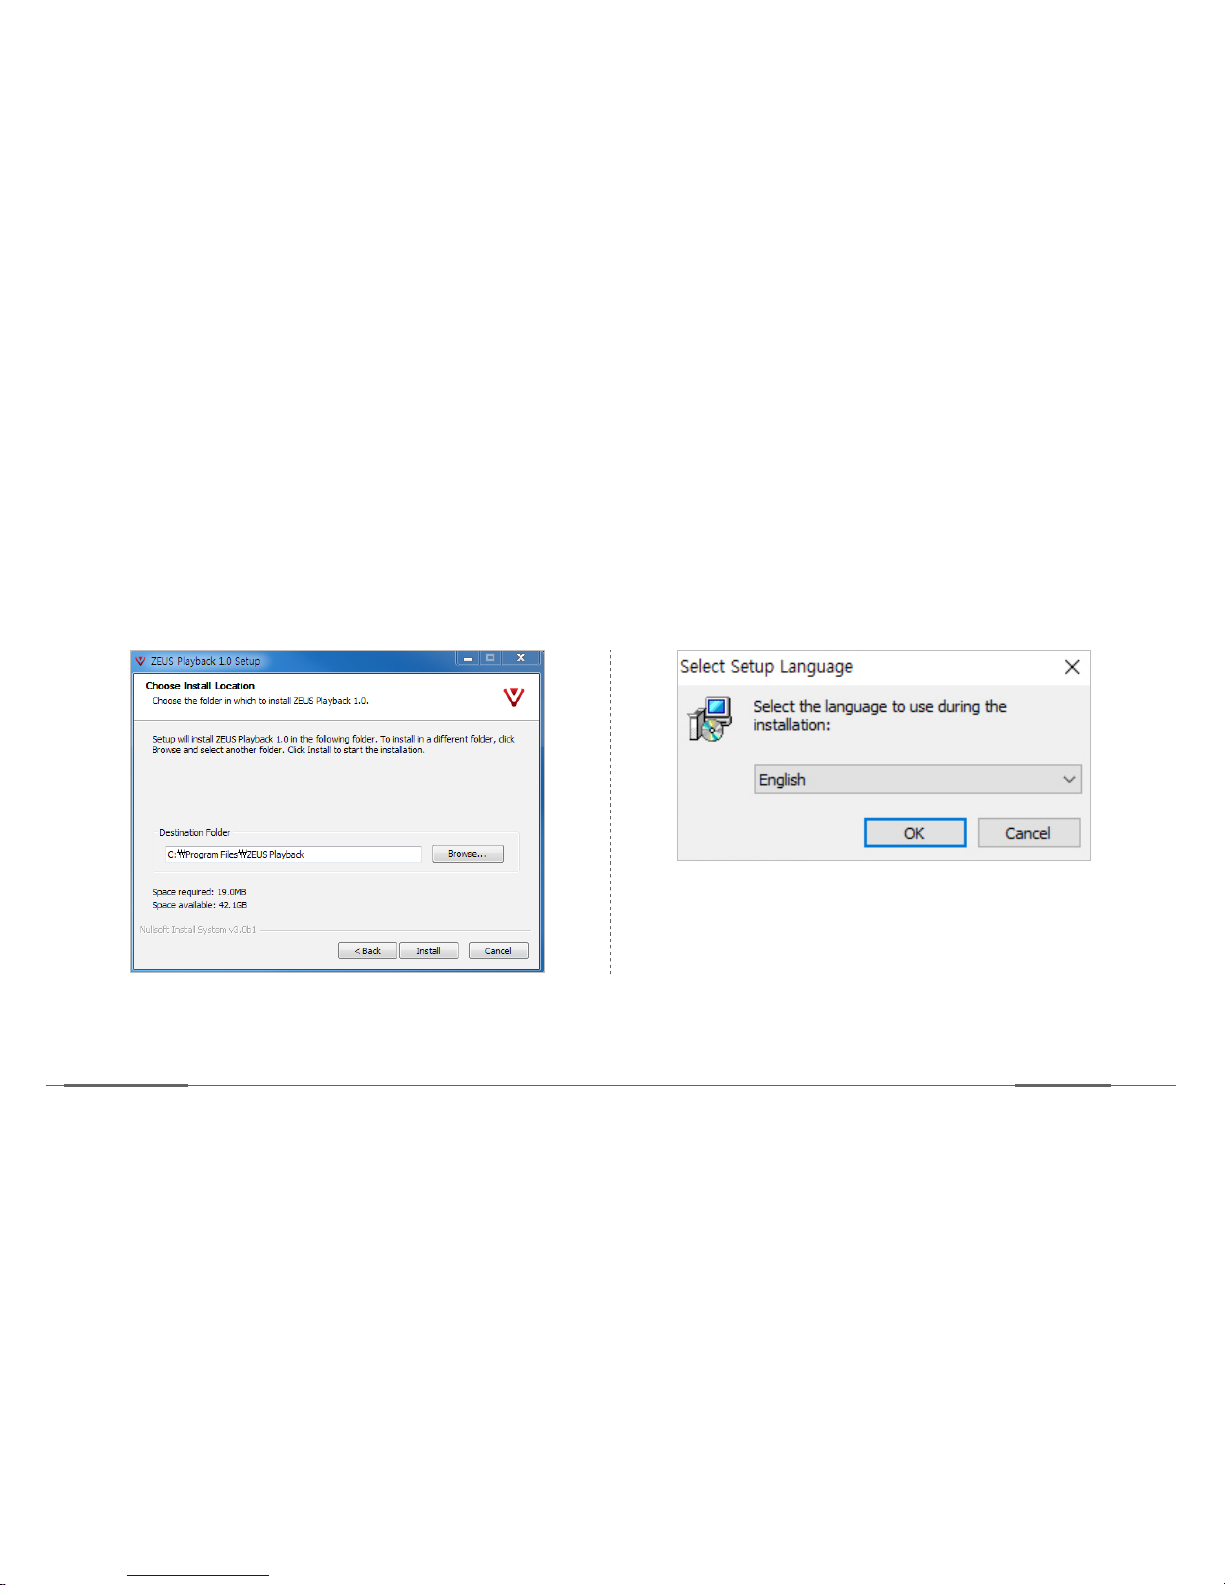
3. Set or browse the destination folder to install
viewer program and click Install. Then the
related files are installed on the computer.
4. When the language selection window appears,
select the desired language.
Page 46
Installation
Zeus
44
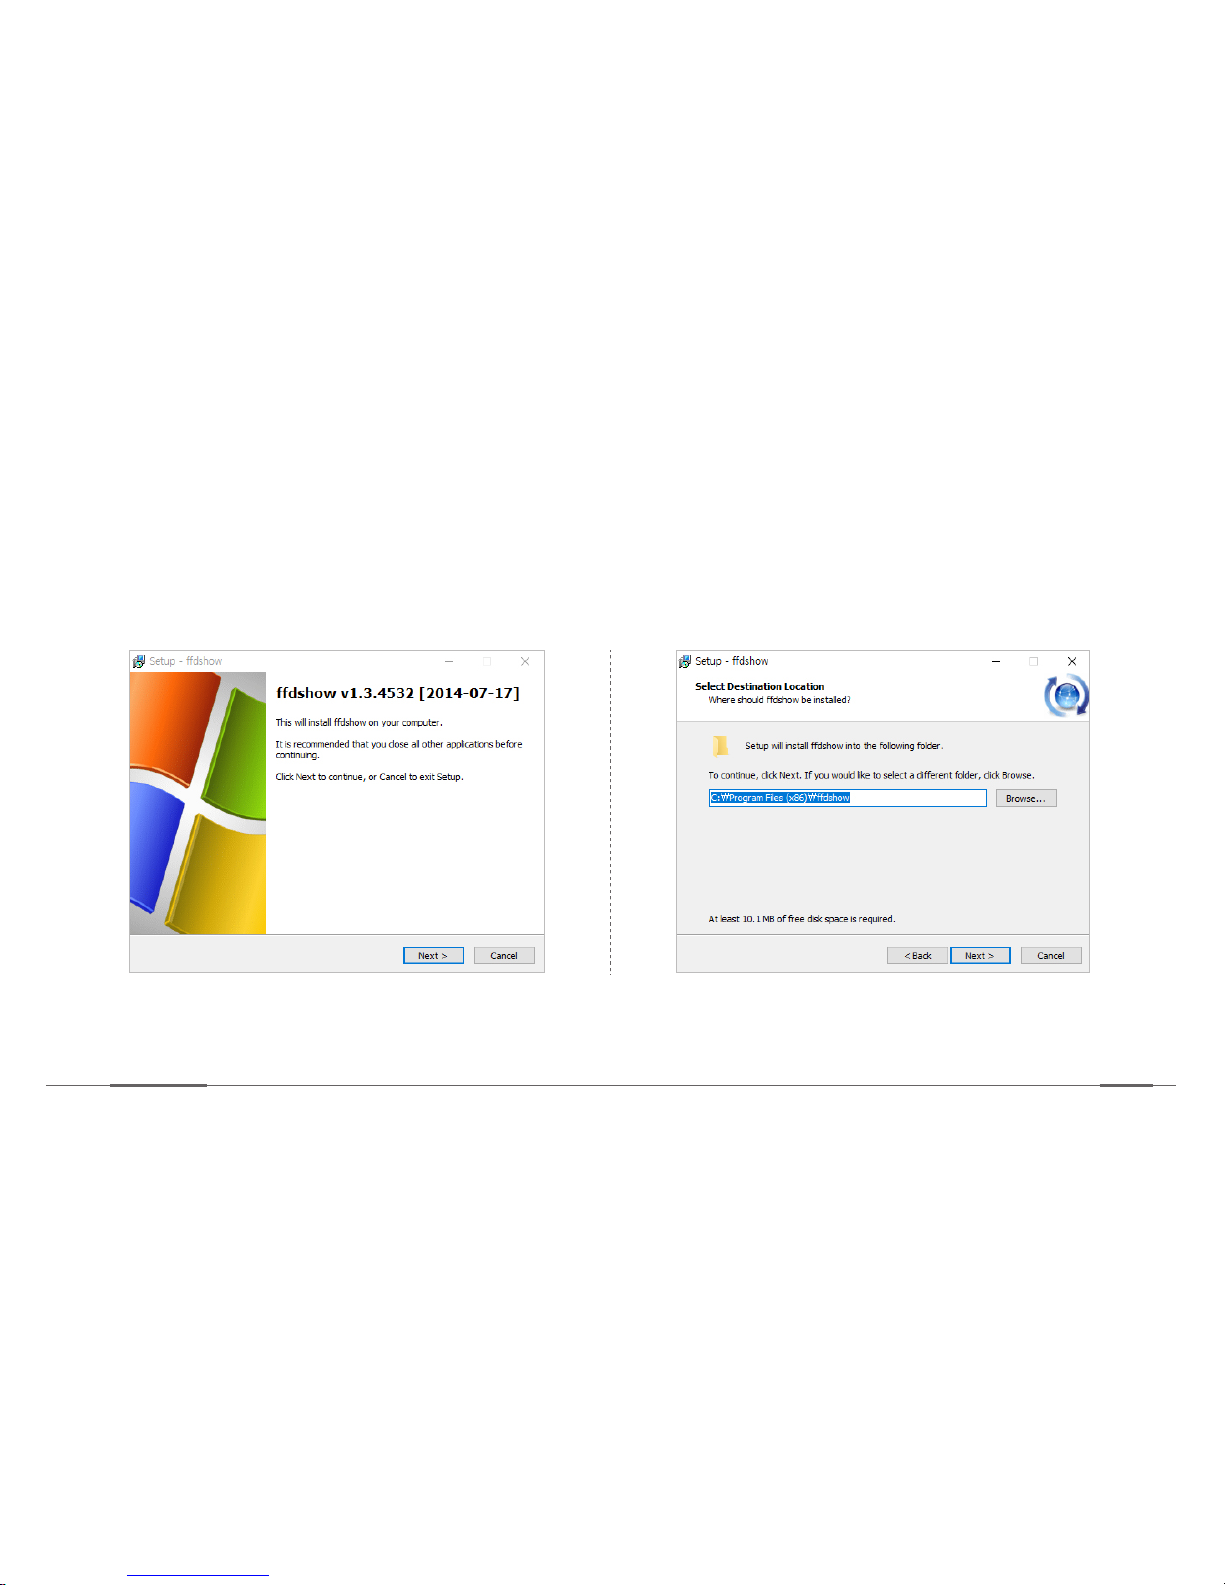
5. When the following window appears, click
Next to proceed with installation. For proper
installation, It is recommended to close other
applications running.
6. Click Next.
Page 47
Installation
Device Manual
45
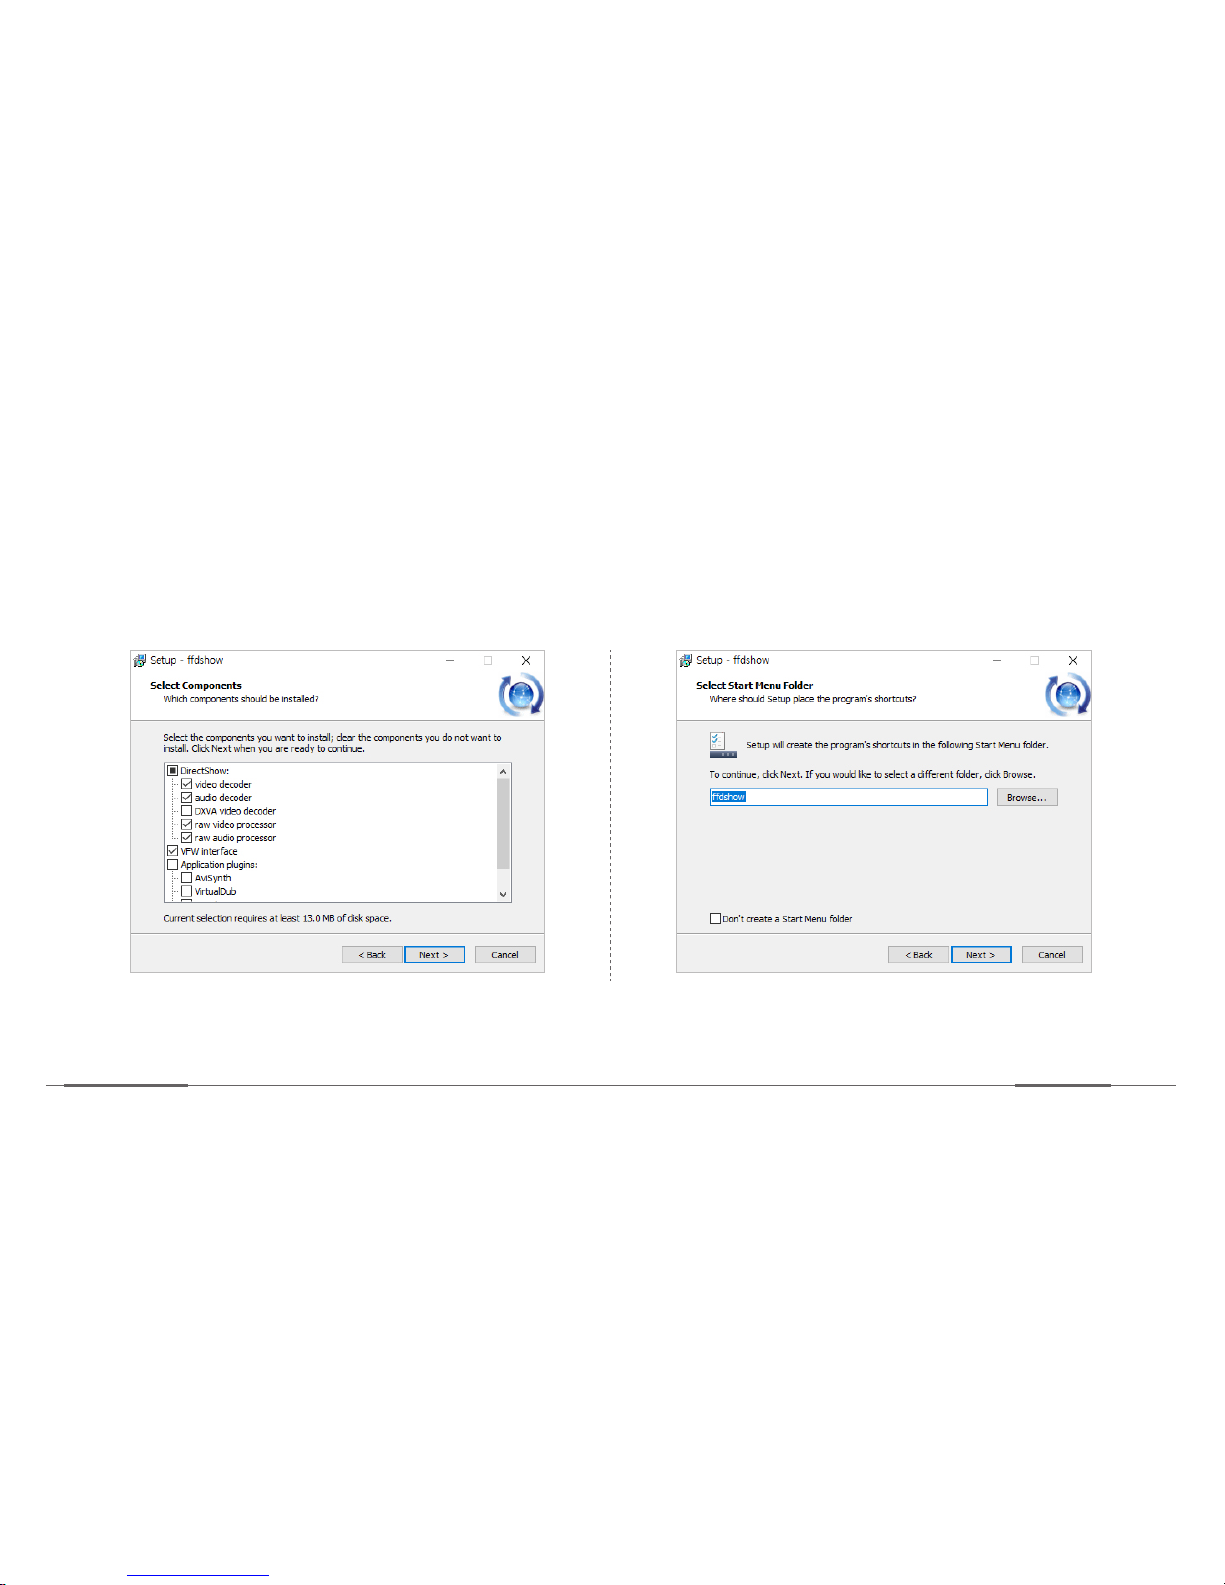
7. Click Next. 8. Click Next.
Page 48
Installation
Zeus
46
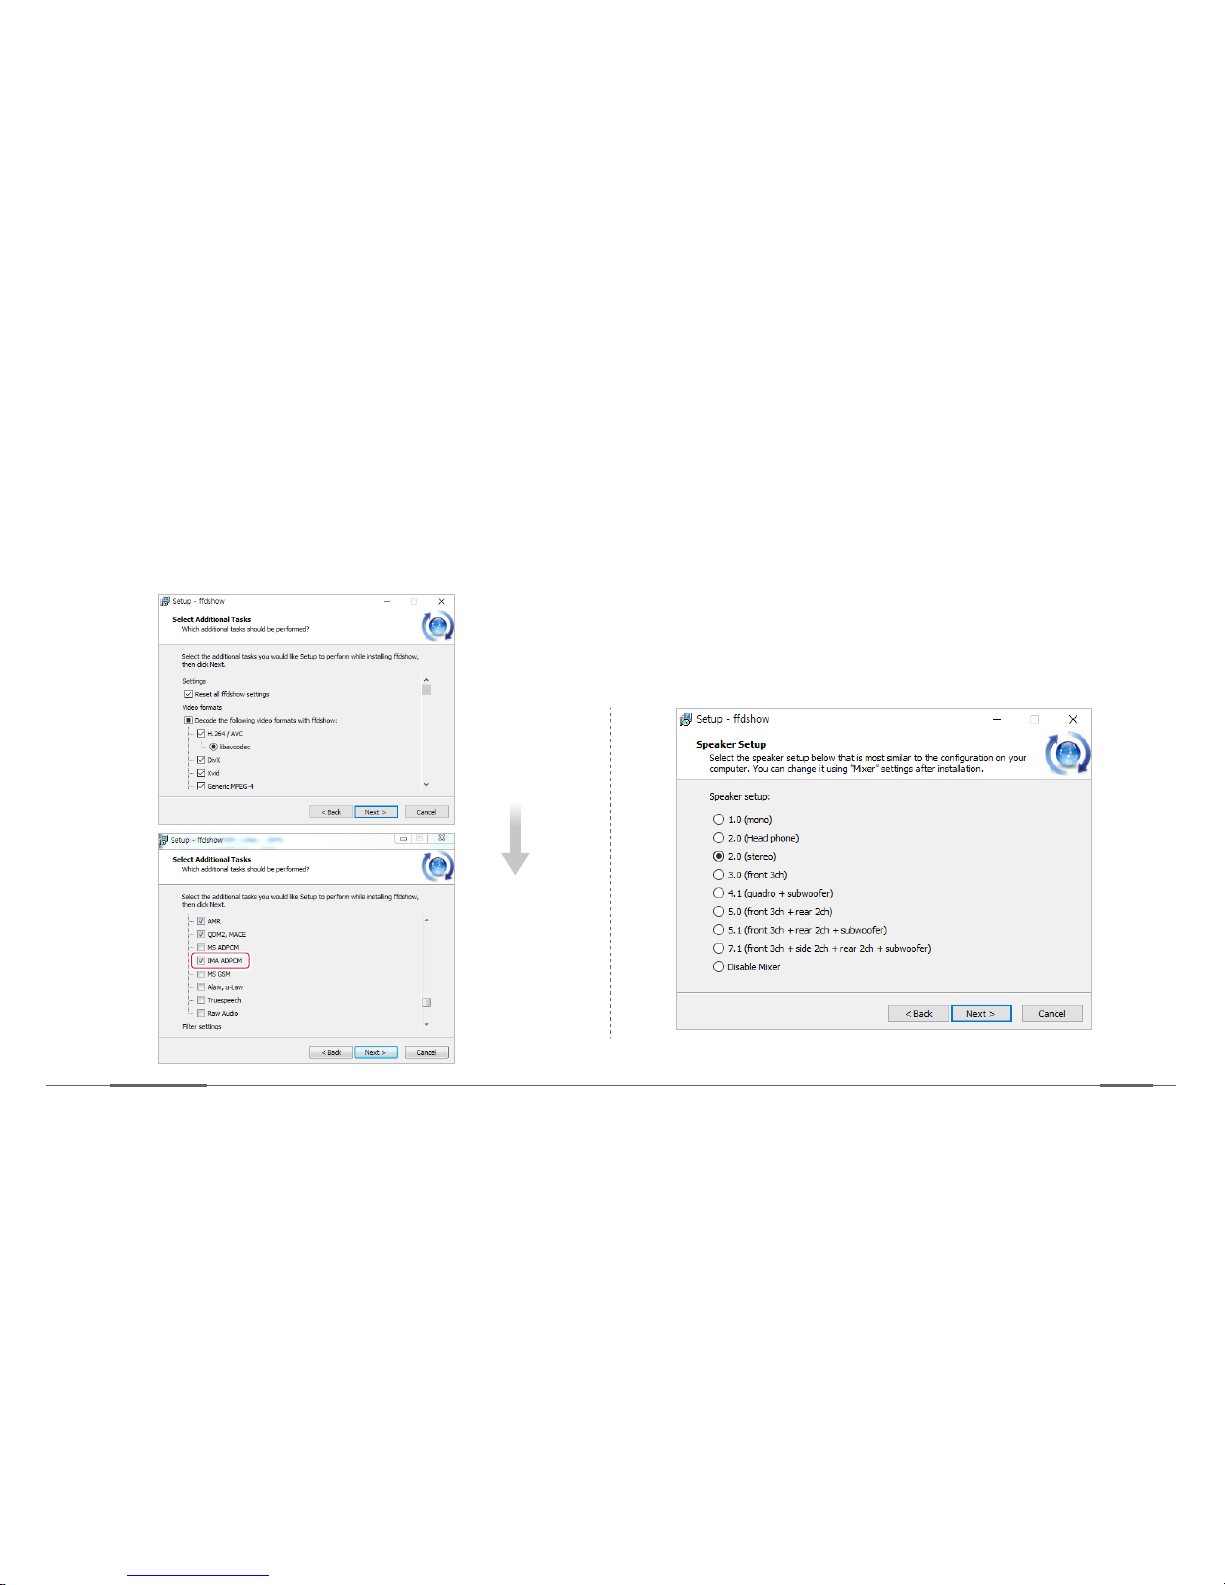
9. Scroll down and tick the following box. 10. Click Next.
Scroll Down
Page 49
Installation
Device Manual
47
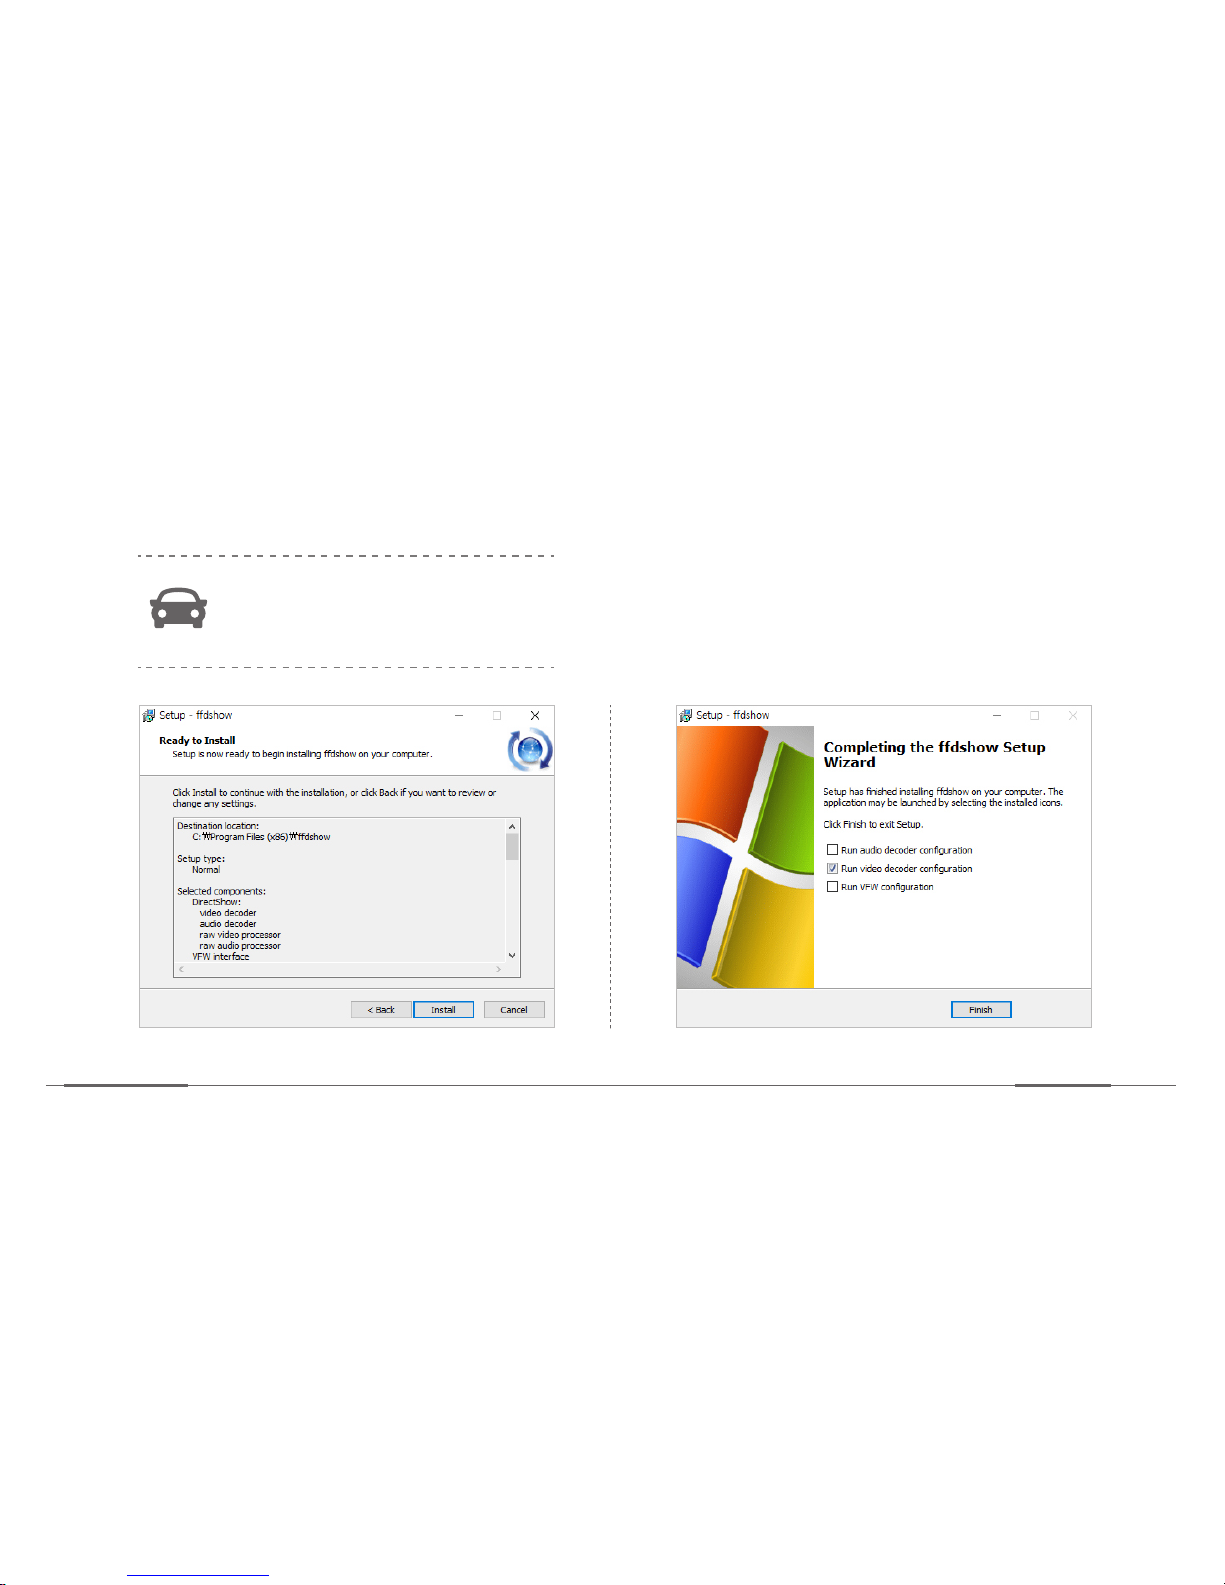
11. Now click Install. Then the related files are
installed on the computer.
If other viewer is installed, it can
cause conflict. Accordingly, remove
other viewer program first.
12. Tick the “Run video decoder configuration” box
and click Finish.
Page 50
Installation
Zeus
48
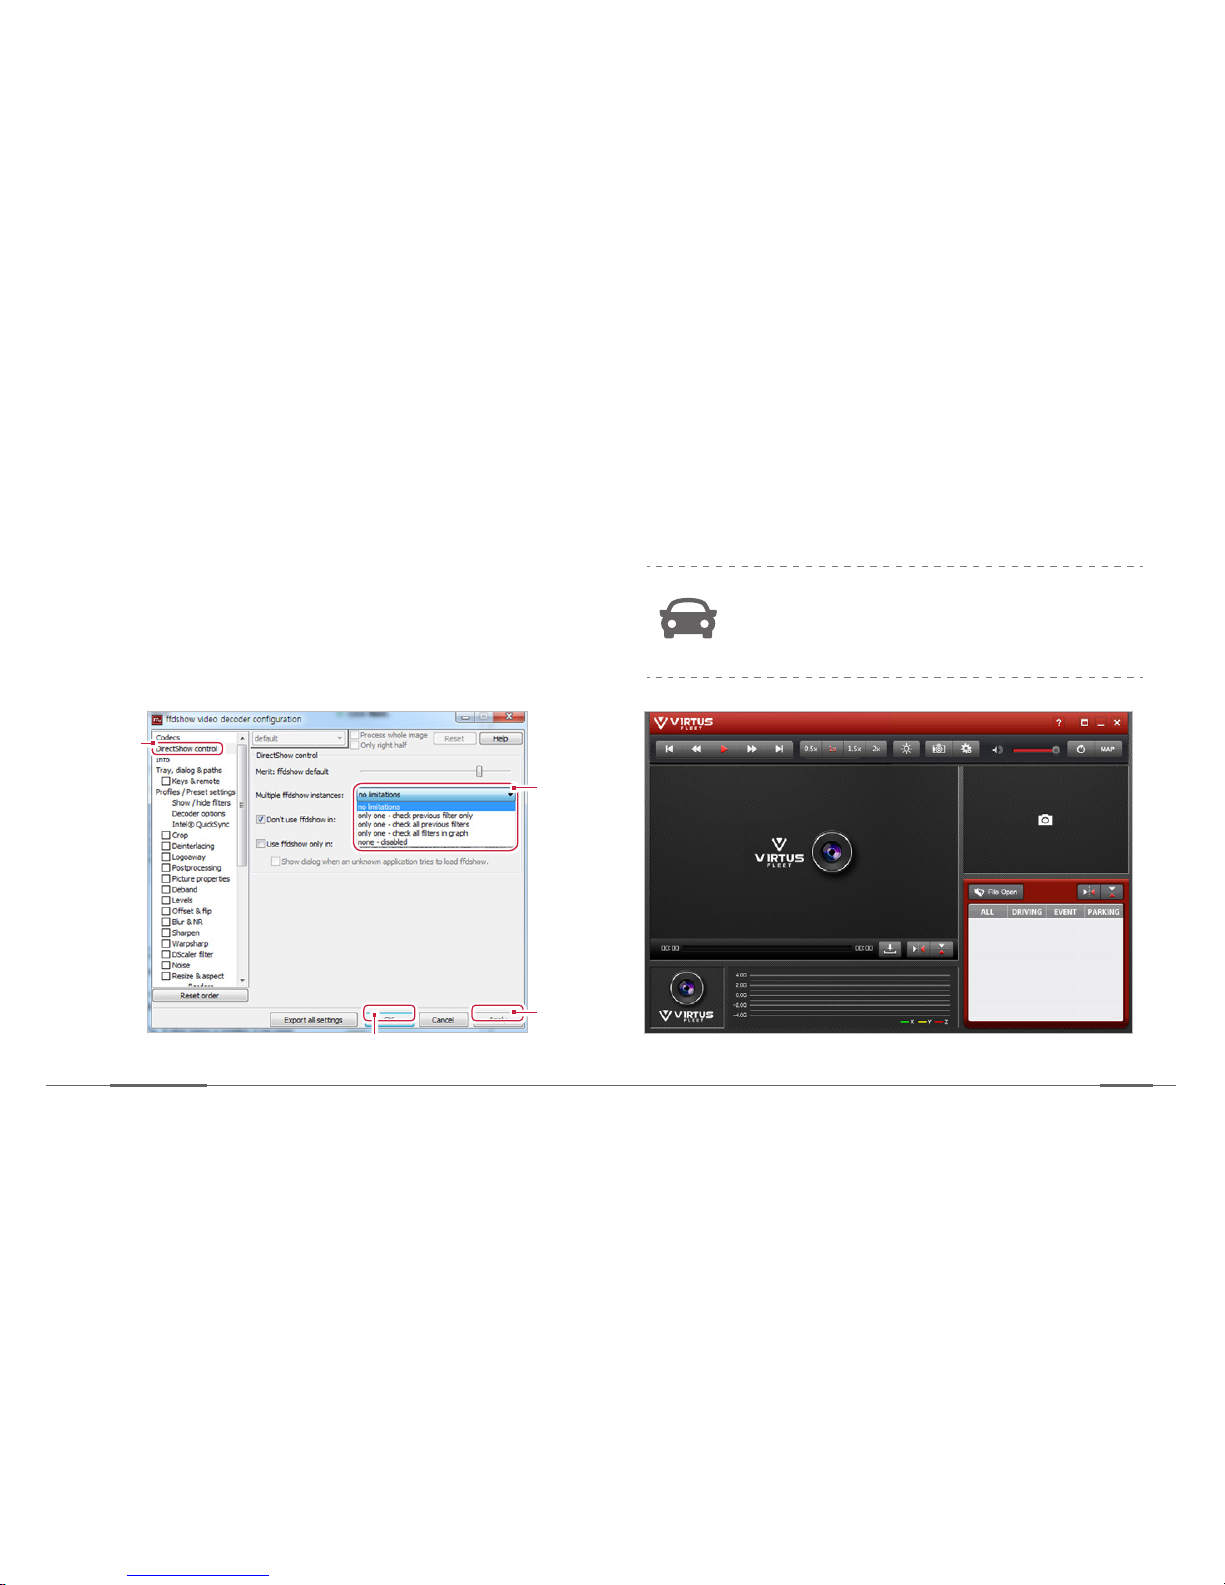
13. Finally, select the following from the drop-down
box and click Apply and then OK.
The playback software is shown as below :
For the users using Window 8 or higher OS,
right click the programe and select “run it as
administrator”.
1
2
3
4
Page 51
Installation
Device Manual
49
Using the PC viewer
The encrypted videos can only be played on your PC using the dedicated PC viewer program.
Or you can download the decrypted videos from the user webpage.
Also for the initial setup stage, you must load the SD card through your viewer program and change “server connection” &
“voice call” details.
refer to pg
54 ~ 57
• The program runs on Windows 7, 8, and 10 only.
• The files are listed depending on the selection of All, Event, Driving, and Parking.
Page 52
Installation
Zeus
50
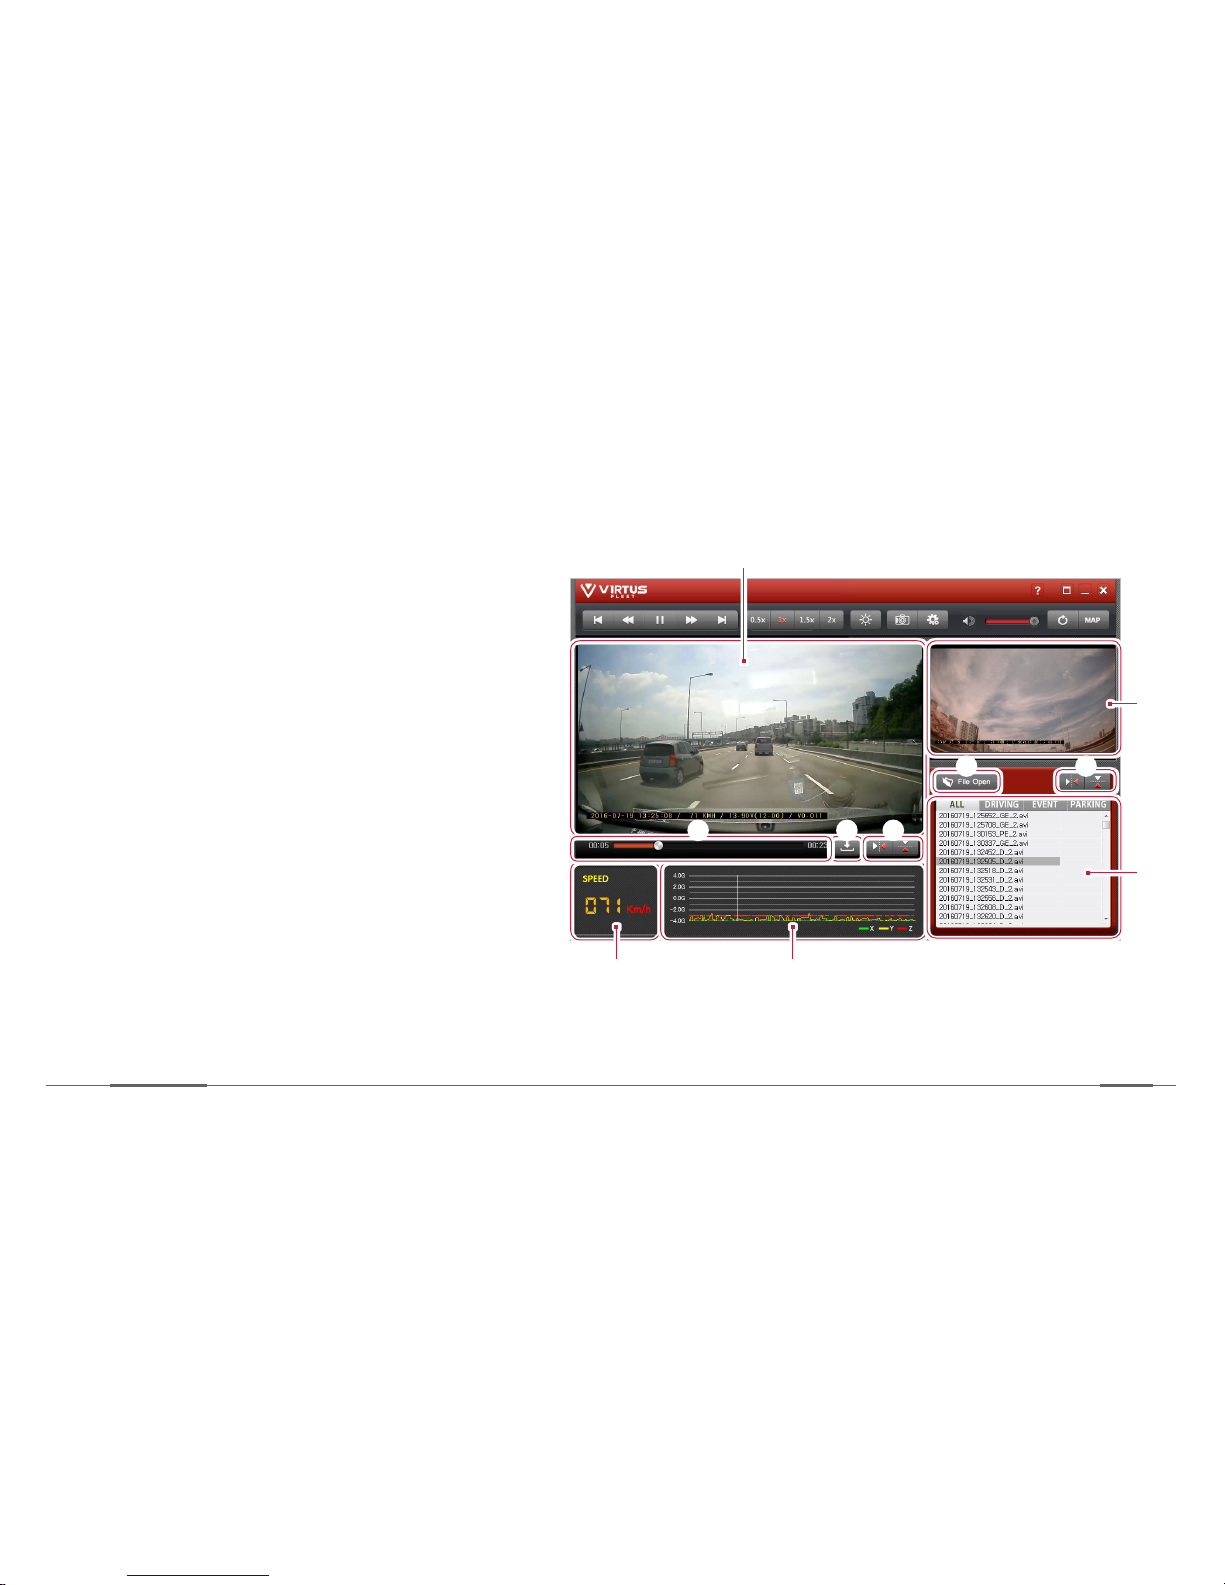
]Screen description
1
65
2 3 4
7
0
8 9
1. Run the program on your computer.
2. Use the following menus.
Page 53

Installation
Device Manual
51
No. Description
1
Main screen used to play the recorded file for the front view
2
Displays the playback progress.
3
Decrypt and download the playback video.
4
Reverses the playback direction of the main screen (right to left or upside down).
5
Displays the driving speed with the GPS connected.
6
Displays information of the G-sensor values.
7
Sub screen used to play the recorded file of the rear view.
8
Click to open a recorded file.
9
Reverses the playback direction of the sub screen (right to left or upside down).
0
File list is displayed.
Page 54
Installation
Zeus
52
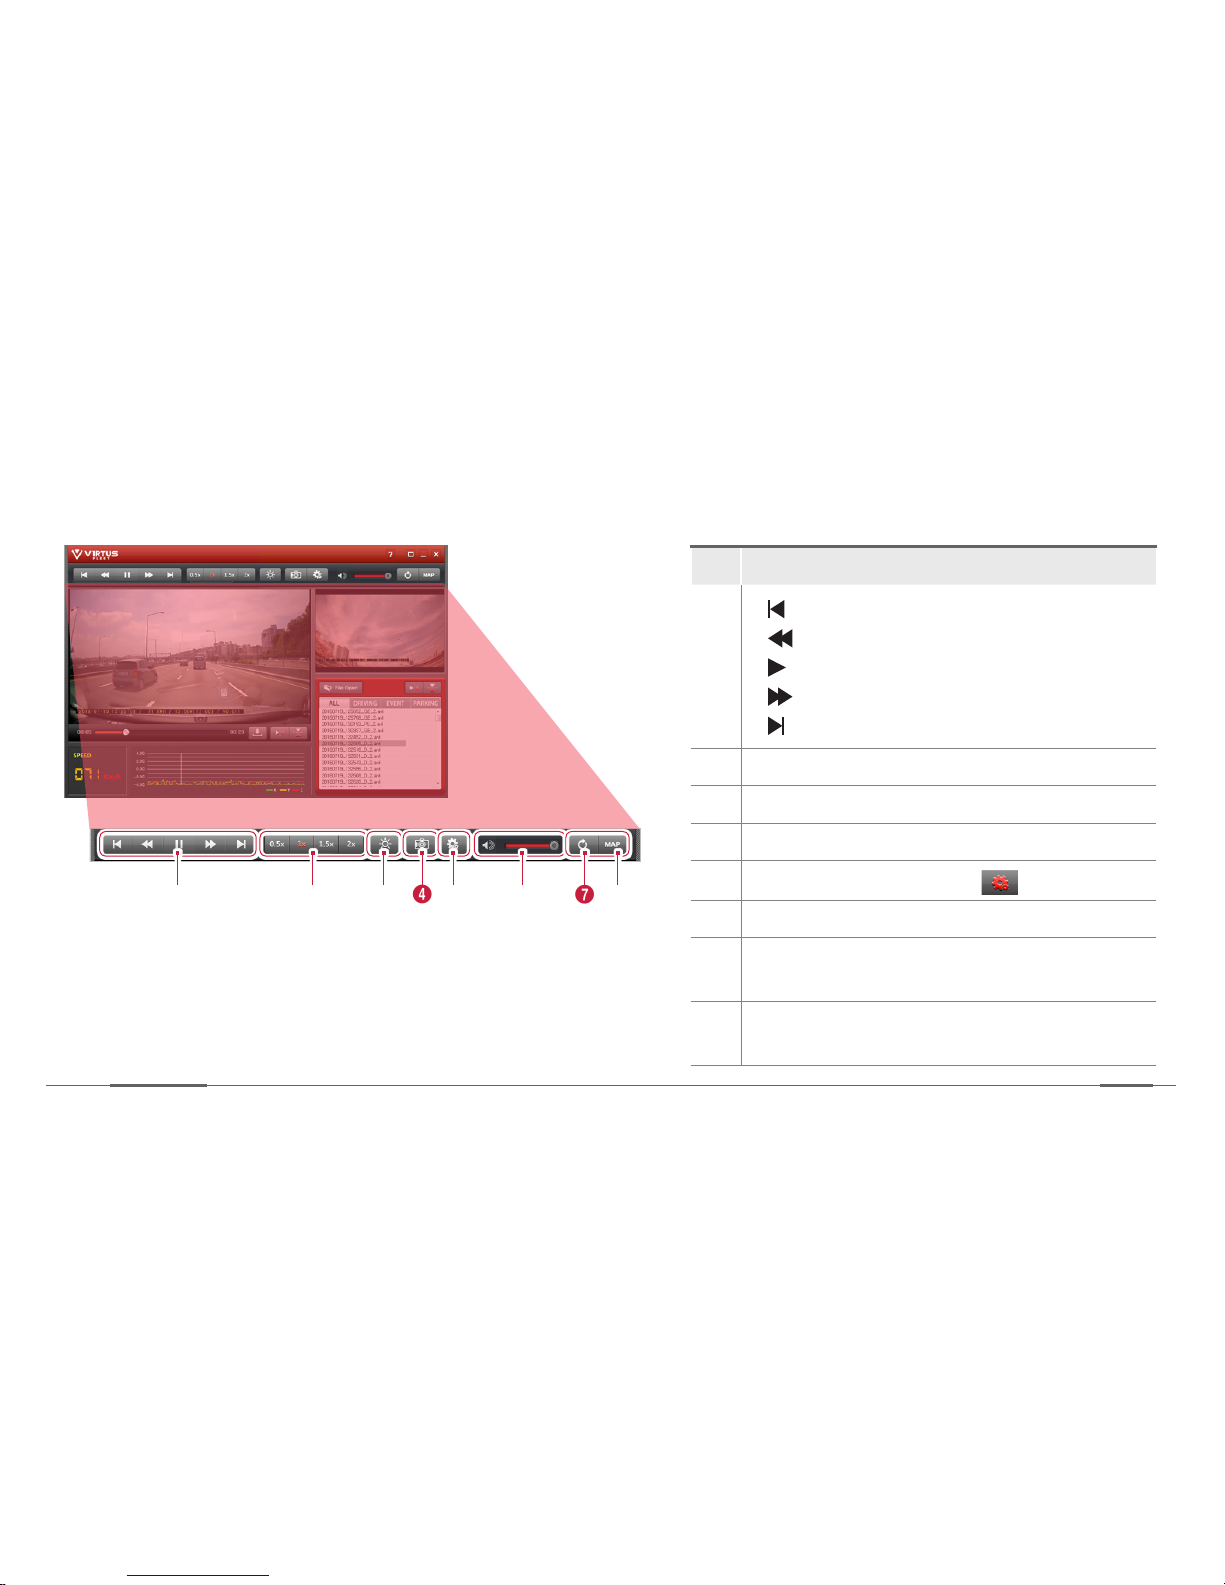
]Control panel description
No. Description
1
[ ]: Skips to the previous.
[ ]: Moves fast backward.
[ ]: Pauses or resumes playback.
[ ]: Moves fast forward.
[ ]: Skips to the next video.
2
Controls the playback speed.
3
Adjusts the brightness of the image.
4
Captures the current image.
5
Change the Device Setting.
6
Adjusts the volume.
7
Changes the main screen to the sub screen
and vice versa.
8
Shows the map of the recorded place (when
recorded with the GPS connected).
1 2 3 4 65 7 8
Page 55
Installation
Device Manual
53
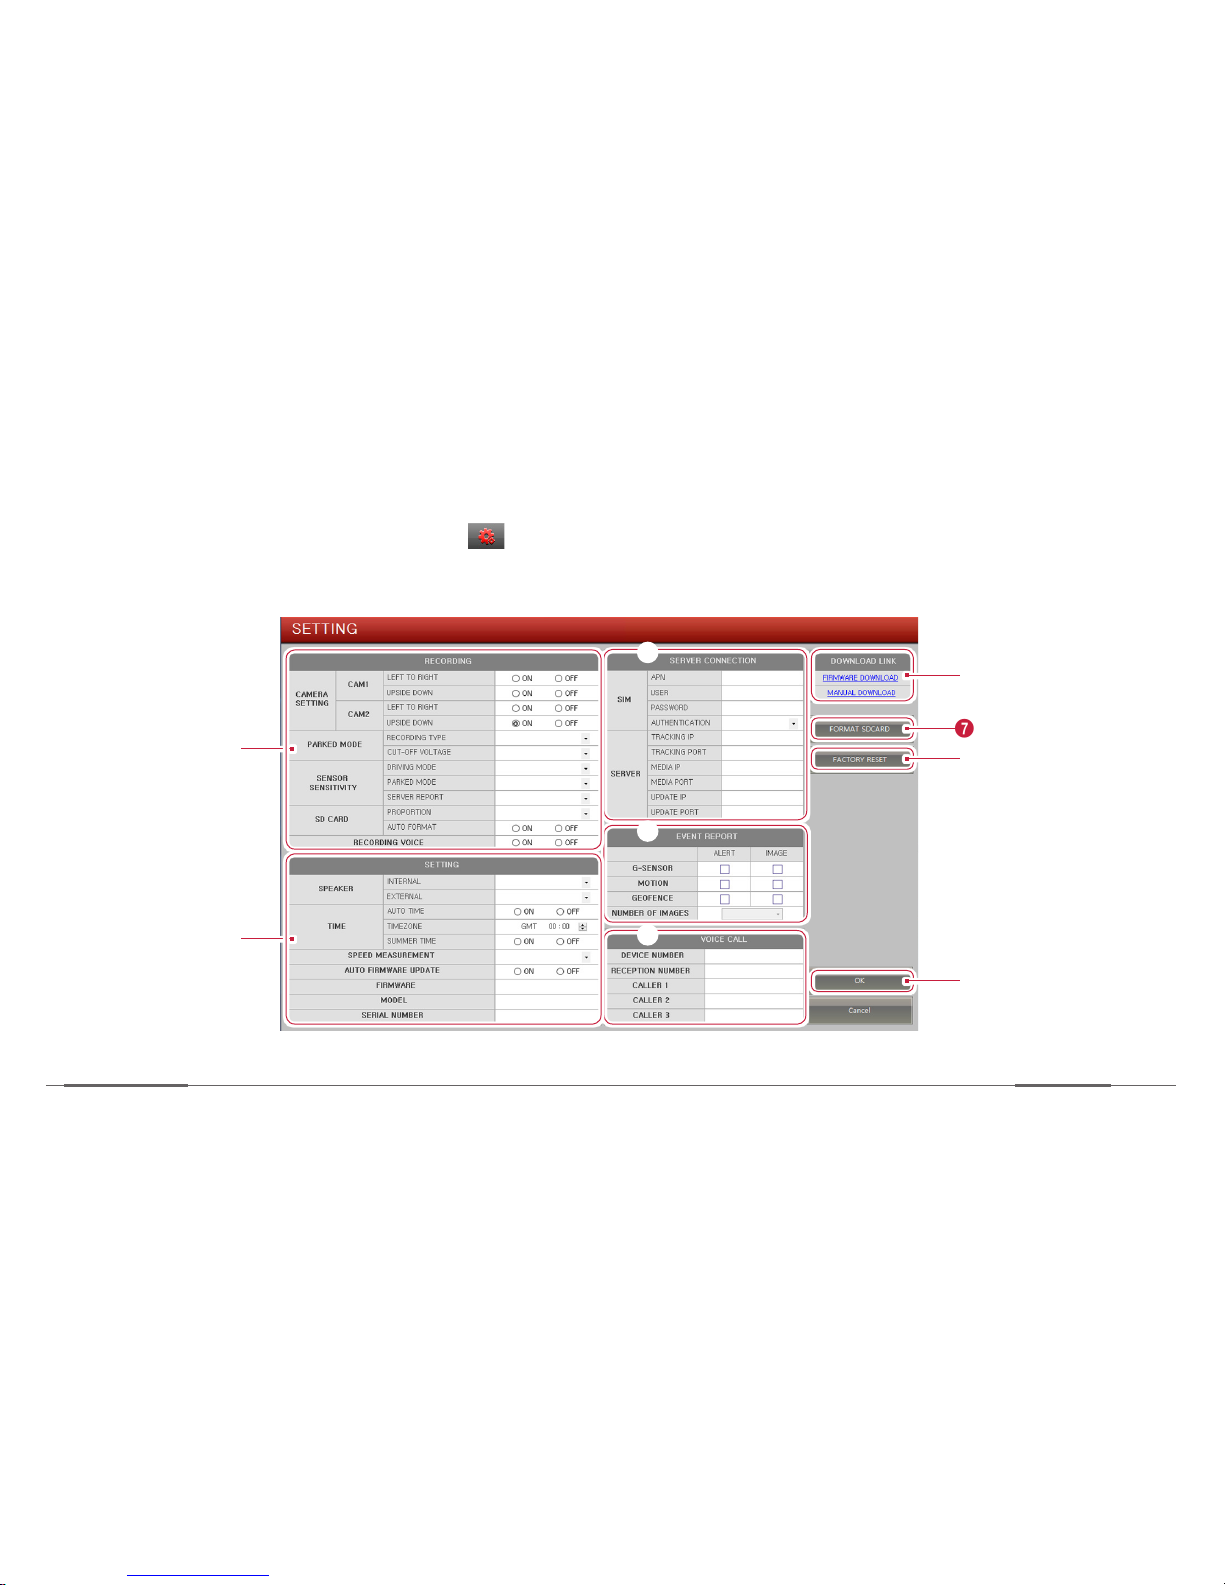
]Device setting
»You can change the device settings from the .
»To change the settings, insert the microSD card to your PC first.
1
2
7
6
8
9
3
4
5
Page 56
Installation
Zeus
54
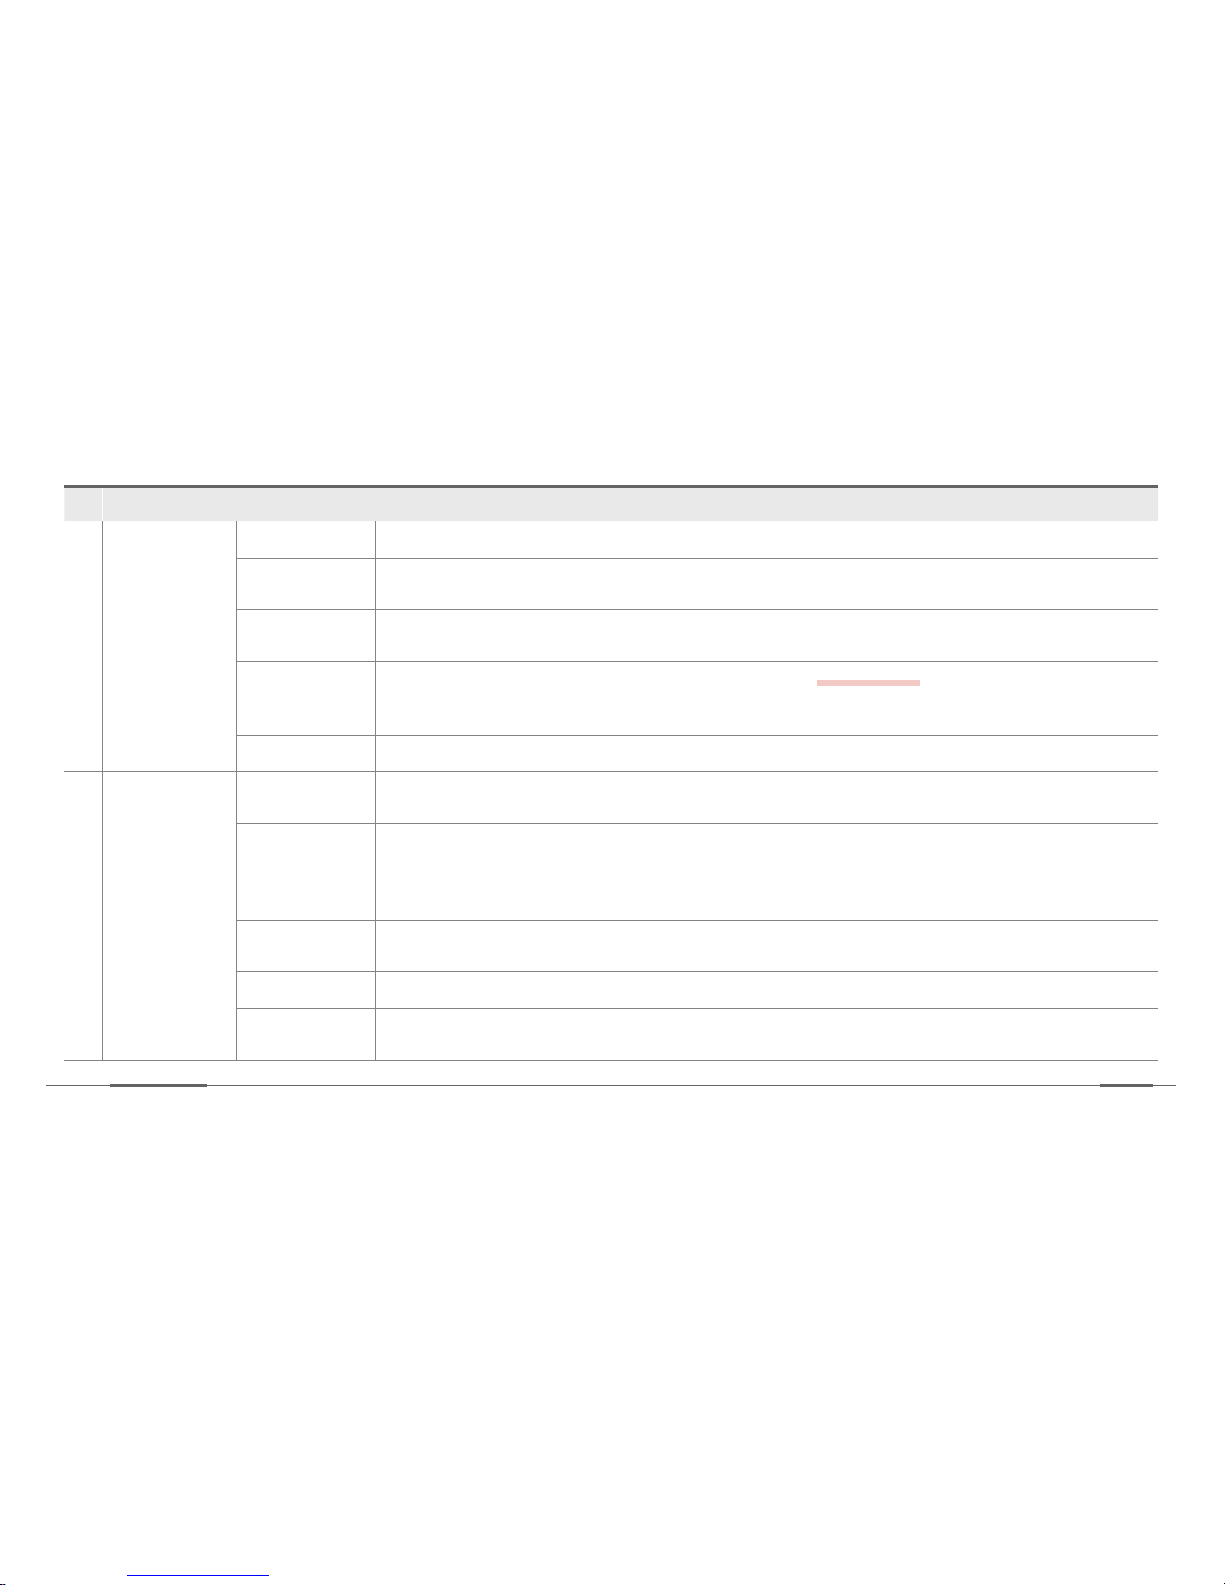
No. Description
1
Recording
Camera Flip the recordings left/right and up/down.
Parked mode
Setting for the Parked mode (impact & motion detection OR motion detection only) and power
cut-off at set voltage.
Sensitivity
Setting for the G-sensor sensitivity against an impact during driving and parking mode. If you lower
the server report sensitivity, event files are saved in the SDcard but alerts are not sent to the server.
SD card
Setting for the SDcard partitioning and auto formatting.
refer to pg 34
* Upon use of AUTO FORMAT, it is automatically formatted every 14 days (334 hours) based on
the set date.
Voice recording Voice is recorded with the videos.
2
Settings
Speaker
Internal - Set loudness level for the main unit (beep noise)
External - Set loudness level for the voice kit (caller's voice)
Time
*AUTO TIME: With ON, it is set as the server time (based on the geographic location).
With OFF, it is set as the GPS time.
TIME ZONE: Set GMT time manually.
SUMMER TIME: Apply summer time.
Speed
Measurement
Speed is displayed in KMH or MPH.
Auto firmware
When the auto firmware is set to ON, the firmware is automatically updated when the device is rebooted.
Device
information
Device information appears.
(including firmware version, model name, serial number -> fixed information)
Page 57
Installation
Device Manual
55
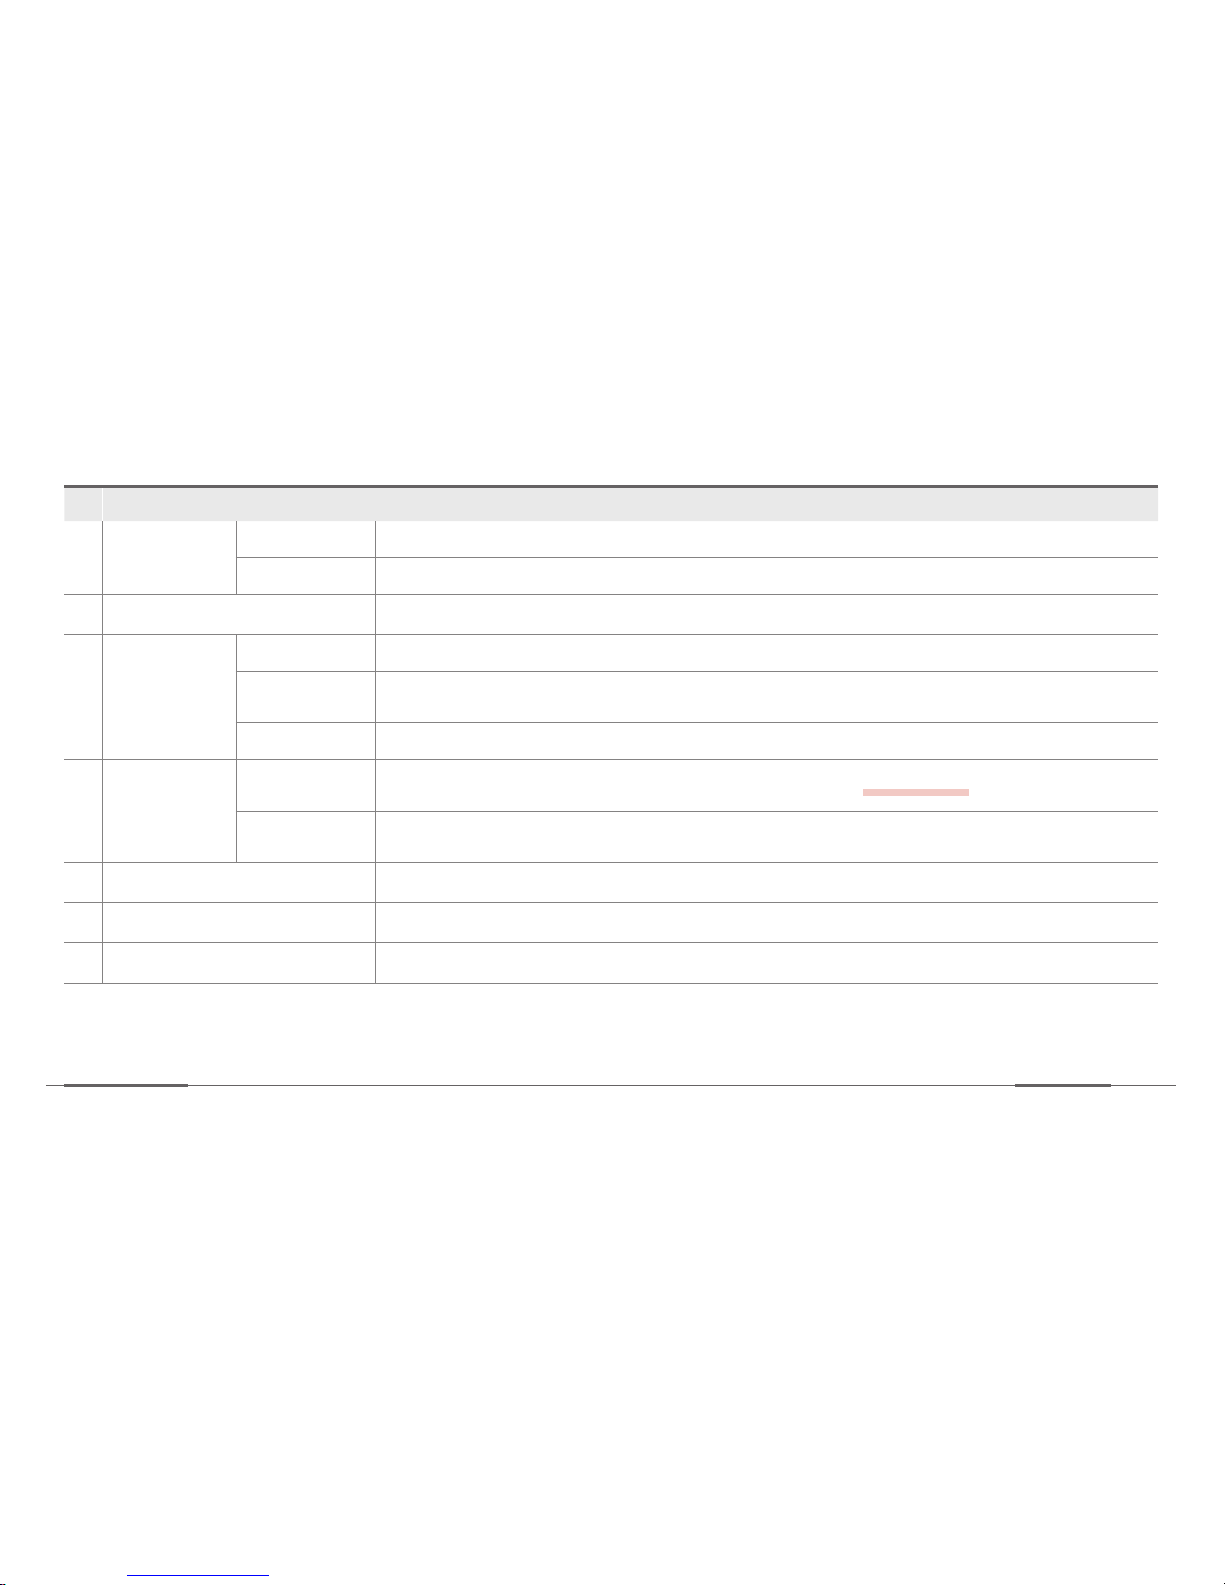
No. Description
3
Sever
Connection
SIM card Enter the SIM card information such as APN, USER, PASSWORD, and AUTHENTIFICATION.
Server Server IP address where the data is received. Type in server IP address and port number.
4
Event Report Settings are configured for alert sending, photo sending, and number of photos.
5
Voice call
Device number My telephone number, reception number.
Reception
number
One outgoing number.
Caller 123 Up to 3 incoming numbers.
6
Download Link
Firmware
download
Downloads the most recent firmware file for manual update.
refer to pg 58
Manual
download
Downloads the most recent device manual file.
7
Format SDcard Download the most recent.
8
Factory Reset Formats SD card and erase all data.
9
OK Click when the settings are completely changed.
Page 58
Installation
Zeus
56
3
Check the SIM card information by consulting with the network provider or the SIM card provider.
4
With the ALERTS box checked, only the notification is sent to the server. Setting is not allowed only with image.
With both checked, both of them are sent to the server upon occurrence of event.
5
The device number is the phone number for the SIM. The device automatically attempts to retrieve the number
from the SIM but some service providers do not allow it. Then you have to manually enter the phone number
to enable the voice call feature.
7
When formatted, the file system is FAT32 and the cluster size is 64 KB.
If the network is connected with the network service provider, the blue LED will blink. If the network is also
connected with the server, it will be ON constantly. It should be turned on constantly to monitor the vehicle
from the server.
If initial APN setup is correctly done and a device is successfully connected to the server, the settings can also
be configured from the user webpage.
Page 59
Installation
Device Manual
57
]Updating the firmware
»Update the firmware in three different methods:
1. Manual update: After SD card format (with the viewer), insert the firmware file to the SD card, then insert
SDcard into the device. If the device does not reboot automatically, press the R pinhole on the device to
reboot the device.
2. Manual server update: After selecting the device from the server, click the firmware update button to
proceed with update.
3. Automatic setting update: When the auto firmware update is set on from the setting menu, automatic
update is run when the device is rebooted.
• Firmware format : MS_T7_updater.bin
• Firmware capacity : Approx. 30 MB
• Firmware checking : Can be checked from the user webpage or from the viewer.
Page 60
Installation
Zeus
58
CE WARNING
responsible for compliance could void the user's authority to operate the equipment.
EN Test Regulation Version
EN 50498 : 2010
ETSI EN 301 908-1 V7.1.1
ETSI EN 301 489-1 V1.9.2
ETSI EN 301 489-19 V1.2.1
ETSI EN 301 489-24 V1.5.1
ETSI EN 300 440-1 V1.6.1
ETSI EN 300 440-2 V1.4.1
EN 60950-1 : 2006+A11:2009+A1:2010+A12:2011+A2:2013
Page 61
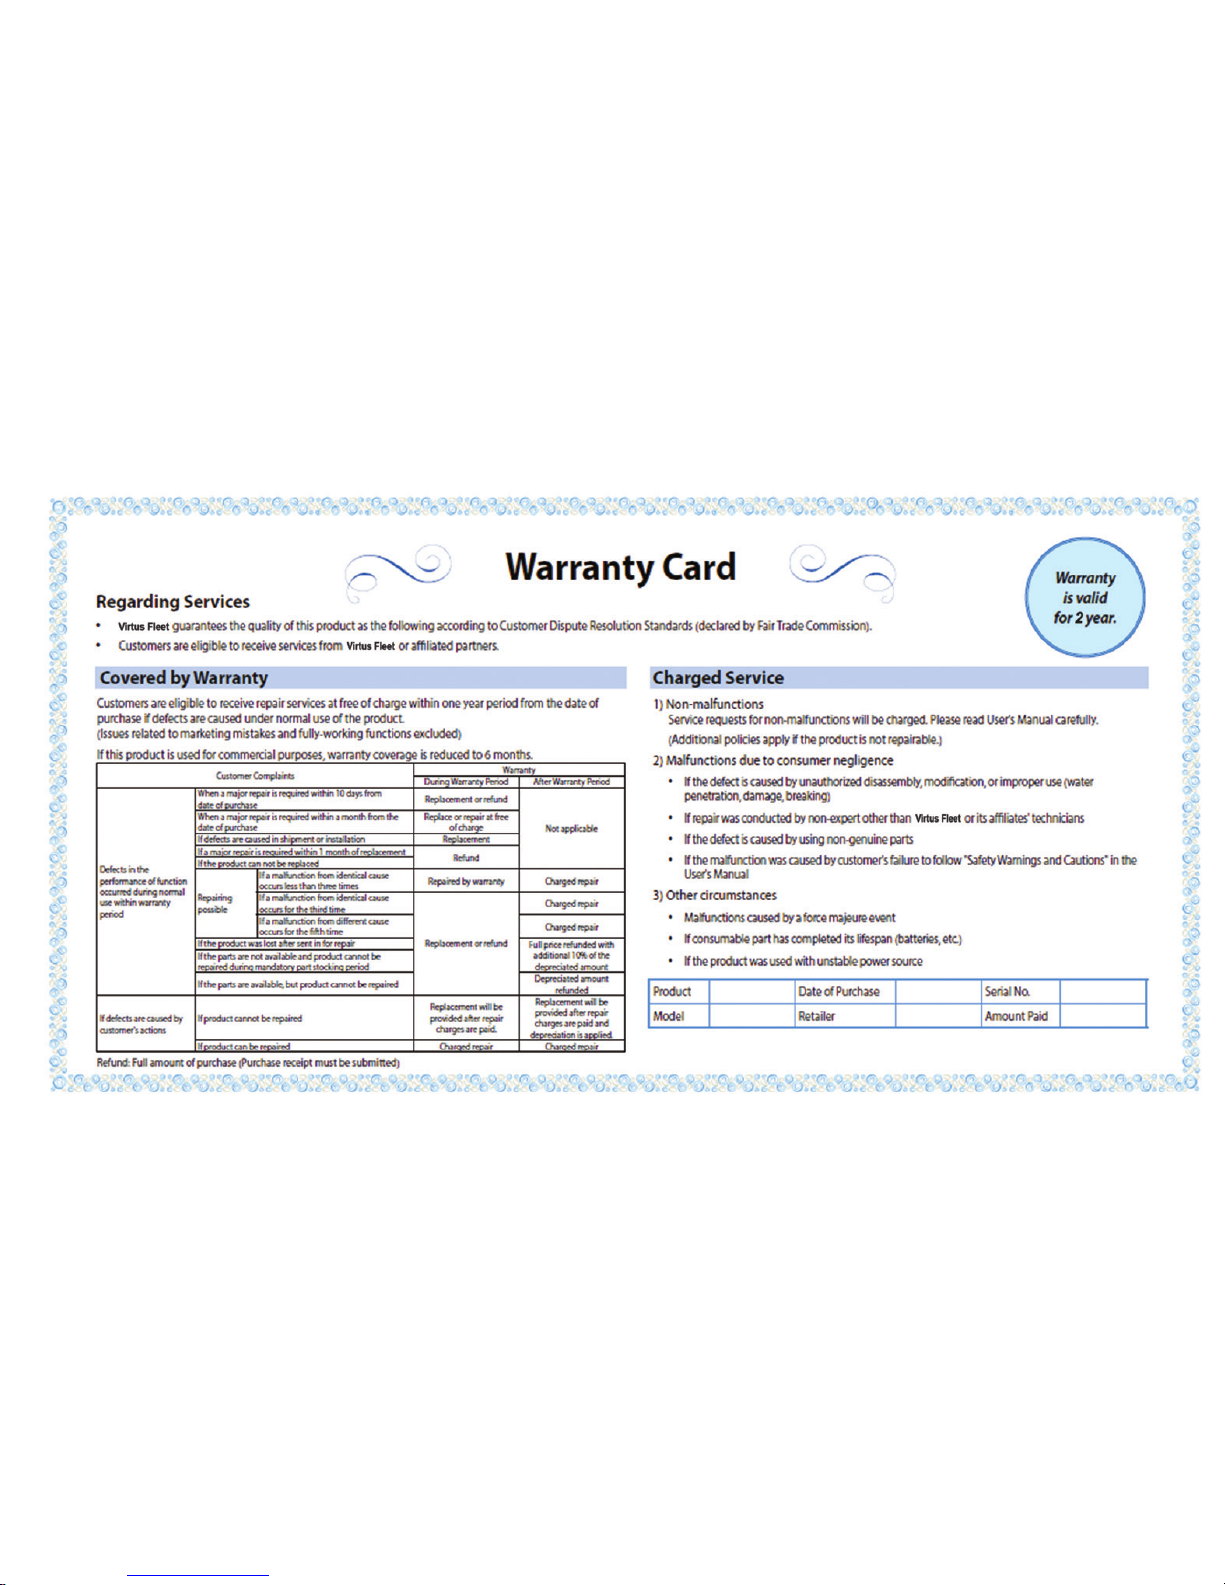
Warranty Card
Page 62
www.virtusfleet.com
Name Zeus Service Representative 0207 2222 100
Service hours Weekdays 8:30 am - 5:30 pm (Excluding Saturday and Sunday, and holidays/ Lunch hour PM 12:00 ~ 1:00)
Address Unit 6 Park House Greenhill Crescent Watford WD18 8PH
Zeus
 Loading...