

Page 1
Ultimate Pro 2 Ergometer Rowing Machine
User manual
EN
Page 2
INDEX
SAFETY INSTRUCTIONS
CHECKLIST
NOTES
ASSEMBLY INSTRUCTIONS
EXPLODED DRAWING
PARTS LIST
3
4-5
6
7-13
14
15-17
VirtuFit Ultimate Pro 2 Ergometer Rowing Machine
EN
2
Page 3
SAFETY INSTRUCTIONS
ASSEMBLY PREPARATION
To ensure ease of product assembly, please take time to verify the size and quantities of all required assembly hardware.
Use the itemized parts listing and hardware chart for reference.
The product assembly process has been documented in easy to follow steps. Please read all assembly instructions
carefully. Take time to review the manual and familiarize yourself with the entire assembly process before proceeding.
Assembly Tip: It is always helpful to pre-stage the items needed for each assembly step.
Perform product assembly in a 1.2 x 3 meter at area. Note: After assembly is completed, allow a minimal 1 meter of
space on each side of rower for user access and dismounting. Do not dispose of any packaging materials until assembly
of the product is completed.
Assembly tools are included, but you may also use standard household tools to complete assembly of this product.
IMPORTANT PRECAUTIONS
WARNING: To reduce the risk of injury, please read the following precautions before assembling or using your new
product.
1. It is the responsibility of the owner to ensure that all users of this equipment are adequately informed of stated
precautions.
2. Read all instructions and enclosed literature carefully. Understand the assembly and operation before using the
equipment.
3. Use equipment on a at level surface. Use adjustment levelers on the bottom of equipment to help stabilize unit.
4. It’s recommended to place an exercise mat beneath the equipment for added protection of oors or carpets.
5. Keep children and pets away from equipment at all times.
6. Inspect product on a frequent basis. Tighten loose assemblies or hardware as needed. Replace worn or damaged
parts.
7. This equipment is intended for indoor use only. Use in non-recommended environment can lead to serious injury and
will
void all related warranties and liabilities.
8. Recommended user weight should not exceed 230 kg.
9. Keep equipment clean and properly maintained.
10. Observe and adhere to all warning labels posted on equipment.
11. Properly warm up and stretch before starting any strength training or cardio exercise routine.
12. If you feel pain or dizziness at any time while exercising, stop immediately and consult your physician.
SAFETY WARNING: Before starting an exercise program, consult your physician. This is especially important for
individuals over
the age of 35 or persons with pre-existing health problems. It’s important to read all instructions carefully. We
assume no responsibility
for personal injury or consequential damages sustained by or through the use of this equipment. Additional terms
and conditions are
listed in the back of this manual or enclosed owner’s manual.
Colors and specications subject to change without notice.
3
EN
VirtuFit Ultimate Pro 2 Ergometer Rowing Machine
Page 4
CHECKLIST
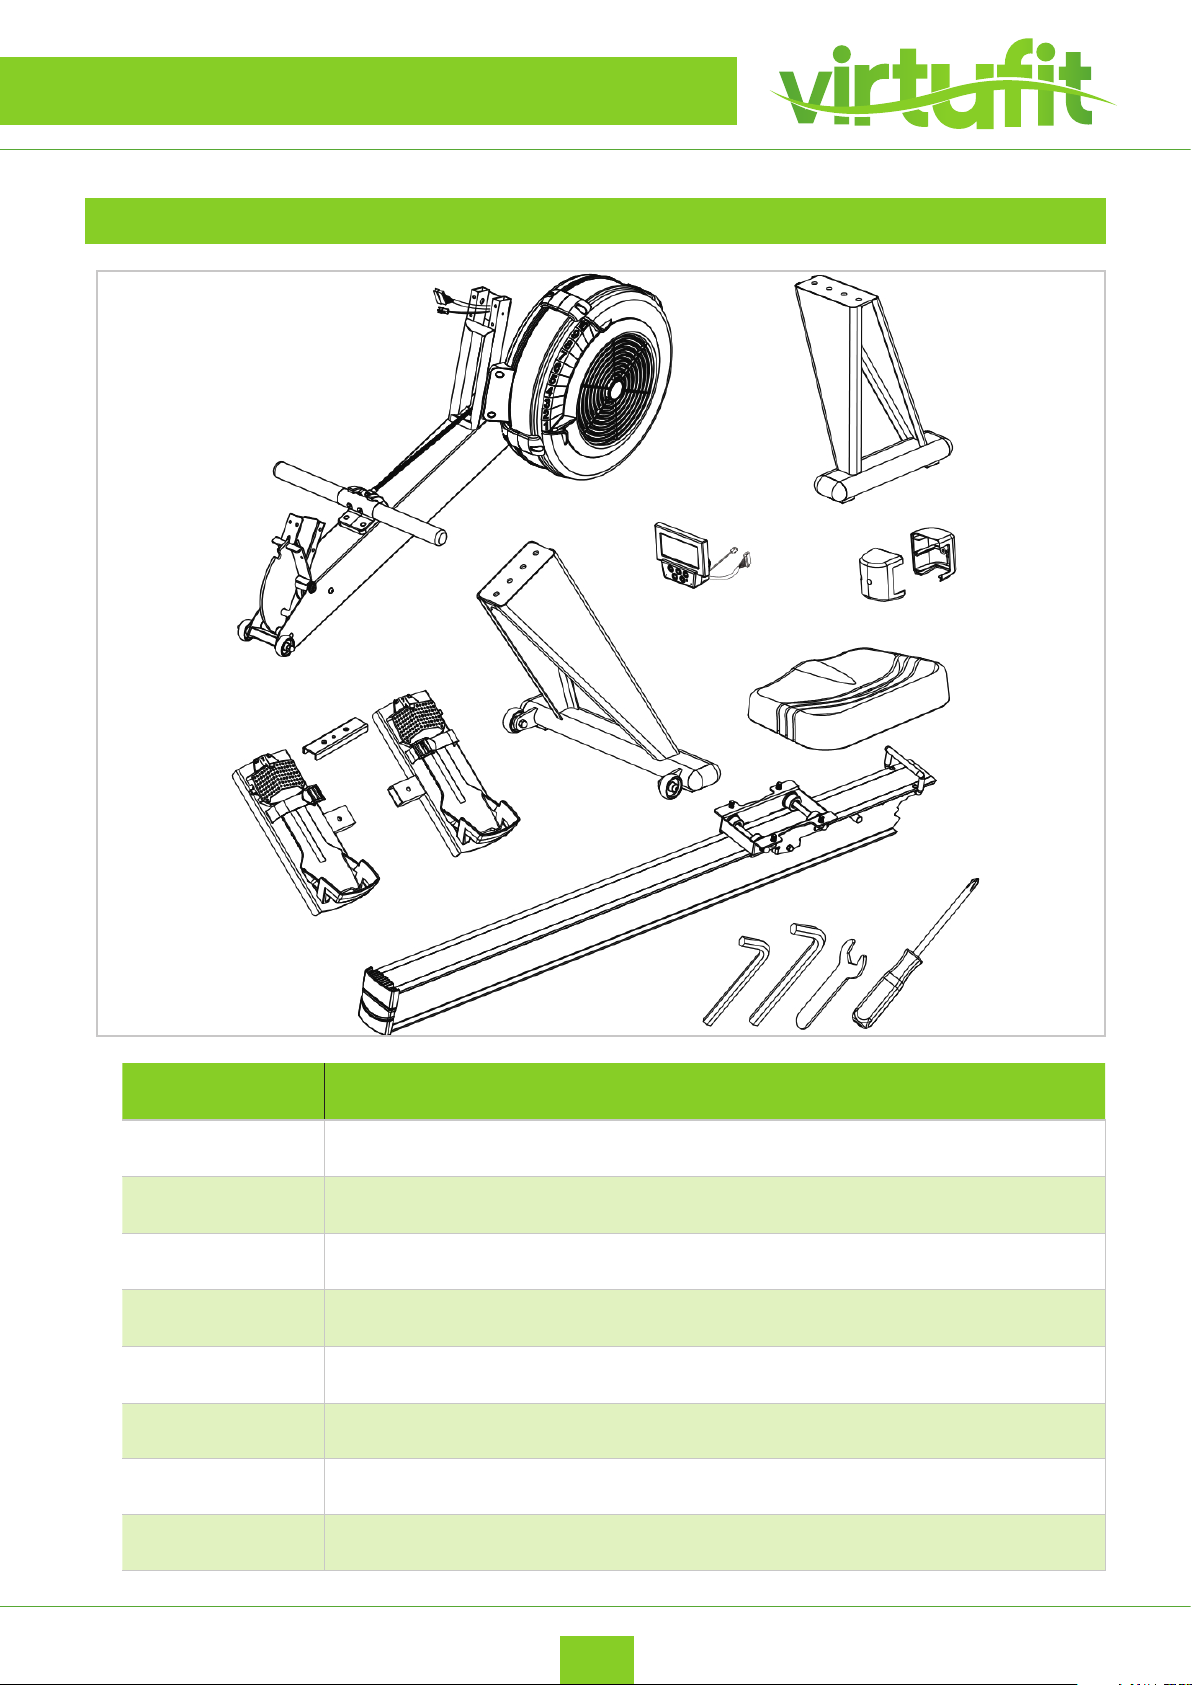
A
C
TOOLKIT
D
G
H
E
F
K
B
NUMBER DESCRIPTION
A
B
Main frame
Aluminum rails
C
D
E
F
G
H
VirtuFit Ultimate Pro 2 Ergometer Rowing Machine
EN
Front stabilizer
Rear stabilizer
Pedals
Seat
Console
Console cover
4
Page 5
CHECKLIST
ONDERDELEN
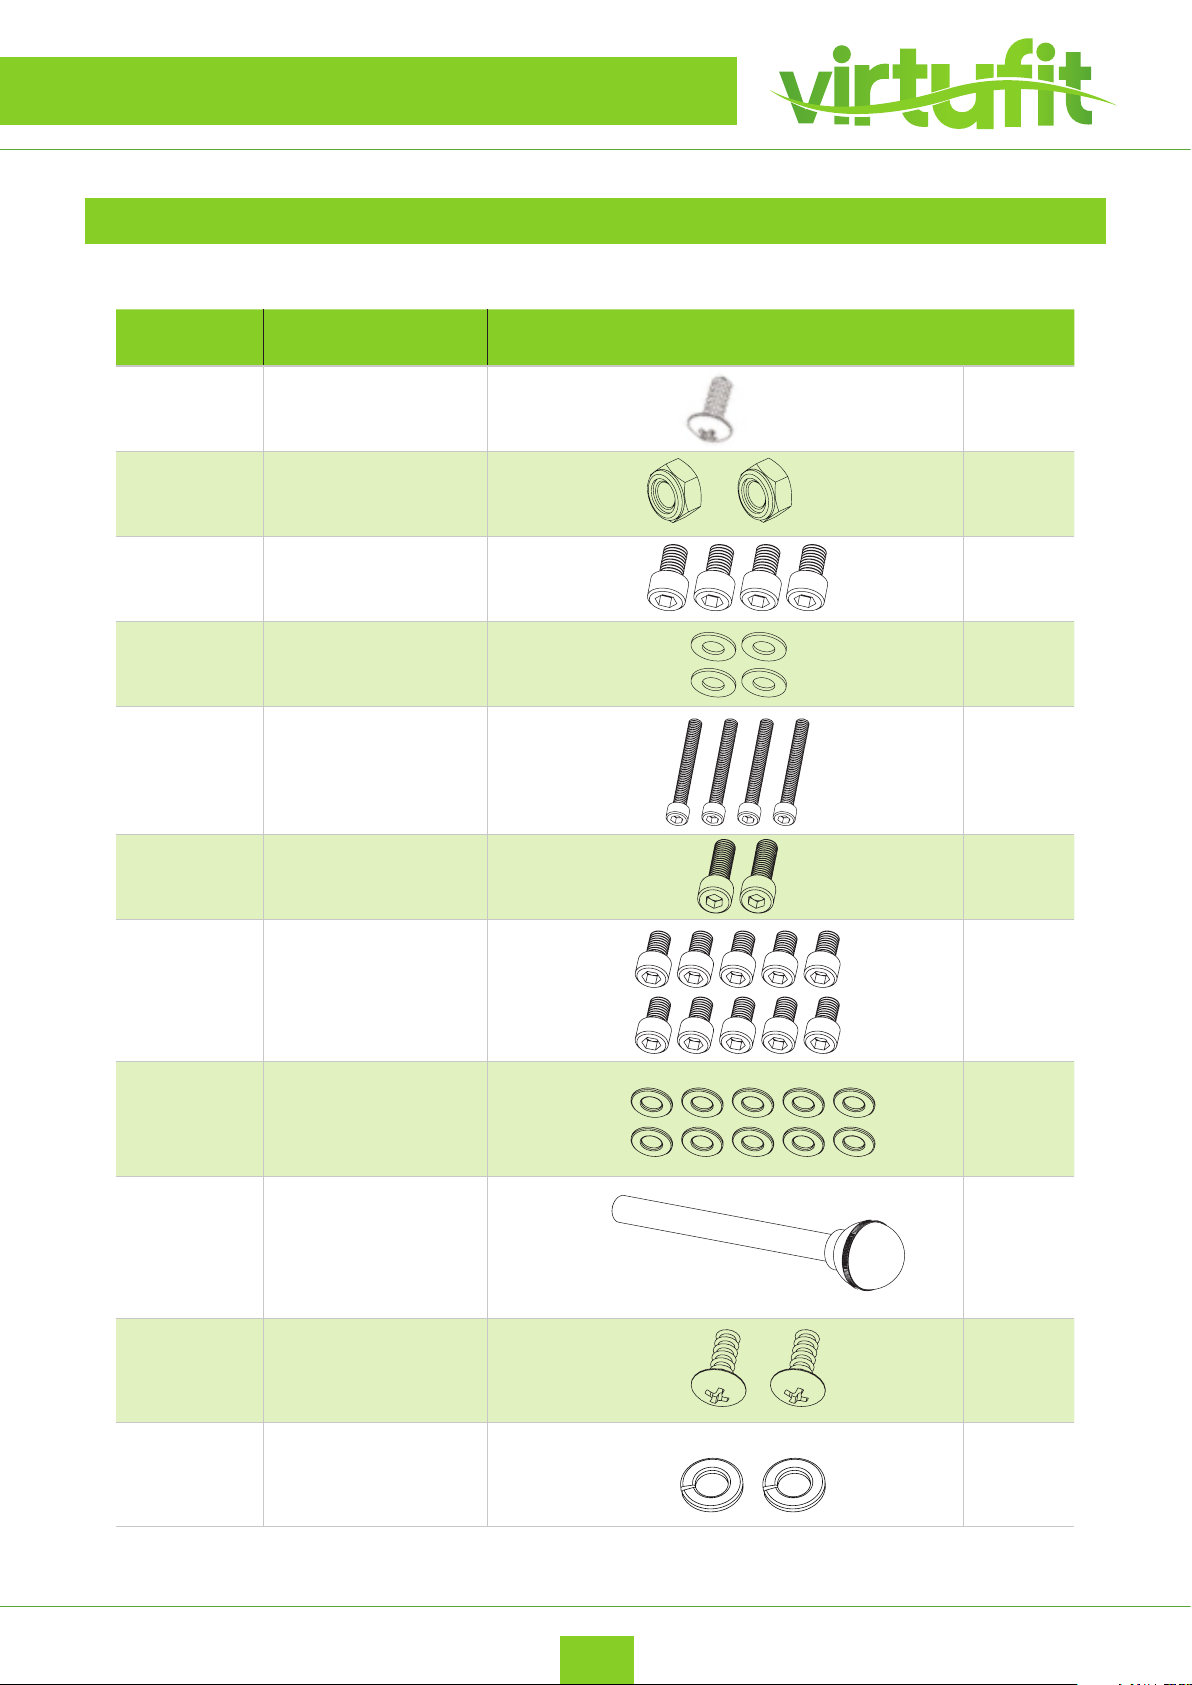
NUMBER DESCRIPTION SHAPE QT Y.
J4
J0
J1
J2
J3
J5
M4 x 12.7 mm Screw 3
M8 Nylon Nut 2
Bolt M10 x 16 mm 4
Washer M10 x 1.5t 4
Bolt M6 x 50 mm 4
Bolt M8 x 25 mm 2
J6
J7
J8
J9
J10
Bolt M8 x 16 mm 10
Washer M8x1.5t 10
Pull pin 1
Screw M4 x 10 mm 2
Spring washer 2
5
EN
VirtuFit Ultimate Pro 2 Ergometer Rowing Machine
Page 6
NOTES
NOTE: Before assembly please lay out ALL pieces accordingly to ensure you
are not missing any items
PLEASE BE CAUTIOUS: As some components may be sharp and can cause
harm if not handled correctly. Always use safety measurements when
assembling any piece of equipment or machinery.
VirtuFit Ultimate Pro 2 Ergometer Rowing Machine
EN
6
Page 7
ASSEMBLY INSTRUCTIONS
STEP 1
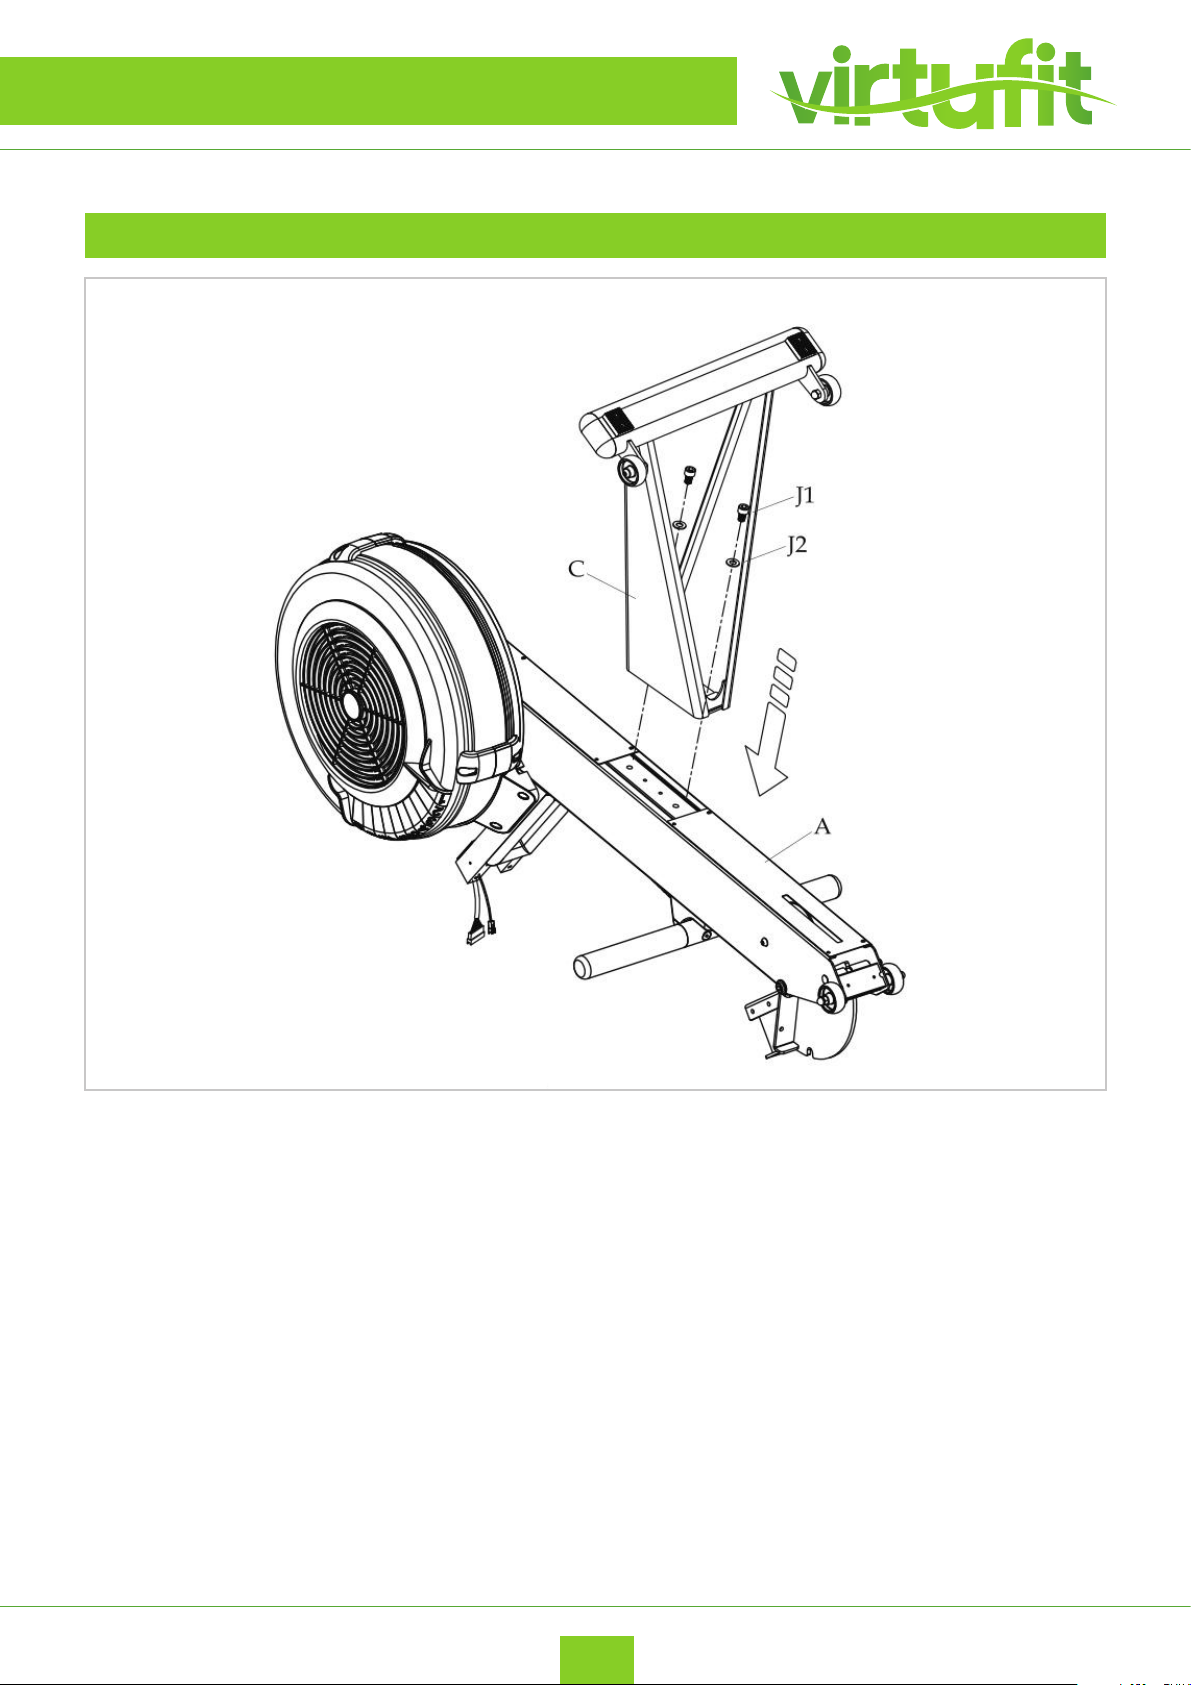
• For best results place Forward Base (A) (Damper Fan) upside down on a soft and secure surface
Once this is done, the pre- screwed holes for Forward Base Leg (C) will be visible. To bolt in
Forward Base Leg (C) into Forward Base (A), place directly on top of pre-screwed holes. Secure
with 2 (J1) Bolt(s) and (J2) Washer(s).
7
EN
VirtuFit Ultimate Pro 2 Ergometer Rowing Machine
Page 8
ASSEMBLY INSTRUCTIONS
STEP 2
1
2
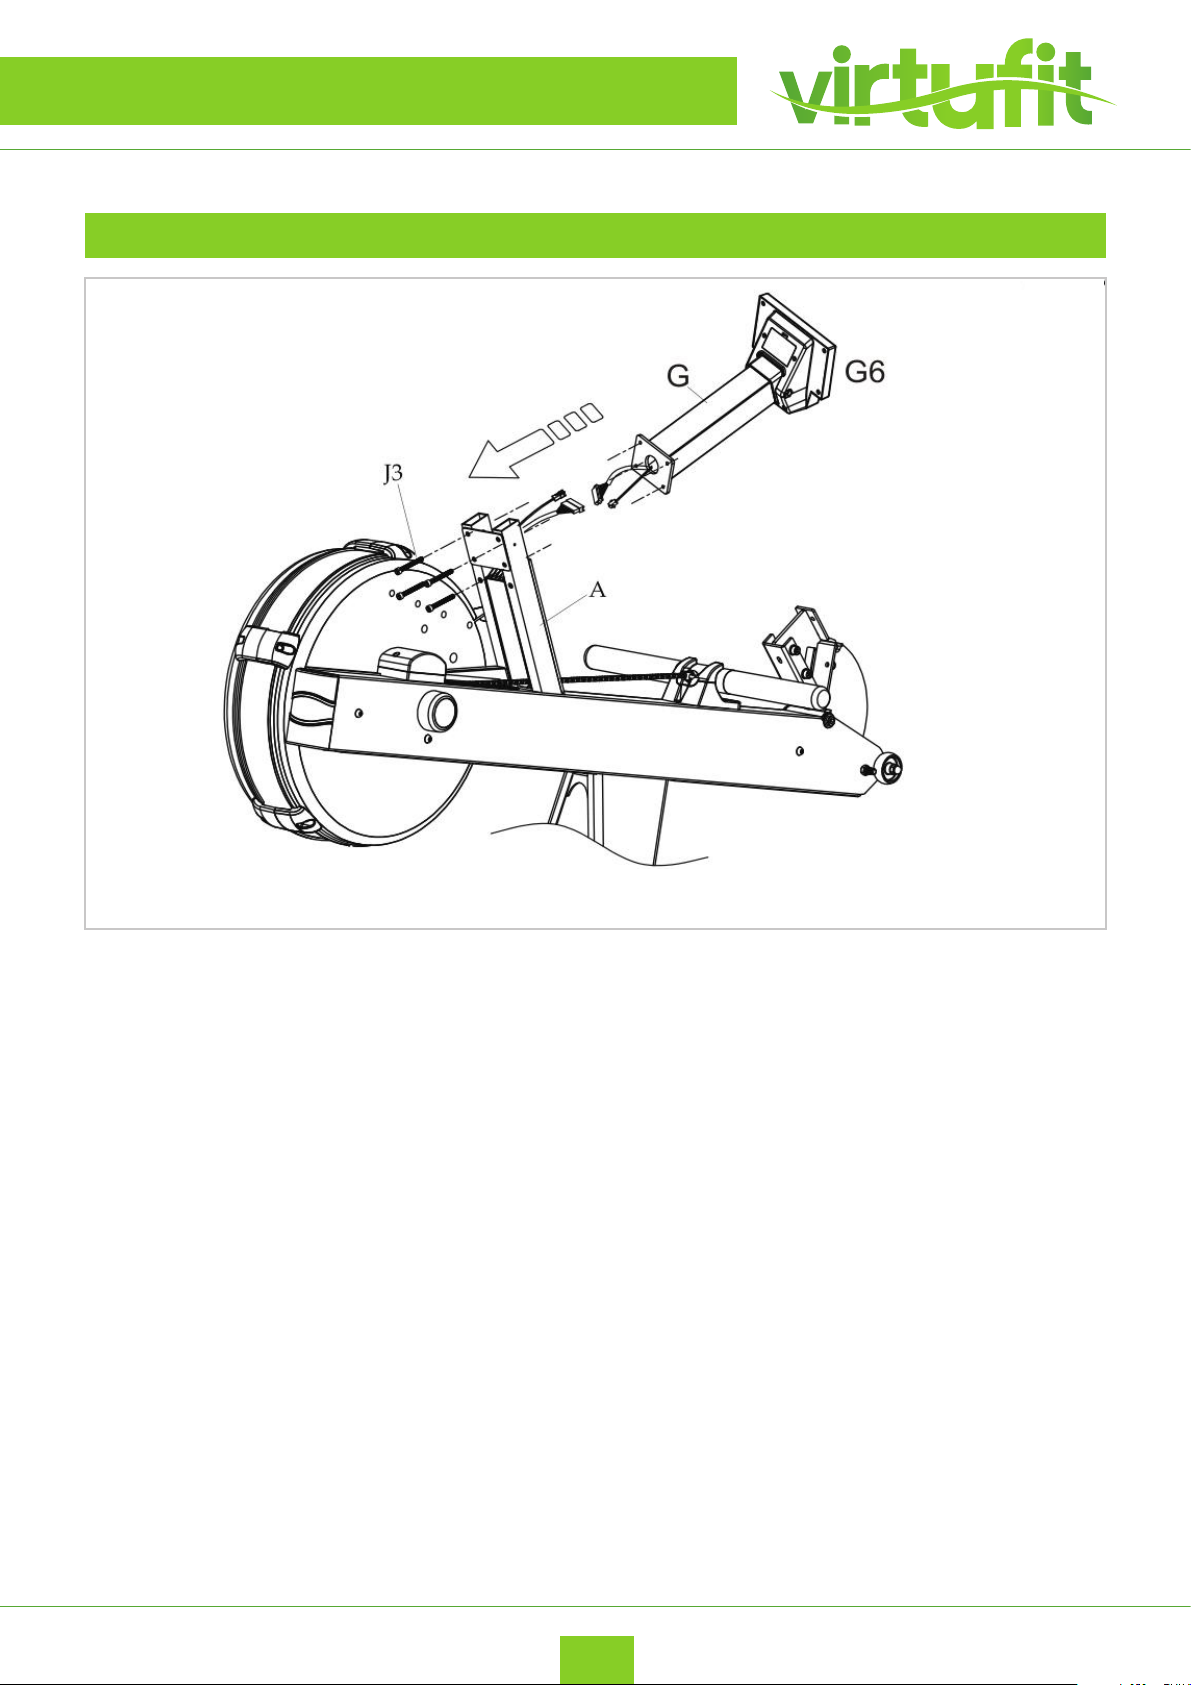
• (1)Please LIGHTLY pull wires so that they do not recede into the stem of Base Leg (A). DO NOT CUT
WIRES; wires will connect to console tube when installing console. CAUTION: Please handle with
care, as electrical wires are delicate. If wires are handled too aggressively they will dislocate.
• (2)Once wires are connected CAREFULLY secure Console Tube (G) to the stem of Base Leg (A). Please
be careful of exposed wire ends. The wires should recede back into stem once connected in order to
prevent damage or dislocation.
VirtuFit Ultimate Pro 2 Ergometer Rowing Machine
EN
8
Page 9
ASSEMBLY INSTRUCTIONS
STEP 3
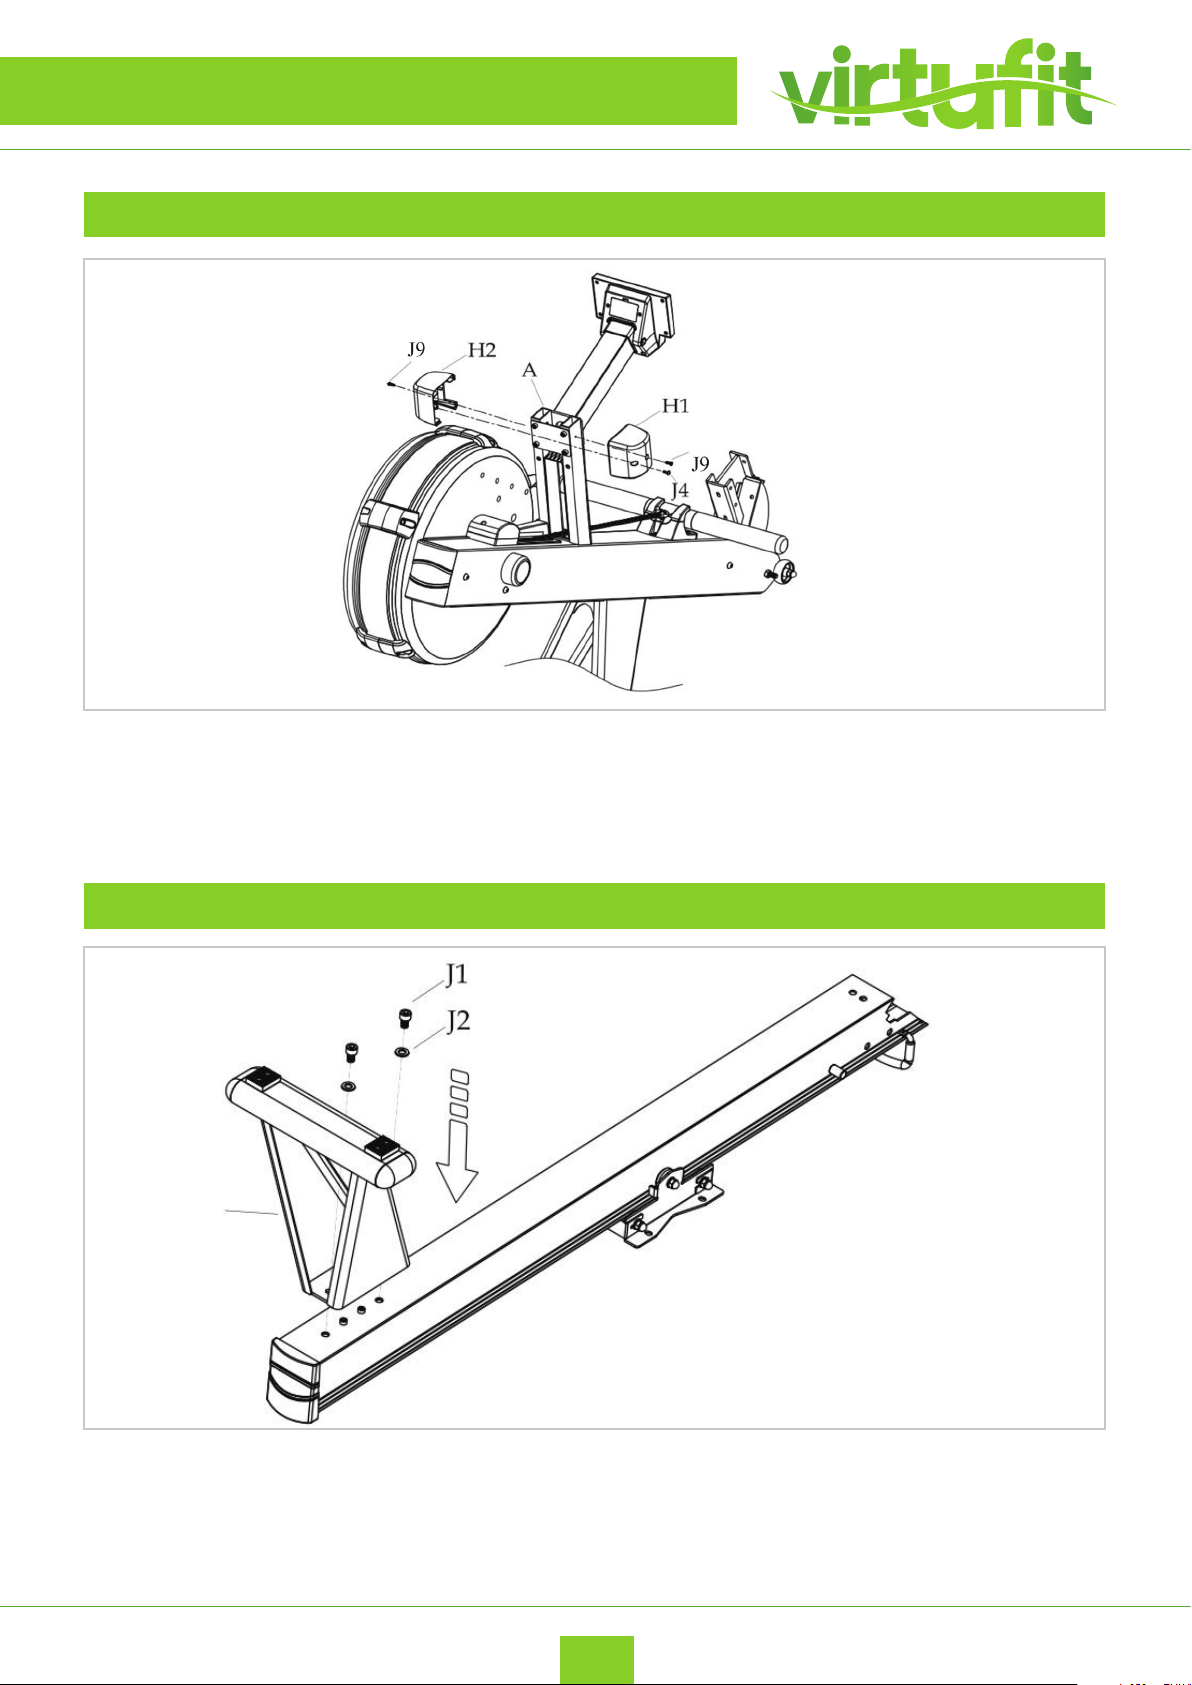
• To nish securing Console (G) onto Forward Base (A) please attach Place Holder (H). Place Holder (H)
willbreak up into 2 components (H1) and (H2). These components will rejoin together once attached onto
forward Base (A). Once rejoined please secure with 2 screws (J9) and 1 screw(J4).
STEP 4
B
D
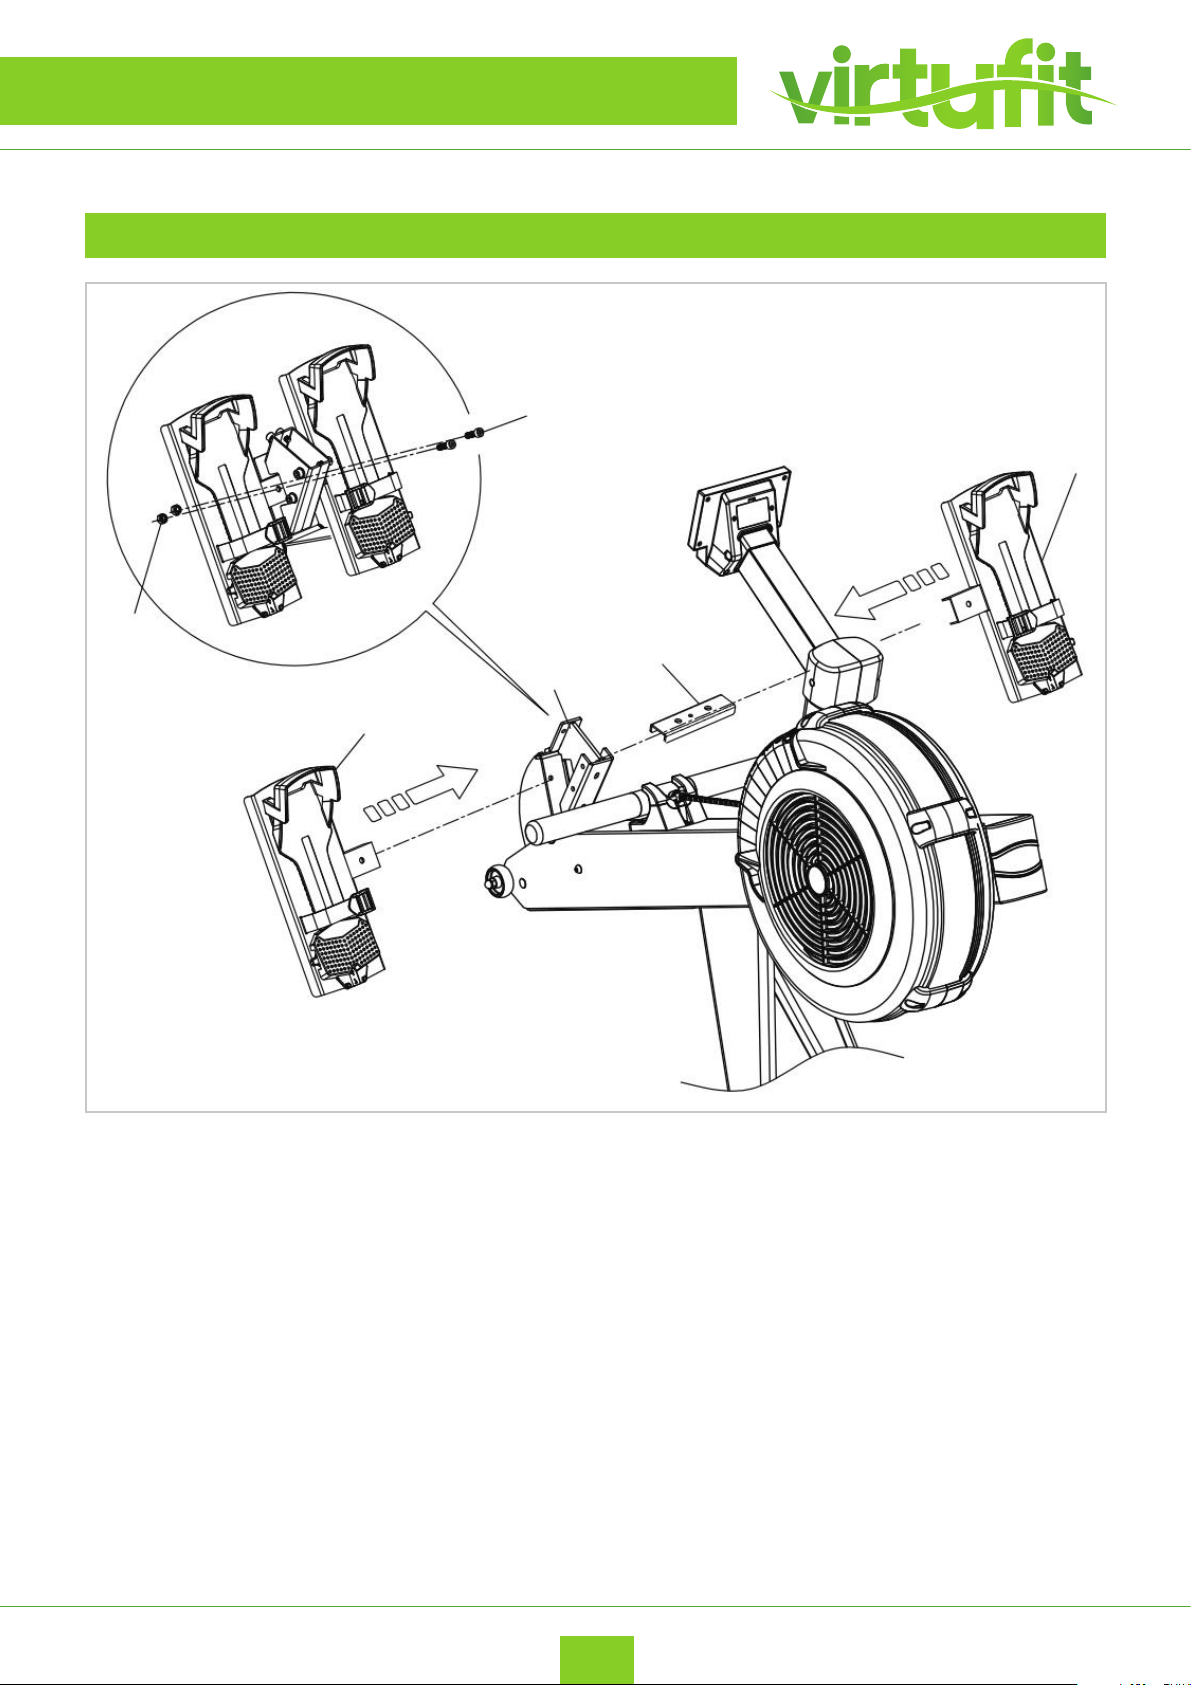
• To install Rear Base Leg (D), face Base Railing (B) face down so that the receiving device for the seat cushion
is on the oor. Place Rear Base Leg (D) above the pre-screwed holes of the Base Rail (B). Once placed secure
with 2 (J1) Bolt(s) and (J2) washer(s).
9
EN
VirtuFit Ultimate Pro 2 Ergometer Rowing Machine
Page 10
ASSEMBLY INSTRUCTIONS
J0
STEP 5
J5
E1
K
A
E2
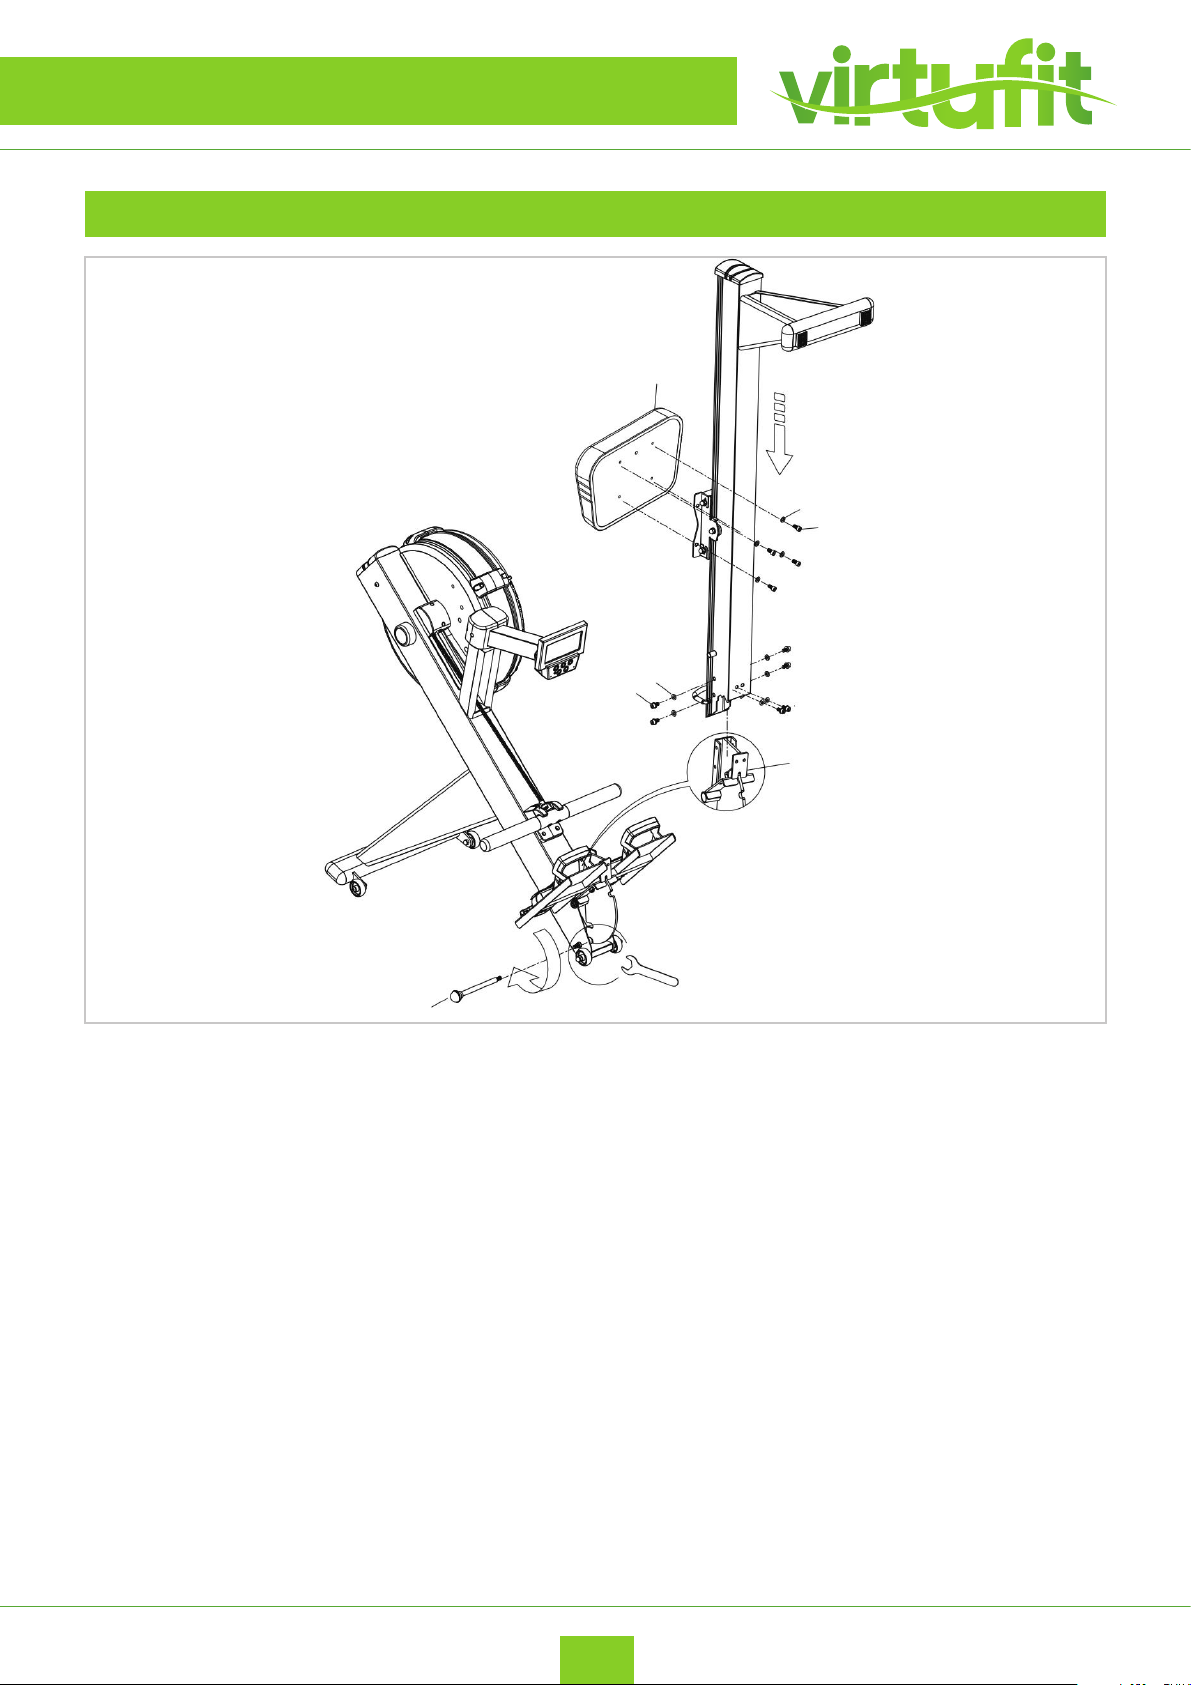
• To install foot pedals (E1) and (E2) into (A) Forward Base join the together by Steel Bracket (K). Steel
Bracket (K) should slide into place of Foot Pedal (E1). Once placed secure with 2 (J5) bolts, 2 (J10)
spring washers and 2 (J0) nuts.
NOTE: You must install foot pedals before moving forward with the assembly process. Should Step 5 be skipped
the Pre-screwed holes on the base railing would cover up the pre screwed holes on the Forward Base leg where
the foot pedals are to be installed. So make sure you do not skip step 5.
VirtuFit Ultimate Pro 2 Ergometer Rowing Machine
EN
10
Page 11
ASSEMBLY INSTRUCTIONS
STEP 6
J6
F
J7
J6
B
J7
A
J8
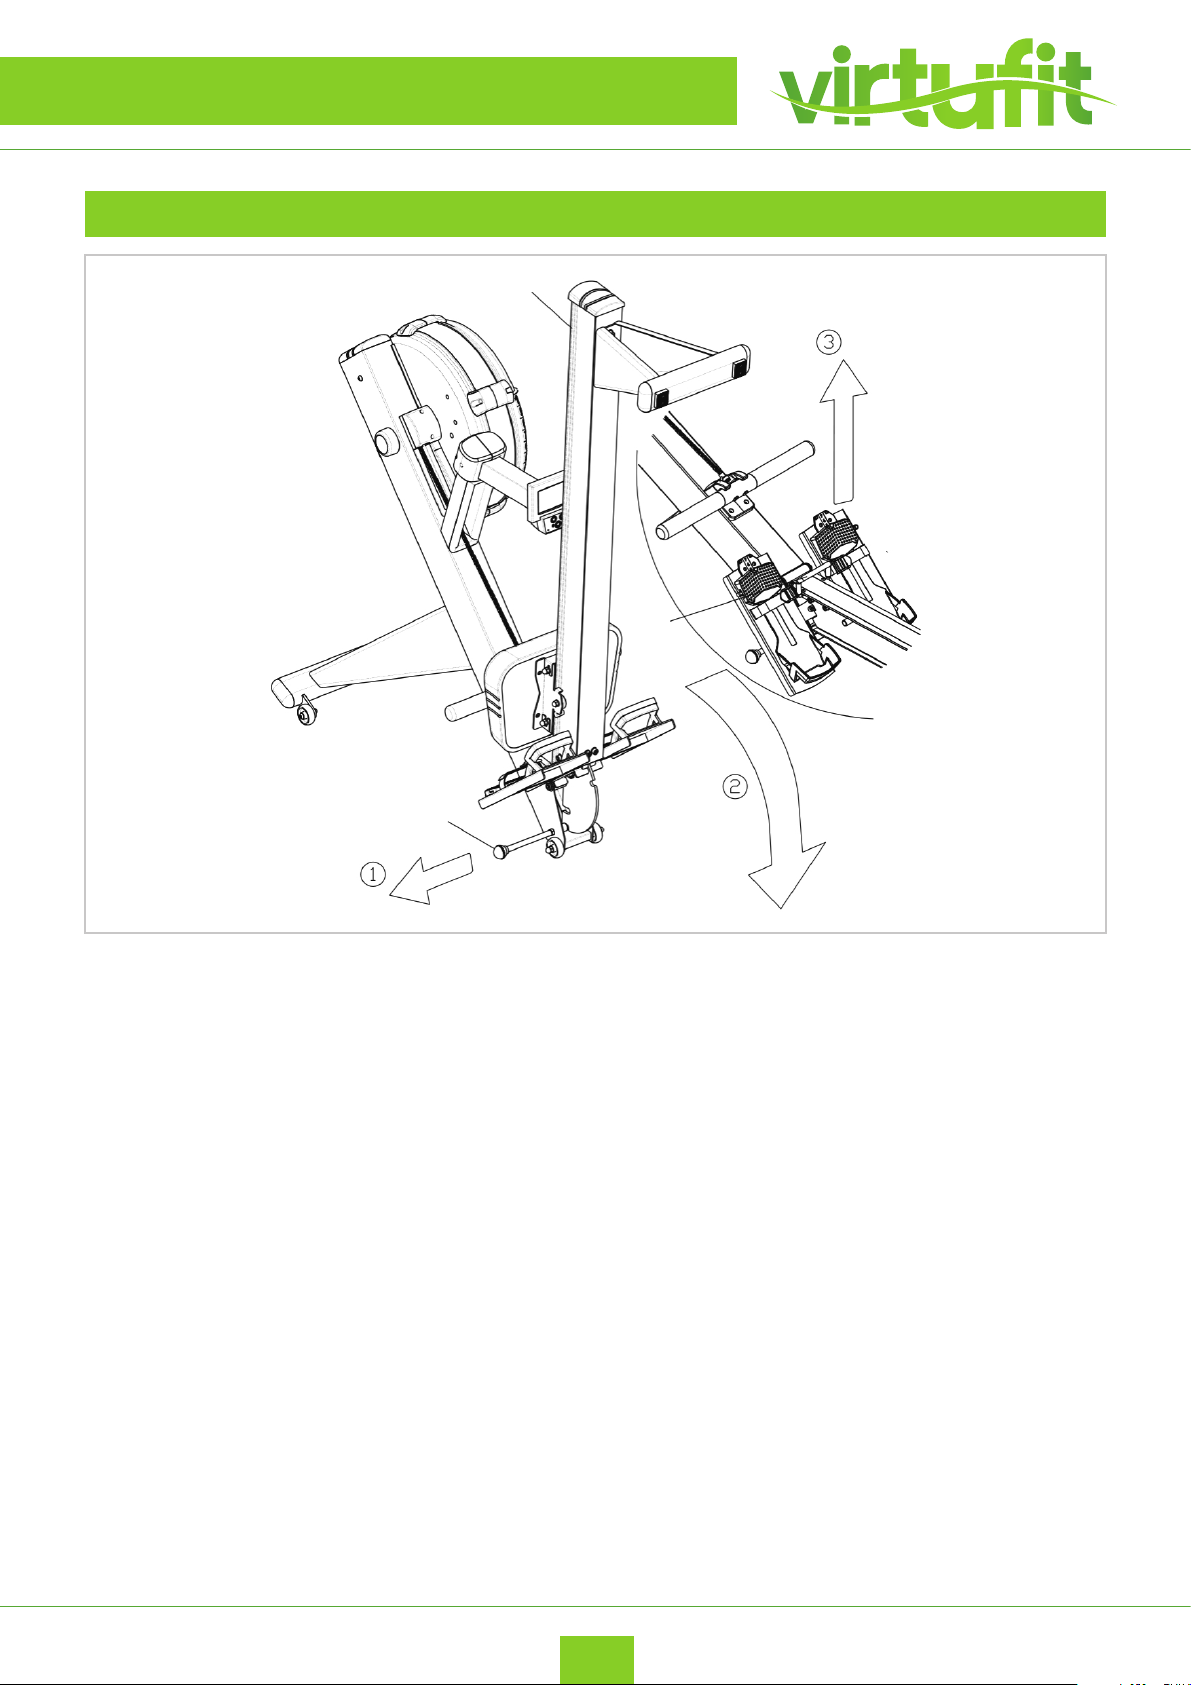
• To install Seating place Seat Cushion (F) above the pre-screwed holes of Base Railing (B). The high
angled read end of Seat Cushion (F) should face the back end of Base Railing (B). Secure with 4 Bolts
(J6) and 4 washers (J7).
• To install Pull pin (J8) locate the pre-screwed bolt at the end of Forward Base (A) and turn clockwise
until the bolt is securely fastened.
• Align Forward Base (A) with Base Railing (B) until the pre-screwed holes are aligned with one
another. Secure Forward Base (A) to Base Railing (B) with 4 Bolts (J6) and 4 Washers (J7).
11
• NOTE: Please be sure to tighten and secure ALL BOLTS AND WASHERS IN THEIR PLACE TO ENSURE A SOLID
AND SECURE foundation to the rower.
EN
VirtuFit Ultimate Pro 2 Ergometer Rowing Machine
Page 12
ASSEMBLY INSTRUCTIONS
STEP 7
Rower storage
• To fold the VirtuFit Ultimate Pro 2 Ergometer Rowing Machine, simply pull the PULL PIN (J8) while
holding the Rail Handle (B21) located between Forward Base (A) and Base Railing (B). Gently set
Forward Base (A) down to ground by controlling Rail Handle (B21) gently downwards. This will cause
Forward Base (A) to drop down and will allow you to raise Base Railing (B) until it clicks securely
into a folded position. When you are ready to unfold the VirtuFit Ultimate Pro 2 Ergometer Rowing
Machine again, simply pull on PULL PIN (J8) while holding onto Base Railing (B). Gently set Base
Railing (B) onto ground, then use Rail Handle (B21) to pull upwards until rower clicks into unfolded
position.
Please use a rm grip on ALL MOVING PARTS when folding the VirtuFit Ultimate Pro 2 Ergometer
Rowing Machine. The weight of the rower will cause Forward Base (A) to drop aggressively when folding and
will cause Base Railing (B) to drop aggressively when unfolding.
VirtuFit Ultimate Pro 2 Ergometer Rowing Machine
EN
12
Page 13
ASSEMBLY INSTRUCTIONS
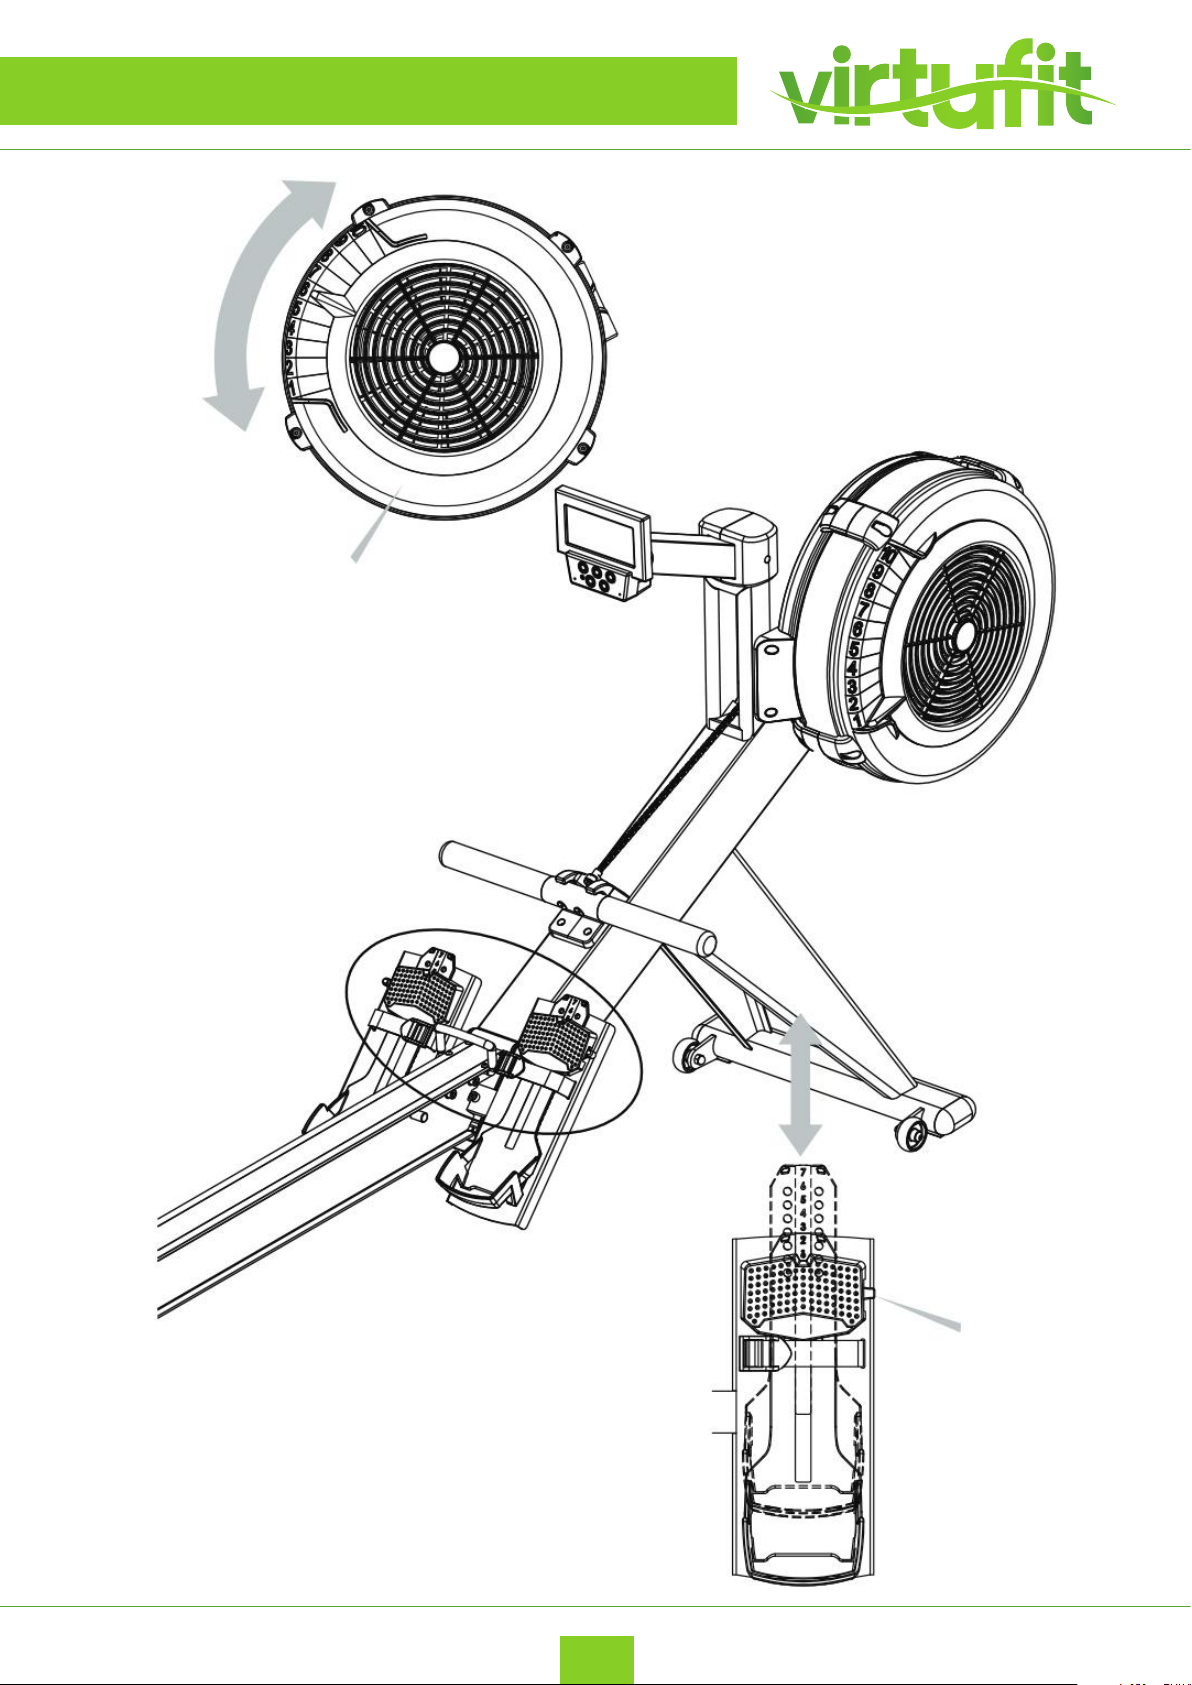
Damper level
13
Push down to adjust the position of the heel support
EN
Foot height adjuster
VirtuFit Ultimate Pro 2 Ergometer Rowing Machine
Page 14
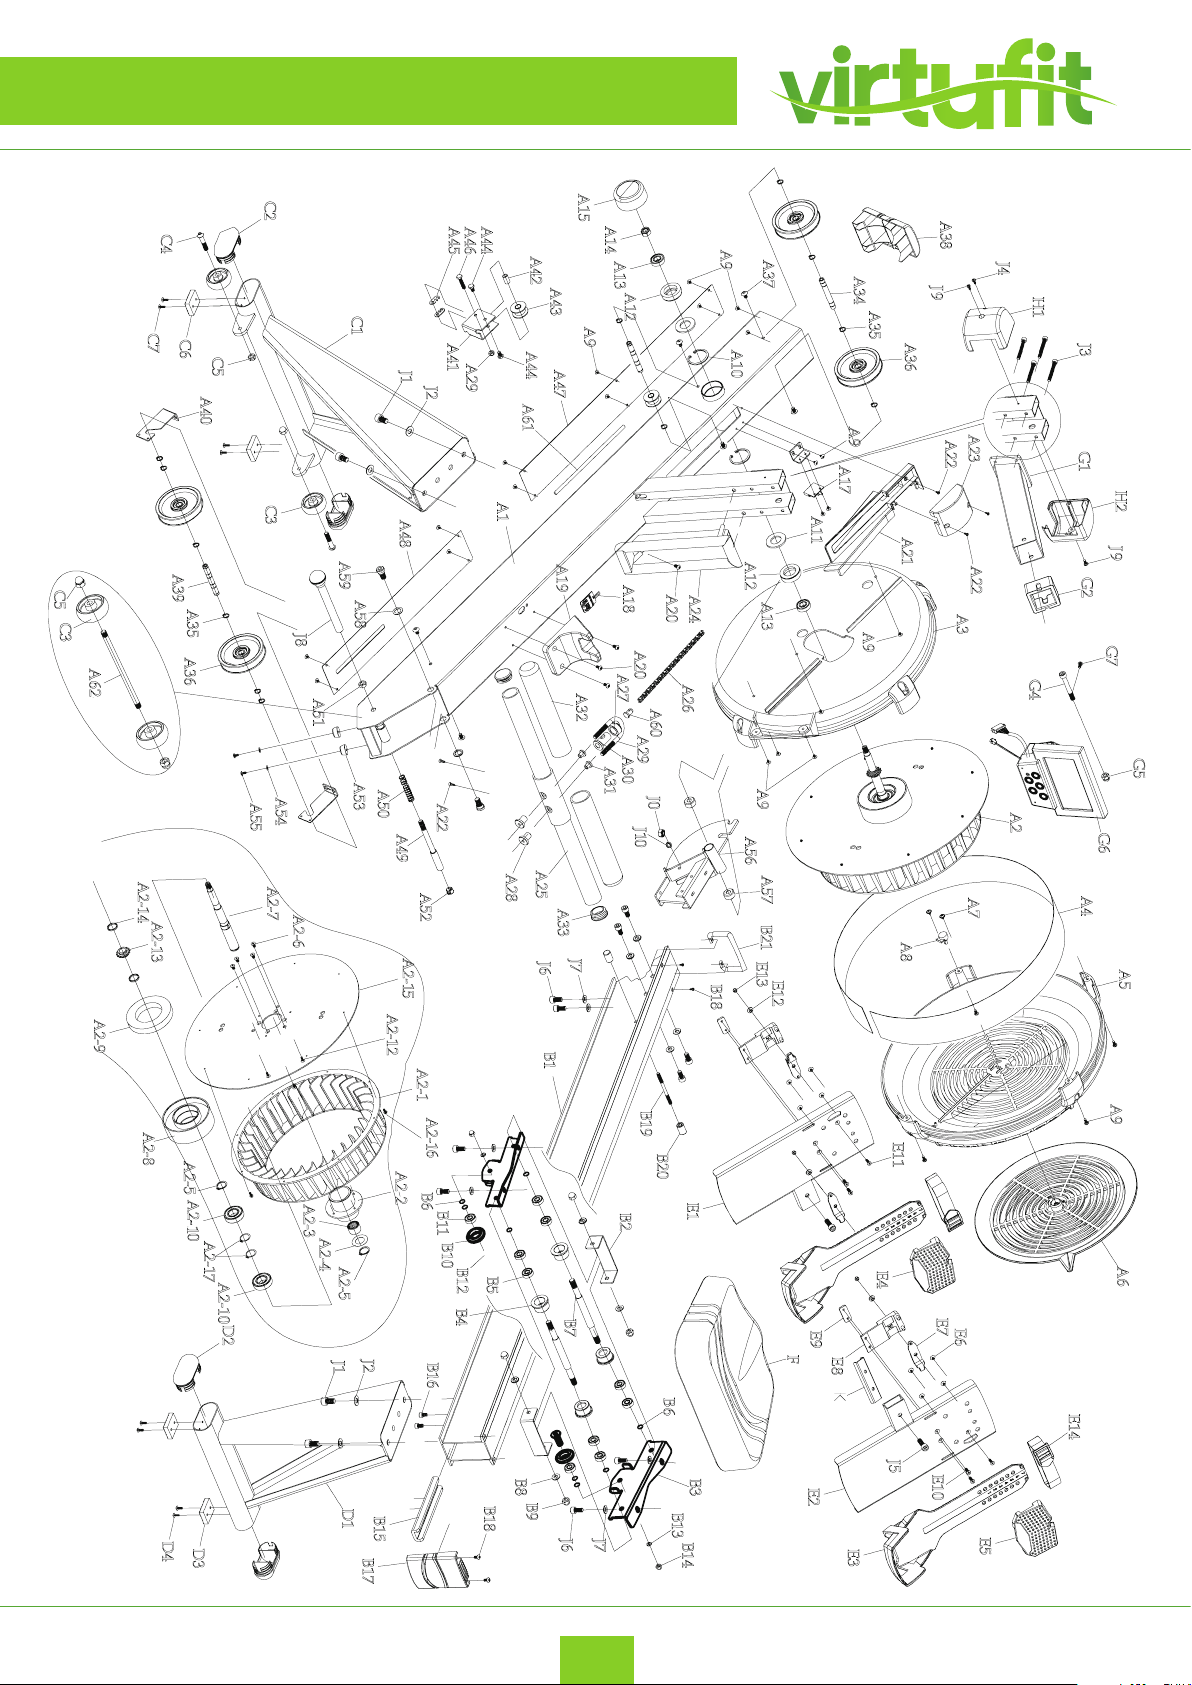
EXPLODED DRAWING
VirtuFit Ultimate Pro 2 Ergometer Rowing Machine
EN
14
Page 15
PARTS LIST
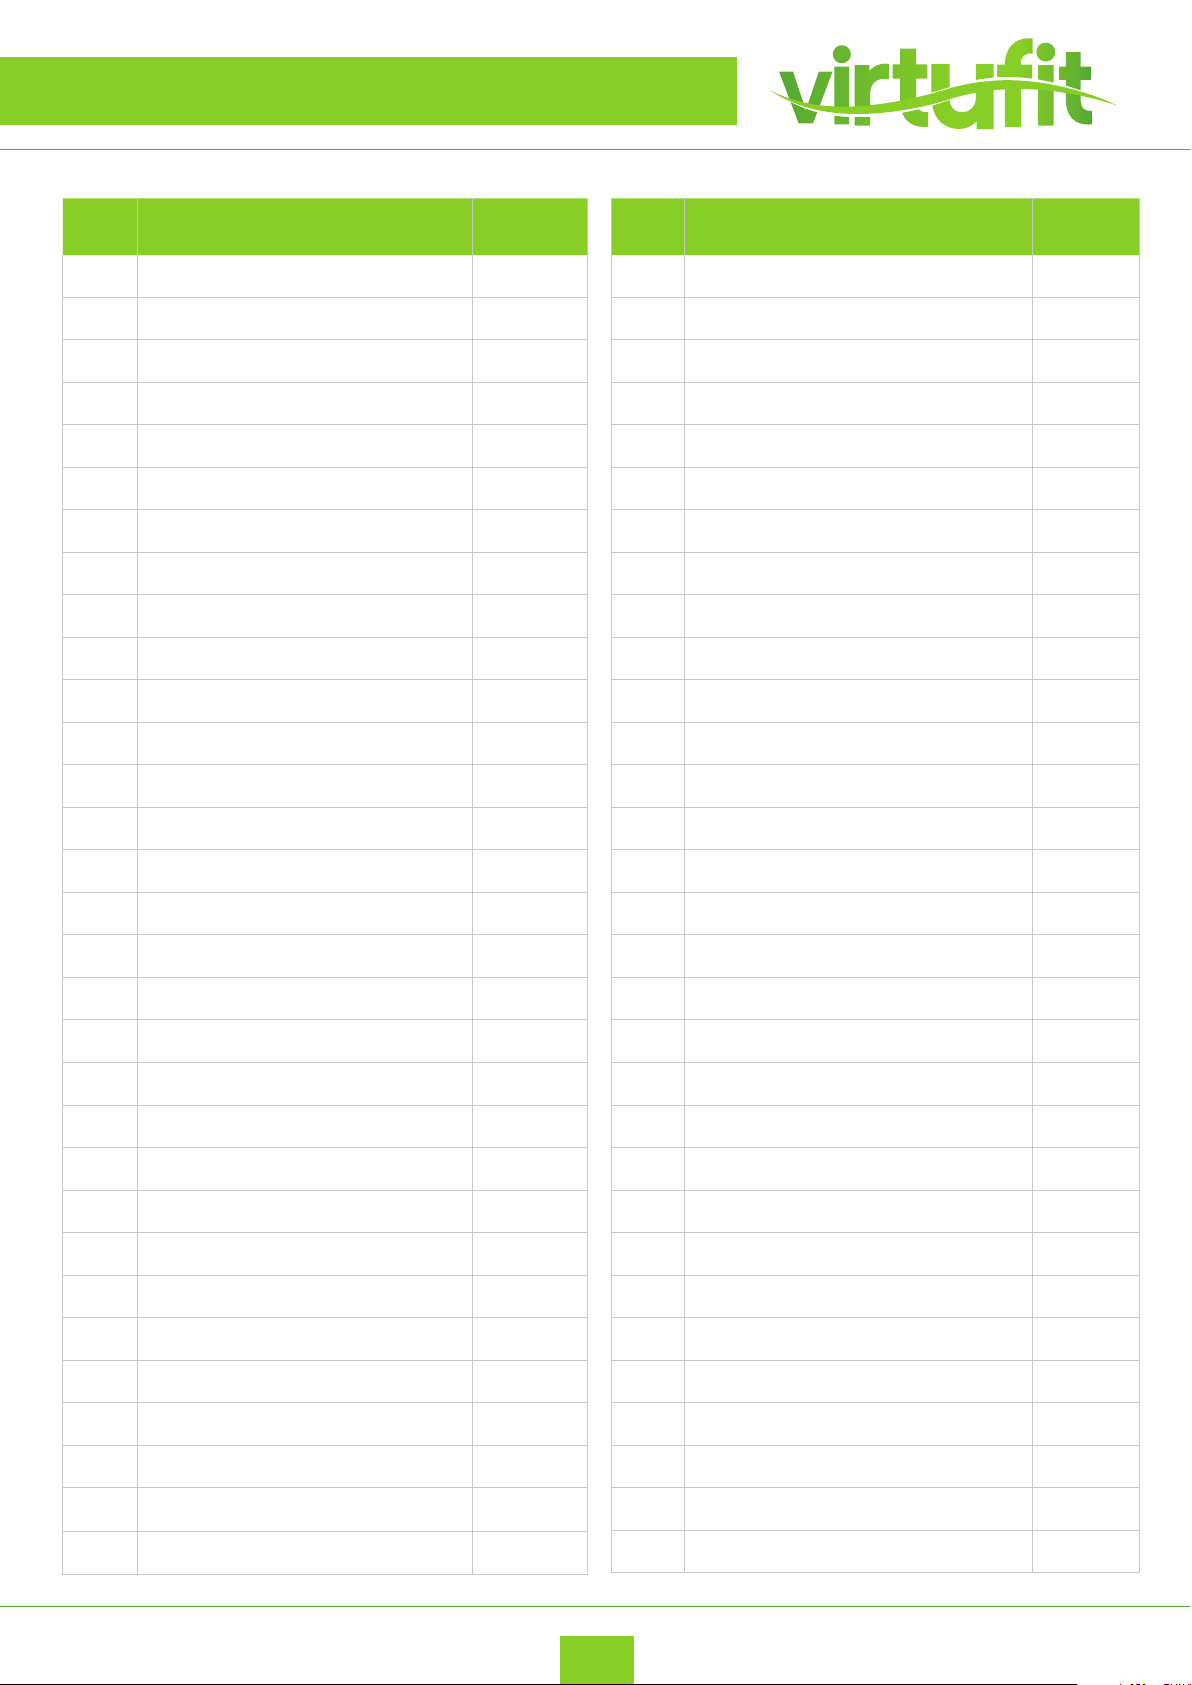
# DESCRIPTION QT Y.
A1 Main Frame assembly 1
A2 Flywheel fan assembly 1
A2-1 Fan 1
A2-2 Tube 1
A2-3 One-way bearing FC2016 1
A2-4 Iron washer 1
A2-5 S-type buckle S20 2
A2-6 Cap head socket screw M5*10 mm 4
A2-7 Axial of ywheel Φ20x197 mm 1
A2-8 Magnet covering 1
A2-9 Ring magnet Φ100*Φ60*15T 1
A2-10 Bearing BR-6004ZZDKFL 2
A2-12 Tapping screw M4*12 mm 3
# DESCRIPTION QT Y.
A14 Nylon Insert Lock Nut M10 1
A15 Ring cover ABS 1
A16 Sensor Bracket 1
A17 Sensor 1
A18 Heart rate receiver 1
A19 Handle holder ABS 1
A20 Philip head socket screw M5*10 mm 4
A21 Sensor Base Cover ABS 1
A22 Tapping screw M4*12 mm 5
A23 Sensor cover ABS 1
A24 Outer chain cover ABS 1
A25 Handle-bar Φ31.8 1
A26 1/4” chain 1
A2-13 1/4” Chain gear 1
A2-14 PU washer 2
A2-15 Fan stable bracket Φ430*2.5T 1
A2-16 Tapping screw M4*10 mm 8
A2-17 R-type buckle R42 2
A3 Chain cover (left) ABS 1
A4 ‘Mesh’ 1
A5 Chain cover (right) ABS 1
A6 Adjust disc ABS 1
A7 Tapping screw M4 * 8 mm 2
A8 Variable resistor 1
A9 Tapping screw M4 x 12 mm 21
A10 C-type buckle R40 2
A11 Washer Φ22*Φ44.2*3T 2
A27 Chain connecting spacer SC-2473 1
A28 Evan Nut 2
A29 Chain hook 1
A30 Chain connector 1
A31 T-type nut 2
A32 Hand grip 2
A33 End cap 2
A34 Axial of pulley (front) Φ10*79.8 mm 1
A35 C-type buckle 10
A36 Pulley 4
A37 Philip head socket screw M5*10 mm 4
A38 Main frame Front cap ABS 1
A39 Axial of pulley (back) Φ12.7*76 mm 2
A40 Elastic rope bracket 2
A12-1 Rubber Cover 6001 1
A12-2 Rubber Cover 6903 1
A13-1 Bearing BR-6001ZZDKFL 1
A13-2 Bearing BR-6903ZZDKFL 1
15
A41 Chain bracket 1
A42 Pulley socket 1
A43 Chain pulley 2
A44 Hexagon head screw M6*10 mm 2
EN
VirtuFit Ultimate Pro 2 Ergometer Rowing Machine
Page 16
PARTS LIST
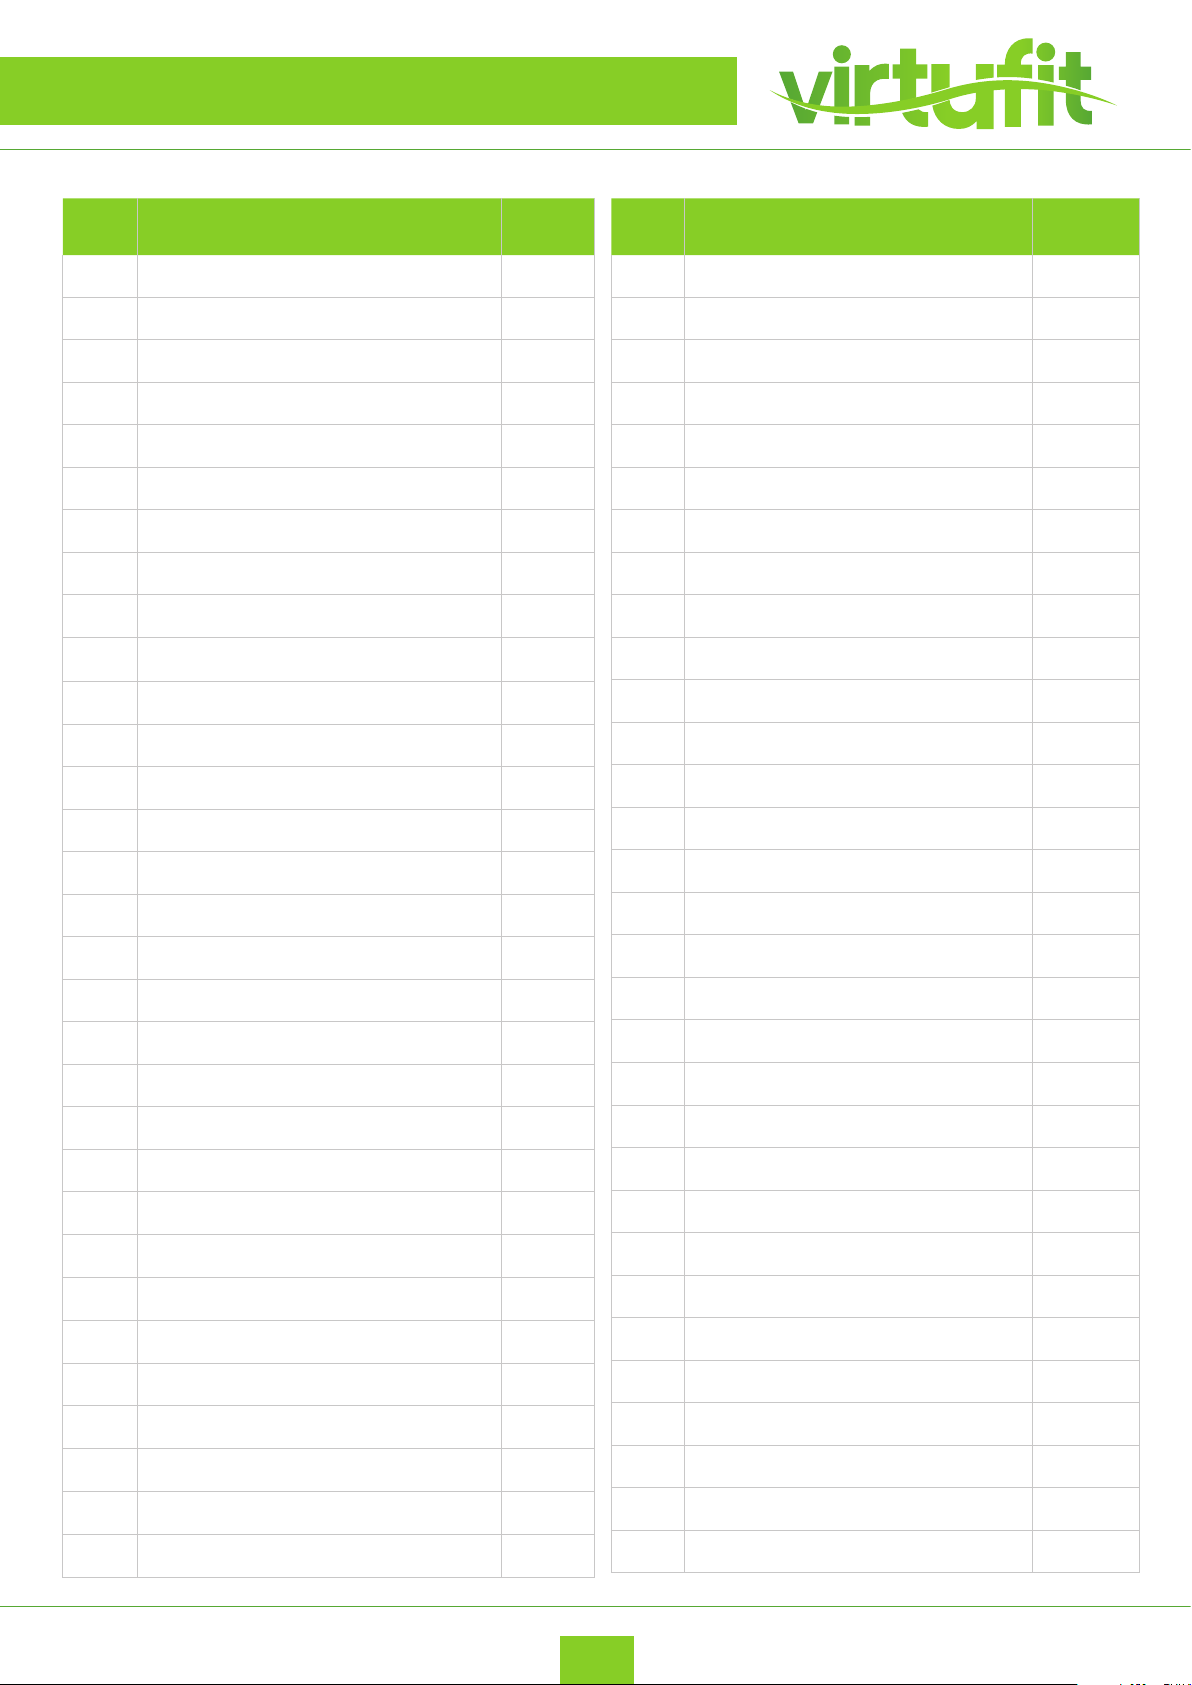
# DESCRIPTION Q TY.
A45 Trim panel 2
A46 Heaxagon head screw M6*30 mm 1
A47 Main frame bottom board (front) 1
A48 Main frame bottom board (back) 1
A49 Axial of pin Φ12.7*76 mm 1
A50 Spring 1
A51 Nut 1
A52 Plug block 1
A53 Foot pad 1
A54 Washer M4*Φ10*1T 2
A55 Tapping screw M4*10 mm 2
A56 Swivel axial 1
A57 Swivel axial socket Φ21.5*12 mm 2
# DESCRIPTION QTY
B13 Washer M8*Φ16*2T 2
B14 Lower acorn nut M8 2
B15 Rail upper plate 1
B16 Cap head socket screw M6*10 mm 2
B17 Rail end cap ABS 1
B18 Philip head socket screw M5*10 mm 4
B19 Double head screw Φ5.25*85 mm 1
B20 Seat carriage stopper TPR 2
B21 Rail handle 1
C1 Front stabilizer 1
C2 Flat oval cap 40*80 2
C3 Moving wheel Φ50 4
A58 Washer 1/2*2.0T*Φ23 2
A59 Cap head socket screw M10*16 mm 2
A60 Chain connecting axial 1
A61 Elastic rope 1
A62 Axial of moving wheel Φ8*156 mm 1
B1 Aluminum rail 1
B2 Seat carriage roller cover 2
B3 Seat carriage cover 2
B4 Seat carriage wheel 4
B5 Bearing PR-608ZZ(BMC) 8
B6 Spacer Φ8*Φ12*2 mm 8
B7 Seat carriage axial Φ10*121 mm 2
B8 Washer M8*2.0T*Φ16 4
C4 Philip head socket screw M8*40 mm 2
C5 Lower acorn nut M8 4
C6 Foot pad 2
C7 Tapping screw M4*12 mm 2
D1 Rear stabilizer 1
D2 Flat oval cap 40*80 2
D3 Foot pad 40*32 2
D4 Tapping screw M4*12 mm 2
E1 Left pedal rest 1
E2 Right pedal rest 1
E3 Adjust pedal pad TPE 2
E4 Left pedal rest cover 1
B9 Lower acorn Nut M8 4
B10 Seat carriage roller 2
B11 Bearing PR-608ZZ(BMC) 2
B12 Even head socket screw M8*20 mm 2
VirtuFit Ultimate Pro 2 Ergometer Rowing Machine
E5 Right pedal rest cover 1
E6 Tapping screw M4*8 mm 8
E7 Set piece 2
E8 Set base 2
EN
16
Page 17
PARTS LIST
# DESCRIPTION QT Y.
E9 Foot snap 2
E10 Flat head philips screw M5*15 mm 4
E11 Flat head philips screw M4*15 mm 2
E12 Spacer 2
E13 Nylon isert lock nut M4 2
E14 Foot strap 2
F Seat 1
G1 Console tube 1
G2 Console bracket 1
G3 Console back cover (old design) 1
G4 Cap head socket screw M8*85 1
G5 Nylon acorn nut M8 1
G6 Console 1
G7 Ball head screw M5*10 mm 4
H1 Left display tube cover ABS 1
H2 Right display tube cover ABS 1
J0 Nylon insert lock nut M8 2
J1 Cap head socket screw M10*16 mm 4
J2 Washer M10*1.5T*Φ20 4
J3 Cap head socket screw M6*50 mm 4
J4 Tapping screw M4*12 mm 3
J5 Cap head socket screw M8*35 mm 2
J6 Cap head socket screw M8*16 mm 10
J7 Washer M8*Φ16*1.5T 10
J8 Pull pin 1
J9 Ball head view M4*10 mm 2
J10 Spring washers 2
K Pedal stable bracket 1
17
EN
VirtuFit Ultimate Pro 2 Ergometer Rowing Machine
Page 18

For questions or missing parts please contact your dealer.
 Loading...