

Page 1
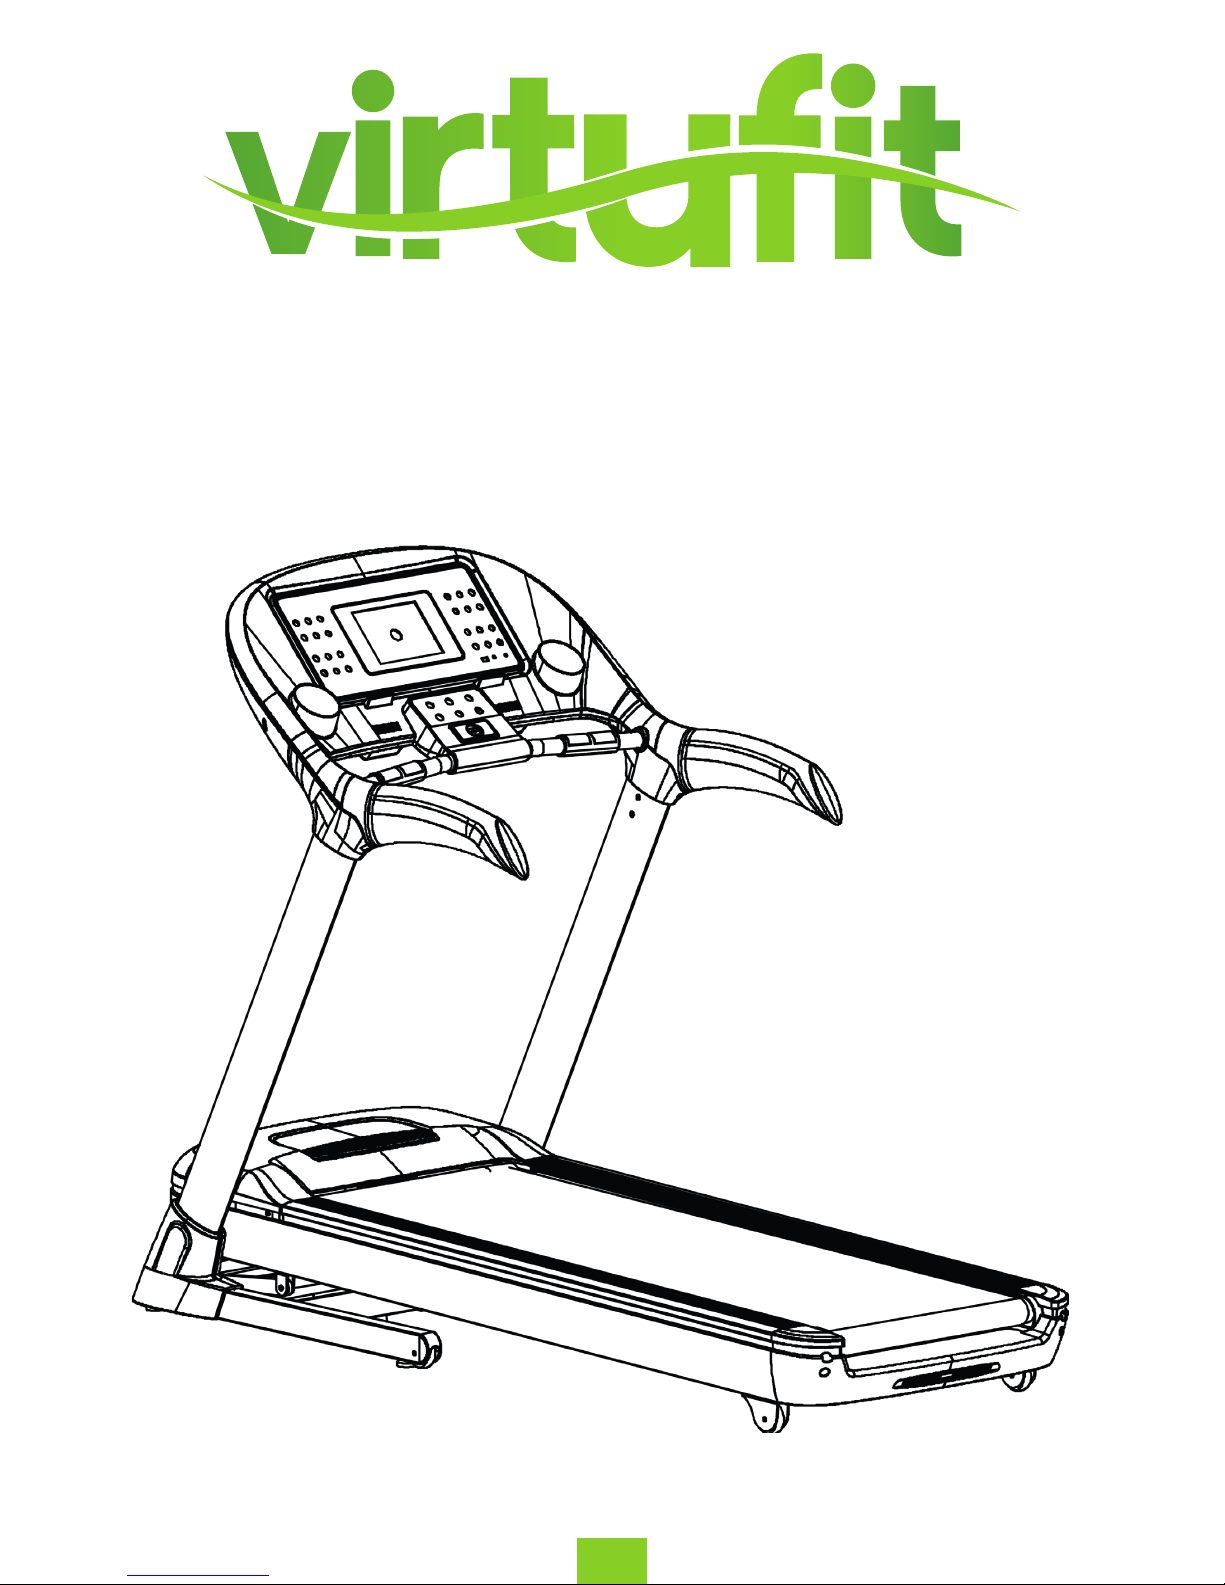
VirtuFit TR-900i Treadmill
1
TR-900i Treadmill
ENG
User manual
Page 2
ENG
VirtuFit TR-900i Treadmill
2
INDEX
Safety instructions 3-4
Checklist 5-6
Assembly instructions 7-10
Folding instructions 11-12
Maintenance treadmill 13-14
Problem solutions 15-16
Control panel 17-23
App possibilities 24
Exploded drawing 25
Parts list 26-29
Training instructions 30
Page 3

ENG
VirtuFit TR-900i Treadmill
3
SAFETY INSTRUCTIONS
WARNING: Now here we suggest that you should consult with your physician or health
professional before starting your workout, especially for the age up to 35 old or
once-health problem people. We take no responsible for any problems or injuries
if you don’t following our specication. Treadmill will be carefully assembled and
covered the motor shield, then connect to the power.
– Ensuring the safety clamps were attached to the clothing or belts before using the treadmill.
– Please do not insert any items to any part of the equipments, which would damage the equipment.
– Position the treadmill on a clear, level surface. Do not place the treadmill on thick carpet as it may
interfere with proper ventilation. Do not place the treadmill near water or outdoors.
– Never start the treadmill while you are standing on the walking belt. After turning the power on and
adjusting the speed control, there may be a pause before the walking belt begins to move, always
stand on the foot rails on the sides of the frame until the belt is moving.
– Wear appropriate clothing when exercising on the treadmill. Do not wear long, loose tting clothing
that may be caught in the treadmill. Always wear running or aerobic shoes with rubber soles.
– Keep the children and pets away from the treadmill while starting workout.
– Don’t exercise in 40 minutes after dinner.
– The equipment is suitable for adults, children need be accompanied with adults while workout.
– You must hold on to the handrails until you become comfortable and familiar with the treadmill
when it is your rst workout.
– Treadmill is indoor-using equipment, not outdoor-using for avoiding damage. Keep the store-place
clean and at, drying. Prohibiting the other purpose using, only for workout.
– Please purchase the power-line to the distributor or contact with our company directly, for the
powerline only equip to the treadmill.
ATTENTION
Page 4

ENG
VirtuFit TR-900i Treadmill
4
SAFETY INSTRUCTIONS
– The treadmill is for indoor and not outdoor use to prevent damage on the product. Keep the storage
area dry, clean and at. It is forbidden to use the device for other purposes than before training.
– Only use the power cable supplied by the supplier for the treadmill. If the cable is missing, please
contact our company.
– If the treadmill should suddenly increase in speed due to an electronics failure or the speed being
inadvertently increased, the treadmill will come to a sudden stop when the pull pin is disengaged
from the console.
– Do not connect line to the middle of cable; do not lengthen cable or change the cable plug; do not
put any heavy thing on cable or put the cable near the heat source; forbid using socket with several
holes, these may cause re or people may be hurt by the power.
– Cut o the power when the equipment is not used. When the power is cut o , do not pull the
power line to keep the wire unbroken. Insert the plug to the socket with the safety ground circuit,
for the power-line is professional equipment .You must contact with the professional people directly
while the line is damaged.
– This Treadmill only for home-using, the max user weight is 150 KGS.
– Please keep the space at least 1 X 2 meter at the end of base frame to escape any accidents!
Page 5
ENG
VirtuFit TR-900i Treadmill
5
CHECKLIST
TOOL KIT
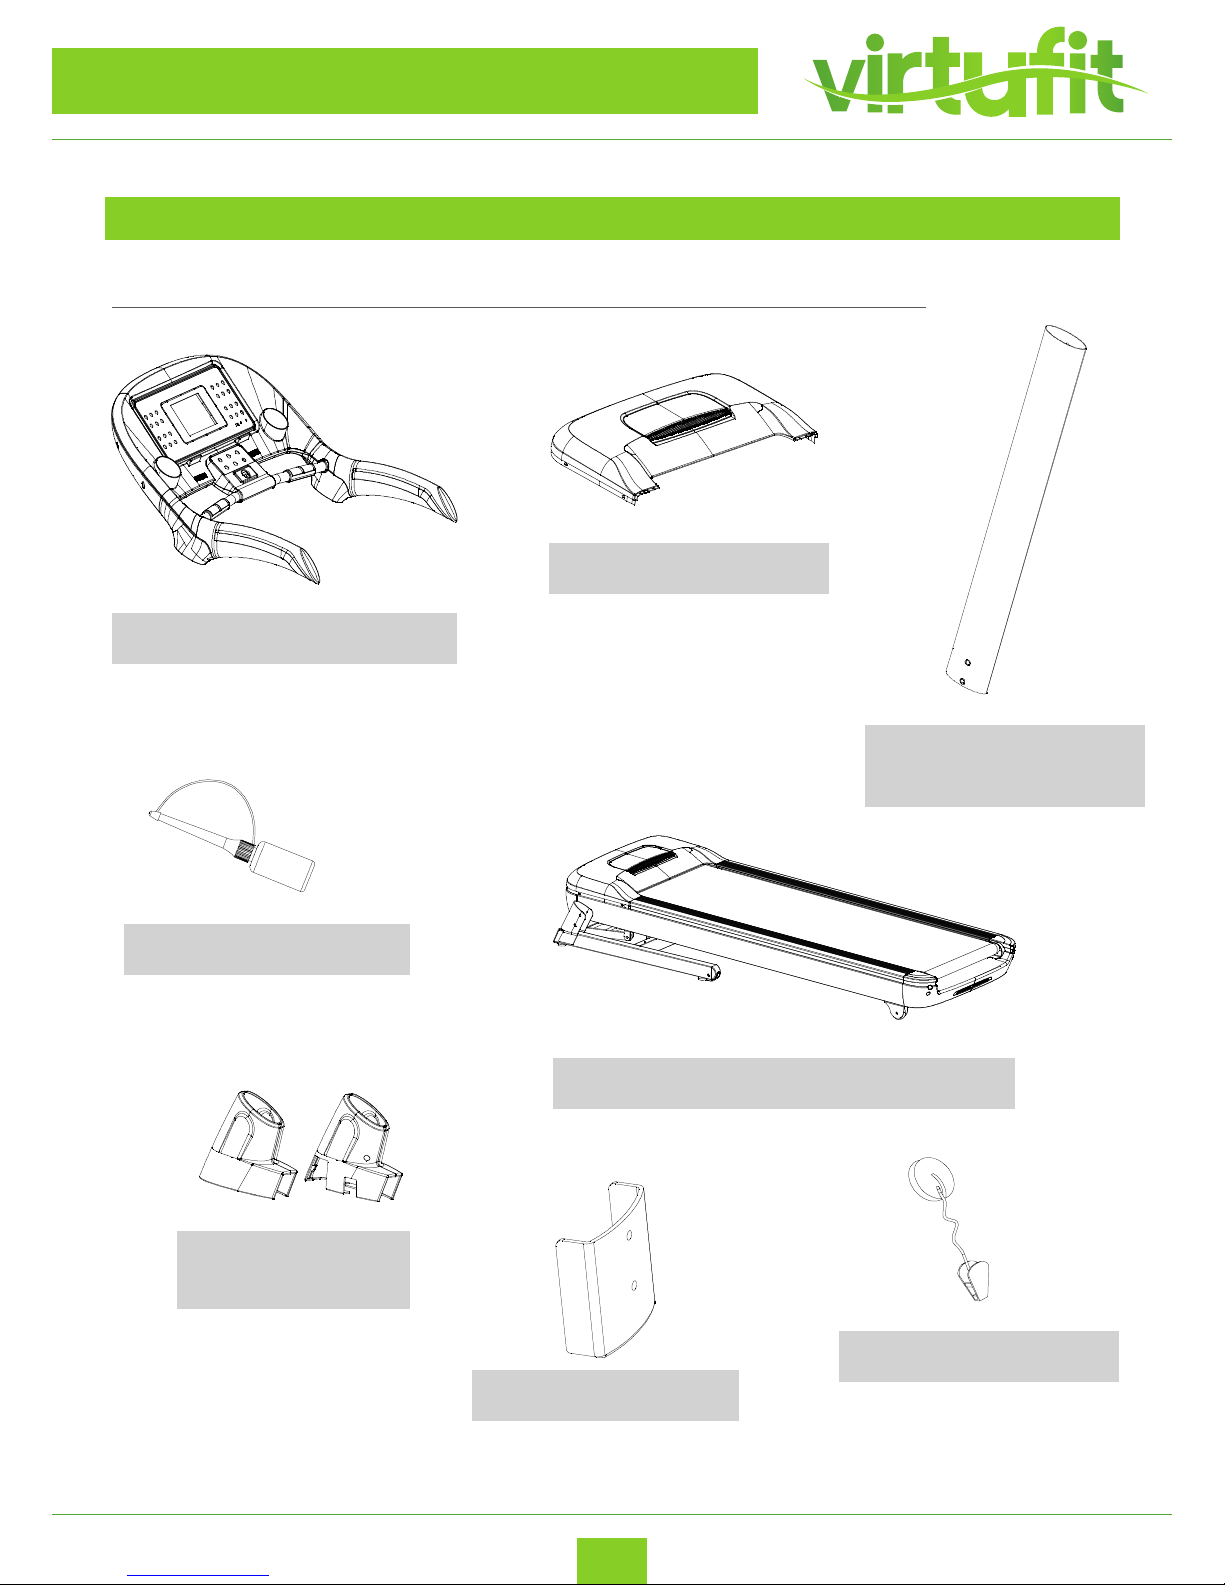
When you open the carton, you will find the below parts in the carton:
Console
Motor cover
Upright post
(L/R)
Silicon oil
Safety key
Main frame
Base cap 1 & 2 (L)
Base cap 1 & 2 (R)
Console clamping ring
Page 6
ENG
VirtuFit TR-900i Treadmill
6
CHECKLIST
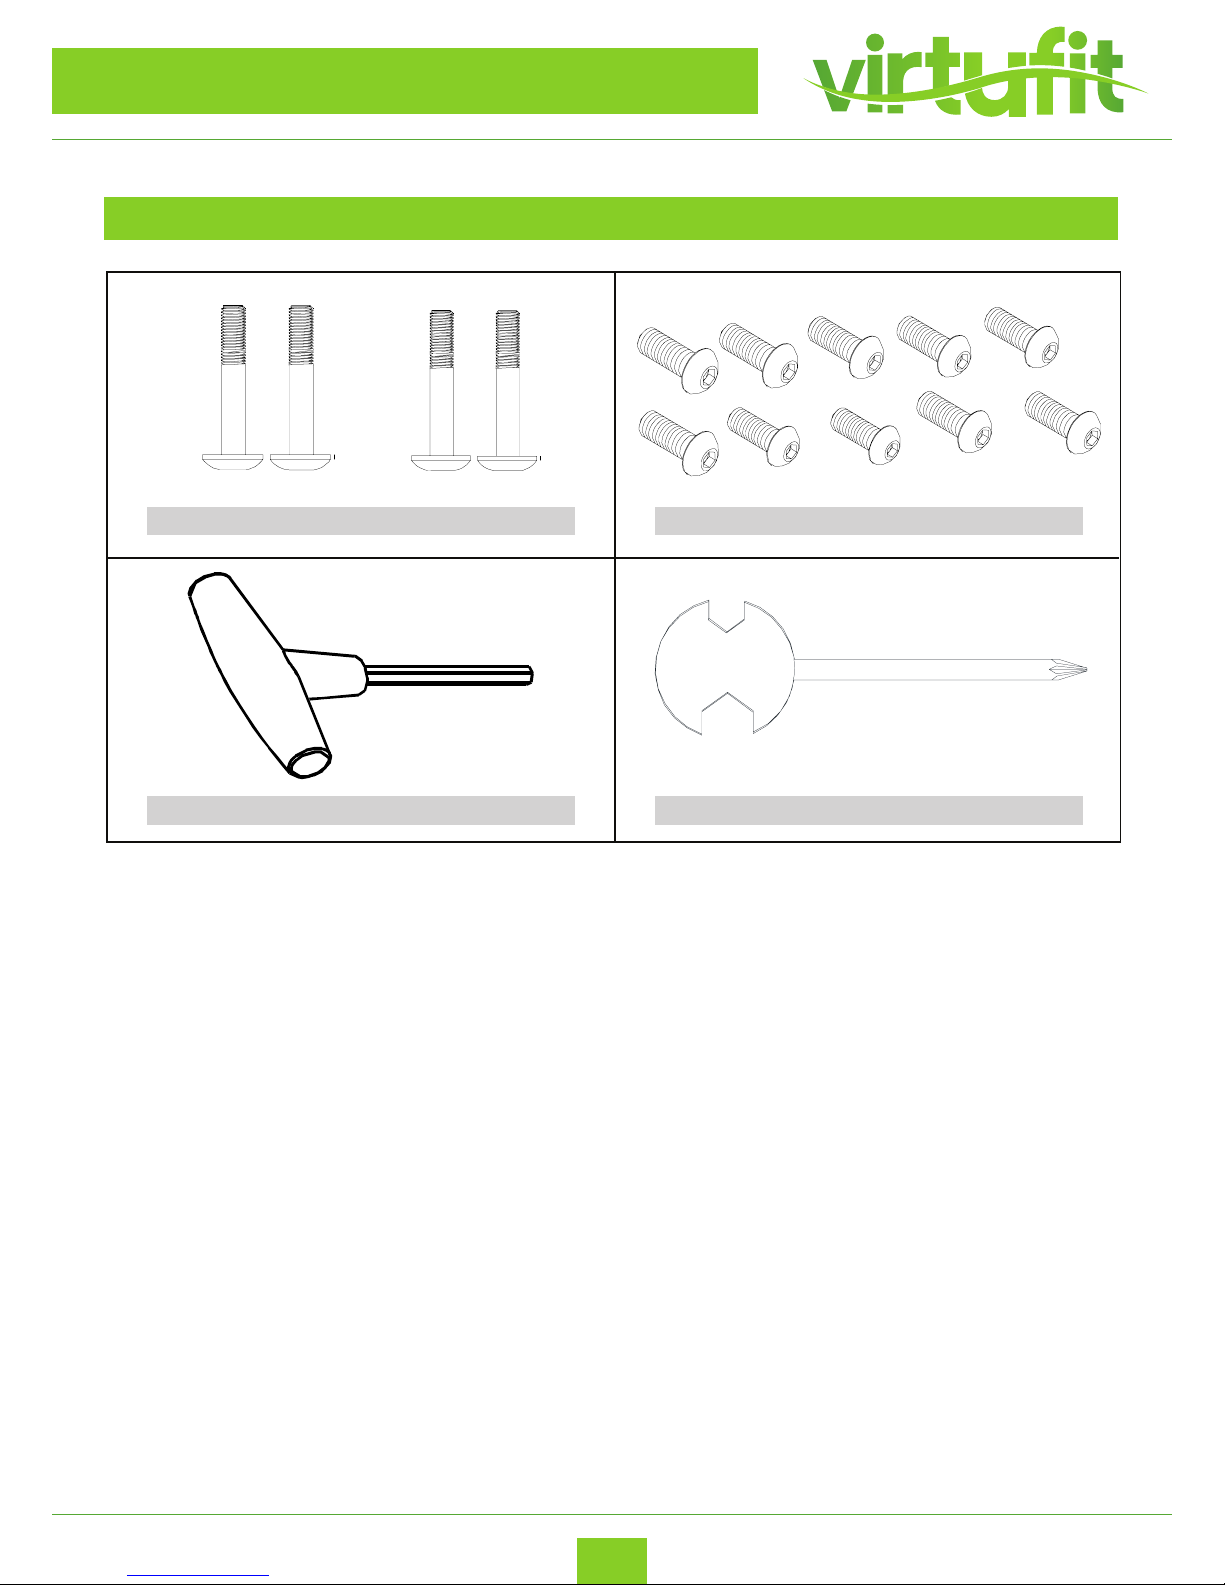
TOOL KIT
Allen screw (half) M8*60*20 (4 pieces)
Allen screw (full) M8*15 (10 pieces)
T shaped wrench M6 (1 piece)
Cross wrench (1 piece)
Page 7
ENG
VirtuFit TR-900i Treadmill
7
ASSEMBLY INSTRUCTIONS
Missing parts: If you think you are missing certain parts in your package, carefully check the styrofoa and
the treadmill. Some parts (bolts, screws, etc.) are already attached to / in the treadmill.
Socket screws: The treadmill contains socket screws, make sure that the allen key is rmly in the bolt
before you apply force to the key. In this way you prevent the head of the socket head screw from being
rotated.
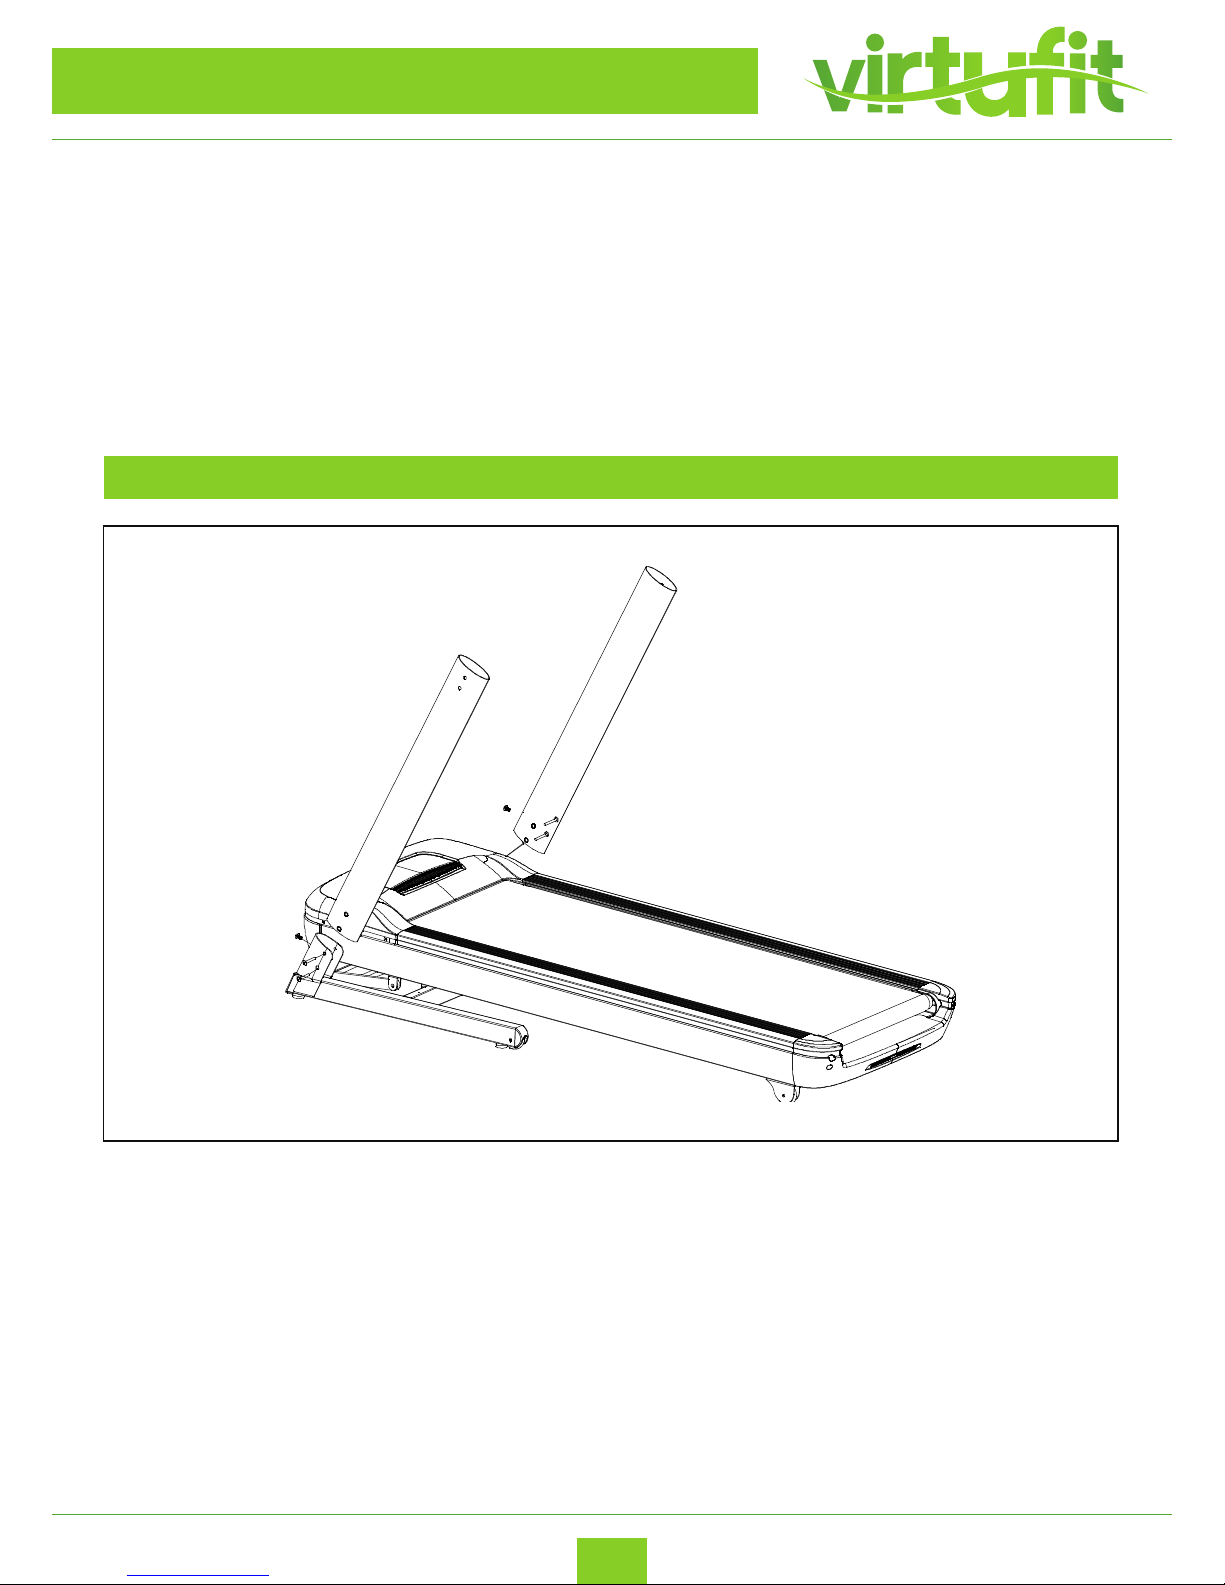
– Take out the machine from box and put in on a at oor.
– Insert the upright post into the clamping ring of both sides of the main frame;
– Attach the upright post with two M8*60*20 bolts on the side of the tube and with a M8*15 bolt
on the front. Tighten all bolts securely.
STEP 1
Page 8

ENG
VirtuFit TR-900i Treadmill
8
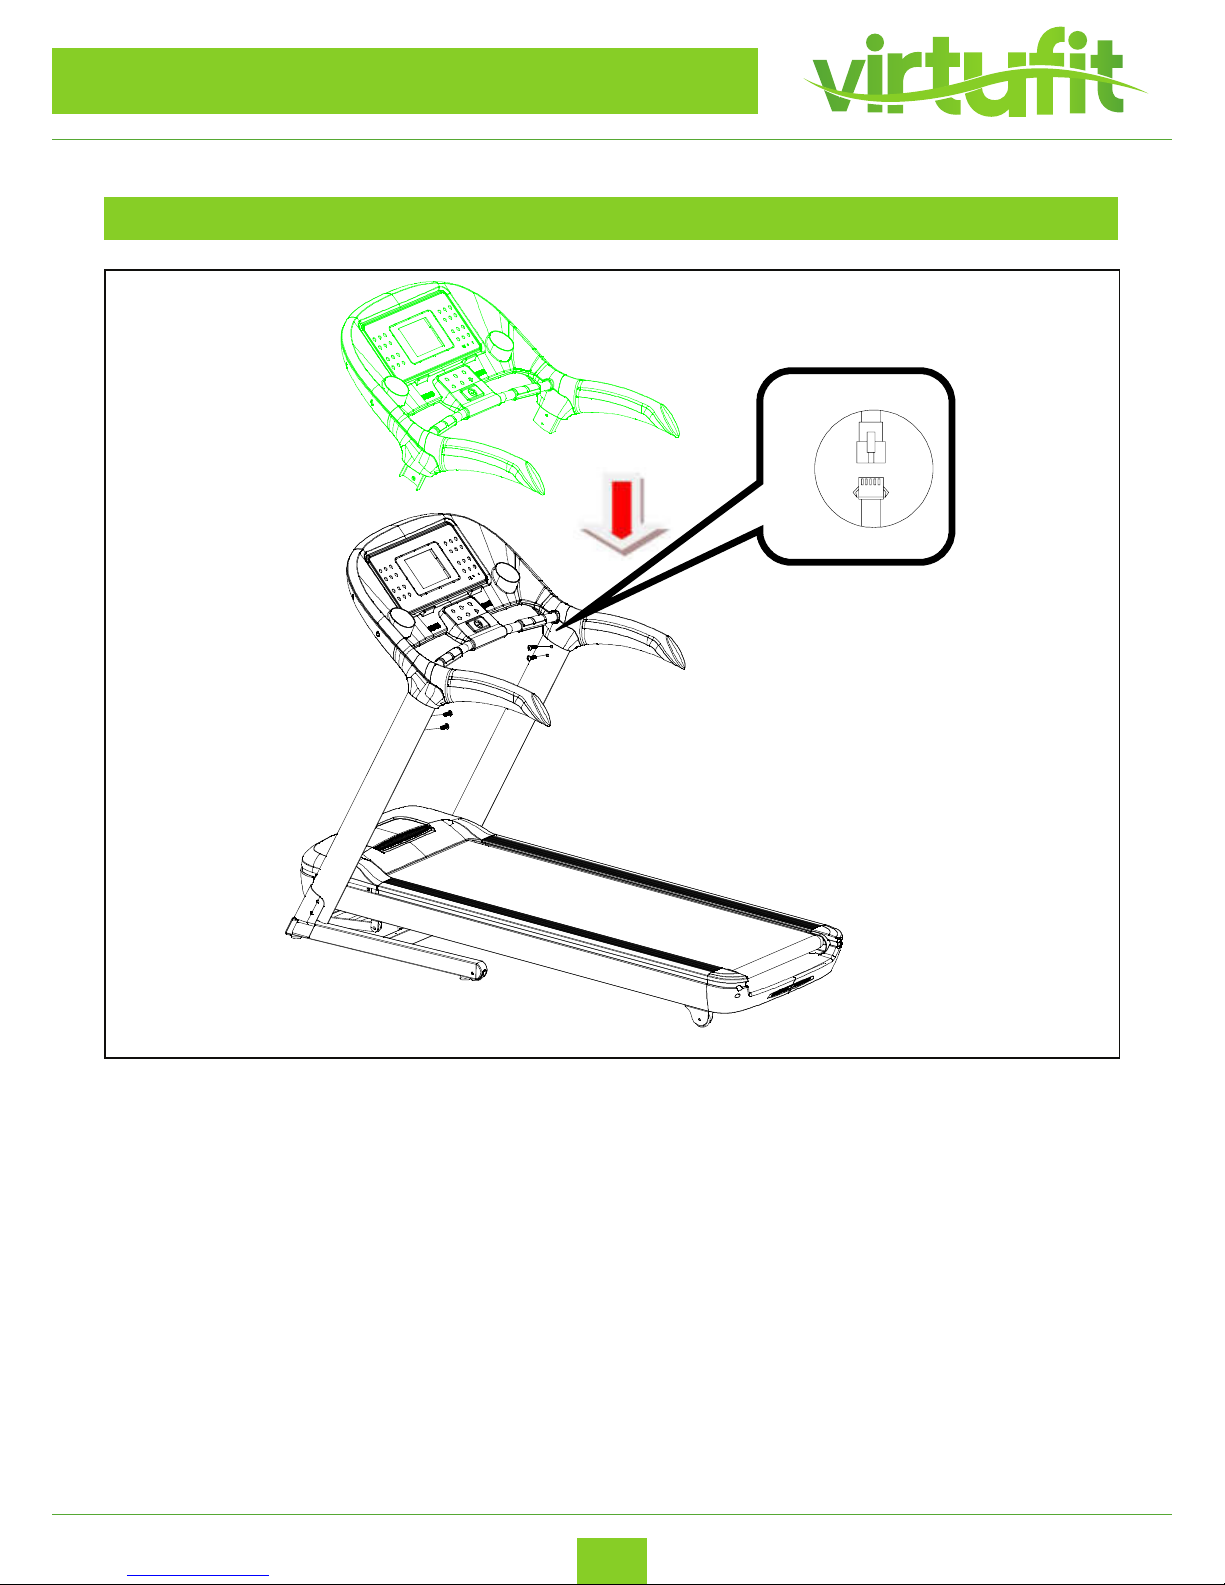
– Put the console on a at and clean oor. Preferably use a mat to prevent scratches;
– Remove the clamping ring fromt the console frame and align the hole on the two sides of the
handles (note: take the cable from the right handle out of the hole of the clamping ring to prevent
the cable from pinching), lock them using two M8*15 screws.
STEP 2
ASSEMBLY INSTRUCTIONS
Page 9
ENG
VirtuFit TR-900i Treadmill
9
– Insert the console with the installed console clamping ring into the upright tubes (connect the
cable until they snap in). Be careful and avoid pinching o the cable;
– Use screw M8*15 to secure the console to the upright tubes. Tighten all screws securely.
STEP 3
ASSEMBLY INSTRUCTIONS
Page 10
ENG
VirtuFit TR-900i Treadmill
10
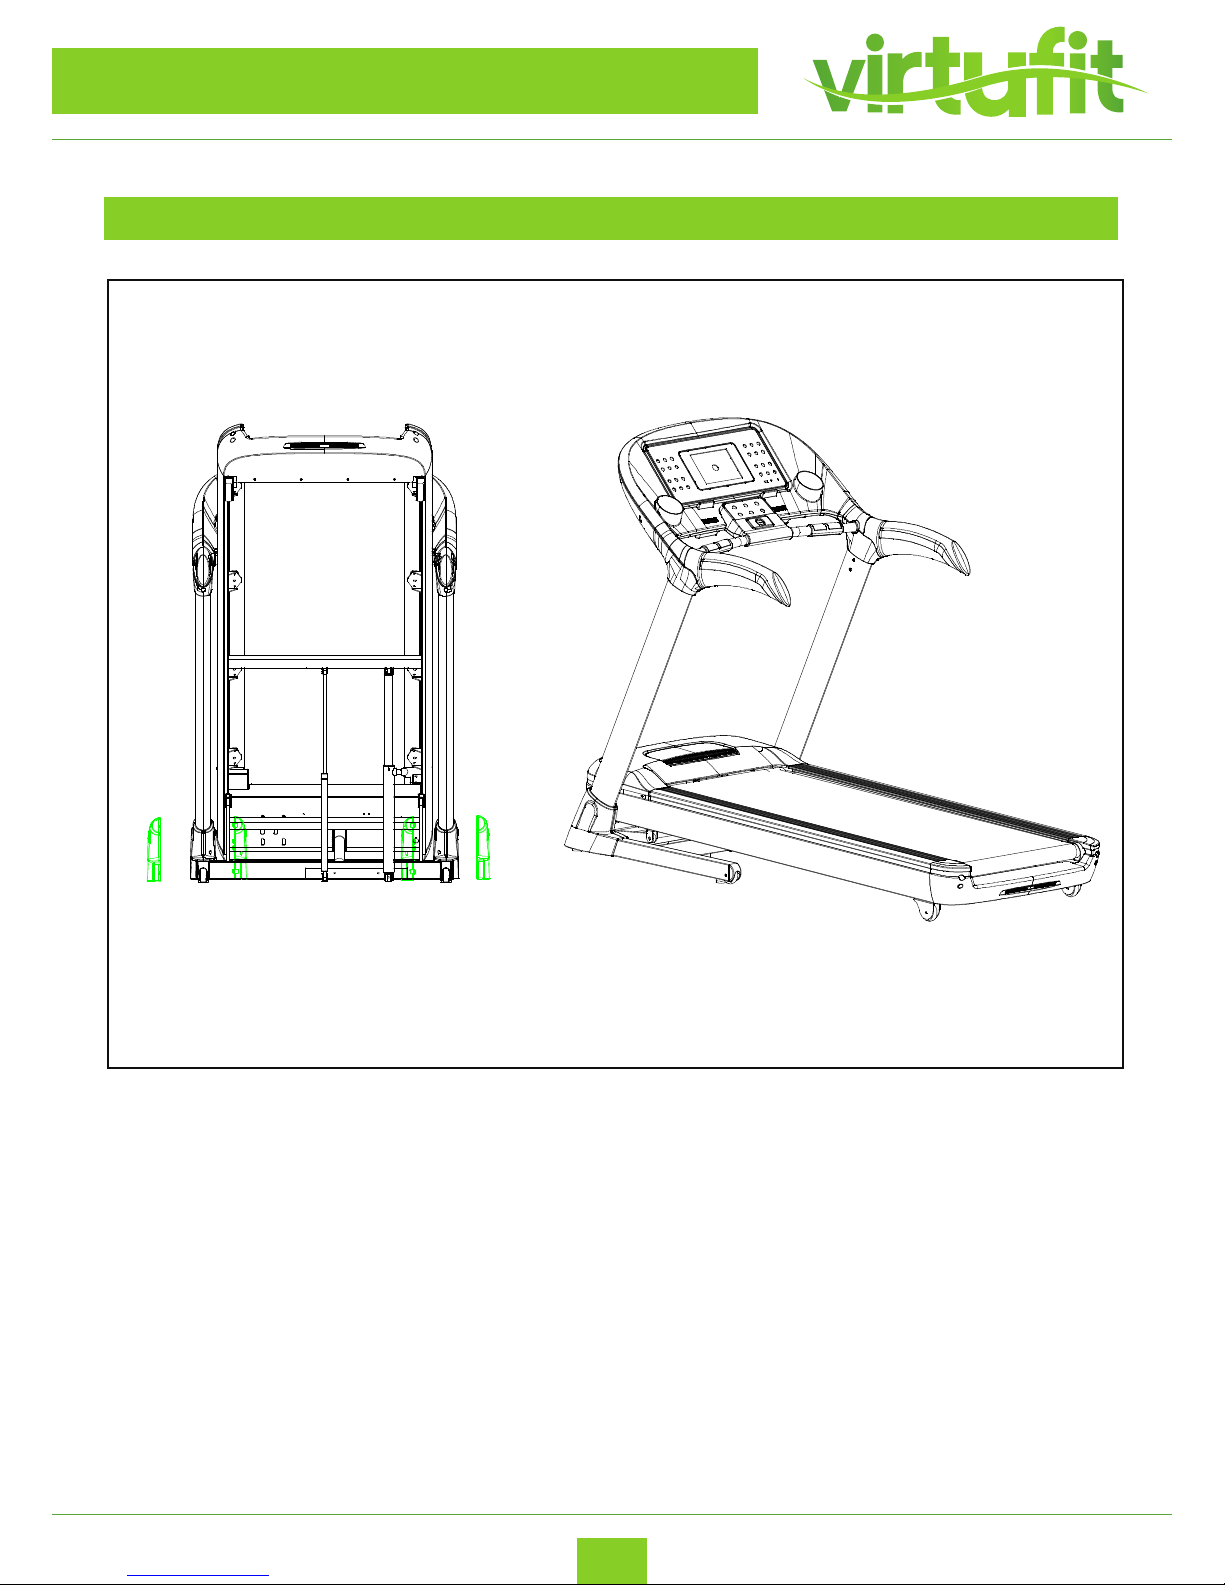
– Fold the machine by lifting the Running desk at the back. Install the caps L 1&2 and R 1& 2 (63,
64, 65, 66) with the self-tapping screw (33);
– Place the security key (78-8) on the console;
– The treadmill is ready to be used.
STEP 4
ASSEMBLY INSTRUCTIONS
Page 11
ENG
VirtuFit TR-900i Treadmill
11
FOLDING INSTRUCTIONS
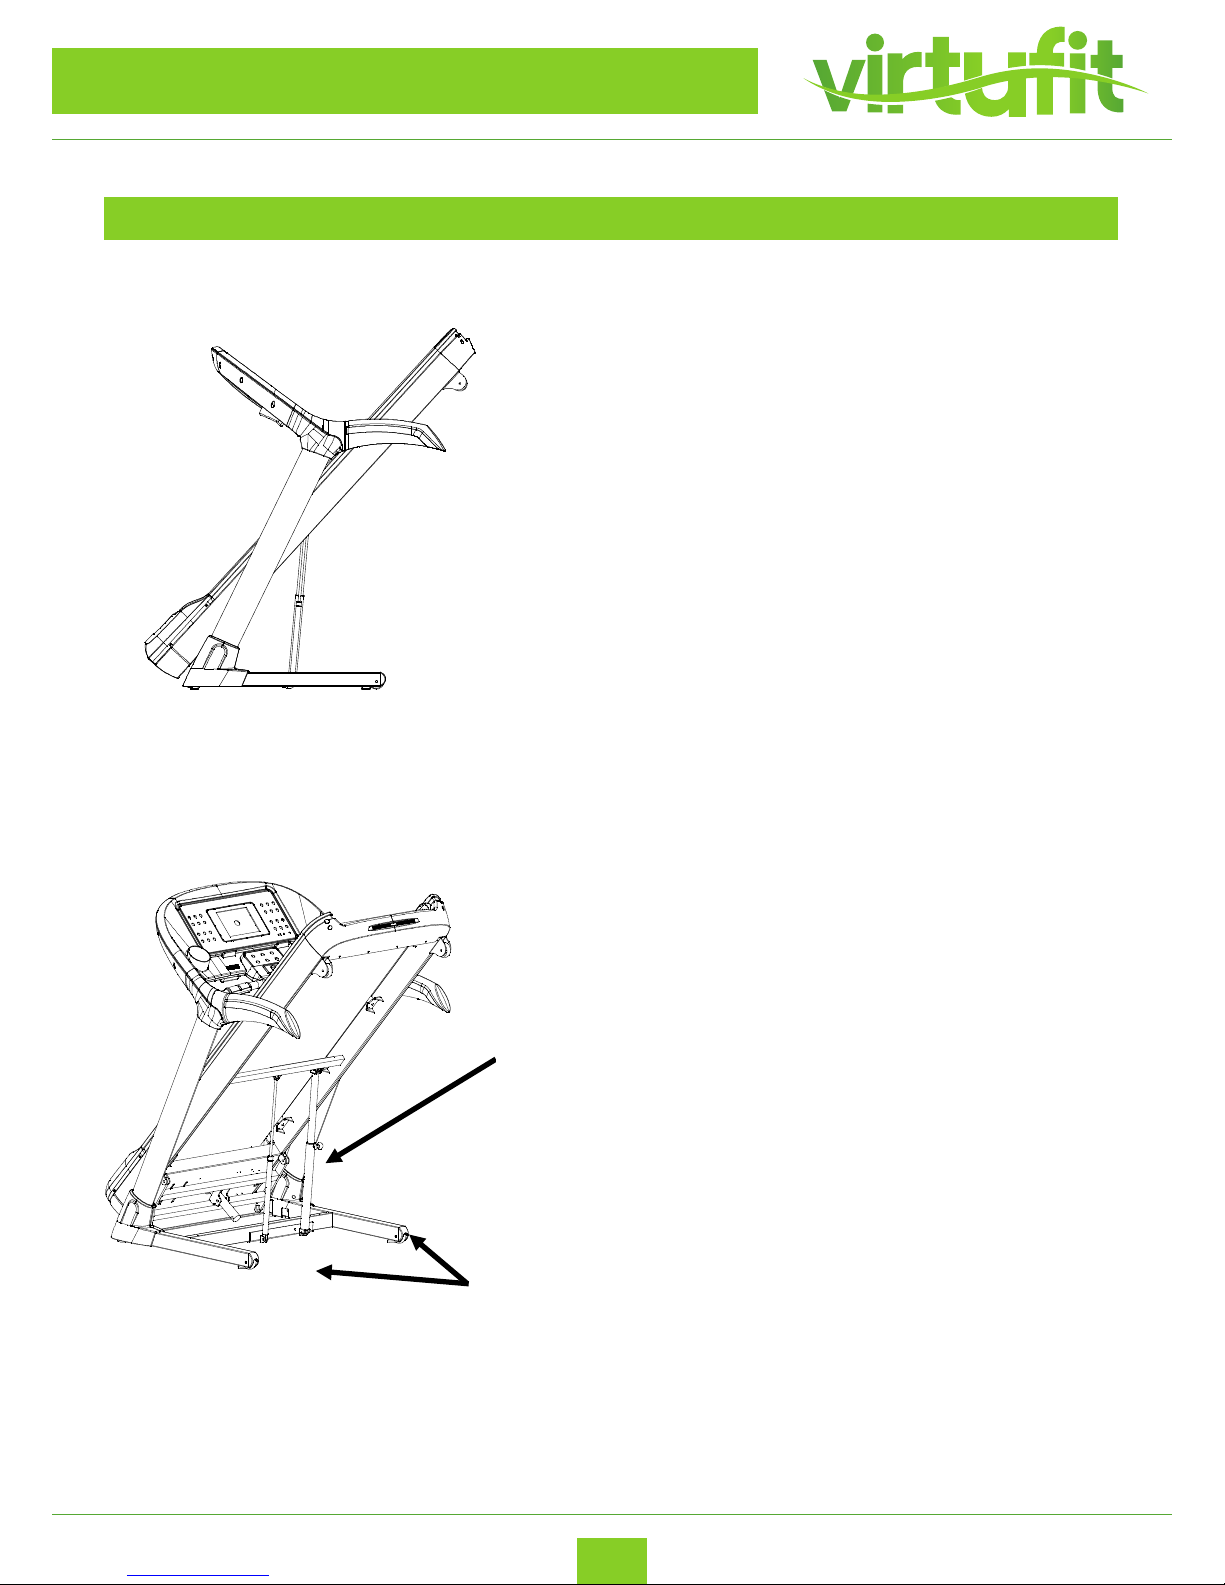
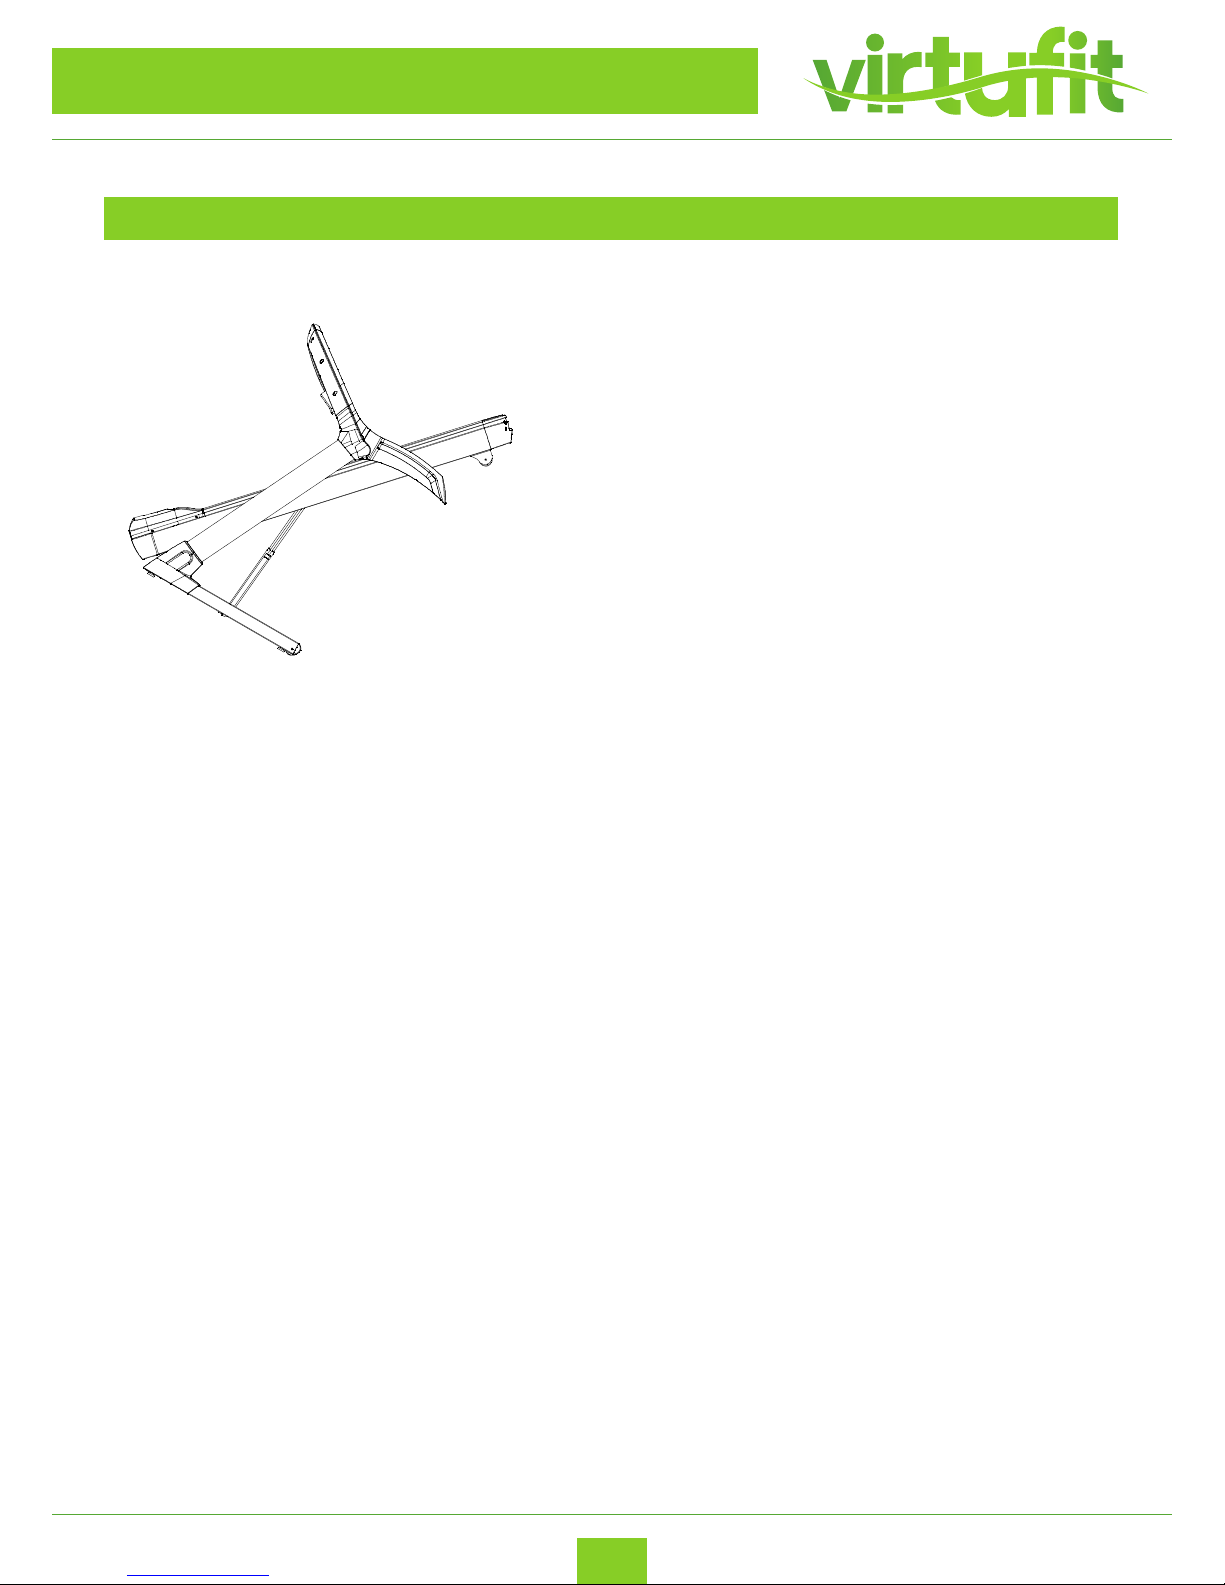
FOLDING INSTRUCTION
Unfolding
1. Place one hand on handIe bar, use the other to
push top of the running deck forward.
2. Press one foot on the middle section of the
cylinder to disengage the locking mechanism.
3. Hold the deck for a few seconds when it’s slowly
dropping then you can release your hands. Do not
depress the running desk, it will fall down
automatically with the gas spring.
Fold up
Restore the incline in at position. Unplug form
power point before unfolding. Hold the running
deck which and then fold it up with the arrow
direction until you hear a “bang” voice from the air
cylinder.
Attention: check to ensure cylinder locking
device is enabled
Cylinder
Transport
wheels
Page 12
ENG
VirtuFit TR-900i Treadmill
12
FOLDING INSTRUCTIONS
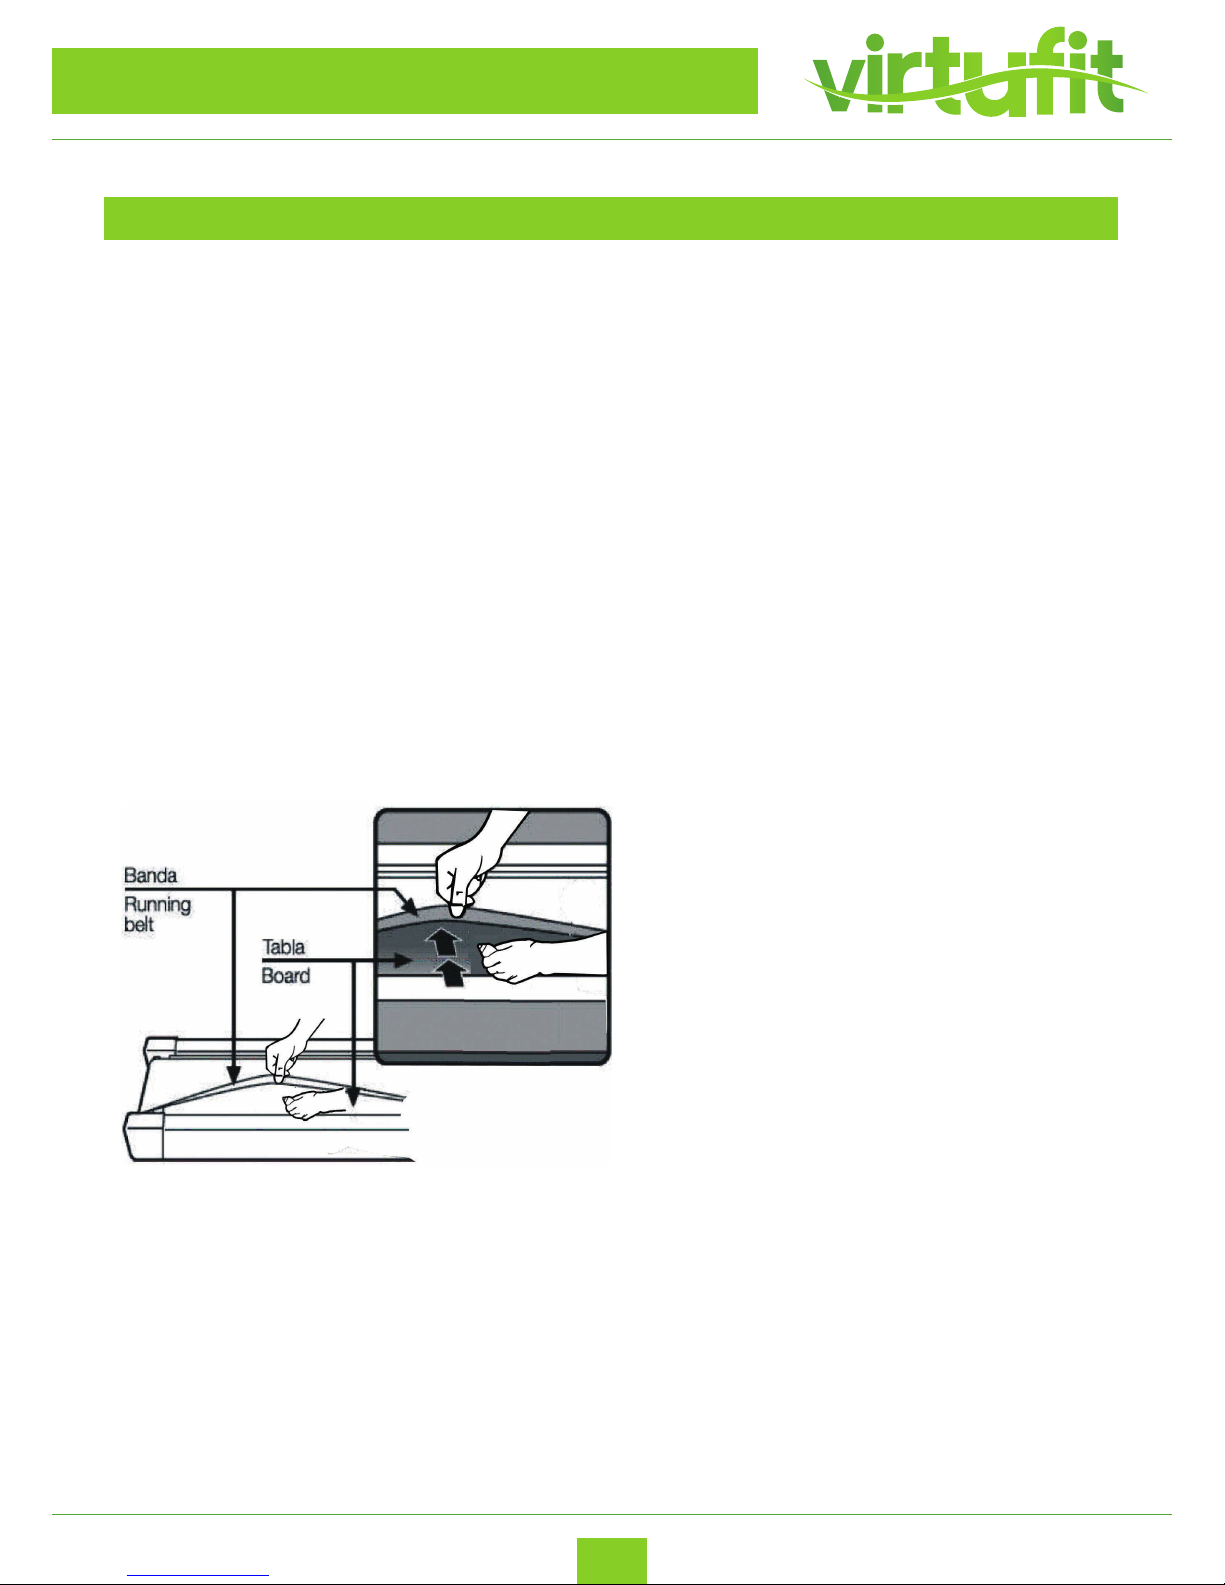
TRANSPORT THE TREADMILL
To transport, hold the treadmill from position “F”
to support it. Place one foot in position D to gold
the bottom of the treadmill in place. Lower the
treadmill (F). When the lower point is reached with
(F), the wheels of the treadmill will become active.
To transport the treadmill, hold the treadmill at
postition and lift the treadmill so it can roll over
the ground with the wheels.
D
F
Page 13
ENG
VirtuFit TR-900i Treadmill
13
MAINTENANCE TREADMILL
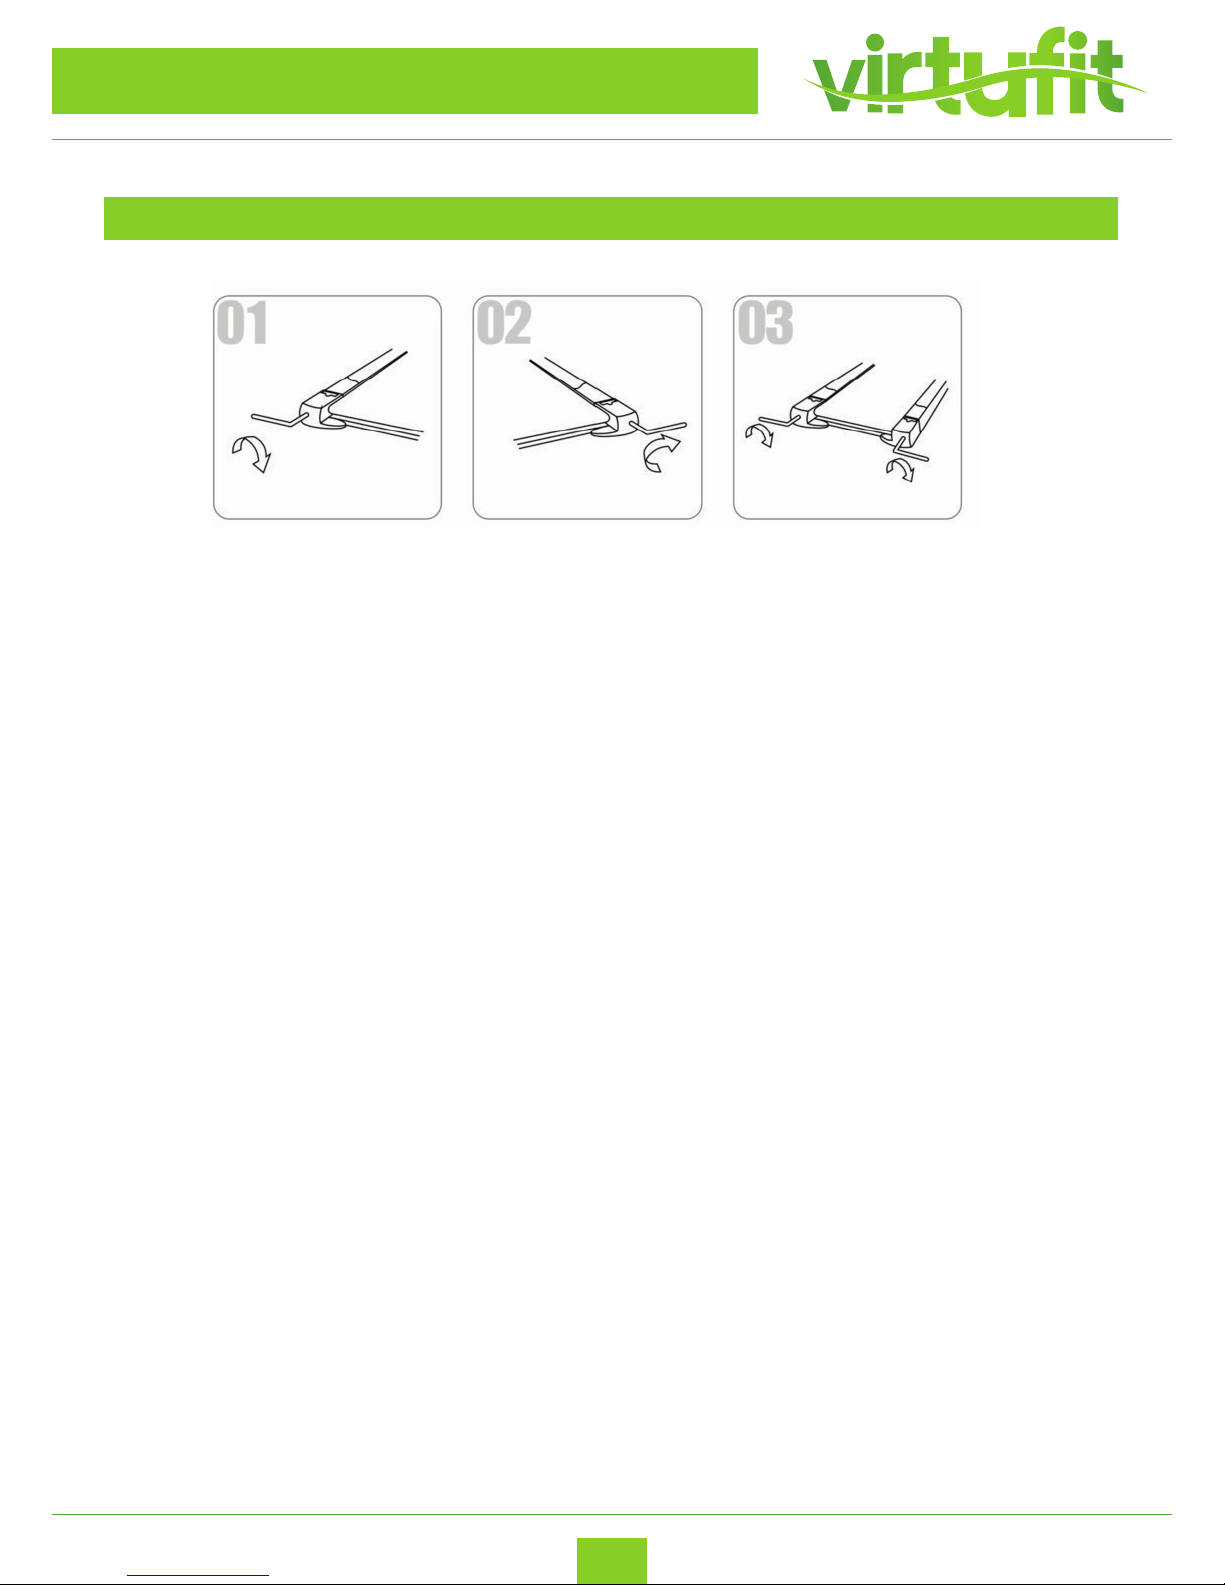
RUNNING BELT AND DECK LUBRICATION
This treadmill is equipped with a pre-lubricated, low maintenance deck system. The belt/ deck friction
may play a major role in the function and life of your treadmill, thus requiring periodic lubrication. We
recommend a periodic inspection of the deck. You need contact with our service center if you nd the
damage of the deck.
We recommend lubrication of the deck according to the following timetable:
I. Light user (less than 3 hours/ week) annually
II. Medium user (3-5 hours/ week) every six months
III. Heavy user (more than 5 hours/ week) every three months
Best indicator is to lubricale when the walking platform feels dry. We recommend that you buy the
lubrication from our distributor or directly to our company.
Attention: Any repair need the professional technician.
I. We suggest that you should cut o the power
for 10 minutes after keep running 2HS ,so that it’s
good for maintain the treadmill.
II. For avoiding the slipping during running , the
belt not too loose; for avoiding the more abrasion
between the roller and belt and maintain the
machine’s good running ,the belt not too tight.
You can adjust the distance between plates and
belt, the belt be away from the plates about 50-
75mm on both sides, if the best not too tight and
loose.
We strongly recommend that you do the following:
1. Switch o and remove the power cable from the wall after every use, especially if children are present.
2. Clean your treadmill after use.
3. Use a dry cloth to clean the control panel and areas around the power switch. Use a soft clean cloth
and cleanser to remove stubborn stains and dirt o the running belt.
4. Tighten the running belt once a month.
5. Keep your treadmill in a safe dry place away from heat and water.
LUBRICATING THE BELT
Page 14
ENG
VirtuFit TR-900i Treadmill
14
MAINTENANCE TREADMILL
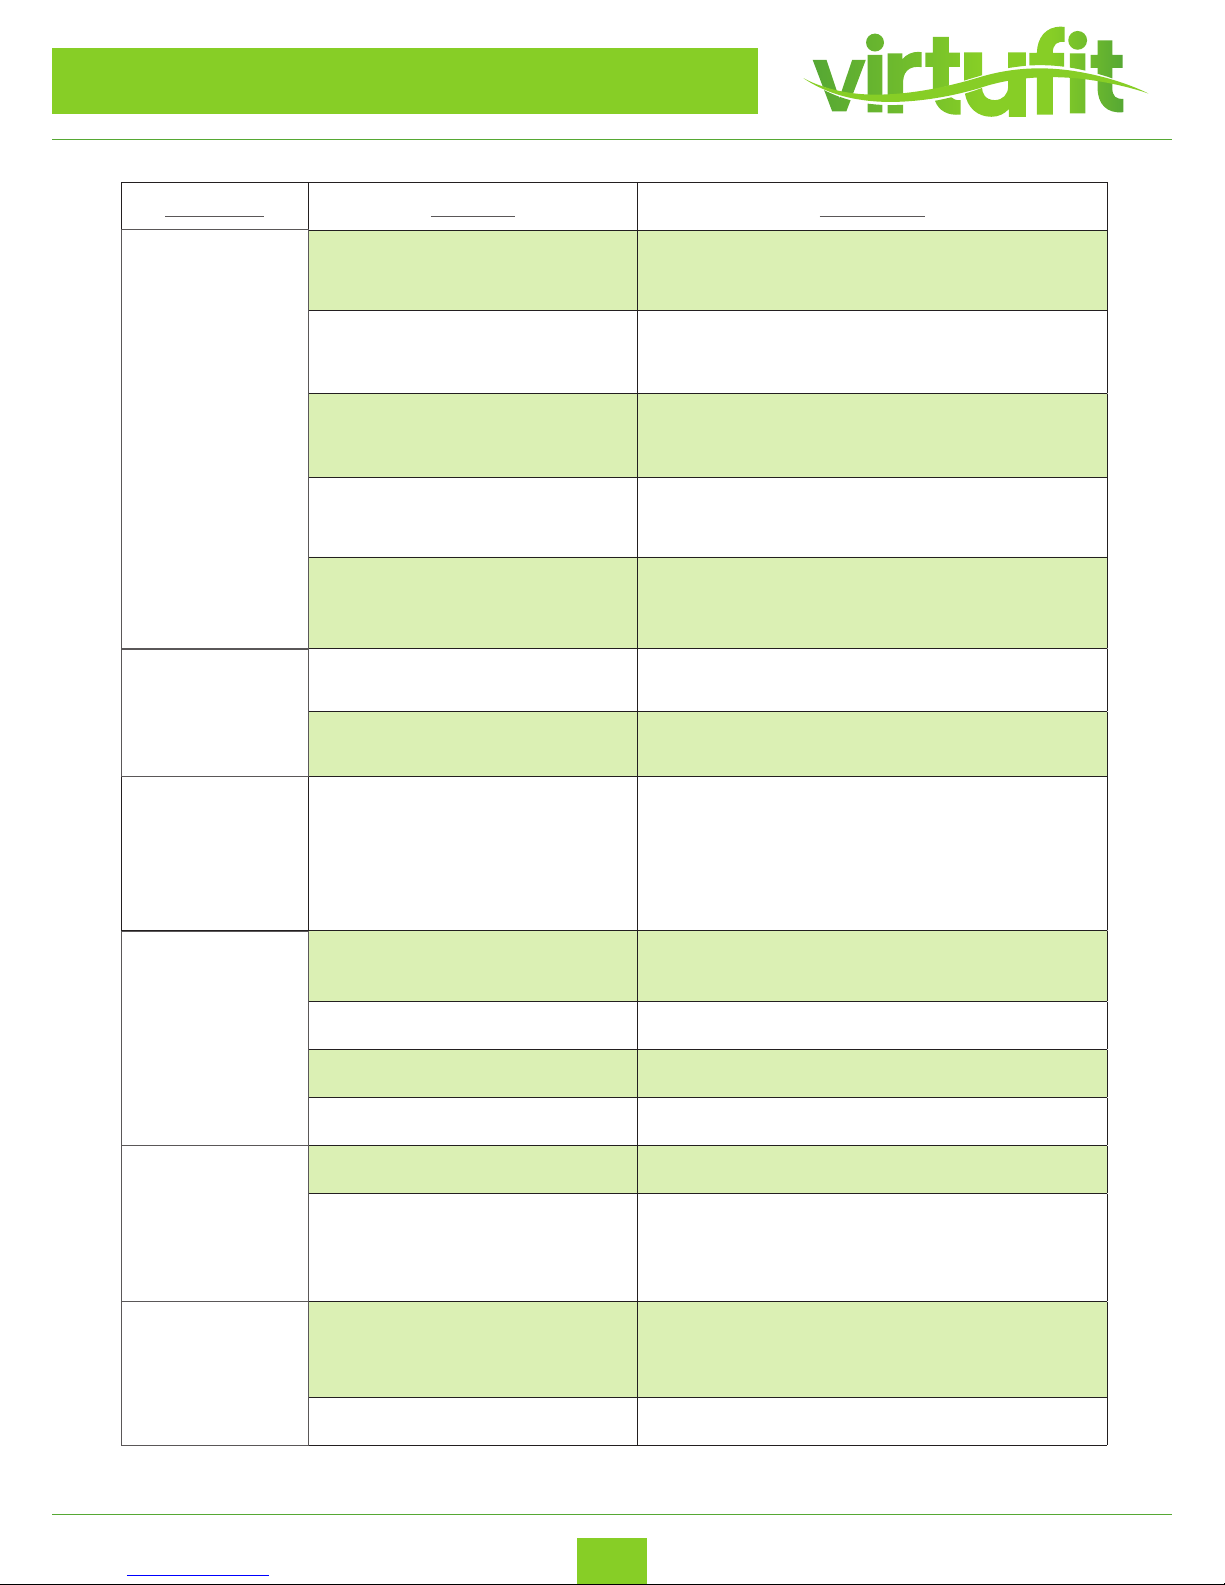
(1) Running belt deviates to left - Start the machine, set speed at 2-3 km/h without a load on the belt,
use Allen key to turn the screw 1/4 turn (see g. 1). Then allow the machine to run without a load for 1-2
minutes. Repeat process until the belt becomes central.
(2) Running belt deviate to right - Start the machine, set speed at 2-3 km/h without a load on the belt,
use Allen key to turn the screw 1/4 turn (see g. 2). Then allow the machine to run without a load for 1-2
minutes. Repeat process until the belt becomes central.
(3) Running belt jam - If the running belt is in dead condition, use the Allen key to turn the screw 1/2 a
turn both left and right until the jam solved (see g 3).
RUNNING BELT ADJUSTMENT
Page 15
ENG
VirtuFit TR-900i Treadmill
15
LOOPBAND AFSTELLEN
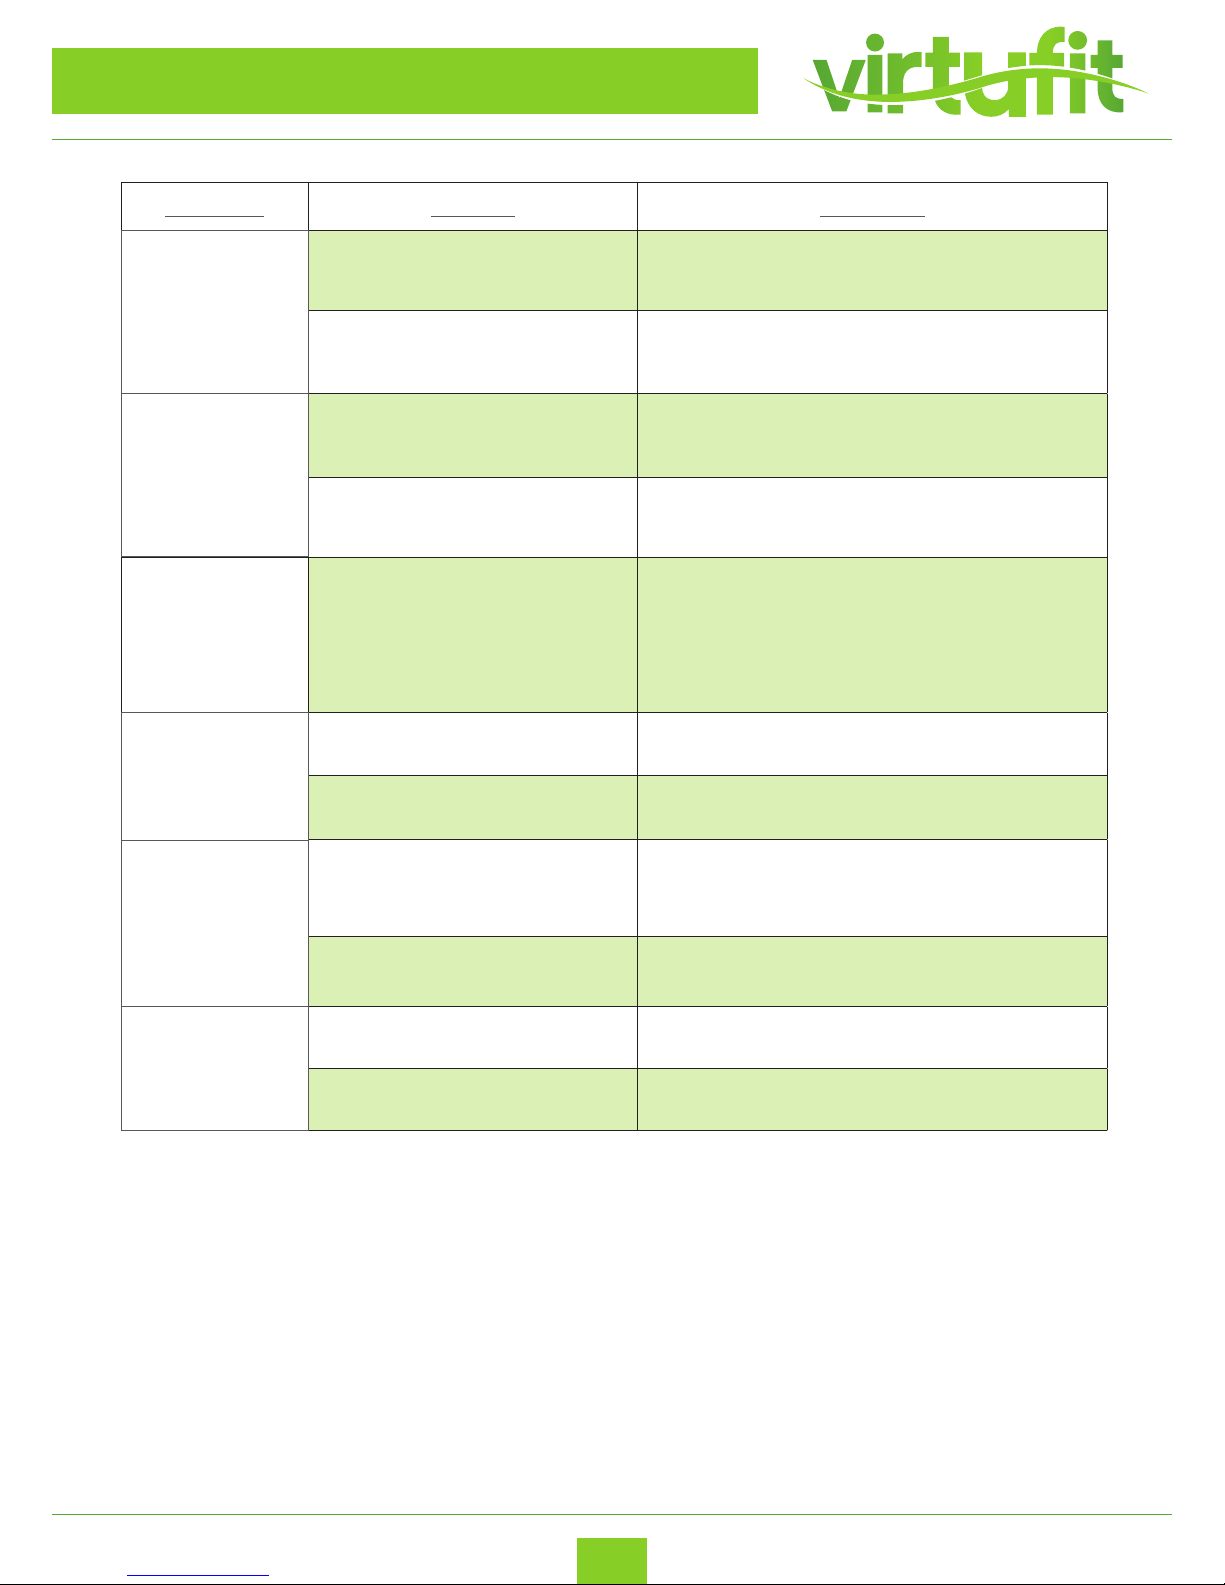
PROBLEM SOLUTIONS
PROBLEM REASON SOLUTION
Loopband werkt
niet.
A: Did not connect the power
supply
Connect the power supply or switch on
Loopband werkt
niet
B: Safety key did not put well Put the safety key on the correct positions
Loopband werkt
niet
C: The circuit of the signal short
out
Check the input port of the controller and the
signal port
Loopband werkt
niet
D: Circuit broken
Check input and output port and
communication wire
Loopband werkt
niet
E: Transformer not connect well
or transformer is defective
Reconnect the transformer or replace the
transformer
A: Safety key drop out Reconnect the safety key
B: System abnormal Ask for repairing
Button invalid
1. Replace the keyboard and press the keyboard
cable
2. Replace the motherboard
3. Replace the electronic form
A: Connect wire loose or
defected
Well connect the wire or change the wire
B: Console gets broken Replace the console
C: Transformer gets broken Replace the transformer
D: Motor controller gets broken Replace the controller
A: Motor cable or motor breaks Replace the motor
B: Motor cable not connect well
with the controller, or controller
breaks
Check and reconnect the cable, or replace the
controller
A: Speed sensor cable does not
connect well with the controller
Check an reconnect the cable or replace the
controller
B: Controller defected Replace the controller
Treadmill
doesn’t
work
Treadmill
stops
Button out
of work
E-01
E-02
E-03
Page 16
ENG
VirtuFit TR-900i Treadmill
16
LOOPBAND AFSTELLEN
PROBLEM REASON SOLUTION
Loopband werkt
niet.
C: Speed sensor not placed well Place Speed sensor correctly
Loopband werkt
niet
D: Speed sensor defected Replace the speed sensor
Loopband werkt
niet
A: Controller defected Replace the controller
Loopband werkt
niet
B: Motor defected Change the motor
E-07 Console can not detect safety key
1. Check the safety key whether it is on right
position
2. Install the safety devise again, conrm the
hole is in the middle
3. Replace the console
A: Bluetooth defected Change bluetooth part
B: Bluetooth not connect right Reset and reconnect bluetooth device
A: Handle pulse wire did not
connect well or wire defected
Well connect the wire or chang the wire
B: Console circuitry defected Change the console
A: The screw on the PCB is loose Tight the screw well
B: Console defected Change the console
PROBLEM SOLUTIONS
E-05
Bluetooth
can not
connect
No pulse
Console
short of
display
Page 17
ENG
VirtuFit TR-900i Treadmill
17
CONTROL PANEL
LOOPBAND AFSTELLENTREADMILL USE INSTRUCTION
I. Power on, the treadmill will start to the lowest position, check the machine is normal.
II. Attatch the safety clip to the shirt.
III. Before running, check that the treadmill is stable and that the treadmill is operating
normally while standing on the side rails. When the treadmill is switched on, grasp the
handlebar with one hand and press “START”. The treadmill will go to 1.0 km/h in 5 seconds.
Now stand on the treadmill. Press “SPEED” “+” and the engine accelerates with 2.5 ~ 3.5
km/h (this is the most suitable running speed). Grasp the handle with both hands at a
constant pace on the running belt.
IV. After a few minutes you can speed up running, it is required to hold the handlebars. Press
“SPEED” “-” to slow down.
V. Shortcuts can be used to go quickly to the desired speed while running.
VI. Press “STOP” to stop the engine at any time while running.
VII. Preset-mode: Press “SELECT” in standby mode to select one of the automatic operating
mode as the current operating mode. Press “START” to start the treadmill. The treadmill
starts to run automatically according to the selected mode. While walking press “SPEED”
“+” or “SPEED” “-” to change the current speed.
VIII. HRC-test (optional): Switch on the treadmill. Hold the HRC mental sensors with your hands,
after a few seconds the heart rate display shows the heart rate value.
NOTE: The measured value can not be considered as the basis of medical treatment and is
an approximation.
Page 18
ENG
VirtuFit TR-900i Treadmill
18
LOOPBAND AFSTELLEN
CONTROL PANEL
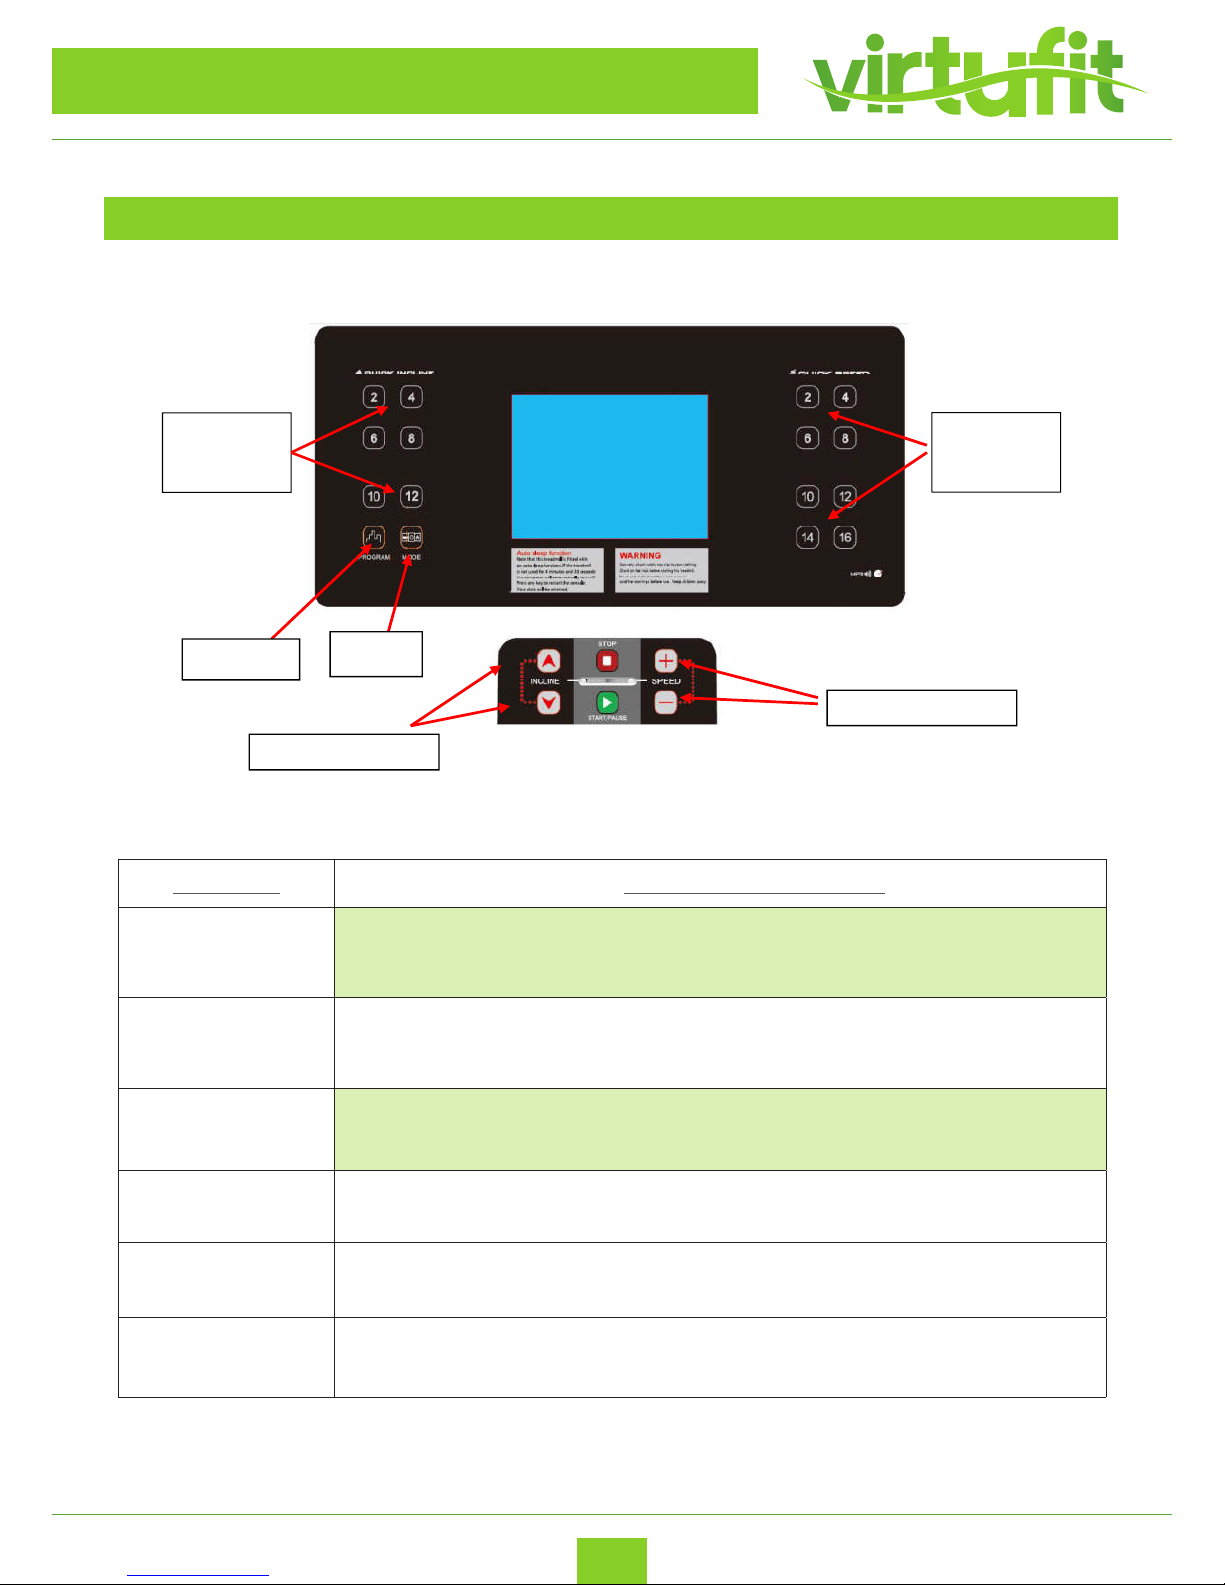
FUNCTION FUNCTION EXPLANATION
DISTANCE Displays the distance value.
CALORIE Displays the calorie value.
TIME Displays the time value.
INCLINE Displays the incline value.
PULSE Displays the heart rate value.
SPEED Displays the speed value.
KEY DEFINITION
Incline
shortcut
Speed
shortcut
Program
Mode
Incline “+” “-”
Speed “+” “-”
Page 19
ENG
VirtuFit TR-900i Treadmill
19
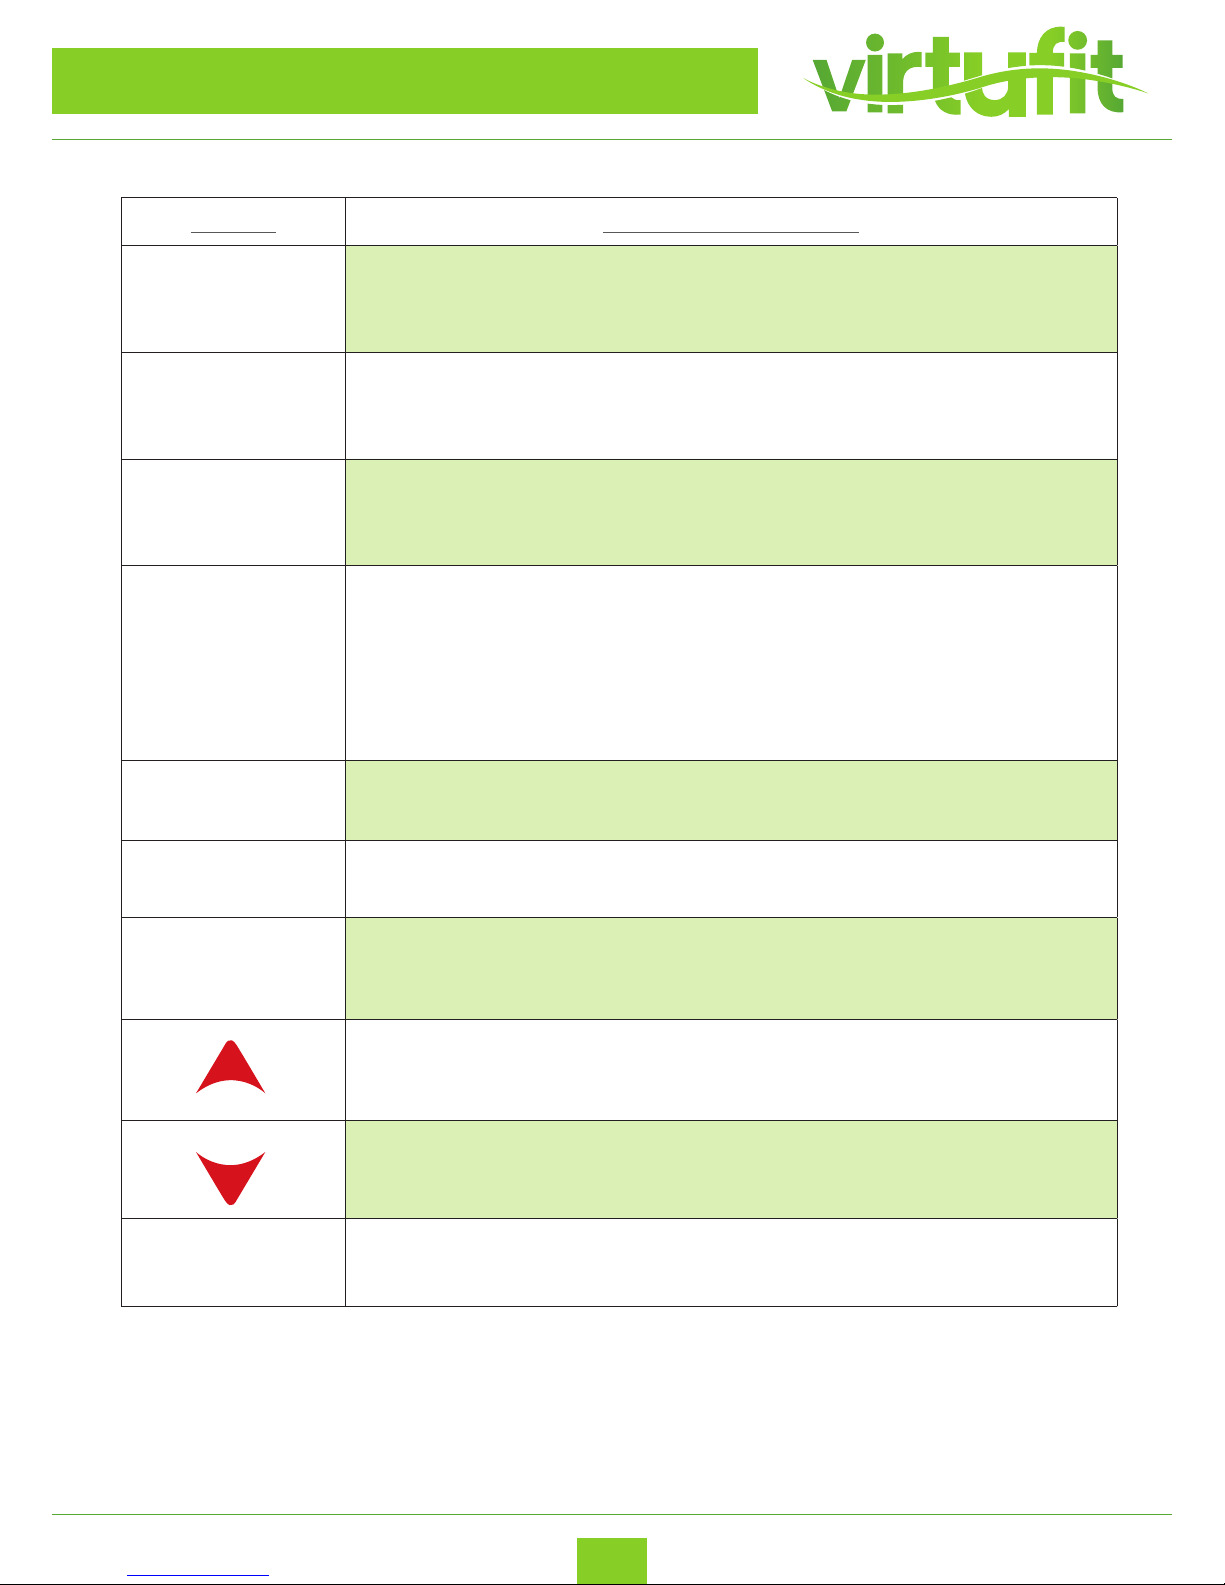
BUTTON FUNCTION EXPLANATION
PROG
Program select key: when the treadmill is stopped, cycle select the
program”P0-P3--> U01 ~U03 ----. FAT “as you prefer.
MODE
Mode selection key: When in manual mode press PO for normal mode to select
from: Time count mode, distance count mode and calorie count mode.
START/PAUSE
When the treadmill has stopped, press “START” to switch the treadmill on again.
When the running belt is moving, press “START” to pause the treadmill.
STOP
When the running belt is moving, press “STOP” once to slowly the treadmill.
When the running belt is moving, press “STOP” twice to stop the treadmill
abruptly. When the LCD window shows an ERR message, press “STOP” to delete
the error message.
SPEED “+”
Increase the speed when running. lncrease the parameter under the body fat
testing.
SPEED “-”
Decrease the speed when running. Decrease the parameter under the body fat
testing.
QUICK SPEED With this shortcut, the treadmill can go at once to the desired speed.
Increase the incline by pressing this key.
Decrease the incline by pressing this key.
QUICK INCLINE
When the treadmill is moving, you can use this shortcut to go at once to the
desired incline.
CONTROL PANEL
Page 20

ENG
VirtuFit TR-900i Treadmill
20
LOOPBAND AFSTELLEN
CONTROL PANEL
PROGRAM / START INSTRUCTION
SAFETY KEY INSTRUCTION
A: PROGRAM
1. PO: Normal mode, time counting down, distance counting down, calories count mode.
2. 36 setting program: P01,P02,P03,P04,P05, ······,P36.
3. HRC-function (optional)
4. Body fat function: FAT
B: START INSTRUCTION
1. Place the safety clip on the safety key switch, the console lights up for 3 seconds.
2. Press “START” the time window shows: 5-4-3-2-1, which makes a beeping sound every second, the
treadmill starts to move when counter is at 0.
The safety key can be removed in each status, after which the display shows “E-07” and a buzzer sounds.
Then carefully reset the safety key after which all buttons will light up for 2 seconds, then go to the
manual start mode (equivalent reset).
MANUAL MODE
1. How to enter manual mode:
A: If the device is switched on, press the normal manual mode.
B: If the device is switched o, press “MODE” to eneter manual mode.
2. You can set three functions in manual mode: time setting, distance setting and calorie burning setting;
Go to manual mode, press “MODE” to set another mode and press “START” to restart the treadmill. Set the
speed and incline. Standard speed: 1.0 km/u, standard incline: 0%.
A: When the manual mode is open, the window shows 0:00. When the engine is running, press “STOP” to
stop the treadmill slowly. All settings are reset to the default settings.
B: In standard manual mode, press “MODE” to set the time. The time window lights up. The initial time is
30:00 minutes. Press “SPEED” “+” or “-” to set the time. Setting range of the time is: 5:00 ~ 99:00 minutes.
C: When in time settings, press “MODE” to set the distance. The distance window lights up. The initial time
is 1.0 KM. Press “SPEED” “+” or “-” to set the distance. Setting range of the distance is: 1.0 ~ 99.0 KM.
Page 21
ENG
VirtuFit TR-900i Treadmill
21
CONTROL PANEL
LOOPBAND AFSTELLEN
D: When in distance settings, press “MODE” to set the calories. The calorie window lights up. Initial calorie
value is: 50 calories, Press “SPEED” “+” or “-” to set the calorie value. Setting range of the calorie value is: 5 ~
990 calories.
3. Manual program setting instruction:
A: Press “START” and the time counts down from 3 to 0. When the engine starts running again, the inital
speed is 1.0 KM/H.
B: Press “SPEED” “+”, “-” or “QUICK SPEED” to change the speed of the treadmill.
C: Press “ ” , “ ” or “QUICK INCLINE” to change the incline of the treadmill.
D: When the treadmill moves, press “STOP” to slowly stop the treadmill.
E: Pull out the safety key so the treadmill stops immediately. The time window will show “Er-07” and a
buzzer will sound.
F: When the calorie value is at 0, the treadmill will stop slowly, then return to the manual settings.
G: When the distance value is at 0, the treadmill will stop slowly, then return to the manual settings.
H: When the time value is at 0, the treadmill will stop slowly, then return to the manual settings.
PROGRAM SETTINGS
“P1-P36” is the key for setting a system program. Only the time window will be used and this screen will
also light up. Press “SPEED” “+” or “-” to adjust the settings. Press “MODE” to return to the default status, the
time window will light up when you are in settings. Initial time is 30:00 minutes. Setting range of the time
is 5:00 - 99:00 minutes. Press “SPEED” “+” or “-” to change the settings.
1. In P1 t/m P36, the speed and incline for each program is divided into 16 segments;
2. When there is a changeof segment, a sound will go o;
3. When the engine is running and “START” is pressed, the engine stops running, while the various
parameters remain unchanged;
4. Press “START” again and the treadmill will go to the (preset) speed of the program;
5. When the time reaches 0, the treadmill will stop slowly and the middle window will show “END”
and a sound will go o;
6. Pull out the safety key so the treadmill will stop immediately. The time window will display “Er-07”
and a buzzer will sound.
Page 22

ENG
VirtuFit TR-900i Treadmill
22
CONTROL PANEL
LOOPBAND AFSTELLENBODY FAT FUNCTION
METERINCH CONVERSION FUNCTION
USER PROGRAM
when the treadmill is stopped, press the “PROG”key until select” FAT “and enter into body fat function,
then press “MODE” key to set the parameter.
A. F1: means gender. 1=male en 2=female. De initial setting is 1.
B. F2: means age. The range is 1-99 years. The initial setting of the age is 25 years.
C. F3: means length. The range is 100-220 CM. The initial setting of the length is 170 cm.
D. F4: means weight. The range is 20-150 KG. The initial setting of the weight is 70 kg.
E. F5: means BMI and can show the body fat after completing the previous parameters. Place two
hands on the sensors of the handlebars and wait for 8 seconds until the window shows the BMI.
A. Pull out the safety key and press the “PROGRAM” key and “MODE” key at the same time, changes
kilometers into miles
B. Pull out the safety key and press the “PROGRAM” key and “MODE” key at the same time, changes
miles into kilometers.
Treadmill has three user modes: USER01, USER02, and USER03 which can be adjusted by the user
themselves.
Press “PROG” key to cycle select the program U01~U03, When setting the speed, press the speed plus
or minus keys to set the corresponding segment customer expected speed, the range of 1km-18km,
can also use the speed shortcut keys to quickly select. When you set Ascension, press Raise Plus and
Decrease keys to set the desired slope. The range is 0-15. You can also use the incline shortcut to quickly
select. Press MODE key to enter the next segment. When the last paragraph is set, the setting will be
saved. Press MODE key to set the time of movement, the default is 30:00 minutes, press the speed plus or
minus keys to adjust the time set value. After setting, the user can press “START” to start the movement.
The user’s special program will be saved. When the customer runs the next time, he can enter the
corresponding mode and run the same program.
Page 23

ENG
VirtuFit TR-900i Treadmill
23
CONTROL PANEL
HRC TESTING FUNCTION
MP3 OPERATION LNSTRUCTION
1: Age setting range:: 13-80 years.
2: Target HRC setting range: 80-180.
3: Maxi HRC data: not over (220-age).
4: Bad HRC = (Target HRC-User’s HRC)
5: lncline can not be changed while running, can be manually set.
Program:
A: Press “PROG” ro select the HRC program when the treadmill is stopped. Window display: HRC, this
means that the HRC program must be entered. in HRC mode the window shows age “25” and
lights up. Press “SPEED” / ”INCLINE” “+” or “-” to adjust the age. Setting range is: 13-80 years.
B: Press “MODE” the time window shows the HRC value and lights up. Enter the setting for the HRC
target. Press “SPEED” / ”INCLINE” “+” or “-” to adjust the target setting value. Setting range: 55-99
minutes.
C: Press “START” to start running.
The console is with built-in double channel audio, switching regulated power supply, connect the
adapter wire of audio with the audio source and MP3 input port of the console , then MP3 starts to
perate.
Page 24

ENG
VirtuFit TR-900i Treadmill
24
APP POSSIBILITIES
KINOMAP
This application operates with a phone or tablet and can be connected to bluetooth to
the treadmill. With this tness app you can train with realistic videos such as the Tour de
France, Marathon of New York etc. Each route has its own level of dicultly. There can
also be trained together by switching to multi-player mode and there is possibility to
compete against each other.
De Kinomap is free for a limited number of videos. To access all videos, a subscription
must be closed.
Download the Kinomap app in the App Store or in Google Play Store by entering
“Kinomap” in the search bar or follow one of the links below:
Apple IOS App Store:
https://itunes.apple.com/us/app/kinomap/id611177969
Google Android Play Store:
https://play.google.com/store/apps/details?id=com.kinomap.training&hl=en
Page 25

ENG
VirtuFit TR-900i Treadmill
25
EXPLODED DRAWING
Page 26
ENG
VirtuFit TR-900i Treadmill
26
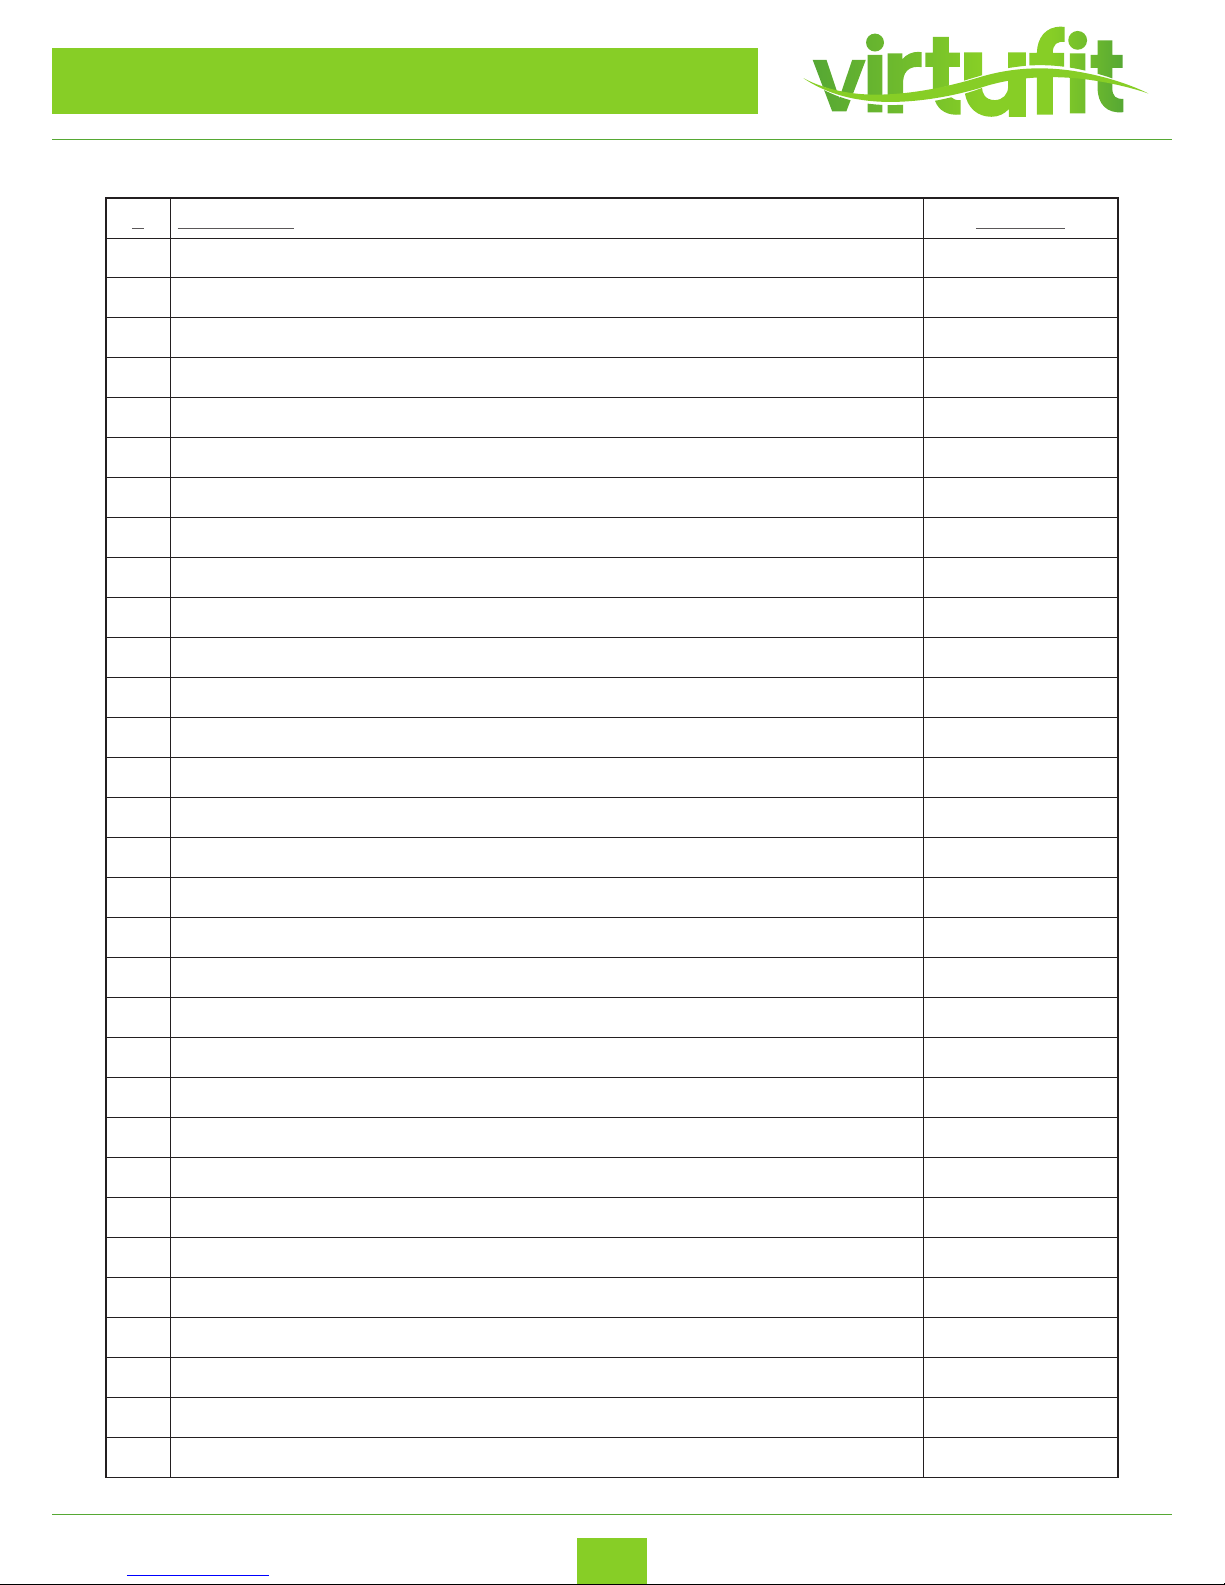
PARTS LIST
# Description Quantity
01 Base frame 1
02 Main frame 1
03 Incline frame 1
04 Upright post (L) 1
05 Upright post (R) 1
06 Console frame 1
07 Upright post clamping ring 1
08 Motor installation panel 1
09 Gas spring 1 1
10 Pedal 1
11 Allen half thread screw M12X Ø14x35x19 14X35X19 2
12 Allen half thread screw M8X40X20 4
13 Allen half thread screw M8X45X20 1
14 Allen half thread screw M8X30X20 2
15 Allen half thread screw M8X60X20 4
16 Allen half thread screw M8X50X20 2
17 Allen half thread screw M8X15 14
18 Allen full thread screw M10X35X20 3
19 Allen half thread screw M10X65X20 1
20 Allen column full thread screw M8X15 2
21 Allen countersunk head full thread screw M8X75 3
22 Screw M6X30XØ16 8
23 Motor bolt -1 M8X65 1
24 Hex full head screw M8X75 1
25 Screw ST4X16 10
26 Screw ST4X40 2
27 Phillips countersunk head self-tapping screw ST3X10 2
28 Phillips countersunk head self-tapping screw ST4X15 12
29 Screw M5X10 6
30 Screw M4X10 9
31 Phillips self-tapping screw ST4X15 27
Page 27
ENG
VirtuFit TR-900i Treadmill
27
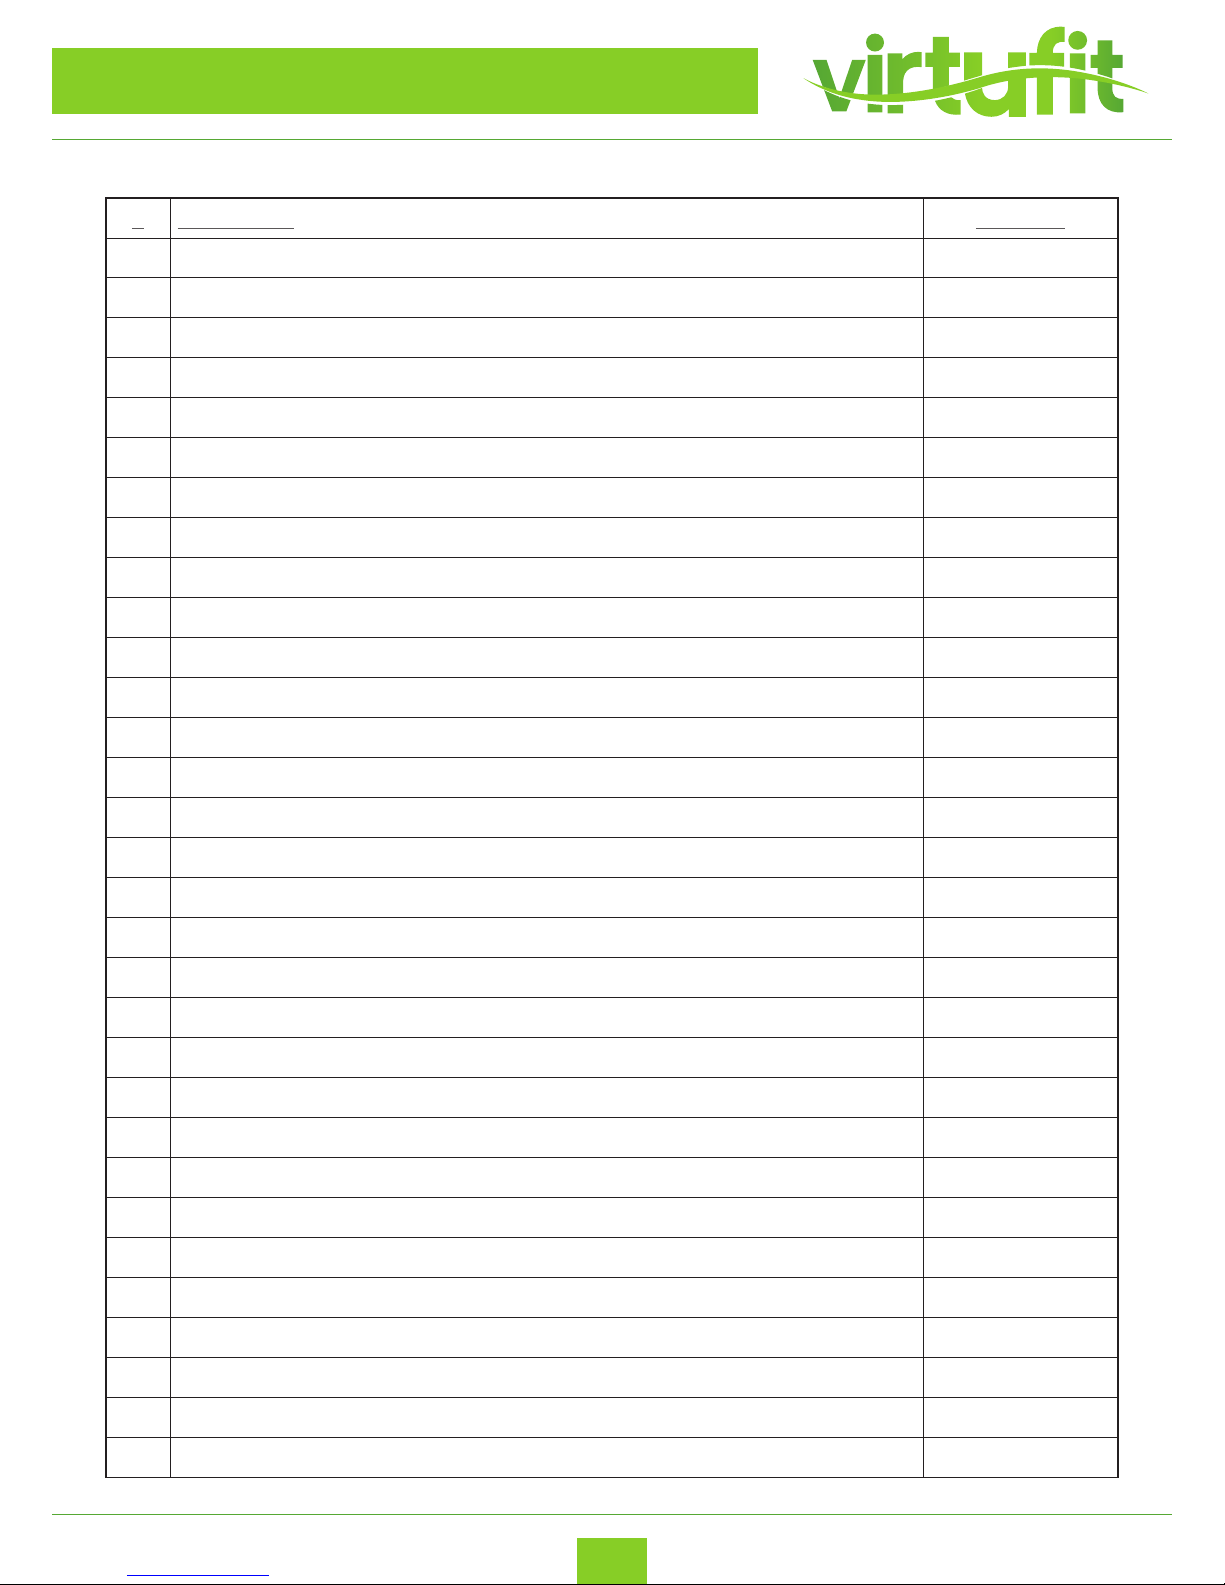
PARTS LIST
# Description Quantity
32 Phillips self-tapping screw ST3X25 4
33 Phillips self-tapping screw ST4X12 14
34 Flat washer Ø8 19
35 Flat washer Ø10 3
36 Flat washer Ø14 2
37 Spring washer Ø8 2
38 Spring washer Ø5 3
39 Hex locked nut M8 9
40 Hex locked nut M10 3
41 Feet pad adjustment Ø35X37X12XM8 4
42 Plastic at washer Ø24XØ16Xt2.0 2
43 Taper feed pad Ø23XØ18XØ5X11 2
44 Cushion 35X35Xt5.0XØ8 4
45 Cushion Ø30X30XM6X6 6
46 Serrated lock washers Ø5 3
47 Incline axle Ø25XØ17XØ10X6X1 4
48 Side rail guider Ø25XØ5X4.5 12
49 Wire protector 1
50 Front roller 1
51 Rear roller 1
52 Cylinder 1
53 Motor 1
54 Incline motor 1
55 Running desk 1
56 Running belt 1
57 Motor belt 1
58 Side rail 2
59 Console upper cover 1
60 Console lower cover 1
61 Panel 1
62 Handle bar 2
Page 28

ENG
VirtuFit TR-900i Treadmill
28
# Description Quantity
63 Base cover (L) - 1 1
64 Base cover (L) - 2 1
65 Base cover (R) - 1 1
66 Base cover (R) - 2 1
67 End cap 1
68 Motor cap 1
69 Main Frame cap 2
70 Cap 2
71 End cap subframe 2
72 Gas spring spacer 1
73 Spring 1
74 Gas spring 2 1
75 Front wheel 2
76 Rear wheel 2
77 Magnetic ring 1
78 Console set 1
79 Speed sensor 1
80 Main wire 1
81 Print wire 1
82 Console wire 1
83 Handle pulse 2
84 Handvat pulse wire 2
85 Console 1
86 PCB 1
87 Power cord 1
88 Power cord 1
89 Wire (ground wire) 1
90 Wire (ground wire) 2
91 Current input 1
92 Switch 1
93 Power cord 2
PARTS LIST
Page 29

ENG
VirtuFit TR-900i Treadmill
29
# Description Quantity
94 Plug 1
95 Cable clamp 2
96 Wire clip 1
# Description Quantity
78 Console set 1
78-1 PCB of meter 1
78-2 PCB of keyboard 1
78-3 Screen overlay 1
78-4 Keyboard overlay 1
78-5 Spring tip 1
78-6 Microswitch 1
78-7 Safety key iron 1
78-8 Safety sticker 1
78-9 Speaker 2
59 Console upper cover 1
61 Panel 1
PARTSLIST
CONSOLE SET PARTS LIST
Page 30
ENG
VirtuFit TR-900i Treadmill
30
TRAINING INSTRUCTIONS
WARMUP
A successful exercise program consists of a warm-up, aerobic exercise, and a cool-down. Do the entire
program at least two and preferably three times a week, resting for a day between workouts. After
several months, you can increase your workouts to four or ve times per week.
The purpose of warming up is to prepare your body for exercise and to minimize injuries. Warm up for
two to ve minutes before strength-training or aerobic exercising. Perform activities that raise your heart
rate and warm the working muscles. Activities may include brisk walking, jogging, jumping jacks, jump
rope, and running in place.
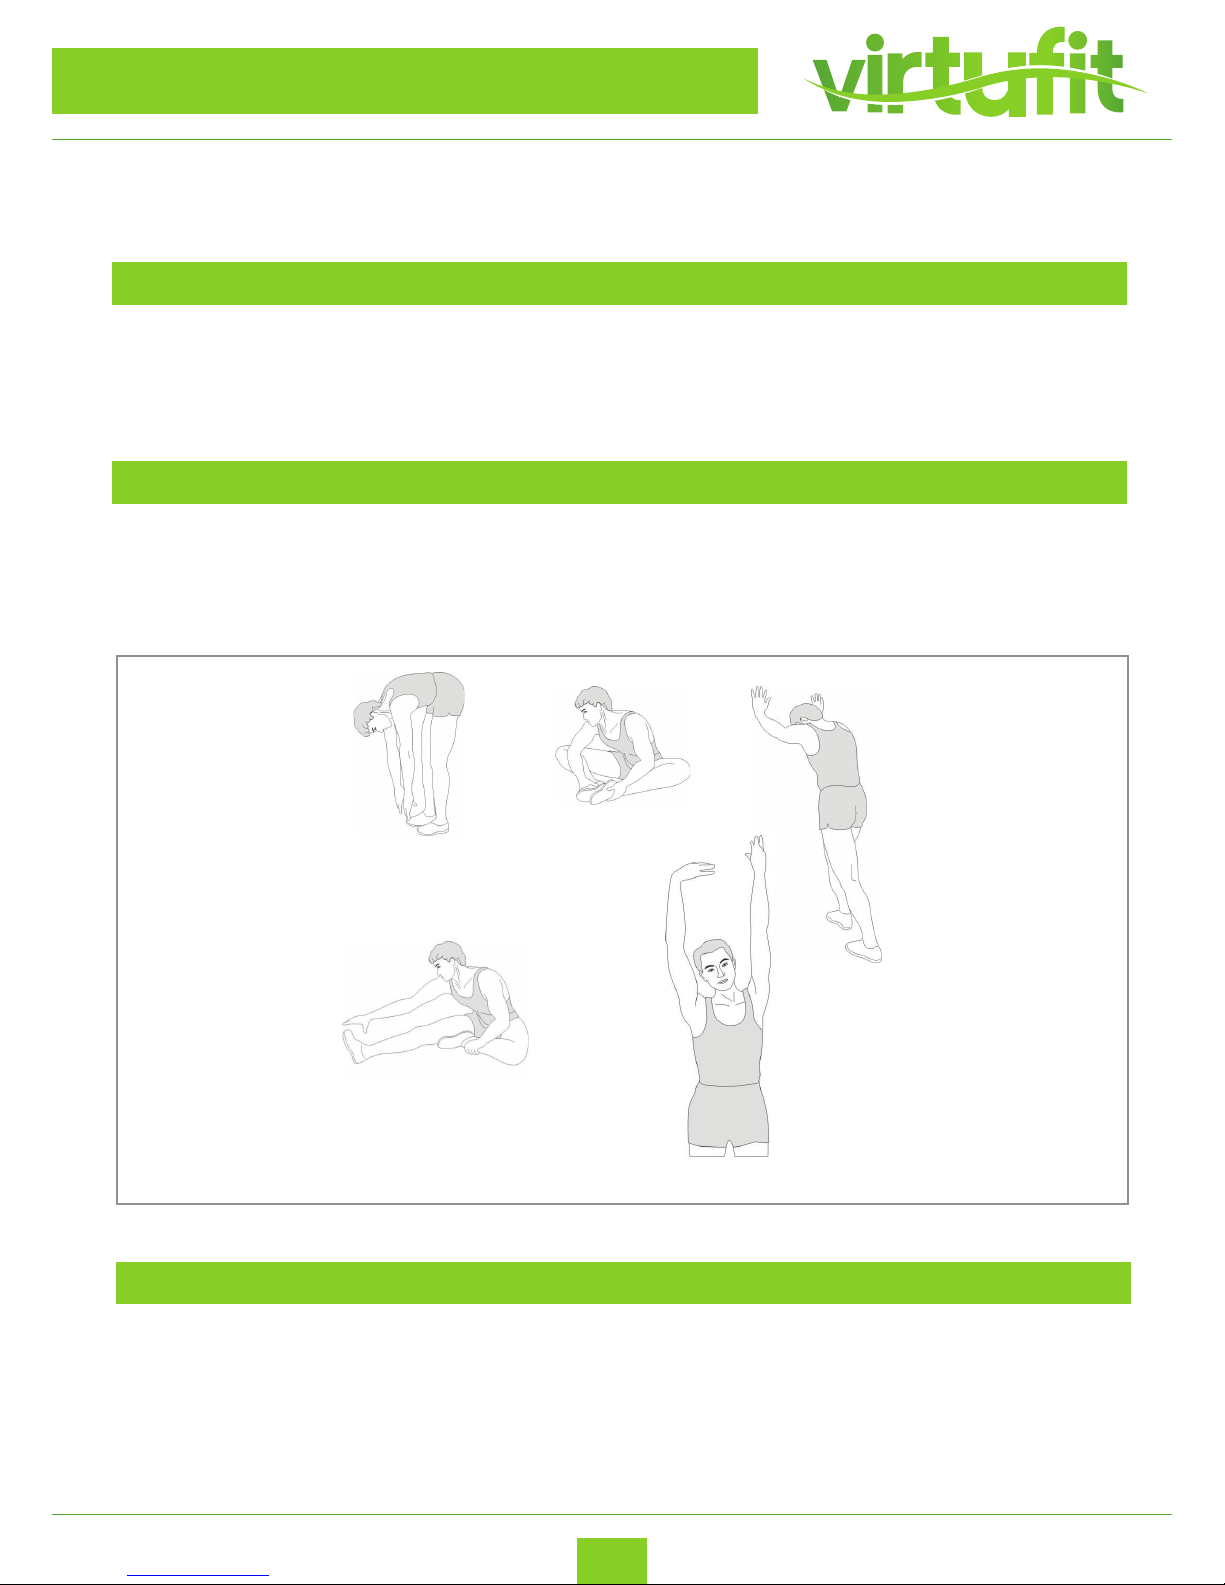
Stretching while your muscles are warm after a proper warm-up and again after your strength
or aerobic training session is very important. Muscles stretch more easily at these times because of their
elevated temperature, which greatly reduces the risk of injury. Stretches should be held for 15 to 30
seconds. DO NOT BOUNCE.
STRETCHING
Toe touch
Inner thigh stretch
Achilles stretch
Hamstring stretch
Side stretch
COOLING DOWN
The purpose of cooling down is to return the body to its normal or near normal, resting state at the end
of each exercise session. A proper cool-down slowly lowers your heart rate and allows blood to return to
the heart.
Page 31

ENG
For questions or missing parts please contact your dealer.
 Loading...