

Page 1
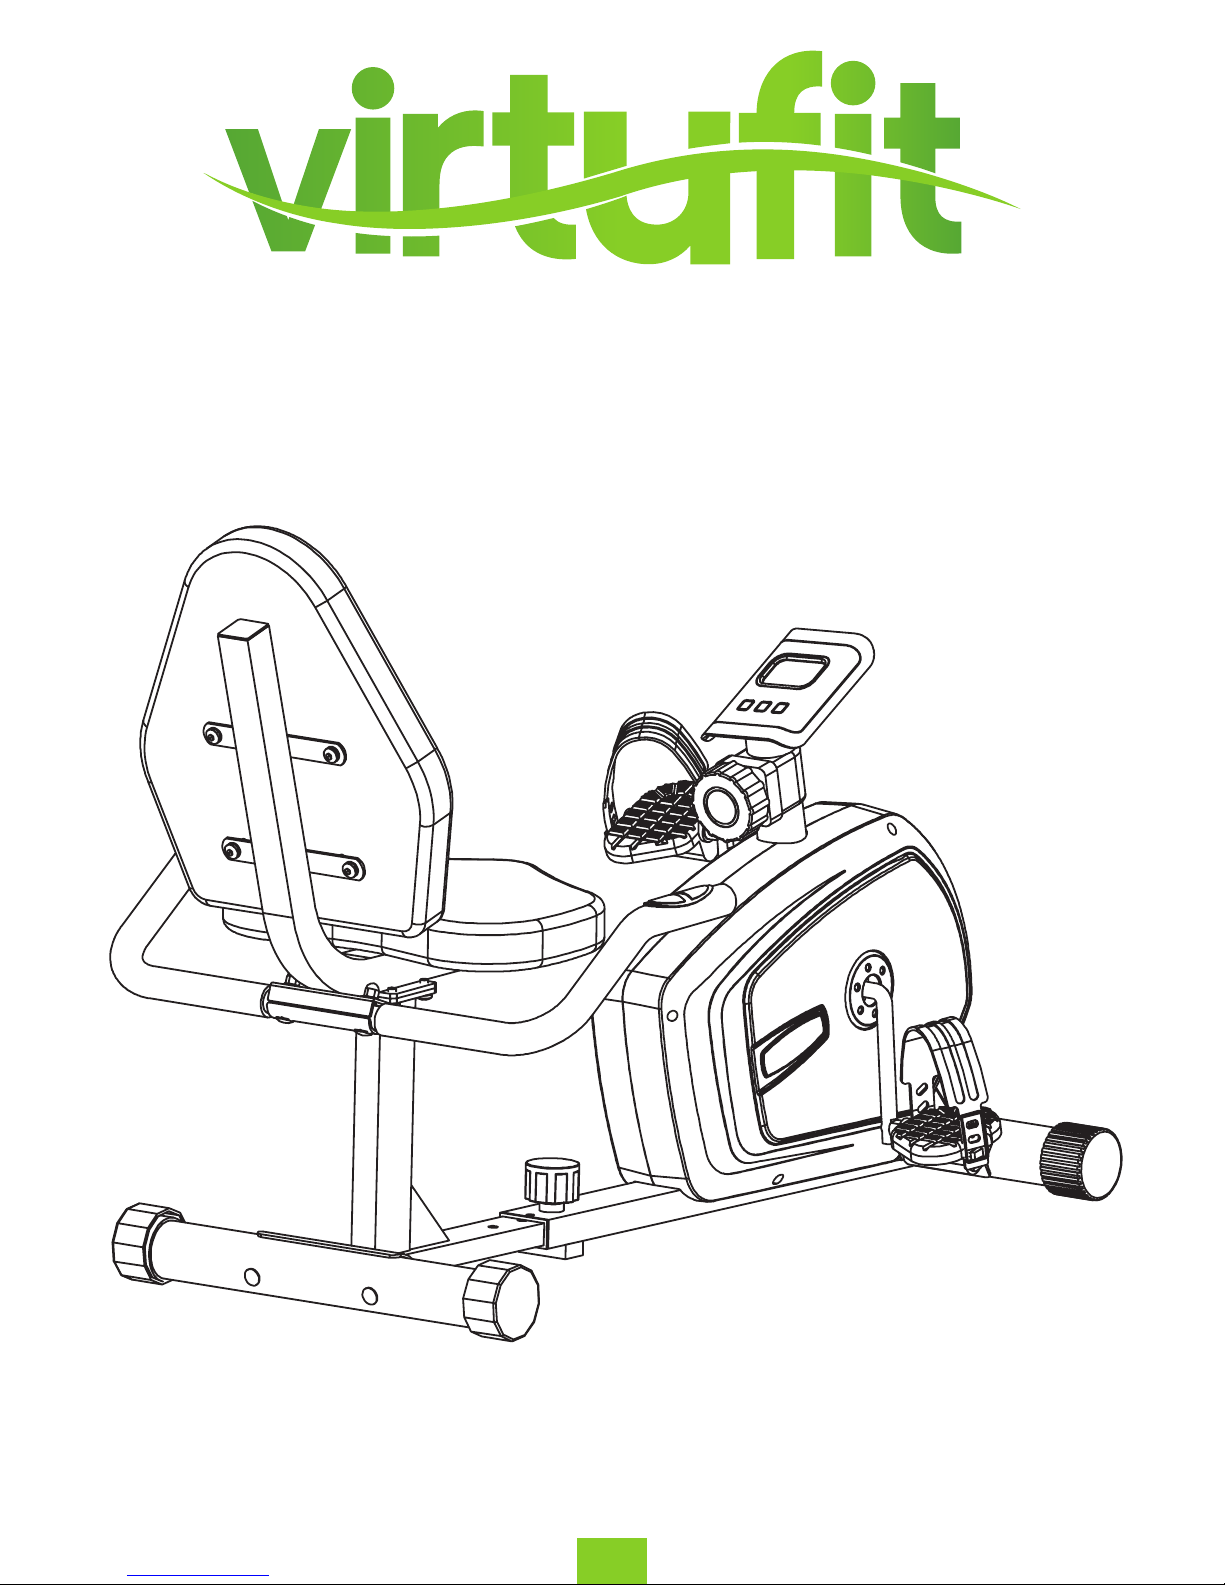
RB 1.0 Recumbent Bike
User manual
ENG
Page 2

2
VirtuFit RB 1.0 Recumbent Bike
ENG
INDEX
Safety instruction 3
Assembly instruction 4-7
Maintenance of the recumbent bike 8
Computer instruction 9-11
Training instruction 12
Exploded drawing 13
Parts list 14
Page 3

3
VirtuFit RB 1.0 Recumbent Bike
ENG
SAFETY INSTRUCTION
WARNING: BEFORE BEGINNING ANY EXERCISE PROGRAM, CONSULT YOUR PHYSICIAN. THIS IS ESPECIALLY
IMPORTANT FOR INDIVIDUALS OVER THE AGE OF 35 OR PERSONS WITH PRE-EXISTING HEALTH PROBLEMS.
READ ALL INSTRUCTIONS BEFORE USING ANY FITNESS EQUIPMENT. VIRTUFIT TAKES NO RESPONSIBILITY FOR
INJURIES OR MATERIAL DAMAGE CAUSED BY USING THIS PRODUCT. BE SURE TO READ THE ENTIRE MANUAL
BEFORE YOU ASSEMBLE OR OPERATE YOUR MACHINE. IN PARTICULAR, NOTE THE FOLLOWING SAFETY
PRECAUTIONS.
- Check all the screws, nuts and other connections before using the machine for the first time and
ensure that the trainer is in the safe condition.
- Set up the machine in a dry level place and leave it away from moisture and water.
- Place a suitable base (rubber mat) beneath the machine in the area of assembly to avoid dirt.
- Before beginning training, remove all objects within a radius of 2 meters from the machine.
- Do not use aggressive cleaning articles to clean the machine, Only use the supplied tools or suitable
tools of your own to assemble the machine or repair any parts of machine. Remove drops of sweat
from the machine immediately after finishing training.
- Your health can be affected by incorrect or excessive training. Consult a doctor before beginning
a training program. He can define the maximum setting (Pulse. Watts. Duration of training etc) to
which you may train yourself and can get precise information during training. This machine is not
suitable for therapeutic purpose.
- Only do training on the machine when it is in correct working way. Use only original spare parts for
any necessary repairs.
- This machine can be used for only one person’s training at a time.
- Wear training clothes and shoes which are suitable for fitness training with the machine. Your
training shoes should be appropriate for the trainer.
- If you have a feeling of dizziness, sickness or other abnormal symptoms, please stop training and
consult a doctor asap.
- People such as children and handicapped persons should only use the machine in the presence of
another person who can give aid and advice.
- The recumbent bike is made for home use and is suitable for users up to 135 kg.
Page 4
4
VirtuFit RB 1.0 Recumbent Bike
ENG
ASSEMBLY INSTRUCTION
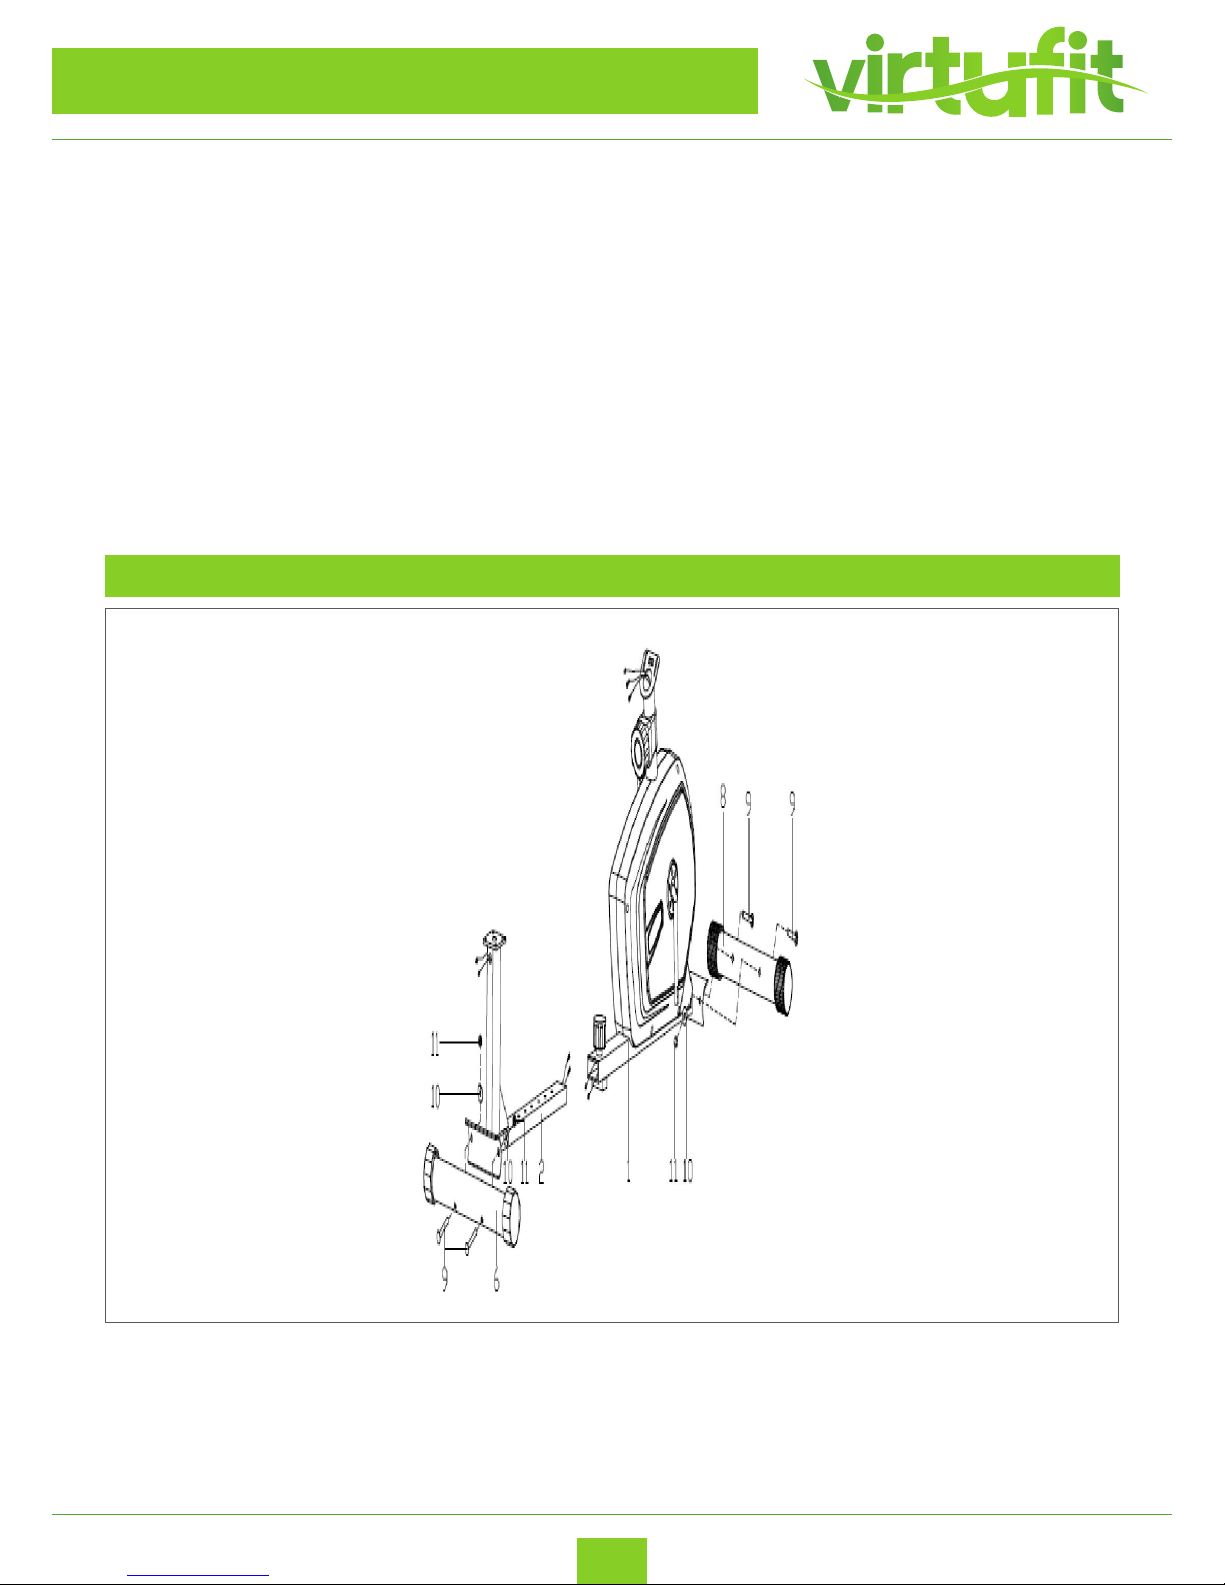
STEP 1
Fix the front stabilizer (8) & the rear stabilizer (6) respectively onto the front main frame (1) the rear main
frame (2) with the carriage bolt (9), arc washer (10) and Acorn nut (11).
Open the box and remove all parts from the packaging and place them on the floor.
Missing parts: If you think you are missing certain parts in your package, carefully check the styrofoam and
the device yourself. Some parts (bolts, screws, etc.) are already attached to / in the device.
Trappers: A left-hand trapper is tightened by turning to the left and a right-hand trapper by turning to the
right. If you turn the left-hand pedal clockwise, there is a chance that you will damage the thread of this
trapper, so that the trapper can no longer be placed on it.
Hexagon socket screws: In the recumbent bike there are hex bolts, make sure that the hex key is properly
inserted into the bolt before applying force to the key. In this way you prevent the head of the socket head
from being turned.
Page 5
5
VirtuFit RB 1.0 Recumbent Bike
ENG
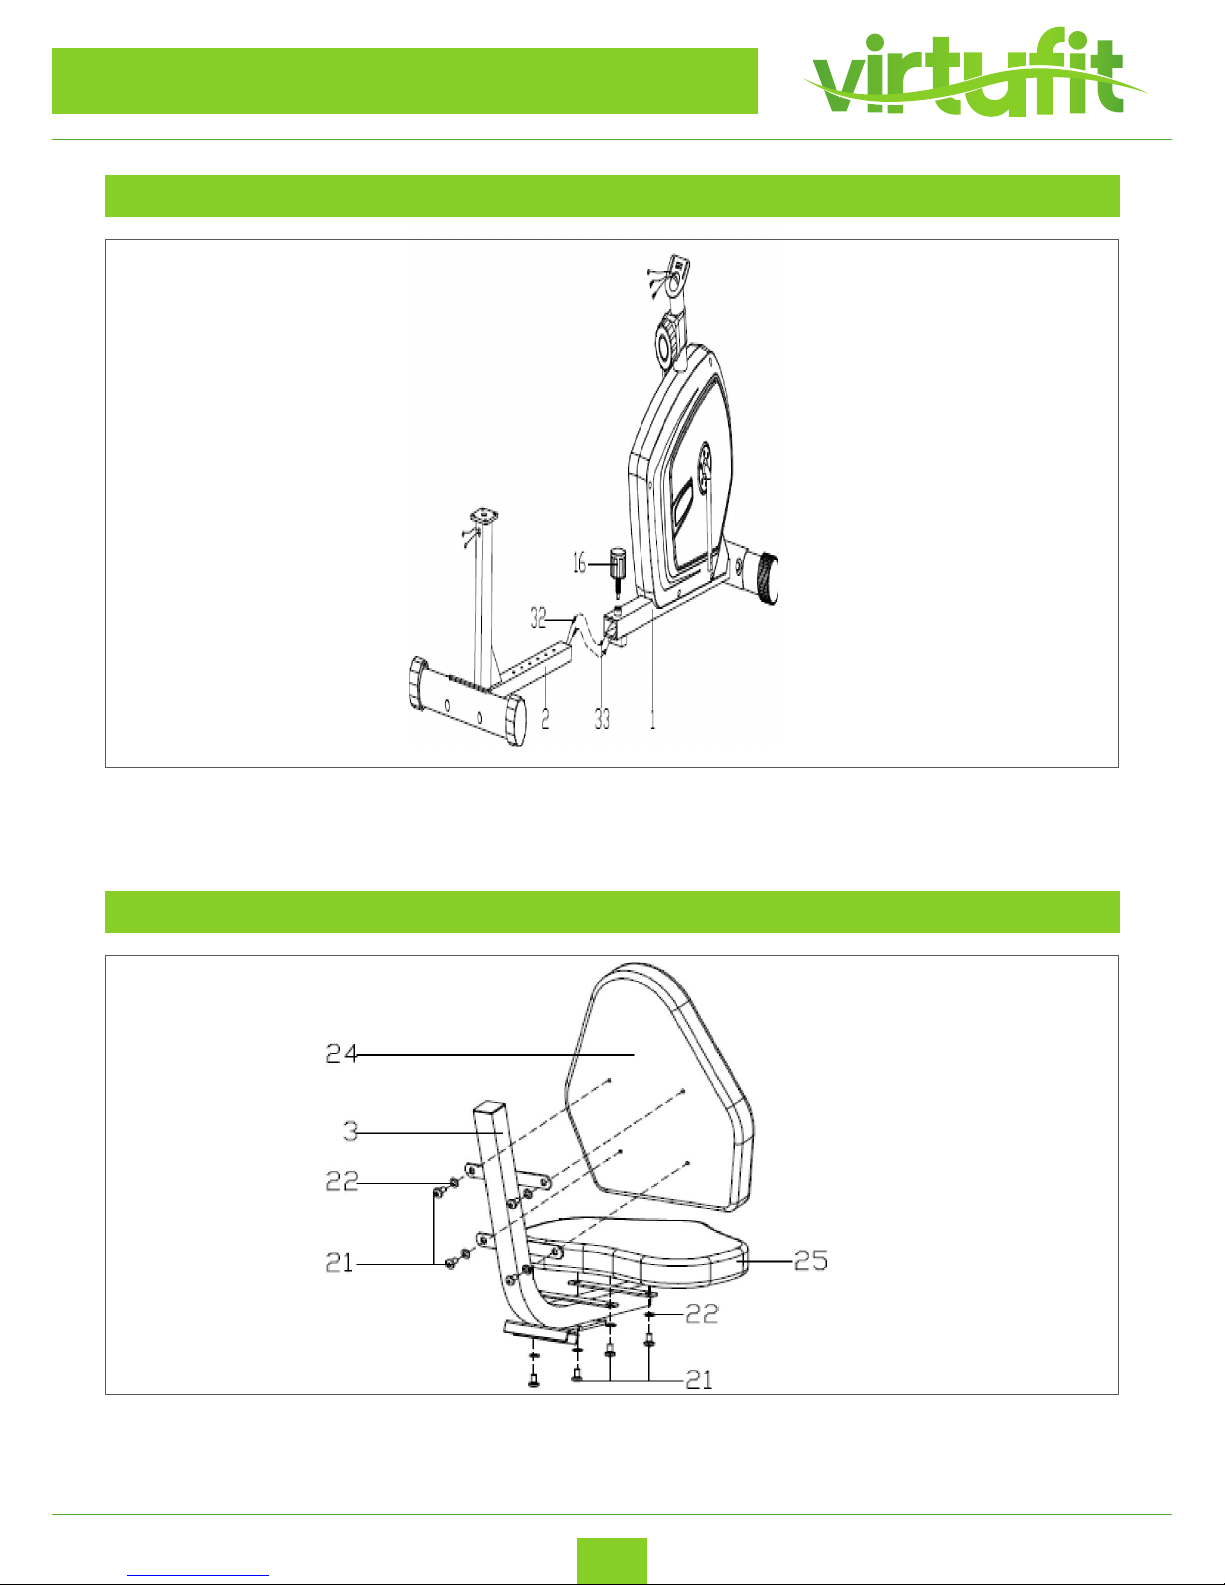
STEP 2
STEP 3
ASSEMBLY INSTRUCTION
Connect the extension wire (32) (33) well , then pull the knob nut(16) and x the rear main frame (2) to the
front main frame (1) lock it to a suitable position with the knob nut(16)
Fix the seat (25) & the backrest (24) onto the seat frame (3) with Inner hex screw (21) and at washer (22) as
shown.
Page 6
6
VirtuFit RB 1.0 Recumbent Bike
ENG
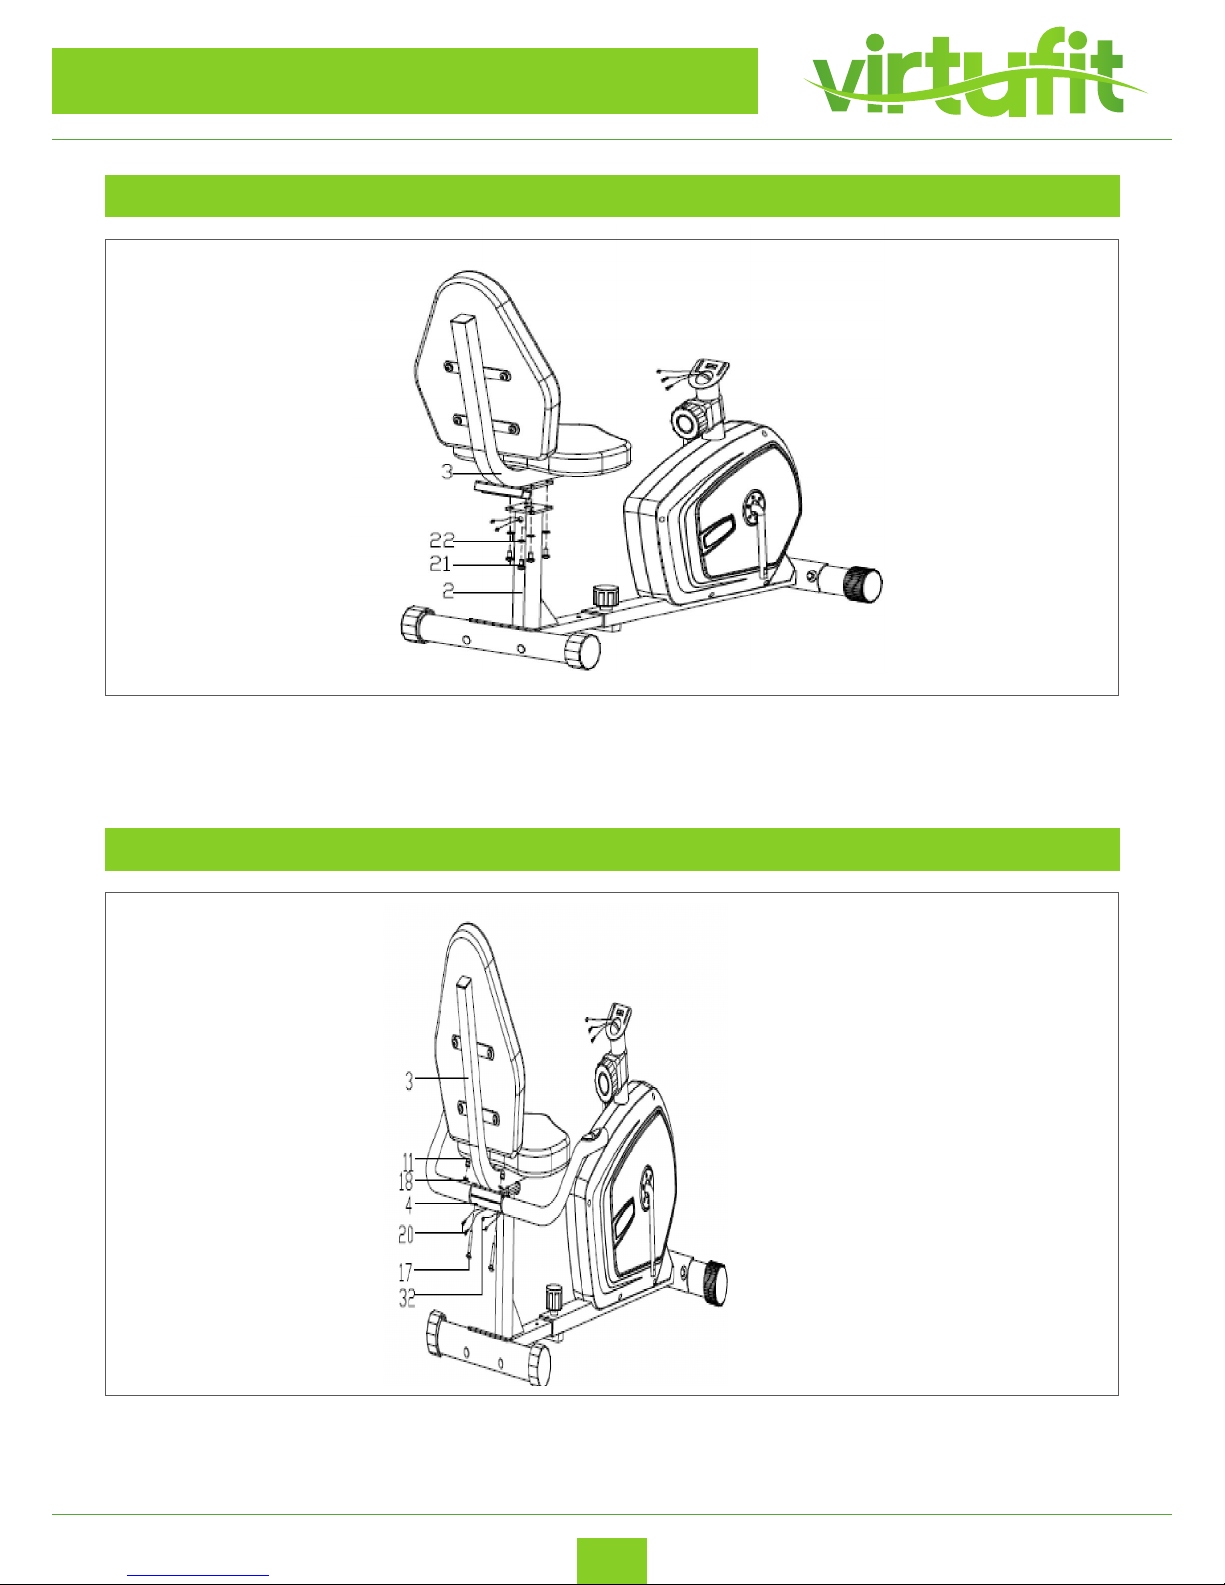
STEP 4
STEP 5
ASSEMBLY INSTRUCTION
Fix the seat frame (3) onto the rear main frame (2) with Inner hex screw (21) and at washer (22).
Connect extension wire (32) with the sensor wire (20), then x the handlebar(4) on the seat frame(3) with
Carriage bolt (17) at washer(18) and acorn nut (11).
Page 7
7
VirtuFit RB 1.0 Recumbent Bike
ENG
ASSEMBLY INSTRUCTION
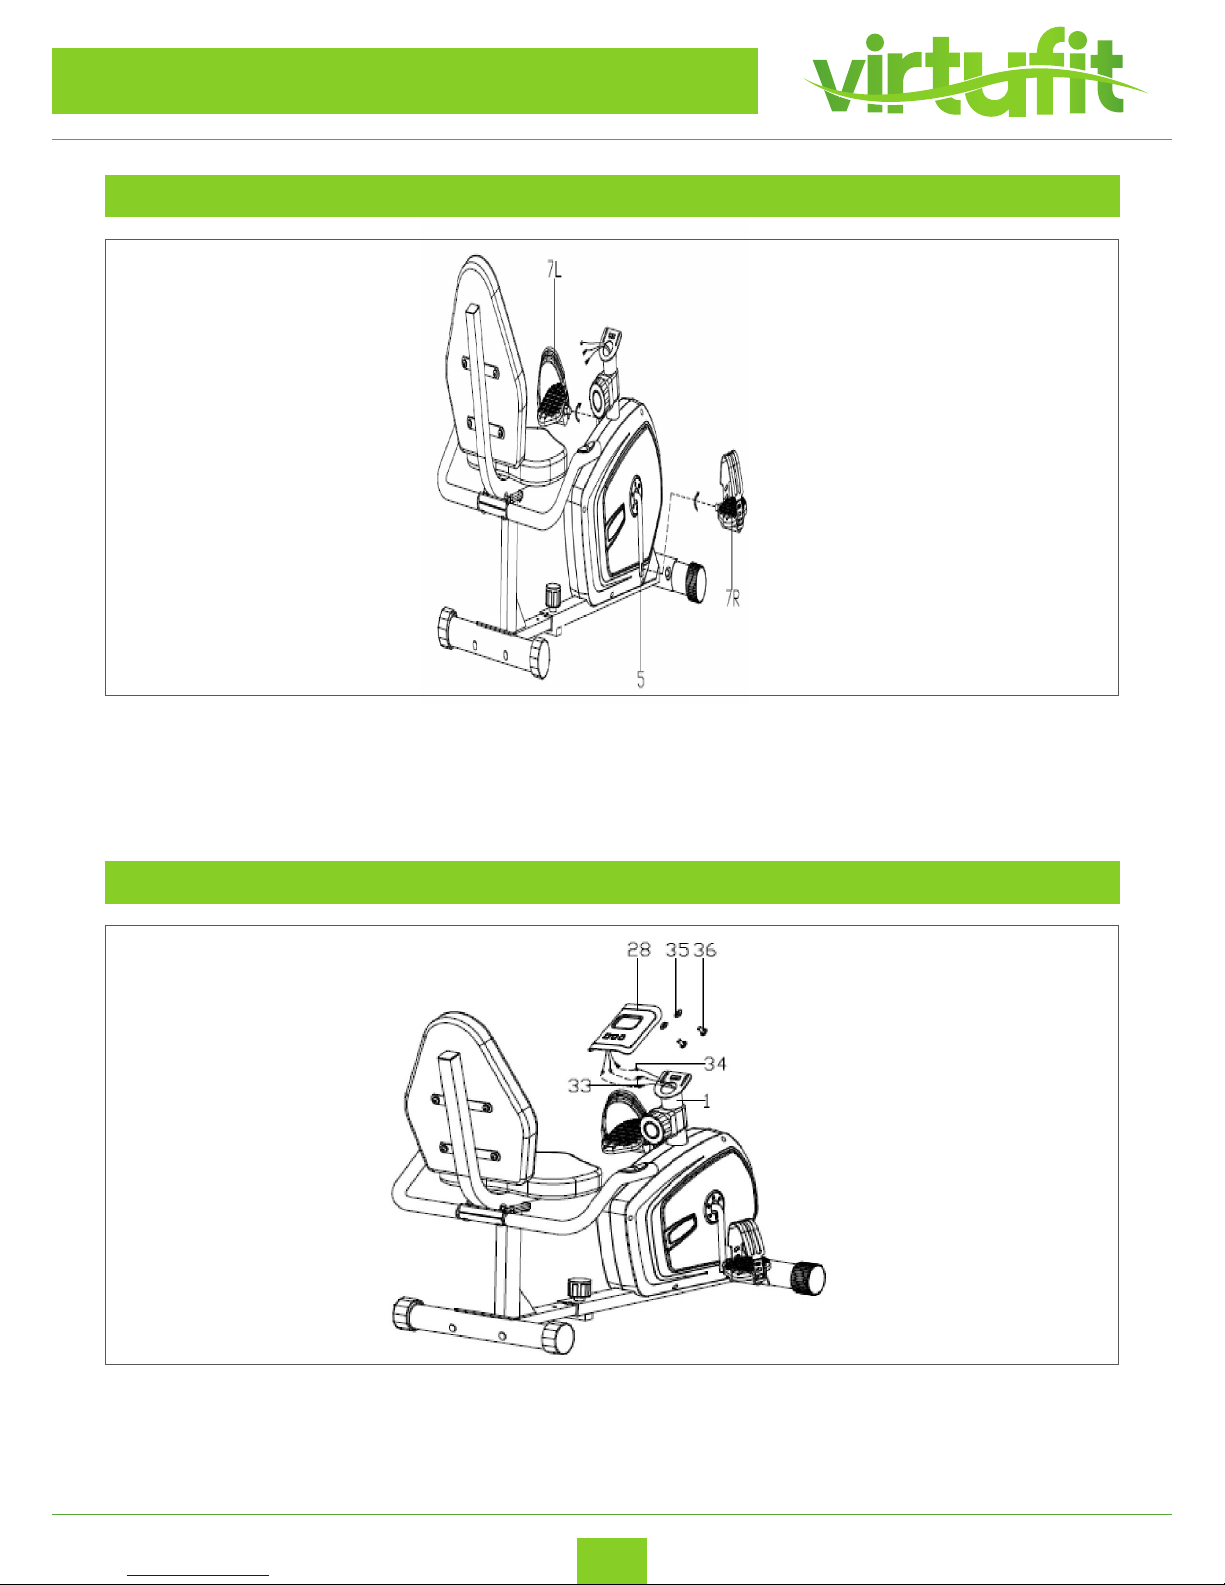
Attach the pedal (7L/R) to the crank (5) of the front main frame (1).
NOTE: Be sure the pedal marked (R) is attached to the crank (R) and tighten in clockwise direction, the pedal
marked (L) is attach to the crank (L) and tightened in the counterclockwise direction.
Connect the extension wire (33) and sensor wire (34) with the wires coming from the meter (28). And then
x the meter (28) on meter bracket of front main frame (1) with the cross screw (36) & at washer (35).
STEP 7
STEP 6
Page 8

8
VirtuFit RB 1.0 Recumbent Bike
ENG
MAINTENANCE RECUMBENT BIKE
Regular maintenance is important for optimal operation and to reduce wear. During use, regularly check
all parts of the exercise bike and tighten them securely. Replace worn parts immediately by contacting the
manufacturer. Use a damp cloth and a little soft soap to clean the recumbent bike.
IMPORTANT: keep liquids away from the control panel to prevent damage. Keep the control panel away
from direct sunlight.
Squeaky recumbent bike
First lubricate all rotating parts with silicone spray. It can also be that a screw is tightened too tightly or too
loosely, this creates friction and therefore a beep. If this is the case, try to nd out exactly where the beep is
coming from and then loosen or tighten this screw. The screws should be tightened in such a way that they
can always be released by hand.
Ticking noise when pedaling
This is probably caused by one of the pedals. Disassemble the trapper (s) and then reattach them to the device. Be careful, the left-hand trapper has to be turned counterclockwise to tighten, the right-hand trapper
clockwise. Tighten the pedals securely. If this does not oer the solution, report this to the supplier.
Heart rate display does not work
This can have various causes.
I. The sensor cables running from the heart rate sensor to the display are incorrectly tted or have come
o during use.
II. It may be that the sensors have become damp, dirty or greasy, clean them regularly.
The console doesn’t work
If the console isn’t working the batteries may be empty. Replace the batteries.
Are there any other problems? Please contact your dealer.
PROBLEM SOLUTIONS
Page 9
9
VirtuFit RB 1.0 Recumbent Bike
ENG
COMPUTER INSTRUCTION
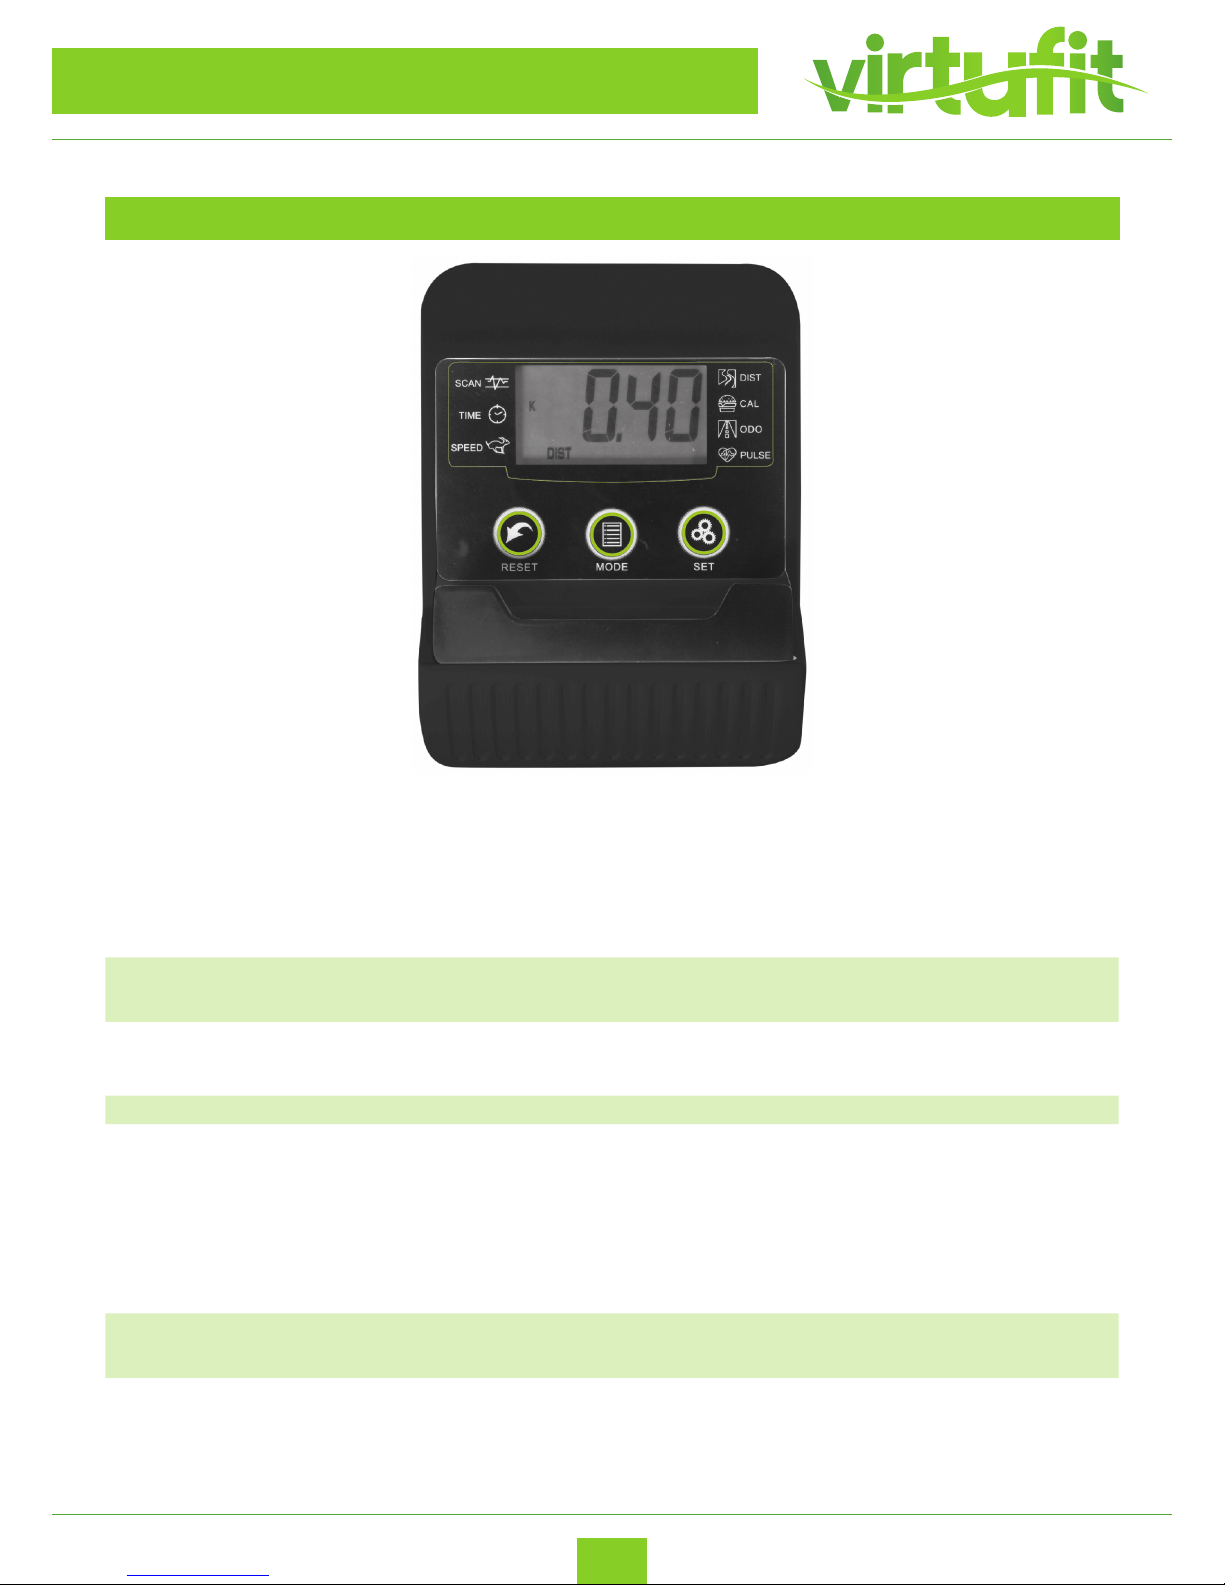
DISPLAY FUNCTION BUTTONS
MODE Press “MODE” to select the desired function
“TIME”, “SPEED”, “DISTANCE”, “ODOMETER”, “CALO RIES” en “PULSE”
SET Set the values for: “TIME” , “DISTANCE” and
“CALORIES”
CLEAR (RESET) With this button you can reset the value to zero
ON/OFF (START/STOP) Start or Stop your workout
AUTO ON/OFF -The device is switched on as soon as you press any
button or when you start cycling
- The device is automatically switched o if you do
not use the keys for 4 minutes or you stop exercising.
RESET By holding down the reset button for 3 seconds you
can clear the settings.
MODE Press the MODE button to select a desired func tion.
Page 10

10
VirtuFit RB 1.0 Recumbent Bike
ENG
COMPUTER INSTRUCTION
FUNCTIONS
TIME Workout time during your exercise
Range 0:00 ~ 99:59
SPEED (SPD) Workout speed during your exercise
Range 0.0 ~ 99.9 KM/H
DISTANCE Workout distance during your exercise
Range 0.0 ~ 9999 KM
CALORIES Burned calories during your exericse
Range 0 ~ 999 KCAL
PULSE (PUL) Heart rate during your exercise
40 ~ 240 BPM
ODOMETER (ODO) Automatically counts the total distance of all training
sesions
0.0 ~ 9999 KM
EXPLANATION OF THE FUNCTIONS
TIME Press the MODE button until TIME is displayed. The
time measured from the beginning of the exercise is
displayed.
SPEED Press the MODE button until SPEED is displayed. The
current speed during the exercise is displayed.
DISTANCE Press the MODE button until DISTANCE is displayed.
The distance traveled during the exercise is displayed.
CALORIES Press the MODE key until CALORIES is displayed. The
number of calories burned during the exercise are
displayed.
ODOMETER Press the MODE button until ODOMETER is displayed.
The total distance of all training sessions is displayed.
PULSE Press the MODE key until PULSE is displayed. Shows
your heart rate. To measure your heart rate, place your
hands on the two contact surfaces. The most accurate
heart rate is displayed after 30 seconds. This
measurement can not be taken as a basis for medical
treatment.
Page 11

11
VirtuFit RB 1.0 Recumbent Bike
ENG
COMPUTER INSTRUCTION
SET TRAINING GOALS
TIME GOAL - Select the TIME function by pressing the MODE key.
To set the time, press the SET button. Press SET to
increase the target value. If you have set the time
goal, it starts counting automatically.
- Press RESET shortly to reset the time goal.
Press MODE to set the next optional target.
DISTANCE GOAL - Select the DISTANCE function by pressing the MODE
key. To set the distance, press the SET key. Press SET to
increase the target value. If you have set the distance
goal, it starts counting automatically.
- Press RESET shortly to reset the distance target.
Press MODE to set the next optional target.
CALORIES GOAL - Select the CALORIES function by pressing the MODE
key. To set the number of calories, press the SET
button. Press SET to increase the target value. If you s
et the calories target, it starts counting automatically.
- Press RESET shortly to reset the calorie target.
Press MODE to set the next optional target.
Page 12
12
VirtuFit RB 1.0 Recumbent Bike
ENG
TRAINING INSTRUCTIONS
WARMUP
A successful exercise program consists of a warm-up, aerobic exercise, and a cool-down. Do the entire
program at least two and preferably three times a week, resting for a day between workouts. After
several months, you can increase your workouts to four or ve times per week.
The purpose of warming up is to prepare your body for exercise and to minimize injuries. Warm up for
two to ve minutes before strength-training or aerobic exercising. Perform activities that raise your heart
rate and warm the working muscles. Activities may include brisk walking, jogging, jumping jacks, jump
rope, and running in place.
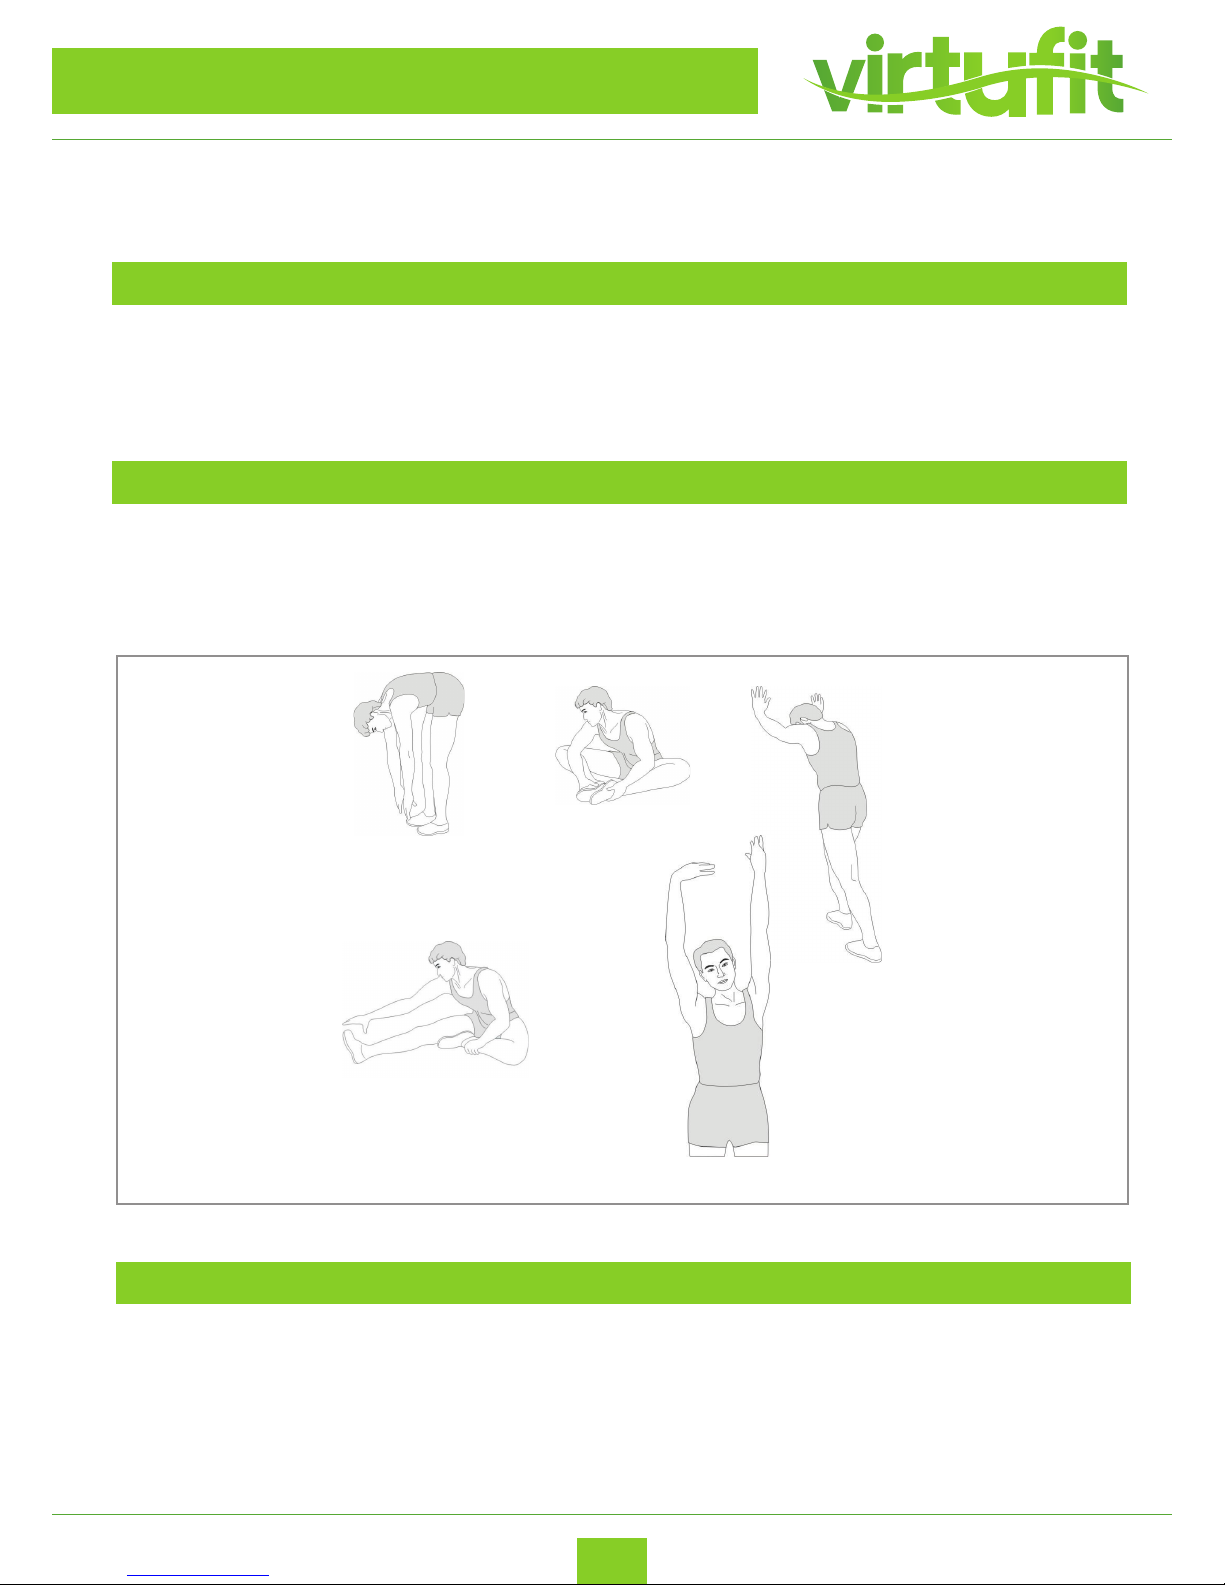
Stretching while your muscles are warm after a proper warm-up and again after your strength
or aerobic training session is very important. Muscles stretch more easily at these times because of their
elevated temperature, which greatly reduces the risk of injury. Stretches should be held for 15 to 30
seconds. DO NOT BOUNCE.
STRETCHING
Toe touch
Inner thigh stretch
Achilles stretch
Hamstring stretch
Side stretch
COOLING DOWN
The purpose of cooling down is to return the body to its normal or near normal, resting state at the end
of each exercise session. A proper cool-down slowly lowers your heart rate and allows blood to return to
the heart.
Page 13
13
VirtuFit RB 1.0 Recumbent Bike
ENG
EXPLODED DRAWING
Page 14
14
VirtuFit RB 1.0 Recumbent Bike
ENG
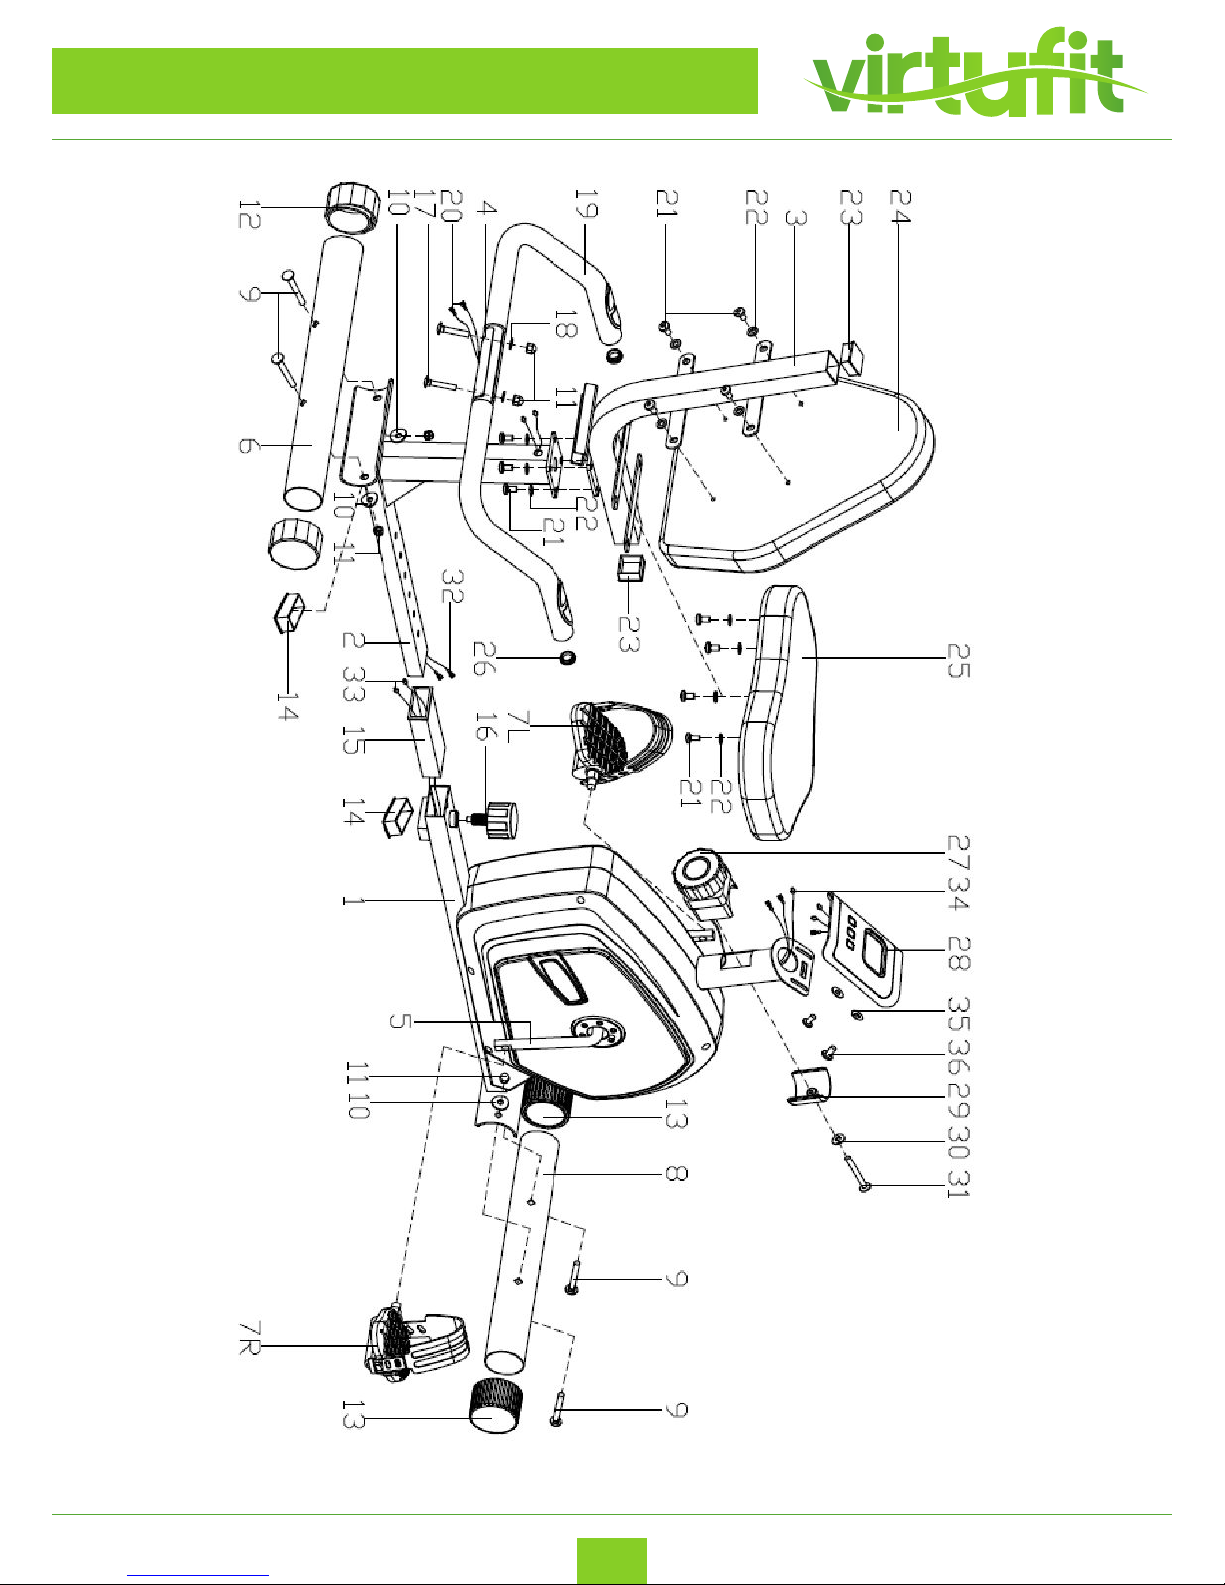
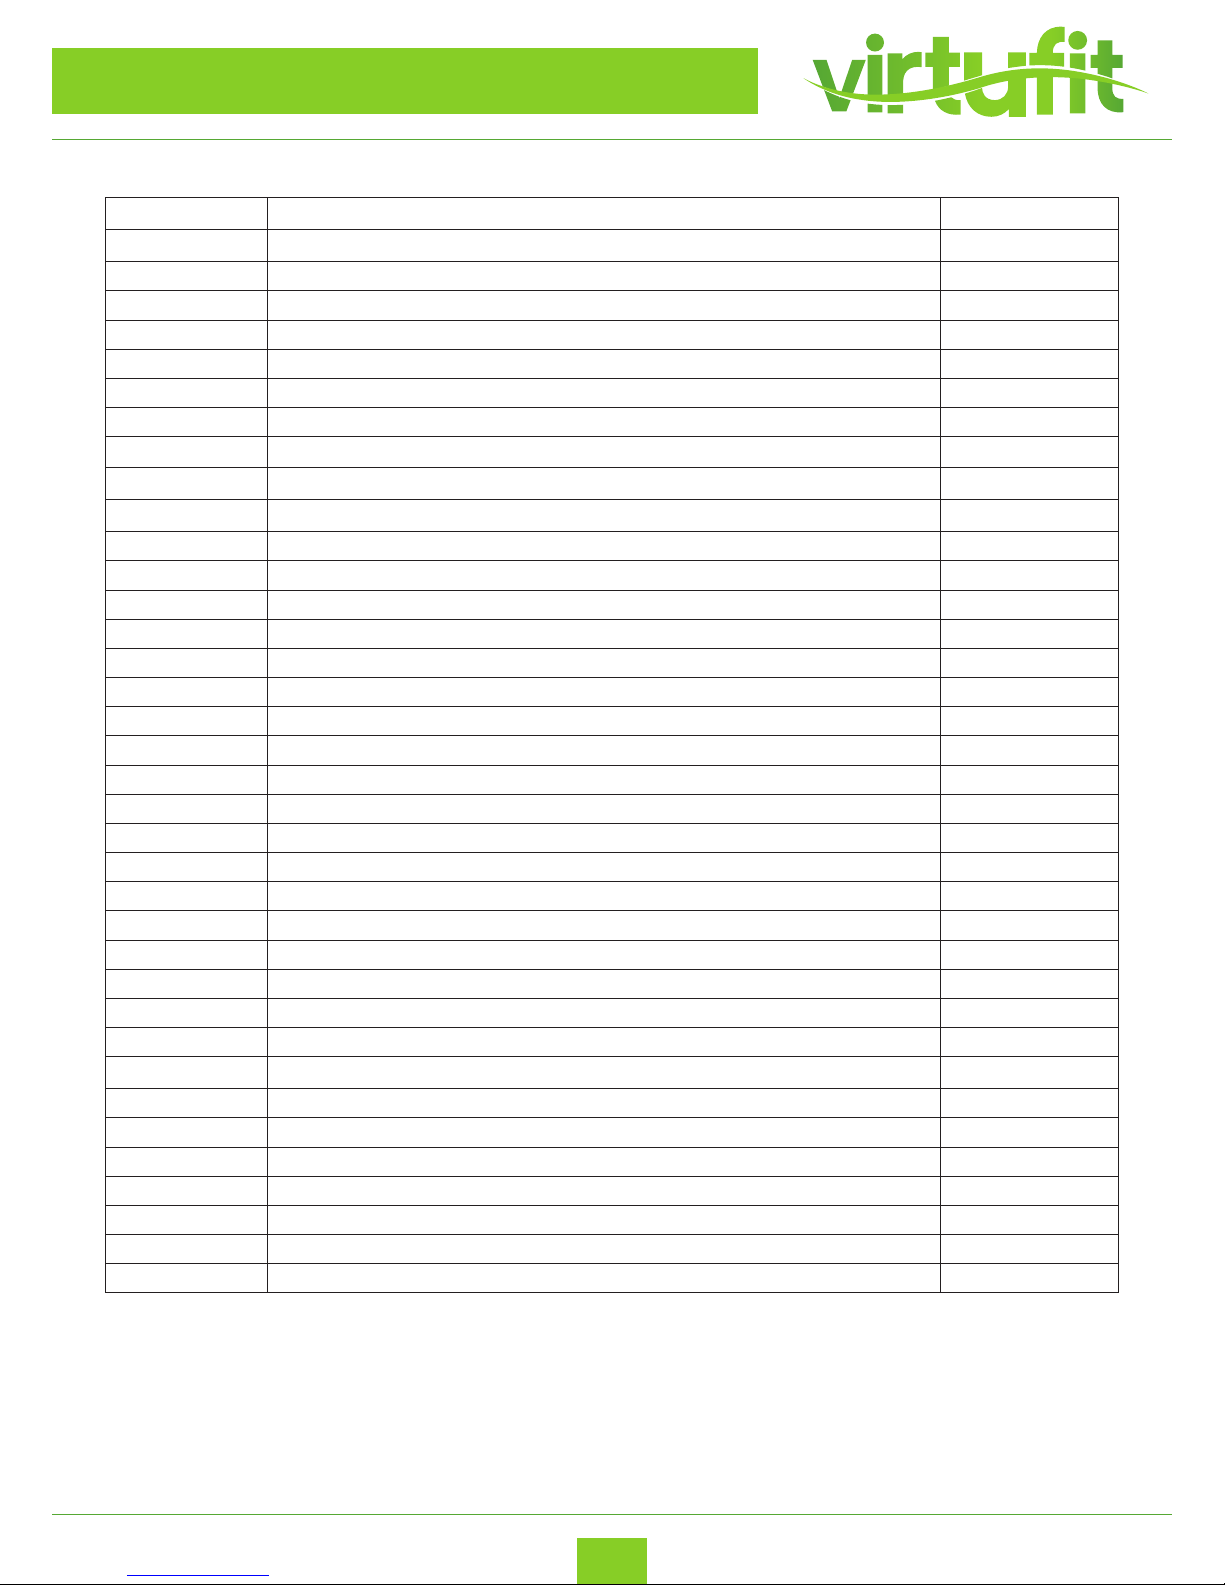
PARTS LIST
Number Description Qty.
1 Front main frame 1
2 Rear main frame 1
3 Seat frame 1
4 Armrest 1 pr.
5 Crank 1 pr.
6 Rear stabilizer 1
7 L/R Pedal 1 pr.
8 Front stabilizer 1
9L / R Carriage bolt 4
10 Arc washer 4
11 Acorn nut 6
12 Rear end cap 2
13 Front end cap 2
14 Square end cap 2
15 Bushing 1
16 Knob nut 1
17 Carriage bolt 2
18 Flat washer 2
19 Foam grip 2
20 Pulse wire 2
21 Inner hex screw 12
22 Flat washer 12
23 Square end cap 2
24 Backrest 1
25 Seat 1
26 End cap 2
27 Tension controller 1
28 Meter 1
29 Tension cover 1
30 Flat washer 1
31 Cross screw 1
32 Extension wire 2
33 Extension wire 1
34 Sensor wire 1
35 Flat washer 2
36 Cross tapping screw 2
Page 15

15
VirtuFit RB 1.0 Recumbent Bike
ENG
For questions or missing parts please contact your dealer.
 Loading...