

Page 1
VirtuFit iConsole FDR 2.1 Ergometer Crosstrainer
1
iConsole FDR 2.1 Ergometer Crosstrainer
ENG
User Manual
Page 2

NL
VirtuFit iConsole FDR 2.1 Ergometer Crosstrainer
2
INDEX
Safety Instructions 3
Checklist 4
Assembly Instructions 5-12
Folding Instructions 13
Maintenance 14
Computer Manual 15-21
Training using an app 22
Exploded Drawing 23
Parts List 24-31
ENG
ENG
Page 3

NL
VirtuFit iConsole FDR 2.1 Ergometer Crosstrainer
3
SAFETY INSTRUCTIONS
WARNING: BEFORE YOU BEGIN YOUR WORKOUT, WE RECOMMEND THAT YOU
FIRST CONTACT YOUR HEALTH SPECIALIST, ESPECIALLY FOR PEOPLE OVER 35
OR PEOPLE WHO ALREADY SUFFER FROM HEALTH PROBLEMS. WE ARE NOT
LIABLE FOR ACCIDENTS IF YOU DO NOT FOLLOW OUR INSTRUCTIONS.
ATTENTION
ENG
- The crosstrainer is only made for home use and is suitable for users up to 155kg.
- Carefully follow the steps of assembly.
- Use only original parts that are supplied.
- After delivery, check everything with the parts list before you start assembling.
- Only use suitable tools for assembly and ask for help where necessary.
- Place the crosstrainer on a flat surface and a stiff surface. Use in damp rooms is not
recommended.
- Check all parts for tightness before you train for the first time. We also recommend checking
the parts every the parts every month. Replace broken parts immediately and do not use the
crosstrainer if you have not yet replaced the part. Only use original spare parts for repair. Ask
your dealer for advice on repairs.
- Avoid using aggressive cleaning agents when cleaning the crosstrainer.
- Start training only after the cross trainer has been fully assembled and checked.
- Be aware that all adjustable parts have a maximum number of settings to which they can be
adjusted.
- The crosstrainer is made for adults. Make sure that children only use it when accompanied by an
adult.
- Inform users of potential danger, watch out for moving parts during use.
Warning: improper / excessive training can cause injuries.
Page 4
NL
VirtuFit iConsole FDR 2.1 Ergometer Crosstrainer
4
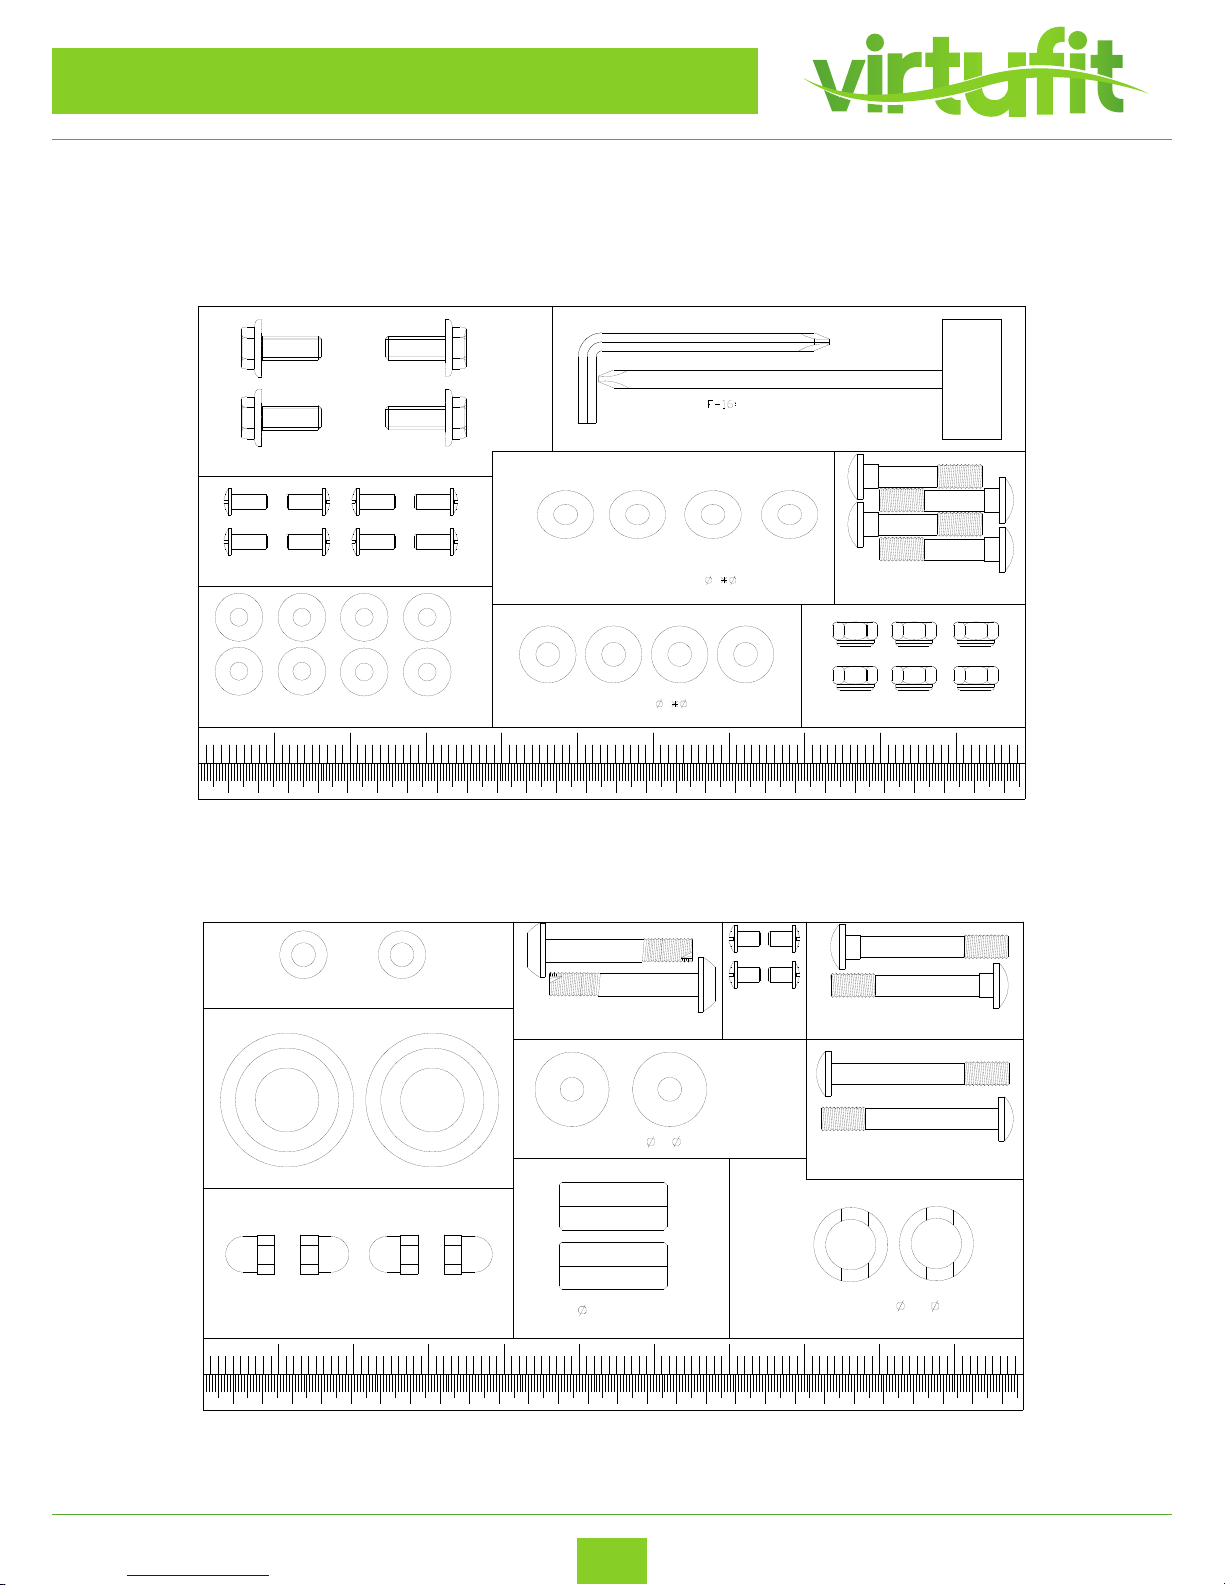
CHECKLIST
F- 4;l o c k nut fo r M8 bo lt ( 6 )
F-5: Curved Washer 8 19* 2T (4)
Al le n K ey (1 )
Ca rri age Bo l t
M8*P1.25*40L (4)
F-17:
IMFD
F-2:HexboltM8*P1.0*20L
( movab ha ndleb ar )( 4)
F-1 4:
F-13:SCREW M5*12L(8)
F- 7: Fl at wa sh er f or 8 1 9* 2T b ol t(4)
F-11; Allen bolt
M8*P1.25*50L(2)
IMFD
F-1;FlatWasher 8* 25*2T bolt(4)
F-9;FlatWasher £p8*£p16*1T(2)
F-12:
SCREW
M5*8L(4)
F-3:Curved Washer 20* 30*0.3T(2)
F-15
¡G¡]2¡ ^
F-10; 16*36.5L bolt(2)
F- 8 :
Carriage Bolt
M8*P1.25*55L (2)
F-2 0:
Carriage Bolt
M8*P1.25*65L (2)
F-19¡F Acorn nut M8(4)
ENG
Page 5

NL
VirtuFit iConsole FDR 2.1 Ergometer Crosstrainer
5
ASSEMBLY INSTRUCTIONS
Missing parts: If you think you are missing certain parts in your package, carefully check the styrofoam
and the device yourself. Some parts (bolts, screws, etc.) are already attached to / in the device.
Error message: Make sure that all cables are carefully attached. The aluminum legs are very sensitive and
should remain straight. Do you get an error message after the installation of your cross trainer? Then you
should bend these aluminum feet straight again, this may cause the error message to disappear.
Transport wheels: Make sure that the transport wheels are attached to the front of the device.
Allen screws: In the uprights of cross trainers are hex bolts, make sure that the Allen key is rmly in the
bolt before you apply force to the key. In this way you prevent the head of the socket head from being
turned
ENG
Page 6
NL
VirtuFit iConsole FDR 2.1 Ergometer Crosstrainer
6
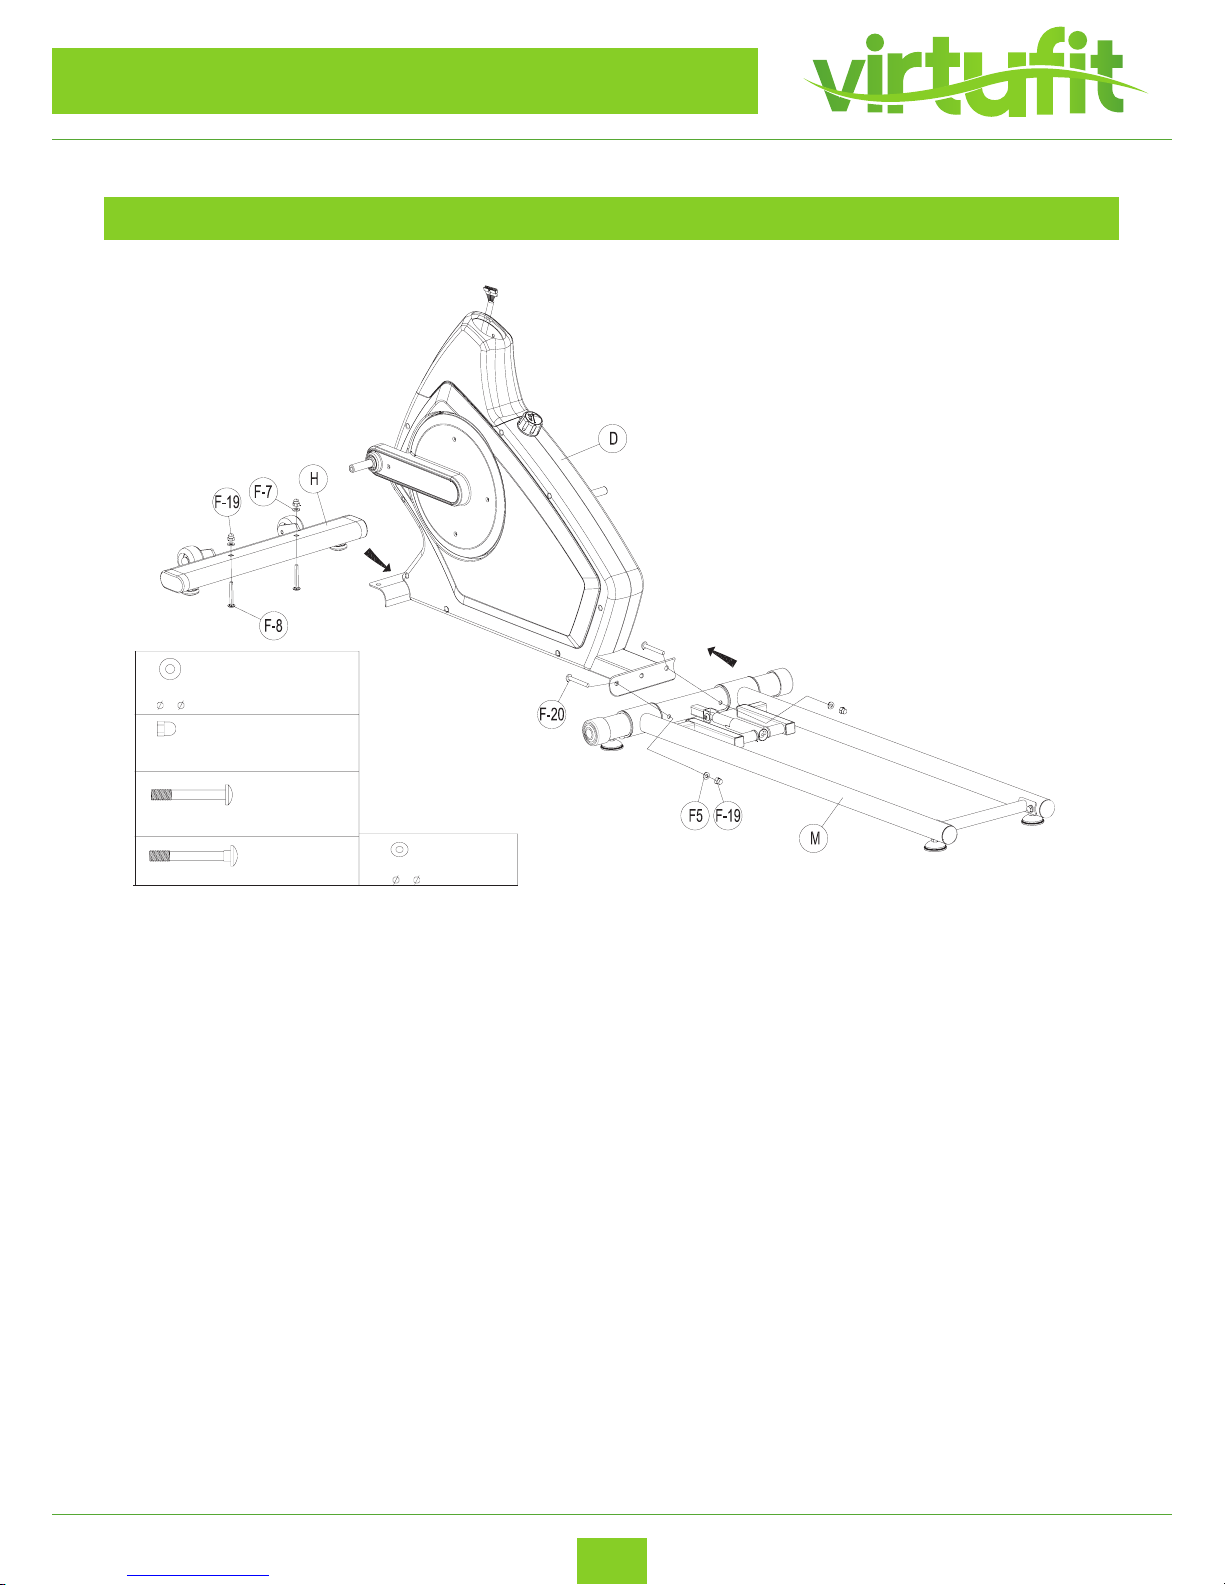
STEP 1
– Attach the front stabilizer (H) rmly to the main frame (D) using 2 at washers (F-7), 2 at head
lock bolts (F-8) and 2 nuts (F-19);
– Attach the rear stabilizer (M) rmly to the main frame (D) using 2 at washers (F-7), 2 at head
lock bolts (F-20) and 2 nuts (F-19).
ASSEMBLY INSTRUCTIONS
ENG
F-20:Carriage Bolt M8*P1.25*65L (2)
F-8:Carria
g
e Bolt M8*P1.25*55L (2
)
F-19¡F Acorn nut M8(4)
F-7:Flat washer for
8* 19*2T bolt(2)
F-5:flatwasher
8* 19*2T (2
)
Page 7
NL
VirtuFit iConsole FDR 2.1 Ergometer Crosstrainer
7
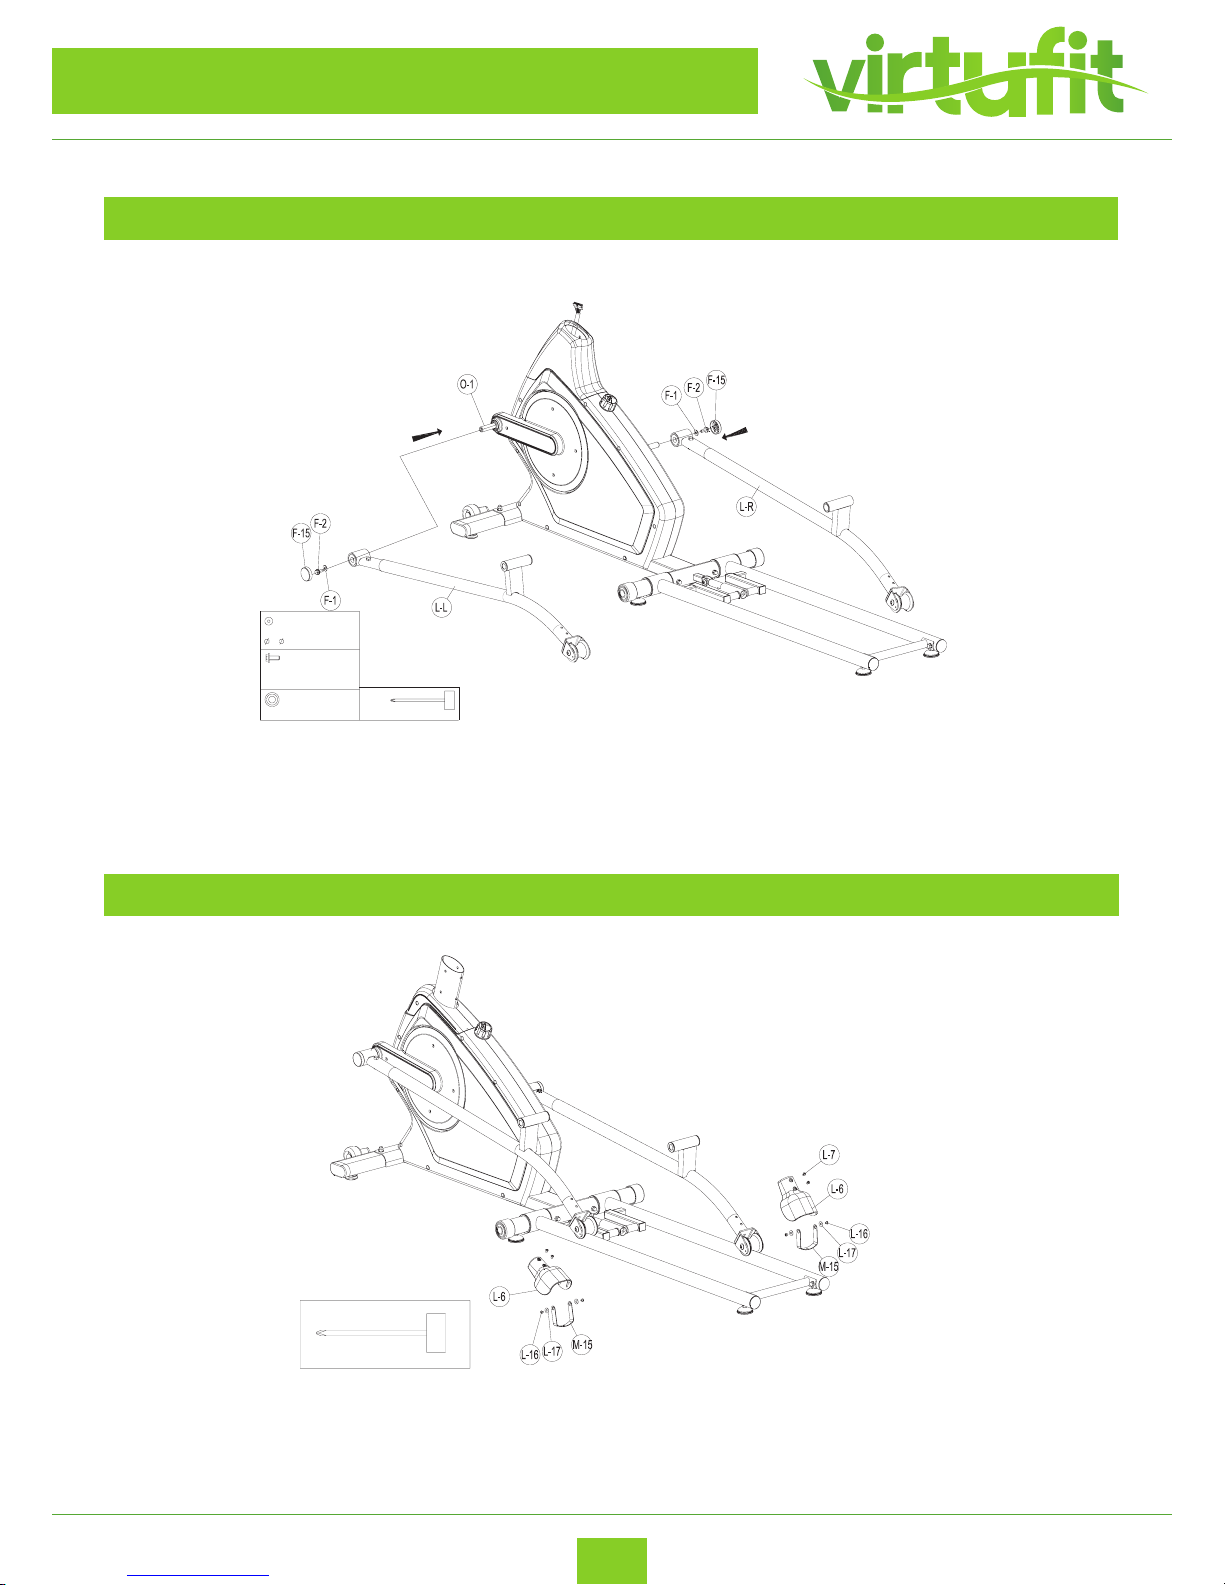
– Mount the left crank arm (L-L) to the left crank (O-1) using 1 at washer (F-1), 1 screw (F-2) and 1
cap for screw (F-15);
– Mount the right crank arm (L-R) to right crank (O-1) using 1 at washer (F-1), 1 screw (F-2) and 1
cap for screw (F-15).
STEP 2
ASSEMBLY INSTRUCTIONS
– Mount the covers (L-6) on sliders with screws (L-7) and fasten the lockers (M-15) with screws and
washers (L-16 & L-17).
STEP 3
ENG
F-15: (2)
F-2:HexboltM8*P1.0*20L
(movable handlebar)(2)
F-1;Flat washer for
8* 25*2T bolt(2)
Box Spanner
F16:
F-16:Box Spanner
Page 8
NL
VirtuFit iConsole FDR 2.1 Ergometer Crosstrainer
8
ASSEMBLY INSTRUCTIONS
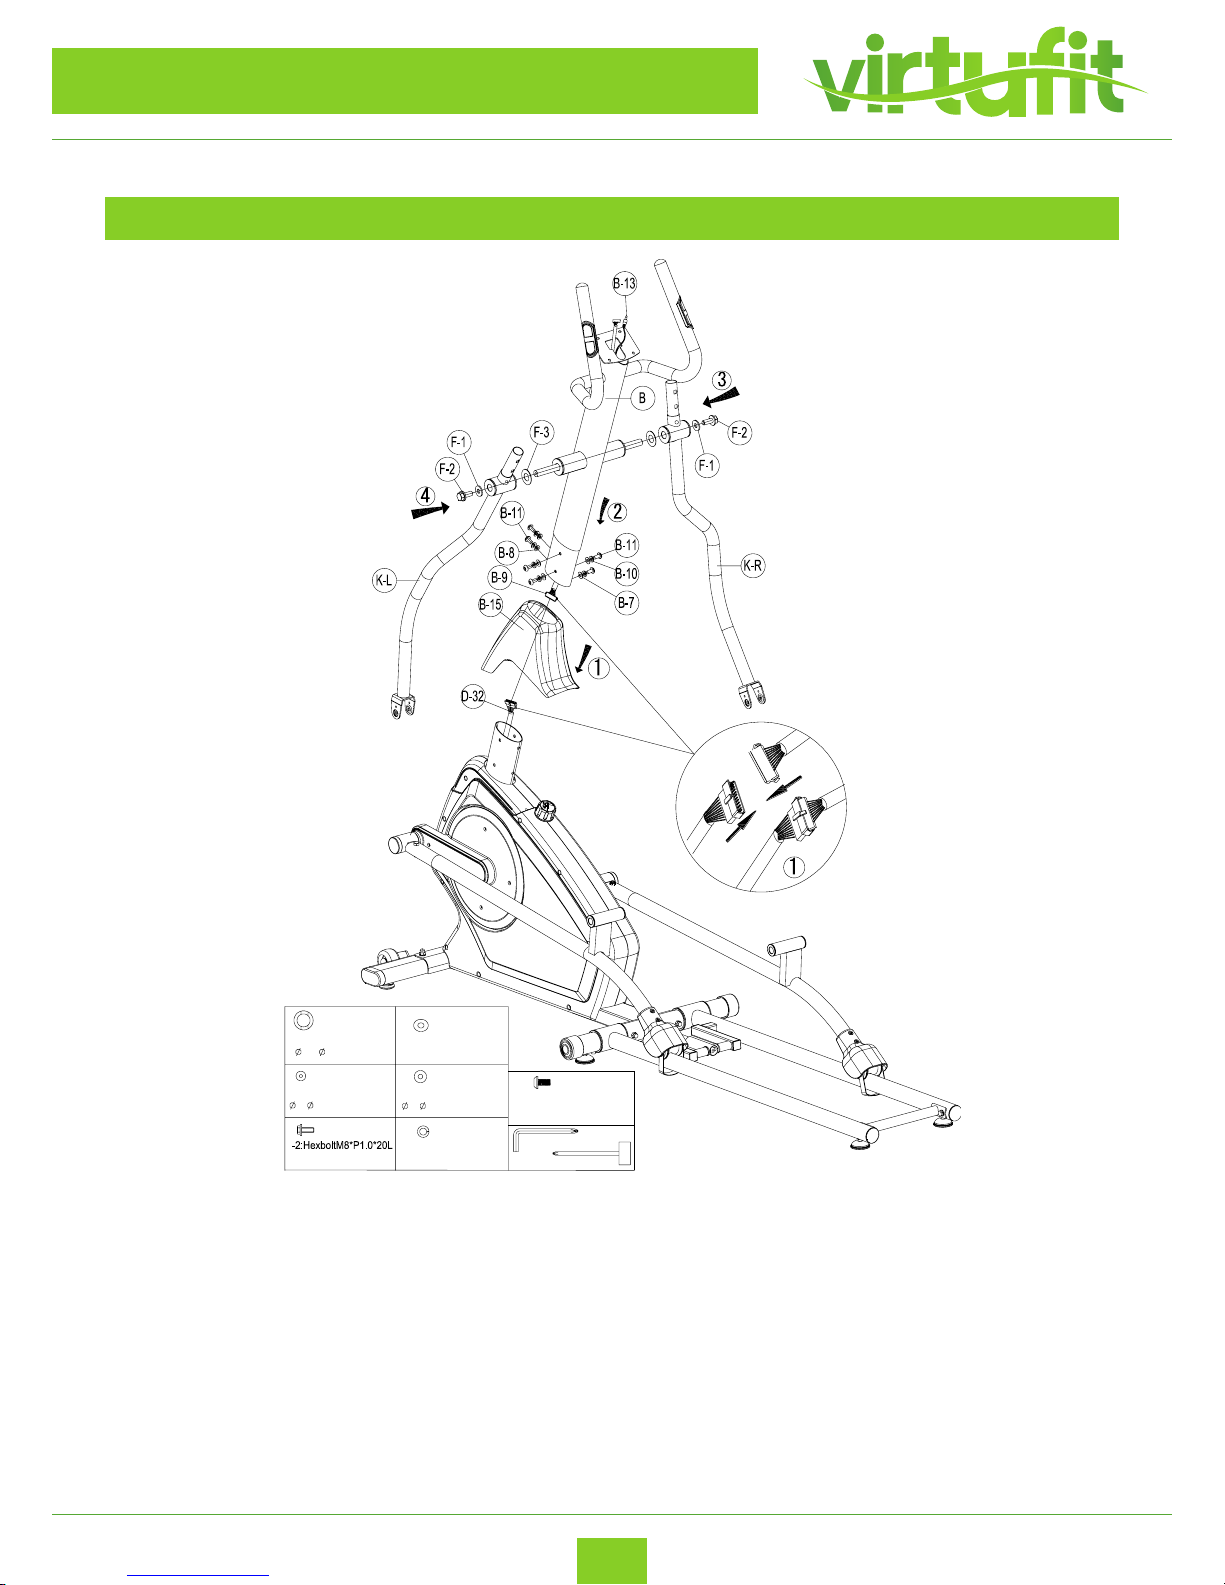
STEP 4
– Connect the cable wire (upper) (B-9) to the cable wire (lower) (D-32);
– Attach the handlebar post set (B) to the main frame with 4 at washers (B-7), 2 half circle washers
(B-8), 6 spring washers (B-10) and 6 screws (B-11);
– Mount the right-hand lower handlebar (K-R) on the steering shaft with 1 at ring (F-1), 1 nylon
screw (F-2) and 1 wave ring (F-3).
ENG
F-1;Flat washer for
8* 25*2T bolt( 2)
F-3:Curved Washer
20* 30*0.3T(2)
B-11:SCREW
M8*P1.25*16L(6)
B-10: Spring Washer
8(6)
B-7:Flat washer for
8* 19*2T bolt(4)
B-8: Curved Washer
for M8 bolt (2)
F17: Allen Key
F-16:Box Spanner
Page 9
NL
VirtuFit iConsole FDR 2.1 Ergometer Crosstrainer
9
ASSEMBLY INSTRUCTIONS
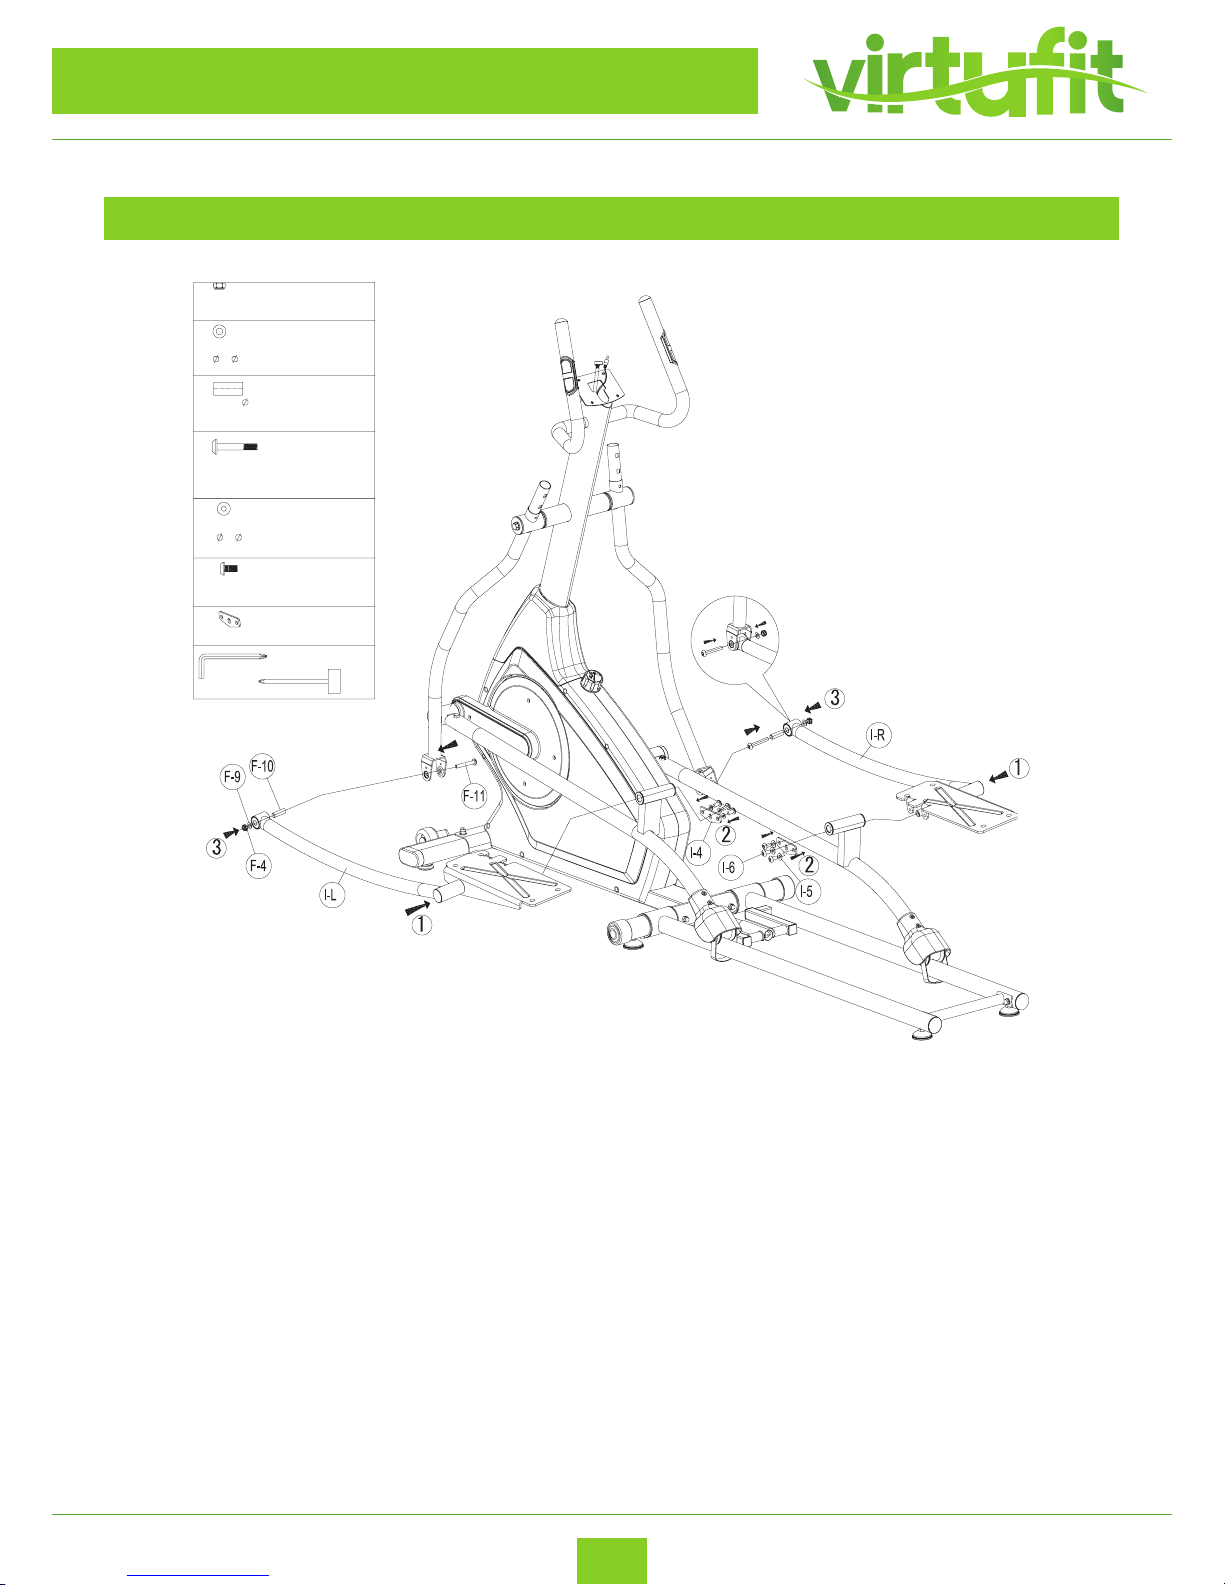
STEP 5
– Mount the right pedal arm (I-R) on the right bottom handle (K-R) using 1 nylon nut (F-4), 1 at
washer (F-9), 1 sleeve (F-10);
– Attach the left pedal arm (IL) to the left crank arm (LL) and then secure it with 1 pedal connector
(I-4), 3 at washers (I-5) and 3 screws (I-6);
– Attach the right pedal arm (IR) to the right crank arm (LR) and then secure it with 1 pedal
connector (I-4), 3 at washers (I-5) and 3 screws (I-6);
– Fit the left pedal arm (I-L) to the left lower handlebar (K-L) using 1 nylon nut (F-4), 1 at washer
(F-9) and 1 sleeve (F-10);
– Mount the right pedal arm (I-R) on the right bottom handle (K-R) using 1 nylon nut (F-4), 1 at
ring (F-9) and 1 sleeve (F-10).
ENG
F-4;lock nut for
M8 bolt (2)
F-9;FlatWasher
8* 16*1T(2)
F-10; 16*36.5L
bolt(2)
F-11; allen bolt
M8*P1.25*50L(2)
I-5:Flat washer for
8* 19*2T bolt(6)
I-6:SCREW
M8*P1.25*16L(6)
I-4:(2)
F17: Allen Key
F-16:Box Spanner
Page 10
NL
VirtuFit iConsole FDR 2.1 Ergometer Crosstrainer
10
ASSEMBLY INSTRUCTIONS
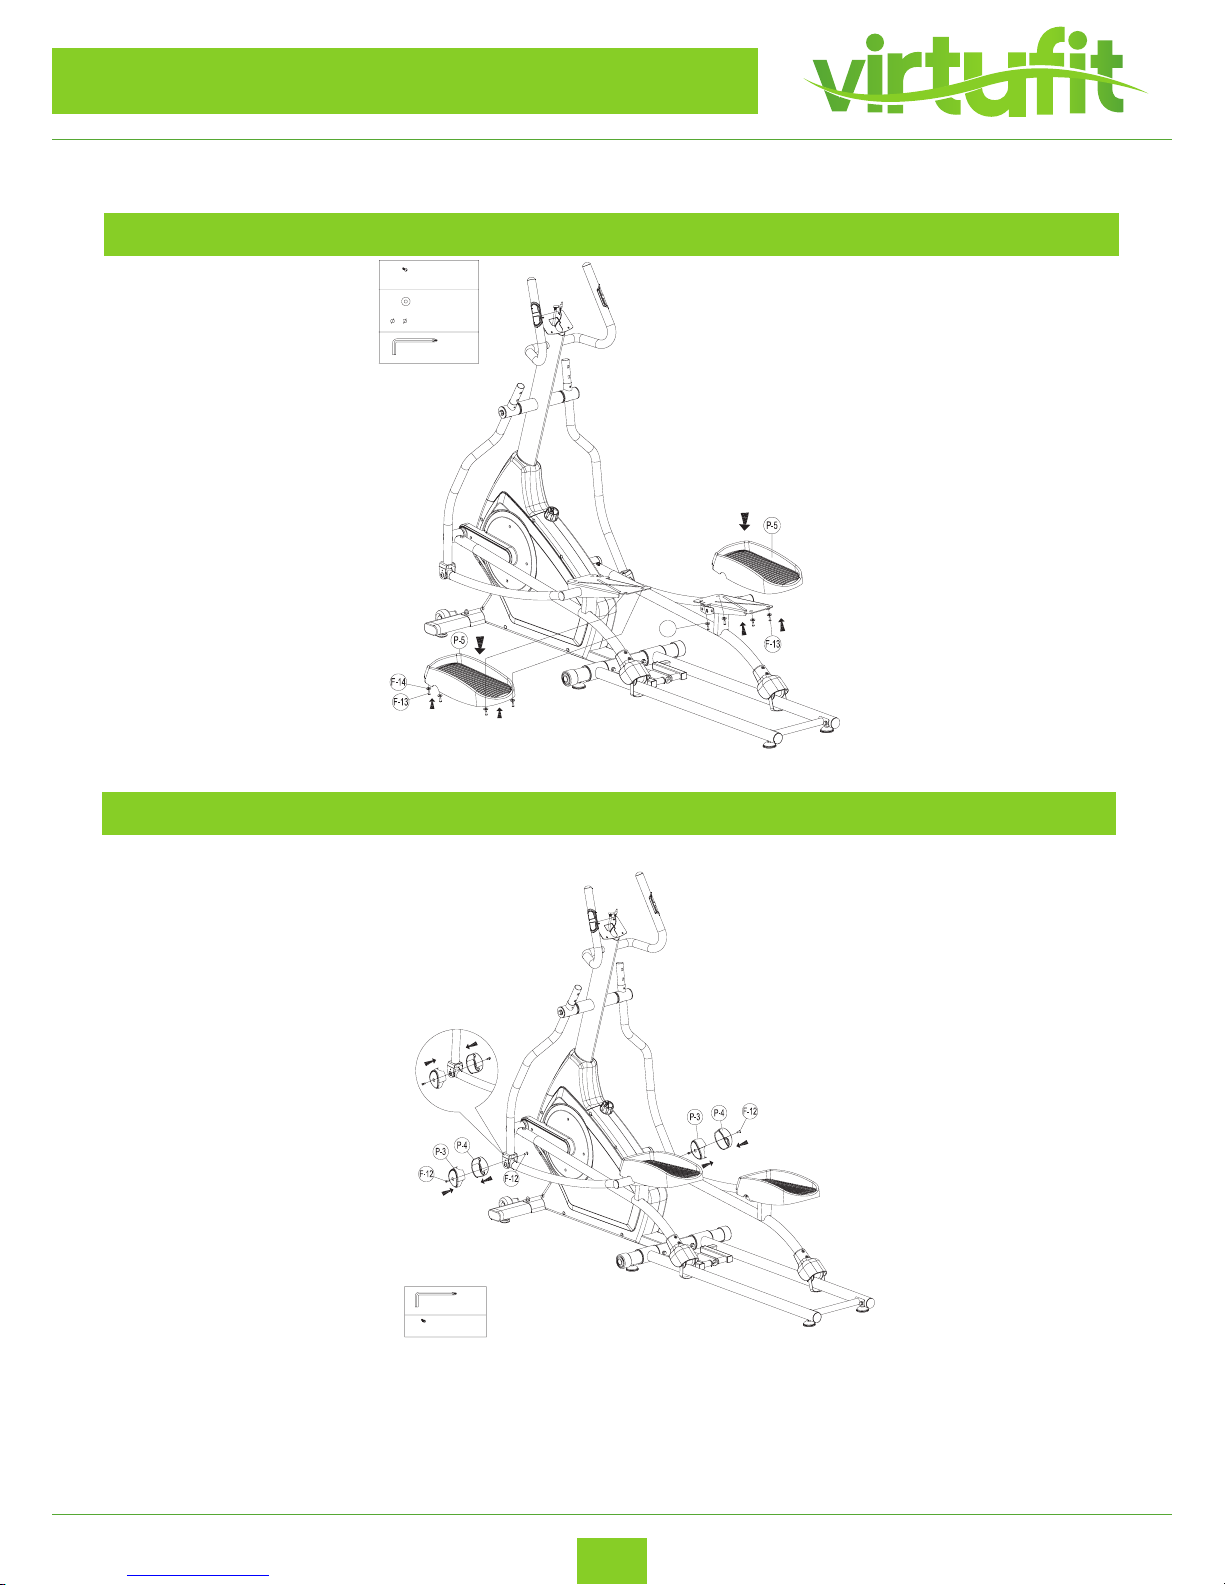
STEP 6
– Mount the pedals (P-5) with 8 screws (F-13) and 8 at washers (F-14)
– Mount the left and right valve for pedal arms (P-3 and P-4) with 4 screws (F-12).
STEP 7
ENG
F-14
F-13:SCREW M5*12L(8)
F-14;FlatWasher
6* 16*1T(8)
F17: Allen Key
F-12:SCREW M5*8L(4)
F17: Allen Key
Page 11
NL
VirtuFit iConsole FDR 2.1 Ergometer Crosstrainer
11
ASSEMBLY INSTRUCTIONS
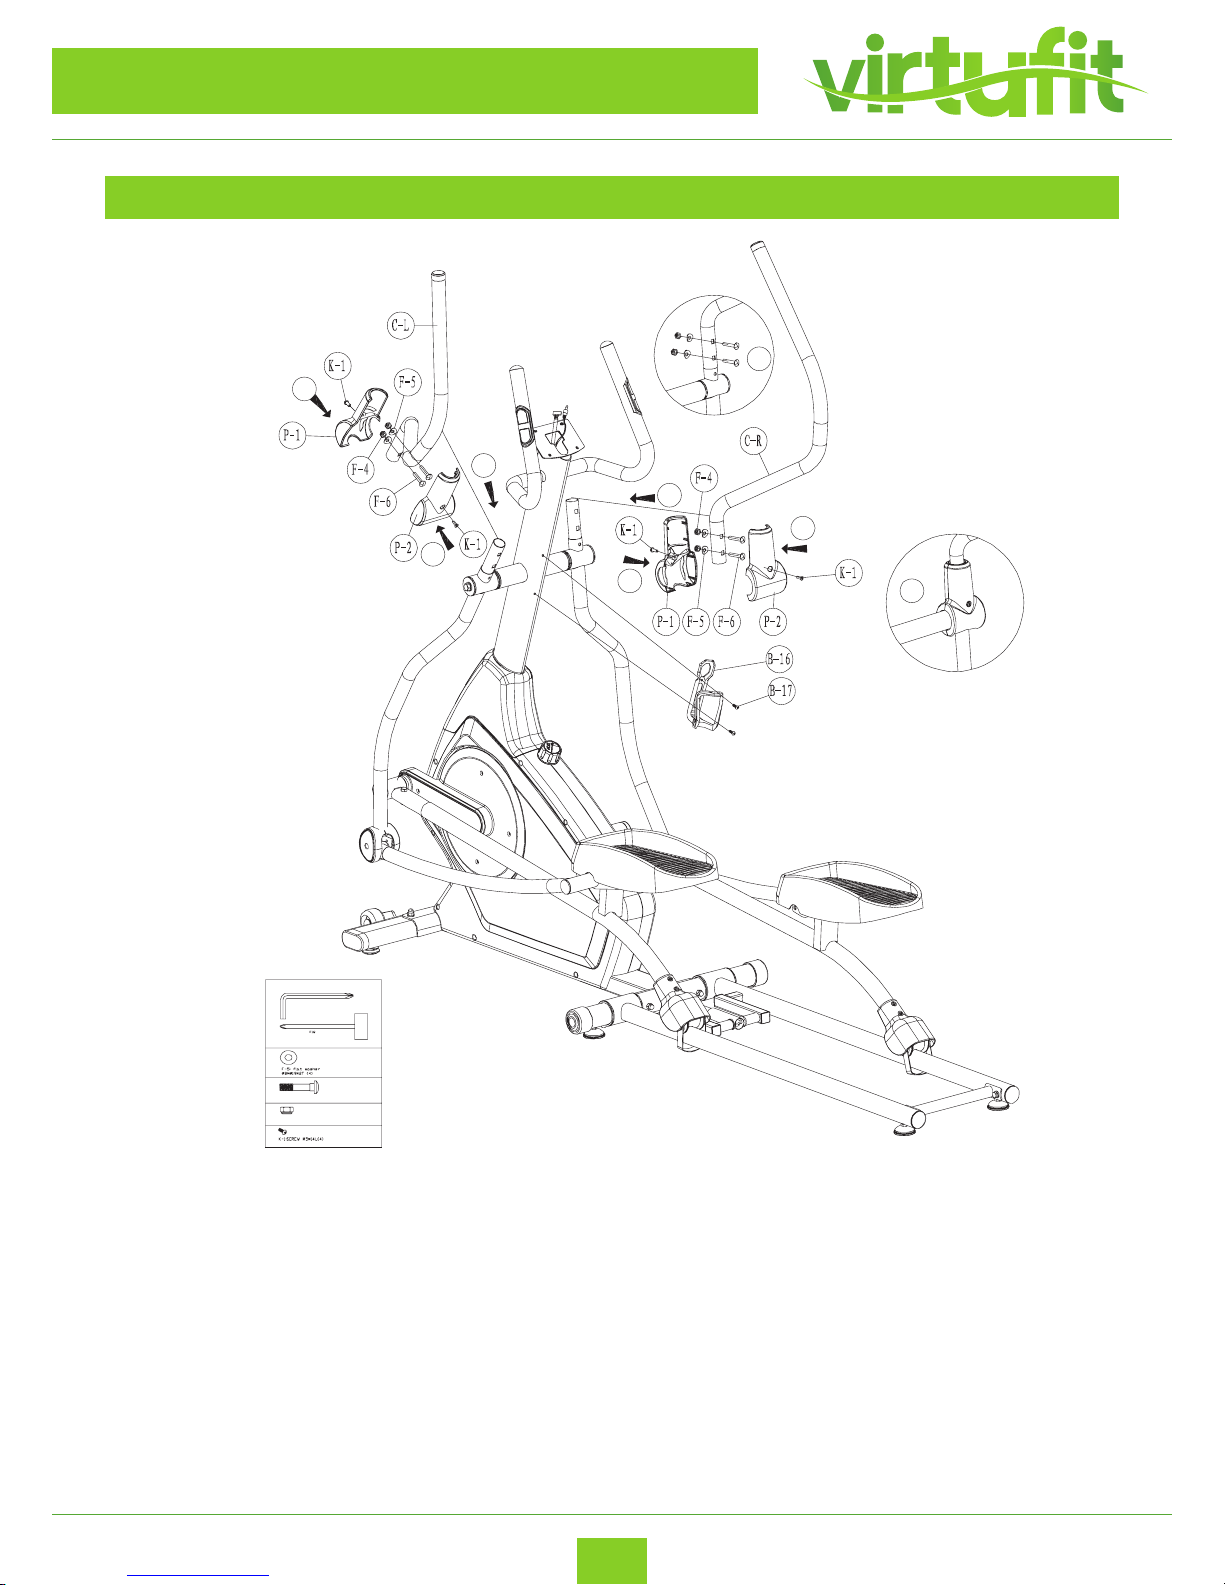
- Mount the left upper handlebar (C-L) on the lower left handlebar using 4 nylon nuts (F-4), 4 half
circle washers (F-5), 4 carriage screws (F-6);
- Mount the right-hand top handlebar (C-R) on the lower right handlebar using 4 nylon nuts (F-4), 4
half circle washers (F-5), 4 carriage screws (F-6);
- Place the front panel for the upper handlebar (P-1) and the rear panel for the upper handlebar
(P-2)on the handlebars on the left and right and secure them with 4 screws (K-1);
- Mount the water container (B-16) with screw (B-17).
1
2
2
1
2
2
F-4;lock nu tf or M8 bolt (4)
F-6:Carriage Bo lt
M8*P1. 25*4 0L (4)
BoxS panner
F17: AllenK ey
1
2
STEP 8
ENG
Page 12
NL
VirtuFit iConsole FDR 2.1 Ergometer Crosstrainer
12
F17: Allen Key
Box Spanner
STEP 9
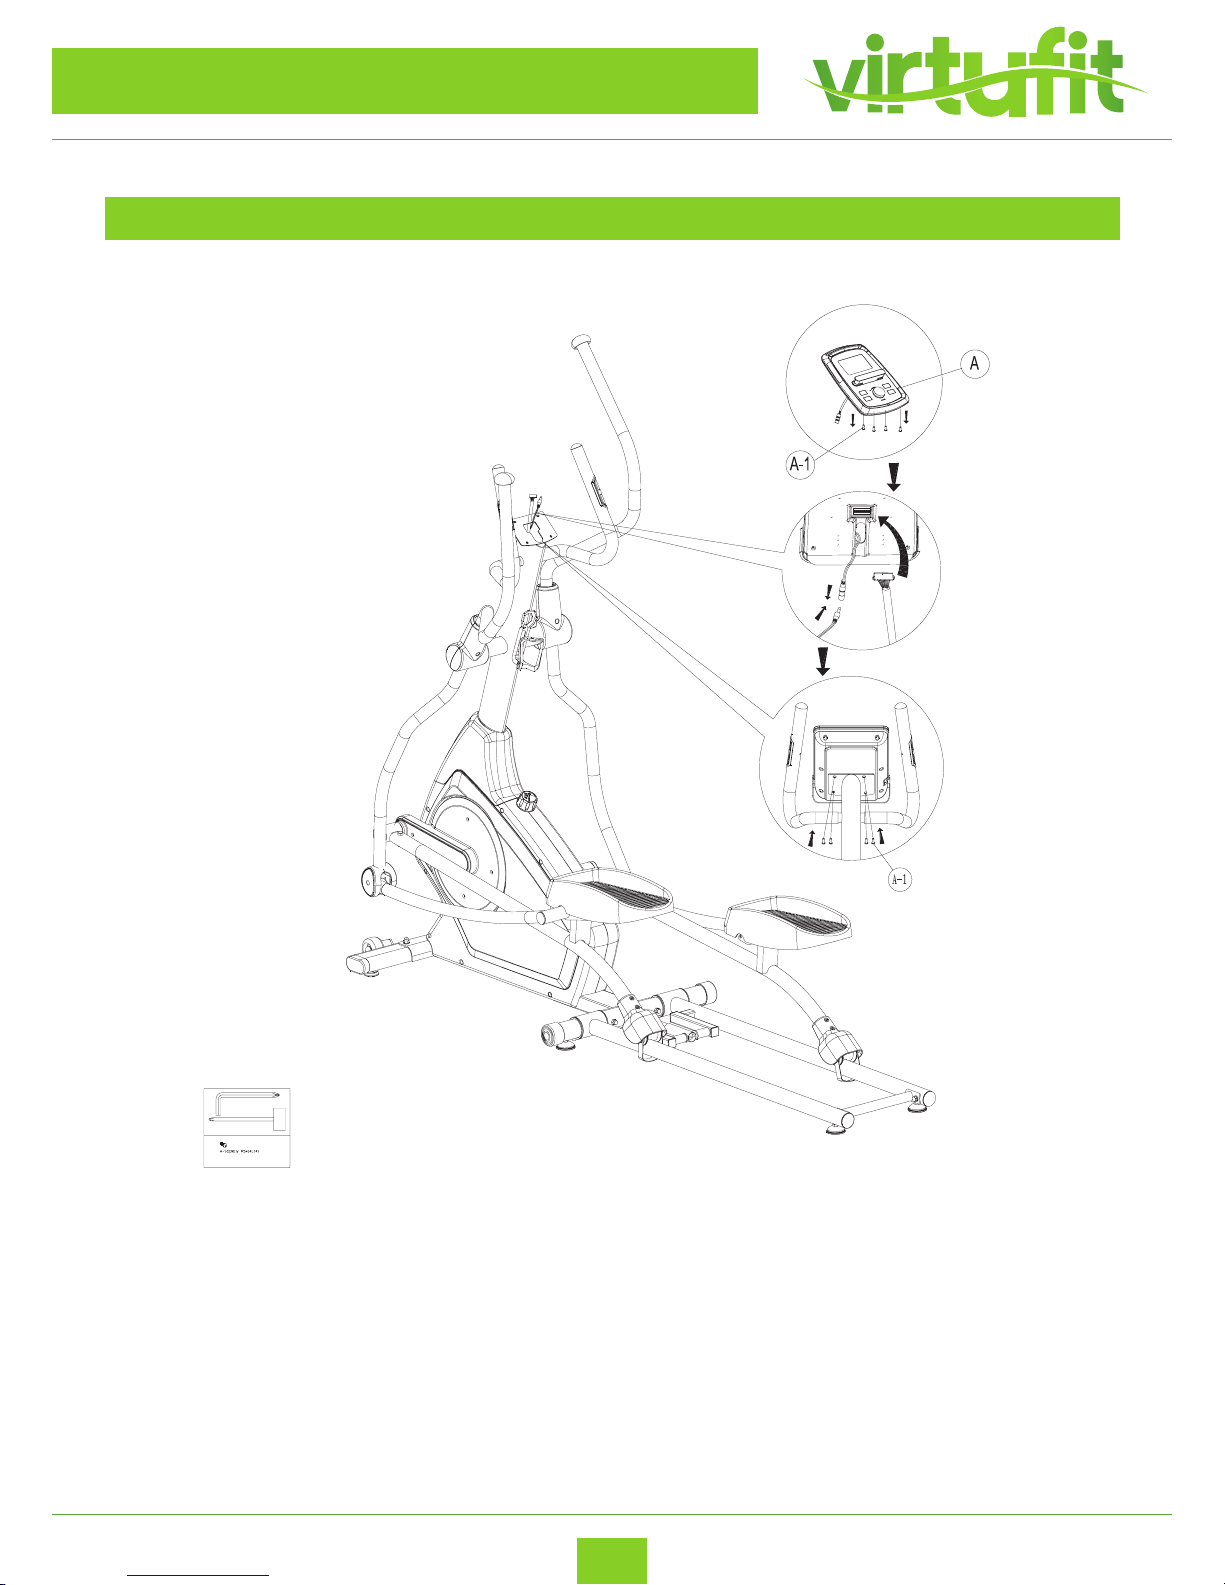
- Connect the cable wire (upper) (B-9) and the handpole cord (B-13) to the back of the computer
(A) make sure cables don’t damage;
- Install the computer (A) on the computer panel that is welded to the top of the steering rod.
Attach the computer with 4 screws (A-1).
ASSEMBLY INSTRUCTIONS
ENG
Page 13
NL
VirtuFit iConsole FDR 2.1 Ergometer Crosstrainer
13
FOLDING INSTRUCTIONS
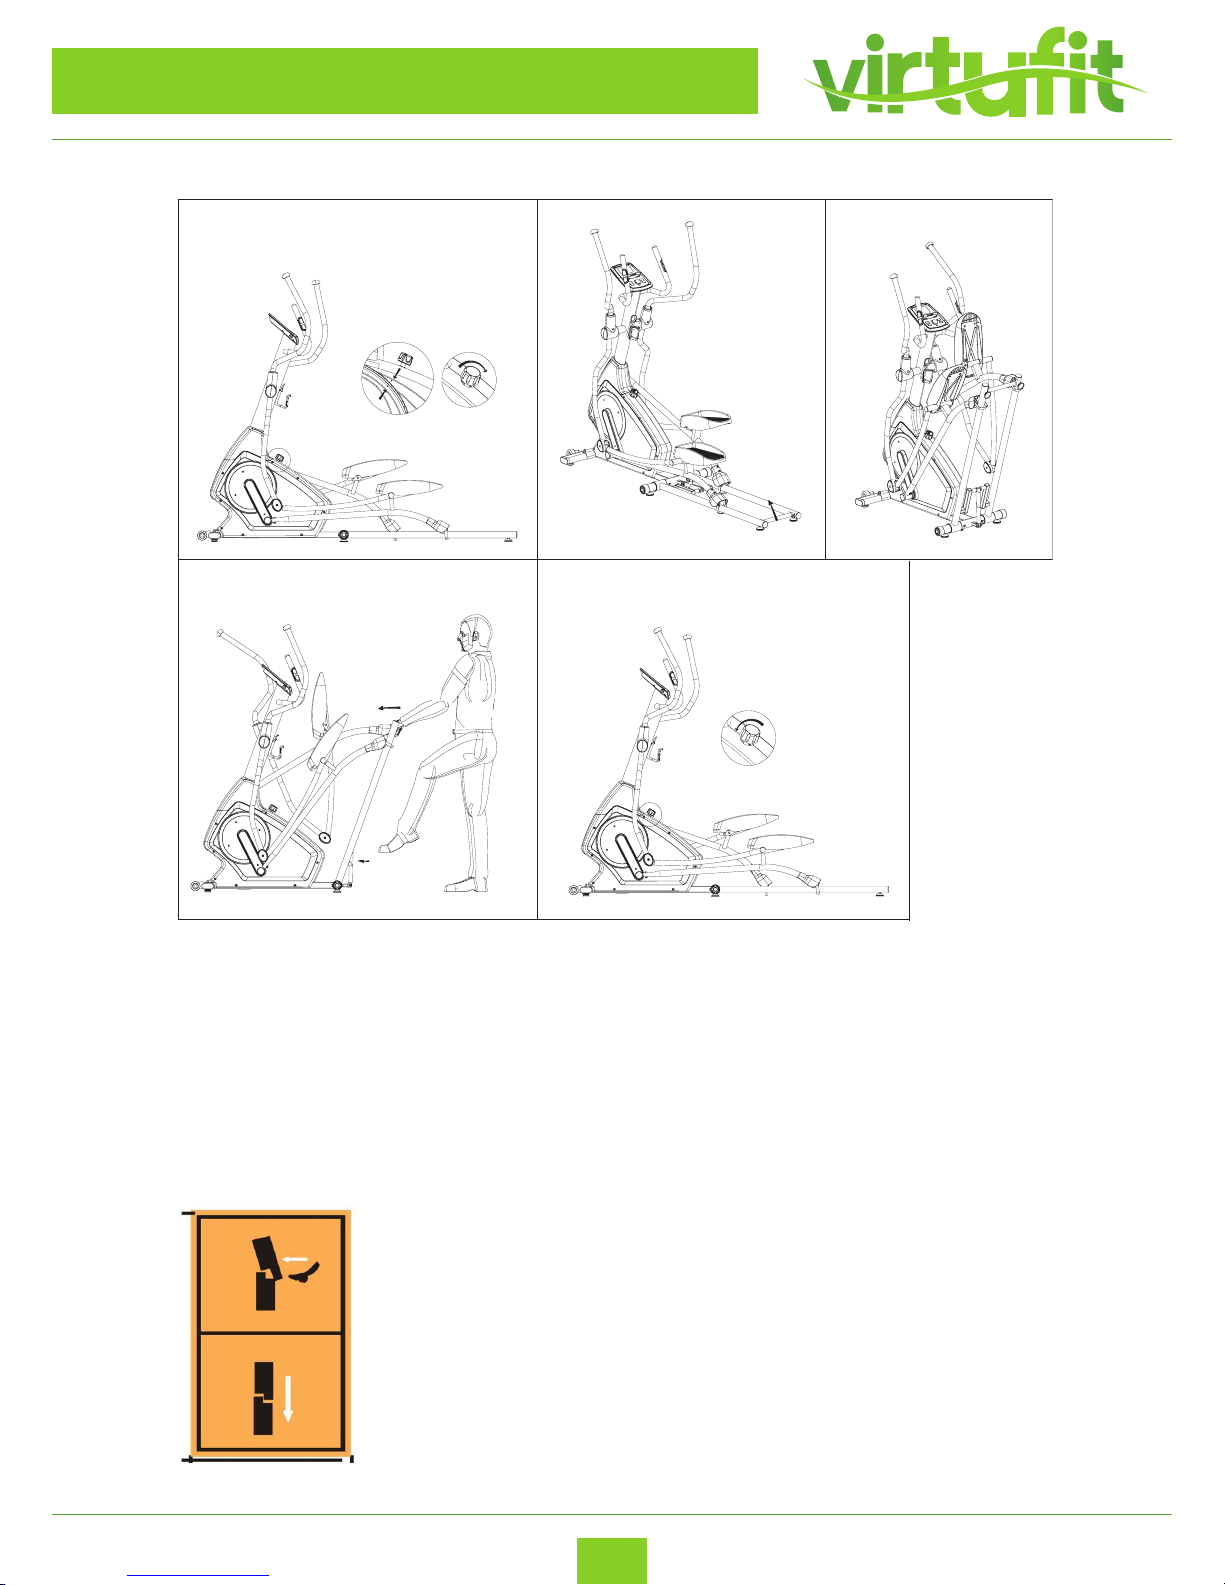
1. Find the knob in the front the chain cover and x the knob with clockwise direction
(make the two marks ”arrow on the cranks” in one line ). Figure 1
2. Lift up linkage tube of rail until you hear a “click”. Figure 2 & 3
3. a. Push forward the rail.
b. Kick the foldable cylinder which area is sticker with the following yellow label by feet
c. Continue to kicking and push gently back until the cylinder is fully change angel as
following.
ENG
1
2
3
4
1
2
5
Page 14

NL
VirtuFit iConsole FDR 2.1 Ergometer Crosstrainer
14
MAINTENANCE
1. The upright is xed with Allen screws, making sure that the bolts are tight at all times. If the bolts
are not tightened tight enough, this can cause cracking.
2. All moving parts mounted on the base of the device should be greased with grease once every 6
months. This can be done with Vaseline (without acids) or with silicone oil.
3. After each use, the appliance should be cleaned with a slightly damp cloth and soft soap. If the
perspiration is not removed in time, corrosion can occur.
4. Do not place the cross trainer in a room with high humidity. For example, a shed or a room where
the washing machine is located.
PROBLEM SOLUTIONS
Squeaky crosstrainer: First lubricate all rotating parts with silicone spray. It can also be that a screw is
tightened too tightly or too loosely, this creates friction and therefore a beep. If this is the case, try to nd
out exactly where the beep is coming from and then loosen or tighten this screw. The screws should be
tightened in such a way that they can always be released by hand.
No resistance: First check whether you can hear the motor running. You will hear the motor spin very
briey when you increase or decrease the resistance. If you hear the engine running then all electronics
are OK, but the V-belt probably ended. You can then open the housing and replace the V-belt. If you do
not hear the motor running, it may be that the motor or display is defective. First check whether the cable
that runs upwards in the pipe is connected properly.
Ticking sound: It is possible that the ywheel (in the housing) comes against a cable with every
pedaling. This may be disturbing but will not cause permanent damage to your cross trainer. To solve this,
open the housing and move the cable or you can fasten it with for example a tie-wrap.
Heart rate display does not work: This can have various causes. 1. The sensor cable running from the
heart rate sensor to the display is not properly mounted or has come o during use. 2. It may be that the
sensors have become damp, dirty or greasy, clean them regularly. 3. If you have a lot of calluses on your
hands, it is more dicult for the sensors to measure, when this is the case a chest strap is recommended.
ENG
Page 15
NL
VirtuFit iConsole FDR 2.1 Ergometer Crosstrainer
15
COMPUTER MANUAL
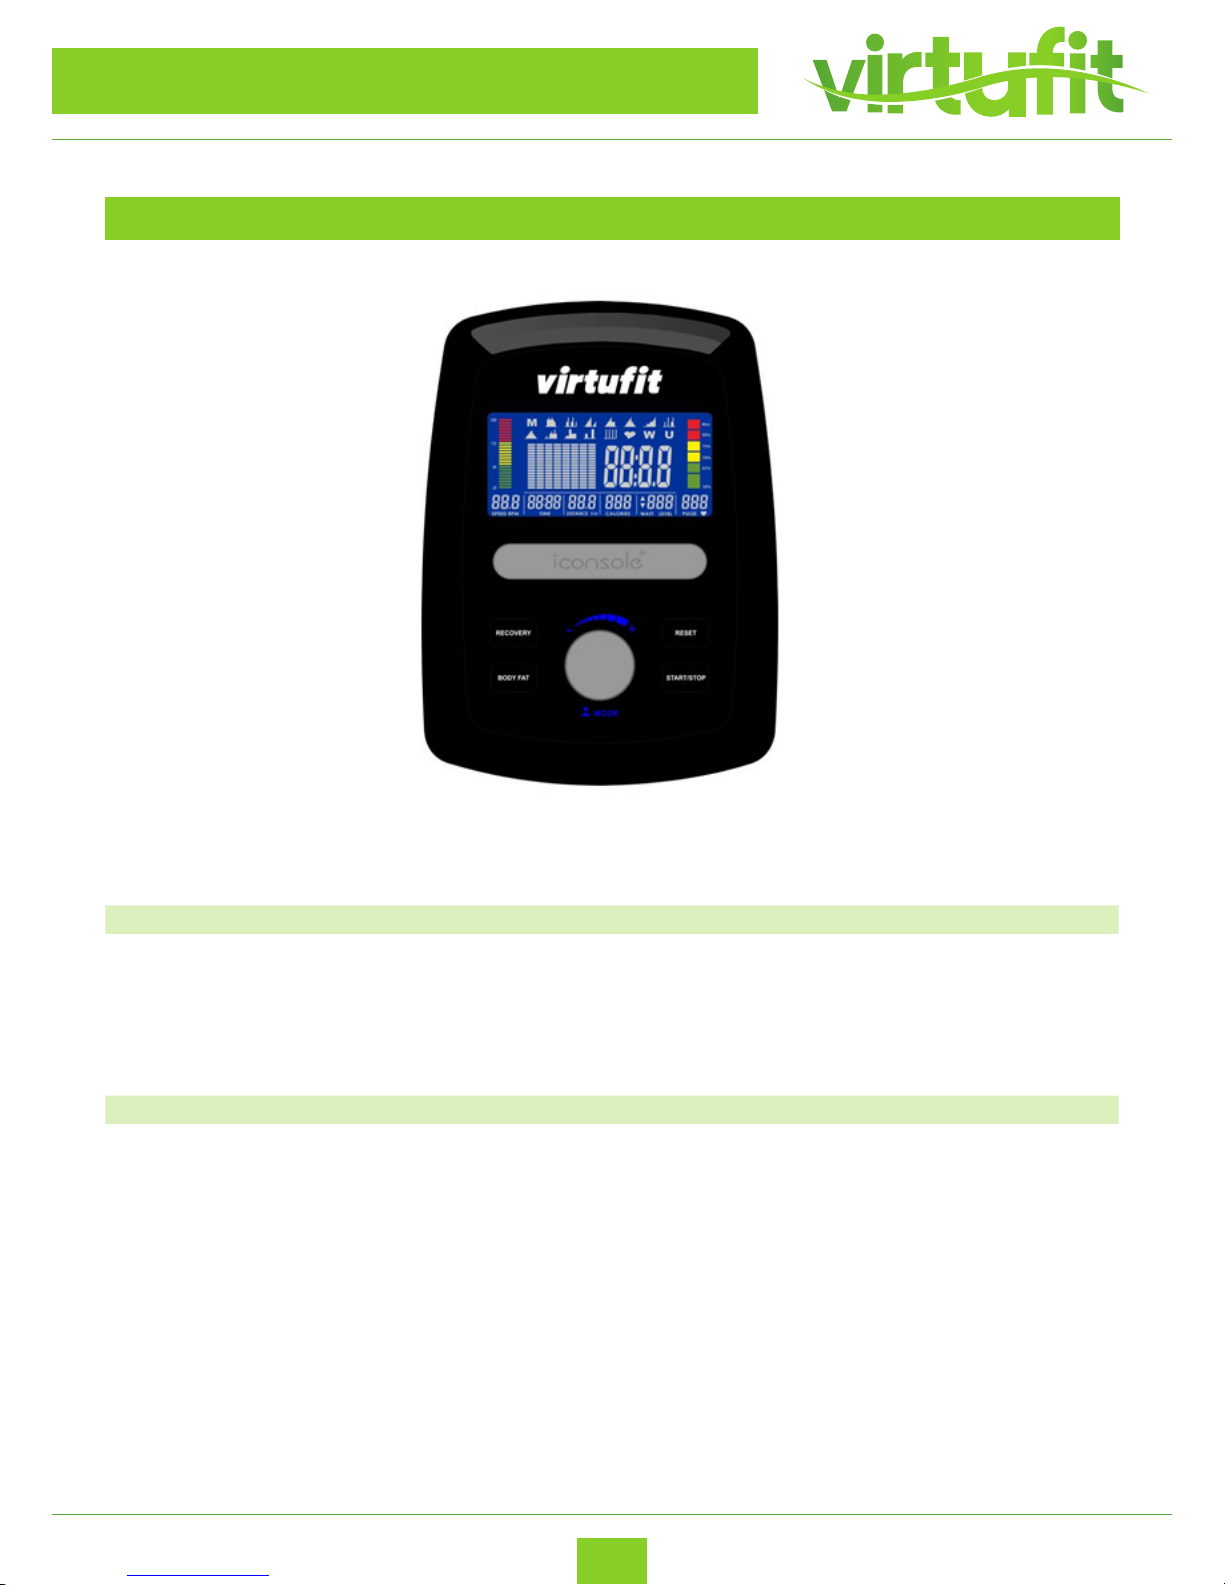
FUNCTION BUTTON
1. Recovery Test your heart rate recovery.
2. Body fat Test your fat percentage and BMI
3. Reset - Press and hold for 2 seconds, computer start again.
- Return to main menu, restores the values or stop
mode
4. Start/ Stop Start of Stop your workout.
5. Encoder - Increase / reduce the value.
- Conrm / value selection.
ENG
Page 16

NL
VirtuFit iConsole FDR 2.1 Ergometer Crosstrainer
16
COMPUTER MANUAL
DISPLAY FUNCTIES BUTTON
TIME Workout time during your exercise.
Range 0:00 ~ 99:59
SPEED Workout speed during your exercise.
Reach 0.0 ~ 99.9
DISTANCE Workout distance during your exercise.
Reach 0.0 ~ 99.9
CALORIES Burned calories during your exercise.
Range 0 ~ 999
PULSE BPM during your exercise. (heartbeat)
Heart rate alarm when the heart rate goes over the
target.
RPM Rotations per minute
Range 0 ~ 999
WATT Workout power consumption
The computer retains its set value (adjustable value
range 0 ~ 350)
MANUAL Manual workout.
PROGRAM 12 PROGRAM selections.
USER The user determines his own resistance program
H.R.C. Heart Rate Control (program based on heart rate)
RECOVERY Heartbeat recovery status.
BODY FAT Body fat measurement.
WATTS Workout power consumption.
Range 10 ~ 350.
ENG
Page 17
NL
VirtuFit iConsole FDR 2.1 Ergometer Crosstrainer
17
COMPUTER MANUAL
OPERATION
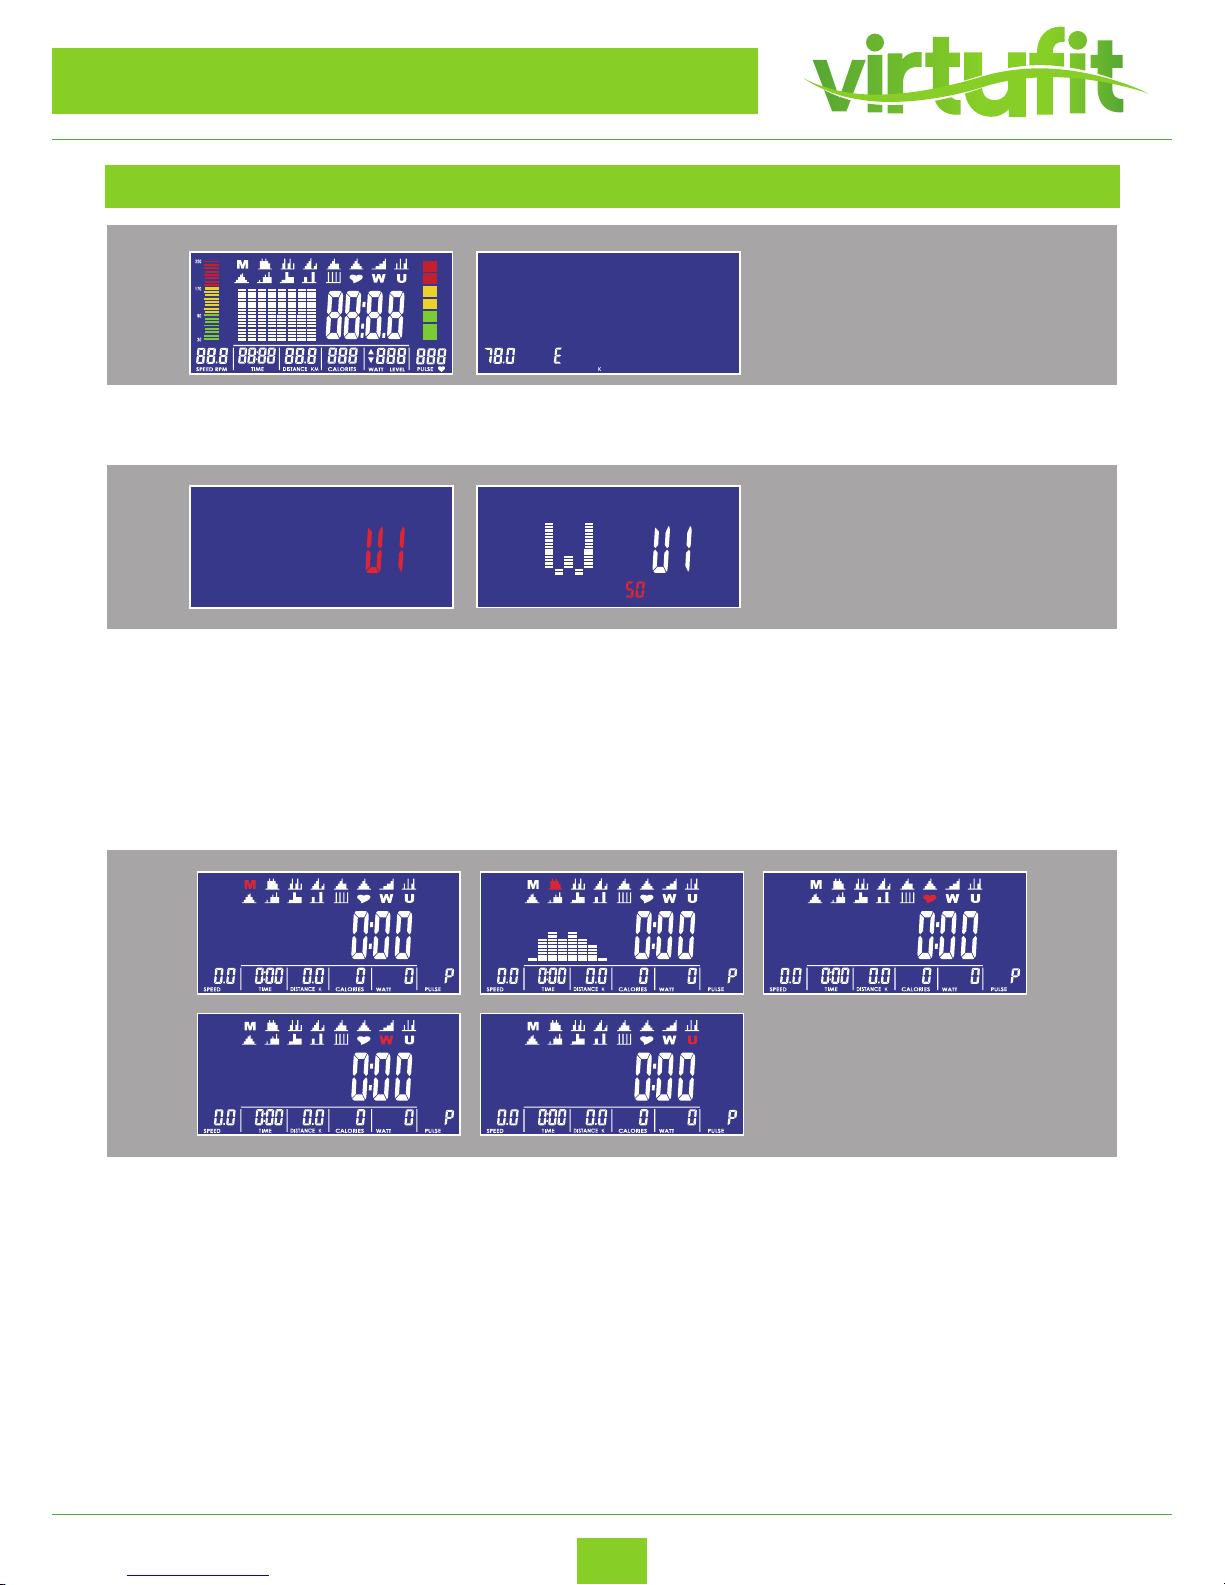
1. Insert the plug into the wall socket (or press and hold RESET button for 2 seconds), the display will light
up and you will hear a beep.
3. By turning the round button you select which program you want, you can see this on it
ashing logo at the top of the screen.
The M stands for Manual. You can adjust the resistance yourself in the program. Press start to select a program. You can select dierent programs by turning the rotary knob. Press start to start the program. Do you
want to adjust the program on time or on a desired calories number? Then rst press the round button. You
can check what is ashing
increase / decrease by means of turning the knob. Press the button to conrm. Press start to start the program.
With the manual program you can set dierent values, with the pre-programmed programs only the time.
2. By turning the knob you select a user prole 1-4. By clicking on the round button you select a prole.
You can then enter your gender by turning the button. Press the round button to conrm. This then also
applies to your age, height and weight. Then go to the programs.
You can also start quickly by pressing the START button directly. You come directly into the manual program.
Increase the resistance by turning the knob.
WERKING
50%
70%
80%
Max
65%
75%
50%
70%
80%
Max
65%
75%
WERKING
1. Steek de stekker in het stopcontact (of houd RESET KNOP 2 seconden in), zoemer maakt geluidje en
gehele display licht op gedurende 2 seconden.
De diameter van het wiel komt bij SPEED te staan en de Europese specificatie laat "E" zien, de
Aziatische specificatie "A" bij TIME & KM (K) / ML (M) DISTANCE tekst zal verschijnen aan de
rechterkant. Als u de instellingenmodus ingaat , ongeacht de motor,
zal het omdraaien en naar 0 gaan en daarna naar LOAD = 1, wacht voor elke instelling.
50%
70%
80%
Max
65%
75%
50%
70%
80%
Max
65%
75%
2. Met draaien en drukken op de encoder gaat u naar USER setting (met lichaamsvet functie), waar
u uw eigen datum in kunt vullen op U1~U4. Daarna gaat u naar de workout.
WERKING
1. Steek de stekker in het stopcontact (of houd RESET KNOP 2 seconden in), zoemer maakt geluidje en
gehele display licht op gedurende 2 seconden.
De diameter van het wiel komt bij SPEED te staan en de Europese specificatie laat "E" zien, de
Aziatische specificatie "A" bij TIME & KM (K) / ML (M) DISTANCE tekst zal verschijnen aan de
rechterkant. Als u de instellingenmodus ingaat , ongeacht de motor,
zal het omdraaien en naar 0 gaan en daarna naar LOAD = 1, wacht voor elke instelling.
50%
70%
80%
Max
65%
75%
50%
70%
80%
Max
65%
75%
ENG
Page 18
NL
VirtuFit iConsole FDR 2.1 Ergometer Crosstrainer
18
COMPUTER MANUAL
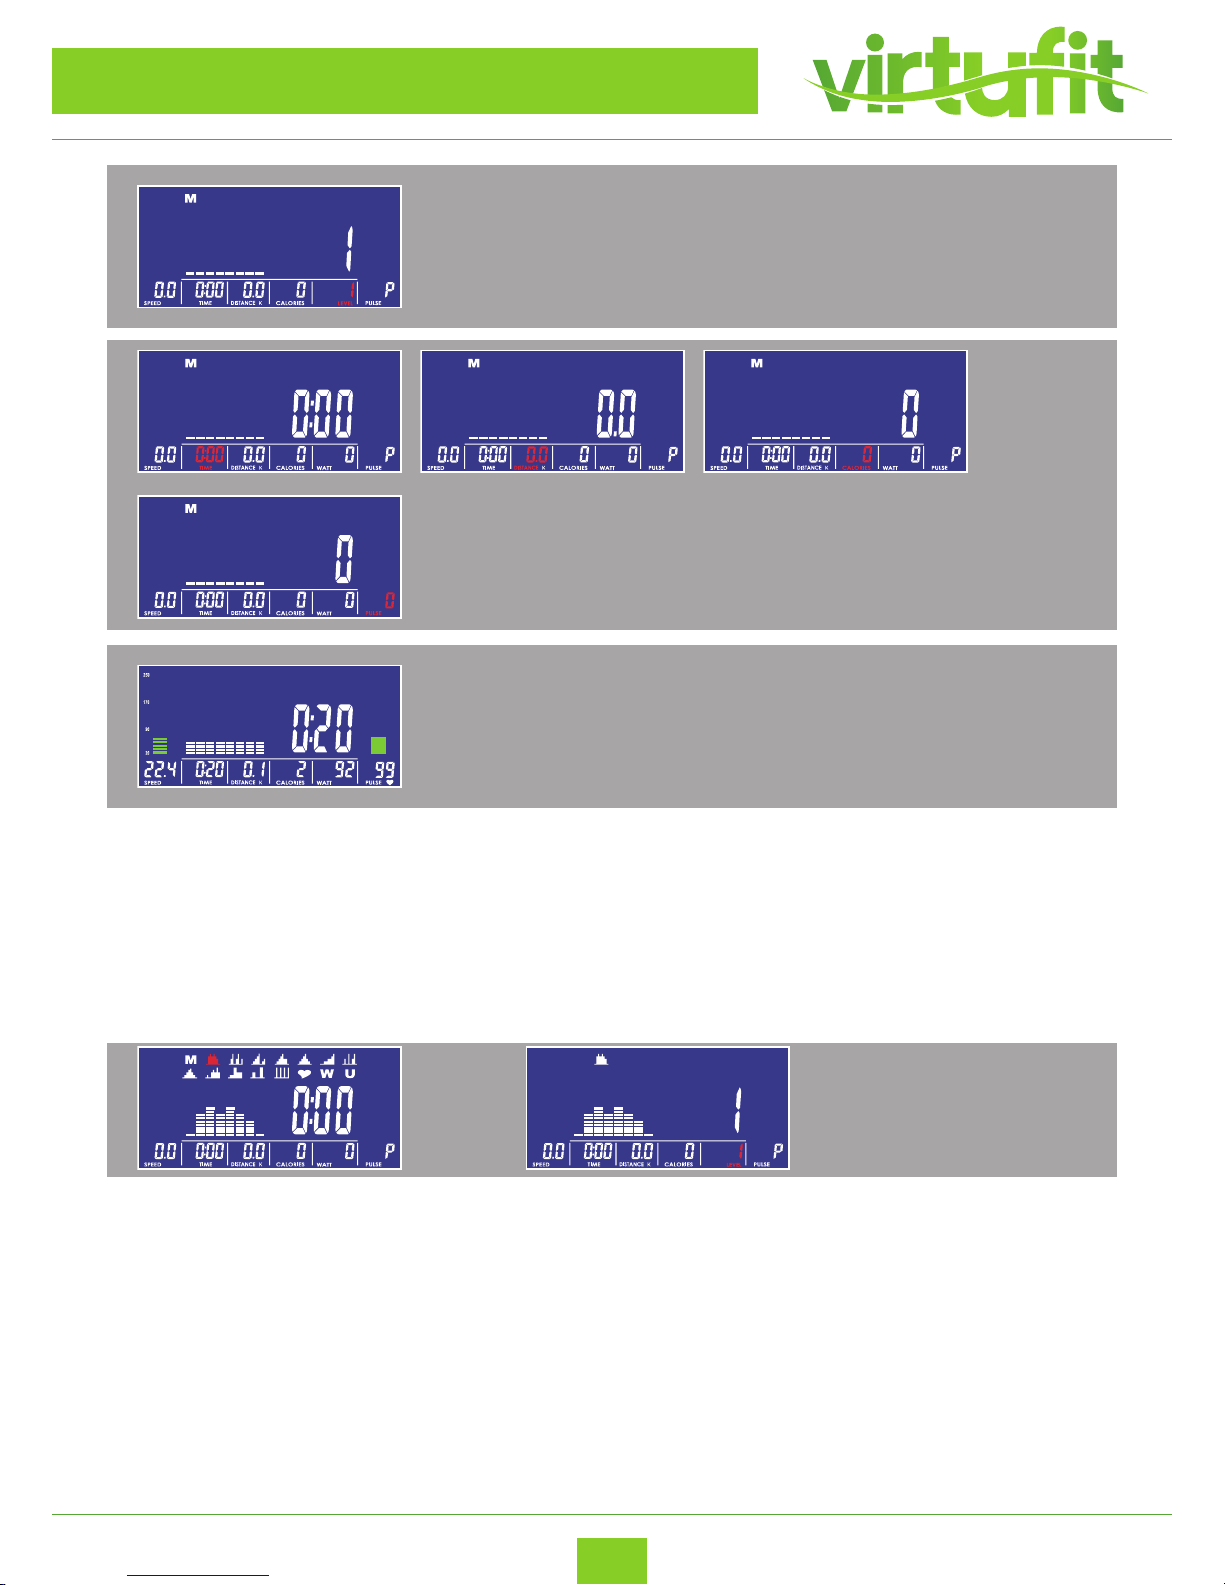
4. Manual mode
(1) When you are in manual mode, you can increase and decrease the resistance with the knob.
(2) By pressing “START” distance, time, calories and pulse can be increased and decreased. For example, you
can select 10 minutes, the time will then expire. This allows you to set up a 10-minute workout.
50%
70%
80%
Max
65%
75%
4-1
4-2
4-3
5. Program mode
(1) Press and hold the RESET button until the unit beeps.
(2) Select a USER 1-4 by pressing the round button. Hold down until the screen appears as shown in the
drawing above. The MANUAL M ashes now. By turning the round button you can now select a program.
(3) Press the round button to conrm the program. You can press the button at the touch of a button
adjust the degree of diculty by turning it afterwards. The time ashes after pressing the button. You
can now set the time by turning the knob. Select the desired time and press “START” to start the pro
gram.
ENG
Page 19
NL
VirtuFit iConsole FDR 2.1 Ergometer Crosstrainer
19
COMPUTER MANUAL
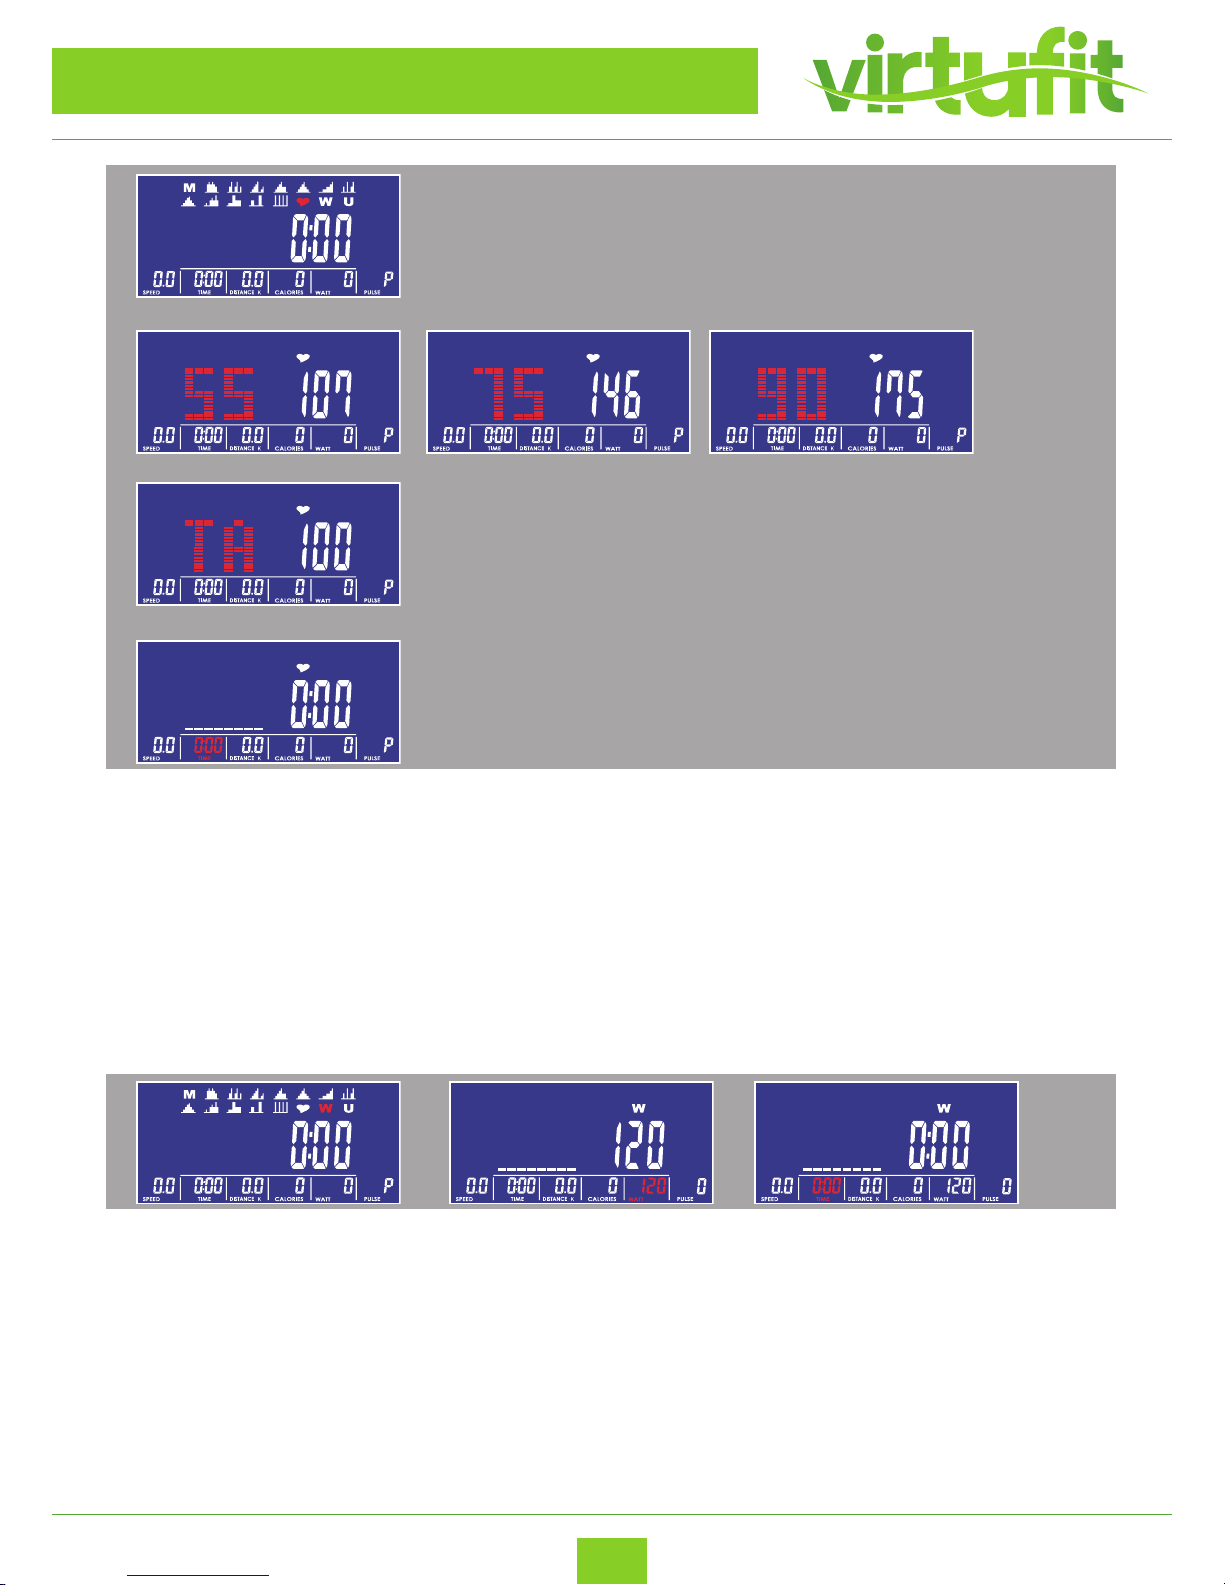
6. H.R.C heart rate mode
(1) The user can select 55%, 75%, 90% and target values by turning the button. TARGET can be set to not
exceed a certain value. If these are set at 80 heartbeats per minute and you come above, the device
starts beeping. Note: the heart rate measurement should not be used for medical purposes and is only
an approximation.
(2) Start the device. Press the round button to set USER 1-4, then turn the HART symbol in the start screen.
Press the round button. Turn the knob to select. Press the button to choose. Time can then be set by
turning and pressing on and on the button. Then press START to start.
5. Programma modus
(1) Door aan de knop te draaien wisselt u tussen P01,P02,P03,P04……,P12 in PROGRAM
MODE.
Het PROGRAM logo zal knipperen totdat deze bevestigd is.
(2) Het PROGRAM logo verschijnt verschillend tijdens het selecteren.
(3) Na het verstellen van TIME drukt u op de START knop om het programma te starten. Na
START kan u LEVEL nog steeds veranderen en de display in LEVEL en waarde. Na drie
seconden zonder invoer komt WATT op het display.
7. WATT mode
(1) By turning and then pressing the button you can adjust the WATT values. By
once again, you can also set the time.
(2) Press START to start training. WATT can be adjusted during training. You can enter a maximum value. If
you go over this, the device starts to beep.
ENG
Page 20
NL
VirtuFit iConsole FDR 2.1 Ergometer Crosstrainer
20
COMPUTER MANUAL
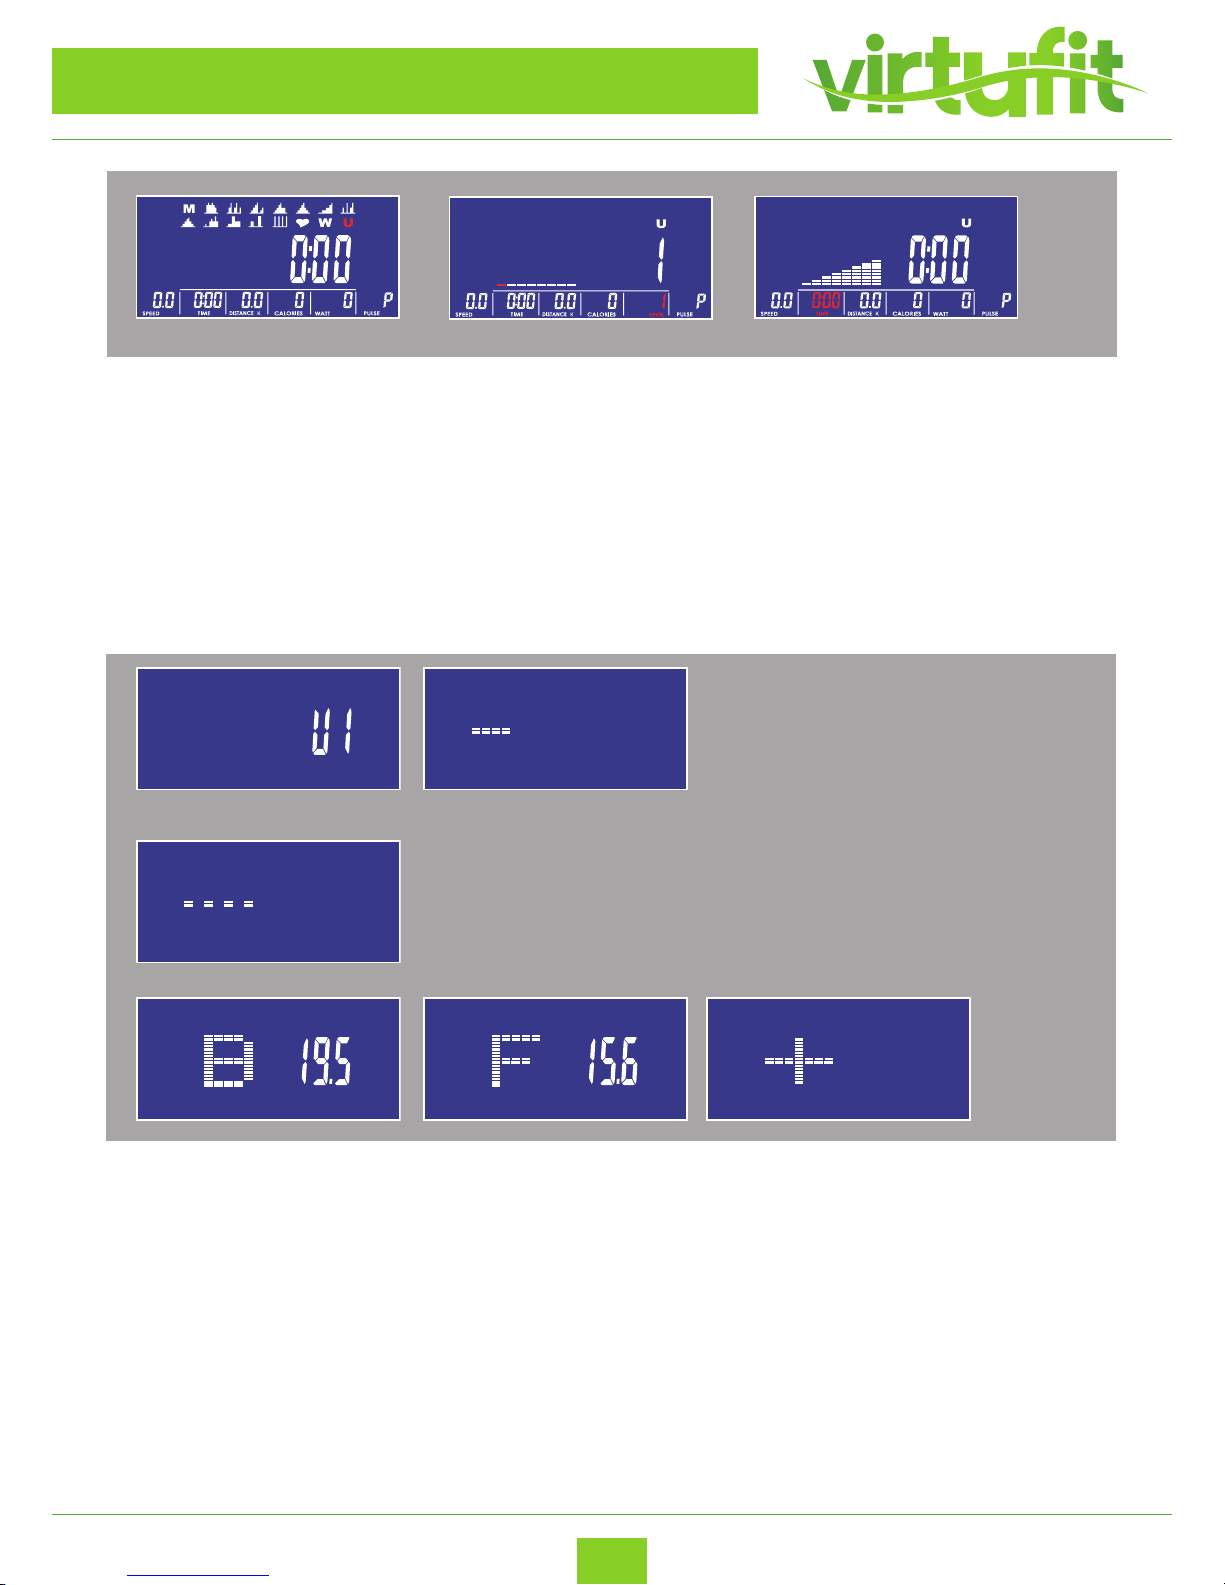
8. User program mode
You can create a program yourself in this mode.
(1) Press and turn the round button to select the U.
(2) Press and turn the knob to change the resistance per beam.
(3) Press START to begin. Press START again to adjust the time by turning the knob. Press START again to
resume. The resistance will change automatically as you have set it.
7. WATT modus
(1) Wattage doel. (standaard: 120)
(2) Door te draaien en drukken op de knop kan u de WATT waarden verstellen.
(3) Na START kan de gebruiker nog steeds trainen en WATT LEVEL zal automatisch aanpassen.
(4) Na START kan de gebruiker nog steeds de WATT waarden aanpassen.
9. Body fat mode
(1) Press the Body Fat button. You can then choose U1-U4 to select your user program which you can
change when starting or resetting the device.
(2) After selecting, you can place your hands on the heart rate sensors on the steering wheel.
(3) After a few seconds, an approximation of your BMI (B) and your body fat percentage (F) will appear.
ENG
Page 21
NL
VirtuFit iConsole FDR 2.1 Ergometer Crosstrainer
21
COMPUTER MANUAL
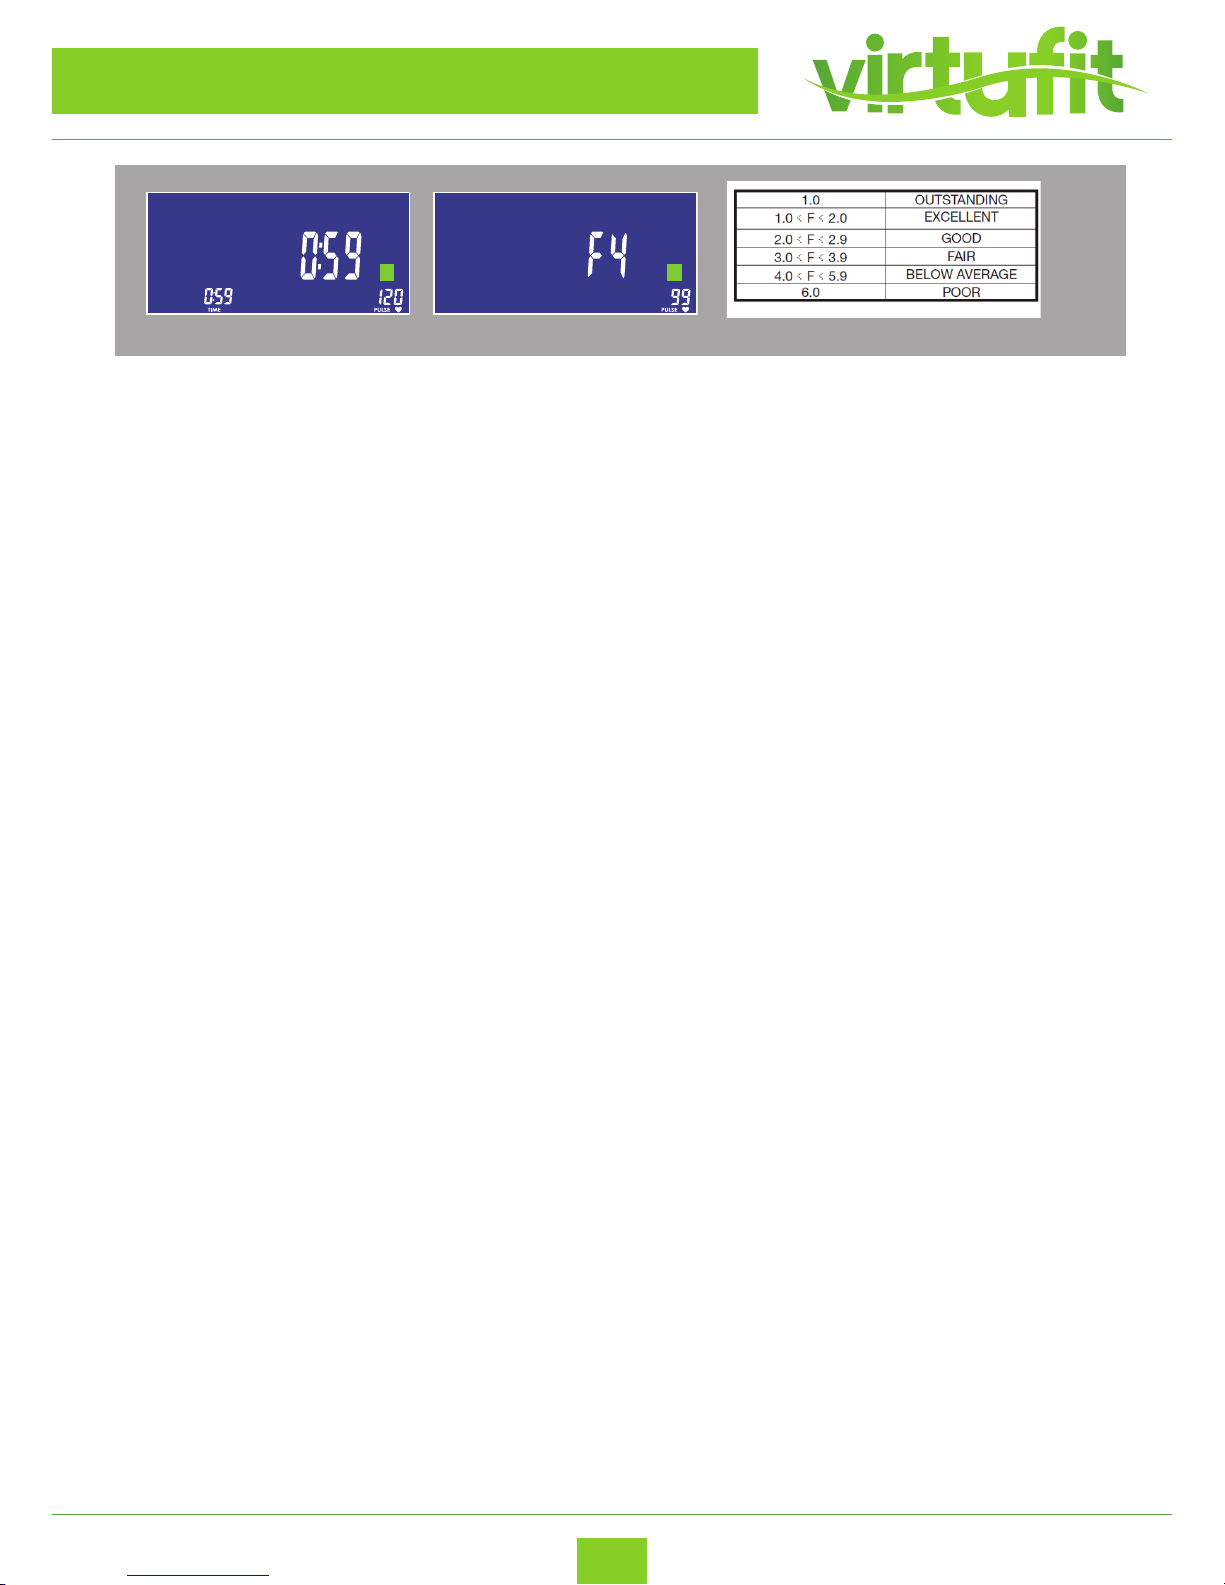
10. Recovery mode
This mode measures how quickly you recover from a workout.
(1) Make sure the device measures your heart rate during training. When you do a heart rate measurement
during your workout press “RECOVERY”.
(2) Time and heart rate are displayed. The time counts down from 60 seconds and the current heart rate is
displayed. You do not have to cycle.
(3) The faster your heart rate falls, the better your condition.
Pay attention. This is an estimate. The results should not be used for medical purposes.
9. Lichaamsvet modus
(1) Gedurende het drukken op STOP, kan FAT het vetpercentage meten. Daarna ziet u U1-U4 2
seconden.
(2) Na het verkrijgen van het HR(hartslag) signaal zal het meten beginnen.
(3) Na 8 seconden komt uw BMI en FAT% op het scherm.
50%
70%
80%
Max
65%
75%
50%
70%
80%
Max
65%
75%
ENG
Page 22
NL
VirtuFit iConsole FDR 2.1 Ergometer Crosstrainer
22
TRAINING USING AN APP
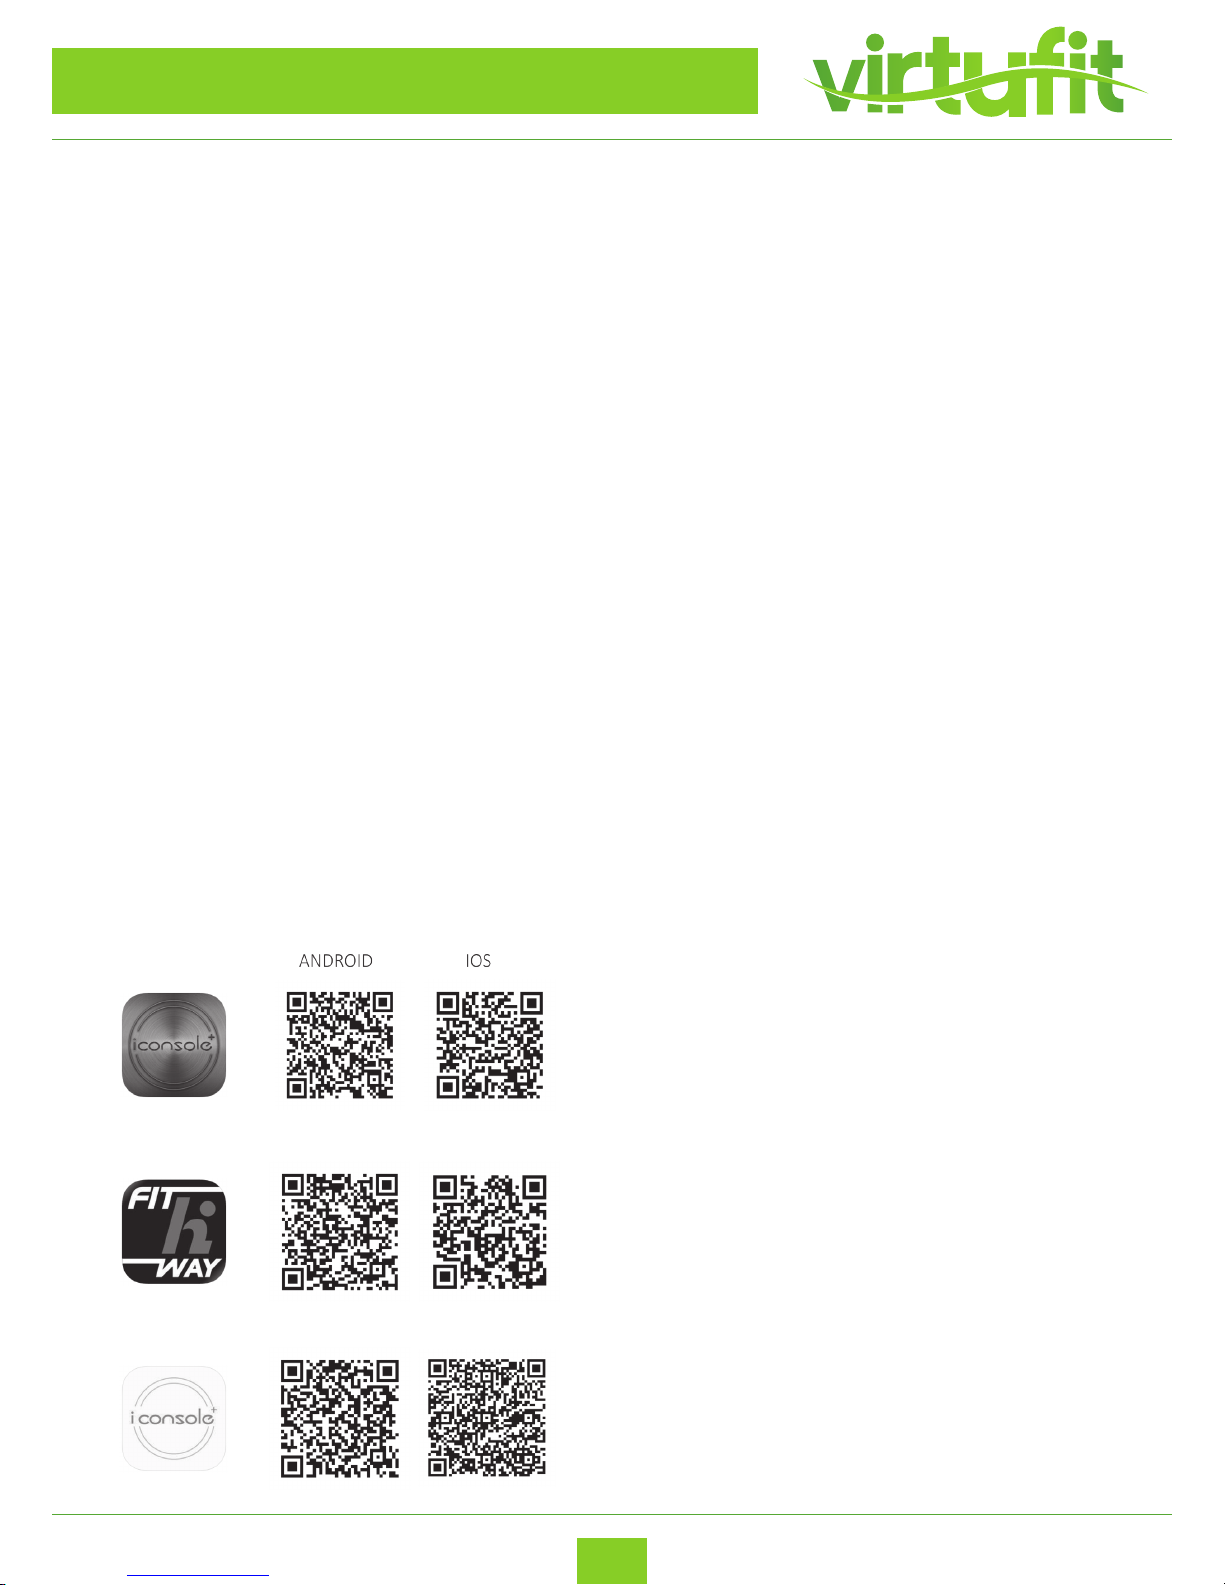
Training using an app.
First you need to download one of the apps. Depending on
the operating system of the tablet or smartphone, you must go to Google Play Store or
Apple App Store to download the app. You can also scan the QR code to download the
app directly.
After the app has been successfully downloaded, you must complete the following steps to connect the
crosstrainer and phone/tablet.
For Apple smartphones or tablets
1. Go to option settings of your smartphone or tablet and turn on the bluetooth function.
2. Next, bluetooth devices are searched for. The name of the app appears in the list.
3. Select it and the two devices will search for a connection.
4. Then type the code 0000 so that the two devices are connected to each other.
5. When the two devices are connected, the computer automatically turns o and you can use the
crosstrainer through your phone.
(If you close the app and disconnect it, the computer will restart.)
For Android smartphones or tablets
1. Go to option settings of your smartphone or tablet and turn on the bluetooth function.
2. Start the app now.
3. Press the bluetooth icon with rotating arrows for the list of bluetooth devices.
4. Select the name of the app in this list to connect.
5. When the two devices are connected, the computer automatically turns o and you can use the
crosstrainer through your phone.
(If youclose the app and disconnect it, the computer will restart.)
ENG
Page 23
NL
VirtuFit iConsole FDR 2.1 Ergometer Crosstrainer
23
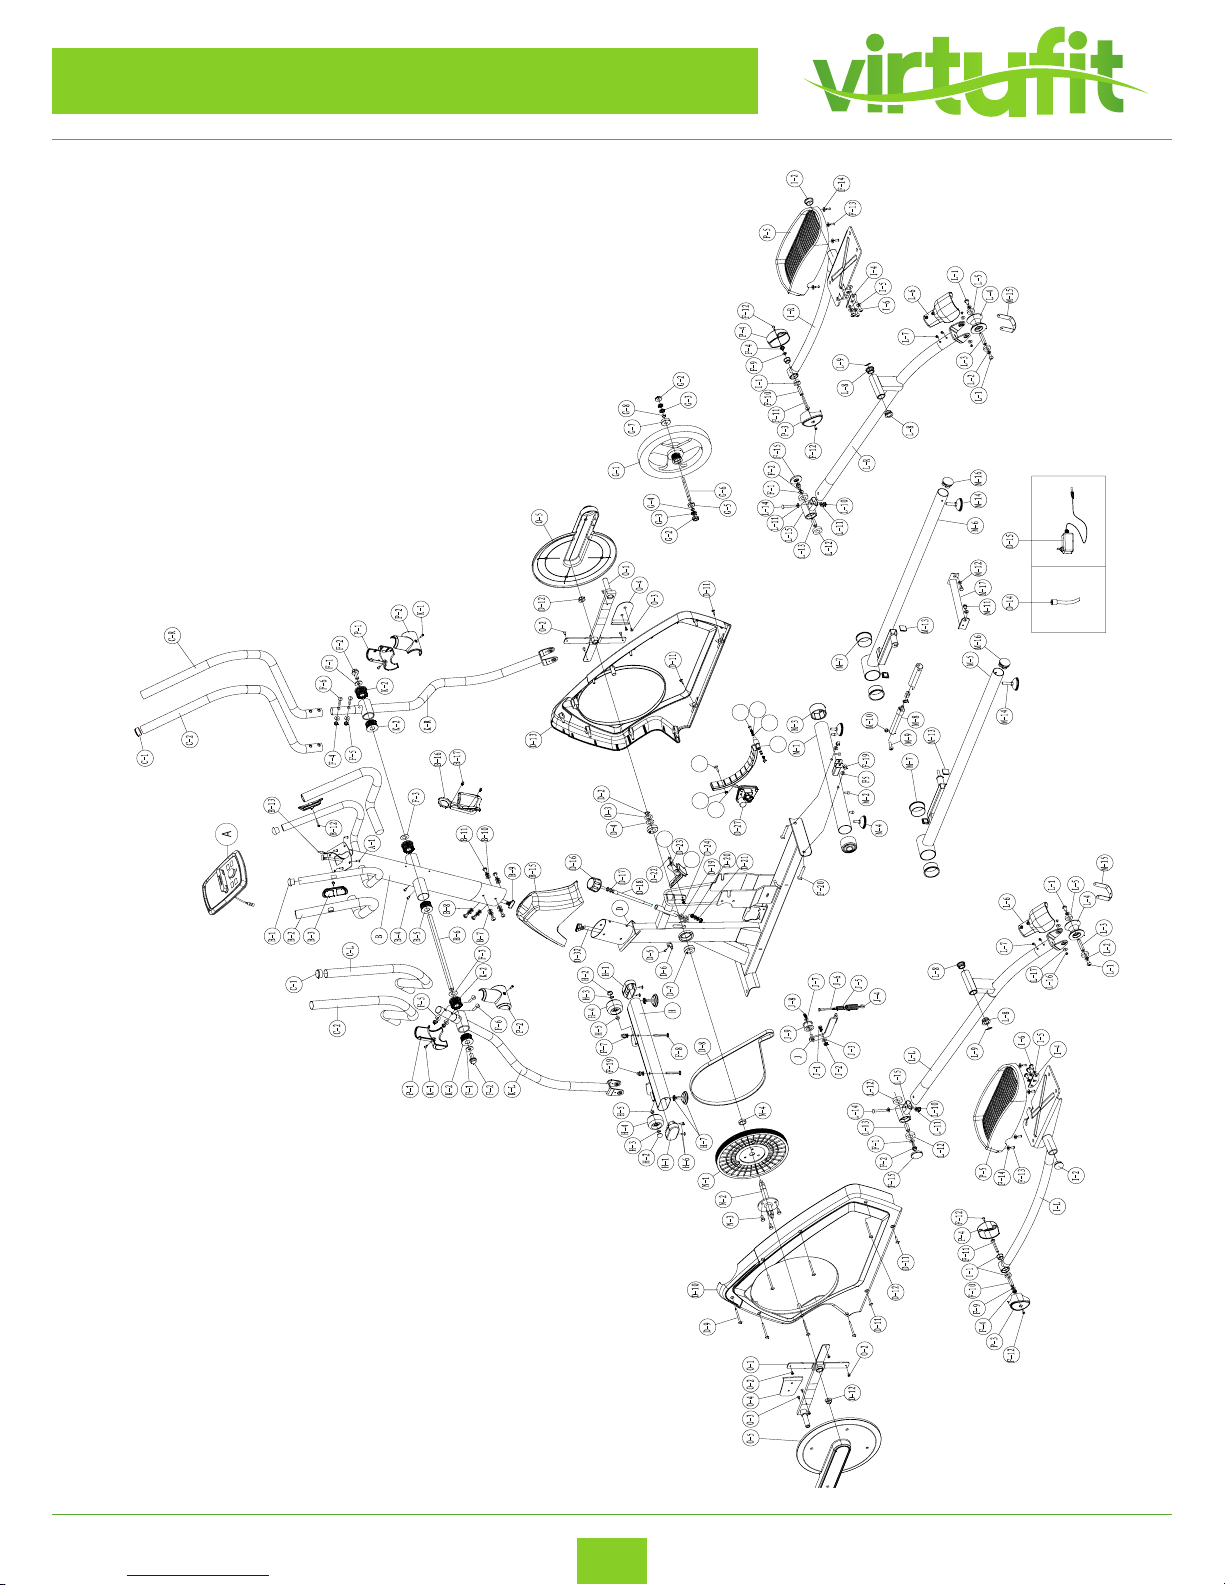
EXPLODED DRAWING
ENG
D-25
D-26
D-29
E
E-3
E-2
E-1
D-31
D-30
Page 24
NL
VirtuFit iConsole FDR 2.1 Ergometer Crosstrainer
24
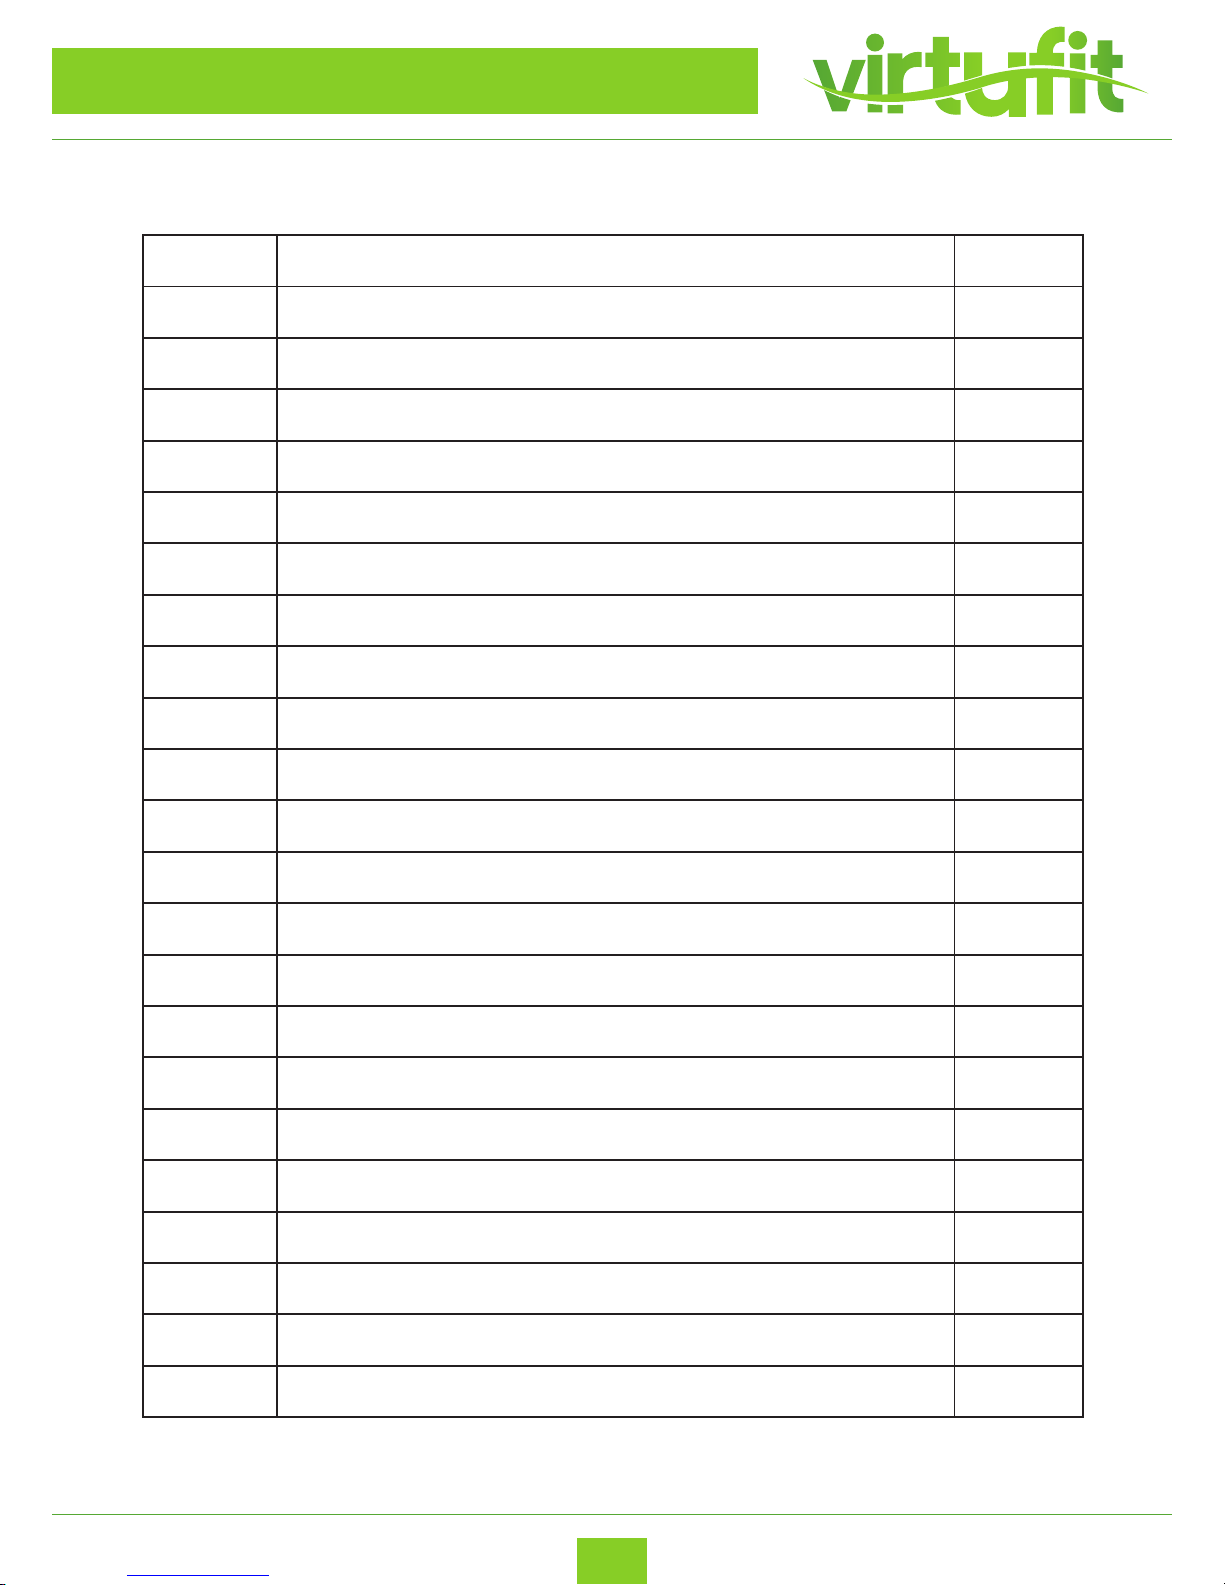
PARTS LIST
ENG
No. Description Q’ty
A Computer 1
A-1 Screw 4
B Handlebar post set 1 (set)
B-1 End cap for front handlebar 2
B-2 Foam grip for front handlebar 2
B-3 Hand pulse 2
B-4 Screw 2
B-5 Sleeve 2
B-6 Axle for handlebar 1
B-7 Flat washer 4
B-8 Semicircle washer 2
B-9 Cable wire (upper) 1
B-10 Spring washer 6
B-11 Screw 6
B-12 Screw 2
B-13 Hand pulse wire 2
B-14 Screw 2
B-15 Cover for handlebar post 1
B-16 Water bottle holder 1
B-17 Screw for xing holder 2
C-L Left upper handlebar 1 (set)
C-R Right upper handlebar 1 (set)
Page 25
NL
VirtuFit iConsole FDR 2.1 Ergometer Crosstrainer
25
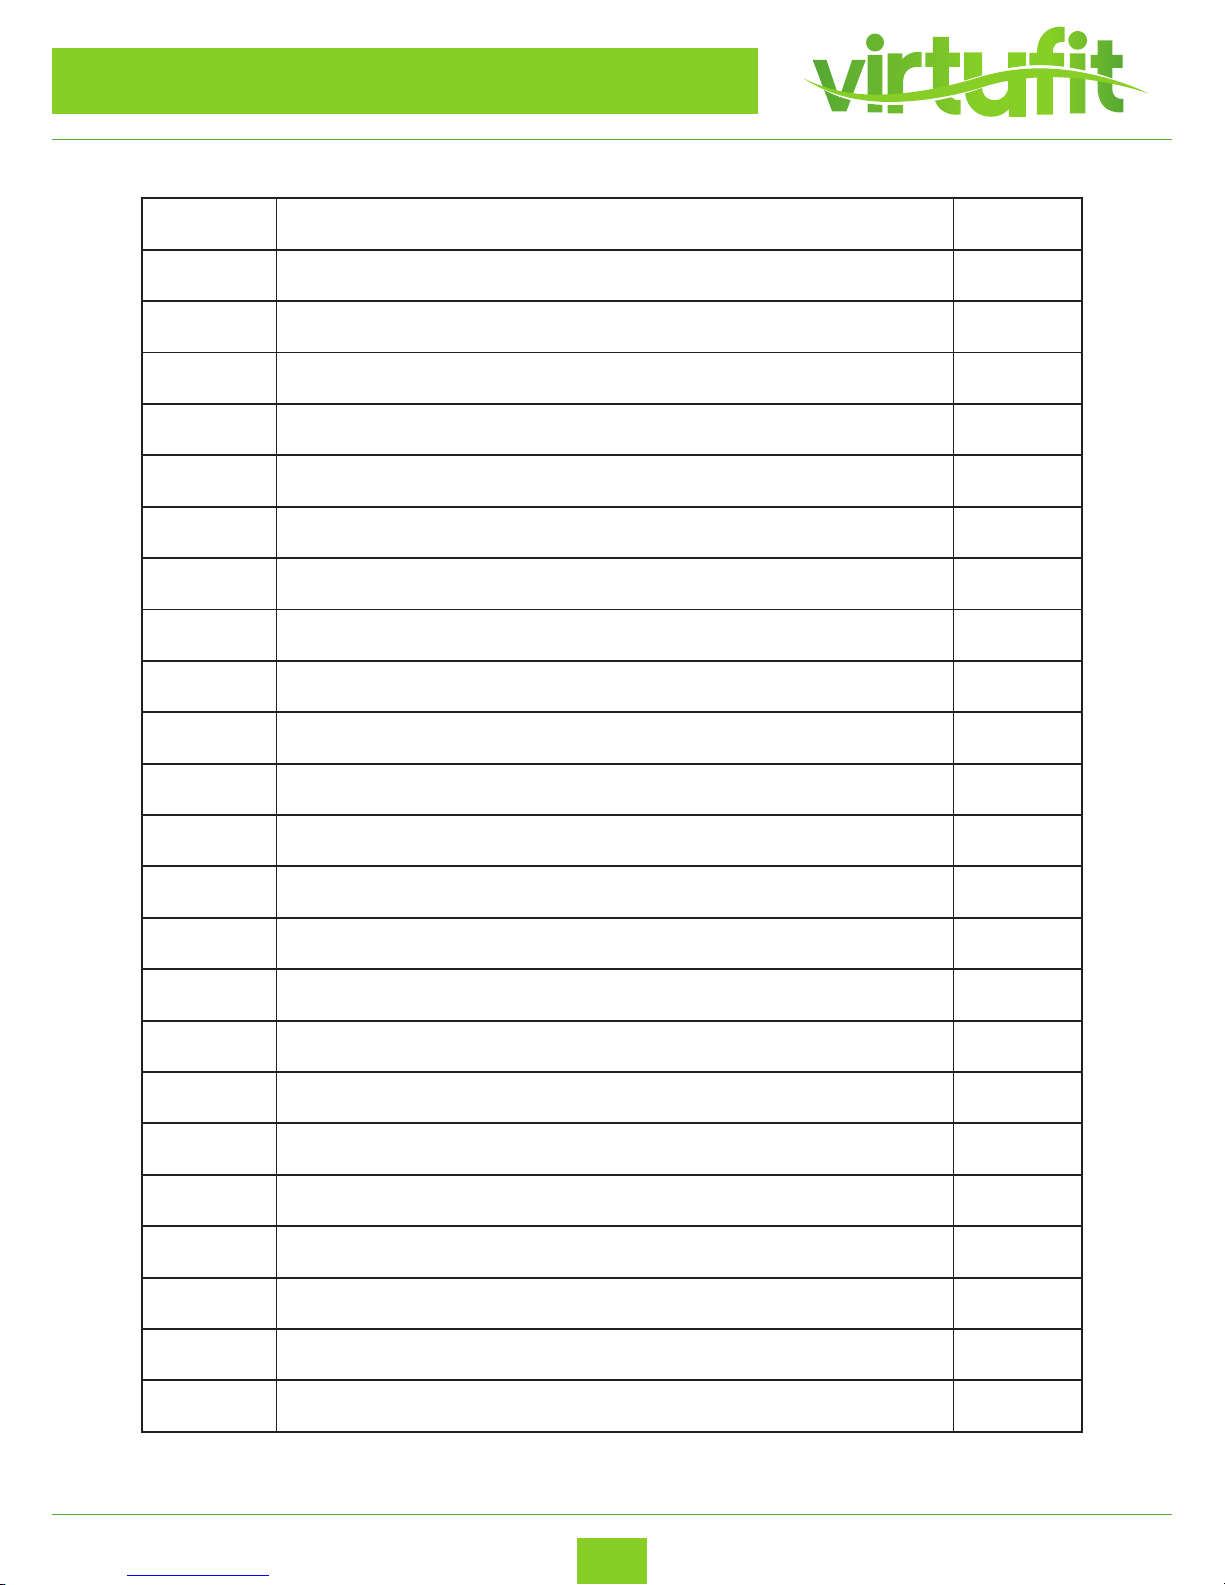
PARTS LIST
ENG
No. Description Q’ty
C-1 End cap for upper handlebar 2
C-2 Foam grip for upper handlebar 2
D Main frame 1 (set)
D-2 C-type ring 1
D-3 Flat washer 1
D-4 Wave Washer 1
D-5 Screw for sensor box 1
D-6 Sensor box 1
D-7 Bearing 2
D-8 Belt 1
D-9 Screw 7
D-10 Chain cover (L) 1
D-11 Screw 4
D-12 Nut 2
D-13 Chain cover (R) 1
D-14 DC Wire 1 1
D-15 Adapter 1
D-16 Brake knob 1
D-17 Nut 2
D-18 Axle for brake 1
D-19 Nut 2
D-20 Nylon nut 2
D-21 Flat washer 2
Page 26
NL
VirtuFit iConsole FDR 2.1 Ergometer Crosstrainer
26
PARTS LIST
ENG
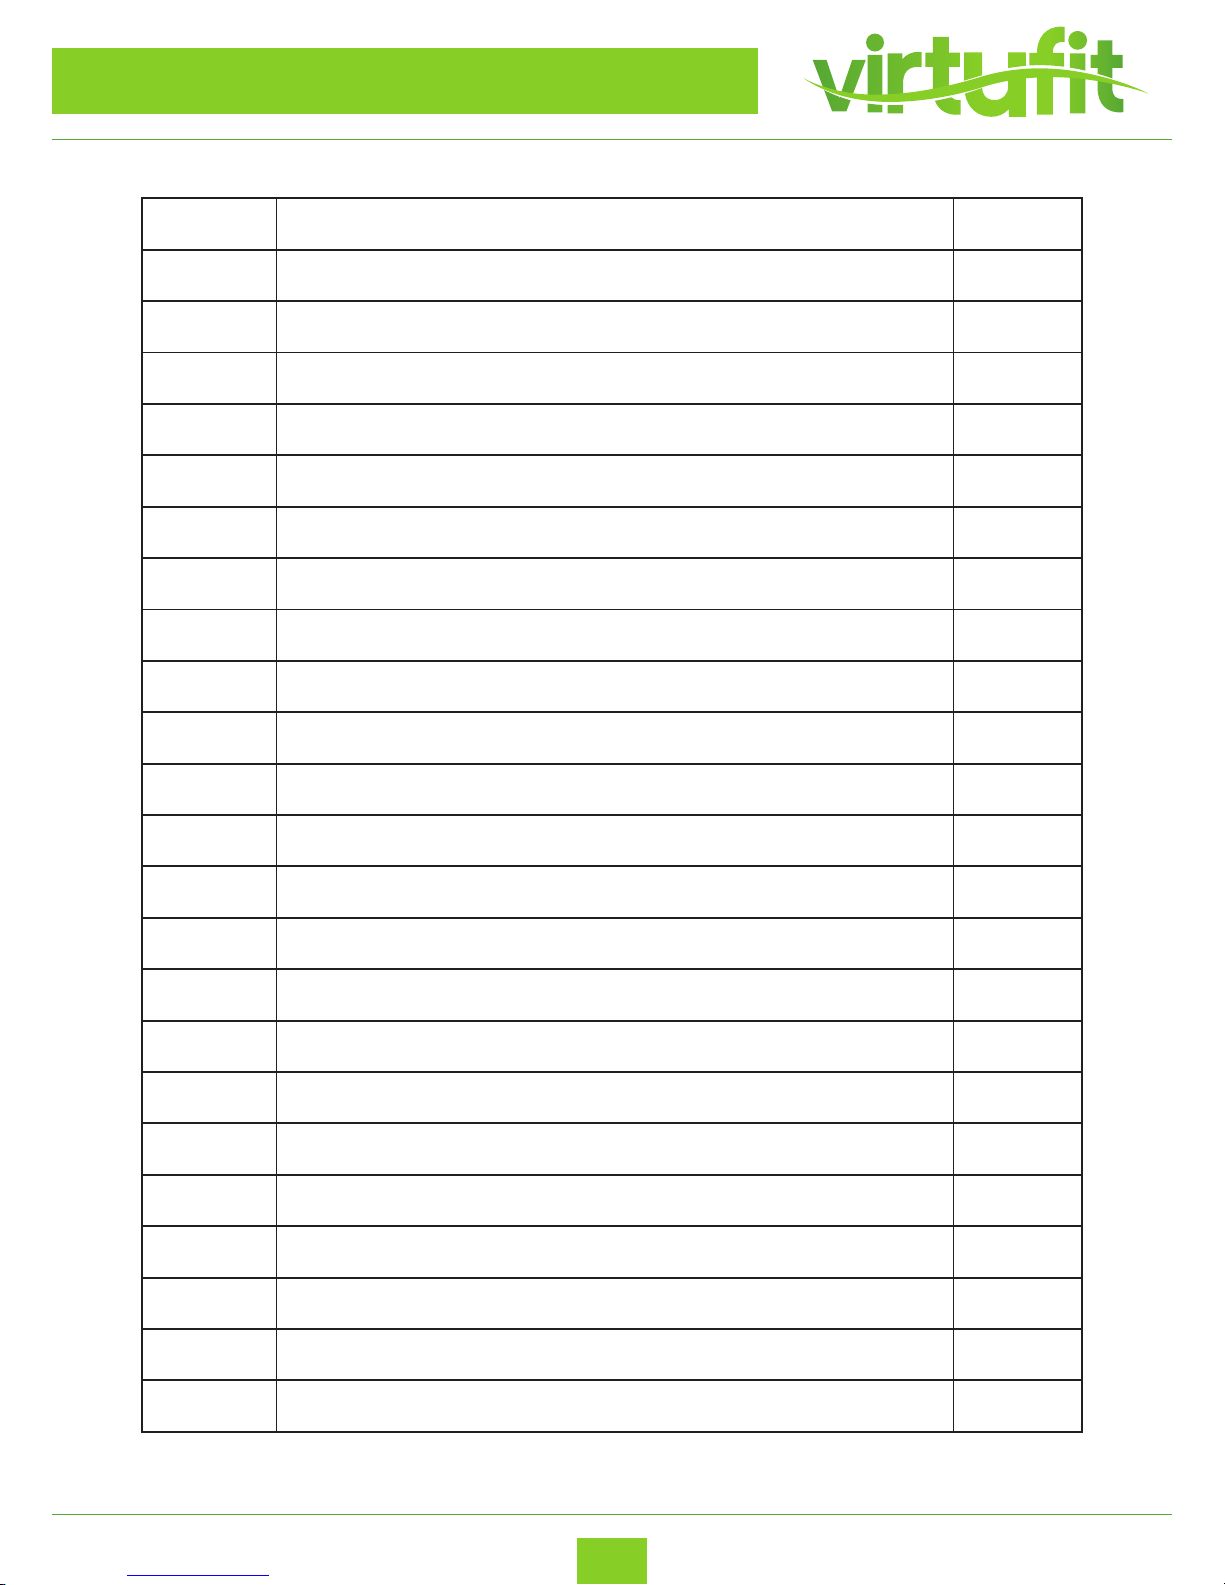
No. Description Q’ty
D-22 Screw 1
D-23 Flat washer 2
D-24 Nylon nut 1
D-25 Brake plate 1
D-26 Felt 1
D-27 Motor bracket 1 (set)
D-29 Axle for gear box 1
D-30 Screw 1
D-31 Nut 1
D-32 Cable wire (lower) 1
E Eddy magnet assembly 1 (set)
E-1 Screw 2
E-2 Flat washer 2
E-3 Spring washer 2
F Screw set 1 (set)
F-1 Flat washer 4
F-2 Nylon screw 4
F-3 Wave washer 2
F-4 Nylon nut 6
F-5 Semicircle washer 4
F-6 Carriage screw 4
F-7 Flat washer 4
F-8 Carriage screw 2
Page 27
NL
VirtuFit iConsole FDR 2.1 Ergometer Crosstrainer
27
PARTS LIST
ENG
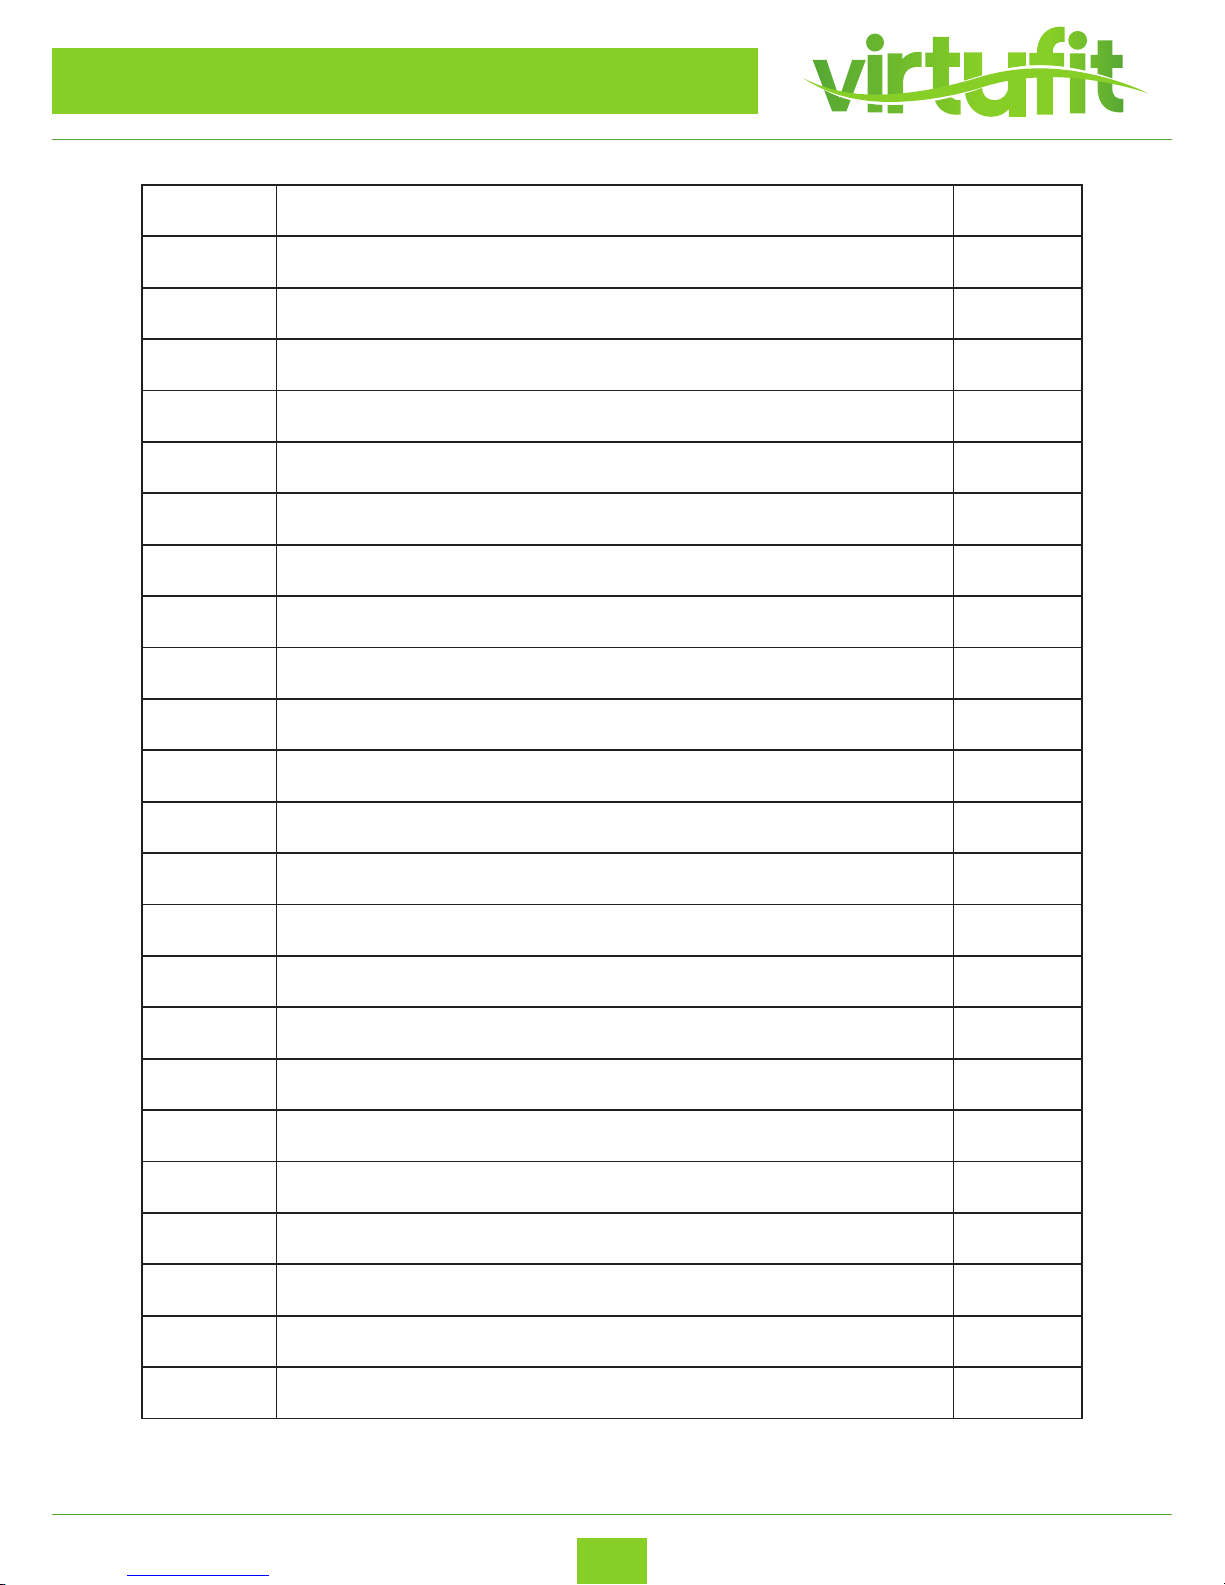
No. Description Q’ty
F-9 Flat washer 2
F-10 Sleeve 2
F-11 Allen bolt 2
F-12 Screw 4
F-13 Screw 8
F-14 Flat washer 8
F-15 Cover for screw 2
F-16 Box spanner 1
F-17 Allen key 1
F-19 Nut 4
F-20 Carriage screw 2
G Flywheel set 1 1 (set)
G-1 Flywheel 1 1
G-2 Nut 2
G-3 Nut 3
G-4 Flat washer 1
G-5 Bearing 1
G-6 Axle for ywheel 1
G-7 Bearing 1 (set)
G-8 Bushing 1
H Front stabilizer set 1 (set)
H-1 Foot cap for front stabilizer 2
H-2 Nut 2
Page 28
NL
VirtuFit iConsole FDR 2.1 Ergometer Crosstrainer
28
PARTS LIST
ENG
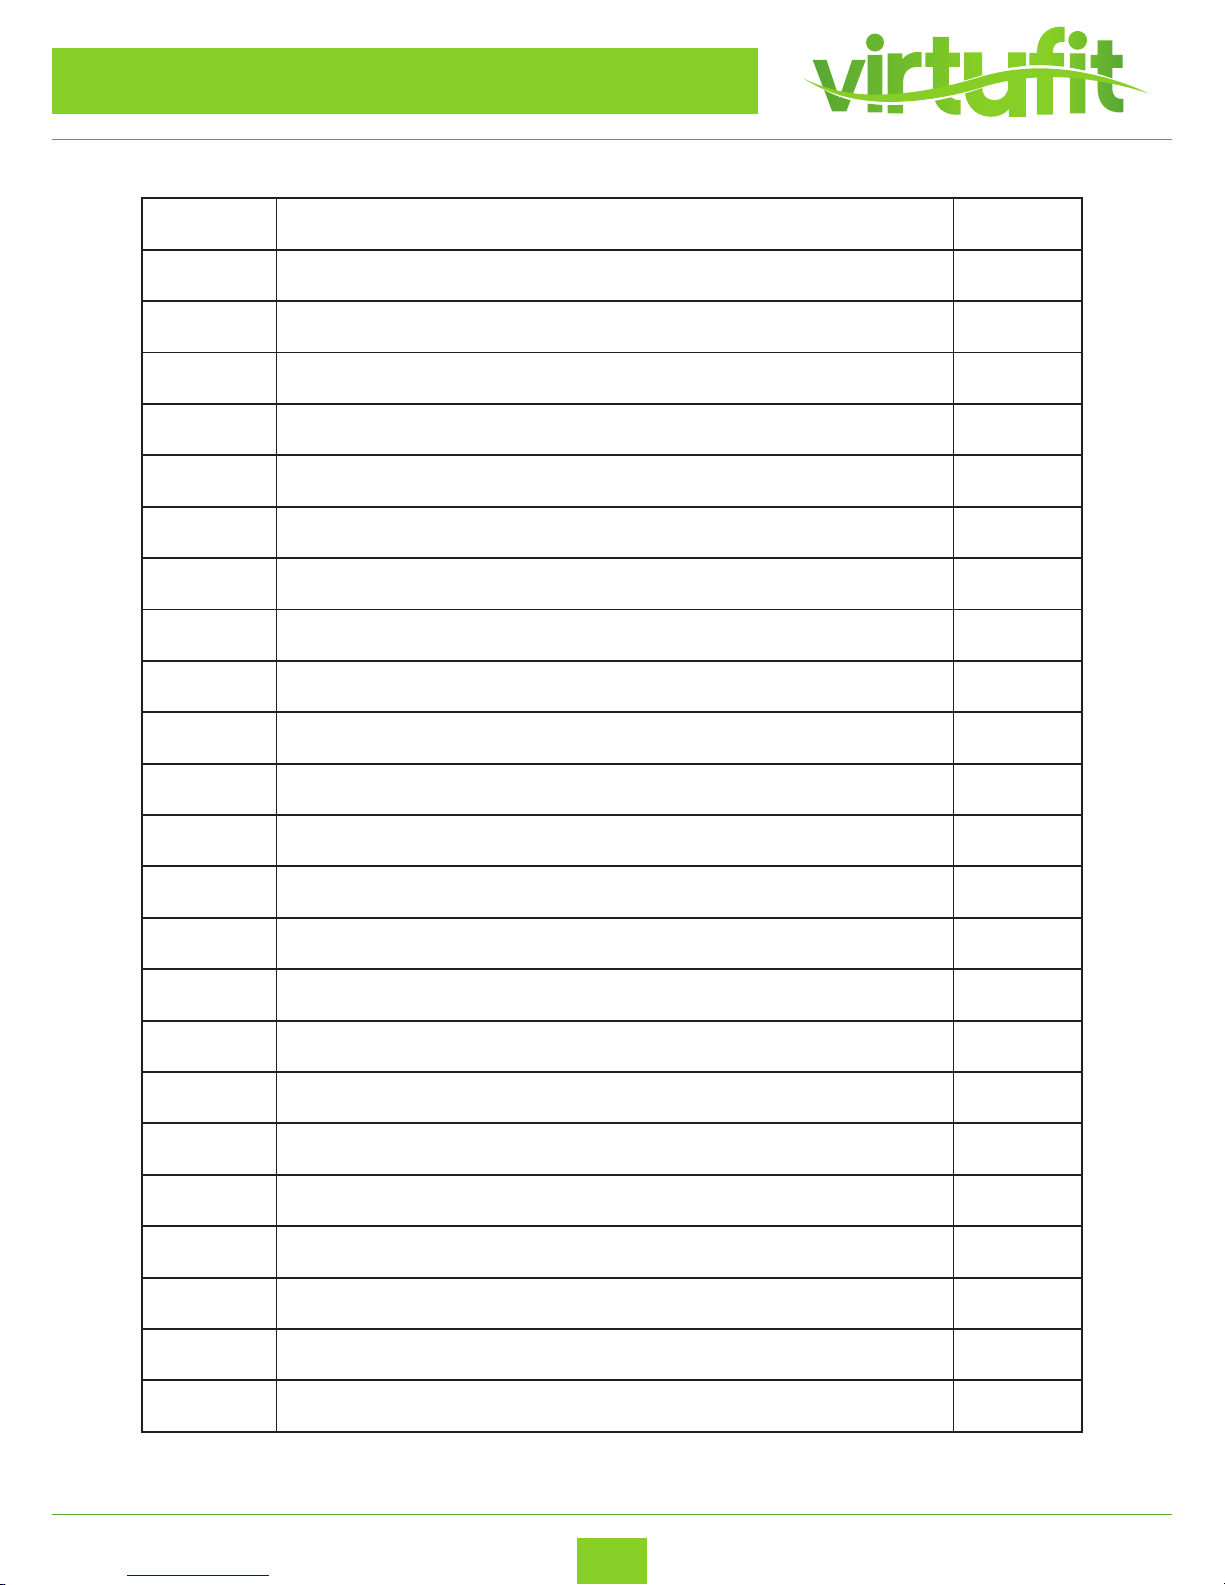
No. Description Q’ty
H-3 C-type ring 2
H-4 Transportation wheel 2
H-5 Sleeve 2
H-6 Screw 4
H-7 Adjustable foot cap 2
I-L Left pedal arm 1 (set)
I-R Right pedal arm 1 (set)
I-1 Sleeve 4
I-2 End cap 2
I-4 Pedal connector 2
I-5 Flat washer 6
I-6 Screw 6
J Idler 1 (set)
J-1 Hex. bolt 1
J-2 Nylon nut 1
J-3 Flat washer 1
J-4 Spring 1
J-5 Spring bracket 1
J-6 Hex. bolt 1
J-7 Flat washer 1
J-8 Hex. bolt 1
J-9 Idler wheel 1
K-L Left lower handlebar 1 (set)
Page 29
NL
VirtuFit iConsole FDR 2.1 Ergometer Crosstrainer
29
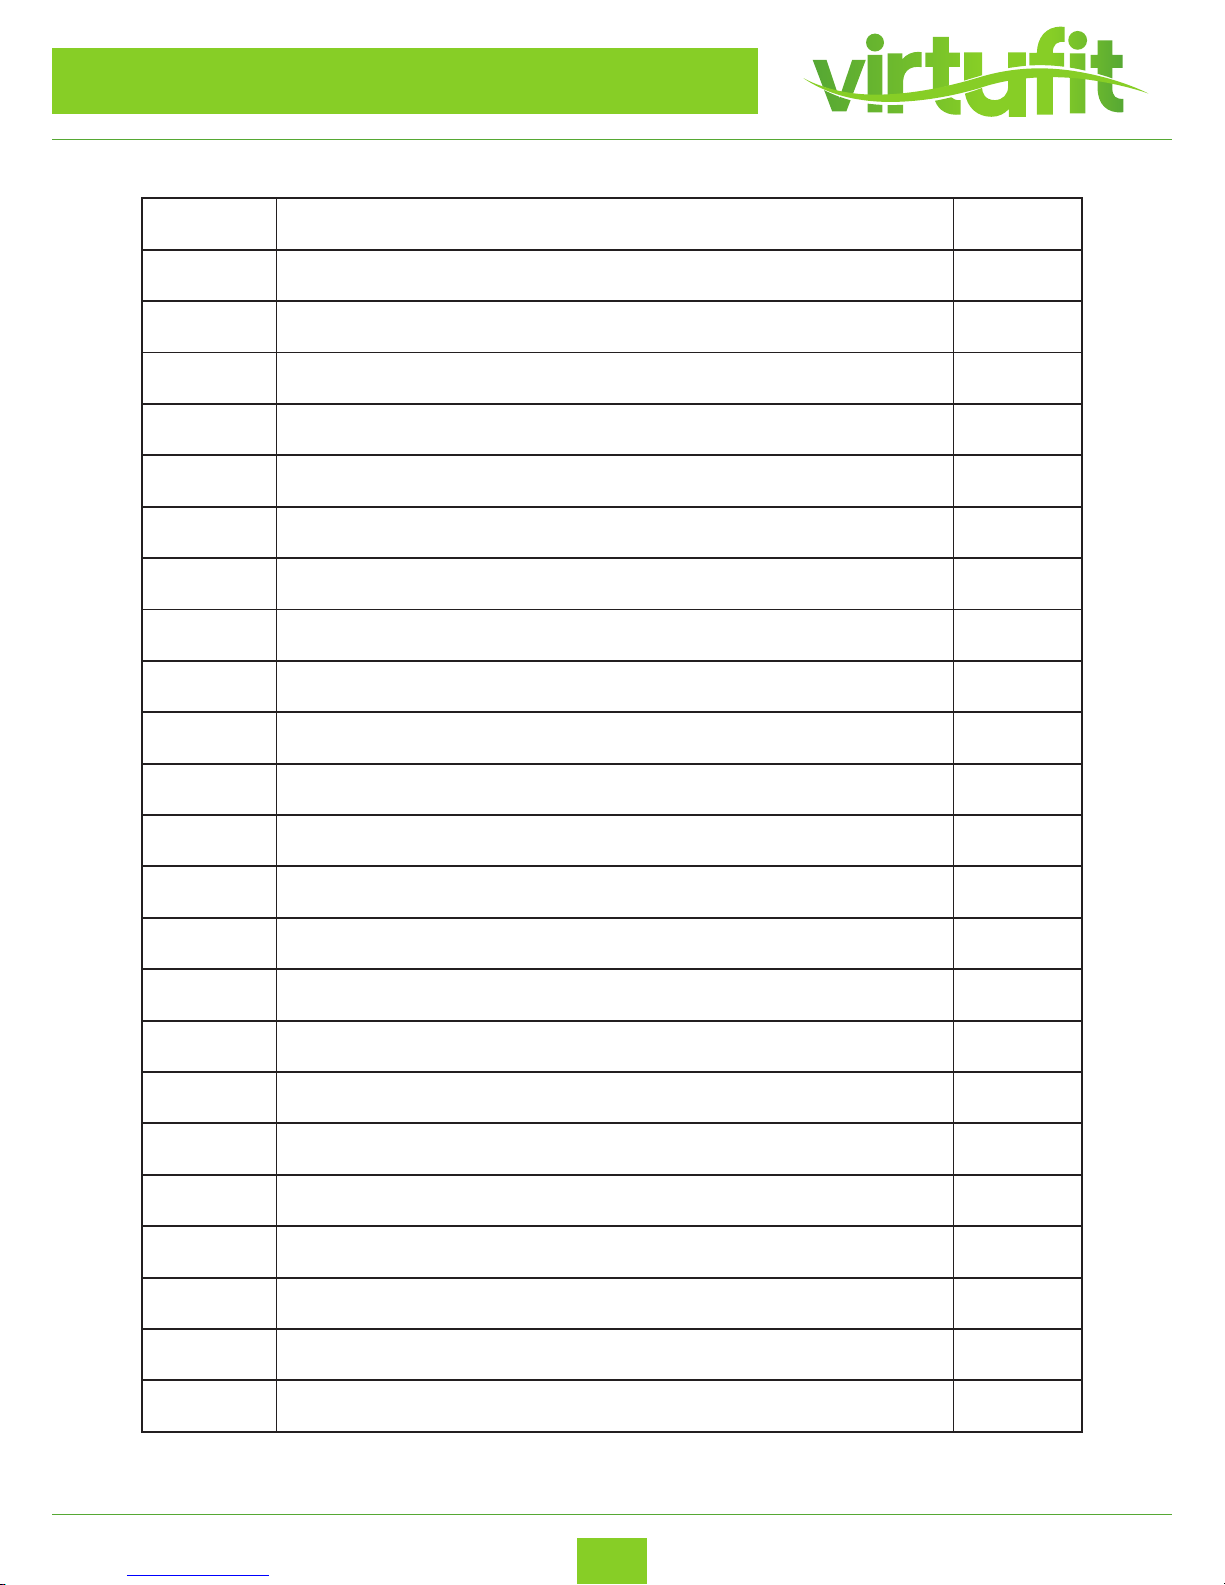
No. Description Q’ty
K-R Right lower handlebar 1 (set)
K-1 Screw 4
K-2 Sleeve 4
L-L Left crank arm 1
L-R Right crank arm 1
L-1 Screw 4
L-2 Flat washer 4
L-3 Fixed stick for wheel 2
L-4 Wheel 2
L-5 Bearing 4
L-6 Cover for wheel 2
L-7 Screw 4
L-8 Bushing 4
L-9 Wave washer 2
L-10 Nylon nut 2
L-11 Flat washer 4
L-12 Bearing 4
L-13 Bushing 2
L-14 Bolt 2
L-15 Crank arm connect base 2
L-16 Screw 4
L-17 Flat washer 4
M Rear stabilizer 1 (set)
PARTS LIST
ENG
Page 30
NL
VirtuFit iConsole FDR 2.1 Ergometer Crosstrainer
30
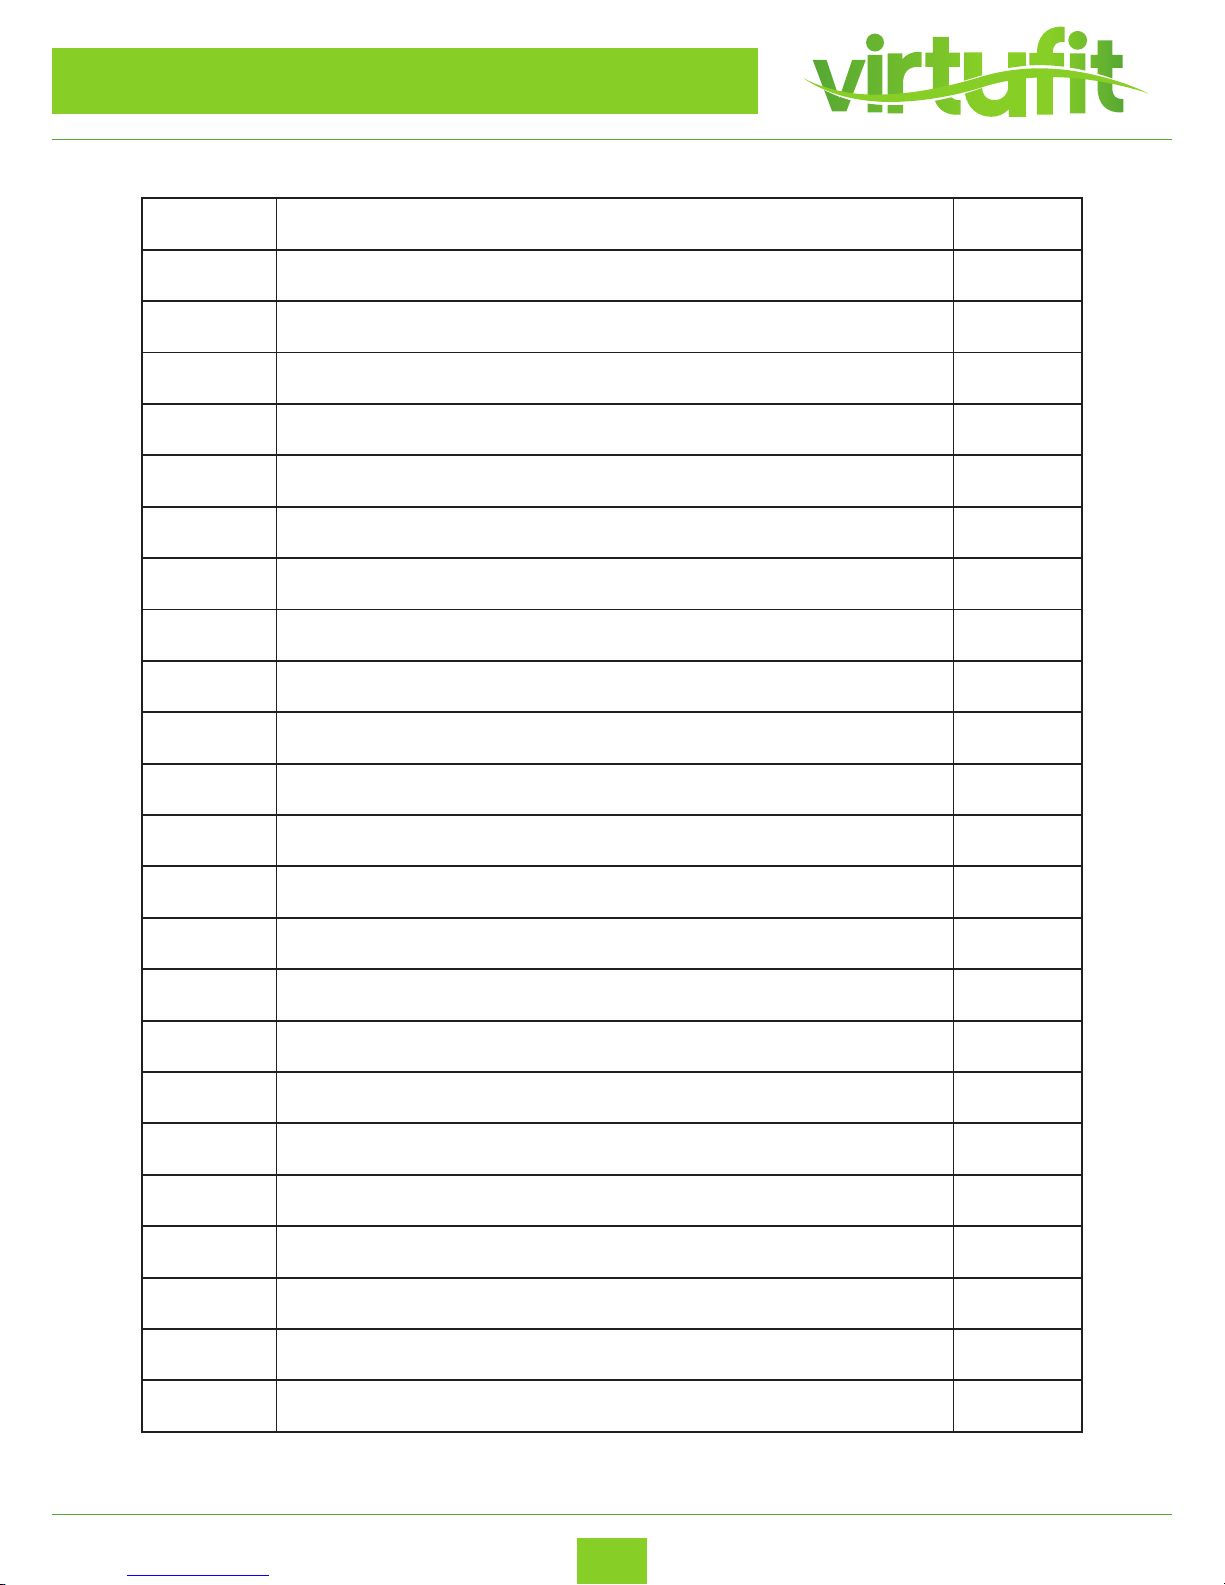
No. Description Q’ty
M-1 Rear stabilizer 2
M-2 Screw 4
M-3 Rear stabilizer end cap 4
M-4 Stabilizer adjusting cap 2
M-5 Slide rail (left) 1
M-6 Slide rail (right) 1
M-7 Sleeve 4
M-8 Cylinder 1
M-9 Screw 1
M-10 Nylon nut 1
M-11 Hex. bolt 2
M-12 Semicircle washer 2
M-13 Square cap 4
M-14 Slider adjusting cap 2
M-15 U-shape locker 2
M-16 Slider end cap 2
M-17 Connection 1
N Axle set 1 (set)
N-1 Pulley 1
N-2 Axle 1
N-3 Hex. bolt 3
N-4 Bushing 1
O Disc cover and crank set 2 (set)
PARTS LIST
ENG
Page 31
NL
VirtuFit iConsole FDR 2.1 Ergometer Crosstrainer
31
PARTS LIST
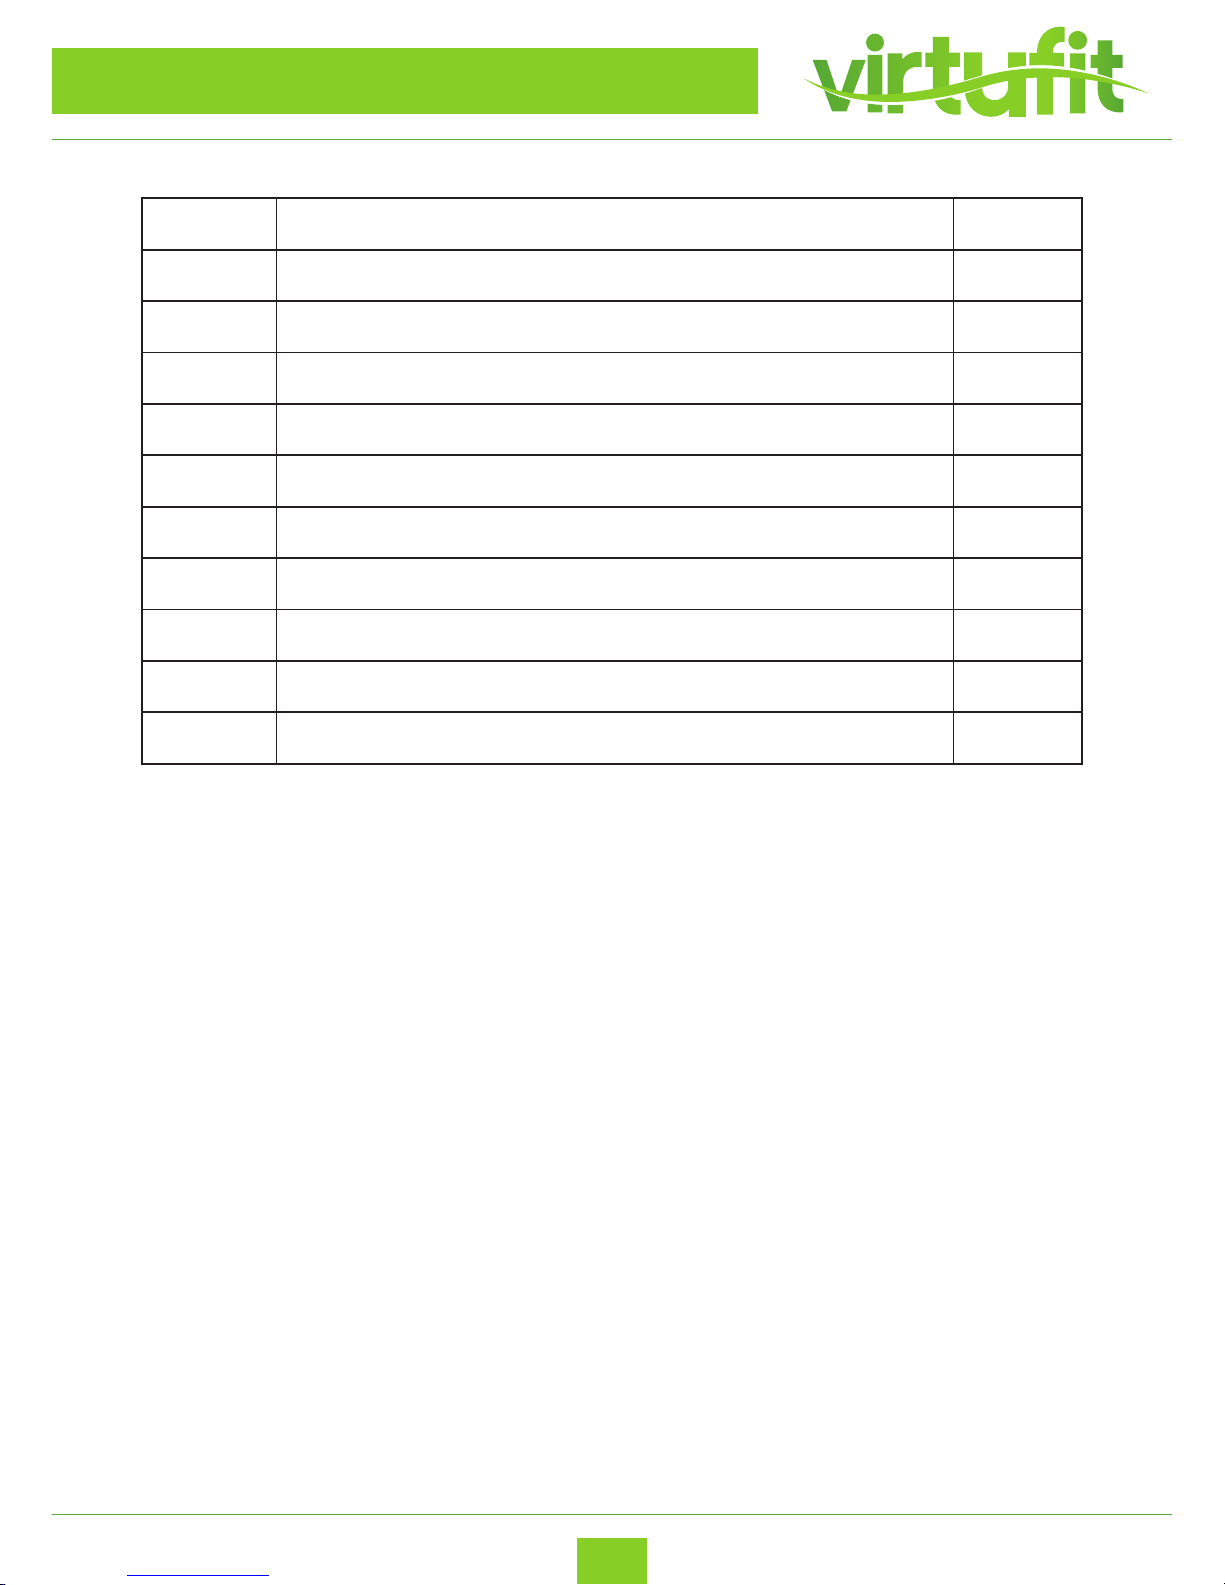
No. Description Q’ty
O-1 Crank (L+R) 2
O-2 Screw 10
O-3 Screw 2
O-4 Cover for disc cover 2
O-5 Disc cover 2
P-1 Front cover for upper handlebar 2
P-2 Rear cover for upper handlebar 2
P-3 Left cover for pedal arm 2
P-4 Right cover for pedal arm 2
P-5 Pedal 2
ENG
Page 32

NL
ENG
For questions or missing parts please contact your dealer.
 Loading...