

Page 1
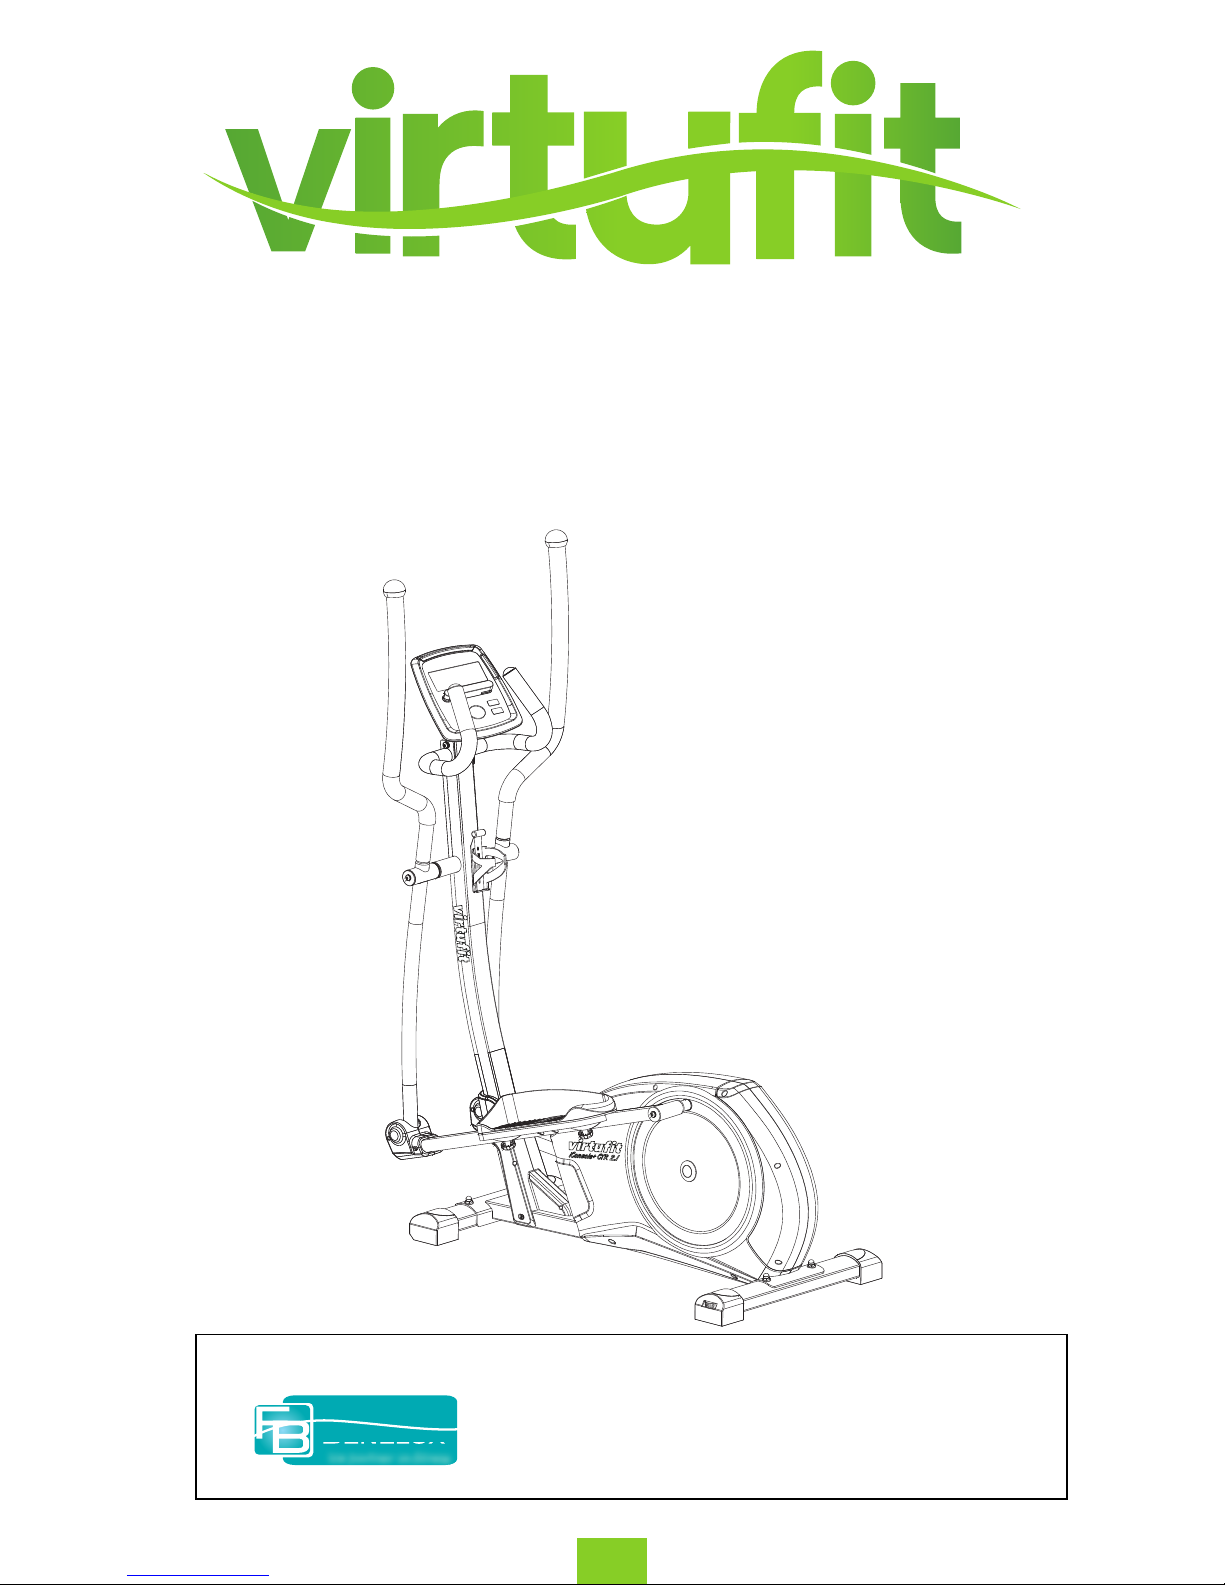
Crosstrainer iConsole CTR 2.1
Owners manual
ENG
T +31 (0)74-7600219
E service@tnessbenelux.nl
W www.tnessbenelux.nl
Twekkelerweg 263
7553 LZ Hengelo
The Netherlands
Fitness
BeneluxBenelux
Uw partner in fitness
For questions or missing parts, please contact Fitness Benelux:
Page 2

2
Crosstrainer iConsole CTR 2.1
ENG
CONTENT
Safety Instruction 3
Check List 4-6
Assembly Instruction 7-16
Exploded Drawing 17
Parts List 18-20
Computer Instruction 21-27
iConsole+ App 28
Training Instruction 29
Page 3

3
Crosstrainer iConsole CTR 2.1
ENG
SAFETY INSTRUCTION
Before you start training on your crosstrainer, please read the instructions carefully.
Be sure to keep the instructions for information, in case of repair and for spare part
delivery.
- This elliptical trainer is made for home use only and tested up to a maximum
body weight of 150 kgs.
- Follow the steps of the assembly instructions carefully.
- Use only original parts as delivered.
- Before the assembly, be sure to check if delivery is complete by using the included parts-list.
- For assembly use only suitable tools and asks for assistance with assembly if necessary.
- Place the exerciser on an even, non-slippery surface. Because of possible corrosion,
the usage of any exerciser in moist areas is not recommended.
- Check before the rst training and every 1-2 months that all connecting elements are
tight tting and are in the correct condition. Replace defective components immediately
and/ or keep the equipment out of use until repair. For repairs, use only original parts.
- In case of repair, please ask your dealer for advice.
- For repairs, use only original spare parts.
- Avoid the use of aggressive detergents when cleaning the home exerciser.
- Ensure that training starts only after correct assembly and inspection of the item.
- For all adjustable parts be aware of the maximum positions to which they can be
adjusted/tightened to.
- The home exerciser is designed for adults. Please ensure that children use it only
under the supervision of an adult.
- Ensure that those present are aware of possible hazards, e.g. movable parts during training.
- Warning: incorrect/excessive training can cause health injuries.
- Consult your physician before staring with any exercise program.
He or she can advise on the kind of training and which impact is suitable.
Page 4
4
Crosstrainer iConsole CTR 2.1
ENG
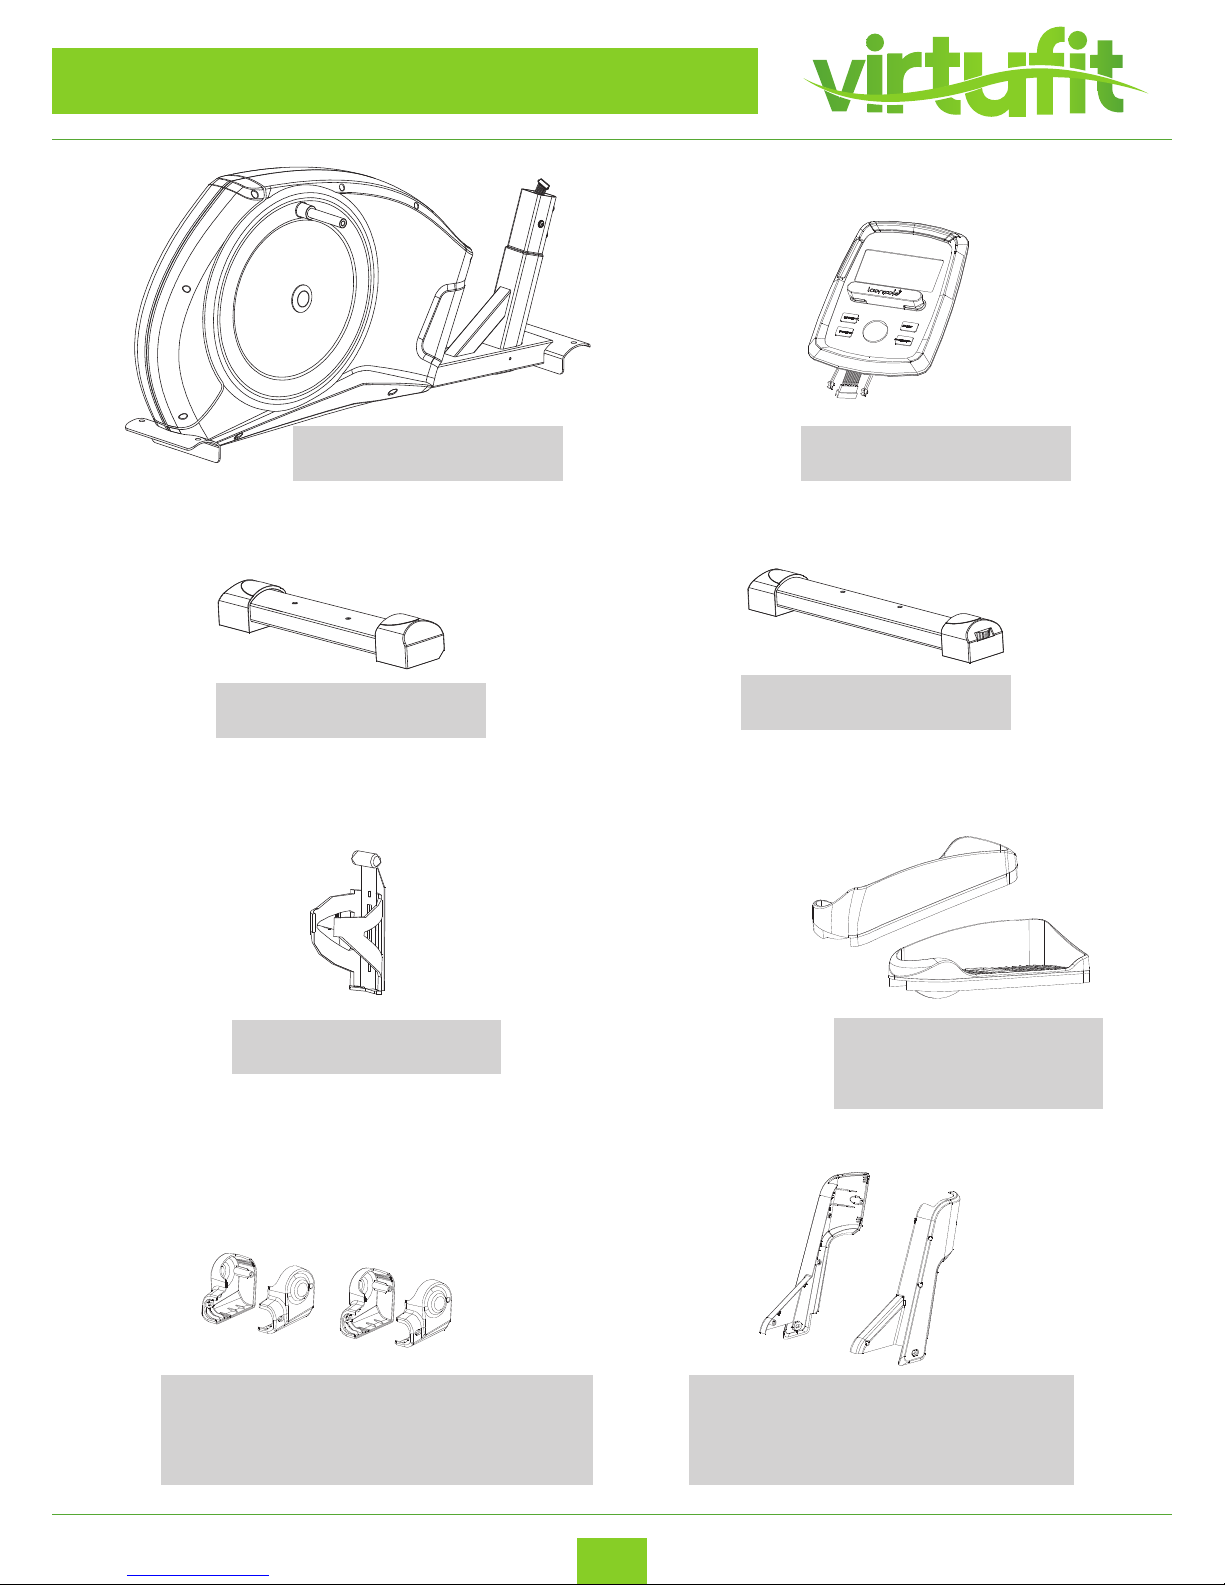
CHECKLIST (contents of packaging)
CHECK LIST (contents of packaging)
Computer
Water bottle holder
Front bottom plastic cover (Left)
Front bottom plastic cover (Right)
Plastic cover for foot support bar(Left)
Plastic cover for foot support bar(Right)
Footplate (Left)
Footplate (Right)
Rear stabilizer
Front Stabilizer
Main frame
Page 5
5
Crosstrainer iConsole CTR 2.1
ENG
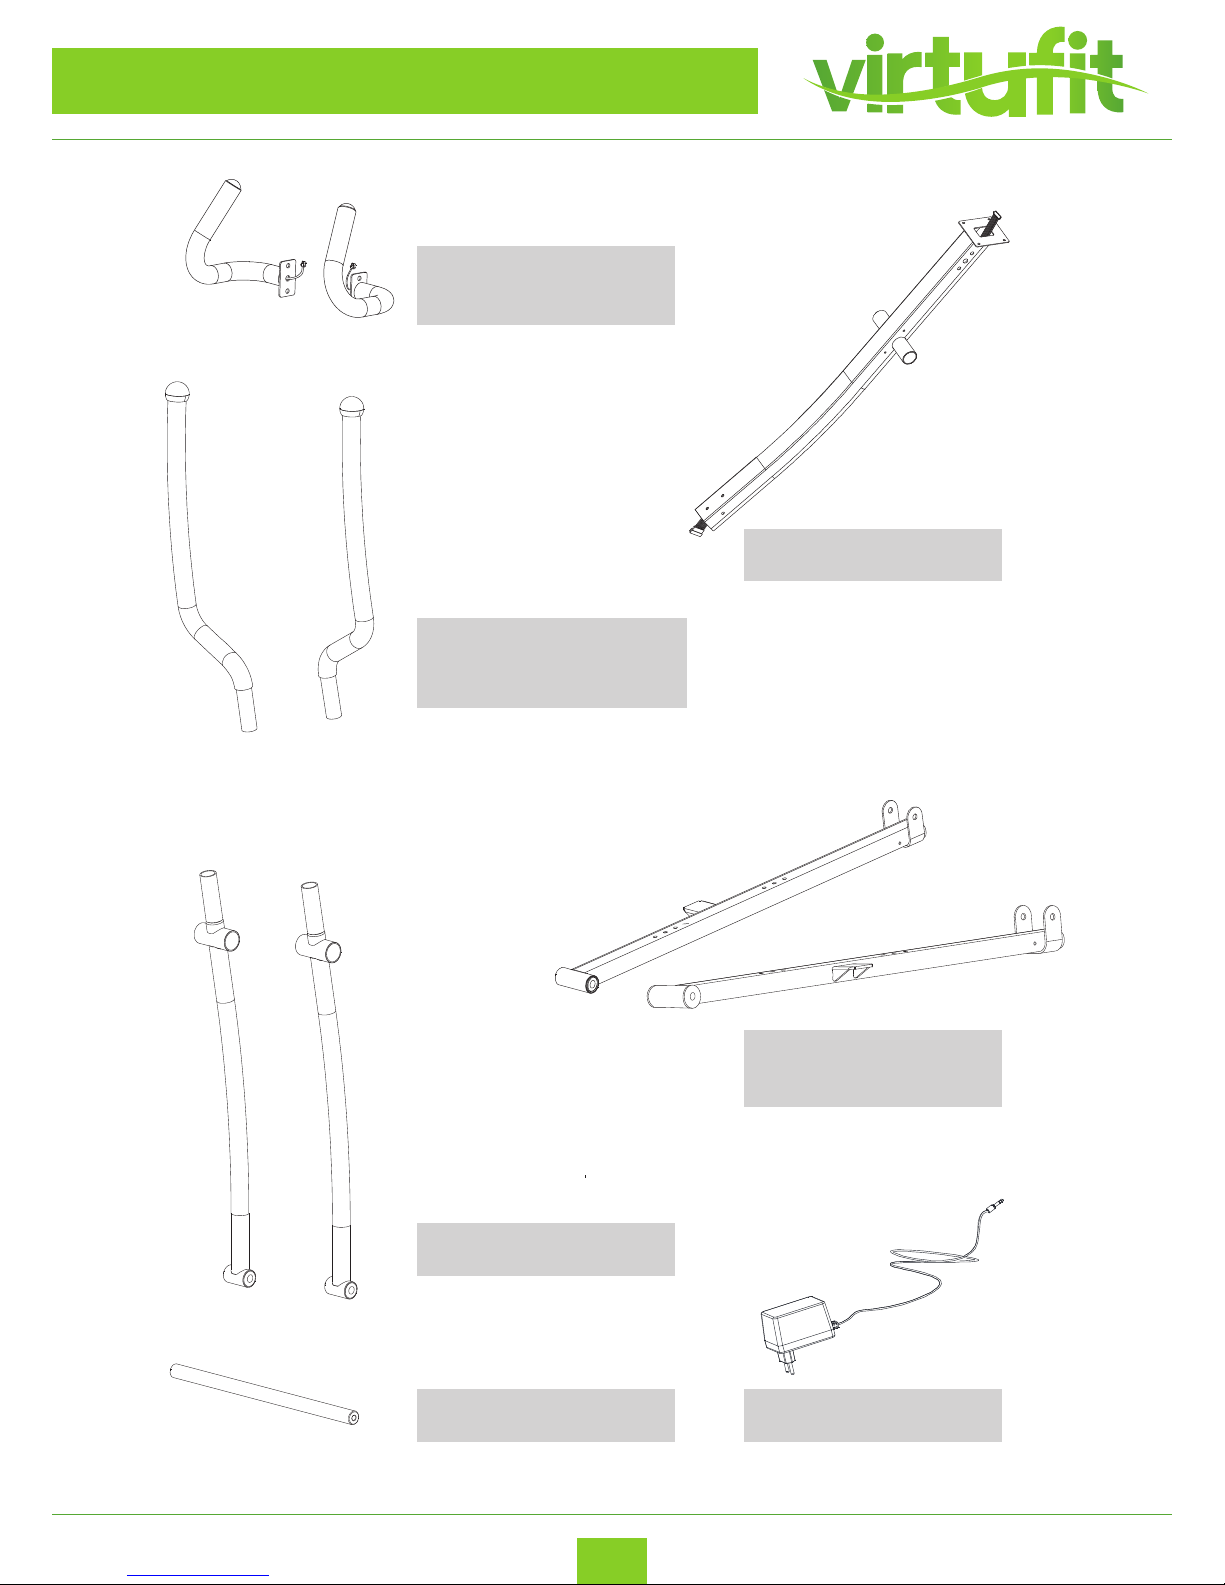
CHECKLIST (contents of packaging)
Handlebar (Left)
Handlebar (Right)
Upper handlebar (Left)
Upper handlebar (Right)
Lower handlebar
Foot support bar (Left)
Foot support bar (Right)
Handlebar post
Rotation rod Adapter
Page 6
6
Crosstrainer iConsole CTR 2.1
ENG
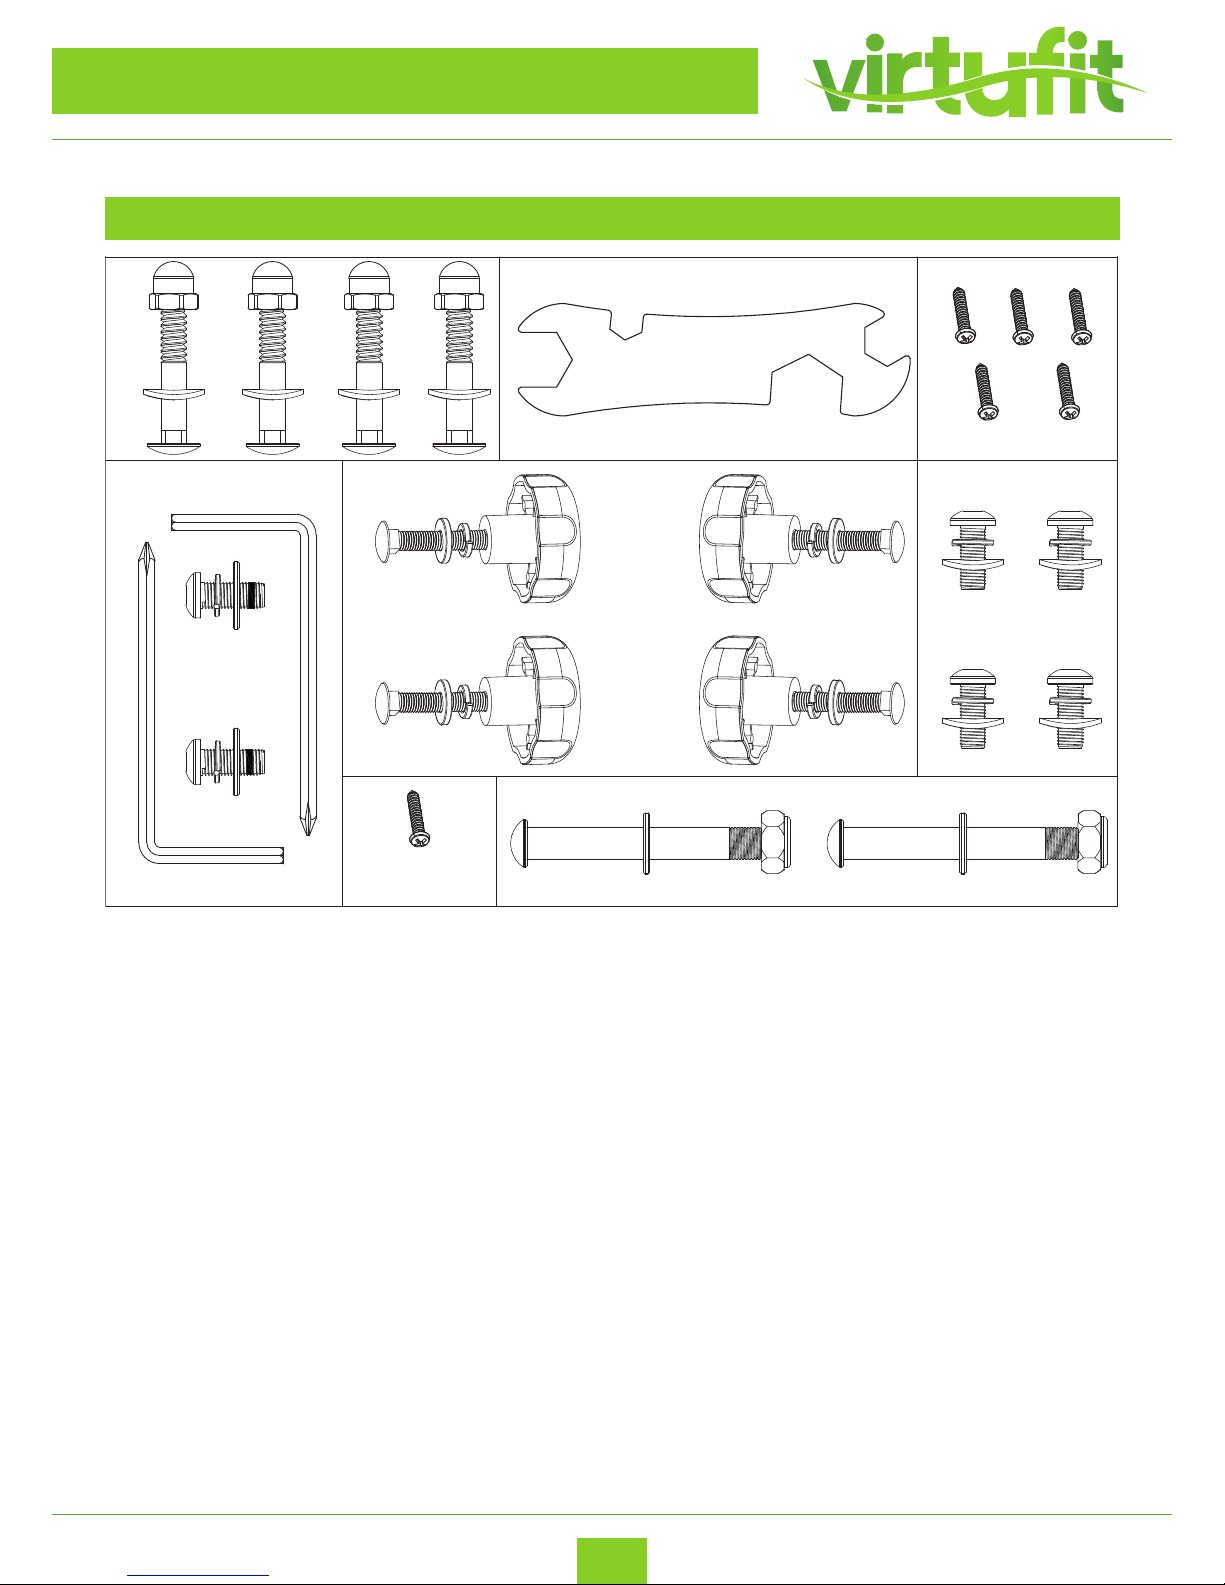
CHECKLIST (contents of packaging)
TOOL KIT
NO 9*4 NO 64*4 NO 91*4
NO 29*5
NO 22*1
NO 101*1
NO 32*4
NO 86*4
NO 87*4
NO 88*4
NO 11*2
NO 14*2
NO 35*2
NO 100*2
NO 23*2 NO 24*2
NO 27*2
NO 9*4
NO 10*4
NO 11*4
Page 7
7
Crosstrainer iConsole CTR 2.1
ENG
ASSEMBLY INSTRUCTION
ASSEMBLY INSTRUCTION
UITLEG BIJ MONTAGE
STAP 1
STEP 1
STEP 1
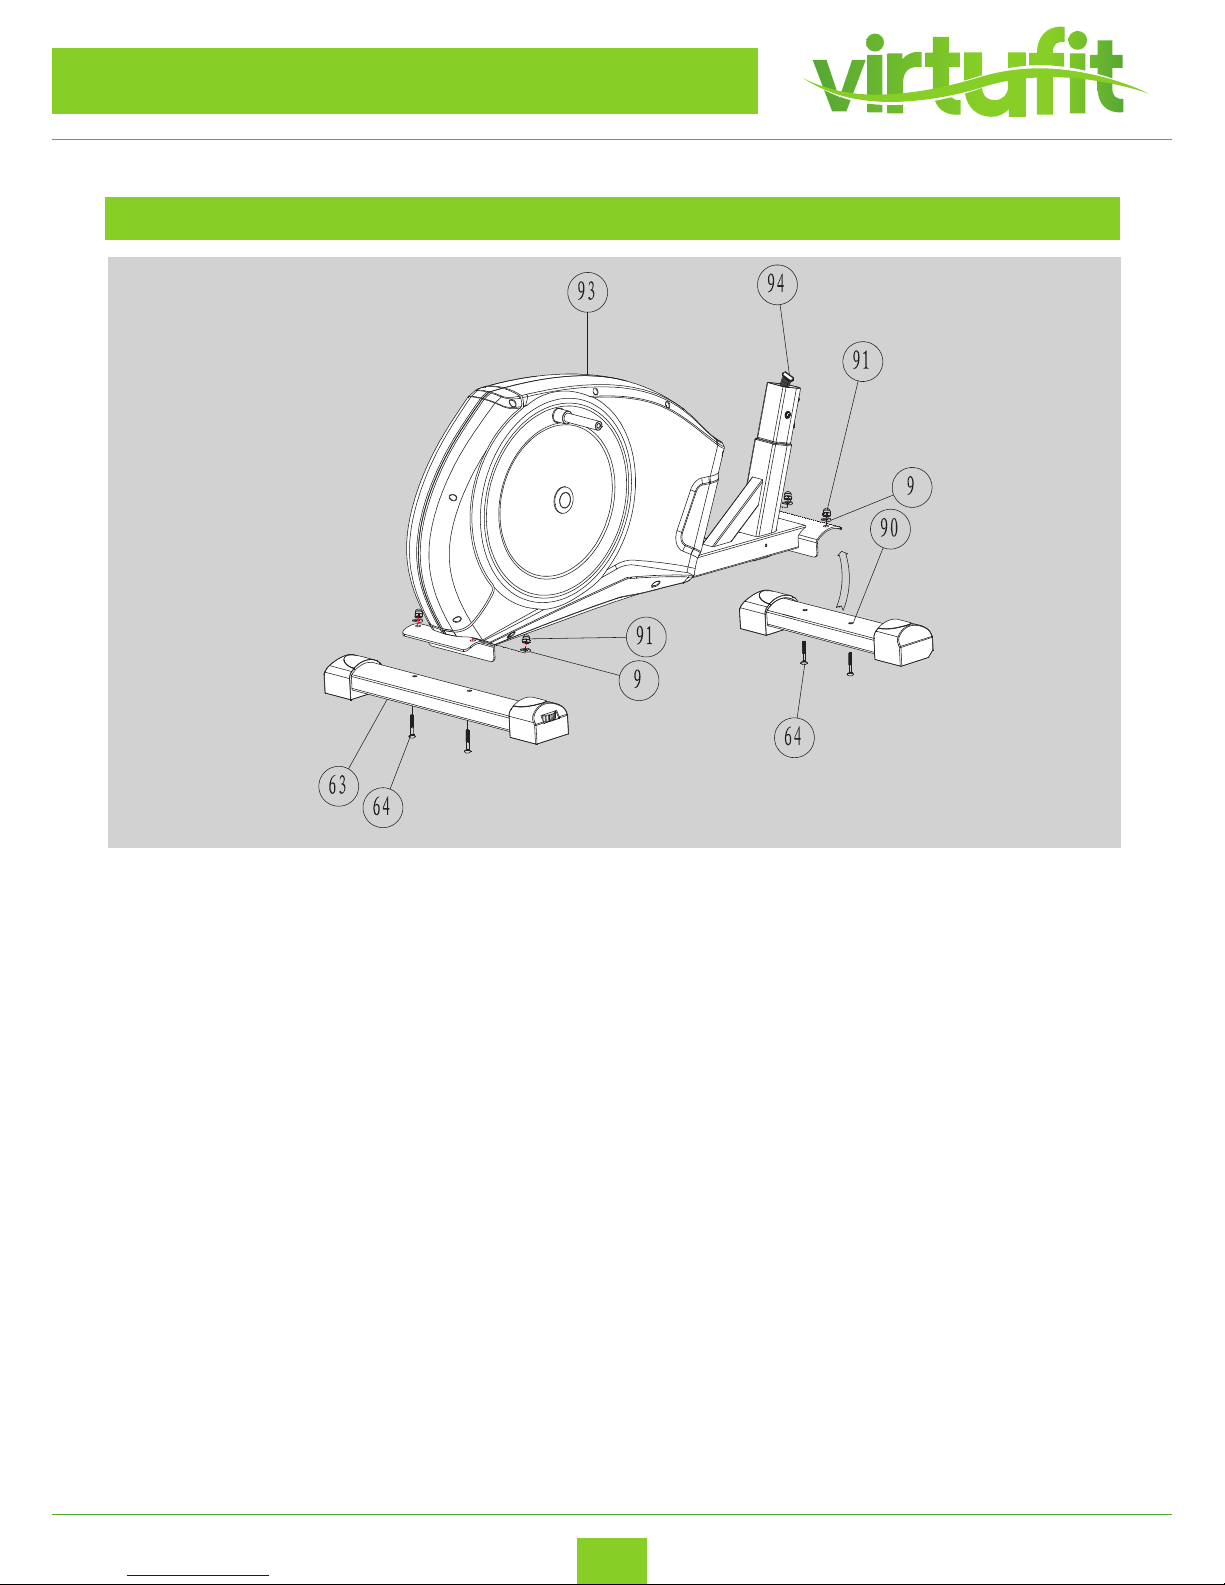
I. Attach the Front Stabilizer (90) onto the Main Frame (93) with M8 Screws (64), Curved washer (9)
and Cap nut (91) .Tighten fully.
II. Attach the Rear Stabilizer (63) onto the Main frame (93) with M8 Screws (64). Curved washer (9)
and Cap nut (91) Tighten fully.
Note: You can adjust the Rear End Cap to keep the elliptical trainer stable.
Page 8
8
Crosstrainer iConsole CTR 2.1
ENG
STEP 2
STEP 2
STA P 2
ASSEMBLY INSTRUCTION
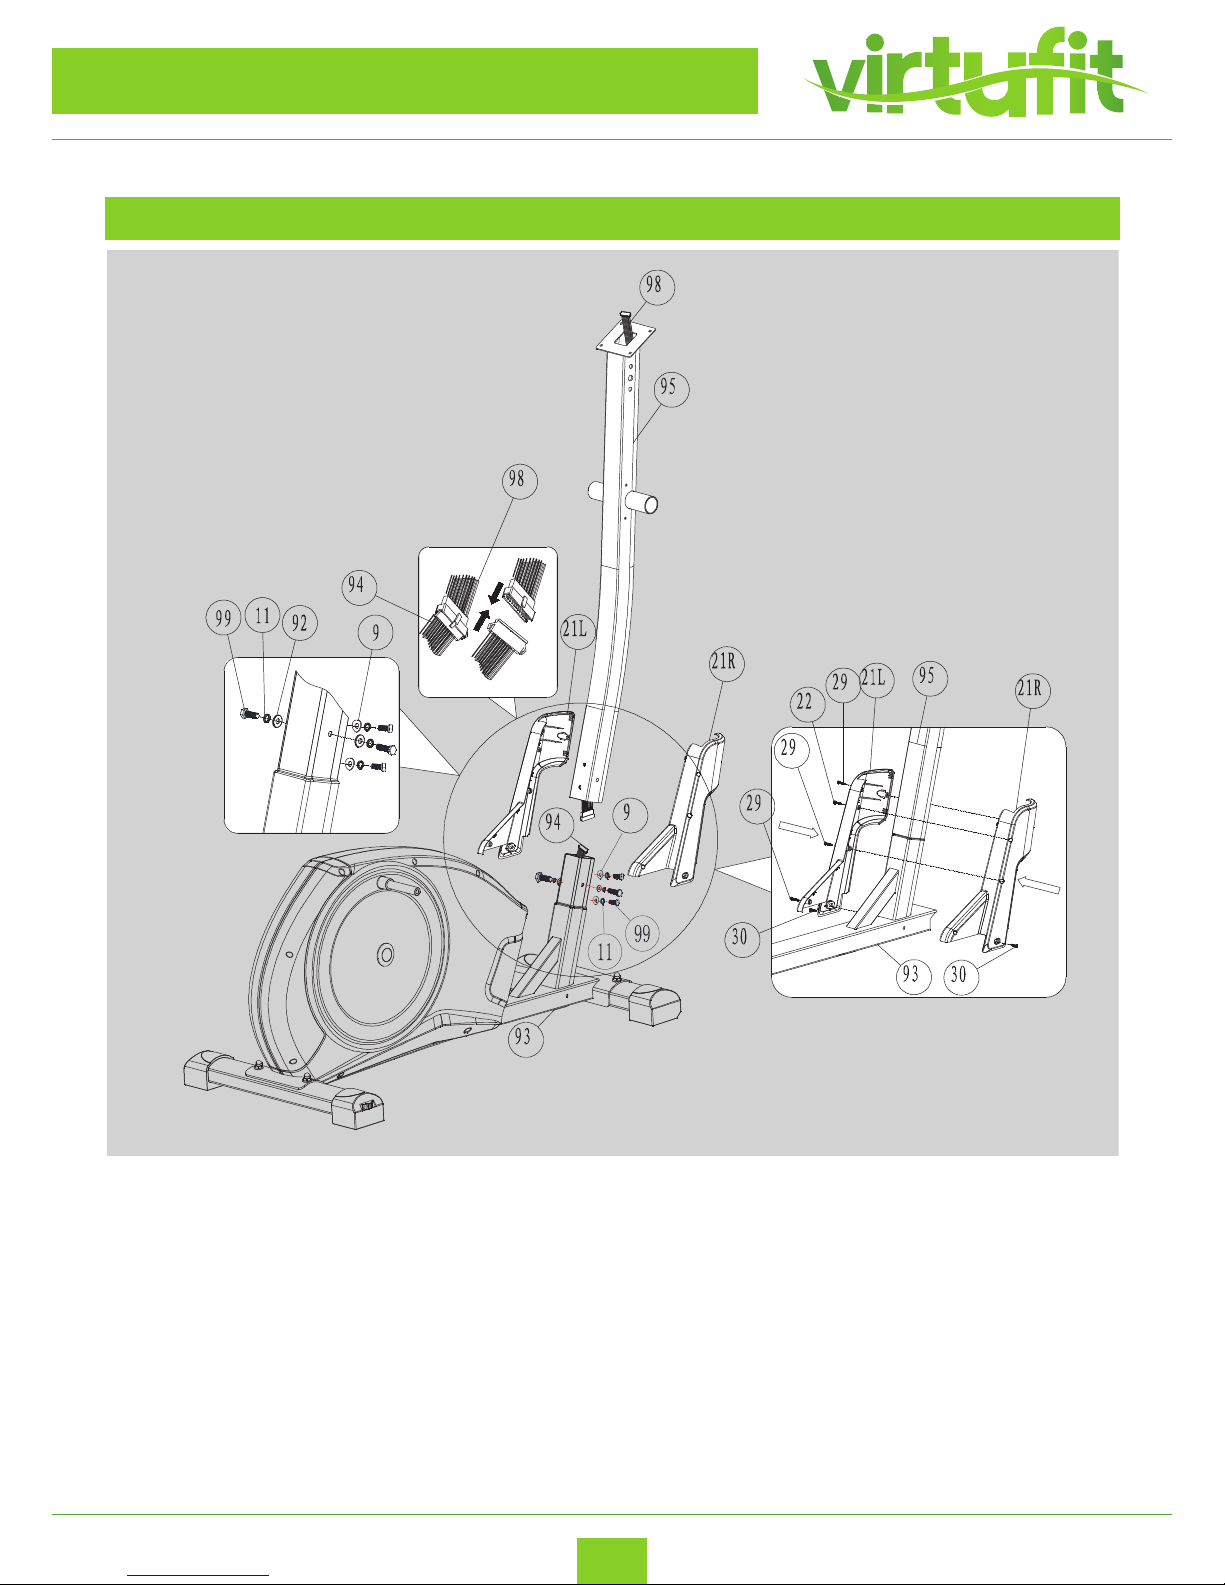
I. Carefully lift the Handlebar Post (95) until it is vertical. Connect the upper Tension Cable (98) by using 4x
Hex bolt M8x20mm (99), M8 Curved Washer (9), M8 Flat Washer (92) and M8 Spring Washer (11).
II. Align the Front Bottom Plastic Cover (21L&21R) together by using Self-tapping Screw M3x15mm (22),
Self tapping Screw M4x15mm (29) and Screw M5x15mm (30).
ASSEMBLY INSTRUCTION
Page 9
9
Crosstrainer iConsole CTR 2.1
ENG
STEP 3
STEP 3
ASSEMBLY INSTRUCTION
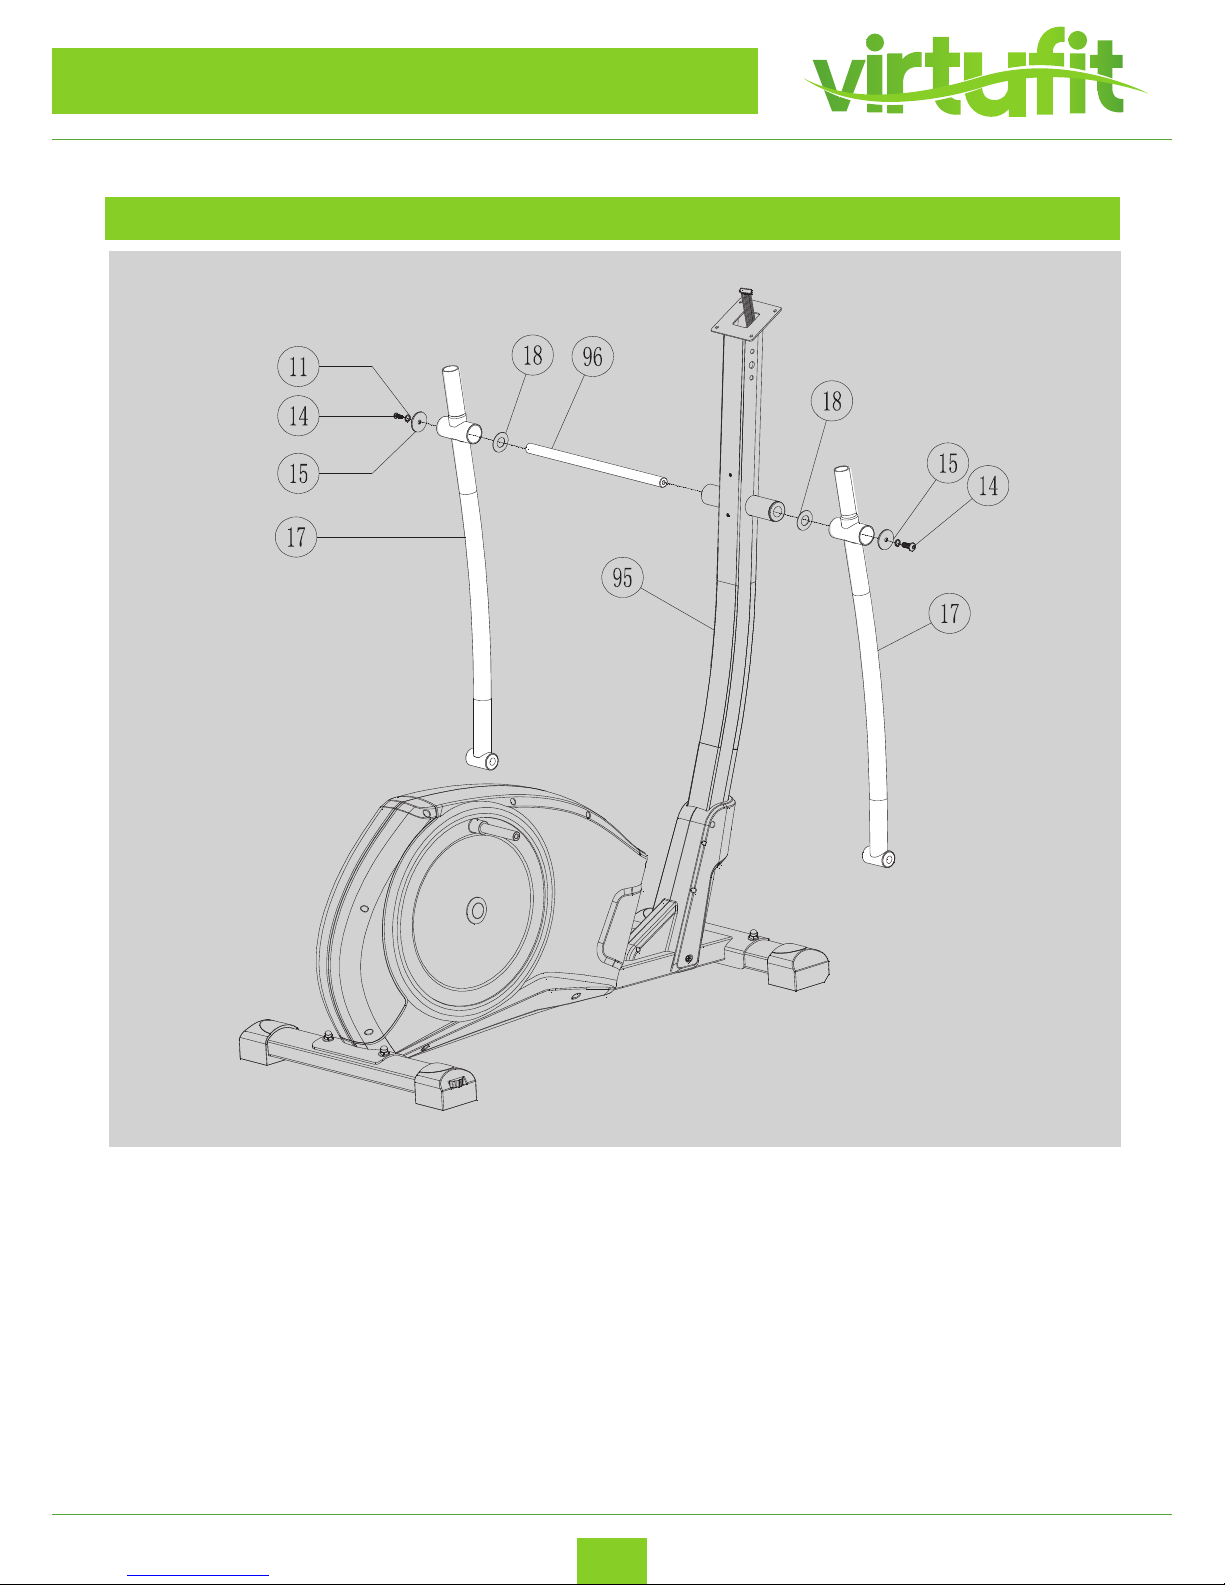
Place the Potation Rod (96) into the Handle Post (95). Slide the left and right Lower Handlebars (17) onto the
Rotation Rod and secure in place with 19.5*38*0.5mm Flat Washer (18), 8.5*36*3mm Flat Washer, M8 Spring
Washer (11) and M8*20 Allen Bolt (14) for each side.
ASSEMBLY INSTRUCTION
Page 10
10
Crosstrainer iConsole CTR 2.1
ENG
STEP 4
STEP 4
ASSEMBLY INSTRUCTION
ASSEMBLY INSTRUCTION
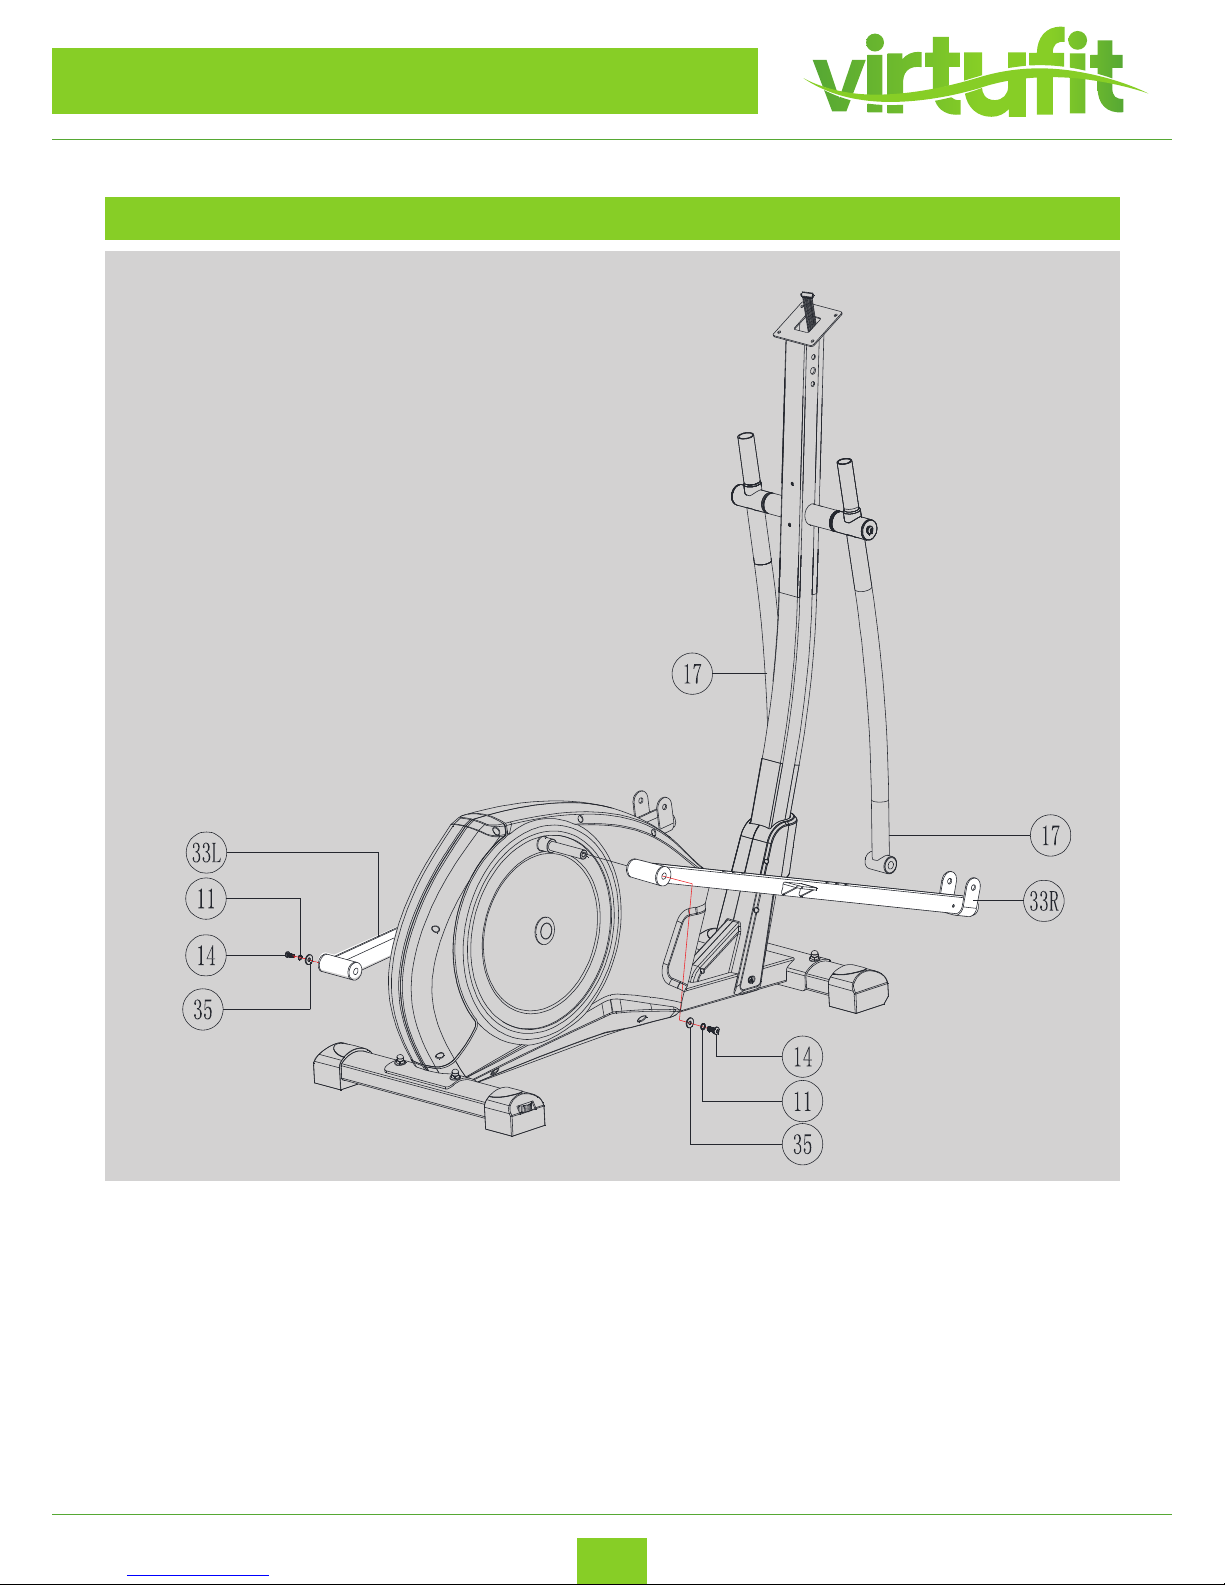
Attach the Footplate Support Bars (33L+33R) by sliding them onto the Main Frame (93) and securing in
place with M8*20 Allen Bolt (14), M8 Spring Washer (11) and M8 Flat Washer (35) for each side. Tighten fully.
Page 11
11
Crosstrainer iConsole CTR 2.1
ENG
ASSEMBLY INSTRUCTION
STEP 5
ASSEMBLY INSTRUCTION
STEP 5
STA P 5
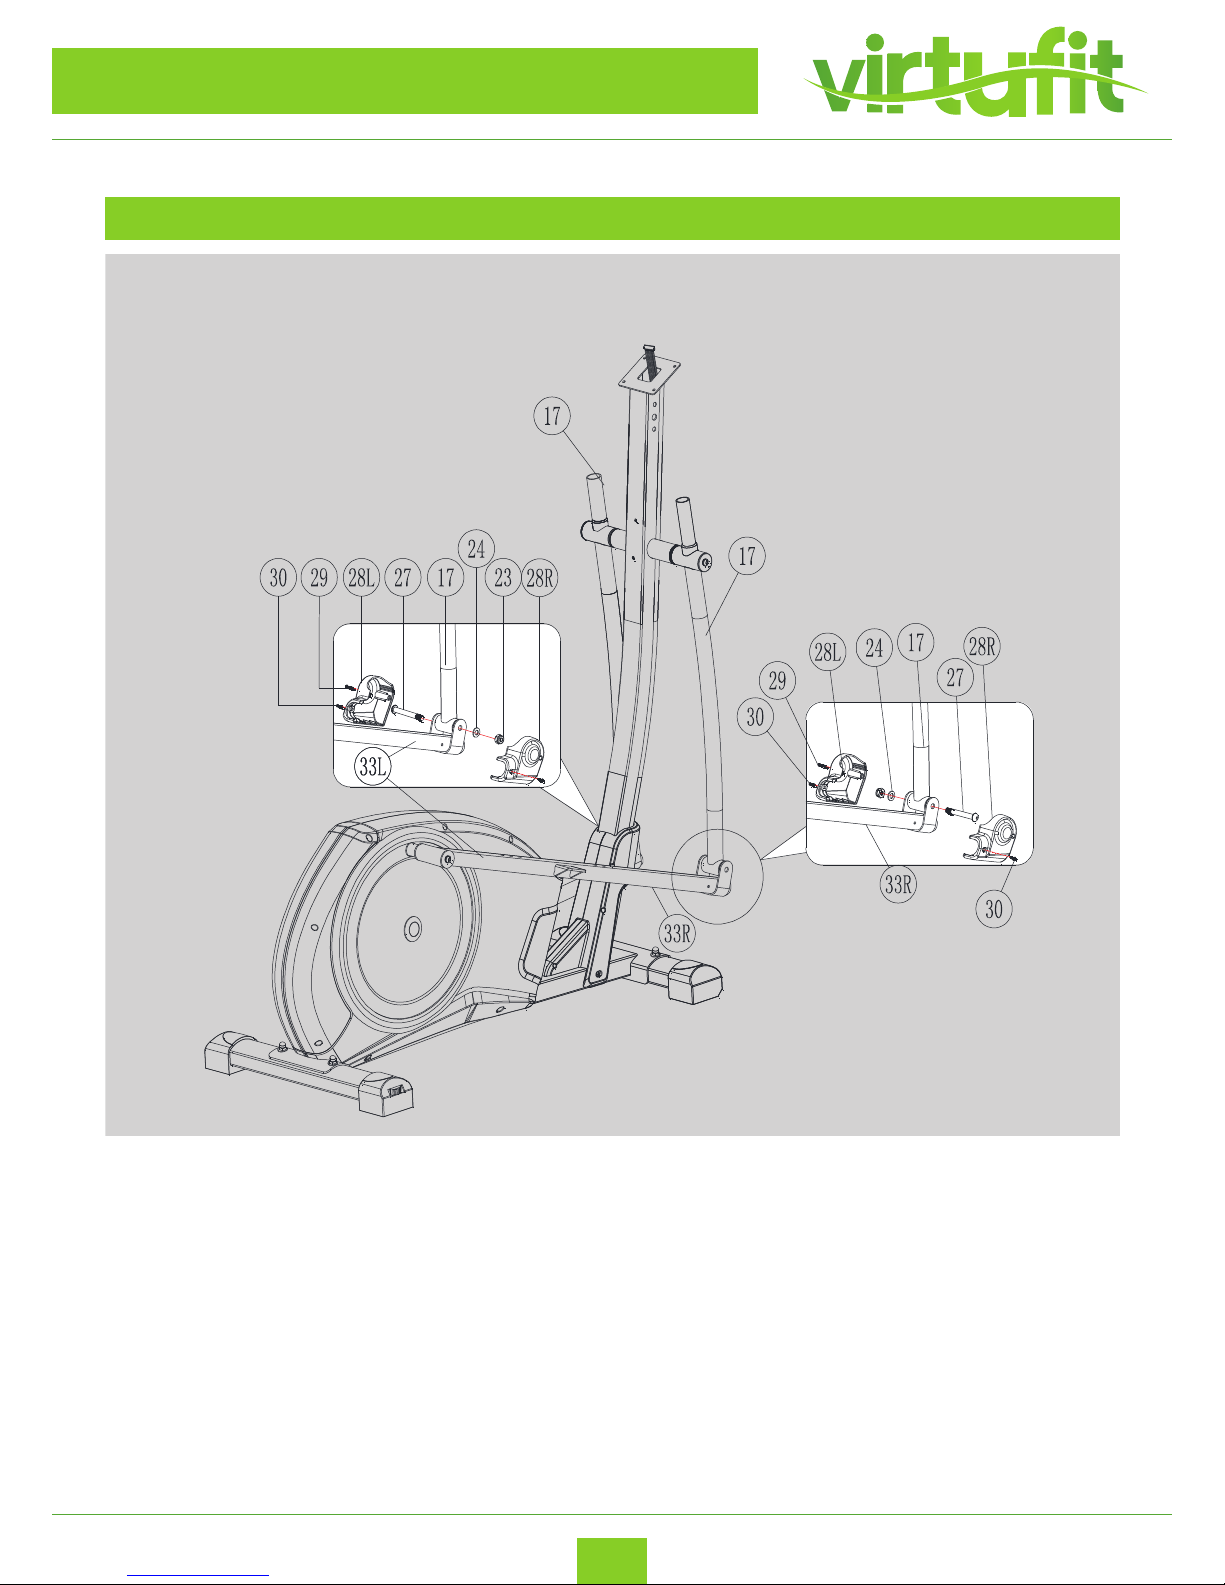
Align the footplate support bars (33L+33R) with the Lower Handle Bars (17) and attach together with M10
Allen Bolt (27), M10 Flat Washers (24) and Nylon Lock Nuts (23). Tighten fully. Attach the Plastic Covers
(28L+28R) onto the Footplate Support Bars (33L+33R) using M4 Self tapping Screws (29) and M5 Screws (30).
Align the Handlebar Post (95), So it is straight and then fully tighten the bolts.
Page 12
12
Crosstrainer iConsole CTR 2.1
ENG
ASSEMBLY INSTRUCTION
STEP 6
ASSEMBLY INSTRUCTION
STEP 6
A
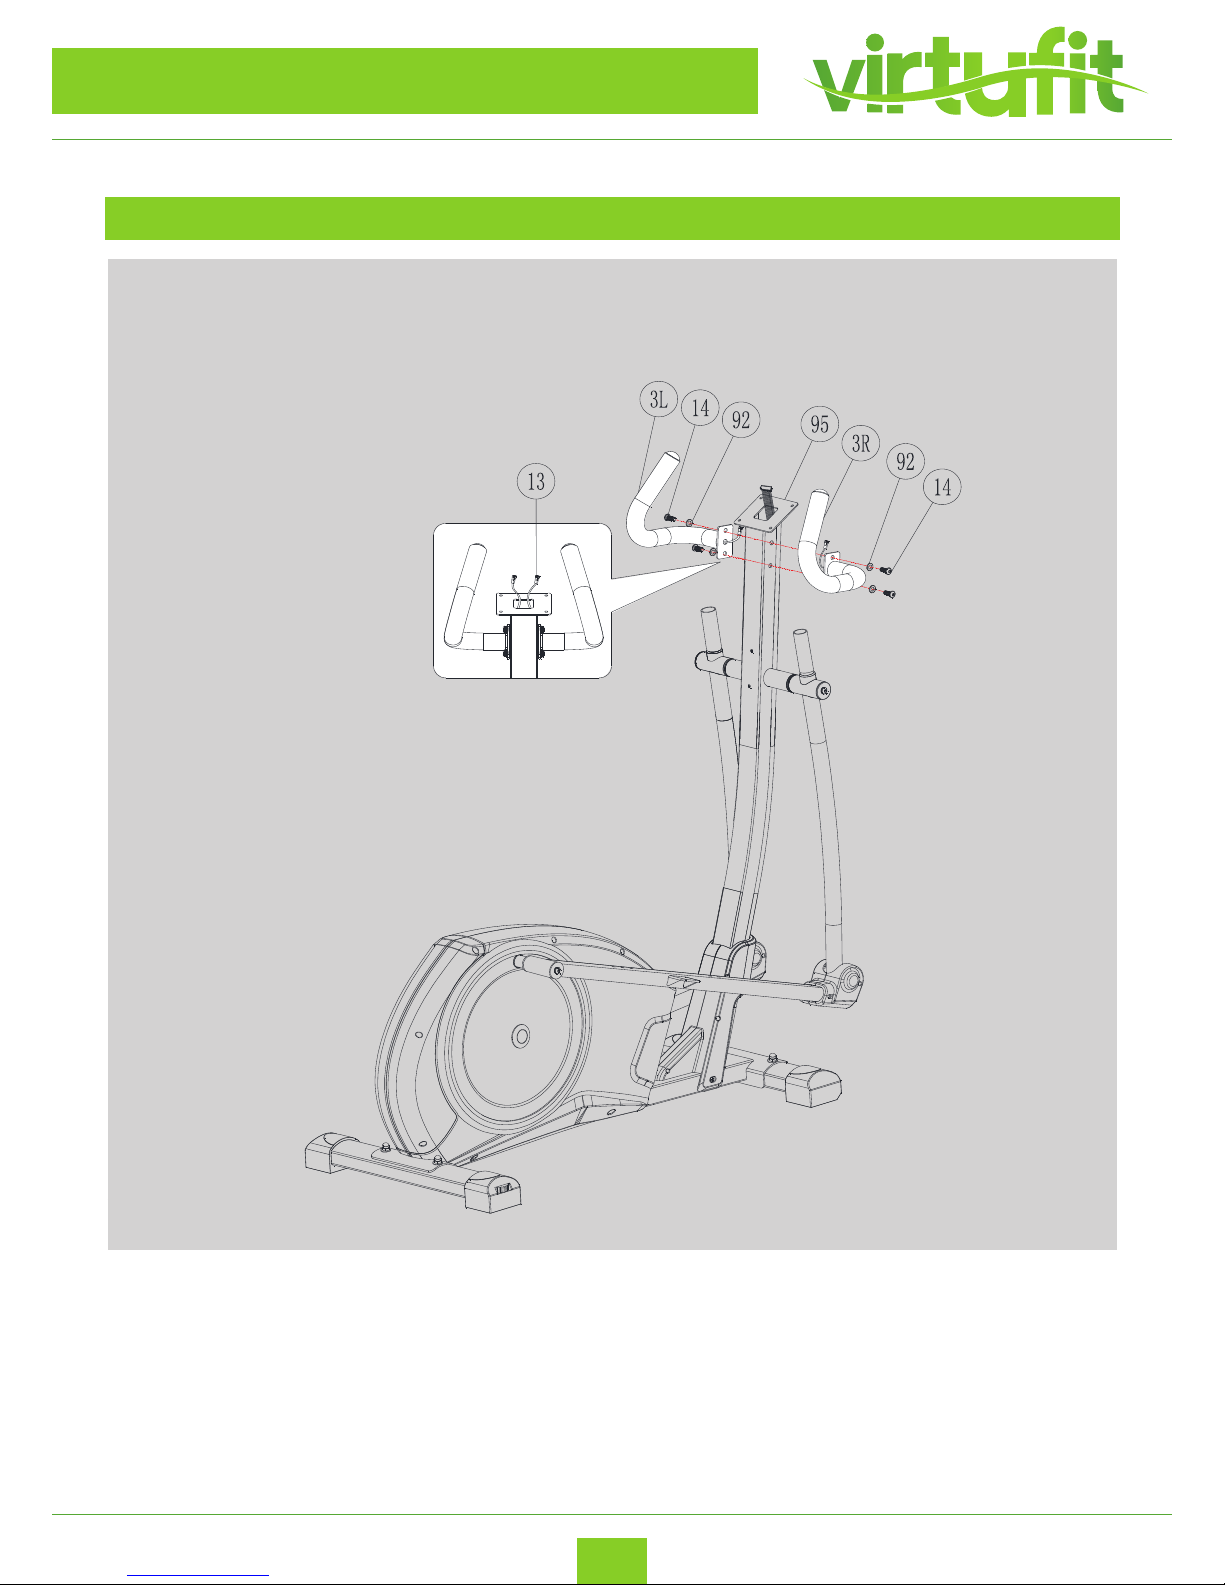
lign the footplate support bars (33L+33R) with the Lower Handle Bars (17) and attach together
with M10
Allen Bolt (27), M10 Flat Washers (24) and Nylon Lock Nuts (23). Tighten fully.
Before attach the Handlebars (3L+3R) to Handlebar Post (95), inset the hand pulse cable (13) to the hole on
Handlebar Post (95) and make sure the 2 ends be pulled and exposed on the middle top of Handlebar Post
hole.
Attach Handlebars (3L+3R) by using M8 Allen Bolt (14) and M8 Flat Washer (92) for each side. Make sure
bolts are fully tightened.
Page 13
13
Crosstrainer iConsole CTR 2.1
ENG
ASSEMBLY INSTRUCTION
STEP 7
ASSEMBLY INSTRUCTION
STEP 7
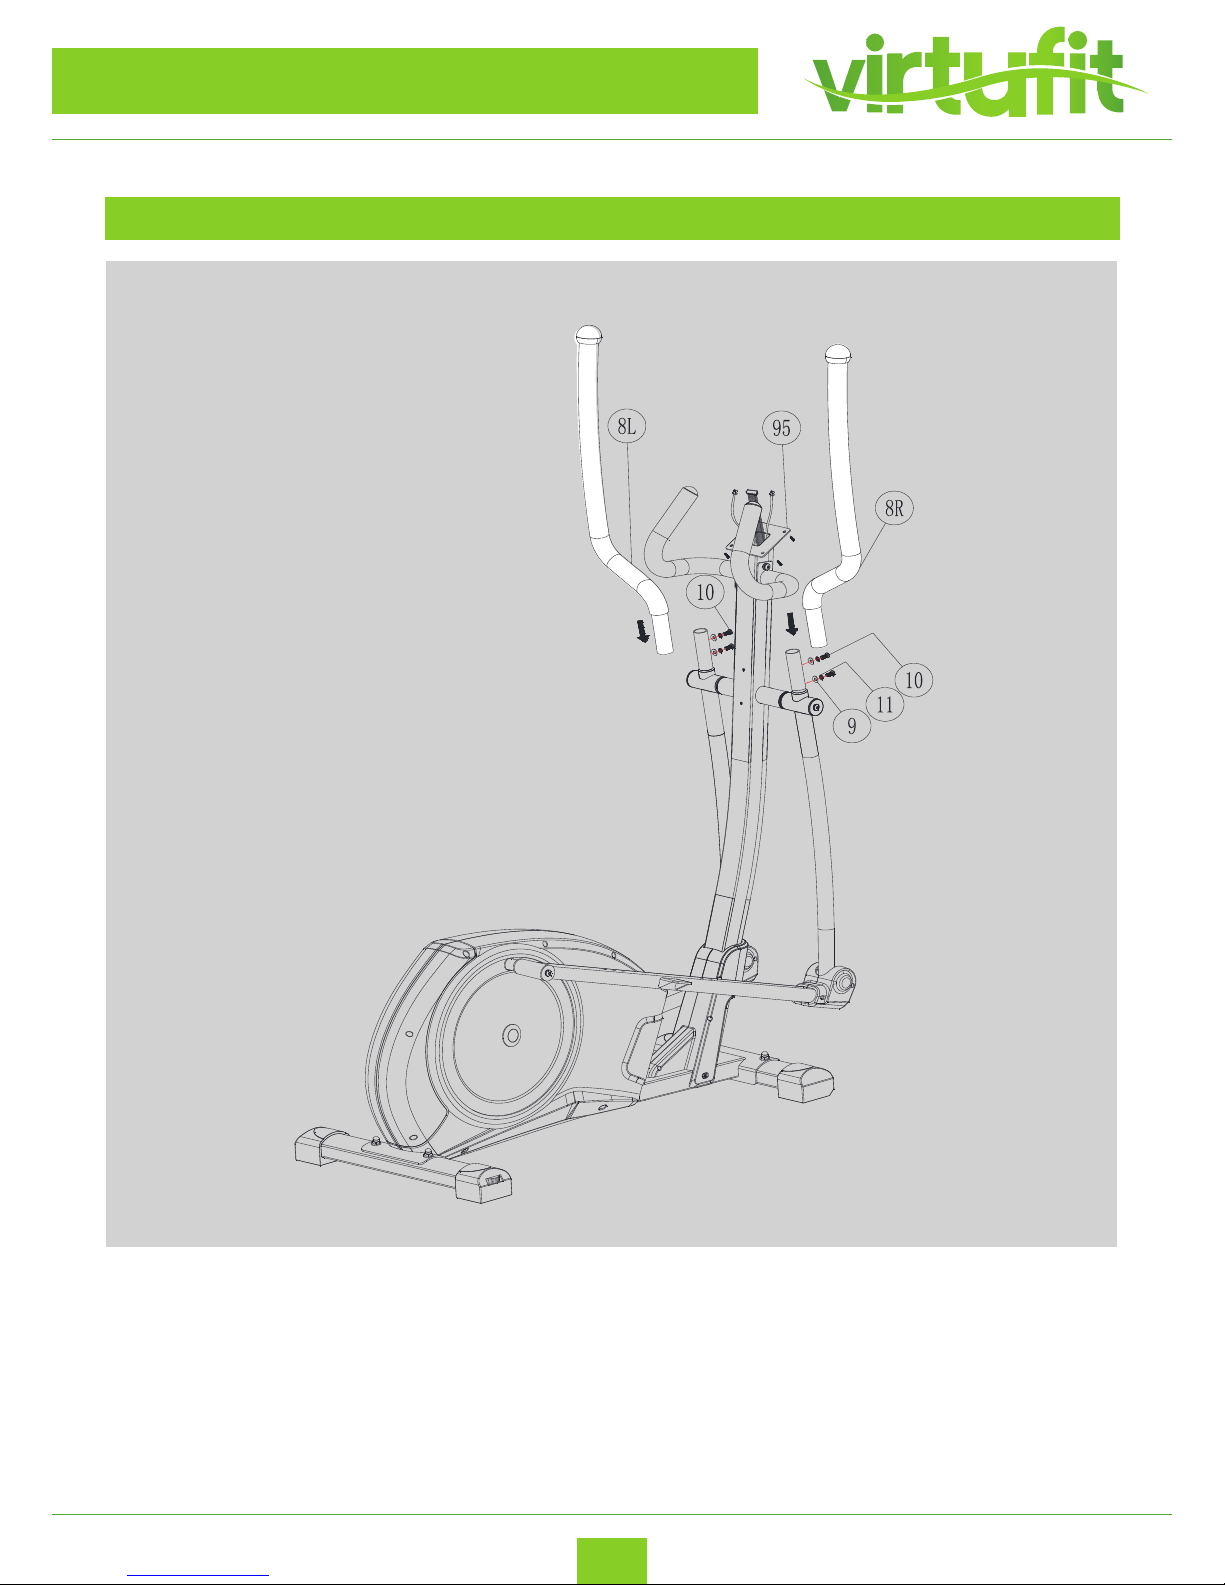
Attach the Upper Handlebar (8L+8R) onto the Lower Handlebar (17) by using M8 Allen Bolt (10), M8 Spring
Washer (11) and M8 Curved Washer (9).
Page 14
14
Crosstrainer iConsole CTR 2.1
ENG
ASSEMBLY INSTRUCTION
STEP 8
ASSEMBLY INSTRUCTION
STEP 8
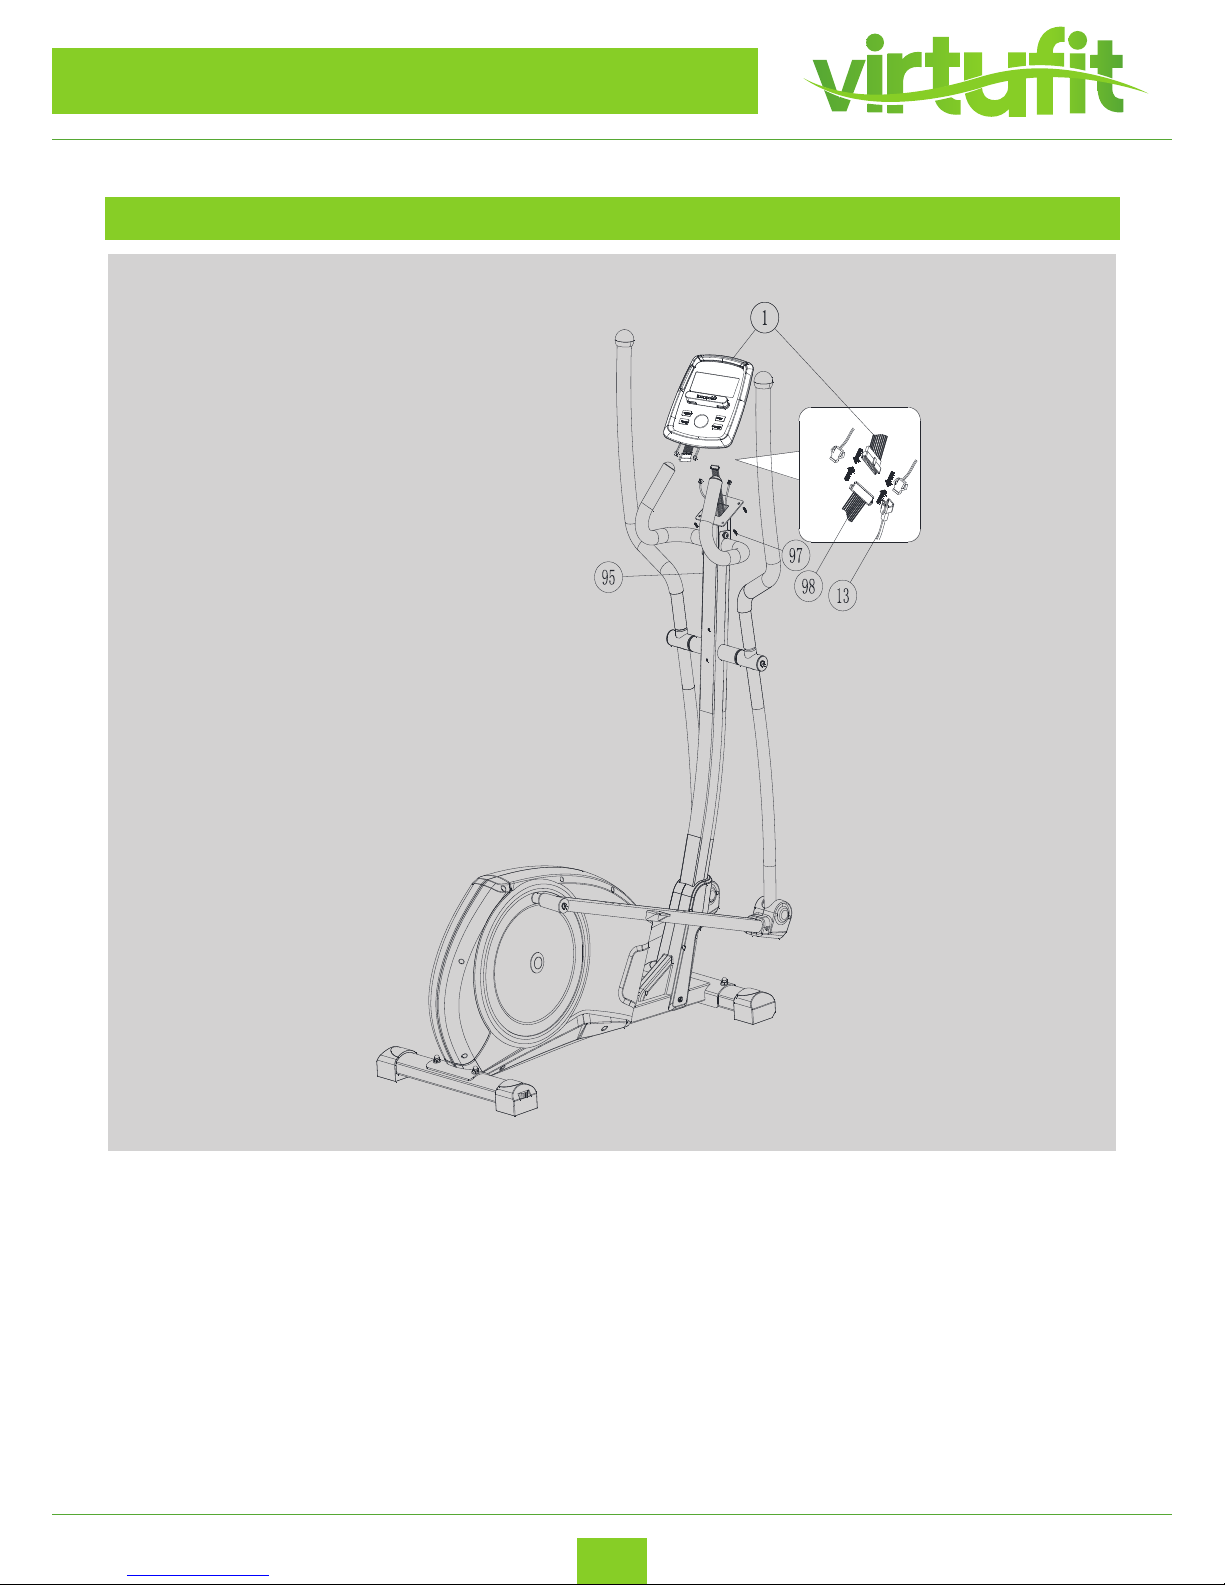
Align the Upper Tension Cable (98) on the top of Handlebar Post (95) with that on the Computer (1). Align
the Hand Pulse Cable (13) as well.
Then Secure the Computer (1) with Handlebar Post by using M5 Screws (97). Make sure all the bolts are fully
tightened.
Page 15
15
Crosstrainer iConsole CTR 2.1
ENG
ASSEMBLY INSTRUCTION
STEP 9
ASSEMBLY INSTRUCTION
STEP 9
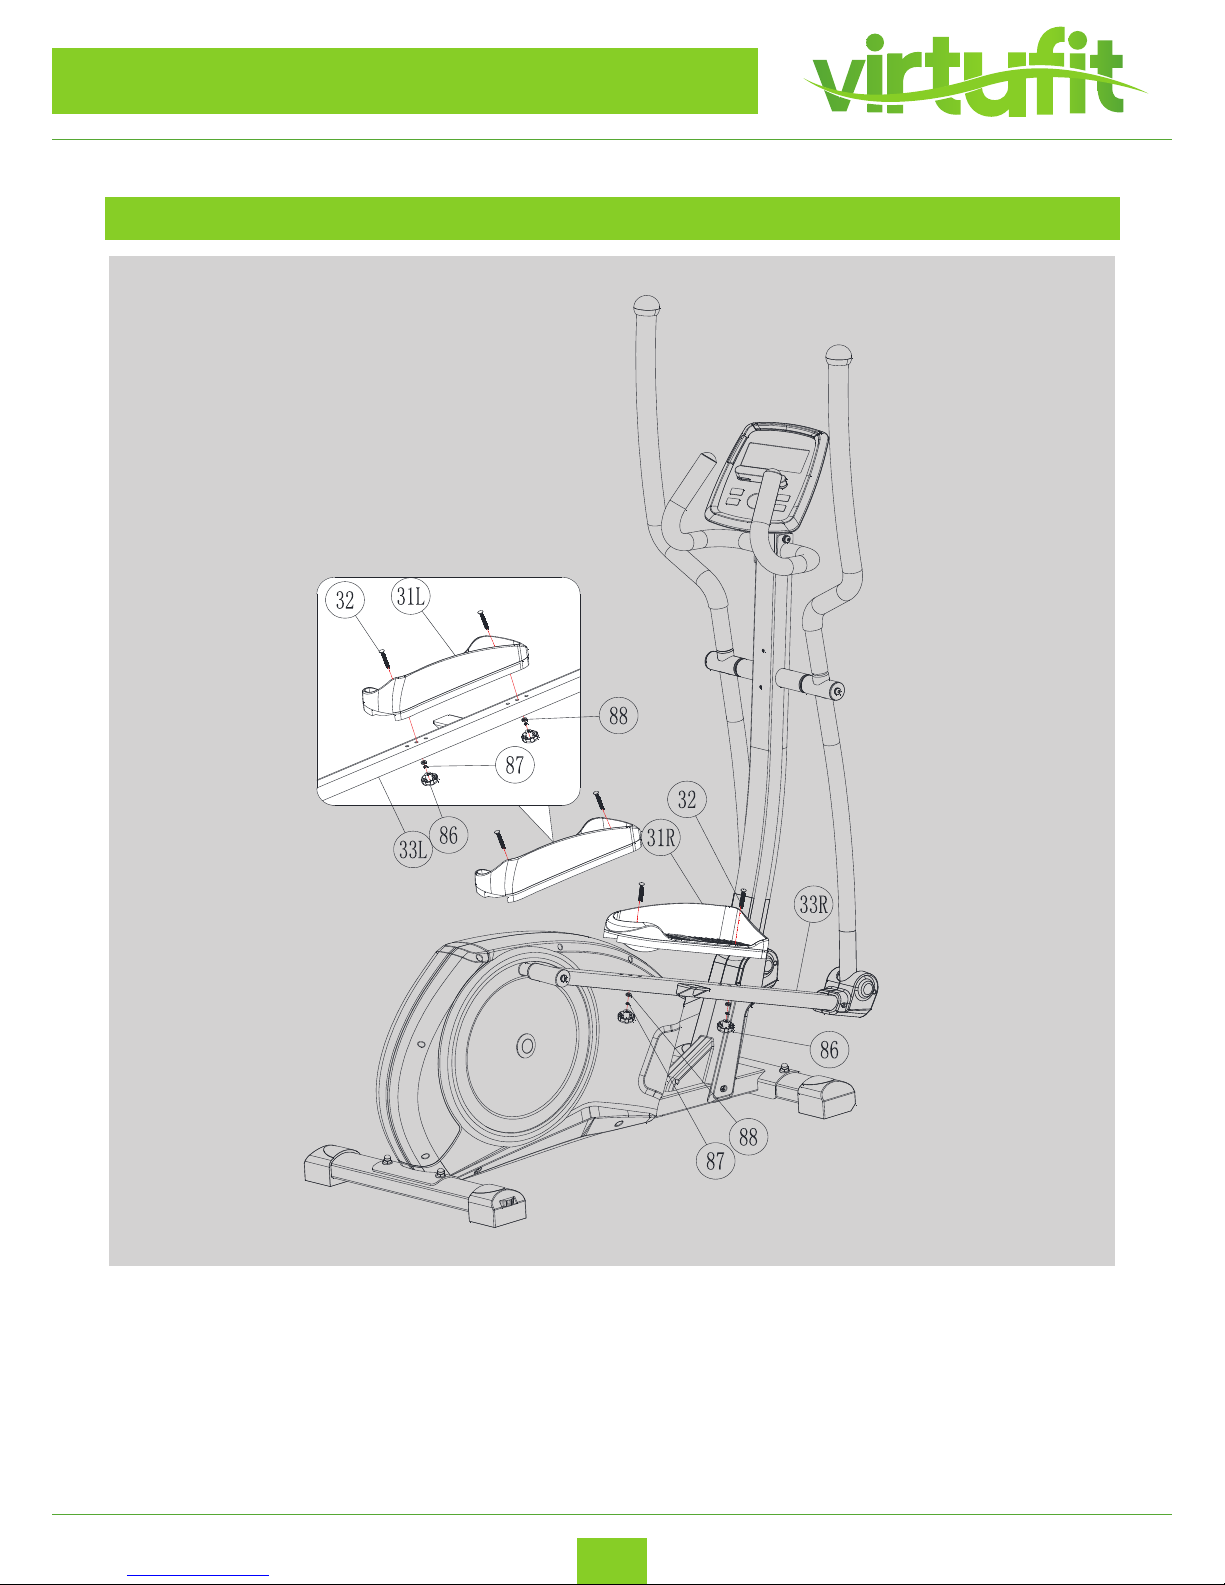
Attach the Footplate (31L+31R) onto the Foot Support Bar (33L+33R) using M6 Carriage Bolts (32), M6 Flat
Washers (88), M6 Spring Washers (87) and M6 Knob (86), tighten fully.
Page 16
16
Crosstrainer iConsole CTR 2.1
ENG
ASSEMBLY INSTRUCTION
STEP 10
ASSEMBLY INSTRUCTION
STEP 10
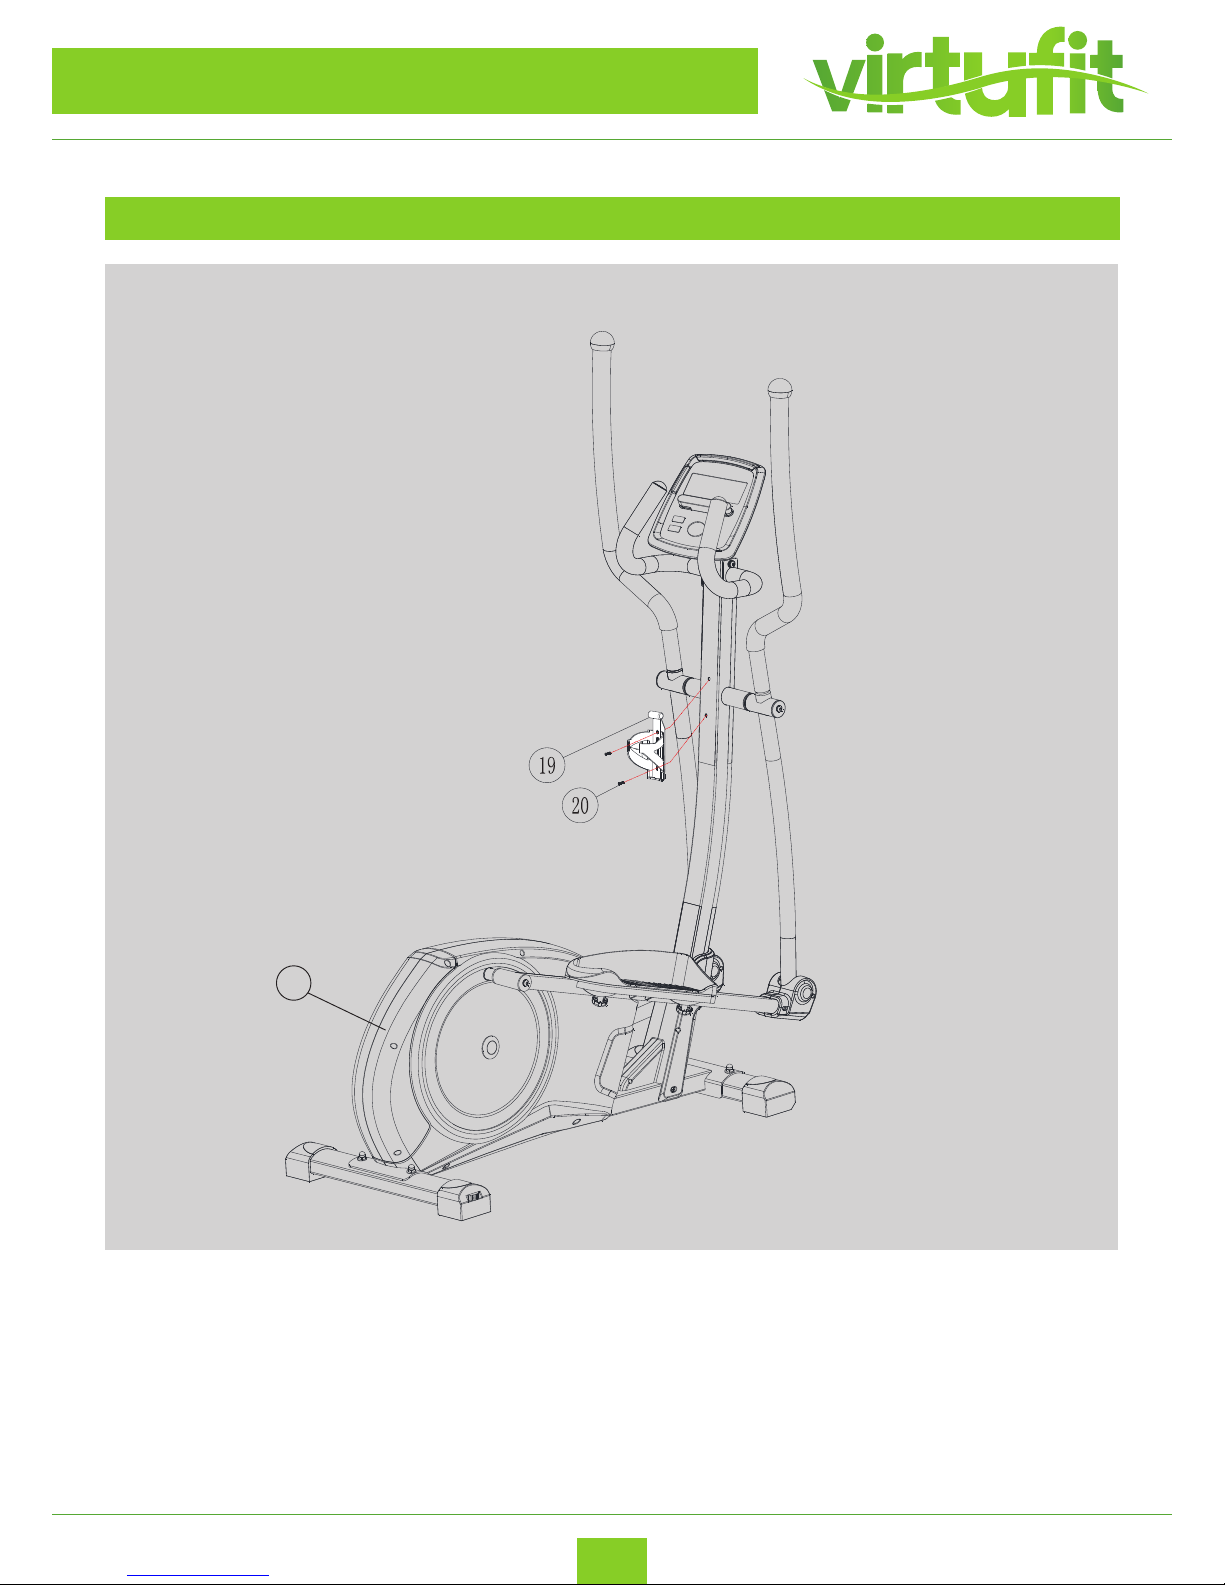
Place the water bottle holder (19) into the hole in the front by using screw m5 x 20mm (20). Connect the
adapter, the adapter input (102) is at the back of the device.
Now ready for use!
102
Page 17
17
Crosstrainer iConsole CTR 2.1
ENG
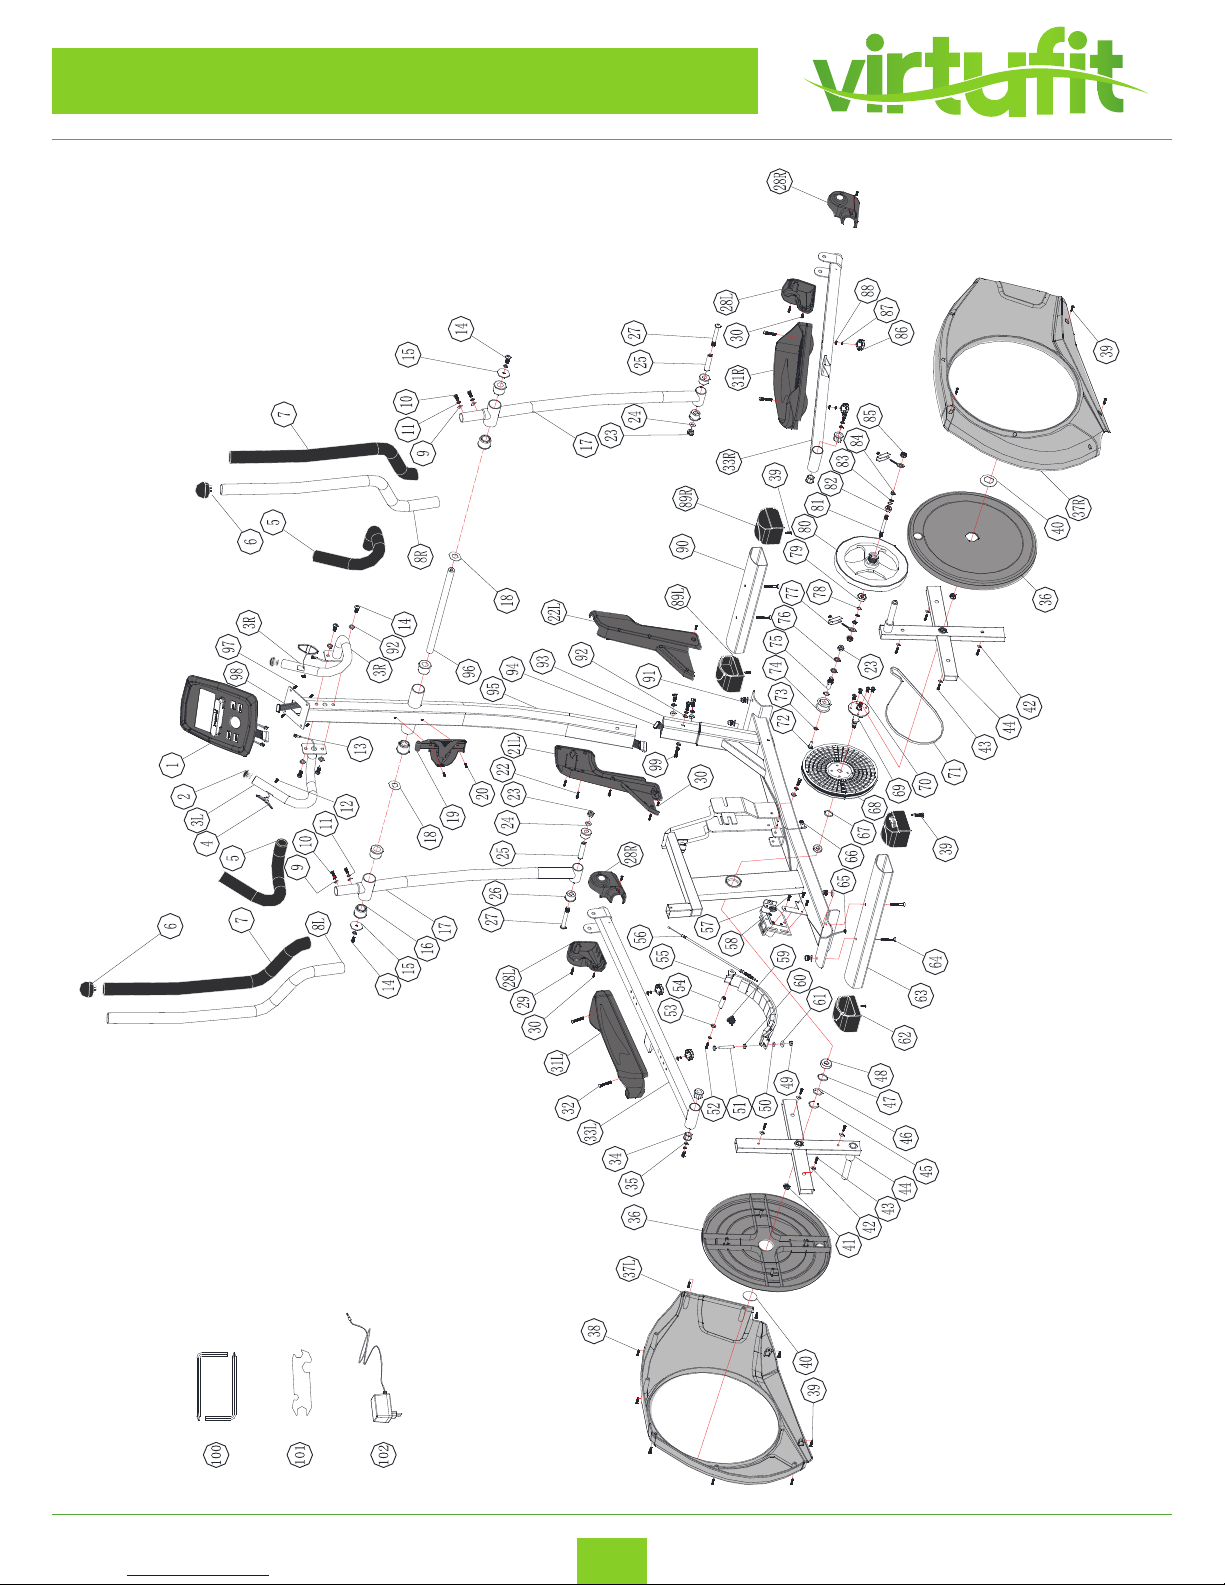
EXPLODED DRAWING
Page 18
18
Crosstrainer iConsole CTR 2.1
ENG
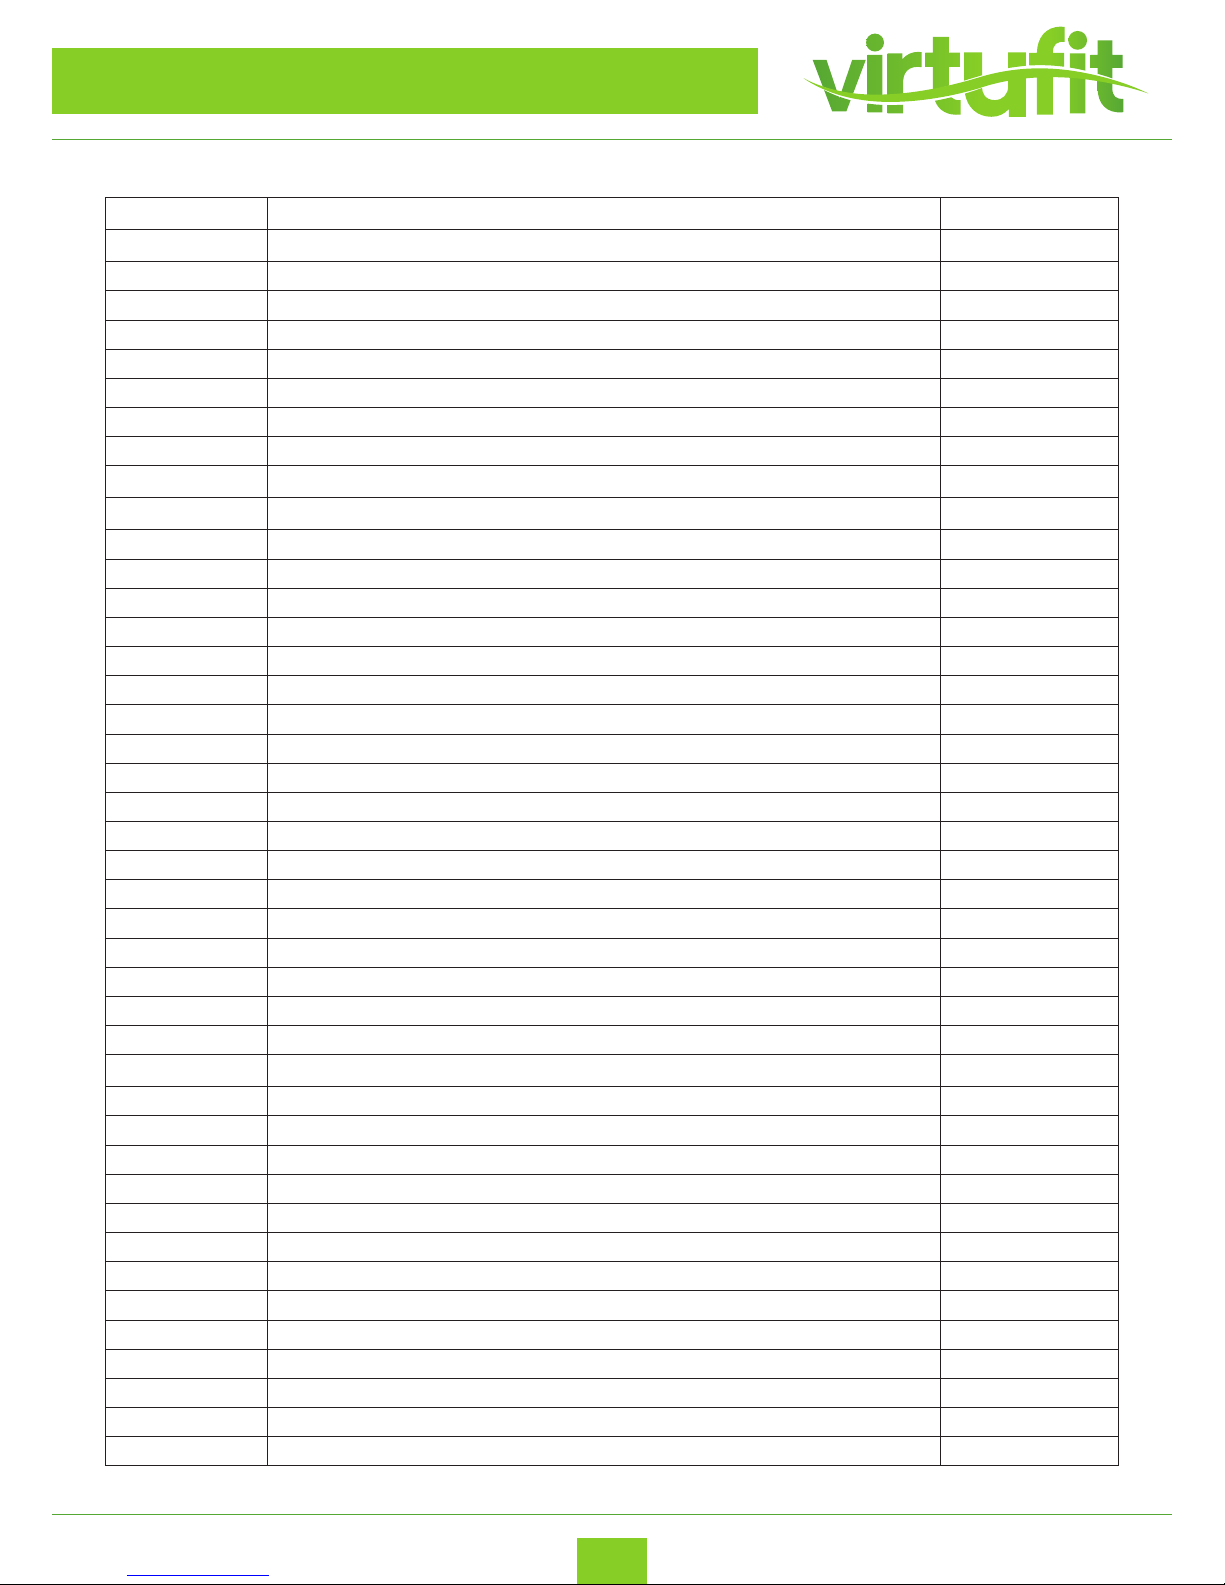
PARTS LIST
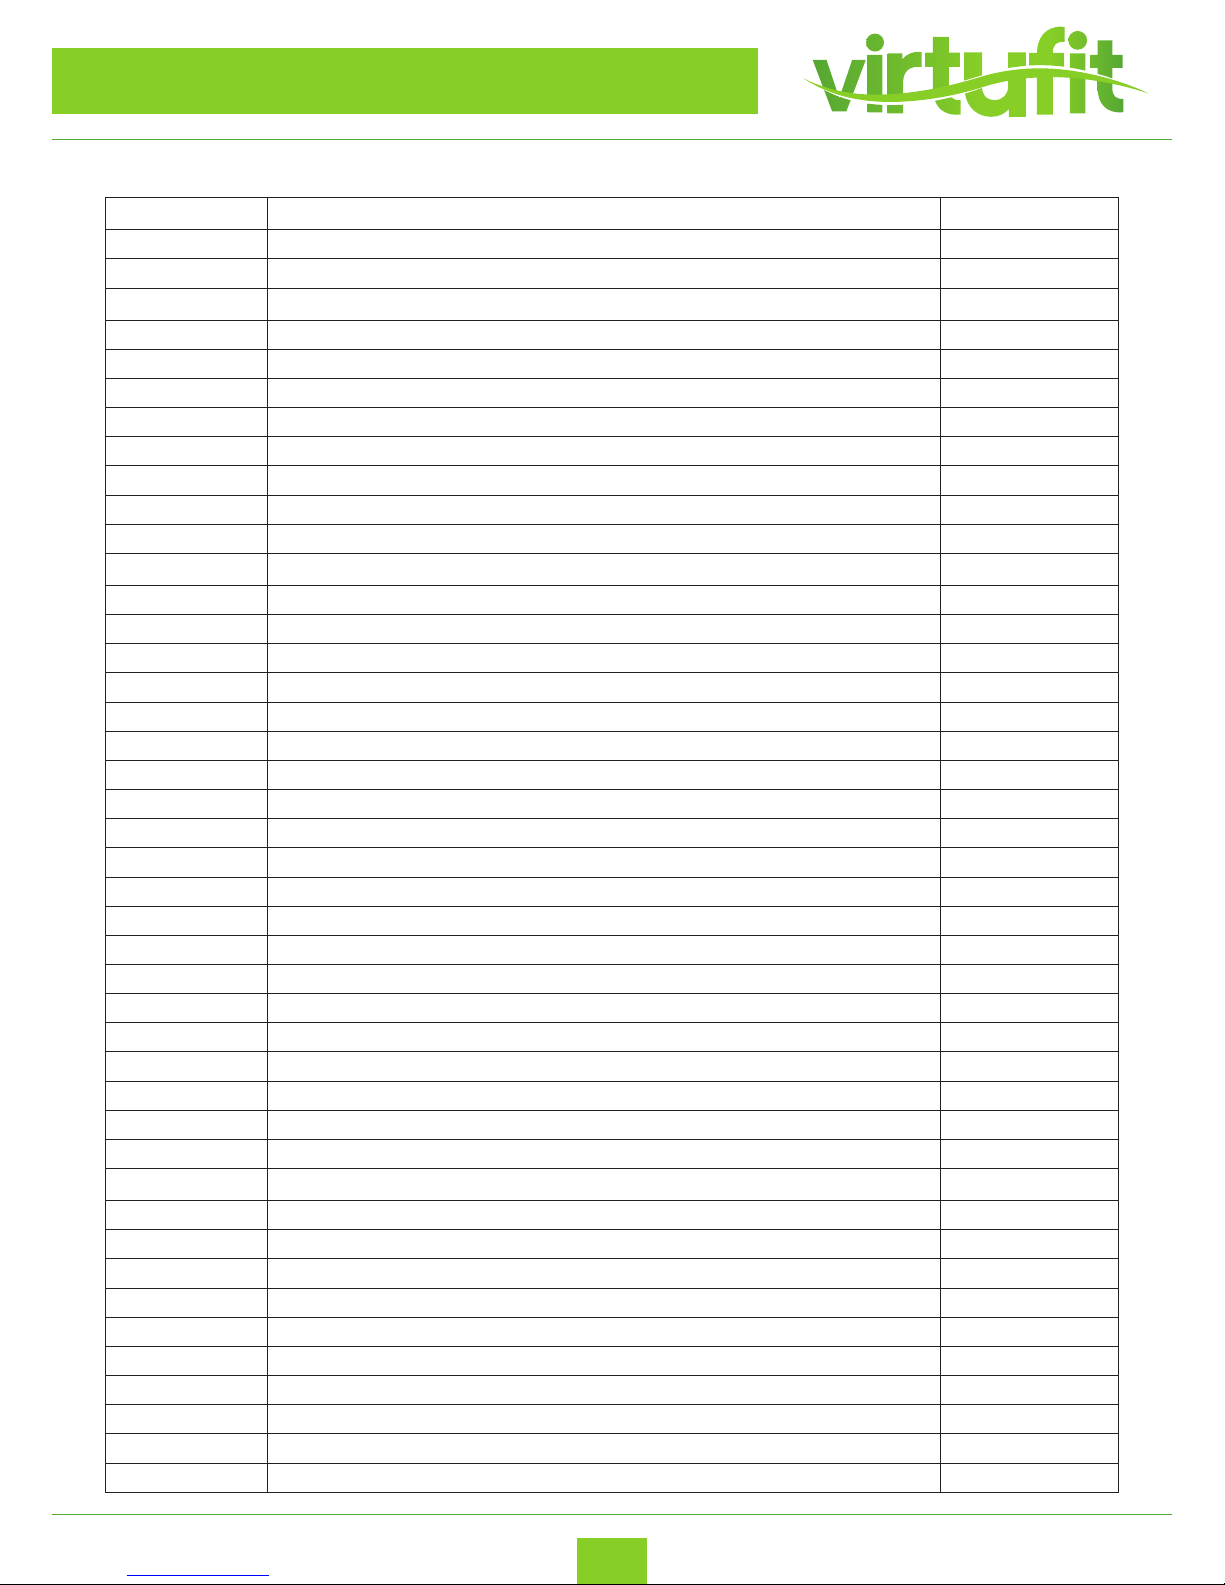
Number Description Amount
1 Computer 1
2 End cap for handlebar 2
3L Handlebar (Left) 1
3R Handlebar (Right) 1
4 Hand pulse pads 2
5 handlebar foam 2
6 End cap for upper handlebar 2
7 Upper handlebar foam 2
8L Upper handlebar (Left) 1
8R Upper handlebar (Right) 1
9 Curved washer M8 10
10 Allen bolt M8*20 4
11 Spring washer M8 12
12 Self-tapping screw M3.5*20 2
13 Hand Pulse cable 2
14 Allen bolt M8*20 8
15 Flat washer Φ8.5*Φ36*3T 2
16 Handlebar pivot bushes 6
17 Lower handlebar 2
18 Flat washer Φ19.5*Φ38*0.5T 2
19 Water bottle holder 1
20 Screw M5*20 1
21L Front bottom plastic cover (Left) 1
21R Front bottom plastic cover (Right) 1
22 Self-tapping screw M3*15 1
23 Nylon lock nut M10 3
24 Flat washer M10*19*2 2
25 Tube spacer 14*59.5 2
26 Handlebar lower pivot bushes 4
27 Allen bolt M10*78 2
28L Plastic cover for foot support bar(Left) 2
28R Plastic cover for foot support bar(Right) 2
29 Self-tapping screw M4*15 5
30 Screw M5*15 6
31L Footplate (Left) 1
31R Footplate (Right) 1
32 Carriage bolt M6*50 4
33L Foot support bar (Left) 1
33R Foot support bar (Right) 1
34 Bushing 4
35 Flat washer 8*28*2T 2
36 Round cover 2
Page 19
19
Crosstrainer iConsole CTR 2.1
ENG
PARTS LIST
Nummer Omschrijving Aantal
37L Chain cover (Left) 1
37R Chain cover (Right) 1
38 Self-tapping screw M4.5*25 6
39 Screw M5*15 10
40 Plastic cover 2
41 Nut M10*1.25 2
42 Washer 5*16*1 8
43 Self-tapping screw M4*15 8
44 Crank 2 2
45 C-shape washer Φ18 1
46 Waved washer Φ20.5*25*0.5T 1
47 Washer 20*25*1 1
48 Bearing 6004RS 2
49 Nut M6 1
50 Flat washer 6.5*19*1.5T 1
51 Hex head screw M6*75 1
52 Allen head screw M6*16 2
53 Flat washer 6*13*1.5T 2
54 Axle for magnet holder 1
55 Magnet set 1
56 Cable 1
57 Motor 1
58 Screw M5*15 5
59 Tapered spring 1
60 Nut M6 1
61 Plastic washer 6.5*22*1.5T 1
62 Rear end cap 2
63 Rear stabilizer 1
64 Carriage bolt M8*55 4
65 DC line 1
66 Sensor 1
67 Washer 20*25*2 1
68 Belt wheel 1
69 Pedal Axle 1
70 Anti-loose Allen bolt M8*12 4
71 Belt 1
72 Hex head screw M6*12 1
73 Flat washer 6*13*1T 1
74 Idler 1
75 Axle for Idler 1
76 Flat washer 10*19*1.5 2
77 Belt adjustment set 2 sets
78 Waved washer Φ10*15*0.3T 2
Page 20

20
Crosstrainer iConsole CTR 2.1
ENG
PARTS LIST
Nummer Omschrijving Aantal
79 Bearing 6300RS 1
80 Flywheel 1
81 Flywheel Axle 1
82 Bearing 6000RS 1
83 C-shape washer Φ9 2
84 Hex nut M10*1.25*4T 2
85 Nut M10*1.25 2
86 Knob M6 4
87 Spring washer M6 6
88 Flat washer 6*16*2 4
89L End cap for front stabilizer (Left) 1
89R End cap for front stabilizer (Right) 1
90 Front Stabilizer 1
91 Cap nut M8 4
92 Flat washer 8*19*1.5T 6
93 Main frame 1
94 Lower tension cable 1
95 Handlebar post 1
96 Rotation rod 1
97 Screw for computer M5*12 4
98 Upper tension cable 1
99 Hex bolt M8*20 4
100 Allen key wrench with phillips head 2
101 Combination wrench 1
102 Adapter 1
Page 21
21
Crosstrainer iConsole CTR 2.1
ENG
COMPUTER INSTRUCTION
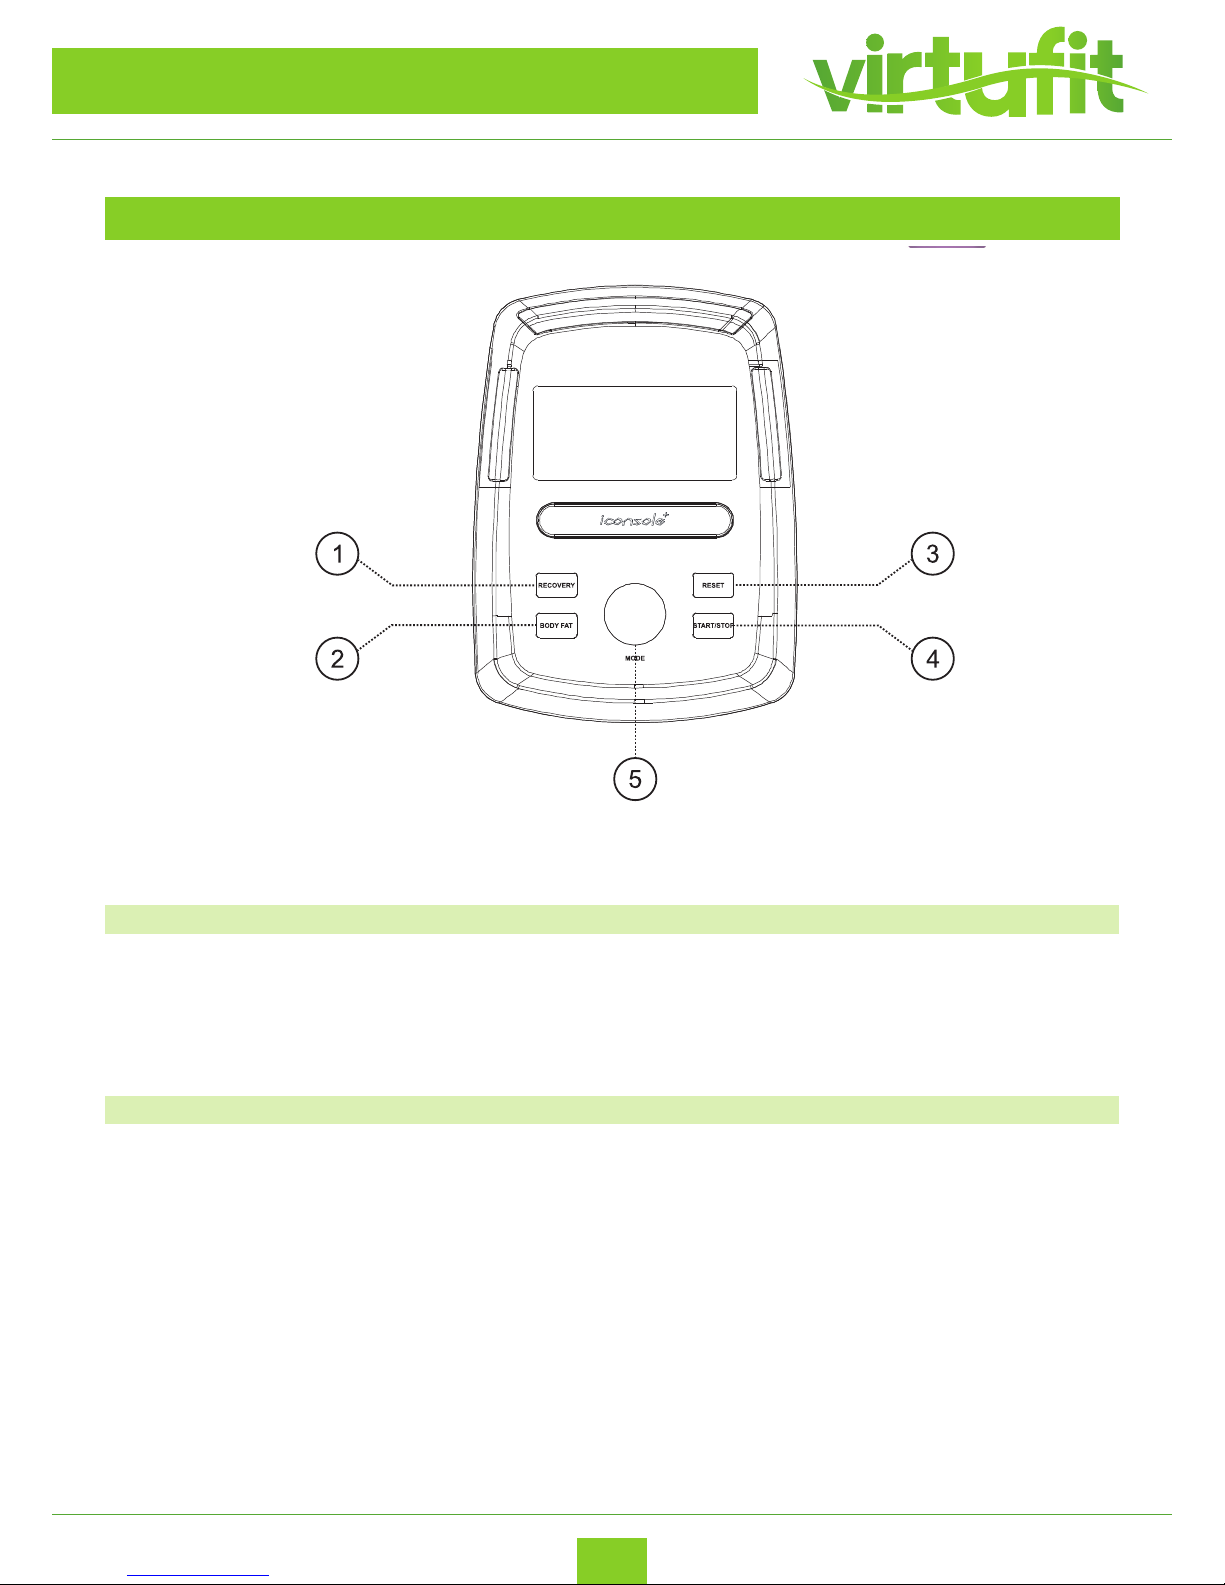
KEY FUNCTION
COMPUTERHANDLEIDING
1. Recovery Test heart rate recovery status.
2. Body fat Test body fat% and BMI.
3. Reset - Hold on pressing for 2 seconds, computer will
reboot and start from user setting.
- Reverse to main menu during presetting workout
value or stop mode.
4. Start/ Stop Start or Stop workout.
5. Encoder - Increase / Decrease Value.
- Con rm / Setting selection.
Page 22

22
Crosstrainer iConsole CTR 2.1
ENG
COMPUTER INSTRUCTION
DISPLAY FUNCTION BUTTON
TIME Workout time displayed during exercise.
Range 0:00 ~ 99:59
SPEED Workout speed displayed during exercise.
Range 0.0 ~ 99.9
DISTANCE Workout distance displayed during exercise.
Range 0.0 ~ 99.9
CALORIES Burned calories during workout display.
Range 0 ~ 999
PULSE Pulse bpm displayed during exercise.
Pulse alarm when over preset target pulse.
RPM Rotation per minute
Range 0 ~ 999
WATT Workout power consumption
In Watt Program mode, computer will remain preset
watt value (setting range 0~350)
MANUAL Manual mode workout.
PROGRAM 12 PROGRAM selections.
USER User creates resistance level pro le.
H.R.C. Target HR training mode.
RECOVERY Heart rate recovery status
BODY FAT Body fat measurement.
WATTS Workout power consumption.
Range 10 ~ 350.
Page 23
23
Crosstrainer iConsole CTR 2.1
ENG
COMPUTER INSTRUCTION
OPERATION
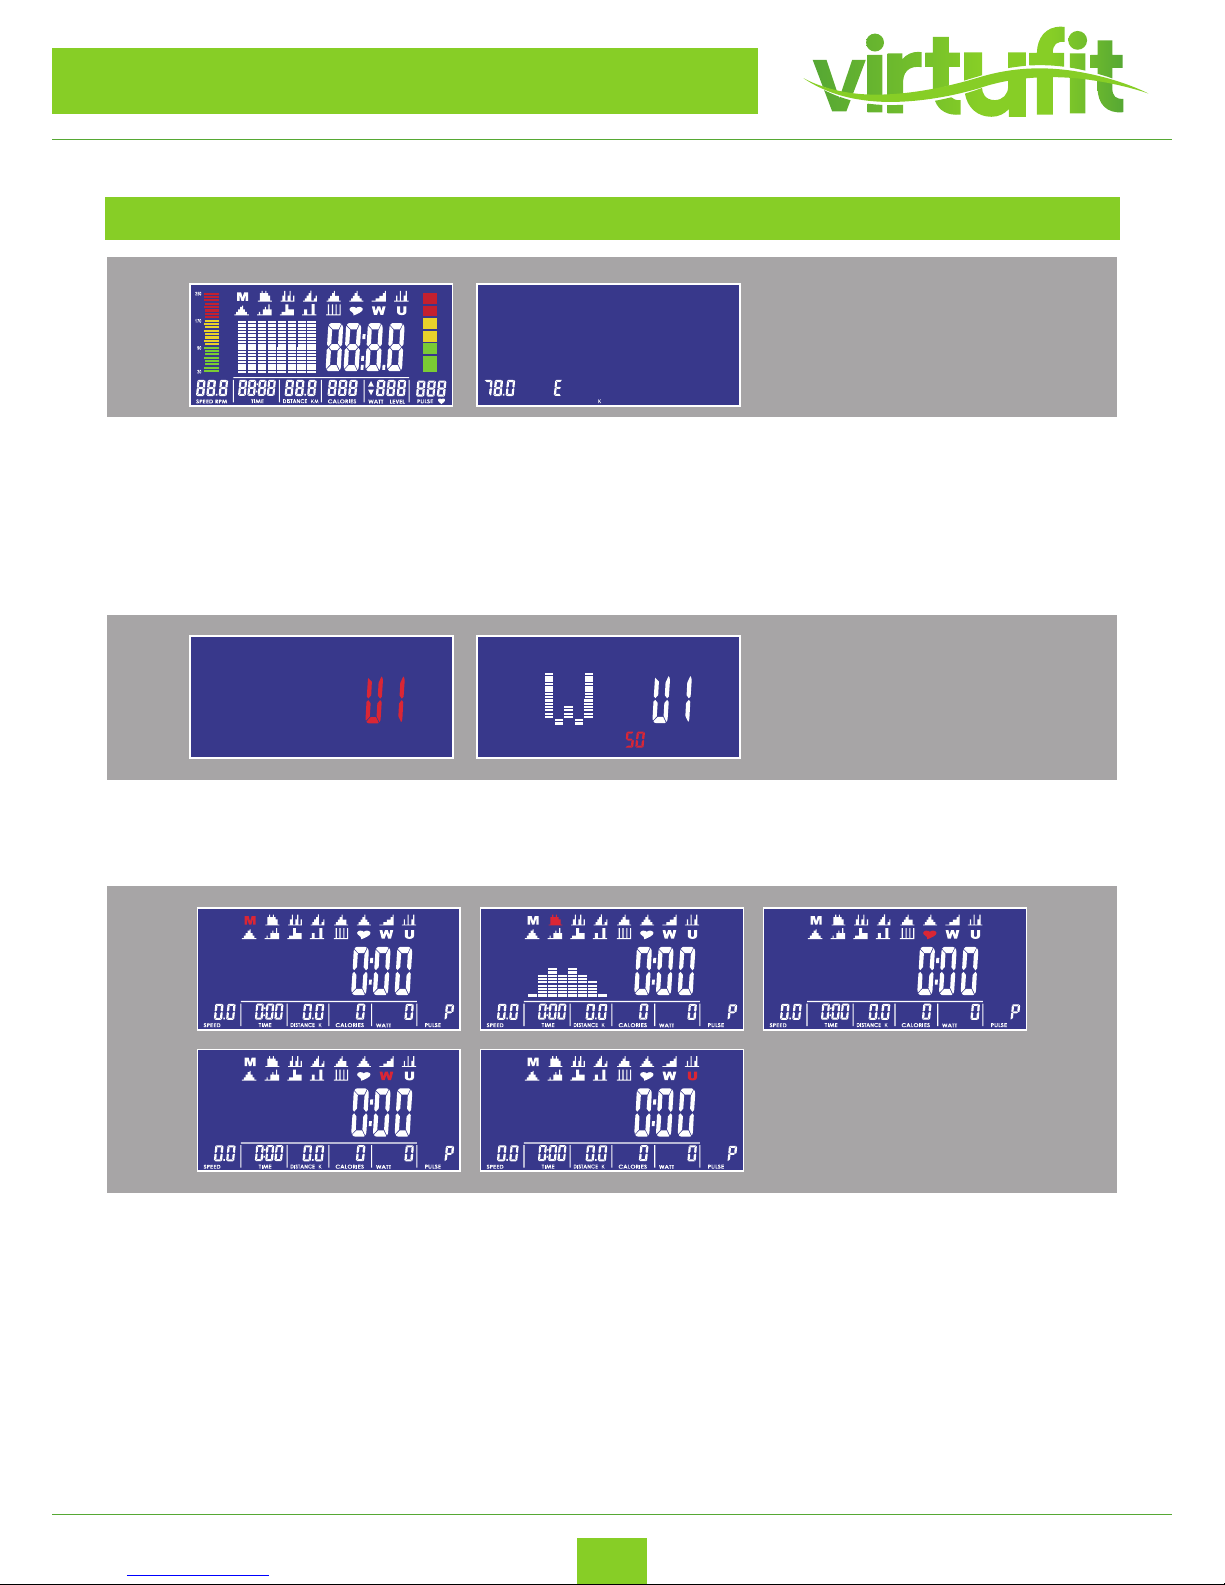
1. Plug in power supply (or Holding press RESET KEY for 2 seconds), buzzer would make a sound and
display all segments on LCD for 2 seconds.
Then wheel diameter value would display in SPEED area and European specication would
display “E”
3. Turning and pressing encoder can enter Entering setting mode, the M (Manual) would ash in
the matrix display with 1HZ. Turning the encoder can choose M(Manual), P(Program),
♥ (H.R.C.),
W(Watt), U(User) cyclically.
2. Turning and pressing encoder can enter USER setting (with BODY FAT function), setting personal
date in U1~U4. Then entering work out section.
WERKING
50%
70%
80%
Max
65%
75%
50%
70%
80%
Max
65%
75%
WERKING
1. Steek de stekker in het stopcontact (of houd RESET KNOP 2 seconden in), zoemer maakt geluidje en
gehele display licht op gedurende 2 seconden.
De diameter van het wiel komt bij SPEED te staan en de Europese specificatie laat "E" zien, de
Aziatische specificatie "A" bij TIME & KM (K) / ML (M) DISTANCE tekst zal verschijnen aan de
rechterkant. Als u de instellingenmodus ingaat , ongeacht de motor,
zal het omdraaien en naar 0 gaan en daarna naar LOAD = 1, wacht voor elke instelling.
50%
70%
80%
Max
65%
75%
50%
70%
80%
Max
65%
75%
2. Met draaien en drukken op de encoder gaat u naar USER setting (met lichaamsvet functie), waar
u uw eigen datum in kunt vullen op U1~U4. Daarna gaat u naar de workout.
WERKING
1. Steek de stekker in het stopcontact (of houd RESET KNOP 2 seconden in), zoemer maakt geluidje en
gehele display licht op gedurende 2 seconden.
De diameter van het wiel komt bij SPEED te staan en de Europese specificatie laat "E" zien, de
Aziatische specificatie "A" bij TIME & KM (K) / ML (M) DISTANCE tekst zal verschijnen aan de
rechterkant. Als u de instellingenmodus ingaat , ongeacht de motor,
zal het omdraaien en naar 0 gaan en daarna naar LOAD = 1, wacht voor elke instelling.
50%
70%
80%
Max
65%
75%
50%
70%
80%
Max
65%
75%
Page 24
24
Crosstrainer iConsole CTR 2.1
ENG
COMPUTER INSTRUCTION
OPERATION
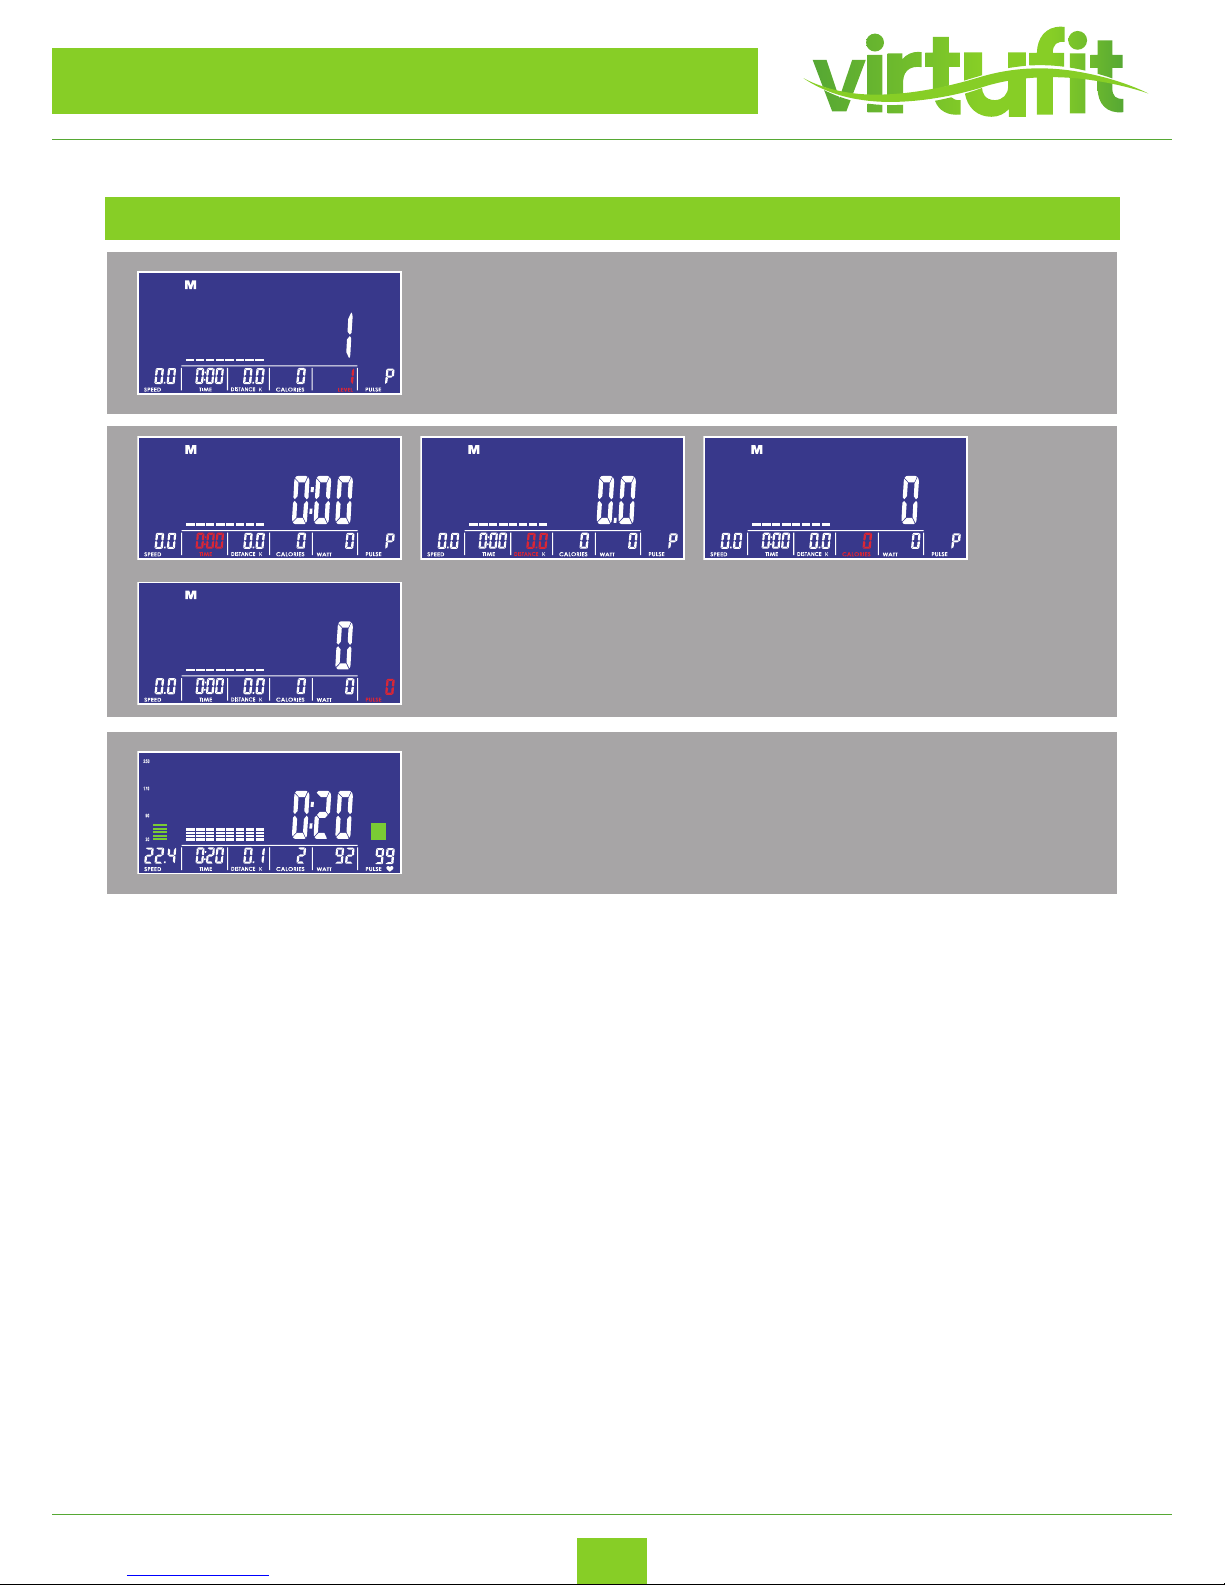
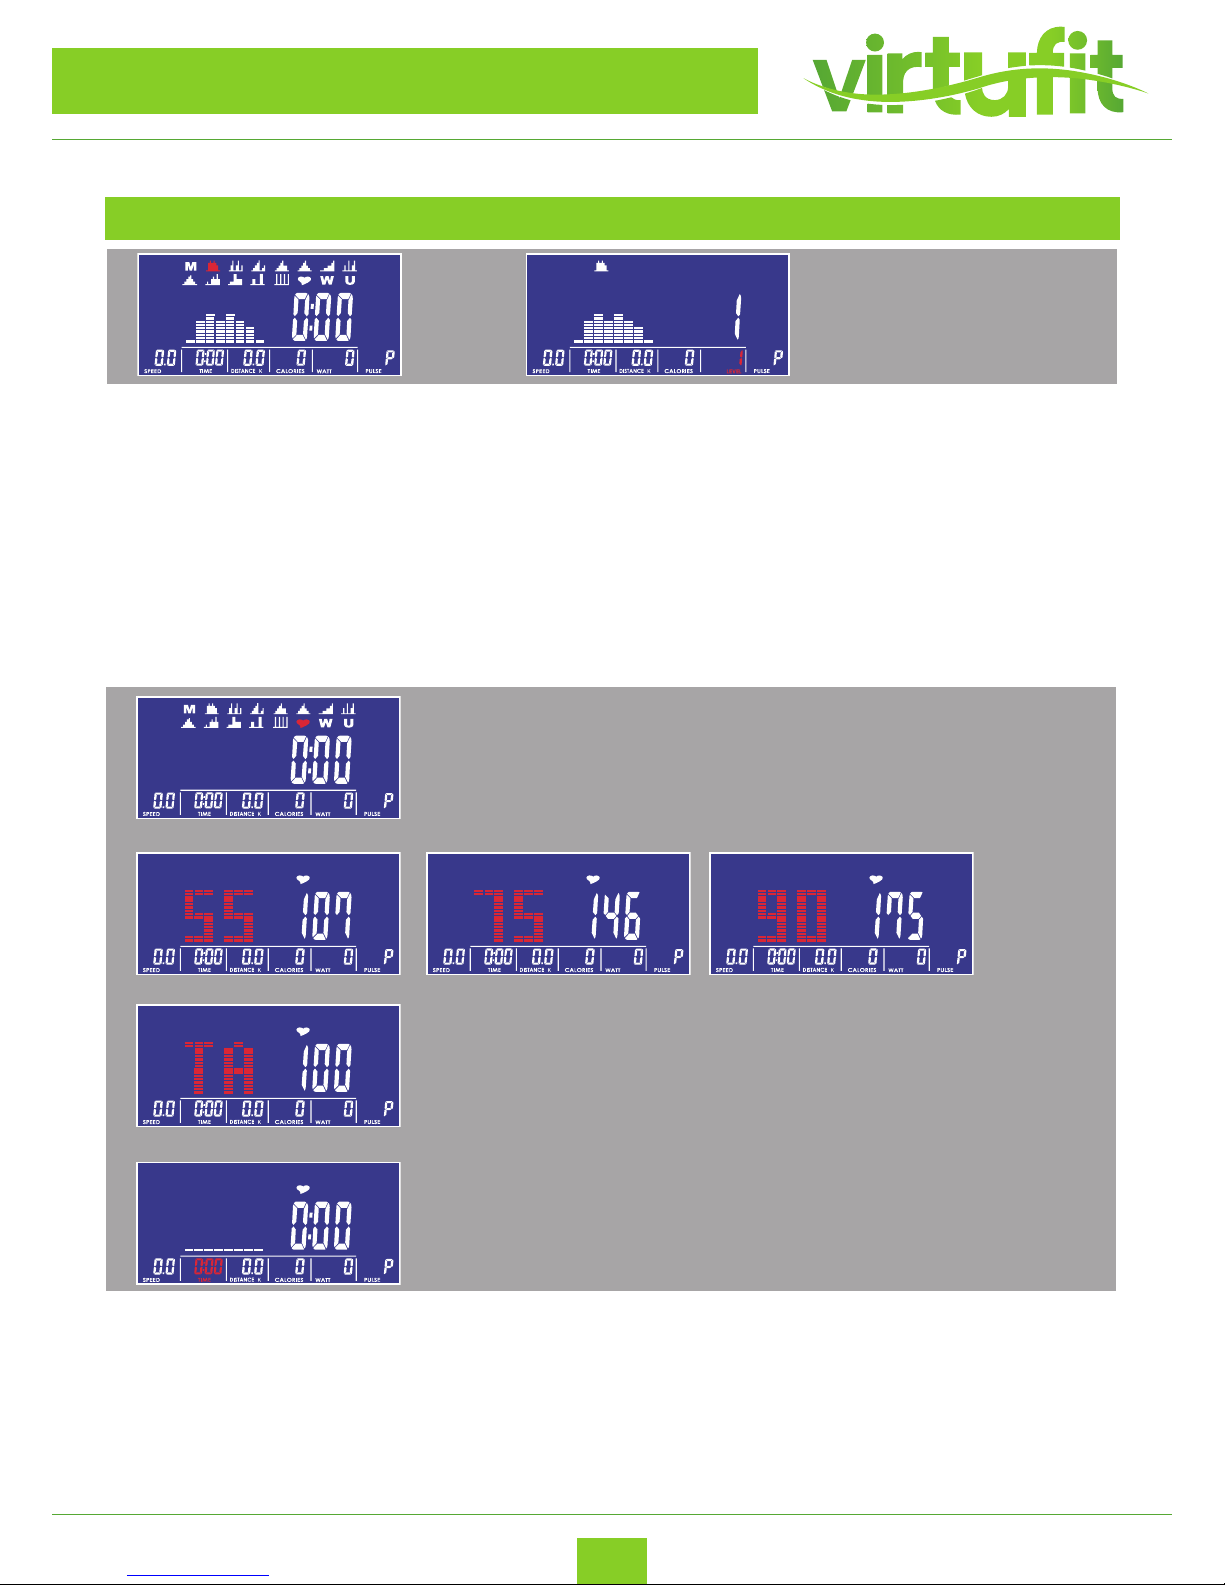
4. Manual Mode
(1) Turning and pressing encoder can adjust the LEVEL value which would ash until setting down. The
default value is LEVEL 1. (see g. 4-1)
(2) The value is not running cyclically as adjusting.
(3) After START user still can adjust MANUAL LEVEL and matrix display LEVEL and value. In three seconds
without any entry then would display WATT value.
(4) Turning and pressing encoder can adjust other values (as TIME, DISTANCE, CALORIES, PULSE) those
values would run cyclically. (see g. 4-2)
(5) After START only can operate the function. RPM BAR and PULSE BAR values would change. Pressing
STOP KEY could stop and all values would remain (HR signal would not eect). Pressing RESET KEY could
return to PROGRAM SELECT. (see g. 4-3)
50%
70%
80%
Max
65%
75%
4-1
4-2
4-3
Page 25
25
Crosstrainer iConsole CTR 2.1
ENG
COMPUTER INSTRUCTION
OPERATION
5. Program Mode
(1) Turning and pressing encoder can selecting P01,P02,P03,P04......,P12 in PROGRAM MODE. The PRO
GRAM gure would ash until setting down.
(2) The PROGRAM gures would display dierently as selecting.
(3) After setting TIME pressing START KEY to start program. After START user still can adjust LEVEL and
matrix display LEVEL and value. In three seconds without any entry then would display WATT value.
6. H.R.C Mode
(1) User can select 55%, 75%, 90% and TARGET value by turning and pressing encoder to conrm.
During selecting the default value, which is calculated by age, would ash.
(2) After setting TIME pressing START KEY to start program.
5. Programma modus
(1) Door aan de knop te draaien wisselt u tussen P01,P02,P03,P04……,P12 in PROGRAM
MODE.
Het PROGRAM logo zal knipperen totdat deze bevestigd is.
(2) Het PROGRAM logo verschijnt verschillend tijdens het selecteren.
(3) Na het verstellen van TIME drukt u op de START knop om het programma te starten. Na
START kan u LEVEL nog steeds veranderen en de display in LEVEL en waarde. Na drie
seconden zonder invoer komt WATT op het display.
Page 26
26
Crosstrainer iConsole CTR 2.1
ENG
COMPUTER INSTRUCTION
OPERATION
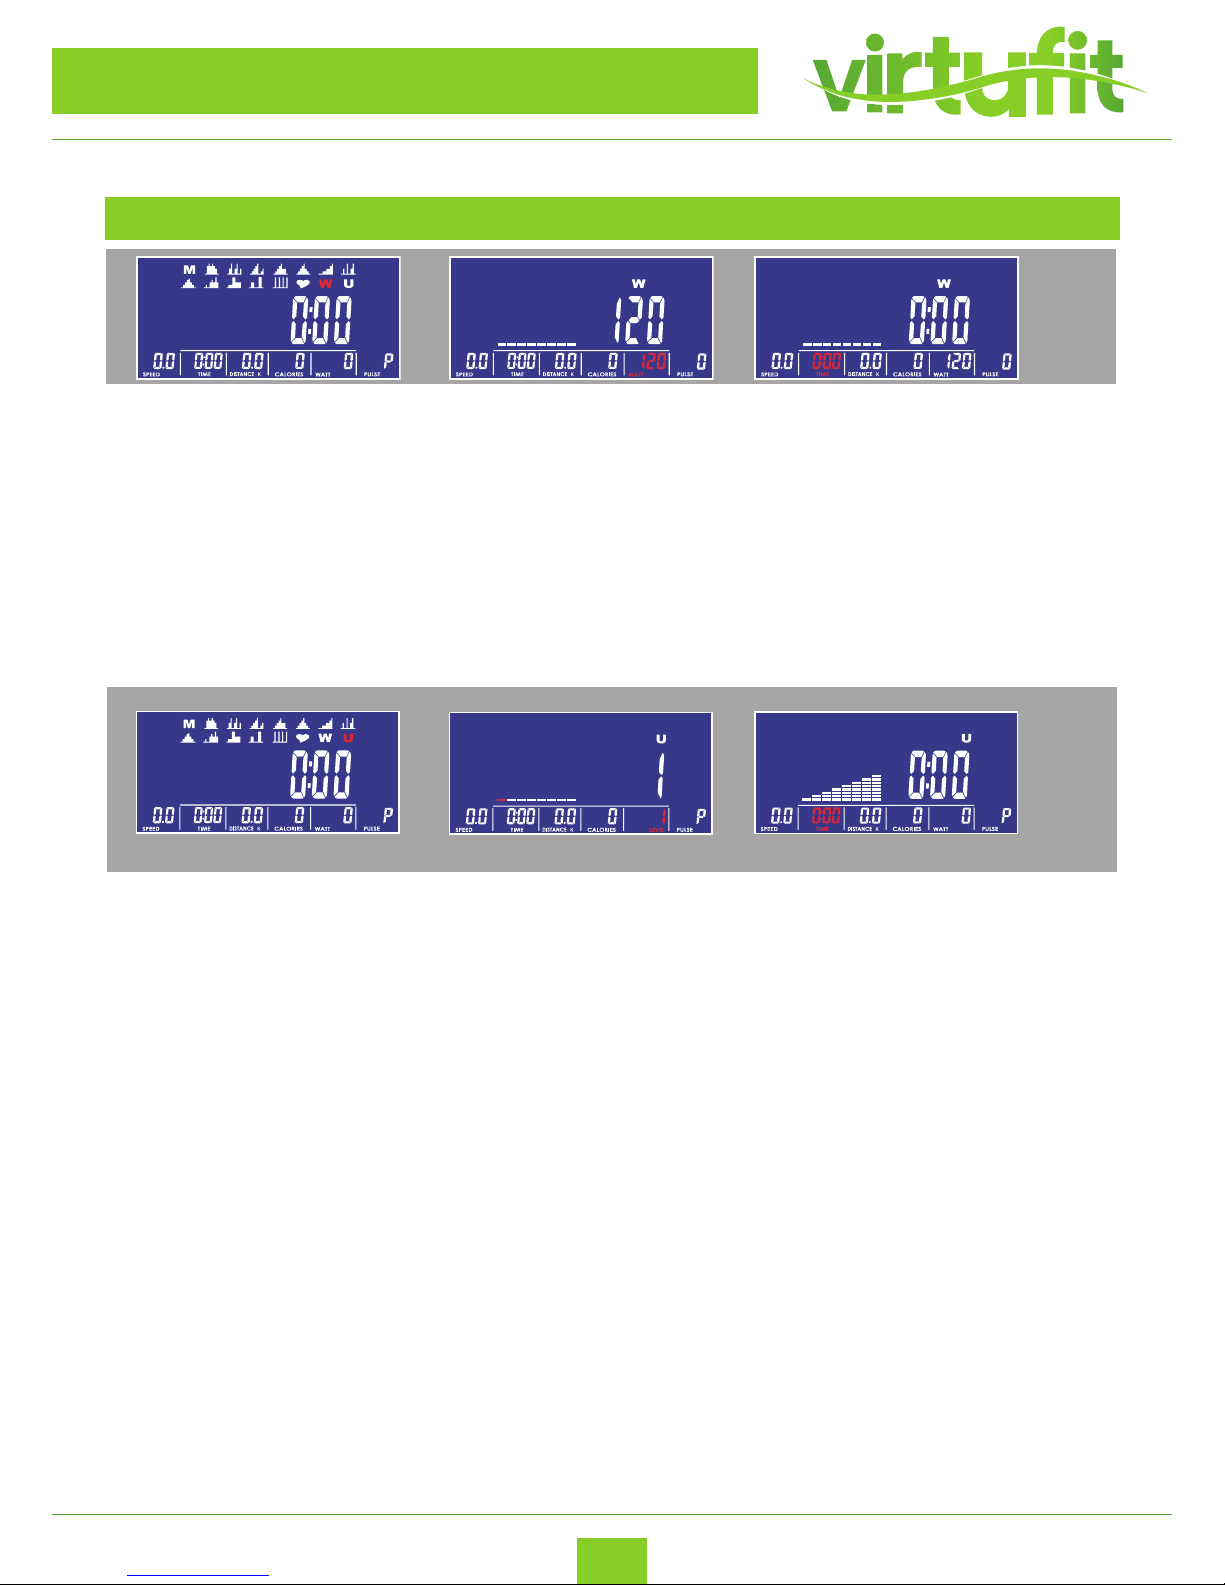
7. WATT mode
(1) WATT target. (default: 120)
(2) Turning and pressing encoder can adjusting WATT value.
(3) Then after START user still can exercise by setting WATT LEVEL and would adjust automatically.
(4) After START user still can adjust WATT value.
8. User Program Mode
(1) Automatically loaded the U1-U4.
(2) Turning and pressing encoder user can set the program (the 8 LEVEL values) that each would ash
until setting down. If user wants to stop setting, pressing encoder for 2 seconds, then the value would be
the same as last setting.
7. WATT modus
(1) Wattage doel. (standaard: 120)
(2) Door te draaien en drukken op de knop kan u de WATT waarden verstellen.
(3) Na START kan de gebruiker nog steeds trainen en WATT LEVEL zal automatisch aanpassen.
(4) Na START kan de gebruiker nog steeds de WATT waarden aanpassen.
Page 27
27
Crosstrainer iConsole CTR 2.1
ENG
COMPUTER INSTRUCTION
OPERATION
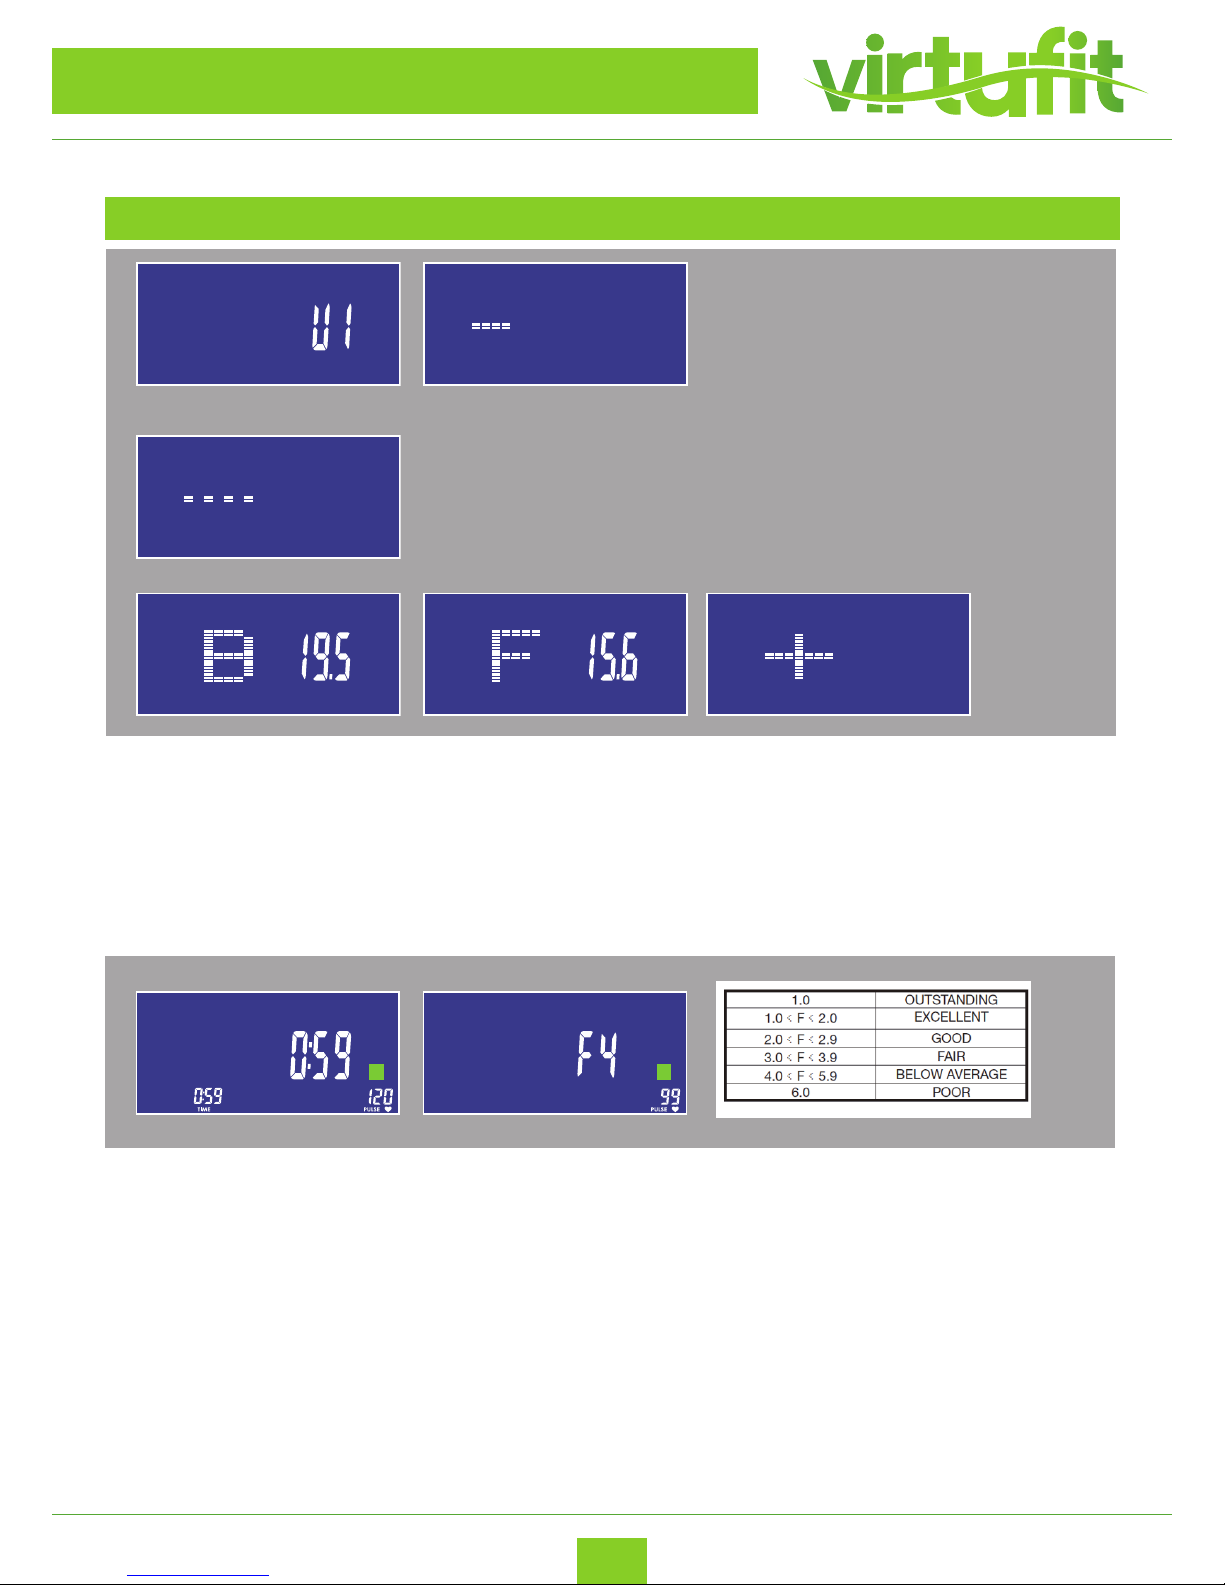
9. Body Fat Mode
(1) During STOP pressing FAT KEY can operate fat measurement. Then entering U1-U4 for 2 seconds.
(2) After receiving HR signal would start operating.
(3) After 8 seconds would display BMI, FAT%, fat or skin icons.
10. Recovery Mode
During START or STOP input the HR signal and display the value, then pressing the RECOVERY KEY to
operate.
The matrix only displaying time and pulse. Time would count down from 60 seconds and the pulse
shows the real HR value. During or end testing pressing RECOVERY KEY to back to last display.
And after testing continue display real HR value.
9. Body Fat Mode
(1) During STOP pressing FAT KEY can operate fat measurement. Then entering U1-U4 for 2 seconds.
(2) After receiving HR signal would start operating.
(3) After 8 seconds would display BMI、FAT%、fat or skin icons.
50%
70%
80%
Max
65%
75%
50%
70%
80%
Max
65%
75%
Page 28
28
Crosstrainer iConsole CTR 2.1
ENG
ICONSOLE+ APP
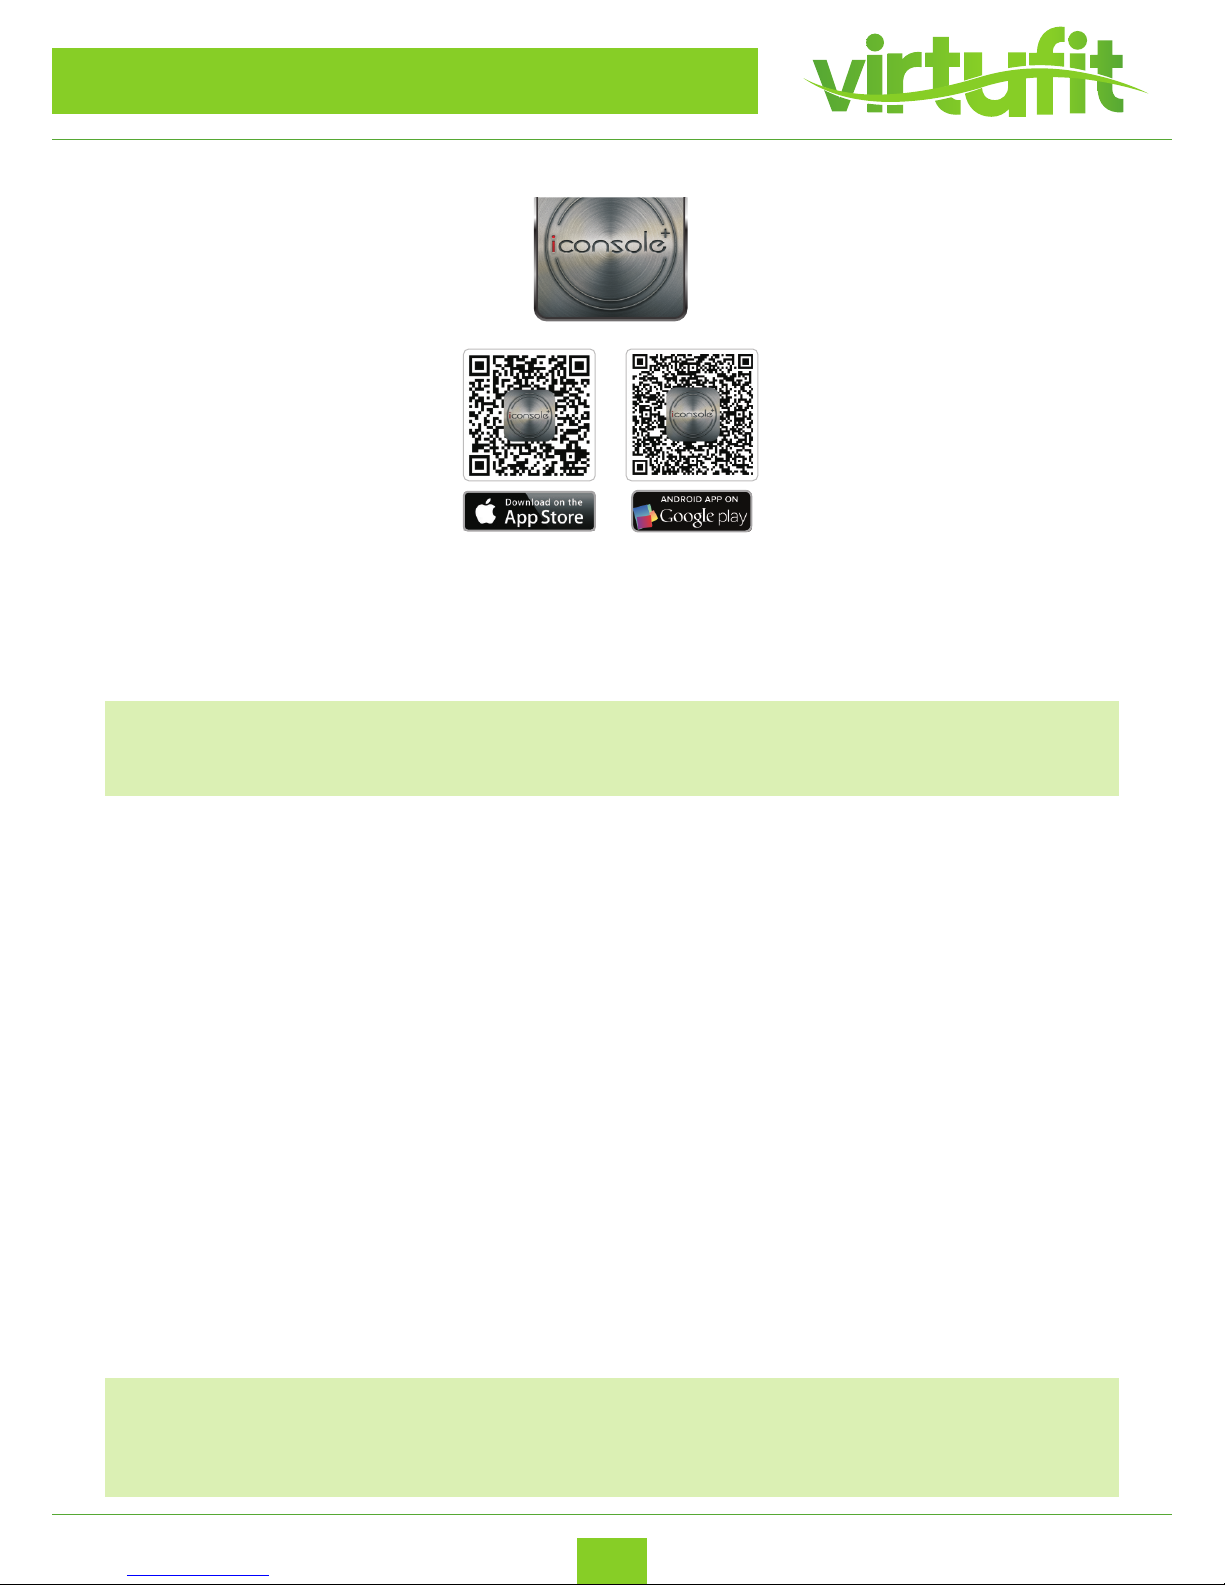
Download iConsole+ app in App Store or Google Play.
Turn on Bluetooth on tablet or smartphone, search for console device and press Connect. Turn on iConsole+
app on tablet or smart phone, and press connect to start workout with tablet. (password: 0000)
NOTE:
1. Once console is connect to tablet or smart phone, the console will power o .
2. Please exit iConsole app and turn o the Bluetooth, then the console will power on again.
Support iOS devices:
iPod Touch (5th generation), iPod Touch (4th generation), iPod Touch (3rd generation), iPhone
6+,
iPhone 6, iPhone 5S, iPhone 5, iPhone 4S, iPhone 4, iPhone 3GS, iPad Air2, iPad Air, iPad 4, iPad 3, iPad 2 iPad,
iPad Min3, iPad Min2, iPad Min
Support iOS 5.1.1 or above
“Made for iPod,” “Made for iPhone,” and “Made for iPad” mean that an electronic accessory has
been designed to connect speci cally to iPod, iPhone, or iPad, respectively, and has been certi ed
by the developer to meet Apple performance standards. Apple is not responsible for the operation
of this device or its compliance with safety and regulatory standards.
Please note that the use of this accessory with iPod, iPhone, or iPad may a ect wireless performance.
iPad, iPhone, iPod, iPod classic, iPod nano, iPod shuffl e, and iPod touch are trademarks of Apple Inc.,
registered in the U.S. and other countries.
Support Android devices:
Android tablet OS 4.02 or above
Android tablet resolution 1280X752 pixels
Android phone OS 2.2 or above
Android phone resolution 800X1280 pixels
720X1280 pixels 480X800 pixels
NOTE:
Android is available in English, German, Traditional Chinese, Simpli ed Chinese.
iOS is available in English, Simpli ed Chinese. The users can select their prefer language under those
options, otherwise all others would display in English.
iConsole+ APP
Downlode iconsole+ app in APP STORE or Goole play.
Page 29
29
Crosstrainer iConsole CTR 2.1
ENG
TRAINING INSTRUCTION
FAT BURNING
SUCCESS
Even after a short period of regular exercises you will realize that you constantly have to increase the
pedaling resistance to reach your optimum pulse rate.
The units will be continuously easier and you will feel a lot tter during your normal day.
For this achievement you should motivate yourself to exercise regularly. Choose xed hours for your work
out and do not start training too aggressively.
And old saying amongst sportsmen says:
“The most difficult thing about training is to start it.” Wishing you lots of fun and success with your exerciser.
The body start to burn fat at approximate 65% of the maximum pulse rate.
To reach an optimum at burning rate, it is advisable to keep the pulse rate between 70%- 80% of the
maximum pulse rate.
The optimum training amount consists of three workouts per week 30 minutes each.
Example:
One 52 years of age to start exercising. Max rate = 220 - 52(age) = 168 pulse/min.
Min rate = 168 * 0.7 = 117 pulse/min.
Highest rate = 168 * 0.85 = 143 pulse/min.
During the rst weeks it is recommended to start with a pulse rate of 117, afterwards increase it to 143. With
increasing improvement of tness, the training intensity should be increased to 70%- 85% of your maximum
pulse rate.
This can be done by increasing the pedaling resistance, by suing a higher paddling frequency or with longer
training periods.
20
25
30
35
40
45
50
55
60
65
70
99
96
93
90
98
AGE
FC
MAX
60%
MAX
65%
MAX
70%
MAX
75%
MAX
80%
MAX
85%
MAX
T +31 (0)74-7600219
E service@tnessbenelux.nl
W www.tnessbenelux.nl
Twekkelerweg 263
7553 LZ Hengelo
The Netherlands
Fitness
Benelux
Uw partner in fitness
For questions or missing parts, please contact Fitness Benelux:
 Loading...