

Page 1
iConsole Total Fit Crosstrainer
EN
User manual
Page 2

2
Virtufit iConsole Total Fit Crosstrainer
EN
INDEX
Safety instructions 3
Assembly instructions 4
Maintenance 10
Computer instruction 11-18
Exploded Drawing 19
Parts List 20
Page 3

3
Virtufit iConsole Total Fit Crosstrainer
EN
SAFETY INSTRUCTIONS
WARNING: We suggest that you should consult with your physician or health
professional before starting your workout, especially for the age up to 35 old or people
with health problems. We take no responsible for any problems or injuries if you don’t
following our specication.
ATTENTION
- This elliptical trainer is made for home use only and tested up to a maximum body weight of 150 kgs.
- Follow the steps of the assembly instructions carefully.
- Use only original parts as delivered.
- Before the assembly, be sure to check if delivery is complete by using the included partslist.
- For assembly use only suitable tools and asks for assistance with assembly if necessary.
- Place the exerciser on an even, non-slippery surface. Because of possible corrosion, the usage of anY
exerciser in moist areas is not recommended.
- Check before the rst training and every 1-2 months that all connecting elements are tight tting
and are in the correct condition. Replace defective components immediately and/ or keep the
equipment out of use until repair. For repairs, use only original parts.
- In case of repair, please ask your dealer for advice.
- For repairs, use only original spare parts.
- Avoid the use of aggressive detergents when cleaning the home exerciser.
- Ensure that training starts only after correct assembly and inspection of the item.
- For all adjustable parts be aware of the maximum positions to which they can be adjusted/ tightened
to.
- The home exerciser is designed for adults. Please ensure that children use it only under the supervi
sion of an adult.
- Ensure that those present are aware of possible hazards, e.g. movable parts during training.
- Warning: incorrect/excessive training can cause health injuries.
- Consult your physician before starting with any exercise program. He or she can advise on the kind of
training and which impact is suitable.
Page 4
4
Virtufit iConsole Total Fit Crosstrainer
EN
ASSEMBLY INSTRUCTIONS
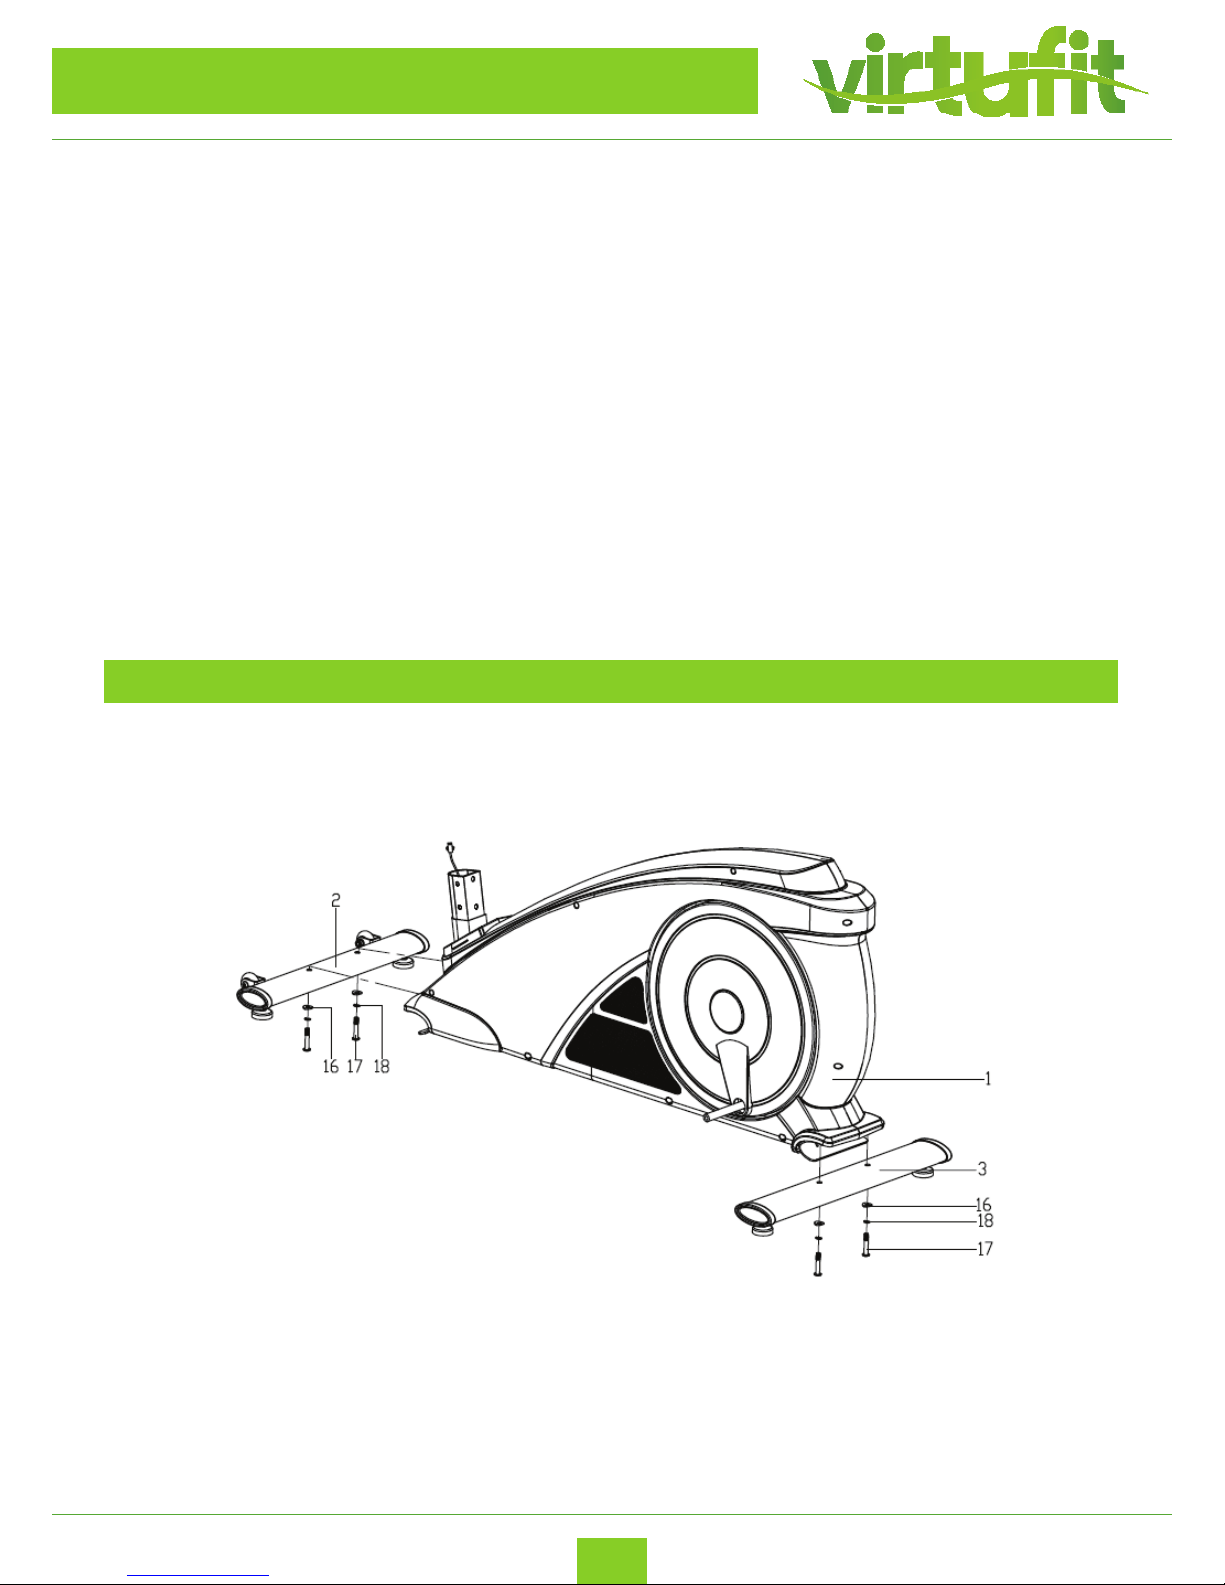
STEP 1
– Install the Front bottom tube (2) and Rear bottom tube (3) to the Main frame (1) with the Hex
socket screws (17), Spring washers (18) and Arc washers (16) as shown.
Before you start to assemble the device, please read the following points carefully:
1. Missing parts: If you think you are missing certain parts in your package, carefully check the styrofoam
and the device yourself. Some parts (bolts, screws, etc.) are already attached to / in the device.
2. Error message: Make sure that all cables are carefully attached. The adjusable feet are very sensitive and
should remain straight. Do you get an error message after the installation of your cross trainer? Then you
should bend these adjustable feet straight again, this may cause the error message to disappear.
3. Transport wheels: Make sure that the transport wheels are attached to the front of the device.
4. Allen screws: In the upright of crossbar are hex bolts, make sure that the Allen key is properly in the bolt
before you apply force to the key. In this way you prevent the head of the socket head from being turned.
Page 5
5
Virtufit iConsole Total Fit Crosstrainer
EN
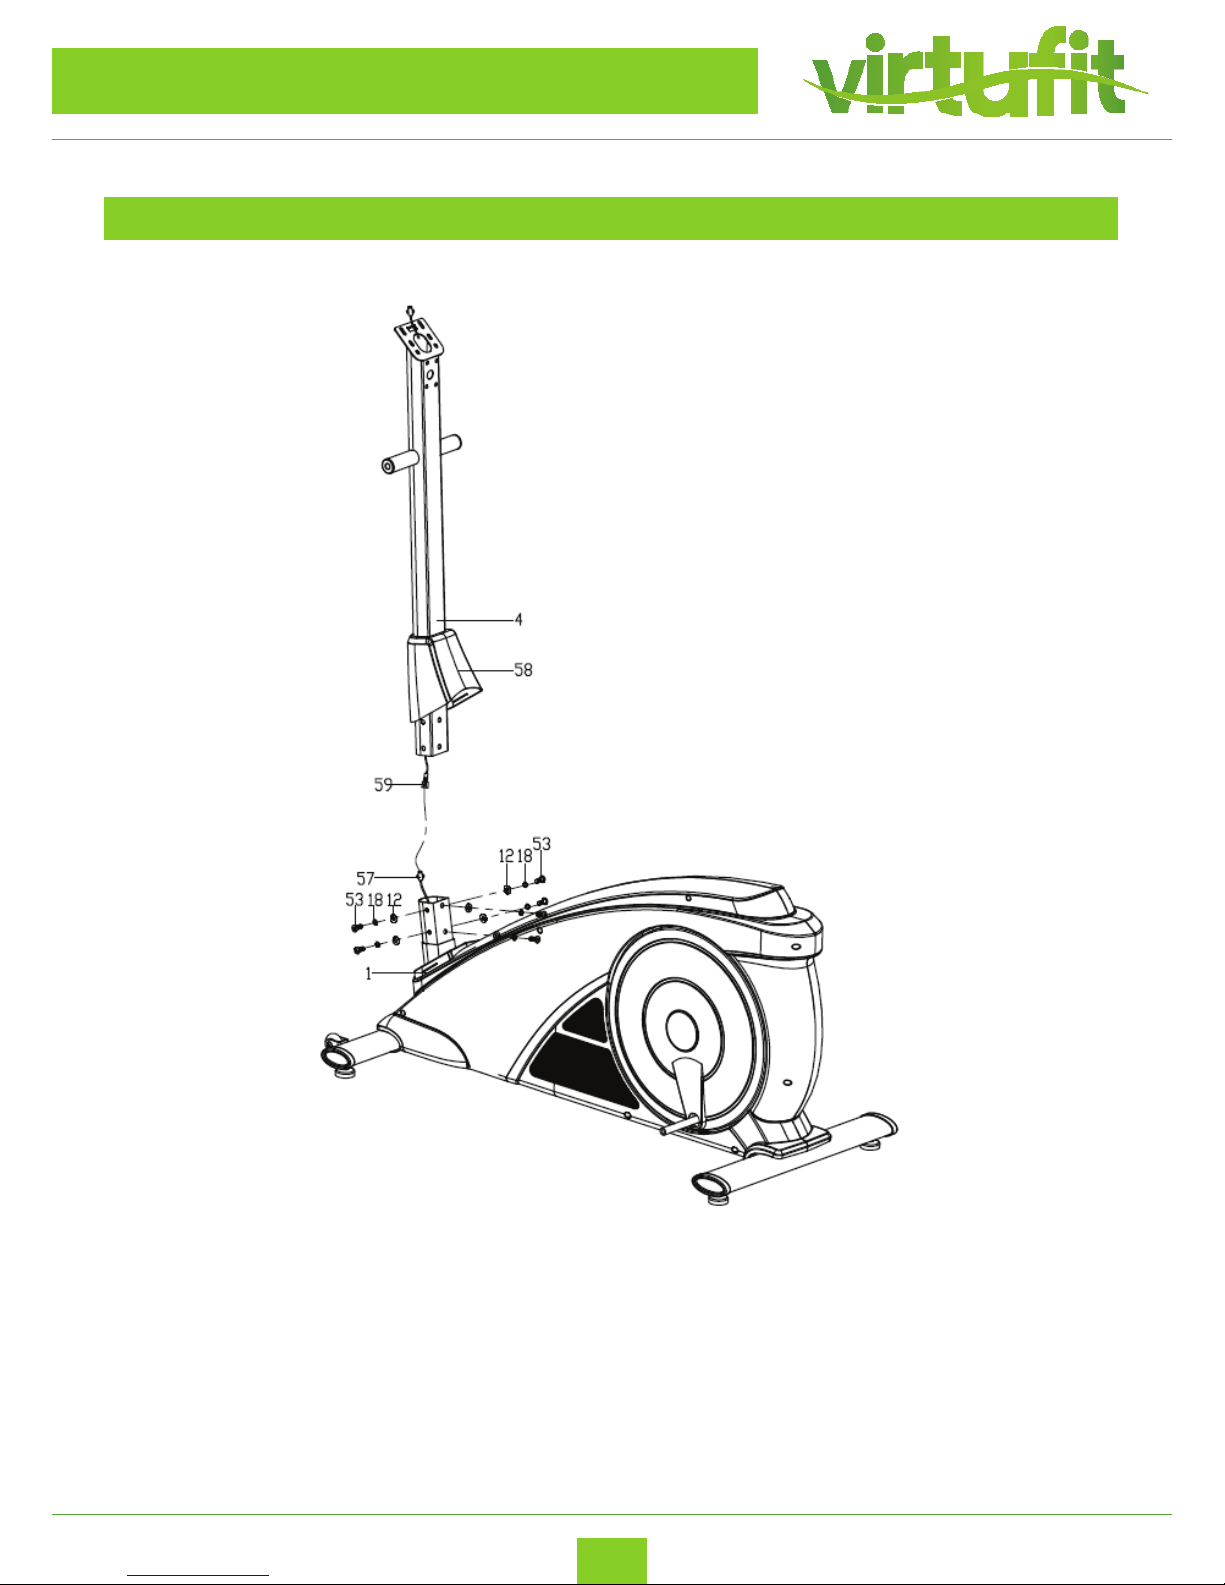
– Insert the Handlebar post (4) through the Protective guard (58);
–
– Connect the Extension sensor wire (59) with the Sensor wire (57) properly at rst, then lock the
Handlebar post (4) onto the Main frame (1) with the Allen bolts (53), Spring washers (18) and Flat
washers (12), and then put on the Protective guard (58) in place.
STEP 2
ASSEMBLY INSTRUCTIONS
Page 6
6
Virtufit iConsole Total Fit Crosstrainer
EN
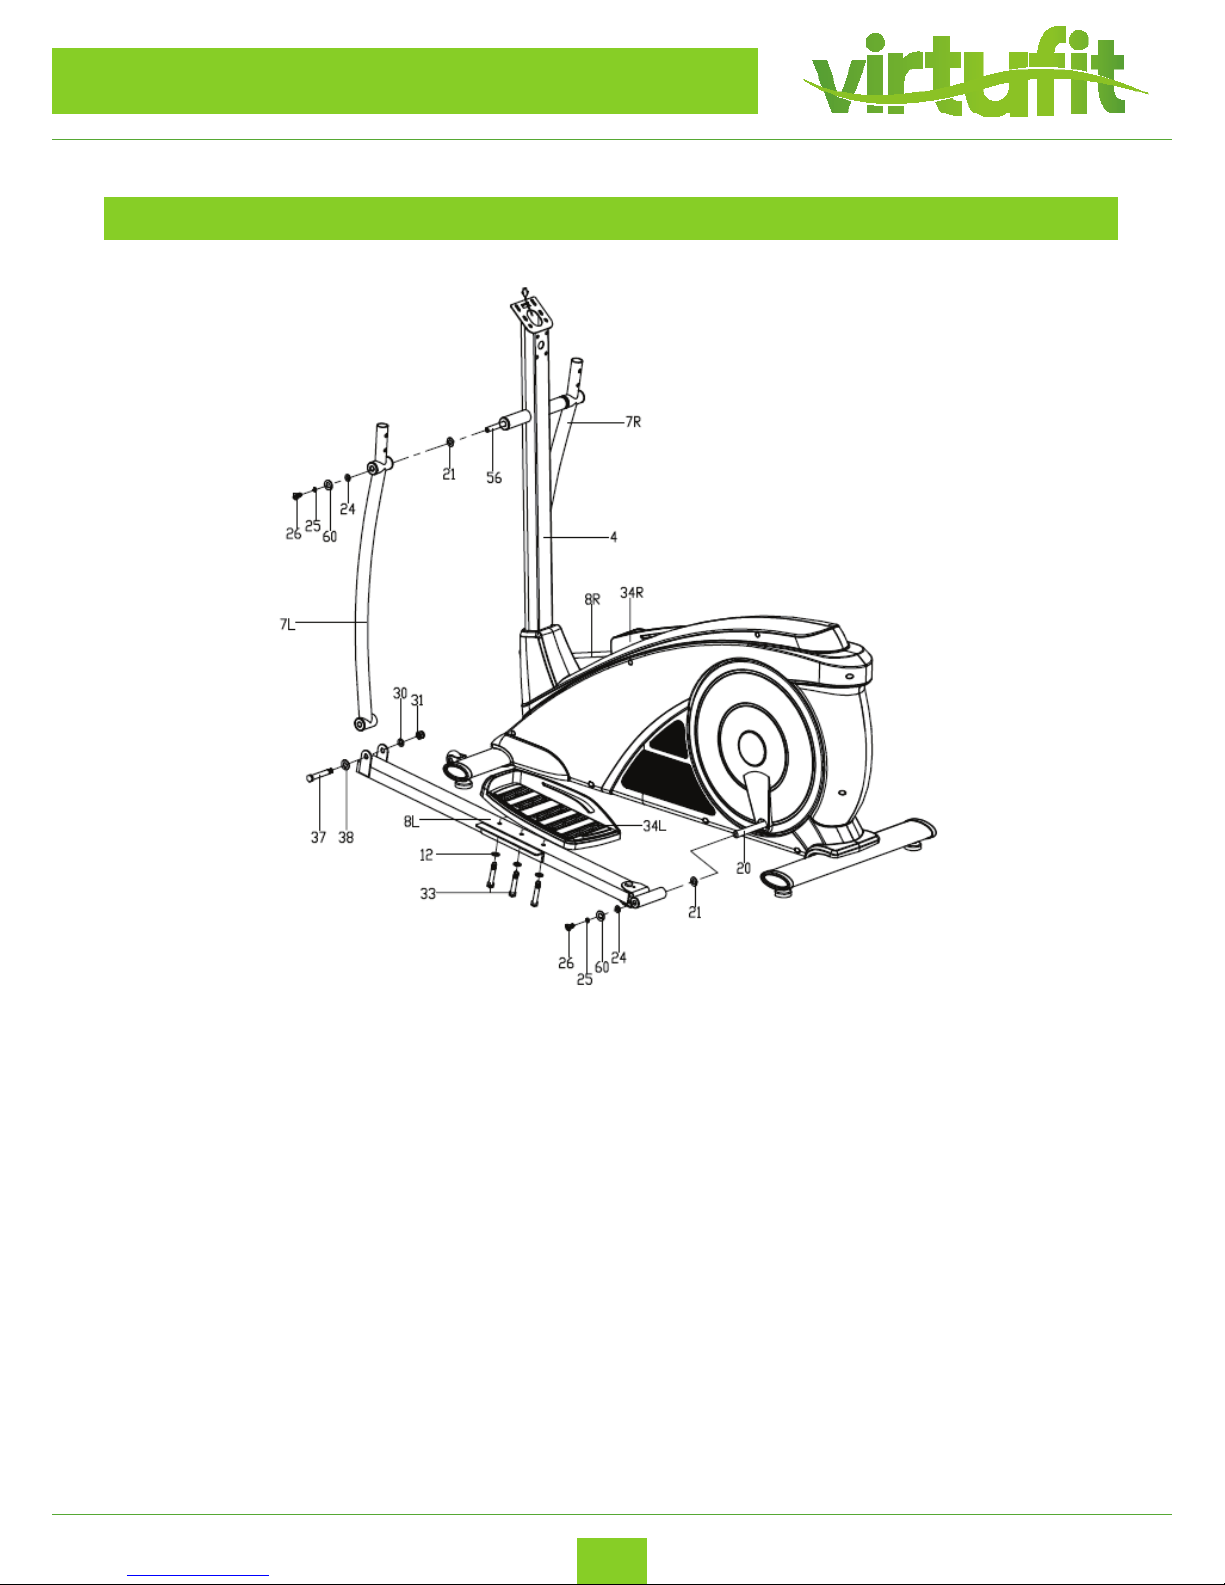
– Insert the Long axle (56) to the Handlebar post (4), then attach the Swing tube (7L/R) on the
Long axle (56) with the Hex socket screws (26), Spring washers (25), Flat washer (60),D-shape
washers (24) and Wave washers (21). Attention: Don’t lock them tightly now;
–
– Fix the Pedal support (8L/R) on the Crank (20) with Hex socket screw (26), Spring washer (25),
Flat washer (60),D-shape washer (24) and Wave washer (21). Attention: Don’t lock them tightly
now;
–
– Connect the Swing tube (7L/R) and Pedal support (8L/R) together with the Screws (37), Flat
washers (38), Flat washers (30) and Nylon nuts (31). Then recheck and lock the above mentioned
Hex screws (26), Screws (37) and Nylon nuts (31) tightly;
–
– Lock the Pedal (34L/R) on the Pedal support (8L/R) tightly with the Hex screws (33), Flat
washers (12) as shown.
STEP 3
ASSEMBLY INSTRUCTIONS
Page 7
7
Virtufit iConsole Total Fit Crosstrainer
EN
STEP 4
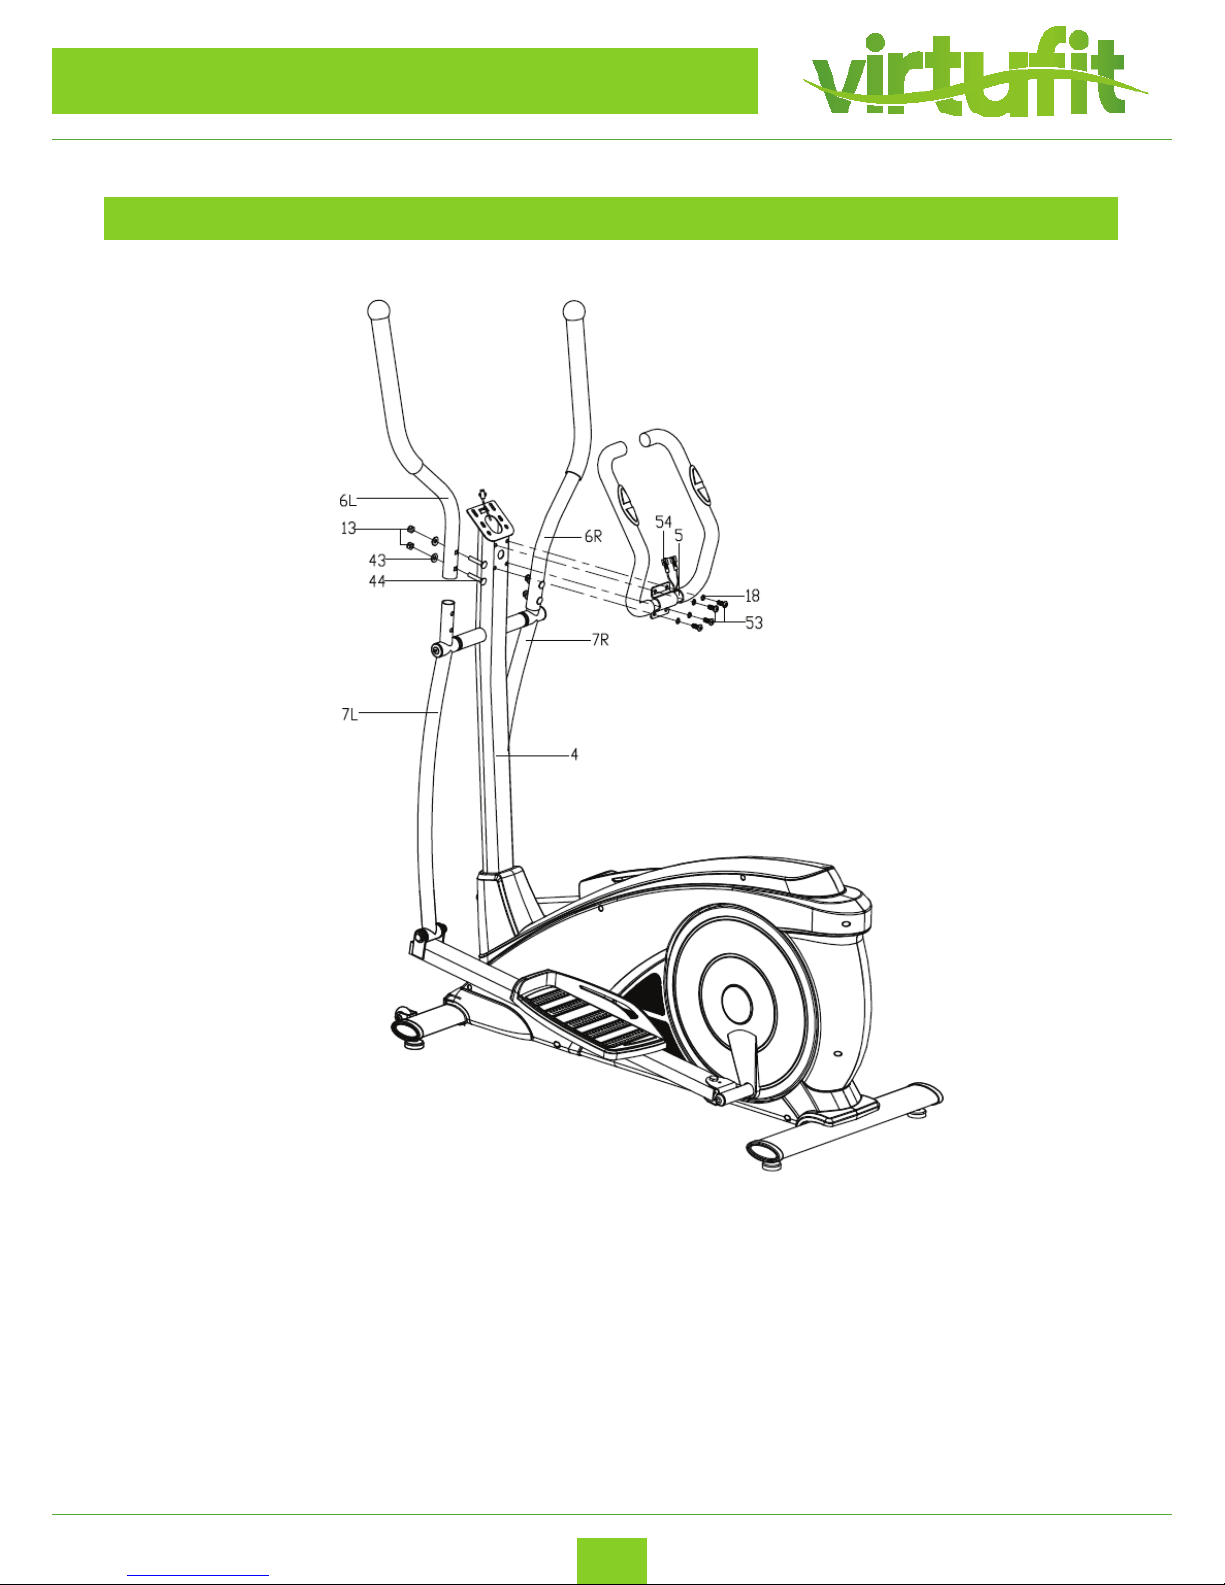
– Lock the Handlebar (6L/R) on the Swing tube (7L/R) tightly with the Carriage bolts (44), Arc
washers (43) and Nylon nuts (13);
–
– Thread the Hand pulse wires (54) into the hole of Handlebar post (4) and then take it out from the
computer bracket. Lock the Fixed handlebar (5) on the Handlebar post (4) tightly with the Allen
bolts (53) and Spring washers (18) as shown.
ASSEMBLY INSTRUCTIONS
Page 8
8
Virtufit iConsole Total Fit Crosstrainer
EN
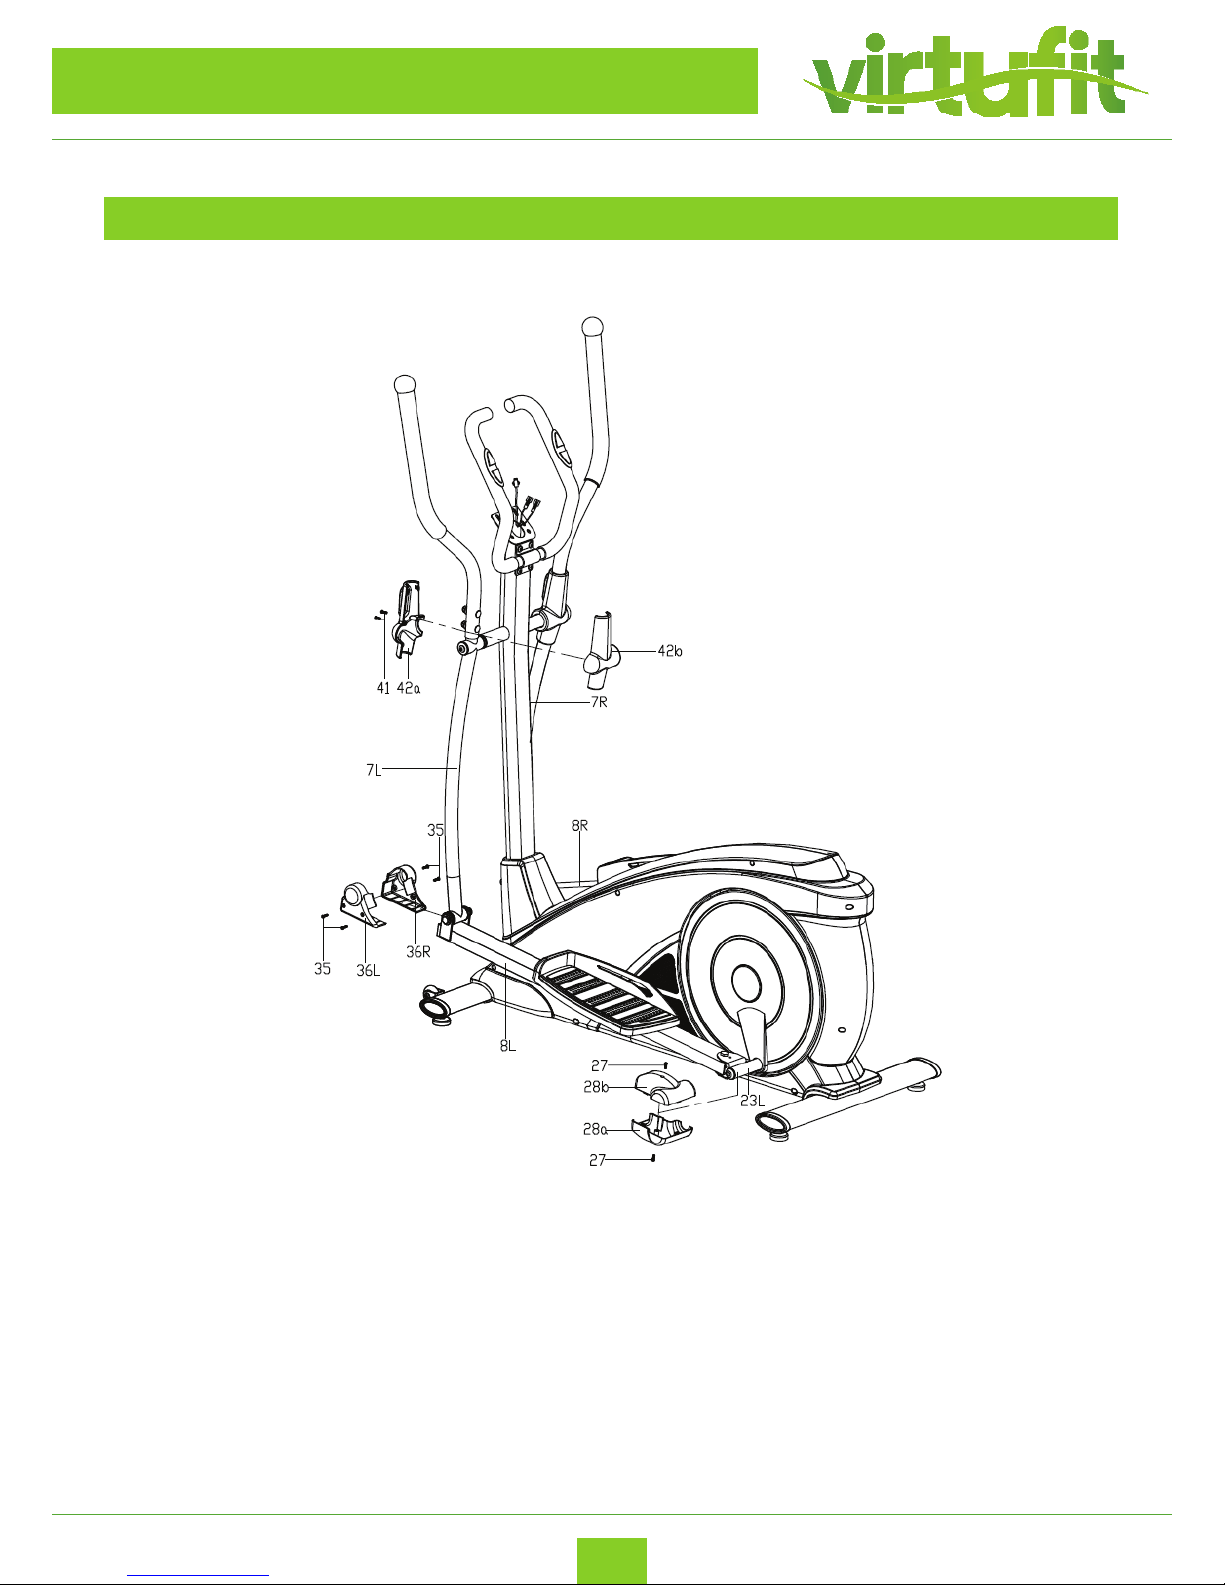
– Fix the Protective guard (42a/b) on the Swing tube (7L/R) with the Screws (41);
–
– Fix the Protective guard (36L/R) on the connecting joint of Swing tube (7L/R) and Pedal support
(8L/R) with the Screws (35);
–
– Fix the Protective guard (28a/b) on the Pedal tube joint (23L/R) with the Screws (27) as shown.
STEP 5
ASSEMBLY INSTRUCTIONS
Page 9
9
Virtufit iConsole Total Fit Crosstrainer
EN
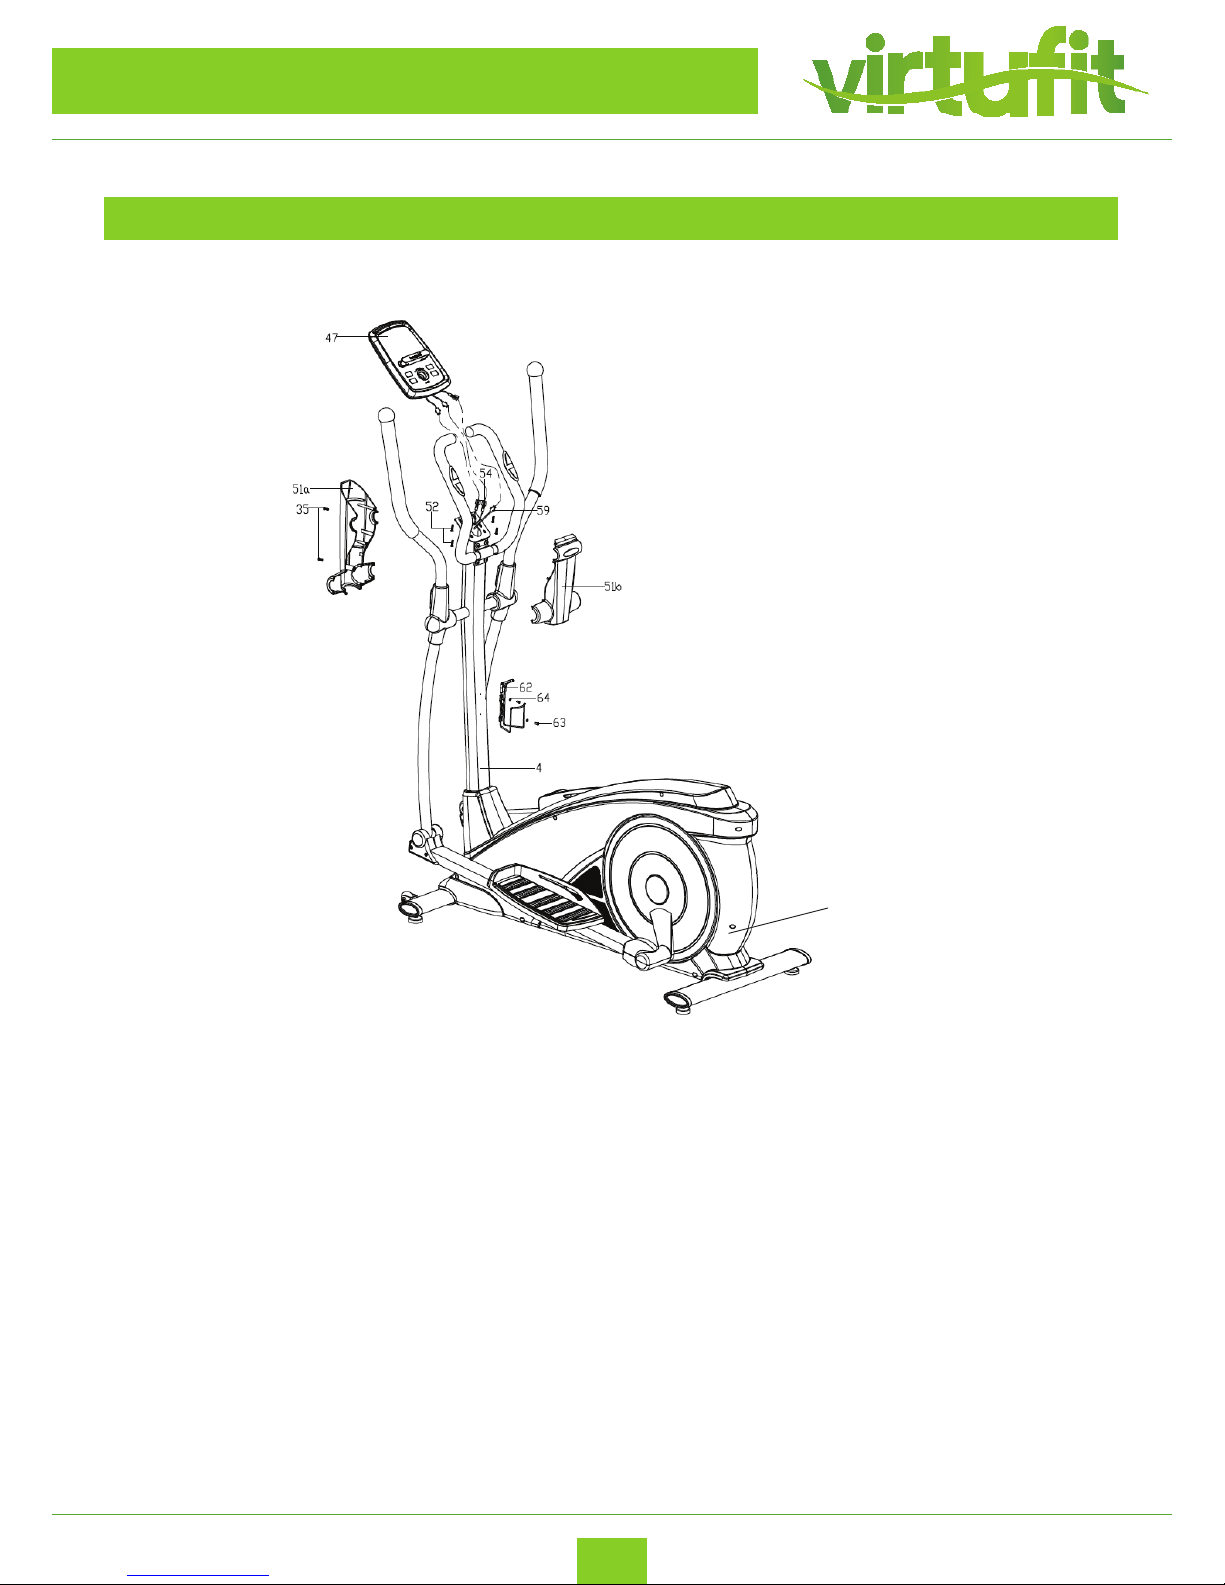
– First, connect the Extension sensor wire (59) and pulse wires (54) with the proper connecting
wires coming out from the Computer (47) respectively, then x the Computer (47) on the bracket
of the Handlebar post (4);
– Lock the Protective guard (51a/b) on the Handlebar post (4) tightly with the Screws (35).
– C: Lock the Kettle holder (62) on the Handlebar post (4) tightly with screw(63) and Flat washer
(64).
– You can plug in the adapter now. The power adapter can be plugged in at the rear of the
machine as indicated by the arrow in the picture above.
STEP 6
ASSEMBLY INSTRUCTIONS
Adapter
Page 10

10
Virtufit iConsole Total Fit Crosstrainer
EN
MAINTENANCE
The upright is xed with Allen screws, making sure that the bolts are tight at all times. If the bolts are not
tightened tight enough, this can cause cracking.
All moving parts mounted on the base of the device should be greased with grease once every 6 months.
This can be done with Vaseline (without acids) or with silicone oil.
After each use, the appliance should be cleaned with a slightly damp cloth and soft soap. If the
perspiration is not removed in time, corrosion can occur.
Do not place the cross trainer in a room with high humidity. For example, a shed or a room where the
washing machine is located.
PROBLEM SOLUTIONS
Squeaky crosstrainer: First lubricate all rotating parts with silicone spray. It can also be that a screw is
tightened too tightly or too loosely, this creates friction and therefore a beep. If this is the case, try to nd
out exactly where the beep is coming from and then loosen or tighten this screw. The screws should be
tightened in such a way that they can always be released by hand.
No resistance: First check whether you can hear the motor running. You will hear the motor spin very
briey when you increase or decrease the resistance. If you hear the engine running then all electronics
are OK, but the V-belt probably ended. You can then open the housing and replace the V-belt. If you do
not hear the motor running, it may be that the motor or display is defective. First check whether the cable
that runs upwards in the pipe is connected properly.
Ticking sound: It is possible that the ywheel (in the housing) comes against a cable with every pedaling.
This may be disturbing but will not cause permanent damage to your cross trainer. To solve this, open the
housing and move the cable or you can fasten it with for example a tie-wrap.
Heart rate display does not work: This can have various causes. 1. The sensor cable running from the
heart rate sensor to the display is not properly mounted or has come o during use. 2. It may be that the
sensors have become damp, dirty or greasy, clean them regularly. 3. If you have a lot of calluses on your
hands, it is more dicult for the sensors to measure, when this is the case a chest strap is recommended.
Page 11
11
Virtufit iConsole Total Fit Crosstrainer
EN
COMPUTER INSTRUCTION
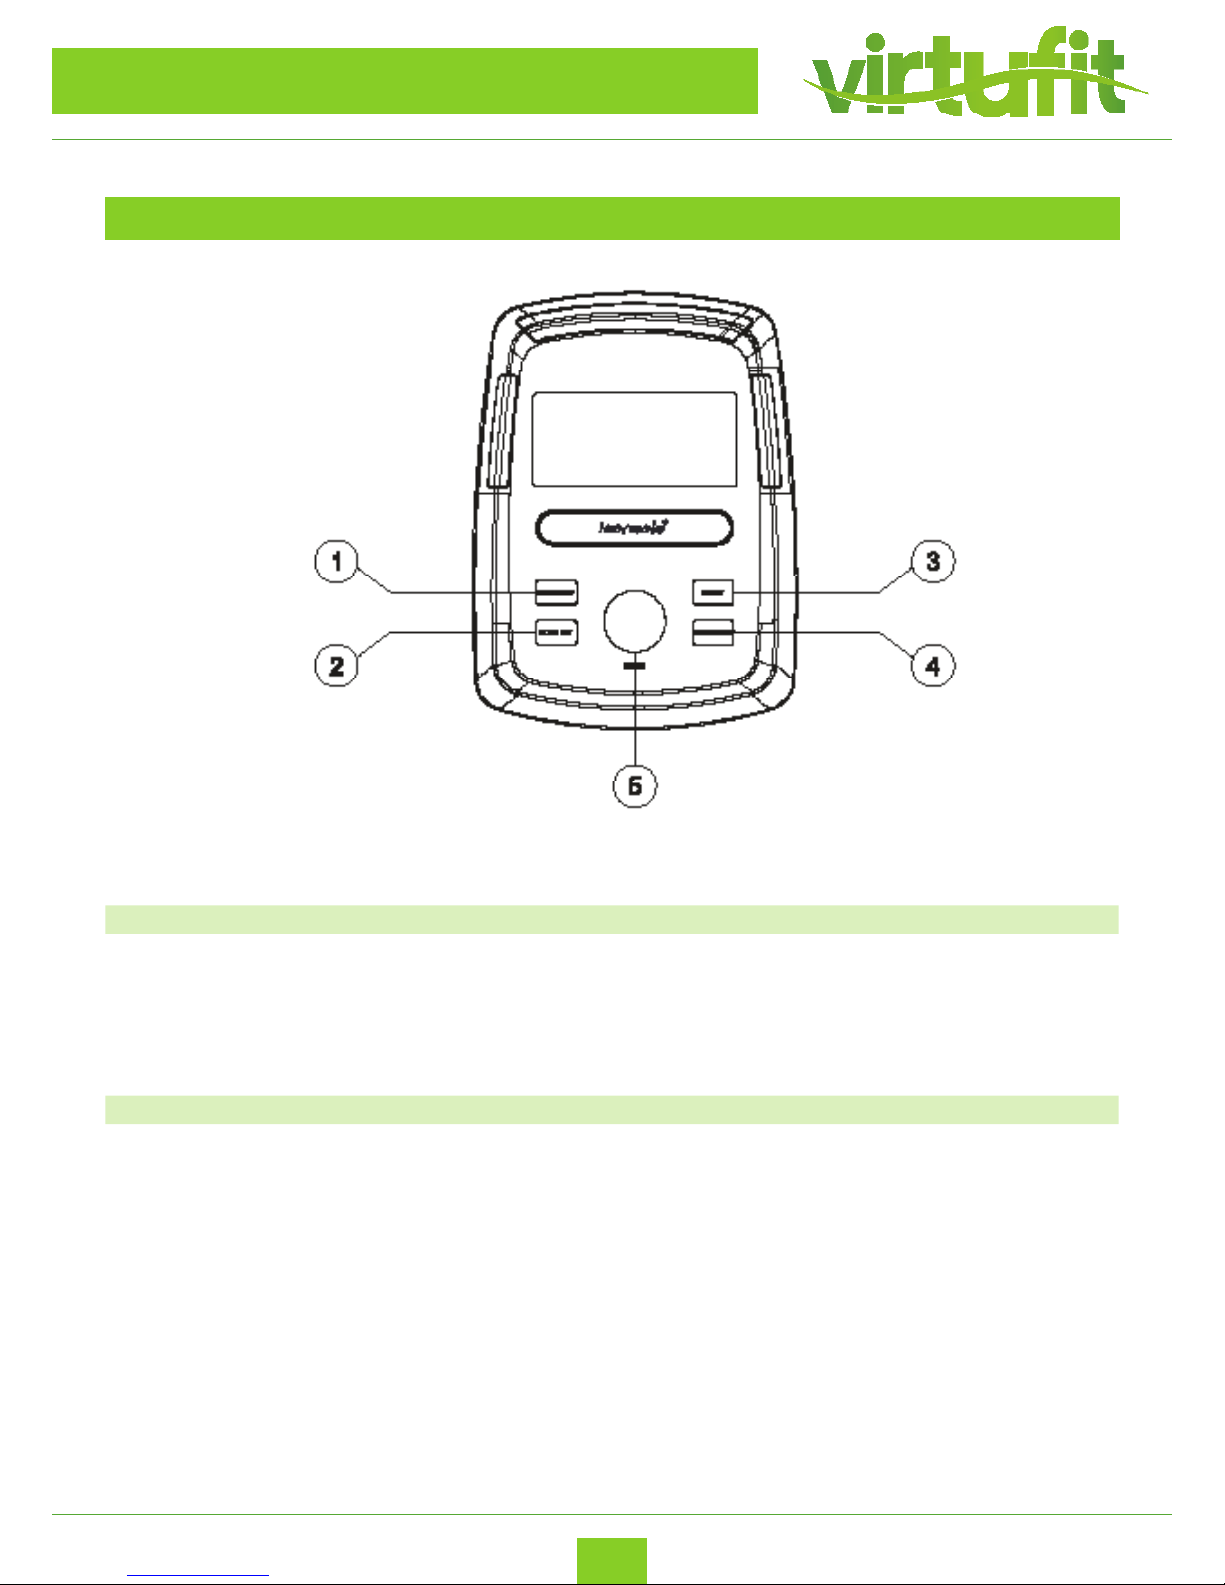
KEY FUNCTION
1. Recovery Test heart rate recovery status.
2. Body fat Test body fat% and BMI.
3. Reset - Hold on pressing for 2 seconds, computer will
reboot and start from user setting.
- Reverse to main menu during presetting workout
value or stop mode.
4. Start/ Stop Start or Stop workout.
5. Encoder - Increase / Decrease Value.
- Conrm / Setting selection.
Page 12

12
Virtufit iConsole Total Fit Crosstrainer
EN
COMPUTER INSTRUCTION
DISPLAY FUNCTIONS
TIME Workout time displayed during exercise.
Range 0:00 ~ 99:59
SPEED Workout speed displayed during exercise.
Range 0.0 ~ 99.9
DISTANCE Workout distance displayed during exercise.
Range 0.0 ~ 99.9
CALORIES Burned calories during workout display.
Range 0 ~ 999
PULSE Pulse bpm displayed during exercise.
Pulse alarm when over preset target pulse.
RPM Rotation per minute
Range 0 ~ 999
WATT Workout power consumption
In Watt Program mode, computer will remain preset
watt value (setting range 0~350)
MANUAL Manual mode workout.
PROGRAM 12 PROGRAM selections.
USER User creates resistance level prole.
H.R.C. Target HR training mode.
RECOVERY Heart rate recovery status
BODY FAT Body fat measurement.
WATTS Workout power consumption.
Range 10 ~ 350.
Page 13
13
Virtufit iConsole Total Fit Crosstrainer
EN
COMPUTER INSTRUCTION
OPERATION
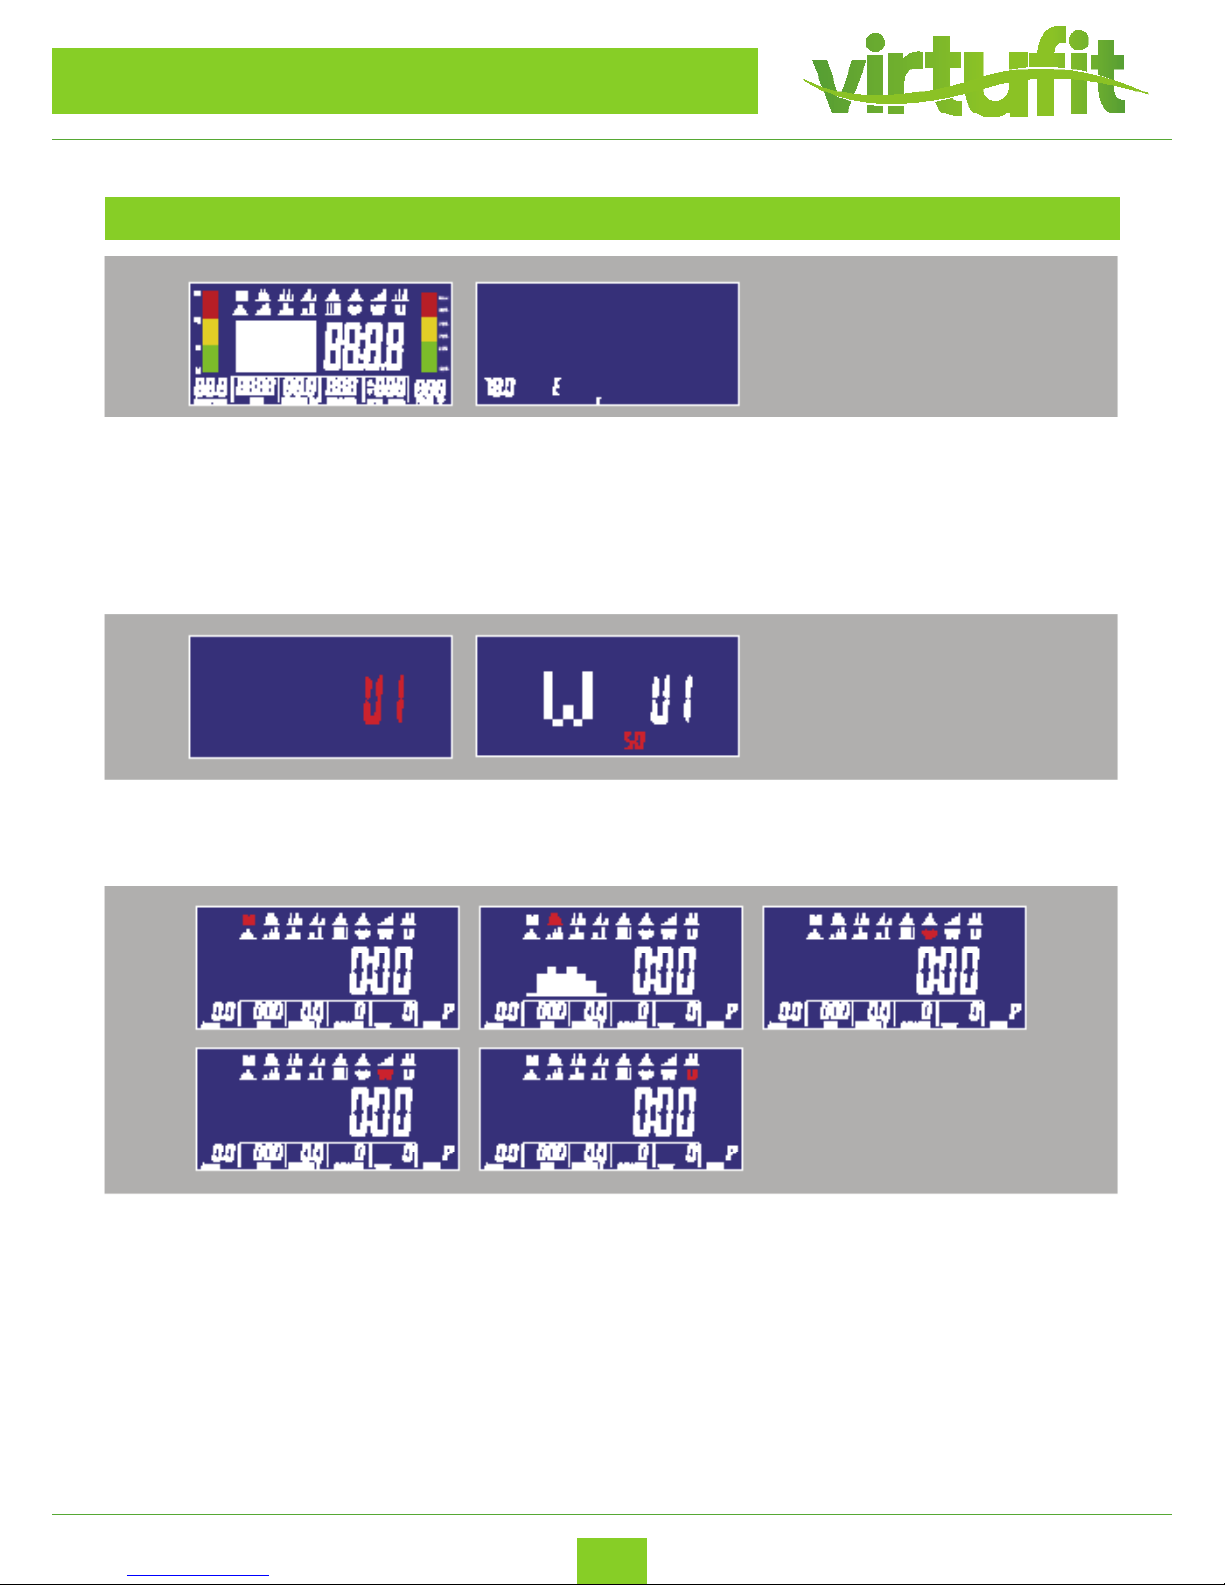
1. Plug in power supply (or Holding press RESET KEY for 2 seconds), buzzer would make a sound and
display all segments on LCD for 2 seconds.
Then wheel diameter value would display in SPEED area and European specication would
display “E” or Asian Specication would display “A” in the TIME area & KM (K) / ML (M) DISTANCE text
would display on the right. Then entering the setting mode , regardless where the motor’s level is,
it has to reverse and turns into zero and then go to LOAD = 1 ,wait for each setting.
3. Turning and pressing encoder can enter Entering setting mode, the M (Manual) would ash in
the matrix display with 1HZ. Turning the encoder can choose M(Manual), P(Program), ♥ (H.R.C.),
W(Watt), U(User) cyclically.
2. Turning and pressing encoder can enter USER setting (with BODY FAT function), setting personal
date in U1~U4. Then entering work out section.
Page 14
14
Virtufit iConsole Total Fit Crosstrainer
EN
COMPUTER INSTRUCTION
OPERATION
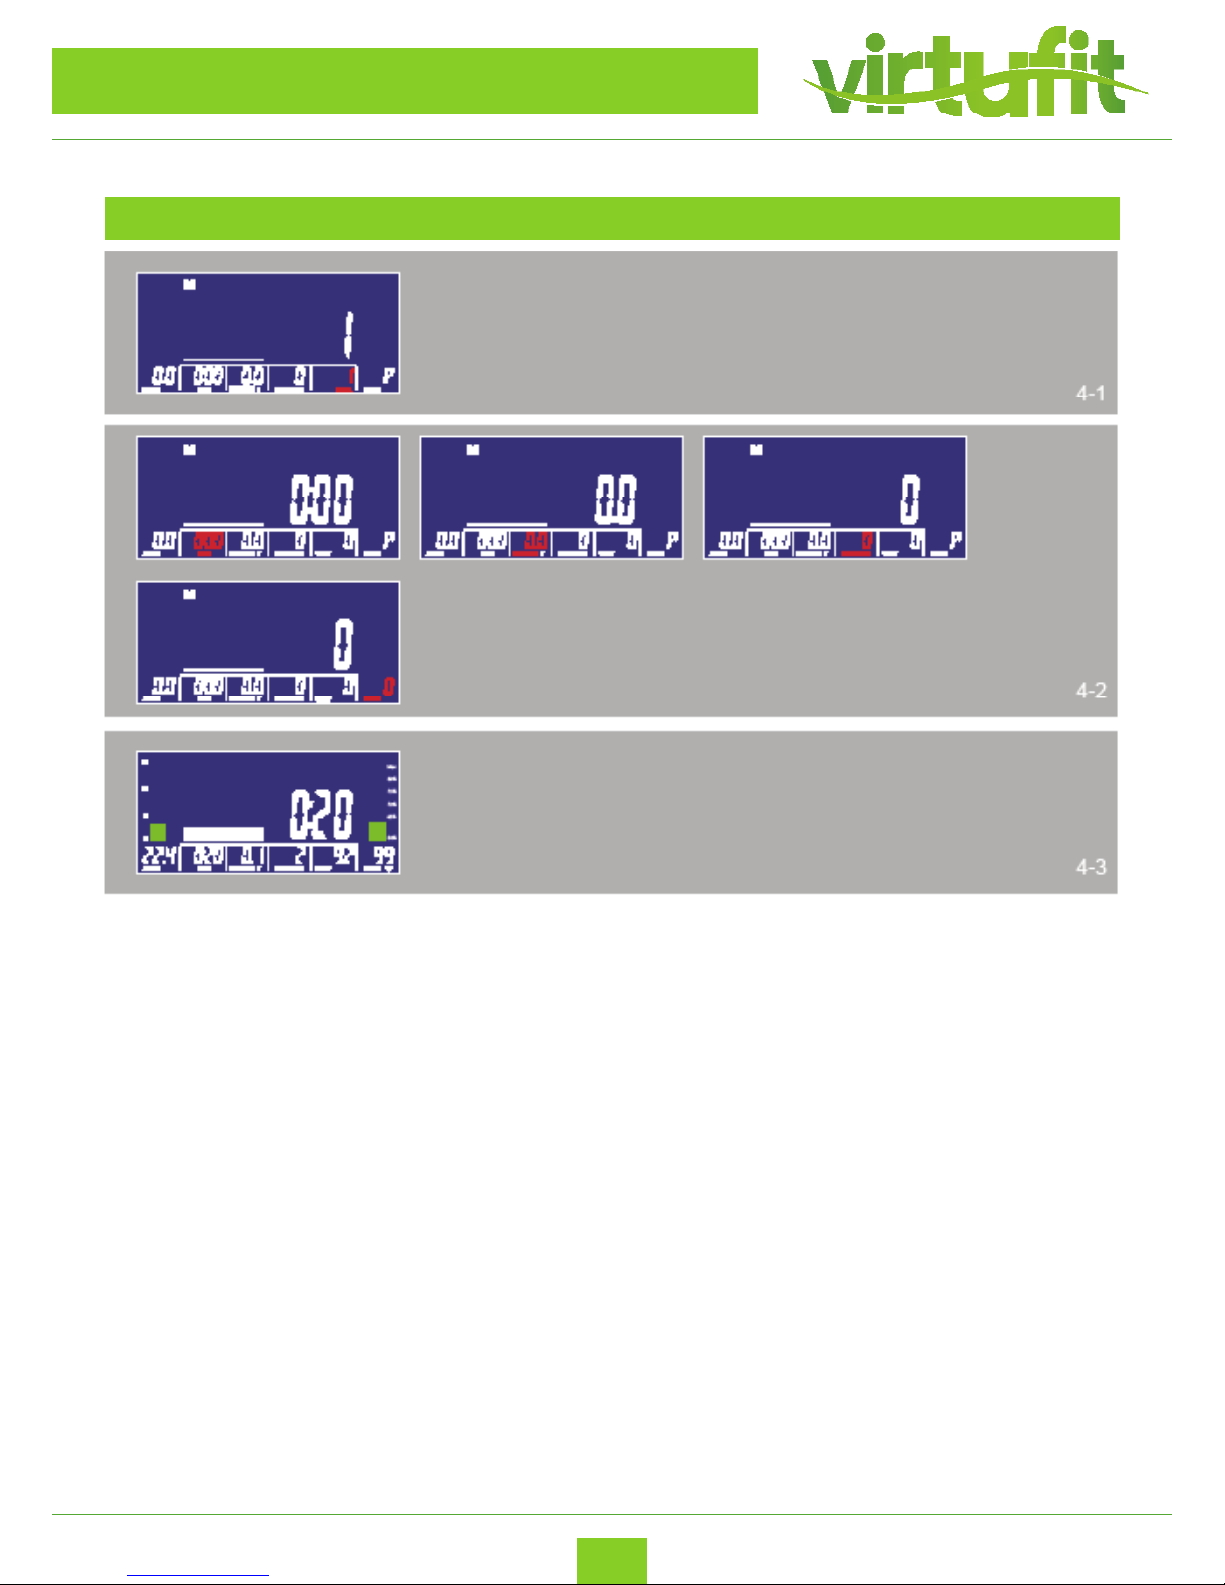
4. Manual Mode
(1) Turning and pressing encoder can adjust the LEVEL value which would ash until setting down. The
default value is LEVEL 1. (see g. 4-1)
(2) The value is not running cyclically as adjusting.
(3) After START user still can adjust MANUAL LEVEL and matrix display LEVEL and value. In three seconds
without any entry then would display WATT value.
(4) Turning and pressing encoder can adjust other values (as TIME, DISTANCE, CALORIES, PULSE) those
values would run cyclically. (see g. 4-2)
(5) After START only can operate the function. RPM BAR and PULSE BAR values would change. Pressing
STOP KEY could stop and all values would remain (HR signal would not eect). Pressing RESET KEY could
return to PROGRAM SELECT. (see g. 4-3)
Page 15
15
Virtufit iConsole Total Fit Crosstrainer
EN
COMPUTER INSTRUCTION
OPERATION
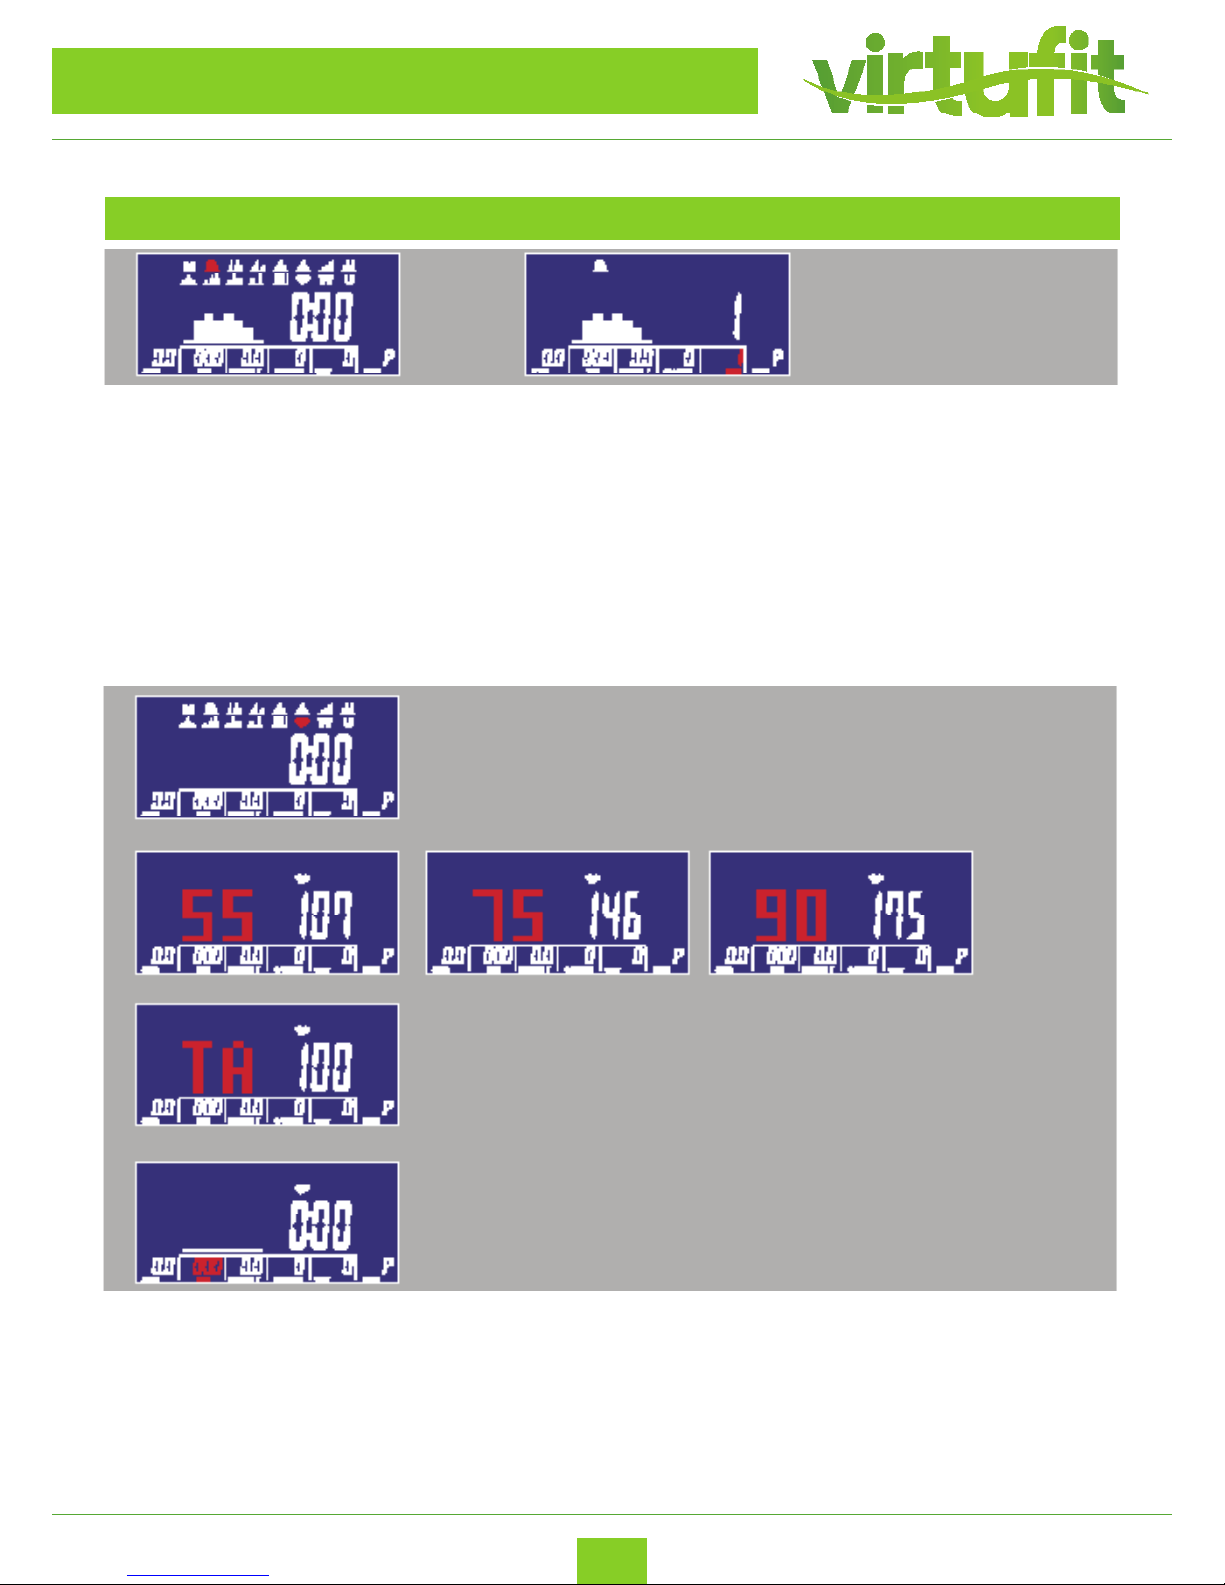
5. Program Mode
(1) Turning and pressing encoder can selecting P01,P02,P03,P04......,P12 in PROGRAM MODE. The PRO
GRAM gure would ash until setting down.
(2) The PROGRAM gures would display dierently as selecting.
(3) After setting TIME pressing START KEY to start program. After START user still can adjust LEVEL and
matrix display LEVEL and value. In three seconds without any entry then would display WATT value.
6. H.R.C Mode
(1) User can select 55%, 75%, 90% and TARGET value by turning and pressing encoder to conrm.
During selecting the default value, which is calculated by age, would ash.
(2) After setting TIME pressing START KEY to start program.
Page 16
16
Virtufit iConsole Total Fit Crosstrainer
EN
COMPUTER INSTRUCTION
OPERATION
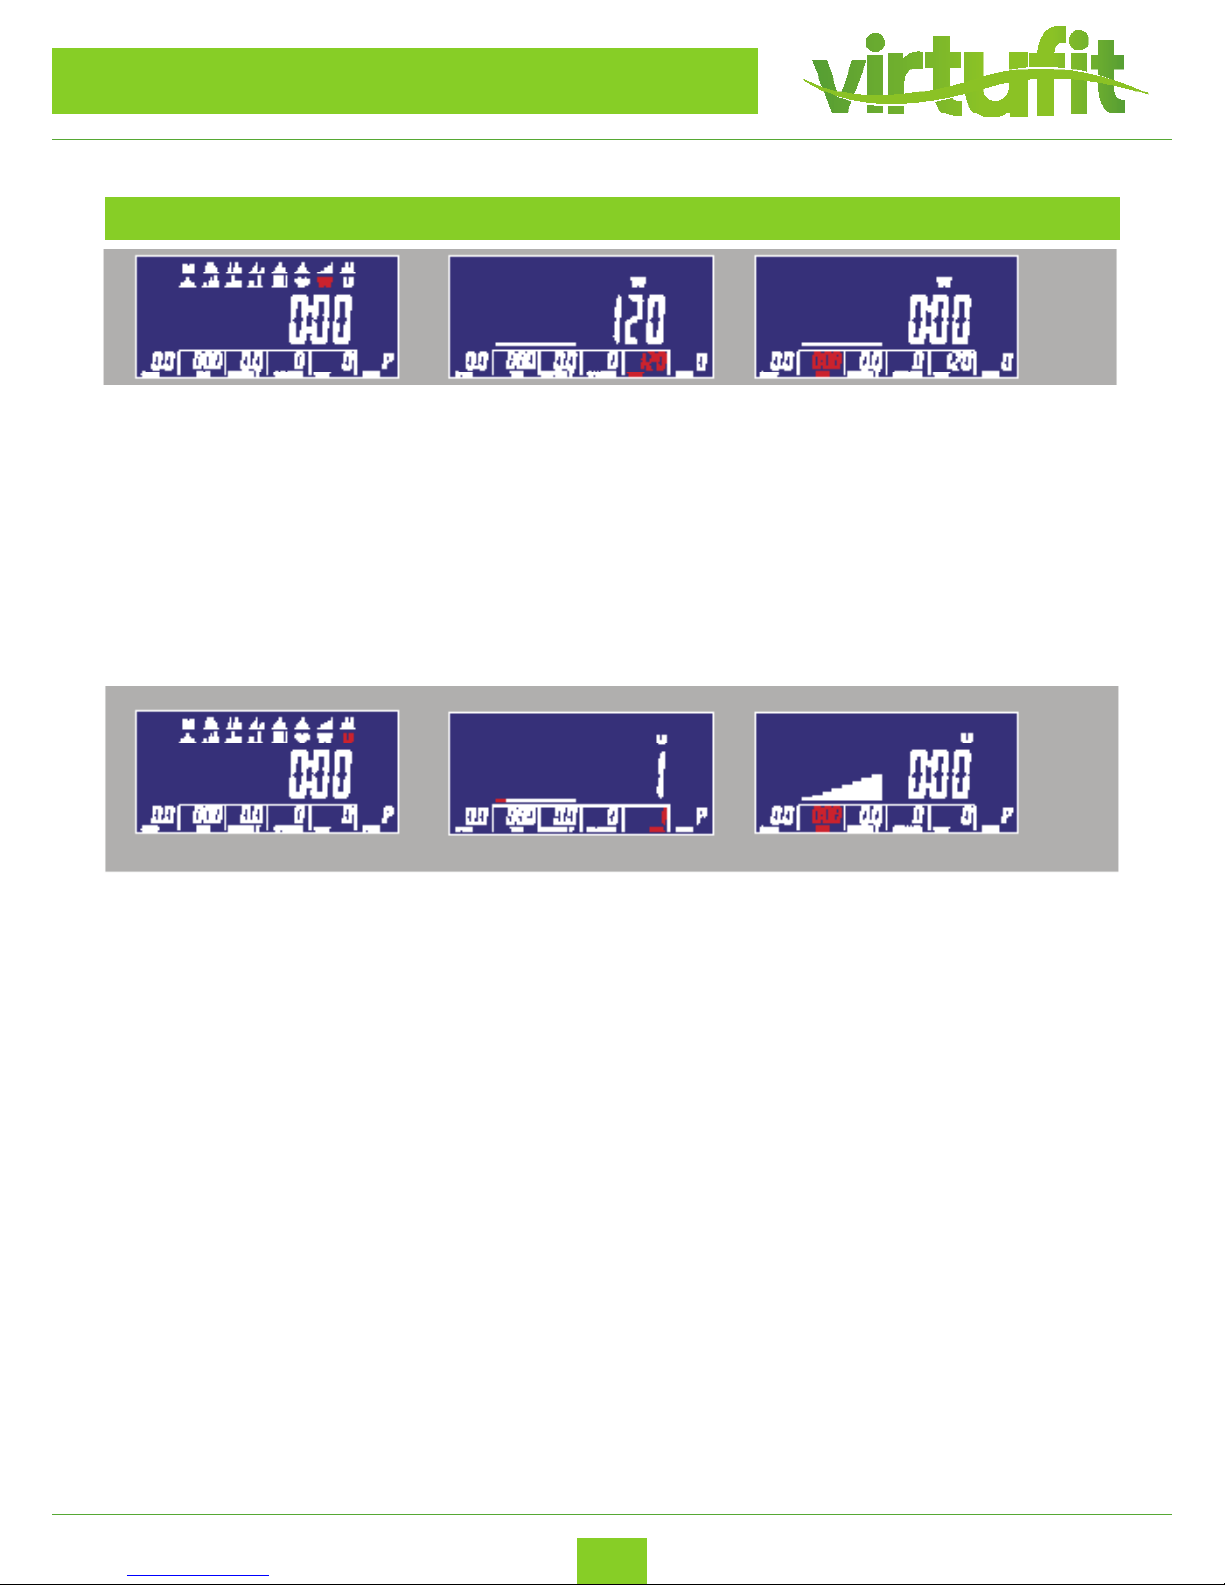
7. WATT mode
(1) WATT target. (default: 120)
(2) Turning and pressing encoder can adjusting WATT value.
(3) Then after START user still can exercise by setting WATT LEVEL and would adjust automatically. (4)
After START user still can adjust WATT value.
8. User Program Mode
(1) Automatically loaded the U1-U4.
(2) Turning and pressing encoder user can set the program (the 8 LEVEL values) that each would ash
until setting down. If user wants to stop setting, pressing encoder for 2 seconds, then the value would be
the same as last setting.
Page 17
17
Virtufit iConsole Total Fit Crosstrainer
EN
COMPUTER INSTRUCTION
OPERATION
9. Body Fat Mode
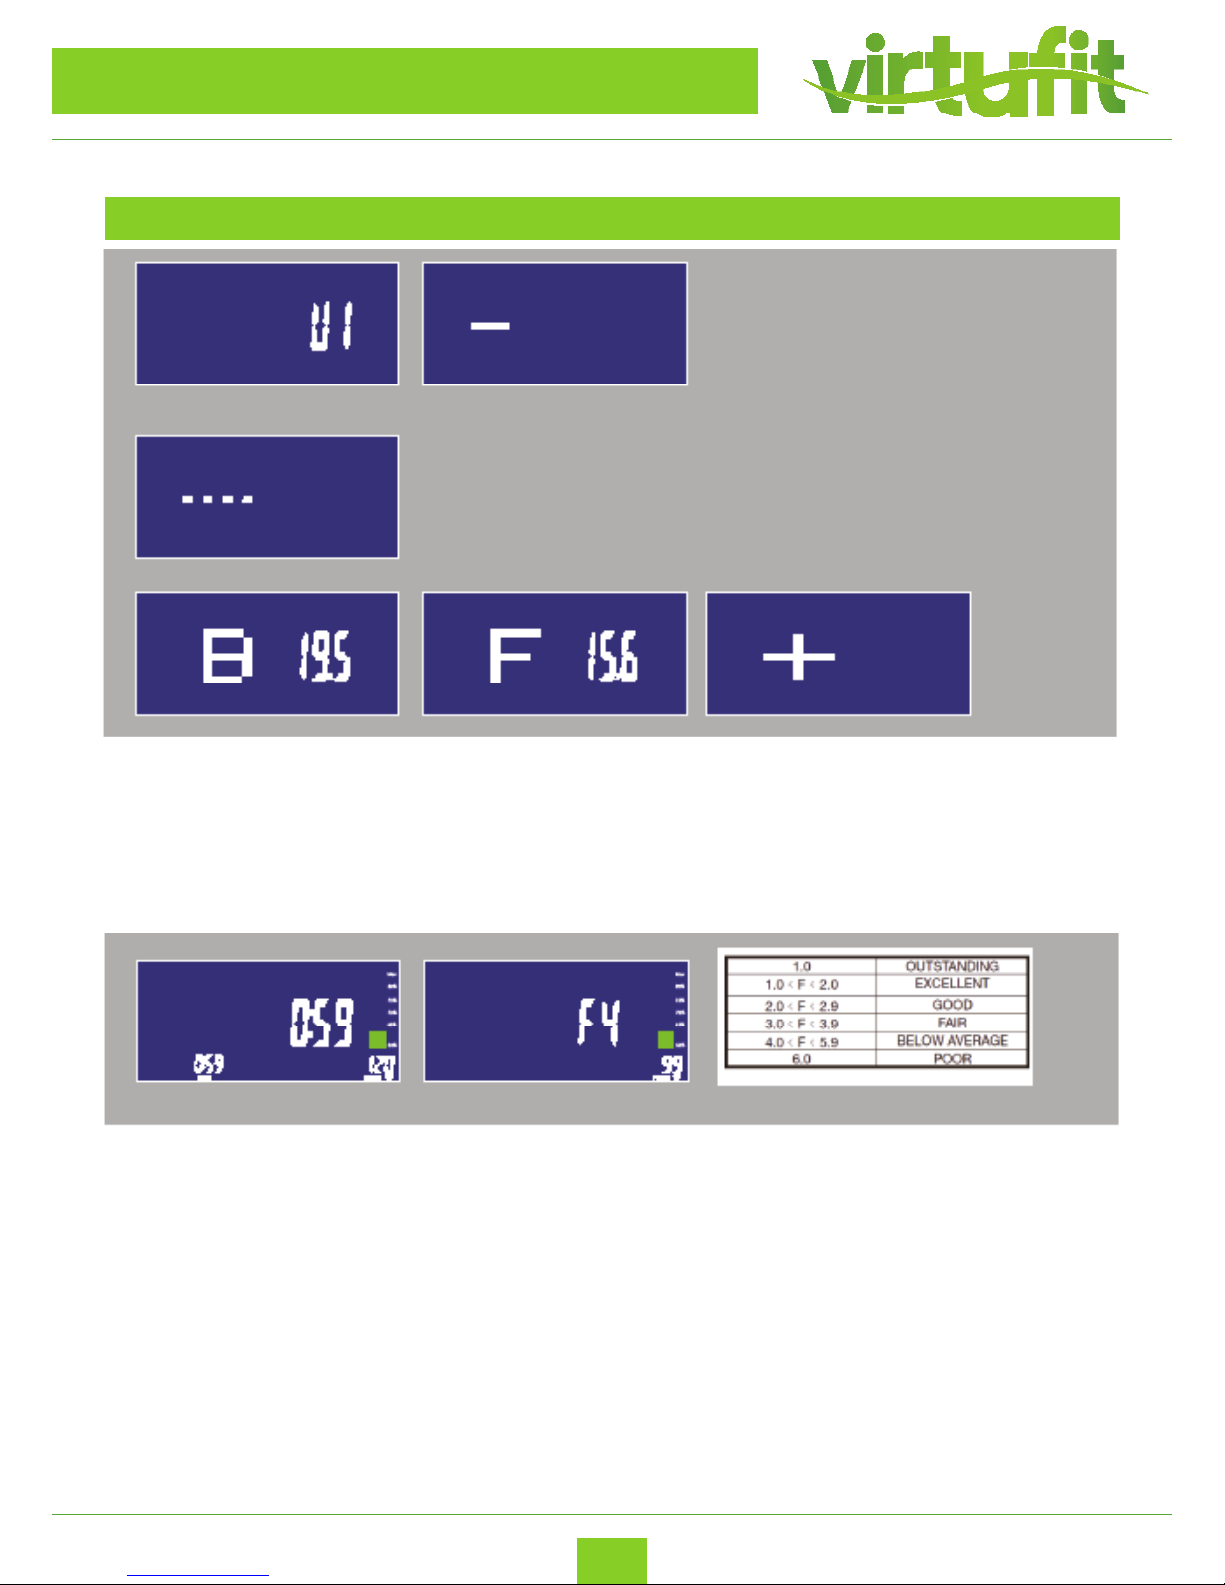
(1) During STOP pressing FAT KEY can operate fat measurement. Then entering U1-U4 for 2 seconds. (2)
After receiving HR signal would start operating.
(3) After 8 seconds would display BMI, FAT%, fat or skin icons.
10. Recovery Mode
During START or STOP input the HR signal and display the value, then pressing the RECOVERY KEY to
operate.
The matrix only displaying time and pulse. Time would count down from 60 seconds and the pulse
shows the real HR value. During or end testing pressing RECOVERY KEY to back to last display.
And after testing continue display real HR value.
Page 18
18
Virtufit iConsole Total Fit Crosstrainer
EN
ICONSOLE+ APP
Download iConsole+ app in App Store or Google Play.
Turn on Bluetooth on tablet or smartphone, search for console device and press Connect. Turn on iConsole+
app on tablet or smart phone, and press connect to start workout with tablet. (password: 0000)
NOTE:
1. Once console is connect to tablet or smart phone, the console will power o.
2. Please exit iConsole app and turn o the Bluetooth, then the console will power on again.
Support iOS devices:
iPod Touch (5th generation), iPod Touch (4th generation), iPod Touch (3rd generation), iPhone
6+,
iPhone 6, iPhone 5S, iPhone 5, iPhone 4S, iPhone 4, iPhone 3GS, iPad Air2, iPad Air, iPad 4, iPad 3, iPad 2 iPad,
iPad Min3, iPad Min2, iPad Min
Support iOS 5.1.1 or above
“Made for iPod,” “Made for iPhone,” and “Made for iPad” mean that an electronic accessory has
been designed to connect specically to iPod, iPhone, or iPad, respectively, and has been certied
by the developer to meet Apple performance standards. Apple is not responsible for the operation
of this device or its compliance with safety and regulatory standards.
Please note that the use of this accessory with iPod, iPhone, or iPad may aect wireless performance.
iPad, iPhone, iPod, iPod classic, iPod nano, iPod shue, and iPod touch are trademarks of Apple Inc.,
registered in the U.S. and other countries.
Support Android devices:
Android tablet OS 4.02 or above
Android tablet resolution 1280X752 pixels
Android phone OS 2.2 or above
Android phone resolution 800X1280 pixels
720X1280 pixels 480X800 pixels
NOTE:
Android is available in English, German, Traditional Chinese, Simplied Chinese.
iOS is available in English, Simplied Chinese. The users can select their prefer language under those
options, otherwise all others would display in English.
Page 19
19
Virtufit iConsole Total Fit Crosstrainer
EN
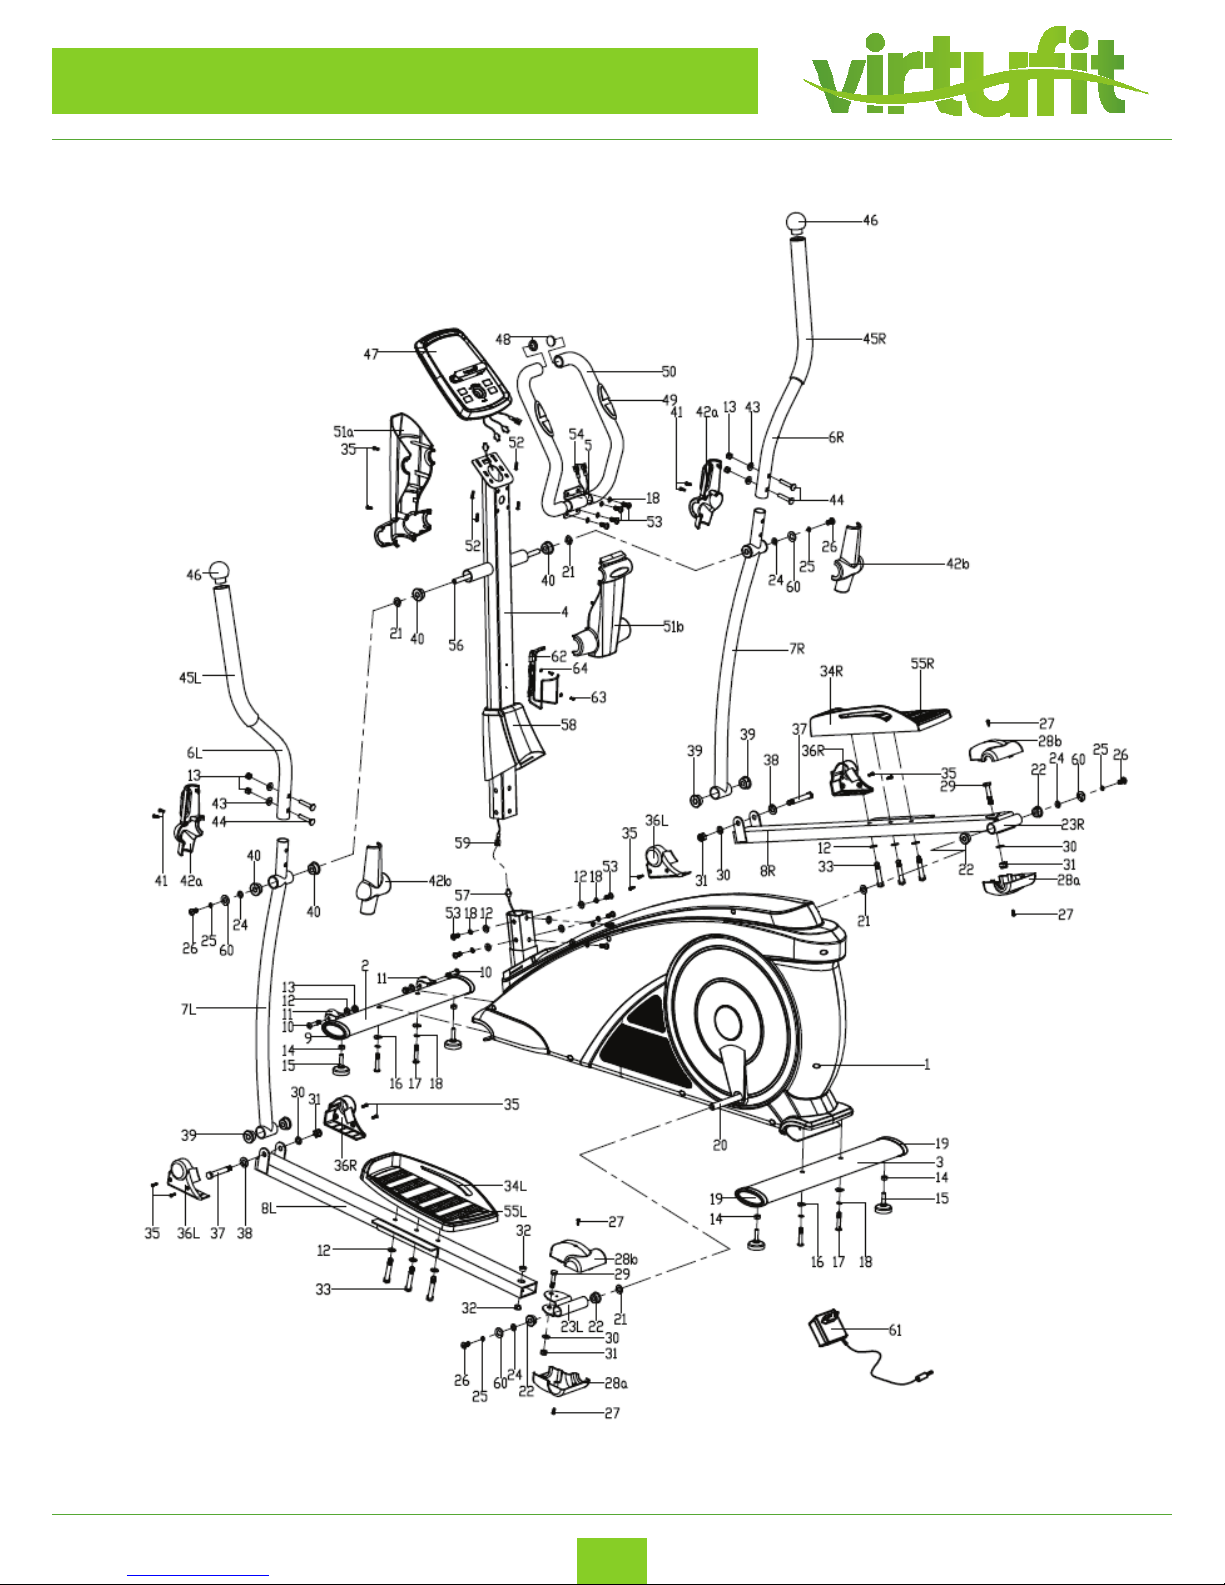
EXPLODED DRAWING
Page 20
20
Virtufit iConsole Total Fit Crosstrainer
EN
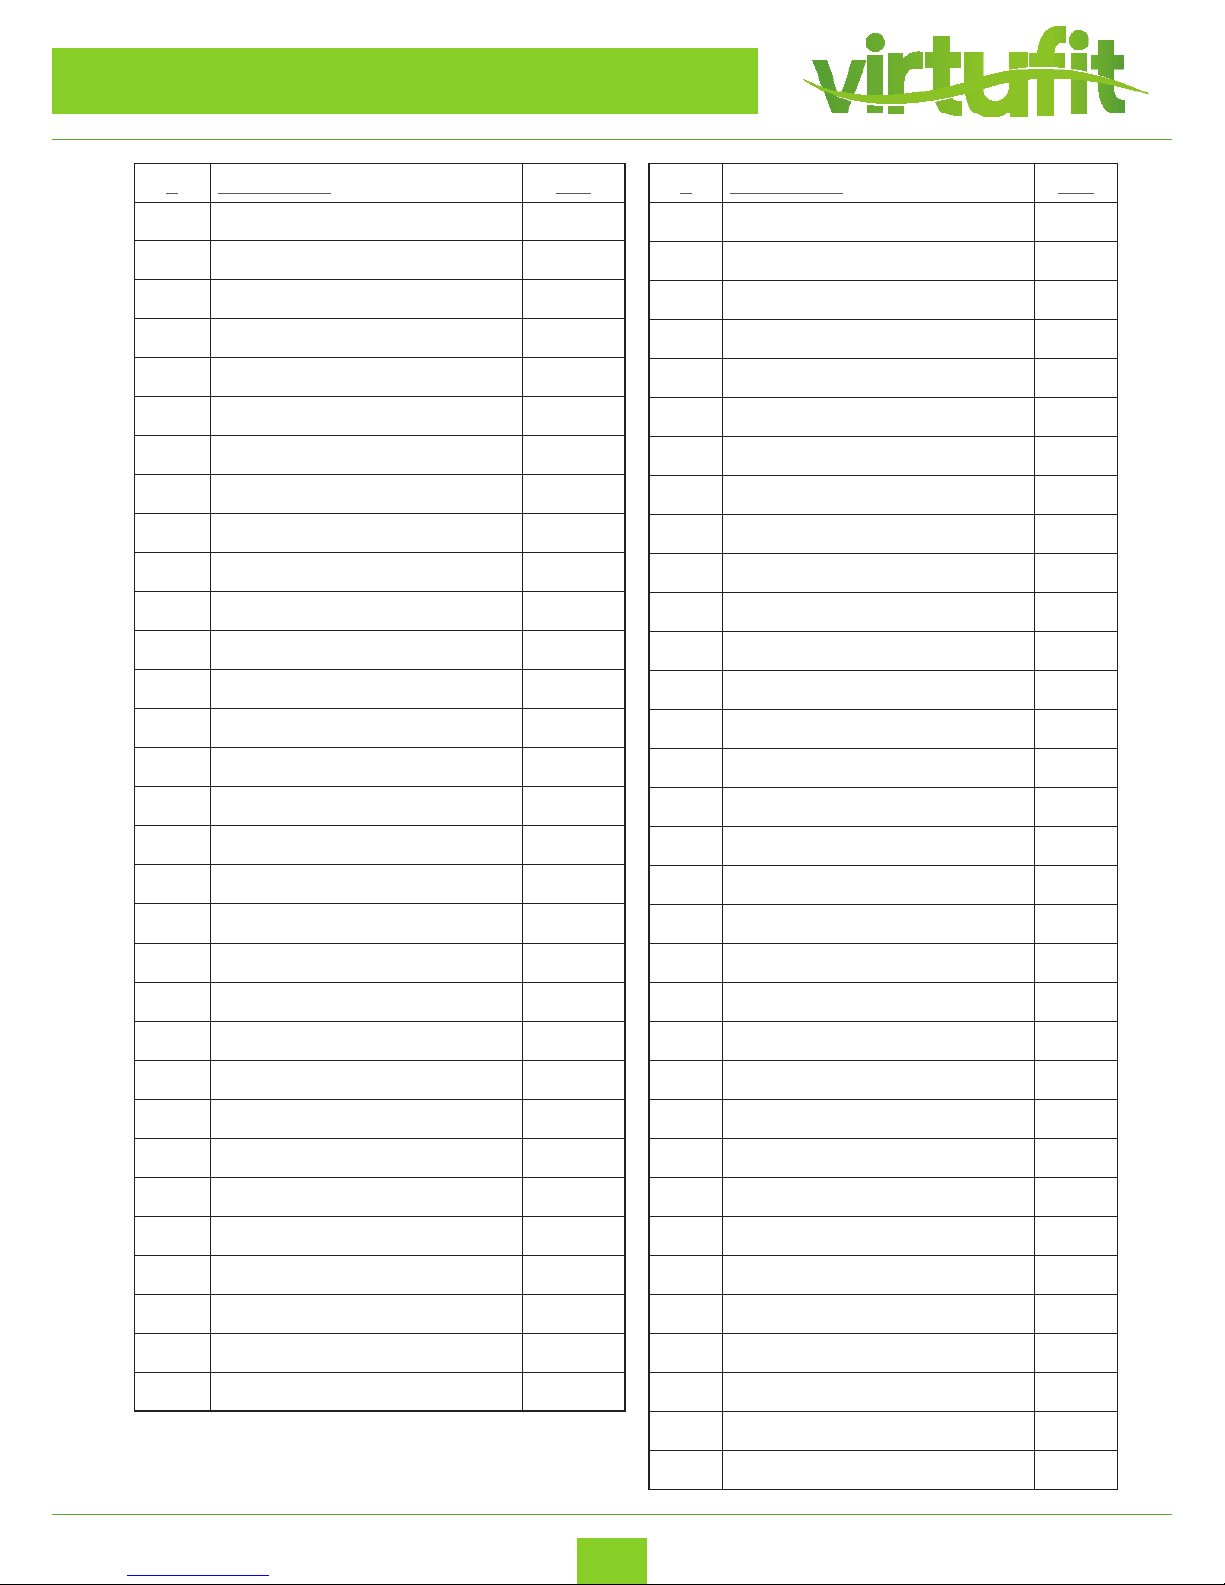
PARTS LIST
# Description Qty
01 Main frame 1
02 Front bottom tube 1
03 Rear bottom tube 1
04 Handlebar post 1
05 Fixed handlebar 1
6 L/R Handlerbar Each 1
7 L/R Swing tube Each 1
8 L/R Pedal support Each 1
09 End cap 2
10 Hex screw M8x40xL12 2
11 Roller 2
12 Flat washer D8x Ø16x1.5 14
13 Nylon nut M8 6
14 Hex nut M10 4
15 Adjustable foot 4
16 Arc washer d8x2x Ø25XR39 4
17 Hex socket screw M8xL58 4
18 Spring washer D8 14
19 End cap 2
20 Crank 2
21 Wave washer Ø17x Ø23x0.3 4
22 Plastic bushing Ø24x16x Ø16.1 4
23 L/R Pedal tube joint Each 1
24 D-shape washer 4
25 Spring washer D10 4
26 Hex socket screw M10x20 4
27 Screw M5x10 4
28 a/b Protective guard Each 2
29 Hex bolt M10x55 2
30 Flat washer D10x Ø20x2 4
31 Nylon nut M10 4
# Description Qty
32 Bushing Ø18x Ø10x11 4
33 Hex screw M8x45 6
34 L/R Pedal Each 1
35 Screw ST4.2x18 10
36 L/R Protective guard Each 2
37 Screw Ø12xM10x80 2
38 Flat washer D12x*24x1.5 2
39 Bushing Ø12x Ø32x23 6
40 Bushing Ø16x Ø31x23 6
41 Screw ST3.5x12 4
42 a/b Protective guard Each 2
43 Arc washer D8x Ø19x1.5xR30 4
44 Carriage bolt M8xL45 4
45 L/R Foam grip Each 1
46 Round cap crossbar 2
47 Console 1
48 Roundcap handlebar 2
49 Handle pulse sensor 2
50 Foam grip 2
51a/b Protective guard Each 1
52 Screw M4x10 4
53 Allen bolts M8x16 10
54 Pulse wire 2
55 L/R Pedal cushion Elk 1
56 Long axle 1
57 Sensor wire 1
58 Protective guard 1
59 Extension sensor wire 1
60 Flat washer D10x Ø20x2 4
61 Adapter 1
62 Kettle holder 1
63 Screw 2
64 Flat washer 2
Page 21

For questions or missing parts please contact your dealer.
 Loading...