

Page 1

VirtueMart 1.1 User Manual
Sören Eberhardt-Biermann
Page 2

VirtueMart 1.1 User Manual
Sören Eberhardt-Biermann
Russel Walker
www.netshinesoftware.com [http://www.netshinesoftware.com/]
$Date: 2008-08-02 22:53:47 +0200 (Sa, 02 Aug 2008) $, $Revision: 1497 $
Copyright © 2005-2008 Soeren Eberhardt-Biermann
This document is published under the Open Content License available from http://www.opencontent.org/opl.shtml [http://
www.opencontent.org/opl.shtml]
Joomla!™ is a Trademark of Open Source Matters, Inc.
Mambo™ is a Trademark of The Mambo Foundation Inc.
Page 3

Table of Contents
Preamble .................................................................................................................... ix
1. Introduction .............................................................................................................. 1
1.1. What is VirtueMart? ......................................................................................... 1
1.2. What does it not do? ........................................................................................ 3
1.3. Screenshots ..................................................................................................... 3
2. Installation ............................................................................................................... 7
2.1. Joomla! / Mambo Installation ............................................................................. 7
2.2. VirtueMart Installation ...................................................................................... 7
3. First Steps .............................................................................................................. 19
3.1. Joomla! Global Configuration ........................................................................... 19
4. Administrator Tutorial .............................................................................................. 21
4.1. Shop Configuration ......................................................................................... 21
4.2. Getting Started ............................................................................................... 28
4.3. Store Setup .................................................................................................... 30
4.4. Countries, Currencies, Core Modules & Functions ................................................ 32
4.5. Manufacturer Administration ............................................................................ 37
4.6. Product Administration .................................................................................... 39
4.7. User Management ........................................................................................... 80
4.8. Order Administration ...................................................................................... 88
4.9. Vendor Administration .................................................................................... 91
4.10. Tax Rates .................................................................................................... 96
4.11. Shipping Modules ......................................................................................... 97
4.12. Payment Methods ........................................................................................ 100
4.13. Coupon Administration ................................................................................ 104
4.14. Reports ...................................................................................................... 105
5. About VirtueMart .................................................................................................. 107
5.1. Known Problems .......................................................................................... 107
5.2. To-Do List .................................................................................................. 107
5.3. About the VirtueMart Project .......................................................................... 107
5.4. The Community ............................................................................................ 107
5.5. The Documentation ....................................................................................... 108
iii
Page 4

iv
Page 5

List of Figures
1.1. Frontend: Category Overview Page ............................................................................ 3
1.2. Frontend: Product Details Page with Review Feature ..................................................... 4
1.3. Administration: Homepage / Summary / Statistics ......................................................... 5
1.4. Administration: Product List ..................................................................................... 5
4.1. The Configuration Form ......................................................................................... 21
4.2. Joomla! Administrator: Component Drop-Down List ................................................... 29
4.3. VirtueMart Control Panel ....................................................................................... 29
4.4. VirtueMart Administration: The Store Form ............................................................... 30
4.5. VirtueMart Administration: Country List ................................................................... 32
4.6. VirtueMart Administration: Country Form ................................................................. 32
4.7. VirtueMart Administration: Currencies List ................................................................ 33
4.8. VirtueMart Administration: Currency Form ................................................................ 33
4.9. VirtueMart Administration: Module List .................................................................... 34
4.10. VirtueMart Administration: Currency Form .............................................................. 35
4.11. VirtueMart Administration: Function List ................................................................. 36
4.12. VirtueMart Administration: Function Form ............................................................... 36
4.13. VirtueMart Administration: Category List ................................................................ 39
4.14. VirtueMart Administration: Category Form .............................................................. 39
4.15. VirtueMart Administration: Product List .................................................................. 41
4.16. VirtueMart Administration: Product Form, Tab 1 - General Information ......................... 42
4.17. VirtueMart Administration: Product Form, Tab 2 - Display Options .............................. 43
4.18. VirtueMart Administration: Product Form, Tab 3 - Product Status ................................. 44
4.19. VirtueMart Administration: Product Form, Tab 4 - Product Dimensions and Weight ......... 45
4.20. VirtueMart Administration: Product Form, Tab 5 - Product Images ............................... 46
4.21. VirtueMart Administration: Product Form, Tab 6 - Related Products ............................. 47
4.22. VirtueMart Administration: Product Form, Price Form in the Product Form .................... 48
4.23. VirtueMart Administration: Price Form in the Product List .......................................... 48
4.24. VirtueMart Administration: Price Update Notice ....................................................... 49
4.25. VirtueMart Administration: Product List - List Prices ................................................. 49
4.26. VirtueMart Administration: Product Form - List Prices ............................................... 50
4.27. VirtueMart Administration: Product Price List .......................................................... 50
4.28. VirtueMart Administration: Product Price Form ........................................................ 51
4.29. VirtueMart Administration: Add Attribute ................................................................ 52
4.30. VirtueMart Administration: Add a new item (=child product) ....................................... 53
4.31. VirtueMart Administration: Edit Items ..................................................................... 53
4.32. Attribute Manager in the Product Form ................................................................... 55
4.33. VirtueMart Administration: Product Type Management - Product Type Information ......... 58
4.34. VirtueMart Administration: Product Types Management - Product Type List ................... 59
4.35. VirtueMart Administration: Product Types Management - Product Type -Parameter
Information ................................................................................................................ 60
4.36. VirtueMart Administration: Product Types Management - Parameters of Product Type ...... 62
4.37. VirtueMart Administration: Product Types Management - Adding new Product Type to a
Product FASE 1 .......................................................................................................... 64
4.38. VirtueMart Administration: Product Types Management - Adding new Product Type to a
Product FASE 2 .......................................................................................................... 64
4.39. VirtueMart Administration: Product Types Management - Adding new Product Type to a
Product FASE 3 .......................................................................................................... 65
4.40. VirtueMart Administration: Product Types Management - Flypage of a Product assigned
to a Product Type ....................................................................................................... 66
4.41. VirtueMart Administration: Product Types Management - Creating a new product already
assigned to a Product Type FASE 1 ............................................................................... 67
4.42. VirtueMart Administration: Product Types Management - Creating a new product already
assigned to a Product Type FASE 2 ............................................................................... 68
4.43. VirtueMart Administration: Product Types Management - Creating a new product already
assigned to a Product Type FASE 3 ............................................................................... 69
v
Page 6

VirtueMart 1.1 User Manual
4.44. VirtueMart Administration: Product Types Management - Advanced Search According to
Parameters - Selecting Product Type ............................................................................... 70
4.45. VirtueMart Administration: Product Types Management - Advanced Search According to
Parameters Form - Selecting Parameter Values ................................................................. 71
4.46. VirtueMart Administration: Product Types Management - Advanced Search According to
Parameters Search Results ............................................................................................ 72
4.47. VirtueMart Administration: File Form ..................................................................... 73
4.48. VirtueMart Administration: ................................................................................... 74
4.49. VirtueMart Administration: File List ....................................................................... 74
4.50. File Form ........................................................................................................... 75
4.51. Download-Info Email ........................................................................................... 76
4.52. Resend Download ID ........................................................................................... 77
4.53. Re-enable Downloads ........................................................................................... 77
4.54. VirtueMart Administration: The Product Discount List ............................................... 78
4.55. VirtueMart Administration: Product Discount Form ................................................... 78
4.56. Add a Product Review (Administrator Side) ............................................................. 79
4.57. List of Product Reviews ....................................................................................... 80
4.58. VirtueMart Administration: Shopper Group List ........................................................ 81
4.59. VirtueMart Administration: Shopper Group Form ...................................................... 81
4.60. VirtueMart Administration: User Group List ............................................................. 82
4.61. VirtueMart Administration: User Group Form ........................................................... 82
4.62. VirtueMart Administration: The New Group in the Module List ................................... 83
4.63. VirtueMart Administration: Manage User Fields ........................................................ 83
4.64. VirtueMart Administration: Add a new User Field ..................................................... 85
4.65. VirtueMart Administration: New Field "EU Vat ID" in the registration form ................... 86
4.66. VirtueMart Administration: Re-Ordering in the Field List ............................................ 87
4.67. VirtueMart Administration: Modifying a Field .......................................................... 88
4.68. VirtueMart Administration: Order List ..................................................................... 89
4.69. VirtueMart Administration: Upper Part of the Order Details ........................................ 90
4.70. VirtueMart Administration: Bottom of the Order Details ............................................. 90
4.71. VirtueMart Administration: Vendor List for a Category .............................................. 92
4.72. VirtueMart Administration: Vendor Category Form ................................................... 92
4.73. VirtueMart Administration: Vendor Category List ..................................................... 93
4.74. VirtueMart Administration: Vendor Category Deletion ............................................... 93
4.75. VirtueMart Administration: Shipper Form ................................................................ 97
4.76. VirtueMart Administration: Shipping Rate List ......................................................... 98
4.77. VirtueMart Administration: Shipping Rate Form ....................................................... 99
4.78. VirtueMart Administration: Payment Method List .................................................... 100
4.79. VirtueMart Administration: Payment Method Editor ................................................. 101
4.80. VirtueMart Administration: Paypal Configuration Screen ........................................... 102
4.81. VirtueMart Administration: Coupon List ................................................................ 104
4.82. VirtueMart Administration: Coupon Form .............................................................. 104
vi
Page 7

List of Examples
4.1. .......................................................................................................................... 63
vii
Page 8

viii
Page 9

Preamble
The content of this document is related to VirtueMart.
VirtueMart is free Software, licensed under GNU/GPL; VirtueMart [ http://virtuemart.net ], ©
2005-2008 Sören Eberhardt-Biermann & the VirtueMart Development Team
The Software 'VirtueMart' is intended for use in Joomla! (Versions 1.0, 1.5) or Mambo (Versions
>= 4.5.3, 4.6.x).
(Joomla! and Mambo is free Software, licensed under GNU/GPL; Joomla! is available from
www.joomla.org [http://www.joomla.org])
ix
Page 10

x
Page 11

Chapter 1. Introduction
1.1. What is VirtueMart?
1.1.1. About
VirtueMart is a PHP-based Shopping Cart Application for selling goods over the internet. It's a
Component (= plugin) for a Content Management System called Joomla! (and Mambo) and can't be
used without Joomla!. It installs fairly easy using the automatic Component and Module Installer. It's
intended for use in small / mid-sized Online Businesses / Online-Shops. So every user who wants to
build up a Online Store can use this Component for selling something to Customers.
1.1.2. Features
VirtueMart offers a lof of Features, some of the standard Features are listed here. Please note that you
can extend the Functionality of Joomla! and VirtueMart using Plugins, Components, Templates and
Modules to make them do what you need!
So please visit virtuemart.net [http://virtuemart.net] and extensions.joomla.org [http://
extensions.joomla.org] for more Features & Extensions.
1.1.2.1. General Features
• capable of using Secure Sockets Layer (https) Encryption (128-bit)
• flexible Tax Models
• Model 1: Zone based Tax Calculation (city/state & country/region)
• Model 2: Store Owner based Tax Calculation
• Model 3: EU Mode (Store Owner based Tax Calculation when Customer comes from an EU
Country)
• Shoppers can manage their User Accounts (registration required)
• Shipping Address Management (Customers can enter their own Shipping Addresses)
• Order History: Shopper can view all their previous Orders (and Order Details)
• Order Confirmation Mail (customizable!) is sent to Shopper and Store Owner
• Multiple Currencies (you can allow Customers to change the Currency and buy using an alternative
Currency)
• Multiple Languages (using the Joomla! Component Joom!Fish).
1.1.2.2. Product Catalog Features
• Powerful Web-Administration Interface (Javascript-powered)
1
Page 12

Features
• Manages an unlimited Number of Products and Categories,
• Can be used as a Shop or just as an Online-Catalog (you can even turn off Price Display)
• quick Search for Products, Categories and Manufacturers; filter by features or discounted Products
• Product Ratings & Testimonials (moderated or auto-published)
• feature specific Products by setting them "on special"
• Product Availability: show how fast a Customer can expect delivery
• Handles downloadable Products,
• "Product is back in Stock"-Notification for subscribed Customers
1.1.2.3. Administration Features
• multiple Images and Files (like Spec Sheets and Flyers) per Product,
• Product Attributes (like Size or Color) can be added to Products,
• Product Types for Classification (like "Car", "Motorbike" or "Music Album")
• Shopper Groups for Customers (allows different Price Levels and Payment Options),
• multiple Prices per Product (Quantity-based and/or Shopper Group-based Prices)
• flexible Price Display (number & currency formatting; including or excluding tax)
• On-the-Fly Price Conversion between different Currencies
• Shop Statistics / Control Panel with a Summary of new Customers, new Orders....
• Stock Level Control for Products and Items
• Order Management with Order History, Customer Notification and Order Edit Functionality
• basic Reporting Feature: sold Items, monthly&yearly Revenue
• Order Status Management
• manage different Currencies, Countries & States
1.1.2.4. Payment Modules
• capable of live Credit Card Processing
• use pre-defined Payment Gateways like authorize.net® [http://www.authorize.net], PayPal [http://
www.paypal.com], 2Checkout [???], eWay, Worldpay, PayMate and NoChex,
• extend your Shop with other Payment Modules using the Payment Module API!
1.1.2.5. Shipping Modules
2
Page 13

What does it not do?
• flexible Shipping Carriers and Rates Configuration
• Live-Shipping Rates using Shipping Modules (e.g. InterShipper, UPS, USPS, FedEx or Canada
Post; Modules can use the Shipping Rate API).
• extend your Shop with other Payment Modules using the Shipping Module API!
1.2. What does it not do?
VirtueMart is a simple Online-Shop application. But it is surely no "out-of-the-box" killer application
for professional companies. It's not tested in 100% secure environments. It's not meant to be 100%
performant.
You will need some time to customize this application to fit your needs.
Be prepared to be confronted with bugs, which have currently not been found yet. VirtueMart has an
active community and a forum where problems and questions can be discussed. (http://virtuemart.net)
1.3. Screenshots
Frontend Screenshots (using the Joomla! 1.5
Template JA Purity)
Figure 1.1. Frontend: Category Overview Page
3
Page 14

Frontend Screenshots (using the
Joomla! 1.5 Template JA Purity)
Figure 1.2. Frontend: Product Details Page with Review Feature
4
Page 15
Administrator Screenshots
Administrator Screenshots
Figure 1.3. Administration: Homepage / Summary / Statistics
Figure 1.4. Administration: Product List
5
Page 16

6
Page 17

Chapter 2. Installation
2.1. Joomla! / Mambo Installation
Unless you have downloaded the VirtueMart eCommerce Bundle (including Joomla!), Joomla! and
Mambo must be installed prior to the Installation of VirtueMart, because VirtueMart needs a CMS
as runtime environment.
The Installation of Joomla! or Mambo is not covered in this Manual, because it is subject to change
and would have to cover a series of Tutorials for all different versions of Joomla! and/or Mambo.
You can find further information about the Installation in the
• Joomla! Installation Tutorial Links [http://docs.joomla.org/Joomla_installation]
• Mambo Knowledgebase: Installation and Configuration [http://docs.mambo-foundation.org/en/?
CategoryID=4]
2.2. VirtueMart Installation
2.2.1. Requirements
2.2.1.1. Server Requirements
VirtueMart has the following System Requirements:
• Apache 1.3.19 or above - http://www.apache.org, recommended: Apache 2.2.x
• PHP 4.2.x or above - http://www.php.net, recommended: PHP 5.2.x
• MySQL 3.23.x or above - http://www.mysql.com, recommended: MySQL 5.0.x
• Joomla! 1.0.x, 1.5.x or Mambo (>= 4.6.2), recommended: Joomla! 1.0.x
You must ensure that you have MySQL-, XML- and Zlib-Support built into your PHP. PHP should
be compiled with support for https (openSSL) and cURL!
PHP Safe Mode should be turned off.
Important
The MySQL user, you access the database with in production use, must have the rights to
create temporary tables.
2.2.1.2. Client Requirements
VirtueMart can be used with most major browsers including: Internet Explorer (version 5.5+), Firefox,
Opera 9+, Safari and Konqueror. Javascript doesn't need to be enabled in the frontend (when shopping
and checking out). The administration section requires Javascript to be enabled.
The client/browser needs to be capable of accepting Cookies and Cookies must be enabled.
2.2.2. Download
2.2.2.1. General
First of all you need to download VirtueMart. You can download all available version from the
VirtueMart Developer Portal - dev.virtuemart.net.
7
Page 18

Installation and Upgrade
The official Download Page is http://dev.virtuemart.net/cb/wiki/1693.
2.2.2.2. Editions
VirtueMart is available in different distribution formats.
Important
The "Complete Package" and the "Manual Installation Package" are available in two basic
versions: one for Joomla! 1.0/Mambo and one for Joomla! 1.5. The second one has the
extension ".j15.zip" (or ".j15.tar.gz").
2.2.2.2.1. VirtueMart eCommerce Bundle
This Package is a modified version of the official Joomla! Distribution. It already contains a
preinstalled, pre-configured VirtueMart, so you don't need to install it separately.
[http://dev.virtuemart.net/cb/wiki/1693]
As this bundle is a complete Joomla! package, you can't use it for an existing Joomla! installation,
but only for a completely new site.
2.2.2.2.2. The VirtueMart "Complete Package"
The complete package is an archive with all the things you need to install VirtueMart on Joomla! or
Mambo using their automatic installer system. You can extract the parts from the complete package
and upload&install them one by one.
2.2.2.2.3. The VirtueMart "Manual Installation Package"
The Manual Installation Package contains all the files from VirtueMart in the typical Joomla! directory
structure. It doesn't contain any installable items.
This archive is meant to be uploaded into an existing Joomla!/Mambo installation via FTP. After that
VirtueMart can be accessed and the necessary table structure will be set up.
If you want to upgrade VirtueMart 1.0.x to VirtueMart 1.1.x, this is your choice.
2.2.3. Installation and Upgrade
2.2.3.1. New Installation
When having met all the requirements and when you are running Joomla! or Mambo you have two
choices:
1. The automatic installation with Joomla's / Mambo's Element (Component-, Module-, Mambot-)
Installer.
2. The manual installation.
Some users can't use the automatic Installer because of the PHP setting 'safe_mode' being set to 'On'.
In case you're running into trouble with the automatic Installer try the manual installation instead.
2.2.3.2. Upgrade from mambo-phpShop
You want to upgrade to VirtueMart from mambo-phpShop? That is possible.
8
Page 19

Installation and Upgrade
All you need to do is install VirtueMart! It will automatically convert your installation of mambophpShop.
So just follow the instructions for the automatic installation (or if you have difficulties with it: the
manual installation).
Note
It is recommended to uninstall the old mambo-phpShop modules after you have installed the
VirtueMart component and then install the new VirtueMart modules.
Caution
It is absolutely necessary to make a backup of your whole site before you upgrade your
shop! An upgrade failure can always happen! So please: BACKUP, BACKUP, BACKUP!
2.2.3.3. Upgrade from VirtueMart 1.0.x
If you're a user of VirtueMart 1.0.x (or mambo-phpShop >= 1.2 stable) you can easily update your
existing shop.
1. Download the file VirtueMart_1.1.0-Manual_Installation_Package.tar.gz
(or the .zip file if you have difficulties unpacking a .tar.gz file).
2. Unpack that archive using WinRAR or a similar Archive Software (7-zip).
3. You should now see some directories:
• /administrator
• /components
• /modules
• /mambots (/plugins for the Joomla! 1.5 version)
The directory structure in those directories is the same as in your Joomla!/Mambo site.
4. Open up an FTP Connection to your site, change to the root directory of your Joomla!/Mambo site
and upload the directories.
Tip
The FileZilla FTP Client [http://filezilla-project.org/download.php?type=client] is a
fabulous FTP client (Open Source!) and reports transfer errors, so you know if everything
has been successfully uploaded or not.
You will probably have to confirm overwriting some existing files in these directories. An existing
configuration file will not be overwritten.
5. Login in to the Joomla! / Mambo Administration (the so-called Backend). http://www.xxxxxx.com/
administrator/
6. When having logged in, navigate to your VirtueMart. You should now see the "Installation was
successful....[UPDATE MODE]..." Screen. There you can click on "UPDATE NOW" - do that
now. Your database structure will be automatically updated.
7. Go to the Store Configuration Form (Admin => Configuration) and make all necessary adjustments.
Make sure you Save the Configuration Form once you're done.
That's it.
9
Page 20

Automatic Installation
Warning
This has been said often enough before, but now once again: before you attempt to upgrade
your existing Store to VirtueMart 1.1 create a BACKUP first and test the upgrade on a local
copy of your store!
Important
Themes are a new feature introduced with VirtueMart 1.1. So the complete templating
system has been changed. If you have modified the shop templates (product_details, browse,
order_email) that shipped with VirtueMart 1.0.x, you will have to manually convert your
existing templates to the new theme structure!
2.2.4. Automatic Installation
To install VirtueMart into Joomla! or Mambo you need to download the file VirtueMart_1.1.xCOMPLETE_PACKAGE.zip (or VirtueMart_1.1.x-COMPLETE_PACKAGE.j15.zip if
you want to install on Joomla! 1.5). This file contains various Elements for VirtueMart.
Important
This "complete package" file is not installable! Its contents are, but they must be unpacked
first.
"Complete Package" Contents:
• 1 Component (com_virtuemart_1.1.x.zip)
• 1 Main VirtueMart module (mod_virtuemart_1.1.x.zip)
• 10 additional Modules
• 2 Mambots (1 Search, 1 Content Mambot)
1. Unpack the file 'VirtueMart_1.1.x_COMPLETE_PACKAGE.zip' to a local directory.
2. Log in into the Backend (using the URL ' http://www.yoursite.tld/administrator')
to access the administrative interface.
10
Backend Login Screen
You need to have the priviliges of an Administrator / Superadministrator to install Elements.
Page 21

Automatic Installation
3. In Mambo/Joomla! 1.0 click Installers # Components. In Joomla! 1.5 click Extensions # Install/
Uninstall in the Top Menu.
Joomla! 1.5 Extension Manager
Caution
You must check if the directories listed above the component list are writable! If the
directories are not writable, use ftp or JoomlaXplorer [http://joomlacode.org/gf/project/
joomlaxplorer/] to change the permissions. For proper installation, the directories should
be set to 777, after that you can change back to 755.
In the part Upload new component (or Upload Package File) select the file
'com_virtuemart_1.1.x.zip'. This is the package file which contains all files for the
VirtueMart Component, located on your computer (see Step 1).
Now click on 'Upload File & Install'.
Note
Since the ZIP file is about 2 MB in size, you will have to wait a moment while the file
is being uploaded to your server and unpacked. If the upload takes too long, try Step 4
or do the Manual Installation.
4. Alternative: You can unpack the contents of 'com_virtuemart_1.1.x.zip' and upload those
files to a directory in your Joomla! site (e.g /media or /tmp) using an FTP client. After you've done
that, specify the directory on the server from where you want to install the files and click 'Install'.
Note
Package Files are mostly a ZIP or tar.gz compressed file directory, which includes all
information for the installation. The main file is an XML document which describes the
installation process. In order to use this function for your installation, your web server
must support the zlib extension. You can check this in the Admin Section Menu
item, System > System Info > System Information.
5. The VirtueMart Component should be installed now. You'll see the Welcome Message Screen with
some options for the next steps:
11
Page 22

Automatic Installation
Installation Welcome Screen
You can now choose whether you want to install Sample Data (some Products, with Attributes,
sorted in Categories) to see how things have to be set up.
Or you can 'go directly to the Shop >>' without installing Sample Data.
Caution
This step again takes some time & the VirtueMart Installer is performing Database
Queries now. So please be patient (especially when you're on Mambo)!
6. Now you must install the VirtueMart "Main Module". In Mambo/Joomla! 1.0 click Installers #
Modules. In Joomla! 1.5 click Extensions # Install/Uninstall in the Top Menu.
Choose the file mod_virtuemart_1.1.x.zip in the File Dialog and click 'Upload File &
Install'.
Repeating this step you can install the additional modules for VirtueMart.
Publishing the Module:
Click 'Modules' # 'Site Modules' in the Top Menu. Now browse through the list of installed modules
and find the one with the name 'VirtueMart Module'. Select it (click on the name) and modify
its settings/details. You can now choose where to put the Module on your Joomla! site. For more
information about modules please consult the Joomla! documentation (help.joomla.org [http://
help.joomla.org]).
12
Important
Anywhere you place the module on your site, IT MUST BE PUBLISHED. If it is not, you
can't access or browse your shop.
Page 23

Additional modules
mod_product_categories "Product Categories Module"
mod_productscroller "Product Scroller Module"
mod_virtuemart_allinone "All-in-one module"
mod_virtuemart_cart "Mini-Cart Module"
Automatic Installation
It can display the product categories you have set up.
It can scroll certain products somewhere on your site using a
marquee tag.
Can display the latest, featured, top-ten or random products in
one module using tabs.
Displays the mini-cart for the customer with a link to the cart
page.
mod_virtuemart_currencies "Currency Module"
Displays a drop down list of the Currencies, which are
available/accepted in your Store.
mod_virtuemart_featuredprod "Featured Products Module"
Can display featured products in your store. Featured products
are those which are "on special".
mod_virtuemart_latestprod "Latest Products Module"
Displays the newest products in your store.
mod_virtuemart_login "Login Module"
Displays a Login Form for VirtueMart Users.
mod_virtuemart_manufacturers "Manufacturer Module"
Shows all manufacturers from your store with a link to find all
products of the selected manufacturer.
mod_virtuemart_randomprod "Random Products Module"
Does what the name says: displays random products from your
store or a certain category.
mod_virtuemart_search "Searchbox Module"
Displays the VirtueMart searchbox (which lets the customer
search for products).
mod_virtuemart_topten "Top Ten Products Module"
Displays the bestsellers from your store.
7. Recommended: Mambot/Plugin Installation
13
Page 24

Manual Installation
Click on 'Mambots' # 'Install/Uninstall' (or 'Extensions' # 'Install/Uninstall when using Joomla! 1.5)
in the Top Menu.
Search Bot Performs a search on the product table and delivers
search results for Joomla's / Mambo's site search. Select
the file 'vmxsearch.mambot_1.1.x.zip' (called
'vmxsearch.plugin_1.1.x.j15.zip' for Joomla!
1.5) and click 'Upload File & Install'.
ProductSnapshot Mambot/Plugin Displays product figure/price/add-to-cart link in content
items.
Select the file
'vmproductsnapshots_1.1.x.zip' (called
'vmproductsnapshots_1.1.x.j15.zip' for
Joomla! 1.5) and click 'Upload File & Install'.
Publishing the Mambots/Plugins:
Mambots/Plugins need to be published before they do ANYTHING. Click on Mambots # Site
Mambots (Joomla! 1.5: Extensions # Plugins) in the Top Menu. Now browse through the list of
installed Mambots/Plugins and find 'vmxsearchbot' and 'vmproductsnapshot'. Select one (click on
the name) and modify its settings/details. Remember to publish it. For more information about
Mambots/Plugins please consult the Joomla! documentation ( http://help.joomla.org).
You're now done with the Installation of VirtueMart and its Elements.
2.2.5. Manual Installation
The installation has failed? Does your site run with PHP's Safe Mode?
You don't need to pull out your hair! You can still attempt the manual installation.
Manual Installation is a little bit harder than the automatic installation.
1. Download the Manual Installation Package (this is just another Package Form of VirtueMart).
2. Unpack the archive file VirtueMart_x.x_Manual-Installation-Package.tar.gz
you have downloaded in Step 1 to a local directory using Winzip or Winrar.
You should now see at least four directories. The directory structure in those directories is the same
as in your Joomla! / Mambo site:
/administrator
/components
/mambots (/plugins for Joomla! 1.5)
/modules
3. Open up an FTP Connection to your site, navigate to the root directory of your Joomla!/Mambo
site and upload the directories.
14
Tip
The FileZilla FTP Client [http://filezilla-project.org/download.php?type=client] is a
fabulous FTP client (Open Source!) and reports transfer errors, so you know if everything
has been successfully uploaded or not.
You will probably have to confirm overwriting some existing files in these directories.
Page 25

Language Installation
4. Login in to the Backend (Administration) of your site (http://www.your_site.com/
administrator/).
5. When having logged in, you see this URL in the address bar:
http://www.yoursite.tld/administrator/index2.php
In Joomla! 1.5 it's http://www.yoursite.tld/administrator/index.php
6. Now just add "?option=com_virtuemart" after index2.php, so it looks like this in your
browser's address bar:
http://www.yoursite.tld/administrator/index2.php?
option=com_virtuemart
and hit Enter.
7. You should now see the "Installation was successful..." Screen. There you can click on "GO TO
THE SHOP >>" or "INSTALL SAMPLE DATA >>" (when you want to have some sample
Products and Categories in your Shop). That's it for the first.
8. To install the Modules and Mambots/Plugins for VirtueMart, follow the instructions of the
Automatic Installation, Step 6 and Step 7. If this doesn't help you, because NO automatic
installations are possible, you can manually upload the files (you have probably already done this
in step 3).
Modules and Mambots/Plugins require entries in the tables jos_mambots/jos_plugins and
jos_modules before they can be used.
You need to add these entries by uploading an SQL file (using phpMyAdmin [http://
phpmyadmin.net]) that contains all necessary queries:
/administrator/components/com_virtuemart/sql/
virtuemart.installation.addons.joomla.sql
Use the file virtuemart.installation.addons.joomla15.sql when you're on
Joomla! 1.5 and virtuemart.installation.addons.mambo.sql when you're on
Mambo.
Now you should have installed VirtueMart correctly.
2.2.6. Language Installation
Virtuemart is localized and its Interface can be switched to various Languages. From the start,
VirtueMart only comes with english language files.
To make your VirtueMart run in the language of your choice you need to follow these steps:
1. Download & Install new Joomla! Language Files
To be able to use other languages, you must first find the right language File for Joomla!/Mambo.
Joomla! Language Files can be downloaded from the Joomla
Extensions Directory: Translations for Joomla! [http://extensions.joomla.org/index.php?
option=com_mtree&task=listcats&cat_id=1837&Itemid=35].
2. Upload the VirtueMart Language Files
VirtueMart Language files are available in a separate "Language Pack". You can find the Language
Pack for your version in the VirtueMart Downloads Directory [https://dev.virtuemart.net/cb/proj/
15
Page 26

Installation FAQ
doc.do?proj_id=1]. Please note that the language files of VM 1.0 and VM 1.1 are of a completely
different structure and not compatible.
After you have extracted the Language Pack on your local hard drive, upload its contents to the
directory
/administrator/components/com_virtuemart/languages
If you have no access or permission to upload the files via FTP, you can upload the whole Language
Package (as one complete archive) to that directory using the eXtplorer. After that you can extract
the file directly on the server.
3. Switch the global Language + Locale
For Joomla! 1.0/Mambo: go to the global Configuration Screen, switch to the Tab "Locale" and
change the language option to the language of your choice.
For Joomla! 1.5: go to "Extensions" => "Languages", select the language of your choice and make
it "default" by clicking that icon in the toolbar.
VirtueMart should now pick up the correct language from its own language folder.
Note
The Language Files for Joomla!/Mambo and VirtueMart should have the same file name
(or a correct value for the tag "backwardLang" in the XML installer file of the language
under Joomla! 1.5).
This section doesn't cover information on how to set up a multi-language site with contents in more
than one language.
This can be achieved by using 3rd Party Tools like
• Joom!Fish [http://extensions.joomla.org/component/option,com_mtree/task,viewlink/link_id,460/
Itemid,35/]
• Nooku [http://nooku.org]
2.2.7. Installation FAQ
2.2.7.1.1.The Installer tells me "ERROR: Could not find an XML setup file in the package". What's
wrong?
Mostly this problem arises because you have not unpacked the file
VirtueMart_x.x_COMPLETE_PACKAGE.zip before and tried uploading / installing this
file.
2.2.7.1.2.The Joomla! 1.5 installer fails to install VirtueMart with the error message "There was an error
uploading this file to the server.". What's the problem?
16
The most common reason for this problem is that the File you have uploaded is too big. The
File Size Upload Limit on your Server is set too low to allow larger files to be uploaded. By
default PHP allows files up to 2 MB, but this limit needs to be set to 4 MB in order to upload
the VirtueMart Component Install File.
If you have access to the php.ini, then change the directive upload_max_filesize to "4M"
and reload the server configuration.
If you are running PHP in CGI mode on Apache, you can place an .htaccess file in your
Joomla! root directory and place the following code inside:
Page 27

Installation FAQ
php_value upload_max_filesize 4M
2.2.7.1.3.The installation on Joomla! 15 fails with the error “Your Extension appears to be written for an
older version of Joomla!. You must enable the System - Legacy Plugin in the Plugin Manager
if you wish to complete this task.”.
You have probably uploaded an old Version of VirtueMart or an old Module, which is not ready
for Joomla! 1.5. Make sure you have downloaded the Virtuemart Package for Joomla! 1.5 (with
the file extension ".j15.zip").
VirtueMart 1.0.x is not compatible to Joomla! 1.5 and no efforts are taken to achieve
compatibility.
2.2.7.1.4.The Installer tells me "Another component is already using the directory com_virtuemart"
Please delete the directories /site_root/components/com_virtuemart and /
site_root/administrator/components/com_virtuemart. If you can't delete
the directories using ftp, try the file manager for Joomla!, eXtplorer [http://
extplorer.sourceforge.net], instead.
2.2.7.1.5.When using the automatic installation nothing happens after clicking on "Upload & Install" or
the installer tells me "Failed to move to /media directory" What's the cause?
VirtueMart is a big component, its installer file archive has a size of more than 2 MB.
When uploading this file to your server you can wait a long time until the file is
completely transferred to your server. You can use the Remote Installer for VirtueMart
instead! (Remote Installer for VirtueMart) [http://joomlacode.org/gf/project/virtuemart/frs/?
action=FrsReleaseBrowse&frs_package_id=192]
2.2.7.1.6.What are those tar.gz files, aren't those for Unix/Linux systems only?
tar.gz Archives come from the Unix World, but they can be used on Windows and Mac systems
as well. On Windows you can unpack them using Winzip or Winrar. Gzip has a much much
better compression than Zip, that's one reason why most Open Source projects use it for their
distributions.
2.2.7.1.7.On an upgrade from mambo-phpShop, the VirtueMart installer won't recognise my existing
tables! What to do now?
Sometimes the tables beginning with jos_pshop_ or mos_pshop_ are not found. Before you click
on "Install sample data" or "Go directly to the shop" you can just type in this URL in the addess
bar of your browser:
index2.php?option=com_virtuemart&install_type=update12pl3
After that the upgrade procedure begins!
2.2.7.1.8.After the installation I try to access VirtueMart, but it just prints out an error like "store is not
a valid VirtueMart module...". What's wrong?
The installation is corrupt. The registered functions and core modules, which are used by
VirtueMart to check the acccess permissions are missing. You need to make sure that the tables
"jos_vm_functions" and "jos_vm_modules" have been created in your database and contain
records. If they are missing, you can add those tables manually by using the SQL installer
file /sql/virtuemart.installation.joomla.sql. Search for those tables, copy
the SQL code and paste it into the textarea in phpMyAdmin's SQL execution screen.
2.2.7.1.9.After having installed the component, I add a Main Menu Link to the VirtueMart component.
But clicking on that link only displays the text "Welcome to Washupito's....." What's wrong?
17
Page 28

Installation FAQ
VirtueMart is no component-only script. It's programmed to be used together with the
corresponding VirtueMart Main Module. VirtueMart will not operate properly without the
VirtueMart Main Module.
18
Page 29

Chapter 3. First Steps
Do you have installed the VirtueMart Main Module?
If not, do so now. Don't forget to publish it somehere on your site. This module is meant to display
all categories and to control the component.
Note
All following procedures mean that you use the Main Menu of the VirtueMart
Administration!
Tip
VirtueMart provides FULL ACCESS to its Administration Panel from the Frontend! That
means that you don't have to login at the backend of your site to make all your changes, but
just click on "Administration" in the VirtueMart Main Module. (requires admin or storeadmin
permissions)
1. Go to "Store" # "Edit Store" and make all important settings that fit to your details. Don't forget to
set currency, currency display style and your email address!
2. Go to "Tax" # "Add tax rate" and add a tax rate accoring to the local settings of your Shop (important
for european shops!).
3. Go to "Components" # "VirtueMart" # "Admin" # Configuration and change all details to fit your
needs.
4. Go to "Components" # "VirtueMart" # "Products" # "Add category" and set up your categories and
category structure. Be sure that all of them are published.
5. Go to "Components" # "VirtueMart" # "Products" # "Add Product" and add as many products as
you need repeating this step.
3.1. Joomla! Global Configuration
[VirtueMart makes use of the global Configuration values which can be set in the Global Configuration
for your Joomla!/Mambo site.]
Allow User Registration YES
An user/customer must be registered to your site before being
able to checkout (even if the customer might not recognise it
due to silent registration). VirtueMart provides an enhanced
Registration Form where customers can leave their account
and shipping data. When register using this form, they are
automatically added to the Joomla! user list.
Use New Account Activation NO
If you keep this feature disabled, new customers have a
streamlined checkout process and don't have to activate their
new account by checking their email and restart their checkout!
Mail Configuration varies
VirtueMart sends Emails using the global Mail Configuration.
So be sure to modify the Values according to your Mail Server
Configuration.
19
Page 30

Joomla! Global Configuration
Caution
If you don't change your Store Information and the
Email Address, VirtueMart sends Order Confirmation
Emails to demo_order@virtuemart.net.
Localization / Language Whatever language you set in the Global Configuration:
VirtueMart tries to pick it from its own language directory:
/administrator/components/com_virtuemart/
languages
If the selected language isn't found, the english language file is
loaded by default - so you must never delete it.
Search Engine Friendly URLs Recommended: Off
VirtueMart is fully SEF compatible, but please note that some
the SEF links for VirtueMart, which are generated by Joomla's /
Mambo's SEF module or others, sometimes lead to "URL
redirection limit exceeded..." or internal server errors.
20
Page 31

Chapter 4. Administrator Tutorial
This tutorial will walk you through the setup of your site, ongoing management, and advanced
administration accessed via the VirtueMart administrative interface.
It assumes that you have already installed and configured your site (VirtueMart 1.1 with Joomla!
1.0.13).
VirtueMart allows you to select "Simple Layout" and "Extended Layout". The simple layout is the
standard layout and provides a basic cross-browser-safe layout. The extended layout instead uses the
fabulous ExtJS library for creating a nested layout that allows better presentation of the administrative
functions of VirtueMart. So it opens items for editing in a new tab inside the main panel. It should
work fine on Internet Explorer 6+, Firefox 2+, Opera 9+ and Safari 2+.
4.1. Shop Configuration
The Configuration Panel is the most important part of VirtueMart. It can be accessed via "Admin"
# "Configuration".
Figure 4.1. The Configuration Form
Note that the Configuration Panel can be accessed by Users with Permissions "admin" only (by
default).
You can access the different parts of the Panel by clicking on the Tab Headings.
4.1.1. Global
Global
Shop is offline? Here you can switch the shop from Online to Offline mode. In
offline mode, the offline message is displayed instead of the
21
Page 32

Global
product pages. This means the whole shop section isnt usable
for customers. Administrators won't see the shop too.
Offline Message This message will be displayed to customers who try to access
your store.
Use only as catalogue Hides all "Add to Cart" buttons.
Show Prices When enabled, product prices are displayed. (useful when
using "catalog-only" functionality. Note that you can't hide
prices from unregistered users to show prices only to registered
users. Either ON or OFF!
Membergroup to show prices to default:"Public Frontend"
Here you can decide which membergroups of your site are
allowed to see product prices.
Show "(including XX% tax)" when
applicable?
Show the price label for
packaging?
Show Prices including tax? Sets the flag whether the shoppers sees prices including tax or
Enable content mambots/plugins in
descriptions?
Enable Coupon Usage If you enable the Coupon Usage, you allow customers to fill in
Customer Review/Rating System If enabled, you allow customers to rate products and write
Auto-Publish Reviews? If enabled, customer reviews are instantly shown after being
Comment Minimum Length This is the amount of characters a customer must write at least
When checked, users will see the text "(including xx% tax)"
when prices are shown incl. tax (which depends on shopper
group settings!).
Use "price per packaging" label?
excluding tax. When enabled prices are displayed like "X.XX
(including XX% Tax)"
If enabled, you can use your mambots and plugins for dynamic
content in the product or category descriptions.
Coupon Numbers to gain discounts on their purchase.
reviews about them. So customers can write down their
experiences with the product for other customers.
submitted. Maybe not a good idea, because you want to check
the product reviews before.
before a review can be submitted.
22
Comment Maximum Length This is the maximum amount of characters a customer can write
before a review can be submitted.
Enable Affiliate Program? This enables the affiliate tracking in the shop-frontend. Enable
if you have added affiliates in the backend.
Caution
The Affiliate Program doesn't fully work. It must be
completed in future versions.
Virtual Tax This determines whether items with zero weight are taxed or
not (only applies in Ship-To-Address based Tax Mode).
Tax mode This determines which tax rate is taken for calculating taxes.
It can be either the tax rate of the customer's shipping address
Page 33

Global
location, the tax rate of the store/vendor location or - in EU
Mode - the tax rate of the country, the store is located in,
regardless where the goods are shipped to.
Enable multiple tax rates? Check this, if you have products with different tax rates (e.g.
7% for books and food, 16% for other stuff).
Discount before tax/shipping? Sets the flag whether to subtract the Discount for the selected
payment BEFORE (checked) or AFTER tax and shipping.
User Registration Type • Normal Account Creation:
This type of registration asks each customer for a username
and password and all other published registration details.
• Silent Account Creation:
In this mode, users don't need to fill in a username and
password for a new account. Instead the email address is used
for the new account and a random password is generated.
The registration details are mailed to the customer.
Show the "Remember me"
checkbox on login?
Customers can select a state/
region?
• Optional Account Creation:
The customer can select if a persistant account is created or
not. If the customers chooses to create an account, he is asked
for an username and password. If he chooses not to create an
account, a hidden account is created - so the customer can be
silently logged in and check out.
• No Account Creation possible
In this mode the customer can checkout without being able to
create an account for returning later on. Each time a dummy
user account is created to keep the data structure intact.
The "Remember me" feature allows to set a cookie in the
customer's browser, so the customer doesn't need to login each
time he returns to the site. This is done by default. But such
cookies can be a security risk - especially when people are
sharing a PC in an Internet Cafe. So check this checkbox to
allow customers *not* to store a user cookie.
When enabled, your customers are presented a drop-down list
with states where they can select one.
Must agree to Terms of Service? Check if you want a shopper to agree to your Terms of Service
before registering to the shop.
Agree to T.o.S. on EVERY
ORDER?
Show information about "Return
Policy" on the order confirmation
page?
Legal information text (short
version)
Check if you want a shopper to agree to your terms of service
on EVERY ORDER (before placing the order).
Store owners are required by law to inform their customers
about return and order cancellation policies in most european
countries. So this should be enabled in most cases.
This text instructs your customers in short about your return
and order cancellation policy. It is shown on the last page of
checkout, just above the "Confirm Order" button.
23
Page 34

Security
Long version of the return policy
(link to a content item)
Check Stock? Sets whether to check the stock level when a user adds an item
Show Products that are out of
Stock?
Enable the Cookie Check? If enabled, VirtueMart checks wether the browser of the
Currency Converter Module This allows you to select a certain currency converter module.
Order-mail format: This determines how your order confirmation emails are set up:
This is the long and detailled version of your returns policy.
This text is linked in the short version and appended to each
order confirmation email.
to the shopping cart. If set, this will not allow user to add more
items to the cart than are available in stock.
Let's you decide wether Products that are out of Stock are
displayed or hidden (only available when Check Stock is
enabled).
customer accepts cookies or not. This is user-friendly, but
it can have negative consequences on the Search-Engine-
Friendlyness of your shop.
Such modules fetch exchange rates from a server and convert
one currency into another.
• as a simple text email
DEBUG ? Turns on the debug output. This causes the DEBUGPAGE to be
4.1.2. Security
SECUREURL Example: https://www.mydomain.com/
Shop Areas which must use https Some of the areas of your shop can be forced to use
• or as a html email with images.
displayed at the bottom of each VirtueMart page. Very helpful
during shop development since it shows the carts contents, form
field values, etc.
The secure URL to your site. (https - with trailing slash at the
end!)
Caution
Be careful what you fill in here - if the address doesn't
exist, customers would be redirected to a non-existing
location and receive a 404 error!
the SECUREURL connection. Here you can choose the
modules which must use this SECUREURL. By default this
is: "account" (Account Maintenance) and "checkout" (the
complete Checkout).
24
Generally prevent secure
connections?
Encryption Function Recommended: AES_ENCRYPT
When checked, the shopper is redirected to the normal URL
when not browsing in those shop areas, which are forced to use
the SECUREURL.
Choose the MySQL function, which is used to encode/encrypt
important data in the database tables. AES Encrypt is far more
Page 35

Site (Display & Layout)
secure, as it actually encrypts the data, not just encodes it.
AES_ENCRYPT is available in MySQL >= 4.0.2.
Encryption Key The secret key for encrypting payment account data like credit
card numbers and storing them encrypted in the database.
Store Credit Card Information? Allows to completely disable the storage of Credit Card data.
Allow Frontend-Administration... ...for non-Backend Users?
With this setting you can enable the Frontend Administration
for users who are storeadmins, but can't access the Mambo
Backend (e.g. Registered / Editor).
Table Prefix for VirtueMart Tables This is an experimental feature to allow multiple shops in one
Joomla! installation.
HOMEPAGE Example: shop.index
This is the page which will be loaded in the frontend by
default.
ERRORPAGE Default: shop.error
This is the default page for displaying VirtueMart Error
Messages.
Proxy Server URL The URL of the Proxy Server you need to pass from the server
for connections into the Internet.
Proxy Port The Port of the Proxy Server
Proxy Auth Username Only if needed: the username for authentication at the proxy
server
Proxy Auth Password Only if needed: the matching password for authentication at the
proxy server
4.1.3. Site (Display & Layout)
VirtueMart makes use of the Joomla/Mambo Templates' CSS. It uses the StandardCSS Classes defined for Joomla! like sectiontableheader, sectiontableentry1,
sectiontableentry2 and so on.
Display
PDF - Button Show or Hide the PDF - Button in the Shop Frontend.
Show the "Recommend to a friend"
button?
Show the "Print View" link? Show or Hide the link for the print view page in the Shop
Show Page Navigation at the Top
of the Product Listing?
Show or Hide the link to the form for recommending a product
to a friend in the Shop Frontend.
Frontend.
default: checked
Switches On or Off the Display of Page Navigation at the Top
of the Product Listings in the Frontend.
25
Page 36

Design
Site (Display & Layout)
Default Product Sort Order Here you can select by which criteria products are ordered in
the product lists.
Available "Sort-by" fields Here you can select the criteria which is available for the
customer to reorder the product list.
Show the Number of Products? default: checked
Switches On or Off the Display of Products in a Category right
behind the Category Name like "Power Tools (3)".
"no image" image default: /components/com_virtuemart/themes/
default/images/noimage.gif
This image will be shown when no product image is available.
Show footer "powered by..." ? Displays a powered-by-VirtueMart footer image. Give credits
back to the author!
Global Shop Theme Here you can select which theme is used to style the shop. The
configuration link takes you to the theme configuration screen.
Default number of products in a
row
This defines the number of products in a row. Example: If you
set it to 4, the default category template will display 4 products
per row.
Note
You can change the Category's Number of products
per row for each category in its category form!
Category Template default: managed
This defines the category template for displaying products in
a category when no special template is set. You can create
new templates by customizing existing template files (which
reside in the directory /components/com_virtuemart/
themes/default/templates/browse/ and start with
"browse_").
Note
You can override this Category Template Setting for
each Category in its Category Form!
FLYPAGE default: shop.flypage
26
This is the page used for displaying product details when no
special flypage is set.
Note
You can change the Flypage for each category in its
category form!
Dynamic Thumbnail Resizing? If checked, you enable dynamic Image Resizing. This means
that all Thumbnail Images are resized to fit the Sizes you
provide below, using PHP's GD2 functions.
Page 37

Thumbnail Image Width The target width of the resized Thumbnail Image.
Thumbnail Image Height The target height of the resized Thumbnail Image.
4.1.4. Shipping
In the Shipping section you can select one or more of the provided Shipping Modules.
Tip
Shipping
Tip
You can check if you have GD2 support by browsing
to "System" # "System Info" # "PHP Info" # gd.
The Thumbnail Image quality is much better than Images
which were "resized" by the browser. The newly generated
Images are put into the directory /shop_image/prduct/resized.
If the Image has already been resized, this copy will be send to
the browser, so no image is resized again and again.
You can configure Online Services (like UPS® or Intershipper®) in "Store" # "List Shipping
Modules" # Service Name. Other Shipping methods like Standard Shipping or Zone Shipping
must be configured through their own administrative interface: "Shipping" # Shipping Rates /
Shippers or "Zone Shipping" # "Zone List". The Free Shipping module can be configured by
amount only in the Store Form.
The selected Shipping Module will list all available Shipping Rates on Checkout.
Note
If you want no Shipping Rate Selection, you must select "Disable Shipping method selection"
AND a checkout process (next Tab) which doesn't include Shipping Method selection.
4.1.5. Checkout
Enable the Checkout Bar default: Enabled
Checkout Steps The Checkout Process is divided into different Steps. Steps
Check this, if you want the 'checkout-bar' to be displayed to the
customer during checkout process ( 1 - 2 - 3 - 4 with graphics).
can be combined to so-called "Checkout Stages" by giving the
same ordering number. Each one of the steps can be re-arranged
by using the input boxes and writing a numeric value into it
indicating the step number.
4.1.6. Downloads
Enable Downloads Check to enable the Download Feature. Only If you want sell
"Enable download" Status value: can be some Order Status (not cancelled ;-)).
downloadable goods.
Select the order status at which the customer is notified about
the download via e-mail.
27
Page 38

Getting Started
"Disable download" Order Status Sets the order status at which the download is disabled for the
customer.
DOWNLOADROOT The physical path to the files for the custumer download.
(trailing slash at the end!)
Important
Must be a physical path, no URL.
Caution
For Security Reasons you should specify a directory
somewhere outside of the Document Root of your
Web Server. If your Website resides in /var/www/
sitename/htdocs/, you should - for examplechoose /var/www/sitename/downloads/ as
the Download Root.
Download Maximum Sets the number of downloads which can be made with one
Download-ID for one order.
Download Expire Sets the time range in seconds in which the download is enabled
Keep Product Stock Level on
Purchase?
4.2. Getting Started
To access the configuration of VirtueMart, select "Components | VirtueMart" in the Joomla!
Administration Interface.
for the customer. This range begins with the first download!
When the time range has expired, the download-ID is disabled.
Tip
86400s=24h
When enabled, the stock level for a downloadable product is
not lowered although it was purchased by customers.
28
Page 39

Getting Started
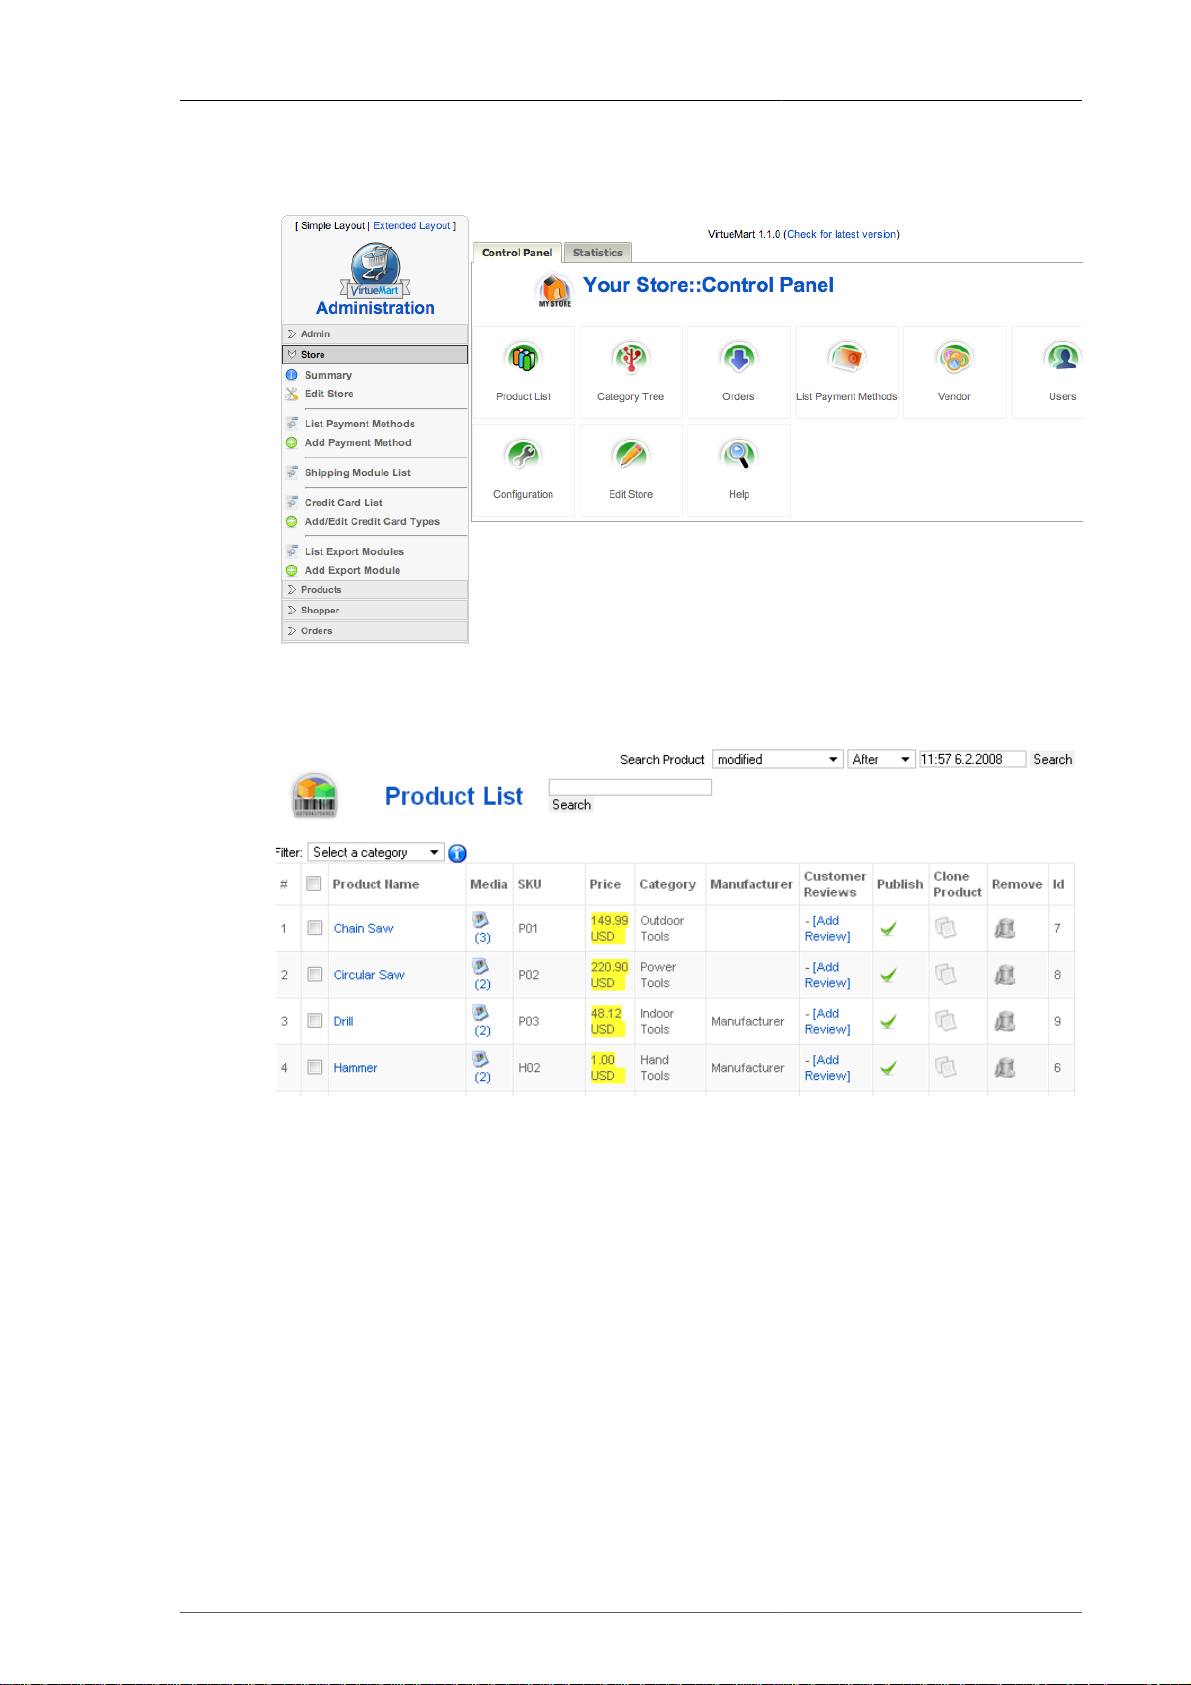
Figure 4.2. Joomla! Administrator: Component Drop-Down List
If you see the VirtueMart "Welcome" page when accessing VirtueMart, click "Go Directly to Shop".
Navigating to the VirtueMart admin interface will bring up the "Store: Summary" page.
Figure 4.3. VirtueMart Control Panel
You may also access this page from within the VirtueMart interface under "Store | Summary"
29
Page 40

4.3. Store Setup
To begin setting up your store, select "Store | Edit Store" from the VirtueMart admin interface.
Store Setup
Figure 4.4. VirtueMart Administration: The Store Form
The Information from the Store Information Form is displayed in various Locations on the Shopping
Site. This is your Store's primary Identity - essentially a special "Master" Vendor.
Store Information Form Fields
Store Name Required
The name of the Store.
Store Company Name Required
The name of your company.
URL The Store's Internet Address.
Address 1 Address Line 1
Address 2 Address Line 2
City The City where your Store is located.
State/Province/Region The State / Region where your Store is located.
Country The Country where your Store is located.
30
Page 41

Store Information Form Fields
Zip/Postal Code The ZIP of your Store's location.
Phone Your Store's Phone Number
Last, First & Middle Name The Name of your Contact Person.
Title The title of the Contact Person.
Phone 1 & 2 Your contact's Phone number.
Fax The Fax number for the Contact.
Email Address Primary store contact email address
Full Image Required
Displays the currently configured store logo.
Upload Image Optional
Browse to your company logo. This will be uploaded when you
click on the "Save" icon.
Minimum Purchase Order Value This is the amount which is the minimum Order Value for
Checkout.
Minimum Amount for Free
Shipping
Currency The Store's global / default Currency
Currency symbol This is the currency symbol which will be used when displaying
Decimals Number of decimals.
Decimal symbol Can be somethin like . , or empty.
Thousands separator Same as decimal symbol.
Positive format Display Order / Style for positive numbers.
Negative format Display Order / Style for negative numbers.
List of accepted currencies This list defines all those currencies you accept when people
This is the amount, from which on Shipping is free.
prices.
are buying something in your store.
Note
All currencies selected here can be used at checkout! If
you don't want that, just select your country's currency
(=default).
Description This is your Store's Description which is shown on the page
shop.index.
Terms of Service This is the complete text for your Terms of Service that is
displayed to the customer.
Click on the "Save" icon. Now you're ready to begin adding Categories, Products and Manufacturers.
31
Page 42
Countries, Currencies,
Core Modules & Functions
4.4. Countries, Currencies, Core Modules & Functions
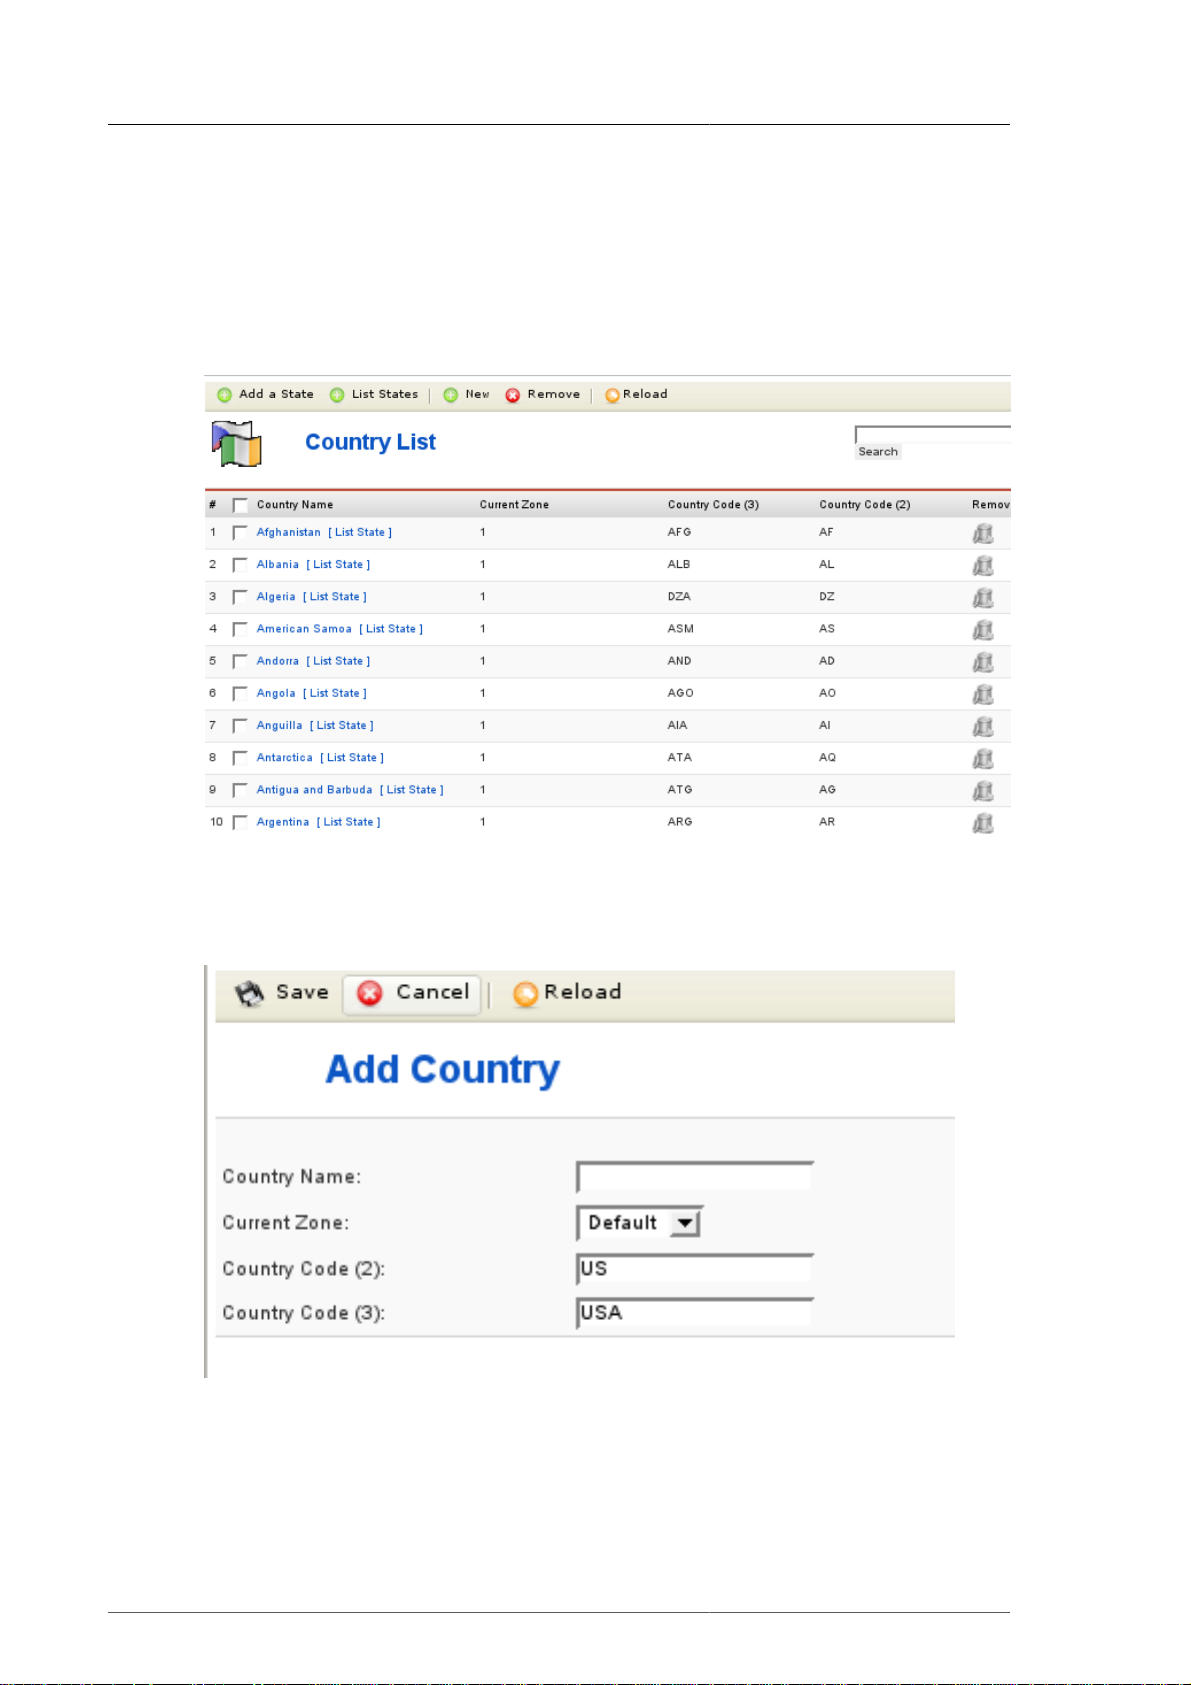
4.4.1. Managing Countries
Countries are managed in the country list, which can be accessed through "Admin" # "List Countries".
Figure 4.5. VirtueMart Administration: Country List
To add a new country, click "New" in the top of the list and fill out the fields in the country form.
Figure 4.6. VirtueMart Administration: Country Form
32
Don't forget to save and the new country is added to the list.
You can modify existing countries. To do so, just click on the name of a country in that list and a form
opens and you can modify the properties of this country. Again don't forget to save your changes.
Page 43

Managing Currencies
To remove one or more countries from the list, either click on the "trash bin" icon in the last column of
each row and confirm to remove the country or select countries and click on "Remove" in the toolbar.
4.4.2. Managing Currencies
Currencies are managed in the currency list, which can be accessed through "Admin" # "List
Currencies".
Figure 4.7. VirtueMart Administration: Currencies List
To add a new Currency, click "New" in the top of the list and fill out the fields in the Currency form.
Figure 4.8. VirtueMart Administration: Currency Form
Don't forget to save and the new currency is added to the list.
You can modify existing currencies. To do so, just click on the name of a currency in that list and a form
opens and you can modify the properties of this currency. Again don't forget to save your changes.
To remove one or more currencies from the list, either click on the "trash bin" icon in the last column
of each row and confirm to remove the currency or select multiple currencies using the checkboxes
and click on "Remove" in the toolbar.
33
Page 44

VirtueMart Core Modules
4.4.3. VirtueMart Core Modules
VirtueMart Core Modules have absolutely nothing to do with "Joomla! Module", which are sideblocks
in your Joomla! site.
Core Modules build a part of your store and are used to manage the different sections and their access
permissions.
Caution
You need to act carefully in this part of VirtueMart. Changing Core Modules and their
permissions can result in locking out other users or even yourself from the store.
Core Modules are managed in the module list, which can be accessed through "Admin" # "List
Modules".
34
Figure 4.9. VirtueMart Administration: Module List
To add a new module, click "New" in the top of the list and fill out the fields in the module form.
Page 45

VirtueMart Core Functions
Figure 4.10. VirtueMart Administration: Currency Form
Don't forget to save and the new module is added to the list.
You can modify existing modules. To do so, just click on the name of a module in that list and a form
opens and you can modify the properties of this module. Again don't forget to save your changes.
To remove one or more modules from the list, either click on the "trash bin" icon in the last column of
each row and confirm to remove the module or select modules and click on "Remove" in the toolbar.
4.4.4. VirtueMart Core Functions
"Functions" are a core feature of VirtueMart and allow to control the access to all processes in
VirtueMart. Functions are executed using the "func" parameter in the URL given the other URL
parameters as function variables.
Caution
You need to act carefully in this part of VirtueMart. Changing Core Functions and their
permissions can result in locking out other users or even yourself from the store.
Functions are always assigned to core modules. So at first you need to go to the module list ("Admin"
# "List Modules") and then click on "Function List" in the row of the module you want to manage
functions for.
If you have done this, you can see a list of all functions for that module.
35
Page 46

VirtueMart Core Functions
Figure 4.11. VirtueMart Administration: Function List
To add a new function, click "New" in the top of the list and fill out the fields in the function form.
36
Figure 4.12. VirtueMart Administration: Function Form
Don't forget to save and the new function is added to the list.
Page 47

Manufacturer Administration
You can modify existing functions. To do so, just click on the name of a function in that list and a form
opens and you can modify the properties of this function. Again don't forget to save your changes.
To remove one or more functions from the list, either click on the "trash bin" icon in the last column of
each row and confirm to remove the function or select functions and click on "Remove" in the toolbar.
4.5. Manufacturer Administration
Manufacturers are associated with products, providing web site, contact, and descriptive information.
Each product that is created is associated with a Manufacturer.
For stores where manufacturer information is not necessarily relevant, a default manufacturer is
created upon installation.
It is not necessary to create manufacturers prior to creating your catalog. Products can be re-associated
to manufacturers after all the product records have been created. However, creating the manufacturers
first can save a lot of extra work if you already know that you will be using this information.
4.5.1. Manufacturer Categories
Manufacturer Categories are used to group Manufacturers into different categories.
Adding Manufacturer Categories
VirtueMart creates the manufacturer category name "-default-" upon installation. It is not necessary
to change this.
To create a new manufacturer category, select "Manufacturer | Add Manufacturer Category".
Manufacturer Category Form Fields:
Category Name The name of the Manufacturer category.
Category Description A description of the Manufacturer category (optional).
Click on the "Save" icon. You will be redirected to the "Manufacturer Category List" page, showing
the "-default-" category, and the new category you just entered.
Editing Manufacturer Categories
To edit an existing manufacturer category, select "Manufacturer | List Manufacturer Categories" in
the VirtueMart admin menu. This will return a list of existing manufacturer categories.
Click on the name of the manufacturer category you want to edit, make any necessary changes to the
fields (listed above), and click on the "Save" icon.
You will be returned to the Manufacturer Category List.
Deleting Manufacturer Categories
Before deleting an existing manufacturer category, all manufacturers associated to that category
must be removed through either deletion or re-association to a different manufacturer category.
VirtueMart will not allow the deletion of a manufacturer category while manufacturers still exist for
that manufacturer category. See below under "Manufacturers" for information on re-association and
deletion of a manufacturer.
37
Page 48

Once the manufacturers have been removed, select "Manufacturers | List Manufacturer Categories"
from the VirtueMart admin menu. Click on the name of the manufacturer category you want to delete.
In the Manufacturer Category Form, click on the "Remove" icon. Click "OK" to confirm that you are
sure you want to delete this category. You will be returned to the Manufacturer Category List.
Note that the manufacturer category you deleted is no longer listed. To recover this record, you
must create a new manufacturer category, and re-associate any manufacturers that belong in that
manufacturer category.
4.5.2. Manufacturers
Adding Manufacturers
To create a new manufacturers, select "Manufacturer | Add Manufacturer" in the VirtueMart admin
menu.
Edit the following fields in the Manufacturer Information Form:
Manufacturer Name The manufacturer's name or company name.
URL http://www.example.com
Manufacturers
Manufacturer Category The manufacturer category this manufacturer will be associated
Email The manufacturer contact's email address.
Description Information promoting or about the manufacturer.
Click the "Save" icon to create your new manufacturer.
Editing Manufacturers
To edit an existing manufacturer, select "Manufacturer | List Manufacturers" to see a list of all
manufacturers. You may also get to this screen by clicking on the linked text, "Manufacturer List", in
the Manufacturers column on the Manufacturer Category List screen.
Click on the name of the manufacturer you would like to edit, or click on the linked text "update" in
the Admin column - either will take you to the same Manufacturer Add Information form. Make your
changes in the Manufacturer "Add Information" form (described above), and click on the "Save" icon.
You will be returned to the Manufacturer List screen.
Deleting Manufacturers
The manufacturer's fully qualified web address.
with.
38
Before deleting an existing manufacturer, all products associated to that manufacturer must be
removed through either deletion or re-association to another manufacturer. VirtueMart will not allow
the deletion of a manufacturerwhile these child records still exist for that manufacturer.
Once these child records have been removed, select "Manufacturer | List Manufacturers" to see a
list of all manufacturer. Then click on the name of the manufacturer you would like to delete. In
the Manufacturer Add Information form, click on the "Remove" icon. You will be returned to the
Manufacturer List screen.
Once this manufacturer has been deleted, it is removed from the system. To recover this manufacturer,
you must re-create the manufacturer information, and re-associate all appropriate products.
Page 49

Product Administration
4.6. Product Administration
VirtueMart offers the ability to categorize products not only by manufacturer, but also by product
category. Product categories may also contain subcategories enabling storekeepers to manage their
products in as much detail as possible. Because products and product categories are associated to a
particular vendor, it is important to create your vendor records before creating the product and product
category records.
4.6.1. Product Categories
VirtueMart includes the ability to associate products to product categories and subcategories to enable
better product management.
Figure 4.13. VirtueMart Administration: Category List
4.6.1.1. Adding or modifying Product Categories
To create a new product category, open the Product Category Form: "Products" # "Add Category".
To modify an existing category, click on the name of the category you want to edit in the category list.
Figure 4.14. VirtueMart Administration: Category Form
39
Page 50

Product Category Fields
Publish? Used to specify whether the category will be published on the
Category Name The name that will be used to identify the category.
Category Description The description that will be displayed for the category.
ListOrder The Place of this category in a list with other categories.
Parent The parent category with which this category will be associated.
Show x products per row The number of products per row when displaying products of
Product Categories
site.
If the category is to be a top level category, leave the Parent drop
down list with the Default Top Level selected.If the category is to
be a sub category of an existing category, choose the appropriate
parent category from the Parent drop down list.
this category.
Note
The Browse Page usually has to be adjusted when the
number of products per row has been changed. You can
use browse_2 for 2 products per row, browse_3 for 3
products per row and so on (maximum per default: 5).
Category Browse Page Example: managed
The template file for displaying the products of this category
in a list. "Managed" Mode looks for the Setting for "Show x
Products per Row" and decides, which browse page template will
be chosen.
Category Flypage Syntax: shop.flypage
This is the template file for displaying the Product
Details of a product in this category. You can create
your own templates by modifiying existing templates
(in the directory /components/com_virtuemart/
themes/templates/product_details).
The file for preparing the display of the Flypage is /html/
shop.product_details.php. Some of the details that
you can't find in the Flypage template can be found there.
Note
You should leave this field empty when you're not sure
what to fill in.
4.6.1.2. Reordering or sorting Product Categories
You can reorder categories the way you want. There are different ways to achieve this.
• Use the blue arrows in the category list to move a category up or down
• Use the input fields in the rows of the category list to change the list order. If you have finished
changing the values, click on the "Save" icon in the column header.
40
Page 51

Products
• Use the "sort alphabetically" icon in the list header. You can sort all categories in your store
alphabetically using this functionality. Please note that this can't be undone. Once the categories are
reodered you would have to change back manually.
4.6.1.3. Removing Product Categories
Before deleting an existing product category, all sub categories associated to the product category
must be removed through either deletion or re-association. VirtueMart will not allow the deletion of
a product category while subcategories still exist for that product category.
Categories can be removed from the store although they contain products. If products are assigned
to more than one category, those products won't be removed if you delete just one category. But if a
product is just assigned to one category, it will be deleted if you delete its category.
Removing a category can be done by clicking the "trash bin" icon in the last column of each row in
the product category list. But you can also click the checkboxes of the categories you want to remove
and click the "Remove" button in the toolbar.
4.6.2. Products
When creating your product records, it is important to make a distinction as to whether the product that
is being created can be uniquely identified by its nature or name (e.g. Compact Disks, Video Cassettes,
Books, etc.), or is one of many similar items that are uniquely identified by their attributes (e.g.
Apparel, Furniture, Automobiles, etc.). The reason this distinction needs to be made, is because the
methods for creating, editing and deleting differ for each. Items require the creation of Item Attributes,
but products do not.
4.6.2.1. Adding/Updating Products
To create a new product, click on "Products" # "Add Product" to display the product form. Complete
the product entry form and click the Save button in the top right corner to save the new product.
When Updating a product, just click on the Product Name in the Product List to display to Product
Form of that product.
Figure 4.15. VirtueMart Administration: Product List
41
Page 52

Product Form
Products
Figure 4.16. VirtueMart Administration: Product Form, Tab 1 - General
Information
Publish? Used to specify whether the product will be published on the site.
SKU Means Article Number. Stock keeping unit ( SKU) is an identification,
usually alphanumeric, of a particular product that allows it to be tracked
for inventory purposes.
Name The name that will be used to identify the product.
URL A URL that can be displayed with a product. Usually used as a link to
the product vendor or manufacturer.
Category The product categories with which this product will be associated.
Vendor The vendor with which the product will be associated.
Manufacturer The manufacturer with which the product will be associated.
Net Price The price for the default Shopper Group. Just fill in a decimal number.
Select the Product Currency from the drop-down list at the right.
Gross Price The Price including taxes (according to the selected VAT ID) for the
default Shopper Group.
42
VAT ID The ID of the tax rate that will be applied to this product. Here you
can select a specific tax rate for this product. If you don't want that this
product is taxed, fill in a zero weight at "product weight" and Disable
"Virtual Tax".
Discount Type Select the Discount to apply to this Product. If no Discount Types are
available, add one using the Discount Form.
Page 53

Discounted Price This overrides the Discount Type and automatically creates a Discount
Short Description The short description that will be displayed on the browse (overview)
Product Description This is the details description that will be displayed on the Flypage
Display Options
Products
Record using the Difference between the Gross Price and the
discounted Price.
page for a category or search result.
(=details page) of this specific product.
You can use Mambots/Content Plugin Tags here if you have enabled
"Use Mambots to parse Descriptions" in the Store Configuration.
Figure 4.17. VirtueMart Administration: Product Form, Tab 2 - Display
Options
Product Status
43
Page 54

Products
Figure 4.18. VirtueMart Administration: Product Form, Tab 3 - Product Status
Quantity in Stock The current quantity in stock for the item. Used for shipping
and inventory purposes.
Minimum Purchase Quantity This number specifies the minimum Quantity, which
Customers can purchase of this Product
Maxmimum Purchase Quantity This number specifies the maximum Quantity which
Customers can purchase of this Product
Availability Date When the current quantity in stock is available for distribution.
Used for shipping and inventory purposes.
Availability Text / Image This is used to display it on the product details page. E.g.: "48
hrs." or "On Order". Alternatively you can select an availability
image from the drop-down list below.
Tip
You can use your own images here! Just copy them
to the direcory /shop_image/availability and then you
can select them here.
On Special? (Featured?) Used to indicate whether there are any specials running for the
product. When checked, this product will be displayed on the
"Featured Products Module".
44
Discount Type The type of special being run on the product. Select a discount
from the discount list. When there are no discounts, create one
using the Product Discont Form.
Advanced Attribute List Syntax:
Size,XL[+1.99],M,S[-2.99];Colour,Red,Green,Yellow,ExpensiveColor[=24.00];AndSoOn,..,..
Page 55

Products
Adds easy attributes to the product. These are attributes which
can be selected by a customer. This does not create items for
each attribute value! If you want to check the stock on each
item (e.g. green, red and black T-Shirts...use the Attribute Form
to add Attributes and after that Items for each Attribute Value
using the Item Form.
Custom Attribute List Syntax: Attribute1;Attribute2;Attribute3
Adds custom attributes to the product. These are attributes
which can be selected by a customer. This does not create items
for each attribute value! If you want to check the stock on each
item (e.g. green, red and black T-Shirts...use the Attribute Form
to add Attributes and after that Items for each Attribute Value
using the Item Form.
Figure 4.19. VirtueMart Administration: Product Form, Tab 4 - Product
Dimensions and Weight
Length The length of the product. Used for shipping purposes.
Width The width of the product. Used for shipping purposes.
Height The height of the product. Used for shipping purposes
Unit of Measure - Dimensions The unit of measure used in determining the LWH of a product.
Used for shipping purposes.
Weight The weight of the product. For shipping purposes.
Unit of Measure -Weight The unit of measure used in determining the weight of a
product. Used for shipping purposes.
45
Page 56
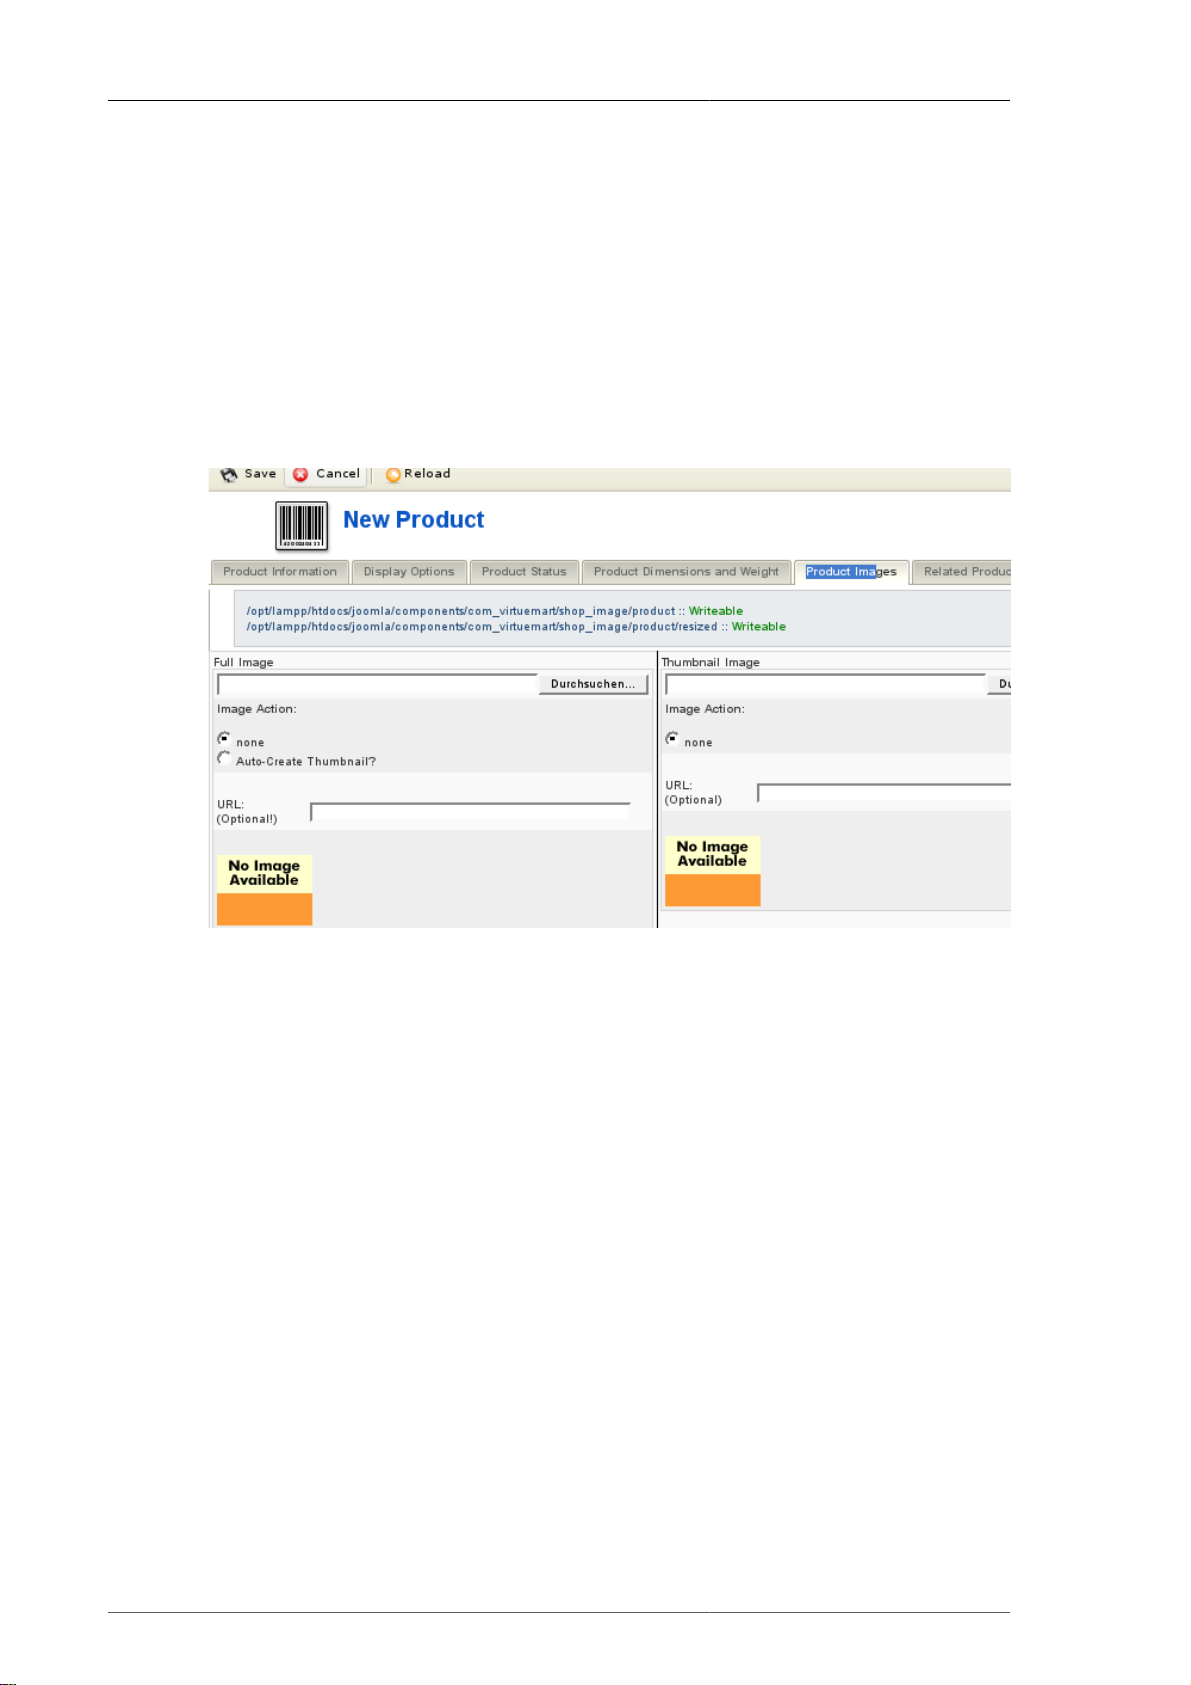
Products
Important
Allowed UOM are
po / pound(s)
kg /kilogram(m)(s)
ou / ounces
lb / LB
Units in Packaging Specifies how many pieces of this Products are in one Package.
Units in Box Specifies how many packages of this Product are in one Box.
Figure 4.20. VirtueMart Administration: Product Form, Tab 5 - Product Images
Thumbnail A thumbnail image that can be displayed along with the product.
Full Image A larger image that can be displayed along with the product.
Note
If you have enabled Dynamic Thumbnail Resizing, the Thumbnail here won't be
automatically created from the Full Image!
Related Products
Related Products are assigned to a product to indicate a general relationship of some kind. Related
Products can be accessoires or other types or a similar product.
46
Page 57

Product Price Management
Figure 4.21. VirtueMart Administration: Product Form, Tab 6 - Related
Products
Now you're done. Just click on "Save" to make sure the changes are stored.
4.6.2.2. CSV Import/Export
VirtueMart itself doesn't provide a Product CSV Import and Export.
You need to install a separate Component called "CSVImproved [http://www.csvimproved.com]" to
manage Export and Import of your Data.
4.6.2.3. Deleting Products
To delete an existing product, click on "Products" # "List Producs" at the top of the VirtueMart
Administration pages to display a list of product categories. Now click on the Trash Icon in the row
of the product you want to delete and confirm that you "want to delete this record".
4.6.3. Product Price Management
Products usually have only one price, but if you need more - VirtueMart allows you a really flexible
Price Management. You can have a different Product Price for each Shopper Group and you can even
have different Prices depending on the Quantity in Cart.
4.6.3.1. Adding or Modifying Prices
The standard Product Price for the default Shopper Group can be set and modified in the Product Form.
47
Page 58

Product Price Management
Figure 4.22. VirtueMart Administration: Product Form, Price Form in the
Product Form
You can also directly add and modify Product Prices from the Product List. Just click on one of the
Price Entries with the yellow Background. This opens a Price Form where you can select Currency
and Shopper Group this Price is for.
48
Figure 4.23. VirtueMart Administration: Price Form in the Product List
Each time you change the Shopper Group from the Drop-Down List, the Form refreshes. If the Price
Field is empty, there's currently no Price for this Shopper Group.
You must save your Changes for the Price of a certain Shopper Group before you switch to another
Shopper Group or your Changes will get lost.
So just click on "Save" and your Changes will be saved.
Page 59

Product Price Management
Figure 4.24. VirtueMart Administration: Price Update Notice
To add Prices for Quantity Ranges, you need to go to the Product Price List, which is available from
the toolbar in the Product List.
Figure 4.25. VirtueMart Administration: Product List - List Prices
You can also access the Price List for a Product from its Product Form. Just click on "List Prices" as
shown in the following figure.
49
Page 60
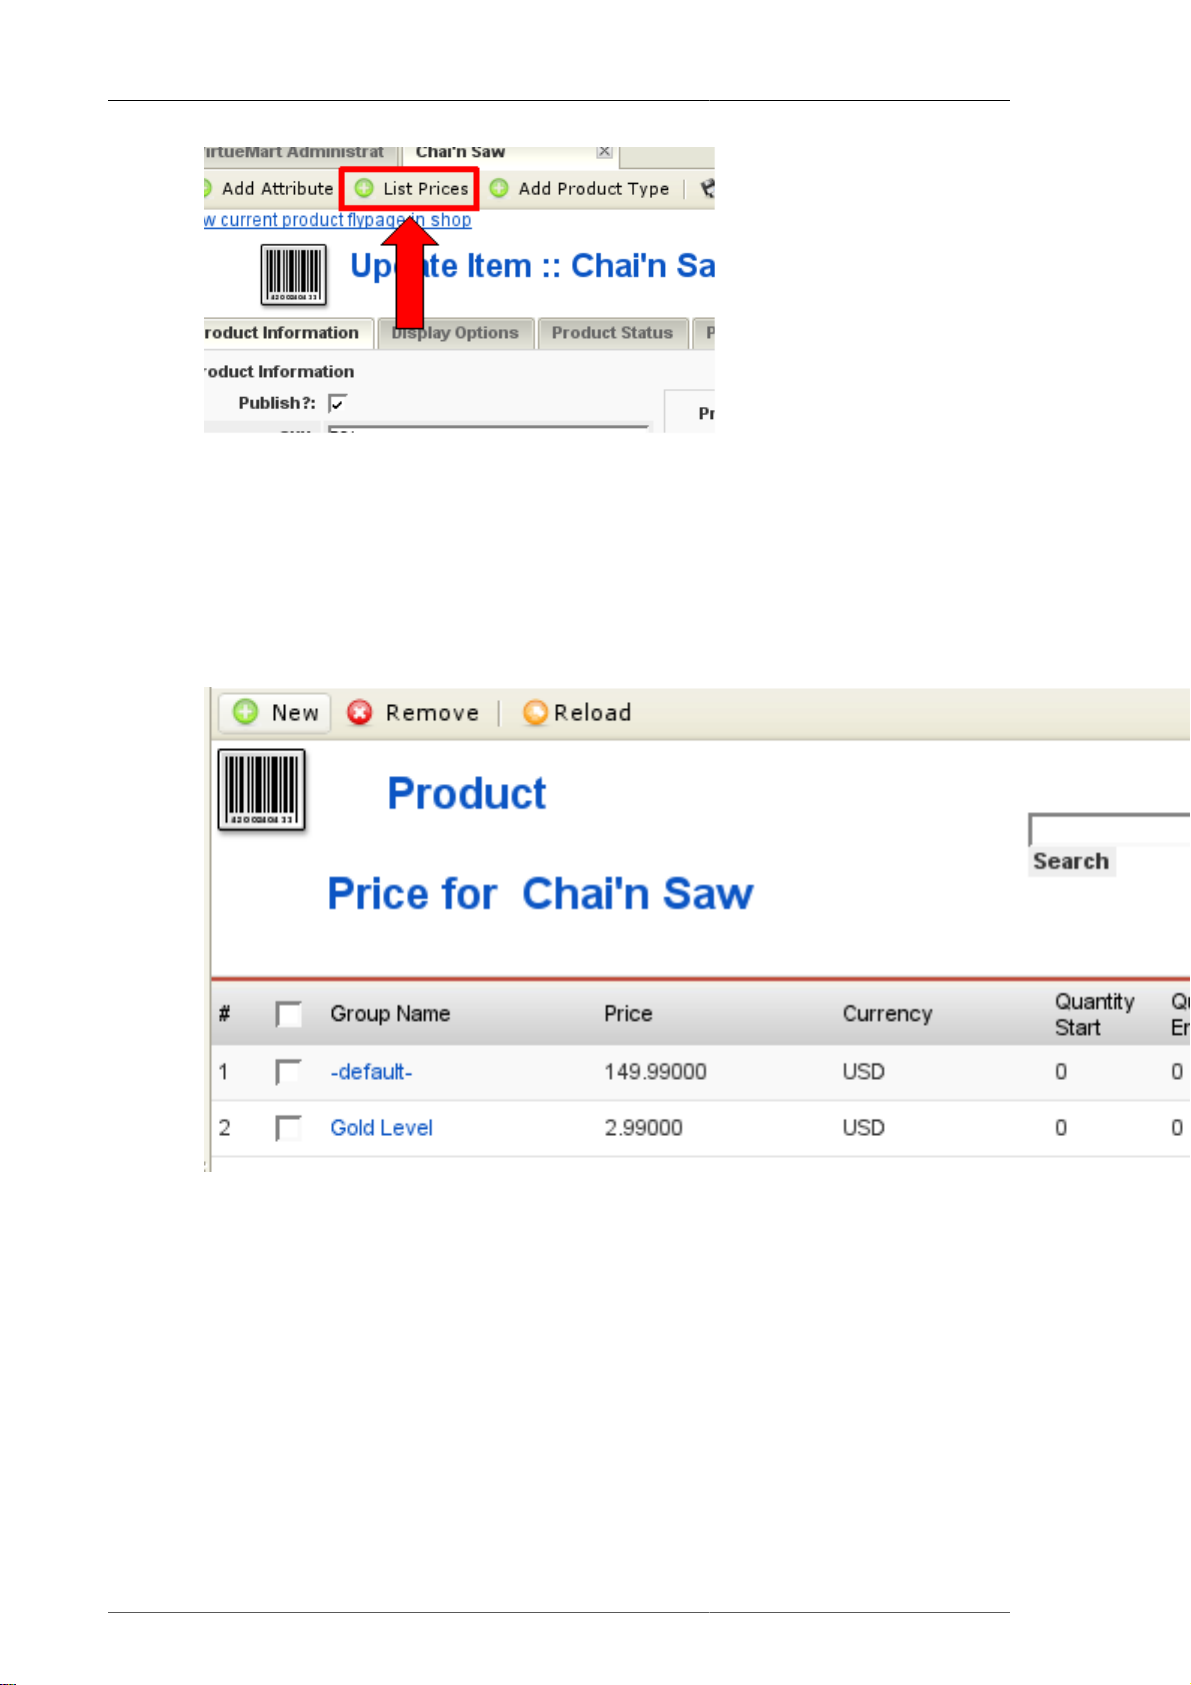
Product Price Management
Figure 4.26. VirtueMart Administration: Product Form - List Prices
In the Price List for this Product you can find a List of all available Prices, for Shopper Groups and
Quantities.
That's where you have a great Price overview. In this List you can modify existing Prices by clicking
on a Group Name or add new Prices by clicking on the "New" button in the toolbar.
50
Figure 4.27. VirtueMart Administration: Product Price List
In the Product Price Form you can choose the Price, the Shopper Group and the Quantity Range this
Price is valid for. If you leave the Quantity Fields empty, the Price will be independent from the
Quantity in Cart.
Page 61

Product Variations and Attributes
Figure 4.28. VirtueMart Administration: Product Price Form
Don't forget to save your changes when you're done.
4.6.3.2. Deleting a Price
Prices can only be delete from the Product Price List. How to access this List can be read in the Section
"Adding or Modifying Prices".
In this List you can click on the Trash Bin Icon at the end of the row of each Price Entry to remove
a Price. You can also select multiple Prices using the Checkboxes and then click on "Remove" in the
Toolbar.
4.6.4. Product Variations and Attributes
Attributes are the characteristics of a product like Color, Size or Type.
VirtueMart knows two types of Attribute Setups, one which allows Stock Control for each Variant
- you need to set up separate Products (called Items) - and one which just defines all attributes and
attribute values directly at the Product (no need to add Products for each Attribute Combination, but
no Stock Control for Variants).
4.6.4.1. Attributes with Stock Control (Child and Parent Products)
Going back now to offering variations on a product: If you want to offer a fixed list of variations for
your customer to choose from, rather than allowing them to pick and mix attributes as they please,
you need to create some Items. Note: These are different from the content Items in Joomla! or Mambo
itself. An item in VirtueMart is a pre-defined variation on the main product. In order to create an item,
51
Page 62

Product Variations and Attributes
you have to set up at least one attribute first. Hence, it is only after you have added an attribute that
the New Item toolbar button and its related menu option appear.
If you add Attributes to a Product, that Product becomes a Parent Product. After that you can add
Child Products (called Items) each one having different Values for each Attribute.
4.6.4.1.1. Adding Product Attributes
To create a new product attribute, go to the Product List ("Products" # "List Products"). Select the
Product you want to add or modify the Attributes. Click on "Add Attribute" in the Toolbar and a new
window will open displaying the Attribute Form. Complete the attribute entry form and click the Save
button in the toolbar to save the new item attribute. Once all item attributes have been defined, it is
time to create the individual items (=child products!).
If you'd already added Items to that Product, you need to define the Values for this new Attribute for
all the items. On the Product List click on "Item Information" under the name of the Parent Product that will open the Item List. Then click on the name of an item to display the product entry form for
that item. Populate the new item attribute field in the product entry form and click on the Save button
at the end of the form to save the new item attribute definition.
Figure 4.29. VirtueMart Administration: Add Attribute
Product Attributes Form Fields
Name The name used to identify the attribute.
Number in List The order in which the attribute is listed.
4.6.4.1.2. Adding Items
To create a new item, a parent product must exist / be created first. When completing the form, keep
in mind that the product information, product dimensions, and product images entered here are the
ones that will be displayed initially for all items. Once a specific item is selected by the customer, the
product information, product dimensions, and product images for that item will be displayed.
52
Page 63

Product Variations and Attributes
Figure 4.30. VirtueMart Administration: Add a new item (=child product)
Click on the Add Items button in the toolbar to display the product entry form for the specific item.
This form is the same as previous product entry forms only the vendor and category fields have been
populated for you, and item attribute fields for the attributes you have defined are now available.
Complete the product entry form and click the Save button in the toolbar to save the new item.
4.6.4.1.3. Editing Items
To edit an existing item, open the product List and click on the "Item Information" Link behind a
Product. You will be presented a List of all Child Items of that product. If you want to make changes
to a specific item, click on the name of the item you want to edit to display the item entry form for that
item. Make your changes and click the save button at the end of the form to update the item. Click on
the Return to Parent Product link at the top of the page to edit another item.
Figure 4.31. VirtueMart Administration: Edit Items
53
Page 64

Product Variations and Attributes
4.6.4.1.4. Deleting Items
To delete an item, List the Product's Items like in the previous section. Then click on the basket at the
end of the row of the item you want to delete. If you want to delete all items, you must delete each
item before deleting the parent item.Once all items have been deleted, click on the Delete button at
the end of the product entry form of the parent item to delete the parent item.
4.6.4.1.5. Editing product Attributes
To edit an existing product attribute, click on "Products" # "List Products" to display the list of
products. Then click on the name of the parent product for which the attribute is being edited to display
the product entry form for that parent product. Then click on "Products" # "Current Product" # "List
Attributes" in the top menu. A new window will open displaying a list of product attributes assigned
to the product selected. Click on the name of the attribute you want to edit to display the attribute entry
form for that attribute. Complete the attribute entry form and click the Save button at the top of the
form to update the item attribute.
4.6.4.1.6. Deleting Product Attributes
To delete an existing product attribute, click on "Products" # "List Products" to display the list of
products. Then click on the name of the parent product for which the attribute is being edited to display
the product entry form for that parent product. Then click on "Products" # "Current Product" # "List
Attributes" in the top menu. A new window will open displaying a list of product attributes assigned
to the product selected. To delete an attribute, click on the Trash Bin icon in the last column of the
row of the attribute you want to delete.
4.6.4.2. Simple Attributes (no Stock Control)
Instead of managing Child Products for each Attribute Variation, you can add Attributes and all their
possible Values to Products directly in their Product Form.
4.6.4.2.1. Advanced Attributes
Normal Attributes are called "advanced Attributes" in the Tab "Product Status" in the Product Form.
You can define as many Attributes and Attribute Values as you want. Additionally you can define
Price Modifiers, so Attribute Values can affect the Price.
The Attribute Values will be presented to the Customer in Drop Down Lists, so an Attribute can be
chosen (and must be chosen).
54
Page 65

Product Types Management
Figure 4.32. Attribute Manager in the Product Form
Important
If you have defined Attributes, the Customer must select a Value for all of the Attributes or
it won't be possible to put the Product into the Cart.
4.6.4.2.2. Custom Attributes
Custom Attributes follow nearly the same Syntax as the "advanced Attributes".
They allow Customers to specify their own Values for Attributes (e.g. "Your Name" or "Your
Greeting").
Important
If you have defined Attributes, the Customer must fill in a Value for all of the custom
Attributes or it won't be possible to put the Product into the Cart.
4.6.5. Product Types Management
Product Types is a powerful feature if you have complex products like electronics, computers, cars
and maybe airplanes. Product Types will help you create an advanced classification according to
the parameters of your complex products and will make possible the Advanced Search According to
Parameters in your site frontend.
The parametric search is the one responsable to the shopper's feeling that he can find EXACTLY what
he needs.
55
Page 66

Product Types Management
Note
Other developers call this magical feature "The Filter".
Note
To fully understand this feature, you really have to try for yourself and focus a few hours,
maybe days, OR you can read and follow this easy step by step guide.
4.6.5.1. Product Types Management
Product Type is very different in functionality than Product Category, but both have the mission
to describe products. Generaly the Category describes the usage of products, but the Product Type
describes products based to specific parameters values, and extends the basic description of the
Category.
4.6.5.1.1. Creating product types
We used "creating" term here to exclude the possibility of confusing it with "Add Product Type" or
assign Product Type to a product.
So to create a New Product Type, go to "Products"#"Add Product Type"
56
Page 67

Product Types Management
Important
"Creating Product Types" is possible only in this manner and only from this menu item.
Although this sounds the same as "Creating a Product Type relation with a Product" option
they are completely different.
4.6.5.1.2. Editing Product Types Information
In the form below you can edit your Product Type's Information.
57
Page 68

Product Types Management
Tip
We recommand not using "Image", "Page break" and "Readmore" options, because it is an
unecessary work. If you want to write detailed information about your products, use the
Category Description field, and further more the Product Description field.
Tip
Some things you need to know about "Product Type Browse Page" and "Product Type
Flypage". This assumes that you already have other, specific templates files for products
assigned to Product Types. By default, category browse page layout is managed by
"browse_1.php" file and product flypage layout is managed by "flypage.tpl.php" file, and
both are good no matter if your products are assigned or not to a Product Type. In our case
here, "Product Type Browse Page" is the one managing the layout when perform an Advanced
Search According to Parameters.
Figure 4.33. VirtueMart Administration: Product Type Management - Product
Type Information
After you finished filling in the information, click "Save" Now you will see the Product Type List.
4.6.5.1.3. Product Type Parameters
After reading this section, you will be able to decide if you want to describe the products from a
category ONLY using Product Type Parameters and don't use "Product Description" field for showing
parameters, OR use both.
Creating parameters
To create parameters, chick the link "Show" you see below.
58
Page 69

Product Types Management
Figure 4.34. VirtueMart Administration: Product Types Management - Product
Type List
Now you see the empty Parameter List for the newly created Product Type. Click "New" and take a
good long look at the Parameter Type dropdown box.
59
Page 70

Product Types Management
60
Figure 4.35. VirtueMart Administration: Product Types Management - Product
Type -Parameter Information
Page 71

Product Types Management
Parameter name is actually the name of the database field for the parameter, so
don't forget spaces in this field! Example: [monitor_weight].
Parameter Label is what exactly is shown in frontend as the parameter name
within Advanced Search According to Parameters form.
Parameter Description can be used to explain the parameter like you teach your
shopper about it, or leave it blank if is not a new or unimportant
information
List order
Parameter types defines the behaviour of the parameter when you perform an
defines the list order of the parameter within Advanced
Search According to Parameters form.
Advanced Search According to Parameters.
Integer like in our example, an integer
number.
Text and Short text can be used for non-numeric
values that stand for different
types of material, or in some
cases the product has or not a
certain feature.
Float Floating point numbers (also
known as "floats", "doubles",
or "real numbers"). Example:
1.23 or 1.23e
Char A single alphanumeric
character. Example: sex - M
or F
Date & time Date and Time of an Event
regarding your product.
Date only the date of an event
regarding your product.
Time only the time of an event
regarding your product.
Multiple values this parameter type is for
multiple purposes, so please
consult a PHP and SQL
reference before using it.
Break line this parameter type is not
realy a parameter, it's only
purpose is to separate
parameter sets, and define
these sets of parameters,
because is needed a better
understanding of parameters
for shoper, in case you
decided not to use Product
Description Field to display
the parameters in product
61
Page 72

Product Types Management
flypage, and use only the
Product Type Parameter List
layout.
Possible Values In this fileld you have to write all the values the parameter could
have, and between values use only the symbol ; with no spaces
before and after it. If a new product is launched on the market
and has a higher value for the parameter, update this field with
the new value, so you can configure your new product properly.
Show Possible Values as Multiple
select?
Default Value you can use this option if more of your products have this value,
Unit Unit of measurement for the parameter.
After filling the parameter information, click "Save". Now you see the parameter list of your Product
Type.
Now is the time to decide how much parameters you need to describe your products. Later, the
parameters you create will "filter" your products.
If checked, it makes possible for both configuring the product
parameters and parameter search to perform a multiple
selection.
or if you want to have a non-parameter option in the dropdownbox, like "none" or "not available", or as the image suggests to
set the layout of the date and/or time.
Figure 4.36. VirtueMart Administration: Product Types Management Parameters of Product Type
4.6.5.2. Product Type Relations
Now it's time to assign the products in the category to the newly created Product Type. Let's
begin with the basics.
Rules of the Product Types - explain the best practices
There are a few rules you must learn when creating a product relation/assignment to a Product Type.
These rules are displayed below in order of importance (most important first):
Important
For begginer VirtueMart users, It is recommanded to not assign more than one Product
Type to a product, because of SEF extensions difficulty on handling long links in the
parameter search process and could cause landing on 404 page. In this case, advanced users
have to manage databases with every single product assigned to more product types, and this
is a hard work, BUT you can always ask for help in VirtueMart Forum.
62
Page 73

Product Types Management
Important
If you want to create a single Product Type for a NON parent category of products, witch is
recommanded, you have to give your Product Type exactly the same name as the category
that contain the products assigned to it. It is best thing to do, because the most important bad
effect is that some products can be ignored by the parameter search. So you must understand
that a Product Type can describe with its parameters all the products in a category, so you
don't need to create more product types for a category. If you feel that the Product Type
Parameters are not enough, the best thing to do is to create more parameters for your existing
product type and reconfigure the products according to the new parameter information.
Important
If you decide to create more product types for a non parent category, you must think about
those Product Types as they would be child categories, so you will give them names like
they were categories, but they are not categories! This is a very risky option, because it is
much more possible you can forget to assign a Product Type to a few products, and those
products are ignored in the parametric search process, BUT you don't have a very deep
category structure. So in this case we are talking about products that have similar functions,
but they have different parameters and different parameter values.
Example 4.1.
Example: you have "Displays" category, and here you would create 2 more child categories:
"LCD Displays" and "Plasma Displays". The 2 categories of products perform same functions
(showing you multimedia information), but have different parameters, and you cannot assign
a single Product Type to describe all LCD and Plasma displays, because lets say Plasma
pixel size is very different than LCD pixel size. So in this particular case you have to
create 2 Product Types for "Displays" Category: "LCD Displays" Product Type and "Plasma
Displays" Product Type. This is actualy the best thing to do, because Plasma is a very different
technology than LCD.
Important
!REMEMBER! You have to make sure that ALL products in a Category are assigned to
at least one Product Type, and that Category must be non parent, with other words must
not have child categories. Further more, if you have a parent category for two categories,
that parent category must not contain any products, or contain all products from the
the two/more child categories.
Creating a relationship between a Product and a Product Type
Case 1 Adding/assigning a Product Type to an existing Product
Go to your Product List and follow theese steps:
63
Page 74

Product Types Management
Figure 4.37. VirtueMart Administration: Product Types Management - Adding
new Product Type to a Product FASE 1
64
Figure 4.38. VirtueMart Administration: Product Types Management - Adding
new Product Type to a Product FASE 2
Now go to your product configuration and configure the product parameters values for your product!
Page 75

Product Types Management
Figure 4.39. VirtueMart Administration: Product Types Management - Adding
new Product Type to a Product FASE 3
Now lets check the product flypage.
65
Page 76

Product Types Management
Figure 4.40. VirtueMart Administration: Product Types Management - Flypage
of a Product assigned to a Product Type
Note
In this example we described the product using only Product Type Parameters, and we didn't
used Product Description and Short Description fields. This is the default flypage layout, and
you can change it by choosing a different flypage file specialy created for products assigned
to Product Types.
Case 2 Creating a new product already assigned to a Product Type
This assumes that you create Product Types first and then add Products. So to do that, you have to
follow some steps. First go to Product Type List, and click "Show" for the Product Type you wish
to create a new Product.
Tip
This is the fastest process to create a database with products assigned to Product Types.
66
Page 77

Product Types Management
Figure 4.41. VirtueMart Administration: Product Types Management Creating a new product already assigned to a Product Type FASE 1
Note
In normal "Product List" page, you don't have the ability to create a Product already assigned
to a Product Type, so ONLY from "Product Type List" you have this ability.
67
Page 78

Product Types Management
Figure 4.42. VirtueMart Administration: Product Types Management Creating a new product already assigned to a Product Type FASE 2
68
Page 79

Product Types Management
Figure 4.43. VirtueMart Administration: Product Types Management Creating a new product already assigned to a Product Type FASE 3
OK! Now you have 2 products fully configured (you can realy merchandise them this way) and assigned to Product Types and we can perform an Advanced Search According to Parameters in site front end.
4.6.5.3. Advanced Search According to Parameters
In order to be able to perform this type of search, you have to enable the "Advanced Search According
to Parameters" link in VirtueMart Module. To do that, go to Joomla! main menu # "Extensions" #
"Module Manager" and open "VirtueMart Module" Configuration. There you must check the option
"Show Product Parameter Search Field?".
Tip
The "Advanced Search According to Parameters" link is also available in "VirtueMart All
in One Module".
Now go to your site frontend, refresh, and click "Advanced Search According to Parameters" link in
VirtueMart Module.
69
Page 80

Product Types Management
Figure 4.44. VirtueMart Administration: Product Types Management Advanced Search According to Parameters - Selecting Product Type
70
Page 81

Product Types Management
Figure 4.45. VirtueMart Administration: Product Types Management Advanced Search According to Parameters Form - Selecting Parameter Values
71
Page 82

Product Types Management
72
Figure 4.46. VirtueMart Administration: Product Types Management Advanced Search According to Parameters Search Results
Page 83

Product Downloads,
additional Images and Files
4.6.5.4. Deleting Product Types
This is an important decision to make, because deleting a Product Type will delete all relations with
products, and you cannot search those products according to their parameters anymore. In case you
don't need a Product Type anymore, you can delete it using the folowing procedure: go to Product
Type List, select the one you want to delete and click "Remove".
4.6.6. Product Downloads, additional Images and Files
To add a new file, let's say an .mp3 file which is the file we want to sell, we just open the file form
by clicking the "New" button in the toolbar of the file list.
Figure 4.47. VirtueMart Administration: File Form
You have the chance to upload a new file, which makes sense if you just upload a smaller image or
product specsheet.
Note
If you want to assign a bigger file (maybe a 8MB mp3 file) you need to upload the file using
an FTP program into the directory you have specified for downloadable product files (see
Configuration). After you have done this, you can select the file from the drop-down list in
the file form.
4.6.6.1. General
VirtueMart allows to manage additional files and images for each product. The File Manager can be
accessed from the Product List:
73
Page 84

Product Downloads,
additional Images and Files
Figure 4.48. VirtueMart Administration:
The image icon is the link to the file manager. The number behind the icon is the total number of all
files assigned to this product.
The File List for a Product contains all files currently assigned to the product. Files can have different
"roles" like "downloadable file (to be sold!)", "additional file" and "additional image".
Figure 4.49. VirtueMart Administration: File List
4.6.6.2. Selling downlodable Products
74
Virtual Products can be sold with VirtueMart - you can specify Files, which are made available for
download after a purchase has been successful.
Page 85

Product Downloads,
additional Images and Files
Important
The Download Mode must be enabled globally in the Configuration first. See Section
Configuration - Downloads for more information about that.
Products can have one or more Files assigned to them as downloadable Product File.
Warning
downloadable Product Files and additional Files are two completely different Things. While
additional Product Files can be downloaded at any time while being published, downloadable
Product Files can only be downloaded after the Product has been purchased and the Order
Status has been changed to that Order Status which enables Downloads.
4.6.6.2.1. Add a downloadable Product File
To access the File Manager, click the small Image Icon in the Product List (Column Media) in the
Row of the Product you want to edit. A new Window opens and shows a List of all Files assigned to
that Product. Click the New Button to open the Product File Form.
Figure 4.50. File Form
In that File Form you need to choose File Type: Downloadable Product File (to be sold!) first because that makes a drop down list with existing Files visible. You can now upload a file using the
Upload Field or select a File from the drop down List.
Note
File Uploads via HTTP are usually limited by Size, so you can upload Files via FTP first into
the Download Root Path and then select the File from the drop down List here in the Form.
You don't need to specify more information now - just submit the Form using the Save Button. You
can repeat this action to add more than one downloadable Product File to a Product.
75
Page 86

Product Downloads,
additional Images and Files
4.6.6.2.2. More Information about Product Downloads
Customers are automatically notified about their Downloads in an Email. The Email is sent out after
the Order Status has been changed automatically (e.g. when using Credit Card Payment with instant
notification that the Payment could be captured) or manually (from the Order List in the Admin
Section).
Figure 4.51. Download-Info Email
The Customer now must click the links, which lead them to the Download Page, so they can get their
File(s).
If a Customer doesn't receive the Download-Info Email, you can resend that Email. Just open the Order
Details of the Order from the Order List and click "Resend Download ID".
76
Page 87

Product Downloads,
additional Images and Files
Figure 4.52. Resend Download ID
When the Download has expired or the Customer has downloaded the maximum number of Times,
you can re-enable the Download Possibility from the same place:
Figure 4.53. Re-enable Downloads
Just click the Button "Re-enable Download" and a new Email with new Download ID(s) is sent out
to the customer.
If you cancel an Order, the Download ID(s) are removed from the Database, so the Customer won't
be able to download any of the purchased Files.
4.6.6.3. Additional Images and Files
You can have as many Images and Files for a Product as you need. To specify a new Image or File,
you need to access the File Manager for that Product (from the Product List, Column Media).
Additional Images are either shown on the Product Details Page or on a separate Images Page
(Amazon-like) - that depends on your "Flypage Template".
Additional Files can be Product Specs, PDF Flyers or other Materials you want to give to the Customer
to give better Information about the Product. The List of available Files is shown on the Product
Details Page.
Note
When removing a File which is still used by other Products, that File won't be physically
removed from the Server.
77
Page 88

Product Discounts
4.6.7. Product Discounts
Discounts in VirtueMart must be created in the Product Discount Form before being able to assign
a Product to a specific Discount.
Caution
When updating a discount, your changes apply to all products which are assigned to this
discount.
Adding / Updating a Discount
Go to "Product" # "Add/Edit Product Discount".
Figure 4.54. VirtueMart Administration: The Product Discount List
Now fill in the details for this Discount Record:
Figure 4.55. VirtueMart Administration: Product Discount Form
Discount Amount (required) This is the amount of discount you want to have subtracted
(added) from the product price.
Has the syntax: 000.0000 (no comma!)
78
Discount Type (required) The Discount Type specifies how the amoung is handled: either
as a percantage or as a total amount. If you select "Percentage",
Page 89

Start Date (optional) By clicking on "..." you can specify a date from the calendar,
End Date (optional) If you have specified a Start Date, you'll surely want an End
When you're done, don't forget to "Save" your information.
Deleting a Discount
You can easily delete a discount. Note that this removes the Discount from all products which are
assigned to it.
Product Ratings and Reviews
the amount will mean that you give a Discount of XX % to
the Product Price. If "Total" is selected, the amount will be
substracted (added) from the Product Price.
which will be the first day, the Discount is calculated and shown
to the customer. The Start Date is no must. You can also only
have an End Date or leave this field blank when this discount
shall begin instantly.
Date - that would be something like "Sale". So click on "..."
and specify the last Day of the Sale from the calendar. You can
also only have an Start Date or leave this field blank when this
discount is not limited.
Just go to the Product Discount List and click on the Trash Icon of the row of the Discount you want
to delete at the right side of the List. Confirm that you "want to delete this record" and done.
4.6.8. Product Ratings and Reviews
4.6.8.1. General
The Review/Rating Feature can be turned on and off in the Configuration. There you can also set if
reviews are automatically published or must be moderated before being published. Only registered
Customers can submit Ratings and Reviews - and only one per Product.
4.6.8.2. Review Moderation
You can access the list of all Reviews for a Product from the Product List, Column "Customer
Reviews". If a Product jas no Review yet, the link says "Add a Review", which brings you to the
Review Form, where you can add Reviews.
Figure 4.56. Add a Product Review (Administrator Side)
79
Page 90

User Management
If a Product has one or more Reviews, you can view the List of all Reviews.
Figure 4.57. List of Product Reviews
To edit or view a Review click on the user name in the "Name" Column - this will bring you to the
Review Form.
You can quickly (un)publish a Review by clicking the Icon in the "Publish" Column. To completely
remove a Review, you can click the Trash Icon in the last Column or select on or more Reviews and
click "Remove" in the Toolbar.
4.7. User Management
VirtueMart comes with an extended User Management compared to Joomla's User Management
Features.
Important
Always use the VirtueMart User Manager for Adding / Editing and Deleting Users to /
from your Joomla! site! If you use Joomla's built-in User Manager you will run into trouble,
because required database table entries are not created for such users. So for the other case:
When you delete Users with the Joomla! User Manager from the site that have been added
with the VirtueMart User Manager, useless entries remain.
VirtueMart also provides the ability to create any number of addresses for a particular user. Not only
can a user have separate bill to and ship to addresses, but addresses for home and business as well.
4.7.1. Shopper Groups
VirtueMart offers the ability to assign users to a Shopper Group. This enables Storekeepers to create
Shopper Groups for whatever need (e.g. site access, customer rating, tax display, etc.). These shopper
groups can then be used to provide special services, discounts, or access to a specific group of users.
Because users and shopper groups are associated to a particular vendor, it is important to create your
vendor records before creating the user and shopper group records.
Note
There's only one "default" shopper group. Whatever shopper group you set as default, its
settings are used for new customers. New customers are automatically assigned to the default
shopper group.
4.7.1.1. Adding or modifying a Shopper Group
You can add and modify shopper groups in VirtueMart using the Shopper Group List, which can be
accessed through the menu: "Shopper" # "List Shopper Groups".
80
Page 91

Users
Figure 4.58. VirtueMart Administration: Shopper Group List
To add a new shopper group, just click on the "New" button in the toolbar. In the following shopper
group form just fill out the necessary fields.
Figure 4.59. VirtueMart Administration: Shopper Group Form
4.7.1.2. Deleting Shopper Groups
You can delete Shopper Groups from the Shopper Group List by clicking the "Trash Bin" icon in
the last column of each row in the shopper group list. You could also check the checkboxes of each
shopper group which you want to remove and click the "Remove" button in the toolbar.
Note
You can't delete shopper groups, which still has customers assigned to it.
4.7.2. Users
TODO
4.7.2.1. Adding or modifying Users
TODO
4.7.2.2. Deleting Users
TODO
81
Page 92
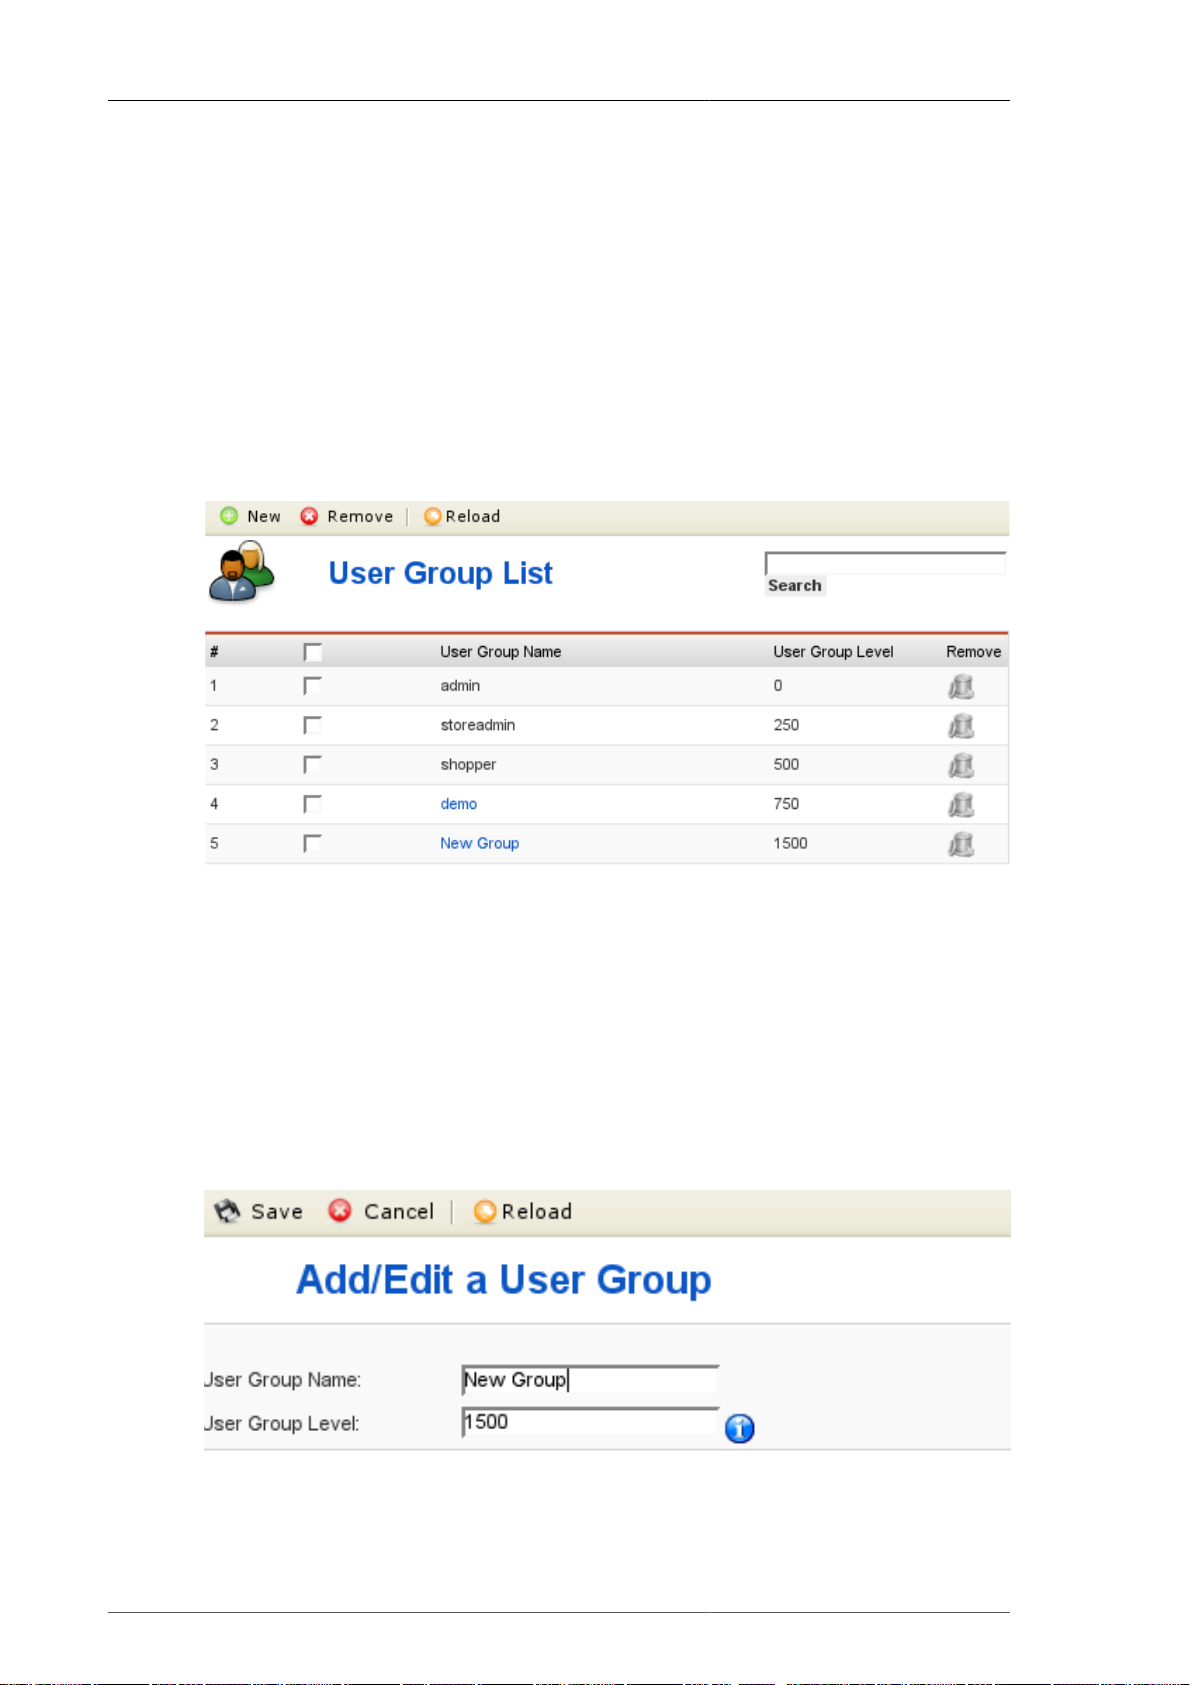
4.7.3. User Groups
User Groups are "Permission Groups" and used to restrict access to certain parts and functions of the
shop. Each user is assigned to a user group. By default registered customers are members of the group
"shopper".
When can this be useful? Imagine you have a user, who wants to access the "Report" section of
the store. Usually this is restricted to admins and stoeradmins. If you assign this user to the admin/
storeadmin group, he will also be able to access other sensible parts of the store, where he could change
or delete important data. The solution is to add a new User Group called "Report", which will have
the same permissions as shoppers PLUS access to the "report" core module. After the Group has been
added, you can assign this user to the new group.
User Groups can be added, modified and deleted from the User Group List ("Admin" # "User Groups").
User Groups
Figure 4.60. VirtueMart Administration: User Group List
You can click on the name of an existing group to open the user group form.
Note
The groups "admin", "storeadmin" and "shopper" are key groups in VirtueMart and can't be
modified nor removed.
You can add a new Group by clicking on the "New" button in the toolbar. This opens the User Group
Form:
82
Figure 4.61. VirtueMart Administration: User Group Form
Page 93

User Registration Fields
Here you can choose a name for the group and the group level.
Note
The higher the group level, the less permissions are assumed: "admin" has higher permissions
than "storeadmin", because the group level number is lower.
After you have saved the user group, it is available in the core module and function list/forms.
Figure 4.62. VirtueMart Administration: The New Group in the Module List
Now you can start to grant permissions to this new group by checking the boxes in this list for the
column of the "New Group".
Important
The same needs to be done for the function list of each module!
4.7.4. User Registration Fields
The "User Fields" Management allows you to freely modify the fields displayed on registration and
account maintenance. Such fields are for example: First Name, Last Name, Telephone,...
The User Field Management can be accessed via "Admin" # "Manage User Fields".
Figure 4.63. VirtueMart Administration: Manage User Fields
83
Page 94

4.7.4.1. Add a new Field
You can add a new field by clicking the "New" button on the toolbar in the User Field List. The Field
Form allows you to choose from various field types like
Text Input Field
Textarea
Checkbox
Date
drop down
email
Web Address Used for Web Addresses.
EU VAT ID Checks for a valid EU VAT ID upon Registration.
Age Verification Allows you to ask the Customer for her/his Birthday to check if she/he is old
User Registration Fields
enough to purchase from your Store. You can specify the minimum age at
the bottom of the Registration Field Form after you have selected this type.
Tip
Some other Field Types will be visible depending on what other Components you have
installed on your Joomla!/Mambo:
Newsletter Registration You can let your new Customers be automatically be
subscribed to a Newsletter. The following Components
are supported: Letterman [http://www.thejfactory.com/
component/option,com_docman/Itemid,56/].
Captcha Field Obviously not a good idea if you don't want
to bug new Customers, but sometimes necessary
to prevent Registration Spam. You can add a
Captcha Check to the Registration Form if the
SecurityImages Component [http://joomlacode.org/gf/
project/securityimages/] is installed on your Site.
In our example we will add a new field where users from the EU can fill in the EU VAT ID of their
company if applicable.
84
Page 95

User Registration Fields
Figure 4.64. VirtueMart Administration: Add a new User Field
The Form Fields have the following meaning:
Type The type of this field. Can't be changed afterwards!
Table Field Name The name of the column that will be inserted into
the table structure of the tables "jos_vm_user_info" and
"jos_vm_order_user_info" in your database.
Title This is the Label of the Field in the Registration / Account
Maintenance Form
Description This description will be shown to the customer in the frontend
in a small tooltip besides the field to explain the field.
85
Page 96

User Registration Fields
Required? If this is set to yes, a value must be provided or chosen,
otherwise registration will not be possible.
Show on Account? This defines wether the field is shown in the account
maintenance form or not.
User Read Only? If this is set to yes, the field is read-only and can't be changed
by the customer.
Show at Registration? If this is set to yes, the field will be shown in the registration
form.
Published Here you can unpublish the field completely, so it won't be
shown in any form.
Size This defines the length of text input fields.
Max Length This is the maximum number of characters that can be filled
into the text field.
Move the customer into the
following Shopper Group...
If you are finished filling in the necessary values, don't forget to Save your changes.
Here is a screenshot of the newly added field "EU Vat ID" in the registration form:
Here you can select into which shopper group the newly
registered customer is moved when the EU VAT ID has been
succesfully validated.
Figure 4.65. VirtueMart Administration: New Field "EU Vat ID" in the
registration form
4.7.4.2. Modifying Fields
Fields can be reordered, renamed, published, set to be required or not and much more.
86
Page 97

Reordering Fields
Fields can be reordered using the blue arrows in the user field list or using the text input fields in
each row of the list:
User Registration Fields
Figure 4.66. VirtueMart Administration: Re-Ordering in the Field List
If you have used the input fields to change the ordering of the fields, you must apply your changes by
clicking the Save Icon in the top of this column. After that the fields will be reordered.
Publish (show)/Unpublish (hide) Fields
You can publish and unpublish fields by clicking on the icon in the column "Published". After that
the publish state will be toggled.
Changing Fields
You can access the field form by clicking a field name in the User Field List. In this form you can
modify all settings except the field type.
87
Page 98

Order Administration
Figure 4.67. VirtueMart Administration: Modifying a Field
4.7.4.3. Deleting Fields
You can delete all non-system fields from the User Field List. You just need to click on the Trash Bin
icon at the end of the row of the item you want to remove. You can also select the checkboxes of the
fields which you want to delete and then click the "Remove" button in the toolbar.
4.8. Order Administration
Your shop is online, your catalogue is bursting at the seams, you've run all of your payment processing
tests, and you're ready to go live! Well, maybe not quite. You need to know what to do when those
orders come flooding in. When someone orders a product through your VirtueMart website, a record
is created in the system with the details of the order.
88
Page 99

The order record has a ‘status’ to indicate where the order is in the stream of events – for example,
whether it has been paid for, shipped, or cancelled. The actual values you use for status are up to you,
but by default you are given status values of Pending, Confirmed, Cancelled, Refunded, and Shipped.
If you want to define your own status values, you can do so by selecting "List Order Status Types’
from the ‘Order Status’ sub-menu of the "Orders" menu.
To view all of the orders in the system, click on "List Orders" on the "Orders" menu. This takes you
to the Order List which is illustrated in the next figure.
4.8.1. The Order List
The Order List
Figure 4.68. VirtueMart Administration: Order List
When you click on an order number, you are given the full details of the order as shown in the next
figure.
When you click on the name of the customer, you will be taken to the user form for this user. The
Print View Link opens a new window that allows you to print out the order. In the status column you
can see the current status of this order. You can change this value and after that click on the "Update
Status" button to the right to update the order status. If you wish to notify the customer about this
action, check the option "Notify the customer?".
To delete an order, use the Trash Bin icon in the last column or select multiple orders using the
checkboxes in the first column and click on "remove" in the toolbar.
89
Page 100

4.8.2. The Order Details
The Order Details
Figure 4.69. VirtueMart Administration: Upper Part of the Order Details
The Order Details View shows all details which are relevant to the store owner. You have three tabs
in the upper part: Order Status Change, Order History and Modify Order.
90
Figure 4.70. VirtueMart Administration: Bottom of the Order Details
In this part of the order details screen you see the list of all purchased products. If the products are
downloadable products, you can re-send the Download Notification Email or re-initiate the downloads
if the maximum download number has been reached or the download period has expired.
 Loading...