

Page 1
Virident FlashMAX II
User’s Guide for VMware ESXi
© 2012- 13 Virident Systems
Page 2

Table of Contents
1 Introduction .......................................................................................................................................... 1
2 System Requirements ........................................................................................................................... 1
3 Hardware Installation ........................................................................................................................... 1
3.1 Bracket Installation ....................................................................................................................... 2
3.2 PCI Slot Selection .......................................................................................................................... 3
4 System BIOS Settings ............................................................................................................................ 3
4.1 Fan Speed Settings in BIOS ........................................................................................................... 3
4.2 Processor Settings in BIOS ............................................................................................................ 4
5 Software Installation ............................................................................................................................. 5
5.1 Device Driver Installation .............................................................................................................. 6
5.1.1 Install Virident Driver VIBs Using Offline Bundle ................................................................... 6
5.1.2 Install Virident Driver Using VMware vSphere Update Manager (VUM)............................... 6
5.1.3 Reboot ................................................................................................................................... 8
5.1.4 Confirm driver installation after reboot ................................................................................ 8
5.2 Ensuring FlashMAX II is Operational ............................................................................................. 8
5.3 Firmware Upgrade ........................................................................................................................ 8
5.3.1 FlashMAX II Firmware Upgrade Procedure ........................................................................... 9
6 Configuring FlashMAX II Datastore using vSphere Client ................................................................... 10
7 FlashMAX II Configuration & Management Utilities ........................................................................... 15
7.1 Esxcli vgc config ........................................................................................................................... 15
7.2 Esxcli vgc monitor ....................................................................................................................... 17
7.3 Esxcli vgc beacon ......................................................................................................................... 18
7.4 Using vgc-diags to collect log bundle .......................................................................................... 19
7.5 Using vgc-secure-erase for purging the drive data. .................................................................... 20
8 Multiple Virident FlashMAX II Devices ................................................................................................ 23
9 Using FlashMAX II Devices in Pass-Through Mode ............................................................................. 23
10 Optimizing Performance ................................................................................................................. 23
Virident FlashMAX II User’s Guide, Version 3.1.1 - i -
Page 3

10.1 Usable space vs. write performance ........................................................................................... 23
10.2 Partitioning and write performance ........................................................................................... 23
10.3 Setup recommendations to utilize full performance of FlashMAX II with a single Guest VM. .. 24
10.3.1 After adding 4 vmdks using VM “Edit Settings” will see VM properties hardware tab
shows as below ................................................................................................................................... 24
11 Troubleshooting on ESXi Systems ................................................................................................... 26
11.1 Device not detected on ESXi ....................................................................................................... 26
11.2 Firmware Mismatch or Device not Initialized ............................................................................. 26
11.3 Thermal Shutdown ...................................................................................................................... 27
11.4 Device is Degraded or in Read-Only mode ................................................................................. 27
11.5 Searching for errors in the logs ................................................................................................... 27
12 Onboard diagnostic LEDs ................................................................................................................ 28
13 Contacting Virident Support ........................................................................................................... 28
Virident FlashMAX II User’s Guide, Version 3.1.1 - ii -
Page 4

VIRIDENT
SOFTWARE END USER LICENCE AGREEMENT
This is a legal agreement between you, the end user,
("You") and Virident Systems Inc. (“Virident”). BY
INSTALLING THIS SOFTWARE OR CLICKING ON THE
“ACCEPT” BUTTON YOU ARE AGREEING TO BE BOUND BY
THE TERMS OF THIS AGREEMENT. Certain of the software
delivered may be open source software and is licensed
pursuant to the applicable open source licenses specified in
the documentation. This Agreement applies to the
software that is proprietary to Virident (the “Program(s)”).
1. License
Virident grants you a non-exclusive, non-transferable
license to use one copy of the Program(s) for each server
product for which you have paid the applicable license fee,
for internal business purposes, in accordance with the user
documentation, and in accordance with the terms of this
Agreement. You may make one back-up copy of the
Program, provided that such copy shall be subject to the
terms of this Agreement. You may not use the Program(s)
with any equipment other than the equipment specified by
Virident. You may not loan, rent, lease, license, sublicense
or distribute the Program(s) or any copies.
3. Copyright and other intellectual property rights
All intellectual property rights in the Program(s) and user
documentation are owned by Virident and are protected by
copyright and other intellectual property laws,
international treaty provisions and applicable national
laws. All rights not expressly granted in this Agreement are
reserved by Virident.
4. Further restrictions
You must not reverse engineer or decompile the
Program(s) except to the extent permitted by applicable
law despite any contractual prohibition. If you wish to
obtain interface information relating to the Program, to
achieve interoperability, a request should be made in
writing to Virident.
5. No warranties
ALL PROGRAMS ARE PROVIDED “AS IS” WITHOUT
WARRANTY OF ANY KIND. NO CONDITIONS, WARRANTIES
OR REPRESENTATIONS SHALL BE DEEMED TO HAVE BEEN
GIVEN BY VIRIDENT IN RESPECT OF THE PROGRAM OR
DOCUMENTATION. VIRIDENT DOES NOT WARRANT OR
ENTER INTO ANY TERM TO THE EFFECT THAT ANY
PROGRAM WILL BE FREE FROM DEFECTS OR THAT ITS
OPERATION WILL BE ERROR-FREE. ALL IMPLIED
WARRANTIES, INCLUDING THE IMPLIED WARRANTIES OF
MERCHANTABILITY, FITNESS FOR PURPOSE,
NONINFRINGEMENT AND SATISFACTORY QUALITY ARE
EXPRESSLY DISCLAIMED. If you have purchased technical
support then errors will be addressed in accordance with
the applicable technical support policies.
6. Limitation of Liability
VIRIDENT'S TOTAL AGGREGATE LIABILITY FOR ANY AND
ALL CLAIMS SHALL NOT EXCEED THE AMOUNTS PAID FOR
THE PROGRAMS DURING THE SIX-MONTH PERIOD PRIOR
TO THE DATE ON WHICH THE CLAIM AROSE. IN NO EVENT
SHALL VIRIDENT BE LIABLE TO ANYONE FOR SPECIAL,
COLLATERAL, INDIRECT, EXEMPLARY, INCIDENTAL OR
CONSEQUENTIAL DAMAGES OF ANY KIND (INCLUDING
COSTS OF COVER, COSTS OF REWORK, RETESTING OR
REMOVAL AND REINSTALLATION OF PRODUCTS, LOSS OF
GOODWILL, LOSS OF PROFITS, OR LOSS OF USE) IN
CONNECTION WITH THIS AGREEMENT ON ANY THEORY OF
LIABILITY AND WHETHER OR NOT VIRIDENT HAS BEEN
ADVISED OF THE POSSIBLITY OF SUCH DAMAGES
7. Termination
Your license to use the Program(s) automatically
terminates if You fail to comply with any provision of this
agreement.
8. Assignment
You may assign all of Your rights to use the Program(a) to
another person or entity provided that: (a) You transfer
this agreement, the physical medium in which the Program
is made available, user documentation and all copies of the
Program(s) and user documentation together with the
equipment on which it is installed; (b) You retain no copies
of the Program(s), including copies stored on any medium;
and (c) You remain liable under this Agreement for any
breach of its terms by the assignee. Otherwise, the
Programs may not be assigned without the consent of
Virident.
9. Statutory rights
Virident FlashMAX II User’s Guide - Version 3.1.1 - iii -
Page 5

If You purchased the copy of the Program(s) covered by
this Agreement as a consumer, the exclusions and
limitations contained in this Agreement do not affect any
statutory rights to which You are entitled and which may
not by law be excluded or limited.
10. Certain Applications
Virident’s Products are not designed and not warranted to
be suitable for use in military applications and/or military
environments, life support applications or other critical
applications which may involve potential risk of death,
personal injury or severe property or environmental
damage Use of Products in such applications is fully at the
risk of Buyer.
11. U.S. Government License Rights
If You are an entity of the United States Government you
receive the Programs with restricted rights. In no event
shall the Government acquire greater than
RESTRICTED/LIMITED RIGHTS. At a minimum, use,
duplication, or disclosure by the Government is subject to
restrictions as set forth in FAR §52.227-14 Alternates I, II
and III (JUN 1987); FAR §52.227-19 (JUN 1987) and/or FAR
§12.211/12.212 (Commercial Technical Data/Computer
Software); and DFARS §252.227-7015 (NOV 1995)
(Technical Data) and/or DFARS §227.7202 (Computer
Software) as applicable. If Products are sold under a US
Government contract, Virident rejects provisions or clauses
required to be passed on to sellers pursuant to such
contract and such provisions or clauses shall not be
deemed to be binding on Virident unless accepted in
writing by an authorized representative.
12. Miscellaneous
A. Export Control: Virident's obligation to provide the
Products, documentation, or any media in which any of the
foregoing is contained, as well as any other technical
assistance shall be subject in all respects to such United
States laws and regulations as shall form time to time
governing the license and delivery of technology and
products abroad by persons subject to the jurisdiction of
the United States, including the Export Administration Act
of 1979, as amended, any successors or legislation, and the
Export Administration Regulations and other United States
laws and regulations governing exports in effect from time
to time.
California, and its interpretation, construction, and the
remedies for its enforcement or breach are to be applied
pursuant to and in accordance with the laws of the State of
California, excluding its conflict of law provisions. The UN
Convention on the International Sale of Goods does not
apply to this Agreement. The parties agree that in the
event any action, suit or proceeding is brought by either
party to enforce this Agreement, then such action, suit or
proceeding may be brought only in a United States District
Court for the Northern District of California, or, if that court
does not have or elect to exercise its jurisdiction, then in
the appropriate state court in the State of California,
county of Santa Clara.
C. Contingency: Virident is not liable, either wholly or in
part, for nonperformance or a delay in performance due to
force majeure or contingencies or causes beyond the
reasonable control of Virident, including but not limited to,
shortage of labor, fuel, raw material or machinery or
technical or yield failure where Virident has exercised
ordinary care in the prevention thereof. Production and
deliveries may be allocated by Virident in a reasonable
manner in the event of shortage of goods.
D. Partial Invalidity: If any provision of this Agreement is
held to be invalid or unenforceable, the remainder of this
Agreement shall continue in full force and effect so long as
neither party is denied material economic benefit
hereunder and will be interpreted to reflect the original
intent of the parties.
E. Waiver. A waiver by Virident of any term or condition of
this Agreement in any instance shall not be deemed or
construed to be a future waiver of such term or condition.
F. Construction; Language. As used in this Agreement, the
words "include" and "including" and variations thereof, will
not be deemed to be terms of limitation, but rather will be
deemed to be followed by the words "without limitation."
The headings in this Agreement will not be referred to in
connection with the construction or interpretation of this
Agreement. This Agreement is in the English language
only, which language shall be controlling in all respects,
and all notices under this Agreement shall be in the English
language.
B. Governing Law and Jurisdiction: This Agreement is
deemed to have been entered into in the State of
Virident FlashMAX II User’s Guide - Version 3.1.1 - iv -
Page 6
Model
PCI Express
Airflow
Processor
Memory
FlashMAX II
550GB and 1.1TB
Gen 2 x8
electrical
150 LFM @
45C inlet
Multicore Intel Xeon®
5500 or AMD
Opteron™
2GB for 550GB
3GB for 1.1TB
FlashMAX II
2.2TB
Gen 2 x8
electrical
200 LFM @
45C inlet
Multicore Intel Xeon®
5500 or AMD
Opteron™
6GB
Please observe Electrostatic Discharge (ESD) precautions while installing or handling
FlashMAX II devices. ESD can damage server and/or device components.
Make sure to power down the system before installing FlashMAX II devices. Disconnect
the server from the AC power to ensure no dangerous voltages are present.
1 Introduction
The Virident FlashMAX™ line of solid state storage devices is a revolutionary product family that utilizes the
industry standard PCI Express bus interface, along with an innovative hardware and software architecture
to deliver highest sustained application performance over its life time and enterprise-class reliability.
Virident FlashMAX II enables enterprises to tackle performance-intensive applications such as databases,
business analytics, virtualization and high-performance computing applications. This document explains
how to install, configure, and manage Virident FlashMAX II devices with software version 3.1.1 on ESXi
5.0/5.1 based systems.
2 System Requirements
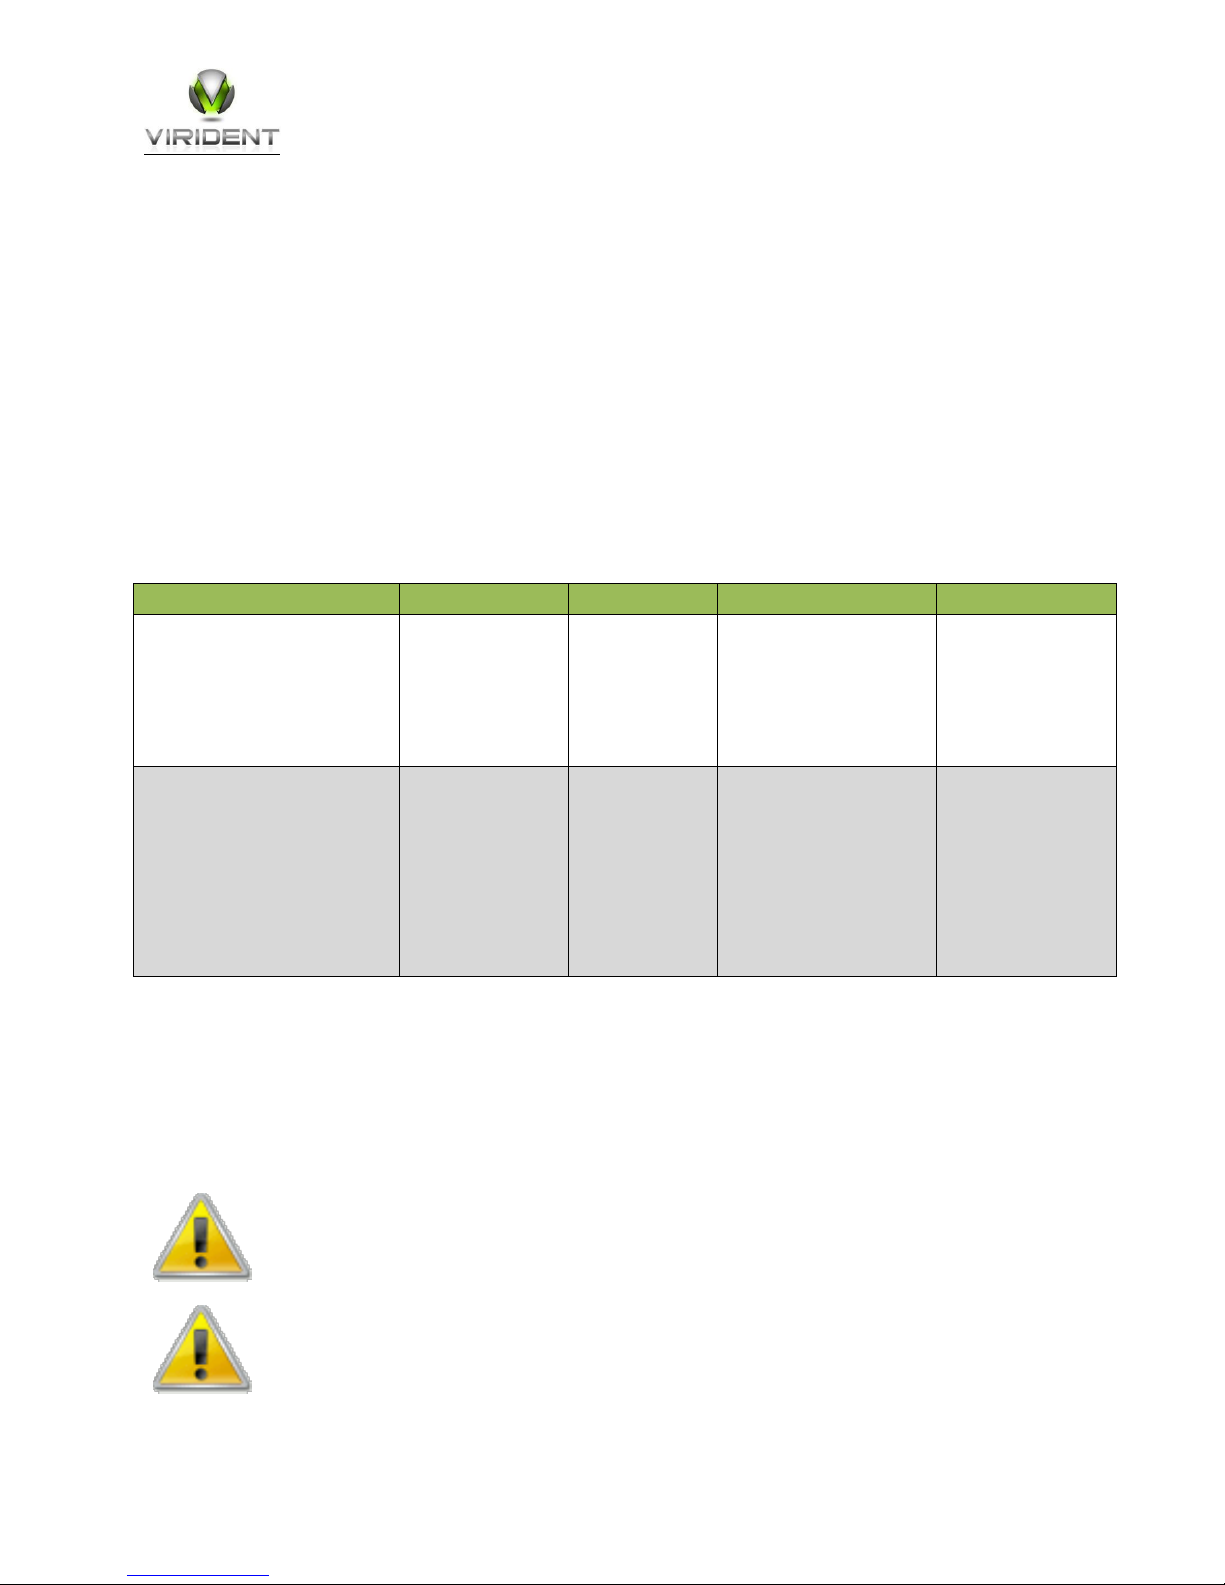
For optimal performance the system hardware needs to meet the following requirements:
Please ensure that you have ample memory for other applications to run in addition to the minimum
memory required by each installed Virident device.
3 Hardware Installation
Virident FlashMAX II User’s Guide - Version 3.1.1
1
Page 7
Please use only brackets supplied by Virident with the device. Also, do not remove the
heatsinks during the bracket replacement process as doing so could incur damage to the
device and void the warranty.
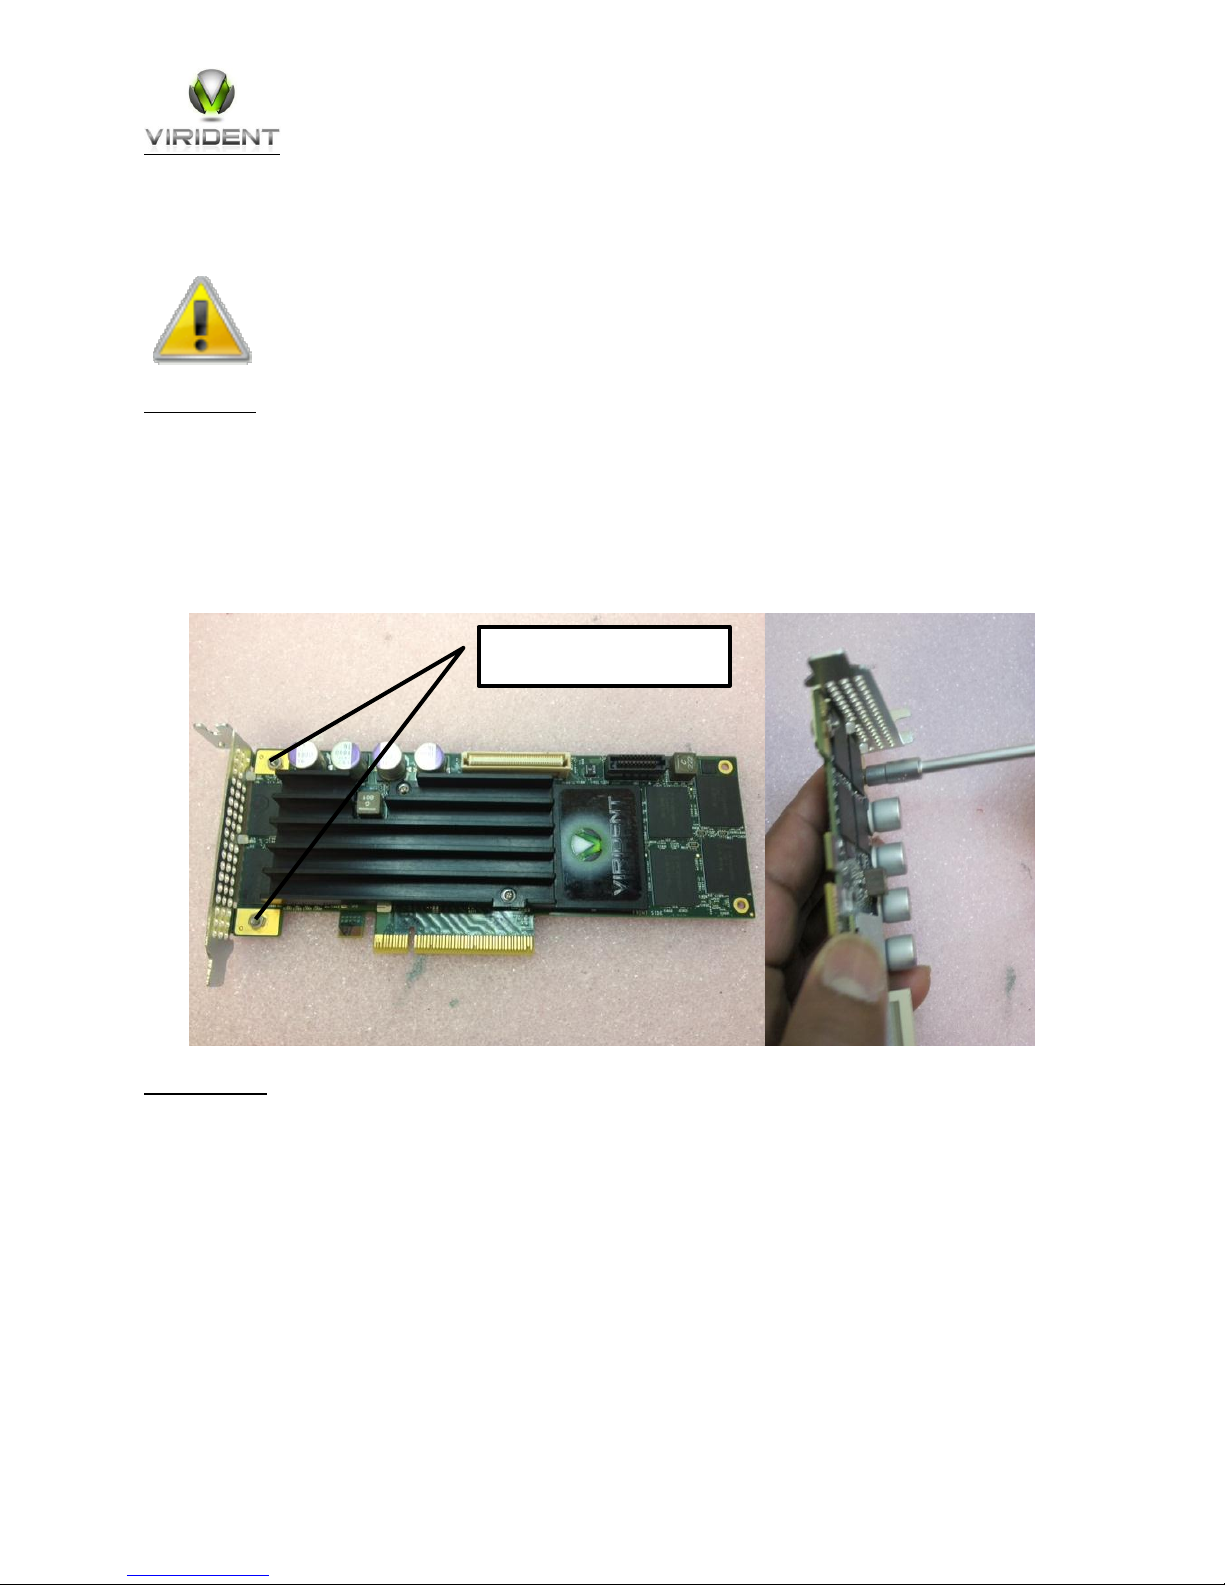
Please remove only these two
screws to replace brackets
3.1 Bracket Installation
If necessary, install the appropriate bracket on the FlashMAX II device.
Single Board: If your single board device has nuts like the one in the picture below then, follow the single
board instructions. If your single board device does not have any nuts, please follow the double board
instructions.
To replace brackets for a single board device, please remove only the two screws closest to the bracket
(see picture below). Please slide the bracket in horizontally to line up with the screw holes. You will need
an ‘m 2.5’ screw driver and an ‘m 2.5’ nut driver. The screws need to be tightened to 4lb-in (0.45Nm).
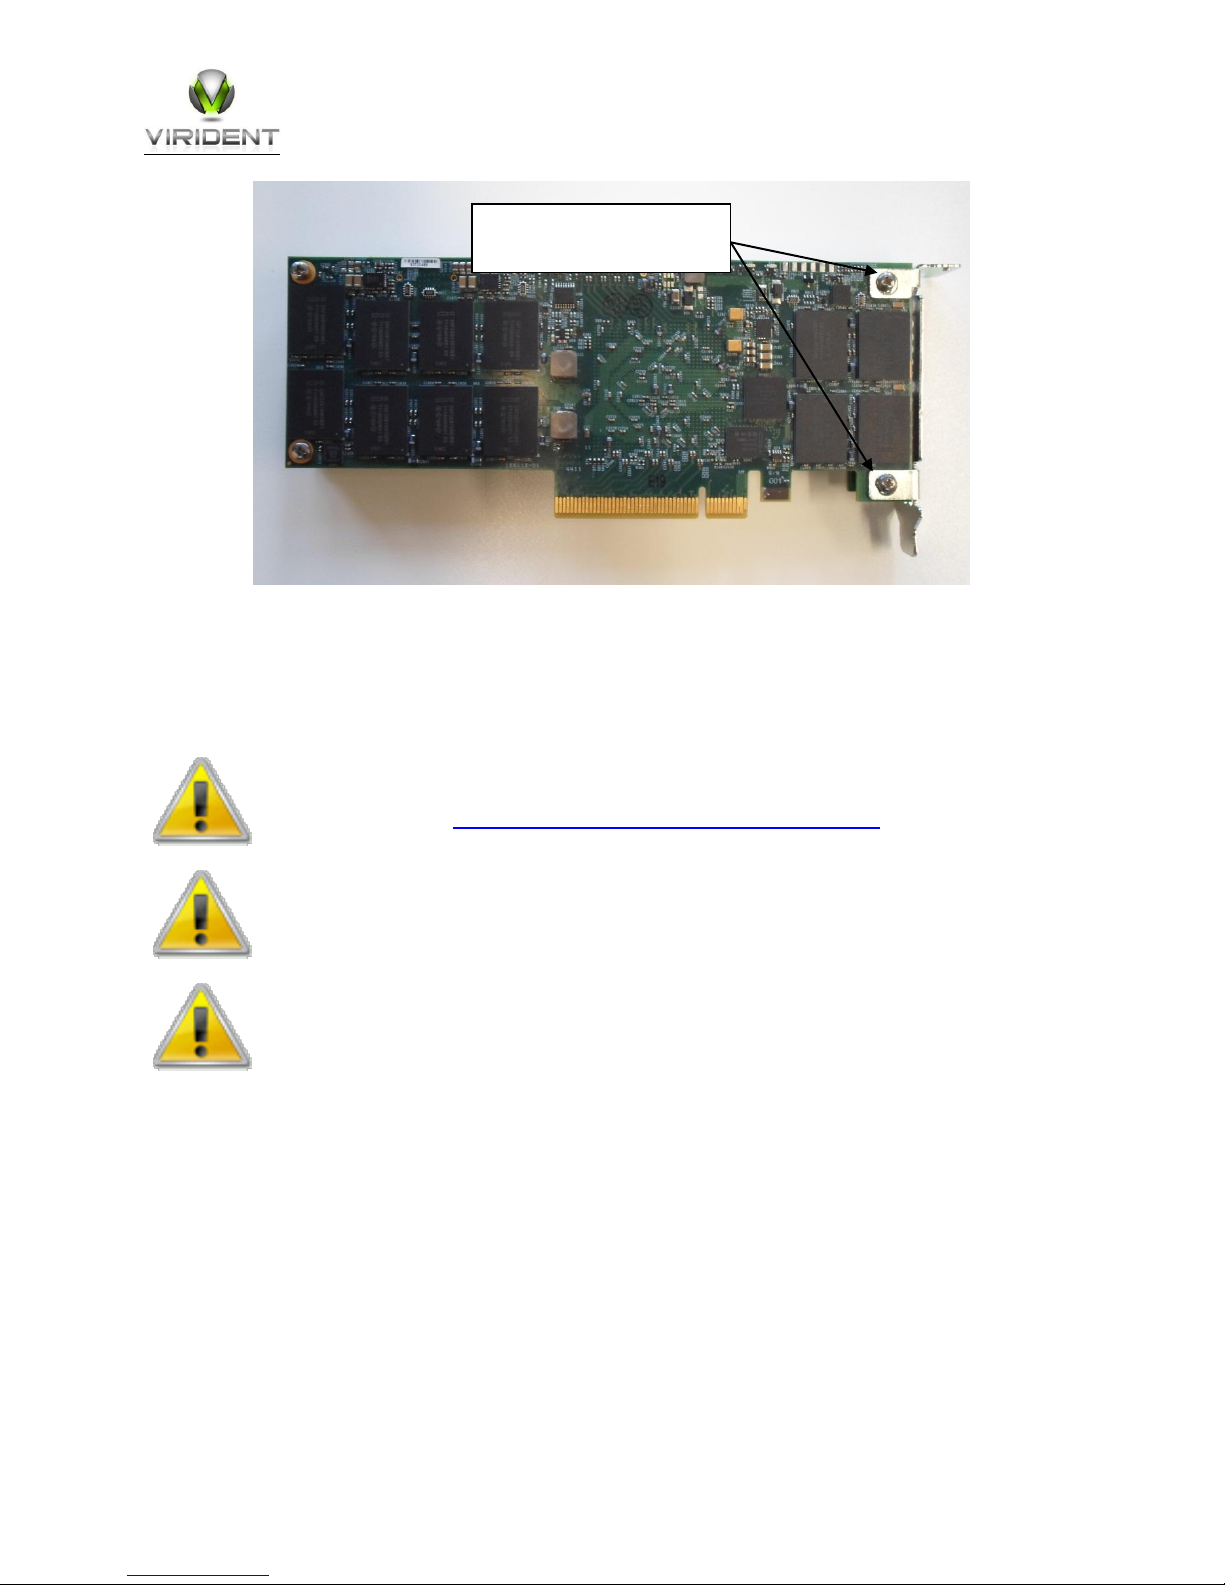
Double Board: To replace brackets for a double board device, or a single board device without retaining
nuts, please remove only the two screws nearest the bracket (see picture below). Please slide the bracket
in horizontally to line up with the screw holes. You will need an ‘m 2.5’ screw driver. The screws need to be
tightened to 4lb-in (0.45Nm).
Virident FlashMAX II User’s Guide - Version 3.1.1
2
Page 8
For optimal performance and cooling on specific servers, please go to the online support
knowledge base at http://support.virident.com/supportweb/kbase.
Some systems have PCIe slots with x8 physical connectors but only provide x4 electrical
connectivity. From a performance point of view these slots behave like an x4 slot. Check
your system documentation for PCIe slot specifications.
Some systems have PCIe slots with x8 physical connectors but only provide x4 electrical
connectivity. From a performance point of view these slots behave like an x4 slot. Check
your system documentation for PCIe slot specifications.
Please remove only these two
screws to replace brackets.
3.2 PCI Slot Selection
FlashMAX II devices need to be installed in x8 or x16 PCIe Gen 2 slots. If no PCIe x8/x16 slots are available,
x4 slots can be used. However, using an x4 slot may result in up to 50% reduction in performance.
4 System BIOS Settings
After a system restart, prior to booting the operating system, enter the system BIOS setup to verify several
important settings. Note that each BIOS often has its own nomenclature for these settings, so the exact
wording of the configuration parameters may not match the examples. Not all BIOS/s will have all of these
options.
4.1 Fan Speed Settings in BIOS
If your system has BIOS settings for configuring system fan speeds, select options that maximize the
airflow.
Virident FlashMAX II User’s Guide - Version 3.1.1
3
Page 9

On HP systems: BIOS -> Advanced Options -> Thermal Configuration -> Increased/Maximum Cooling
On Dell systems: System Settings -> iDRAC Settings -> Thermal
Maximum Performance
Fan Speed Offset
High Fan Speed Offset
4.2 Processor Settings in BIOS
The following settings are often found under the “Advanced: Processor/Chipset Control” BIOS menus.
Disable the following optional settings:
Processor Performance States / C States / C-State Tech / EIST
C1E States / C1 Enhanced States
(Link) Active State Power Management
Enable the following on Intel™ based systems:
Hyperthreading / Logical Processors
Turbo Mode
Finally, if there are performance profiles (System Power Modes) available, set them to “Maximum
Performance.”
Intel has identified an issue in Xeon E5-2600 series processors that may result in severe drops
of PCIe and FlashMAX II bandwidth when running workloads that have low CPU consumption.
To avoid this issue, C2 and C1E processor power states must be disabled. For details, please
see Erratum BT160 in the below document:
http://www.intel.com/content/dam/www/public/us/en/documents/specification-updates/xeon-e5-familyspec-update.pdf
Virident FlashMAX II User’s Guide - Version 3.1.1
4
Page 10

--password=<password> <command name space> <command arguments>
password='password' software vib list
5 Software Installation
This section covers the procedure for installing the device drivers and updating the firmware for FlashMAX
II devices on an ESXi 5.0 or ESXi 5.1 system.
All the ESXCLI commands listed in this section can be executed in one of the following methods.
1. Directly on the ESXi host after logging in via SSH (SSH service must be enabled)
Syntax:
~# esxcli <command name space> <command arguments>
Example:
~# esxcli software vib list
2. Remotely using the vSphere Remote CLI utility (VCLI)
http://www.vmware.com/support/developer/vcli/
Note that if any command uses a filename, the file should be present on the target system and
not on the system where VCLI is executed.
Syntax:
~# esxcli --server=<ESX host name/IP Address> --username=<root>
Example:
~# esxcli --server='lab-m6' --username='root' –
Virident FlashMAX II User’s Guide - Version 3.1.1
5
Page 11
~ # lspci | grep -i virident
000:131:00.0 Memory controller: Virident Systems, Inc. FlashMAX II [vgca]
# esxcli software vib install -d /tmp/VSI-FlashMAXII-ESXi5x-
5.1 Device Driver Installation
Download the device driver offline bundle from Virident Support website before proceeding. Ensure that
the device is seen by the operating system.
5.1.1 Install Virident Driver VIBs Using Offline Bundle
Note that full path to the driver offline bundle must be provided.
3.1.1.51450.C6.zip
Installation Result
Message: The update completed successfully, but the system needs to be
rebooted for the changes to be effective.
Reboot Required: true
VIBs Installed: Virident_bootbank_block-vgc_3.1.1 51450.C61OEM.500.0.0.472560, Virident_bootbank_esxcli-vgc-utils_3.1.1.51450.C6-
5.0.0.464360
VIBs Removed:
VIBs Skipped:
5.1.2 Install Virident Driver Using VMware vSphere Update Manager (VUM)
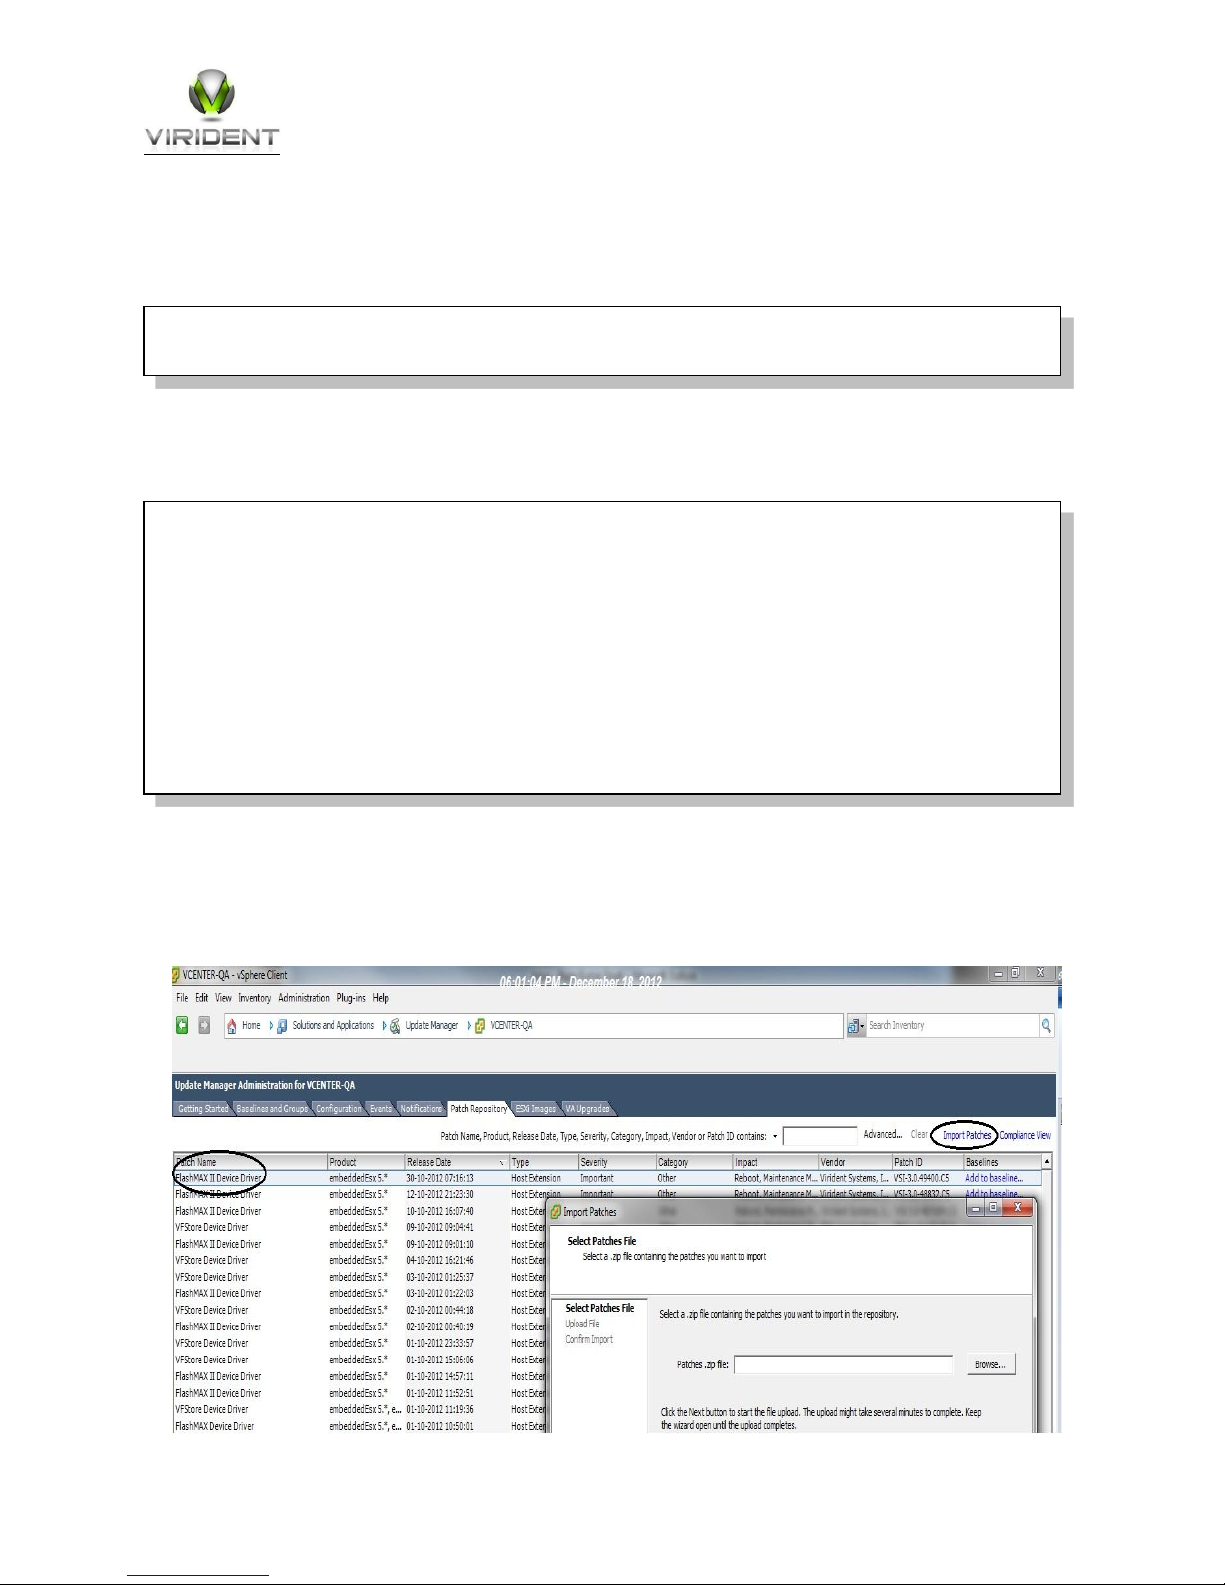
1. Configure update manager and install the required plugin for vSphere client. Import the
downloaded device driver bundle into the update manager Patch Repository as show below.
Virident FlashMAX II User’s Guide - Version 3.1.1
6
Page 12
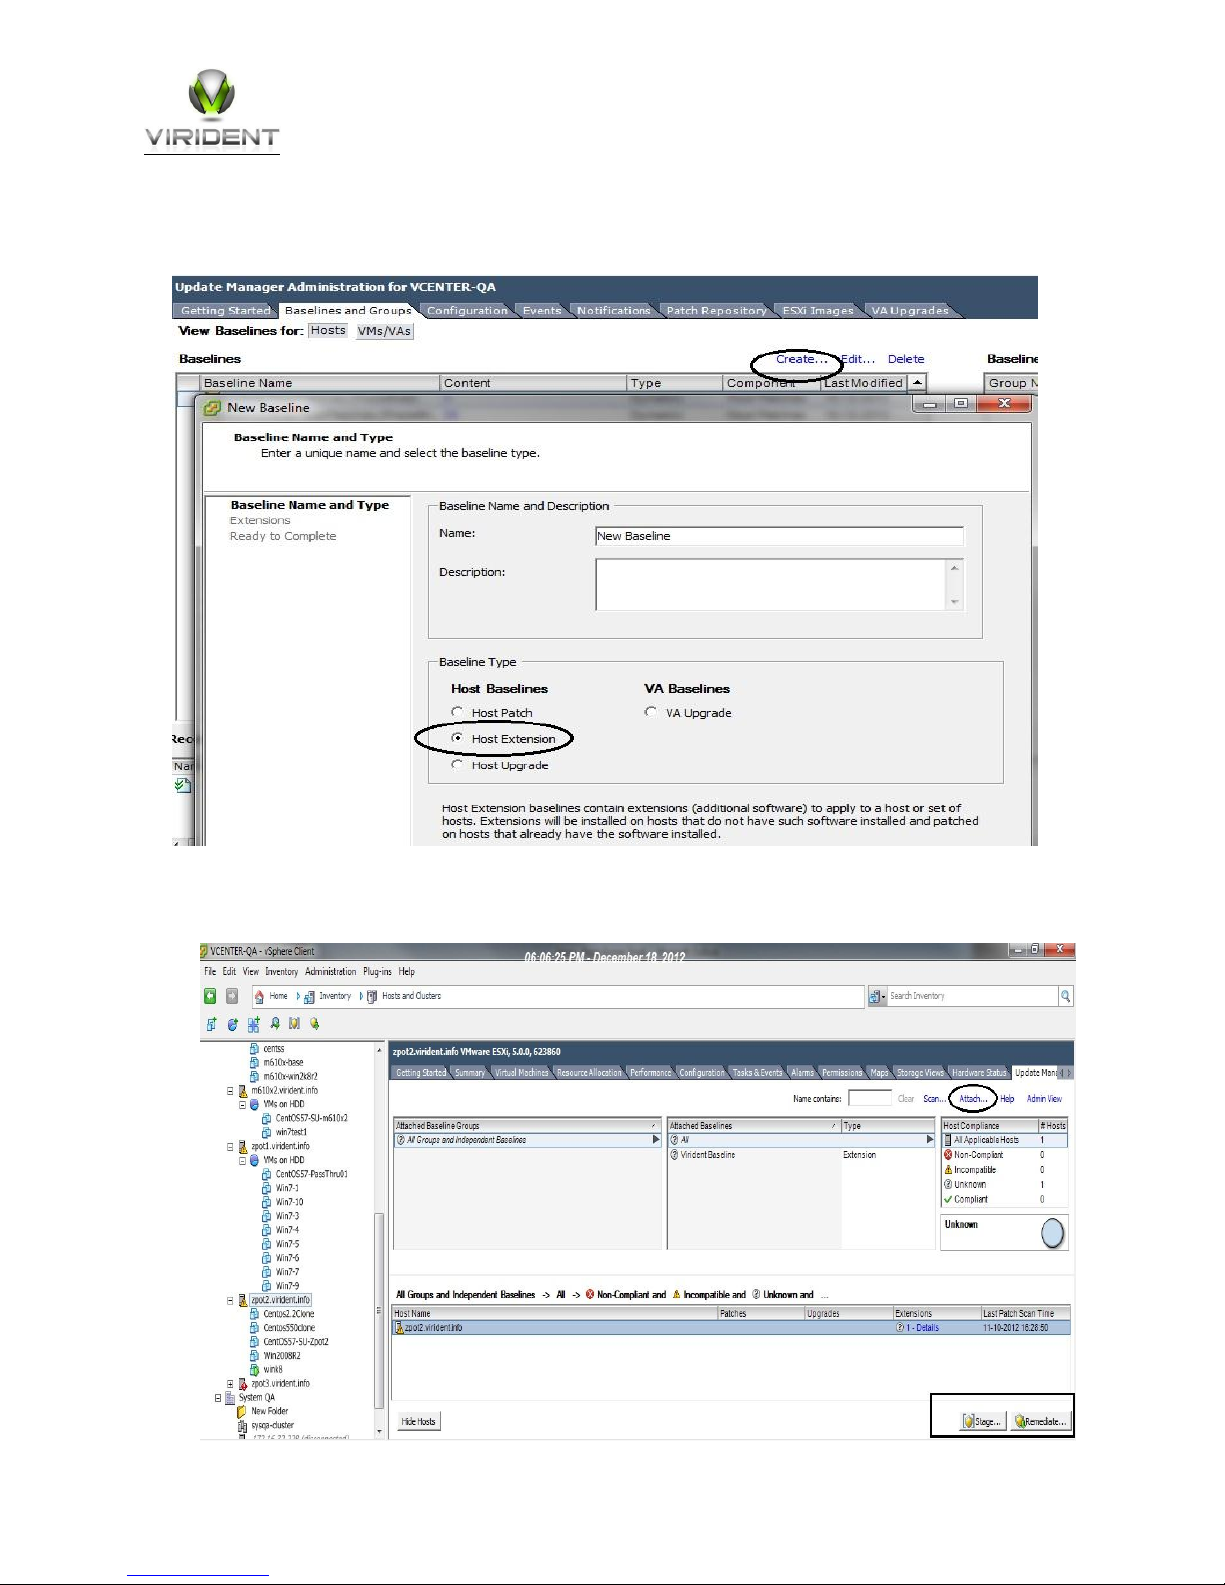
2. Create a new baseline with type as Host Extension and include the driver from the repository.
3. Attach proper baseline to host or cluster and stage/remediate.
Virident FlashMAX II User’s Guide - Version 3.1.1
7
Page 13

~# reboot
~ ~ # esxcli software vib list | grep -i virident
block-vgc 3.1.1.51450.C6-1OEM.500.0.0.472560 Virident
esxcli-vgc-utils 3.1.1.51450.C6-5.0.0.464360 Virident
For additional vSphere Update Manager details please refer to the following VMware KB article
http://kb.vmware.com/kb/2004501
5.1.3 Reboot
Reboot the host for the driver installation to take effect. Please ensure that all the Guest VMs are gracefully
shutdown before the reboot.
5.1.4 Confirm driver installation after reboot
~ # esxcli software vib list | grep -i virident
VMwareCertified 2013-01-25
PartnerSupported 2013-01-25
5.2 Ensuring FlashMAX II is Operational
Check if Driver Modules are loaded using the vmkload_mod command:
~ # vmkload_mod -l | grep vgc
vgc 1 1788
To verify the other operational parameters, such as FlashMAX II device health, use the esxcli vgc
monitor command documented in this Guide. In addition, please review the section on configuring
datastore on ESXi systems as well.
5.3 Firmware Upgrade
In some cases your FlashMAX II device may require firmware upgrade. Use the vgc-monitor utility to check
whether or not the firmware is up to date.
If the firmware is up to date, the following is displayed:
Virident FlashMAX II User’s Guide - Version 3.1.1
8
Page 14

~ # esxcli vgc monitor drive
vgc-monitor: 3.1.1(51450.C6)
Driver Uptime: 0:06
Card_Name Num_Partitions Card_Type Status
/dev/vgca 1 VIR-M2-LP-2200-2A Good
Partition Usable_Capacity RAID
/dev/vgca0 2222 GB enabled
The following message is displayed if the FlashMAX II device has older firmware
~ # esxcli vgc monitor drive
vgc-monitor: 3.1.1(51450.C6)
/dev/vgca: Could not get information about FlashMAX drive /dev/vgca: No
such device (rc=19)
Unclaimed Drives:
0000:86:00.0 FLASH memory: Virident Systems Inc. FlashMAX Drive (rev
00) (0x1a78:0x0040, 0x1a78:0x0040)
5.3.1 FlashMAX II Firmware Upgrade Procedure
Use the vgc-update utility to upgrade FlashMAX II Firmware as follows:
Virident FlashMAX II User’s Guide - Version 3.1.1
9
Page 15
~# cd /opt/vgc/bin/
~# sh vgc-update.sh
WARNING! This will update FlashMAX firmware.
This is sensitive operation and may potentially cause data loss.
All data on all FlashMAX drives must be backed up before the firmware
update.
PLEASE MAKE SURE THAT POWER IS NOT DISCONNECTED DURING THE UPDATE.
PLEASE DO NOT INTERRUPT THE UPDATE PROCESS ONCE IT IS STARTED.
Do you want to continue? (Yes/No) : yes
Firmware upgrade starts within few seconds, Please wait...
Initialize /dev/vgcmgmta-zion_secondary_image
Erasing 128 Kibyte @ 1fe0000 -- 100% complete.
Upgrading Firmware-- 100 % complete.
Verifying Firmware -- 100 % complete.
Initialize /dev/vgcmgmta-zion_image
Erasing 128 Kibyte @ 1fe0000 -- 100% complete.
Upgrading Firmware-- 100 % complete.
Verifying Firmware -- 100 % complete.
#################################
# #
# PLEASE POWER CYCLE SYSTEM NOW #
# #
#################################
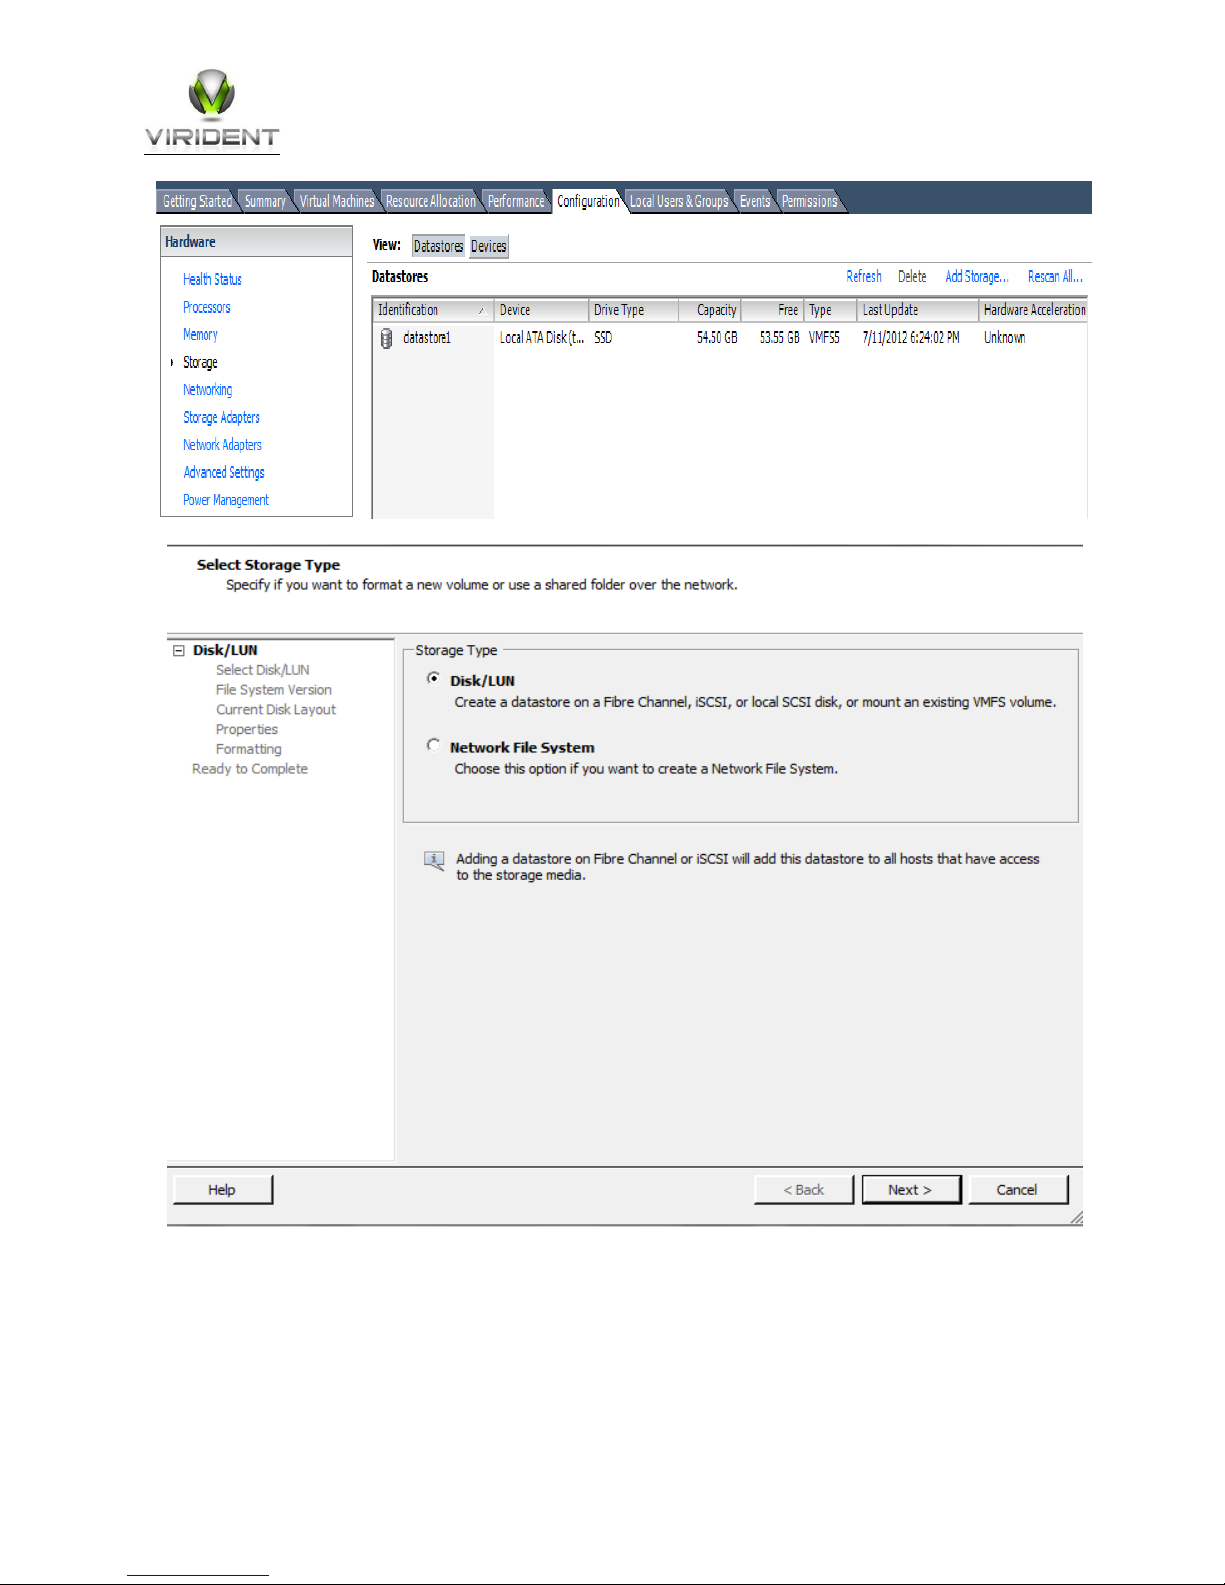
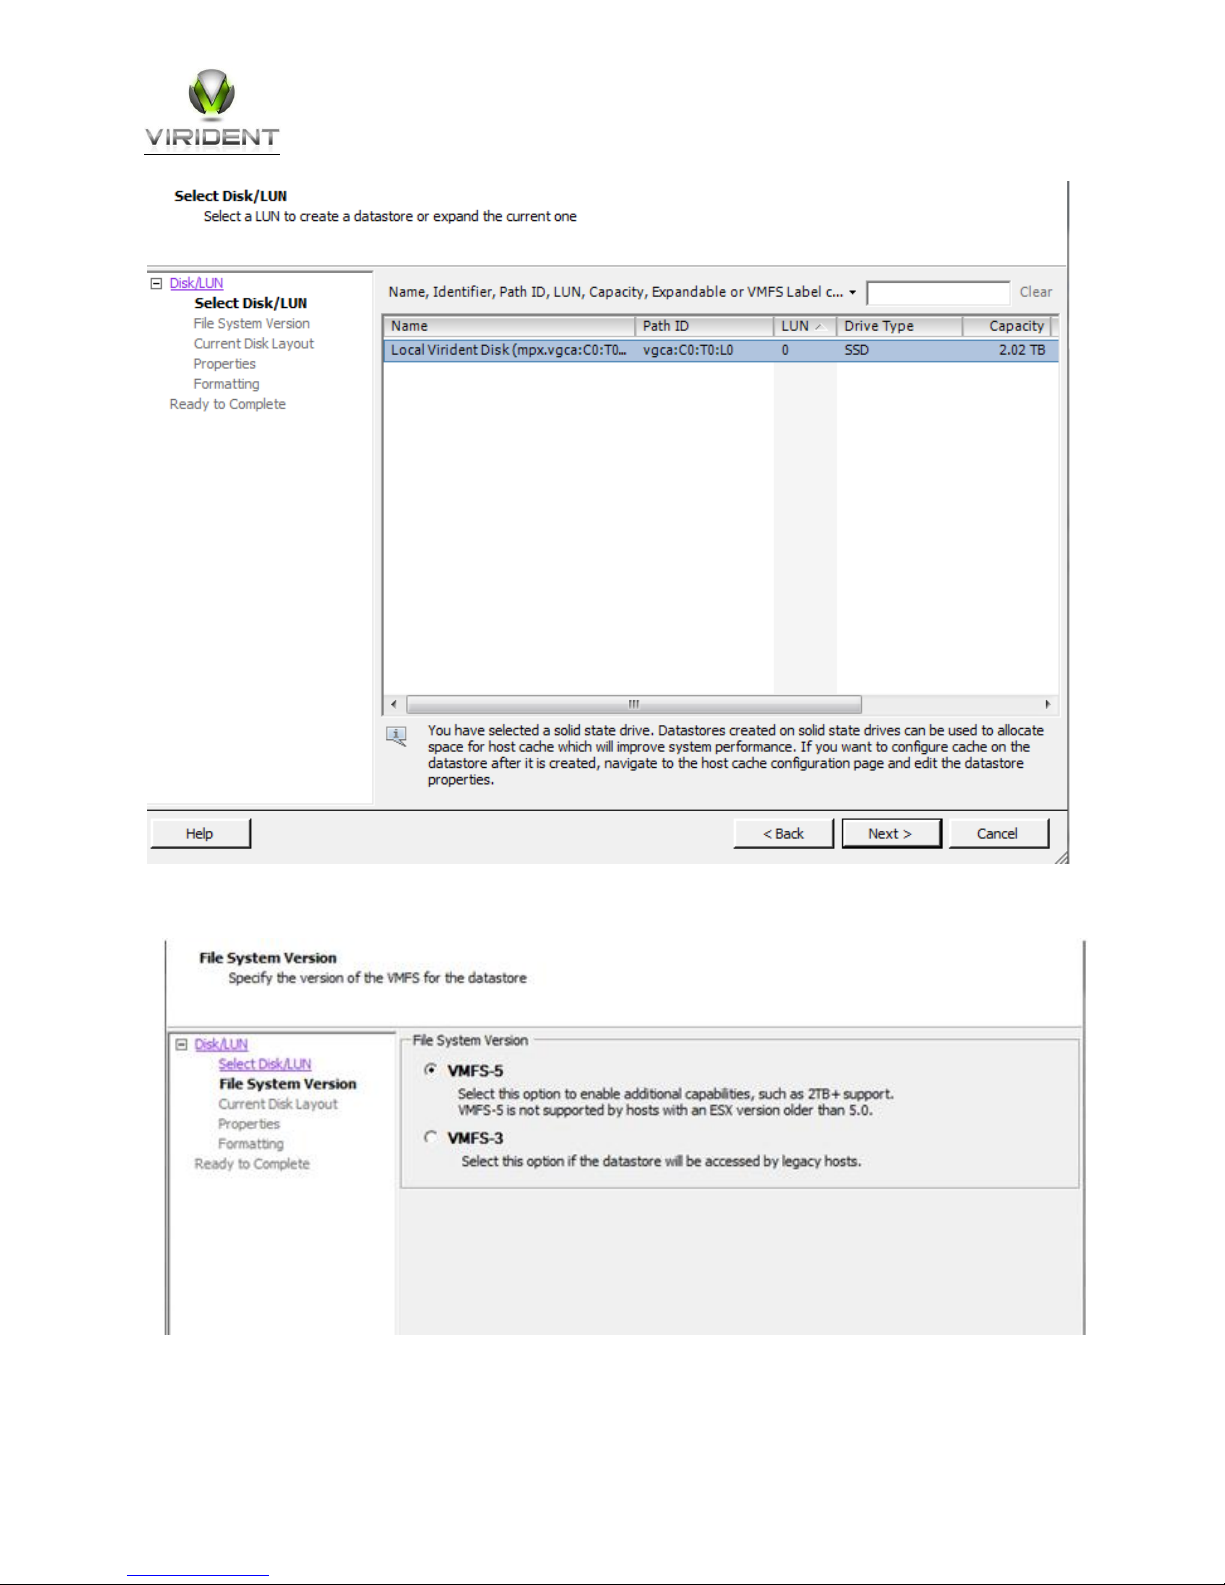
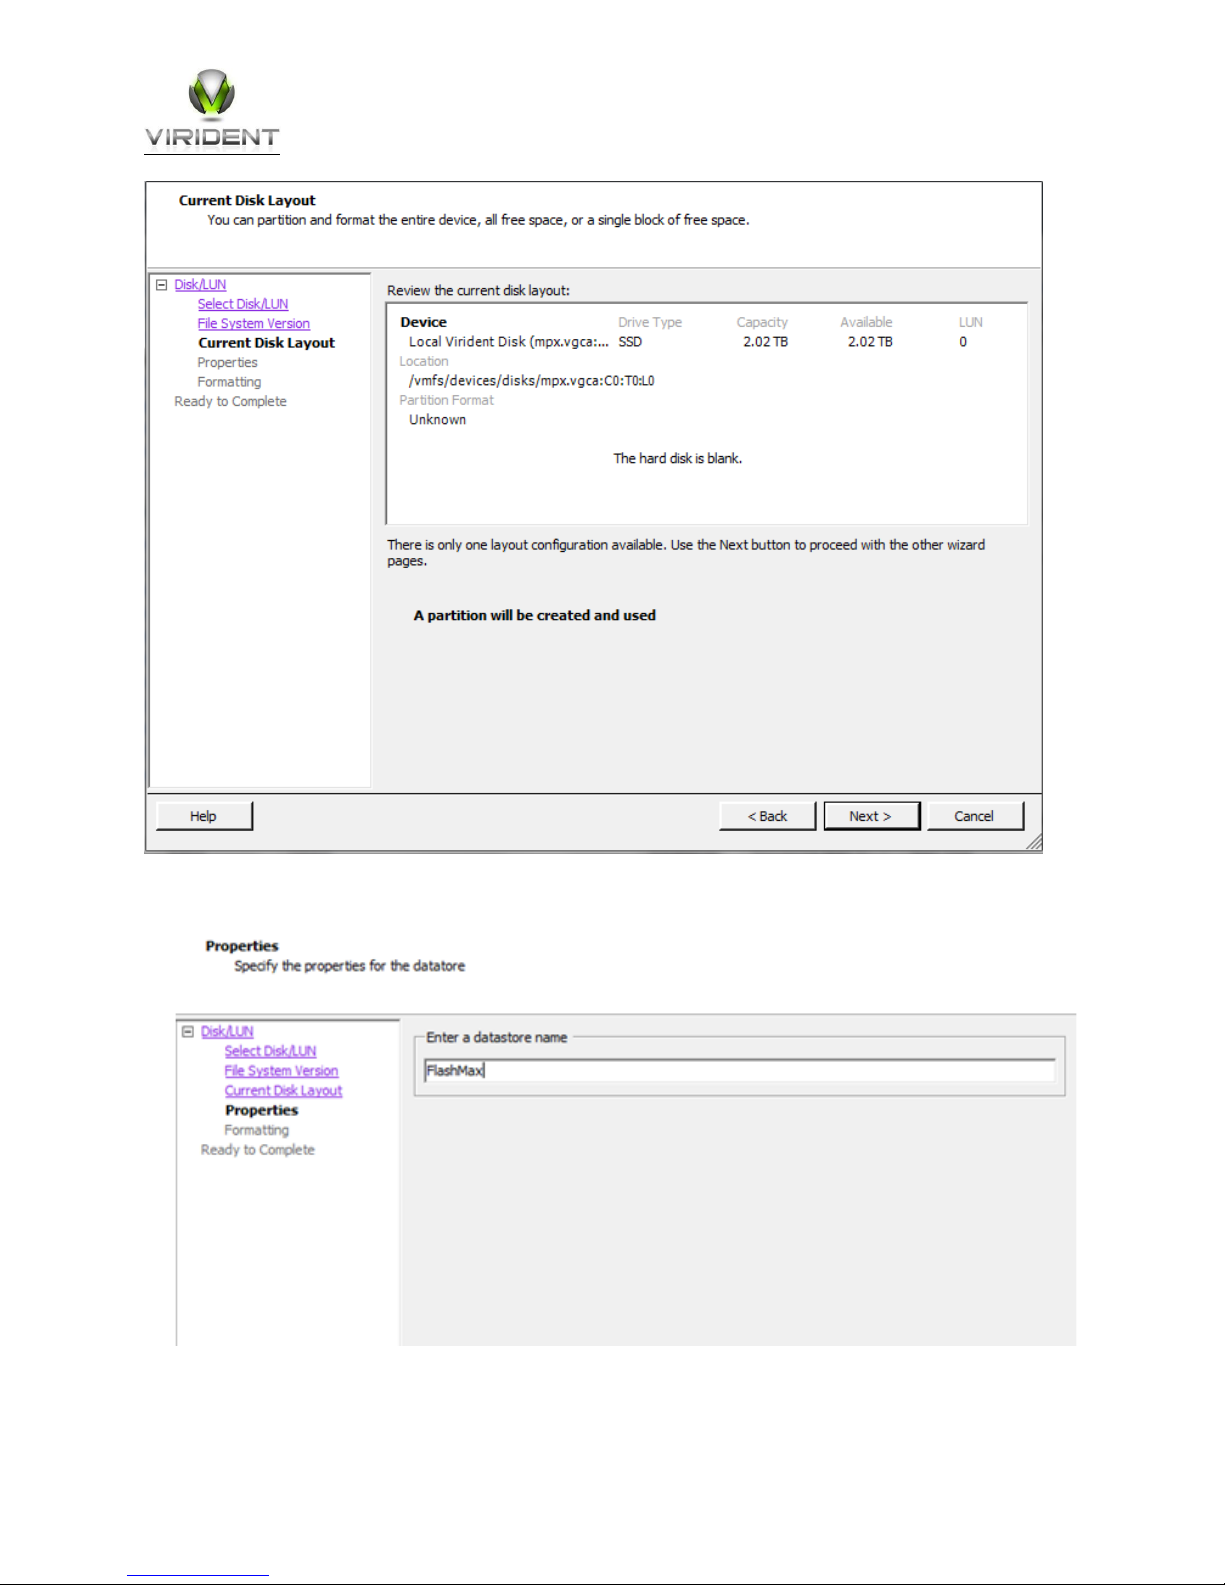
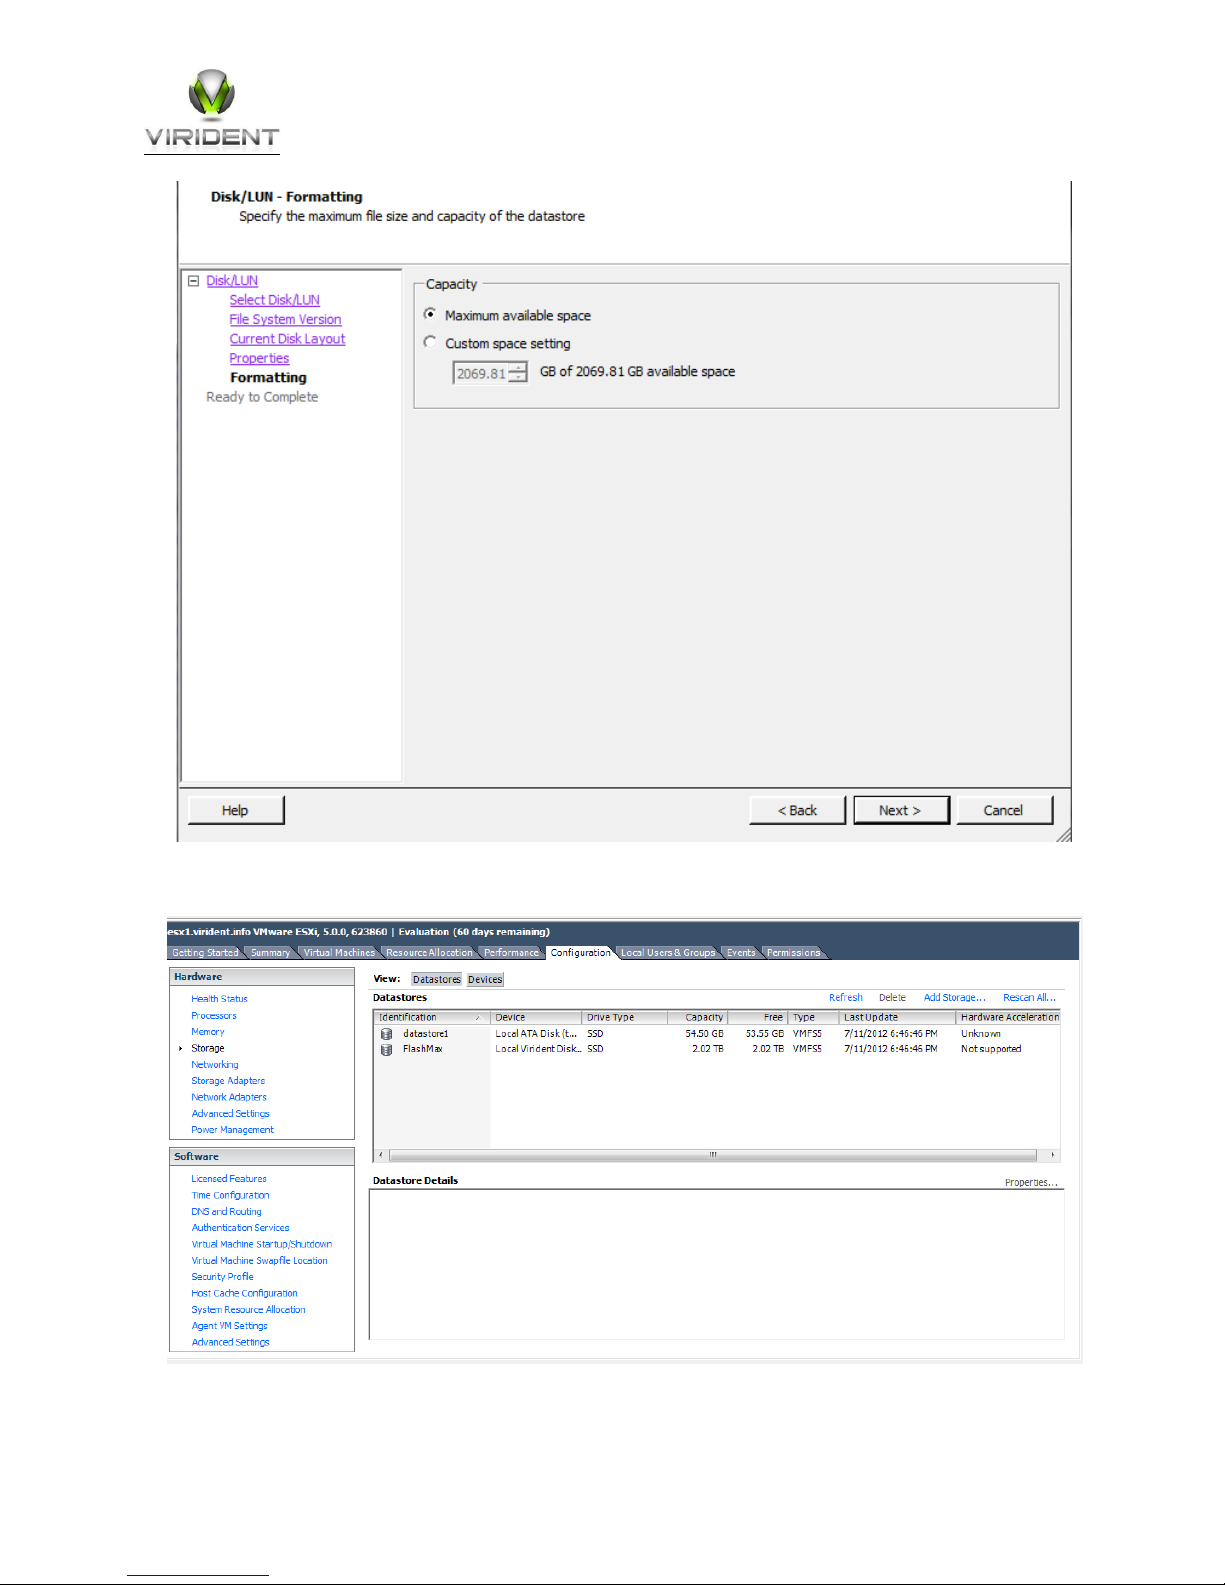
6 Configuring FlashMAX II Datastore using vSphere Client
Add the FlashMAX II device as a VMware datastore using the vSphere client.
Select Configuration-> Storage-> Add Storage…
Host system Power Cycle is mandatory for successful firmware upgrade
Virident FlashMAX II User’s Guide - Version 3.1.1
10
Page 16
Virident FlashMAX II User’s Guide - Version 3.1.1
11
Page 17
Virident FlashMAX II User’s Guide - Version 3.1.1
12
Page 18
Virident FlashMAX II User’s Guide - Version 3.1.1
13
Page 19
Virident FlashMAX II User’s Guide - Version 3.1.1
14
Page 20

esxcli vgc config -h
7 FlashMAX II Configuration & Management Utilities
A suite of CLI utilities is delivered with the device driver to allow end-users to configure, manage and
monitor the FlashMAX II devices.
7.1 Esxcli vgc config
Most administrative interactions with the Virident FlashMAX II device are handled by the esxcli vgc config
command. This utility can show the current partitioning and write acceleration modes on an existing
device.
The usage information for esxcli vgc config is listed below. Users can set the number of physical partitions
(“-n XX”) and a write performance profile (“-m YYY”) of the Virident FlashMAX II devices.
Usage: esxcli vgc config {cmd} [cmd options]
Available Commands:
drive drive related options
list List all configuration
partition Partition related options
reset Reset Configurations to Factory default
esxcli vgc config list
Description:
Lists available devices configuration
Syntax:
Usage: esxcli vgc config list [cmd options]
Description:
list List all configuration
Cmd options:
-d|--drive=<str> drive name /dev/vgc[a-h].
-p|--partition=<str> partition name /dev/vgc[a-h][0-1]
Example:
# esxcli vgc config list
vgc-config: 3.1.1(51450.C6)
Current Configuration:
/dev/vgca 1 partition(s)
/dev/vgca0 mode=maxperformance sector-size=512 raid=enabled
Virident FlashMAX II User’s Guide - Version 3.1.1
15
Page 21

esxcli vgc config drive
# esxcli vgc config drive -d /dev/vgca -m maxperformance -n 2
esxcli vgc config partition
Description:
Configures the performance mode and number of partitions. Please check
your FlashMAX II device specifications for two partition support
Syntax:
esxcli vgc config drive [cmd options]
Description:
drive drive related options
Cmd options:
-d|--drive=<str> drive name /dev/vgc[a-h]. (required)
-m|--mode=<str> maxperformance/maxcapacity mode. (required)
-n|--num-partitions=<str>
Number of partitions, (1/2). (required)
Example:
Description:
Configure individual partition modes.
Note that this operation will result in loss of all data on the partition
Syntax:
esxcli vgc config partition [cmd options]Cmd options:
-m|--mode=<str> maxperformance/maxcapacity mode. (required)
-p|--partition=<str> partition name /dev/vgc[a-h][0-1]. (required)
Example:
esxcli vgc config partition -m maxperformance -p /dev/vgca0
Virident FlashMAX II User’s Guide - Version 3.1.1
16
Page 22

esxcli vgc config reset
~ # esxcli vgc monitor drive
Description:
Resets the drive configuration to Factory defaults
Note that this operation will result in loss of all data on the drive
Syntax:
esxcli vgc config reset [cmd options]
Cmd options:
-d|--drive=<str> drive name /dev/vgc[a-h].
-p|--partition=<str> partition name /dev/vgc[a-h][0-1].
Example:
esxcli vgc config reset -d /dev/vgca
7.2 Esxcli vgc monitor
The state of each device is monitored on an ongoing basis by the device driver and usage statistics are
logged. A suite of utilities is delivered with the device driver to allow end-users access to these statistics.
The FlashMAX II vgc monitor utility is the main tool for monitoring Virident FlashMAX II device status and
health. When called without parameters, it lists all Virident FlashMAX II devices in the system with their
configuration and health summary.
vgc-monitor: 3.1.1(51450.C6)
Driver Uptime: 0:06
Card_Name Num_Partitions Card_Type Status
/dev/vgca 1 VIR-M2-LP-2200-2A Good
Partition Usable_Capacity RAID
/dev/vgca0 2222 GB enabled
The following example shows detailed output for the device ‘vgca’. The first section of the monitor output
shows physical characteristics of the Virident FlashMAX II device such as raw device size, serial number,
and overall device health, while the latter half shows the configured mode, total read/write bytes and
remaining flash life.
Virident FlashMAX II User’s Guide - Version 3.1.1
17
Page 23

~# esxcli vgc monitor drive -d /dev/vgca
Flash Reserves Left : 100.00%
vgc-monitor: 3.1.1(51450.C6)
Driver Uptime: 10:29
Card_Name Num_Partitions Card_Type Status
/dev/vgca 1 VIR-M2-LP-2200-2A Good
Serial Number : SJT00213
Card Info : Part: SJT00213
Rev : FlashMax II 47955, module 47956, x8 Gen2
Temperature : 53 C (Safe)
Card State Details : Normal
Action Required : None
Partition Usable_Capacity RAID
/dev/vgca0 2222 GB enabled
Mode : maxcapacity
Total Flash Bytes : 185471631131136 (185.47TB) (reads)
287958594402485 (287.96TB) (writes)
Remaining Life : 99.08%
Partition State : READY
7.3 Esxcli vgc beacon
To facilitate service in a multiple-device installation, an individual device can identify itself by flashing its
onboard LEDs. Execute the “esxcli vgc beacon” command with the desired “/dev/vgc*a-z+” device and “-b
1”or “-b 0” to enable or disable the beacon respectively. When enabled, the named FlashMAX II device can
be identified using two on-board LEDs flashing in unison.
Virident FlashMAX II User’s Guide - Version 3.1.1
18
Page 24

~# esxcli vgc beacon
-d|--drive=<str> drive name /dev/vgc[a-h].Display info for the given
~ # ./opt/vgc/bin/vgc-diags –h
Usage: esxcli vgc beacon {cmd} [cmd options]
Available Commands:
drive Vgc beacon with drive options
pciaddr Vgc beacon with pci address options
~# esxcli vgc beacon drive [cmd options]
Description:
drive Vgc beacon with drive options
Cmd options:
-b|--blink=<str> 1/0 : enable beacon/disable beacon.
drive. (required)
~# esxcli vgc beacon drive -d /dev/vgca -b 1
New Beacon value = on
~# esxcli vgc beacon drive -d /dev/vgca -b 0
New Beacon value = off
7.4 Using vgc-diags to collect log bundle
The vgc-diags utility saves support information, such as log files, system configuration, device
configuration, and device metadata into a single tgz archive file. Virident support team may ask you to
provide this support file when troubleshooting technical issues.
vgc-diags: 3.1.1(51450.C6)
vgc-diags -p <dump directory> [ -v ]
vgc-diags [ -h ] -h : display this help and exit
-v : verbose, dumps quite detailed information
-p : Directory to save the diags file
Virident FlashMAX II User’s Guide - Version 3.1.1
19
Page 25

FlashMAX II has been designed from ground-up to deliver highest enterprise class reliability
with built-in RAID and end to end data protection. However, when used in DAS use case,
Virident recommends the use of application level replication or backup strategies to ensure
high data availability.
7.5 Using vgc-secure-erase for purging the drive data.
To purge or clear user data, vgc-secure-erase can be used on partition. The feature ensures all user data is
removed from flash media. The usage model is that if a device needs to be returned to the factory for
repair/replacement, or is being leveraged for a new project by the customer, all potentially sensitive data
needs to be securely removed prior to leaving the facility or redeployment for another project.
The standards call this process ‘sanitization’. The sanitization standards are different depending upon what
type of media is being used. For example, the standards for magnetic disk media are different than what is
required for flash memory.
Virident has a Secure Erase Utility that will perform this function for customers who need to securely erase
data from a device.
Data Sanitization Standards
There are different levels of Sanitization specified in the standards: Clear and Purge. In most cases, the
Clear level of Sanitization will suffice for most use cases, but in some cases Purge will be required. Both
types of sanitization are supported by the Virident Secure Erase Utility.
The Virident Secure Erase Utility complies with the Clear and Purge levels of Sanitization in accordance with
the following Government standards:
DOD 5220.22-M – Complies with sanitization requirements for Flash EPROM
(http://www.dss.mil/documents/pressroom/isl_2007_01_oct_11_2007_final_agreement.pdf )
NIST SP800-88 – Complies with instructions for Flash EPROM
(http://csrc.nist.gov/publications/nistpubs/800-88/NISTSP800-88_with-errata.pdf)
The specifications state the following requirements for the two levels of Sanitization:
Clear (directly quoting from NIST and DOD publication): Perform a full chip purge as per
manufacturer’s data sheets
Purge (directly quoting from NIST and DOD publication): Overwrite all addressable locations with a
single character, followed by performing a full chip erase as per manufacturer’s data sheets.
Virident FlashMAX II User’s Guide - Version 3.1.1
20
Page 26

~ # /opt/vgc/bin/vgc-secure-erase -h
--verbose Use this for detailed error logs from driver (in syslog).
Operation
The device needs to be in a minimally operative state in order to use the Secure Erase Utility. The Secure
Erase Utility will attempt to erase all user data from the device according to which ever method is chosen
by the user (Clear or Purge). If it is not successful due to the fact that some blocks that contain user data
are no longer accessible due to media failure, error messages will be produced. There are some cases
where a block is not usable from the start and is marked bad when the device is shipped from the factory,
and therefore never receives any user data. These blocks cannot be ‘sanitized’ either, but since they are
guaranteed never to receive user data the tool can successfully sanitize a device when these blocks are
present.
Note that this is not an esxcli command and need to be executed at the shell.
Usage: vgc-secure-erase [--clear|--purge] /dev/vgcxx
------------------------------------------Physically erases all data from the partition. The operation can take
several minutes.
NOTE: please run this on all partitions on the card in order to erase all
data on the card.
WARNING! This operation is destructive. The data cannot be recovered after
it is erased.
Options:
--clear Clear (Erase) the contents of the device. This is the
default option.
--purge Purge (Erase and overwrite) the contents of the device.
--yes Start the operation without user confirmation.
--help Displays options/parameters that vgc-secure-erase can
take.
The following example shows the simple command lines & respective outputs of vgc-secure-erase utility.
Virident FlashMAX II User’s Guide - Version 3.1.1
21
Page 27

~ # /opt/vgc/bin/vgc-secure-erase --clear --verbose /dev/vgca1
will
~ # /opt/vgc/bin/vgc-secure-erase --purge --yes /dev/vgca0
This operation will erase all data on the physical partition /dev/vgca1. It
take up to 20 minutes to complete.
Once started you cannot stop or undo this operation.
Do you want to continue? [yes/no]yes
Starting Secure Erase (Clear) operation. Please wait ... Result:
Secure Erase (Clear) on device /dev/vgca1 completed succesfully.
Operation Summary:
Number of erase operations skipped due to factory bad blocks : 230
Number of erase operations skipped due to grown bad blocks : 9
Number of erase operation failures : 0
Reformatting the device /dev/vgca1
Starting Secure Erase (Purge) operation. Please wait ... Result:
Secure Erase (Purge) on device /dev/vgca0 completed succesfully.
Reformatting the device /dev/vgca0
Note that factory bad blocks are quarantined before the card is put into
operation and therefore never were written to.
Virident FlashMAX II User’s Guide - Version 3.1.1
22
Page 28

8 Multiple Virident FlashMAX II Devices
Up to four devices are supported on a single ESXi system. For optimal performance, it is recommended that
the number of FlashMAX II drivers per server not exceed the number of NUMA nodes in the system. Each
device will appear as “/dev/disks/mpx.vgcN:C0:T0:L0” ” and can be used to create datastores.
9 Using FlashMAX II Devices in Pass-Through Mode
Virident FlashMAX II devices can be used in pass-through mode on ESXi hosts. They can be added as a PCI
device to a Linux of Windows Guest VM. In such cases, it is required that the Guest VM have the Guest OS
(Windows or Linux) specific drivers installed. For using FlashMAX II devices on Linux or Windows, please
consult the corresponding documentation.
To configure FlashMAX II in “pass through” mode, please refer VMware vSphere
product documentation.
10 Optimizing Performance
Virident FlashMAX II devices and software are tuned to provide good performance across a wide range of
application workloads. It is, however, possible to optimize performance further by customizing your VM
settings or by configuring the devices differently.
10.1 Usable space vs. write performance
By default the Virident FlashMAX II device creates physical partitions with a “max capacity” mode that is
optimal for most real-world workloads. A small portion of the raw capacity of each FlashMAX II device is
set aside to help accelerate writes, while the majority is used to store user data. Setting the device to “max
performance” mode will reduce the total usable space to achieve better write performance, especially
when the device is used to near full capacity.
10.2 Partitioning and write performance
The esxcli vgc config allows you to create up to two physical partitions on the Virident FlashMAX II device.
Each of these physical partitions can have different capacity/write performance characteristics as well, so
one physical partition could be optimized to have maximum space available for static user data while
another can be optimized for heavily updated data (like database logs, scratch space, etc.).
Virident FlashMAX II User’s Guide - Version 3.1.1
23
Page 29
When multiple partitions are created, the aggregate performance is divided among
partitions.
10.3 Setup recommendations to utilize full performance of FlashMAX II with
a single Guest VM.
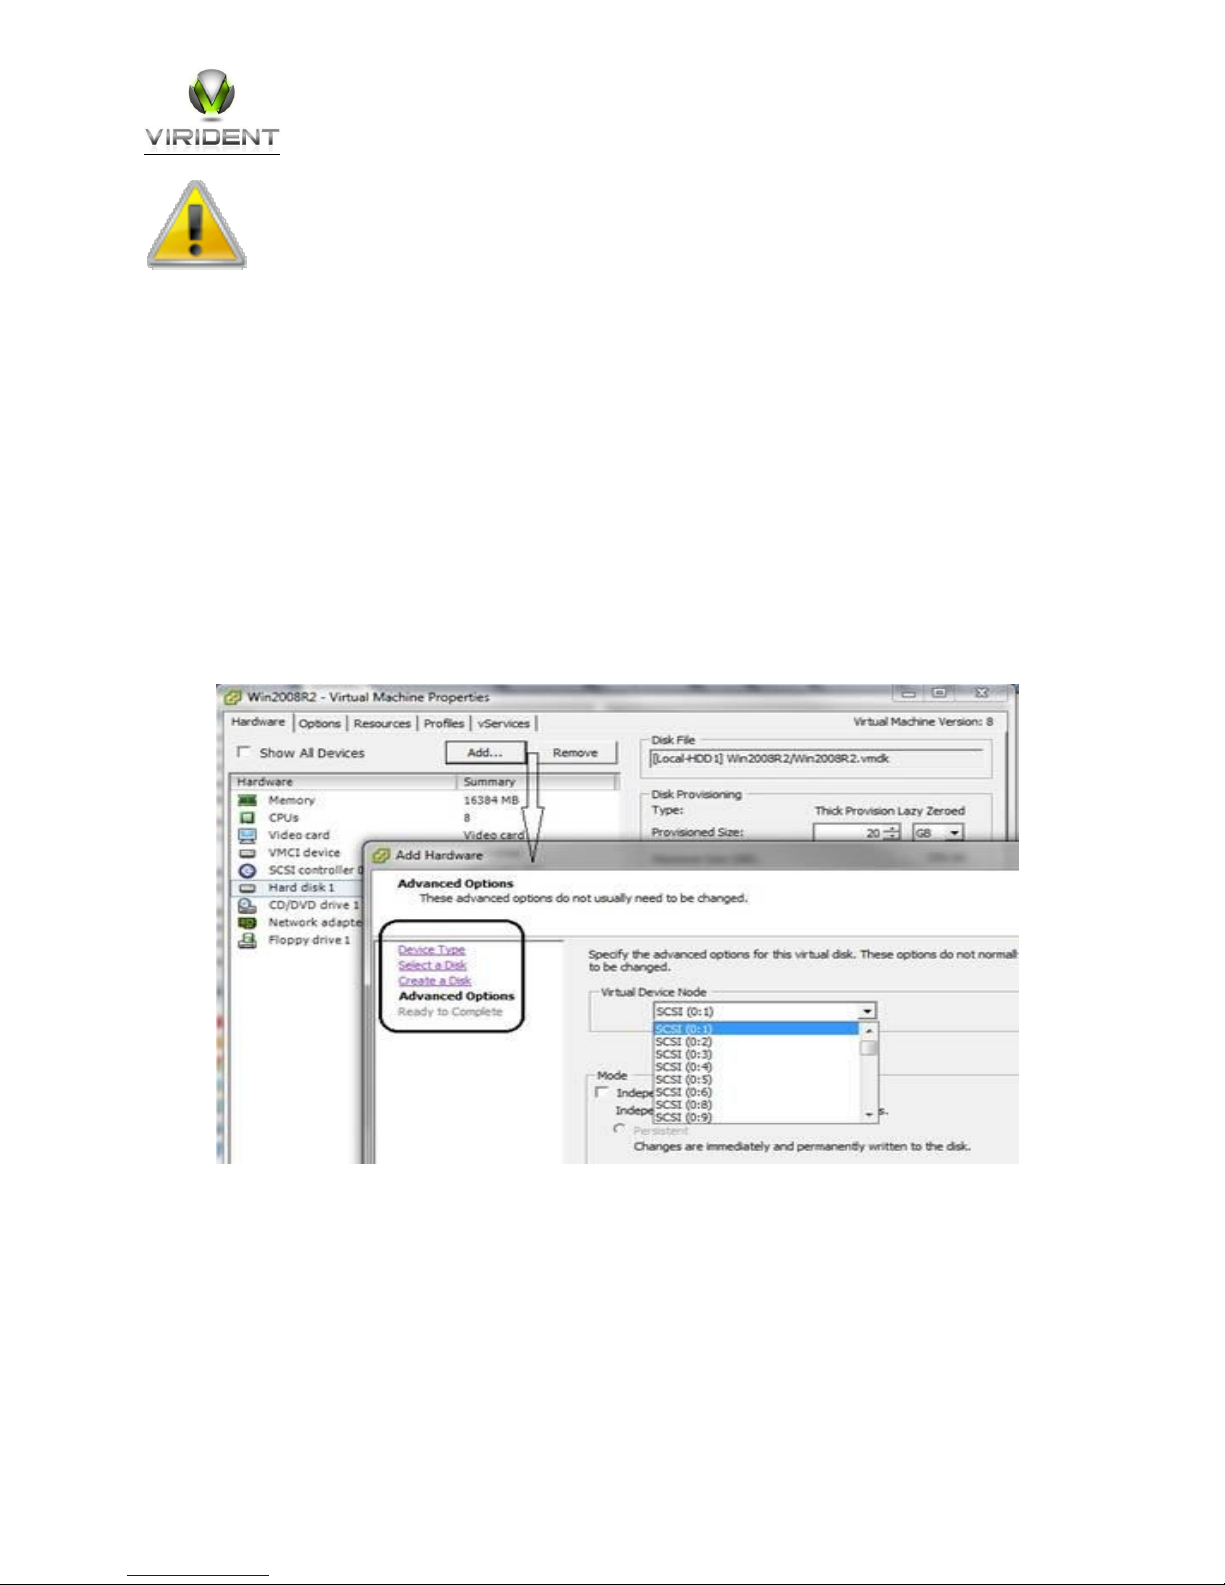
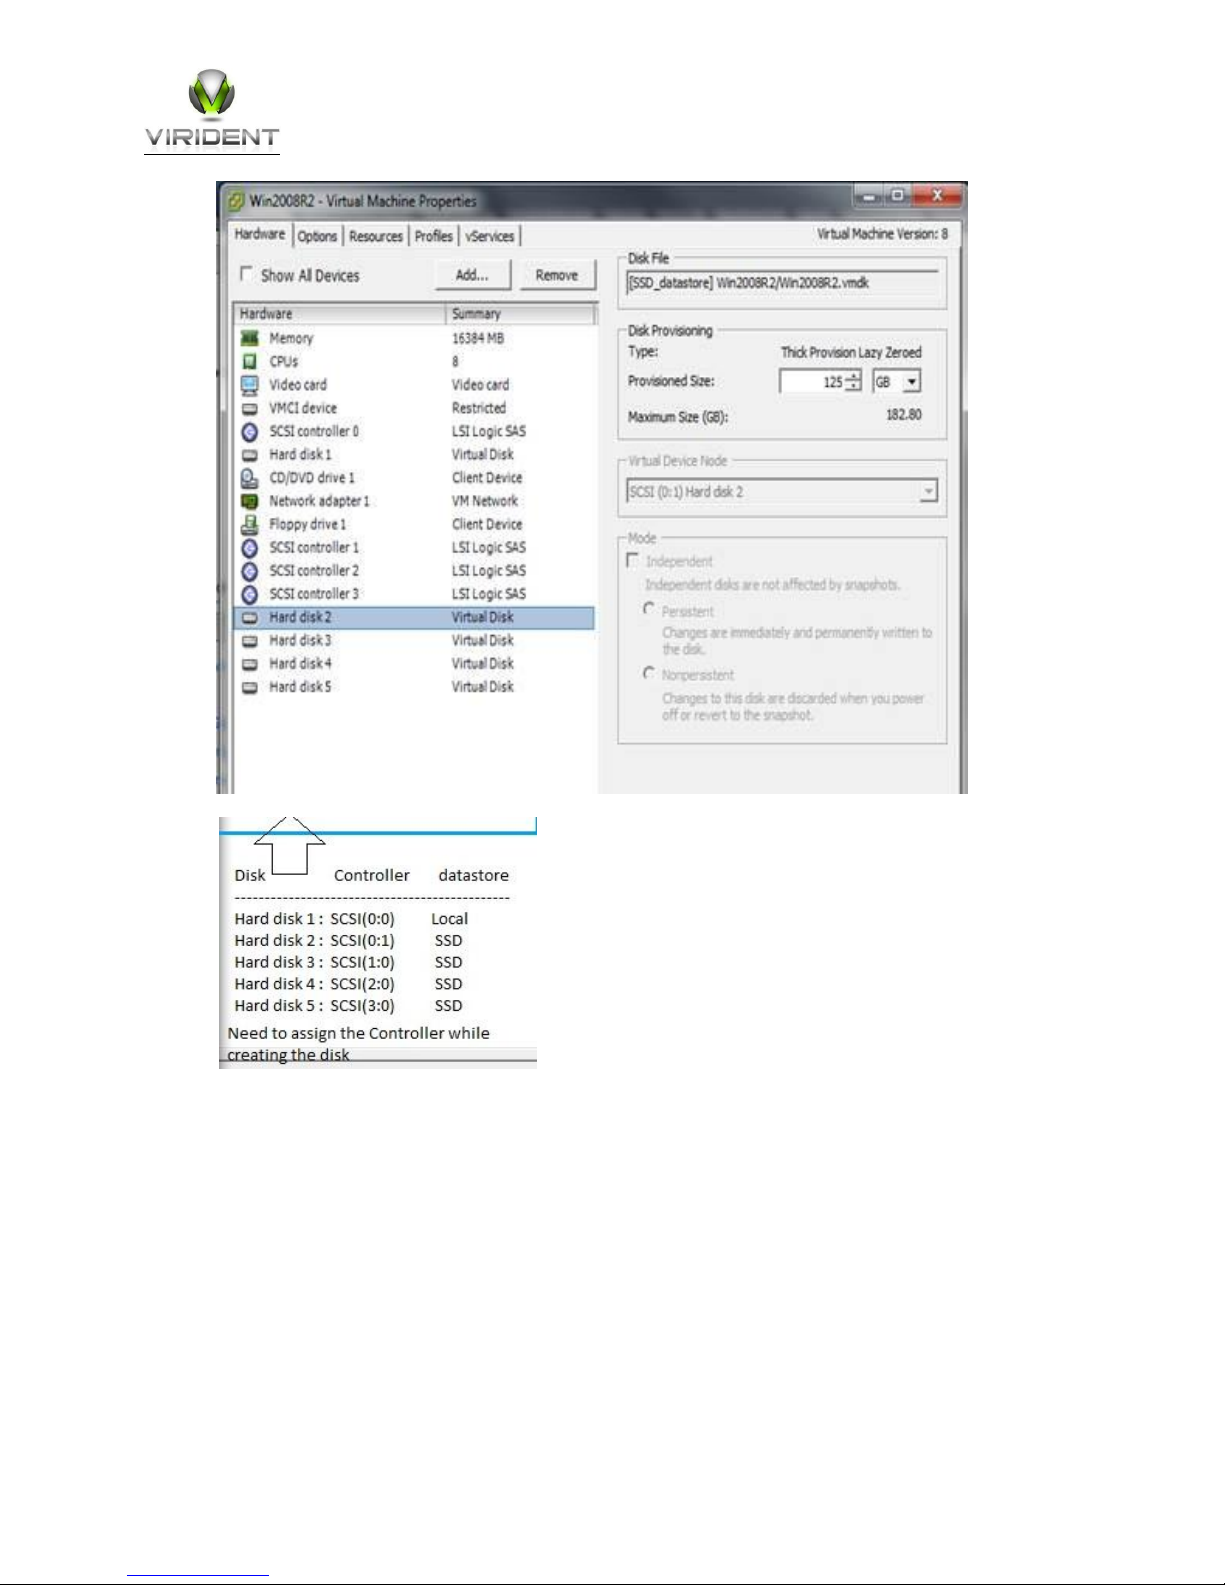
Create a windows 2008 Enterprise VM with 4 LSI SCSI controllers
Configure FlashMAX II device in “maxperformance” mode.
Create a VMFS5 datastore using the available space.
Add 4 Virtual Disks to the VM: attach each vmdk to the 4 SCSI controllers.
From within the windows VM, create a striped volume with the 4 Virtual Disks.
Assign a drive letter and use this volume for max performance
10.3.1 After adding 4 vmdks using VM “Edit Settings” will see VM
properties hardware tab shows as below
Virident FlashMAX II User’s Guide - Version 3.1.1
24
Page 30
Virident FlashMAX II User’s Guide - Version 3.1.1
25
Page 31

~ # lspci | grep -i virident
~ # vmkload_mod -l | grep -i vgc
11 Troubleshooting on ESXi Systems
If the FlashMAX II device or device drivers do not appear to be working properly, use the information in this
section to try to identify the problem. If the issue cannot be resolved or fixed using this information it may
be necessary to contact Virident Support. Virident Support personnel may require that the utility vgc-
diags be used to collect all of the relevant information from the system in order to complete the analysis
and any failure diagnosis.
11.1 Device not detected on ESXi
Ensure the device is detected on the PCI bus. If it is not, please power down the system and check the
device seating in the slot. If it is still undetected, please contact Virident support.
000:008:00.0 Memory controller: Virident Systems, Inc. FlashMAX II [vgca]
Ensure the device driver VIBS are installed and modules are loaded.
vgc 3 1800
Ensure the device is configured. If not, please reset it to factory defaults and try once again.
If the datastore shows inactive or missing. Make Sure the SSD device is in attached state from the
Storage adapters list (host Configuration page )and then perform rescan.
11.2 Firmware Mismatch or Device not Initialized
If there is a mismatch between the installed driver and the firmware installed on the FlashMAX II device,
errors will be displayed in the log as well as by vgc-monitor. See the section below that covers how to
search for errors in the logs.
If the device has not initialized due to a firmware mismatch or another incompatibility you will see errors
similar to the following in the log.
Drive vgcc0 failed to initialize, only limited functionality available
Device configuration changed for /dev/vgca0. Please run vgc-config to reconfigure the device.
Virident FlashMAX II User’s Guide - Version 3.1.1
26
Page 32

11.3 Thermal Shutdown
The FlashMAX II device starts logging errors when the card reaches a temperature of 83OC and the
temperature status will change from “Safe” to “Not Safe”. The FlashMAX II device will discontinue
processing IO requests if the temperature reaches 85OC at any point or if it remains at or above 83OC
continuously for 30 minutes and the device will enter “ADMIN OFFLINE” state. If thermal shutdown
happens then airflow around the FlashMAX II card needs to be increased. Consider changing system BIOS
settings to increase fan speed or using different PCI slot. See section 3.1 “Fan Speed Settings in BIOS”.
In addition, you will see an error similar to the one shown below in the system message logs:
Virident: [0000000400891803:E] ALARM ALARM ALARM 1 : TEMPERATURE HAS EXCEEDED
BEYOND THRESHOLD in FlashMAX drive a (Serial Number VS001E2-000146)
11.4 Device is Degraded or in Read-Only mode
This can occur if there are too many flash failures for the device to operate properly. If this occurs, vgc
monitor will display the device as DEGRADED status. In addition, you will see an error similar to the
following logged:
Virident: [0000000003a81003:E] ******** setting device vgca0 to read only (RO)
mode ******** Reason : ndm returned unknown status : 12 block : 51319536
11.5 Searching for errors in the logs
To find the Virident errors in the logs use the following commands to search:
# dmesg | grep –i vgc: (for all messages)
# dmesg | grep –i vgc: | grep :E (for errors only)
Also we can search ESXi specific logs like /var/log/vmkernel.log for possible storage errors.
Virident FlashMAX II User’s Guide - Version 3.1.1
27
Page 33
Green
Amber
Status Indicated
OFF
OFF
No power to the card.
ON
ON
Power on, no driver loaded.
ON
OFF
Power on, driver loaded.
FLASH
-
Data being read.
-
FLASH
Data being written.
SLOW FLASH
SLOW FLASH
Beacon On.
12 Onboard diagnostic LEDs
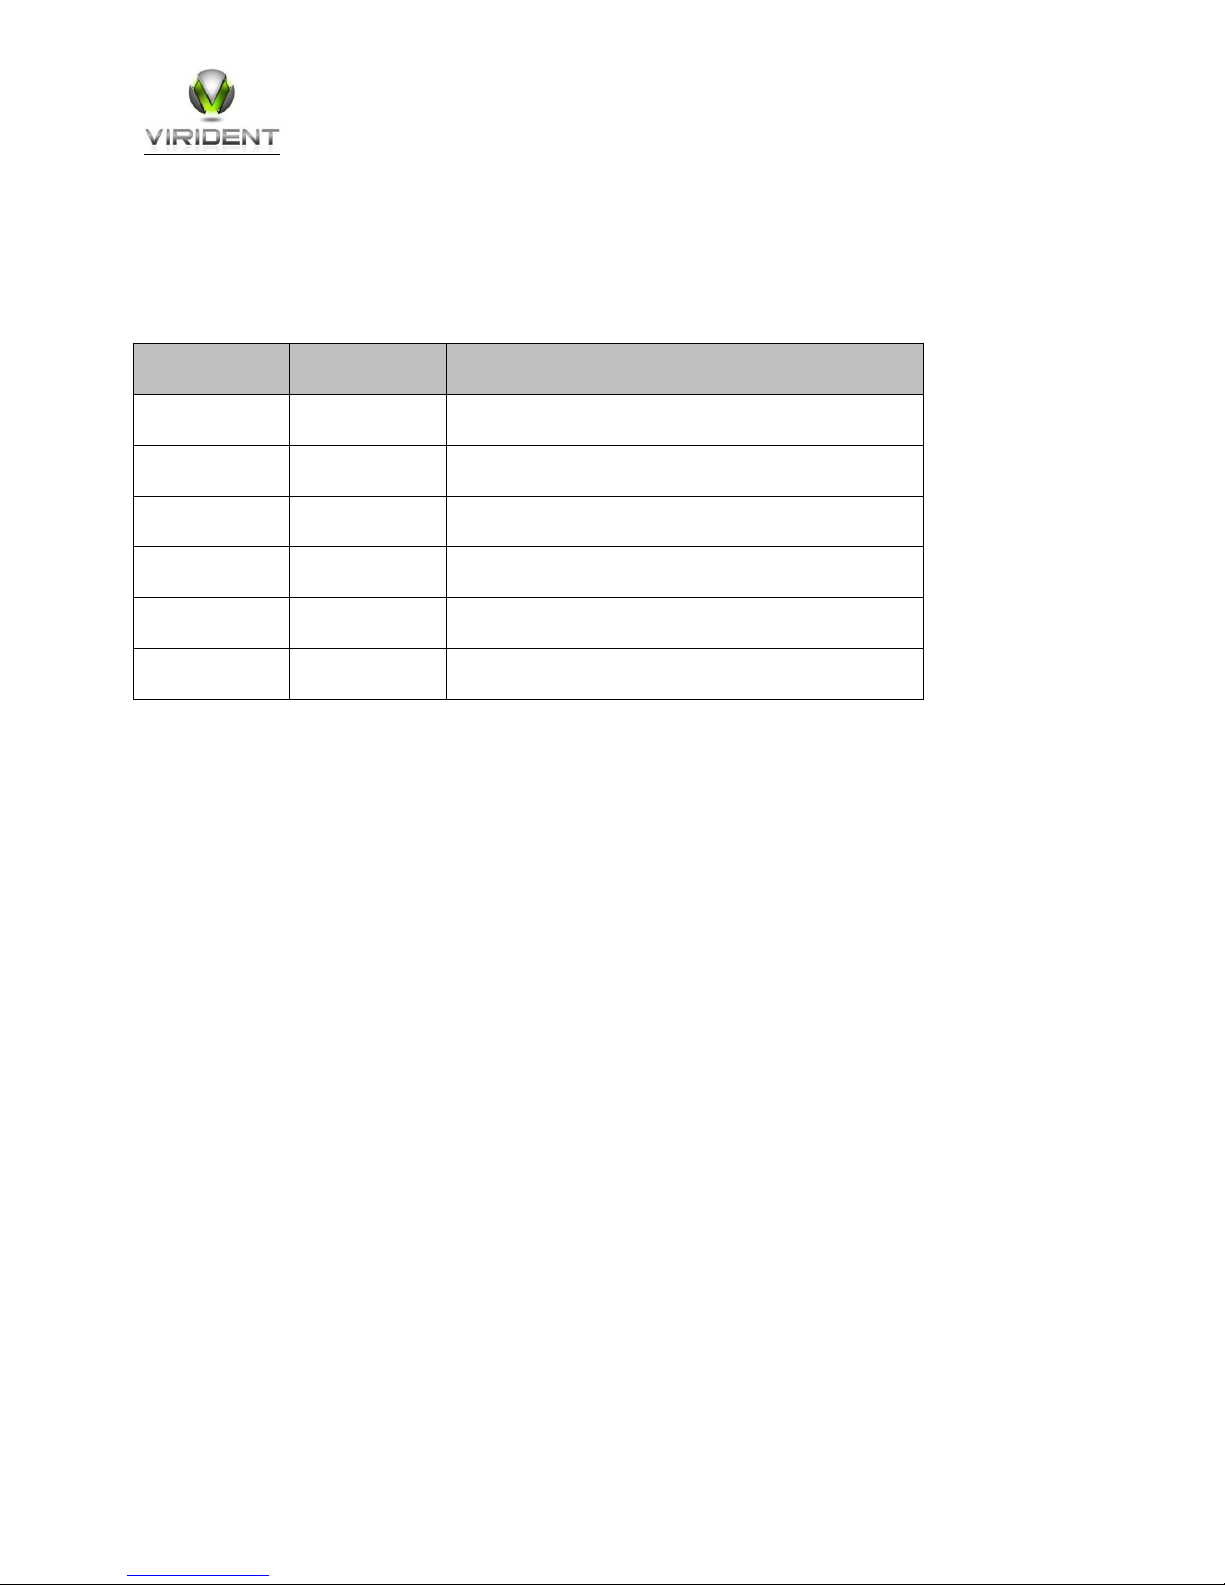
There are two onboard LEDS on the Virident FlashMAX II device. They are visible through the back bracket
and always indicate the state of the system. The following table explains what each combination of these
LEDs indicates:
13 Contacting Virident Support
Virident FlashMAX II User’s Guide - Version 3.1.1
28
 Loading...