

Page 1

OM8074VM5U000100C0A REV.00
Page 2

Contents 1
GETTING STARTED ....................................03
Package contents .........................................04
Phone dimensions ........................................
04
Phone overview ............................................
05
Menu overview .............................................
07
Charging the battery ...................................
08
Turn the phone on/off .................................
09
Display icons .................................................
09
Entering text .................................................
09
Activating your Virgin Mobile phone .........
11
Finding your phone’s serial number ...........
11
Programming your phone ...........................
11
MY ACCOUNT ...........................................13
Top-Up your account ....................................14
CALLS & CONTACTS ................................. 15
Making, receiving & ending a call ..............16
Caller ID ........................................................
17
Call waiting function ...................................
17
Speakerphone ............................................... 17
Vibrate on/off mode ....................................
17
Making an emergency call ..........................
17
Options during a call ...................................
17
Call setting ....................................................
18
Checking all calls ..........................................
19
Speed dialing ................................................
20
Using contacts ..............................................
20
Voice commands (VR) ...................................
21
Using your headset ......................................
23
MESSAGING ..............................................25
Messaging .....................................................26
Received message .........................................
26
Voicemail .......................................................
26
Sent message ................................................
27
Create and send a new text message .........
28
Message templates .......................................
28
Create and send a new multimedia
(picture) message .........................................
28
Create and send new email message .........
29
Create and send new instant message .......
29
Virgin alerts ..................................................
29
Erase messages .............................................
29
Message settings ..........................................
30
MULTIMEDIA ............................................31
Camera ..........................................................32
Pictures and image album ...........................
33
Music and sound album ...............................
34
Themes album ..............................................
34
Other files .....................................................
34
Playing game ................................................
34
USEFUL FEATURES ....................................35
Calendar ........................................................36
Alarm clock ...................................................
36
Calculator, Tip calculator, Stopwatch &
World clock ...................................................
37
Page 3

Voice memo ..................................................37
SETTINGS ..................................................39
Ringtones, Alerts & Tones ............................40
Decorate the display ....................................
41
Call options ...................................................
42
Bluetooth ......................................................42
Security .......................................................... 42
Msg settings ..................................................
43
Game settings ...............................................
43
Language ......................................................43
To set other options .....................................
43
Phone info ....................................................
43
CONNECTIVITY .........................................45
Bluetooth ......................................................46
Using the Internet ........................................
47
VirginXL ........................................................
49
My stuff .........................................................
49
APPENDIX .................................................51
12 Month limited warranty .........................52
Safety information for wireless handheld
phones ........................................................... 53
Safety information for FCC RF exposure ....
56
SAR information ...........................................
56
FDA consumer update .................................
57
Emergency calls ............................................
62
Compliance with other FCC regulations .....
63
General safety ..............................................
63
Antenna ........................................................63
Battery ........................................................... 64
Adapter/Charger ........................................... 65
Recycle your cell phone! ..............................
65
FCC Hearing-Aid Compatibility (HAC)
regulations for wireless devices ..................
66
U.S.Federal Communications Commission
radio frequency interference statement ....
67
FCC compliance information .......................
68
2 Contents
CHAPTER 1
GETTING
STARTED
Package contents
Phone dimensions
Phone overview
Menu overview
Charging the battery
Turn the phone on/off
Display icons
Entering text
Activating your Virgin Mobile phone
Finding your phone’s serial number
Programming your phone
CHAPTER 1 GETTING STARTED
Page 4
Getting Started 5
H
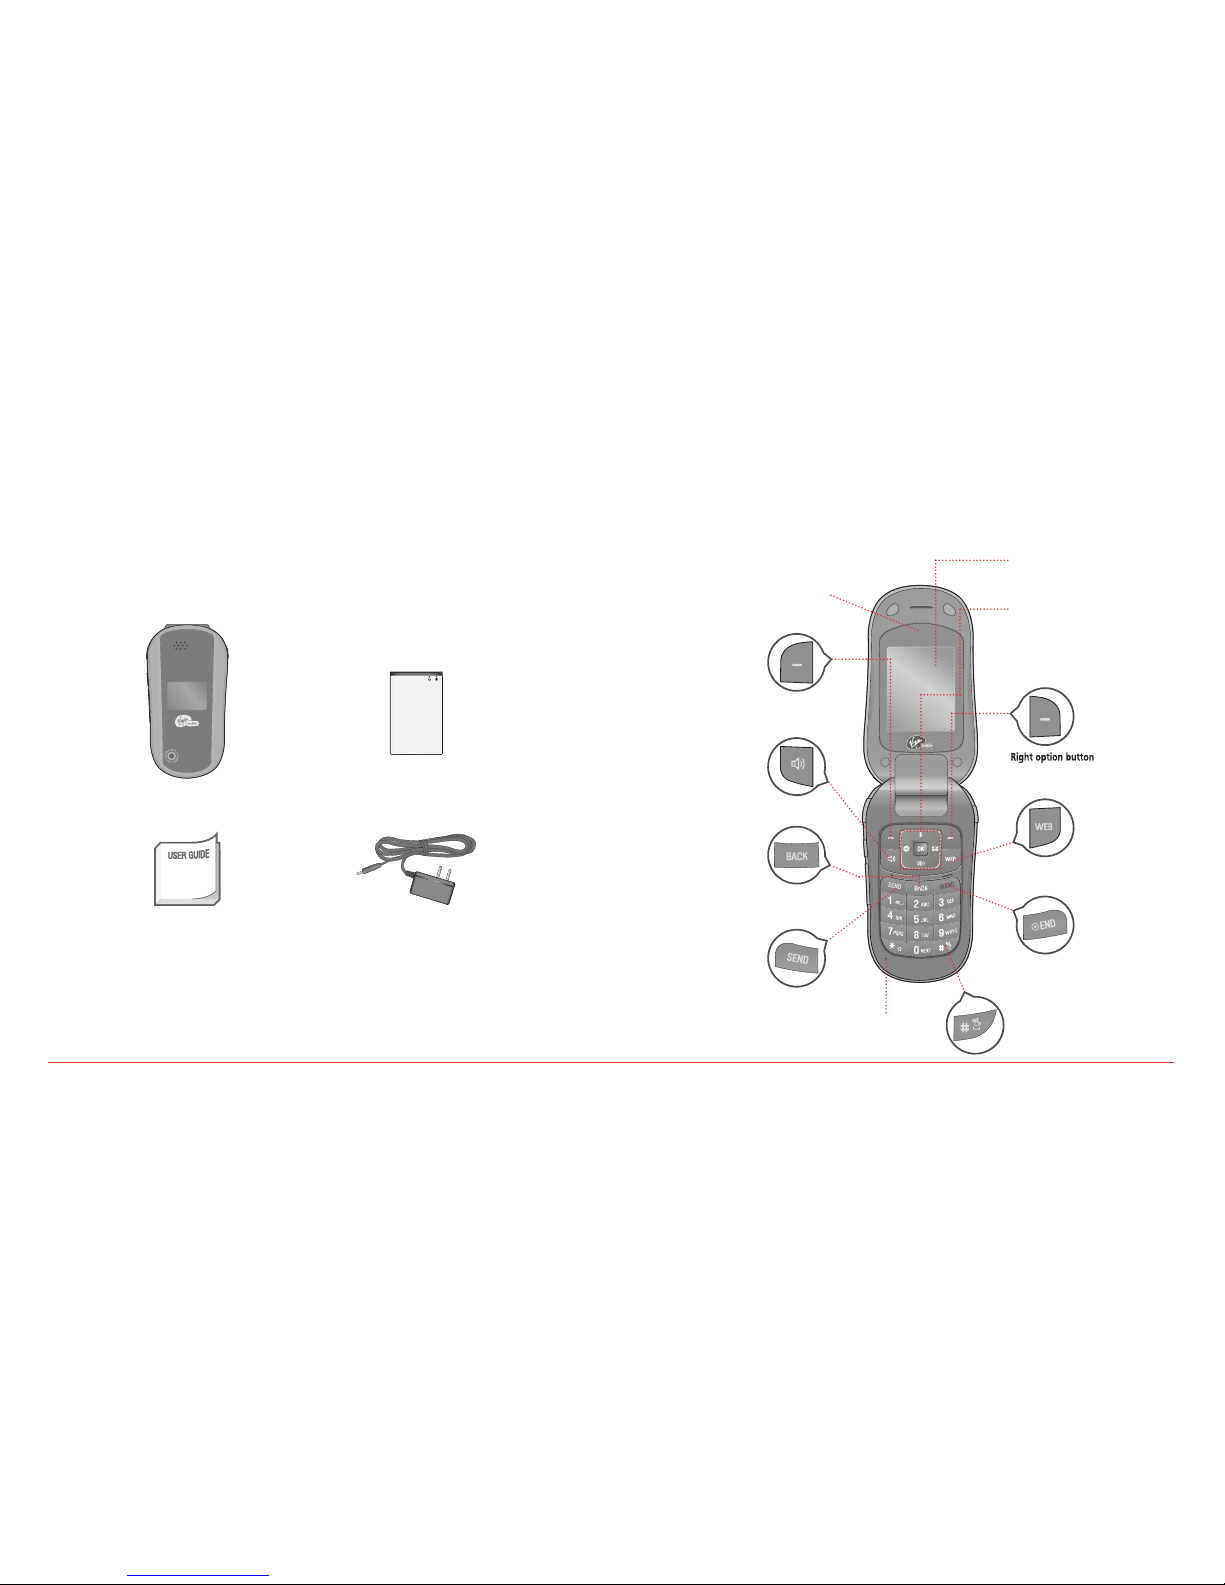
PACKAGE CONTENTS
This package should include all items pictured below.
If any are missing or different, immediately contact the retailer where you purchased the cellular
telephone.
4 Getting Started
Left option button
Perform the functions shown at the
Left bottom of the display.
Microphone
H
PHONE OVERVIEW
Open view of your phone
Speaker key
Press to turn speakerphone On or Off.
SEND key
Press to make or receive a call.
Earpiece
END key/Power on and off key
Press to end a call or to return to idle mode.
Press and hold to turn phone On/Off.
WEB key
Access the Internet.
Right option button
Perform the functions shown at the
Right bottom of the display.
Vibrate mode key
Press and hold to turn Vibrate
mode On/Off.
Navigation and shortcuts keys
Scroll through the menu options.
Left : Access VirginXL
Up : Access My Account
Right : Access Send Text Msg page
Down : Access Recent Calls menu
Internal display
To display the phone’s main menu, features,
modes, etc.
Back key
Press to clear a digit from the display or
to return to the previous page.
H
PHONE DIMENSIONS
Dimensions: 1.9” x 3.6” x 0.8”
Weights: 3.0 ounce
Handset
Standard Battery
User Guide
Travel Charger
Page 5
Getting Started 7
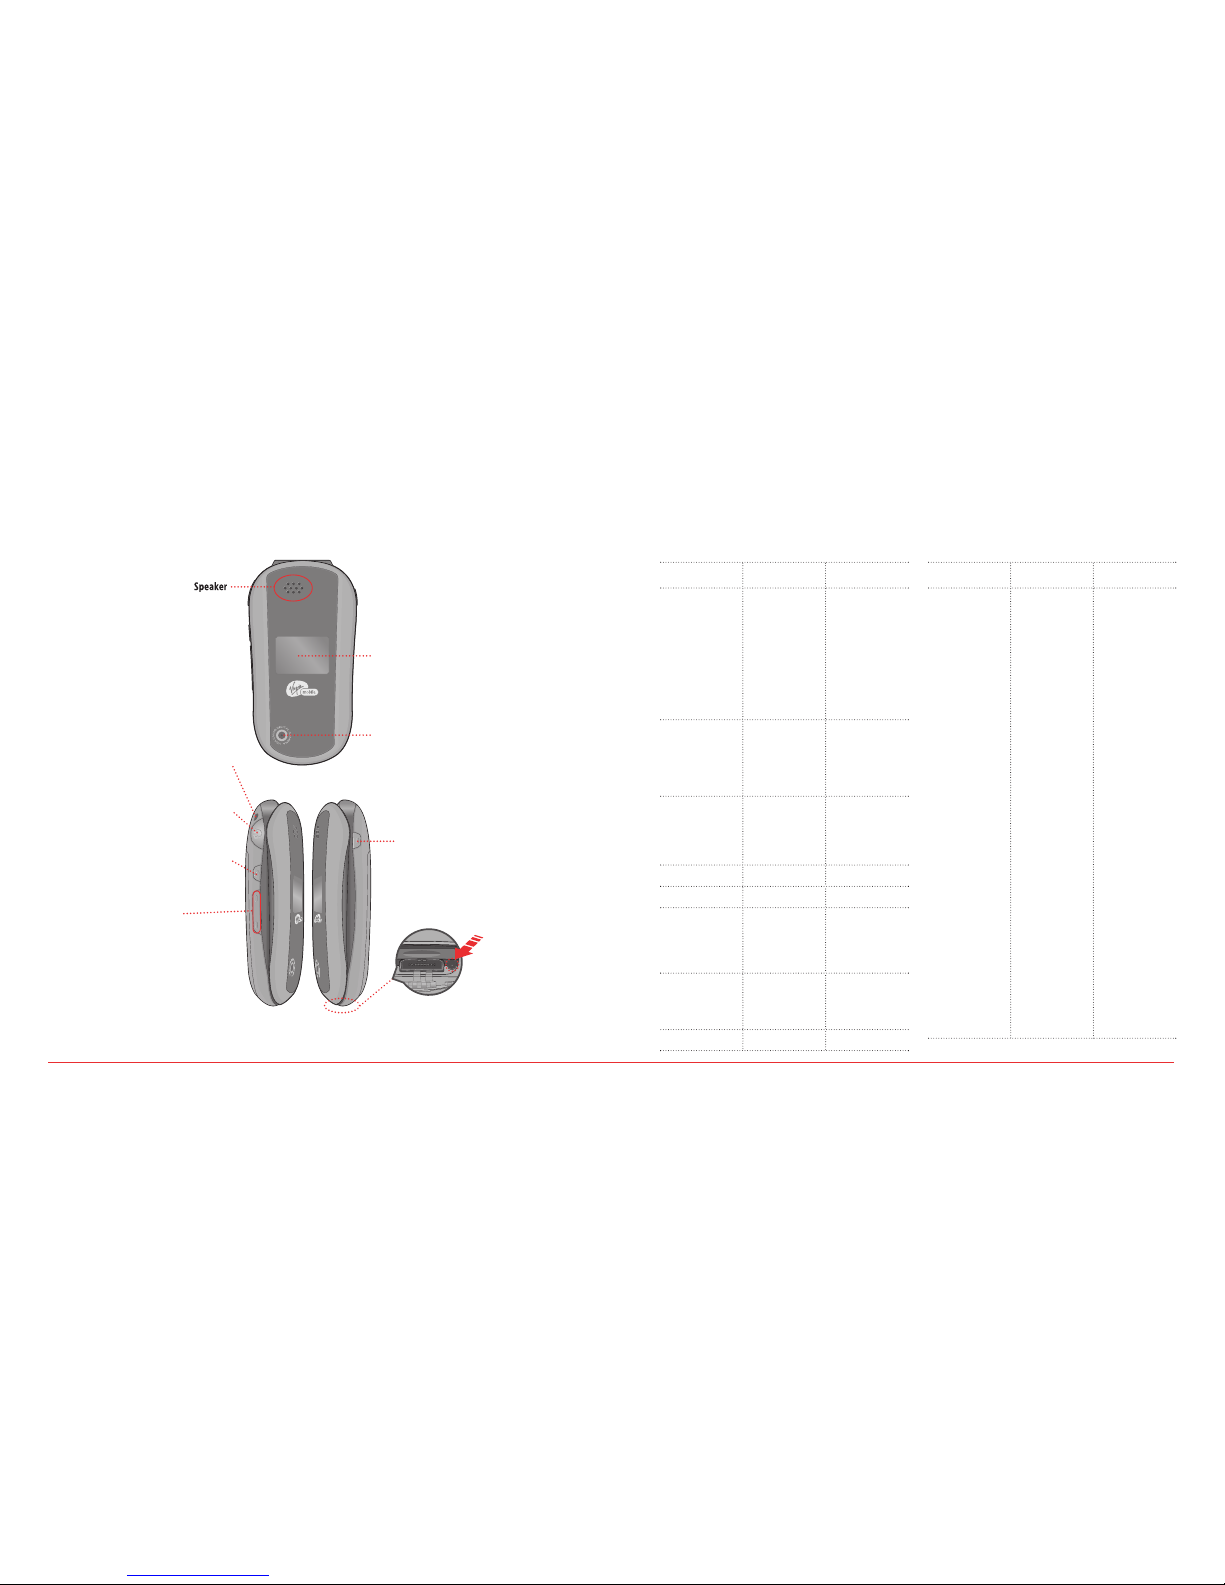
Camera key
Press for quick access to
camera function.
Headset jack
Plug in the Headset Interface
Connector.
Side volume key
•
Adjusts the earpiece volume.
When phone is closed:
•
Press and hold Up to turn the
backlight on.
•
Press and hold Down to turn the
ringtone off when receiving an
incoming call.
VR key
Press to enable VoiceSignal
6 Getting Started
Speaker
Music, Ringtones, and
Sounds are played
through the speaker.
External display
To display the phone’s status and see
who’s calling without opening the
phone.
Camera lens
Lets you take pictures.
Closed view of your phone
Strap hole
Accessory eyelet (for optional straps
and lanyards).
Charger Jack
Connects to power cord to charge phone.
Charger plugs into the round hole under
the protective cover.
H
MENU OVERVIEW
MAIN MENU
2ND DEPTH
3RD DEPTH
9. Tools &
Settings
1. Tools
2. Display
3. Sounds
4. Call options
5. Bluetooth
6. Security
7. Msg settings
8. Game settings
1. Calendar
2. Alarm clock
3. Tip calculator
4. Calculator
5. World clock
6. Stopwatch
7. Voice command
8. Voice memo
1. Graphics
2. Menu style
3. Greeting banner
4. Contrast
5. Backlight
6. Themes
1. My ringtones
2. Msg tones
3. Service alerts
4. Volume
5. Power tone
6. Key tone
1. Call reminder
2. Call answer
3. Auto answer
1. Lock phone
2. Change lock code
3. Special numbers
4. Erase contacts
5. Erase downloads
6. Reset phone
1. Msg tones
2. Reminder
3. Text entry
4. Auto text
5. Save to Sent
6. Signature
7. Groups
8. Auto erase
1. Volume
2. Backlight
MAIN MENU
2ND DEPTH
3RD DEPTH
1. Messaging
2. Contacts
3. Recent Calls
4. My Account
5. VirginXL
6. My Stuff
7. Pictures
8. Surf the Web
1. Send text msg
2. Send pic msg
3. Send email msg
4. Send IM
5. Inbox
6. Virgin Alerts
7. Voicemail
8. Sent
9. Saved
0. Msg settings
*. Erase msgs
1. Find name
2. Add new
3. Groups
4. Speed dial
5. My phone
number
1. Missed calls
2. Received calls
3. Outgoing calls
4. All calls
5. Call timers
1. My ringtones
2. My graphics
3. My games
4. My themes
5. My other stuff
1. Take a picture
2. My pictures
3. Send pic msg
4. Help
Page 6
8 Getting Started Getting Started 9
H
CHARGING THE BATTERY
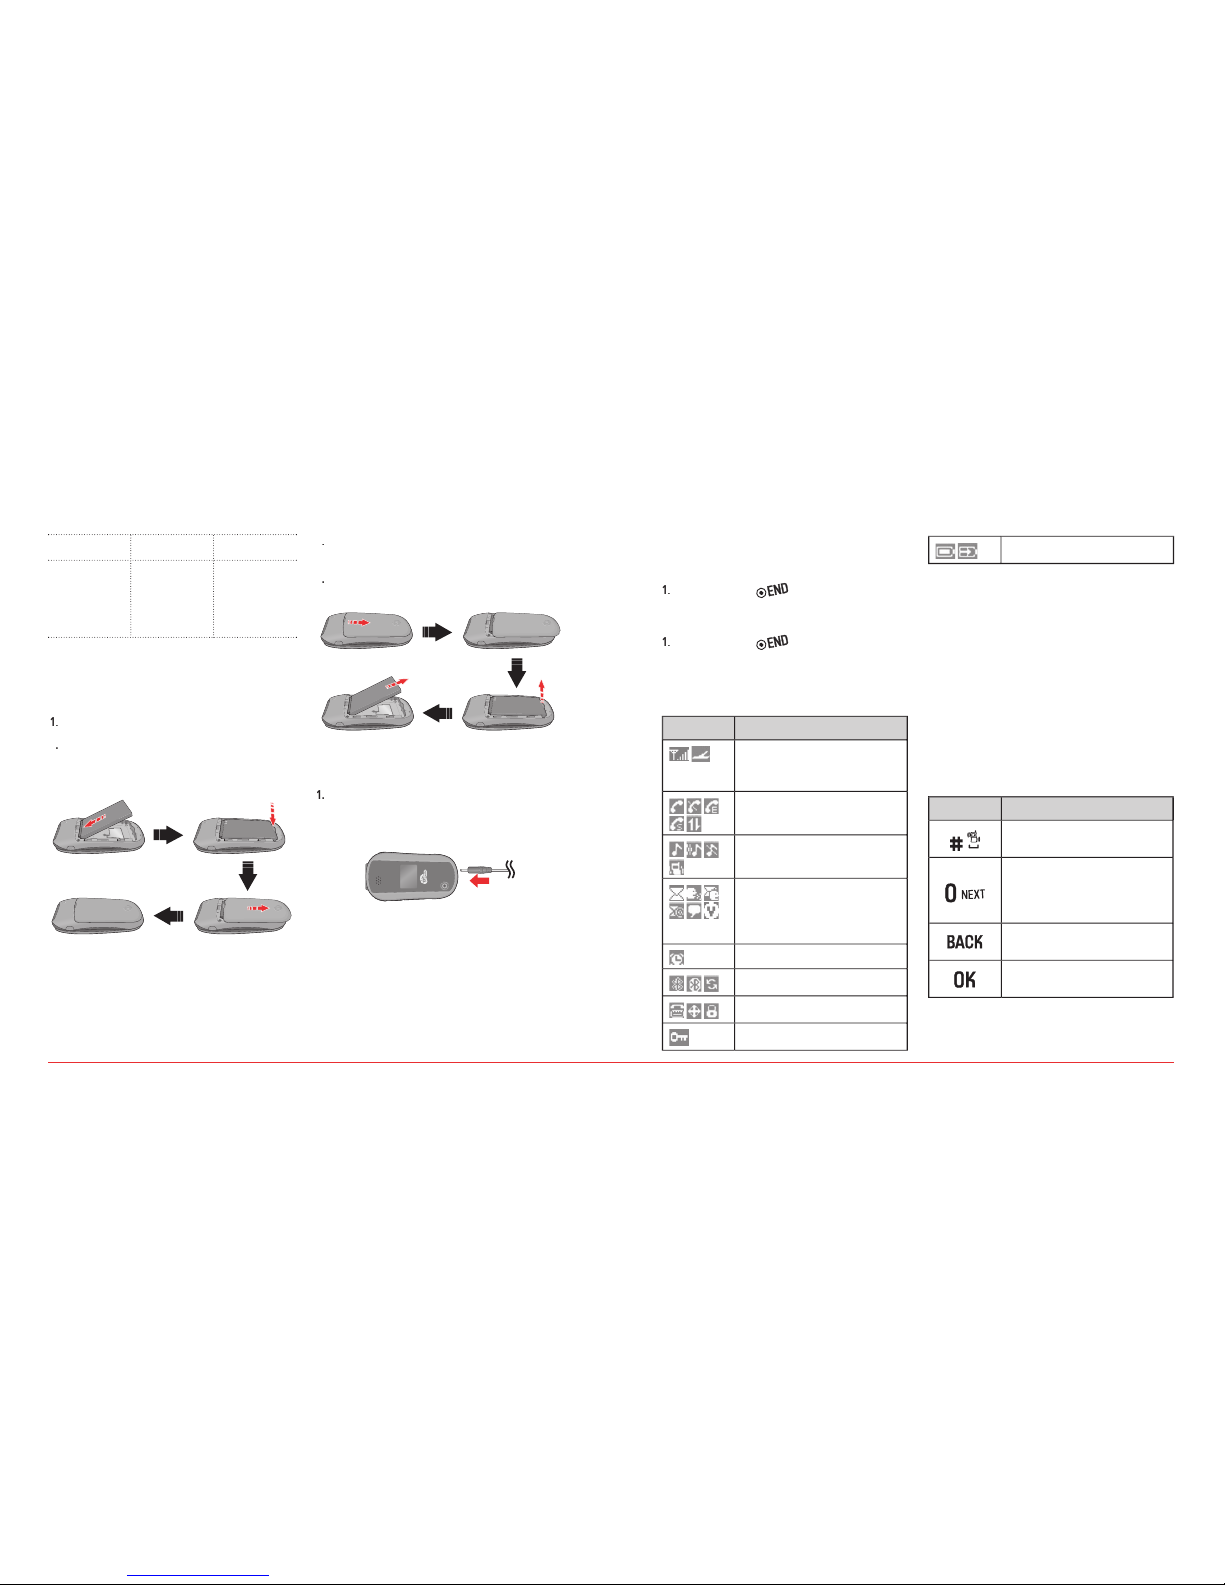
To install/remove your battery
1.
Remove the battery cover from the unit.
Slide the battery into the slot located at the
bottom of the unit and press until you hear
the “click”.
3
To remove the battery, push down on the top
of the battery and slide it out.
Slide the battery cover back into the unit.
To charge your battery
Open the protective cover on the bottom and
connect the charger adapter. Plug the other
end into a standard outlet.
MAIN MENU
2ND DEPTH
3RD DEPTH
9. Tools &
Settings
9. Language
0. Other
*. Phone info
1. Airplane mode
2. TTY mode
3. Location
1. My phone number
2. Version info
H
TURN THE PHONE ON/OFF
To turn on
1.
Press and
hold [
].
To turn off
Press and h
old [
].
H
DISPLAY ICONS
Display indicators
Icon
Name
Signal Strength
Current signal strength: the more
lines, the stronger the signal.
Phone Status (Calling/No Service/
Emergency/Speaker/Data)
Ring type (Ringtone/Vibrate_Ring/
Silent/Vibrate)
Message (Text, Picture, WAP, Multi)
Voicemail, Message+Voicemail,
Ema
il, IM (Instant Message),
Virgin Alerts
Alarm/schedule is set
Bluetooth® (On/Connected/Pairing)
TTY/GPS (Location)/Lock Mode
Secure site
Battery (Strength/Charging)
H
ENTERING TEXT
The input mode (Alpha editor) will automatically
be activated when necessary to enter letters and
numbers. As shown below, there are 4 available
modes : Standard input mode (Abc), Input mode
(T9Abc), Numeric mode (123) and Symbols. The
input mode indicator appears on the upper right
of the display when letters and numbers are
entered. To select the desired input mode among
the 4 modes below, press
Options
and then select
input mode.
Useful keys
Key
Function
Press to accept a word and add
a space.
In T9Abc Mode, press to view
the next matching word if the
highlighted word is not the word
you intended.
Press to delete a character to the
left of the cursor.
Confirm the letters and numbers
you entered.
Page 7
10 Getting Started Getting Started 11
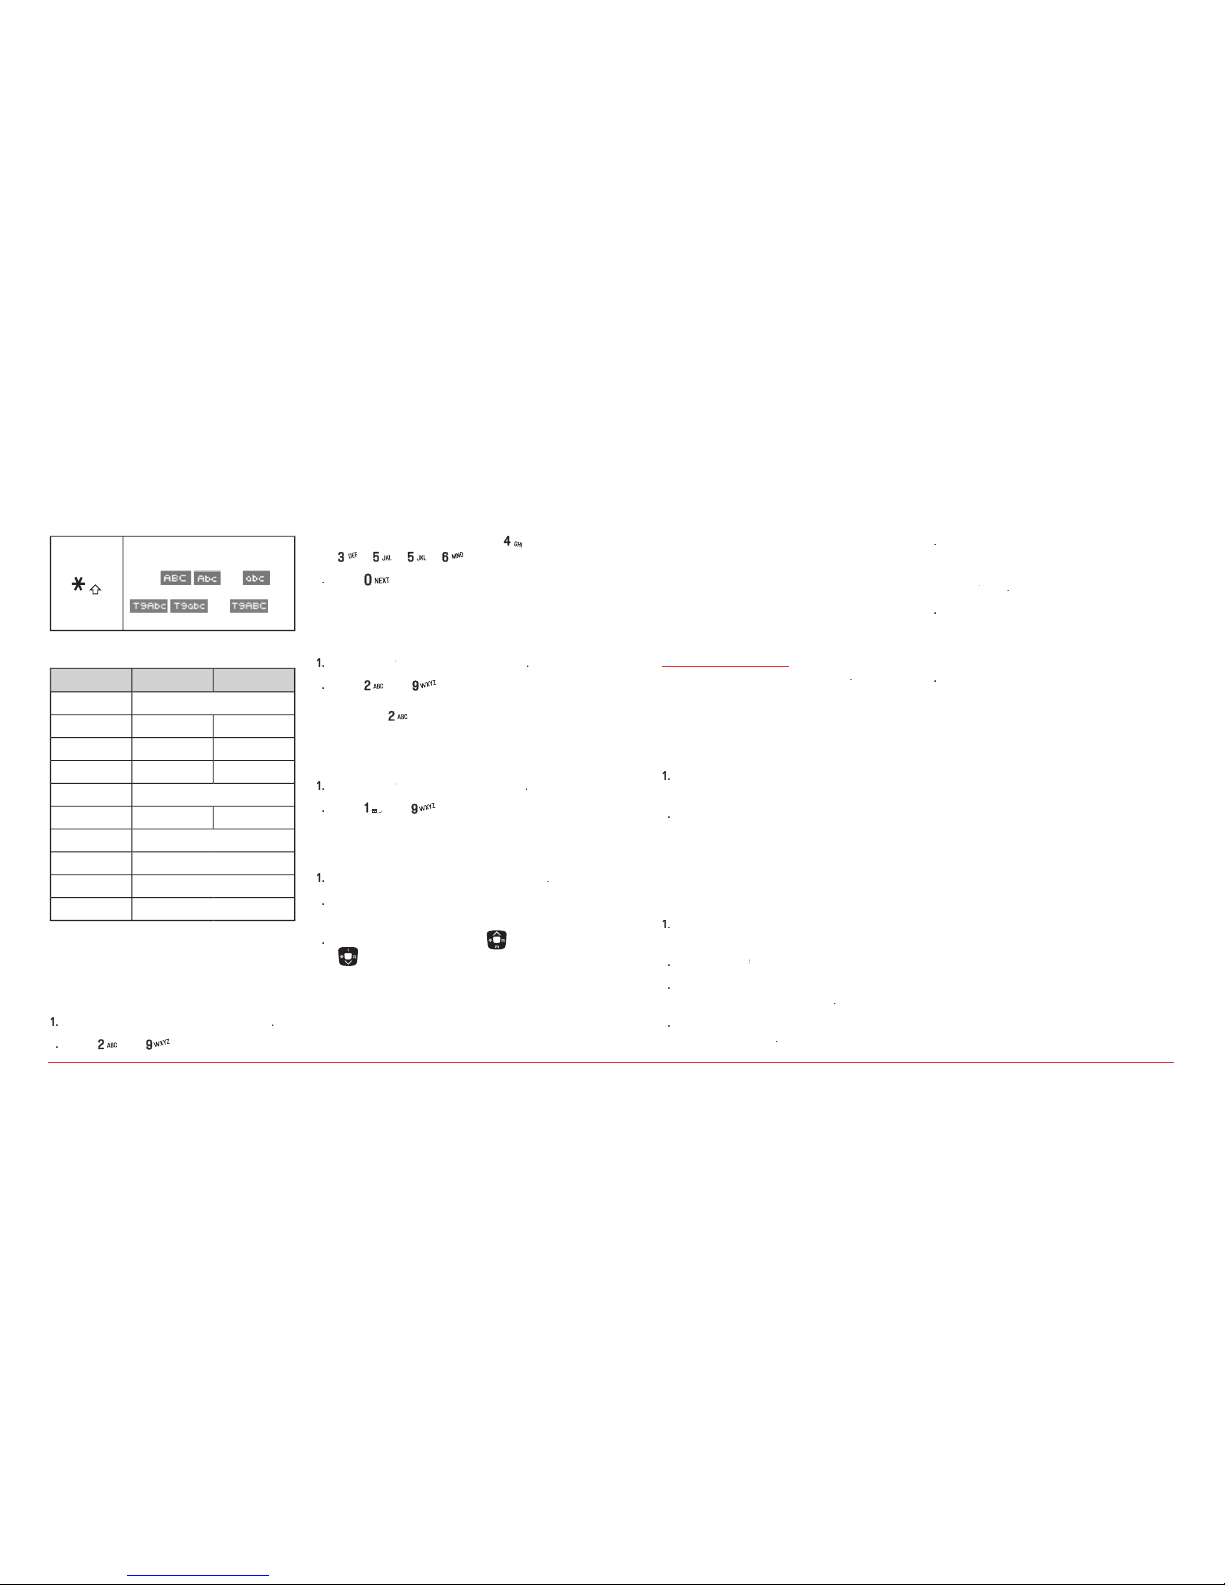
Press to select a letter case of the
standard text input or text input
mode. and
indicate the standard text input.
and
indicate the predictive text input.
To enter text using the keypad
Key
English
Spanish
1 Key . @ ? ! - , & : ’ / 1
2 Key a b c 2 a á b c 2
3 Key d e f 3 d e é f 3
4 Key g h i 4 g h i í 4
5 Key j k l 5
6 Key m n o 6 m n ñ o ó 6
7 Key p q r s 7
8 Key t u v 8
9 Key w x y z 9
0 Key 0
Predictive mode (T9Abc)
T9 mode automatically compares your keystrokes with an
internal dictionary to determine the correct word. The
most commonly used word will appear first. To use T9Abc
mode, press
Options > T9Abc.
Press
Options
> change the mode to
T9Abc
Pre
ss [
] to [
] to input text.
For example, to write ‘hello’ press [
]
[
] [
] [
] [
].
3
.
Press [
] to search for the word.
Multi-tap input mode
Press the key labeled with the target letter once for the
first letter; press it twice for the second letter, and so on.
Press
Options
> change the mode to
Abc
2.
Pr
ess [
] to [
] to input text
repeatedly. For example, to write the letter
“C”, press [
] 3 times.
Numeric mode
Number mode allows you to enter numbers.
1.
Press
Options
> change the mode to
Symbol mode
Allows you to enter symbols.
> change the mode to
To display m
] or
].
H �
ACTIVATING YOUR VIRGIN MOBILE
PHONE
Virgin Mobile. You need your phone’s serial
To activate your phone online go to
www.virginmobileusa.com
and click on Activate.
H �
FINDING YOUR PHONE’S SERIAL
NUMBER
To activate your Virgin Mobile account, you need your
phone’s serial number.
The serial number is under the letters MEID. It
H �
PROGRAMMING YOUR PHONE
Once your account is active, you’ll receive your Virgin
Mobile phone number. When you are ready, follow these
steps to program it into your phone:
Turn on your phone and wait for it to power
(that’s #-#-8-4-7-4-4-6-#)
You are now in the Programming menu. Scroll
Activate Phone
>
4
Your screen will say, “Do you want to activate
your phone ?” >
Your phone will connect to the network, and
then the screen will say “Hi. Press Start to
to
Your phone will say “We’re getting your phone
your new Virgin Mobile phone number. Write
>
to complete the
That’s it:
It might take Virgin Mobile a couple of hours to get you
set up on their network, so they’ll send your phone a text
message to let you know when you can start talking. Also,
it may take up to 4 hours for VirginXL, voicemail, and
Top-Up features to come online.
Page 8

12 Getting Started
CHAPTER 2
MY ACCOUNT
Top-Up your account
CHAPTER 2 MY ACCOUNT
Page 9

14 My Account
CHAPTER 3
CALLS &
CONTACTS
Making, receiving & ending a call
Caller ID
Call waiting function
Speakerphone
Vibrate on/off mode
Making an emergency call
Options during a call
Call setting
Checking all calls
Speed dialing
Using contacts
Voice commands (VR)
Using your headset
CHAPTER 3 CALLS & CONTACTS
H
TOP-UP YOUR ACCOUNT
When you balance is low, you can Top-Up your
Top-Up with a Top-Up Card
>
link and press
key.
4
and press
key.
key.
and press
key.
You are now topped up
]
to exit.
Top-Up with a Debit Card, Credit Card, or
PayPal Account
Before you can Top-Up from your phone with a debit card,
credit card, or PayPal account, you need to register the
card or PayPal account at www.virginmobileusa.com.
>
link and press
key.
and press
key.
key. You can
in amounts of
and press
key.
At the confirmation screen, select
You are now topped up.
]
to exit.
Note:
You can also Top-Up at www.virginmobileusa.com.
For more Information
www.virginmobileusa.com
Page 10

Calls & Contacts 17
H
MAKING, RECEIVING & ENDING A CALL
To make a call
To answer a call
To end a call
To reject a call
To make a call using call list
Your phone logs up to 270 outgoing, received and missed
call numbers.
list.
Note:
•
To red
ial the last number in the Recent Calls list, press
[ ].
•
After 270 received, outgoing or missed calls, the oldest
call will automatically be erased from the history.
To make a call using contacts
to access the
To adjusting the call volume
key up or down to
To insert a Time/Hard pause feature
Insert a pause after a phone number and then enter
another group of numbers. If "Time pause" inserted, the
second set of numbers is dialed automatically after the
pause. If "Hard pa
use" inserted, send the next set of
numbers when you press [
].
or
To switch between two calls
To reply to a missed call
to display the list of missed calls.
] or
To answer a second call
16 Calls & Contacts
The call on hold is automatically reconnected.
H
CALLER ID
Identifies caller by displaying their phone number.
If the caller’s name and number are already stored in your
contact list, name and number will appear. The caller ID is
stored in the Recent Calls Menu.
H
CALL WAITING FUNCTION
Notifies you of an incoming call when you are already on
a call by sounding a beep tone and displaying the caller’s
phone number.
To answer another
call while on the phone,
H
SPEAKERPHONE
The speakerphone feature lets you hear audio through the
speaker and talk without holding the phone.
To activate the speakerphone in idle mode or while
H
VIBRATE ON/OFF MODE
to turn
Vibrate mode On/Off.
H
MAKING AN EMERGENCY CALL
The 911 feature automatically places the phone in
Emergency Call Mode when you dial the preprogrammed
emergency number, 911.
To make an emergency (911) call in lock
mode
The phone maintains the Emergency Mode for
To make an emergency (911) call using any
available system
The phone will stay in Emergency Mode
the Emergency Callback Mode.
H
OPTIONS DURING A CALL
Microphone off and on
To switch your phone’s microphone off
To switch your phone’s microphone back on
To switch your phone’s microphone back on
To talk on speaker
Page 11

18 Calls & Contacts Calls & Contacts 19
To put a call on hold and return
To put a call on hold
To return to a held call
To save a number in contacts list during a
call
>
To search a number in contact list during a
>
T
in contact list
the first entry matching your input.
To find a name manually in contact list
To view the details of highlighted entry in
conta
To search a number in recent calls during
a call
>
To read a message during a call
>
>
> select a
To write a text message during a call
>
>
Note:
During the call, you can only send text messages.
Multimedia messages cannot be sent or saved.
H
CALL SETTING
To set call reminder
>
>
or
To set auto answer
>
>
Auto answer
20 seconds
or
To answer with any key press
>
>
Note:
You can answer with any key ex
cept [ ],
and Ignore.
H
CHECKING ALL CALLS
You can view information about all Recent Calls. For more
options for all, missed, received and outgoing calls press
Options.
To view all calls
Recent Calls
All calls
to view the
To view missed calls
Recent Calls
to view the
To view received calls
Recent Calls
to view
the details.
To view outgoing calls
Recent Calls
to view
the details.
To send a message from the recent call list
or
Write the message
Send
To delete call logs
Erase
Yes
Note:
If no logs exist, the message “[Name] calls empty” appears.
To view t
>
>
All calls
>
Page 12

20 Calls & Contacts Calls & Contacts 21
H
SPEED DIALING
You can dial quickly using speed dialing. Nine numbers
from 2 to 10 can be saved.
To set speed dial
Contacts
Assign
To update
>
To remove from speed dial
Yes
H
USING CONTACTS
You can save names, phone numbers, and up to 500
contacts in the phone.
To add a contact
Contacts
Add new
To save a new contact >
To view contact list
Contacts
To search for a phone number
Contacts
to view the details.
To call from contact list
Contacts
To send contacts information
Contacts
You can send the information via
4
Write the message >
To delete a contact
Contacts
>
>
To make groups
To save a group options >
To send a group message
>
or
>
Write the message >
To ad
>
Add member
To erase a group
>
>
To view your phone number
H
VOICE COMMANDS (VR)
Your phone is equipped with an VR (Voice Recognition)
feature. This feature allows you to make calls or use the
phone’s functions by simply using your voice.
All you have to do is talk into the phone, and the phone
will recognize your voice and complete tasks by itself.
To use VR (Voice Recognition)
Key.
The phone displays the Command menu and
you want to use. To complete your task, simply
to confirm the name you said. Say “Yes“ if it
was repeated correctly. That phone number
will be dialed. If there is more than one
Page 13

22 Calls & Contacts
The View Contact page will be displayed for
that contact name.
Go to <M
followed immediately by one of
the items: (Recent Calls, Contacts, Messaging,
VirginXL, Surf the Web, My Stuff, Pictures,
Tools&Settings)
followed immediately by one
Tutorial
with additional information on using Voice
To set VR settings
To set VR confirmation
>
You can control whether the system asks you
to confirm a name or number.
Automatic
Always Confirm
Never
>
To set VR adaptation
To set VR adaptation
>
Adaptation
>
Adapt Voice
Adaptation will take a couple of minutes to
To set VR modes
>
Prompt Mode
Readout
>
To set VR speakerphone
To set VR speakerphone
>
You can control the speakerphone behavior
when voice recognition is started.
Automatic
Always On
Always Off
To set VR about
>
About
The VSuite version appears.
H
USING YOUR HEADSET
To send or receive a call using your headset, connect the
headset to the jack on your phone. Once connected, the
button on the headset controls the following:
While in standby mode
While the phone is closed
Note:
Headset sold separately.
Calls & Contacts 23
Page 14

24 Calls & Contacts
CHAPTER 4
MESSAGING
Messaging
Received message
Voicemail
Sent message
Create and send a new text message
Message templates
Create and send a new multimedia (picture) message
Create and send new email message
Create and send new instant message
Virgin alerts
Erase messages
Message settings
CHAPTER 4 MESSAGING
Page 15

Messaging 27
H
MESSAGING
The messaging feature is an integrated messaging
application that lets you send and receive Text, Picture,
Email, and Instant Messaging (IM) messages.
To delete a me
>
>
To reply to a message
View
Reply
H
RECEIVED MESSAGE
To read new messages
To read message using Inbox
>
>
To save new numbers from received
>
>
>
4
To launch a URL address from a received
>
To save a picture or sound from a picture
>
Note
If image file saved, It will be saved in one of the categories
in My Stuff. If sound file saved, It will be saved in Voice
memo.
To listen to voice messages
>
>
H
VOICEMAIL
Whenever you receive new voicemail, an alert will pop up
on your phone’s screen. The alert will let you know how
many new messages you have waiting and whether any of
them have been marked Urgent. Open the alert to view
the number of new voice messages in your voicemail. If a
caller leaves a callback
number, this number will also be
sent via an alert. To access the voicemail center, press and
hold [
].
26 Messaging
To set up your voicemail
Before your phone can receive voicemail messages, you
must set up a 4-10 digit passcode and record a personal
voicemail greeting. When you have set up your voicemail,
all unanswered calls to your phone are automatically
transferred to voicemail, even if your phone is in use or
turned off.
Messaging
or press a
To access your voicemail box
Messaging
or press and
H
SENT MESSAGE
To edit a message in the sent folder
>
>
>
To send the edited message >
Note:
This option is only available for pending or failed messages
in your sent folder. You can not edit messages that have
successfully been sent.
To call a number in a sent message
>
>
Options
Call
To forward message to another recipient
>
>
>
>
To save sent message
>
>
Options
Save
Note:
It will be saved in Saved folder.
To save n
>
>
>
Page 16

28 Messaging Messaging 29
H �
CREATE AND SEND A NEW TEXT
MESSAGE
To send new text message
>
>
>
Write the message >
To view sent message press
>
Note:
All successful or failed messages will be saved in Sent
folder.
To view all sent messages
>
>
H
MESSAGE TEMPLATES
If you often use the same words or phrases in your text
messages, save them as a template to save time.
To save the message as a template
>
>
>
Auto text
>
Write a message >
To edit the saved template message
>
>
>
Auto text
>
H �
CREATE AND SEND A NEW MULTIMEDIA
(PICTURE) MESSAGE
You can send picture and sound files via multimedia
(picture) messages. If message exceeds 200Kb an error
message will pop up.
To send new multimedia message
>
>
>
4
Write the
Text
Image
Audio
To view sent message press
Messaging
Sent
Note:
All successful or failed messages will be saved in Sent
folder.
To add saved pi
window.
To add new picture to a message
window.
Camera
Take the picture.
To add saved sound to the message
Audio
window.
Audio
To add new sound to the message
Audio
window.
Audio
Record
H �
CREATE AND SEND NEW EMAIL
MESSAGE
You can send and receive email messages from your
phone. Check Virgin Mobile’s web site at
www.virginmobileusa.com for availability and pricing.
To launch mobile email
My Stuff
Mobile Email
Or,
>
>
H �
CREATE AND SEND NEW INSTANT
MESSAGE
You can send and receive instant messages (IMs) from
your phone. Check Virgin Mobile’s Web site at
www.virginmobileusa.com for availability and pricing.
To launch instant messaging
My Stuff
Or,
>
>
H �
VIRGIN ALERTS
To review the Virgin Alerts you’ve received
Messaging
View
H �
ERASE MESSAGES
Erase old messages to free up memory in your phone.
To erase all m
Messaging
Sent
Saved
All
Yes
Page 17

30 Messaging
H �
MESSAGE SETTINGS
Customize your messages by adjusting the Message
Settings.
To set Message Tones
Messaging
Msg tones
or
•
Select desired ringtone >
Assign
Note:
To play ringtone, press Play.
•
Vibrate mode:
or
To set Reminder Message
Messaging
Reminder
or
To set Text Entry Mode
Messaging
Text entry
Alpha
or
>
To set Save to Sent message
Messaging
Save to Sent
Auto
>
To create a signature for a messages
Messaging
Signature
> Enter your signature in
the text field >
To create and edit the contacts group
Messaging
Groups
To set Auto Erase Message
Messaging
Auto erase
or
>
CHAPTER 5
MULTIMEDIA
Camera
Pictures and image album
Music and sound album
Themes album
Other files
Playing game
CHAPTER 5 MULTIMEDIA
Page 18
Multimedia 33
H
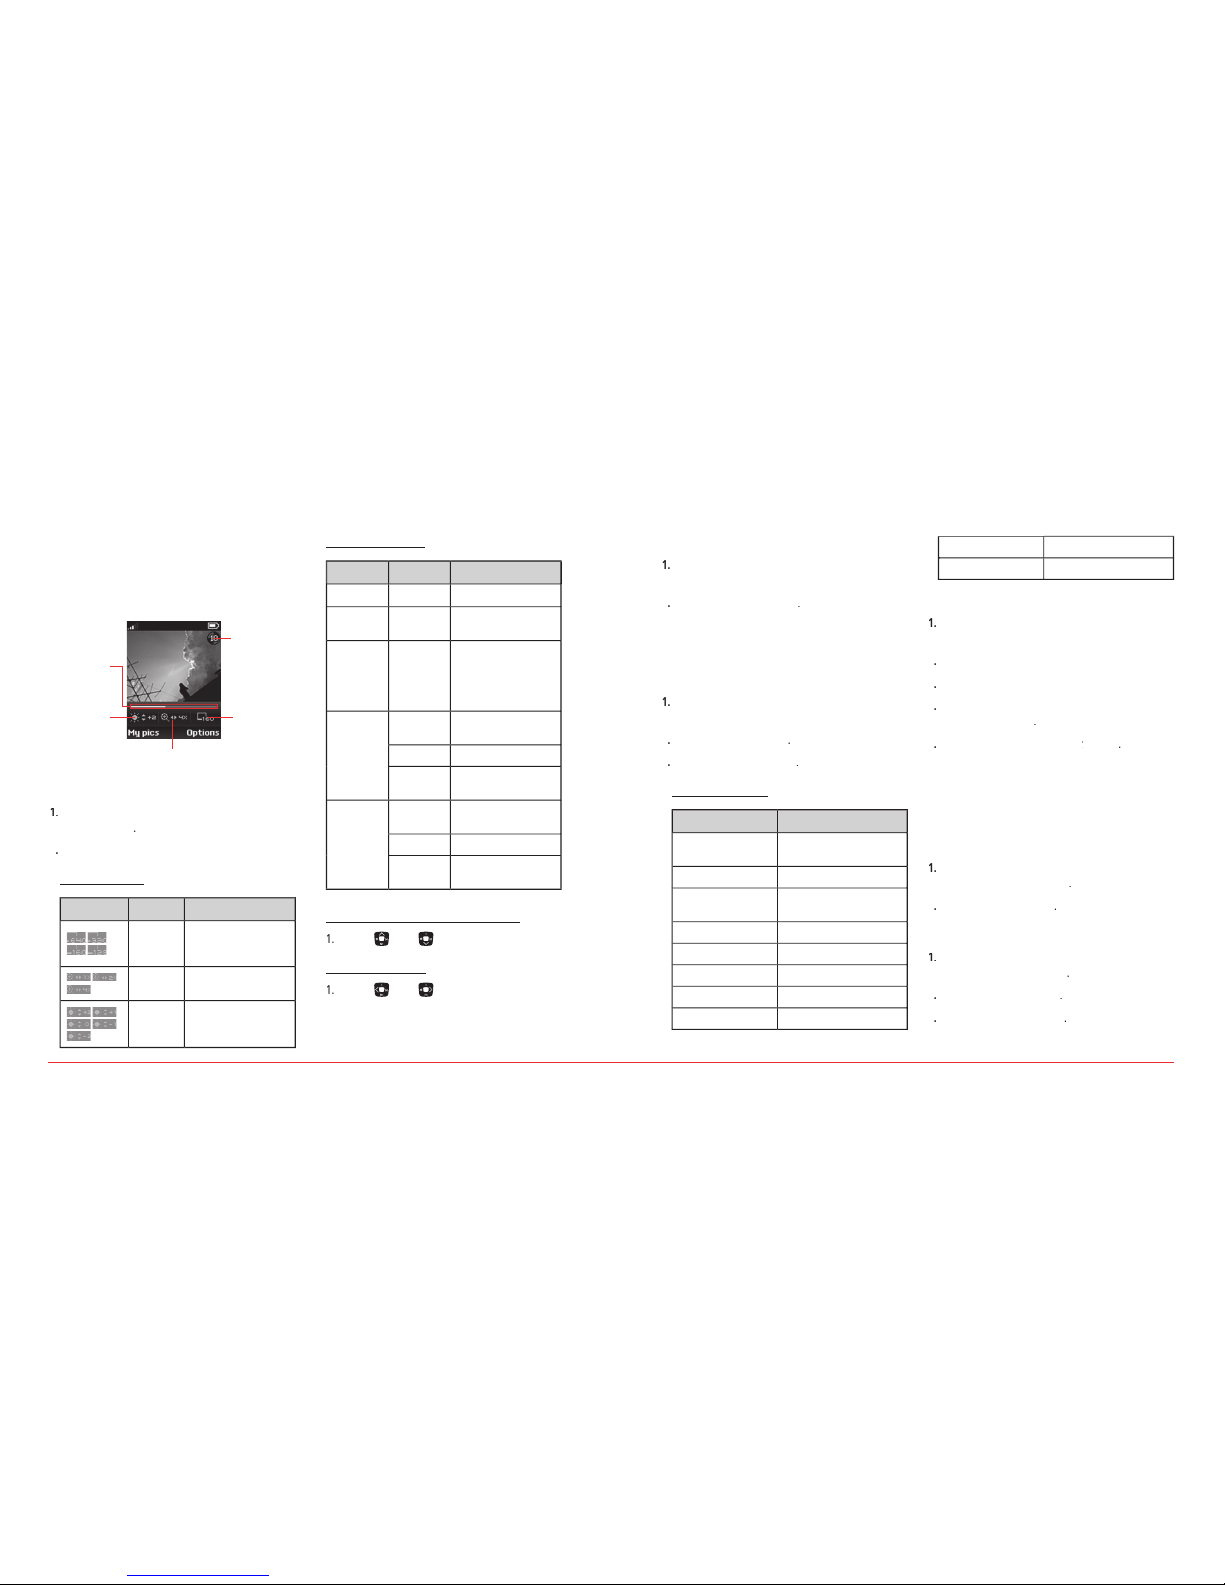
CAMERA
You can take pictures using the built-in camera.
The photos can be saved and sent using
To adjust the camera settings
Pictures
before you take a picture.
Icons for camera
Resolution
Display photo resolution
640x480, 320x240,
160x120, 128x96
Zoom 1x, 2x, 4x
Brightness +2, +1 0 -1, -2
Settings for camera
Self portrait
Self timer
Off, 5 seconds,
10 seconds, 15 seconds
Fun frames
None, I love you, Clown,
Mona Lisa, I miss you,
Punch, Happy bus,
Frame, Happy birthday,
Monkey, Rabbit
Image
controls
White
balance
Auto, Sunny, Cloudy,
Tungsten, Fluorescent
Contrast Level -2 ~ +2
Color effect
Normal, Gray, Sepia,
Negative
Settings
Resolution
640x480, 320x240,
160x120, 128x96
Quality High, Medium, Low
Shutter
sound
Default, Say “Cheese”,
Ready! 123
To increase or decrease the brightness
To zoom in and out
32 Multimedia
To take a picture
Pictures
Take
Note:
Your picture will be saved automatically to My Stuff > My
graphics > My pictures or Menu > Pictures > My pictures.
To view pictures you’ve taken
Pictures
My
pictures
To use options >
My pictures option
Set a photo for a
specific contact
Options > Assign > Caller ID
Set as standby screen
Options > Assign > Wallpaper
Set as screensaver
Options > Assign >
Screensaver
To upload web site
Options > Upload to My Pix
Delete the picture
Options > Erase
Take a new picture
Options > Take pic
Rename the picture
Options > Rename
Lock/Unlock the picture
Options > Lock/Unlock
View the information Options > File info
Delete all pictures
Options > Erase all
To send pictur
Pictures
Write the
Text
4
window.
Pictures
H
PICTURES AND IMAGE ALBUM
You can view, assign, delete the saved pictures.
The supported formats are JPEG, GIF, BMP and PNG.
To view the downloaded or saved image
and pict
My Stuff
My pictures
To set as wallpaper in the display
My Stuff
Wallpapers
Assign
Page 19

34 Multimedia
CHAPTER 6
USEFUL
FEATURES
Calendar
Alarm clock
Calculator, Tip calculator, Stopwatch & World clock
Voice memo
CHAPTER 6 USEFUL FEATURES
To set as screens
My Stuff
Screensavers
Assign
H
MUSIC AND SOUND ALBUM
You can record, set as, delete and save voice memos or all
received, attached sound and music files. Supported
formats MIDI, SMAF, iMelody, pmd, qcp and MP3.
To listen the
Tools & Settings
Tools
Voice memo
To set as a ringtone
My Stuff
Assign
All contacts
All callers
H
THEMES ALBUM
To set as the t
My Stuff
H
OTHER FILES
To view the
list of the files
My Stuff
H
PLAYING GAME
Your phone comes preloaded with demo games.
To play a game
My Stuff
Play
To end the game
To set the game options
To set the g
Tools &
Game settings
Volume
Level 1 ~ Level 5
Select
To set the game backlight
To set the game backlight
Tools &
Game settings
Backlight
Disable
5 seconds
10 seconds
30 seconds
Always on
Select
Page 20
H
CALENDAR
Calendar helps you manage your schedule. Enter events in
the calendar and set a reminder using the alarm function.
To view ca
Tools & Settings
Tools
Calendar
Note:
Monthly view is displayed as default.
In the monthly view
To
Move to another day
for Previous
for Next
Move to another week
for Previous
for Next
To create a new event
Tools & Settings
Tools
Calendar
New
screen, select and input
To edit a event
Tools & Settings
Tools
Calendar
Edit
screen, select and edit an
To erase a saved event
Tools & Settings
Tools
Calendar
Erase
H
ALARM CLOCK
To set
Tools & Settings
Tools
Alarm clock
> Edit a new alarm >
To view the saved alarms
Tools & Settings
Tools
Alarm clock
To edit existing alarms
Tools & Settings
Tools
Alarm clock
> Edit an alarm
36 Useful Features Useful Features 37
H �
CALCULATOR, TIP CALCULATOR,
STOPWATCH & WORLD CLOCK
To use the calculator
Use the Calculator for basic mathematical equations.
Tools & Settings
Tools
Calculator
](
),
]() or [
to change the number from positive or negative.
To use tip calculator
The Tip Calculator helps you calculate how much tip to
include with a bill.
Tools & Settings
Tools
Tip calculator
the next field
4
To use the stopwatch
The Stopwatch counts the time you spend for an activity.
Tools & Settings
Tools
Stopwatch
to start stopwatch.
to save Lap time (Max eight Lap
time).
4
to stop stopwatch.
to reset stopwatch.
To use world clock
Tools & Settings
Tools
World clock
/
To set daylight saving, press
4
H
VOICE MEMO
To record
voice memo
Tools & Settings
Tools
Voice memo
New
To stop recording, press
To listen to the recording voice memo
Tools & Settings
Tools
Voice memo
Page 21

38 Useful Features
CHAPTER 7
SETTINGS
Ringtones, Alerts & Tones
Decorate the display
Call options
Bluetooth
Security
Msg settings
Game settings
Language
To set other options
Phone info
CHAPTER 7 SETTINGS
To send voice mem
Tools & Settings
Tools
Voice memo
Send message
Write the message
Send
To rename saved voice memo
Tools & Settings
Tools
Voice memo
Rename
To erase saved voice memo
Tools & Settings
Tools
Voice memo
Erase
Yes
Page 22

Settings 41
H
RINGTONES, ALERTS & TONES
To set my rin
Tools & Settings
Sounds
My ringtones
Assign
Note:
To play/stop sound, press Play or Stop.
To set msg tones
To set my
Tools &
Sounds
Msg tones
Assign
Note:
To play/stop sound, press Play or Stop.
To set vibrate mode
Tools &
Sounds
Msg tones
Vibrate
or
To set service alerts
Tools & Settings
Sounds
Service alerts
or
or
To set volume
To set the ringer volume
To set the ringer volume
Tools &
Sounds
Volume
Ringer volume
Vibrate
Level 1
Level 5
Select
To set the voice call volume
Tools &
Sounds
Volume
Voice call
Select
To set the speakerphone volume
To set the speakerphone volume
Tools &
Sounds
Volume
Speakerphone
Select
To set power tone on/off
Tools & Settings
Sounds
Power tone
or
>
or
To set key tone
Tools & Settings
Sounds
Key tone
Level 1
Level 5
>
40 Settings
H
DECORATE THE DISPLAY
To set the graphics
To set the
wallpaper
wallpaper
Tools &
Display
Graphics
Wallpapers
External screen
Select
To set the screensaver timeout
Tools &
Display
Graphics
Screensavers
10 seconds
20 seconds
30 seconds
Off
Select
To set the screensaver image
To set the screensaver image
Tools &
Display
Graphics
Screensavers
Select
To set the main screen clock format
Tools &
Display
Graphics
Clock format
Main screen
Analog
or
Select
To set the external screen clock format
Tools &
Display
Graphics
Clock format
Analog
or
Select
To set the caller ID with default VMU image
To set the caller ID with default VMU image
Tools &
Display
Graphics
Caller ID
Select
To view the menu style
Tools & Settings
Display
Menu style
List view
To enter greeting message
Tools & Settings
Display
Greeting banner
color, then press
color
To set contrast display
Tools & Settings
Display
Contrast
High
Medium
Low
Lowest
Page 23

42 Settings Settings 43
To set time for backlight
Tools & Settings
Display
Backlight
5 seconds
30 seconds
Always on
To set background image
Tools & Settings
Display
Themes
H
CALL OPTIONS
Tools & Settings
H
BLUETOOTH
Tools & Settings
H
SECURITY
To access security menus
Tools & Settings
Security
Note:
The default lock code will be the last 4 digits of your
phone number.
To lock your phone
Unlock
To change the password
To change the password
and enter again
Save
To set special numbers
To set special numbers
Assign
Save
To erase special numbers
To erase special numbers
Erase
Yes
To erase all contact lists
Yes
To erase all downloaded contents
Yes
To reset your phone
To reset your phone
Yes
H
MSG SETTINGS
Tools & Settings
H
GAME SETTINGS
Tools & Settings
H
LANGUAGE
Tools & Settings
Language
or
H
TO SET OTHER OPTIONS
Airplane mode
Tools & Settings
Other
Airplane mode
or
TTY mode
Tools & Settings
Other
TTY mode
Locati
Tools & Settings
Other
Location
>
H
PHONE INFO
My phone n
Tools & Settings
Phone info
My phone number
Version info
Tools & Settings
Phone info
Version info
Page 24

44 Settings
CHAPTER 8
CONNECTIVITY
Bluetooth
Using the Internet
VirginXL
My stuff
CHAPTER 8 CONNECTIVITY
Page 25

H
BLUETOOTH
technology connectivity enables
wireless connections between electronic devices.
Handsfree device,
you can use your phone more freely. It can also
wireless technology. Since devices with
connectivity communicate using radio
waves, your phone and the other device do not
Technology
https://www.bluetooth.org/
To access the Bluetooth menu
Tools & Settings
Bluetooth
To activate Bluetooth
The Power feature allows you to turn the Bluetooth®
function on and off.
Tools & Settings
Bluetooth
/
To add a device
Pairing is the process that allows the phone to locate,
establish and register 1-to-1 connection with the target
device.
Tools & Settings
Bluetooth
New device
OK
Note:
If Bluetooth® is set to off, “Turn Bluetooth power on?”
will appear. Press
Yes.
to in discoverable mode) will be displayed.
headset or
carkit, your phone will attempt
to auto pair with “0000” - 4 zeroes passcode.
the Bluetooth
accessory instructions for the
4
Note:
The default passcode may differ depending on Bluetooth®
devices. Please refer to the user guide of the Bluetooth
®
device that you wish to use.
and press
to connect with the device.
the “New device” menu.
To turn on Discovery Mode
Tools & Settings
Bluetooth
Settings
Discovery mode
Off
46 Connectivity Connectivity 47
To name the phone
Tools & Settings
Bluetooth
Settings
My phone name
To select the supported profiles
Tools & Settings
Bluetooth
Settings
Supported profiles
To remove a device from the paired list
Tools & Settings
Bluetooth
To rename the paired device
Tools & Settings
Bluetooth
To review information about the paired
Tools & Settings
Bluetooth
To call using a hands-free headset
To answer a call using a hands-free headset
H
USING THE INTERNET
To access the Internet
Surf the Web
Note:
This will access your Wireless Web service provider’s
homepage.
To view visi
Surf the Web
History
To set new bookmarks
Surf the Web
Mark Page
To edit, press
>
To view bookmarks
Surf the Web
Menu
To search web site
Surf the Web
Search
Page 26

To refresh the current page
Surf the Web
Reload
To show the URL on the current page
Surf the Web
Show Link
To access the web site directly by entering
the address
Surf the Web
Goto Page
GO
To go to the homepage
Surf the Web
Home
To send the current page’s URL information
Surf the Web
Send Link
To set enable/disable download objects
Surf the Web
Settings
Downloads
To restart web browser
Surf the Web
Settings
Restart Browser
To clear cache memory
Surf the Web
Settings
Clear...
Clear Cache
Clear
To clear saved history
Surf the Web
Settings
Clear...
Clear History
Clear
To clear saved cookies
Surf the Web
Menu
Settings
Clear...
Clear
Clear
To clear autofill
Surf the Web
Menu
Settings
Clear...
Autofill
Clear
48 Connectivity Connectivity 49
H
VirginXL
VirginXL is a fun collection of features which you
www.virginmobileusa.com
for details.
To access VirginXL
Note:
You cannot receive incoming calls when a VirginXL session
is in progress. All incoming calls will be automatically
forwarded to voicemail.
Note:
A scroll bar on the right side of the screen indicates that
there is more text. Scroll down to go to the next screen of
text. Press the BACK key to move back one screen.
Ending a VirginXL session
]
H
MY STUFF
To access My Ringtones
My Stuff
My
Get more ringtones
Go
To access My Graphics
My Stuff
My
Get more graphics
Select
To access My Games
My Stuff
My
Get more games
Go
To access My Themes
My Stuff
Blue
or
Aqua
Select
To download other stuff
My Stuff
My
Get more stuff
Go
Page 27

50 Connectivity
CHAPTER 9
APPENDIX
12 Month limited warranty
Safety information for wireless handheld phones
Safety information for FCC RF exposure
SAR information
FDA consumer update
Emergency calls
Compliance with other FCC regulations
General safety
Antenna
Battery
Adapter/Charger
Recycle your cell phone!
FCC Hearing-Aid Compatibility (HAC) regulations for wireless devices
U.S.Federal Communications Commission radio frequency interference statement
FCC compliance information
CHAPTER 9 APPENDIX
Page 28

Appendix 53
H
12 MONTH LIMITED WARRANTY
telephone, that should this product or any part
thereof during normal consumer usage and condi-
tions, be proven defective in material or workman-
twelve (12) month period from the date of pur-
The antenna, keypad, display, rechargeable bat-
tery and battery charger, if included, are similarly
warranted for twelve (12) months from date of
This Warranty extends only to consumers who pur-
This Warranty does not apply to:
tions, accident, mishandling, neglect, unau-
thorized alteration, misuse, improper installa-
tion or repair or improper storage;
tal conditions;
tive parts;
The Company disclaims liability for removal or
When sending your wireless device to UTStarcom
you make a back up copy of all data and software
52 Appendix
warranty or not, returned to UTStarcom Personal
To obtain repairs or replacement within the terms
with proof of Warranty coverage (e.g. dated bill
telephone in the United States (800) 229-1235,
THE EXTENT OF THE COMPANY’S LIABILITY UNDER
THIS WARRANTY IS LIMITED TO THE REPAIR OR
THE PURCHASE PRICE PAID BY PURCHASER FOR
THE PRODUCT.
ANY IMPLIED WARRANTIES, INCLUDING ANY
WARRANTY. ANY ACTION FOR BREACH OF
ANY WARRANTY MUST BE BROUGHT WITHIN A
ANY OTHER WARRANTY, EXPRESS OR IMPLIED,
WHATSOEVER.
THE COMPANY SHALL NOT BE LIABLE FOR THE
WARRANTY OR LOSS OF USE DURING THE TIME
THE PRODUCT IS BEING REPAIRED OR REPLACED.
this product.
tial damage so the above limitation or exclusions
to province.
H �
SAFETY INFORMATION FOR WIRELESS
HANDHELD PHONES
Page 29

54 Appendix Appendix 55
Driving safety
Talking on the phone while driving is extremely
Always obey them. If you must use your phone
while driving, please:
•
Give full attention to driving. Driving safely is
your first responsibility.
•
Use hands-free operation and/or one-touch,
•
Pull off the road and park before making or
An air bag inflates with great force. DO NOT place
the air bag deployment area. If in-vehicle wireless
WARNING!:
Failure to follow these instructions could lead to serious
personal injury and possible property damage.
Electronic devices
Your wireless handheld portable telephone is a
Pacemakers
The Health Industry Manufacturers Association
wireless phone and a pacemaker to avoid poten-
tial interference with the pacemaker.
These recommendations are consistent with the
with a heart pacemaker implant when using
your phone. Doing so could result in interference
with the function of the pacemaker.
•
ALWAYS keep the phone more than six inches
turned on.
•
Do not carry the phone in a breast pocket.
•
Use the ear opposite the pacemaker to mini-
•
If you have any reason to suspect that inter-
Hearing aids
vider (or call the customer service line to discuss
Other medical devices
to assist you in obtaining this information.
Hospitals and health care facilities
Turn your phone OFF in health care facilities
when any regulations posted in these areas
Vehicles
Posted facilities
Turn your phone OFF where posted notices so
Aircraft
Always request and obtain prior consent and
Always follow the instructions of the airline
Blasting areas
To avoid interfering with blasting operations,
turn your phone OFF when in a “blasting area”
Potentially explosive atmospheres
Turn your phone OFF when in any area with a
Areas with a potentially explosive atmosphere
where you would normally be advised to turn
Page 30

56 Appendix Appendix 57
H �
SAFETY INFORMATION FOR FCC RF
EXPOSURE
WARNING! Read this Information before Using
Cautions
The design of this phone complies with the FCC
Body-Worn operation
This device was tested for typical body-worn
The use of accessories that do not satisfy these
visit the FCC website at
www.fcc.gov
H �
SAR INFORMATION
This model phone meets the government’s
Your wireless phone is a radio transmitter and
to exceed the emission limits for exposure to
The standards include a substantial safety margin
The exposure standard for wireless mobile phones
Although the SAR is determined at the highest
to operate at multiple power levels so as to use
tion antenna, the lower the power output. Before
tests are performed in positions and locations (e.g.,
the FCC for each model.
The highest SAR value for this model phone
when tested for use at the ear is 1.37 W/kg PCS
While there may be differences between the SAR
they all meet the government requirement for safe
The FCC has granted an Equipment Authorization
http://www.fcc.gov/oet/fccid
after searching on
after searching on http://www.fcc.gov/oet/fccid
Additional information on Specific Absorption
Telecommunications & Internet Association (CTIA)
web-site at
http://www.phonefacts.net
ty to give additional protection for the public and
to account for any variations in measurements.
H �
FDA CONSUMER UPDATE
1. What kinds of phones are the subject of this
update?
The term “wireless phone” refers here to handheld
wireless phones with built-in antennas, often
types of wireless phones can expose the user to
the user’s head. These RF exposures are limited
When the phone is located at greater distances
The so-called “cordless phones,” which have a base
typically operate at far lower power levels, and
thus produce RF exposures well within the FCC’s
2. Do wireless phones pose a health hazard?
The available scientific evidence does not show
Page 31

58 Appendix Appendix 59
that any health problems are associated with
that wireless phones are absolutely safe. Wireless
They also emit very low levels of RF when in the
3. What is FDA’s role concerning the safety of
wireless phones?
to repair, replace or recall the phones so that the
Although the existing scientific data do not justify
•
Support needed research into possible biologi-
•
Design wireless phones in a way that minimizes
•
Cooperate in providing users of wireless phones
with the best possible information on possible
•
National Institute for Occupational Safety and
•
Environmental Protection Agency
•
Federal Communications Commission
•
Occupational Safety and Health
Administration
•
National Telecommunications and
The National Institutes of Health participates in
All phones that are sold in the United States must
wireless phones themselves, the RF exposures that
thousands of times lower than those they can get
the primary subject of the safety questions dis-
4. What are the results of the research done
already?
The research done thus far has produced conflict-
5. What research is needed to decide whether RF
exposure from wireless phones poses a health
risk?
A combination of laboratory studies and epide-
to human populations, but 10 or more years’ fol-
the interval between the time of exposure to a
6. What is FDA doing to find out more about the
possible health effects of wireless phone RF?
the world to ensure that high priority animal stud-
that has driven the establishment of new research
Page 32

60 Appendix Appendix 61
Agreement (CRADA) to do research on wireless
to independent investigators. The initial research
will include both laboratory studies and studies of
wireless phone users. The CRADA will also include
7. What steps can I take to reduce my exposure to
radiofrequency energy from my wireless phone?
very small.
to minimize your exposure to radiofrequency
•
If you must conduct extended conversations by
wireless phone every day, you could place more
the RF, since the exposure level drops off dra-
Again, the scientific data do not demonstrate that
wireless phones are harmful. But if you are con-
you can use measures like those described above
to reduce your RF exposure from wireless phone
8. What about children using wireless phones?
The scientific evidence does not show a danger
to users of wireless phones, including children
the time of wireless phone use and increasing the
the government in the United Kingdom distrib-
tumors or other ill effects. Their recommendation
to limit wireless phone use by children was strictly
9. Do hands-free kits for wireless phones reduce
risks from exposure to RF emissions?
the absorption of RF energy in the head be believe
that accessories that claim to shield the head from
those emissions reduce risks. Some products that
with proper operation of the phone.
The phone may be forced to boost its power
to compensate, leading to an increase in RF
10. What about wireless phone interference with
medical equipment?
this reason, FDA helped develop a detailed test
the Association for the Advancement of Medical
This standard will allow manufacturers to ensure
that cardiac pacemakers and defibrillators are safe
http://www.fda.gov/cellphones
Page 33

62 Appendix Appendix 63
H �
EMERGENCY CALLS
FCC ENHANCED 911 (E911) RULES
Background
The Federal Communications Commission (FCC)
tude and longitude location (Automatic Location
to identify the location of the caller in case of
The UTStarcom CDM8074VM is an ALI-capable
ALI-capable network to comply with the FCC’s ALI
The network compliance with the above FCC
wireless “base stations” (atmospheric and environ-
Also the transmission of the ALI information is
wireless network to which the E911 signal is trans-
This feature allows you to place an emergency call
The phone maintains emergency mode until you
To call “911” in “Phone Lock” or “Restrict” mode.
H �
COMPLIANCE WITH OTHER FCC
REGULATIONS
OPERATING PROCEDURES
•
Never use your Cellular Phone to send false
•
Never wiretap or otherwise intercept a phone
•
Never make any anonymous calls to annoy,
•
Never charge another account without authori-
•
Never willfully or maliciously interfere with any
•
Never refuse to yield the line when informed
that it is needed for an Emergency Call. Also,
H �
GENERAL SAFETY
PRECAUTIONS
Your Handheld Portable Telephone is a high qual-
•
DO NOT use or store this equipment in a place
where it will be exposed to high temperatures,
•
DO NOT drop your device or subject it to severe
•
DO NOT expose this equipment to rain or
•
DO NOT use unauthorized accessories.
•
DO NOT disassemble the phone or its accesso-
to an authorized UT Starcom cellular service
tric shock or fire may result.
H �
ANTENNA
ANTENNA SAFETY
Page 34

64 Appendix Appendix 65
H �
BATTERY
BATTERY SAFETY
Your device uses a removable and rechargeable
DOs
•
Only use the battery and charger approved by
the manufacturer.
•
Only use the battery for its original purpose.
•
Try to keep batteries in a temperature between
•
If the battery is stored in temperatures above
to warm up or cool down before using.
•
Completely drain the battery before recharg-
•
Store the discharged battery in a cool, dark,
•
Purchase a new battery when its operating time
•
Properly dispose of the battery according to
DON’Ts
•
Don’t attempt to disassemble the battery – it is
•
Don’t expose the battery terminals to any other
•
Don’t leave the battery in hot or cold
temperature. Otherwise, it could significantly
•
Don’t dispose of the battery into a fire.
with RBRC standards. When disposing of the
the eyes or skin, could cause injury to the skin or
the eyes, irrigate the eyes thoroughly with clean
water and immediately seek medical attention. In
the event the liquid comes into contact with the
H �
ADAPTER/CHARGER
CHARGER
The charger designed by UTStarcom for this unit
•
Never attempt to disassemble or repair a
•
Never use a charger if it has a damaged or
worn power cord or plug. Always contact a
•
Never alter the AC cord or plug on your char-
•
Never allow any liquids or water to spill on the
•
Never attempt to connect or disconnect the
when it is not in use.
H �
RECYCLE YOUR CELL PHONE!
their used wireless devices to specified carrier retail
www.recyclewirelessphones.com
To mail in your old wireless device to UTStarcom
Wireless phones also can be donated to the
Wireless Foundation’s DONATE A PHONE
CALL TO
campaign. This charitable cause collects
wireless phones to benefit victims of domestic vio-
www.wirelessfoundation.org/CalltoProtect/dropoff.
cfm
trademark and the UTStarcom logo is a trademark
Page 35

66 Appendix Appendix 67
VIRGIN and the Virgin Signature logo are
is a trademark of Bluetooth
SIG, Inc.
Trademarks are owned by Bluetooth
SIG, Inc. All
H �
FCC HEARING-AID COMPATIBILITY
(HAC) REGULATIONS FOR WIRELESS
DEVICES
THIS PHONE HAS A HAC RATING OF M4
While some wireless phones are used near some
they generate.
The wireless telephone industry has developed a
with their hearing devices. Not all phones have
The ratings are not guarantees. Results will vary
vulnerable to interference, you may not be able to
Trying out the phone with your hearing device
M-Ratings:
Phones rated M3 or
to interference noise. The hearing aid and wireless
A sum of 6 is considered for best use.
the particular wireless phone. “Normal usage” in
this context is defined as a signal quality that is
The M mark is intended to be synonymous
with the U mark. The T mark is intended to
T marks are recommended by the Alliance for
Telecommunications Industries Solutions (ATIS). The
the FCC Rules. The HAC rating and measurement
wireless phones
•
Fcc Hearing Aid Compatibility and Volume
http://www.fcc.gov/cgb/dro/hearing.html
•
Gallaudet University, RERC
http://tap.gallaudet.edu/voice
•
Self Help for Hard of Hearing People Inc.
http://www.hearingloss.org
•
The Hearing Aid Compatibility FCC Order
http://hraunfoss.fcc.gov/edocs_public/attach‐
match/FCC‐03‐168A1.pdf
H �
U.S.FEDERAL COMMUNICATIONS
COMMISSION RADIO FREQUENCY
INTERFERENCE STATEMENT
INFORMATION TO THE USER
to comply with the limits for a Class B digital
tion against harmful Interference in a residential
tions, may cause harmful Interference to radio
that interference will not occur in a particular
the interference by one or more of the following
•
Reorient or relocate the receiving antenna.
•
Connect the equipment into an outlet of a
•
Consult the dealer or an experienced radio/TV
technician for assistance.
the user’s authority to operate the equipment.
4
2 6
Page 36

68 Appendix
H �
FCC COMPLIANCE INFORMATION
This device complies with Part 15 of FCC Rules.
69
H �
NOTE
 Loading...